

Page 1

Rockerverb 30
Owners Manual
Orange Amplifiers
Glenhaven Avenue
Borehamwood
Hertfordshire
WD6 1AY
ENGLAND
Tel: +44 20 8905 2828
Fax: +44 20 8905 2868
Orange USA
2065 Peachtree Industrial Ct.
Suite 208
Atlanta, GA 30341
USA
Tel: 1-404-303-8196
Fax: 1-404-303-7176
Page 2

Contents
Rocker 30 Owners Manual
Introduction
Front and Rear Panel Explanations
Using Your Amplifier
Technical Specifications
Thank you for choosing Orange. You are now a member of the ‘Legendary British Guitar Amplifier’ owners club!
Since 1968, when the company was founded, Orange has been a pioneering force in the guitar amplification
industry. Today, with a team of the world’s finest amplifier engineers, Orange continues to push back the
boundaries of conventional tube amplifier design.
Our commitment to craftsmanship and quality control has allowed our amplifiers to stand the test of time, giving
their owners as much pleasure now, as the day they were bought. To maintain this level of excellence, each Orange
amplifier is put through many rigorous test procedures before leaving the factory.
The warmth, tonal quality and rich harmonics generated by a valve amplifier cannot be reproduced by ‘artificial’
means. Many guitarists have reached the same conclusion: neither the transistor nor microchip is a suitable
alternative to valve technology.
This booklet contains valuable technical and safety information Please take the time to read this manual as the
information may enhance the sound and performance of your amplifier.
.........................................................................................................................................................................................1
...............................................................................................................................................2
..........................................................................................................................................................................3
...................................................................................................................................................................3
We are confident that you will be delighted with your new purchase and that it will provide you with many years of
enjoyment.
1
Page 3
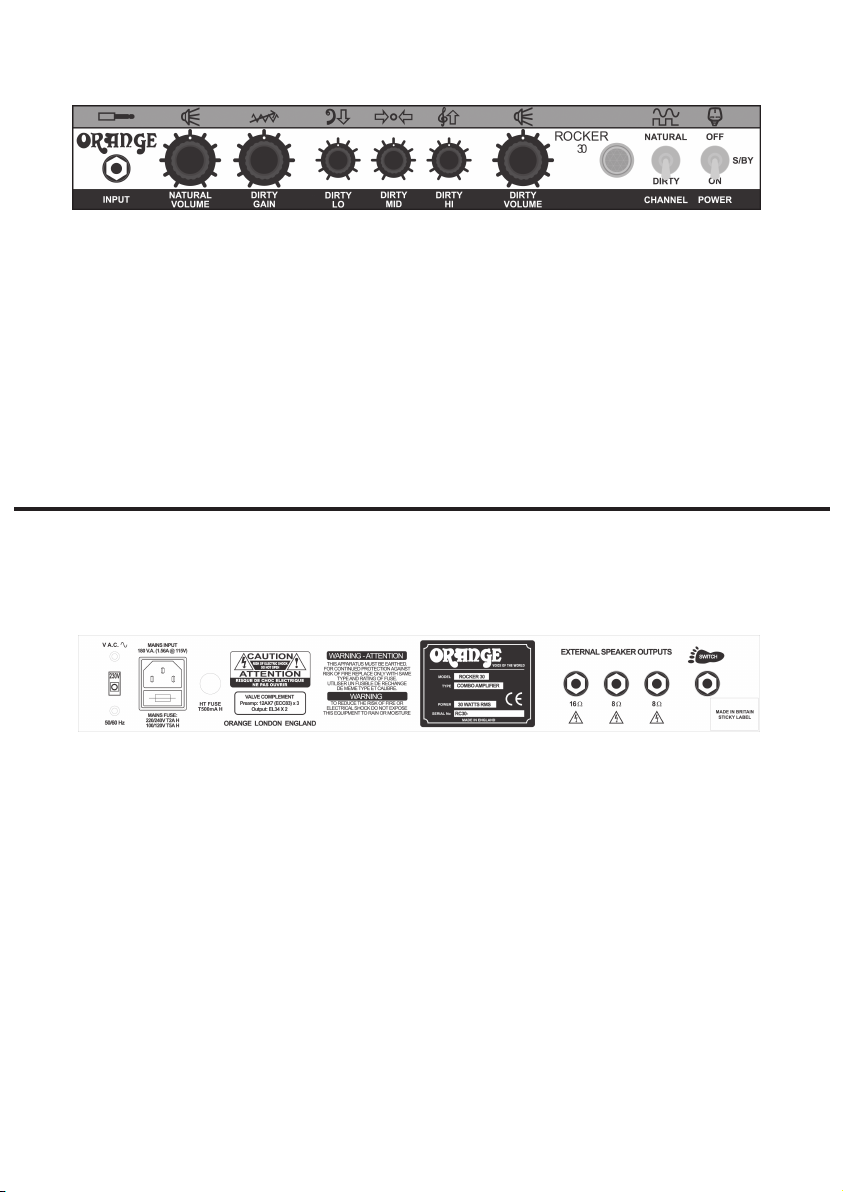
Front Panel
9 8 7 6 5 4 3 2 1
1. Power/Standby Switch Up position - amplifier is off
Middle position - amplifier is on standby
Down position - amplifier is on
2. Channel Switch Switches between the Natural and Dirty channels
3. Power Indicator Lamp
4. Dirty Volume Control Controls output volume level for the Dirty channel
5. Dirty Hi Control Controls treble frequency levels for the Dirty channel
6. Dirty Mid Control Controls middle frequency levels for the Dirty channel
7. Dirty Low Control Controls bass frequency levels for the Dirty channel
8. Dirty Gain Control Overdrive/Distortion level for the Dirty channel
The Gain works from left to right increasing in saturation as the control is turned clockwise.
9. Natural Volume Control Controls output volume for this channel. Please note this channel has no gain control and
no EQ section. It is a ‘non-master volume’ channel.
Rear Panel
5 4 3 2 2 2
1. Channel Footswitch Socket Attaching an optional footswitch to this socket will allow you to remotely change channels.
2. Speaker Outputs When using a single Orange 16 ohm speaker cabinet, (i.e. PPC412 or PPC212), attach it to the
16 ohm output sock et on your amplifier.
When using two Orange 16 ohm speaker cabinets attach each one to a separate 8 ohm
output sock et on your amplifier.
When using a single 8 ohm cabinet attach it to either one of the two 8 ohm output
sock ets on your amplifier.
WARNING: Never use two 8 ohm cabinets at the same time.
When using the Rocker 30 combo with a 16 ohm ex tension speaker, disconnect the internal speaker
from the 16 ohm socket and reconnect to one of the two 8 ohm sockets. Connect the extension
speak er to the other 8 ohm socket.
WARNING: Orange Rocker amplifiers should not be used with 4 ohm speakers.
3. HT Fuse The high tension fuse, protects transformers and other circuitry from blowing in the event
of an output valve shorting. Please refer to the Technical Specification section for fuse ratings.
4. Mains Inlet Socket & Fuse Holder Tray This is where your mains lead plugs in. Also the mains fuse is located here. Please refer to
the Technical Specification section for fuse ratings.
5. Mains Voltage Switch Switches amp between 220V and 240V or 100V and 120V. This should be set to the mains
electricity voltage used in the country where the amplifier is to be operated.
Please ensure your amplifier is switched to the correct voltage for your country. If unsure please consult your dealer.
1
2
Page 4
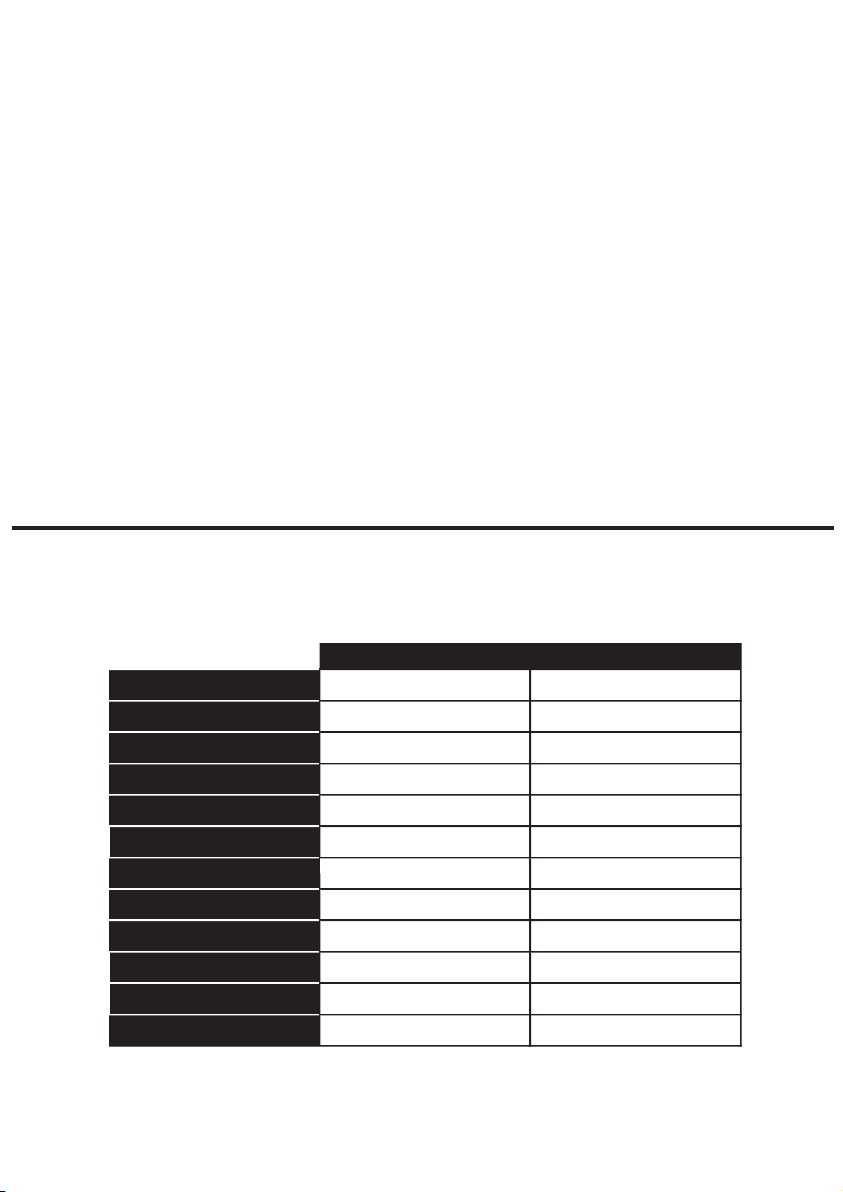
Using Your Amplifier
Rocker 30 Head Rocker 30 Combo
Power
30 Watts - Class 'A' 30 Watts - Class 'A'
Channel Configuration
Natural / Dirty Natural / Dirty
Speaker
- 1x12" Celestion Vintage 30
Footswitch Function
Channel Channel
Preamp Valves
3 x ECC83 / 12AX7 3 x ECC83 / 12AX7
Power Valves
2 x EL34 2 x EL34
220 / 240V - T2A 220 / 240V - T2A
100 / 120V T5A 100 / 120V T5A
HT Fuses
T500mA T500mA
Clean Channel Controls
Volume Volume
Dirty Channel Controls
Gain / Volume Gain / Volume
Weight
18kg / 40lb 24.5kg / 54lb
Dimensions (mm)
550 x 245 x 255 545 x 285 x 450
Mains Fuses
IMPORTANT! Before connecting your amplifier to a power source, please check the following:
1. Ensure your speaker cabinet is connected to the correct impedance speaker output socket, (see Rear Panel, item 2), using a
good quality speaker cable. Do not use guitar leads. (Head models only. Combo models will have it’s speaker attached).
2. Ensure that the voltage selector switch is set to the correct mains voltage, (see Rear Panel, item 5).
When powering up your amplifier, switch to the ‘Standby’ position first and leave for two minutes before switching to the ‘On’ position. (This will maximise
the life of your valves)..
If you are unsure about any of the above points please consult your local Orange supplier.
Using The ‘Natural’ Channel
The Natural channel feeds your guitar straight into your amplifier’s power amp for pure, unaffected tone. Try this channel with different guitars to hear the
tonal variations of each instrument. Increasing the gain will allow the power section to break up a little for natural distortion sounds.
Using the ‘Dirty’ Channel
The Dirty Channel has a three stage gain section, turning the gain control clockwise will gradually increase the saturation level from clean through
blues/crunch up to full rock sounds.
Technical Specifications
2
 Loading...