

Page 1
Page 2
Page 3
Environnement et Sécurité
F Sécurité : Cet équipement na pas été conçu pour passer des appels durgence en cas de
panne dalimentation secteur. Vous devez donc disposer dune alternative dans ce cas.
F Raccordement électrique : Alimentation sur réseau 230 volts, courant alternatif
monophasé, à lexclusion des installations à schéma IT définies dans la norme EN 60-950.
F ATTENTION ! Lalimentation secteur est classifiée au niveau de sécurité Tension
dangereuse tel que défini par la norme EN 60-950. Cet appareil ne peut être mis
complètement hors tension quen débranchant le bloc dalimentation secteur de la prise
murale. La prise doit être située à proximité de lappareil et facilement accessible.
F Connexion du téléphone : La tension du réseau est classée TRT-3 (Tension de Réseau
de Télécommunication), comme définie dans la norme EN 60-950. En cas de panne secteur,
les réglages date et heure, ainsi que lappel en cours, sont perdus.
F Précautions dutilisation : Ne pas mettre le combiné au contact de liquides. Ne pas
ouvrir le combiné ni la base. Vous risquez de vous exposer à des tensions élevées. Toujours
contacter le service après-vente pour des réparations. Eviter de mettre en contact les plots
de chargement ou la batterie avec des objets conducteurs.
F Protection de lenvironnement :Veuillez vous conformer aux réglementations locales
lorsque vous jetez les emballages, les batteries usagées ou votre ancien téléphone. Dans la
mesure du possible, tentez de promouvoir le recyclage.
l Vous pouvez utiliser directement votre téléphone après lavoir
chargé pendant 24 heures.
l Si vous devez changer votre pack batteries, nutiliser quun
pack batteries rechargeable du type NiMH AAA 600 x 2.
packs multicombinés
Les informations contenues dans ce manuel sont aussi valables pour les
packs Aleor 300 multicombinés.
Français
Philips a marqué de symboles standards les batteries et lemballage. Ces
symboles sont conçus pour promouvoir leur recyclage.
Les batteries doivent être jetées dans les containers prévus à cet effet.
Une contribution financière a été payée pour favoriser le recyclage du manuel et de
lemballage.
1
Page 4
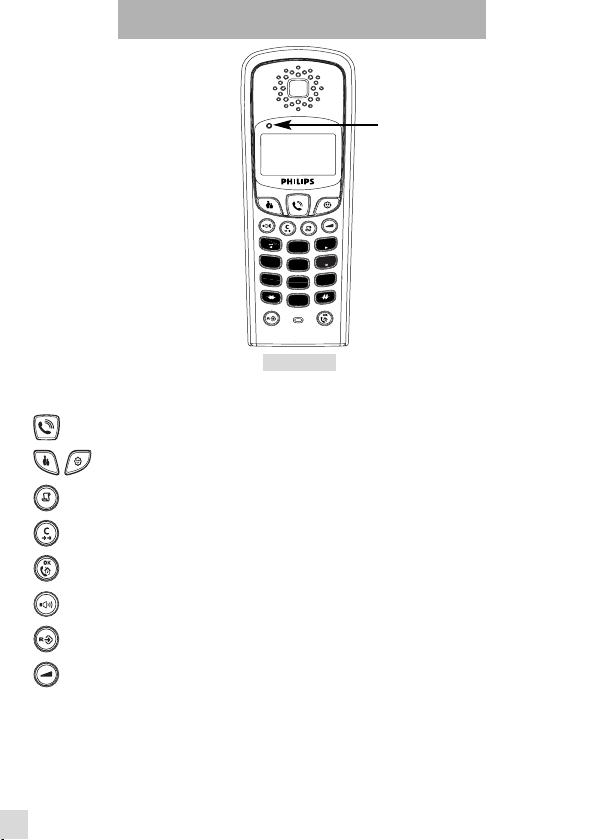
Combiné Aleor 300
Voyant
lumineux de la
Boîte vocale
1
3
DEF
ABC
2
4
GHI
6
MNO
5
JKL
7
PQRS
9
WXYZ
TUV
8
0
Aléor 300
Clavier
Prise de ligne p 5
Répertoires p 6
Journal des appels p 6
Bis et Correction p 5
Validation et Interphonie p 8
Haut-parleur p 5
Touche de programmation et de rappel p 9
Volume p 5
2
Page 5
Base Aleor 300
Icones écran
Réglage des sonneries du combiné p 9
Associer / désouscrire un combiné à la base p 10
Réglages techniques p 10
Etat de charge des batteries : en charge - chargée - faible p 4
Journal des appels / Boîte vocale p 6
Haut-parleur p 5
Répertoire Amis p 6
Appel en cours - Appel interne p 8
Répertoire famille p 6
Liaison base / combiné p 11
Voyant lumineux
marche/arrêt
Touche recherche
du combiné p 8
Français
3
Page 6

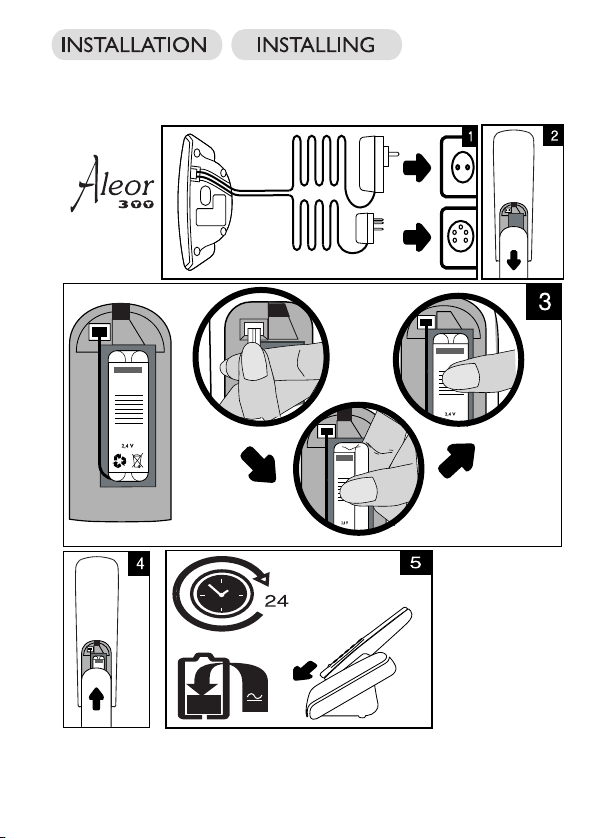
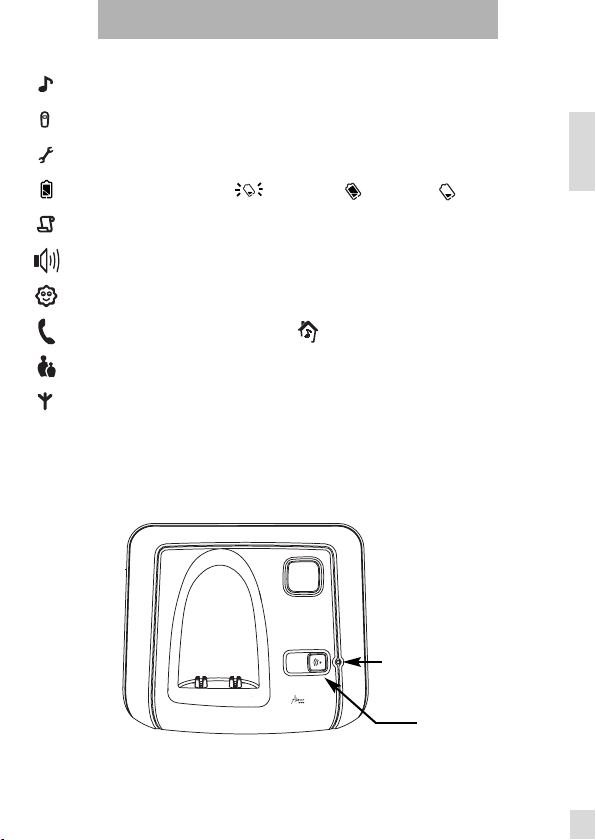
Installer votre téléphone
F Installer / Remplacer le pack batteries / Connexion du téléphone
Attention : Pour installer votre pack batteries et/ou pour connecter votre téléphone, merci
de vous référer aux schémas se trouvant en seconde page de couverture.
En vous aidant du schéma dinstallation :
l Ouvrez la trappe batterie du combiné en la faisant glisser vers le bas
l Connectez lextrémité du fil du pack batteries dans le connecteur à lintérieur
du combiné
l Placez le pack batteries avec létiquette face à vous et le fil le long du pack.
l Refermez la trappe batterie du combiné
F Charger / Recharger le téléphone (Voir Etat de charge des batteries en page 3.)
Pour une première utilisation ou après linstallation de batteries neuves, chargez les batteries
avec le combiné pendant 24 heures au moins
cycles complets de charge/décharge. Vous devez charger les batteries si vous entendez un bip
provenant de lécouteur.
. Lautonomie maximale est atteinte après 3
4
Page 7
Utiliser le téléphone
Téléphoner
F Répondre à un appel / Raccrocher
Répondez à lappel.
Pour mettre fin à la conversation, appuyez de nouveau sur la touche ou
reposez le combiné sur la base.
F Appeler directement
Composez le numéro.
F Pré-numéroter avant dappeler
Composez le numéro
F Appeler à partir dun répertoire
or ou
pour se déplacer dans la liste
F Régler le volume (écouteur ou haut-parleur)
Utiliser le haut-parleur sur le combiné
F Activer / Désactiver le haut-parleur
/
Attention : L'activation du haut-parleur peut générer des niveaux très
forts dans l'écouteur. Veillez à en éloigner votre oreille.
Utiliser la liste Bis et la touche correction
F Accéder / Sortir de la liste Bis
ou /
pour se déplacer dans la liste pour sortir
F Appeler un des numéros de la liste Bis
ou
pour se déplacer dans la liste
clignote
sur un appel
entrant.
Français
Pour corriger
le numéro
utilisez .
3 niveaux
sonores sont
disponibles
pour
lécouteur et
le hautparleur.
La liste des Bis
contient les 5
derniers
numéros
appelés : du
plus récent au
plus ancien.
F Effacer un des numéros de la liste Bis
ou efface la fiche sélectionnée
pour se déplacer dans la liste
5
Page 8
F Enregistrer un des numéros de la liste Bis dans un des répertoires
ou ou bip entrez
pour se déplacer dans la liste le nom
F Correction dun numéro
corrige :
l un numéro pendant sa préparation,
l un chiffre ou une lettre durant la programmation des répertoires.
Un appui long sur annule toute procédure en cours.
Créer et modifier vos répertoires
Votre téléphone a deux répertoires :
Un répertoire Famille de 20 fiches (voir fonction VIP p. 9)
Un répertoire Amis de 20 fiches (voir fonction VIP p. 9 )
F Créer une fiche
Chaque fiche contient un nom (max. 10 lettres) et un numéro (max. 16 chiffres).
1. Entrez le numéro de téléphone et appuyez sur ou .
Note : Pour insérer une pause, faites un appui long sur .
2. Entrer le nom et appuyez sur pour valider.
F Modifier une fiche (nom)
ou ou
pour se déplacer dans le répertoire pour modifier le nom
F Modifier une fiche (numéro)
ou ou
pour se déplacer dans le répertoire pour modifier
F Effacer une fiche
ou or
pour se déplacer dans le répertoire
lancien numéro
pour effacer la fiche
Vous pouvez
aussi créer une
fiche à partir
de votre liste
des Bis ou
votre Journal
des appels.*
Appuyez sur
ou
pour
accéder ou
sortir de vos
répertoires.
Utiliser le Journal des appels
Option disponible si vous êtes abonné au service Présentation du Numéro auprès
de votre opérateur.
Le Journal des appels conserve les 10 derniers appels externes reçus :
- les appels répondus
* Sous réserve dabonnement à la Présentation du Numéro auprès de votre opérateur.
6
Page 9
- les appels non-répondus
- les notifications de messagerie Boîte Vocale*
* Sous réserve dabonnement auprès de votre opérateur.
F Accéder / Sortir du Journal des appels
ou /
pour se déplacer dans le Journal pour sortir
F Consulter le Journal des appels
Votre écran peut afficher soit :
l
le numéro de lappelant*
l
le nom de lappelant (si enregistré dans le répertoire, ou si envoyé par le réseau)*
l
des étoiles en appel non identifié**
l
des tirets en cas dun numéro non reconnu
Le numéro de téléphone, lheure et la date de lappel peuvent être affichés
en appuyant sur .
Appuyez sur pour revenir en mode consultation.
* Disponible si vous avez souscrit au service Présentation du Numéro et/ou Présentation du
Nom auprès de votre opérateur
** Identité de lappelant masquée.
F Appel dun numéro à partir du Journal des appels
ou
pour se déplacer dans le Journal
F Effacer un numéro du Journal des appels
ou bip
pour se déplacer dans le Journal
pour sortir
F Enregistrer un numéro du Journal des appels dans un des répertoires
ou ou bip entrez
pour se déplacer dans le Journal le nom
Remarque : Si après avoir consulté tous les messages déposés dans votre Boîte
vocale et lu toutes les fiches du Journal des appels, le voyant lumineux du combiné
et restent clignotants, vous pouvez les éteindre en effaçant manuellement la
fiche du journal des appels qui correspond au message vocal de votre Boîte vocale.
et le
voyant lumineux
du combiné
clignotent sil y a
un nouveau
message sur la
Boîte vocale.
Français
Laffichage de
lheure et de
la date
dépendent du
réseau.
7
Page 10

Utiliser linterphonie
Cette fonction nest utilisable quavec un combiné supplémentaire. Linterphonie
vous permet de réaliser des communications internes gratuites et de transférer
des appels extérieurs entre deux combinés.
F Appel interne
pour appeler tous les combinés en mode veille.
appui long, entrez le numéro du combiné à appeler (1 à 4).
Si le combiné nappartient pas à la gamme Aleor 300, il se peut que cette fonction ne soit
*
pas disponible.
Appuyez sur ou pour répondre ou rendre la ligne dun appel
interne.
F Transfert dappel rapide
Pendant un appel en cours vous transférez lappel vers tous les combinés supplé-
mentaires sans attendre quun tiers décroche : .
Tous les combinés sonnent.
F Transfert dappel vers un combiné spécifique
Pendant un appel en cours vous transférez lappel vers un des combinés :
Appui long sur entrez le numéro du combiné (1 à 4)
Paging
Cette fonction vous permet de localiser le(s) combiné(s).
Appuyez sur sur la base. Appuyez sur nimporte quelle touche du
combiné ou appuyez de nouveau sur pour arrêter le(s) combiné(s)
de sonner, une fois localisé(s).
Linterphonie
et le transfert
dappel ne
sont possibles
quavec des
combinés*
souscrits à la
même base.
Pendant le
transfert la
personne en
attente
entendra de la
musique.
Vous pouvez
souscrire 4
combinés à la
même base.
Tous les
combinés
souscrits
sonnent.
8
Page 11

Personnaliser votre téléphone
Programmer votre téléphone
Pour entrer en mode programmation appuyez sur .
Les icones représentant les menus seront affichées sur votre écran :
Réglages du volume et de la sonnerie (Mélodies VIP)
Souscription dun combiné
Autres réglages
Une fois le menu choisi avec les touches et , appuyez sur
pour confirmer votre choix.
Note : Chaque menu a une ou plusieurs options. Les options safficheront lune
après lautre en appuyant sur . Pour sortir du mode programmation à
tout moment, appuyez sur ou (appui long) .
Réglages sonneries du combiné ()
F Volume de la sonnerie (option 1 sur 4 :1/4)
Sélectionnez le volume avec les touches ou .
Appuyez sur pour valider votre choix.
F Sonnerie du combiné (option 2/4)
Choisissez parmi les 7 différentes sonneries avec les
touches ou . Appuyez sur pour valider.
F Sonnerie (VIP) du répertoire Amis* (option 3/4)
Choisissez parmi les 7 différentes sonneries avec les
touches ou . Appuyez sur pour valider.
F Sonnerie (VIP) du répertoire Famille* (option 4/4)
Choisissez parmi les 7 différentes sonneries avec les
touches ou . Appuyez sur pour valider.
* Sous réserve dabonnement au service Présentation du Numéro auprès de
votre opérateur.
Utilisez et
pour
naviguer dans les
menus.
Les icones :
Elles clignotent
à la sélection du
menu et restent
affichées une
fois le menu
selectionné.
Une mélodie VIP
peut être
associée à chaque
répertoire.
Quand le
téléphone sonne,
la mélodie VIP
vous permet
didentifier le
groupe du
correspondant.
clignote
une fois le
répertoire Amis
choisi.
clignote
une fois le
répertoire
Famille choisi.
Français
9
Page 12

Souscription/Désouscription dun combiné ( )
Vous pouvez associer 4 combinés à la base.Un combiné ne
peut être associé quà 1 seule base.
Pour souscrire un autre combiné, entrez tout dabord
en mode de souscription en débranchant et
rebranchant le bloc dalimentation de votre base.
Une fois le menu sélectionné, entrez le code de souscription* (RC)
indiqué sous la base et appuyez sur pour confirmer.
Attention : Si vous souhaitez associer un combiné autre quun Aleor 300 aux
bases Aleor 300 , vérifiez que ce combiné répond à la norme GAP sinon il risque
de ne pas fonctionner correctement.
F Pour désouscrire le combiné que vous utilisez
entrez le code de souscription*
F Pour désouscrire tous les combinés (sauf celui que vous utilisez)
entrez le code de souscription*
Attention : Une fois désouscrit le combiné nest plus opérationnel.
Réglages techniques
Pour accéder aux réglages techniques : ou
pour défiler dans les menus
Appuyez sur pour sortir de la programmation.
F Changer le type de rappel
Lutilisation de certains services dont laccès se fait avec (Signal dAppel,
Transfert dAppel...) dépendra de ce réglage (short/long) selon votre type dinstallation (RTPC, PABX).
ou pour choisir entre Short ou Long
*Le code de
souscription
(RC) est écrit
sous la base de
votre
téléphone.
: Short .
: Long.
10
Page 13

F Téléphone, un problème...
En cas de problèmes
PROBLEMES CAUSES SOLUTIONS
- Pas de tonalité lors de lappui
sur .
- Licone clignote.
- Lorsque le combiné est placé
sur la base, aucun bip nest
émis.
- Licone batterie reste vide
après avoir chargé le combiné
24 heures.
- Aucun symbole sur lécran. Les batteries sont déchargées.
- Une fiche dun répertoire na
pas été mémorisée.
- Mauvaise qualité audio
(hachures, silence, écho, etc.).
- Laffichage du numéro ne
fonctionne pas.
- Les connexions électriques ou
téléphoniques de la base sont
incorrectes.
- Trop loin de la base
-Les batteries sont faibles (licone
batterie faible est affichée).
- Le combiné nest pas souscrit.
- Le combiné est hors de portée.
- Le combiné est mal positionné sur la
base.
- Les connecteurs sont encrassés.
Les batteries du combiné sont
défectueuses.
La mémoire du répertoire que vous
voulez utiliser est pleine.
- Interférence avec un autre appareil
électrique situé trop près de la base.
- La base est installée dans une pièce
dont les murs sont épais.
- Vous utilisez le combiné trop loin de
la base.
Le service nest pas activé.
- Vérifiez les connexions.(2ème
page de couverture).
- Rapprochez vous de la base
- Chargez les batteries. (2ème
page de couverture).
- Souscrire le combiné à la base.
(p 10)
- Rapprochez vous de la base.
- Retirez le combiné de la base,
puis replacez le.
- Nettoyez les connecteurs avec
un chiffon sec.
Contactez votre revendeur
PHILIPS afin dacheter de
nouvelles batteries rechargeables.
-Vérifiez que votre produit est bien
branché. (2ème page de couverture).
- Chargez les batteries.
Supprimez des fiches pour libérer
de la mémoire.
- Installez la base à un autre
emplacement.
- Installez la base dans une autre
pièce.
- Rapprochez vous de la base.
Vérifiez votre abonnement auprès
de votre opérateur.
Français
11
Page 14

Conformité
F Déclaration de Conformité :
Nous,
PCE
DECT & Home Telephony
Route d'Angers
72081 Le Mans Cedex 9
France
Déclarons que le produit Aleor 300 est en conformité avec l'Annexe III de la Directive 1999/5/EC-R&TTE et
dont les exigences essentielles applicables sont les suivantes :
Article 3.1 a : (protection de la santé et de la sécurité de l'utilisateur)
Article 3.1 b : (exigences de protection en ce qui concerne la compatibilité électromagnétique)
Article 3.2 : (Utilisation efficace de la bande de fréquences)
La présomption de conformité et les exigences essentielles applicables à la Directive 1999/5/EC sont
assurées.
Le Mans, le 24/10/2002
Vice President & General Manager DECT & Home Telephony
Le produit ne peut être connecté que sur le réseau téléphonique analogue
des pays indiqués sur le dos de la couverture de ce manuel.
EN 60950 ( 2000 )
ETSI EN 301 489-6 V1.1.1 ( 09/2000 ) & ETSI EN 301 489-1 V1.3.1 ( 09/2001 )
EN 301 406 ( 2001 )
Le marquage atteste de la conformité des produits aux réglements
techniques applicables conformément à la Directive 1999/5/CE pour la sécurité
usagers, les perturbations électromagnétiques et pour les essais radio.
12
Page 15

Environment & Safety
F Safety information : This equipment is not designed for making emergency calls when
the power fails. An alternative should be made available for access to emergency calls.
F Power requirements : The product requires an electrical supply of 220-240 volts, single
phase alternating current, excluding IT installations defined in standard EN 60-950.
F WARNING ! The electrical network is classified as dangerous according to criteria in the
standard EN 60-950. The only way to power down this product is by unplugging the power
supply from the electrical outlet. Ensure the electrical outlet is located close to the
apparatus and is always easily accessible.
F Telephone connection : The voltage on the network is classified as TNV-3
(Telecommunication Network Voltages, as defined in the standard EN 60-950). Following a
power cut, date and time settings, as well as the call in progress are lost.
F Safety precautions : Do not allow the handset to come into contact with liquids. Do
not open the handset or the base station. This could expose you to high voltages. Do not
allow the charging contacts or the battery to come into contact with conductive materials.
F Environmental care : Please remember to observe the local regulations regarding the
disposal of your packaging materials, exhausted batteries and old phone and where possible
promote their recycling.
l You can install your product immediately and start using the
phone after charging it for 24 hours.
l In case you need to change the battery pack, always use a
NiMH AAA 600 x 2 rechargeable battery pack .
multihandset packs
The information included in this manual is also valid if you have bought an
Aleor 300 multihandset pack.
Philips has marked the battery and packaging with standard symbols designed to
promote the recycling and appropriate disposal of your eventual waste.
Batteries should not be disposed of with general household waste.
A financial contribution has been paid to the associated national recovery & recycling
system.
English
1
Page 16

Aleor 300 Handset
Voicemail box
indicator
1
3
DEF
ABC
2
4
GHI
6
MNO
5
JKL
7
PQRS
9
WXYZ
TUV
8
0
Aleor 300
Keypad
Talk key p 5
Phonebook keys p 6
Call log key p 6
Redial list & correction key p 5
Validation and intercom key p 8
Loudspeaker key p 5
Programming and recall type key p 9
Volume key p 5
2
Page 17

Aleor 300 Base Station
Screen Icons
Handset ringer settings p 9
Handset registering / unregistering p 10
Technical settings p 10
Battery charge status : charge in progress - fully charged - low p 4
Call log / Voicemail Box p 6
Loudspeaker p 5
Friend phonebook p 6
Call in progress - Internal call p 8
Family phonebook p 6
Base / Handset link p 11
English
On / Off
indicator status
Paging key p 8
3
Page 18

Installing your telephone
F Inserting / Replacing battery / Telephone connection
Warning :To insert the battery and/or to connect your telephone, please refer to
the drawings printed on the inside cover and on the lip inside the box.
With the help of the installation drawings :
F Charging / Recharging the telephone (See battery status icon on page 3.)
On first use or when inserting a new battery, charge the battery with the handset for at
least 24 hours. This ensures optimal battery life reached after 3 cycles of charge/uncharge.
The battery needs to be charged if you hear a beep when using the telephone.
l Open the battery door by sliding it down,
l Connect the battery pack to the connector inside the handset,
l Place the battery with sticker face up and wires along the left side of the
battery pack,
l Replace the battery door.
4
Page 19

Using the telephone
Making a call
F Answering a call / Hanging up
answer the call.
To end the conversation, press the key again or replace the handset on the
base station.
F Calling directly
dial the phone number.
F Predialling the number before calling
Dial the phone number
F Calling from a phonebook
or or
F Adjusting the volume (earpiece or loudspeaker)
Using handsfree on the handset
F Activating / Deactivating the loudspeaker
Warning : Handsfree activation could suddenly increase the volume in the
earpiece to a very high level. Make sure the handset is not too close to
your ear.
Using the Redial list and Correction key
F Accessing / exiting the redial list
to scroll through the redial list
F Calling a number from the redial list
to scroll through the redial list
to scroll through the list
/
or /
to exit
or
flashes
on an
incoming call.
To correct
entries use
.
3 volume
levels are
available for
both the
earpiece and
the
loudspeaker.
The redial list
contains the
last 5 numbers
called : from
the latest to
the oldest.
English
F Deleting a number from the redial list
or to delete the current entry
to scroll through the redial list
5
Page 20

F Storing one of the redial list numbers into one of your phonebooks
or or beep enter
to scroll through the redial list the name
F Number correction
corrects :
l a digit when predialling,
l a digit or a character when entering names in the phonebooks.
A long press on aborts any procedure in progress.
Creating and changing phonebook entries
The telephone has two phonebooks :
A 20-entry family phonebook (see VIP feature p.9)
A 20-entry friends phonebook. (see VIP feature p. 9 )
F Creating an entry
Each entry contains a name (max.10 characters) and a number (max. 16 digits).
1. Enter the phone number and press or .
Note : To insert a pause, long press on .
2. Enter the name and press to validate.
F Changing an entry (name)
or or
to scroll through the list
F Changing an entry (number)
or or
to scroll through the list to modify the old number
to modify the name
You can also
create an
entry from the
redial list and
the call log*.
Press or
to
access or exit
the
phonebooks.
F Deleting an entry
or or
to scroll through the list to delete the entry
Using the call log
This feature is available if you have registered to the caller identification service
with your operator.
The call log stores the last 10 external calls received :
- answered calls
* Subject to a subscription with your operator.
6
Page 21

- unanswered calls
- Voicemail box service information*
* Subject to a subscription with your operator..
F Accessing / exiting the call log
or /
F Consulting the call log
to scroll through the log
The screen can either display :
l
the callers number*
l
the callers name (if known in the phonebook, or if sent by the network)*
l
stars if it is an unidentified call**
l
dashes if non recognised number
You can display, the phone number, the time and date of the call by
to exit
pressing .
Press to return to consulting mode.
* Subject to a subscription with your operator for the Caller Line Identification and/or Name
Display services.
** Withheld caller identification
F Calling a number from the call log
or
to scroll through the log
F Deleting an entry from the call log
or beep
to scroll through the log
to exit
F Storing one of the log numbers into your phonebooks
or or beep enter
to scroll through the log
the name
and the
handset
indicator flash
if there is a
new message
on the
Voicemail box.
English
Time and date
depends on
the network.
is
displayed if a
message has
been left on
the operator
mail box.
Note : If the handset indicator and the icon keep on flashing after having
consulted all the messages on your Voicemail box and after having read all the call
log entries, you can switch them off by deleting the call log entry which corresponds
to the Voicemail box message.
7
Page 22

Using the intercom
This function can only be used with a multi-handset configuration. It allows you to
make free internal calls and transfer external calls from one handset to another.
F Internal call
short press to call all the handsets in idle mode.
long press, enter the handset number (1 to 4) to call the selected
handset in idle mode.
* If the handset does not belong to the Aleor 300 range, this function may not
be available.
Press or to answer or hang up the internal call.
Intercom &
call transfer is
only possible
with handsets*
registered to
the same base
station.
F Fast call transfer
During a call in progress you can transfer the call without waiting for the
other handset to pick up : .
All the handsets ring.
F Call transfer to a specific handset
During a call in progress you transfer the call to a specific handset :
Long press on enter the handset number (1 to 4)
Paging
This feature allows you to locate the handset(s).
Press on the base station. Press any key on the handset to stop
ringing once relocated or press again.
8
During
transfer, the
person on hold
will hear music.
4 handsets can
be registered
to the same
base station.
All the
subscribed
handsets ring.
Page 23

Customising the telephone
Programming the phone
To enter the programming mode press .
Icons representing the menus will then be displayed on the screen :
Volume and melody settings (VIP melodies*)
Handset registering
Other settings
Once the menu is selected with and keys, press to enter
in the selected menu.
Note : Each menu has one or several options. The options will appear on the
screen one after the other by pressing . To exit the programming mode
at any time press or (long press) .
Handset ringer Settings ( )
F Ringer Volume (option 1 out of 4 :1/4)
Scroll through the different volume settings using
or keys. Press to validate your choice.
F Handset Melody (option 2/4)
Scroll through the 7 different melodies using or
keys. Press to validate.
F Friends phonebook (VIP) Melody* (option 3/4)
Scroll through the 7 different melodies using or
keys. Press to validate.
F Family phonebook (VIP) Melody* (option 4/4)
Scroll through the 7 different melodies using or
keys. Press to validate.
* Subject to a subscription with your operator to the Caller Line Identification
service.
Use and
to
navigate within
the menus.
Icons : flashing
to select the
menu and
steady on once
entered in the
menu.
A VIP melody
can be
associated to
each
phonebook.
When ringing,
the VIP melody
helps you
identify the
callers group.
is blinking
when selecting
the friends
phonebook
melody.
is blinking
when selecting
the family
phonebook
melody.
English
9
Page 24

Handsets registering / unregistering ( )
4 handsets can be registered to the base station.A handset
can only be associated with 1 base station.
To register another handset, first enter registration
mode by unplugging and plugging back in the
power adapter to the electricity supply.
Once the menu is selected, enter the RC* code written under the
base and press to confirm.
Warning : If you wish to associate another handset than a Aleor 300 to the
Aleor 300 base stations, make sure that these handsets are GAP compliant
otherwise it will not operate properly.
F To unregister the handset you use
enter the RC code*
F To unregister all the handsets (except the handset you are using)
enter the RC code*
Warning : Once unregistered, the handset is no longer operational.
Technical settings (country dependent)
To enter the following settings : or
To scroll through the menus
Press to exit the programming option.
F Changing recall type (flash setting)
The use of some services accessed with (call waiting, call forward...) will
depend on the flash setting (Short/Long) according to your installation type (Public,
PABX).
or to choose between
Short or Long
*RC code
(Registration
Code) is
written under
the base.
: Short .
: Long.
10
Page 25

Troubleshooting
F Telephone troubleshooting.....
PROBLEMS CAUSES SOLUTIONS
- No dialling tone when
pressing .
- icon is blinking.
- When the handset is placed
on the charging unit, no beep
is heard.
- Battery icon remains empty
although the handset has
charged for 24 hours.
- No symbol on the display. Battery pack is uncharged.
- A phonebook entry has not
been memorised.
- Bad audio quality (crackles,
muted, echo, etc.).
- Caller display does not work.
- The base station is not properly
connected to electricity or to the
telephone sockets.
- Too far from the base station
- Battery pack is low (low battery icon
is displayed).
- The handset is not registered.
- The handset is out of range.
- The handset is not placed correctly
on the base station charging unit.
- Charging contacts are dirty.
Handset battery pack is defective.
The phonebook you wish to use is full.
- Interference from nearby electrical
appliance.
- Base station installed in a room with
thick walls.
- You are using the handset too far
from the base station.
Service not activated.
- Check the connections.(inside
cover).
- Move closer to the base
- Charge battery pack. (inside
cover).
- Register the handset to the base
station. (p 10)
- Move closer to the base station.
- Take the handset off the base
station and put it back again.
- Clean them with a clean and dry
cloth.
Please contact your PHILIPS
dealer in order to purchase new
rechargeable battery pack.
Make sure your product is plugged
in. (inside cover).
Charge battery pack. (inside cover).
Delete some entries to free
memory space.
- Try to plug the base station in
elsewhere.
- Install the base station in a
different room.
- Move closer to the base station.
Check your subscription with your
operator.
English
11
Page 26

Conformity
F Declaration of Conformity :
We,
PCE
DECT & Home Telephony
Route d'Angers
72081 Le Mans Cedex 9
France
Declare that the product Aleor 300 is in compliance with ANNEX III of the R&TTE-Directive
1999/5/EC and then with the following essential requirements :
Article 3.1 a : (protection of the health & the safety of the user)
Article 3.1 b : (protection requirements with respect to electromagnetic compatibility)
Article 3.2 : (effective use of the radio spectrum)
The presumption of conformity with the essential requirements regarding Council Directive
1999/5/EC is ensured.
Date : 27/03/03 Le Mans
Vice President & General Manager DECT & Home Telephony
The product can only be connected to the analogue telephone network in the
countries indicated on the back cover of this manual.
EN 60950 ( 2000 )
ETSI EN 301 489-6 V1.1.1 ( 09/2000 ) & ETSI EN 301 489-1 V1.3.1 ( 09/2001 )
EN 301 406 ( 2001 )
The marking certifies compliance with technical regulations in
accordance with the Directive 1999/5/EC for the safety of the user, electromagnetic
perturbations and for radio spectrum.
12
Page 27

 Loading...