

Page 1

Orah 4i User Guide - v1.2.0
Page 2

Orah 4i User Guide v1.2.0
Getting started 5
I. Using the web control application 5
II. Updating the stitching box 7
1. Update via the "Update Pop up" 7
2. Update via the support page 8
3. Updating the Orah 4i system 10
4. Updating the Orah 4i camera 11
Home screen 14
I. Settings 15
1. Broadcast Presets 15
2. Video 17
3. SD Card 17
4. Network Settings 21
5. Support 22
II. VR Browser 24
1.HMD Preview 25
Audio 26
I. Audio sources 26
II. External USB Cards 27
1.Using USB audio cards 27
2. Channel layout 28
a.Mono 28
b.Stereo 28
c.First order ambisonic (4 channels) 28
Ambisonic audio 30
I.Spatial audio preview in the browser 30
II. Ambisonic recording 30
III. Ambisonic broadcasting 30
Orientation 31
I. Stabilization 31
Broadcast 32
I. How to setup a live broadcast 33
1. Broadcast to YouTube 33
2. Broadcast to Wowza 33
II. Using the preview streams in a third party player 34
Orah 4i - User Guide v1.2.0 Copyright 2017 - VideoStitch inc.
This guide is protected under copyright law
1
Page 3

Orah 4i User Guide v1.2.0
Record to SD card 35
HDMI output 41
I. Using the HDMI video output 41
II. HDMI resolution and framerate 41
III. Using Orah 4i HDMI output with Blackmagic Design Decklink and ATEM equipment 41
Troubleshooting 43
I. Reporting bugs related to the camera 43
II. Reporting bugs related to USB audio card support 43
III. Reporting bugs related to HDMI video output 43
Getting support 45
Supported browsers 45
Orah 4i - User Guide v1.2.0 Copyright 2017 - VideoStitch inc.
This guide is protected under copyright law
2
Page 4

Orah 4i User Guide v1.2.0
Orah user guide
Using your Orah camera.
Orah 4i - User Guide v1.2.0 Copyright 2017 - VideoStitch inc.
This guide is protected under copyright law
3
Page 5

Orah 4i User Guide v1.2.0
Getting started
For setting up and connecting your Orah 4i camera see the Quick Start Guide.
The stitching box should be connected to LAN. The Orah 4i camera is connected to the POE then
connected to the stitching box. The WiFi antenna is connected to the stitching box. Power is
connected to stitching box. The stitching box can be turned on.
For more information about “how to setup the Orah 4i”, please follow the “Quick Start Guide”
instructions.
I. Using the web control application
This application is hosted on the Orah stitching box
Follow the following steps to access the application:
1. Connect to the stitching box using WiFi :
a. Network/SSID: ORAH4I_xxxxxxxxxxx
b. WPAPSK password: 0123456789
2. Open a web browser.
3. Connect to the web control application by connecting to:
a. http://myorah4i.orah.co
b. or http://10.224.224.224, 10.224.224.224 being the IP of Orah when you are
connected to it’s WiFi.
The Orah web control application uses modern web standards and a responsive design to offer
the best browsing experience from small to large screens.
Note: Please note that Javascript must be enabled on your browser.
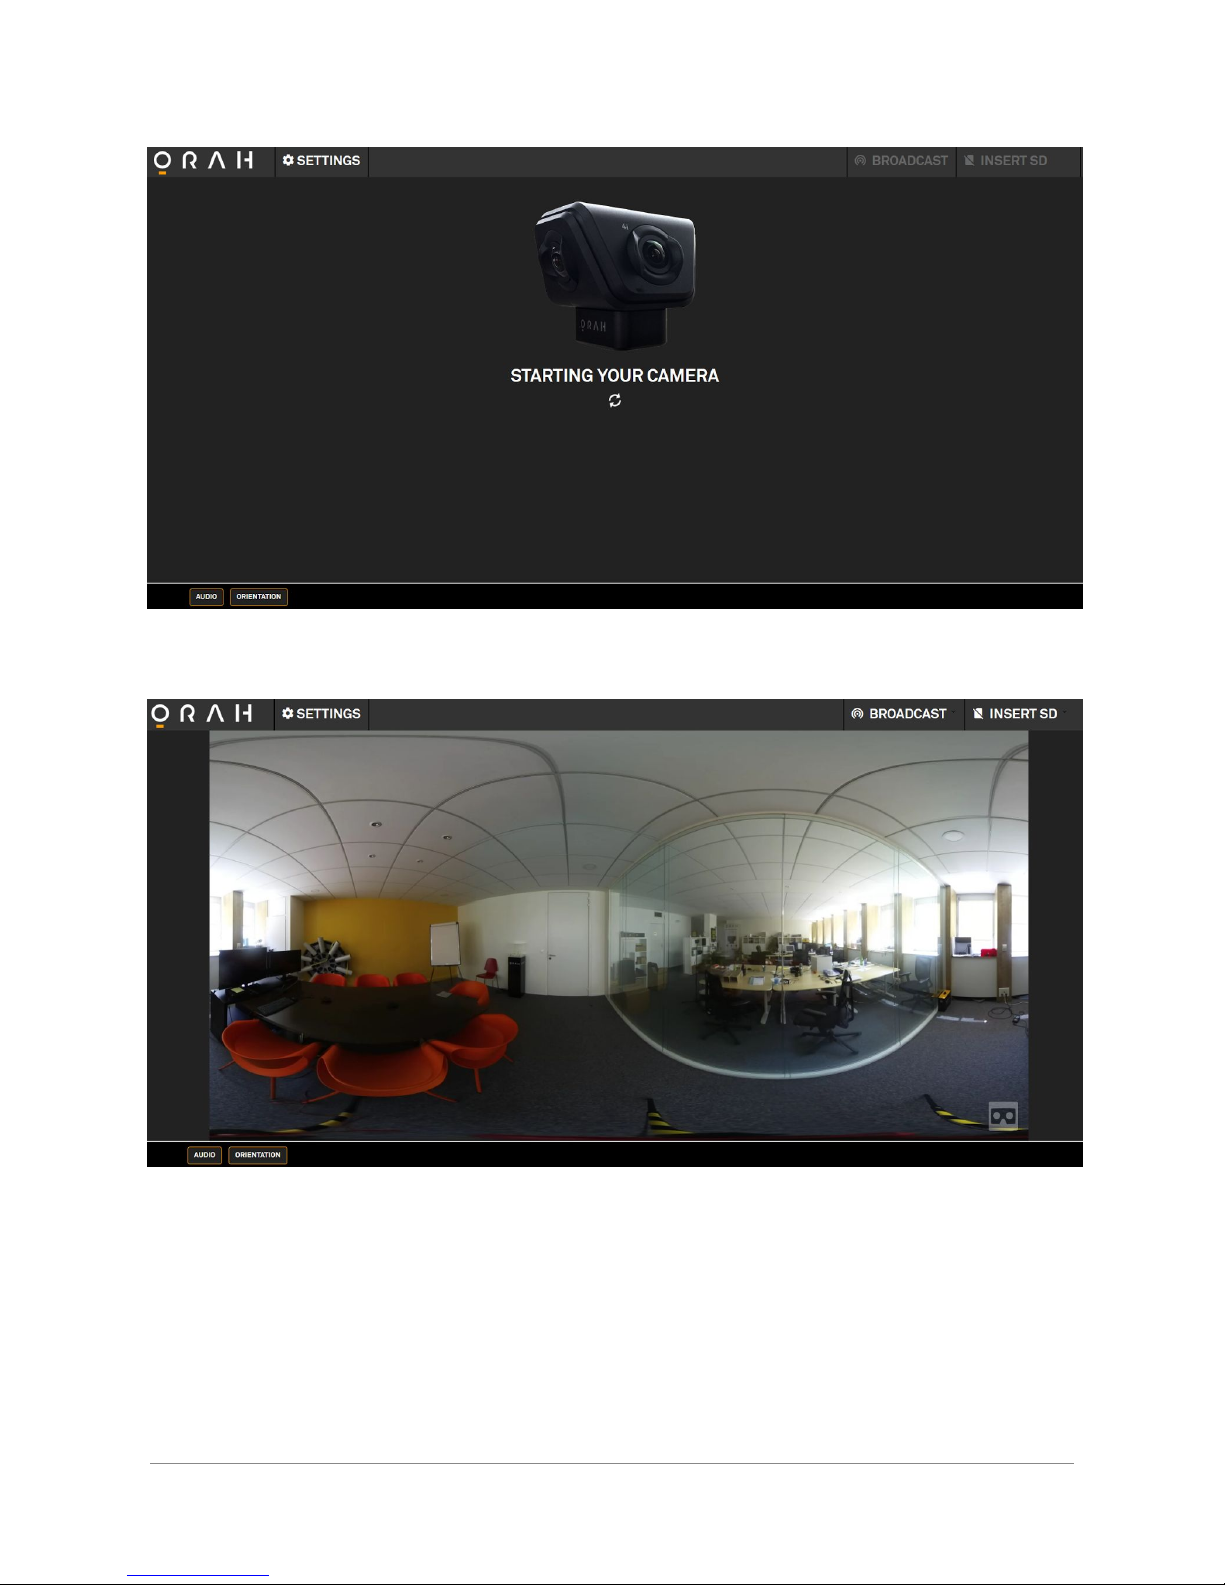
When connecting your camera to the stitching box, and connecting to the web control
application, the stitching box will look for the camera on the network, then connect and start the
camera before displaying the preview.
Orah 4i - User Guide v1.2.0 Copyright 2017 - VideoStitch inc.
This guide is protected under copyright law
4
Page 6
Orah 4i User Guide v1.2.0
The web control application features a live preview, options to view and change various settings
for the stitching box and the Orah 4i camera, as well as controls to start/stop broadcasting live
content on the Internet and record to an SD card.
Orah 4i - User Guide v1.2.0 Copyright 2017 - VideoStitch inc.
This guide is protected under copyright law
5
Page 7
Orah 4i User Guide v1.2.0
II. Updating the stitching box
To enjoy the best experience using our product, we recommend you to keep the Orah camera and
stitching box up to date.
Updates will install new features and corrections.
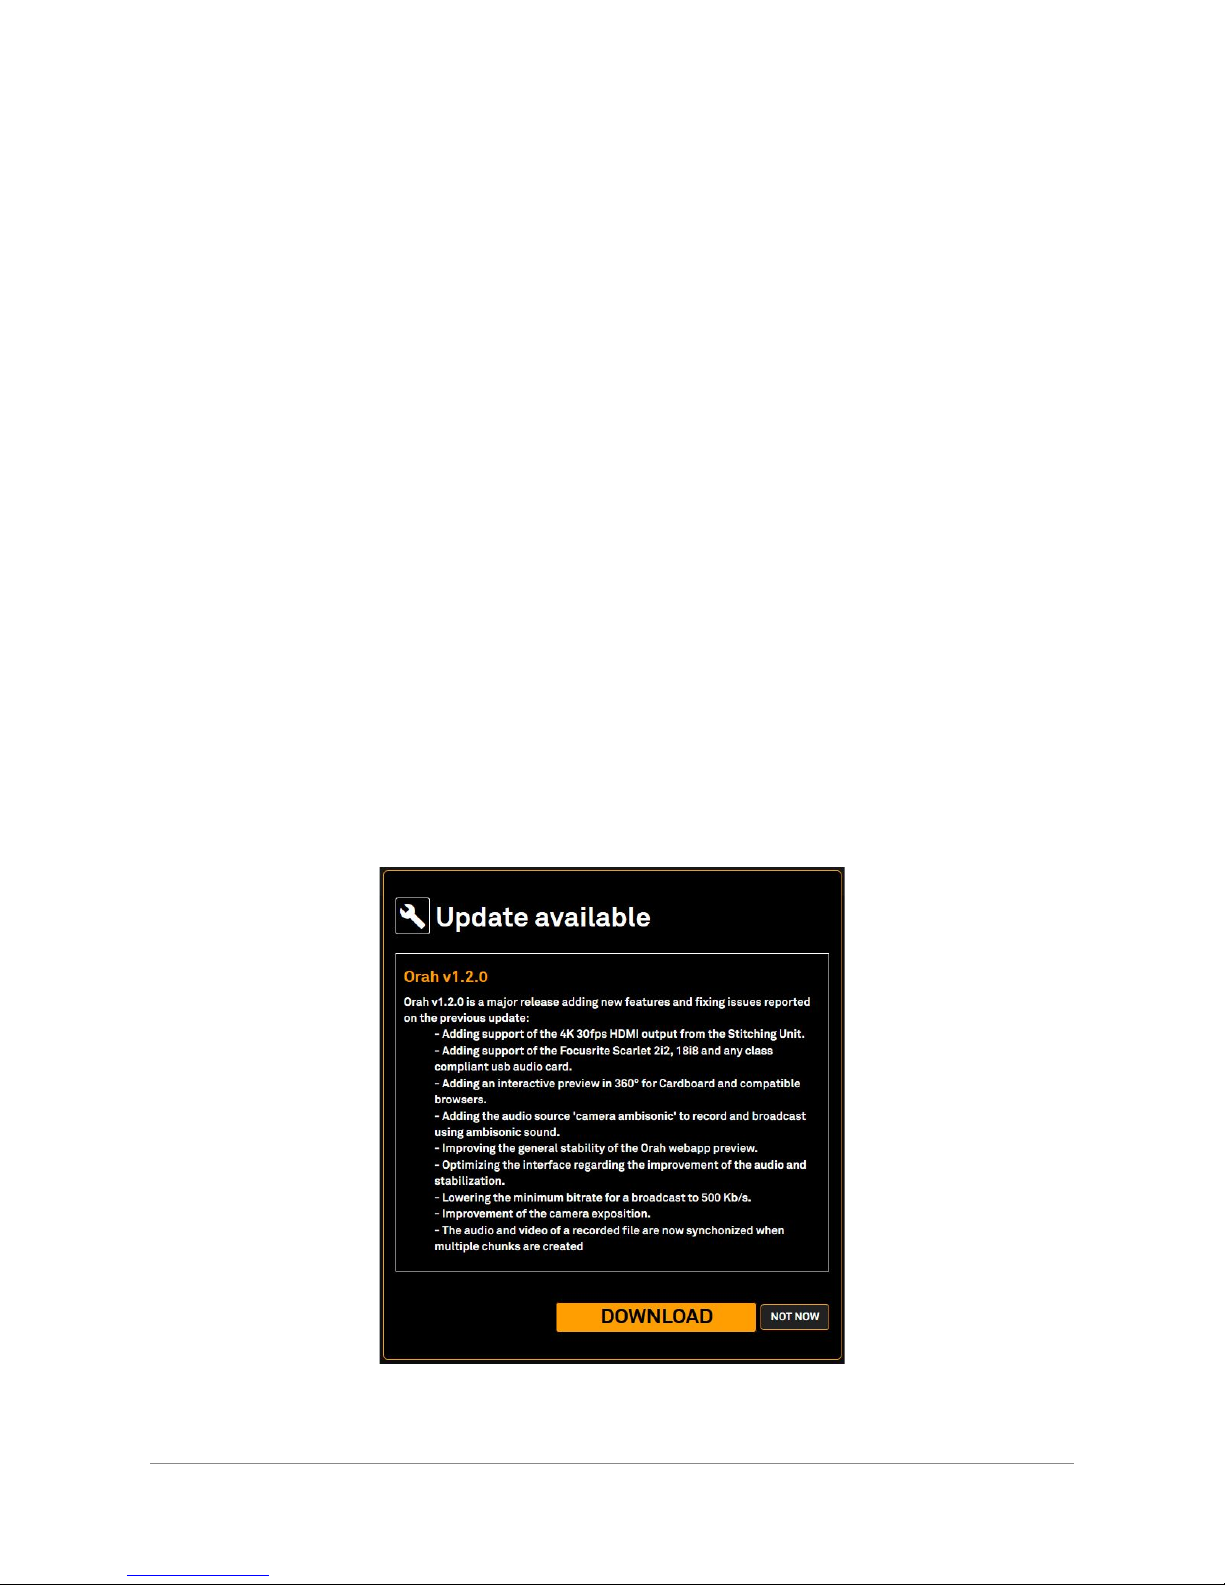
If the stitching box is connected to the internet and a new firmware version is available, a
notification will appear in the web control application.
Note : You need to be connected to the internet to be notified of updates.
If you launch the update, you will be redirected to an instruction page to download and install
the new firmware.
If you select the "not now" option, no update will happen and you will be redirected to the web
control application home screen.
1. Update via the "Update Pop up"
Click on DOWNLOAD to open a new web page and discover the changes available and
proceed with the download. If you do not want to download at this time select NOT NOW.
Orah 4i - User Guide v1.2.0 Copyright 2017 - VideoStitch inc.
This guide is protected under copyright law
6
Page 8
Orah 4i User Guide v1.2.0
2. Update via the support page
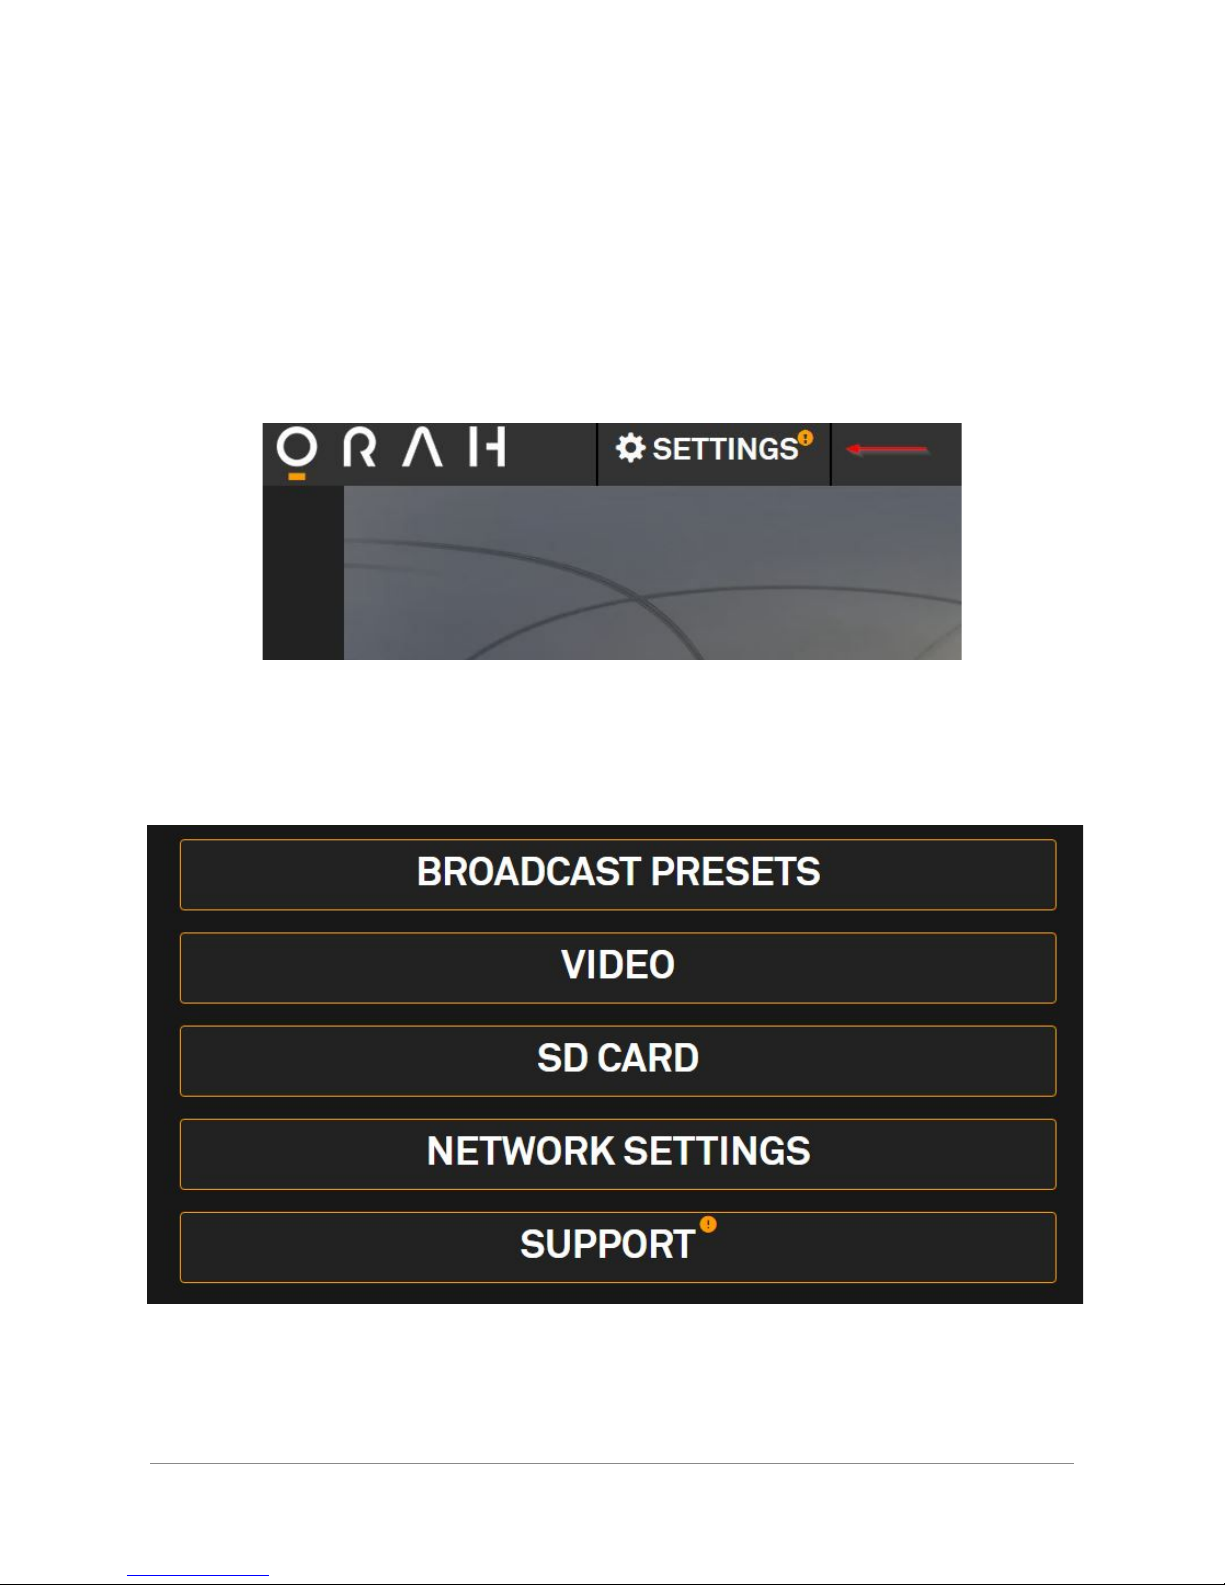
If you select ‘not now’, an update notification icon will remain available in the web control
application interface next to the settings button.
● Click the "Settings", then on "Support".
Orah 4i - User Guide v1.2.0 Copyright 2017 - VideoStitch inc.
This guide is protected under copyright law
7
Page 9
Orah 4i User Guide v1.2.0
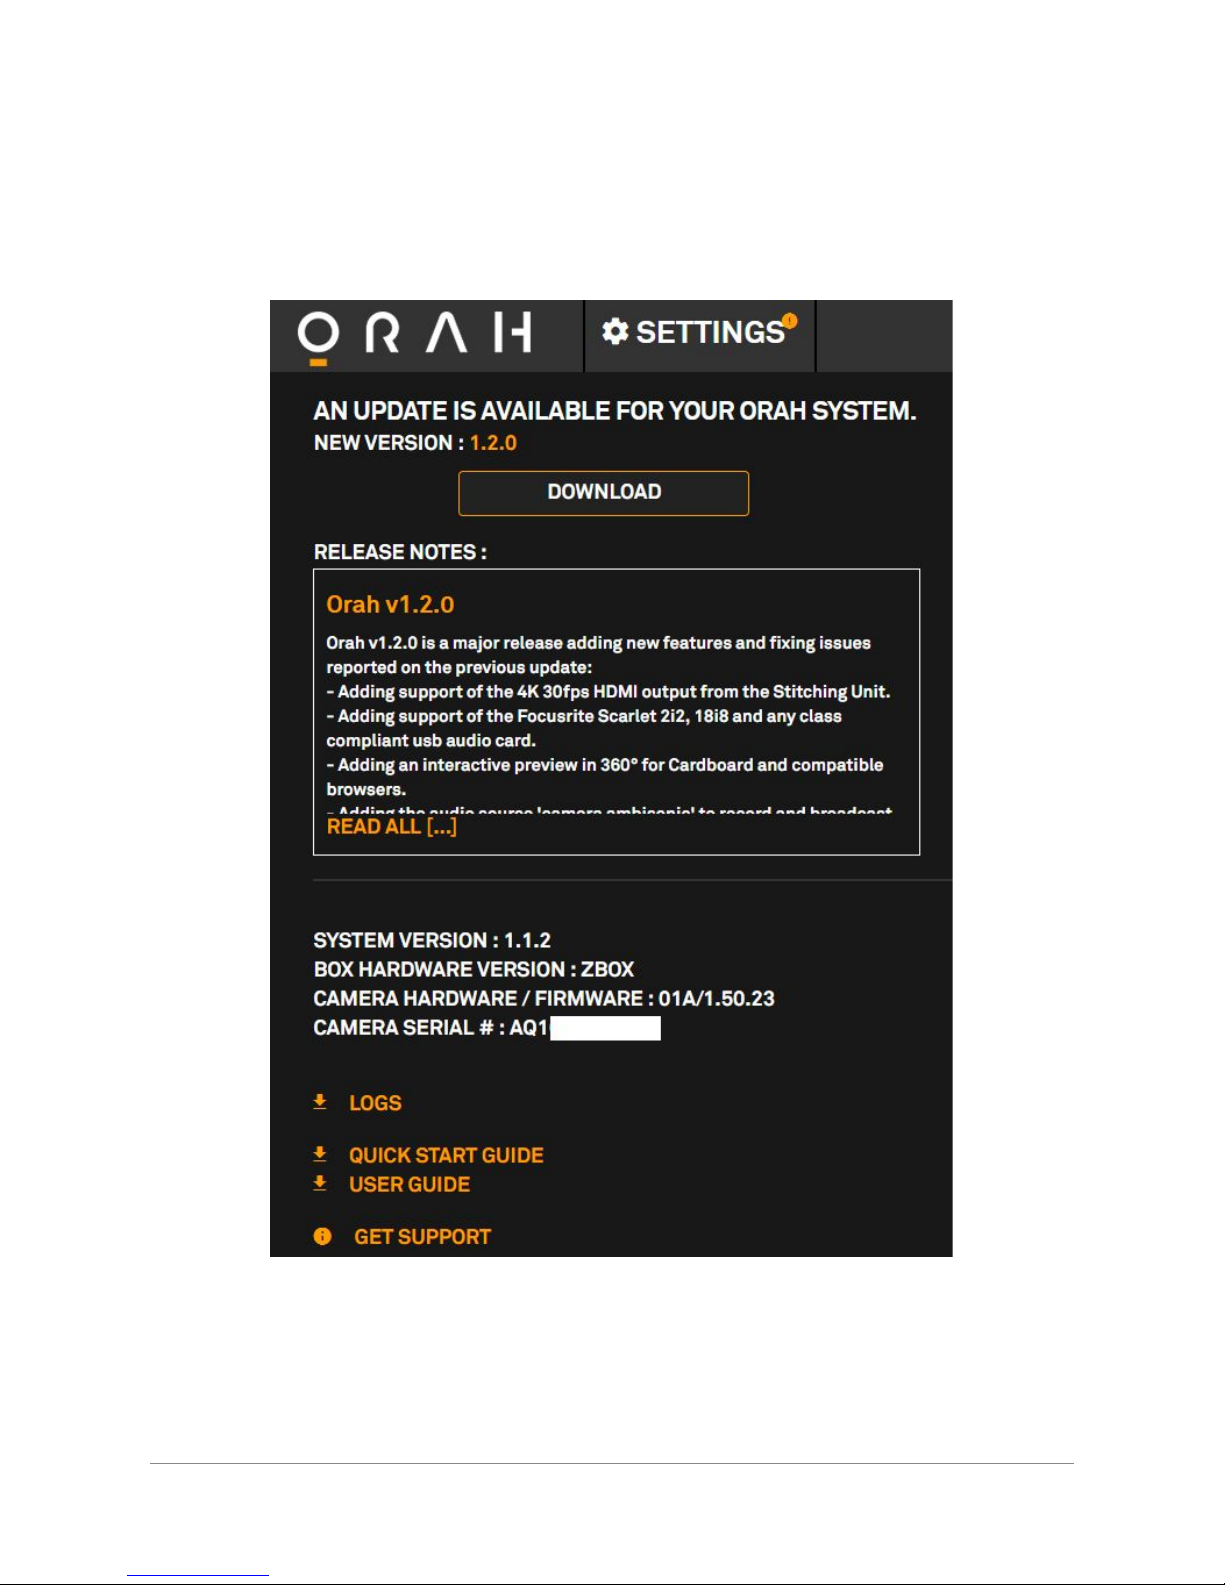
● On this page, you can review the release notes for the new version.
Simply click on the "download update" button to access the download page and get the instructions
to proceed.
Just follow the steps to download the new update for the stitching box.
Orah 4i - User Guide v1.2.0 Copyright 2017 - VideoStitch inc.
This guide is protected under copyright law
8
Page 10
Orah 4i User Guide v1.2.0
3. Updating the Orah 4i system
Prerequisite :
● You will need a USB key Fat32 formatted with at least 1GB of available space.
● You will need the latest firmware. It can be downloaded here
● Your Orah 4i stitching box is turned off, the camera is disconnected from the box, and
Orah 4i web app is closed
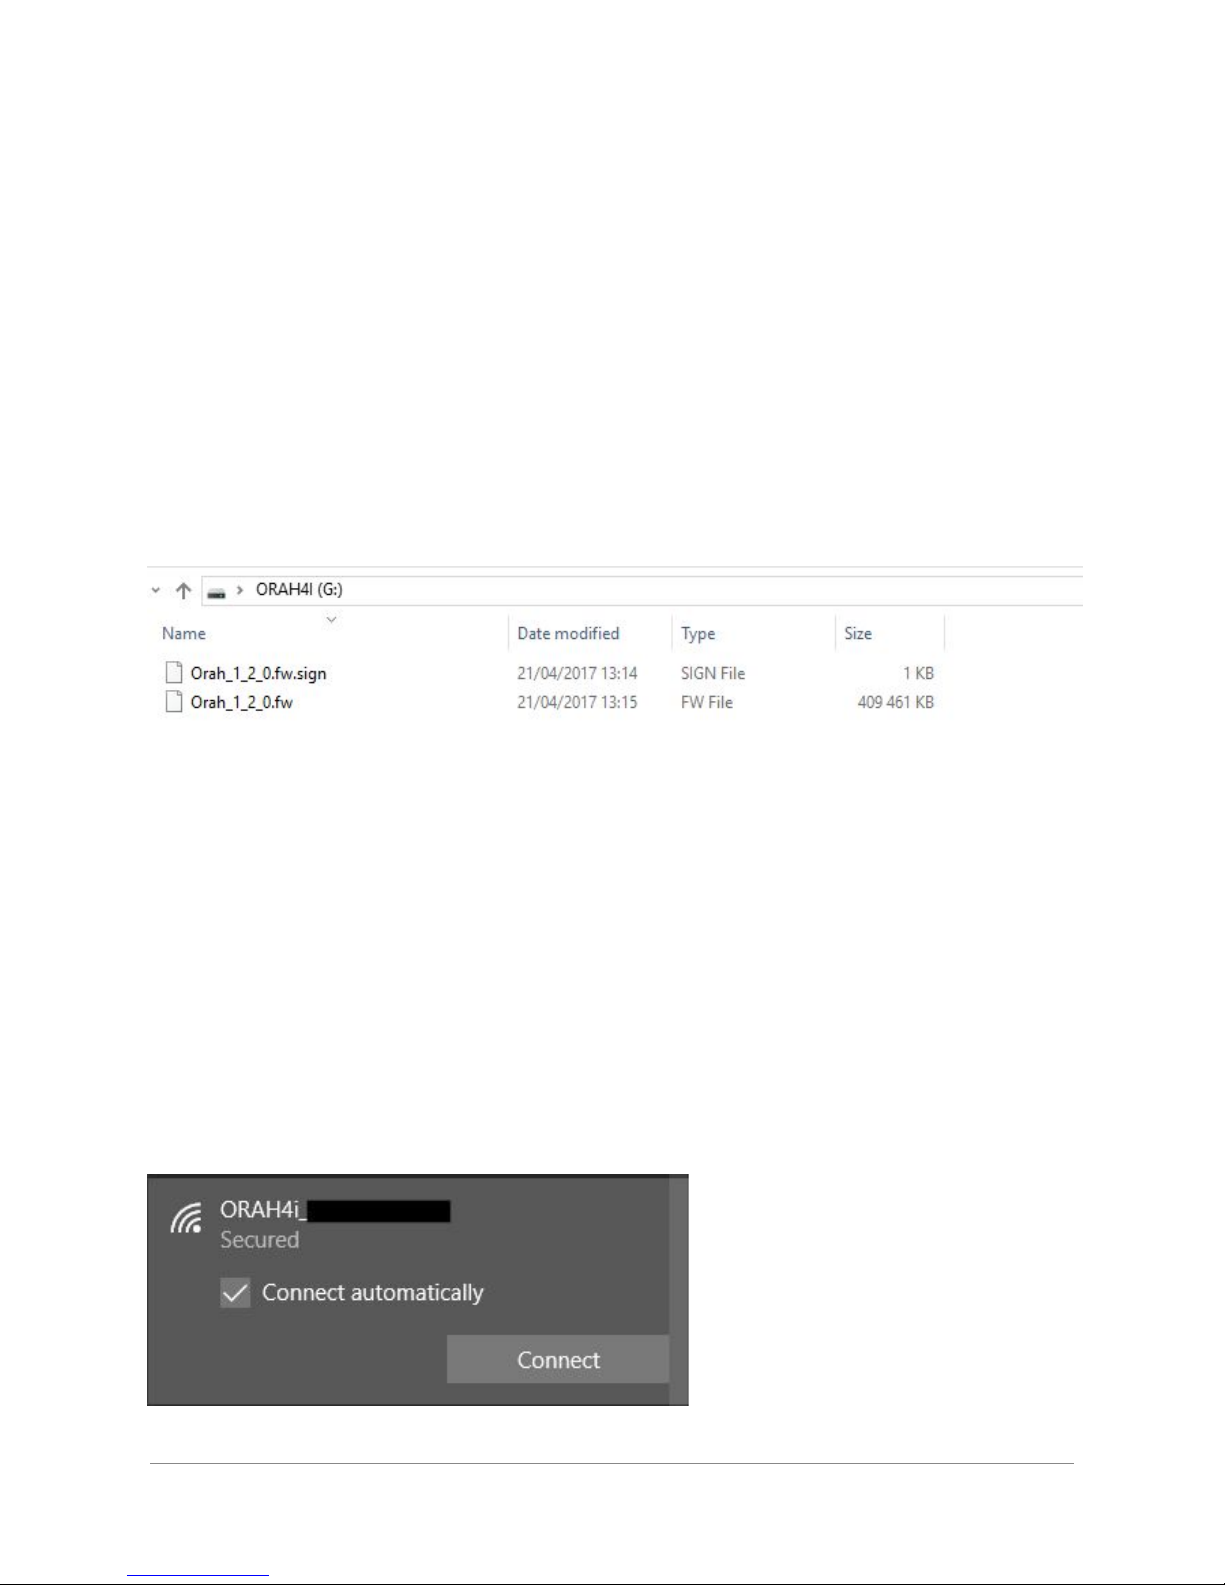
1. Copy and unzip the downloaded firmware to the root of your USB key
Make sure that you do not have other Orah firmware files copied on the same USB key
2. Plug the USB key to one of the USB 2.0 ports of the stitching box
3. Turn the Orah 4i stitching box on
The system will automatically update itself from the USB key. Once the update is completed the
system will reboot and you should hear a bip at the reboot.
Note: The complete update should take 2 to 3 mins.
4. Plug the camera to the stitching box
5. Connect to the wifi network of your Orah system
Orah 4i - User Guide v1.2.0 Copyright 2017 - VideoStitch inc.
This guide is protected under copyright law
9
Page 11
Orah 4i User Guide v1.2.0
You can refer to the Orah Quick Start guide for more explanation
6. Connect to the Orah 4i web application
You can access the web application by connecting to 10.224.224.224 after connecting to your Orah
4i wifi network.
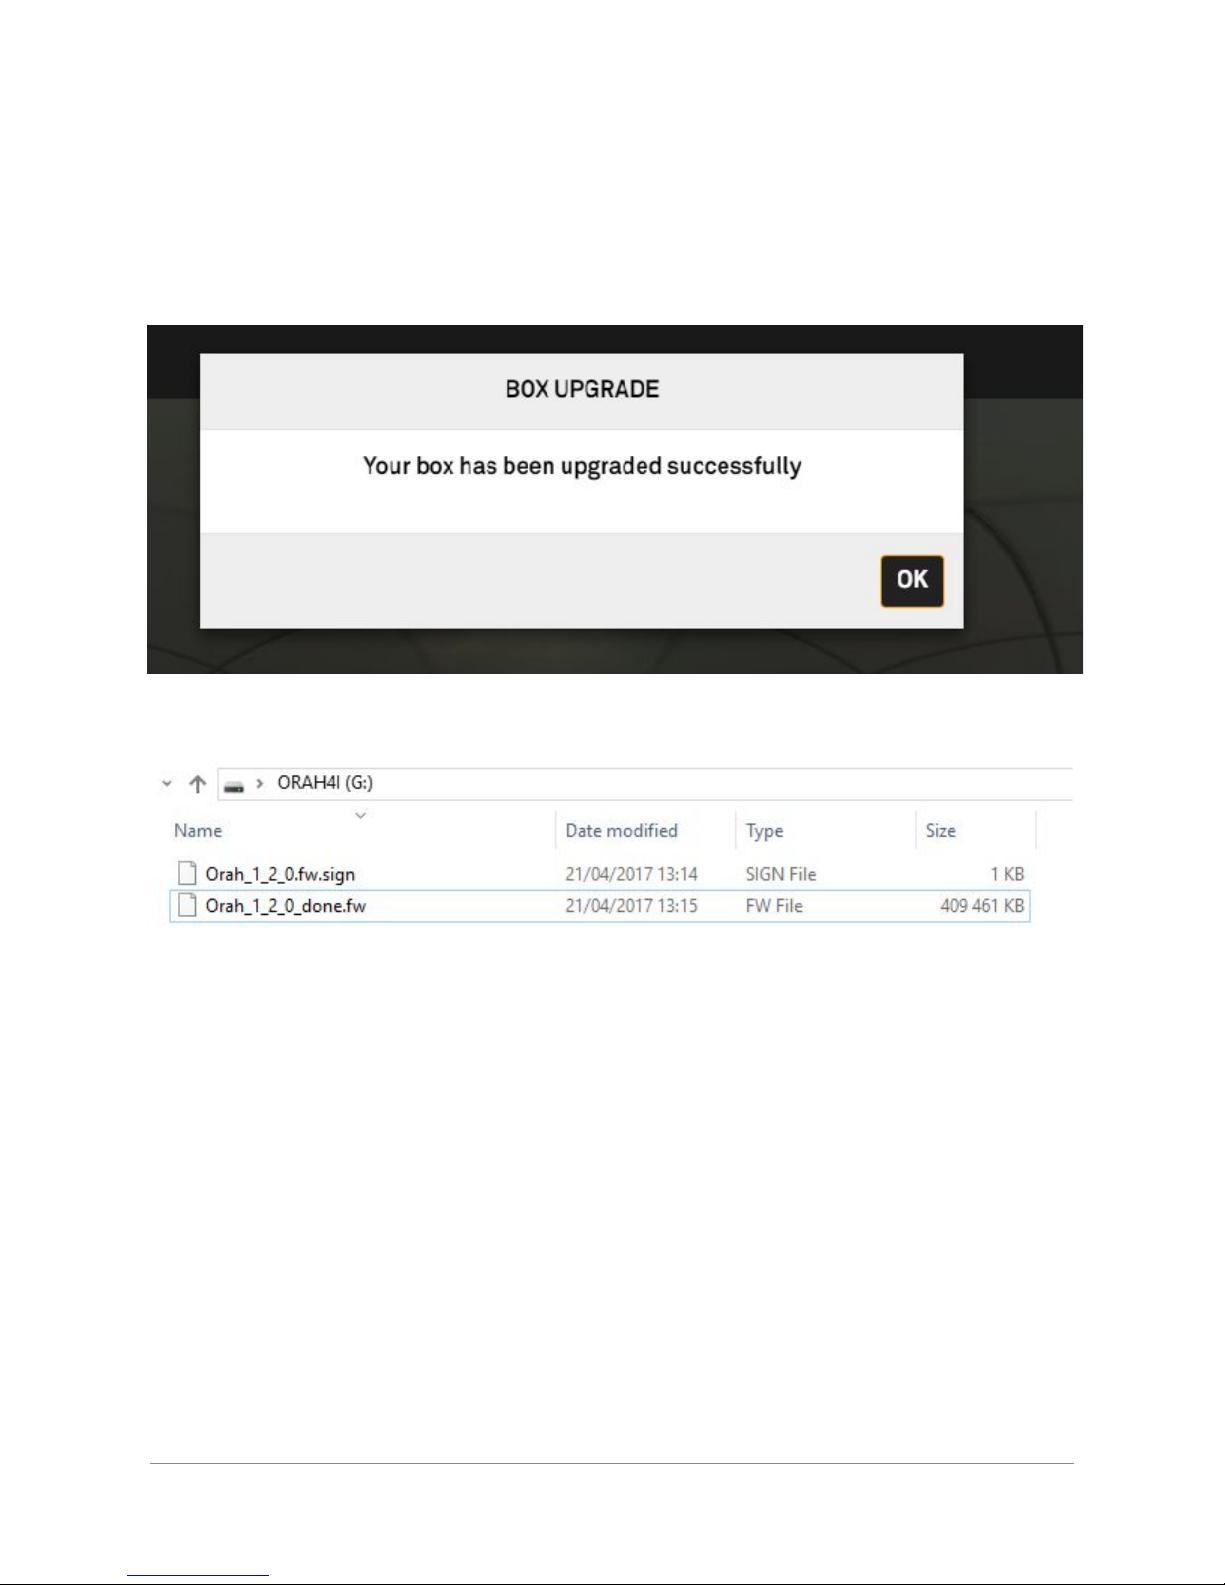
In the home screen, a pop-up will notify you of the successful update
You can also open your USB key, the firmware file will now be suffixed "done" after a successful
update
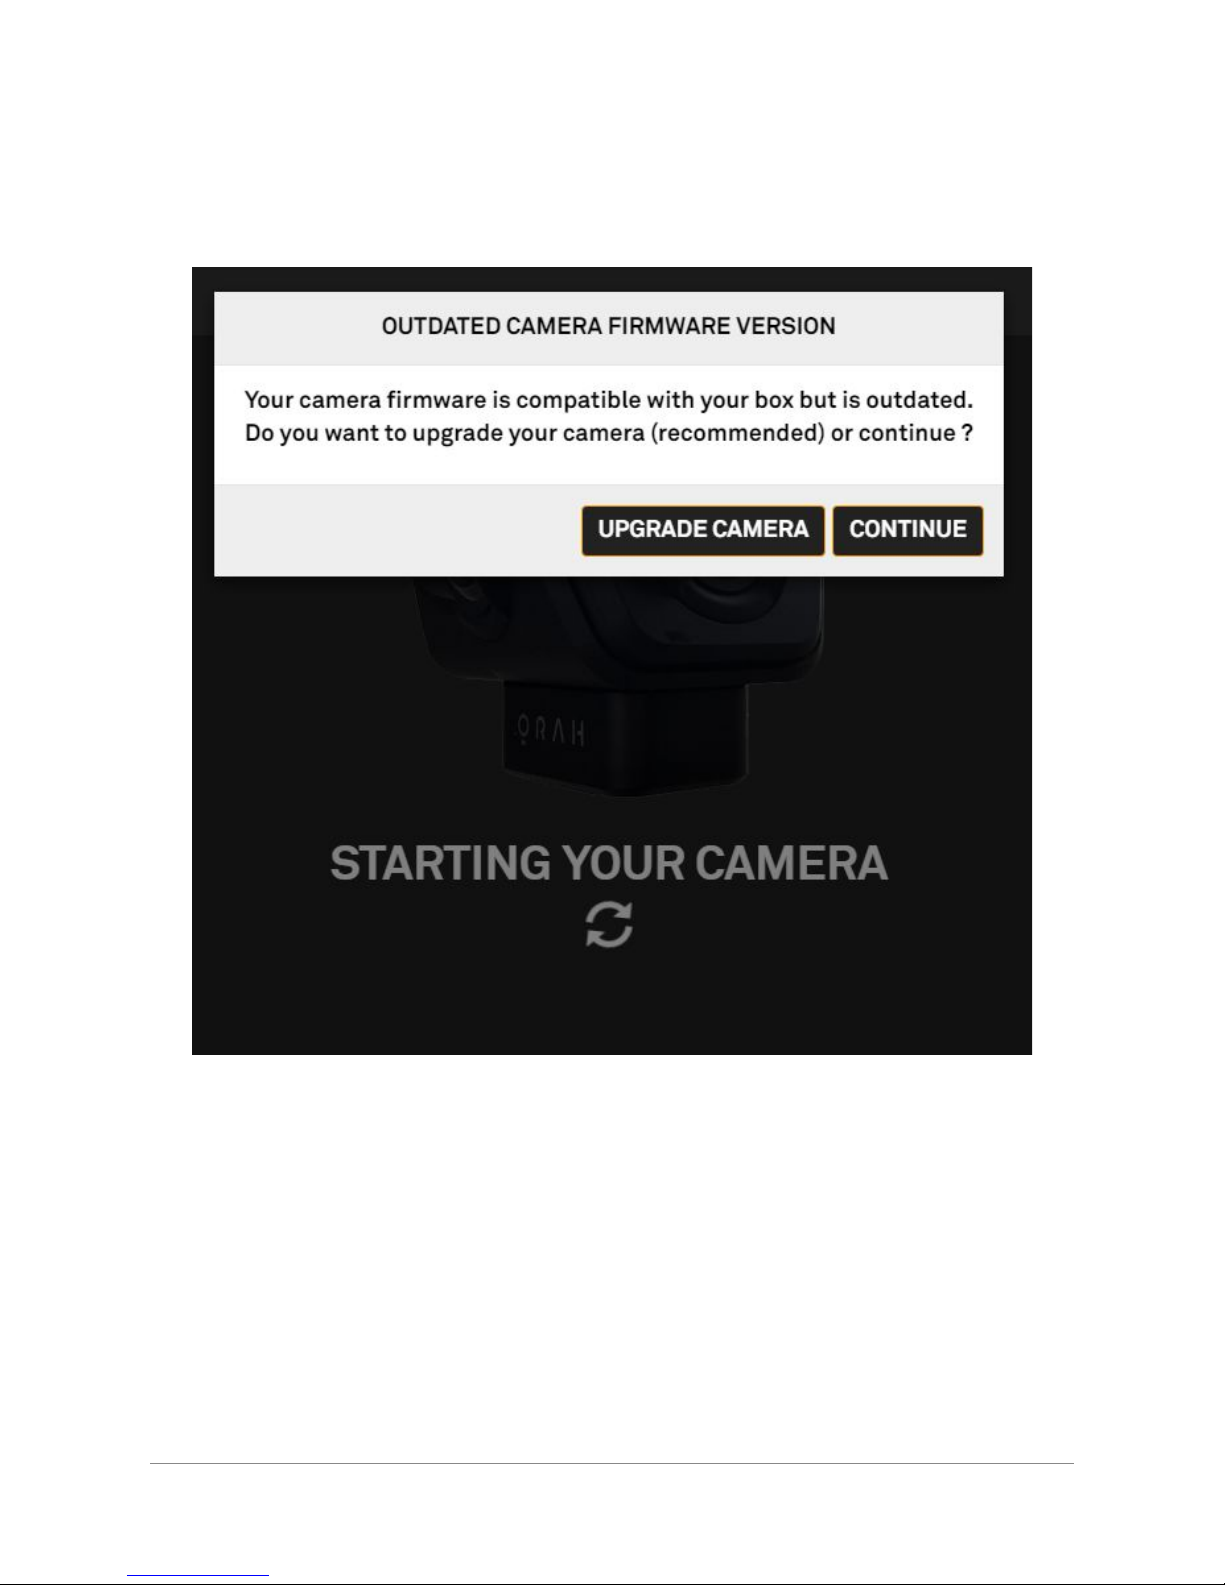
If the firmware of your camera is not the latest one, you will see a notification in the web application
prompting you to update the camera firmware. This update is done automatically through the web
application.
4. Updating the Orah 4i camera
Any given version of the Stitching Box embed an approved and validated Camera firmware.
Each time the Orah 4i camera is connected to a stitching box, the stitching box will check the
camera’s firmware (FW) version.
Orah 4i - User Guide v1.2.0 Copyright 2017 - VideoStitch inc.
This guide is protected under copyright law
10
Page 12
Orah 4i User Guide v1.2.0
● If the Camera Firmware version is older than the Stitching Box, the system will detect it
and suggest you to update the Camera firmware
If you own multiple Orah cameras, we recommend you keep them all updated to the latest
available version by following the Camera Firmware update process.
If you just received your Orah 4i, after upgrading the stitching box, you will see the following :
Orah 4i - User Guide v1.2.0 Copyright 2017 - VideoStitch inc.
This guide is protected under copyright law
11
Page 13
Orah 4i User Guide v1.2.0
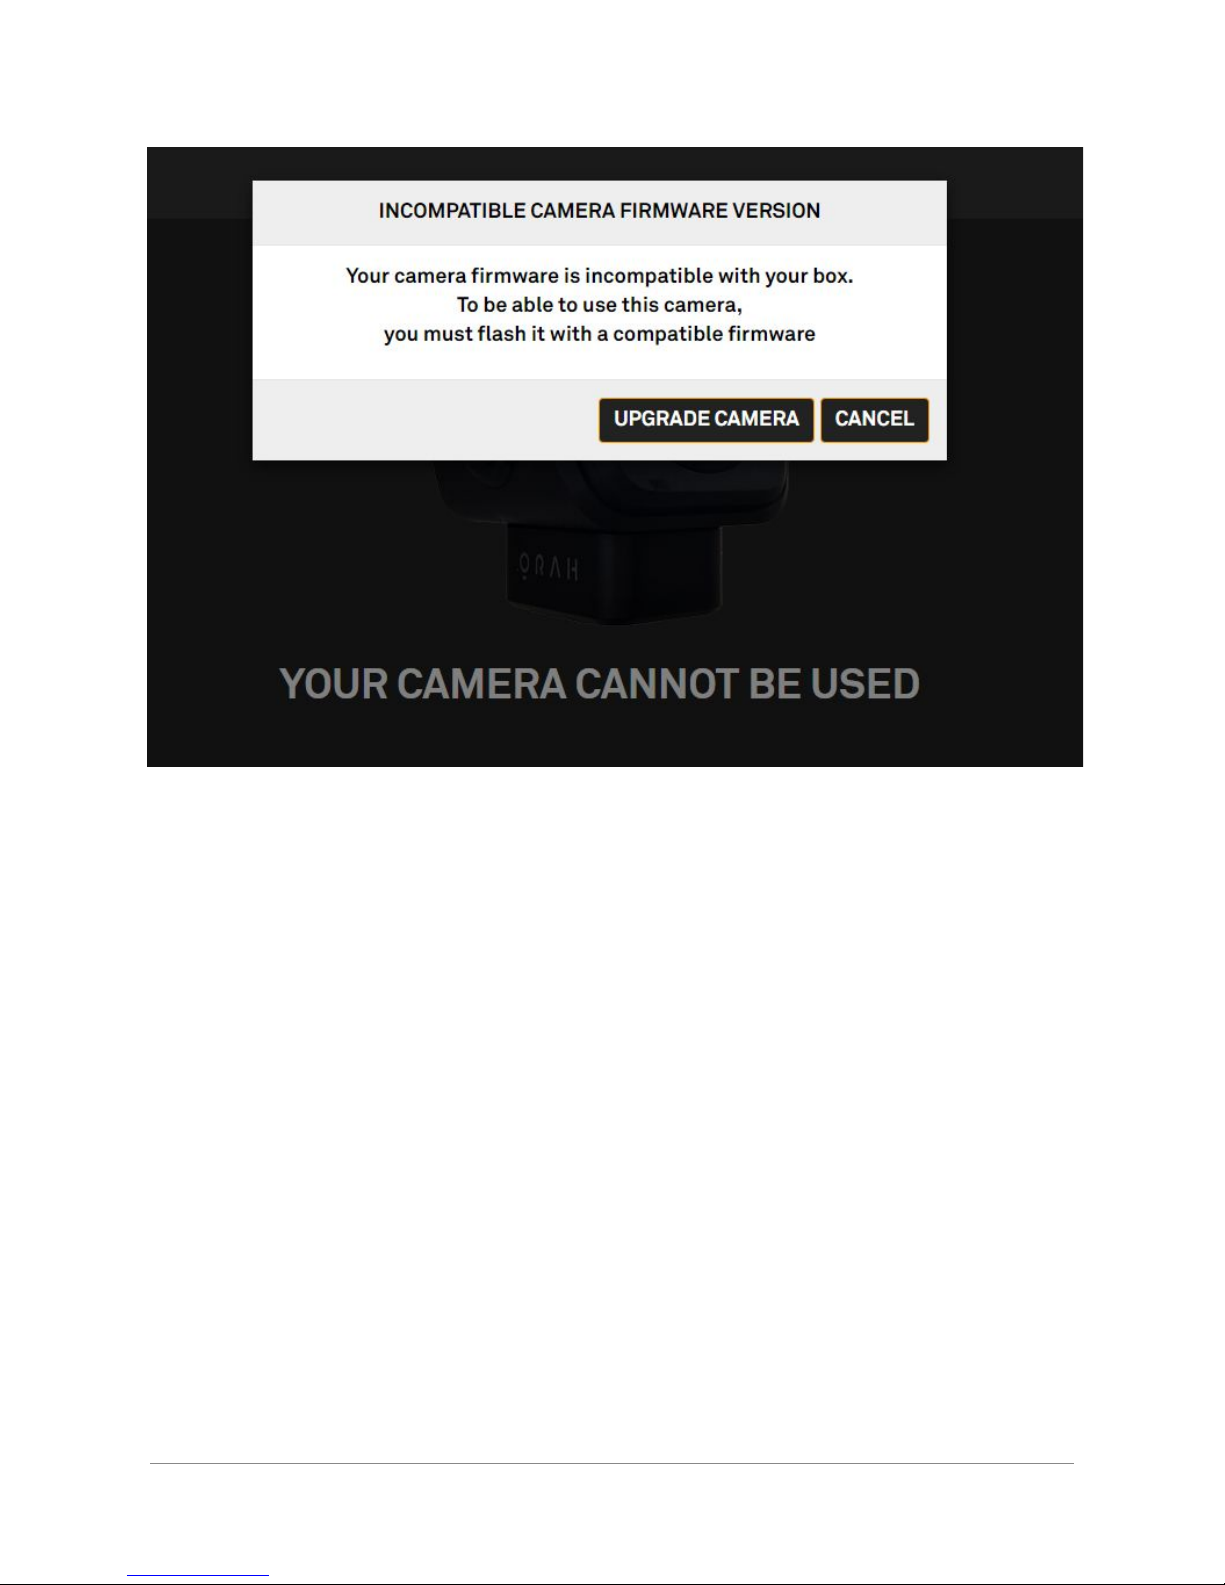
After upgrading the camera firmware, you will see the same message again and will need to
upgrade once again.
After the update, the preview will load and you will be able to see your stitched panorama
Orah 4i - User Guide v1.2.0 Copyright 2017 - VideoStitch inc.
This guide is protected under copyright law
12
Page 14
Orah 4i User Guide v1.2.0
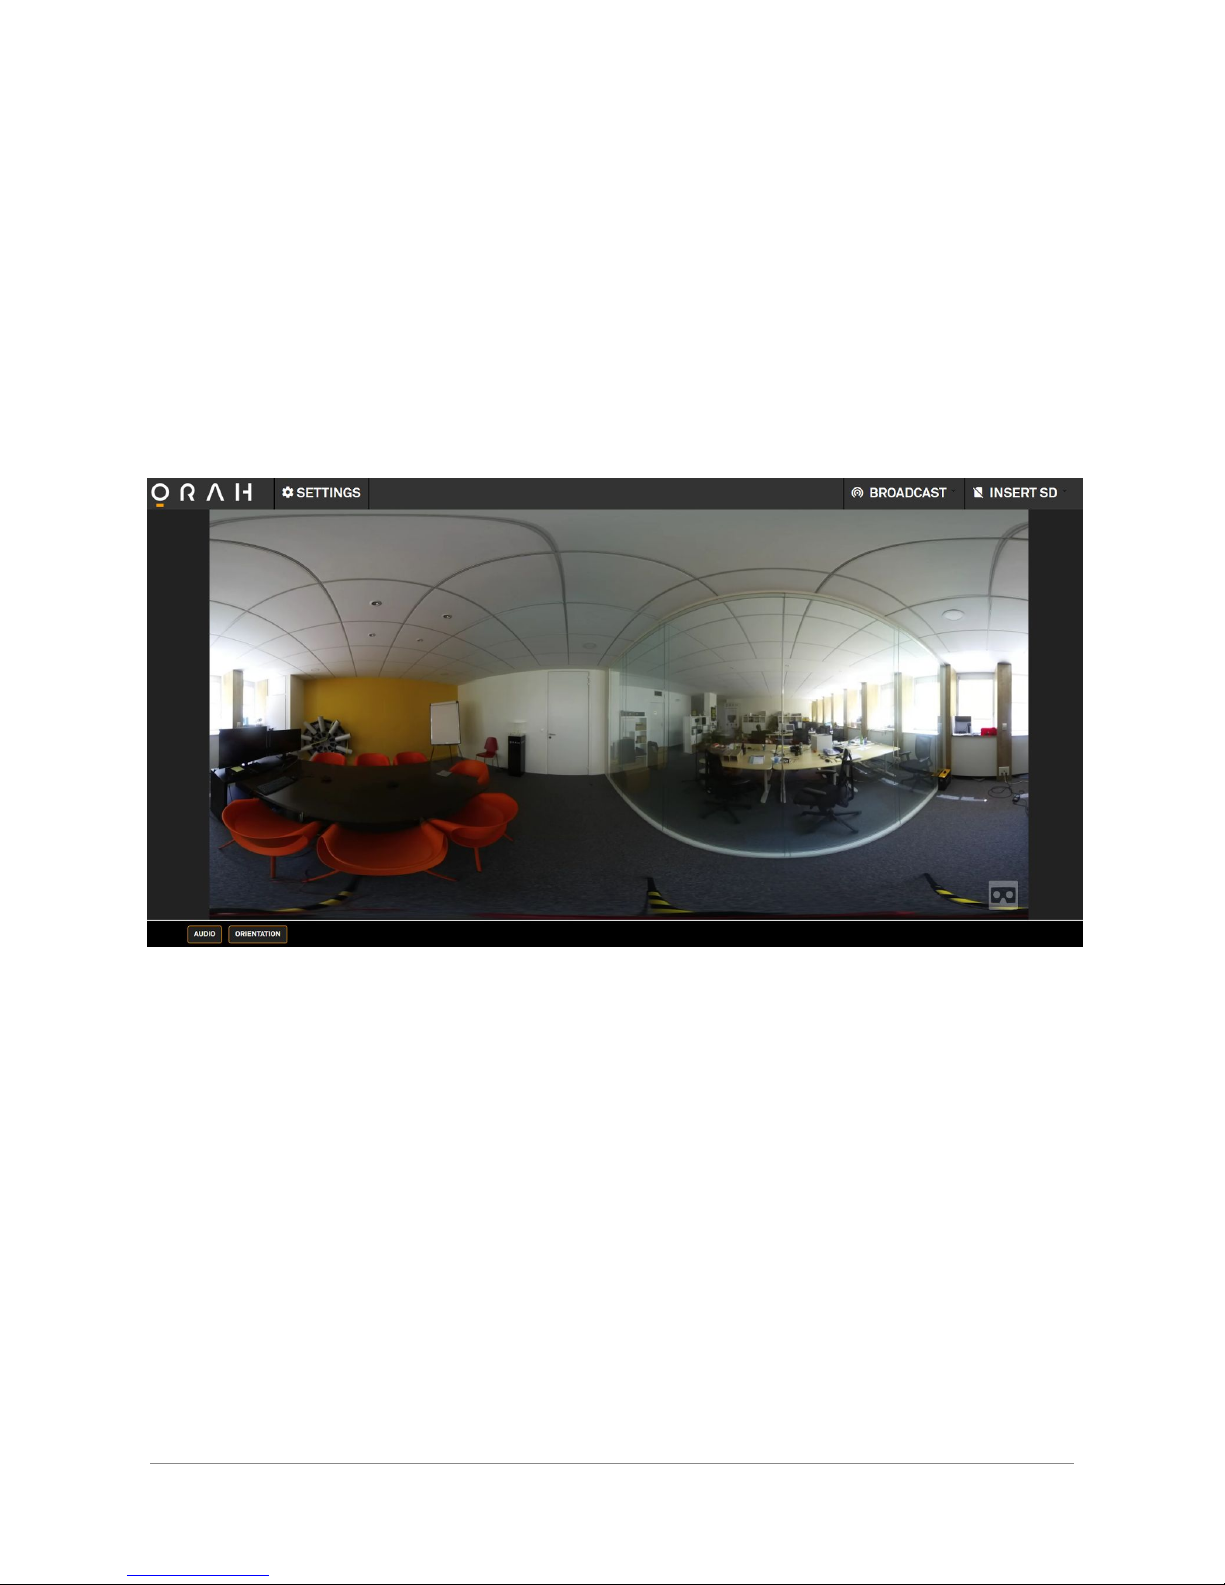
Home screen
The home screen gives you access to a live preview and the following configurations:
● Settings
● Broadcast
● Record to SD card
● Audio settings
● Live stabilization
The preview does buffer the stream to improve preview reliability inducing several seconds of
delay.
Orah 4i - User Guide v1.2.0 Copyright 2017 - VideoStitch inc.
This guide is protected under copyright law
13
Page 15
Orah 4i User Guide v1.2.0
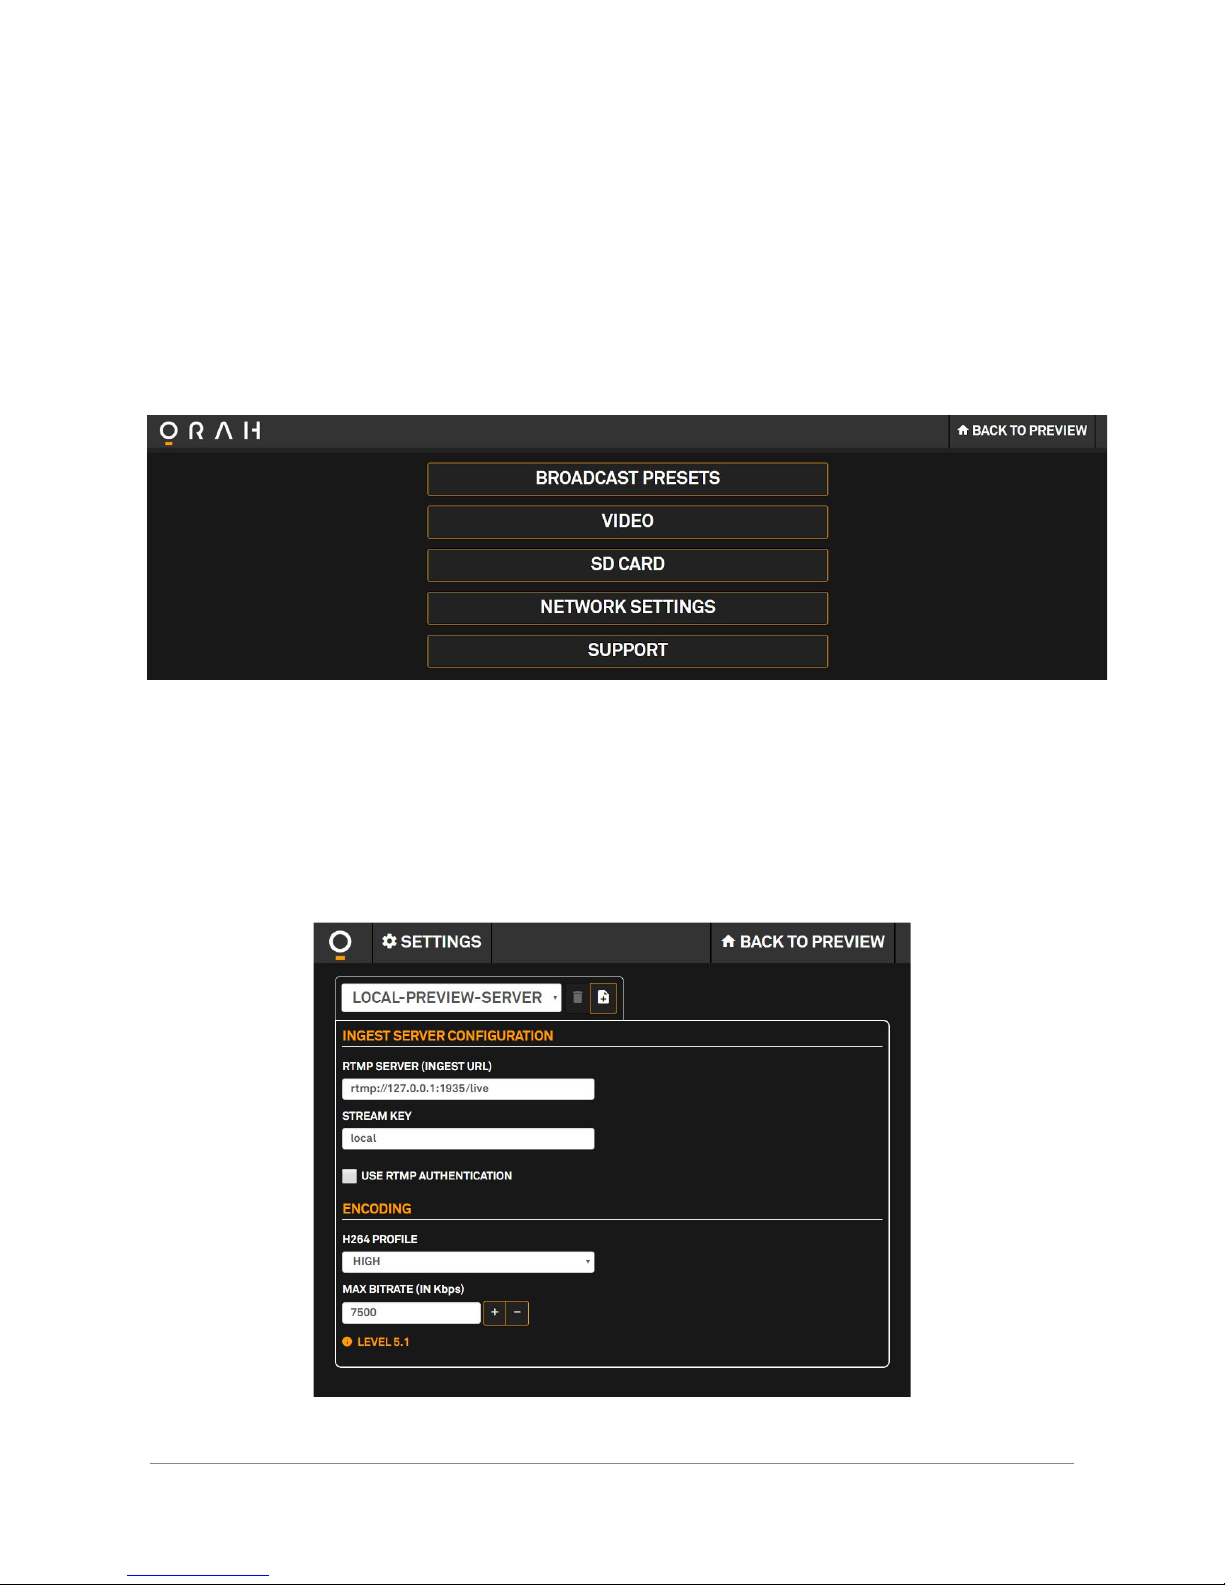
I. Settings
Clicking on the Settings button will give you access to a menu where you can configure and
save your broadcast options (via the broadcast presets), configure the video, view the stitching
box network details and access technical data for support (firmware versions, logs).
Clicking on “Back to preview” will send you back to the Home page.
1. Broadcast Presets
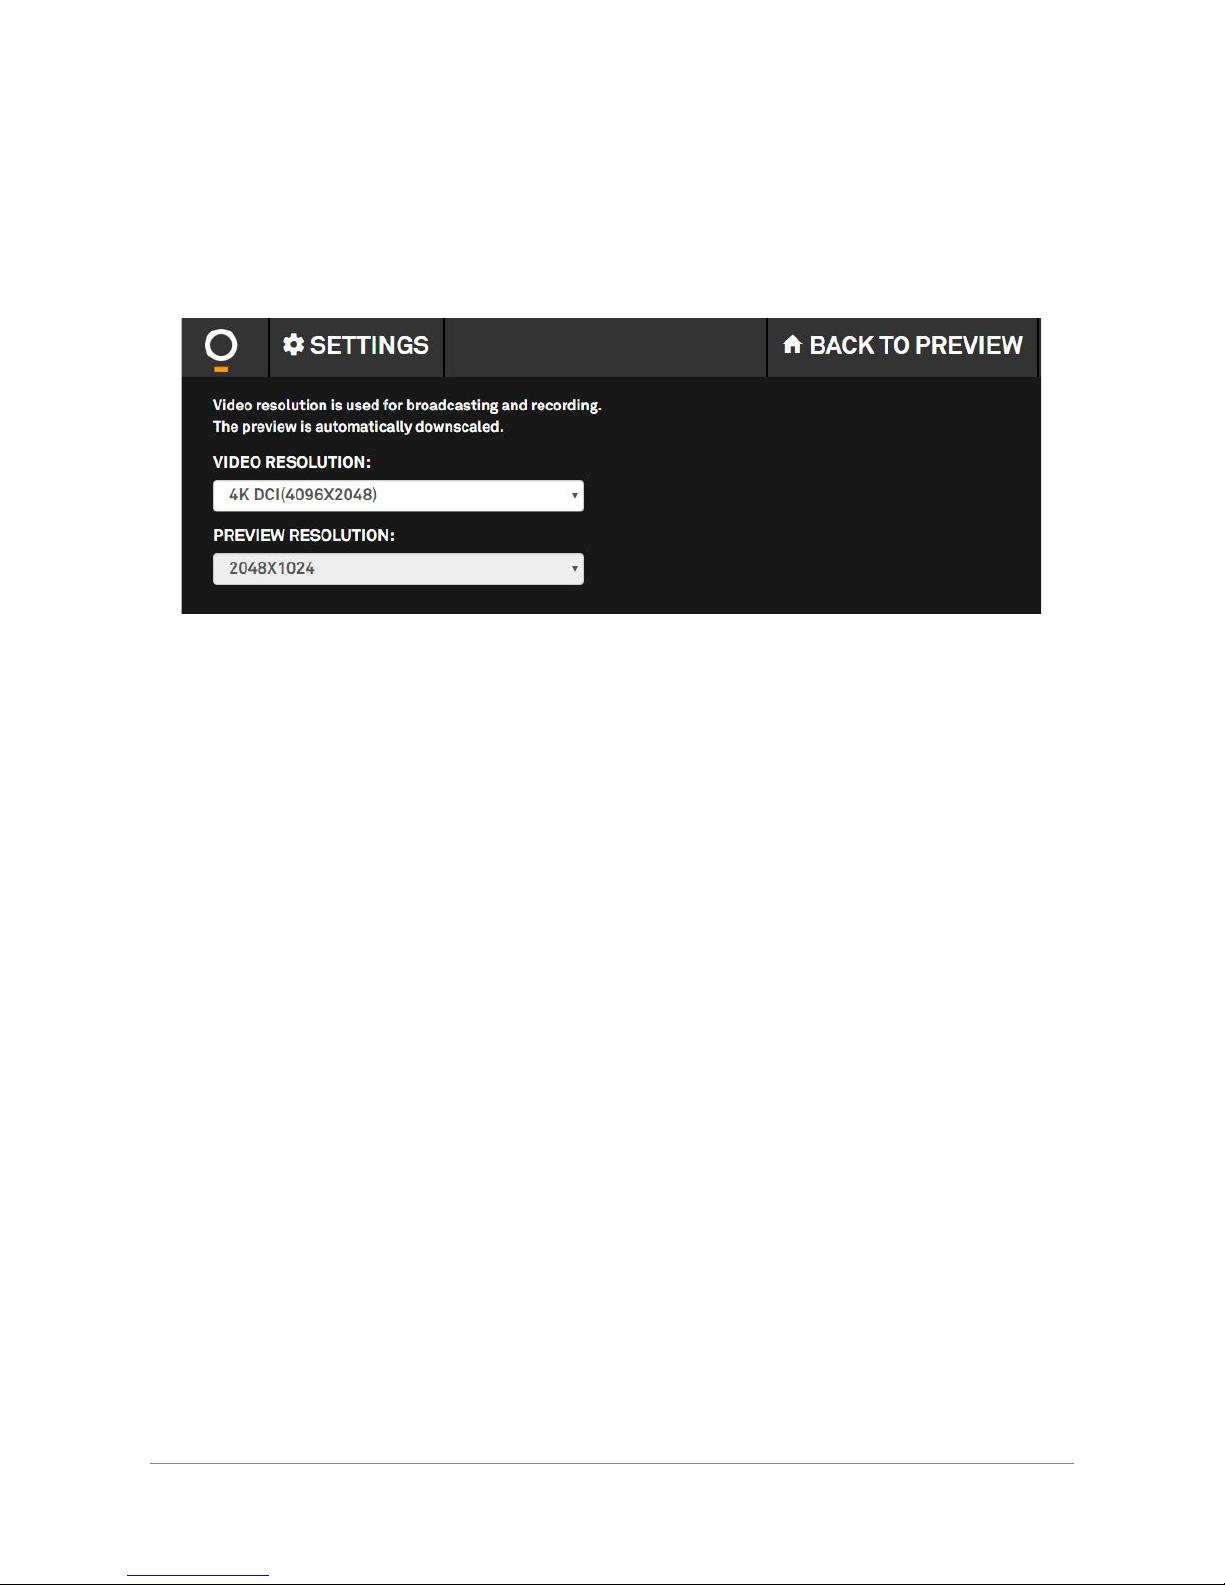
You can use the broadcast presets menu to edit the broadcasting parameters.
Orah 4i - User Guide v1.2.0 Copyright 2017 - VideoStitch inc.
This guide is protected under copyright law
14
Page 16

Orah 4i User Guide v1.2.0
You can choose an existing preset, delete the selected custom preset, or create a new one.
If you modify an existing preset, you will be able to update, save as a new preset or cancel.
The default preset (local-preview-server) can not be deleted. This preset can be used to stream
to the box internal server. For more detail you can see our tutorial:
http://support.orah.co/hc/en-us/articles/115000034264-How-to-setup-a-4K-preview
■ RTMP endpoint configuration
■ Enter the correct RTMP server URL to broadcast the RTMP stream to. The
system supports any service capable of ingesting RTMP.
■ Enter the stream key as configured on your server.
For more security when broadcasting, you can tick the “use RTMP authentication” box. The
username and password to fill in in the RTMP configuration are those defined in your CDN
configuration.
You can also change the encoding of the video you will stream.
■ Encoding - to define how the video is compressed and streamed.
■ H264 Profile: to change the compression quality.
■ High (recommended)
■ main
■ baseline
Generally High profile offers the most bandwidth efficient compression for
streaming. Main and Baseline can be useful if you have specific device or server
compatibility requirements. For more details about profiles : click here.
■ Max Bitrate in Kbps: the number of kilobits per second. This parameter defines
the video compression. It affects the general quality of the image. The minimum
is 2500 and the maximum is 50000. YouTube’s recommendation for 4k streamed
video is between 13000 Kbps - 30000 Kbps. Do not exceed the upload
bandwidth of your internet connection, to avoid packet losses during the upload.
The level is the result of the resolution, H264 profile and the bitrate.
Save your changes to a new profile or update one of your existing profiles.
Orah 4i - User Guide v1.2.0 Copyright 2017 - VideoStitch inc.
This guide is protected under copyright law
15
Page 17
Orah 4i User Guide v1.2.0
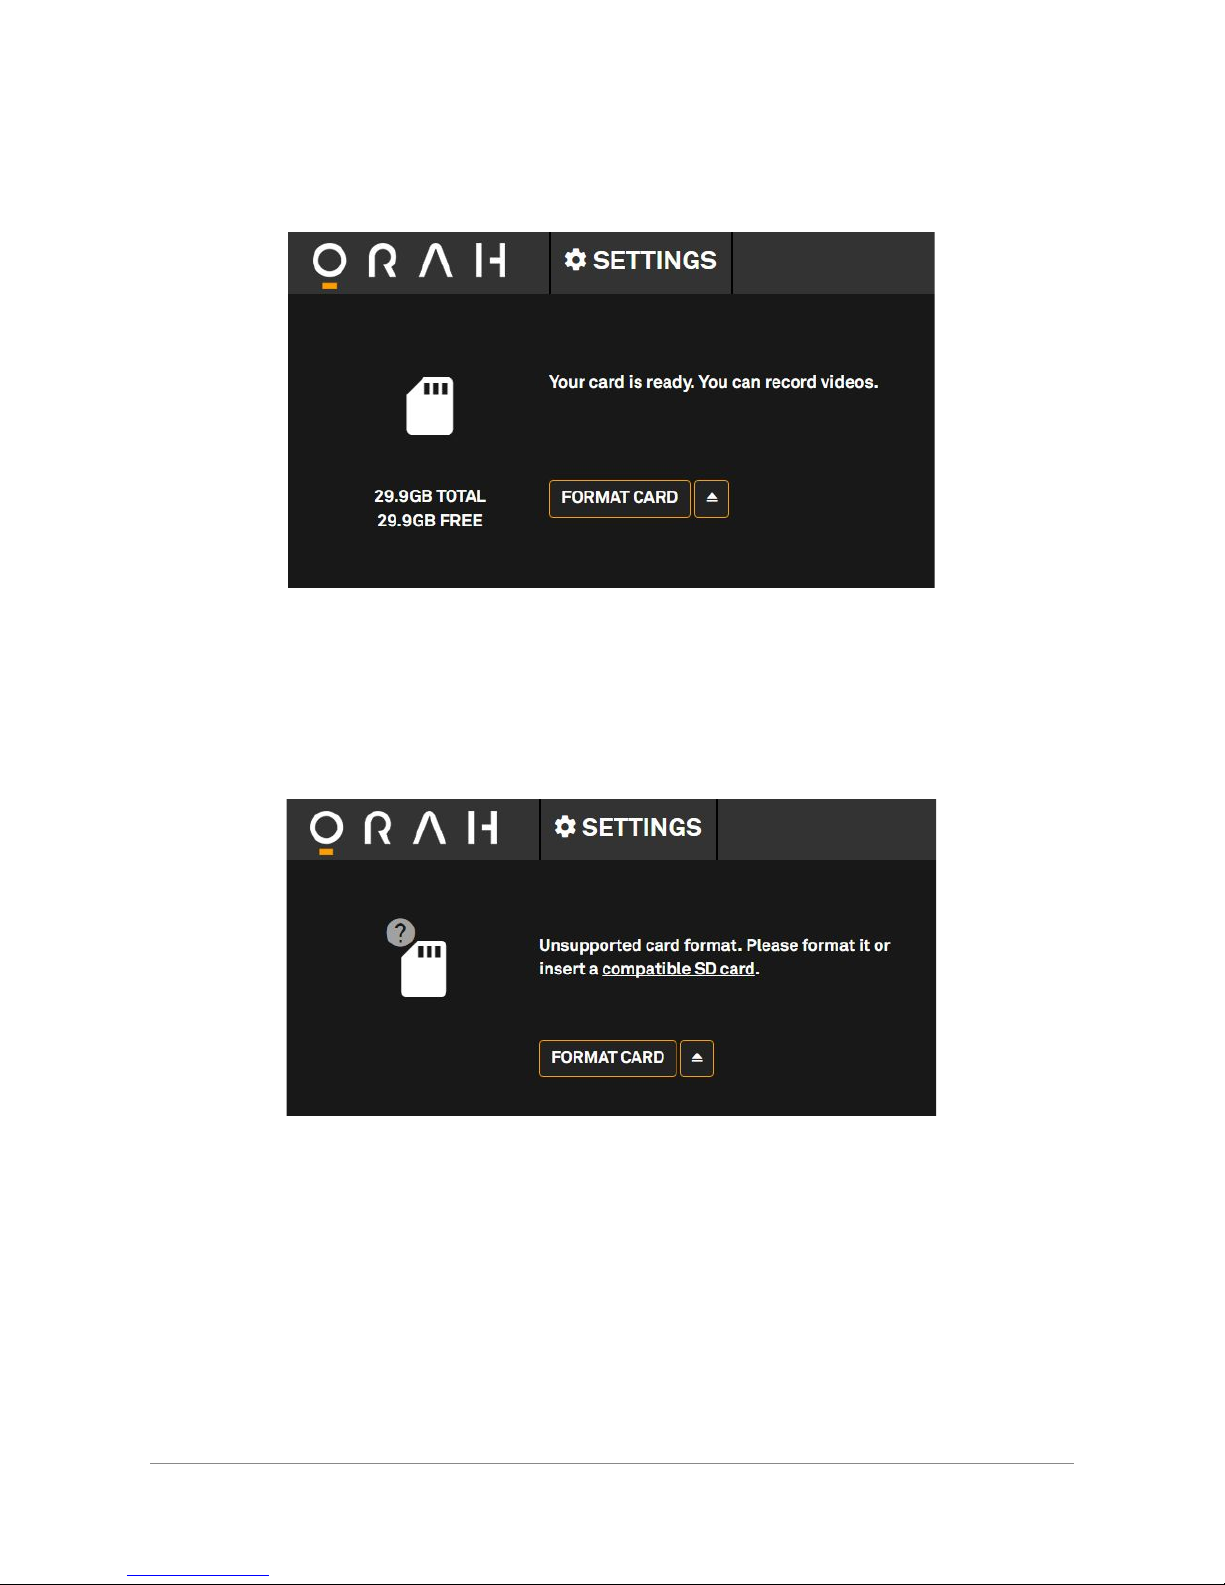
2. Video
In this section you can change the video resolution,
Please note, that is not possible to change the video resolution while broadcasting nor
recording.
There are five available resolution options:
● 4K DCI - 4096x2048
● 4K UHD - 3840x1920
● 2.8K - 2880x1440
● 2K - 2048x1024
● HD - 1920x960
Currently the preview resolution is set to 1/4 of the broadcast resolution and encoded as
Baseline 4.0, 5 Mbps to ensure it plays smoothly on a wide range of devices.
3. SD Card
Please note we recommend to use class 10 SD card with at least 10 Mbp/s. We tested some
references you can find by clicking on the link below:
[link to the FAQ]
This list is non exhaustive and that does not mean that your card won’t work.
Note: The SD card needs to be reversed to be plugged on the Stitching Unit.
Orah 4i - User Guide v1.2.0 Copyright 2017 - VideoStitch inc.
This guide is protected under copyright law
16
Page 18
Orah 4i User Guide v1.2.0
When you insert a SD card, the Stitching Unite checks it. If everything is fine, the message below
appears.
If the card is not compatible, the message below appears. In this case, the formatting is necessary to
use the card.
Please note the formatting of the card erases all the content of the card - this action is
irredeemable.
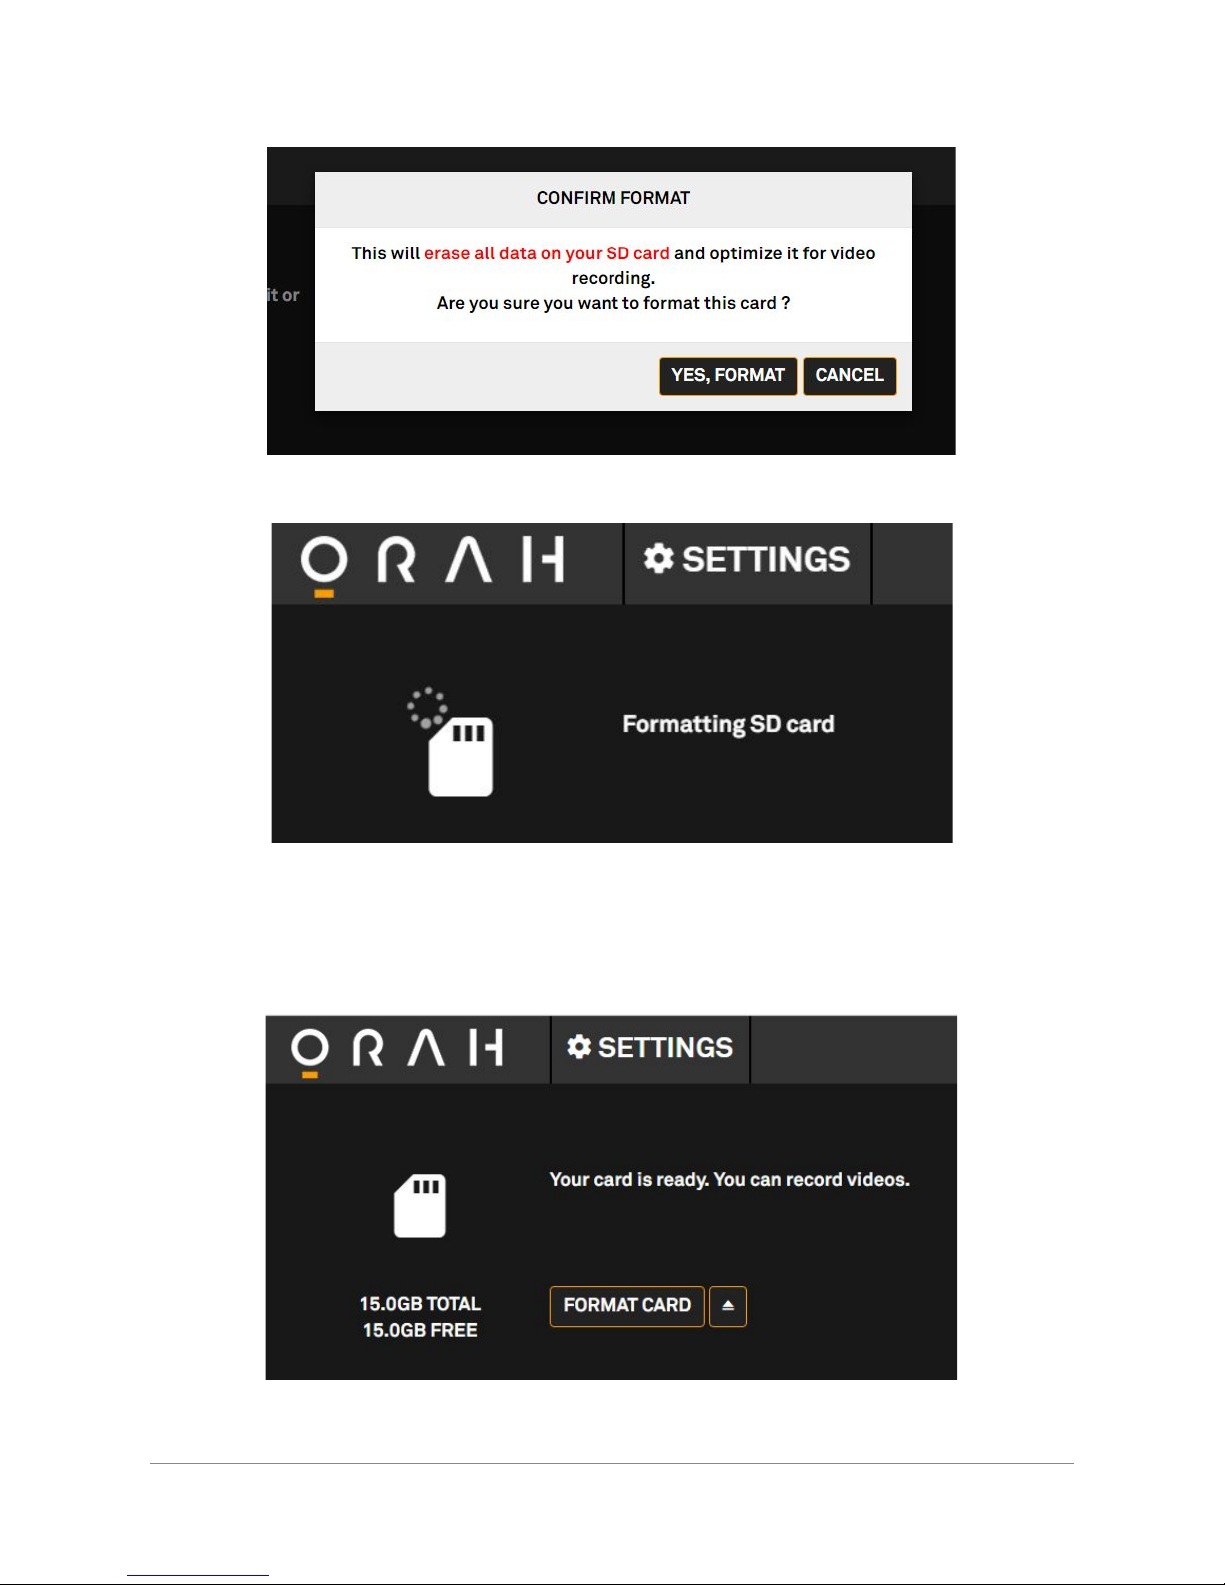
After clicking on "format card" a validation window displays. The user has to click on "yes, format" to
initiate the formating of the card.
Orah 4i - User Guide v1.2.0 Copyright 2017 - VideoStitch inc.
This guide is protected under copyright law
17
Page 19
Orah 4i User Guide v1.2.0
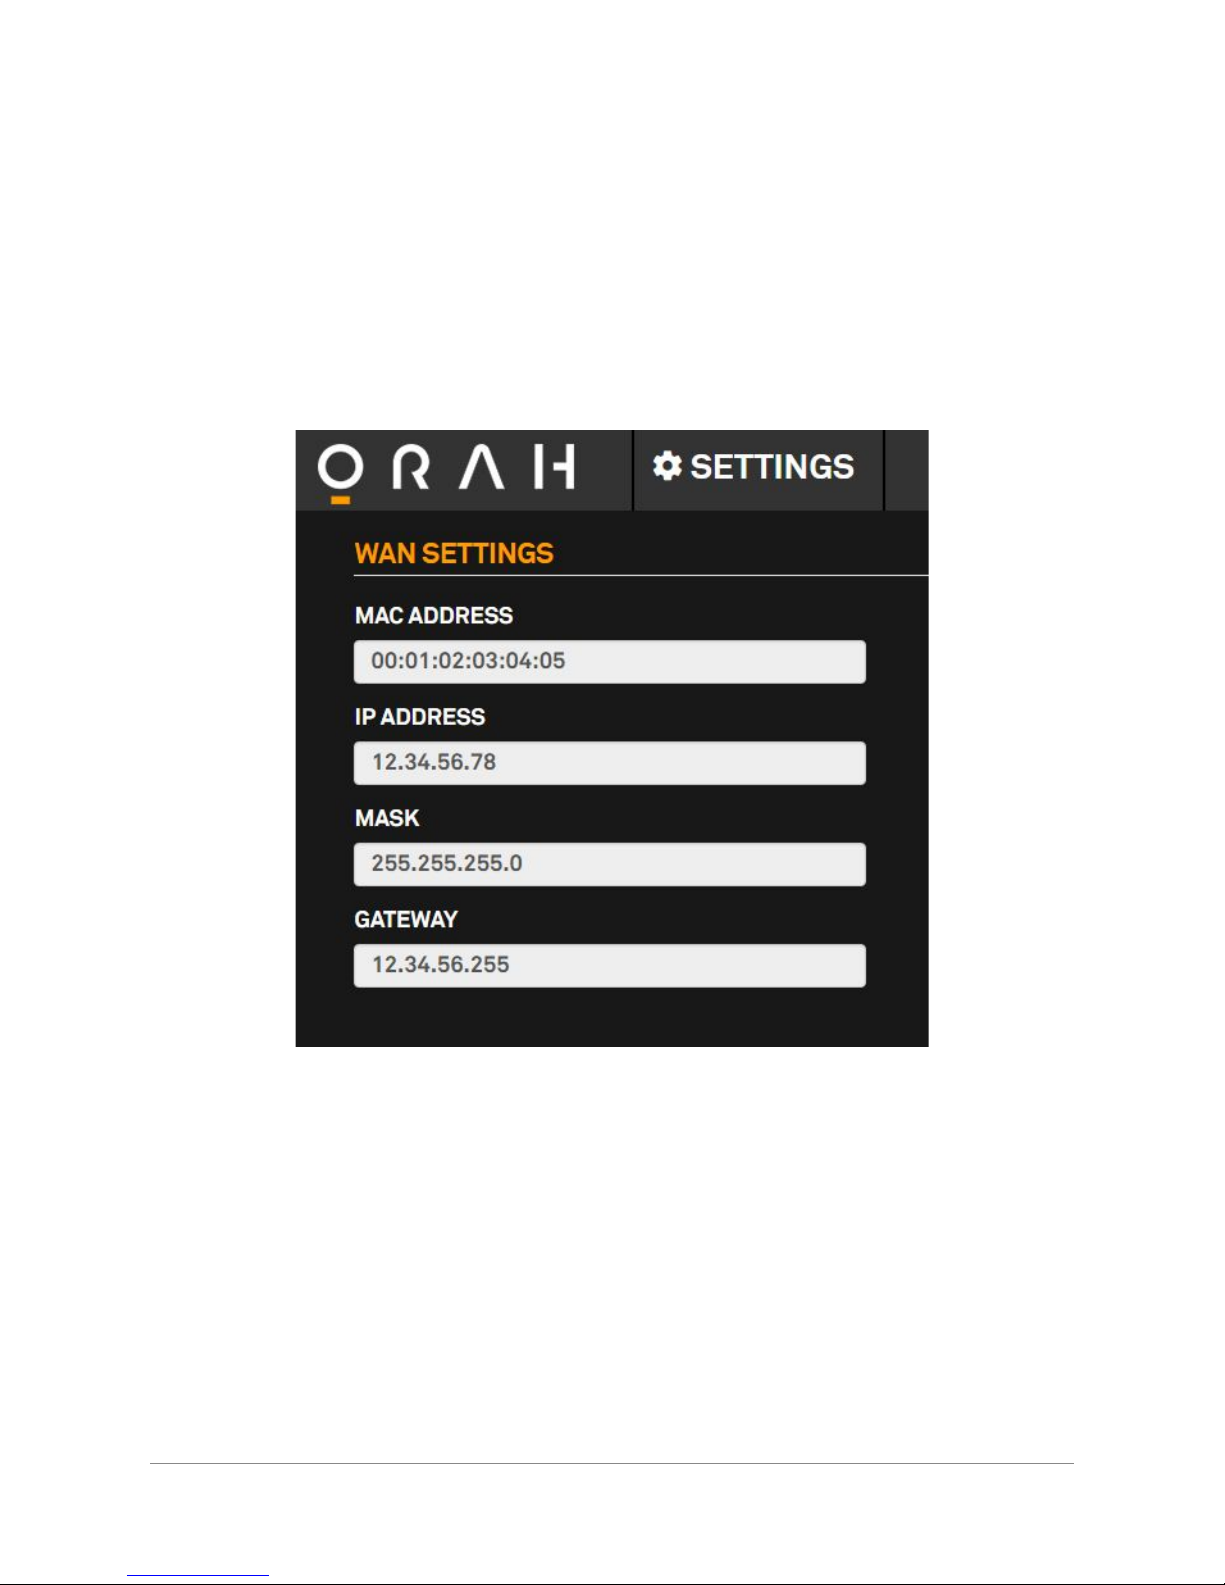
After few seconds - the length of this operation depends on the performance of the SD card - the
card is ready to use.
Orah 4i - User Guide v1.2.0 Copyright 2017 - VideoStitch inc.
This guide is protected under copyright law
18
Page 20
Orah 4i User Guide v1.2.0
Please note that the card will be formats in FAT32 with the optimum cluster size. We recommend to
the user the formating of the SD card via this process.
4. Network Settings
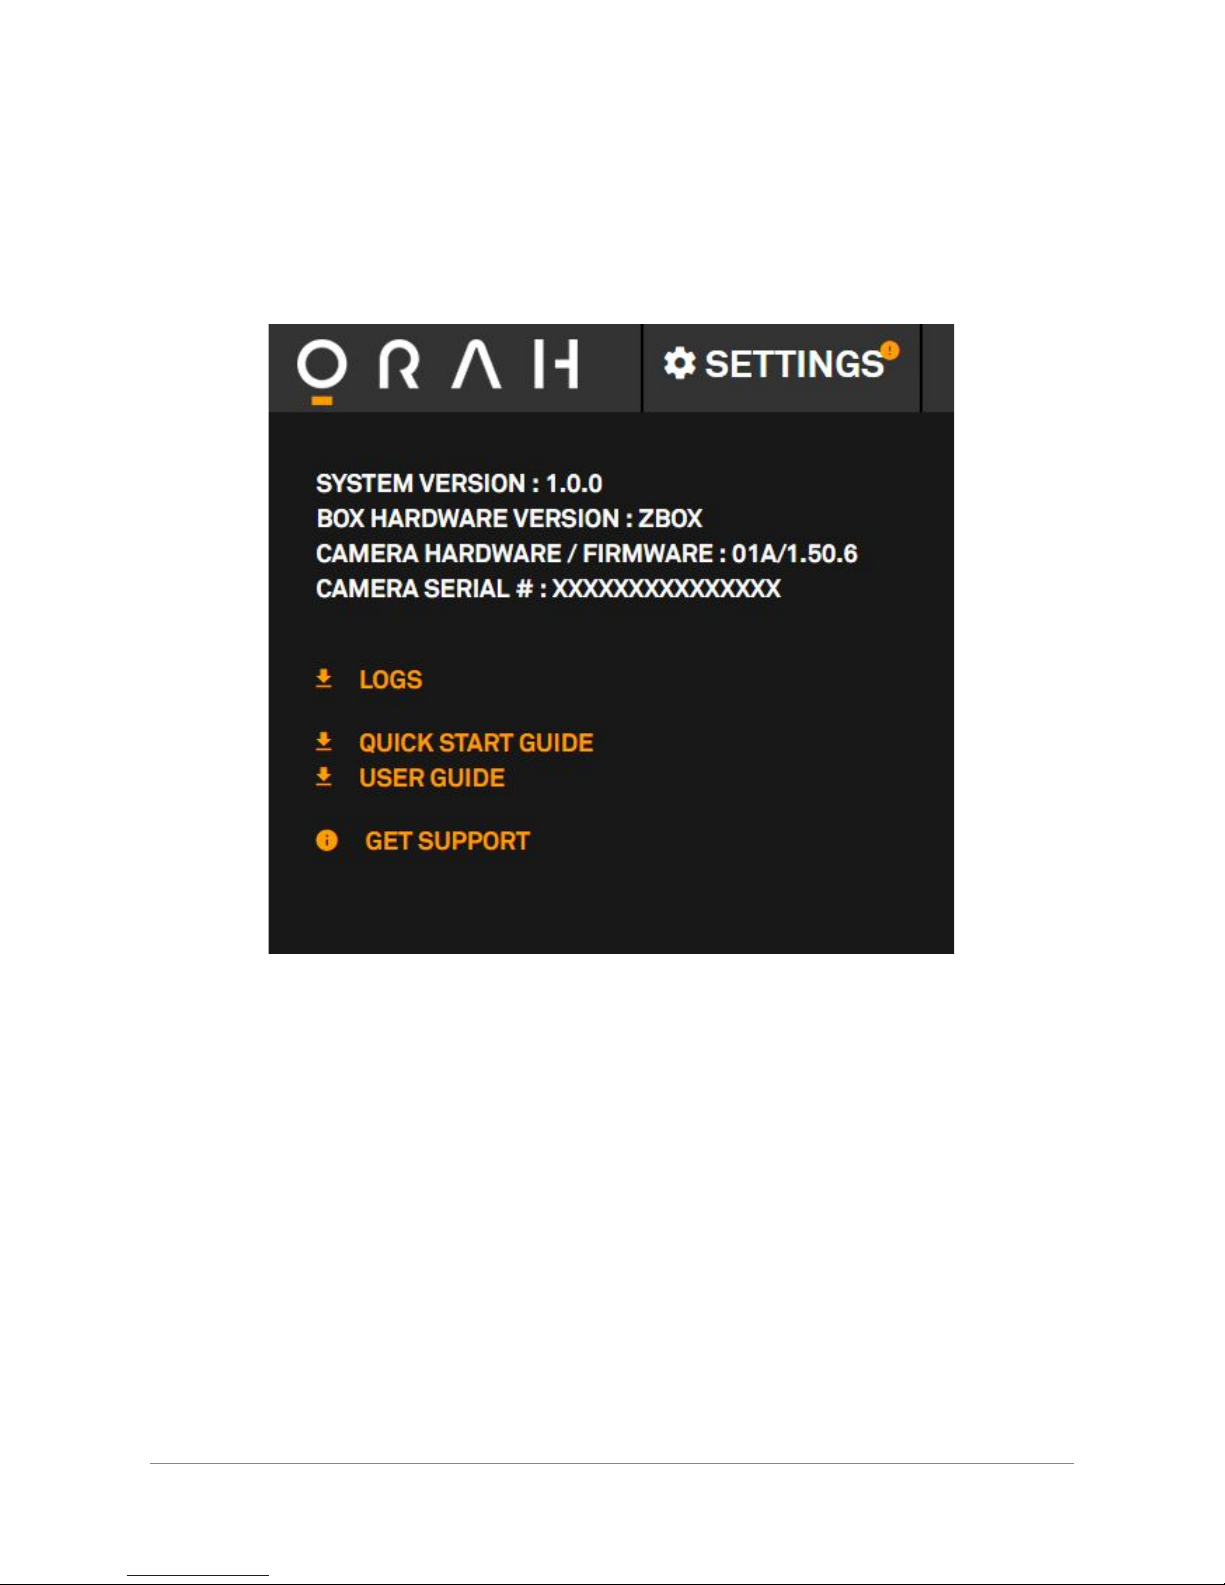
Access the WAN Settings:
■ Mac address - unique identifier assigned to network interfaces for communication at the data
link layer of a network segment. The MAC address may be needed by the network
administrator to allow the Stitching Box to connect on the network.
■ IP address - a numerical label assigned to each device of an Internet Protocol network,
allowing to find and reach it.
■ Mask - bit mask defining which part of an IP address is targeting the network and which is
targeting hosts.
■ Gateway - allows to communicate with another network.
If IP Address, Mask, and Gateway boxes are blank then check the physical connections between the
Stitching Box and the DHCP server. Ensure the DHCP server is configured correctly. Without
information here the Stitching Box will not be able to broadcast a live stream.
Orah 4i - User Guide v1.2.0 Copyright 2017 - VideoStitch inc.
This guide is protected under copyright law
19
Page 21
Orah 4i User Guide v1.2.0
5. Support
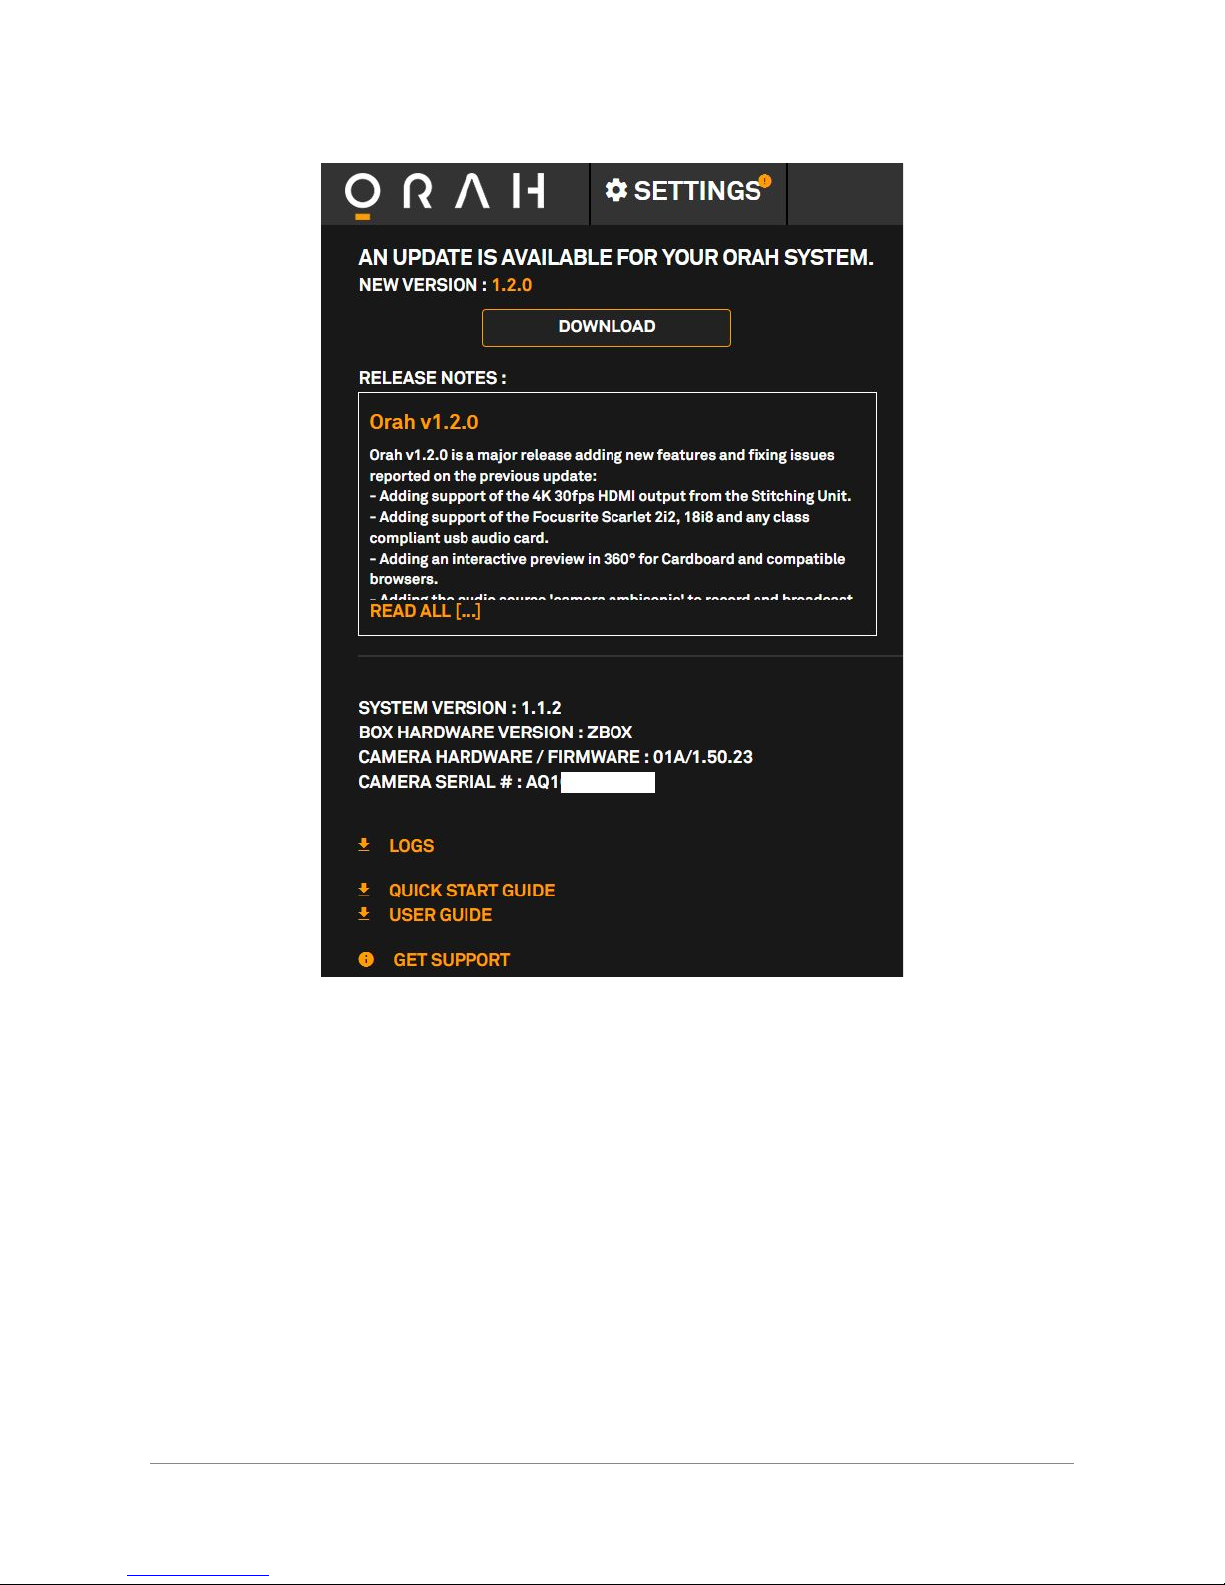
Displays technical information on your system necessary for any exchange with our support team.
You will also find your system technical details (stitching box firmware version, camera hardware
and firmware version and camera serial number). Camera information will only be displayed if the
camera is connected to the stitching box.
Such information is required when contacting the support.
If a firmware update is available, you will also be able to download it from this screen.
Orah 4i - User Guide v1.2.0 Copyright 2017 - VideoStitch inc.
This guide is protected under copyright law
20
Page 22
Orah 4i User Guide v1.2.0
At the bottom section of the support page you can download the logs, documentation and visit our
online knowledge base.
■ Logs: Click on the “logs” do download them. Please make sure to attach the logs file to your
support request if you encounter any trouble using the stitching box or the camera. Note that
this package is for the use of our support only, you won’t able to open it.
■ Quick Start Guide: By clicking on this link, you will be able to access and download the Orah
"Quick Start Guide".
■ User Guide : By clicking on this link, you will be able to access and download the full Orah 4i
user guide
■ Get Support: This will redirect you to the Orah knowledge base where you can access
tutorials, answers to frequently asked questions, solutions to common problems and
documentation about Orah 4i features.
Orah 4i - User Guide v1.2.0 Copyright 2017 - VideoStitch inc.
This guide is protected under copyright law
21
Page 23
Orah 4i User Guide v1.2.0
II. VR Browser
Orah 4i control app let's you live preview the scene it is capturing either flat, with a traditional
360 video interactive view, or even directly in HMD's (Head Mounted Displays).
Interactive preview, and HMD preview enable you to preview the scene exactly as the end user
will experience it. You should use it every time it's possible to adjust the camera positioning.
The default video preview is a flat equirectangular projection. To access interactive and VR
preview, click on the HMD icon.
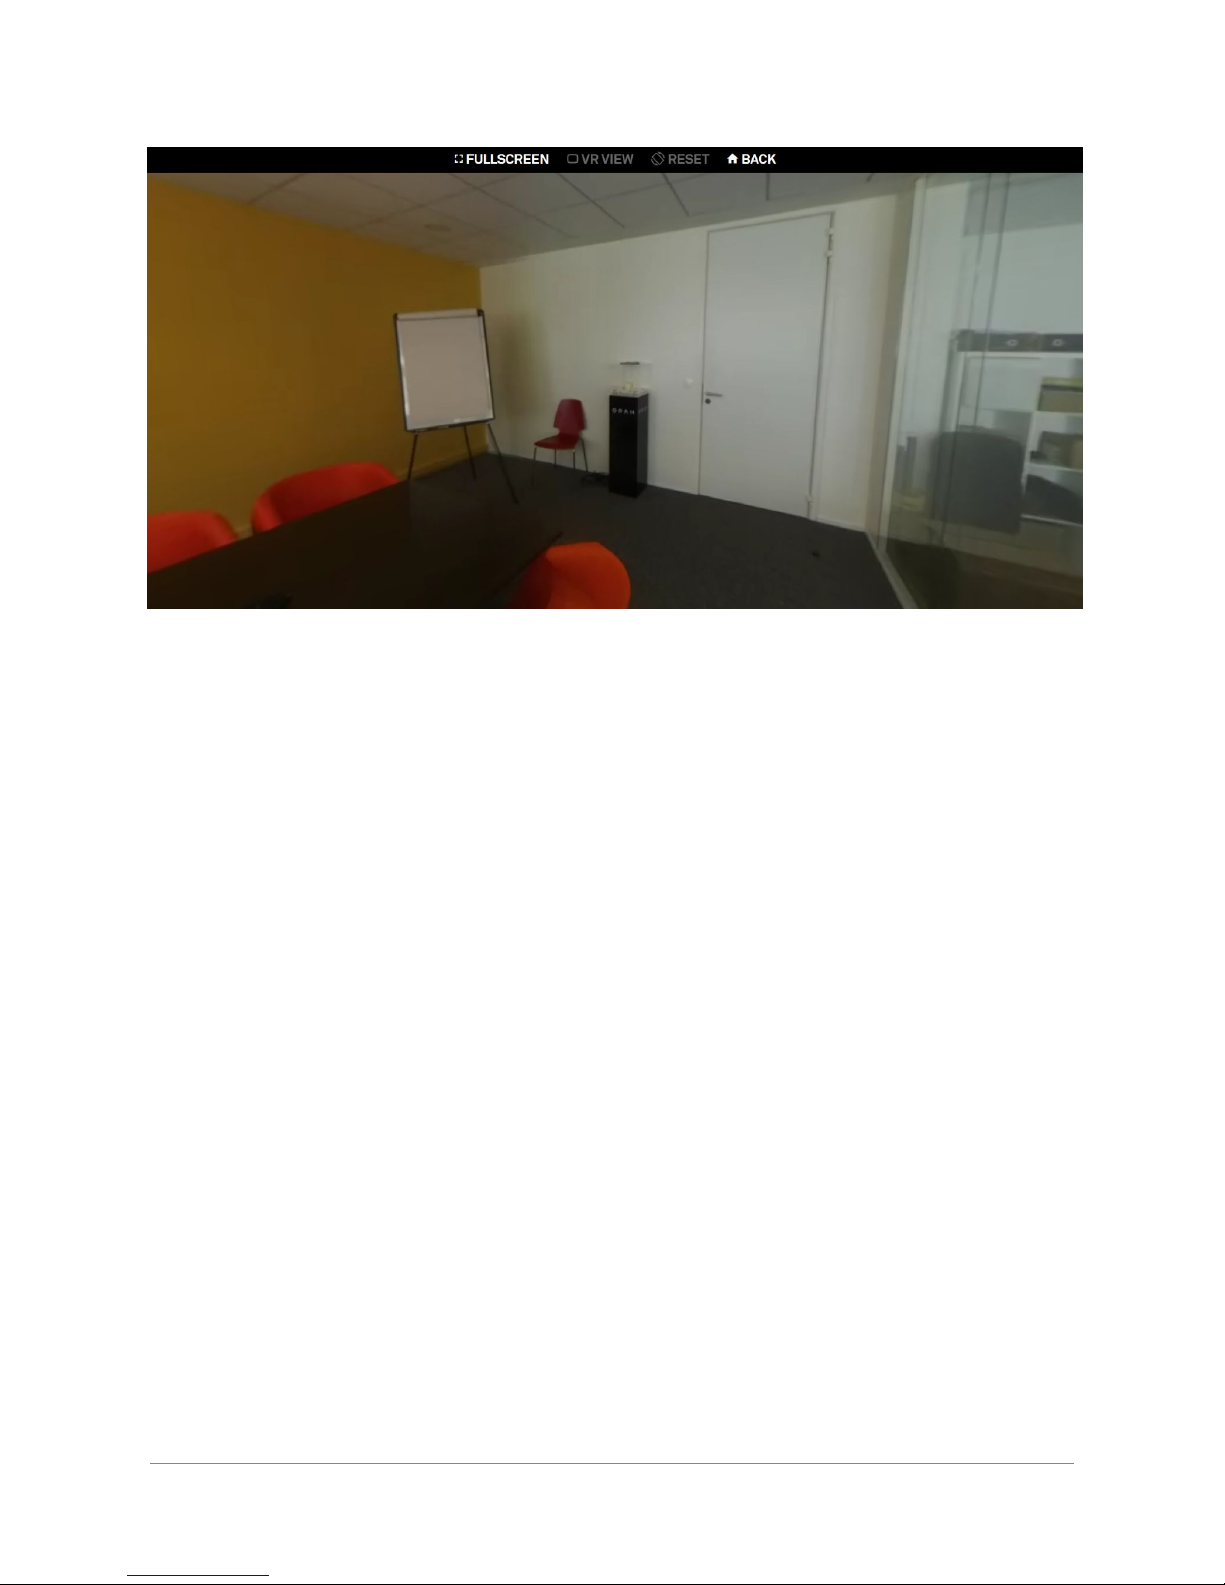
This will open a dedicated window with the interactive preview player.
● Full Screen: To display the VR browser view in fullscreen. To leave the full screen view
press “esc”.
● VR View: To display a Side to Side view for the Cardboards.
● Reset: To reset the horizon while using a cardboard or a HMD.
● Back: To close the VR Browser and open the classic equirectangular preview.
1.HMD Preview
Orah 4i's HMD preview leverages the WebVR API which provides in browser HMD support.
When the WebVR API is not available in a mobile browser, Orah falls back automatically to a
'cardboard' type of preview.
If your browser supports the WebVR API, or if your are using a smartphone, the 'VR preview'
will be enabled and let you toggle the HMD preview mode.
Orah 4i - User Guide v1.2.0 Copyright 2017 - VideoStitch inc.
This guide is protected under copyright law
22
Page 24
Orah 4i User Guide v1.2.0
If your web browser doesn't support the WebVR API, or if no HMD was detected, the 'VR
preview' button will be disabled.
For an up to date view of the various HMD devices in each browser, make sure to check out :
https://webvr.rocks/
Orah 4i - User Guide v1.2.0 Copyright 2017 - VideoStitch inc.
This guide is protected under copyright law
23
Page 25
Orah 4i User Guide v1.2.0
Audio
I. Audio sources
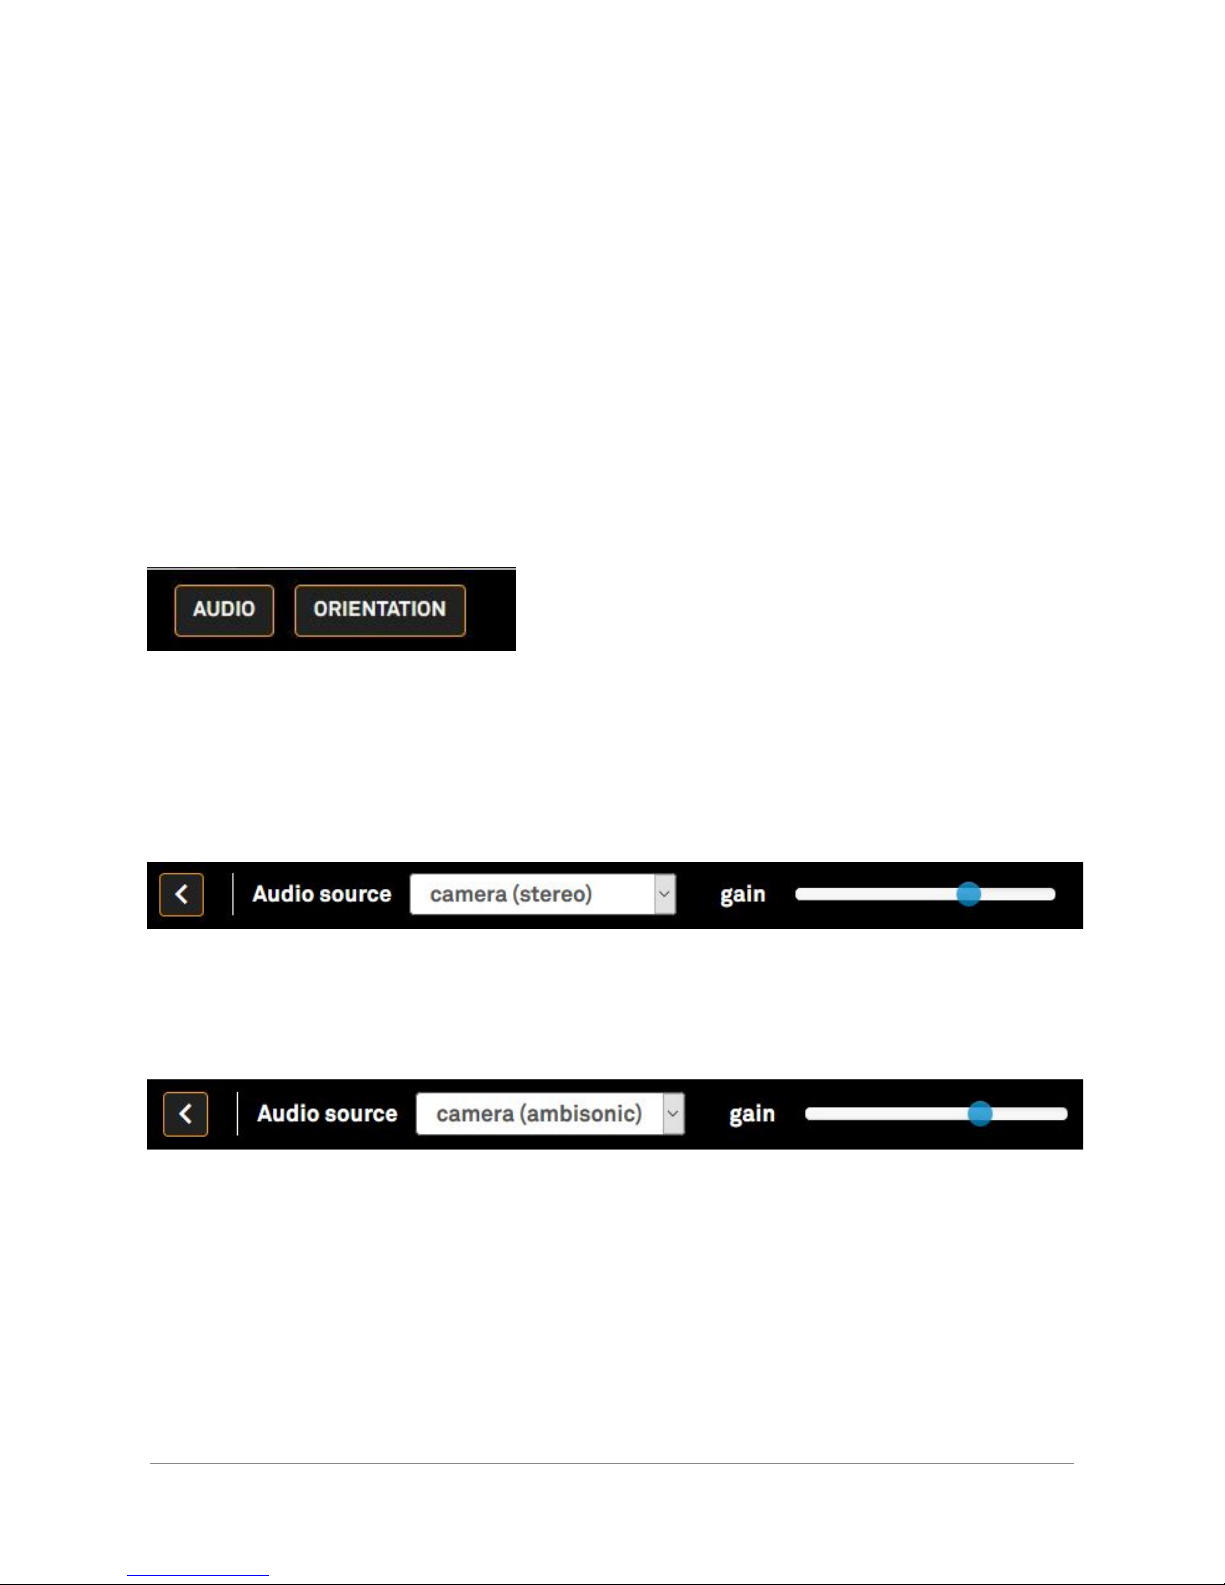
By clicking on the “Audio” button on the bottom left of the interface, the audio settings display.
It can take 3 to 5 seconds for the modifications to be applied. This is due to the streaming
protocol we are using (HLS).
● There is two ways to capture the sound from the camera: stereo and ambisonic.
● Stereo: The preview, the broadcast and the record are in stereo.
● Ambisonic: The VR preview, the broadcast and the record are in ambisonic
sound.
Please note that the equirectangular preview is always in stereo, no matter which audio source
is selected.
When the camera source is selected, the gain slider displays. The gain permits to change the
sensibility of the microphone (the value ranges from -12 to +67.5).
The higher the gain, the more sensitive the microphones.
Orah 4i - User Guide v1.2.0 Copyright 2017 - VideoStitch inc.
This guide is protected under copyright law
24
Page 26

Orah 4i User Guide v1.2.0
Using line-In (stereo): You can connect an external microphone or a smartphone/tablet/mp3 on
the box via the frontal jack 3.5.
Note: The sound may not be synchronized with the video. To reach a perfect synchronization,
you can tweak the delay slider(value ranging from -1sec to +1sec).
If the sound comes later than the video, you should decrease the delay value and vice versa.
II. External USB Cards
Orah v1.2.0 release adds support for professional USB audio cards.
We currently support two cards: Focusrite Scarlett 2i2 et Scarlette 18i8.
We will list supported cards as we collect feedback. Any USB audio class compliant device is
expected to detected and work similarly. If you have a different USB audio card, we encourage
you to test it and tell us about it.
1.Using USB audio cards
Hot plugging / unplugging of the card is not supported :
● USB audio card must be plugged in before boot in order to be detected
● USB audio card must not be removed while Orah 4i is running
● Multiple USB audio cards can not be used simultaneously
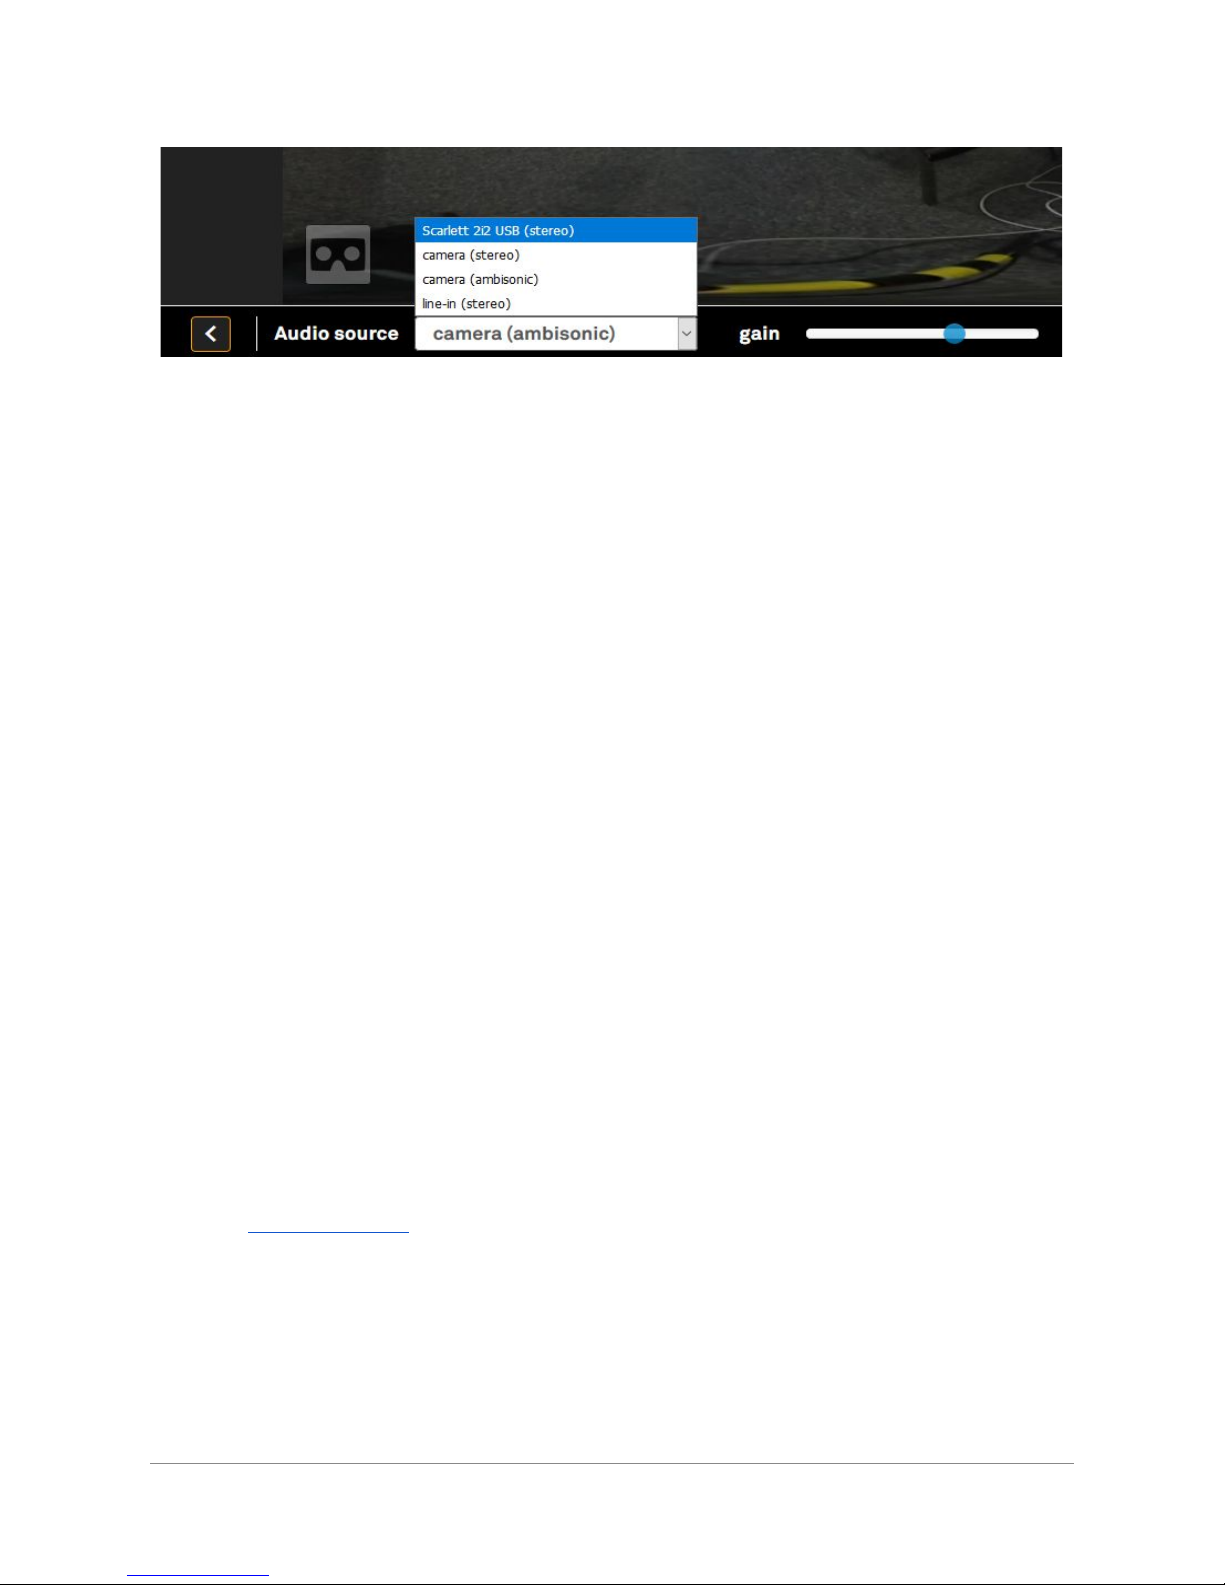
When the audio card is detected, it will appear as an audio source in the audio settings.
Orah 4i - User Guide v1.2.0 Copyright 2017 - VideoStitch inc.
This guide is protected under copyright law
25
Page 27
Orah 4i User Guide v1.2.0
When the audio card is selected, it is used as audio source for preview, broadcasting and
recording.
2. Channel layout
a.Mono
Mono channel layout is not supported.
b.Stereo
When selecting stereo audio, the first two channels of your USB audio card will be used as Left
and Right channels.
c.First order ambisonic (4 channels)
USB audio cards providing at least 4 channels of audio will be listed with an option to ingest
ambisonic. When ambisonic is selected, the first 4 audio channels of you device will be used as
audio source for audio passthrough.
The expected audio signal should be in AmbiX format: ACN channel layout & SN3D
normalization.
See also : Ambisonic audio
Note : the provided ambisonic audio signal should be aligned with the video. Orientation
adjustments and stabilization applied to the video, are not applied to the audio soundfield.
Orah 4i - User Guide v1.2.0 Copyright 2017 - VideoStitch inc.
This guide is protected under copyright law
26
Page 28

Orah 4i User Guide v1.2.0
Ambisonic audio
Orah 4i can capture ambient audio in first order (4 channels) ambisonic, thanks to it's advanced
audio processing and specifically positioned microphones.
It delivers spatial audio in AmbiX format (ACN channel layout and SN3D normalization).
I.Spatial audio preview in the browser
Spatial audio can be previewed in the control app using the VR preview. It is enabled
automatically when you configure Orah 4i with an ambisonic audio source.
Note: Ambisonic playback will fail on iPhones and iPads, as iOS does not currently support HLS
preview with 4 channels of audio. Internet Explorer 11 does not support Ambisonic neither.
In those cases an icon is displayed on the upper-right of the Orah Webapp.
II. Ambisonic recording
The recorded MP4 files embed spatial media metadata for spatial audio playback on platforms
that support it, such as Youtube and Facebook.
The metadatas provide the description of the ambisonic format for these platforms to playback
the audio accurately.
III. Ambisonic broadcasting
Orah 4i is also capable of broadcasting spatial audio. The broadcasted stream will yield 4
channels of AmbiX formatted audio.
In the case of ambisonic audio broadcasting, no metadata are passed to configure the player or
CDN.
Orah 4i - User Guide v1.2.0 Copyright 2017 - VideoStitch inc.
This guide is protected under copyright law
27
Page 29
Orah 4i User Guide v1.2.0
Orientation
I. Stabilization
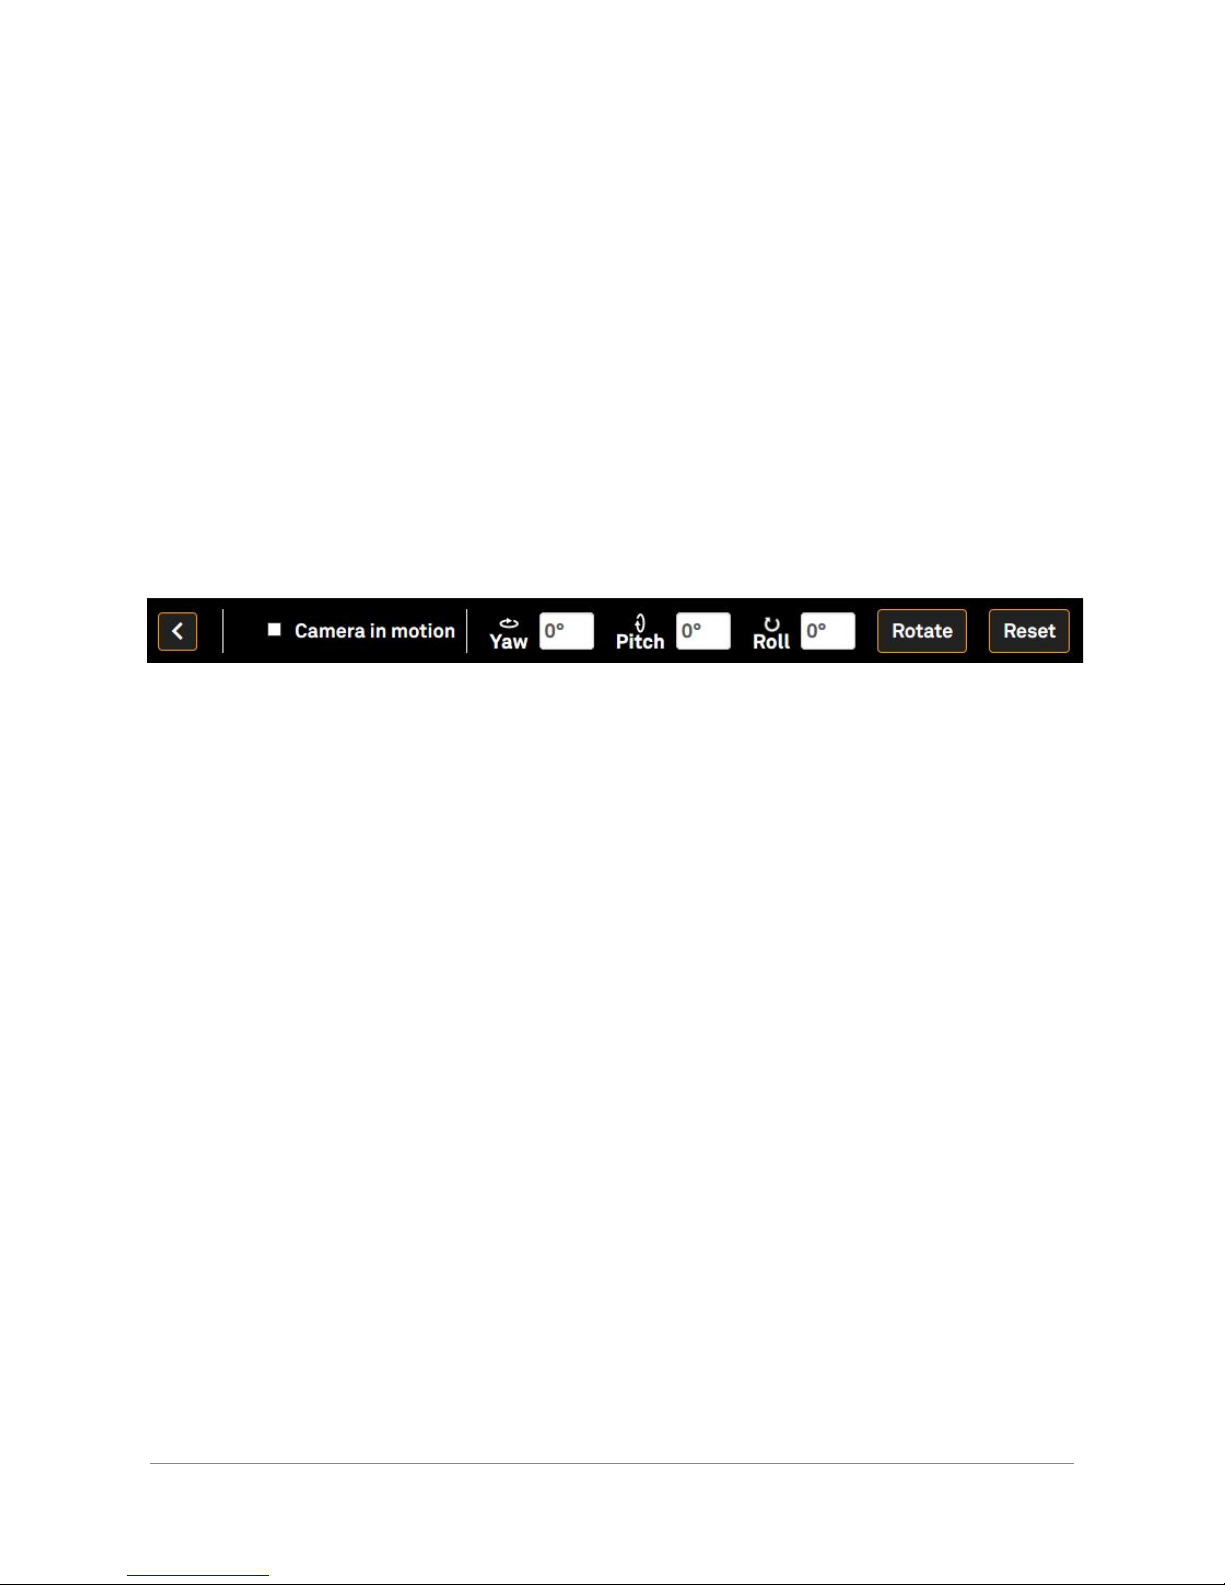
Ticking the “camera in motion” box keeps the image straight and aligned with the horizon.
The stabilization process can also be used to avoid crooked horizon if the camera is shaking
(during a movement).
You can also feel the need of putting the camera in place upside-down. In this case, once the
installation is done, you can tick the “camera in motion” to level the image of the camera.
You can also rotate the view of the camera manually using the Yaw, Pitch and Roll value.
Add a value between -359 to 359 and click on the “rotate” button to apply it.
It is possible to reset the value pressing the reset button.
Orah 4i - User Guide v1.2.0 Copyright 2017 - VideoStitch inc.
This guide is protected under copyright law
28
Page 30
Orah 4i User Guide v1.2.0
Broadcast
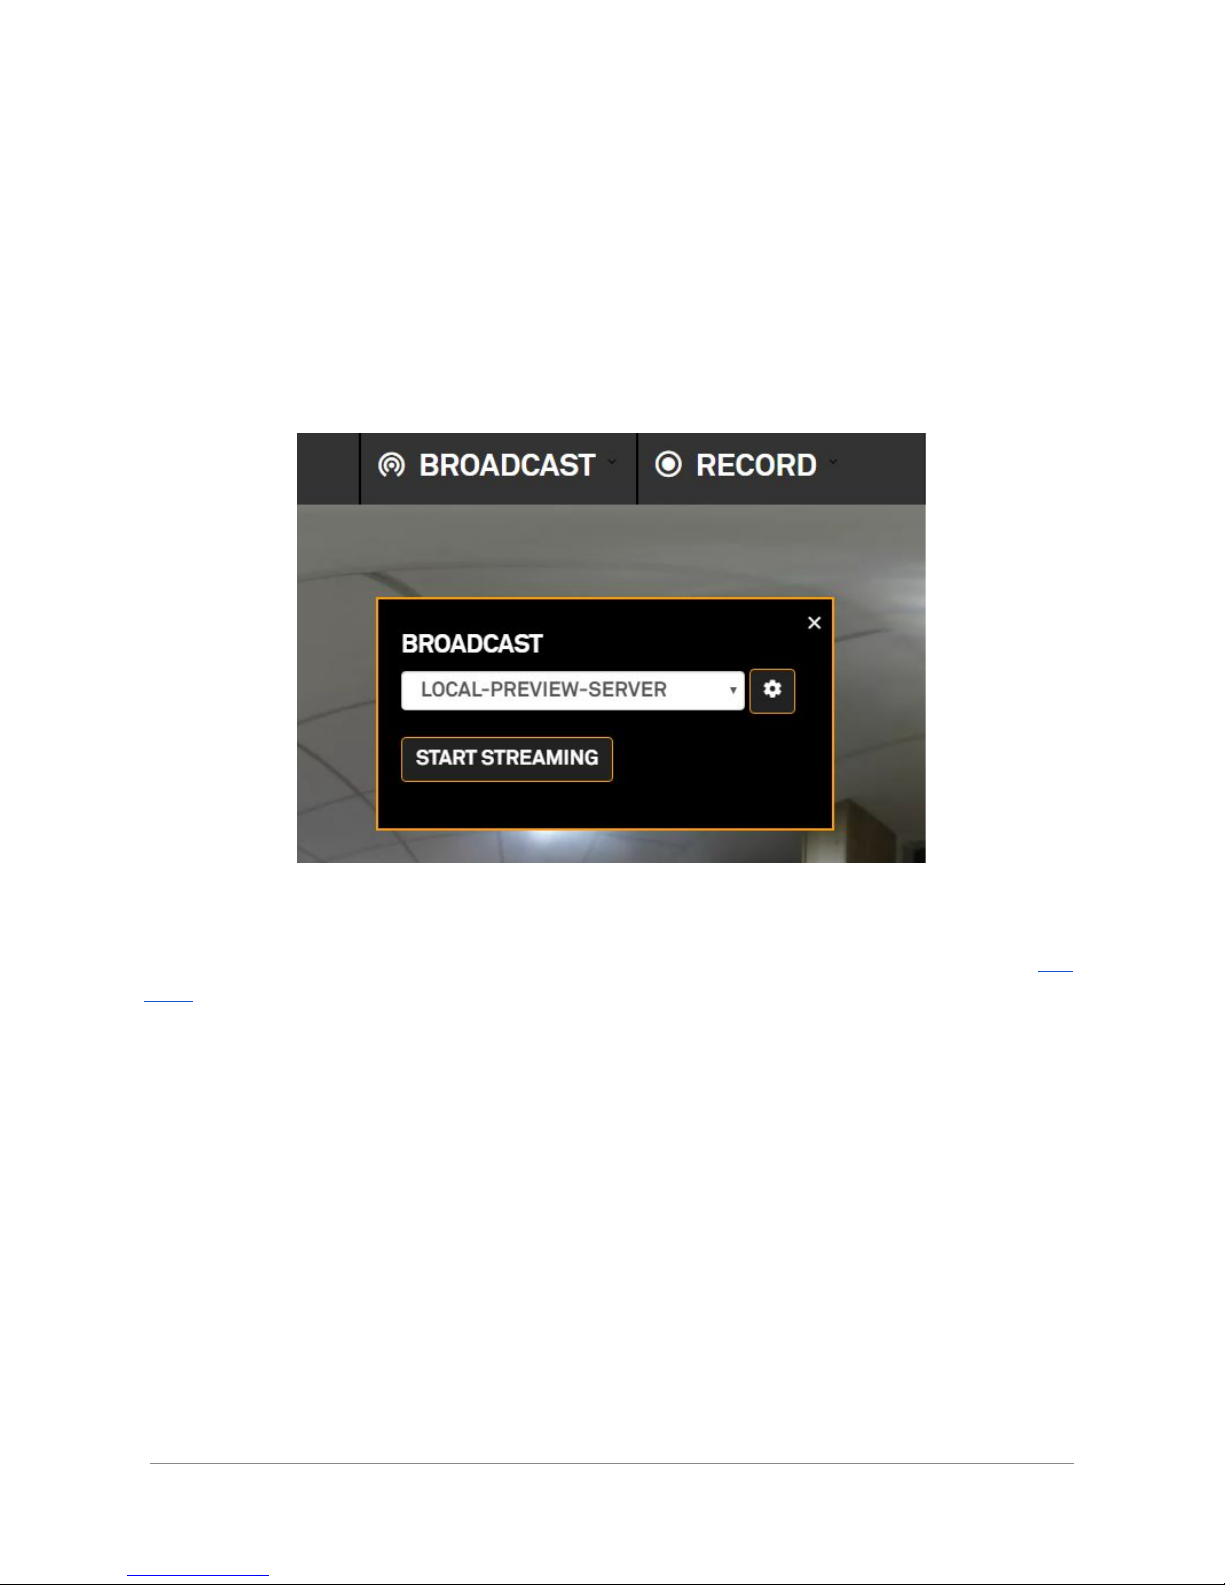
Broadcast option is available straight from the homescreen. Pressing this button opens a
broadcast box.
Choose from one of the created profiles. Click the cog to view or modify the profile. Refer to this
page for more information about this section.
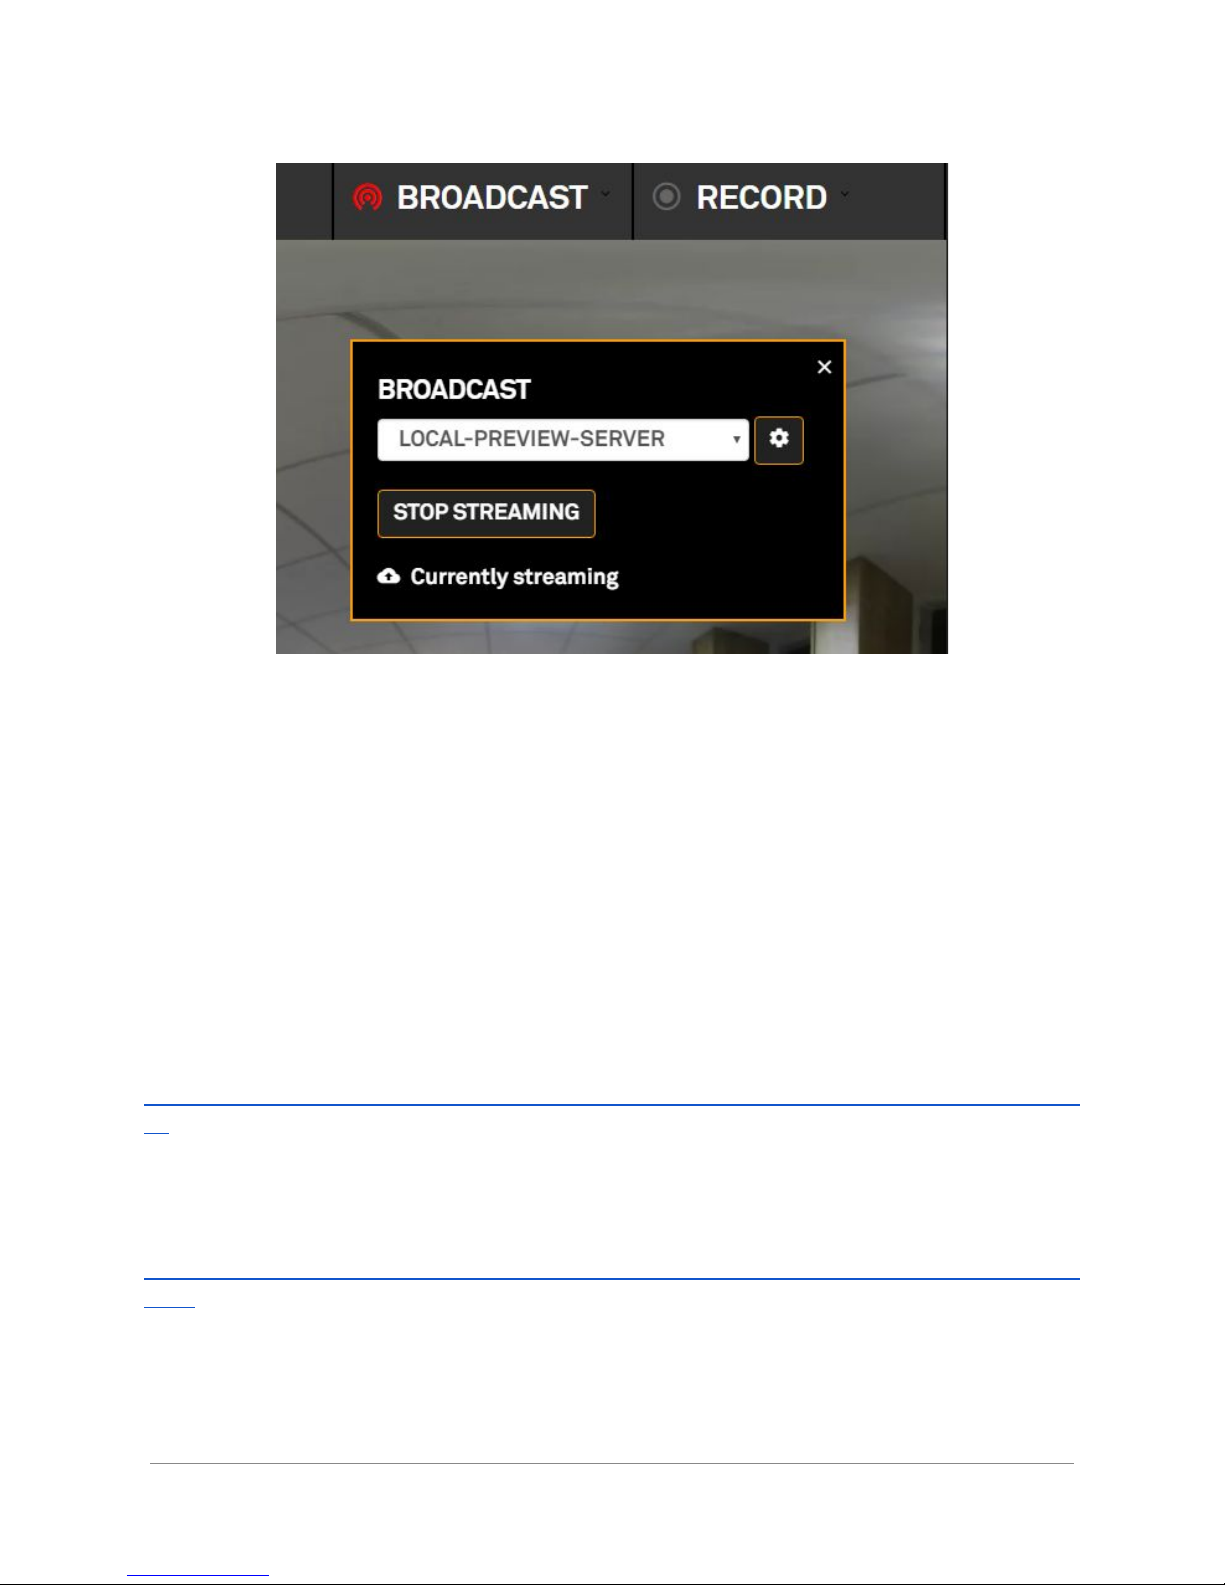
Click “start streaming” to publish the panoramic video to the selected preset. Once the
streaming has started it must be stopped to make any change to the preset (framerate,
resolution…).
Orah 4i - User Guide v1.2.0 Copyright 2017 - VideoStitch inc.
This guide is protected under copyright law
29
Page 31
Orah 4i User Guide v1.2.0
I. How to setup a live broadcast
You can access our dedicated YouTube and Wowza tutorials through the link below:
1. Broadcast to YouTube
http://support.orah.co/hc/en-us/articles/206497084-How-to-stream-to-YouTube-using-the-Orah
-4i
2. Broadcast to Wowza
http://support.orah.co/hc/en-us/articles/207316010-How-to-live-stream-with-the-Orah-4i-and-W
owza
Orah 4i - User Guide v1.2.0 Copyright 2017 - VideoStitch inc.
This guide is protected under copyright law
30
Page 32

Orah 4i User Guide v1.2.0
II. Using the preview streams in a third party player
- There are some 360° video players for PC and smartphone that can play the streams
interactively.
- An example of this is SpherePlay available for Android and iOS.
- Connect to your Stitching Box using WiFi
- From the menu …, choose Open URL
- Enter http://{box-ip}/hls/preview/index.m3u8 or
http://myorah4i.orah.co/hls/preview/index.m3u8 (please note that the box IP can
be found in the network settings)
- Select projection, choose Sphere
- Hold your phone level in landscape mode and double tap to set the orientation.
- Pan and zoom to inspect the video to ensure the camera is placed in the ideal
location.
Orah 4i - User Guide v1.2.0 Copyright 2017 - VideoStitch inc.
This guide is protected under copyright law
31
Page 33

Orah 4i User Guide v1.2.0
Record to SD card
I. Recommended cards
We recommend using Class 10, U3 SD Card (UHS-I, UHS-II, UHS-III).
You can find below a list of cards known to work well with the system:
● Lexar 1000x 32GB
● Lexar 633x 16GB
● Sony SF-M32 32GB
● Samsung Pro+ 64GB
● SanDisk Extreme Pro 128GB
II. Recording to SD card
The content of the record button (on the left of the broadcast button) may changed depending on the
SD card plugged by the user.
Please note by clicking on the button, the user can have more informations about the errors. An
error can occur with an incompatible card for instance (NTFS or exFAT format...).
In each case, this error can be corrected by formating the card using in the SD card settings. Simply
click on the button "SD CARD" to reach the dedicated menu.
Orah 4i - User Guide v1.2.0 Copyright 2017 - VideoStitch inc.
This guide is protected under copyright law
32
Page 34
Orah 4i User Guide v1.2.0
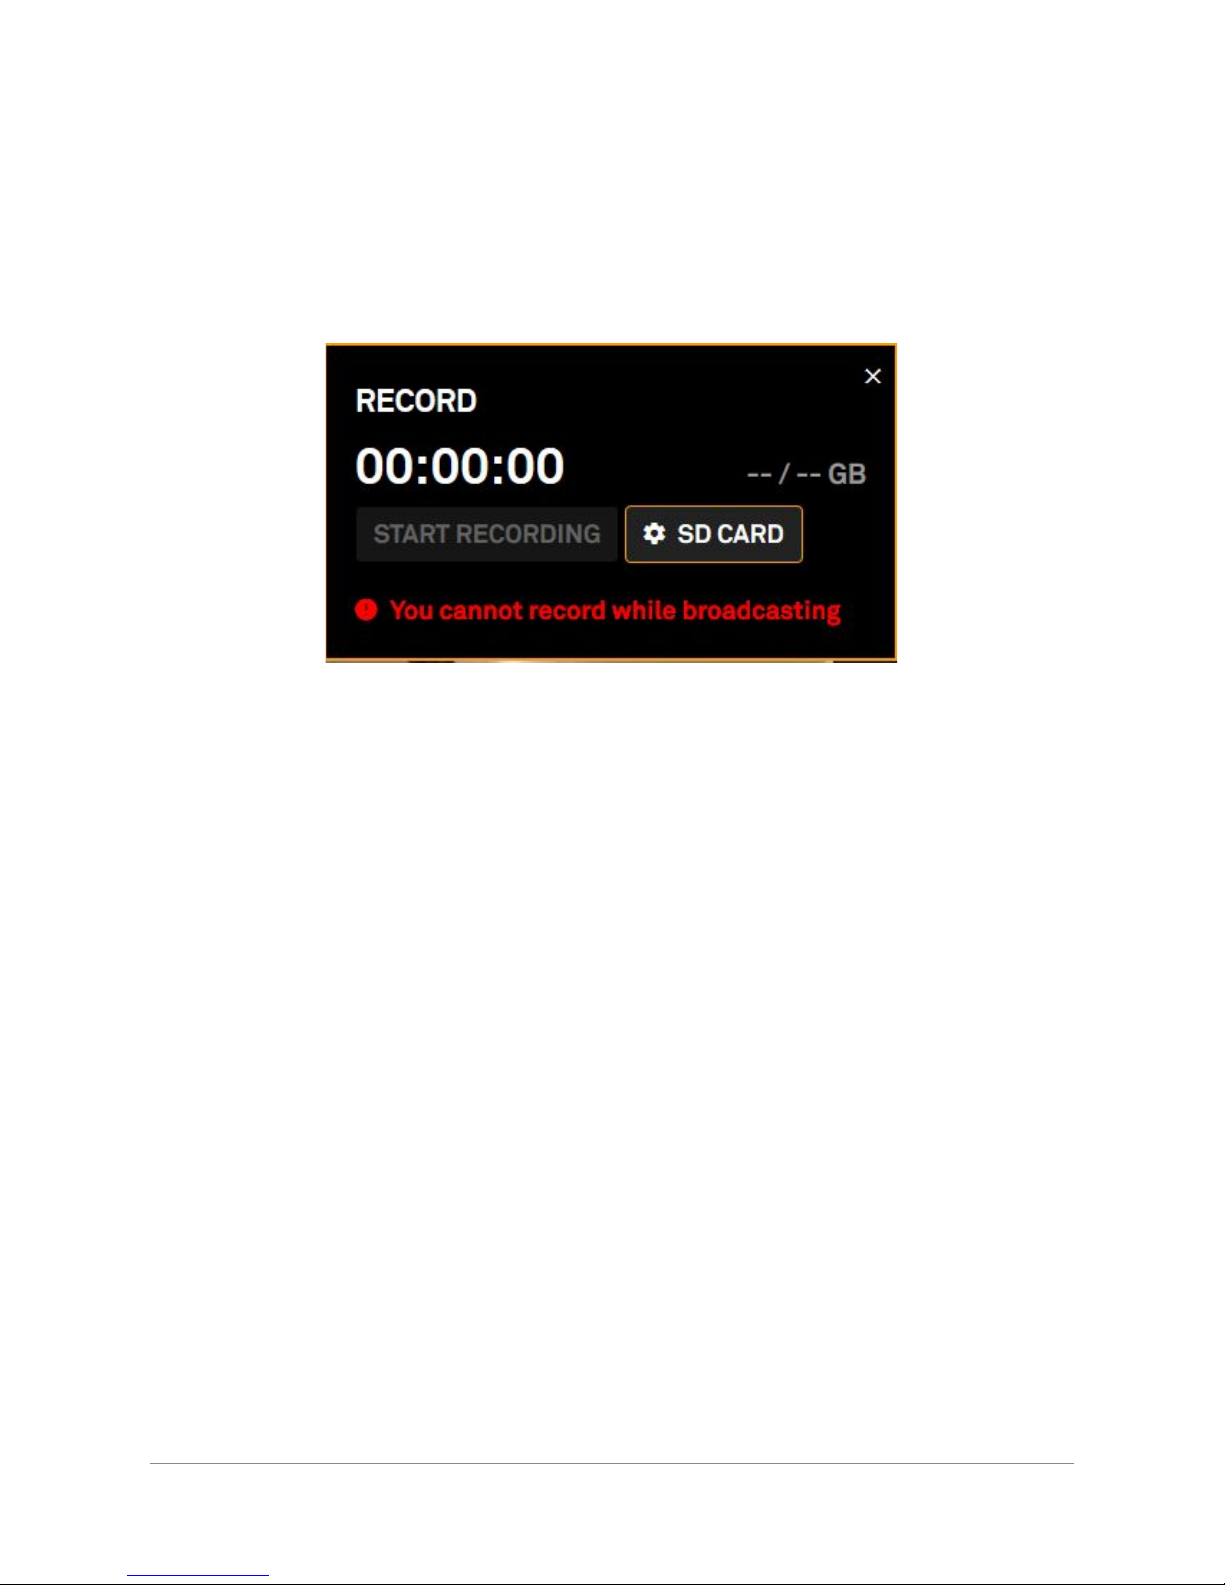
● It is not possible to broadcast and record in the same time.
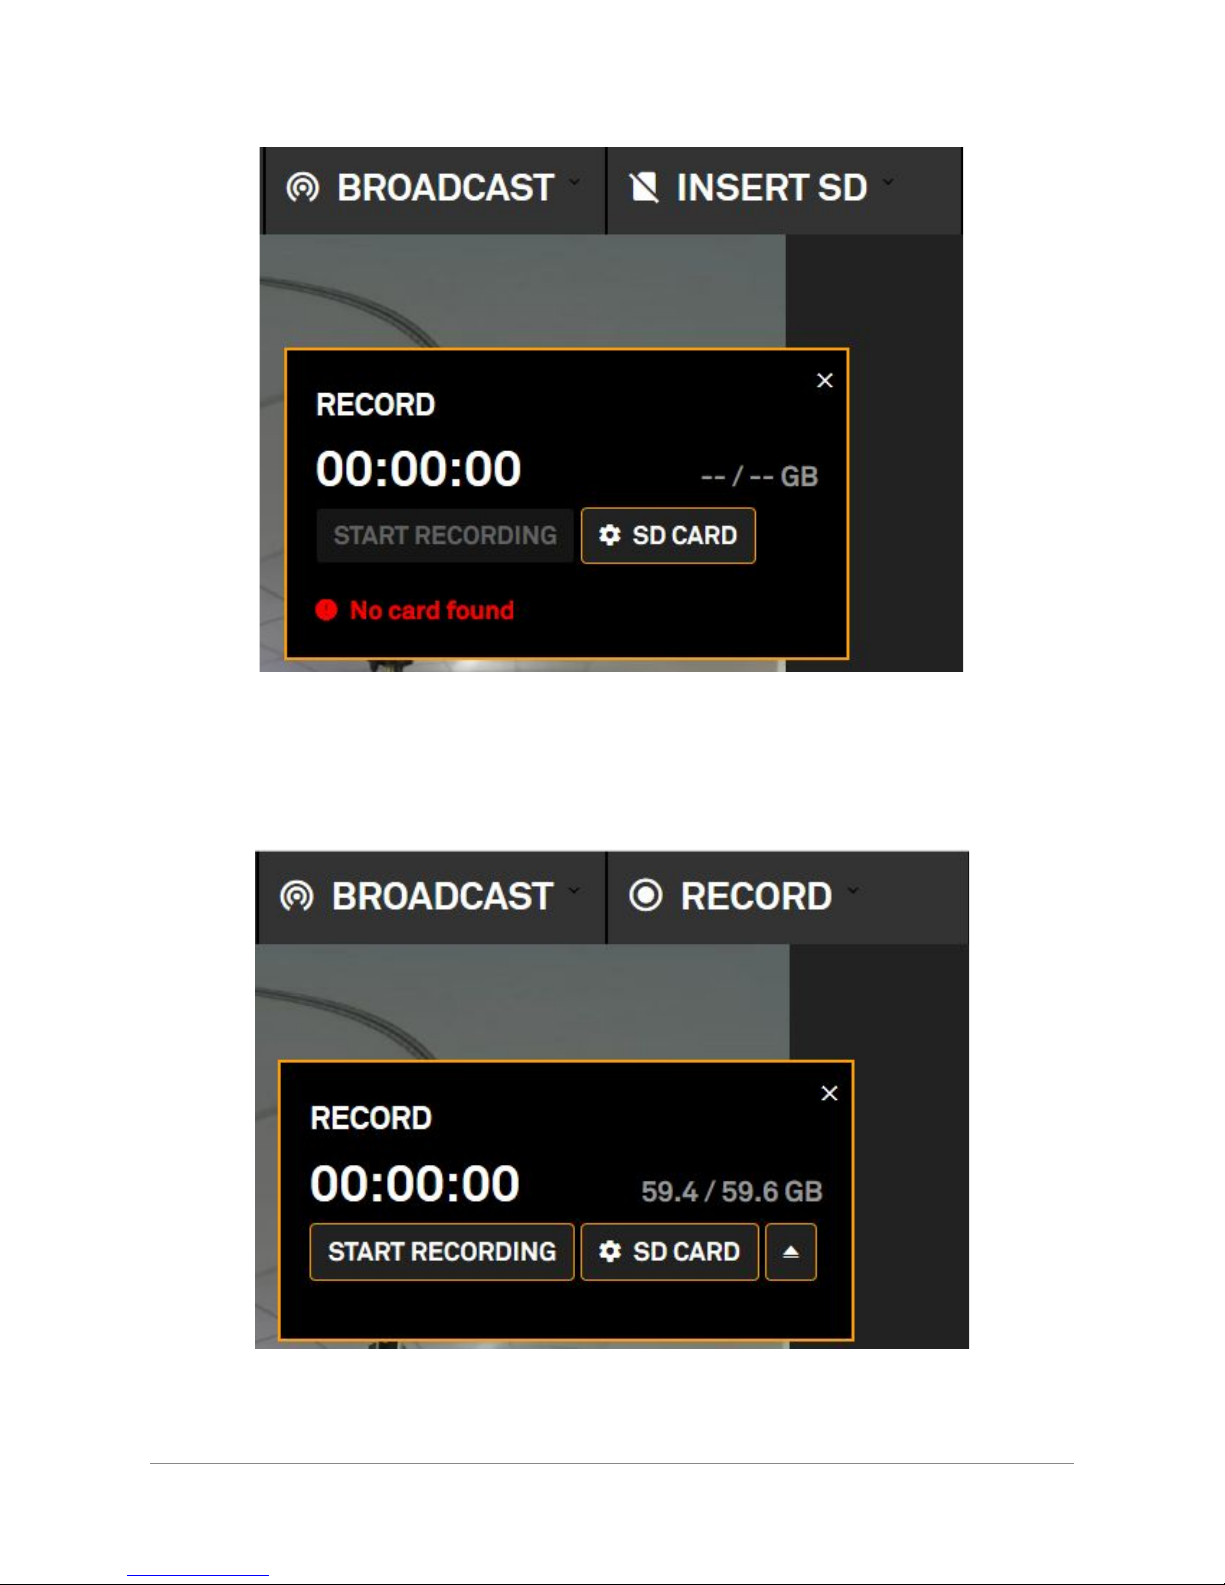
● If no card is inserted, the button will turns into "Insert SD" state.
Orah 4i - User Guide v1.2.0 Copyright 2017 - VideoStitch inc.
This guide is protected under copyright law
33
Page 35
Orah 4i User Guide v1.2.0
● If a compatible card is inserted, the button will turns into "Record" state.
Orah 4i - User Guide v1.2.0 Copyright 2017 - VideoStitch inc.
This guide is protected under copyright law
34
Page 36
Orah 4i User Guide v1.2.0
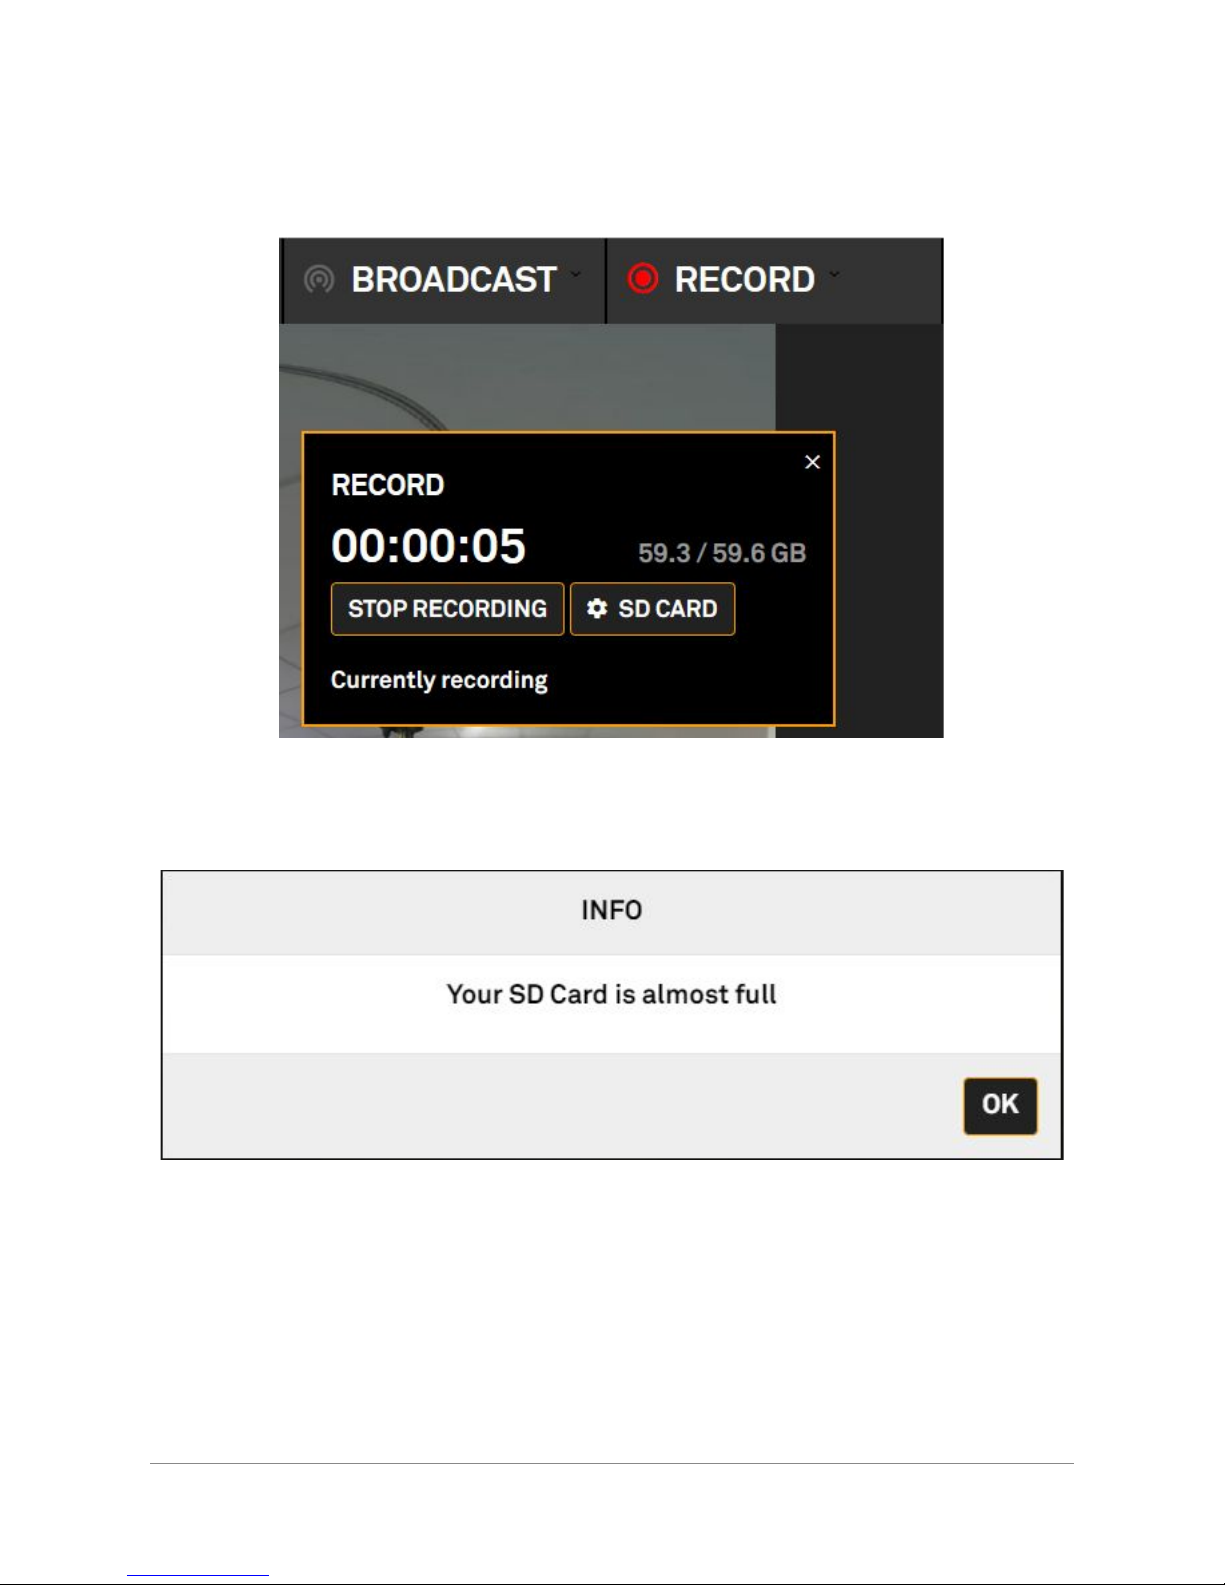
● In the record state, it is possible to launch a record. Click on “start recording” to begin the
record. To stop it, simply click on “stop recording”.
● When your SD card is nearly full, a warning will be displayed
● The Recording will stop when the card is full
Orah 4i - User Guide v1.2.0 Copyright 2017 - VideoStitch inc.
This guide is protected under copyright law
35
Page 37
Orah 4i User Guide v1.2.0
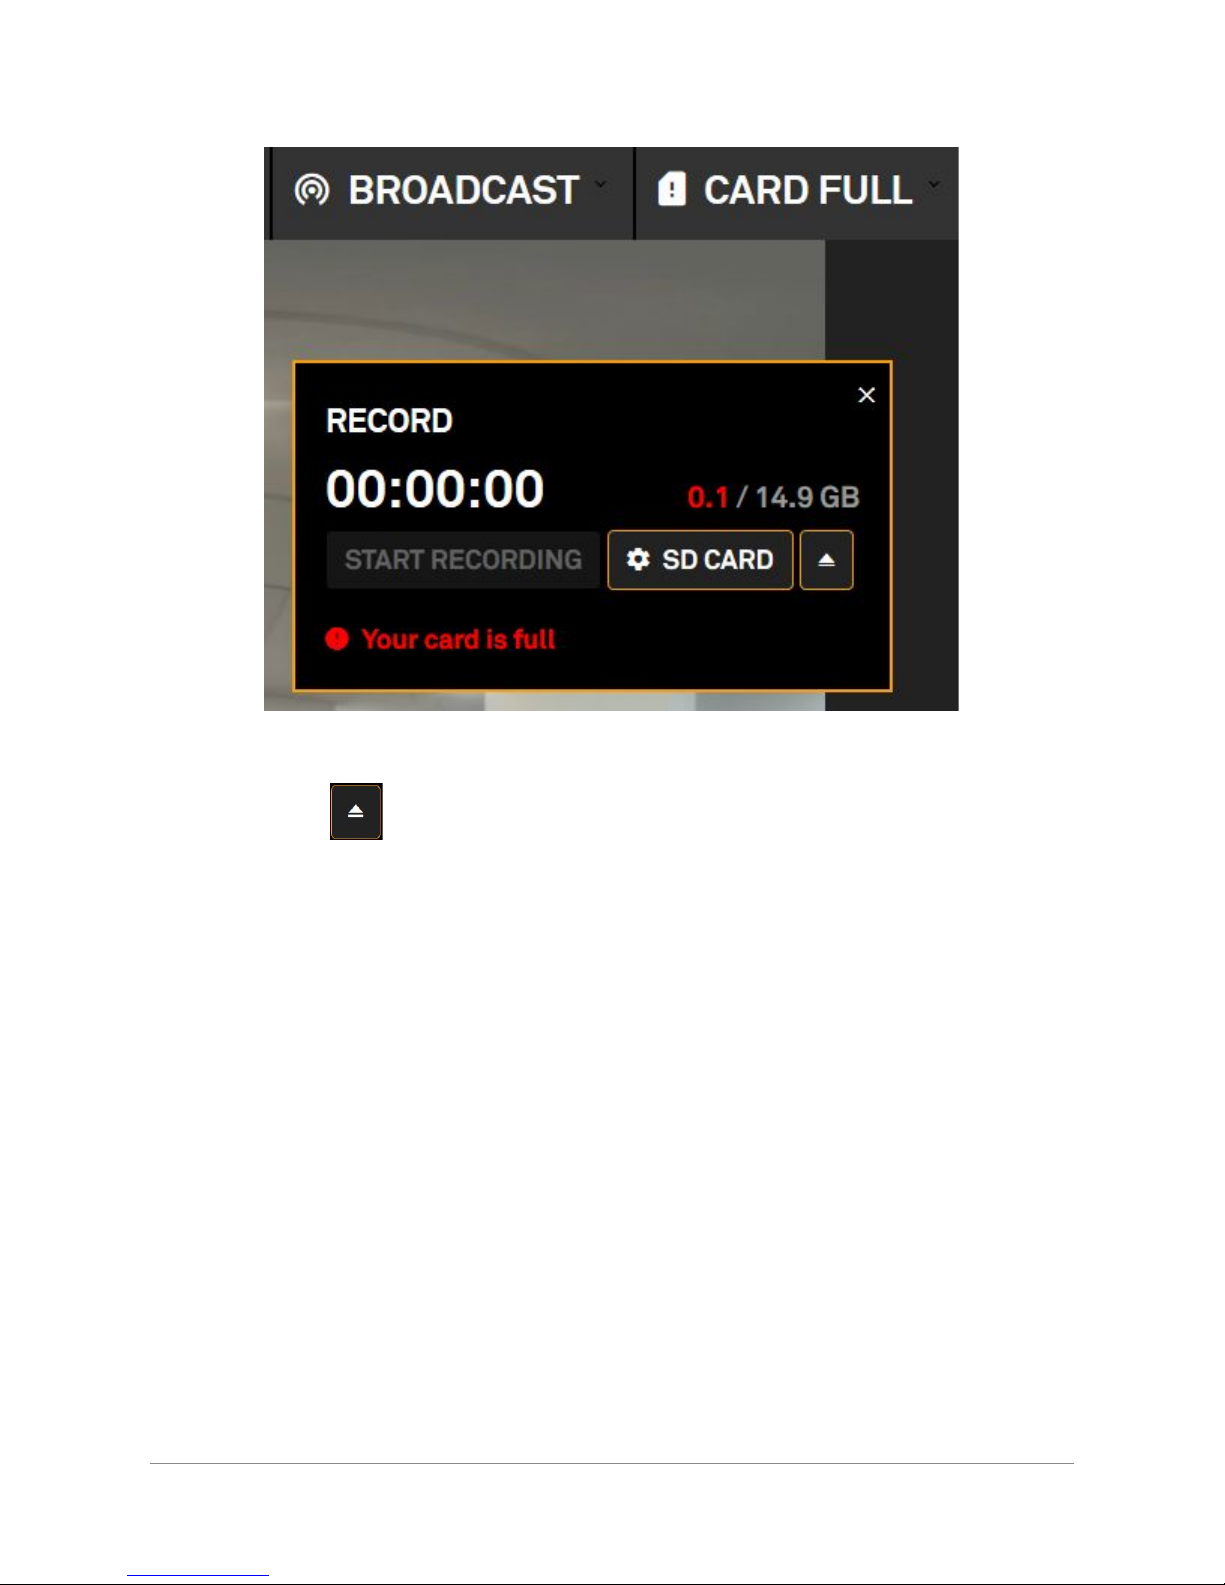
Please note that you should not unplug the card during a record and eject it via the
dedicated button
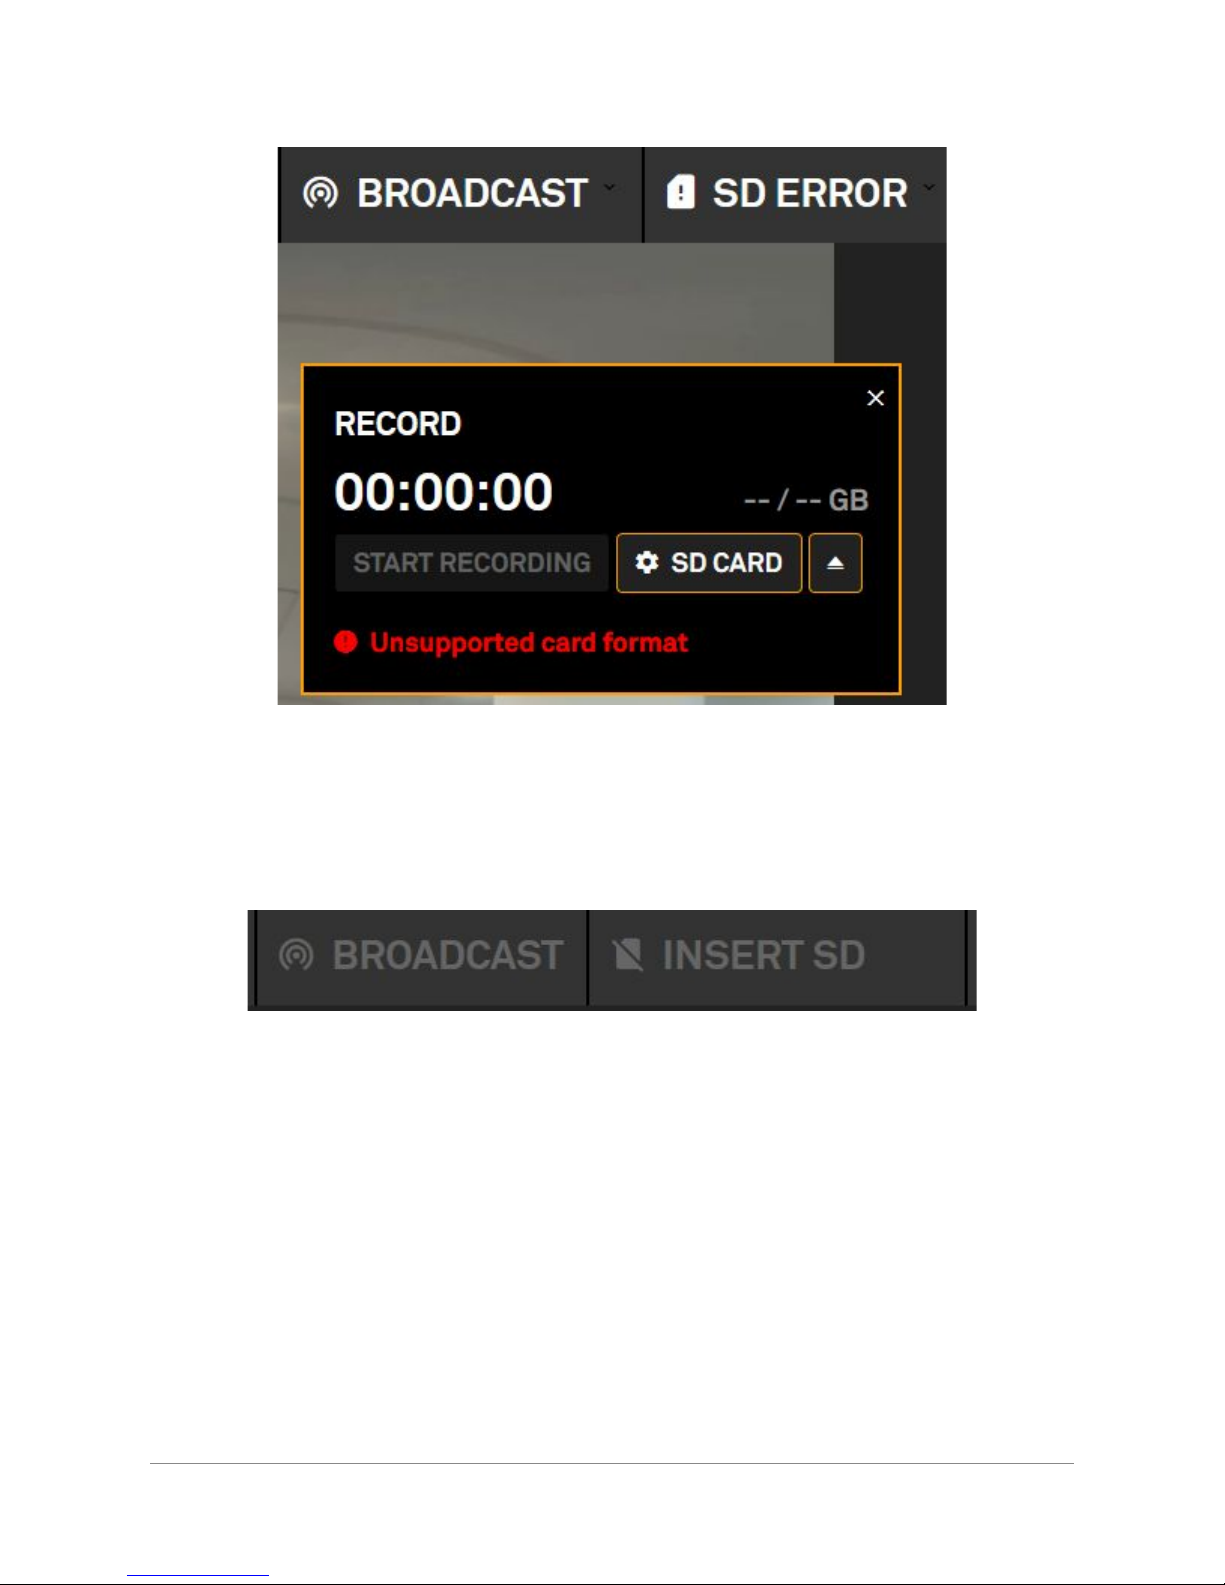
● If an incompatible card is inserted the button will turns into "SD error" state.
Orah 4i - User Guide v1.2.0 Copyright 2017 - VideoStitch inc.
This guide is protected under copyright law
36
Page 38
Orah 4i User Guide v1.2.0
● If no card and no camera is plugged or inserted, the button is grey over. It won't be
clickable.
Orah 4i - User Guide v1.2.0 Copyright 2017 - VideoStitch inc.
This guide is protected under copyright law
37
Page 39
Orah 4i User Guide v1.2.0
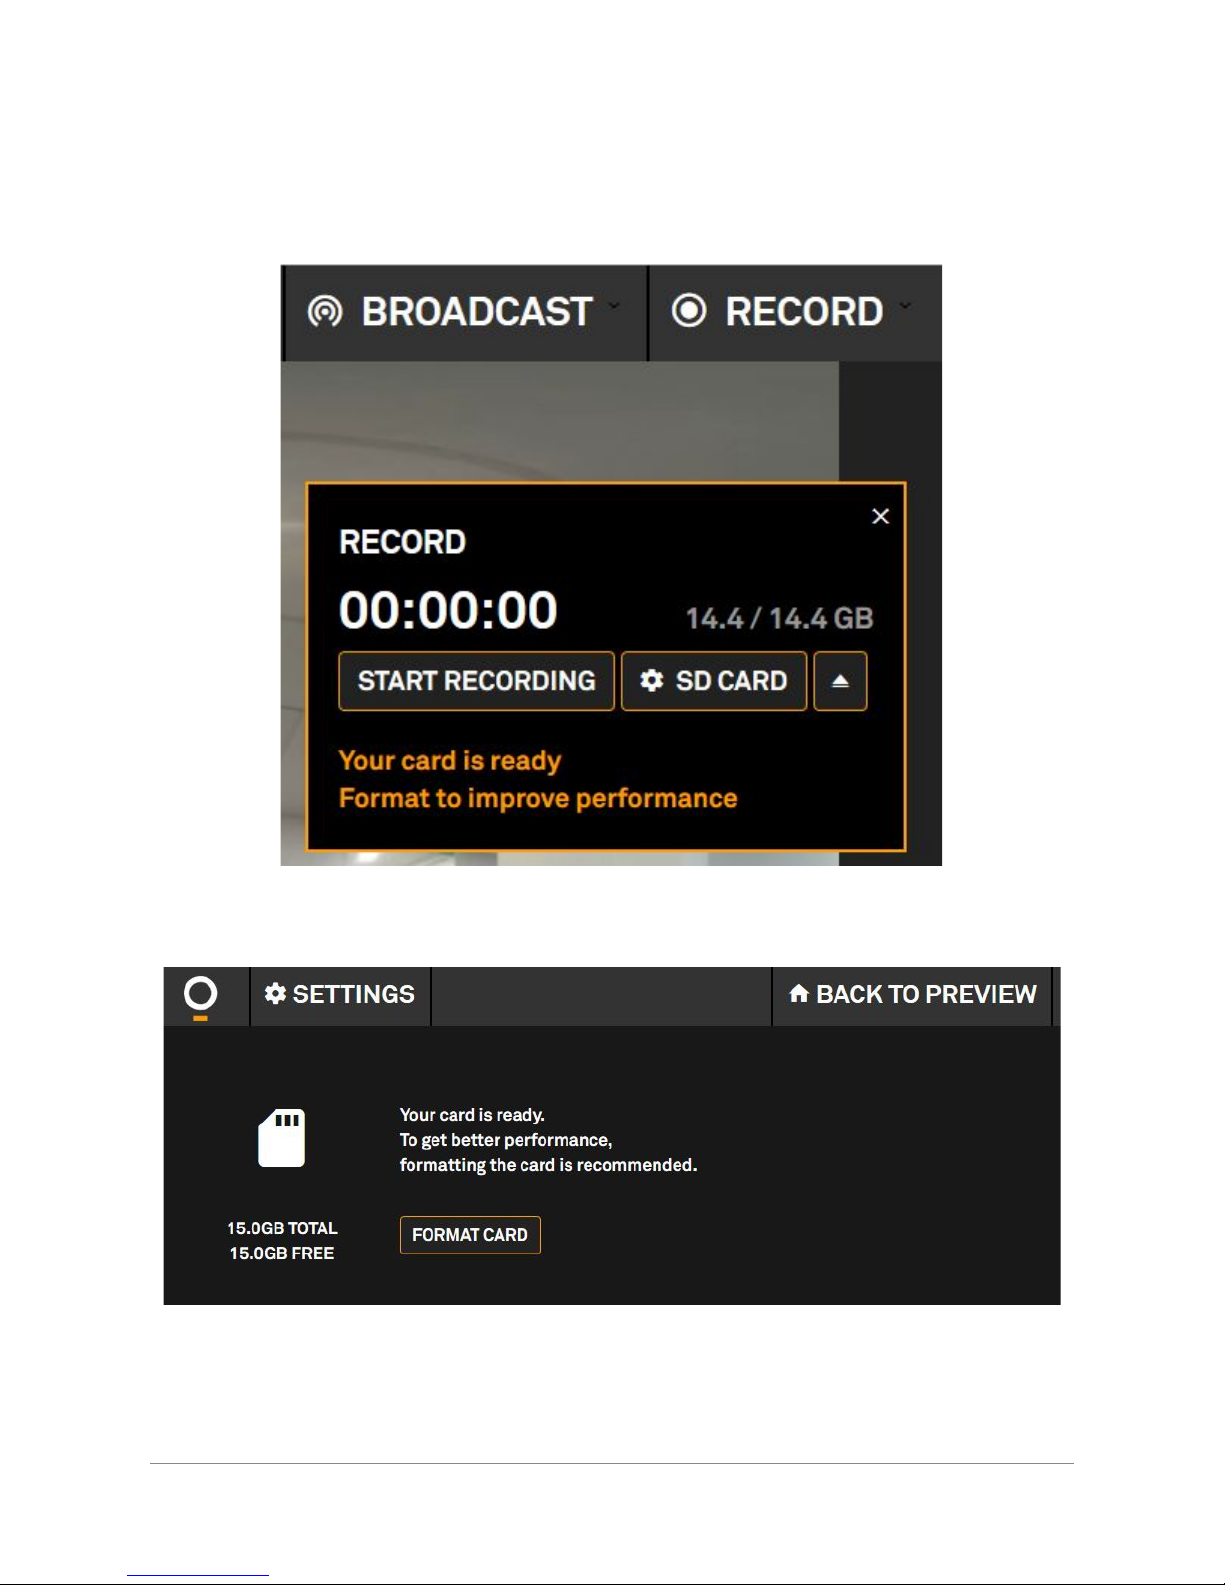
● Formatting the card can also improve the performances of the SD card. In this case, an
orange message will be displayed.
Orah 4i - User Guide v1.2.0 Copyright 2017 - VideoStitch inc.
This guide is protected under copyright law
38
Page 40

Orah 4i User Guide v1.2.0
HDMI output
I. Using the HDMI video output
The aspect ratio is 16:9 with a resolution up to 4096x2160p. The framerate is up to 30fps.
● Your HDMI device should be plugged in before you power up the stitching unit.
● Using multiple HDMI ports at the same time is currently not supported.
II. HDMI resolution and framerate
The maximum HDMI output resolution you will get is bound to the configured video mode.
Orah 4i delivers video signal over the stitching unit HDMI 2.0 with supports HDMI 4096x2160
resolution at 30fps and above.
The actual Orah 4i output resolution depends on capabilities of the sink HDMI device you plug
to it. Please refer to your third party equipment to check on supported resolutions and
framerates.
For optimal resolution on the HDMI port, we recommend configuring Orah's video mode to 4K
DCI (4096x2048).
Orah 4i - User Guide v1.2.0 Copyright 2017 - VideoStitch inc.
This guide is protected under copyright law
39
Page 41

Orah 4i User Guide v1.2.0
III. Using Orah 4i HDMI output with Blackmagic Design Decklink
and ATEM equipment
When plugging Orah 4i to a Blackmagic design ATEM switch, you need to plug the HDMI cable
on the switch after it has been connected to Orah 4i HDMI output. You may need to reboot
unplug and replug the HDMI cable on the ATEM switch for the video to display.
Please note that most Blackmagic design equipment will not display any video signal unless
they are configured at the correct resolution and framerate.
Orah 4i - User Guide v1.2.0 Copyright 2017 - VideoStitch inc.
This guide is protected under copyright law
40
Page 42

Orah 4i User Guide v1.2.0
Troubleshooting
I. Reporting bugs related to the camera
Before reporting a bug related to the detection of the camera on the Orah WebApp, please
follow this article.
Before reporting a bug related to the update of the camera, please follow this article.
II. Reporting bugs related to USB audio card support
Before reporting a problem related to USB audio ingest:
● Make sure whether the card is listed when you re-open Orah 4i's control app in a fresh
browser window.
● Try to reboot to see if the issue occurs.
● Try the card on a different USB port. Make sure no other device is connected on the
USB ports.
When looking for support on USB audio ingest, please send us the following information:
● The exact reference of the USB card you are having issues with.
● The logs collected right after the issue occurs.
● A sample file that we can use to analyze the audio signal if the issue is related to audio
quality (eg. recorded to SD card).
Orah 4i - User Guide v1.2.0 Copyright 2017 - VideoStitch inc.
This guide is protected under copyright law
41
Page 43

Orah 4i User Guide v1.2.0
III. Reporting bugs related to HDMI video output
I. Before reporting a problem related to HDMI output :
● Make sure your cable is working correctly and no dust is causing electrical interference.
● Make sure your cable is suitable for 4K resolutions if you are trying to get 4K video signal
through HDMI.
● Check whether the video signal displays when using another device.
● Check whether the video signal displays when using another HDMI port on Orah 4i's
stitching unit.
When reporting issues related to HDMI video signal, please try to provide as much information
as possible, especially :
● Send us the reference of the device are trying to use Orah 4i with.
● If you report a visible artifact, send us a picture or short video showing the artifact.
● Send us the logs collected from the support page of Orah 4i control web app right after
the issue occurred.
Orah 4i - User Guide v1.2.0 Copyright 2017 - VideoStitch inc.
This guide is protected under copyright law
42
Page 44

Orah 4i User Guide v1.2.0
Getting support
For any question you can contact our support team at
→ http://support.orah.co/hc/en-us/requests/new
Make sure you provide the camera and stitching box versions and attach your log files.
Supported browsers
The Orah WebApp uses modern web standards to give the best experience for our customer.
Please make sure you browser is up to date and has javascript enabled, here is the list of
compatibility:
Windows 10: Google Chrome, Mozilla Firefox and Edge
Mac (El capitan and Sierra): Google Chrome and Mozilla Firefox
Android: Google chrome and Mozilla Firefox
Ios: Safari, Google Chrome and Mozilla Firefox
If you don't know the browser you are using, you can find out at whatbrowser.org.
Please note that the list is not exhaustive.
Orah 4i - User Guide v1.2.0 Copyright 2017 - VideoStitch inc.
This guide is protected under copyright law
43
 Loading...