

Page 1

8.0
Made With Pride In the USA.
No Wiring or Trenching
One year limited WARRANTY
Intercom
This product is compatible with Oracle Portable Intercom (OPI)
5 or later and/or Oracle Telephone Interface Unit
International Electronics Inc. (IEI) warrants this product to be free of defects in materials and
workmanship, for one year. For a period of ONE YEAR following purchase, IEI will repair or
replace the product free of charge, including parts, labor, return shipping to you, and handling.
After the initial one year of operation, the limited lifetime warranty will cover parts, labor, and
return shipping to you, with a minimal handling charge specific to the product, as listed below:
If you have installation or operation questions or are in need of warranty service, please
contact our Product Support department by email at techsupp@nwlink.com or call 360-2541564 Tuesday-Friday 7-5 Pacific T ime. If the issue is not resolvable, a manufacturer’s
warranty repair order may be issued. To have the product(s) sent for warranty service. A
Return Authorization number will be issued for warranty service, which must be put on the
outside of the package, to be received and handled properly. Packages for warranty service
may be sent to the following address. Packages with no RA# may not be accepted.
Please include a note describing the problem that you are having and a copy of your original
sales receipt (within the first year). If the warranty service is outside the first year, please
include a check made out to IEI, based on the list of handling fees, shown above. Please note
that you may need to send multiple units for warranty service, testing, and upgrading, though
only the applicable fee for handling the failed unit(s) will be charged.
Please allow 2-4 weeks for service and return shipping. If an EXPEDITED repair/replacement is
requested, a 100% surcharge applies. In this case, please write EXPEDITED after the RA
number. IEI will attempt to return expedited repair orders within one week, except during
holidays.
All repairs or replacements are at the discretion of the Manufacturer. This warranty excludes
items that have been abused, altered, incorrectly installed, or repaired by an unauthorized
person. Changes or modifications not expressly approved by the Manufacturer could void the
user’s authority to operate the equipment. The manufacturer is not responsible for any radio or
TV interference caused by unauthorized modifications to this equipment. Such modifications
could void the user’s authority to operate the equipment. This warranty is limited to the product
only. No consequential damages are covered.
FrontDoor Wireless Intercom: $40.00
5913C NE 127th AVE, Suite 800
Vancouver, WA 98682
IEI
Thank you for purchasing the Oracle
Oracle
FrontDoor
(tm)
™
FrontDoor Unit. This product has been
designed and manufactured in the USA,
utilizing the highest quality standards
available.
Wireless
Doorbell and
• Easy to Install
• Totally wireless
•
Fully Compatible with other Oracle Intercom units
• Weather Resistant Design
• Doorbell tones for Front Door and Back Door
• Unlimited number of units can operate on a property,
without interfering with other Intercom Networks
•
Up to 5 Year battery life
• Penetrates buildings with ease
• Range up to 1000 feet
• Auto channel and frequency selection
• Crystal Clear, digitally secure connection
•
900 MHz Digital Radio Technology
•
One year limited warranty
NOTE:
model 605(OTIU).
Model OFD-614
5/4/2006
Patents Pending
Required
This device complies with part 15 of the FCC Rules. Operation is subject to the following two
conditions: (1) This device may not cause harmful interference, and (2) this device must accept any
interference received, including interference that may cause undesired operation.
International Electronics, Inc.
Country Of Origin: USA
FCC ID: JLFODI1
IC:
- 12 -
TABLE OF CONTENTS
A manufacturer’s full One Year Warranty covers this product.
- 1 -
Page 2

Model OFD-614
5.1
General Information………………………………………….………….….….3
Parts Supplied……………………………………………………………….....3
Installing the OFD with screws……………...……………..…4
Installing the Batteries………………………………………...…….5
Activating an Intercom Network……………………..……………..5
Activating into an Existing Network……………….…………….....6
Activating an OFD to the Main Intercom Unit…………..…..6
Activating Intercom Units back into the network………..….6
Activating an OFD with an OFD………………………..…….7
Activating an OFD with a Gate Access Panel………..…….8
Activating an OFD with a Repeater……………………..…...8
Assembling the Intercom…………………………………………………..…9
MOUNTING TEMPLATE
NOTE: The manufacturer is not responsible for any radio or TV interference caused
by unauthorized modifications to this equipment. Changes or modifications not
expressly approved by the party responsible for compliance could void the user’s
5/4/2006
Patents Pending
Preface
.
Section 1 – Installation
1.1 Installing the Oracle FrontDoor (
A.
B. Installing the OFD with mounting tape………...………..…...4
1.2
Section 2 – Activation
2.1
A. Activating the OFD with an Oracle Portable (
B. Activating the OFD with a Flush Mount (
C. Activating the OFD with a Telephone Interface (
2.2
A.
B.
2.3 Multi-OFD Mode……………………………………….………….…7
A.
B.
C.
Section 3 – Assembly
Section 4 – Use
Section 5 – Adjusting Volume
Section 6 – Alternate Doorbell Chimes
Section 7 – Frequently Asked Questions
Section 8 – Mounting Template
Using the Intercom………………………………………………..…………..9
5.1 Adjusting the Speaker Volume………………………...………..10
5.2 Adjusting Microphone Sensitivity…………………………....….10
Alternating Chimes for FrontDoor vs. BackDoor…………………….…..10
Troubleshooting and FAQ’s……………………………..………………....10
Mounting Template…………………………………………………….…...11
OFD
)…………………….……...4
OPI
)………….5
RIFM
)……..…..….5
OTIU
(Use this template as a guide for mounting screw placement)
)……6
- 2 - - 11 -
ADJUSTING THE SPEAKER VOLUME
authority to operate the equipment.
GENERAL INFORMATION
Page 3

Model OFD-614
1.1
C.
There is a Double Beep Every Ten Minutes
6.0 ALTERNATE CHIMES FOR FRONTDOOR VS. BACKDOOR
7.0 TROUBLESHOOTING AND FREQUENTLY ASKED QUESTIONS
By switching dipswitch #4 UP (away from the circuit board), you can set the Indoor/Outdoor
To increase the Outdoor Intercom’s microphone sensitivity, switch dipswitch #3 UP (away
The FrontDoor can be set to ring the inside Intercom units with two alternate chime patterns,
to identify which unit is signaling. Switch dipswitch #2 UP (away from the circuit board) to set
Make sure that the Intercom has fresh batteries in it. W hen you press the CALL
button, you should hear a tone. If the units have power but do not communicate,
they may need to form a network. Press the LEARN button on each unit that needs
and they will beep in response. You may need to clear their
Trees, metal, electrical wiring or other electrical devices directly between units can
be
Hold the LEARN button down for 20 seconds. A tone will indicate that the unit has
teach it to a new intercom. If an intercom
Make sure that the “CALL” button is in easy reach of a visitor. The unit may be mounted with
NOTE: If the Repeater Units have not been previously activated to
5/4/2006
Patents Pending
Intercom’s volume to be louder.
5.2
ADJUSTING MICROPHONE SENSITIVITY
from the circuit board).
a FrontDoor unit to the alternate chime tone.
Nothing Happens. The Intercom Does Not Function
to form a network
memory and re-teach them (see How do I Clear the Intercom’s Memory, below).
The Intercom is Not Getting the Expected Transmission Range
limit the range, as can having it mounted on a tree, masonry, or metal surface.
NOTE: STUCCO WALLS
When used in a dwelling with stucco or cement walls, the RF range can
reduced greatly. Place the repeater close to the house to mitigate this problem.
The intercom is indicating that the batteries are low and need to be replaced.
How do I Clear an Intercom's Memory
(Only when used in passive mode. In active mode there is no need to erase this devices memory)
cleared its memory and you can resignals, while the buttons are depressed, the procedure will have to be repeated.
- 10 -
INSTALLING THE OFD
The Oracle
and Intercom for residential, as well as commercial applications. It is
designed to tolerate severe outdoor conditions of -40 to +85 C, as well as
high humidity and condensation. Since this intercom system requires no
connection to wall power, it is perfect for remote locations.
The Oracle
allows multiple simultaneous conversations, using a 900 MHz secure
digital radio link.
Compatible with the Oracle Portable Intercom (OPI) and Oracle Flush
Mount Intercom (RIFM), your intercoms form an exclusive network, and
respond only to other intercoms in your network (patent pending).
When used with Oracle Telephone Interface Unit (OTIU), the Oracle
FrontDoor (OFD) will ring your telephones and allow you to speak with the
visitor. No wiring of any kind is required. Simply plug into any phone jack
and receive your visitors on the phone. Features Caller ID and much
more.
FrontDoor
FrontDoor
(OFD) is designed for use as a Wireless Doorbell
(OFD) features an amazing 1000’ range, and
PARTS SUPPLIED WITH OFD SINGLE UNIT
1 - Oracle FrontDoor Unit (OFD)
2 – Black #8 X ¾ Assembly Screws
4 – Silver #4 X ¾ Mounting Screws
1 – Piece of 3M High Strength Mounting Tape
PARTS SUPPLIED WITH OFD/OTIU KIT
All of the parts supplied with the OFD plus:
1 - Oracle Telephone Interface Unit (OTIU)
1 – Instructions for Installing the OTIU
1 - Antenna
1 – 18V Power Adapter
1 – Phone Cord
1 – Set of 4 Bumper Feet
PARTS SUPPLIED WITH OFD/OPI KIT
All of the parts supplied with the OFD plus:
1 – Oracle Portable Intercom (OPI)
1 – Instructions for Installing the OPI
1 – Set of 4 Bumper Feet
- 3 -
ACTIVATING THE OFD WITH A REPEATER - CON'T
either the included screws or the included double-sided high strength tape.
Page 4
A.
B.
1.2
Make sure that the “CALL” button is in easy reach of a visitor. The unit may be mounted with
either the included screws or the included double-sided high strength tape.
To mount the FrontDoor, use the included mounting template (see page 11) as a guide for
screw placement. Tighten the top two screws halfway. Place the back of the Intercom on
he bottom
To mount the Intercom on a metal, glass, or other smooth surface where you wouldn’t want
sided mounting tape will be in
Peel the protective paper off of the mounting tape and firmly press it onto the back of the
Intercom (see Figure 1). Press firmly on the back of the tape; to push out any trapped air
ective paper from the mounting tape and
Put the two halves of the Intercom body together. Place the two black screws in the
top and bottom holes on the front of the Intercom and tighten. The Intercom is ready
To talk, hold down the “CALL” button. All intercom units in your network will receive
the signal. When somebody responds by holding down the “CALL” button on a
different intercom unit, a secure channel is created and other units will not hear the
NOTE: If the Repeater Units have not been previously activated to
anything within an existing network, please follow the directions found
Place four AA Alkaline batteries in the battery pack. The batteries should last one
MOUNTING THE OFD WITH SCREWS
the two screws, slide the unit down and tighten. Put the other two screws in t
holes and tighten (see Figure 1).
Do not assemble the front of the unit until it has been activated.
Note:
MOUNTING THE OFD WITH MOUNTING TAPE
to use screws, use the double-sided mounting tape.
For best results, clean both surfaces that the double-
Note:
contact with, using the included alcohol wipe.
bubbles. When ready to do so, peel the red prot
firmly press the intercom on to the surface that you wish to mount it on.
Do not assemble the front of the unit until it has been activated.
Note:
in the Oracle Wire-free Repeater product manual.
Model OFD-614
5/4/2006
Patents Pending
Figure 1
B. ACTIVATING AN OFD WITH A GATE ACCESS PANEL (GAP)
3.0 ASSEMBLING THE INTERCOM
to use.
4.0 USING THE INTERCOM
signal, making your conversation secure.
- 9 -- 4 -
INSTALLING THE BATTERIES
year with average use.
Page 5

2.1
A.
2.1
C.
(WITHIN AN EXISTING NETWORK)
B. ACTIVATING THE OFD WITH A FLUSH MOUNT
To set a FrontDoor unit to Passive Mode, switch dipswitch #1 UP (away from the circuit
board).
Any Intercoms that had been taught to this unit will have to have their memory cleared
To activate the Passive FrontDoor, press the LEARN button inside the
To activate the Passive FrontDoor, press the LEARN button inside the FrontDoor
Press the LEARN button on ONE of the Repeater Units. The LED by the LEARN
and then will go out, indicating a successful
Press and release the LEARN button on an Oracle Portable Intercom
2. Press the LEARN button inside the FrontDoor unit for a second (until
you hear a beep) and release. The OPI will sound a tone indicating a
On a Flush Mount Intercom, hold down both buttons for 3 seconds,
Press the LEARN button inside the FrontDoor unit for a second (until
you hear a beep) and release. The Flush Mount will sound a tone
The FrontDoor must be taught to an intercom to form an intercom network, or must be
taught into an existing network (See “Activating into an Existing Intercom Network”).
activated Oracle Intercom
(On a Flush Mount Intercom hold down both buttons for 3 seconds, until the
Note:
and be re-taught to the Active Unit in the network as if they were newly installed.
Note: Both steps 1 & 2 must occur within 20 seconds of each other.
C.
1.
FrontDoor unit for a second (until you hear a beep) and release it.
2. Enter the Master PIN number on the GAP:
For example:
Then enter:
After the “BEEP” press “CALL”.
3. You will hear a tone indicating a successful activation.
4. Proceed to Section 3
1 2 3 4
0 5
ACTIVATING THE OFD WITH A REPEATER
Model OFD-614
Patents Pending
If used in location that will be below -10°C (20°F) Lithium batteries are
Note:
recommended.
ACTIVATING AN INTERCOM NETWORK
The FrontDoor is fully compatible with other Oracle System Intercoms.
ACTIVATING THE OFD WITH AN ORACLE PORTABLE
Note: Both steps 1 & 2 must occur within 15 seconds of each other.
1.
(OPI).
successful activation.
3. Proceed to Section 3
5/4/2006
Note: Both steps 1 & 2 must occur within 15 seconds of each other.
1.
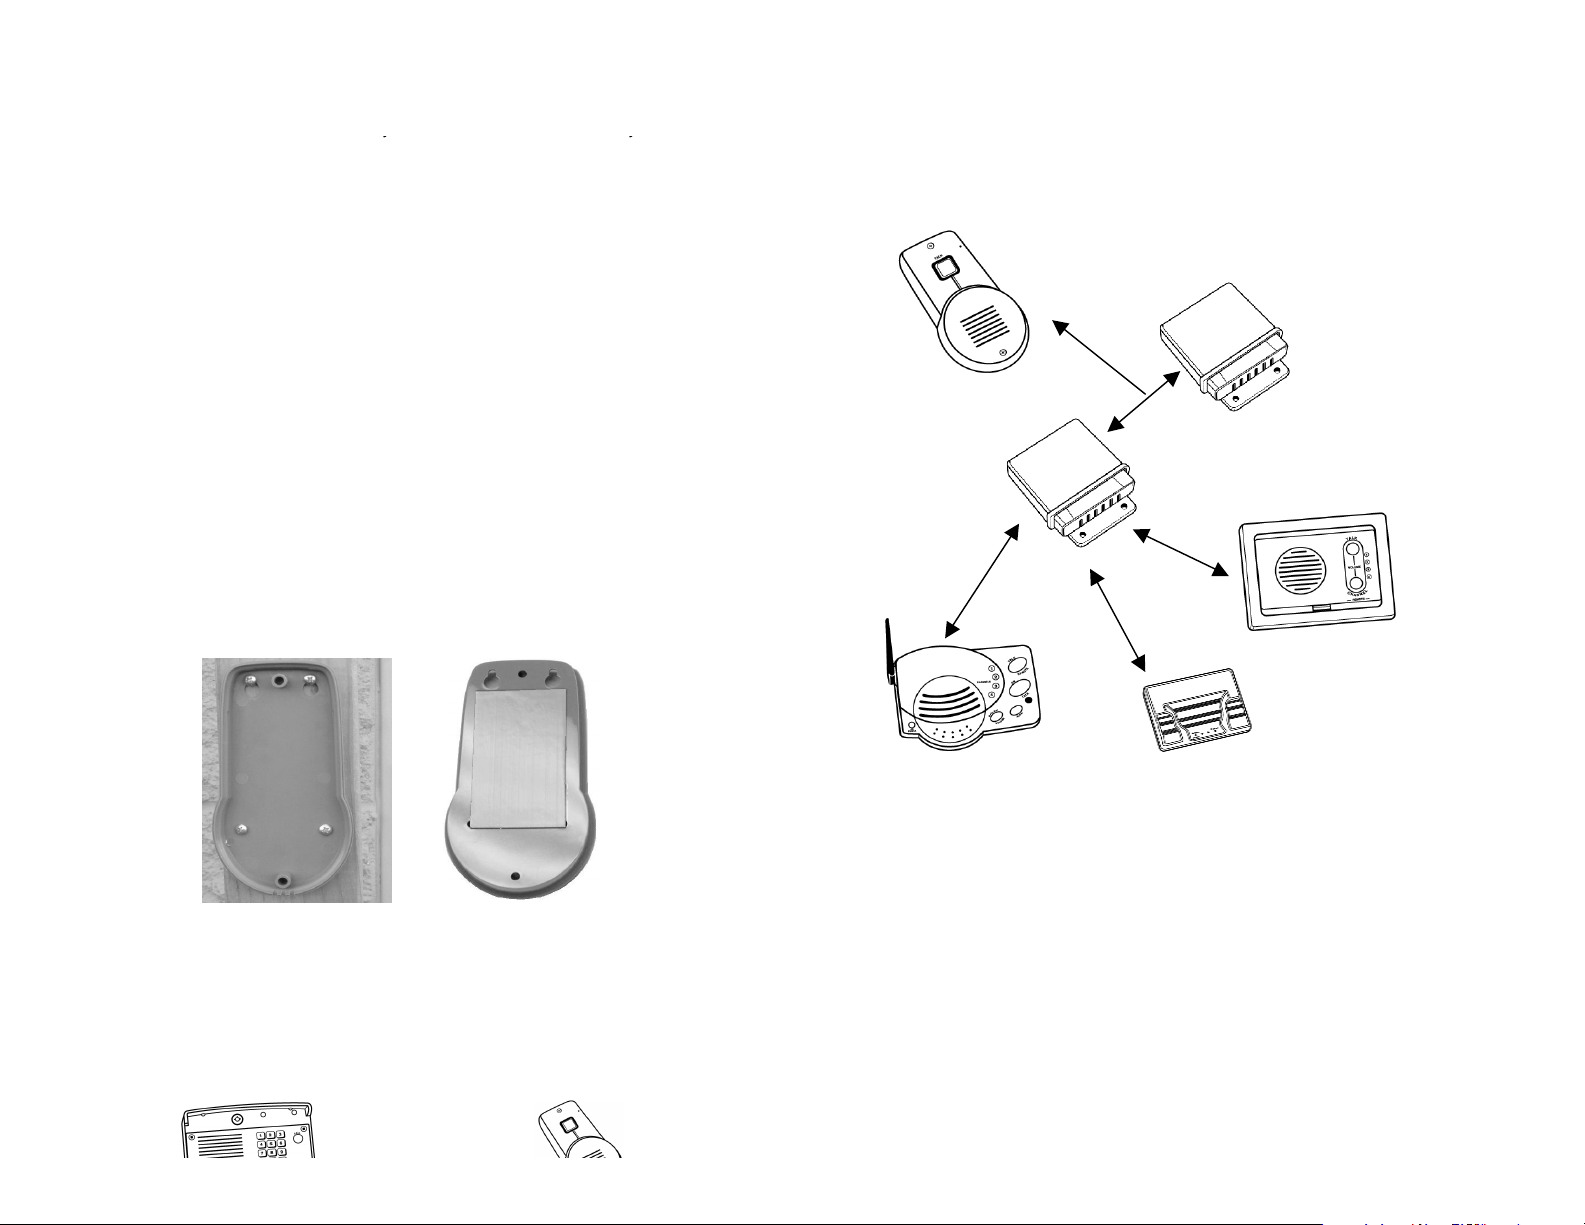
(See next page for an example of an existing network with an OFD and Repeater).
unit for a second (until you hear a beep) and release it.
2.
button will light up for several seconds
activation.
3. Proceed to Section 3
- 8 - - 5 -
ACTIVATING AN INTERCOM NETWORK - CON'T
Note: Both steps 1 & 2 must occur within 15 seconds of each other.
1.
until the channel lights start flashing quickly.
2.
B. ACTIVATING ADDITIONAL INTERCOM UNITS BACK INTO THE NETWORK
indicating a successful activation.
3. Proceed to Section 3
Note: Both steps 1 & 2 must occur within 15 seconds of each other.ACTIVATING THE OFD WITH AN OTIU
1. Press and release the LEARN button on an un-
channel lights start flashing quickly).
Page 6

2.3
A.
FD
To activate a FrontDoor into an existing intercom network, the memory on each of the
an Oracle Intercom, hold down the learn button for up to 20
To clear the memory on a Flush Mount Intercom, hold down both buttons of the
Press and release the LEARN button on an Oracle Intercom (On a Flush Mount
Intercom hold down both buttons for 3 seconds, until the channel lights start flashing
Activate all other Intercoms to this Intercom, NOT to the FrontDoor. (See example
Note: Both steps 1 & 2 must occur within 20 seconds of each other.
Hang up and the LEARN light will flash for up to 15 seconds. If it does not and you
2. On the FrontDoor, press and hold down the learn button for 1 second, to put it into
Step B
To set a FrontDoor unit to Passive Mode, switch dipswitch #1 UP (away from the
Any Intercoms that had been taught to this unit will have to have their memory
re newly
To activate the Passive FrontDoor, press the LEARN button inside the
nside the primary FrontDoor unit for a second
channel lights start flashing quickly).
com or
An Oracle FrontDoor (OFD) unit is an ‘Active’ unit that takes control of the Intercom
Network. If you wish to have a second (or multiple) Oracle Frontdoor unit in the
network, or if using the Frontdoor with an Oracle Gate Access Panel, or MiniGAP,
will have to be placed in Passive mode. The Passive FrontDoor will become an
1. Using the phone that is connected to the OTIU, once you hear a dial tone press:
hear an error tone, check the OTIU manual.
0 7
"BEEP"
Model OFD-614
Patents Pending
2. Press and release the LEARN button on the activated Oracle Inter
Flush Mount Unit.
3. Proceed to Section 3
MULTI-OFD MODE
5/4/2006
learn mode.
3. The OTIU will ring the telephone and a Caller ID will display "Unit Learned".
4. Proceed to Section 3
2.2 ACTIVATING INTO AN EXISTING INTERCOM NETWORK
A. ACTIVATING THE OFD TO THE MAIN INTERCOM UNIT
If the existing network contains a GAP, MiniGAP, or another FrontDoor see “Multi-
Note:
Mode”.
Intercoms to be used, needs to be cleared.
Note:
below and Step B on next page.)
To clear the memory on
Note:
seconds until a tone is heard.
Note:
Intercom for up to 20 seconds until a tone is heard.
Note: Both steps 1 & 2 must occur within 20 seconds of each other
1.
quickly).
2. Press and release the LEARN button inside the FrontDoor unit.
Step A
then it
accessory to the Primary FrontDoor or Gate Access Panel.
ACTIVATING AN OFD WITH AN OFD
circuit board).
Note:
cleared and be re-taught to the Active Unit in the network as if they we
installed.
Note: Both steps 1 & 2 must occur within 20 seconds of each other.
1.
FrontDoor unit for a second (until you hear a beep) and release it.
2. Press the LEARN button i
(until you hear a beep) and release it.
3. You will hear a tone indicating a successful activation.
4. Proceed to Section 3
Step B
- 6 -
- 7 -
Page 7

Model OFD-614
5/4/2006
Patents Pending
Page 8

Model OFD-614
5/4/2006
Patents Pending
Page 9

Model OFD-614
5/4/2006
Patents Pending
Page 10

Model OFD-614
5/4/2006
Patents Pending
Page 11

Model OFD-614
5/4/2006
Patents Pending
Page 12

Model OFD-614
5/4/2006
Patents Pending
 Loading...