

Page 1

Contact Center Anywhere
Installation Guide
Version 8.1
March 2007
Page 2

Copyright © 2005, 2007, Oracle. All rights reserved.
The Programs (which include both the software and documentation) contain proprietary information;
they are provided under a license agreement containing restrictions on use and disclosure and are also
protected by copyright, patent, and other intellectual and industrial property laws. Reverse engineering,
disassembly, or decompilation of the Programs, except to the extent required to obtain interoperability
with other independently created software or as specified by law, is prohibited.
The information contained in this document is subject to change without notice. If you find any problems
in the documentation, please report them to us in writing. This document is not warranted to be errorfree. Except as may be expressly permitted in your license agreement for these Programs, no part of
these Programs may be reproduced or transmitted in any form or by any means, electronic or
mechanical, for any purpose.
PRODUCT MODULES AND OPTIONS. This guide contains descriptions of modules that are optional and
for which you may not have purchased a license. Siebel’s Sample Database also includes data related to
these optional modules. As a result, your software implementation may differ from descriptions in this
guide. To find out more about the modules your organization has purchased, see your corporate
purchasing agent or your Siebel sales representative.
If the Programs are delivered to the United States Government or anyone licensing or using the Programs
on behalf of the United States Government, the following notice is applicable:
U.S. GOVERNMENT RIGHTS. Programs, software, databases, and related documentation and technical
data delivered to U.S. Government customers are "commercial computer software" or "commercial
technical data" pursuant to the applicable Federal Acquisition Regulation and agency-specific
supplemental regulations. As such, use, duplication, disclosure, modification, and adaptation of the
Programs, including documentation and technical data, shall be subject to the licensing restrictions set
forth in the applicable Oracle license agreement, and, to the extent applicable, the additional rights set
forth in FAR 52.227-19, Commercial Computer Software--Restricted Rights (June 1987). Oracle USA,
Inc., 500 Oracle Parkway, Redwood City, CA 94065.
The Programs are not intended for use in any nuclear, aviation, mass transit, medical, or other inherently
dangerous applications. It shall be the licensee's responsibility to take all appropriate fail-safe, backup,
redundancy and other measures to ensure the safe use of such applications if the Programs are used for
such purposes, and we disclaim liability for any damages caused by such use of the Programs.
Oracle, JD Edwards, PeopleSoft, Siebel, Contact Center Anywhere, and Telephony@Work are registered
trademarks of Oracle Corporation and/or its affiliates. Other names may be trademarks of their
respective owners.
The Programs may provide links to Web sites and access to content, products, and services from third
parties. Oracle is not responsible for the availability of, or any content provided on, third-party Web sites.
You bear all risks associated with the use of such content. If you choose to purchase any products or
services from a third party, the relationship is directly between you and the third party. Oracle is not
responsible for: (a) the quality of third-party products or services; or (b) fulfilling any of the terms of
the agreement with the third party, including delivery of products or services and warranty obligations
related to purchased products or services. Oracle is not responsible for any loss or damage of any sort
that you may incur from dealing with any third party.
Page 3

Contents
Chapter 1: What’s New in This Release
Chapter 2: CCA Overview and Requirements
CCA Architecture Overview 5
Tier Zero 6
Tier One 7
. . . . . . . . . . . . . . . . . . . . . . . . . . . . . . . . . . . . . . . . . . . . . . . . . . . . . .Tier Two 7
. . . . . . . . . . . . . . . . . . . . . . . . . . . . . . . . . . . . . . . . . . . . . . . . . . . . Tier Three 8
Software Requirements 8
CCA Installation Overview 10
Installing Required Software 10
Configuring Database for CCA 10
Installing CCA Server Components 10
Configuring Web Server 10
Getting Started With CCA 10
Chapter 3: Configuring the Database
Database Configuration Options 11
Configuring an Oracle 9i Database for CCA 11
Creating a New Oracle 9i Database 11
Upgrading an Older Oracle 9i Database for CCA 13
Configuring a MS SQL Server 2000 Database 14
Creating a New Database on MS SQL Server 2000 14
Upgrading Database on MS SQL Server 2000 16
Chapter 4: Installing CCA Server Components
Creating Database Connection to the Application Server 19
Creating an ODBC Data Source for Oracle 9i Database 20
Creating a TNS Name for Oracle 9i Database on Solaris 9/Red Hat AS4 20
Creating an ODBC Data Source for Ms SQL Server DB 21
Installing CCA Application Files 22
Installing the TCPIPBus 23
Configuring CCA Resources 25
Contact Center Anywhere Installation Guide Version 8.1 1
Page 4

Contents
Using the Network Manager to Manage CCA Resources 25
Adding Shared and Dedicated Server Resources 26
Configuring Resources Using Network Manager 28
Starting and stopping TCPIPBus 34
Starting and Stopping CCA Resources 34
■
Chapter 5: Configuring the Web Server
Deploying CCA Web Applications on Oracle 10g Application Server (OAS 10g) 35
Creating JDBC Connection Pool on OAS 10g 36
Creating JDBC Data Source on OAS 10g 37
Deploying CCA Web Applications on OAS 10g 37
Deploying CCA Web Applications on WebLogic 8.1 SP5 40
Creating a New Server Domain 41
Installing WebLogic as a Windows Service 42
Deploying CCA web applications on WebLogic 42
Chapter 6: Getting Started With CCA
Logging in Administration Manager (AM) 47
Logging into the Integrated Client 47
Enabling the Partition Feature 48
Making interactions 48
Index
2
Contact Center Anywhere Installation Guide Version 8.1
Page 5

1 What’s New in This Release
What’s New in Contact Center Anywhere Installation Guide, Version
8.1
Ta b le 1- 1 lists changes of the documentation described in this version to support release 8.1 of the
software.
Table 1-1. New Product Features in Contact Center Anywhere Installation Guide, Version 8.1
Topic Description
Deploying CCA Web Applications
on Oracle 10g Application Server
(OAS 10g) on page 35
Creating a TNS Name for Oracle 9i
Database on Solaris 9/Red Hat
AS4 on page 20
CCA web applications now can be deployed on Oracle 10g
Application Server.
Red Hat Enterprise Linux AS4 is now supported by CCA.
Contact Center Anywhere Installation Guide Version 8.1 3
Page 6

What’s New in This Release
■
4
Contact Center Anywhere Installation Guide Version 8.1
Page 7

2 CCA Overview and
Requirements
This chapter describes the architecture overview of the CCA application and the software
requirements to run a CCA system. It also describes a brief overview of the CCA installation
procedures described in later chapters. This chapter includes the following topics:
■ CCA Architecture Overview
■ Tier Zero
■ Tier One
■ Tier Two
■ Tier Three
■ Software Requirements
■ CCA Installation Overview
■ Installing Required Software
■ Configuring Database for CCA
■ Installing CCA Server Components
■ Configuring Web Server
■ Getting Started With CCA
CCA Architecture Overview
Contact Center Anywhere (CCA) is a multi-channel e-contact center solution. It is built on a carriergrade architecture designed to address the concerns of unique provisioning, scalability, reliability,
and economies of scale of Telcos and other service providers, who want to deploy hosted contact
center technology in their networks.
Contact Center Anywhere Installation Guide Version 8.1 5
Page 8
CCA Overview and Requirements
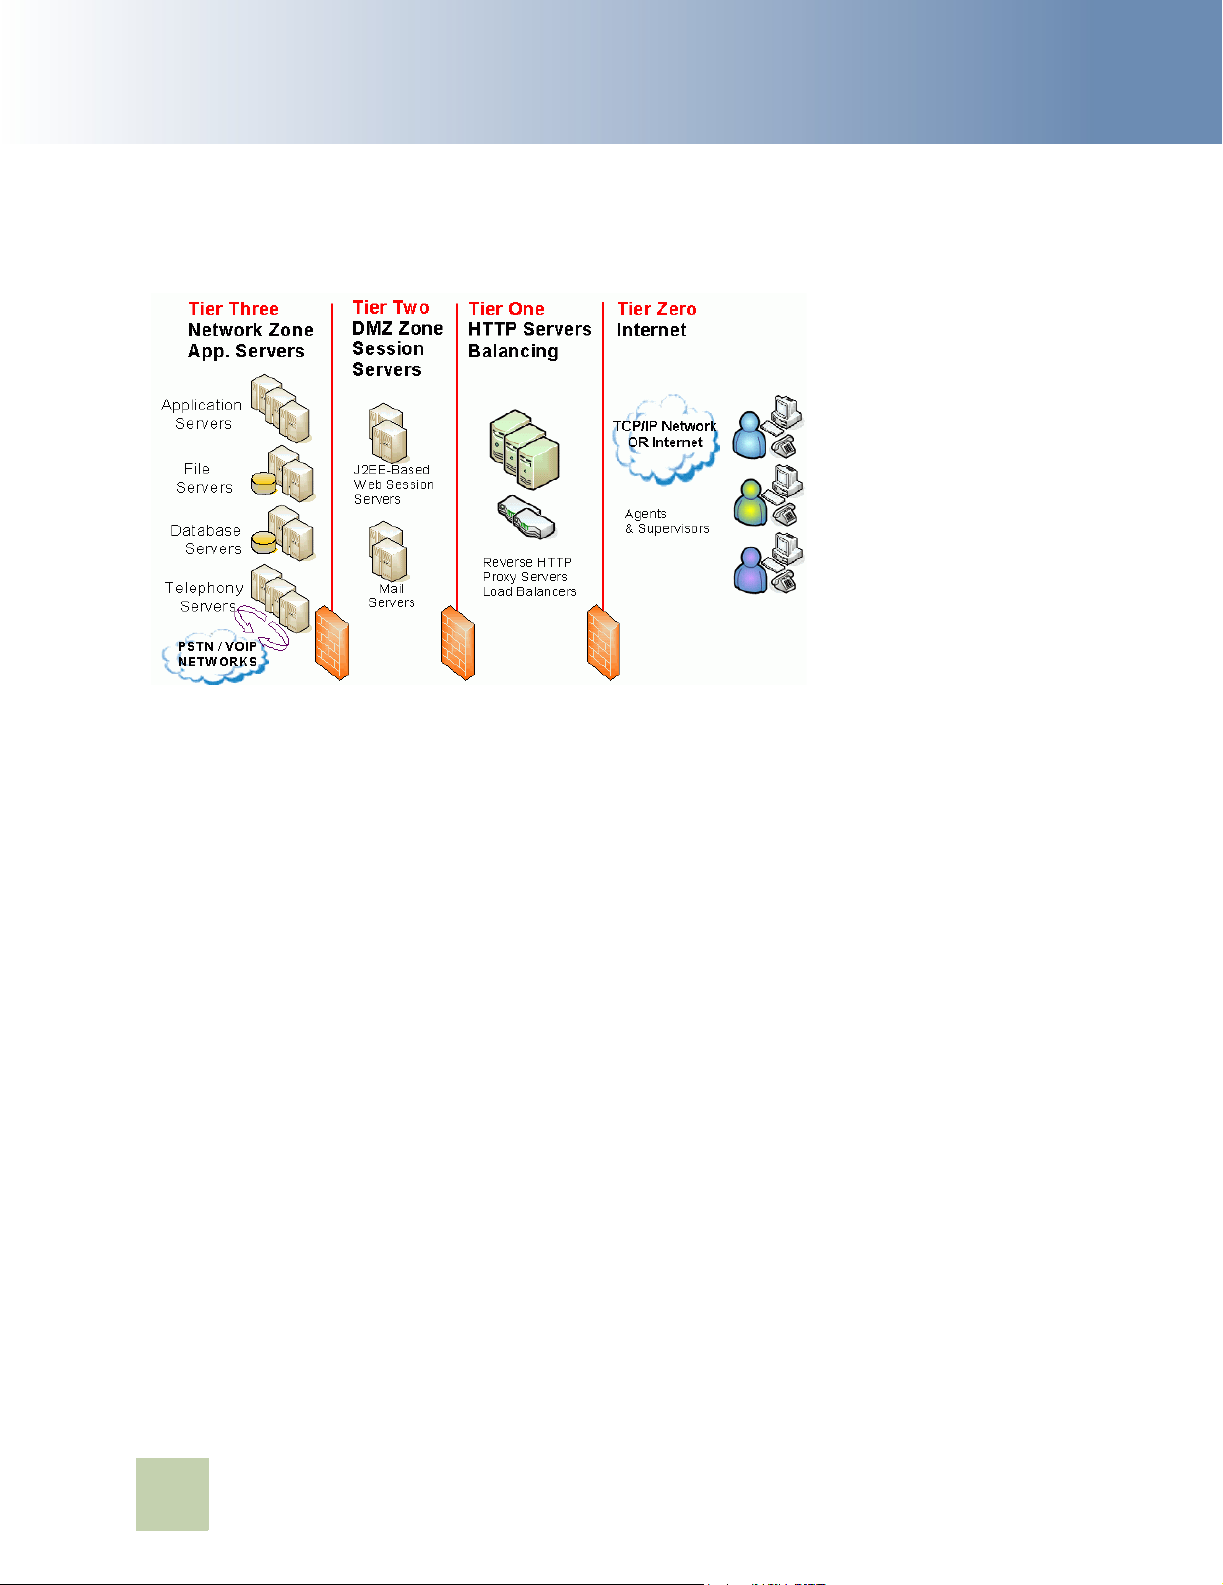
Architecturally, CCA is split into four tiers, as shown in Figure 1.
■ CCA Architecture Overview
Figure 1. CA Architecture Overview
Tier Zero
Tier Zero is also re f e r r e d to as the Internet Zone or the User Zone. This is where agents, supervisors,
and administrators reside along with their respective interfaces. There are several communication
threads that connect CCA to these users. For example, there is a session established between their
PCs, using their Web-based interface, and the Web servers in the Tier One and Tier Two Zones. This
session is supported over HTTP typically using port 80 (or user defined), or its more secure cousin,
HTTPS, typically using port 443 on the firewall. Likewise, chat communications flow over HTTP and
emails travel based on the native protocol of the corporate email server. In addition, call control
messages and screen refreshes all use HTTP or HTTPS. Using these standard protocols and ports
helps avoid unnecessary customizations of firewall rules, making CCA easy to implement, install, and
maintain.
Agents and supervisors are also connected to the platform by the telephony network (either PSTN
or Voice Over IP). When customers’ calls flow through the Telephony Servers in Tier Three from the
network, a second call from one of Telephony Servers is placed to the appropriate agent and then
they are patched together. Tier Zero of the architecture is where the CCA client applications reside
and where connectivity to the outside world happens. Agents and the supervisors may be located
wherever a broadband Internet connection or private network connection is available. This means
Tier Zero extends into the home for remote agents.
6
Contact Center Anywhere Installation Guide Version 8.1
Page 9

CCA Overview and Requirements ■ CCA Architecture Overview
Tier One
In reality, this is an optional tier that can be collapsed together into the Tier Two/DMZ zone. It shows
how CCA fits into an overall multi-tiered communications infrastructure used by many companies.
For example, many companies with distributed users and multiple sites, use a set of HTTP servers
as the user interface to their DMZ zone, where various Web-based session servers reside. There are
two reasons for doing this; namely load balancing and HTTP caching.
The interface handling and caching is typically managed by Reverse Proxy Servers and Basic HTTP
Servers. HTTP servers can cache static information (such as images) and provide segmentation for
additional tiers of security. This layer of HTTP servers is not part of the traditional CCA
implementation, but usually exists in larger corporate environments.
Load balancers are an essential part of any architecture using multiple HTTP/J2EE servers. There are
three functions load balancers perform:
■ Balancing the HTTP stream traffic amongst multiple HTTP.J2EE servers,
■ Off-loading of HTTPS-to-HTTP de-encryption (SSL encryption), and
■ Failover functions of re-directing HTTPS sessions from one HTTP/J2EE server to another.
CCA works with the Cisco CSS11500 content switch, which offers these three load balancing
functions. Other gear may work as long as a persistent or sticky session from the Load Balancer can
be maintained for each HTTP/J2EE server, but these are not certified.
Tier Two
This is where CCA's J2EE-based session servers live. A traditional firewall implementation in most
corporate networks includes a DMZ zone to provide maximum security. DMZ access is based on rules
set up by a security administrator, who dictates what communications are allowed through the DMZ
zone to the internal Network Zone. CCA is engineered to work properly within this structure.
Client applications access the J2EE Web Session Server(s) supporting CCA using the standard port
80 for HTTP or port 443 for HTTPS. The J2EE Web Session Servers then request data and services
from the application servers (in Tier Three/Network Zone) using port 9001 on the Company LAN. This
traffic can be limited, using a firewall, to only accept traffic on that port from the specific Web server.
No traffic is ever given the ability to directly reach the corporate data or application servers directly.
One of the most critical components of the CCA application is the J2EE Web Session Server. Located
in the Tier Two/DMZ Zone, the J2EE Web Session Server handles all requests from all users and
customers located in the Tier Zero/Internet & User Zone. These J2EE Web Session Servers handle
dynamic information and act as the main entry to the system.
J2EE Web Session Servers are hosted in a standard computer. These standard computers run four
types of software:
■ Off-the-shelf Web Server software, such as Oracle Web Session Server or BEA Systems WebLogic
■ CCA Application JSP pages
■ Servlets and other connectivity software, such as FTP and JDBC software
Contact Center Anywhere Installation Guide Version 8.1 7
Page 10

CCA Overview and Requirements
■ A Web services library and interpretive layer. The Web Services interpretive layer acts as a
standard interface to the CCA native Web container.
In larger environments, such as overlay networks or service provider deployments, it is best to have
separate physical servers set up as Report Servers. These serve all customers reports and extract
data from secondary databases.
The Tier Two/DMZ zone is also a typical zone to house corporate mail servers. These corporate mail
servers are not part of the CCA architecture per se, but they interface to CCA to facilitate unified
messaging and identifying ACD Email projects.
In some cases, additional physical servers may be placed in the Tier Three/Network Zone to act as
Email proxy servers. Do this when corporate Email servers use IMAP/4 protocols are in the Tier Two/
DMZ zone. The Email Proxies in the Tier Three/Network Zone perform protocol conversion duties
(POP3/SMTP-to-IMAP/4).
■ Software Requirements
Tier Three
The Tier Three, which is also called the Network Zone, is where the Application Servers, File Servers,
Database Servers, and Telephony Servers reside. The CCA application servers can be classified into
separate functional areas or Resources. Each CCA resource is responsible for delivering specific
functionality. CCA uses two types of resources in Tier Three; Shared Resources and Dedicated
Resources.
■ Shared Resources are common system resources that are used systemwide. An example of a
shared resource is the Call Center Server. It is responsible for managing voice and switching
functions between the Telephony Servers and the Public Switched Telephone Network (PSTN).
Even though it defaults as a shared resource, it is possible to configure a Call Center Server to
be used for only one company and to have still other Call Center Servers configured in the same
system as shared.
■ Dedicated Resources are company-specific resources. These dedicated resources use private
data that can only be accessed by one company. This is part of CCA's partitioning and data
security schema. For example, the ACD Server holds all of the routing rules for Company A.
Therefore, it would not be used for Company B. So, Company B has its own, dedicated ACD
Server running on its behalf. In an overlay network or service provider arrangement, it is typical
to have multiple instantiations of the same type of dedicated resource running on the same
physical server. For example, you may have 18 ACD Servers (each for its own dedicated use for
a specific company) running on a single physical application server.
In the case of one company with many lines of business or departments, the system can be
configured to allow each department or line of business to be set up as individual companies.
Software Requirements
Before installing CCA, verify that softwares in Ta b l e are installed on your system.
8
Contact Center Anywhere Installation Guide Version 8.1
Page 11
CCA Overview and Requirements ■ Software Requirements
Table 2. Software Requirements
Item Requirement
Operating system One of the following operating system versions:
■ Microsoft Windows 2000 Server
■ Microsoft Windows 2003 Server(32-bit)
■ Sun Solaris 9 (32-bit or 64-bit)
■ Sun Solaris 10 (5.10)
■ Red Hat Enterprise Linux AS4 for x86
Database server One of the following database servers:
■ Microsoft SQL Server 2000 Service Pack 3
■ Oracle 9i Database Server
■ Oracle 10g Database Server
Web server One of the following Web servers:
■ Oracle Application Server 10g Release 3.
■ BEA WebLogic 8.1 Service Pack 5.
Client Web browser One of the following Web browser:
■ Microsoft Internet Explorer 6.
■ Microsoft Internet Explorer 7.
Others The following softwares must be installed:
■ Sun Java JDK 1.4.2_13 installed on Web server.
■ Sun Java JRE 1.5.0 Update 10 installed on client PC, where Web
browser is launches CCA.
■ FTP server: The FTP server hosts all voicemails, quality recordings,
agent and supervisor recordings, faxes, and so on. Typically, this
server is a separate physical file server with plenty of disk space.
Optional tools ■ A media player on client PC to listen to voice mails, recordings, and son
on.
■ A sound recorder to record prompts.
■ Adobe Acrobat to view advanced reports.
■ SNMP client to receive traps generated by CCA SNMP agent.
■ Converter for wav-to-mp3 installed on the same host with FTP server
to run MP3 server.
Contact Center Anywhere Installation Guide Version 8.1 9
Page 12

CCA Overview and Requirements
■ CCA Installation Overview
CCA Installation Overview
The CCA installation process consists of following phases:
Installing Required Software
Before installing CCA, make sure that all required software listed in “Software Requirements” on
page 8 section are installed. Ta b le 3 provides reference links to some softwares required by CCA.
Table 3. Some Required Software Reference Links
Software Reference Link
Microsoft SQL Server 2000 http://support.microsoft.com/kb/303747
Oracle 9i Database http://www.oracle.com/technology/documentation/
oracle9i.html
Oracle 10g Database http://www.oracle.com/technology/pub/articles/
smiley_10gdb_install.html
WebLogic 8.1 http://e-docs.bea.com/platform/docs81/install/index.html
Oracle 10g Application Server http://www.oracle.com/technology/pub/articles/smiley-
as10gr3-install.html
Configuring Database for CCA
Chapter 3 describes how to create database or upgrade an existing database for CCA.
Installing CCA Server Components
Chapter 4 describes how to install and configure all server resources (reside at Tier Three) needed
by CCA.
Configuring Web Server
Chapter 5 describes how to deploy CCA Web applications on WebLogic 8.1 SP5 and Oracle Application
Server 10g Release 3.
Getting Started With CCA
Chapter 6 describes how to launch and verify a successful installation.
10
Contact Center Anywhere Installation Guide Version 8.1
Page 13

3 Configuring the Database
This chapter describes how to create a new database or upgrade an existing database previously
used by Contact Center Anywhere. It includes the following topics:
■ Database Configuration Options
■ Configuring an Oracle 9i Database for CCA
■ Creating a New Oracle 9i Database
■ Upgrading an Older Oracle 9i Database for CCA
■ Configuring a MS SQL Server 2000 Database
■ Creating a New Database on MS SQL Server 2000
■ Upgrading Database on MS SQL Server 2000
Database Configuration Options
When installing CCA 8.1, choose whether to create a new database or upgrade an existing database
used by previous CCA versions. When installing a new CCA system, create a new database. Choose
upgrade, if a previous version of CCA is running and you want to upgrade it to version 8.1.
CCA provides three different character sets for your system and you can choose one of them when
creating a new database: Latin, Japanese, and Chinese. This guide uses Latin.
This installation guide uses two database servers; Oracle Database Server 9i and Micosoft SQL
Server 2000.
NOTE: Before configuring database for CCA, make sure Sun Java JDK 1.4.2_13 is installed on the
host used to run the database scripts.
Configuring an Oracle 9i Database for CCA
In the CCA installation package, find the Database directory. There are two sub directories; Oracle
and Sql Server. The Oracle directory contains scripts to configure a database on an Oracle database
server. The the SQL Server directory is for Microsoft SQL Server. Each one has two sub directories;
Automated and Patch. Automated is for creating a new database. Patch is for upgrading a database.
Creating a New Oracle 9i Database
Complete these steps to create a new Oracle 9i database for use with CCA:
Contact Center Anywhere Installation Guide Version 8.1 11
Page 14

Configuring the Database
■ Configuring an Oracle 9i Database for CCA
To create a new Oracle 9i database
Copy the database\Oracle\Automated directory from the CCA installation package to the host you
1
use to run database creation scripts.
2 Edit the UseMe.sql file to reflect the correct information necessary to create the database by
using the following guidelines:
NOTE: Keep the quotation marks (‘’) surrounding the parameters’ value.
■ Replace &1 with the password of the sys user.
■ Replace &2 with the name of the connection to the database server saved in tnsnames.ora
file. The tnsnames.ora file typically resides at ORACLE_HOME\network\admin.
■ Replace &3 with the name of the table space that will contain all database tables.
■ Replace &4 with the path to the location where table space will be created. For example,
C:\oracle\oradata\oracle\twcc81.ora.
■ Replace &5 with the size of the table space. The default size is 500MB. This value is not a
limitation, and the database can grow over that limit.
■ Replace &6 with the name of the temporary table space that contains temporary data, which
occurs, for example, when a complex SELECT statement is executed.
■ Replace &7 with the path to the location where the temporary table space will be created.
For example, C:\oracle\oradata\oracle\twcc81tmp.ora
■ Replace &8 with the size of the temporary table space. The default size is 50MB.
■ Replace &9 with the growth size of the temporary table space. The default size is 10MB.
■ Replace &10 with the name of the database role will be created.
■ Replace &11 with the username of the user that has administration privileges on the new
database. For example, admincc81 can be used.
■ Replace &12 with the password of user declared in parameter &11.
■ Replace &13 with the username of user who has access to the CCA database. For example,
cc81.
■ Replace &14 with the password of user declared in parameter &13.
■ Replace &15 with the database service name (SID).
■ Replace &16 with the host name or IP address of the database server.
■ Replace &17 with the port that Oracle 9i database server uses to listen for new connection.
By default, port 1521 is used by Oracle 9i database server. If your Oracle 9i database server
is using a different port, this value must be modified.
After editing the script file, it returns to the following:
-- &1 - sys password sys_password
-- &2 - Database TNS Name my_db_connection
-- &3 - TWTableSpace CCA db Table Space
12
Contact Center Anywhere Installation Guide Version 8.1
Page 15

Configuring the Database ■ Configuring an Oracle 9i Database for CCA
-- &4 - PathTableSpace Path for the TAW Table Space
-- &5 - TableSpaceSize 500M Initial size of the Table Space
-- &6 - TWTableSpaceTemp TAW Temporary Table Space
-- &7 - PathTableSpaceTemp Path for the TAW Temporary Table Space
-- &8 - TableSpaceTempSize 50M Initial size of the Temporary Table Space
-- &9 - TableSpaceTempGrowthSize 10M Temporary Table Space Growtrh Size
-- &10 - TWRole TWRole
-- &11 - ADMINCC81 (Admin Username) ADMINCC81
-- &12 - ADMINCC81 (Admin Password) ADMINCC81
-- &13 - CC81 (User Username) CC81
-- &14 - CC81 (User Password) CC81
-- &15 - Database Service Name Use by the JDBC Connection
-- &16 - Database Hostname db Hostname --> Use by the JDBC Connection
-- &17 - Database Port Number db port number --> Use by the JDBC Connection
@CreateDatabase.sql 'syspassword' 'oracle' 'TWTableSpacecc81'
'c:\oracle\oradata\oracle\twcc81.ora' '500M' 'TWTableSpacecc81Tmp'
'c:\oracle\oradata\oracle\twcc81tmp.ora' '50M' '10M' 'TWRolecc81' 'ADMINCC81'
'admincc81' 'cc81' 'cc81' 'oracle' 'support-db' 1521
3 Open the command line window. Navigate to directory that contains the UseMe.sql file by cd
command.
4 Open the Sql Plus console by typing: sqlplus /nolog
5 From the Sql Plus command prompt, type: @UseMe.sql to run the script file.
6 After the script file completes running, check all log files created to verify that no error is
reported during database creation process.
Upgrading an Older Oracle 9i Database for CCA
Complete these steps to upgrade an older Oracle 9i database for CCA:
To upgrade an Oracle 9i database for CCA
1
Copy the Patch folder for Oracle 9i Database Server from the installation package to the host
used to run database scripts. For example, we put it in C:\CCA\database\Oracle\Patch.
2 Edit the UseMe_upgrade.sql file in Patch folder to reflect the correct information that is
necessary to upgrade the database by using the following guidelines:
NOTE: Retain the quotation marks (‘’) surrounding the parameters’ values.
■ Replace &1 with the username of the administrator who owns all the objects (tables, views,
indexes, and so on) in the database to be upgraded.
■ Replace &2 with the password of the administrator used in previous parameter.
Contact Center Anywhere Installation Guide Version 8.1 13
Page 16

Configuring the Database
■ Replace &3 with the name of the database user that the current CCA system uses to access
the database.
■ Replace &4 with the password of the user used in parameter &3.
■ Replace &5 with the database TNS name of the database server.
■ Replace &6 with the host name of the database server.
■ Replace &7 with the database service name (SID).
■ Replace &8 with the listening port of the database server. By default, Oracle 9i database
server listens on port 1521.
After the script file is edited, it will return to the following:
-- &1 - Admin User Username
-- &2 - Admin User Password
-- &3 - CCA db User Username
-- &4 - CCA db User Password
-- &5 - database TNS Name
-- &6 - database hostname
-- &7 - Database Service Name
-- &8 - Database Port Number
■ Configuring a MS SQL Server 2000 Database
@upgrade.sql 'admincc81' 'admincc81' 'cc81' 'cc81' 'oracle' 'support-db' 'cc81' 1521
3 Open a command line window. Use the cd command to navigate to the Patch folder.
4 At the command line, type sqlplus /nolog to open Sql Plus console.
5 At the Sql Plus console, type: @UseMe_upgrade.sql
6 After the script file completes running, check all log files created to verify that no error is
reported during database upgrading process.
Configuring a MS SQL Server 2000 Database
Creating a New Database on MS SQL Server 2000
Complete these steps to create a new Ms SQL Server database for use with CCA:
To create a MS SQL database
Copy the Automated directory for SQL Server from the installation package to the host used to
1
run database scripts. For example, we put it in C:\CCA\database\Sql Server\Automated.
14
Contact Center Anywhere Installation Guide Version 8.1
Page 17

Configuring the Database ■ Configuring a MS SQL Server 2000 Database
2 The database creation procedure can be completed by running the
useMe70LatinLanguage.bat file. Before running, edit the batch file to reflect the correct
information that is necessary to create the database by using the following guidelines:
NOTE: If you are installing the Chinese and Japanese languages, use the corresponding batch
file.
■ Replace %1 with the host name of the database server.
■ Replace %2 with the sa username. Typically, default value sa is used.
■ Replace %3 with the password for the sa user.
■ Replace %4 with the path to the location where the database files will be created.
■ Replace %5 with the database name for CCA. The default value cc81 is typically used.
■ Replace %6 with the name of the user who will be created and has access to the database.
This user is used by CCA system to access the database. The default value cc81 is typically
used.
■ Replace %7 with the password that you want to provide to the user defined in the previous
parameter.
■ Replace %8 with the port used by the Microsoft SQL Server to listen for new connections. By
default, Ms SQL Server listens on port 1433.
■ The -remoteDatabase flag should remain as False.
■ Replace %10 with the language you want to use. If you do not specify a value for this
parameter, Latin language will be used.
Contact Center Anywhere Installation Guide Version 8.1 15
Page 18

Configuring the Database
After editing the batch file, it returns to the following:
echo off
CHCP 437
rem %1 <The database server name>
rem %2 <The admin users - normally sa ->
rem %3 <The password for the admin user>
rem %4 <The database path where to create it, for example: c:\databases>
rem %5 <The database name>
rem %6 <CCA username>
rem %7 <CCA password>
rem %8 <database port number by default Sql server is using 1433>
■ Configuring a MS SQL Server 2000 Database
rem %9 <remote database - "true" or "false">
rem %10 <database Encoding, default American English, "Japanese_CI_AI" for
Japanese,"Chinese_PRC_Stroke_CI_AI" for Chinese>
java -jar DatabasePopulation.jar -hostname=support-db -username=cc81 password=cc81 -databasePortNumber=1433 -databaseName=cc81 -saUsername=sa saPassword=sa -dbPath=C:\databases -remoteDatabase=false
echo on
3 Open a command prompt, and run the batch file in the Command line window.
4 After the batch file completes running, check log files created in the same folder with the batch
file to verify that no error is reported during the database creation process.
Upgrading Database on MS SQL Server 2000
Complete these steps to upgrade an older Microsoft SQL Server database for CCA:
To upgrade an older MS SQL Server database:
1
Copy the Patch directory for Ms SQL Server from the installation package to the host used to
run database scripts. For example, we put it in C:\CCA\database\Sql Server\Patch.
2 Edit the runmePatch.bat batch file to reflect the correct information that is necessary to
upgrade the database by using the following guidelines:
NOTE: For Chinese and Japanese languages, use the corresponding batch file.
■ Replace %1 with the host name of the database server.
■ Replace %2 with the sa username. By default it is sa.
16
Contact Center Anywhere Installation Guide Version 8.1
Page 19

Configuring the Database ■ Configuring a MS SQL Server 2000 Database
■ Replace %3 with the password for the sa user.
■ Replace %4 with the name of the CCA database that you are upgrading.
■ Replace %5 with the name of the user who has access to the CCA database that you are
upgrading.
■ Replace %6 with the password of the user declared in previous parameter.
■ Replace %7 with the port number used by Ms SQL Server to listen for new connections. By
default, Ms SQL Server listens in on the port 1433.
After the batch file is edited, it will return to the following:
rem %1 <The database server name>
rem %2 <The admin users - Normally sa>
rem %3 <The password for the admin user>
rem %4 <The database name>
rem %5 <CCA db username>
rem %6 <CCA dbpassword>
rem %7 <Database Port Number> sql server default use 1433
rem %8 <flag isUpgrade>
echo off
CHCP 437
java -jar DatabasePopulation.jar -hostname=dbserver -username=cc81 -password=cc81 languageOption=1 -databasePortNumber=1433 -databaseName=cc81 -saUsername=sa saPassword=sapassword -isUpgrade=true
echo on
3 Open a command line window and run the batch file.
4 After the batch file completes running, check all log files created to verify that no error is
reported during database upgrading process.
Contact Center Anywhere Installation Guide Version 8.1 17
Page 20

Configuring the Database
■ Configuring a MS SQL Server 2000 Database
18
Contact Center Anywhere Installation Guide Version 8.1
Page 21

4 Installing CCA Server
Components
This chapter describes how to install server components for Contact Center Anywhere. It includes
the following topics:
■ Creating Database Connection to the Application Server
■ Creating an ODBC Data Source for Oracle 9i Database
■ Creating a TNS Name for Oracle 9i Database on Solaris 9/Red Hat AS4
■ Creating an ODBC Data Source for Ms SQL Server DB
■ Installing CCA Application Files
■ Installing the TCPIPBus
■ Configuring CCA Resources
■ Using the Network Manager to Manage CCA Resources
■ Adding Shared and Dedicated Server Resources
■ Configuring Resources Using Network Manager
■ Starting and stopping TCPIPBus
■ Starting and Stopping CCA Resources
Creating Database Connection to the Application Server
The CCA application server can be classified into separate functional areas or Resources. Each CCA
resource is responsible for delivering specific functionality. For example, the Call Center resource
manages all of the phone call functionality. To make CCA resources running, create a database
connection for them. The Network Manager and all resources uses this database connection to
connect to the database and load CCA configuration data. This section describes how to create
database connection using MS SQL Server 2000 and Oracle 9i on MS Windows 2003 and Solaris 9/
Red Hat Enterprise Linux AS4. It covers the following cases:
■ Creating an ODBC Data Source for Oracle 9i Database
■ Creating a TNS Name for Oracle 9i Database on Solaris 9/Red Hat AS4
■ Creating an ODBC Data Source for Ms SQL Server DB
Contact Center Anywhere Installation Guide Version 8.1 19
Page 22

Installing CCA Server Components
Server
■ Creating Database Connection to the Application
Creating an ODBC Data Source for Oracle 9i Database
To create an ODBC data source for Oracle 9i Database Server
1
From the Windows Start menu, navigate to Programs > Administrative Tools > Data Sources
(ODBC).
2 From the ODBC System Administrator System DSN tab, click Add.
3 Select Oracle in OraHome92 from the list and click Finish.
NOTE: If this option is not present, Oracle 9i Client Tools must be installed.
4 Provide the following information in the wizard dialog boxes, and click Next where appropriate.
Table 4. ODBC data source settings for Oracle 9i Database
Field Description Comments
Data Source Name The name you want to use to refer
to the data source.
Description Text description of the data source. For example: Contact Center
TNS Service Name The TNS name that contains
connection to database server.
UserID Name of Oracle 9i database user.
Refer parameter &13 in database
creation script file described in
Creating a New Oracle 9i Database
The name should be similar to your
DB name, and it cannot include
spaces.
Anywhere V8.1 Data Source Name
For example: support-db
For example: cc81
5 Click Test Connection to verify that connection is correct.
6 Click OK to finish.
Creating a TNS Name for Oracle 9i Database on Solaris 9/Red Hat AS4
NOTE: Install Oracle 9i client tool on servers running CCA resources.
To create a TNS Name for Oracle 9i Database on Solaris 9/Red Hat AS4
Edit the tnsnames.ora file on the server running CCA resources to point to the Oracle 9i database
1
server. Typically, this file resides at ORACLE_HOME/network/admin. For example, if your
database server is support-db, SID = oracle, this record should be added in tnsnames.ora file:
CC81 =
20
Contact Center Anywhere Installation Guide Version 8.1
Page 23

Installing CCA Server Components ■ Creating Database Connection to the Application
Server
(DESCRIPTION =
(ADDRESS_LIST =
(ADDRESS = (PROTOCOL = TCP)(HOST = support-db)(PORT = 1521))
)
(CONNECT_DATA =
(SERVICE_NAME = ORACLE)
)
)
Creating an ODBC Data Source for Ms SQL Server DB
To create an ODBC data source for SQL Server
From the Windows Start menu, navigate to Programs > Administrative Tools > Data Sources
1
(ODBC).
2 From the ODBC System Administrator System DSN tab, click Add.
3 Select SQL Server from the list and click Finish.
NOTE: If this option is not present, installing SQL Server Client Tools is required.
4 Provide the following information in the wizard dialog boxes, and click Next where appropriate.
Table 5. ODBC Data Source Settings for SQL Server
Field Description Comments
Name The name you want to use to refer
to the data source.
Description Text description of the data source. For example: Contact Center
Server The SQL Server to which you want
to connect.
Login Select the option that specifies the
method SQL Server uses to
authenticate the login ID.
The name should be similar to your
DB name, and it cannot include
spaces.
Anywhere V8.1 Data Source Name
For example: support-db
SQL Server Authentication
Connect to SQL
Server to obtain
default settings
- Login ID SQL server login ID For example: cc81
- Password SQL server Password For example: cc81
Select the check box. Allows you to provide the up used
when creating the database.
Contact Center Anywhere Installation Guide Version 8.1 21
Page 24

Installing CCA Server Components
Table 5. ODBC Data Source Settings for SQL Server
Field Description Comments
- Default database Select The CCA database.
■ Installing CCA Application Files
For example: cc81
Client
Configuration
Confirm that the Client
Configuration selection is set for
TCP/IP and not for Named Pipes.
5 Click Next until you get to the last screen, and then click Finish.
6 Test the Data Source.
The test must verify that the connection is correct before you continue.
Installing CCA Application Files
Complete these steps to install the CCA application server files:
To install CCA application server files
Create a directory for CCA application files.
1
For example: C:\ccanywhere (on Ms Windows) or /usr/ccanywhere (on Solaris/Linux).
2 Copy the CCA servers directory in the CCA installation package to the directory that is created
in previous step. Verify that the following sub directories exist in the CCA directory:
❏ bin
❏ lib (only on Solaris/Linux)
❏ prompt
❏ log
❏ tmp
❏ Network Manager
3 Add the path to the location of bin directory in CCA directory created in step 1 to your PATH
environment variable.
a Right click on My Computer on the desktop and select Properties.
b Select the Advanced tab, and then click Environment Variables.
22
Contact Center Anywhere Installation Guide Version 8.1
Page 25

Installing CCA Server Components ■ Installing the TCPIPBus
c Select the variable PATH, click Edit, and then add CCA directory (for example,
c:\ccanywhere\bin) to the path.
TIP: Make sure you put a semicolon(;) before you make a new entry.
For UNIX, you must put both the ccanywhere/bin and ccanywhere/lib path to system
environment PATH and LD_LIBRARY_PATH. You can put them in startup script file such as
.profile. The following is an example of a .profile file:
CCA_INSTALL_PATH=/usr/ccanywhere;export CCA_INSTALL_PATH
LD_LIBRARY_PATH=${LD_LIBRARY_PATH}:$ORACLE_HOME/lib:$CCA_INSTALL_PATH/lib;export
LD_LIBRARY_PATH
PATH=${PATH}:/usr/bin:/usr/ccs/bin:/etc:/opt/sfw/bin:/space/oracle/oracle/bin:/
usr/local/bin:/usr/sbin:/sbin:/space/j2sdk1.4.2_13/bin:/space/j2sdk1.4.2_13/jre/
bin:$CCA_INSTALL_PATH/bin:$CCA_INSTALL_PATH/lib; export PATH
MANPATH=${MANPATH}:/usr/share/man:/usr/local/man:$CCA_INSTALL_PATH;export MANPATH
ulimit -n 4048
NOTE: On Solaris/Linux, for security reasons we should not use root account to run CCA
resources. We should create another user account to run CCA resources and do not forget to
change the owner of the CCA directory to the user we use to run CCA resources and assign write
and execute permissions for this directory.
Installing the TCPIPBus
The CCA application server uses the TCPIPBus connection to communicate across its resources. This
is a critical part of the application. The TCPIPBus must be installed as a service on each host that
runs the CCA application server.
Complete these steps to install the TCPIPBus on Windows and on Solaris/Linux:
To install the TCPIPBus on Ms Windows
Open a command line window (Run cmd).
1
2 From the command line prompt, change current directory to the CCA bin directory. By changing
current working directory to CCA bin directory, we can execute CCA server files without
specifying the absolute path to those files.
For example: C:\ccanywhere\bin
3 Install the TCPIPBus service.
Contact Center Anywhere Installation Guide Version 8.1 23
Page 26

Installing CCA Server Components
■ Installing the TCPIPBus
a Run: "tcpipbus -?" to show its usage:
Usage: tcpipbus.exe [-install | -remove | -debug] -aup
-install to install tcpipbus as windows service and save parameter into the registry
-remove to remove tcpipbus from windows service manager
-debug to run tcpipbus on console mode
-a<Database alias> used when creating the ODBC entry
-u<Database user> used when creating the ODBC entry
b Type "tcpipbus -install -a<database alias> -u<database user>"
Make sure that there is no space after -a and -u. The database alias and database user must
be the same with information you used to create database connection in Creating an ODBC
Data Source for Oracle 9i Database section or Creating an ODBC Data Source for Oracle 9i
Database section if you are using Oracle 9i Database server.
4 You are prompted to enter the ODBC connection password. This password is then saved in an
encrypted format in Windows registry.
5 After installing the TCPIPbus, a registry entry named Telephony@Work TCPIPBus is created in
Windows registry.
NOTE: In a multi-machine environment, the same TCPIPBus configuration setup must be installed
on eac h m a c h i ne that is runn i n g C o n t a ct Center Any w h e r e resources. It d o e s n o t n eed to be inst a l l e d
for Web server or Database server.
To install the TCPIPBus on Solaris/Linux
Verify that the LD_LIBRARY_PATH variable includes the path to the location of CCA library
1
directory.
2 Open a terminal, use cd command to navigate to CCA bin directory.
3 Run this command: tcpipbus -install -aTNSAlias -uDBUuser
TNSAlias: This is the TNS name saved in tnsname.ora file. This must match the name you use to
create database connection in Creating a TNS Name for Oracle 9i Database on Solaris 9/Red Hat
AS4 section.
DBUser: Database user used by CCA. Refer parameter &13 described in Creating a New Oracle 9i
Database section.
4 After pressing ENTER, enter the database user password at the prompt.
5 Verify that the file taw_tcpip_bus.cfg has been created in the /etc directory.
6 Change the owner of taw_tcpip_bus.cfg file to user used to run CCA server resources and assign
its write permission.
NOTE: After the TCPIPBus is installed, do not start it until a Host Manager is added. See Configuring
CCA Resources for information on how to add a Host Manager.
24
Contact Center Anywhere Installation Guide Version 8.1
Page 27

Installing CCA Server Components ■ Configuring CCA Resources
Configuring CCA Resources
This section describes how to add and run all resources required by CCA using the Network Manager.
This section covers the following topics:
■ Starting Network Manager. See Using the Network Manager to Manage CCA Resources on page 25.
■ Adding Server Resources. See Adding Shared and Dedicated Server Resources on page 26.
■ Starting and stopping TCPIPBus. See Starting and stopping TCPIPBus on page 34.
■ Configuring and starting the resources in accordance with your specific Call Center business. See
Configuring Resources Using Network Manager on page 28.
Using the Network Manager to Manage CCA Resources
The Network Manager is used to configure, start and stop CCA resources. You can create a shortcut
on the desktop to the CCA Network Manager, which is typically installed in the CCA
directory\NetworkManager directory, for example C:\ccanywhere\NetworkManager.
To use Network Manager
Start Network Manager. Run the executable file NetworkManager81.exe in NetworkManager
1
directory. For example, C:\ccanywhere\NetworkManager\NetworkManager81.exe
2 Log in using the information you specified during ODBC setup.
For example:
Alias = cc81
User = cc81
Password = cc81
NOTE: Network Manager logs to log\NetworkManager.log only if the file is present. You do not
need the log file unless you are experiencing problems running a service.
3 From the Database tab, configure the Database Connections properties using the same
information that is specified during ODBC setup. For example:
Alias = cc81
User = cc81
Password = cc81
Driver = SQL (select Oracle option if you are using Oracle 9i database)
Contact Center Anywhere Installation Guide Version 8.1 25
Page 28

Installing CCA Server Components
■ Configuring CCA Resources
4 From the System tab, which specifies values used for FTP connection, complete the fields and
then click OK.
Server Host: FTP server name or IP address.
Server Root Path: path to the location on FTP server that CCA will use to put files. Use ‘/’ to use
the root directory of FTP server.
File size limit (kb): the maximum size of a file that CCA can put in the FTP server in kilobytes.
Ftp Username: FTP username.
Ftp Password: FTP user’s password.
Adding Shared and Dedicated Server Resources
One critical CCA resource we need to add before adding other ones is the Host Manager resource.
Each server that runs the CCA resources needs a Host Manager running. Host Manager creates
directories peculiar to the server that it is running for storing and retrieving voice files, greetings,
chat and email history, etc. Host Manager also assists in FTP process, helping other resources upload
and download needed files from FTP server to the server it is running.
Add Host Manager resource using the Add Host Manager dialog box, which appears automatically
after the system configuration settings are completed:
To add a host manager
From the Host Manager dialog box, enter the machine name that you are going to add as a host
1
of the services.
2 Complete the remaining fields in the dialog.
■ Host: host name of server where Host Manager will be running (Do not use 'localhost').
■ Port: Click Suggest.
■ Home Directory: path to the CCA directory. For example, C:\ccanywhere.
■ Location: This is the logical location.
■ (Optional) Select the check box Create Library Email if you are using email.
■ Select the check box Create Lib Fax and Prompt and select Dialogic in the right combo box.
■ Log Size (kb): 12000
■ Number of Logs: 1 - 10
■ Trace Level: This is the detail level of the log files generated by Host Manager resource. Valid
value is 1-5 (where 1 is lowest and 5 is highest).
3 Click Save.
4 After you click Save, the Default Resources dialog box appears. You can use this dialog box to
add all other resources or you can add them one by one later as described in To add a resource
in Network Manager section.
26
Contact Center Anywhere Installation Guide Version 8.1
Page 29

Installing CCA Server Components ■ Configuring CCA Resources
5 From the Default Resources dialog box, Shared tab, select all shared resources you need
according to your server and click Save. These resources can be added at a later time. Following
shared resources can be added by using this dialog box:
■ Call Center Server
■ Unified Messenger
■ CTI Bridge (for ATM configurations only)
■ Com Switch Manager
■ MCU Server
■ SNMP Agent
■ License Server
■ Redirect Server
6 From the Default Resources dialog box, Dedicated tab, add dedicated resources.
a Use the drop-down list to select the company to which resources will be added. By default, a
company named ASP Services was already created automatically when creating database.
b Select the check box for each dedicated resource that you need to add.
NOTE: If you do not want to add dedicated resources now, click Save and add them later.
c Click Save.
If you did not add resources using the Default Resources dialog box as described in the previous
section, you can use Network Manager to add resources that you need according to your system.
Contact Center Anywhere Installation Guide Version 8.1 27
Page 30

Installing CCA Server Components
■ Configuring CCA Resources
To add a resource in Network Manager
Open View Hosts by clicking View by Host (Figure 2) to add shared resource.
1
Figure 2. Network Manager - Host view
To add dedicated resource, click View by Company.
2 From Resources menu, choose Add Resource.
3 In the Add New Server dialog box, complete the following fields:
■ Host: Select the computer on which the resource is to be loaded.
■ Resource ID: Numeric sequential identifier for the resource. This value is automatically
assigned when the resource is created.
■ Port: The IP port the resource uses for TCPIPBus messaging.
■ Resource Type: The type of resource to configure.
■ Dedicated: If this check box is checked, then the resource is assigned to a single company
to use. If left unchecked, then the resource is available to all companies.
■ Resource Mode: This can be set to Master or Backup.
■ Company: Only used if Dedicated is checked.
■ Trace Level: The level of detail written to the logs (where 1 is lowest and 5 is highest).
4 Click Save to add another resource.
Configuring Resources Using Network Manager
Some resources require additional configuration after they are added. These resources are:
28
Contact Center Anywhere Installation Guide Version 8.1
Page 31

Installing CCA Server Components ■ Configuring CCA Resources
■ Call Center. See Configuring the Call Center Resource on page 29.
■ Redirect Server. See Configuring the Redirect Server Resource on page 31.
■ MP3 Server. See Configuring the MP3 Server Resource on page 32.
■ MCU Server. See Configuring the MCU Server Resource on page 33.
■ CTI Server. See Configuring the CTI Server Resource on page 33.
Configuring the Call Center Resource
The Call Center resource serves as the interface between the telephony server resources and the rest
of the system. It is responsible for controlling all voice and fax communications as well as IVR routing
capabilities. Complete the steps in the following procedure to configure a basic VoIP Call Center
resource.
To configure the Call Center resource
1
From Network Manager, choose the Call Center resource to modify.
2 From the Resources menu, choose Modify Resource.
3 From the Resource Information dialog box, click Advanced.
4 From the Call Center Advanced dialog box, complete the fields and then click Save.
5 Click Configure to continue configuration. Tab le 6 describes some of the fields.
Table 6. Call Center Configuration
Field Comments
Hardware Select TAW-VoIP
Ext length Depends on the customer. Typically 4 in length.
Dial Out The digit pressed to dial out. Typically this value is 9.
Pbx Prefix Only used if connections to an external PBX are required.
ANI Validation Size Value is typically 10; other countries may use a different value.
Auto Answer Call If this check box is not checked, the system rejects calls for
projects that are not defined.
If it is checked, the Call Center will accept calls for undefined
projects and play a prompt saying service unavailable.
Country Code 1 in the US.
Nation Prefix 1 in US.
Int Prefix 011 in US.
Private Prefix Leave blank.
Strip Country Code (check
box)
Typically checked. Removes the country code.
Contact Center Anywhere Installation Guide Version 8.1 29
Page 32

Installing CCA Server Components
Table 6. Call Center Configuration
Field Comments
Local Patterns Can be set to route calls to a specific call centers to reduce long
distance charges.
Dial Plan Group Typically set up to route calls through specific call centers
Description Text field to describe the call center’s setup.
■ Configuring CCA Resources
6 Click Save, and then Configure.
7 From the VoIP dialog box, complete the fields. Ta b l e 7 describes some of the fields.
Table 7. VoIP Interface General Configuration
Field Comments
Host IP address of the Call center host. This value must be correct or
one-way audio is the result.
Start Port Call Center uses a range of ports to pass calls. This is the starting
port in that range. Typically 8000 is used.
Payload MuLaw is the typical choice. G729 requires a special configuration.
Frame Per Second This value is always 160.
Sip Port 5060
8 From the VoIP dialog box (Figure 3), double click in the area beneath Name to continue
configuration of the call center.
Figure 3. Sample Figure
30
Contact Center Anywhere Installation Guide Version 8.1
Page 33

Installing CCA Server Components ■ Configuring CCA Resources
9 From the VoIP Detail dialog box, complete the fields. Tabl e 8 describes some of the fields.
Table 8. VoIP Interface Configuration
Field Comments
Name Specify what you are installing. For example, gateway or agent channels.
Interface Options are SipGateway, Sip, H323Gateway, and H323. Specify what you
are installing, and what your gateway is passing to you.
Number of
Channels
Gateway IP
Address
Gateway Type Options are Unknown, Audio codes, Quintum, Cisco.
Default DNIS The DNIS that is sent if a DNIS is not received from a project.
Sip Port 5060
Enable Takeback If this option is enabled, it prevents a call that is transferred out of
Outbound Select the check box if the call center allows outbound calling.
Predictive Select this check box if the call center allows predictive calling.
PBX Select this check box to allow the call center to act as a PBX.
Set this value to the number of channels the call center plans to use. The
number cannot exceed 120 channels for each server, and includes the
agent channels.
Address of the gateway that is sending the calls.
system from tying up a line. This service must be enabled with your
carrier.
Configuring the Redirect Server Resource
The Redirect Server is used to route calls to multiple call centers for load balancing. You can specify
that all inbound calls are to be directed to a specific set of call centers.
To configure Redirect Server
1
From Network Manager, choose Redirect Server as the resource to modify.
2 From the Resources menu, choose Modify Resource.
3 From the Resource Information dialog box, click Advanced.
Contact Center Anywhere Installation Guide Version 8.1 31
Page 34

Installing CCA Server Components
■ Configuring CCA Resources
4 From the Redirect Server dialog box (Figure 4), select the call center from the Call Centers
Unused list, and move it to the Call Centers Used list. Specify the call center to which calls will
be routed.
Figure 4. Redirect Server Configuration
5 Enter the Server IP Address. (This is the IP address of the machine where the Redirect Server is
installed.)
6 Click Save.
Configuring the MP3 Server Resource
The MP3 Server is responsible for automatically converting all WAV files listed in the QualityControl
table and History tables to MP3 format to facilitate transfer from the File Server to remote users such
as Agents and Supervisors, and to reduce the amount of storage required for these files. Complete
the steps in the following procedure to configure an MP3 server.
NOTE: Before configuring the MP3 Server, you need to install an mp3 converter on the same host
with the FTP server.
To configure an MP3 server
1
From Network Manager, choose MP3 Server as the resource to modify.
2 From the Resources menu, choose Modify Resource.
3 From the Resource Information dialog box, click Advanced.
32
Contact Center Anywhere Installation Guide Version 8.1
Page 35

Installing CCA Server Components ■ Configuring CCA Resources
4 From the MP3 Server dialog box, complete the fields and then click Save. Tab l e 9 describes the
fields.
Table 9. MP3 Server Configuration
Field Comments
Enable MP3 Encoding Selecting the check box that enables the MP3 conversion
option.
Command The location of the mp3 conversion executable file.
FTP Path The path to the FTP server share folder. For example,
D:\Storage.
Configuring the MCU Server Resource
MCU Server is used to make conference calls in CCA. Complete the steps in the following procedure
to configure a MCU server resource.
To configure an MCU server
From Network Manager, choose Redirect as the resource to modify.
1
2 From the Resources menu, choose Modify Resource.
3 From the Resource Information dialog box, click Advanced.
4 From the MCU Server dialog box, complete the fields, and then click Save. Tab l e 1 0 describes
some of the fields.
Table 10. MCU Server Configuration
Field Comments
IP Address The IP address of the server hosting the MCU service.
Payload Mulaw
Frame per Second Typically this value is 160.
Description Text that helps to identify the MCU service.
Configuring the CTI Server Resource
The CTI Server (Computer Telephony Interface) serves as the interface between the telephone
network resources (Call Center) and the software interface. In effect this resource is in charge of
managing all of the available telephony resources. While the Call Center provides the interface to
allow access to the resources, the CTI Server is the system brain that determines what to do with
those resources.
Configuration of the CTI Server resource is similar to configuration of the Redirect resource. However,
in the Call Center Unused and Call Centers User dialog box, if you do not select any call centers, the
application by default uses all of the call centers in the list.
Contact Center Anywhere Installation Guide Version 8.1 33
Page 36

Installing CCA Server Components
You only select a call center if you want the CTI server to use only that call center.
■ Configuring CCA Resources
To configure the CTI server
1
From Network Manager, choose CTI Server as the resource to modify.
2 From the Resources menu, choose Modify Resource.
3 From the Resource Information dialog box, click Advanced.
4 From the Call Centers (tab) dialog box, select the call center that will be dedicated to the CTI
server from the Call Centers Unused list, and move it to the Call Centers Used list.
Starting and stopping TCPIPBus
TCPIPBus is the key element of the CCA application server. With TCPIPBus, Web Server and all CCA
resources can communicate with each other in real-time. Before you can start CCA resources, the
TCPIPbus must be started in advance.
In Ms Windows:
■ Open the Services control panel in Start > Programs > Administrative tools > Services.
■ Navigate to the TAW TCP-IP Bus service.
■ On the right menu, click Start to start the TCPIPBus or click Stop to stop the service.
In Solaris/Linux:
■ Login as user account used to run CCA server resources.
■ To start TCPIPBus and run as service, run command: nohup tcpipbus &
■ To stop TCPIPBus:
❏ Find the process ID of the running TCPIPBus by command: ps -e | grep tcpipbus
❏ Kill the TCPIPBus process by command: kill -9 PID with PID is the process ID of the
running TCPIPBus.
Starting and Stopping CCA Resources
NOTE: Before you can start any CCA resource, the TCPIPBus must be installed and started first.
To start and stop resources
From Network Manager, choose the resource to be started or stopped.
1
2 Click Go to start it. Note that button Go is enable only when the resource is not running.
3 If the resource is running, click Stop to stop it.
34
Contact Center Anywhere Installation Guide Version 8.1
Page 37

5 Configuring the Web Server
This chapter describes how to configure and deploy CCA Web applications on WebLogic 8.1 SP5 and
Oracle 10g Application Server. It includes the following topics:
■ Deploying CCA Web Applications on Oracle 10g Application Server (OAS 10g)
■ Creating JDBC Connection Pool on OAS 10g
■ Creating JDBC Data Source on OAS 10g
■ Deploying CCA Web Applications on OAS 10g
■ Deploying CCA Web Applications on WebLogic 8.1 SP5
■ Creating a New Server Domain
■ Installing WebLogic as a Windows Service
■ Deploying CCA web applications on WebLogic
Deploying CCA Web Applications on Oracle 10g Application Server (OAS 10g)
This section describes how to deploy CCA Web applications on Oracle 10g Application Server Release
3. Oracle 9i database server is used for example. It covers the following topics:
■ Creating JDBC Connection Pool on OAS 10g
■ Creating JDBC Data Source on OAS 10g
■ Deploying CCA Web Applications on OAS 10g
■ Deploying the TAW Application
■ Deploying the CCA Application
■ Deploying Integration application
■ Updating the System Configuration Key
NOTE: Make sure SUN JDK 1.4.2_13 is installed on the Web server.
Contact Center Anywhere Installation Guide Version 8.1 35
Page 38

Configuring the Web Server
Server (OAS 10g)
■ Deploying CCA Web Applications on Oracle 10g Application
Creating JDBC Connection Pool on OAS 10g
To create a JDBC Connection pool:
1
Login the administration console of OAS 10g. The default administrator username of OAS 10g is
oc4jadmin. The typical URL is http://server_name:port/em with server_name i s host n a me
of OAS 10g server and port is you
2 From the Administration console home page, click the OAS 10g instance that is used to deploy
CCA web applications.
3 From the OAS 10g Instance detail page (Figure 5), in Administrations tab, click icon Create JDBC
Resources.
used when installing OAS 10g.
Figure 5. OAS 10g Instance Home Page
4 From the JDBC Resources page, click Create beneath Connection Pools label.
5 From the Create Connection Pool - Application page, select New Connection Pool and click
Continue.
6 From the JBDC Connection Pool detail page, complete all required fields. Ta b le 1 1 describes some
of fields:
Table 11. OAS 10g JDBC Connection Pool Details
Field Name Value
Name name of the JDBC connection
Connection Factory Class oracle.jdbc.pool.OracleDataSource
36
Contact Center Anywhere Installation Guide Version 8.1
Page 39

Configuring the Web Server ■ Deploying CCA Web Applications on Oracle 10g Application
Server (OAS 10g)
Table 11. OAS 10g JDBC Connection Pool Details
Field Name Value
JBDC URL jdbc:oracle:thin:@//dbservername:1521/SID
dbservername: host name or IP address of the database server
SID: the database service name
Username Database user name. Refer to parameter &13 in Creating a New
Oracle 9i Database on page 11.
Password Password of database user declared in previous parameter.
Option Use Cleartext Password should be selected.
7 Click Test Connection to verify the connection is set correctly.
8 Click Finish to finish creating connection pool.
Creating JDBC Data Source on OAS 10g
To create a JDBC Data Source:
1
Complete step 1 through step 3 in previous section to open the JDBC Resources page.
2 From the JDBC Resources page, click Create beneath Data Sources label.
3 From the Create Data Source - Application & Type, select Managed Data Source for data Source
Type. Click Continue.
4 From the Create Data Source - Managed Data Source, complete the following fields:
■ Name: name of data source
■ JNDI Location: use the same value with data source name
■ Transaction Level: Global & Local Transaction
■ Connection pool: select the connection pool created previously.
■ Login Timeout: 60
5 Click Finish. You will be brought back to the JDBC Resources page.
6 From the JDBC Resources page, click Test Connection icon beside the Data Source we have just
created to verify it is working correctly.
Deploying CCA Web Applications on OAS 10g
CCA Web Applications deployment on OAS 10g is similar to deployment on WebLogic.
Contact Center Anywhere Installation Guide Version 8.1 37
Page 40

Configuring the Web Server
■ Deploying CCA Web Applications on Oracle 10g Application
Server (OAS 10g)
Deploying the TAW Application
Complete the steps in the following procedure to deploy the TAW application.
To deploy TAW
1
Copy the TAW.war file in the CCA installation package to the OAS 10g server. For example,
C:\CCA\TAW.war.
2 Edit the web.xml file in TAW.war\WEB-INF directory (you may need an unzip tool to access this
file). Change values of context parameters listed in Ta b l e 1 2 :
Table 12. Context Parameters To Be Modified in TAW Web.xml File
Context Parameter Name Parameter Value
applicationPath path to the location of TAW directory. For example,
C:\bea\user_projects\domains\mydomain\applications\TAW.
URLstoragePath URL that clients will use to download files from their session.
Typically it is the URL to Storage directory under TAW directory.
For example, http://server_name/TAW/Storage
busConnection Host name or IP address of the server that TCPIPBus is running.
busConnectionBackup Host name or IP address of the server that secondary TCPIPBus
is running. This can be left blank if you only have one TCPIPBus
running.
databaseDatasource The name of the data source you created in previous
section.
databaseUser The user name of the WebLogic domain user. For example, cc81.
databasePassword The password of the WebLogic domain user. For example, cc81.
reportServerUrl http://server_name/TAW
isReportServer true
logPath Location where log files will be created. For example,
C:\bea\user_projects\domains\mydomain\applications\TAW
\WEB-INF\logs\ccanywhere.log
3 From the OAS 10g Instance home page (tab Applications), click Deploy to deploy a new web
application.
4 From the Deploy: Select Archive page, select option "Archive is already present on the server
where Application Server Control is running" and input the absolute path to TAW.war in OAS
10gserver. For example, C:\CCA\TAW.war. For deployment plan, use the default selection.
5 From the Deploy: Application attributes page, complete following fields and click Next.
■ Application name: TAW
■ Parent Application: default
■ Bind Web Module to Site: default website
38
Contact Center Anywhere Installation Guide Version 8.1
Page 41

Configuring the Web Server ■ Deploying CCA Web Applications on Oracle 10g Application
Server (OAS 10g)
■ Context Root: /TAW
6 From the Deploy: Deployment settings page, verify all information is correct and click Deploy to
deploy the TAW application. Wait until OAS 10g finishes deploying TAW application.
Deploying the CCA Application
Deploying CCA application is similar to deploying TAW application. Complete the following steps to
deploy CCA application:
1 Copy the CCA.war file in the CCA installation package to the OAS 10g server. For example,
C:\CCA\CCA.war.
2 Edit the web.xml file in CCA.war\WEB-INF directory. Change value of context parameters listed
in Tab l e 1 3 to reflect correct information of your system.
Table 13. Parameters To Be Modified in CCA Web.xml
Context Parameter Name Parameter Value
applicationPath path to the location of CCA directory. For example,
C:\bea\user_projects\domains\mydomain\applications\CCA.
URLstoragePath URL that clients will use to download files from their session.
Typically it is the URL to Storage directory under TAW directory.
For example, http://webserver/TAW/Storage
busConnection Host name or IP address of the server that TCPIPBus is running.
busConnectionBackup Host name or IP address of the server that secondary TCPIPBus
is running. This can be left blank if you only have one TCPIPBus
running.
databaseDatasource The name of the data source you created in previous
section.
databaseUser The user name of the WebLogic domain user. For example, cc81.
databasePassword The password of the WebLogic domain user. For example, cc81.
3 Complete steps 3 through step 6 in Deploying the TAW Application section to deploy CCA.war.
Deploying Integration application
Deploying Integration application is similar to deploying TAW application. Complete step 1 through
6 in Deploying the TAW Application to deploy Integration.war file. The only difference is that you do
not need to edit the web.xml file.
Updating the System Configuration Key
A configuration key should be provided with CCA installation package. This key is used to activate
the CCA web applications. If you do not apply the key, the CCA web applications will refuse to start.
Following these steps to apply a configuration key to activate CCA web applications.
Contact Center Anywhere Installation Guide Version 8.1 39
Page 42

Configuring the Web Server
■ Deploying CCA Web Applications on WebLogic 8.1 SP5
To update the system configuration key
Open the Key Configuration page in a web browser by URL: http://server_name/TAW/
1
configuration.jsp.
2 At the Configuration page, edit the following options:
■ Remote DB enabled - Disable this option by removing the checkmark.
■ Source - Select Sql Server if your are using Ms SQL Server or select Oracle if your database
server is Oracle 9i.
■ Hostname - Set this option to the name of the DB server or IP address.
■ Schema: This field is only displayed if you select Oracle option in previous Source field. Put
the name of the database schema.
■ Username: name of the DB user.
■ Password: password of the DB user.
■ Bus IP address: IP Address of the server where TCPIPBus is running.
■ Bus Backup IP address: IP Address of the server where secondary TCPIPBus is running. You
can leave it blank if you have only one TCPIPBus running.
■ Application Storage URL: http://server_name/TAW/Storage
■ Log level, Number of Logs, Log Files Maximum Size: Leave these fields as default values.
■ Application Password and Application Key: The password and application key are provided
with the CCA product.
3 Click OK to apply the configuration key.
4 Restart OAS 10g instance.
Deploying CCA Web Applications on WebLogic 8.1 SP5
This section describes how to deploy CCA web applications on a WebLogic 8.1 web server. It covers
the following topics:
■ Creating a New Server Domain
■ Installing WebLogic as a Windows Service
■ Deploying CCA web applications on WebLogic
■ Configuring listening port of WebLogic domain server and creating domain login user
■ Configuring the JDBC Connection Pool
■ Deploying the TAW Application
■ Deploying the CCA Application
■ Deploying the Integration Application
■ Updating the System Configuration Key
40
Contact Center Anywhere Installation Guide Version 8.1
Page 43

Configuring the Web Server ■ Deploying CCA Web Applications on WebLogic 8.1 SP5
Creating a New Server Domain
Before you can deploy web applications on a WebLogic web server, you must first create a WebLogic
Server domain. Complete the steps in the following procedure to create a new server domain on
WebLogic 8.1 SP5.
NOTE: Make sure Sun JDK 1.4.2_13 is installed on the Web server.
To create a new WebLogic server domain
1
Click Start > BEA WebLogic Platform 8.1 > Configuration Wizard.
2 From the WebLogic QuickStart page, click Create a new domain configuration.
3 From the Create or Extend a Configuration page, select Create a new WebLogic configuration,
and then click Next.
4 From the Select a Configuration Template page, accept the default templates.
5 From the Choose Express or Custom Configuration page, make sure that the Basic WebLogic
Server Domain is selected and then click Next.
6 From the Choose Express or Custom Configuration page, make sure that Express is selected and
then click Next.
7 From the Configure Administration Username and Password page, set the user name and
password for the domain administrator, and then click Next.
NOTE: You can change the user name and password at a later time.
8 From the Configure Server Start Mode and Java SDK page, select Production mode as the
WebLogic configuration startup mode.
a In the Java SDK section, select Other Java SDK and then click Browse.
b From the browser window, choose the location where the JDK 1.4.2_13 is installed and then click
Next.
9 From the Create WebLogic Configuration page, click Create.
The Creating Configuration opens.
10 Click Done when the configuration creation is completed.
11 Start the application clicking Start > Programs > BEA WebLogic Platform 8.1 > User Projects >
mydomain > Start Server.
The application prompts for a username and password in the command window.
Contact Center Anywhere Installation Guide Version 8.1 41
Page 44

Configuring the Web Server
■ Deploying CCA Web Applications on WebLogic 8.1 SP5
Installing WebLogic as a Windows Service
When installing WebLogic 8.1 on a Windows platform, you can optionally install the WebLogic Server
Node Manager as a Windows service. The WebLogic Server Node Manager is used to start and stop
managed servers in a domain. After you install the Node Manager as a Windows service, the service
is started the next time you reboot the system. You can also manually start the service from the
Windows Services control panel. Complete the steps in the following procedure to install WebLogic
as a Windows service.
To install WebLogic as a service
Edit file InstallService.cmd.
1
This file is located at BEA home directory\user_projects\domains\your_domain_name.
For example, C:\bea\user_projects\domains\mydomain.
a Delete "@rem" from the line “@rem set MEM_ARGS=-Xms32m -Xmx200m”.
b Change the settings similar to the following example for a Web server with 1 GB of RAM:
-Xms768m -Xmx768m
NOTE: If you have additional RAM, then you can reserve more memory for the service.
2 Open a Command Line window (Start > Run, and then type CMD).
3 From the Command Prompt, use cd command to navigate to the your domain directory. For
example, C:\bea\user_projects\domains\mydomain.
4 Run the InstallService.cmd followed by the username and password you used to create the
domain in step 7 of Creating a New Server Domain section.
For example: InstallService.cmd weblogic 123456 with weblogic is the username and
123456 is the password.
5 Start WebLogic using the Windows Services control panel (The name of the service installed is
beasvc_yourdomainname_myserver).
Deploying CCA web applications on WebLogic
Complete the steps in the following sections to deploy CCA web applications on WebLogic.
Configuring listening port of WebLogic domain server and creating domain login user
After we created a WebLogic domain, we can change the listening port of the domain server if we
need. By default, port 7001 is used when creating a domain. To deploy CCA web applications, we
also need to create a domain user. This user is used by CCA applications to access all domain
resources such as connection pool, data source, etc.
42
Contact Center Anywhere Installation Guide Version 8.1
Page 45

Configuring the Web Server ■ Deploying CCA Web Applications on WebLogic 8.1 SP5
To change listening port of domain server and create domain user
Open the BEA WebLogic Server Administration Console using a web browser, and log in.
1
The WebLogic Console URL is: http://server_name:7001/console
NOTE: 7001 is the default port when you create a new domain. If you use another port while
creating the domain, use that port in the URL.
2 You can change the HTTP listening port of the domain server.
a Go to: Servers > myserver > General and change Listen Port from 7001 to 80.
b Click Apply.
3 To deploy CCA web applications, we need to create a WebLogic user on the domain. If you do not
want to use a long password for the user, you change the password length.
a Go to Page: Security > Realms > myrealm > Providers > Authentication > Default Authenticator
> Details.
b Change the Minimum Password Length. For example, change from 8 to 4.
c Click Apply.
4 Create a WebLogic domain user (Figure 6).
Figure 6. Create User Page
a Go to Page: Security > Realms > myrealm > Users.
b Create new login user.
c Complete the required information, and then click Apply to save the information.
Configuring the JDBC Connection Pool
Before deploying CCA web applications, we need to create an JDBC connection pool to our CCA
database. Complete the steps in the following procedure to configure the JDBC connection pool.
To configure the JDBC connection pool
1
In Services > JDBC > Connection Pools, click the Configure new JDBC Connection Pool link.
Contact Center Anywhere Installation Guide Version 8.1 43
Page 46

Configuring the Web Server
■ Deploying CCA Web Applications on WebLogic 8.1 SP5
2 From the Database Type drop-down list, select MS SQL Server.
3 From the Database Server drop-down list, select BEA's MS SQL Server Driver (Type 4).
4 Click Continue.
5 From the Define Connection Properties page, enter your database configuration information:
a Name: Remove MyJDBC Connection Pool and enter the database name.
b Connection Properties:
❏ Database Name: name of CCA database. For example, cc81.
❏ Hostname: database server name or IP address. For example, support-db.
❏ Port: Listening port of database server. By default, 1433 is used by Ms SQL Server.
❏ Database User Name: name of user who has access to database. Refer to parameter %6
in Creating a New Database on MS SQL Server 2000 section. For example, cc81.
❏ Password: password of the database user. For example, cc81.
6 Click Next.
7 From the Test Database Connection page, click Test Driver Configuration. If a green Connection
Successful message appears, click Create and Deploy.
8 After the Connection Pool is created, you can define the connection configuration of the JDBC
connection pool.
a Click the Connection Pool that you created.
b Select the Connections tab.
9 Change the Initial Capacity to 25, and the Maximum Capacity to 50.
10 Click Show at the bottom right of the page to display the Advanced Options that must be edited.
You may need to scroll down the screen to see the options.
a Set the Test Frequency: 300
b Select the check box for Test Reserved Connections.
c Set the Connection Creation Retry Frequency to 300
d Leave other fields as default.
11 Click Apply.
Configuring the JDBC Data Source
Complete the steps in the following procedure to configure the JDBC data source.
To configure the JDBC data source
1
In Services > JDBC > Data Sources, click the link Configure a new JDBC Data Source.
2 From the Configure a JDBC Data Source page, enter your database name in both the Name and
JNDI Name text boxes.
44
Contact Center Anywhere Installation Guide Version 8.1
Page 47

Configuring the Web Server ■ Deploying CCA Web Applications on WebLogic 8.1 SP5
3 From the Connect to connection pool page, select the Pool Name created previously from the Pool
Name drop-down list
4 Click Continue.
5 From the Target the Data Source page, click to choose the selection under Independent Servers,
and then click Create.
6 Restart the WebLogic Service.
Deploying the TAW Application
Complete the steps in the following procedure to deploy the TAW application.
To deploy TAW
1
Copy the TAW.war file in the CCA installation package to the WebLogic domain applications
directory. For example, C:\bea\user_projects\domains\mydomain\applications.
2 Create a directory TAW under the applications directory and extract the TAW.war file into it.
3 Delete the TAW.war file.
4 Edit web.xml file to reflect correct information of your system. Refer to step 4 in Deploying the
TAW Application section to know what parameters need to be modified.
5 Connect to the Web based WebLogic console (http://server_name/console).
6 Click the Deploy a new Web Application Module link in Deployments > Web Application Modules.
7 In the Deploy a Web Application Module page, select the Applications directory link.
8 From the Select an archive for this Web application module page, select TAW and then click
Tar g et M o du l e.
9 From the Review your choices and deploy page, click Deploy.
10 Check log files created in log path to verify that no error is reported during the application
deployment.
Deploying the CCA Application
Deploying the CCA application is similar to deploying the TAW application.
To deploy CCA
1
Copy the CCA.war file in the CCA installation package to the WebLogic domain applications
directory. For example, C:\bea\user_projects\domains\mydomain\applications.
2 Create a directory CCA under the applications directory and extract the CCA.war file into it.
3 Delete the CCA.war file.
4 Edit web.xml file to reflect correct information of your system. Refer to Tab le 2 in step 4 in
Deploying the CCA Application section to know what parameters need to be modified.
Contact Center Anywhere Installation Guide Version 8.1 45
Page 48

Configuring the Web Server
■ Deploying CCA Web Applications on WebLogic 8.1 SP5
5 Connect to the Web based WebLogic console (http://server_name/console).
6 Click the Deploy a new Web Application Module link in Deployments > Web Application Modules.
7 In the Deploy a Web Application Module page, select the Applications directory link.
8 From the Select an archive for this Web application module page, select CCA and then click Target
Module.
9 From the Review your choices and deploy page, click Deploy.
10 Check log files created in log path to verify that no error is reported during the application
deployment.
Deploying the Integration Application
The steps for deploying the Integration application are similar to those in the topic Deploying the TAW
Application on page 45.
To deploy the Integration Application
1
Copy the integration.war file in the CCA installation package to the WebLogic domain applications
directory. For example, C:\bea\user_projects\domains\mydomain\applications.
2 Create a directory integration under the applications directory and extract the integration.war
file into it.
3 Delete the integration.war file
4 Deploy the application (complete Step 5 through Step 10 of Deploying the TAW Application on
page 45).
Updating the System Configuration Key
Updating system configuration key in WebLogic is the same with updating in OAS 10g. Refer to
Updating the System Configuration Key section to know how to update system configuration key for
CCA web applications.
46
Contact Center Anywhere Installation Guide Version 8.1
Page 49

6 Getting Started With CCA
After you complete Chapters 3 through 5 to install the CCA application, launch the CCA to verify that
it is working correctly. This chapter describes how to launch CCA and verify the CCA installation. It
includes the following topics:
■ Logging in Administration Manager (AM)
■ Logging into the Integrated Client
■ Enabling the Partition Feature
■ Making interactions
Logging in Administration Manager (AM)
The Administration Manager (AM) is a browser-based software program that allows users to set up,
configure, and maintain the CCA multi-media call center.
To login to AM
Open URL in a Web browser: http://server_name/TAW with server_name is the host name of the
1
web server.
2 Login as Network Administrator, using the default administrator account. This account is created
when installing CCA. The default user name and password for this user is netadmin/1234.
3 Make sure you can log in without any error message. If you cannot login, review the log files in
TAW/WEB-INF/logs/ccanywhere.log to find detail of any error during the CCA web applications
deployment.
4 Create an agent. Refer the CCA AM user guide to know how to add agents in AM.
Logging into the Integrated Client
The Integrated Client is an application for Contact Center agents. With the Integrated Client, agents
can communicate with customers in different ways, including by phone, email, and the Web. Agents
can work from any computer that has access to the Internet.
To login the Integrated Client
Open URL in a web browser: http://server_name/CCA.
1
2 Click link Click here to launch to open the login dialog box.
3 Complete required fields:
Contact Center Anywhere Installation Guide Version 8.1 47
Page 50

Getting Started With CCA
■ Company Alias: alias of the company we are logging in.
■ Username: username of the agent.
■ Password: password of agent
■ Enabling the Partition Feature
4 You should be able to log in. If you receive any error message, check the log files in CCA/WEB-
INFO/ccanywhere.log to find detail of any error during deployment.
Enabling the Partition Feature
Partition is a new feature in CCA version 8.1. A partition is a way for your administrator to segment
your call center operations into smaller, more manageable units. A unit is typically a set of projects
and workgroups, and other information related to them. Partitioning has two purposes; the first one
is of functionality and the second is of security. For example, assigning users to specific partitions
means they are able to log in and work only on one of these partitions. Furthermore, a supervisor
can monitor and supervise only the partitions to which he/she belongs.
The Partition feature is disabled by default. Following these steps to enable this feature:
To enable the Partition feature
1
Enable the Partition in the database by running the SQL query: Update systempackage set
packageconfigurable = 1 where resourcebundlekey='partitions'
2 Enable the Partition in Administration Manager (AM).
a After running the query, log in to AM page with a Network Administrator account.
b After login AM, click Go to and select Package Creator.
c Edit the package that your company is using. By default it is System Package.
d When the Partitions option appears in the Package Configuration page in AM, select the check
box for this option, and then click OK.
3 Log out and log in AM again to enable the Partition feature.
Making interactions
CCA is a multi-channel e-contact center solution. It helps agents communicate with customer
through many channels such as calls, email, chat, and so on. After installing CCA, make sure these
kinds of channel work correctly.
NOTE: Refer the AM user guide and Integrated user guide for detail on how to make these kinds of
interaction.
Making interactions
Login AM as described in the previous section.
1
2 Create a call, chat, and email project.
48
Contact Center Anywhere Installation Guide Version 8.1
Page 51

Getting Started With CCA ■ Making interactions
3 Login Integrated Client.
4 Make an inbound call to CCA system. Make sure that agent can accept the call.
5 Make an outbound call. Make sure that agent can connect to an outbound number.
6 Send an email interaction. Make sure that agent can receive the email.
7 Send an chat request to CCA system. Make sure that agent can chat with the customer.
Contact Center Anywhere Installation Guide Version 8.1 49
Page 52

Getting Started With CCA
■ Making interactions
50
Contact Center Anywhere Installation Guide Version 8.1
Page 53

Index
Symbols
.profile 23
/usr/ccanywhere 22
A
add a host manager 26
add a resource 28
Adding Shared and Dedicated Server
Resources 26
Administration console home page 36
Application Storage URL 40
applicationPath 38
Audio codes 31
Auto Answer Call 29
B
BEA's MS SQL Server Driver (Type 4) 44
busConnection 38
busConnectionBackup 38
C
Call Center 29
CCA Architecture 5
CCA_INSTALL_PATH 23
Chinese 11
Cisco 31
Com Switch Manager 27
Configuring CCA Resources 25
Connection Creation Retry Frequency 44
Connection Factory Class 36
Connection Pool 36
Connection Successful 44
Contact Center Anywhere 5
Context Root 39
Country Code 29
Creating Database Connection 19
CTI Bridge 27
CTI Server 33
Custom Configuration 41
D
Data Source Name 20
databaseDatasource 38
databasePassword 38
databaseUser 38
Dedicated resources 8
Default DNIS 31
Default Resources dialog 27
Deploying Integration application 39
Deploying the CCA Application 39
Deploying the TAW Application 38
Dial Out 29
Dial Plan Group 30
DMZ zone 7
E
Environment Variables 22
Express 41
Ext length 29
F
Frame Per Second 30
G
Gateway IP Address 31
Gateway Type 31
H
Host Manager 26
HTTP/J2EE server 7
I
Initial Capacity 44
Installing CCA Application Files 22
Installing WebLogic as a Windows
Service 42
InstallService.cmd 42
Int Prefix 29
Interface 31
Internet Zone 6
isReportServer 38
J
Japanese 11
JBDC URL 37
JDBC Data Source 37
L
Latin 11
LD_LIBRARY_PATH 23
Contact Center Anywhere Installation Guide Version 8.1 51
Page 54

Index ■ M
License Server 27
listening port of WebLogic 42
Load balancer 7
Local Patterns 30
log 22
logPath 38
M
MCU Server 27, 33
MCU server configuration 33
MEM_ARGS 42
MP3 Server 32
N
Nation Prefix 29
Network Manager 25
Number of Channels 31
O
OAS 10g Instance detail page 36
ODBC Data Source 20
ODBC System Administrator System 21
Oracle 9i Client Tools 20
ORACLE_HOME/network/admin 20
P
Parent Application 38
PATH 23
Payload 30
Pbx Prefix 29
Private Prefix 29
prompt 22
Q
Quintum 31
R
Redirect Server 27, 31
reportServerUrl 38
Resources 8
runmePatch.bat 16
S
server domain 41
Shared resources 8
Sip Port 30
SNMP Agent 27
Start Port 30
Starting and Stopping CCA Resources 34
Starting and stopping TCPIPBus 34
Strip Country Code 29
Sun Java JDK 1.4.2_13 11
System Configuration Key 39
T
table space 12
Takeback 31
taw_tcpip_bus.cfg 24
TCPIPBus 23
TCPIPBus on Ms Windows 23
TCPIPBus on Solaris/Linux 24
Test Connection 37
Test Driver Configuration 44
Test Frequency 44
Test Reserved Connections 44
Tier One 7
Tier Three 8
Tier Two 7
Tier Zero 6
tmp 22
TNS name 20
tnsnames.ora 12
U
Unified Messenger 27
Updating the System Configuration Key 39
URLstoragePath 38
UseMe.sql 12
UseMe_upgrade.sql 13
useMe70LatinLanguage.bat 15
User Zone 6
V
VOIP Interface general configuration 30
W
What’s New 3
52
Contact Center Anywhere Installation Guide Version 8.1
 Loading...