

Page 1

Oracle7 Server
Getting Started
for Windows NT
Release 7.3
Part No. A42396–1
The Relational Database Management System
Page 2

Oracle7 Server Getting Started for Windows NT , Release 7.3
Part No. A42396–1
Copyright 1996 Oracle Corporation
All rights reserved. Printed in the U.S.A.
Primary Author: Joseph Garcia
Contributors: Mark MacDonald, Uma Murthy, Liff Thomas, Milton Wan,
Vivekandha Raja, Prem Kumar, Dave Colello, Linlong Jiang, Tina Marc
This software was not developed for use in any nuclear, aviation, mass
transit, medical, or other inherently dangerous applications. It is the
customer’s responsibility to take all appropriate measures to ensure the safe
use of such applications if the programs are used for such purposes.
This software/documentation contains proprietary information of Oracle
Corporation; it is provided under a license agreement containing restrictions on
use and disclosure and is also protected by copyright law. Reverse engineering
of the software is prohibited.
If this software/documentation is delivered to a U.S. Government Agency of
the Department of Defense, then it is delivered with Restricted Rights and the
following legend is applicable:
Restricted Rights Legend Use, duplication, or disclosure by the Government is
subject to restrictions as set forth in subparagraph (c)(1)(ii) of DFARS
252.227–7013, Rights in Technical Data and Computer Software (October 1988).
Oracle Corporation, 500 Oracle Parkway, Redwood City, CA 94065.
If this software/documentation is delivered to a U.S. Government Agency not
within the Department of Defense, then it is delivered with “Restricted Rights”,
as defined in FAR 52.227–14, Rights in Data – General, including Alternate III
(June 1987).
The information in this document is subject to change without notice. If you
find any problems in the documentation, please report them to us in writing.
Oracle Corporation does not warrant that this document is error free.
Oracle, SQL*Loader, SQL*Net, and SQL*Plus are registered trademarks of
Oracle Corporation. Oracle7, Oracle7 Workgroup Server, Oracle Names, Oracle
Network Manager, Oracle Objects and Oracle MultiProtocol Interchange are
trademarks of Oracle Corporation.
All other products or company names are used for identification purposes only,
and may be trademarks of their respective owners.
Page 3

T
Preface
his User’s Guide is your primary source of introductory,
installation, and configuration information for Oracle7 Server for
Windows NT. Included in this Guide:
• introduction to Oracle7 Server for Windows NT
• installation instructions
• Oracle WebServer 1.0
• Oracle Spatial Data Option
• using Oracle7 Server for Windows NT
• getting the most out of Integration with Windows NT
• database maintenance
• documentation roadmap
• directory structures
• initialization parameter files
• configuration file parameters and the Windows NT Registry
• messages and codes
• national language support
iiiPreface
Page 4

Audience
This Guide is necessary for anyone installing, configuring, or
administering Oracle7 Server for Windows NT.
Prerequisites
This Guide assumes that you:
• are familiar with the concepts presented in the generic
• have installed and tested Windows NT and configur ed it for your
• are familiar with W indows NT and your network transport
Oracle7
Concepts
How this Guide Is Organized
Chapter 1 Introducing Oracle7 Server for Windows NT
Describes the basic features of Oracle7 Server for Windows NT. It also
describes new features of this release, and the contents of your Oracle7
Server for Windows NT package.
documentation for Oracle7 Server for Windows NT. (See
Documentation Roadmap for information about documentation.)
PC and network hardware
protocol
Additional Information: If you are not familiar with Oracle
products and terminology, see Oracle7 Server Concepts.
Chapter 2 Installing Oracle7 Server for Windows NT
Instructions for installing and configuring Oracle7 Server for W indows
NT, and for migrating from earlier releases.
Chapter 3 Using Oracle7 Server for Windows NT
Instructions for performing the tasks necessary to set up and run the
Oracle7 Server for Windows NT.
Additional Information: For information on using the
graphical database tools, see the integrated online Help
included with the Database Tools. It contains important
information about the database tools you can install.
Chapter 4 Getting the Most out of Integration with Windows NT
Instructions for using the W indows NT operating system integration
features.
iv Oracle7 Server Getting Started for Windows NT
Page 5

Chapter 5 Database Maintenance
Instructions for performing ongoing database maintenance tasks using
graphical and command–line procedures.
Appendix A Documentation Roadmap
Details the documentation included in your package, and how you can
use it most effectively.
Appendix B Directory Structures
Directory structures for Windows NT and Windows/Windows95.
Additionally, information about the types of possible Oracle WebServer
installations is included.
Appendix C Initialization Parameter Files
Describes Oracle7 Server for Windows NT initialization parameters,
how to edit them, and Windows NT–specific defaults (and ranges) for
them.
Appendix D Configuration Parameters and the NT Registry
Describes the use of the Windows NT Registry for various Oracle
products. Additionally, it lists the defaults and ranges for configuration
parameters.
Appendix E Messages and Codes
Lists the error messages and codes specific to installing and using
Oracle7 Server for Windows NT and supported network protocols.
Appendix F National Language Support
Explains the NLS_LANG configuration parameter (and its components),
and lists the available options.
Using the Documentation
This Guide, contains installation and operating information specific to
the Oracle7 Server for Windows NT envir onment. It includes frequent
references to the location—in other Oracle7 Server documents—of
additional sources of information on topics discussed in this Guide.
For New Users
Oracle7 Server Concepts describes the essential concepts behind an Oracle
database server. Users new to Oracle products should refer to this
document before installing Oracle7 Server for Windows NT.
vPreface
Page 6

Installation
Database Administration
Server Utilities
Database Tools
See Installing Oracle7 Server for Windows NT of this Guide and the
accompanying Release Notes to answer questions regarding Oracle7
Server for Windows NT installation.
This Guide contains information about database administration on
Windows NT systems. Oracle7 Server Administrator’ s Guide contains
information on Oracle7 Server database administration not specific to
Windows NT.
Oracle7 Server Utilities contains detailed generic information on the
utilities included with your Oracle7 Server for Windows NT package
and their use.
See the chapters on setting up and operating Oracle7 Server for
Windows NT of this Guide for Windows NT–specific (32–bit)
information on these utilities.
Detailed information on the GUI–based database tools is included as
online Help. These tools can be used from a Windows platform, or
through Windows on a Win32 (WOW) subsystem.
Troubleshooting
Oracle7 Server Messages contains a complete listing of Oracle7 Server
error messages and codes. For Oracle7 Server messages and codes
specific to Windows NT operation, see Messages and Codes in this Guide.
Release Notes
Release Notes contain information not available at the time the
documentation was created. See Release Notes for information about
specific features and procedures.
vi Oracle7 Server Getting Started for Windows NT
Page 7

Conventions Used in this Guide
Note these typographical conventions when reading this Guide:
Monospace text
[ ]
|
Punctuation
UPPERCASE
lowercase mono
lowercase italics
Type text exactly as shown. Text typed for a
command statement is not case sensitive unless
noted otherwise.
Brackets enclose optional items or indicate a
function key. Do not enter the brackets.
A vertical bar represents an “or” option between
several options. You must enter only one of the
options. Do not enter the vertical bar .
Punctuation other than brackets and vertical bars
must be entered in commands exactly as shown.
Uppercase characters within the text represent
command names, SQL reserved words and
keywords, and filenames.
Lowercase characters within command lines
represent variables. You should substitute an
appropriate value for the variable. In examples,
lowercase characters represent sample values for
the variables.
Lowercase italics in the text represent variables. You
should substitute an appropriate value for the
variable.
C:\>
\DIRECTORY
SID
Special icons are provided to alert you to particular information in this
Guide:
Attention: Calls your attention to important
☞
information and suggestions.
C:\> represents the Windows NT command prompt
of the current hard disk drive. Your prompt may
differ and may, at times, reflect the subdirectory in
which you are working.
A backslash before a directory name indicates that
the directory is a subdirectory.
SID (system identifier) represents the unique name
of an Oracle instance. The SID you assign to a
particular instance becomes the value of the
ORACLE_SID initialization parameter for the
associated database.
viiPreface
Page 8

Reader Comments
Additional Information: Highlights text referring you to other
parts of the other Oracle documentation.
W arning: Highlights text that warns you of actions that could
be particularly damaging or fatal to your operations.
We value and appreciate your comments as an Oracle user and reader of
our manuals. As we write, revise, and evaluate our documentation, your
opinions are the most important input we receive. At the back of this
Guide is a Reader’s Comment Form. We encourage you to use it to tell
us what you like and dislike about this (or other) Oracle manuals.
If the form is missing, or if you would like to contact us, write us at the
following address:
Desktop Documentation Manager
Workgroup Solutions Division
Oracle Corporation
500 Oracle Parkway, Box 659107
Redwood Shores, CA 94065
viii Oracle7 Server Getting Started for Windows NT
Page 9

Contents
Chapter 1 Introducing Oracle7 Server for Windows NT 1 – 1. . . . . . . . . . . . . .
Special Terms 1 – 2. . . . . . . . . . . . . . . . . . . . . . . . . . . . . . . . . . . . . . . . . . .
Oracle7 Server for Windows NT Overview 1 – 3. . . . . . . . . . . . . . . . .
Feature Highlights 1 – 3. . . . . . . . . . . . . . . . . . . . . . . . . . . . . . . . . . .
Features Specific to Windows NT 1 – 6. . . . . . . . . . . . . . . . . . . . . .
Oracle7 Server for Windows NT Product Contents 1 – 7. . . . . . . . . .
Server—Windows NT 1 – 8. . . . . . . . . . . . . . . . . . . . . . . . . . . . . . . .
Client Software 1 – 9. . . . . . . . . . . . . . . . . . . . . . . . . . . . . . . . . . . . . .
Oracle Networking Software 1 – 11. . . . . . . . . . . . . . . . . . . . . . . . . .
Chapter 2 Installing Oracle7 Server for Windows NT 2 – 1. . . . . . . . . . . . . . . .
A Note on Directories 2 – 2. . . . . . . . . . . . . . . . . . . . . . . . . . . . . . . .
System Requirements—Server 2 – 2. . . . . . . . . . . . . . . . . . . . . . . . . . . .
Oracle7 Server for Windows NT Hardware 2 – 2. . . . . . . . . . . . .
Advanced Replication Option Hardware 2 – 2. . . . . . . . . . . . . . .
Software 2 – 3. . . . . . . . . . . . . . . . . . . . . . . . . . . . . . . . . . . . . . . . . . . .
Windows on Win32 (WOW) 2 – 4. . . . . . . . . . . . . . . . . . . . . . . . . . . . . .
Before You Install 2 – 5. . . . . . . . . . . . . . . . . . . . . . . . . . . . . . . . . . . . . . .
First Time Installation 2 – 5. . . . . . . . . . . . . . . . . . . . . . . . . . . . . . . .
Re–installation of Oracle7 Server for Windows NT 2 – 5. . . . . . .
Co–existence of Oracle7 Server for Windows NT and Oracle7
Workgroup Server 2 – 5. . . . . . . . . . . . . . . . . . . . . . . . . . . . . . . . . . . . . . .
Installation Types—Windows NT 2 – 6. . . . . . . . . . . . . . . . . . . . . . . . .
Networking Products 2 – 6. . . . . . . . . . . . . . . . . . . . . . . . . . . . . . . .
Oracle Documentation 2 – 6. . . . . . . . . . . . . . . . . . . . . . . . . . . . . . .
Oracle7 Client 2 – 6. . . . . . . . . . . . . . . . . . . . . . . . . . . . . . . . . . . . . . .
ixContents
Page 10

Oracle7 Server 2 – 7. . . . . . . . . . . . . . . . . . . . . . . . . . . . . . . . . . . . . .
Programmer/2000 2 – 7. . . . . . . . . . . . . . . . . . . . . . . . . . . . . . . . . . .
SQL*Plus 2 – 7. . . . . . . . . . . . . . . . . . . . . . . . . . . . . . . . . . . . . . . . . . .
Selective 2 – 8. . . . . . . . . . . . . . . . . . . . . . . . . . . . . . . . . . . . . . . . . . . .
Options—Windows NT Server 2 – 9. . . . . . . . . . . . . . . . . . . . . . . .
Using Oracle Installer 2 – 9. . . . . . . . . . . . . . . . . . . . . . . . . . . . . . . . . . . .
Windows NT Installations 2 – 9. . . . . . . . . . . . . . . . . . . . . . . . . . . . . . . .
Installation Types—Windows/Windows 95 Clients 2 – 16. . . . . . . . . .
Oracle7 Client 2 – 16. . . . . . . . . . . . . . . . . . . . . . . . . . . . . . . . . . . . . . .
Oracle Documentation 2 – 17. . . . . . . . . . . . . . . . . . . . . . . . . . . . . . .
Selective 2 – 17. . . . . . . . . . . . . . . . . . . . . . . . . . . . . . . . . . . . . . . . . . . .
Client System Requirements 2 – 18. . . . . . . . . . . . . . . . . . . . . . . . . .
Configuring SQL*Net 2 – 22. . . . . . . . . . . . . . . . . . . . . . . . . . . . . . . . . . . .
Separately Installing Oracle7 Options 2 – 23. . . . . . . . . . . . . . . . . . . . . .
Removing Oracle7 Products/Options 2 – 23. . . . . . . . . . . . . . . . . . . . . .
Migrating from Earlier Releases 2 – 24. . . . . . . . . . . . . . . . . . . . . . . . . . .
Overview 2 – 24. . . . . . . . . . . . . . . . . . . . . . . . . . . . . . . . . . . . . . . . . . .
Prepare for the Migration 2 – 24. . . . . . . . . . . . . . . . . . . . . . . . . . . . .
Install the Oracle7 Server 2 – 26. . . . . . . . . . . . . . . . . . . . . . . . . . . . .
Move Database Files 2 – 27. . . . . . . . . . . . . . . . . . . . . . . . . . . . . . . . .
Chapter 3 Using Oracle7 Server for Windows NT 3 – 1. . . . . . . . . . . . . . . . . . . .
Overview of Database Administration Tasks 3 – 2. . . . . . . . . . . . . . . .
What is an Instance? 3 – 2. . . . . . . . . . . . . . . . . . . . . . . . . . . . . . . . .
The Starter Database 3 – 2. . . . . . . . . . . . . . . . . . . . . . . . . . . . . . . . .
Oracle Services 3 – 5. . . . . . . . . . . . . . . . . . . . . . . . . . . . . . . . . . . . . . . . .
Instance Manager 3 – 6. . . . . . . . . . . . . . . . . . . . . . . . . . . . . . . . . . . . . . .
Creating an Instance (and Database) with Instance
Manager 3 – 6. . . . . . . . . . . . . . . . . . . . . . . . . . . . . . . . . . . . . . . . . . . .
Changing Passwords 3 – 8. . . . . . . . . . . . . . . . . . . . . . . . . . . . . . . . .
Advanced Parameters 3 – 9. . . . . . . . . . . . . . . . . . . . . . . . . . . . . . . .
Starting a Database 3 – 10. . . . . . . . . . . . . . . . . . . . . . . . . . . . . . . . . . . . . .
Starting a Database Using Instance Manager 3 – 11. . . . . . . . . . . .
Starting a Database Using Server Manager 3 – 11. . . . . . . . . . . . . .
Shutting Down an Instance/Database 3 – 11. . . . . . . . . . . . . . . . . .
Delete an Instance 3 – 12. . . . . . . . . . . . . . . . . . . . . . . . . . . . . . . . . . .
Running Multiple Instances 3 – 12. . . . . . . . . . . . . . . . . . . . . . . . . . .
Using Server Manager 3 – 12. . . . . . . . . . . . . . . . . . . . . . . . . . . . . . . .
Creating an Instance 3 – 13. . . . . . . . . . . . . . . . . . . . . . . . . . . . . . . . . . . . .
Starting an Instance 3 – 13. . . . . . . . . . . . . . . . . . . . . . . . . . . . . . . . . . . . .
Running Multiple Instances 3 – 13. . . . . . . . . . . . . . . . . . . . . . . . . . . . . . .
2 – 22. . . . . . . . . . . . . . . . . . . . . . . . . . . . . . . . . . . . . . . . . . . . . . . . . . . .
x Oracle7 Server Getting Started for Windows NT
Page 11

Creating a New Database 3 – 14. . . . . . . . . . . . . . . . . . . . . . . . . . . . . . . .
Preparing to Create a New Database 3 – 15. . . . . . . . . . . . . . . . . . .
Starting an Instance and Creating the Database 3 – 18. . . . . . . . . .
Creating Database Objects 3 – 20. . . . . . . . . . . . . . . . . . . . . . . . . . . . . . . .
Setting Resource Costs 3 – 20. . . . . . . . . . . . . . . . . . . . . . . . . . . . . . . . . . .
Using the Oracle7 Server Utilities 3 – 21. . . . . . . . . . . . . . . . . . . . . . . . .
Using Export and Import 3 – 21. . . . . . . . . . . . . . . . . . . . . . . . . . . . .
Using SQL*Loader 3 – 22. . . . . . . . . . . . . . . . . . . . . . . . . . . . . . . . . . .
SQL*Loader Processing Options 3 – 22. . . . . . . . . . . . . . . . . . . . . . .
Instance Manager Command Line Commands 3 – 24. . . . . . . . . . . . . .
–NEW 3 – 24. . . . . . . . . . . . . . . . . . . . . . . . . . . . . . . . . . . . . . . . . . . . . .
–EDIT 3 – 24. . . . . . . . . . . . . . . . . . . . . . . . . . . . . . . . . . . . . . . . . . . . . .
–STARTUP 3 – 25. . . . . . . . . . . . . . . . . . . . . . . . . . . . . . . . . . . . . . . . .
–SHUTDOWN 3 – 25. . . . . . . . . . . . . . . . . . . . . . . . . . . . . . . . . . . . . .
–DELETE 3 – 25. . . . . . . . . . . . . . . . . . . . . . . . . . . . . . . . . . . . . . . . . . .
/help 3 – 25. . . . . . . . . . . . . . . . . . . . . . . . . . . . . . . . . . . . . . . . . . . . . .
ORADIM Log 3 – 26. . . . . . . . . . . . . . . . . . . . . . . . . . . . . . . . . . . . . . .
Chapter 4 Getting the Most out of Integration with Windows NT 4 – 1. . . . .
Oracle7 and the Windows NT Performance Monitor 4 – 2. . . . . . . . .
Performance Monitor Objects 4 – 3. . . . . . . . . . . . . . . . . . . . . . . . .
Event Viewer 4 – 5. . . . . . . . . . . . . . . . . . . . . . . . . . . . . . . . . . . . . . . . . . .
Database Security 4 – 5. . . . . . . . . . . . . . . . . . . . . . . . . . . . . . . . . . . . . . .
Starting Services Automatically 4 – 7. . . . . . . . . . . . . . . . . . . . . . . . . . .
Using Windows NT OS Authentication 4 – 7. . . . . . . . . . . . . . . . . . . .
NT GROUPS and ROLES 4 – 8. . . . . . . . . . . . . . . . . . . . . . . . . . . . .
Chapter 5 Database Administration 5 – 1. . . . . . . . . . . . . . . . . . . . . . . . . . . . . . . .
Backup Manager 5 – 2. . . . . . . . . . . . . . . . . . . . . . . . . . . . . . . . . . . . . . . .
Hot Database File Backup 5 – 2. . . . . . . . . . . . . . . . . . . . . . . . . . . . . . . .
Backing Up Active Files 5 – 2. . . . . . . . . . . . . . . . . . . . . . . . . . . . . .
Restoring Active Files 5 – 3. . . . . . . . . . . . . . . . . . . . . . . . . . . . . . . .
Backing Up RAW Files 5 – 4. . . . . . . . . . . . . . . . . . . . . . . . . . . . . . .
Restoring RAW Files 5 – 4. . . . . . . . . . . . . . . . . . . . . . . . . . . . . . . . .
Recovery Manager 5 – 4. . . . . . . . . . . . . . . . . . . . . . . . . . . . . . . . . . . . . .
Using Trace and Alert Files 5 – 5. . . . . . . . . . . . . . . . . . . . . . . . . . . . . . .
Logging Error Messages 5 – 5. . . . . . . . . . . . . . . . . . . . . . . . . . . . . . . . .
Refreshing Table Snapshots 5 – 6. . . . . . . . . . . . . . . . . . . . . . . . . . . . . . .
Advanced Replication Option 5 – 7. . . . . . . . . . . . . . . . . . . . . . . . . . . . .
Installation Requirements 5 – 7. . . . . . . . . . . . . . . . . . . . . . . . . . . . .
Upgrading 5 – 7. . . . . . . . . . . . . . . . . . . . . . . . . . . . . . . . . . . . . . . . . .
xiContents
Page 12

Using Advanced Replication Option 5 – 8. . . . . . . . . . . . . . . . . . .
System Requirements for the Advanced Replication Option5 – 8
Oracle Tablespace Requirements 5 – 8. . . . . . . . . . . . . . . . . . . . . . .
Initialization Parameters for Advanced Replication 5 – 9. . . . . .
Setup Procedures 5 – 9. . . . . . . . . . . . . . . . . . . . . . . . . . . . . . . . . . . .
Other Notes 5 – 10. . . . . . . . . . . . . . . . . . . . . . . . . . . . . . . . . . . . . . . . .
SQL*Language Conventions 5 – 11. . . . . . . . . . . . . . . . . . . . . . . . . . . . . .
ROWID Datatype 5 – 11. . . . . . . . . . . . . . . . . . . . . . . . . . . . . . . . . . . .
Appendix A Documentation Roadmap A – 1. . . . . . . . . . . . . . . . . . . . . . . . . . . . . . .
Documentation Catalog A – 2. . . . . . . . . . . . . . . . . . . . . . . . . . . . . . . . . .
Roadmap A – 4. . . . . . . . . . . . . . . . . . . . . . . . . . . . . . . . . . . . . . . . . . . . . .
Documentation Sets A – 5. . . . . . . . . . . . . . . . . . . . . . . . . . . . . . . . . .
Installation Documentation A – 5. . . . . . . . . . . . . . . . . . . . . . . . . . .
Oracle7 for Windows NT Administration Documentation A – 5.
Oracle Product Documentation A – 6. . . . . . . . . . . . . . . . . . . . . . . .
Using Oracle Documentation A – 13. . . . . . . . . . . . . . . . . . . . . . . . . .
Appendix B Oracle7 Server Directory Structures B – 1. . . . . . . . . . . . . . . . . . . . . . .
Windows NT Directory Structure B – 2. . . . . . . . . . . . . . . . . . . . . . . . .
Windows/ Windows 95 Directory Structure B – 4. . . . . . . . . . . . . . . .
Oracle WebServer Installation Types B – 5. . . . . . . . . . . . . . . . . . . . . . .
Appendix C Initialization Parameter Files C – 1. . . . . . . . . . . . . . . . . . . . . . . . . . . .
What Is an Initialization Parameter File? C – 2. . . . . . . . . . . . . . . . . . .
Location of Initialization Parameter Files C – 2. . . . . . . . . . . . . . .
Editing Initialization Parameter Files C – 2. . . . . . . . . . . . . . . . . . .
The Sample Initialization Parameter File C – 2. . . . . . . . . . . . . . . .
Parameters to Modify when Creating a New Database C – 3. . . . . . .
Initialization Parameters C – 4. . . . . . . . . . . . . . . . . . . . . . . . . . . . . . . . .
Appendix D Configuration Parameters and the Windows NT Registry D – 1. . .
About Configuration Parameters D – 2. . . . . . . . . . . . . . . . . . . . . . . . . .
Editing Configuration Parameters D – 2. . . . . . . . . . . . . . . . . . . . . . . . .
Configuration Parameter Descriptions D – 3. . . . . . . . . . . . . . . . . . . . .
General Parameters D – 3. . . . . . . . . . . . . . . . . . . . . . . . . . . . . . . . . .
Networking Parameters D – 7. . . . . . . . . . . . . . . . . . . . . . . . . . . . . .
xii Oracle7 Server Getting Started for Windows NT
Page 13

Appendix E Messages and Codes E – 1. . . . . . . . . . . . . . . . . . . . . . . . . . . . . . . . . . . .
Logging Error Messages E – 2. . . . . . . . . . . . . . . . . . . . . . . . . . . . . . . . .
Installer Error Messages E – 2. . . . . . . . . . . . . . . . . . . . . . . . . . . . . . . . . .
Codes 9200–9499: Oracle Database Messages E – 5. . . . . . . . . . . . . . .
Codes 4000–4999: Windows NT–Specific Oracle Messages E – 9. . .
File I/O Errors: OSD–4000 to OSD–4099 E – 9. . . . . . . . . . . . . . . .
Memory Errors: OSD–4100 to OSD–4199 E – 12. . . . . . . . . . . . . . .
Process Errors: OSD–4200 to OSD–4299 E – 14. . . . . . . . . . . . . . . .
Loader Errors: OSD–4300 to OSD–4399 E – 16. . . . . . . . . . . . . . . . .
Semaphore Errors: OSD–4400 to OSD–4499 E – 16. . . . . . . . . . . . .
Miscellaneous Errors: OSD–4500 to OSD–4599 E – 17. . . . . . . . . . .
Codes 6100 – 6199: SQL*Net TCP/IP Errors E – 19. . . . . . . . . . . . . . . .
Codes 6220 – 6400: SQL*Net Named Pipes Errors E – 25. . . . . . . . . . .
Codes 6401 – 6430: NETCMN Errors E – 28. . . . . . . . . . . . . . . . . . . . . .
Appendix F National Language Support F – 1. . . . . . . . . . . . . . . . . . . . . . . . . . . . . .
NLS_LANG F – 2. . . . . . . . . . . . . . . . . . . . . . . . . . . . . . . . . . . . . . . . . . . .
Territory and Character Set Defaults F – 2. . . . . . . . . . . . . . . . . . .
Selecting Alternate Territories and Character Sets F – 4. . . . . . . .
NLS Initialization Parameters F – 4. . . . . . . . . . . . . . . . . . . . . . . . . . . . .
NLS_LANGUAGE and NLS_TERRITORY F – 4. . . . . . . . . . . . . .
Using ALTER SESSION F – 4. . . . . . . . . . . . . . . . . . . . . . . . . . . . . .
NLS_SORT F – 5. . . . . . . . . . . . . . . . . . . . . . . . . . . . . . . . . . . . . . . . .
Parameter Lists F – 5. . . . . . . . . . . . . . . . . . . . . . . . . . . . . . . . . . . . . . . . .
Languages F – 5. . . . . . . . . . . . . . . . . . . . . . . . . . . . . . . . . . . . . . . . . .
Territories F – 6. . . . . . . . . . . . . . . . . . . . . . . . . . . . . . . . . . . . . . . . . .
Single–byte Character Sets F – 7. . . . . . . . . . . . . . . . . . . . . . . . . . . .
Multi Byte Character Sets F – 8. . . . . . . . . . . . . . . . . . . . . . . . . . . . .
Installing Additional Languages F – 8. . . . . . . . . . . . . . . . . . . . . . . . . .
Index
xiiiContents
Page 14

xiv Oracle7 Server Getting Started for Windows NT
Page 15

C H A P T E R
T
1
Introducing Oracle7 Server for Windows NT
his chapter introduces you to Oracle7 Server for Windows NT. It
includes:
• special terms
• Oracle7 Server for Windows NT overview
• Oracle7 Server for Windows NT integration with Windows NT
• Oracle7 Server for Windows NT product contents
1 – 1Introducing Oracle7 Server for Windows NT
Page 16

Special Terms
Note the following special terms when using this Guide:
Client
Instance
Listener
Oracle7 Server
Oracle7 database
Oracle7 RDBMS
Oracle Protocol
Adapter
A system that runs an Oracle–supported
application and connects to the shared database(s)
on an Oracle7 Server .
The combination of processes that begins each time
a database is started.
An executable program that enables an Oracle7
Server to accept connections from client
workstations.
A host system that runs a multiuser Oracle7
Relational Database Management System (RDBMS)
and maintains at least one database that can be
shared by remote clients. The term Oracle7 Server
refers to the RDBMS that is using SQL*Net and is
capable of serving Oracle clients.
The software used to create and maintain the
database system, as well as the actual data stored in
the database.
The Oracle Relational Database Management
System. Oracle7 Server for Windows NT is an
Oracle RDBMS.
The software component of the Oracle Transparent
Network Substrate (TNS) architecture that
translates TNS function calls into requests to the
underlying network protocol.
Oracle tool
SQL
SQL*Net
Oracle Database
Tools
1 – 2 Oracle7 Server Getting Started for Windows NT
Any Oracle application tool (such as SQL*Plus), an
Oracle end–user tool (such as Oracle Forms), or a
third–party software program that interfaces with
an Oracle7 Server .
Structured Query Language—the internationally
accepted standard for defining and manipulating
relational databases.
The Oracle client/server communication software
that offers transparent operation to Oracle tools or
databases over any type of network protocol and
operating system.
Oracle Database Tools are a suite of powerful,
easy–to–use, graphical database management tools
Page 17

that help you complete database tasks efficiently.
Oracle Database Tools include: Database Manager,
User Manager , Object Manager, Session Manager,
Database Expander, Import, Export, and
SQL*Loader.
Server Utilities
Oracle7 Server Utilities are included in the server
software of your Oracle7 Server for Windows NT
package. Oracle7 Server Utilities include: Backup
Manager, Recovery Manager, Server Manager,
Import, Export, and SQL*Loader (all Windows NT
versions).
Additional Information: For information on using the
graphical database tools, see the integrated online Help
included with the Database Tools.
Oracle7 Server for Windows NT Overview
Oracle7 Server for Windows NT is a full–function Release 7.3 Oracle
Relational Database Management System (RDBMS).
Oracle7 Server for Windows NT runs on a personal computer (PC) that
is part of a local area network (LAN). The server machine must be
running W indows NT Version 3.51. This customized Windows NT
version of the Oracle RDBMS operates in essentially the same manner as
the Oracle RDBMS on other platforms.
Note:
This Guide describes only the features of the Oracle7
Server for Windows NT software that apply to the Windows NT
operating system. For information about the Oracle7 RDBMS in
general, see Oracle7 Server Concepts, and other documentation
included in your package.
Feature Highlights
This release of Oracle7 Server for Windows NT includes the following
features:
• Distributed Option—separately licensable feature. Distributed
Option is a system for distributing data in your database(s) across
multiple machines. Additionally, the processing of your data can
be distributed among multiple machines.
Additional Information: For more information about the
Distributed Option, see Oracle7 Server Distributed Systems,
Distributed
Option
1 – 3Introducing Oracle7 Server for Windows NT
Page 18

SDO
Oracle7 Server
Tuning
Volume I: Distributed Data, Oracle7 Server Concepts, Oracle7 Server
Administrator’s Guide, and other appropriate documentation
(included online with your product).
• Spatial Data Option—separately licensable feature. The Spatial
Data Option enables you to store spatial data within the relational
database model.
Additional Information: For more information on the Spatial
Data Option, see Spatial Data Option Application Developer’s
Guide, Spatial Data Option Reference and Administrator’s Guide,
and Spatial Data Option Overview.
• Parallel Query Option—separately licensable feature. With the
parallel query option, multiple processes can work together
simultaneously to process a single SQL statement. By dividing the
work necessary to process a statement among multiple server
processes, the Oracle Server can process the statement mor e
quickly than if only a single server process processed it.
Additional Information: For more information on the Parallel
Query Option, see Oracle7 Server Tuning.
• Enterprise Manager—system management tools that combine a
single point–of–control management console, intelligent agents,
and common services in an integrated, comprehensive systems
management platform.
Additional Information: For more information on Enterprise
Manager, see Oracle Enterprise Manager Concepts Guide, and
Oracle Enterprise
Manager
other Enterprise Manager documents included in your package.
• W ebServer 1.0 —bundled as part of Oracle7 Server for Windows
NT. Oracle WebServer 1.0 enables you to bring data stored on
your Oracle7 Server to the World Wide Web.
Additional Information: For more information on the
WebServer 1.0, see Oracle WebServer User’s Guide .
WebServer
User’s Guide
• Advanced Replication Option—separately licensable feature.
Advanced Replication Option enables users to maintain and
manipulate multiple copies of data at different sites in a
distributed environment.
Additional Information: There are many configuration and
usage possibilities with Advanced Replication. For more
Advanced
Replication
information about Advanced Replication, in this Guide, Oracle7
Server Distributed Systems, V olume II: Replicated Data, Oracle7
Server Concepts, Oracle7 Server Administrator’s Guide, and other
appropriate documentation.
1 – 4 Oracle7 Server Getting Started for Windows NT
Page 19

Instance Manager (GUI version)—a GUI version of Instance
•
Manager is included in this release. All of the functionality of the
command line version of Instance Manager has been incorporated
into a powerful, easy to use GUI tool.
• Performance Monitor—Oracle7 Server for Windows NT uses the
Windows NT Performance Monitor to monitor Oracle7 activity.
Using Performance Monitor, administrators can monitor the
performance of local and remote databases.
• Event Viewer—Oracle7 Server for Windows NT uses the
Windows NT Event Viewer to log Oracle7 events. The Event
Viewer notifies you of errors and alert conditions that exist on the
database. This list can be viewed online, saved to a file, or
printed.
• Easy Configure Utility—Oracle7 Server for Windows NT
includes this utility for easily configuring simpler networks. You
can configure your network environment by answering questions
on a few dialog boxes.
• Oracle Objects for OLE—object linking and embedding (OLE)
application programming interface for use with Microsoft Visual
Basic and VBA–enabled applications.
• Oracle Database Tools—Oracle has enhanced its database tools
to help you administer your database more easily and efficiently
than ever. Extensive integrated online Help is included with the
Database Tools.
Migration
• Security Features—improved security features for remote
database access. See Security Features in this chapter for more
information on database security.
• Multiple Version Installation—Oracle7 Server for Windows NT
can run along with earlier releases of Oracle7 Server for Windows
NT. See Installation in this Guide for more information.
• Oracle Names Support—a tool that allows you to save (in a
centralized database) full network locations in the form of
easy–to–remember aliases.
Additional Information: For detailed information on the new
features of Oracle7 Server not specific to Windows NT, see
Oracle7 Server Migration.
1 – 5Introducing Oracle7 Server for Windows NT
Page 20

Features Specific to Windows NT
This Guide describes a number of features unique to Oracle7 Server for
Windows NT. This chapter describes those features briefly; more
detailed discussions appear later in this Guide.
Windows NT Services
A service is an executable process installed in the W indows NT Registry
database and administered by Windows NT. The Windows NT Registry
automatically tracks and records security information for each service
you create. Once you create and start a service on your Oracle7 Server
for Windows NT machine, the service can run even while no user is
logged on.
Windows NT Services and Workstation Security
Since Oracle7 Server for Windows NT runs each instance as a service,
the instance can also run with no user logged on to the server machine.
This feature allows you to maintain workstation security while running
Oracle7 Server for Windows NT. A database administrator can start a
particular instance of the database and log off the machine.
Windows NT Services Naming Conventions
For each instance created, Oracle defines an Oracle service—the Windows
NT service related to the database executable. This Oracle database
service is named OracleServicesid, where sid is the instance name. (The
instance name is the same as the value of the ORACLE_SID
configuration parameter, and can be any alphanumeric combination of 1
to 4 characters.)
In addition, for each network listener defined during network
installation, Oracle creates a SQL*Net listener service—another
Windows NT service related to the network listener. This service is
named OracleTNSListenerid, where id is the name or abbreviated ID
associated with the network listener .
Additional Information: Use the SQL*Net Easy Configuration
Utility to configure simpler networks. Use Network Manager to
Network
Manager
configure more complex networks. Oracle Network Manager for
Windows Installation and User’s Guide includes information on
configuring more complex networks.
Security Features
Oracle7 Server for Windows NT provides extra security features. Earlier
releases allowed remote database access with the Server Manager
1 – 6 Oracle7 Server Getting Started for Windows NT
Page 21

CONNECT INTERNAL command. With Release 7.3, the following two
steps ensure database security:
• verify that the database connection is secure
• assign SYSOPER or SYSDBA privileges to users to whom you
want to grant privileged access to the database
This procedure enables administrators to track who logs on as SYSOPER
and SYSDBA. Rather than logging on as INTERNAL, users log on with
their user ID plus the SYSOPER or SYSDBA privileges.
Additional Information: See Oracle7 Server Reference for more
information about database security.
Server
Reference
Oracle7 Server for Windows NT Memory Structures
When you start a database, Oracle7 Server for W indows NT
automatically starts a single instance by creating background threads
and memory structures unique to the Windows NT environment.
Each instance of the Oracle7 Server for Windows NT has its own
(separate) Oracle system process and Oracle database service. When you
make a local or remote connection to an instance, Oracle starts one new
thread in the process dedicated to the new connection.
Oracle7 Server for Windows NT Integration with Windows NT
The tight integration of Oracle7 Server for Windows NT with the
Windows NT operating system gives you unprecedented opportunity to
monitor and manipulate your server .
Information on Oracle7 Server for Windows NT and Performance
Monitor, Event Viewer, OS Authentication, and Groups and Roles is
presented later in this guide.
Oracle7 Server for Windows NT Product Contents
Oracle7 Server for Windows NT includes three types of software:
• server software—applications and utilities used on the server
side to run, administer , and maintain database operations
• client software—applications and utilities used on the client side
to access databases and make use of database functions
1 – 7Introducing Oracle7 Server for Windows NT
Page 22

•
Server—Windows NT
Server software includes the RDBMS, utilities, and products that enable
you to connect to clients.
Here are the major server product components included in this package:
Oracle7 Server for Windows NT
Release 7.3 multi–user Oracle7 Server for Windows NT (the basis of
Oracle7 Server for Windows NT software)
PL/SQL
PL/SQL (the procedural language extension to SQL) PL/SQL supports the
following features:
• database triggers
• database alerts
• stored procedures and packages
Oracle7 Utilities
networking software—software used to provide connectivity
among database clients and servers
Oracle7 Server for Windows NT includes a suite of server–based
utilities, five of which are detailed below. These are 32–bit, Windows NT
utilities for database administration.
Server Manager—aids database administration functions. Server
Manager recognizes not only standard SQL commands, but additional
commands pertaining to DBA activities.
Instance Manager—enables you to create, modify, start and stop
instances/databases.
SQL*Loader—provides utilities for loading data from existing data files
into your Oracle7 Server for Windows NT database.
Export—writes data from the Oracle7 Server for Windows NT to an
operating system file. Use Export for data archiving and moving data to
other Oracle databases. See Chapter 4 of this Guide and Oracle7 Server
Utilities for instructions.
Import—reads data from export files into Oracle7 Server for Windows
NT.
1 – 8 Oracle7 Server Getting Started for Windows NT
Page 23

SQL*Net
SQL*Plus
Secure Network Services
Required Support Files
SQL*Net is the network interface that enables client workstations to
communicate with the
Oracle7 Server for Windows NT. The SQL*Net suite
of products for Oracle7 Server for Windows NT include the
following:SQL*Net V2.3:
• TCP/IP Adapter V2.3
• Named Pipes Adapter V2.3
• SPX Adapter V2.3
• Oracle Names V1.1 (use with SQL*Net V2)
SQL*Plus for Windows NT is a command language interface enabling
you to use the SQL and PL/SQL database languages in the Windows
NT environment.
Secure Network Services enable you to protect your database from
unauthorized access.
Client Software
The Oracle7 Server for Windows NT and the client utilities require
various support files. The necessary files are installed automatically
based on the components you choose to install.
Additional Information: See PL/SQL User’s Guide and Reference
for more information about using the features of PL/SQL.
PL/SQL
User’s Guide
Additional Information: For more information on Oracle7
Server utilities, see Oracle7 Server Utilities.
Server
Utilities
This section describes the major client software components included in
this package.
The Oracle7 Server for Windows NT package contains a variety of
Oracle7 Server for Windows NT products for clients. Among the
products included are:
1 – 9Introducing Oracle7 Server for Windows NT
Page 24

Database Tools
Oracle Objects for OLE
Adobe Acrobat Runtime
Network Manager
The database tools appear as icons in the Program Manager (Explorer
for Windows 95).These tools allow you to perform basic database
functions from your client machine. See the online Help for more
information.
Oracle Objects for OLE is an object linking and embedding (OLE)
application programming interface for use with Microsoft Visual Basic
and VBA–enabled applications.
Installation of the Oracle7 Server for Windows NT software includes a
runtime version of Adobe Acrobat. Adobe Acrobat enables you to view,
search, and print any of the included documentation. Use Adobe
Acrobat to read and search through Oracle documentation.All RDBMS,
networking, and programming documentation you receive in your
Oracle7 Server for Windows NT package is in Adobe Acrobat format.
See the documentation catalog in this chapter for additional information
on available titles and on using the online documents.
Use Network Manager to create configuration files for Oracle
networking products. For more information on Network Manager, see
Oracle Network Manager for Windows Installation and User’s Guide, and
Oracle Network Manager Administrator’s Guide.
Server Manager
Complete advanced database administration tasks from client
workstations using Server Manager .
Enterprise Manager
Oracle Enterprise Manager is Oracle Corporation’s newest generation of
system management tools. Enterprise Manager combines a single
point–of–control management console, intelligent agents, and common
services in an integrated, comprehensive systems management platform.
1 – 10 Oracle7 Server Getting Started for Windows NT
Page 25

Oracle Networking Software
SQL*Net is the Oracle network interface that enables front–end
application software on client workstations to:
on Oracle7 database servers.
SQL*Net uses communication protocols and application programming
interfaces (APIs) supported by a wide range of networks providing
distributed database capabilities for the Oracle7 RDBMS.
SQL*Net Version 2
This release of Oracle7 Server for Windows NT includes SQL*Net
Version 2 only.
The specific networking components you install with your Oracle7
Server for Windows NT depend upon the version(s) of SQL*Net you are
using on your network.
Use the new Easy Configure feature to quickly configure simpler
network environments. For complex network environments, or for more
detailed control of your network, use Network Manager to configure
your network.
• access data,
• modify data,
• share data, and
• store data
Network Manager
SQL*Net V2 and the other TNS–based networking products
(MultiProtocol Interchange and Oracle Names) require a number of
configuration files with precise syntax. These configuration files must be
created using Oracle Network Manager (a graphical user interface tool
for creating configuration files quickly and accurately).
Additional Information: For more information on Network
Network
Manager
Manager, see Oracle Network Manager for Windows Installation and
User’s Guide, and Oracle Network Manager Administrator’s Guide.
SQL*Net V2 supports the Oracle MultiProtocol Interchange, providing a
bridge between transport protocols. The MultiProtocol Inter change is
not currently supported under W indows NT.
If your network includes machines running another operating system(s),
the MultiProtocol Interchange could run on these machines. In such a
1 – 11Introducing Oracle7 Server for Windows NT
Page 26

case, a server could connect to a client running a protocol different from
those available on the server .
SQL*Net V2 also supports Oracle Names, which establishes a centrally
located database of short aliases representing the full network locations
of all databases on the network.
Appropriately configured users can access this database at every node
on the network over any network protocol supported by SQL*Net.
Oracle Names enables such users to access or refer to databases
anywhere else on the network by short mnemonic names.
Additional Information: A complete description of this
Oracle
Names
product and its configuration appears in the Oracle Names
Administrator’s Guide.
1 – 12 Oracle7 Server Getting Started for Windows NT
Page 27

C H A P T E R
T
2
Installing Oracle7 Server for Windows NT
his chapter covers the following installation topics:
• system requirements—server
• Windows on Win32 (WOW)
• before you install
• co–existence of Oracle7 Server for Windows NT and Oracle7
Workgroup Server
• installation types
• using Oracle Installer
• server/client installations
• Windows client installations
• configuring SQL*Net
• separately installing Oracle7 Options
• removing Oracle7 products
• migrating from earlier releases
Attention: The instructions in this chapter cover installation
☞
of Oracle7 Server for Windows NT from a CD–ROM only.
2 – 1Installing Oracle7 Server for Windows NT
Page 28

A Note on Directories
This Guide assumes that all directory names are the default names
created during the Oracle7 Server for Windows NT installation process.
For example, the Oracle home directory for Windows NT products is
assumed to be \ORANT. If your system is set up using different
directory names, substitute these names for the default names found in
this Guide.
System Requirements—Server
Attention: To install Oracle7 Server for Windows NT, you
☞
To install and run Oracle7 Server for Windows NT, you must have the
required hardware and software.
Oracle7 Server for Windows NT Hardware
Oracle7 Server for Windows NT requires an IBM, Compaq, or
100%–compatible PC–based on an 80486 (or higher), or Pentium
processor. Multiprocessor machines are also supported. The following
components must be part of the system:
must log on to the server machine as a member of the
Windows NT Administrators Group.
• RAM—32 MB recommended
• Available disk space—65 MB of free hard disk space (100MB if
you want to install all of the online documentation onto your
hard drive)
• a compatible network interface card (NIC), for networked
operation
• a connected CD–ROM drive, functioning as a logical drive
Advanced Replication Option Hardware
Oracle7 Server for Windows NT with the Advanced Replication Option
requires an IBM, Compaq, or 100%–compatible PC–based on an 80486
(or higher) or Pentium processor. Multiprocessor machines are also
supported. The following components must be part of the system:
• RAM—a minimum of 32 MB
2 – 2 Oracle7 Server Getting Started for Windows NT
Page 29

Software
• Available disk space—90 MB of free hard disk space (125 MB if
you want to install all of the online documentation onto your
hard drive)
• a compatible network interface card (NIC), for networked
operation
• a connected CD–ROM drive, functioning as a logical drive
Oracle7 Server for Windows NT requires the following software:
• Microsoft Windows NT Workstation Version 3.51 OR
• Microsoft Windows NT Server Version 3.51
• CD–ROM device driver
• appropriate network transport protocol software
– Named Pipes—the necessary Named Pipes software is
installed as part of the Windows NT Complete/New
Installation.
– TCP/IP—Microsoft TCP/IP for Windows NT is not
automatically installed during Windows NT installation. See
your Windows NT documentation for installation
information.
– SPX—NWLink (Microsoft’s implementation of the IPX/SPX
protocol) is available as part of Windows NT but is not
automatically installed during Windows NT installation. See
your Windows NT documentation for installation
information.
Note: The preceding list describes only the requirements for
the Oracle7 Server for Windows NT software, which includes
the Oracle RDBMS, Oracle7 utilities, and SQL*Net server
software.
Note: Client machines connected to the Oracle7 Server for
Windows NT must use the client component of the same
version of SQL*Net installed on the server.
2 – 3Installing Oracle7 Server for Windows NT
Page 30
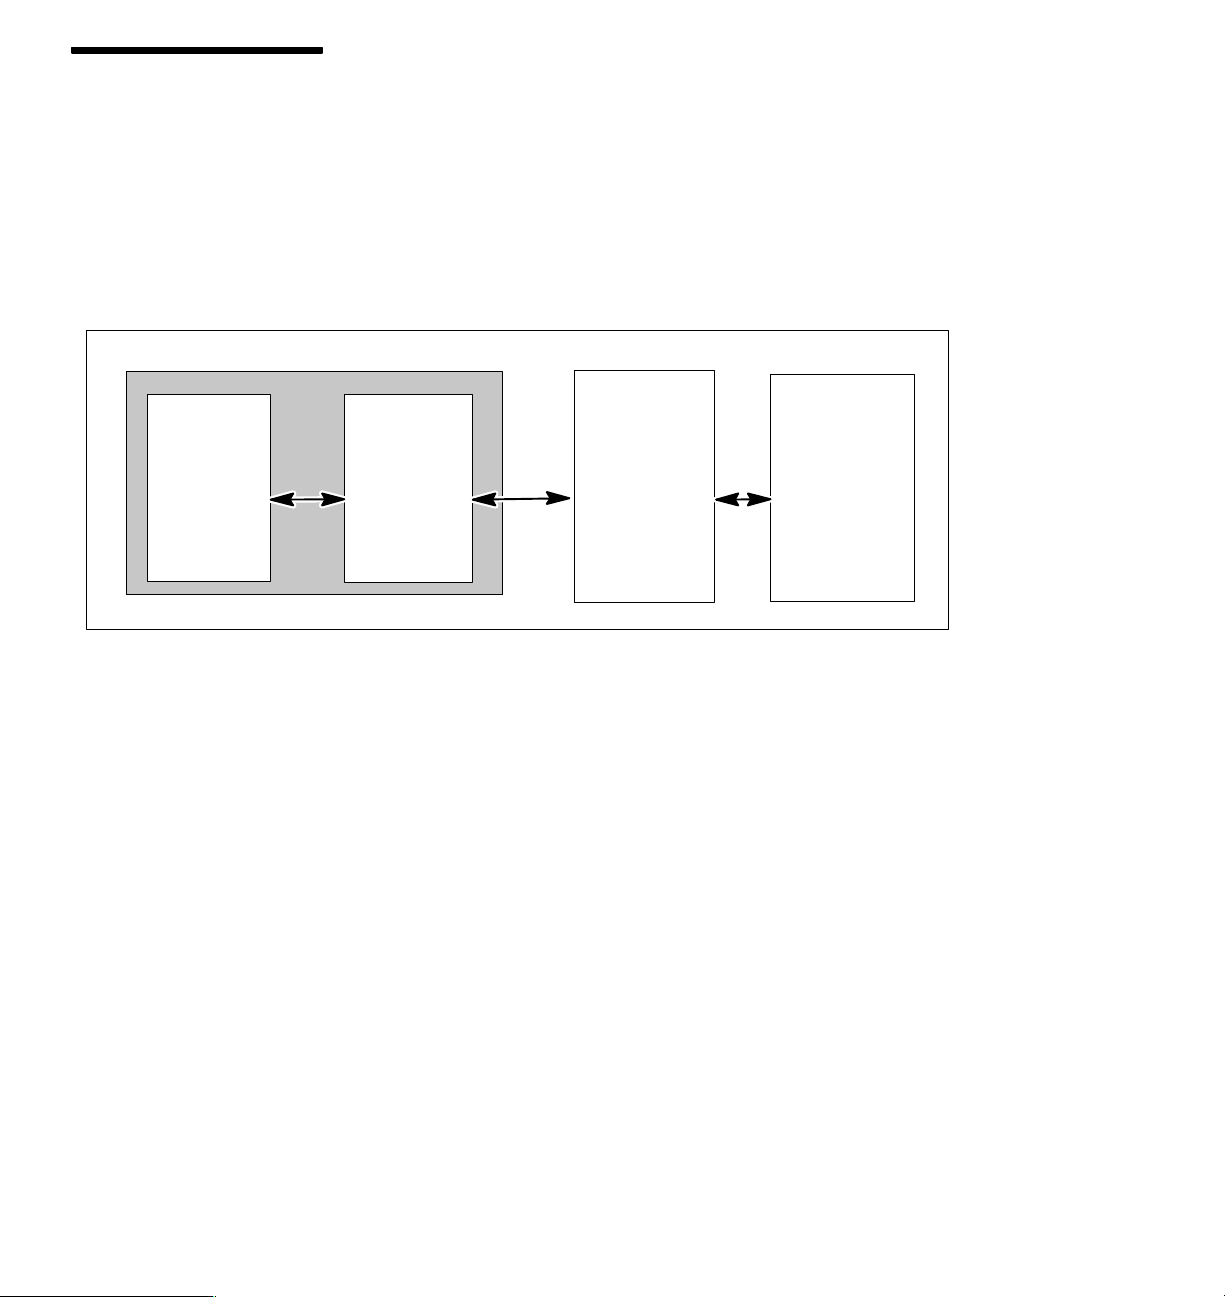
Windows on Win32 (WOW)
Most products running on Windows NT machines (including Oracle7
Server for Windows NT and the SQL*Net Listener) are 32–bit
Windows NT applications.
However, you can also use the Windows NT subsystem—Windows on
Win32 (WOW)—to use 16–bit Oracle Windows products. (Windows on
Win32 is installed automatically when you install the Windows NT
operating system.)
Windows NT
WOW Subsystem
Oracle
Database
Tools for
Windows
SQL*Net
and
Network
Protocol
for
Windows
The interaction between Oracle products for Windows running on
WOW and your local Oracle7 database for Windows NT is called
loopback. You must install the same version of SQL*Net—along with the
appropriate protocol adapter software—for both Windows NT and
Windows in order for loopback to occur.
Attention: You can always achieve loopback by using
☞
☞
SQL*Net V2 along with the Oracle Named Pipes Protocol
Adapter or the Oracle TCP/IP Protocol Adapter for Windows
NT and Windows. Remember that you need a network card if
you use SQL*Net V2 with the TCP/IP protocol adapter.
Attention: If you are using your Windows NT machine as a
client, you can install SQL*Net V2 Client for Windows NT plus
the appropriate Windows NT protocol adapter (Named Pipes,
TCP/IP, or SPX).
SQL*Net
and
Network
Protocol
for
Windows NT
Oracle7
RDBMS
for
Windows NT
2 – 4 Oracle7 Server Getting Started for Windows NT
Page 31

Before You Install
Before you install Oracle7 Server for Windows NT software on your
Windows NT server, perform the following tasks appropriate to your
installation.
First Time Installation
For the first time installation of Oracle7 Server for Windows NT on a
server containing no previous version of an Oracle Server, verify that
the volume on which you plan to install the Oracle7 Server for
Windows NT exists and has enough disk space (see System Requirements
in this Chapter). Choose a volume with a dedicated disk drive (if
possible).
Re–installation of Oracle7 Server for Windows NT
If you are re–installing Oracle7 Server for Windows NT over a previous
release of Oracle7 Server, shut down the database and back–up all
database files.
Note: Oracle7 Server for Windows NT cannot run
simultaneously with previous releases. Ensure that earlier
versions are not running before you install or run Oracle7
Server for Windows NT.
Oracle Installer detects previous Oracle7 Server installations. Oracle
Installer attempts to use the same volumes, company name, and
language when installing Oracle7 Server for Windows NT. You can
accept the default information provided by Oracle Installer or provide
new information.
Note: You will receive an error message during installation if
your Windows NT server previously contained Oracle
products and the volume containing those products no longer
exists. To complete the installation, delete the ORACLE_HOME
line from the Windows NT Registry, and rerun Oracle Installer.
Additional Information: For information on migrating data,
see Migrating from Earlier Releases later in this chapter.
Co–existence of Oracle7 Server for Windows NT and Oracle7 Workgroup Server
Oracle7 Server for Windows NT and Oracle7 Workgroup Server for
Windows NT cannot co–exist.
2 – 5Installing Oracle7 Server for Windows NT
Page 32

Installation Types—Windows NT
The ways in which Oracle7 Server for Windows NT installation for
Windows NT server and clients can be performed are described in the
following sections.
This release of Oracle7 Server for Windows NT offers seven types of
Windows NT installations, listed below.
Networking Products
Install your choice of:
• Oracle Intelligent Agent
• Oracle Names Server
• SQL*Net Client
• SQL*Net Protocol Adapters (Named Pipes, SPX, TCP/IP)
• SQL*Net Server
Oracle Documentation
Install:
• Oracle Documentation
Oracle7 Client
Install your choice of:
• Application User
– SQL*Plus
– SQL*Net Client
– SQL*Net Protocol Adapters
– Oracle Call Interface
– Oracle Installer
• Database Administrator
– Oracle7 Utilities
– SQL*Plus
– SQL*Net Client
2 – 6 Oracle7 Server Getting Started for Windows NT
Page 33

Oracle7 Server
– SQL*Net Protocol Adapters
– Oracle Call Interface
– Oracle Enterprise Manager
– Oracle Installer
Install your choice of:
• Oracle7 Server
• Oracle7 Server Options
• Oracle WebServer
• Oracle7 Utilities
• Oracle7 Performance Utility
• Oracle Call Interface
• Oracle Intelligent Agent
• Oracle Enterprise Manager
• SQL*Plus
• SQL*Net Server
Programmer/2000
SQL*Plus
• SQL*Net Protocol Adapters (Named Pipes, SPX, TCP/IP)
• Oracle Installer
Install your choice of:
• Pro C
• Oracle Call Interface
Install:
• SQL*Plus
2 – 7Installing Oracle7 Server for Windows NT
Page 34

Selective
Install your choice of:
• Oracle Call Interface
• Oracle Documentation
• Oracle Enterprise Manager
• Oracle Installer
• Oracle Pro*C
• Oracle WebServer
• Oracle7 Database Administration Tools
• Oracle7 Performance Utility
• Oracle7 Server
• Oracle7 Server Options
– Oracle7 Advanced Replication Option
– Oracle7 Distributed Option
– Oracle7 Parallel Query Option
– Oracle7 Spatial Data Option
• Oracle7 Spatial Data Utilities
• Oracle7 Utilities
• Required Support Files
• SQL*Net
– Oracle Intelligent Agent
– Oracle Names Server
– SQL*Net Client
– SQL*Net Protocol Adapters (Named Pipes, SPX, TCP/IP)
– SQL*Net Server
• SQL*Plus
2 – 8 Oracle7 Server Getting Started for Windows NT
Page 35

Options—Windows NT Server
This release of Oracle7 Server for Windows NT offers the following
options:
• Distributed Option
• Parallel Query Option
• Spatial Data Option
• Advanced Replication Option
Using Oracle Installer
These versions of Oracle Installer are available on your product CD:
• Oracle Installer for Windows NT (for installing Windows NT
• Oracle Installer for Windows (for installing Windows products
Additional Information: For more information on these
options, see Introducing Oracle7 Server for Windows NT in this
Guide.
products)
on the Windows on Win 32 subsystem of Windows NT or on
client workstations running Windows)
☞
Windows NT Installations
If you have both DOS and Windows NT installed on your Windows NT
server machine, start your machine and select Windows NT from the
OS Loader option.
Log on to your Windows NT Server machine as a member of the
Administrators group.
☞
• Oracle Installer for Windows95 (for Windows 95 systems)
Attention: Get help during installation by choosing Using
Oracle Installer . . . from the Help menu.
Attention: If you previously installed another Oracle
Windows NT product, such as an earlier version of Oracle7
Server, Oracle Installer should already be set up in the
Windows NT Program Manager.
2 – 9Installing Oracle7 Server for Windows NT
Page 36

However, you should complete Step 2 below to ensure that you
use the current release of Oracle Installer to install your Oracle7
Server for Windows NT.
1. Set Up the CD–ROM Drive
a. Verify that your CD–ROM drive is properly installed.
You can use any CD–ROM drive that can be attached to the
Windows NT server (either locally or as a shared resource) as a
logical drive to install the Oracle7 Server for Windows NT
software. If the connected CD–ROM drive cannot copy files to your
hard disk, refer to your CD–ROM documentation.
b. Load the Oracle7 Server for Windows NT CD–ROM.
– Insert the Oracle7 Server for Windows NT CD–ROM into
your CD–ROM drive.
– Verify that the drive is mapped to the logical drive you
selected and that you can access files on the CD–ROM.
The installation steps below assume that the CD–ROM is mapped
to the G:\> drive.
Warning: If you have already installed a version of the Oracle
database, shut down any instances and stop any Oracle
services currently running before you attempt to install the new
database software.
2. Install Oracle7 Server for Windows NT Products
a. To start Oracle Installer for Windows NT, run Oracle Installer
executable, ORAINST. You can run ORAINST for Windows NT
one of the two ways described below.
From the Program Manager
– From the Windows NT Program Manager, select Run from
the File menu.
– Enter the path and executable file name, for example,
G:\NT_X86\INSTALL\ORAINST.EXE
– Click Enter.
From the File Manager
– From the Windows NT Program Manager, choose the File
Manager icon.
– Select the drive to which the CD–ROM is connected.
– Choose the NT_X86 icon.
2 – 10 Oracle7 Server Getting Started for Windows NT
Page 37

– Choose the INSTALL directory icon.
– Choose the ORAINST.EXE file icon.
If you are using Oracle Installer for the first time, it prompts you to
select a language.
b. Select a language, or choose OK to accept the default language.
When you select a language, Oracle Installer sets the NLS_LANG
configuration parameter. National Language Support (NLS) can be
changed after installation by changing the values for the
NLS_LANG configuration parameter and by using Oracle Installer
to install the message files for the additional language. See
Migrating from Earlier Releases, and National Language Support for
details on installing additional languages.
You can also set NLS for an individual instance using several
parameters in the initialization parameter file. NLS Language
Support in this Guide contains information about installing
additional languages.
Note: The default language, English, is installed with every
Oracle7 Server for Windows NT, in addition to any other
language you select.
c. Specify a company name and Oracle Home location, then
choose OK. The Software Asset Manager window appears.
Notice that the Software Asset Manager dialog box contains the
following buttons:
Exit Closes the Software Asset Manager, and exits Oracle Installer.
Options . . . Allows you to do the following:
– request for confirmations before removing or installing products
– receive detailed messages and prompts during various phases of Oracle Install-
er ’s function
– record the actions being performed by the Oracle Installer in a log file
View Log . . . Allows you to view the Event Log. The Event Log displays installation and con-
figuration events in the Description Level you choose: Summary, Brief, and Detail. You can store and retrieve logs, and save them to files.
By default, log files are stored in %ORACLE_HOME%\ORAINST\ORAINST.LOG. If a
log file from a previous logging exists, it is renamed to ORAINST.OLG.
If you want to keep more than two log files (.LOG and .OLG), you must rename
the .OLG file so that it is not overwritten.
Restore Icons Allows you to restore Oracle product icons that have been accidently deleted.
Help Accesses the online Help system.
2 – 11Installing Oracle7 Server for Windows NT
Page 38

When you run Oracle Installer from the Oracle7 Server for
Windows NT CD, Oracle Installer prompts you to enter the
company name. (If you install Oracle Installer on your computer ’s
hard drive, you will not receive this prompt during subsequent
uses.)
The default location of Oracle Home is C:\ORANT, where C:\ is
the designator of your local hard drive. Oracle recommends that
you use this default setting.
Note: During installation, Oracle Installer detects previous
versions of Oracle7 Server software on your server. When a
previous version is detected, a dialog box appears displaying
migration information.
Choosing OK in this dialog box installs Oracle7 Server for
Windows NT software in addition to the old version. Choosing
Cancel quits the installation so that you can migrate your
database as outlined in the steps in Migrating from Earlier
Releases. After migration, you can restart the installation.
3. Installation Options
a. Select Networking Products in the Software Asset Manager to
install and configure SQL*Net V2.3.
b. Click the Install button. The SQL*Net V2.3 Products dialog box
appears.
c. Choose the networking product(s) you want to install. If you
choose SQL*Net Protocol Adapters, the SQL*Net Protocol
Adapters dialog box appears.
d. Select the protocol adapters you want to install.
e. Click OK. The Adapter dialog box appears giving you the
choice of installing SQL*Net Client and/or SQL*Net Server.
f. Make your selection, then click OK. Oracle Installer installs the
selected products. After the product(s) are installed, you will
be prompted to read the Release Notes for the latest
information.
g. Click OK to dismiss the notification. The Software Asset
Manager window reappears.
h. Exit Oracle Installer by clicking on the Exit button, and confirm
your exit when prompted.
2 – 12 Oracle7 Server Getting Started for Windows NT
Page 39

If you choose Oracle Documentation:
a. Select Oracle Documentation in the Software Asset Manager to
install Oracle Documentation.
b. Click the Install button. The Oracle Documentation dialog box
appears.
c. Choose CD ROM or Hard Drive installation.
d. Click OK. Oracle Installer installs the selected products. After
the product(s) are installed, you will be prompted to read the
Release Notes for the latest information.
e. Click OK to dismiss the notification. The Software Asset
Manager window reappears.
f. Exit Oracle Installer by clicking on the Exit button, and confirm
your exit when prompted.
If you choose Oracle7 Client:
a. Select Oracle7 Client in the Software Asset Manager to install
the products included in this package.
b. Click the Install button. The Oracle7 Client Option dialog box
appears, displaying the types of user you may install. If you
choose Database Administrator, the Database Administrator
dialog box appears; if you choose Application User, the
Application User dialog box appears.
c. Choose the products you want to install.
d. Click OK to begin the installation. The SQL*Net Protocol
Adapters dialog box appears.
e. Choose the SQL*Net Protocol Adapters you want to install,
then click OK. An Oracle dialog box appears displaying the
progress of the installation. When the installation is complete, a
notification dialog box appears prompting you to read the
Release Notes for the latest information.
f. Click OK to dismiss the notification. The Software Asset
Manager window reappears.
g. Exit Oracle Installer by clicking on the Exit button, and confirm
your exit when prompted.
2 – 13Installing Oracle7 Server for Windows NT
Page 40

If you choose Oracle7 Server:
a. Select Oracle7 Server in the Software Asset Manager to install
the products included in this package.
b. Click the Install button. The Oracle7 Server dialog box appears,
displaying the products that will be installed. You can de–select
products from this list.
c. Click OK to begin the installation. The Oracle7 Server for
Windows NT Options dialog box appears.
d. Select the options for which you are licensed, then click OK.
The Install Starter Database dialog box appears, asking if you
want to install the starter database in the ORANT\DATABASE
directory.
e. Choose Yes (unless you want to create a new database of your
own [Oracle recommends you use the starter database]). The
Starter Database Install Options dialog box appears giving you
the choice of Standard or Replication.
f. Choose Replication if you chose the Advanced Replication
Option. Otherwise, accept Standard, then click OK. The
Internal Password dialog box appears, asking you to enter and
verify a password for the starter database.
g. Enter and verify your password, then choose OK. The Starter
Database Summary dialog box appears, displaying the
language and character set used for the starter database.
h. Select Yes to accept the settings, otherwise select No to choose
another language/character set for the starter database. The
Oracle WebServer Settings dialog box appears with default
Host Name and Port Number settings.
Note: You must manually enter the Host Name and Port
Number of your computer. For Oracle7 Server for Windows
NT the Host Name is hostname.domainname. Verify this
information (and Port Number) with your system
administrator. The Host Name may be different than the
machine name. This Host Name must map to your IP address.
i. Choose OK to accept the settings, or change them and click OK.
The Oracle WebServer Security Settings dialog box appears.
j. Enter (or accept) the username and password, then confirm the
password.
2 – 14 Oracle7 Server Getting Started for Windows NT
Page 41

k. Click OK. The Oracle WebServer Post–Installation dialog box
appears displaying the URL you must open to use Oracle7
Server for Windows NT.
l. Click OK. The SQL*Net Protocol Adapters dialog box appears.
m. Choose the SQL*Net Protocol Adapters you want to install,
then click OK. An Oracle dialog box appears displaying the
progress of the installation. After the product(s) are installed,
you will be prompted to read the Release Notes for the latest
information.
n. Click OK to dismiss the notification. The Software Asset
Manager window reappears.
o. Exit Oracle Installer by clicking on the Exit button, and confirm
your exit when prompted.
If you choose Programmer/2000:
a. Select Programmer/2000 in the Software Asset Manager to
install the products included in this package.
b. Click the Install button. The Programmer/2000 dialog box
appears giving you the choice of installing Pro*C and/or
Oracle Call Interface.
c. Choose the product(s) you want to install, then click OK. An
Oracle dialog box appears displaying the progress of the
installation. After the product(s) are installed, you will be
prompted to read the Release Notes for the latest information.
d. Click OK to dismiss the notification. The Software Asset
Manager window reappears.
e. Exit Oracle Installer by clicking the Exit button, and confirm
your exit when prompted.
If you choose SQL*Plus:
a. Select SQL*Plus in the Software Asset Manager to install the
product included in this package.
b. Click the Install button. The product is installed. A dialog box
appears reminding you to read the Release Notes.
c. Click OK to dismiss the notification. The Software Asset
Manager window reappears.
d. Exit Oracle Installer by clicking on the Exit button, and confirm
your exit when prompted.
2 – 15Installing Oracle7 Server for Windows NT
Page 42

If you choose Selective:
a. Choose {Selective Product Install} in the Software Asset
Manager. You can view the products in this package by
double–clicking on the product(s) displaying a plus sign (+) to
their left.
b. Click the Install button. The Selective Product Install dialog box
appears.
c. Select the products you want to install.
d. Click the OK button.
e. Answer questions and make choices in the dialog boxes that
appear. An Oracle dialog box appears displaying the progress
of the installation. After the product(s) are installed, you will be
prompted to read the Release Notes for the latest information.
Note: The questions/dialog boxes that appear will vary
depending upon the product choices you make.
f. Click OK to dismiss the notification. The Software Asset
Manager window reappears.
g. Exit Oracle Installer by clicking the Exit button, and confirm
your exit when prompted.
Installation Types—Windows/Windows 95 Clients
This section describes Oracle7 Client, Oracle Documentation, and
Selective installation procedures for clients. This release of Oracle7
Server for Windows NT offers three types of Windows/Windows 95
client installations, listed below.
Oracle7 Client
Install your choice of:
• Application User
– SQL*Plus
– SQL*Net
– Oracle Call Interface
– Oracle Objects for OLE
– Oracle7 ODBC Driver
2 – 16 Oracle7 Server Getting Started for Windows NT
Page 43

Oracle Documentation
– Oracle Installer
• Database Administrator
– Oracle7 Utilities
– Database Administration Tools
– SQL*Plus
– SQL*Net
– Oracle Objects for OLE
– Oracle7 ODBC Driver
– Oracle Call Interface
– Oracle Network Manager (Windows only)
– Oracle Installer
Install:
• Oracle Documentation
• Oracle Installer
Selective
Install your choice of:
• Database Administration Tools
• Oracle Call Interface
• Oracle Documentation
• Oracle Objects for OLE
• Oracle7 ODBC Driver
• Oracle7 Utilities
• SQL*Net
• SQL*Plus
• Oracle Network Manager (Windows only)
• Oracle Client Software Agent (Windows only)
2 – 17Installing Oracle7 Server for Windows NT
Page 44

Client System Requirements
The following sections specify the hardware and software requirements
for installing the client software components of the Oracle7 Server for
Windows NT from your client workstation. You may need to install
additional hardware and software, depending on your network.
Hardware Requirements
• IBM, Compaq, or 100%–compatible with an 80386 processor or
higher
• at least 8 MB of memory
• hard disk space for the client software and related files.
Note: Installing all of the items (including online
documentation) requires 85MB of free hard disk space.
• a connected CD–ROM drive, functioning as a logical drive (if
you are completing the installation from a client workstation).
• a network interface card (NIC) and accompanying software. The
NIC must be supported by Microsoft for use with LAN Manager
Enhanced or Windows for Workgroups.
Warning: Before installing software for the Oracle7 Server for
Windows NT, and for client workstations, be sure you have
completely installed your networking software and verified
that it is functioning properly.
Software Requirements
Client installations require the following software:
• Microsoft Windows Version 3.1 or higher, running in Enhanced
Mode, Microsoft Windows for Workgroups 3.11, or Microsoft
Windows 95
• appropriate network transport protocol software
1. Set Up the CD–ROM Drive
a. Verify that your CD–ROM drive is properly installed.
You can use any CD–ROM drive that can be attached to the
Windows NT server (either locally or as a shared resource) as a
logical drive to install the Oracle7 Server for Windows NT
software. If the connected CD–ROM drive cannot copy files to your
hard disk, refer to your CD–ROM documentation.
b. Load the Oracle7 Server for Windows NT CD–ROM.
2 – 18 Oracle7 Server Getting Started for Windows NT
Page 45

Insert the Oracle7 Server for Windows NT CD–ROM into your
CD–ROM drive. Verify that the drive is mapped to the logical drive
you selected and that you can access files on the CD–ROM. The
following installation steps assume that the CD–ROM is mapped to
the G:\> drive.
2. Install Oracle7 Server for Windows NT Client Products
a. To start Oracle Installer for Windows, run Oracle Installer
executable, ORAINST. You can run ORAINST for Windows in
one of the following ways:
From the Program Manager
From the Windows Program Manager do the following:
– select Run from the File menu
– enter the path and executable file name, for example,
G:\WINDOWS\INSTALL\ORAINST.EXE.
– click Enter
From the File Manager
From the Windows Program Manager do the following:
– choose the File Manager icon
– select the drive to which the CD–ROM is connected
– choose the WINDOWS directory icon, and the INSTALL
directory icon
– double–click the ORAINST.EXE file icon.
From the Windows 95 Start Button
From the Windows 95 Start button do the following:
– select Start
– select Run. The Run dialog box appears.
– enter the path and executable file name (or browse to find
it), for example, G:\WINDOWS\INSTALL\ORAINST.EXE.
– click Enter
If you are using Oracle Installer for the first time, you must select a
language at the language prompt.
b. Select a language, and choose OK to accept the default
language.
2 – 19Installing Oracle7 Server for Windows NT
Page 46

When you select the language, Oracle Installer sets the NLS_LANG
configuration parameter. National Language Support (NLS) can be
changed after installation by changing the values for the
NLS_LANG configuration parameter and using Oracle Installer to
install the message files for the additional language.
See National Language Support in this Guide for details on installing
additional languages.
You can also set NLS for an individual instance using several
parameters in the initialization parameter file. National Language
Support in this Guide contains information about installing
additional languages.
Note: The default language, English, is installed with every
Oracle7 Server for Windows NT, in addition to any other
language you select.
c. Specify a company name and Oracle Home location, then
choose OK.
When you run Oracle Installer from the Oracle7 Server for
Windows NT CD, it prompts you to enter the company name. (If
you install Oracle Installer on your computer ’s hard drive, you will
not receive this prompt in subsequent installations.) Type in the
company name and Oracle Home location, then choose OK. The
default location of Oracle Home is C:\ORAWIN (C:\ORAWIN95
for Windows 95), where C:\> is the designator of your local hard
drive. Oracle recommends that you use this default setting.
The Installation Options dialog box appears giving you the choice
of Application User, Database Administrator, Developer, and
Selective Install.
d. Select one of the installations, then choose OK.
3. Installation Types
If you choose Oracle7 Client:
a. Select Oracle7 Client in the Software Asset Manager to install
the products included in this package.
b. Click the Install button. The Oracle7 Client Option dialog box
appears, displaying the types of user you may install. If you
choose Database Administrator, the Database Administrator
dialog box appears; if you choose Application User, the
Application User dialog box appears.
c. Choose the products you want to install.
2 – 20 Oracle7 Server Getting Started for Windows NT
Page 47

d. Click OK to begin the installation. The SQL*Net Protocol
Adapters dialog box appears.
e. Choose the SQL*Net Protocol Adapters you want to install,
then click OK. An Oracle dialog box appears displaying the
progress of the installation. When the installation is complete, a
notification dialog box appears prompting you to read the
Release Notes for the latest information.
f. Click OK to dismiss the notification. The Software Asset
Manager window reappears.
g. Exit Oracle Installer by clicking on the Exit button, and confirm
your exit when prompted.
If you choose Oracle Documentation:
a. Select Oracle Documentation in the Software Asset Manager to
install Oracle Documentation.
b. Click the Install button. The Oracle Documentation dialog box
appears.
c. Choose CD ROM or Hard Drive installation.
d. Click OK. Oracle Installer installs the selected products. After
the product(s) are installed, you will be prompted to read the
Release Notes for the latest information.
e. Click OK to dismiss the notification. The Software Asset
Manager window reappears.
f. Exit Oracle Installer by clicking on the Exit button, and confirm
your exit when prompted.
If you choose Selective:
a. Choose {Selective Product Install} in the Software Asset
Manager. You can view the products in this package by
double–clicking on the product(s) displaying a plus sign (+) to
their left.
b. Click the Install button. The Selective Product Install dialog box
appears.
c. Select the products you want to install.
d. Click the OK button.
e. Answer questions and make choices in the dialog boxes that
appear. When the installation is complete, a notification dialog
box appears.
2 – 21Installing Oracle7 Server for Windows NT
Page 48

Configuring SQL*Net
A listener configuration
file on the server. This
file defines information
file defines information
used by the listener to
connect to a server.
e
allows a server to
Database SID
Note: The questions/dialog boxes that appear will vary
depending upon the product choices you make.
f. Click OK to dismiss the notification. The Software Asset
Manager reappears.
g. Click Exit to exit Oracle Installer.
Some of the installation packages allow you to selectively install and
automatically configure SQL*Net release 2.3 server networking
software.
To configure these products, use the Easy Configuration Utility that is
automatically installed with your SQL*Net V2.3 products.
Note: For complex networks, use Network Manager for
configuration.
Additional Information: For information on using Easy
Configuration, see Oracle Network Products User’s Guide for the
appropriate operating system.
A single SQL*Net release 2.3 networking software connection is
automatically configured with each of these packages. Configuration
consists of creating and copying the information described below into
two files:
2 – 22 Oracle7 Server Getting Started for Windows NT
File Description File Contents
LISTENER.ORA A listener configuration
Listener ID
Service_name
used by the listener to
Database SID
Hostname (for TCP/IP)
TNSNAMES.ORA A client configuration fil
on the server. This file
Database alias
Database SID
connect to additional
servers.
Additional Information: See Understanding SQL*Net for
complete descriptions of LISTENER.ORA, TNSNAMES.ORA,
and the contents of each file. See also Oracle Network Products
User’s Guide for your client(s) for more information about your
networking products.
Page 49

Additional SQL*Net release 2.3 connections must be manually
configured with the Oracle Network Manager. See Oracle Network
Manager Administrator’s Guide for information.
Note: Oracle7 Server for Windows NT licensing lets you use
one release of SQL*Net, and one protocol adapter. Use of more
than one protocol and release of SQL*Net is available at an
added cost.
Separately Installing Oracle7 Options
You may choose to install Oracle7 Options separately from other
installation tasks, or you may need to install these options after
obtaining licenses for them. In these cases, follow these steps:
1. Start Oracle Installer as noted earlier in this chapter. Oracle
Installer starts.
2. Double–click on {Selective Product Install} in the Products available
on field in the Software Asset Manager window. The items in
Selective Product Install appear.
3. Double–click on Oracle7 Server Options. The items in Oracle7
Server for Windows NT Options appear.
4. Choose the option(s) you want to install.
5. Click the Install button. An Option License dialog box (for each
selected option) appears asking if you are licensed for the selected
options.
6. Click Yes if you are licensed. If you are not licensed, contact Oracle
to purchase a license. The installation process begins. After
installation is complete, the Software Asset Manager reappears.
7. Exit Oracle Installer by clicking the Exit button, and confirm your
exit when prompted.
Removing Oracle7 Products/Options
To de–install Oracle7 products or Options, run Oracle Installer for
Windows NT.
1. Select from the Installed Products window the product(s) you want
to remove.
2 – 23Installing Oracle7 Server for Windows NT
Page 50

2. Choose Remove.
Oracle Installer warns you of any product dependencies that might
cause problems if particular products are removed, and prompts you
to confirm the de–installation.
Migrating from Earlier Releases
This section contains instructions for migrating databases created using
earlier versions of Oracle7 Server for Windows NT. If you currently
have data stored in one of the following:
• Oracle7 Server for Windows NT database, Versions 7.0, 7.1, or
7.2
OR
• Oracle7 Workgroup Server for Windows NT, Versions 7.0, 7.1, or
7.2,
you must migrate your database to make it work with Oracle7 Server
for Windows NT. This section describes procedures for migrating your
earlier Oracle7 Server version(s) to Release 7.3.
Overview
Use this procedure for migrating earlier Oracle7 Server versions to
Release 7.3. It includes the following tasks and example:
• preparing for migration
• installing the Oracle7 Server for Windows NT
• moving database files
Prepare for the Migration
Before migrating to Release 7.3, make sure you have at least 8MB of
free space in the system tablespace You can verify the amount of free
space in the SYSTEM tablespace using this SQL statement :
select sum(A.blocks * B.value) from sys.dba_free_space A,
sys.V$parameter B where A.tablespace_name = ’SYSTEM’ and
B.value = ’db_block_size’ ;
If 8MB of free space is not available in the SYSTEM tablespace, you can
enlarge the SYSTEM tablespace by adding a datafile of the appropriate
2 – 24 Oracle7 Server Getting Started for Windows NT
Page 51

size (for example, the following SQL statement adds an 8MB file to the
SYSTEM tablespace:
alter tablespace SYSTEM add datafile ’<directory for the
file>\<filename>’ size 8M;
1. List files for the instance
For each instance you want to migrate, make a list of the control,
data, and log files for the instance.
To get a list of these files for the instance:
a. Run Server Manager in line mode.
b. Enter the following at the Server Manager prompt:
SVRMGR> connect system/<account password for the instance>
SVRMGR> spool migrate.log;
SVRMGR> select member from v$logfile ;
SVRMGR> select name from v$datafile ;
SVRMGR> select value from v$parameter
where name = ’control_files’;
2. Shut down your Oracle7 database
At the SVRMGR prompt, enter the following:
SVRMGR> connect internal
SVRMGR> shutdown
SVRMGR> exit
3. Shut down and delete Oracle services
Shutdown and delete Oracle services belonging to the earlier
database version using orasrv.exe (for Version 7.0),
oradim71.exe (for Version 7.1), oradim72.exe (for Version 7.2).
Example:
oradim71 –delete –srvc <Oracle Service Name>
Note: This stops and deletes the service.
4. Backup the 7.0/7.1/7.2 database
For more information on backing up your database, see your
database documentation.
5. De–install the 7.0/7.1/7.2 server, RSFs and Utilities
2 – 25Installing Oracle7 Server for Windows NT
Page 52

Warning: Do not remove the 7.0/7.1/7.2 database files when prompted!
Warning: After installing Release 7.3, do not de–install 7.1 (doing so will disrupt your
Release 7.3 install).
Install the Oracle7 Server
Use orainst.exe to de–install 7.0/7.1/7.2 Server, Required
Support Files and Utilities.
Refer to the documentation that shipped with your 7.0/7.1/7.2
database for more information about de–installation.
a. Run orainst.exe in line mode.
b. From the products list, select:
– 7.0/7.1/7.2 Server
– Required Support Files
– Utilities
c. Choose Remove.
1. Install the Oracle7 Server for Windows NT
Install the Oracle7 Server for Windows NT. During installation, you
will have the choice of installing the starter database. If you do not
need another Release 7.3 database (in addition to the one that you
are upgrading from 7.0/7.1/7.2), you do not need to install the
starter database.
Additional Information: See Installation for installation steps
and options.
2. Add an ORACLE_SID key to the NT registry
a. Create a SID for the to–be–migrated database instance.
For example, choose ABCD as the SID.
Note: If you have chosen to install the starter database during
Release 7.3 installation, Do not use ORCL as the SID (the
starter Release 7.3 database has ORCL as the default SID).
Change the ORACLE_SID from ORCL to ABCD.
Note: SID is limited to four alphanumeric characters or less.
b. Run regedt32.exe in line mode.
c. Go to \HKEY_LOCAL_MACHINE\SOFTWARE\ORACLE.
2 – 26 Oracle7 Server Getting Started for Windows NT
Page 53

d. Create the ORACLE_SID value with data type
REG_EXPAND_SZ and the SID you chose earlier in the string
field.
e. Close the Registry.
3. Create and start Oracle Release 7.3 services
Create and start an Oracle Release 7.3 instance (without creating a
new database) using the command line version of Instance
Manager.
If you need more information on using the command line version
of Instance Manager, see Using Instance Manager for the Command
Line.
Warning: If you use the GUI version of the Instance Manager, a new database is
automatically created.
a. From the command line, enter:
oradim73 –new –sid <sidname> –intpwd <pwd> –maxusers
<users>
This creates the following:
– OracleService<sidname> service
– OracleNMPListener<sidname> service(only if SQL*Net V1
Named Pipes [i.e. nmplsnr.exe] protocol is installed)
Move Database Files
– password file (pwd<sidname>.ora) in
%ORACLE_HOME%\DATABASE
b. From the command line, enter:
oradim73 –startup –sid <sidname> –usrpwd <pwd> –starttype
srvc
Note: This will start the services only.
1. Move files
Move all 7.0/7.1/7.2 database files to the Release 7.3 directory.
Note: If you have your own database file structure, go to the
Merge and Edit the Initialization Files step.
a. Move ALL current control, data, and log files from the
%ORACLE_HOME%\rdbms70 (or 71) to the
%ORACLE_HOME%\database directory.
2 – 27Installing Oracle7 Server for Windows NT
Page 54

Using the above example (and if the current control file is in
directory c:\orant\rdbms71):
Move To
c:\orant\rdbms71\ctl1orcl.ora c:\orant\database\ctl1abcd.ora
b. Move all of the archive files from
%ORACLE_HOME%\rdbms71\ARCHIVE
to
%ORACLE_HOME%\DATABASE\ARCHIVE
The original list of files are:
7.0 7.1 7.2
%rdbms70%\ctl1.ora
%rdbms70%\dbs1.ora
%rdbms70%\log1.ora
%rdbms70%\log2.ora
%rdbms71%\ctl1orcl.ora
%rdbms71%\sysorcl.ora
%rdbms71%\userorcl.ora
%rdbms71%\rbsorcl.ora
%rdbms71%\temporcl.ora
%rdbms71%\log1orcl.ora
%rdbms71%\log2orcl.ora
%rdbms71%\archive\ctl1orcl.ora
%rdbms71%\archive\logorcl1.ora
%rdbms71%\archive\logorcl2.ora
%oracle_home%\database\ctl1orcl.ora
%oracle_home%\database\sysorcl.ora
%oracle_home%\database\userorcl.ora
%oracle_home%\database\rbsorcl.ora
%oracle_home%\database\temporcl.ora
%oracle_home%\database\log1orcl.ora
%oracle_home%\database\log2orcl.ora
%oracle_home%\database\archive\ctl1orcl.ora
%oracle_home%\database\archive\logorcl1.ora
%oracle_home%\database\archive\logorcl2.ora
Note: This information is in the spool file you created earlier.
c. If you have expanded the database, move the additional
database files as well.
Note: You can combine the steps above into one operation
with the move command. For example, move
2 – 28 Oracle7 Server Getting Started for Windows NT
Page 55

Into:
\DATABASE\INIT
sid
.ORA
b. Edit the CONTROL_FILES parameter in the Release 7.3
initialization file for the instance (that is,
%ORACLE_HOME%\DATABASE\INITsid.ORA), to reflect the
changes to the filename.
Note: The control file is now in the directory
%ORACLE_HOME%\DATABASE.
Example:
Using the above example:
Change this . . . To this . . .
CONTROL_FILES =
(%RDBMS70%\ctl1.ora)
CONTROL_FILES =
(%RDBMS71_CONTROL%\ctl1.ora,
%RDBMS71_ARCHIVE%\ctl1.ora
CONTROL_FILES =
(%ORACLE_HOME%\DATABASE\ctl1abcd.ora)
CONTROL_FILES =
(%RDBMS73_CONTROL%\ctl1.ora,
%RDBMS73_ARCHIVE%\ctl1.ora
Note: By default:
%RDBMS71_CONTROL% = %ORACLE_HOME%\RDBMS71
%RDBMS71_ARCHIVE% = %ORACLE_HOME%\RDBMS71\ARCHIVE
%RDBMS73_CONTROL% = %ORACLE_HOME%\DATABASE
%RDBMS73_ARCHIVE% = %ORACLE_HOME%\DATABASE\ARCHIVE
Note: If you have your own database file structure, edit the
control files parameter to point to your control files.
c. Change any occurrence of %rdbms70%, %rdbms71%, or
%rdbms72% in the initialization file to %rdbms73%.
3. Alter the database to reflect new names
Alter the database to reflect the new directory and filenames; then
exit Server Manager.
Start the Oracle 7.0/7.1/7.2 database using Server Manager Release
7.3.
a. Run SVRMGR73.exe in line mode.
b. When prompted for a password, enter the password you used
to create Oracle services. Then enter the following:
2 – 29Installing Oracle7 Server for Windows NT
Page 56

SVRMGR> connect internal/<password for the instance>
SVRMGR> startup exclusive mount
Note: If you have your own database file structure, go to Step
4 (you have neither moved nor renamed your files).
c. Enter the altered database statement at the Server Manager
prompt to change the full pathnames of the data and log files.
Following are 7.0 and 7.1 examples for migrating the default
SID. Your statement should match your actual files.
7.0 7.1
SVRMGR> alter database rename file SVRMGR> alter database rename file
SVRMGR> ’C:\ORANT\RDBMS70\dbs1.ora’, SVRMGR> ’C:\ORANT\RDBMS71\log1orcl.ora’,
SVRMGR> ’C:\ORANT\RDBMS70\log1.ora’, SVRMGR> ’C:\ORANT\RDBMS71\ARCHIVE\log1orcl.ora’,
SVRMGR> ’C:\ORANT\RDBMS70\log2.ora’ to SVRMGR> ’C:\ORANT\RDBMS71\log2orcl.ora’,
SVRMGR> ’C:\ORANT\DATABASE\dbs1orcl.ora’, SVRMGR> ’C:\ORANT\RDBMS71\ARCHIVE\log2orcl.ora’,,
SVRMGR> ’C:\ORANT\DATABASE\log1orcl.ora’, SVRMGR> ’C:\ORANT\RDBMS71\sysorcl.ora’,
SVRMGR> ’C:\ORANT\DATABASE\log2orcl.ora’; SVRMGR> ’C:\ORANT\RDBMS71\userorcl.ora’,
SVRMGR> ’C:\ORANT\RDBMS71\rbsorcl.ora’,
SVRMGR> ’C:\ORANT\RDBMS71\temporcl.ora’ to
SVRMGR> ’C:\ORANT\DATABASE\log1orcl.ora’,
SVRMGR> ’C:\ORANT\DATABASE\ARCHIVE\log1orcl.ora’,
SVRMGR> ’C:\ORANT\DATABASE\log2orcl.ora’,
SVRMGR> ’C:\ORANT\DATABASE\ARCHIVE\log2orcl.ora’,
SVRMGR> ’C:\ORANT\DATABASE\sysorcl.ora’,
SVRMGR> ’C:\ORANT\DATABASE\userorcl.ora’,
SVRMGR> ’C:\ORANT\DATABASE\rbsorcl.ora’,
SVRMGR> ’C:\ORANT\DATABASE\temporcl.ora’;
Note: If your Oracle home directory is not c:\orant, replace
it with the actual directory name.
Note: If you have expanded the database, include the
additional database files in the above statement.
4. Run SQL scripts to migrate the database
Run SQL scripts to migrate the database.
a. Enter the following commands at the Server Manager prompt.
2 – 30 Oracle7 Server Getting Started for Windows NT
Page 57

7.0.15 to 7.3 7.1.3 to 7.3 7.2.2 to 7.3
SVRMGR> alter database open; SVRMGR> alter database open; SVRMGR> alter database open;
SVRMGR> @%RDBMS73%\ADMIN\cat70101
SVRMGR> @%RDBMS73%\ADMIN\cat70102
SVRMGR> @%RDBMS73%\ADMIN\cat7103
SVRMGR> @%RDBMS73%\ADMIN\cat7201.sql SVRMGR> @%RDBMS73%\ADMIN\cat7201.sql SVRMGR> @%RDBMS73%\ADMIN\cat7203.sql
SVRMGR> @%RDBMS73%\ADMIN\cat7301 SVRMGR> @%RDBMS73%\ADMIN\cat7301 SVRMGR> @%RDBMS73%\ADMIN\cat7301
SVRMGR> @%RDBMS73%\ADMIN\cat7302.sql SVRMGR> @%RDBMS73%\ADMIN\cat7302.sql SVRMGR> @%RDBMS73%\ADMIN\cat7302.sql
SVRMGR> @%RDBMS73%\ADMIN\catalog SVRMGR> @%RDBMS73%\ADMIN\catalog
Note: The statements in the table below are for special
purposes. catproc.sql is for PL/SQL functionality.
catrep.sql is for the Advanced Replication Option. Run
catrep only if you have the Advanced Replication Option and
want to use it. Refer to Appendix A for a detailed discussion of
Advanced Replication before proceeding.
Note: Ensure that you spool all of the output from the .sql
scripts to a file. Then, check the file for errors.
Note: catrep may take an hour or more to run!
7.0.15 to 7.3 7.1.3 to 7.3 7.2.2 to 7.3
SVRMGR> @%RDBMS73%\ADMIN\catproc SVRMGR> @%RDBMS73%\ADMIN\catproc SVRMGR> @%RDBMS73%\ADMIN\catproc
SVRMGR> @%RDBMS73%\ADMIN\catrep SVRMGR> @%RDBMS73%\ADMIN\catrep SVRMGR> @%RDBMS73%\ADMIN\catrep
b. Rerun utlxplan.sql in any schema in which you want to use
EXPLAIN PLAN.
5. Shut down and restart the database
Your Oracle database is now migrated to Release 7.3. Shutdown
and restart by entering the following commands at the Server
Manager prompt:
SVRMGR> shutdown
SVRMGR> startup
2 – 31Installing Oracle7 Server for Windows NT
Page 58

2 – 32 Oracle7 Server Getting Started for Windows NT
Page 59

C H A P T E R
T
3
Using Oracle7 Server for Windows NT
his chapter describes how to set up and use the Oracle7 Server for
Windows NT. Among the topics discussed in this chapter are:
• overview of database administration tasks
• Oracle services
• Instance Manager
• starting a database
• Instance Manager command line commands
• creating an instance
• starting an instance
• running multiple instances
• creating a new database
• creating database objects
• setting resource costs
• using the Oracle7 Server Utilities
3 – 1Using Oracle7 Server for Windows NT
Page 60

Overview of Database Administration Tasks
This section introduces you to the starter database installed during the
Oracle7 Server for Windows NT installation. It shows you how to
modify the starter database or create a new database of your own.
Note:
Database creation is an advanced function; Oracle
recommends that you use the starter database and modify it to
suit your needs.
What is an Instance?
An Oracle instance is a logical term that refers to an Oracle service and a
database server .
Oracle services are similar to W indows NT services. In order to connect
to and use an Oracle server, an Oracle service must be created and
associated with the Oracle database. Each Oracle instance must have a
unique SID. With Oracle7 Server for Windows NT, you can run multiple
Oracle instances simultaneously on one machine.
During the installation, a default instance is installed. This instance is
identified by the sid ORCL. This Guide refers to the database of this
default instance as the starter database. You can expand the starter
database if necessary to better suit your needs.
The installation process creates an Oracle service and a listener service
for the default instance. Both services are created as automatic Windows
NT services. This means that they start automatically when the machine
powers up. To use the starter database, start the database with Server
Manager or Database Manager .
The Starter Database
The starter database ORACLE is the core of the Oracle7 Server for
Windows NT database system. The starter database contains:
• four tablespaces
• four database files
• two log files
• a preloaded data dictionary
• usernames
The data dictionary (SYSTEM tablespace) contains tables and views
commonly used by many Oracle tools and sample programs.
3 – 2 Oracle7 Server Getting Started for Windows NT
Page 61

Admin.
Guide
Note: The starter database is installed to operate in
NOARCHIVELOG mode. If you wish to archive redo log files,
see Setting the Archivelog Mode and Recovering the Database later in
this Guide.
Additional Information: You can protect your database from a
disk drive malfunction by keeping (on separate physical drives)
multiple control files for each database and setting the
CONTROL_FILES initialization parameter to list each control
file. See Oracle7 Server Administrator’s Guide for information on
setting this initialization parameter value.
Starter Database
Tablespace Structure
The four tablespaces in the Oracle7 Server for Windows NT starter
database hold various types of data, as follows:
SYSTEM tablespace
contents of the data dictionary including
definitions of tables, views, and stored
procedures needed by the RDBMS.
Information in this area is maintained
automatically. Your application data goes in
the USER_DA TA tablespace.
USER_DATA
tablespace
empty when the server is initially installed. As
you create tables and enter data into them, you
fill this space with your data. When you add
users to the system using the User Manager
tool (described later in this chapter), the
default tablespace of the users is automatically
set to USER_DA TA.
TEMPORARY_DATA
tablespace
used for rolling back transactions that fail to
complete normally. You may need to expand
this tablespace if you have long–running or
high–data–volume transactions.
3 – 3Using Oracle7 Server for Windows NT
Page 62

Starter Database Files
The starter database contains the following database files:
Server Alert Files
SYS1ORCL.ORA
USR1ORCL.ORA
RBS1ORCL.ORA
TMP1ORCL.ORA
database files of the SYSTEM, USER_DA TA,
TEMPORARY_DATA, and ROLLBACK_DATA
tablespaces.
INITORCL.ORA
LOG1ORCL.ORA
redo log files for the database.
LOG2ORCL.ORA
CTL1ORCL.ORA the database control file, containing the
database name, the names and locations of the
data files and redo log files, and the time
stamp of database creation. This file is required
to start and run a database system.
An alert file contains important information about error messages and
exceptions that can arise during database operation. The alert file is the
first place you should check if something goes wrong with the database
and the cause is not immediately obvious.
Information is appended to the file each time the database is started. For
example, if automatic archiving of redo logs halts because no disk space
is available, Oracle7 Server for Windows NT automatically places a
message in the alert file.
The Oracle7 Server for Windows NT alert file is named
sid
ALRT.LOG
and is located in the \ORANT\RDBMS73\TRACE directory.
User Accounts
Three user accounts are automatically created for the starter database:
SYS and SYSTEM
SCOTT username with CONNECT and RESOURCE
3 – 4 Oracle7 Server Getting Started for Windows NT
administrator usernames with CONNECT ,
RESOURCE, and DBA roles for the database.
The password for the SYS username is
CHANGE_ON_INSTALL. The SYSTEM
password is MANAGER.
roles for the database. The SCOTT username
has the password TIGER.
Page 63

Oracle Services
When you start or reboot the server machine, Oracle services are started.
Depending on the networking protocol used, these services are:
• OracleServiceORCL
• OracleTNSListener <id>
• OracleStartORCL
If any of these services does not start correctly and you attempt to use
any of the Oracle Database Tools, the following message appears:
DBA–00314: unable to attach to default host
ORA–09352: Windows 32–bit Two–Task driver unable to spawn
new ORACLE task
Start the services following these steps:
1. Open the Windows NT Control Panel.
2. Choose Services.
3. Find OracleServiceORCL in the list, and verify that its status is
Started. If OracleServiceORCL is not started, select it and choose
Start.
4. Find OracleTNSListenerORCL and verify that its status is Started.
Note:
You must complete steps 3 and 4 in order.
Note:
choose the Startup button, and choose Manual Startup Type.
If you cannot find these service names in the list, use Instance
Manager.
Attention: For information on the GUI version (32–bit)
☞
On occasion (for example, if you want to re–install the server software),
you must stop the Oracle Services. To do this, open the Windows NT
Control Panel, select Services and choose Stop.
Instance Manager, see the following section. For information on
the command line version of Instance Manager , see the
appendix, Using the Instance Manager from the Command Line in
this Guide.
To start Oracle services whenever the server starts,
3 – 5Using Oracle7 Server for Windows NT
Page 64

Instance Manager
Instance Manager is a graphical tool used to create and modify
instances. This section describes how to create and modify Oracle
instances using Instance Manager .
Creating an Instance (and Database) with Instance Manager
Creating Oracle instances includes creating an Oracle service(s) and a
database. Follow these steps:
W arning: When you create an instance using Instance
Manager, a new database is automatically created. If you want
to create an instance without creating a new database, use the
command line version of Instance Manager (ORADIM73.EXE).
Attention: For information on the GUI version (32–bit)
☞
1. Double–click the Oracle Instance Manager icon in the Oracle7 Server
Instance Manager, see the following section. For information on
the command line version of Instance Manager , see the
appendix, Using the Instance Manager from the Command Line in
this Guide.
for Windows NT Program Group.
Instance Manager starts, and the Instance Manager dialog box
appears.
2. Click the New button in the Instance Manager dialog box.
3 – 6 Oracle7 Server Getting Started for Windows NT
Page 65
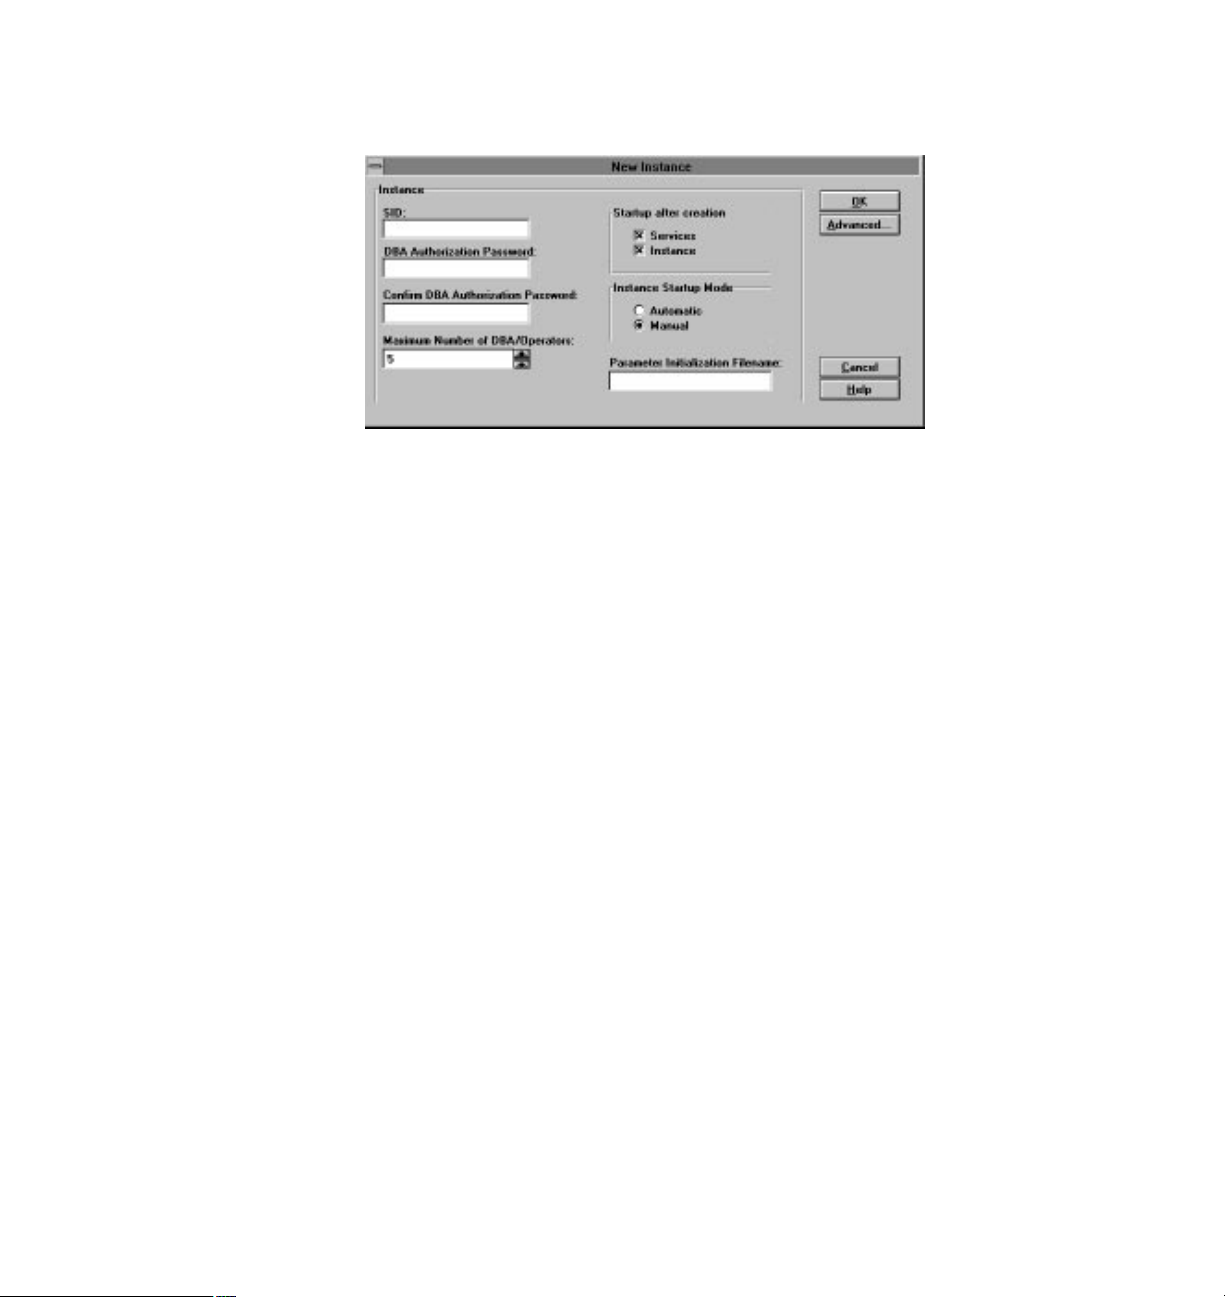
The New Instance dialog box appears.
3. Type a SID (up to four characters; remember that each SID must be
unique).
4. Type the DBA Authorization Password.
5. Confirm the DBA Authorization Password.
6. Type the Maximum Number of DBA/Operators.
7. Choose whether to start the Services and/or Instance after creation.
These selections are for specifying starting the Services and/or
Instance immediately after creation. By default, both are selected.
8. Choose Automatic or Manual Instance Startup Mode.
Selecting Automatic will start the database automatically when the
machine is booted.
Setting Startup Mode to Automatic will cause the following:
• a new service is created (OracleStart<sid>). This service
points to the executable STRTDB73.EXE.
• a command file (STRT<sid>.CMD) is created in
\ORACLE_HOME\DATABASE. This file contains the command
line version of Instance Manager to start the database. Please note
that the command file contains the password to the INTERNAL
account. If you change the INTERNAL password later, be sure to
change the password in the command file also.
9. Choose OK to complete instance creation.
Note:
After creating the instance/database, a dialog box
appears giving you the option to run two scripts: catalog.sql
(to create the Oracle7 Server for W indows NT data dictionary
3 – 7Using Oracle7 Server for Windows NT
Page 66

Changing Passwords
views) and catproc.sql (if you will be using PL/SQL). If
you choose Yes, Instance Manager spawns Server Manager and
runs these scripts in the background.
Attention: For information on the GUI version (32–bit)
☞
You can use Instance Manager to change Instance passwords. Follow
these steps to change passwords:
1. Select (in the Instance Manager main window) the instance for
Instance Manager, see the following section. For information on
the command line version of Instance Manager , see the
appendix, Using the Instance Manager from the Command Line in
this Guide.
which you want to change the password.
3 – 8 Oracle7 Server Getting Started for Windows NT
Page 67

Advanced Parameters
From the New Instance dialog box, choose Advanced. The Advanced
Parameters dialog box appears.
Instance Manager enables you to customize creation of new databases.
Note:
Remember that creating new databases is an advanced
task.
The following table explains the parameters in the Advanced
Parameters dialog box.
3 – 9Using Oracle7 Server for Windows NT
Page 68

Parameter Description
LOGFILE filespec Specify the redo log filenames to be created and maintained. If you omit this
sid
parameter, Oracle7 creates two log files (the minimum): LOG1
sid
LOG2
size.
MAXLOGFILES integer Maximum number of redo log files the database will create (2 MAXLOGFILES
are created by default). The default value is 32; the range is 2 to 255 log files.
MAXLOGMEMBERS integer Maximum number of copies for a redo log file group. Set this parameter if
you plan to use multiplexed redo log files as discussed in the Oracle7 Server
Administrator’s Guide. The default value is 2; the range is 2 to 5 log file copies.
MAXLOGHISTORY integer This parameter is not used with Oracle7 Server for Windows NT.
DATAFILE filespec Specify one or more database files to be created and maintained. The default
database files (DBS1sid.ORA) of 6MB, are stored in \ORANT\DATABASE.
filespec filespec defines the name, size, and location of redo log files and database files
using the syntax
where d :\path\filename specifies the complete drive, path, and filename for
the file. (Always enclose the path and filename in single quotation marks.)
The SIZE parameter operates as described in the Oracle7 Server SQL Reference.
MAXDATAFILES integer Specify the maximum number of data files that the database can create (1
MAXDATAFILE is created by default). The default value is 32; the range is 1
to 254 files.
MAXINSTANCES integer This parameter is not relevant with Oracle7 Server for Windows NT.
NOARCHIVELOG To avoid logging the commands used to create your database, you should
create the database in NOARCHIVELOG mode (the default). If you plan to
operate the database in ARCHIVELOG mode, see the section Enabling Auto-
matic Archiving in Chapter 4 for instructions on changing this setting.
CHARACTER SET name The character set Oracle7 Server for Windows NT uses to store data. The de-
fault is WE8ISO8859P1.
.ORA. The default size of each log file is 50K; there is no maximum
’d:\path\filename’ [SIZE integer [K|M]]
.ORA and
Additional Information: For more detailed information, see
SQL Ref.
Oracle7 Server SQL Reference.
Starting a Database
Before starting the database, make sure that a database instance has
been created and that the services have been started. (See the section
Creating an Instance with Instance Manager earlier in this chapter.) Then,
use the Database Instance Manager or Server Manager to start the
database.
3 – 10 Oracle7 Server Getting Started for Windows NT
Page 69

Starting a Database Using Instance Manager
Databases can be started using Instance Manager (by selecting the
Services and Instance checkboxes in Startup After Creation), or from
ORADIM73 command line mode.
Starting a Database Using Server Manager
To start the database using Server Manager, follow these steps:
1. Start Server Manager by typing (at the command prompt):
C:\>SVRMGR73
2. Connect to the database using your username:
SVRMGR> CONNECT username [/password]
When you use Server Manager in line mode, if you do not include a
password in your CONNECT statement and a password has been
set, Server Manager prompts you to enter one.
When you use Server Manager in screen mode, if you do not include
a password in your CONNECT statement and a password has been
set, Server Manager displays an error message. To enter your
password without typing it on the command line, choose Connect
from the Session menu.
3. Start up the database by typing the following:
SVRMGR> STARTUP [PFILE=path\filename]
where path\filename specifies an initialization parameter file other
than the default, INITsid.ORA. This example starts the database
using a file named INIT2.ORA:
SVRMGR> STARTUP PFILE=C:\ORANT\RDBMS73\INIT2.ORA
After completing these steps, you can make local connections to Oracle7
Server.
Shutting Down an Instance/Database
In Release 7.3, you can startup and shutdown a database using Server
Manager, Database Manager, or ORADIM73 command line mode.
Instance Manager does not provide that functionality, except while
creating/deleting an instance.
3 – 11Using Oracle7 Server for Windows NT
Page 70

Delete an Instance
To delete an instance:
1. Select the instance you wish to delete in the Instance Manager
2. Choose the Delete button.
3. Choose Yes to confirm the deletion.
Running Multiple Instances
To run multiple instances, you must ensure that you have already
created each instance and started the services for each instance using the
Instance Manager (use the Instance Manager to create and delete
instances).
You then run multiple instances by starting each of the instances, using
either Server Manager or Database Manager (Server Manager is used to
start up the database only). Start Services using the Services applet in
the Windows NT Contr ol Panel (if the services are not already started).
Using Server Manager
W arning: Deleting an instance also deletes the database!
dialog box.
For each instance you wish to run:
1. Begin at the command prompt and set a value for the ORACLE_SID
configuration parameter by typing:
C:\> SET ORACLE_SID=sid
where sid is the name of the instance.
2. Start Server Manager and start up the instance by typing:
C:\>SVRMGRnn
SVRMGR>CONNECT INTERNAL/PASSWORD
SVRMGR>STARTUP
Note: In the first line, nn is the version of Server Manager you
are using (for example, “SVRMGR73”).
Note:
After you type the connect internal statement, you’re
prompted to type the password of the internal account (this is
the same password you entered while creating the instance).
3 – 12 Oracle7 Server Getting Started for Windows NT
Page 71

Creating an Instance
The Instance Manager command line tool is run with the
ORADIM73.EXE executable. To use this tool, from the command line,
type ORADIM73, followed by appropriate commands and arguments
(listed below).
Note:
If you enter ORADIM73 or ORADIM73.EXE at the
command line followed by a return (that is, without any
commands), you start the graphical tool. Likewise, if you type
“ORADIM73” followed by an invalid command, you start the
graphical tool. If you type “ORADIM73” followed by a
combination of valid and invalid commands, the Instance
Manager processes as many valid commands as possible and
remain at the command line.
To get a complete listing of ORADIM73 commands, enter a question
mark after the executable name:
C:\>ORADIM73 –?
To use ORADIM73 to create an instance called sid, enter the following:
C:\>ORADIM73 –NEW –SID sid –INTPWD <password> –STARTMODE –PFILE
These two commands are mandatory: create an instance (–NEW) and
the system identifier of the instance (–SID sid).
Starting an Instance
To start an instance using ORADIM73.EXE directly from the command
line, enter the following:
C:\>ORADIM73 –STARTUP –SID sid –STARTTYPE SRVC,INST
–USRPWD <password> –PFILE <filename>
where sid is the system identifier (SID) of the database, INST indicates
that the instance should be started.
Running Multiple Instances
For each instance you wish to run, from the command line type:
C:\>ORADIM73 –STARTUP –SID sid –STARTTYPE SRVC,INST
–USRPWD <password> –PFILE <filename>
3 – 13Using Oracle7 Server for Windows NT
Page 72

where sid is the system identifier (SID) of the database, SRVC,INST
indicates that both the services and the instance are to be started (if
applicable).
Creating a New Database
After you complete an Oracle7 Server installation of Oracle7 Server for
Windows NT, you install a starter database. If you chose Selective Install
and did not install a starter database, you must create your own
database.
The steps below are divided into two sections:
• preparing to create a new database
• creating a new database
The following flow chart diagrams the decision process for the types of
tools and protocols you use if you decide to create a custom database
(one specialized for your needs).
3 – 14 Oracle7 Server Getting Started for Windows NT
Page 73

Do you want to replace
the starter database?
Yes
No
Use the Instance
Manager to create
an instance
Use EXP to
export data
Shut down
the instance
Delete data-
base files
Create/edit
.SQL scripts
Start the
instance
Run Server Mgr &
the SQL scripts
Use IMP to
import data
If you have installed Oracle7 Server for Windows NT without the starter
database or if you are creating an additional database, you must create a
separate Oracle instance. See Creating an Instance with Instance Manager
in this chapter for more details.
Note:
created an instance, follow the steps below.
Preparing to Create a New Database
Follow the steps below to create a new database.
1. Use the EXP utility to export any data from the current database that
you wish to migrate to the new database. To start EXP, type:
C:\>EXP73 [options]
To replace the starter database, or if you have already
3 – 15Using Oracle7 Server for Windows NT
Page 74

Oracle7 Utilities
2. Start Server Manager from the console and connect with your user
3. Shut down your Oracle7 Server for Windows NT using Database
4. Make backup copies of all the database, redo, log, and control files if
☞
5. Delete all the database files (including data files, redo log files, and
Additional Information: When you run the EXP utility from
Windows NT workstations, the BUFFER parameter defaults to a
value of 4K, and the RECORDLENGTH parameter defaults to
2K. See Oracle7 Server Utilities for more information about EXP.
name and password:
C:\>SVRMGR73 [MODE=LINE]
Manager or the Server Manager SHUTDOWN command.
Additional Information: For more information on using
Database Manager, or any of the Database Tools, see the online
Help included with your product.
the database contains important information.
Attention: See the sections Setting the Archivelog Mode and
Recovering the Database and Backing Up the Database in this
chapter, and Oracle7 Server Administrator’s Guide for more
information.
control files) from the starter database:
• SYS1ORCL.ORA
• USR1ORCL.ORA
• RBS1ORCL.ORA
• TMP1ORCL.ORA
• INITORCL.ORA
• LOG1ORCL.ORA
• LOG2ORCL.ORA
• CTL1ORCL.ORA
If you are replacing the starter database, go to Step 8 now.
6. If you have created a new instance, copy the sample initialization
parameter file INITsid.ORA to a new file named INIT
where sid is the new instance name.
7. Using any text editor, modify the new INIT
references to the CONTROL_FILES parameter reflect the new SID.
For example, if the new instance’s SID is ABC, replace
CTL1ORCL.ORA (in the INIT ABC.ORA) with CTL1ABC.ORA.
3 – 16 Oracle7 Server Getting Started for Windows NT
sid
sid
.ORA file so that all
.ORA,
Page 75

Attention: The CONTROL_FILES parameter in the
☞
☞
8. (Optional) Use a text editor to create a SQL script containing the
INITsid.ORA file must specify the complete path(s) of control
file(s), including drive designators. For example:
CONTROL_FILES =
(D:\MY_ORACLE_HOME\DATABASE\CTL1ABC.ORA)
OR
CONTROL_FILES = (%RDBMS73%\DATABASE\CTL1ABC.ORA)
W arning: %RDBMS73% is instantiated by Oracle to a directory
with the drive designator stated above. If a drive letter(s) is not
provided, Oracle will not start properly.
Attention: See Initialization File Parameters in this Guide for
important additional information on modifying Windows
NT–specific initialization parameters. See also Oracle7 Server
Administrator’s Guide.
CREATE DATABASE statement.
A SQL script is a file containing SQL commands just as you would
type them in Server Manager. Using a SQL script makes it easier to
edit and verify the SQL statement required for creating a new
database.
Use the following syntax for the CREATE DATABASE statement:
CREATE DATABASE database_name
[CONTROLFILE REUSE]
[LOGFILE filespec [,filespec] ...]
[MAXLOGFILES integer]
[MAXLOGMEMBERS integer]
[DATAFILE filespec [,filespec] ...]
[MAXDATAFILES integer]
[ARCHIVELOG | NOARCHIVELOG]
[EXCLUSIVE]
[CHARACTER SET name]
Attention: If you assigned a value to the DB_NAME
sid
☞
SQL Ref.
initialization parameter in the INIT
use the same value for the database_name parameter in the
CREATE DATABASE statement.
The CREATE DATABASE parameters are described in Chapter 3.
Additional Information: The remaining parameters in the
CREA TE DATABASE statement are described in Oracle7 Server
SQL Reference.
.ORA file, be sure you
3 – 17Using Oracle7 Server for Windows NT
Page 76

Starting an Instance and Creating the Database
Follow these steps to create a new database:
1. Start the instance with the Instance Manager, or follow the
instructions in the Oracle Service section earlier in this chapter.
2. Set the Oracle SID environment variable to equal the SID. For
example:
SET ORACLE_SID=ABC
If you will use this instance often, you can set the ORACLE_SID key
to equal the SID in the Windows NT Registry. To do this, start the
Registry’s editor , choose Software and Oracle.
3. Start Server Manager from the command line and connect to the
database as follows:
SVRMGR>CONNECT INTERNAL/PASSWORD
Attention: If you receive the errors DBA–00314 or ORA–09352,
☞
4. Start an Oracle7 instance without mounting a database. If the
the Oracle SID environment variable is not set to the instance’s
SID. See Step 2 above.
initialization parameter file you are using is not named
sid
INIT
directory of the computer executing Server Manager, use the PFILE
option with the ST ARTUP statement:
.ORA or is not located in the \ORANT\DATABASE
SVRMGR>STARTUP NOMOUNT [PFILE=path\filename]
5. If you created a SQL script file earlier, execute the CREATE
DATABASE statement stored in that script file by typing:
SVRMGR>@[path]filename
where filename is the name of the file containing the SQL statement.
If you did not create a SQL script for the CREATE DATABASE
statement, enter the statement directly at the SVRMGR prompt.
Oracle7 Server for Windows NT automatically cr eates the redo log
file(s) and database file(s) that you specify in the CREATE
DATABASE statement. It also creates the control files listed in the
CONTROL_FILES initialization parameter .
6. After entering the CREATE DAT ABASE statement, you should run
the SQL script CA TALOG.SQL to create the Oracle7 Server for
Windows NT data dictionary views and the script CATPROC.SQL if
you will be using PL/SQL.
3 – 18 Oracle7 Server Getting Started for Windows NT
Page 77

You should also run any other SQL scripts at this time. All SQL
scripts for Oracle7 Server for Windows NT are stored in
\ORANT\RDBMS
Attention: See Advanced Replication Option if you will be
☞
Admin.
Guide
Utilities
creating a database for Advanced Replication at this time.
Additional Information:
nn
\ADMIN.
3 – 19Using Oracle7 Server for Windows NT
Page 78

Creating Database Objects
Once you have created new database files, as described in Chapter 3 of
this Guide, you can create new database objects including:
Admin.
Guide
When creating database objects such as tables, clusters, and indexes,
specify a STORAGE clause to define the way in which the object size
increases over time.
SQL
• tables
• clusters
• indexes
• views
• roles
Additional Information: See Oracle7 Server Administrator’s
Guide for guidelines on creating database objects. In particular,
see the section that provides equations for estimating the space
requirements for clusters, nonclustered tables, and indexes.
Windows NT uses the same fixed header, transaction header,
and row header constants described in that chapter.
Additional Information: The individual parameters of the
STORAGE clause have the same defaults and minimum values
as those described in the Oracle7 Server SQL Reference.
Setting Resource Costs
Oracle7 Server for Windows NT allows you to limit users’ access to
database resources and database objects.
For example, you can set limits for a user’s file input/output (I/O)
regardless of which database objects the user accesses. Set a resour ce
cost for the logical reads of the user’s session to set I/O limits.
Define resource costs through user pr ofiles. A profile is a collection of
valid database resources and costs for a given user. With Oracle7 Server
for Windows NT, you can create user profiles to define the following
resource costs:
• logical reads for individual sessions or SQL statements
• number of sessions that a user may create
• idle time and elapsed time for each user session
3 – 20 Oracle7 Server Getting Started for Windows NT
Page 79

CPU time used by each user’s session on the server machine
•
Additional Information: See Oracle7 Server Administrator’s
Guide for details on setting resource costs.
Admin.
Guide
Using the Oracle7 Server Utilities
The Oracle7 Server utilities enable you to move data to and from an
Oracle database and administer database–related functions.
For example, SQL*Loader lets you load data from ASCII text files and
other file formats into an Oracle7 Server for Windows NT database. The
Import and Export utilities let you move existing Oracle data to and
from database files.
The Oracle7 Server utilities are available for many different operating
systems and hardware platforms; the utilities operate in essentially the
same way for all platforms.
This section describes only those functions of the Oracle7 Utilities that
apply to the Windows NT operating system (these utilities ar e the
Windows NT 32–bit versions). For general information on the Oracle7
utilities, refer to Oracle7 Server Utilities.
Using Export and Import
Export
Note:
The Oracle7 utilities for Windows NT use the same
messages and codes as the Oracle utilities on other platforms.
For further information on Oracle utility error messages, refer to
the Oracle7 Server Messages.
Note:
Import, Export, and SQL*Loader are also available in a
16–bit GUI–based version (included with the Windows database
tool set).
Export and Import utilities can run as operating system command–line
tools in Windows NT. Their 16–bit counterparts can run when you
choose their respective icons from the Windows Program Manager (or
Windows 95 Explorer.
Use the Export utility to export your database tables and other objects to
disk when archiving them or prior to migrating data between hardware
platforms. To start Export, type:
3 – 21Using Oracle7 Server for Windows NT
Page 80

C:\> EXP73 [options]
Import
Use the Import utility to import database tables and other objects that
you exported using the Export utility. To start Import, type:
C:\> IMP73 [options]
See Oracle7 Server Utilities for complete usage instructions and
command–line options available for Export and Import.
BUFFER and RECORDLENGTH Defaults
When running the Export and Import utilities from the Oracle7 Server
for Windows NT, note that the default values for certain parameters are
operating–system specific. Specifically, the BUFFER parameter defaults
to a value of 4K under Windows NT and the RECORDLENGTH
parameter defaults to 2K.
Using SQL*Loader
SQL*Loader enables you to load data from delimited ASCII text files
and fixed–length record files.
SQL*Loader Release 7.3 includes a direct path option that bypasses the
Oracle redo log and data verification features, thereby decreasing
loading time. Use the direct path option only with data files known to be
error free. To start SQL*Loader, type:
C:\> SQLLDR73 [options]
SQL*Loader Processing Options
Windows NT supports the following processing options:
• “VAR”—load variable length records. Specify the OSD ”VAR
<recsizehint>” in the control file for this option to take effect. The
maximum size is 64K bytes.
• “FIXn”—fixed record format in which each record is exactly n
bytes long. If the record is terminated by a newline character, the
newline character must be the nth byte.
• “”—stream record format in which each record is terminated by a
newline character. The maximum record size is 48K bytes.
Additional Information: For a complete list of options and
instructions on using SQL*Loader, see the Oracle7 Server
3 – 22 Oracle7 Server Getting Started for Windows NT
Page 81

Control File Conventions
When preparing a SQL*Loader control file, you must follow certain
syntax and notational conventions. For general information on the use
and syntax of control files, refer to Oracle7 Server Utilities.
Native Datatypes
When specifying datatypes in the SQL*Loader control file, note that the
default size of native datatypes are specific to Windows NT. You cannot
override these defaults in the control file.
Native Datatype Default Field Length
INTEGER 4
SMALLINT 2
FLOAT 4
DOUBLE 8
Using the MONITOR Command
In addition to performing database administration tasks outside the
scope of the client Database Tools, you can use Server Manager to
monitor the performance of the Oracle7 Server for Windows NT using
the MONITOR command.
Utilities. The directory \ORANT\RDBMS73\LOADER contains
a number of examples on the use of SQL*Loader.
To use Server Manager MONITOR screens, run Server Manager in
screen mode and pick one of the selections from the MONITOR menu.
For further information, refer to Oracle7 Server Utilities.
3 – 23Using Oracle7 Server for Windows NT
Page 82

Instance Manager Command Line Commands
This section describes the ORADIM73 commands and parameters. Note
that each command is preceded by a dash.
–NEW
Create an instance by specifying the following parameters:
–NEW –SID <sid>
[–INTPWD <internal_pwd>]
[–MAXUSERS <number>]
[–STARTMODE <auto, manual>]
[–PFILE <filename>]
• –SID is mandatory; sid is the system identifier (SID). The
remaining parameters are optional.
• For internal_pwd specify the password for the INTERNAL
account.
• For number, specify the number of users in the password file. The
default is 5.
Attention: Creating an instance using ORADIM73 in command
☞
line mode only creates the password file and related service.
The database is NOT created (that is, database files are not
created).
–EDIT
Edit a database instance by specifying the following parameters:
–EDIT –SID <sid>
[–NEWSID <newsid>]
[–INTPWD <internal_pwd>]
[–STARTMODE <auto, manual>]
[–PFILE <filename>]
• –SID is mandatory; sid is the system identifier (SID). The
remaining parameters are optional.
• For newsid, specify the new SID for the instance (enter only if
changing an existing instance name).
• For internal_pwd specify the password for the INTERNAL account
(this is necessary only if the password file was not created
earlier).
3 – 24 Oracle7 Server Getting Started for Windows NT
Page 83

–STARTUP
–SHUTDOWN
To start an instance, specify the following parameters:
–STARTUP –SID <sid>
–PFILE <filename>
[–USRPWD <user_pwd>]
–STARTTYPE <SRVC,INST>
• For sid, specify the system identifier (SID).
• For user_pwd, specify the password for the user account specified.
(Not needed if the user has connected as INTERNAL and either
the DBA_AUTHORIZATION or DBA_sid_AUTHORIZATION
parameter is set to BYPASS.)
• For –STARTTYPE, specify SR VC for services, INST for instance, or
both.
To stop an instance, specify the following parameters:
–SHUTDOWN –SID <sid>
[–USRPWD <user_pwd>]
–SHUTTYPE <SRVC,INST>
–SHUTMODE <a, i, n>
–DELETE
/help
where a is abort mode, i is immediate mode, and n is normal mode.
To delete any number of instances, specify the following:
–DELETE –SID <sida, sidb, sidc, . . . >
–DELETE –SRVC <srvca, srvcb, srvcc, . . . >
To display a listing of Instance Manager commands, specify one of the
following queries:
–? | /? | /h | /help
3 – 25Using Oracle7 Server for Windows NT
Page 84

ORADIM Log
When you use ORADIM73 in command line mode, Instance Manager
opens a log file (ORADIM73.LOG) in: %ORACLE_HOME%\\RDBMS73.
All operations (both successful and failed) are logged in this file. You
must check this file to verify the success of an operation.
3 – 26 Oracle7 Server Getting Started for Windows NT
Page 85

C H A P T E R
T
4
Getting the Most out of Integration with Windows NT
his chapter describes ways in which the tight integration between
Oracle7 Server for Windows NT and the Windows NT operating system.
This topics are covered in this chapter:
• Oracle7 and the Windows NT Performance Monitor
• Oracle7 Event Viewer
• database security
• starting services automatically
• using Windows NT OS authentication
4 – 1Getting the Most out of Integration with Windows NT
Page 86

Oracle7 and the Windows NT Performance Monitor
Oracle7 Server for Windows NT takes advantage of the Windows NT
Performance Monitor to help you keep track of, and measure the
performance of your database. The following descriptions include
Oracle–specific information about Performance Monitor .
• If no data or Oracle objects appear, either the database is down, or
an invalid host string or password has been entered. If the
database is down, exit Performance Monitor , start the database,
and restart Performance Monitor .
• See operf.log located in ORANT\DBS for information on the
status of the Oracle Performance Monitor .
• All Oracle–specific items that can be monitored through
Performance Monitor begin with Oracle7.
Additional Information: For more information on the
Windows NT Performance Monitor, see your operating system
documentation.
The following information is located in the Windows NT Registry. After
running regedt32, the information is located in
\\HKEY_LOCAL_MACHINE\SYSTEM\CURRENT_CONTROL_SET\SERVICES\
ORACLE7\PERFORMANCE
Value Name Data Type Value
Perf_File_Name REG_EXPAND_SZ %ORACLE_HOME%\DBS\PERF.ORA
Library REG_EXPAND_SZ operfdll.dll
Open REG_EXPAND_SZ OpenOracle7PerformanceData
Close REG_EXPAND_SZ CloseOracle7PerformanceData
Collect REG_EXPAND_SZ CollectOracle7PerformanceData
Hostname REG_EXPAND_SZ 2:ORCL
Username REG_EXPAND_SZ System
Password REG_EXPAND_SZ Manager
Only the last 3 items (Hostname, Username, Password) in the above
table can be modified. They can point to any Oracle database (local or
remote). You must have read access to any tables from which you want
to get data.
Note:
One SID per machine can be monitored using
Performance Monitor at a time.
4 – 2 Oracle7 Server Getting Started for Windows NT
Page 87

Performance Monitor Objects
Performance Monitor objects are detailed below.
Memory Allocation Objects
Object: Oracle7 Library Cache
The Library Cache object contains one counter , the r eloads/pins
percentage counter .
This value is not time derived.
The reloads/pins is the percent of SQL statements, PL/SQL blocks and
object definitions which required re–parsing. This percentage should be
near ZERO. If the percentage is greater than 1%, then you should reduce
the library cache misses. See Reducing Library Cache Misses in Oracle7
Server Tuning.
Additional Information: For more information on the
Performance Monitor, see your operating system
documentation.
Additional Information: For more information on the meaning
of Windows NT Performance Monitor r esults, and what you can
do about your database performance, see Oracle7 Server Tuning
and your operating system documentation.
Object: Oracle7 Data Dictionary Cache
The Data Dictionary Cache object contains one counter , the get
misses/gets percentage counter.
This value is not time derived.
For frequently accessed dictionary caches, the value of this counter
should be less than 10–15%. If the ratio continues to increase above this
threshold while your application is running, increase the amount of
memory available to the data dictionary cache. See Reducing Data
Dictionary Cache Misses in Oracle7 Server Tuning.
Object: Oracle7 Buffer Cache
The Buffer Cache object contains one counter, the phyreads/gets
percentage counter .
This value is not time derived.
If the Miss counter is high (higher than 30% – 40%), increase the number
of buffers in the cache to improve performance. See Reducing Buffer
Cache Misses in Oracle7 Server Tuning.
4 – 3Getting the Most out of Integration with Windows NT
Page 88

Tuning I/O
Tuning Contention
Note: The percentage is calculated as a Miss ratio: Reducing
Buffer Cache Misses expresses the calculation as a High ratio.
Object: Oracle7 Data Files
The Data Files object contains two counters per data file instance, the
phyrds/sec and phywrts/sec counters.
These values are time derived.
See Reducing Disk Contention in Oracle7 Server Tuning.
Object: Oracle7 Dynamic Space Management
The Dynamic Space Management object contains one counter , the
recursive/calls per second counter.
If Oracle7 makes excess recursive calls while your application is
running, it may be necessary to determine the cause of excess recursive
calls. See Detecting Dynamic Extension in Oracle7 Server Tuning.
Object: Oracle7 Redo Log Buffer
The Redo Log Buffer object contains one counter, the r edo log space
request counter.
The value of this counter should be near 0. If this value increments
consistently, processes have had to wait for space in the buffer. In this
case, it may be necessary to increase the size of the redo log buffer. See
Space in the Redo Log Buffer in Oracle7 Server Tuning.
Additional Tuning Contentions
Object: Oracle7 Tuning Sorts
The Tuning Sorts object contains two counters, the sorts in memory/sec
and the sorts on disk/sec counters.
If a significant number of sorts require disk I/O to temporary segments,
your application’s performance may benefit from increasing the size of
the sort area. See Increasing Sort Area Size in Oracle7 Server Tuning.
Object: Oracle7 Free List
The Free Lists object contains one counter, the freelist waits/requests
percentage counter .
If this value is greater than 1% add more free list to reduce contention.
See Identifying Free List Contention in Oracle7 Server Tuning.
4 – 4 Oracle7 Server Getting Started for Windows NT
Page 89

Event Viewer
Database Security
The Windows NT Event Viewer displays warnings and errors about the
Oracle7 database. As with other events displayed in the Event Viewer,
you can double–click on them to display more detailed error
information.
Note:
The Windows NT Event Viewer displays the same
information contained in ALERT.LOG.
Additional Information: For more information on using the
Windows NT Event Viewer, see your operating system
documentation.
When a user on the W indows NT server machine (on which the
database is running) attempts to connect to a database as INTERNAL,
Oracle7 Server for Windows NT verifies if the database can be accessed
without a password. The database can be accessed without a password
if at least one of the following conditions is true:
• the Windows NT Registry key for the environment variable
DBA_AUTHORIZATION is set to BYPASS
• the Windows NT Registry key for the environment variable
DBA_sid_AUTHORIZATION is set to BYPASS, where sid is the
SID of the current instance
Additional Information: See Configuration Parameters and the
NT Registry in this Guide for details on configuration
parameters and the Windows NT Registry.
If either of the above conditions is true, the database connection is
considered secure (that is, accessible), and Oracle7 Server for Windows
NT allows the user to connect to the database without a password.
If neither of these conditions is true, or if the user is not on the same
machine as the Oracle7 Server for Windows NT, Oracle7 determines the
value of the REMOTE_LOGIN_PASSWORDFILE initialization
parameter, and proceeds as follows:
• REMOTE_LOGIN_PASSWORDFILE=EXCLUSIVE:
Oracle7 looks in the Windows NT Registry for the value of the
ORA_sid_PWFILE parameter. If not found, it looks in the Registry
for the value of the ORA_PWFILE parameter, which points to a
file containing the INTERNAL password as well as user names,
passwords, and privileges. Based on the value of the parameter
4 – 5Getting the Most out of Integration with Windows NT
Page 90

• REMOTE_LOGIN_PASSWORDFILE=SHARED:
• REMOTE_LOGIN_PASSWORDFILE=NONE:
Database Password Encryption
With this release of Oracle7 Server for Windows NT, you can require
that the password used to verify a remote connection—that is, a
connection over SQL*Net—always be encrypted. You do this in two
steps:
• Set the DBLINK_ENCRYPT_LOGIN initialization parameter on
found, the user is granted or denied privileged access to the
database
The SHARED value of this parameter affords backward
compatibility with earlier releases of Oracle7. Oracle7 looks for
the same files as it does when the value is EXCLUSIVE, but only
the INTERNAL account is available for privileged access. Users
will not be able to log in with SYSOPER or SYSDBA privileges
even if those privileges are granted in the password file.
If the value of this parameter is NONE, either one of the first two
security conditions above is true, or no users are granted access to
the database.
Additional Information: See Initialization Parameter Files in this
Guide for details on Windows NT initialization parameters.
the server to TRUE.
• Set the ORA_ENCRYPT_LOGIN envir onment variable on the
client machine to TRUE.
Once these parameters are set, whenever you attempt a remote login,
Oracle encrypts the password before sending it to the remote database.
If the connection fails, the failure is noted in the audit log. Oracle then
checks the appropriate parameter values. If either is set to FALSE,
Oracle attempts the connection again using an unencrypted version of
the password. If the connection is successful, the success is noted in the
audit log, and the connection proceeds.
Attention: Releases of the Oracle7 Server prior to 7.1 did not
☞
4 – 6 Oracle7 Server Getting Started for Windows NT
support encrypted passwords. Therefore, if you know you are
connecting to earlier versions of an Oracle7 Server for Windows
NT, you must set the initialization parameter
DBLINK_ENCRYPT_LOGIN to FALSE for the connection to
succeed.
Page 91

Creating Password Files
You create password files with the Instance Manager, as part of the
process of creating an instance. The two essential elements of a
password file you specify with the Instance Manager are:
• the password for the INTERNAL account for that instance
• the maximum number of users to whom you wish to grant
SYSOPER or SYSDBA privileges
The Instance Manager creates (in \ORANT\DATABASE) a password
file with the name PWDsid.ORA, where sid is the system identifier (SID).
Later, you can add (or delete) user names, user passwords, and user
privileges in the password file, using Server Manager.
Warning: Do not move or copy password files on your own; do
so only with the Instance Manager . If you do, the Instance
Manager may not be able to find a password in order to start an
instance.
Starting Services Automatically
You can start Oracle7 Server for Windows NT automatically on restart
by setting the OracleStartORCL service to automatic in the Services
control panel.
Using Windows NT OS Authentication
When enrolling ORACLE users, you may optionally use the NT
username as the basis for ORACLE usernames. Users enrolled in this
way can connect to ORACLE7 Server faster and more conveniently.
When using the NT username for authentication, the database
administrator sets the OS_AUTHENT_PREFIX parameter in the
INITsid.ORA file. If this parameter is not set, the default value is OPS$.
The syntax for granting automatic logins when using the default value
of OS_AUTHENT_PREFIX is as follows:
SVRMGR> create user TO OPS$USERID IDENTIFIED EXTERNALLY;
where USERID is the user’s NT username.
Additional Information: For more information on operating
system authentication, see Oracle7 Server Administrator’s Guide.
4 – 7Getting the Most out of Integration with Windows NT
Page 92

For example, to enroll a user whose NT username is FRANK, when the
OS_AUTHENT_PREFIX id set to XYZ, enter:
SVRMGR> CREATE USER XYZFRANK INDENTIFIED EXTERNALLY;
Subsequently, if you are accessing a shared resource from a Windows
NT or Windows 95 station, and you connect to Oracle, you need not
enter your Oracle username. For example, after you enter SVRMGR you
can enter:
CONNECT /<@destination>
at the SVRMGR prompt. Oracle searches the directory tables for an
automatic login username corresponding to the NT username of
FRANK , verifies it, and allows you to connect as XYZFRANK.
Because the Oracle Username is the whole name XYZFRANK, all objects
created by XYZFRANK (that is tables, views, indexes, etc.) are prefixed
by this name. For another user to reference the table SHARK owned by
XYZFRANK, the user would enter:
SVRMGR> Select * from XYZFRANK.SHARK
Note: Automatic authorization accounts are supported for all
protocols under SQL*Net V2. The user must be already
authenticated on the NT workstation/server running the
ORACLE7 database. An authenticated connection is established
between the client’s workstation and the NT workstation/server
when a shared resource is accessed and the corr ect
username/password are supplied.
You can set OS_AUTHENT_PREFIX to the null string (a set of double
quotes with no string included). This eliminates the need for any prefix
to the NT usernames.
Note:
No INITsid.ORA changes are necessary to enable
automatic login.
NT GROUPS and ROLES
Oracle7 Server for Windows NT allows database roles to be granted to
users directly by Windows NT. When database users are enrolled using
the automatic authenticated accounts, Windows NT groups can be used
to grant these users database roles. NT groups are created by using the
Windows NT USER MANAGER utility.
Additional Information: For more information on managing
roles, see Oracle7 Server Administrator’s Guide.
4 – 8 Oracle7 Server Getting Started for Windows NT
Page 93

One INITsid.ORA parameter must be properly set before Windows NT
groups can be used to grant a database role:
OS_ROLES must be set to TRUE.
The default setting for this parameter is FALSE. Unless set to TRUE,
Windows NT groups cannot be used to grant a database role.
1. Set the INITsid.ORA parameter OS_ROLES to be TRUE
2. Start or restart the database instance
3. Create and add users using the Windows NT USER MANAGER.
Include the ORA_%SID%_ROLENAME format as described :
ORA_%SID%_ROLENAME[_[D][A]]
where %SID% indicates the database instance.
ROLENAME identifies the role assigned to database users during the
session.
D indicates the role as the default role
A indicates the role includes the ADMIN OPTION. This option allows
the user to grant the role to other roles only. Roles cannot be granted to
users if the operating system is used to manage roles.
Note:
Oracle will convert the group name to UPPERCASE.
Note:
Both the [D] and [A] characters are optional. If either the
D or A characters are specified, they must be preceded by an
underscore.
For example, a database instance of ORCL would have the following
names if the role was identified by USERS:
• ORA_ORCL_USERS
• ORA_ORCL_USERS_D
• ORA_ORCL_USERS_A
• ORA_ORCL_USERS_DA
In the following example the Groups user are:
• ORA_ORCL_VIEWUSERS
(created using CREATE ROLE)
• ORA_ORCL_UPDATEUSERS_A
(created using CREATE ROLE)
• ORA_ORCL_CONNECT_DA
(predefined ROLE; active even if OS ROLES is false)
4 – 9Getting the Most out of Integration with Windows NT
Page 94

ORA_ORCL_RESOURCE_D
•
(predefined ROLE; active even if OS ROLES is false)
In this example, when a database user connects to the Oracle7 Server
using an automatic authenticated account whose user id is also included
in the above NT Groups (ORA_ORCL_CONNECT_DA and
ORA_ORCL_RESOURCE_D are the default roles)
ORA_ORCL_UPDATEUSERS_A and ORA_ORCL_VIEWUSERS are
available for use by the user through the SET ROLE command.
Additionally, users can grant ORA_ORCL_UPDATEUSER_A and
ORA_ORCL_CONNECT_DA to other roles.
Note:
All privileges for these roles are active when the user
connects. When using operating system roles, all roles are
granted and managed through the operating system. You
cannot use both operating system roles and Oracle roles at the
same time.
When OS_ROLES is set to TRUE in the INITsid.ORA file, it is important
to understand how roles, and the privileges granted to these roles are
obtained by Oracle users whose IDs are not defined externally.
For example, if an authenticated connection exists between a client’s
workstation and a Windows NT machine running Oracle7, and the user
connects over SQL*Net V2 with the Oracle username scott/tiger , the
roles applied to the Oracle username SCOTT consist of all roles defined
for the Windows NT user NTUSER. All roles available under an
authenticated connection are determined by the Windows NT user id
and the groups available to the user.
Administration group
• CONNECT / as sysdba
• CONNECT / as sysoper
• CONNECT INTERNAL
Database administrators who use CONNECT INTERNAL from a client
workstation may belong to the ORA_OPER, ORA_DBA,
ORA_%SID%_DBA or ORA_%SID_OPER groups.
The SYSDBA and SYSOPER roles are mapped s follows:
SYSDBA> ORA_%SID%_DBA, ORA_DBA
SYSOPER> ORA_%SID%_OPER, ORA_OPER
For example:
If an authenticated connection exists between a client workstation and a
Windows NT machine running Oracle7 (with the authenticated
4 – 10 Oracle7 Server Getting Started for Windows NT
Page 95

username being NTUSER2), then the following takes place when the
user issues the command SVRMGR> connect / as sysdba
Oracle will search for the username NTUSER2 in group
ORA_ORCL_DBA. If found, the user will be given DBA privileges. If
not found Oracle will check the global group ORA_DBA.
4 – 11Getting the Most out of Integration with Windows NT
Page 96

4 – 12 Oracle7 Server Getting Started for Windows NT
Page 97

C H A P T E R
T
5
Database Administration
his chapter explains how to perform the following routine database
tasks using the Oracle7 Utilities for Windows NT:
• backup manager
• hot database file backup
• recovery manager
• refreshing table snapshots
• using trace and alert files
• logging error messages
• advanced replication option
• SQL language conventions
SQL language conventions specific to Windows NT are discussed at the
end of this chapter.
5 – 1Database Administration
Page 98

Backup Manager
Backup Manager is one of the Windows NT–based database
management tools included with Oracle7 Server for Windows NT. Use it
to back up your Oracle7 database.
The Backup Manager runs in two modes (depending upon the status of
the database and the Support Recovery option), located on the
Configure Initialization Parameters dialog box of Database Manager.
The Backup Manager, when opened, appears in one of two ways,
depending upon the status of the database:
During the Backup process, you may be prompted to enter your
database password. If so, type your database password and choose OK.
Hot Database File Backup
• running in ARCHIVELOG mode—the database is running and
the Support Recovery option is on, the database is in
ARCHIVELOG mode
• running in NOARCHIVELOG mode or not running—the
database is running and the Support Recovery option is off, the
database is in NOARCHIVELOG mode
This section discusses:
• backing up active files
• restoring active files
• backing up RAW files
• restoring RAW files
Additional Information: See Oracle7 Server Administrator’s
Guide for a detailed discussion of backing up the database.
Admin.
Guide
Backing Up Active Files
Use OCOPY two ways. The first way is to copy the open file to another
name and location on a hard disk, where an archive utility can back it
up.
The syntax for using OCOPY in this way is:
C:\>OCOPYnn old_file new_file
5 – 2 Oracle7 Server Getting Started for Windows NT
Page 99

where nn indicates the version of OCOPY Release 7.3 or later, old_file
specifies the name and location of the open file you want to back up,
and new_file specifies the name and location for the backup copy.
Note:
OCOPY also accepts two other optional command line
options, a and size_1 [size_n]. These command line options
should not be used to make backups of database files.
OCOPY can also back up large open files directly to multiple diskettes.
Use OCOPY with the /B option to split large files over multiple
diskettes.
OCOPY also reconstructs the parts of a file that have been split over
multiple diskettes if the backup copy must be restored to the hard disk.
The syntax for using OCOPY with the /B option is:
C:\>OCOPYnn /B open_file a:
where open_file specifies the path and filename of the open file you want
to back up and a: specifies the diskette drive containing the diskette on
which the backup copy should be saved.
If the file is too large to fit on one diskette, OCOPY prompts you to
insert new diskettes as needed. OCOPY catalogs the parts of the file
automatically so that it can be reconstructed at a later time.
Note:
Always use a fresh diskette for each OCOPY procedure;
do not use OCOPY to back up a file onto a diskette that contains
part or all of another file backed up using OCOPY.
Restoring Active Files
To restore files backed up with OCOPY without the /B option, use the
Windows NT COPY command to restore the files to the desired
directory.
To restore a file that has been backed up to multiple diskettes using
OCOPY with the /B option, insert the diskette containing the first part of
the backed up file into the disk drive and use the following syntax:
OCOPYnn /R a: restore_dir
where /R specifies the restore option, a: specifies the drive containing
the diskette with the backed up file, and restore_dir specifies the
directory on the server where the file being restor ed should be placed.
(The restored file will have the same name as the original file that was
backed up.)
5 – 3Database Administration
Page 100

Backing Up RAW Files
Logical RAW Files
Physical RAW Files
This section describes how to back up Logical RAW files and Physical
RAW files.
To back up Logical RAW files, use the following syntax:
C:\>OCOPYnn \\.\C: new_file
C:\>OCOPYnn /B \\.\C: a:
where c: represents the raw drive, which holds a single RAW database
file. If you use a different drive as your raw drive, substitute it for c:.
To back up Physical RAW files, use the following syntax:
Restoring RAW Files
Recovery Manager
C:\>OCOPYnn \\.\
C:\>OCOPYnn /B \\.\
physicaldriveN
physicaldriveN
: new_file
: a:
where N is the number(s) representing each of the physical drives in the
system.
To restore RAW files, use the following syntax:
C:\>OCOPYnn new_file \\.\c:
C:\>OCOPYnn /R a: \\.\c:
where c: represents the raw drive, which holds a single RAW database
file. If you use a different drive as your raw drive, substitute it for c:.
OCOPY prompts you to insert diskettes as needed.
Use Recovery Manager to recover your Oracle7 database after a failure.
During the Recovery process, you are prompted to enter your database
password. If so, enter your database password and select OK.
Additional Information: For more information about recovery,
see Oracle7 Server Administrator’s Guide.
Admin.
Guide
5 – 4 Oracle7 Server Getting Started for Windows NT
 Loading...