

Page 1

contents
start guide
part 1
introduction to the model 01 02
part 2
powering up
part 3
using the thumb keyboard and TrackStik
part 4
using the digital pen and thumbwheel
part 5
using the docking cable and desktop stand
part 6
connecting to a network
part 7
installing software and copying files
part 8
product support 16
04
06
08
10
12
14
Page 2
part 1
introduction to the
intro
model 01
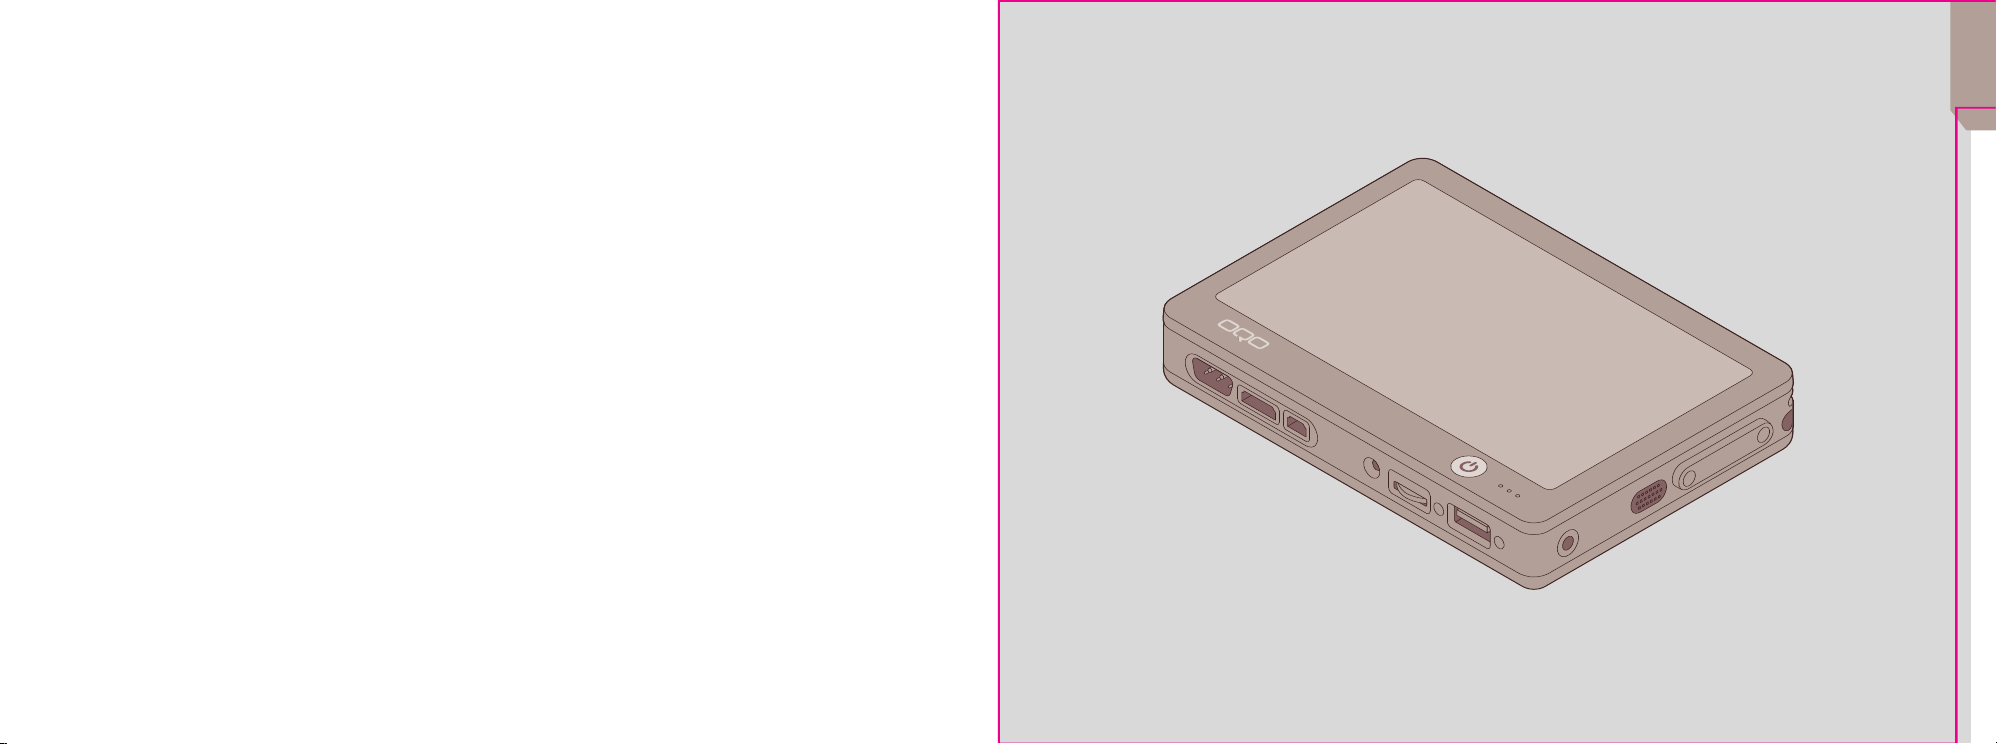
Welcome to the OQO model 01 ultra personal
computer (uPC). The model 01 is a complete,
full-featured computer. Docked at your desk it
is a normal PC. Undock it and have instant
access to all your applications and data,
wherever you go.
You can use the model 01 as a handheld
computer with its own thumb keyboard,
TrackStik®, thumbwheel, and digital pen. You
can also use it as a desktop computer by
connecting it to an external monitor,
keyboard, and mouse. When in transit, simply
slip the model 01 into your pocket, briefcase,
or bag.
Because the model 01 uses the Microsoft
Windows®XP operating system, you can use
it with all your favorite software applications
and seamlessly integrate with existing
networks via Ethernet, WiFi, or Bluetooth®.
This guide provides quick instructions for
setting up and learning to operate your
model 01. To locate more detailed
instructions, see “online documentation” on
page 18.
®
0302
Page 3
a
d
c
b
part 2
powering up
powering up
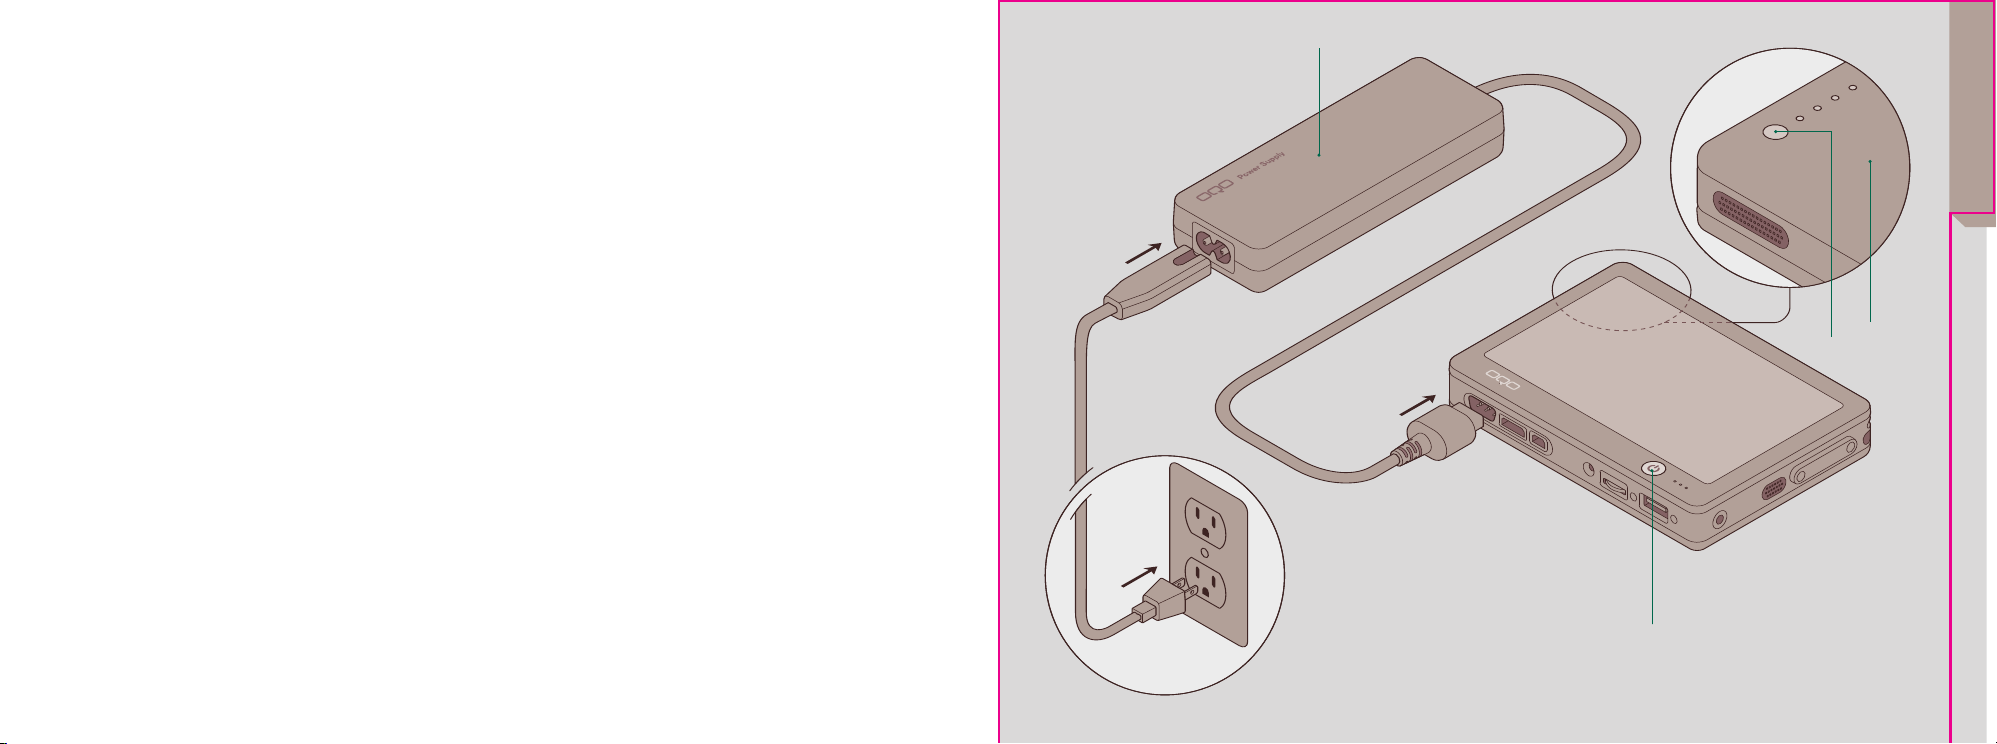
Your model 01 arrives with the battery
attached. The first time you use the model 01,
you must connect the power supply in order
to power the computer and charge the battery.
Connect the power supply to the model 01 as
shown at right, then plug it into an outlet.
The battery is charging whenever the
computer is connected to an outlet through
the power supply, regardless of whether the
computer is turned on or off. The battery fuel
gauge is located on the back of the battery.
While the model 01 is charging, the battery
fuel gauge lights flash in sequence.
When the battery is not charging, the battery
fuel gauge lights are unlit. To check the
battery power level, push the battery fuel
gauge button on the back of the battery.
During normal use, the fully-charged battery
can provide about three hours of operating
time. (For more information about maximizing
battery life, see
http://www.oqo.com/support/batterylife).
To turn on your model 01, press the power
button. The first time you do this, you must
set up Windows XP. See the
for Windows XP, included with your computer.
a Power supply
b Battery
c Battery fuel gauge button
d Power button
Start Here guide
0504
Page 4
a
d
c
b
e
f
part 3
When using your model 01 as a standalone
handheld computer, you can use the thumb
keyboard and TrackStik for input.
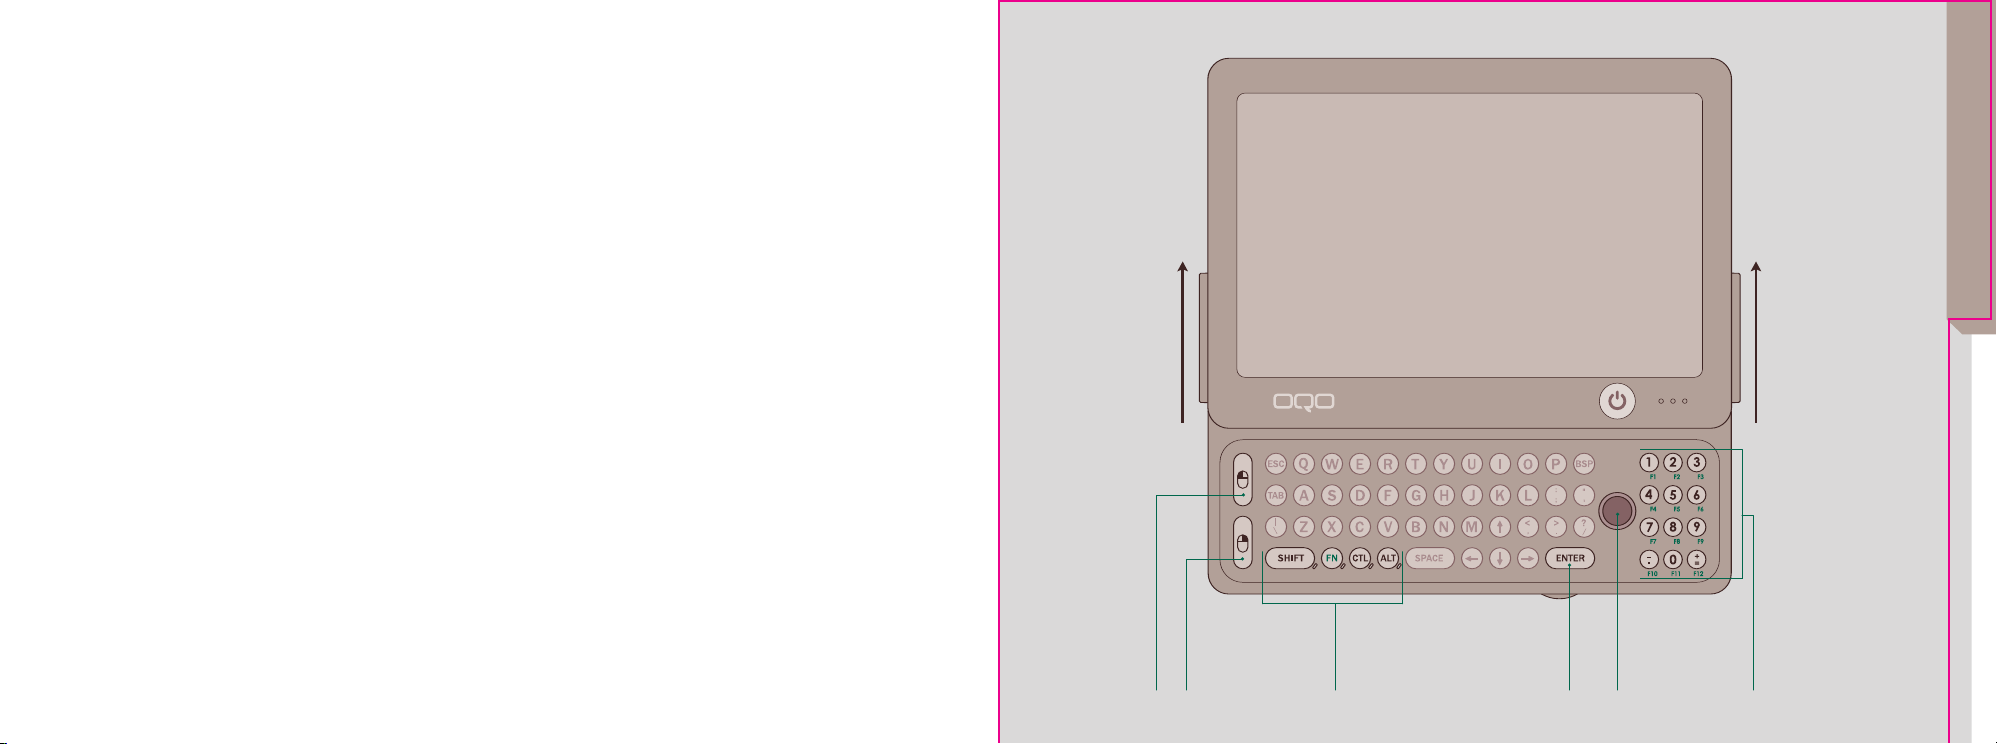
Slide the screen upward to reveal the
keyboard. The mouse buttons are located on
the left edge of the keyboard. The keyboard is
designed to be operated with your thumbs.
Move the TrackStik with your thumb to control
the mouse pointer. Use the left mouse button
to left-click and the right mouse button to
right-click.
You can also connect an external keyboard and
mouse to the model 01 via a USB port,
Bluetooth, or the OQO docking cable. See
“using the docking cable and desktop stand”
on page 10.
Unlike on a regular keyboard, the shift
(SHIFT), function (FN), control (CTL), and alt
(ALT) keys are all sticky. Press once and the
LED next to it will flash, and the next key you
using the thumb
keyboard and
TrackStik
hit will be affected. Press it twice to lock it
and the LED will be on. All subsequent keys
will be affected until you hit it again to unlock
and the LED turns off.
Here are a few examples of operations using
sticky keys:
• To activate caps lock, press the SHIFT key
twice.
• To deactivate caps lock, press the SHIFT
key a third time.
• To activate the Task Manager, press FNCTL-ALT-BSP.
• To switch to an external display, press FN-L.
• To turn WiFi on and off, press FN-”.
a Left mouse button
b Right mouse button
c Sticky keys
d ENTER key
e TrackStik
f Numeric keypad
keyboard
0706
Page 5
a
d
c
b
e
part 4
using the digital pen
and thumbwheel
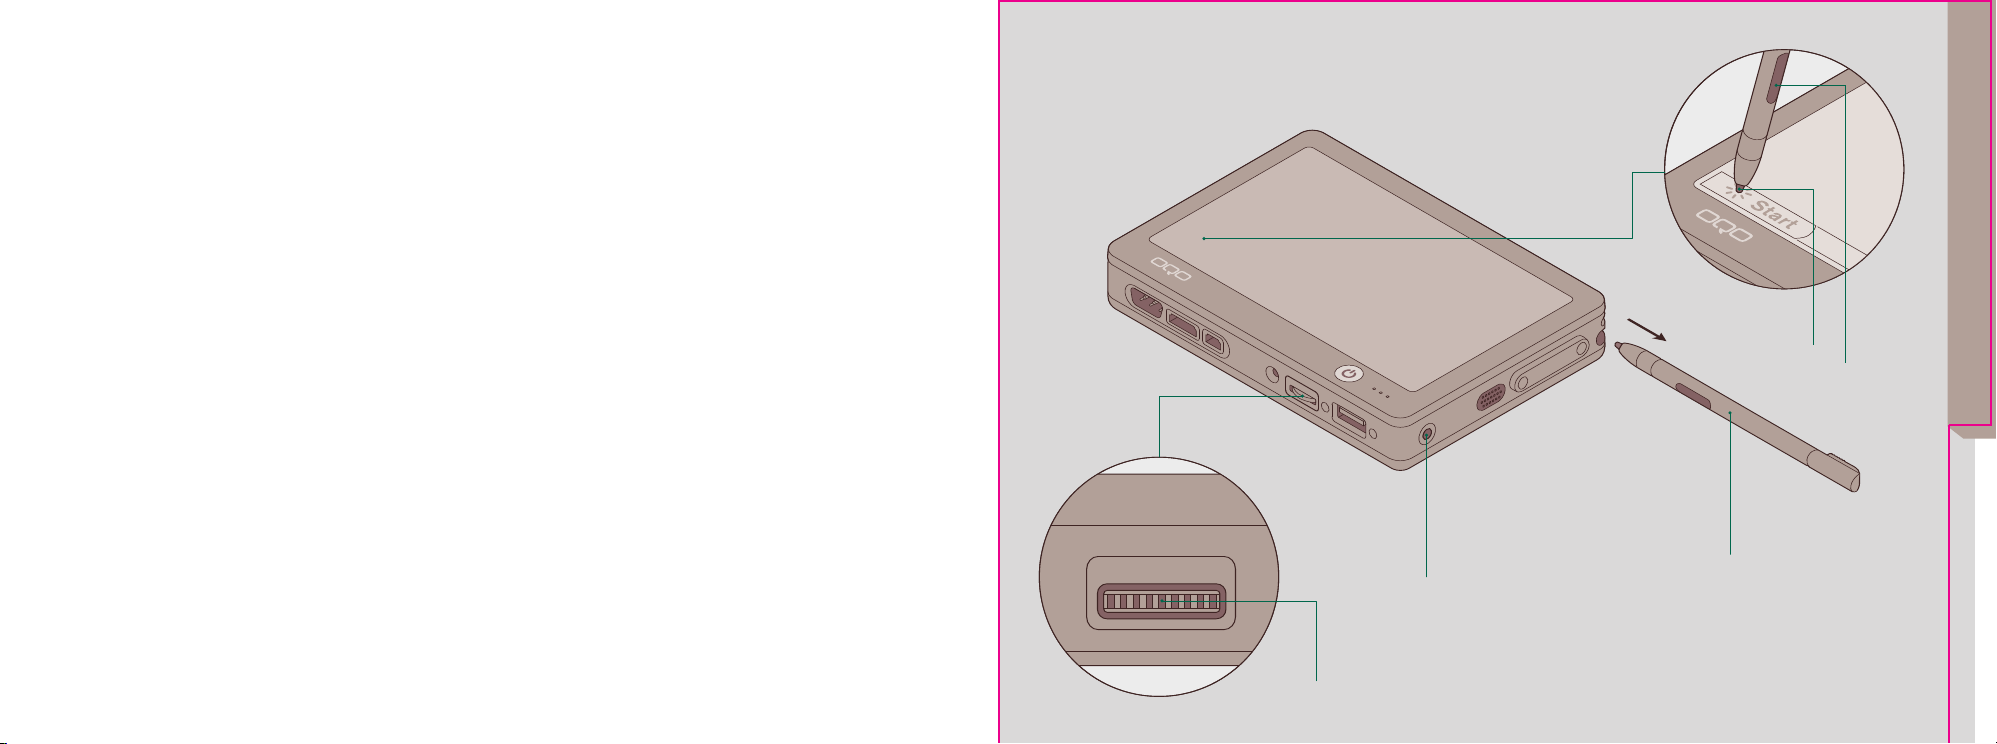
The thumbwheel can be used in multiple
modes. Use the OQO Settings applet found
in the Control Panel to change its behavior.
By default, the thumbwheel works like this:
• Click the thumbwheel once to display the
current mode, then click again to toggle
among the modes.
• Double-click the thumbwheel to toggle
between open applications or launch new
applications.
• In volume mode, rotate the wheel to the left
to decrease the volume and to the right to
increase it.
• In vertical scrolling mode, rotate the wheel
to the left to scroll up and to the right to
scroll down.
• In horizontal scrolling mode, rotate the
wheel to the left to scroll left and to the
right to scroll right.
Remove the digital pen by pulling it out of the
slot in the upper right corner of the OQO.
Use the digital pen like this:
• To select an object on the screen, touch it with
the tip of the pen.
• To drag an object, hold the pen over it and drag
across the screen. To drop the object, lift the
pen.
• To double-click an object, tap it twice.
• To right-click an object, select it and click the
button located on the digital pen.
Use the “Wacom Pen Settings” applet found in the
Control Panel to change this behavior and calibrate
the pen. It is important to calibrate your pen before
you start to use it. Use only light pressure with
the pen. The angle of the pen will affect its
behavior. More information on the pen can be
found at http:/www.oqo.com/support.
a Thumbwheel
b Digital pen
c Tap to select
d Pen (right-click) button
e Audio in/out
0908
more inputs
Page 6
a
d
c
b
e
f
part 5
using the docking
cable and desktop
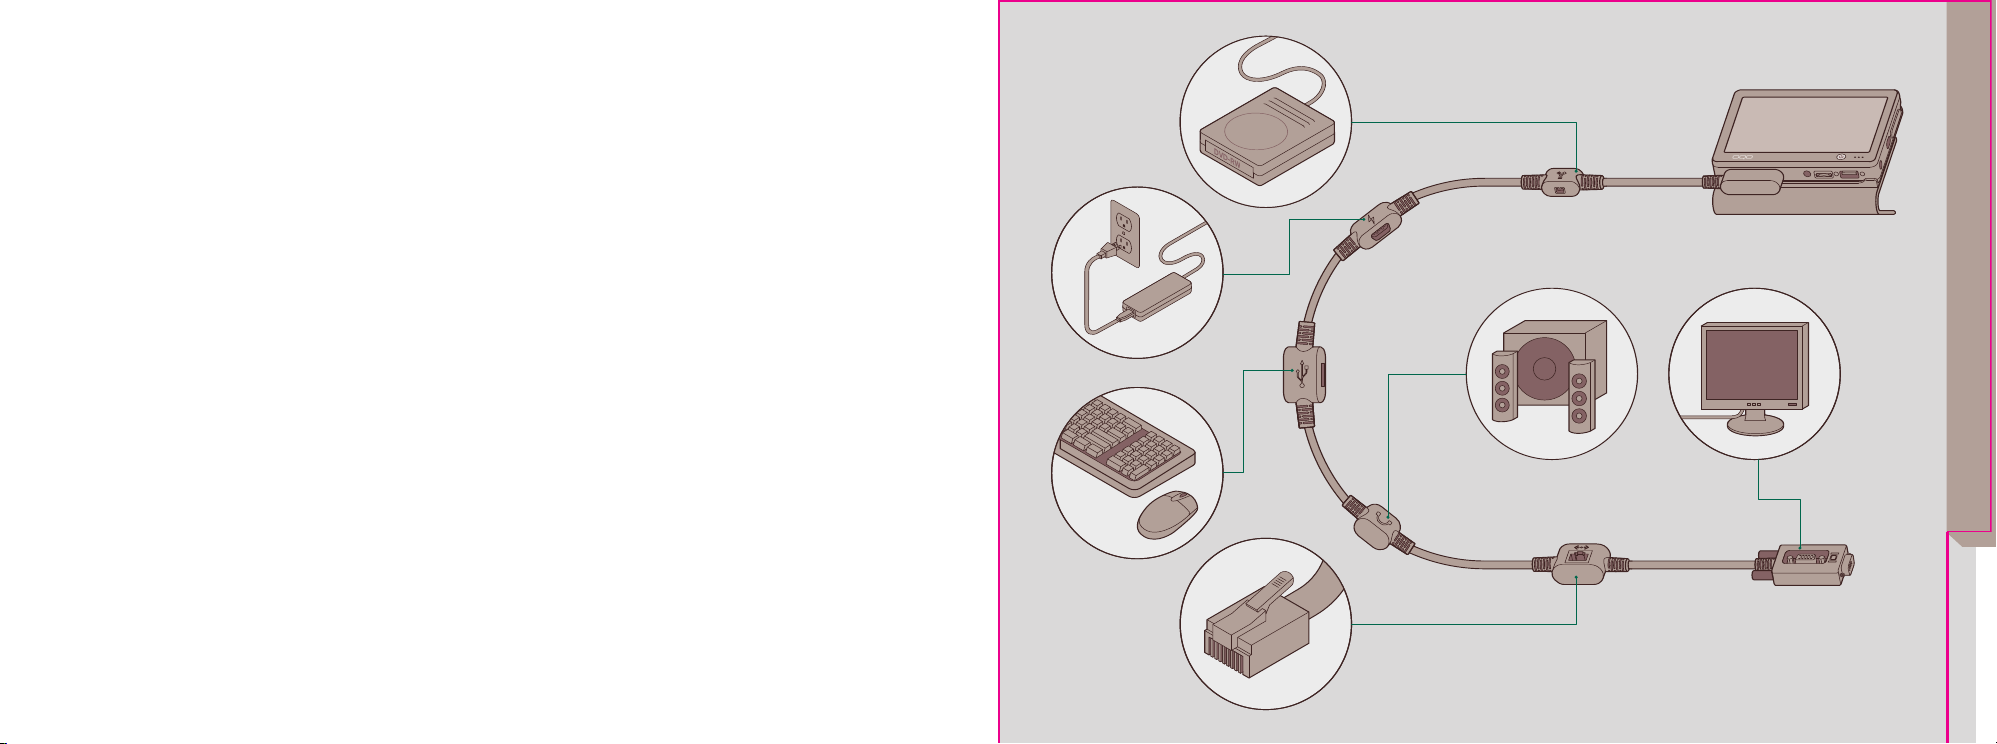
When using the model 01 as a desktop
computer, place it on the desktop stand to
hold it in a convenient, upright position.
The docking cable attaches to your model 01
as shown at right. When removing the docking
cable from the docking connector, keep the
cable straight, as twisting or angling it can
damage the connector. It includes multiple
ports that can be used simultaneously to
connect a variety of peripheral devices:
• Use the VGA port to connect to an external
monitor or projector. Resolutions up to
1280 x 1024 are supported. To change the
resolution of your external monitor or
projector, go to the “Display” applet in the
Control Panel and select the “Settings” tab.
The model 01 will remember the settings
and automatically adjust the screen
resolution when you dock and undock.
• Use the Ethernet port to connect to a Local
Area Network (LAN).
stand
• Use the USB 1.1 port to connect to USBenabled devices, such as a keyboard or a
scanner. Use a USB hub to connect multiple
devices. A powered US B hub is recommended.
• Use the FireWire®(IEE E 1394) port to
connect to FireWire-enabled devices such as a
hard drive or camera.
• Use the audio out port to connect to
headphones or external speakers. An
additional audio out port is located on the
body of the computer.
• Use the DC power port to connect the power
supply to the cable. The power supply cannot
connect directly to the computer while the
docking cable is in use.
a FireWire port
b Power supply in
c US B port
d Audio out
e Ethernet port
f V GA out
1110
docking
Page 7

a
d
c
b
e
part 6
connecting to a
network
The model 01 provides several ways to
connect to a network:
• Use the integrated WiFi to connect to a
wireless network.
• Use the docking cable to attach an
Ethernet cable and connect to a Local Area
Network (LAN).
• Use the integrated Bluetooth and a
Bluetooth-enabled mobile phone to connect
to a wireless data network provider. (See
http://www.oqo.com/support/bluetooth for
more information).
• Use the USB port to attach a USB modem
and connect to a dial-up Internet Service
Provider (ISP).
For detailed information about configuring
network connections, see the Microsoft
Windows XP documentation.
a WiFi antenna
b Bluetooth antenna
c Docking cable Ethernet port
d US B port
e External WiFi antenna connector
(non-standard)
networking
1312
Page 8
a
b
part 7
installing software
and copying files
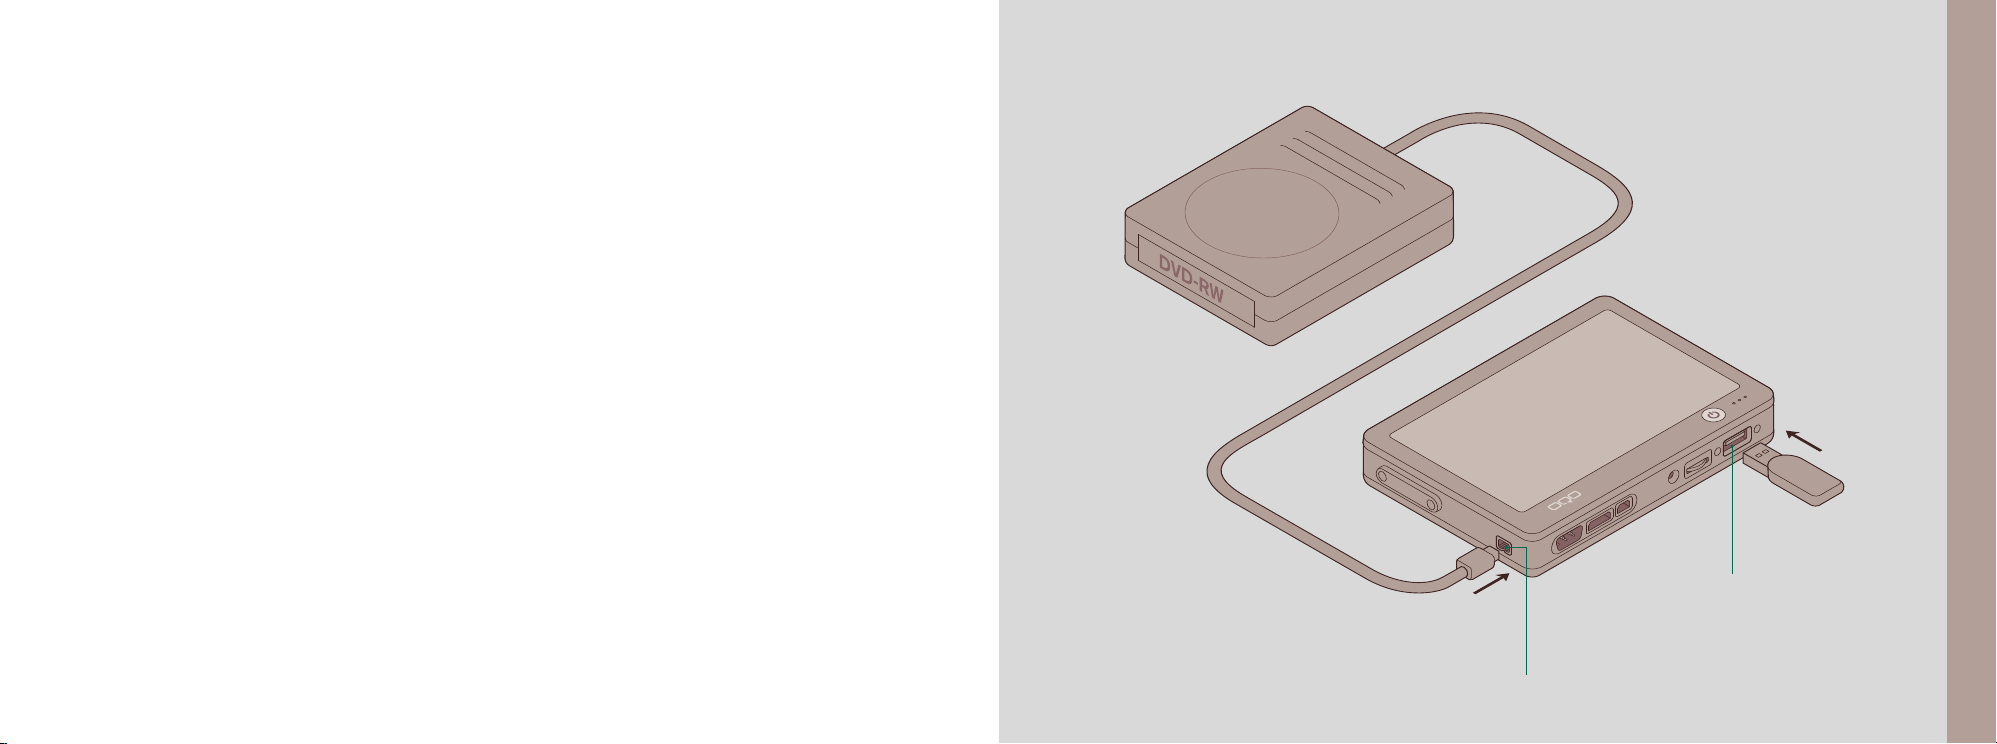
There are several ways to copy your existing
files from another computer to the model 01:
• Connect to a network and copy your files
over the network.
• Burn your files on a CD, then connect an
external US B 1.1 or FireWire DVD/CD
drive to the computer.
• Use a portable USB “key” or external
FireWire hard drive.
• Connect to another computer via FireWire.
We recommend using an external FireWire
hard drive to back up the files from your
model 01.
Your model 01 comes with Microsoft
Windows XP. There are several ways to
install your own software:
• Connect an external, US B 1.1 CD-ROM
drive to install the software from a
CD-RO M.
• Use a portable US B “key.”
• Connect to a secure network and run the
software installer from a network server.
a FireWire port
b USB port
installing
1514
Page 9
a
c
b
part 8
product support
The OQO support site provides additional
information, including FAQs and articles, and
contact information for technical support.
Access the support site at
http://www.oqo.com/support/.
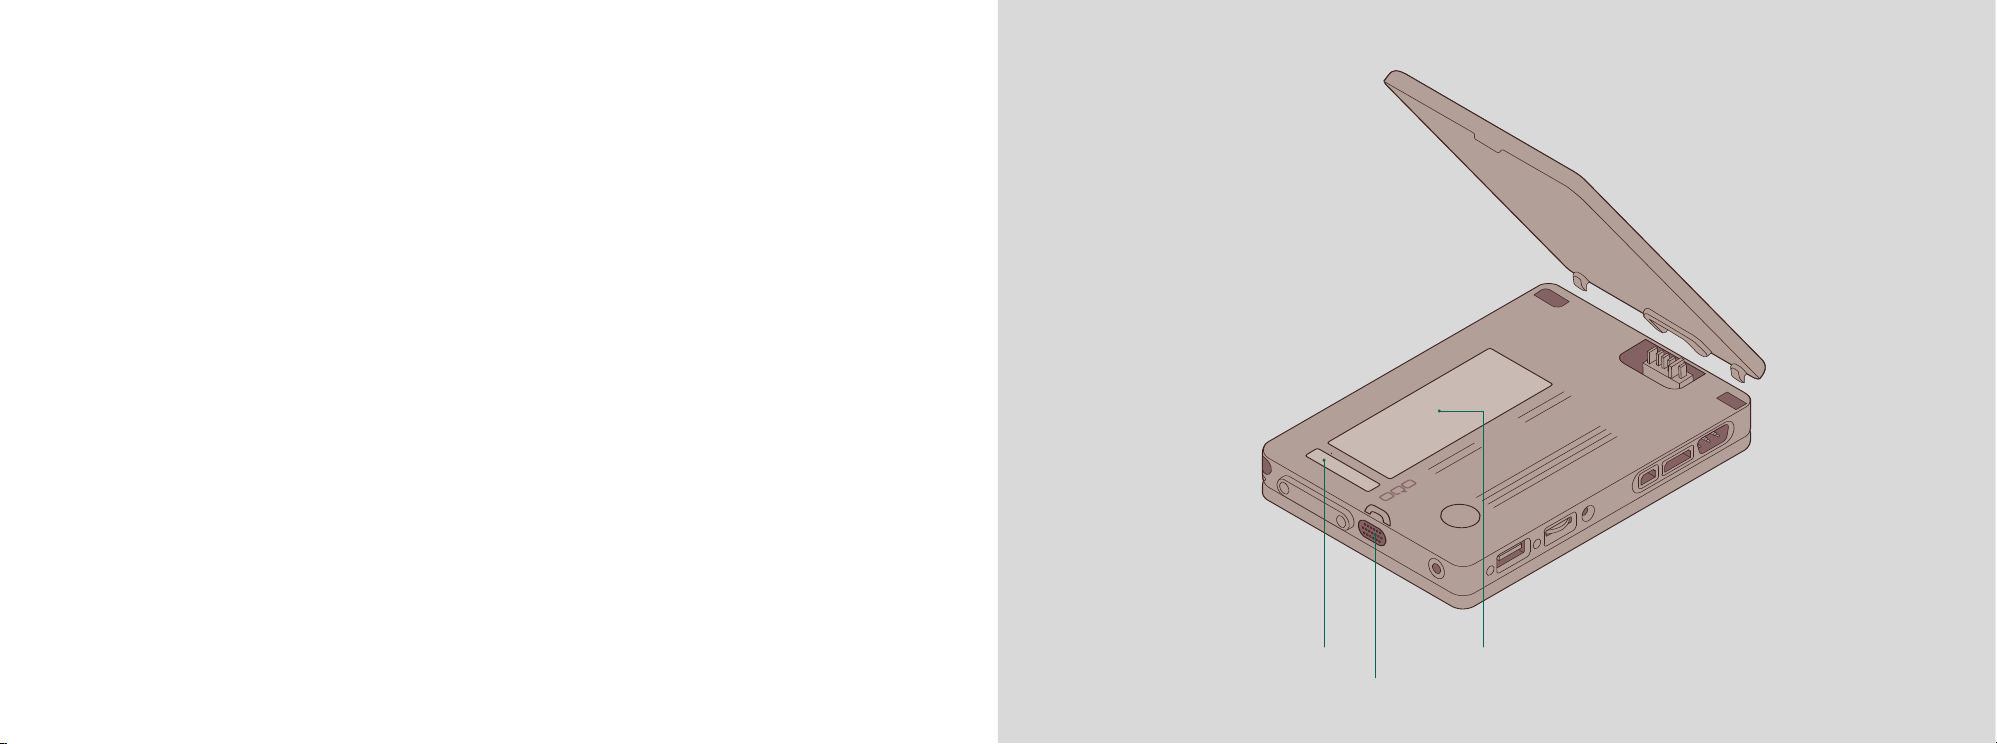
In the event that you need to contact OQO
technical support for help, be sure to have
your serial number and Microsoft Certificate
of Authenticity (COA) number ready. They are
located under the battery, on the underside of
the model 01. To remove the battery, push the
small latch next to the audio port and lift the
battery away from the computer.
a Battery release button
b Microsoft Certificate of Authenticity (COA)
c Serial number
16
17
Page 10
online documentation
This guide provides a brief overview of the
many features of the model 01. For more
comprehensive information, see the model 01
user's manual, available at
http://www.oqo.com/support/documentation.
Warranty information is available at
http://www.oqo.com/warranty.
The OQO return policy is available at
http://www.oqo.com/returns.
18 19
T al device, pursuant to Part 15 of the FCC Rules. These
interference to radio or television reception, which can be determined by turning the equipment off and on, the user is encouraged to try to correct
the interference by one or more of the following measures:
(1) Reorient the receiving antenna
(2) Increase the separation between the equipment and receiver
(3) Move the computer away from the receiver
(4) Connect the equipment into an outlet on a circuit different from that to which the receiver is connected.
Declaration of Conformity
We, OQO, Inc. 583 Shotwell Street, San Francisco, California, USA, 415 430 6200, declare under our sole responsibility that the product, OQO
model 01, complies with Part 15 of FCC Rules. Operation is subject to the following two conditions:
(1) This device may not cause harmful interference, and
(2) This device must accept any interference received, including interference that may cause undesired operation.
Any modifications made to the UPC that are not authorized by OQO could void the user's right to operate the device.
Information regarding cable and type of ferrite to be used
(1) To prevent unwanted radio interference, the following type of cable may be used with the Ethernet jack:
(2) To prevent unwanted radio interference, the following type of ferrite may be used on the Audio cable or Headphone cable connected to the
(3) To prevent unwanted radio interference, the following type of IEEE-1394 cable may be used for the FireWire jack:
19
Manufacturer: E-MU Systems, Part Number: 70EM886106000
OQO model 01:
Manufacturer: Steward, Part Number: 28A2026-0A2
Manufacturer: Granite Digital, Part Number: 1660
, there is no guarantee that interference will not occur in a particular installation. If this equipment does cause harmful
alled and used in accordance with the instructions, may cause harmful interference to radio
allation. This equipment generates, uses and
Page 11

©2004, OQO, Inc. All rights reserved.
 Loading...