

Page 1
C 0870
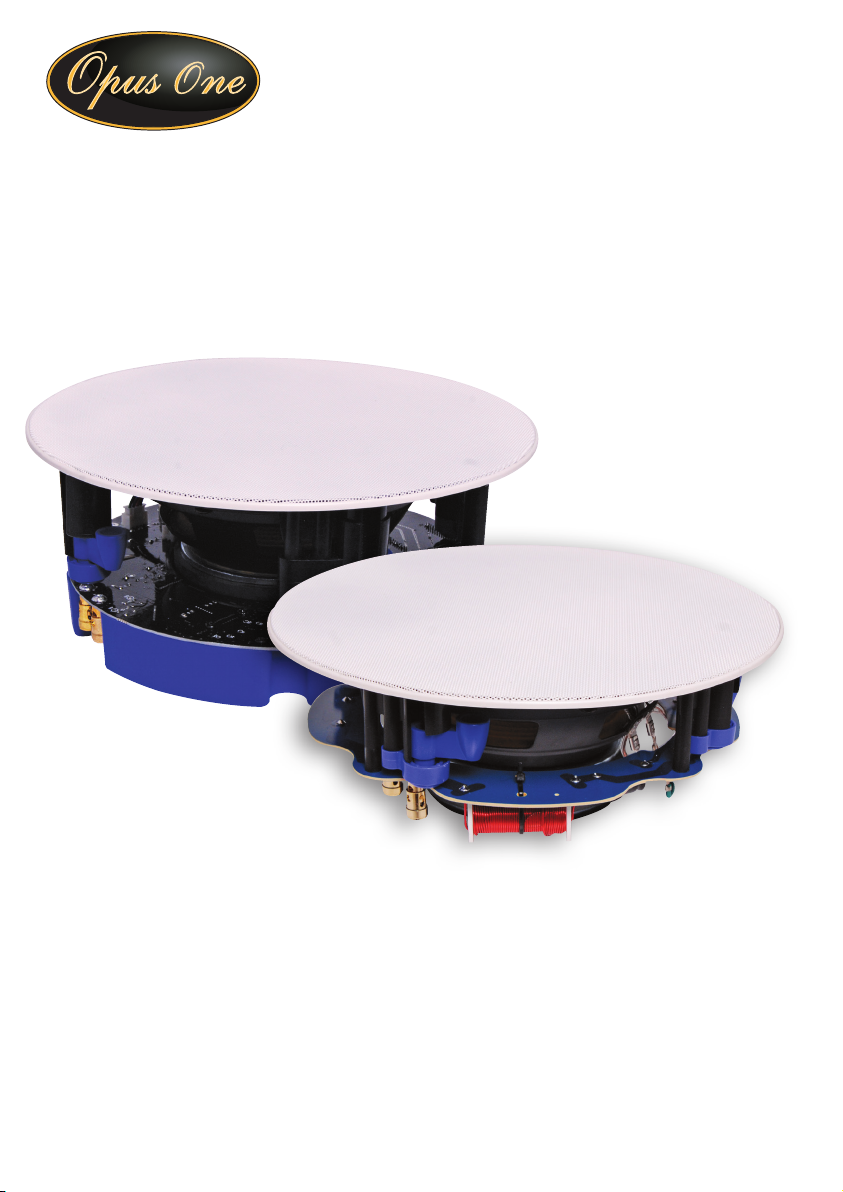
165mm 2-Way Round Wi-Fi
Ceiling Speaker Pair
Operating Instructions
Features
• In-built wi (802.11b/g/n) with smartphone, tablet or PC control.
• In-built 2 x 30W RMS amplier.
• Includes active speaker and passive speaker units - 60W RMS.
• High performance kevlar woofer and titanium dome tweeter.
• Supports multi-room/zone installations.
• In-app content, zone and output level control.
• Includes power supply.
Page 2
C 0870 165mm 2 Way Round WiFi Ceiling Speaker Pair
e
Introduction
Experience wireless music streaming throughout your home with these high
performance Kevlar cone wireless speakers. They connect to your home is
wireless router and allow you to stream music directly from your device.
Playback can be via stored music, podcasts, Spotify or other music streaming
services. The Smartsonix app, available on iOS or Android, enables volume
control in each zone. Speakers are also compatible with Apple Airplay permitting easy audio streaming directly from a huge array of iOS and Mac appstore
applications. The amplier inside the active speaker, drives the other connected
passive speaker in the ceiling. Sold in pairs.
Specications
Speaker
Frequency response 65Hz-20kHz
RMS Power 60W
Impedance 8 ohms
Sensitivity (1w/1m) 90dB
Woofer 16.5cm (6.5”)
Kevlar woven
cone
Tweeter 1.9cm (0.75”)
Titanium dome
Treble attenuation +3dB/-3dB
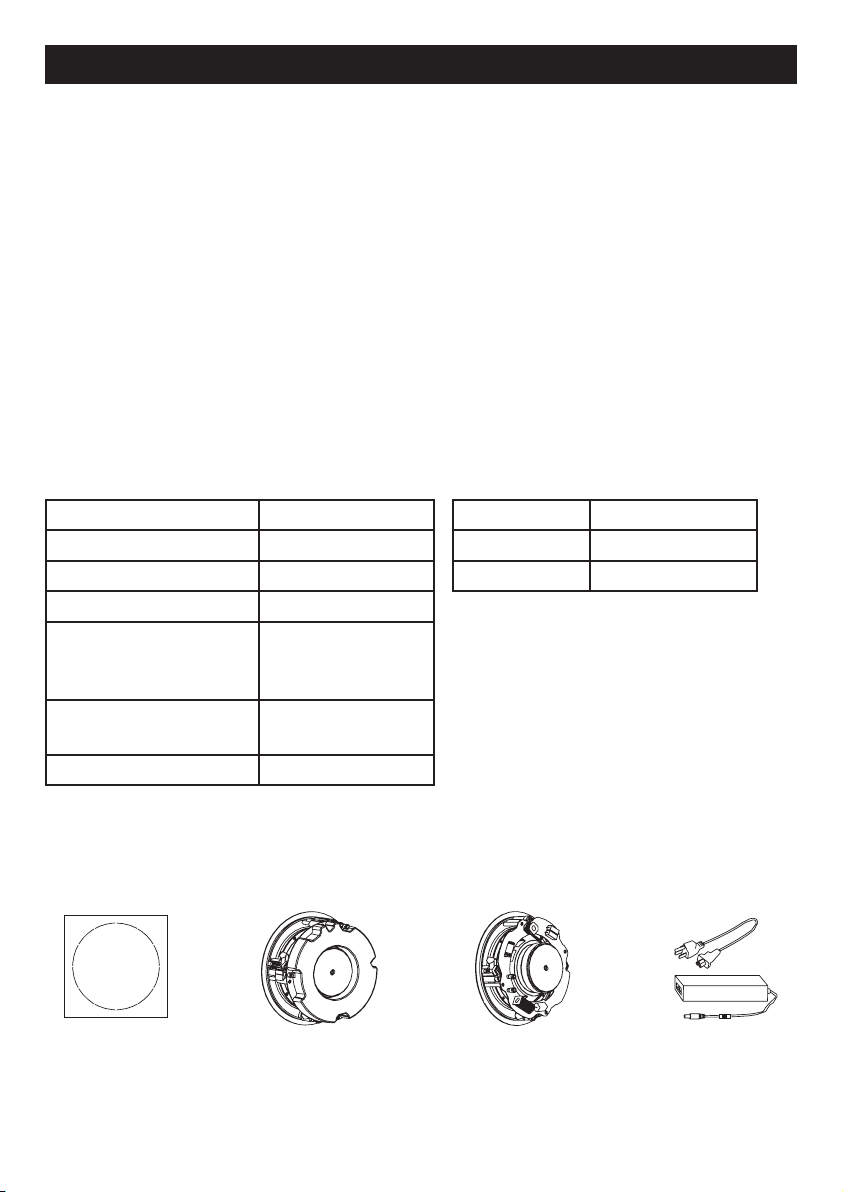
Inside the Package
Mounti ng Hole
Cut- Ou t Templa t
Mounting Template
Wi-Fi Speaker
Amplier
Type Class D (digital)
RMS Power 2x 30W/8ohm
Power Input 24Vd.c./2.5A
Built-in WiFi
• Wireless network compatibility
802.11b/g/n
• Support online audio streaming
media
• Support audio format: MP3/
WMA/AAC/ACC/ACC+/ALAC/APE/
WAV
Passive Speaker
Power supply
1
Page 3
C 0870 165mm 2 Way Round WiFi Ceiling Speaker Pair
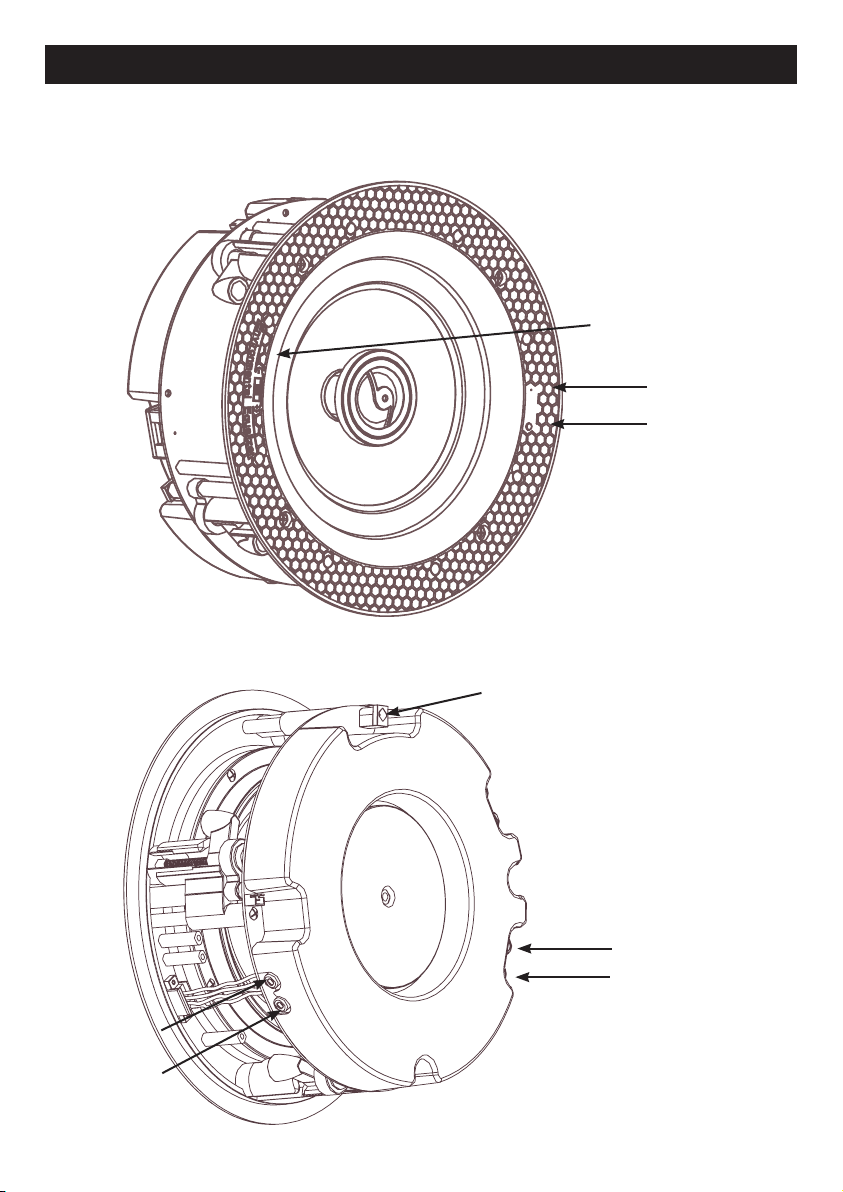
Speaker Parts
Figure 1: Active Wi-Fi Speaker with Amplier - Front
Environment equaliser:
Cut-Neutral-Boost
LED Indicator
WPS Button
LED indicator: Indicates
the power, Wi-Fi and
music operating status.
WPS: The trigger to
congure multi-room
music network or restore
the device to original
default settings.
Figure 2: Active Wi-Fi Speaker - Rear
RCA- (Black)
RCA+ (Red)
2
Power Input
Power input: Connect
with adaptor to provide
power for the speakers.
R+ (Red)
B- (Black)
R+ (Red) B- (Black): To link passive
speaker to stream stereo sound.
RCA: To connect with your home
TV set or stereo amplier.
Page 4
C 0870 165mm 2 Way Round WiFi Ceiling Speaker Pair
Controller App Installation
Please search “Smartsonix” to download controller app from Google Play (Android) or Apple App Store
(IOS). Before your Wi-Fi speaker is installed into ceilings, please arrange testing to make sure the device
works properly. WPS button might not be accesible once installed - see Step 5.
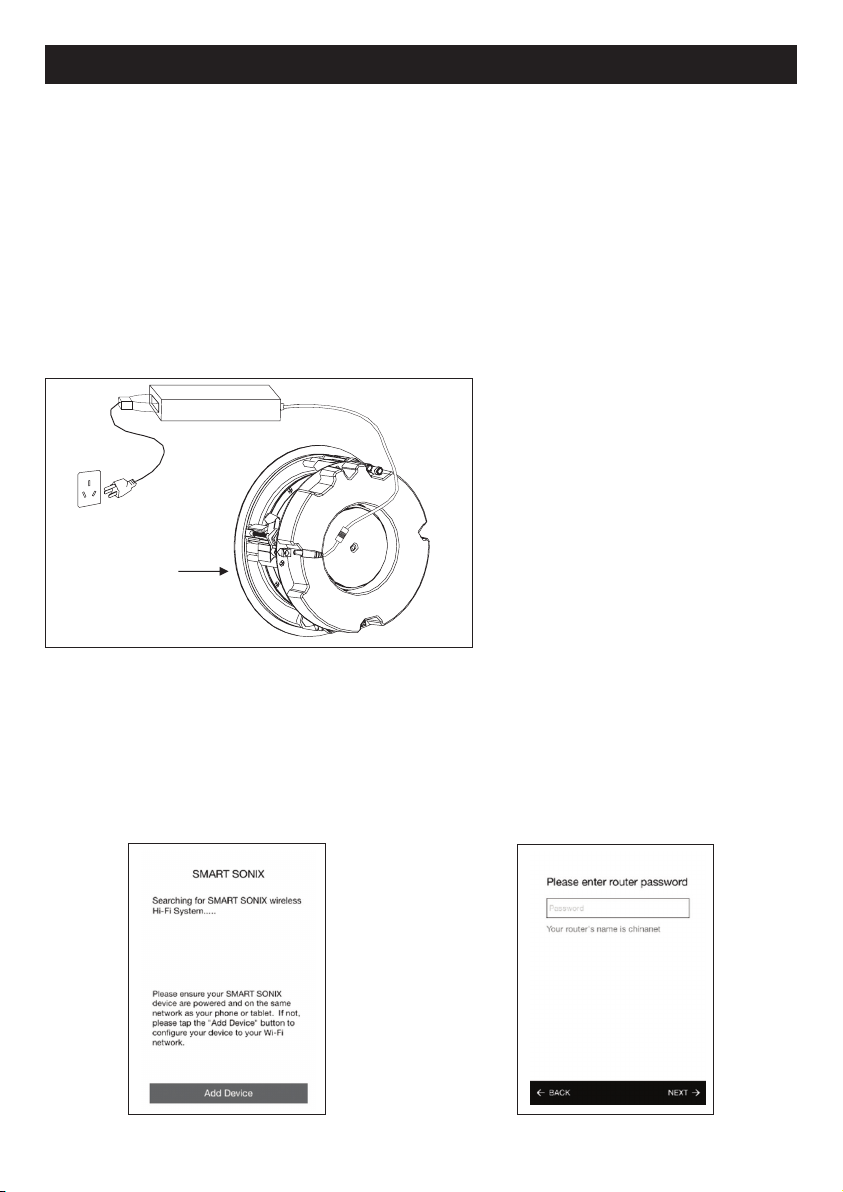
WiFi Activation Steps:
Step 1: Connect the speaker to the power supply Step 2: Switch on the Wi-Fi function and connect
Step 3: Start the controller APP Smartsonix and
click ADD DEVICE. Please ensure the router is
within range.
your phone to the Wi-Fi
Step 4: Enter the router password and click NEXT.
This will be the same password used for other
Wi-Fi devices linked to the network.
3
Page 5
C 0870 165mm 2 Way Round WiFi Ceiling Speaker Pair
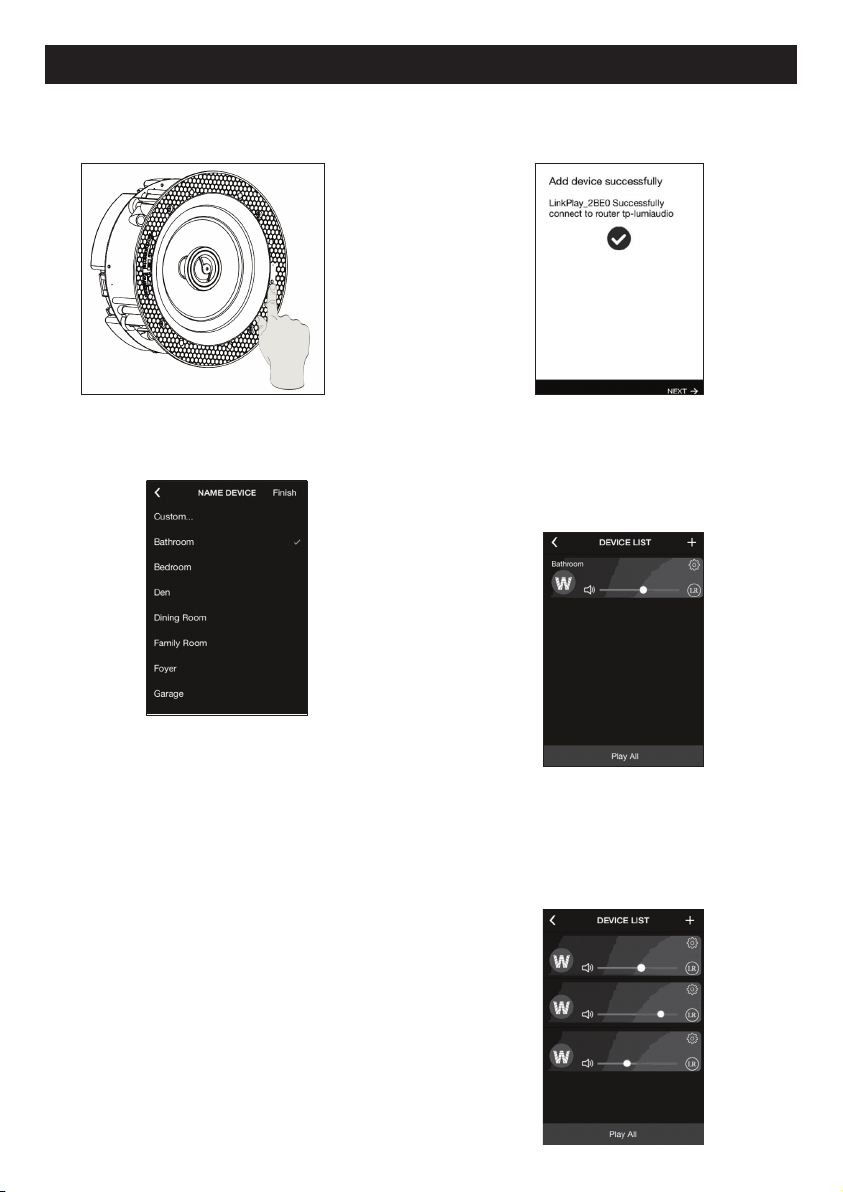
Step 5: Press the WPS button on the front of the
speaker to congure the network and click NEXT.
Step 7: Name the device according to the room
you will install and click FINISH.
Step 6: After the pairing is completed, the device
will be connected to your router automatically. If
this fails, click RETRY and repeat Step 4 and Step 5.
Step 8: After naming the rooms, the Wi-Fi speaker
will appear in the device list. If you have more than
one set of Wi-Fi speakers, add devices and name
them accordingly. Your multi-room music network
is now established.
Note: Maximum recommended speaker pairs
installed and synced with the app is 10 pairs.
> Smartsonix App displays that WPS Button is on
the back of speaker. For this model the button is
located behind the grill. It is easier to WPS pair
when installed this way.
* This app can enable the playback of one track
in multiple Areas/Zones. It can also play multiple
tracks and send them individually to each Area/
Zone.
Alternative Method: Connect the speaker to a
WiFi network using the IP Address 10.10.10.254.
When the speaker is connected in adhoc mode,
use a laptop or a phone with a browser - Chrome,
Explorer, Firefox, Safari - and type the IP Address
into the search bar.
You can then follow the prompts to enable the
speaker as part of the WiFi network. Default password for direct connection is 88888888.
4
Step 9: Choose a device from the device list in
app and play a track from your mobile player to
test whether the device works. If playback is
operating properly, the App installation process is
complete. If Playback fails, reset the settings and
start again.
Bathroom
Master Bedroom
Theatre
Page 6
C 0870 165mm 2 Way Round WiFi Ceiling Speaker Pair
WiFi Speaker Installation
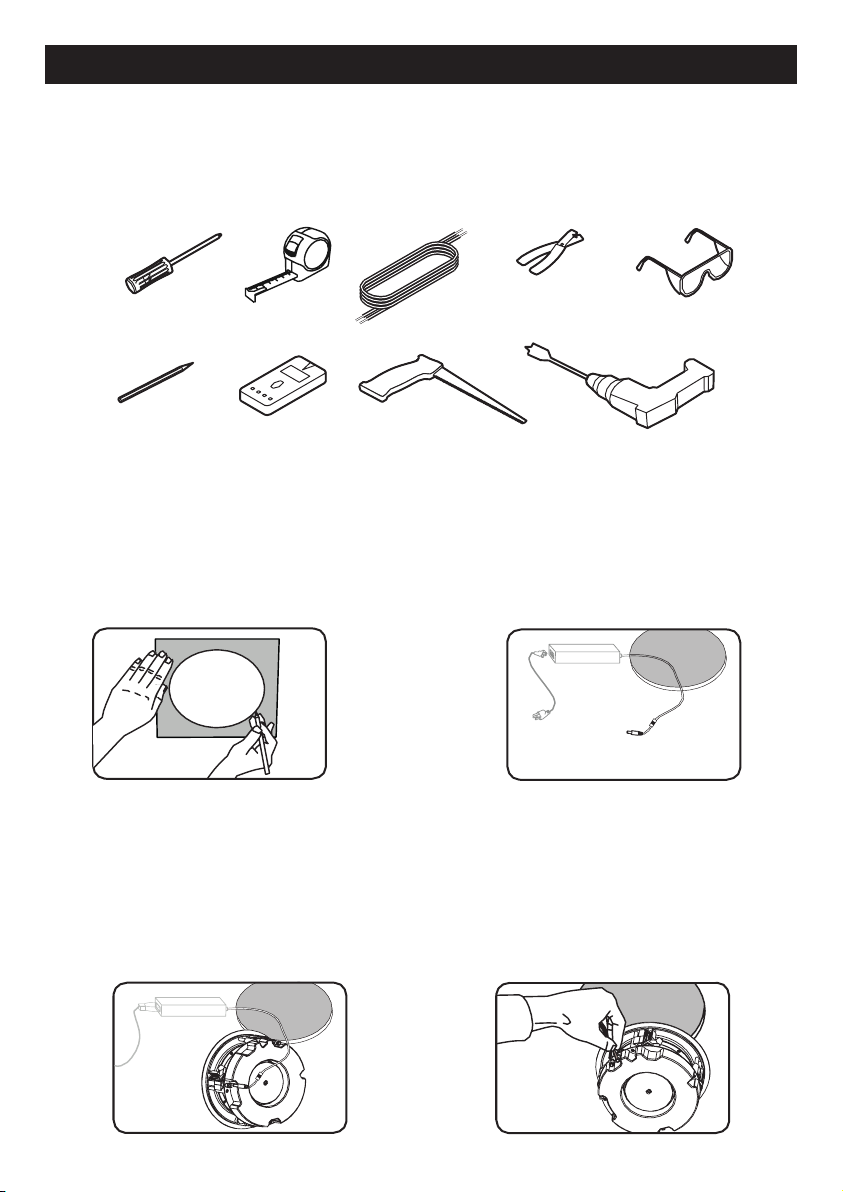
Equipment you will need:
Besides the cut-out template that is included in the box, you must have a ladder and ideally the equipment shown below to guarantee a safe and efcient installation.
Wire cutter/stripper
Square head or phillips
head screwdriver
Tape measure Speaker cable
Protective eyewear
Sharp pencil
Steps:
Step 1: Use the enclosed template to mark out
the cut out, then simply cut along the line. This is
the only cut you will need to make.
Stud finder
Cutout Diameter: Ø210mm
Installation Depth: >102mm
Step 3: Connect the DC adaptor jack to the Wi-Fi
speaker and mount the speaker into the ceiling.
The location should suit the room you have identied in the controller APP.
Cutting tool
Step 2: Mount the DC adaptor in a suitable place
in your wall or ceiling. Leave the plug end and jack
end dangling through the ceiling hole. The adapter
must be able to plug into a mains power supply.
Step 4: To enjoy a superior stereo sound quality,
install the passive speaker to be paired with the
Wi-Fi speaker in the same room. The two speakers
are physically connected by wires between the
matching black and red terminal points on each
speaker. The Wi-Fi main active speaker is marked
R+ and R-, and the passive speaker is marked In+
and Out-.
Power drill
5
Page 7
C 0870 165mm 2 Way Round WiFi Ceiling Speaker Pair
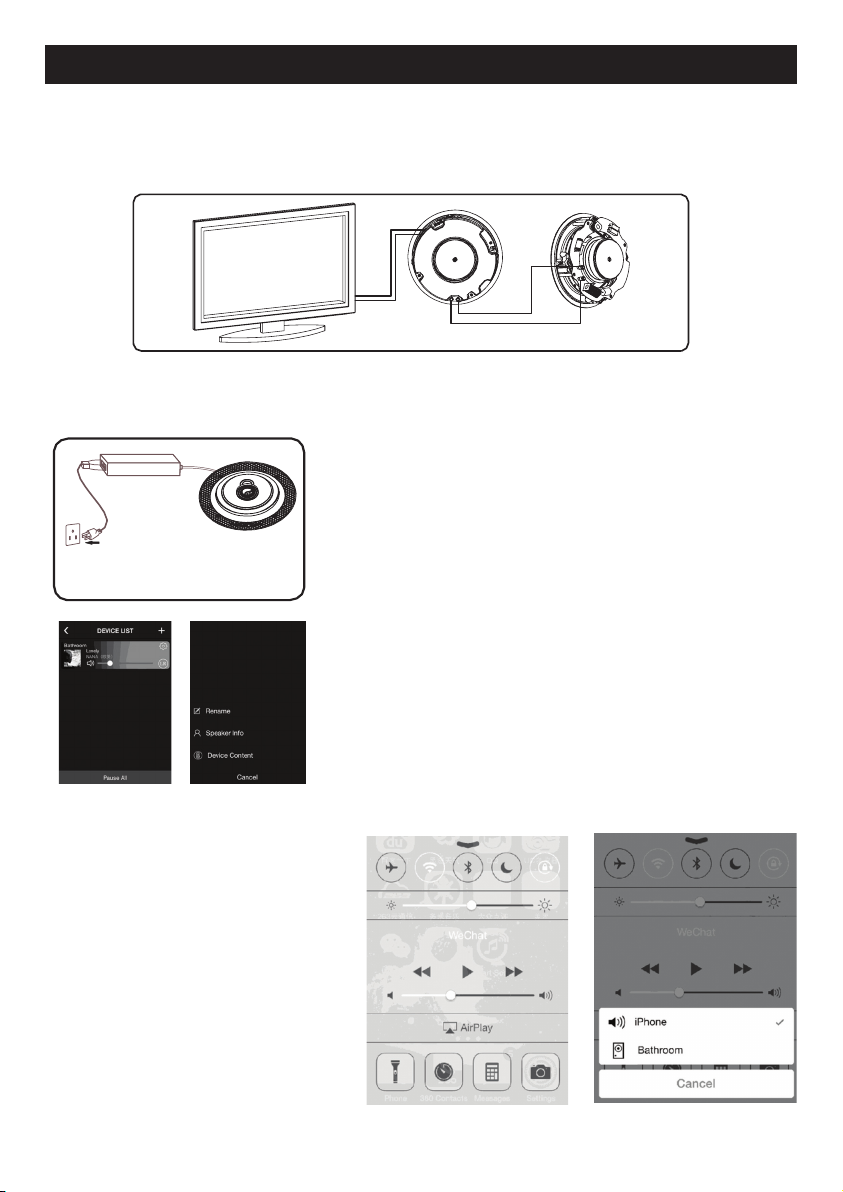
Note: Diagram showing Wi-Fi speaker and passive speaker connected to a TV monitor. The cables shown
ought to be installed before closing the speaker grills as per Step 5.
Step 5: Cover the speaker with the supplied grill and plug in the DC adaptor to the power supply
Device Resetting:
If the multi-room network fails during operation, you can press the
WPS button to restore the speaker to its original factory default
settings. Uninstall the Wi-Fi speaker from the ceiling and press
the WPS button for around 5 seconds. During this operation,
make sure the speaker is power switched on.
Device Personal setting:
• Rename: If you nd the Wi-Fi speaker is wrongly named
after installation, you can rename the device as you see t
using the mobile App.
• Speaker info: To protect the speaker’s Wi-Fi signal from
being hacked by others, you can set a password for your
device. The default password is 88888888.
Airplay Function:
You can use the Wi-Fi speaker with any
smart device based on the IOS operating
system - iPhone, iPad and iMac. After
installing the IOS app, connect your device
wirelessly to the speaker using Wi-Fi. In
the pull-up menu, click Airplay and choose
the Wi-Fi speaker. Then the audio can be
steamed from your smart device.
6
Page 8

C 0870 165mm 2 Way Round WiFi Ceiling Speaker Pair
Altronic Distributors warrants this product for one year from date of purchase from Altronics or its
resellers to the consumer. If this item is part of an installation or another product, please contact the
installer or supplier for your warranty.
During the warranty period, we undertake to repair or replace your product at no charge if found to be
defective due to a manufacturing fault. The warranty excludes damage by misuse or incorrect instal-
lation (i.e. failure to install and operate device according to specications in the supplied instruction
manual), neglect, shipping accident, or no fault found, nor by use in a way or manner not intended by
the supplier.
For repair or service please contact your PLACE OF PURCHASE.
If this item was purchased directly from Altronics please make a warranty claim by:
1. FOR MAIL ORDER CUSTOMERS (includes school and trade orders),
a) Ringing us on 1300 797 007 and quoting your tax invoice number.
b) Upon contacting Altronics, we will issue an R.A. (Return Authorisation).
As Altronics have a number of service agents throughout Australia,
a copy of the R.A. will be emailed, faxed or mailed to you with full instructions
of how and where to send the goods. The freight for shipping goods back to
Altronics for all repairs is at the customers expense.
c) A copy of the R.A. form, (or at the very minimum, the R.A. number) must
accompany the goods to effect the repair.
d) Altronics will pay the return freight to the customer where the warranty claim
has been accepted.
e) Please quote the R.A. number in any correspondence to us.
2. FOR OVER THE COUNTER PURCHASES to make a warranty claim,
please return the goods to us in any of our stores, with a copy of your
proof of purchase (tax invoice).
a) Upon leaving the goods at one of our stores, an R.A. number
will be issued to you.
b) Once repaired, you will be contacted, advising that the goods are ready to be
collected from the store.
It is at Altronics discretion as to whether the goods will be repaired or replaced (whilst under warranty); and as to whether identical goods will be used to replace the item due to changes of models /
products.
Note: Under no circumstances should you attempt to repair the device yourself or via a non-authorised Altronics service centre, as this will invalidate the warranty!
Our goods come with guarantees that cannot be excluded under the Australian Consumer Law. You
are entitled to a replacement or refund for a major failure and for compensation for any other reasonably foreseeable loss or damage. You are also entitled to have the goods repaired or replaced if the
goods fail to be of acceptable quality and the failure does not amount to a major failure.
Distributed by Altronic Distributors Pty. Ltd. Perth. Western Australia.
Phone: (08) 9428 2199 Fax: (08) 9428 2198
altronics.com.au
 Loading...