

Page 1
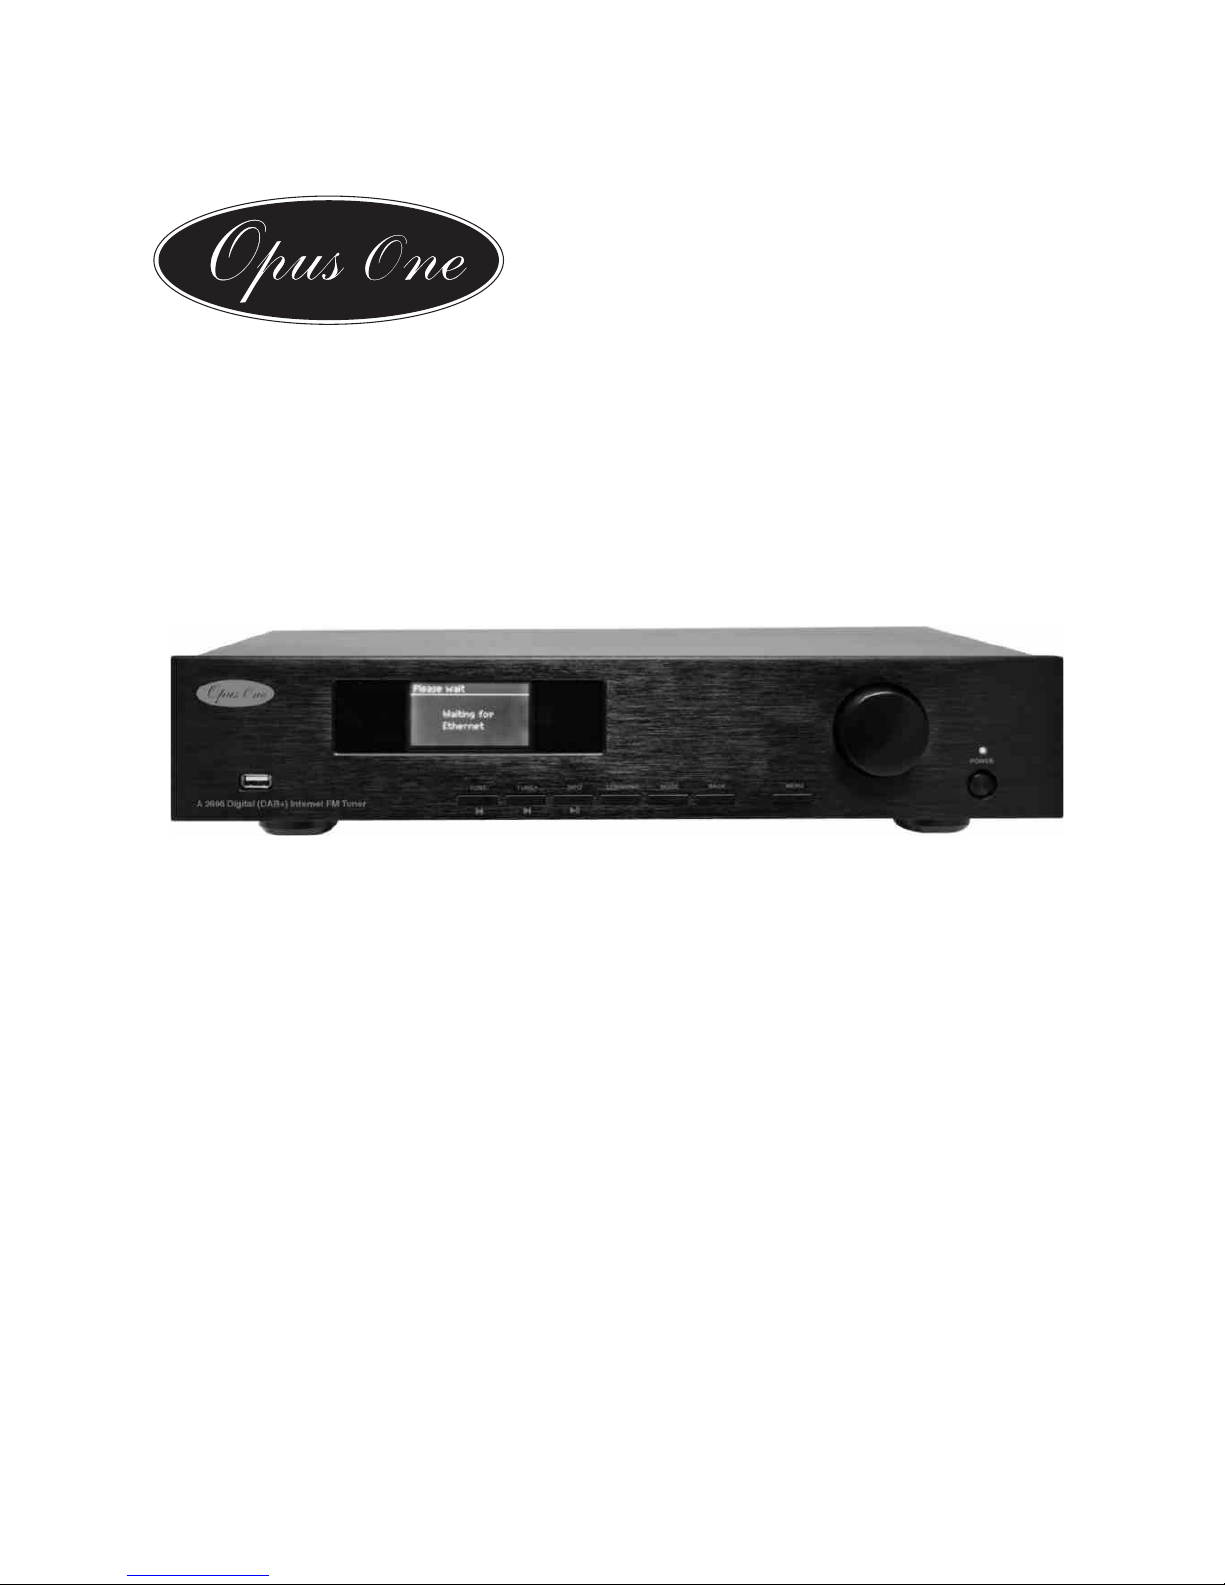
A 2696
Digital (DAB+) Inter net FM Tuner
User Guide
Page 2
Thank you for deciding to purchase this product. This instruction manual will give you a general idea of how this device
operates, as well as providing you with information on safety procedures and cleaning. In order to maintain this product in
good condition, and to ensure it's safe operation, please take a few minutes to read and carefully follow all the safety and
operating instructions found in this manual.
Dear Valued Customer
Please retain this instruction manual for future reference and pass it along with the device if handed over to a third party.
Should you have any additional questions regarding the operation or installation of this device, or should any problems arise
from its use, then please contact a specialized dealer or our service team for further information.
We assume no liability for any damage incurred as a result of improper use resulting from failure to comply with the safety
instructions found in this manual. Under such circumstances all claims under warranty will become null & void. We assume no
liability for any consequential damage!
This product is EMV-certified and complies with all European and National guideline requirements. A declaration of CE
conformity has been established for this product. Certification has been documented and entrusted to the manufacturer
Page 3
Table of Contents
1. INTENDED USE........................................................................................................................................................................ 5
EXPLAN ATION OF SYMBOLS.. ...... ....... ....... ...... ....... ....... ...... ....... ...... ....... ....... ...... ....... ....... ...... ....... ....... ...... ....... ....... ...... ....... ....... ...... ....... ...... ....... ....... ...... ....... 5
2. SAFETY INFORMATION............................................................................................................................................................. 6
3. ACCESSORIES........................................................................................................................................................................... 7
4. DESCRIPTION OF PARTS.......................................................................................................................................................... 8
5. CONNECTION........................................................................................................................................................................... 12
6. BEFORE GETTING STARTED................................................................................................................................................. 13
7. GETTING STARTED................................................................................................................................................................. 16
8. INTERNET RADIO MODE......................................................................................................................................................... 22
9. MUSIC PLAYER MODE............................................................................................................................................................ 27
10. USING THE “PLAY TO” FEATURE IN WINDOWS 7............................................................................................................... 30
11. USING THE A 2696 WITH AN APPLE MACINTOSH COMPUTER.......................................................................................... 31
FR ONT P AN EL. ..... ..... ..... ..... ..... ..... ..... ..... ..... ..... ..... ..... ..... ..... ..... ..... .. ... ..... ..... ..... ..... ..... ..... ..... ..... ..... ..... ..... ..... .. ... ..... ..... ..... ..... ..... ..... ..... ..... ..... . 8
RE MOT E CONT ROL HAND SET.... ..... ..... ..... ..... ..... ..... ..... .. ... ..... ..... ..... ..... ..... ..... .. ... ..... ..... ..... ..... ..... ..... .. ... ..... ..... ..... ..... ..... ..... .. ... ..... ..... ..... ..... .... 9
RE AR PA NEL.. ..... ..... .. ... .. ... .. ... .. ... .. ... .. ... ..... .. ... .. ... .. ... .. ... .. ... ..... .. ... .. ... .. ... .. ... .. ... ..... .. ... .. ... .. ... .. ... .. ... .. ... ..... .. ... .. ... .. ... .. ... .. ... ..... .. ... .. ... .. ... .. ... .. ... .. 10
PO WER S UP PLY... ... .. ... .. ... ..... .. ... ..... ..... .. ... ..... .. ... ..... .. ... ..... .. ... ..... ..... .. ... ..... .. ... ..... .. ... ..... .. ... ..... ..... .. ... ..... .. ... ..... .. ... ..... .. ... ..... ..... .. ... ..... .. ... ..... .. 12
RA DIO A ER IA LS. ..... ..... ..... ..... ..... ..... ..... ..... ..... ..... ..... ..... ..... ..... ..... ..... ..... ..... ..... ..... ..... ..... ..... ..... ..... ..... ..... ..... ..... ..... ..... ..... ..... ..... ..... ..... ..... ..... . 12
ET HER NET NET WORK CONN ECTIO N.... ..... ..... ..... ..... ..... ..... ..... ..... ..... ..... ..... ..... ..... ..... ..... ..... ..... ..... ..... ..... ..... ..... ..... ..... ..... ..... ..... ..... ..... ..... ..... 1 2
WI REL ESS LAN. .. ... .. ... ..... .... ... .. ... ..... ..... .... ... .. ... ..... ..... .... ... .. ... ..... ..... ..... .... ... .. ... ..... ..... .... ... .. ... ..... ..... .... ... .. ... ..... ..... ..... .... ... .. ... ..... ..... .... ... .. .. 12
SC REE NS... ..... ..... ..... ..... ..... ..... ..... ..... ..... ..... ..... ..... ..... ..... ..... ..... ..... ..... ..... ..... ..... ..... ..... ..... ..... ..... ..... ..... ..... ..... ..... ..... ..... ..... ..... ..... ..... ..... ..... .... 13
MO DES & M ENUS OV ERVIE W MA P.... ... ..... ..... ..... ..... ..... ..... ..... ..... ..... ..... ..... ..... .... ... .. ... .. ... ..... ..... ..... ..... ..... ..... ..... ..... ..... ..... ..... ..... ..... ..... ..... ..... . 15
ME NUS ..... ..... .. ... ..... ..... ..... ..... ..... ..... .. ... ..... ..... ..... ..... ..... ..... .. ... ..... ..... ..... ..... ..... ..... .. ... ..... ..... ..... ..... ..... .. ... ..... ..... ..... ..... ..... ..... .. ... ..... ..... ..... ..... . 14
MA NUA L SET.. .. ... .. ... .. ... .. ... .. ... ..... .. ... .. ... ..... .. ... ..... .. ... .. ... ..... .. ... .. ... ..... .. ... ..... .. ... .. ... ..... .. ... .. ... ..... .. ... .. ... ..... .. ... ..... .. ... .. ... ..... .. ... .. ... ..... .. ... ..... .. ... . 17
SE TUP W IZA RD... ..... .. ... ..... .. ... .. ... ..... .. ... .. ... ..... .. ... ..... .. ... .. ... ..... .. ... .. ... ..... .. ... ..... .. ... .. ... ..... .. ... .. ... ..... .. ... ..... .. ... .. ... ..... .. ... .. ... ..... .. ... ..... .. ... .. ... ..... . 16
CO MPL ETION ..... ..... ..... ..... ..... ..... ..... ..... ..... ..... ..... ..... ..... ..... ..... ..... ..... ..... ..... ..... ..... ..... ..... ..... ..... ..... ..... ..... ..... ..... ..... ..... ..... ..... .... ... .. ... .. ... ..... .... 18
NE TWO RK... ..... ..... ..... ..... ..... ..... ..... ..... ..... ..... ..... ..... ..... ..... ..... ..... ..... ..... .... ... .. ... .. ... ..... ..... ..... ..... ..... ..... ..... ..... ..... ..... ..... ..... .... ... .. ... .. ... ..... ..... .... 17
SE TTI NG U P A MUS IC SERV ER ... .. ... ..... ..... .. ... ..... ..... .. ... ..... ..... ..... .. ... ..... ..... ..... .. ... ..... ..... ..... .. ... ..... ..... ..... .. ... ..... ..... .. ... ..... ..... ..... .. ... ..... ..... ..... .. . 20
SE TTI NG U P THE A 2696 F OR “P LAY TO” WI NDOWS 7 S TREAM IN G MED IA FE ATUR E.. .. ... ..... .. ... .. ... .. ... ..... .. ... .. ... .. ... ..... .. ... .. ... .. ... ..... .. ... .. ... . 21
LA ST LI ST ENE D. ... .. ... ..... ..... ..... ..... .. ... ..... ..... ..... ..... ..... ..... .. ... ..... ..... ..... ..... ..... ..... .. ... ..... ..... ..... ..... ..... ..... .. ... ..... ..... ..... ..... ..... ..... .. ... ..... ..... ..... .... 22
PR ESE TS ... ..... .. ... ..... .. ... ..... .. ... .. ... ..... .. ... ..... .. ... ..... .. ... ..... .. ... ..... .. ... ..... .. ... .. ... ..... .. ... ..... .. ... ..... .. ... ..... .. ... ..... .. ... .. ... ..... .. ... ..... .. ... ..... .. ... ..... .. ... ..... 2 3
FAVO URITE S.... ..... ..... ..... ..... ..... ..... ..... ..... ..... ..... ..... ..... ..... ..... ..... ..... ..... .... ... .. ... .. ... ..... ..... ..... ..... ..... ..... ..... ..... ..... ..... ..... ..... ..... ..... ..... ..... ..... ..... . 23
BR OWS E. ... .. ... ..... .. ... .. ... .. ... ..... .. ... .. ... ..... .. ... .. ... .. ... ..... .. ... .. ... .. ... ..... .. ... .. ... ..... .. ... .. ... .. ... ..... .. ... .. ... .. ... ..... .. ... .. ... ..... .. ... .. ... .. ... ..... .. ... .. ... ..... .. ... .. ... 2 4
SE ARC H.... ..... ..... ..... ..... ..... ..... ..... ..... ..... ..... ..... .... ... .. ... .. ... ..... ..... ..... ..... ..... ..... ..... .... ... .. ... .. ... ..... ..... ..... ..... ..... ..... ..... ..... .... ... .. ... .. ... ..... ..... ..... .... 25
NO W PLAY ING I NFORM ATI ON. .. ... .. ... ..... ..... ..... ..... ..... .. ... ..... ..... ..... ..... ..... .. ... ..... ..... ..... ..... ..... ..... .. ... ..... ..... ..... ..... ..... ..... .. ... ..... ..... ..... ..... ..... ..... . 25
IN TER NE T RAD IO PO RTAL REGI ST RATI ON. .. ... ..... .. ... ..... .. ... .. ... ..... .. ... ..... .. ... ..... .. ... .. ... ..... .. ... ..... .. ... .. ... ..... .. ... ..... .. ... .. ... ..... .. ... ..... .. ... .. ... ..... .. ... .. 26
MY ADD ED STATION S.... ..... ..... .. ... .. ... .. ... .. ... ..... .. ... .. ... .. ... ..... .. ... .. ... .. ... ..... .. ... .. ... .. ... ..... .. ... .. ... .. ... ..... .. ... .. ... .. ... ..... .. ... .. ... .. ... ..... .. ... .. ... .. ... ..... .. ... . 26
USB PL AYBA CK. ..... ..... ..... ..... ..... ..... ..... ..... .. ... ..... ..... ..... ..... ..... ..... .. ... ..... ..... ..... ..... ..... ..... .. ... ..... ..... ..... ..... ..... ..... .. ... ..... ..... ..... ..... ..... ..... .. ... ..... . 28
SH ARE D MEDIA (F ROM UP NP M EDI A SER VER ). ... ..... .... ... .. ... ..... ..... ..... .... ... .. ... ..... ..... ..... .... ... .. ... ..... ..... ..... .... ... .. ... ..... ..... ..... .... ... .. ... ..... ..... .... . 27
VI EWI NG TRAC K ME TADATA. .. ... ..... ..... ..... .... ... .. ... ..... ..... ..... ..... ..... ..... ..... ..... ..... .... ... .. ... ..... ..... ..... ..... ..... ..... ..... ..... .... ... .. ... ..... ..... ..... ..... ..... ..... .. 28
PL AYLI STS ..... ..... .. ... .. ... .. ... ..... .. ... .. ... .. ... ..... .. ... .. ... ..... .. ... .. ... .. ... ..... .. ... .. ... .. ... ..... .. ... .. ... ..... .. ... .. ... .. ... ..... .. ... .. ... ..... .. ... .. ... .. ... ..... .. ... .. ... .. ... ..... .. ... . 29
RE PEAT /S HUF FLE.. ..... .. ... ..... .. ... ..... ..... .. ... ..... .. ... ..... .. ... ..... ..... .. ... ..... .. ... ..... ..... .. ... ..... .. ... ..... ..... .. ... ..... .. ... ..... .. ... ..... ..... .. ... ..... .. ... ..... ..... .. ... ..... .. 29
NO W PLAY ING I NFORM ATIO N.... ..... ..... ..... ..... ..... ..... ..... ..... .. ... ..... ..... ..... ..... .. ... ..... ..... ..... ..... .. ... ..... ..... ..... ..... .. ... ..... ..... ..... ..... .. ... ..... ..... ..... ..... .. . 29
US E “PL AY TO” I N WI NDO WS MED IA PLAY ER ... .. ... .. ... .. ... .. ... .. ... .. ... .. ... ..... .. ... .. ... .. ... .. ... .. ... .. ... ..... .. ... .. ... .. ... .. ... .. ... ..... .. ... .. ... .. ... .. ... .. ... ..... .. ... .. .. 30
NO W PLAY ING I NFORM ATI ON. .. ... .. ... ..... ..... ..... ..... ..... .. ... ..... ..... ..... ..... ..... .. ... ..... ..... ..... ..... ..... ..... .. ... ..... ..... ..... ..... ..... ..... .. ... ..... ..... ..... ..... ..... ..... . 31
US E “PL AY TO” E LSEWH ERE IN WIND OW S 7. ... .. ... ..... ..... ..... ..... ..... .. ... ..... ..... ..... ..... ..... ..... .. ... ..... ..... ..... ..... ..... ..... .. ... ..... ..... ..... ..... ..... ..... .. ... .... 30
Page 4
12. DAB RADIO MODE.................................................................................................................................................................. 32
13. FM RADIO MODE..................................................................................................................................................................... 33
14. LIBRETTO WIRELESS DEVICE REMOTE CONTROL............................................................................................................ 35
15. SOFTWARE UPGRADE AND FACTORY RESET..................................................................................................................... 43
16. TROUBLESHOOTING AND ERROR MESSAGES................................................................................................................... 44
17. MAINTENANCE AND HANDLING............................................................................................................................................ 47
18. GLOSSARY................................................................................................................................................................................49
19. SPECIFICATIONS......................................................................................................................................................................49
SCANNI NG FOR STATIONS..... ....... ...... ....... ...... ....... ...... ....... ...... ...... ....... ...... ....... ...... ....... ...... ....... ...... ...... ....... ...... ....... ...... ....... ...... ...... ....... ...... ....... ...... ....... ... 32
SELECT ING STATIONS..... ....... ...... ....... ...... ....... ....... ...... ....... ...... ....... ...... ....... ...... ....... ....... ...... ....... ...... ....... ...... ....... ...... ....... ....... ...... ....... ...... ....... ...... ....... ...... 32
PRESET S..... ....... ...... ....... ...... ....... ....... ...... ....... ...... ....... ...... ....... ...... ....... ...... ....... ...... ....... ...... ....... ...... ....... ...... ....... ....... ...... ....... ...... ....... ...... ....... ...... ....... ...... .. 32
NOW PLAYING INFO RMATION... ...... ....... ...... ...... ....... ...... ...... ....... ...... ....... ...... ...... ....... ...... ...... ....... ...... ...... ....... ...... ...... ....... ...... ...... ....... ...... ...... ....... ...... ...... ... 32
SETTIN GS.... ...... ...... ...... ....... ...... ...... ...... ...... ....... ...... ...... ...... ....... ...... ...... ...... ...... ....... ...... ...... ...... ...... ....... ...... ...... ...... ....... ...... ...... ...... ...... ....... ...... ...... ...... ...... 32
SELECT ING STATIONS..... ....... ...... ....... ...... ....... ....... ...... ....... ...... ....... ...... ....... ...... ....... ....... ...... ....... ...... ....... ...... ....... ...... ....... ....... ...... ....... ...... ....... ...... ....... ...... 33
NOW PLAYING INFOR MATION..... ...... ....... ....... ....... ...... ....... ....... ....... ....... ...... ....... ....... ....... ...... ....... ....... ....... ...... ....... ....... ....... ...... ....... ....... ....... ...... ....... ....... ... 33
OBTAINING THE WIRE LESS DEVIC E REMOTE CONT ROL APPLICATION.... ....... ....... ...... ....... ....... ....... ...... ....... ....... ....... ...... ....... ....... ....... ...... ....... ....... ....... . 35
SETTIN GS..... ...... ....... ...... ....... ....... ...... ....... ...... ....... ....... ...... ....... ....... ...... ....... ...... ....... ....... ...... ....... ....... ...... ....... ...... ....... ....... ...... ....... ...... ....... ....... ...... ....... ..... 33
SETTIN G UP THE CONNECTION TO THE A 2696...... ...... ...... ....... ...... ....... ...... ....... ...... ....... ...... ...... ....... ...... ....... ...... ....... ...... ...... ....... ...... ....... ...... ....... ...... ..... 35
STARTING THE WIREL ESS DEVIC E REMOTE CONT ROL APPLICATION... ...... ....... ...... ...... ....... ...... ...... ....... ...... ....... ...... ...... ....... ...... ...... ....... ...... ....... ...... .... 35
MENU STRUC TURE.. ....... ...... ....... ....... ...... ....... ....... ...... ....... ....... ...... ....... ...... ....... ....... ...... ....... ....... ...... ....... ...... ....... ....... ...... ....... ....... ...... ....... ....... ...... ....... ..... 37
PLAYING FROM THE MUSI C PLAYER...... ...... ....... ....... ...... ....... ...... ....... ...... ....... ....... ...... ....... ...... ....... ...... ....... ....... ...... ....... ...... ....... ...... ....... ....... ...... ....... ...... .. 38
PLAYING INTER NET RADIO... ....... ...... ....... ....... ....... ....... ....... ...... ....... ....... ....... ....... ....... ....... ...... ....... ....... ....... ....... ....... ...... ....... ....... ....... ....... ....... ...... ....... ....... 37
PLAYING DAB RADIO ....... ....... ....... ....... ....... ....... ....... ....... ...... ....... ....... ....... ....... ....... ....... ....... ....... ...... ....... ....... ....... ....... ....... ....... ....... ....... ....... ...... ....... ....... .. 39
PLAYING FM RADIO.. ...... ....... ....... ...... ....... ...... ....... ....... ...... ....... ....... ...... ....... ...... ....... ....... ...... ....... ....... ...... ....... ...... ....... ....... ...... ....... ...... ....... ....... ...... ....... .... 40
PLAYING PRESE T RADIO STATIONS....... ...... ....... ....... ....... ...... ....... ....... ...... ....... ....... ...... ....... ....... ....... ...... ....... ....... ...... ....... ....... ...... ....... ....... ...... ....... ....... ...... 41
OTHER SETT INGS.. ....... ...... ....... ...... ....... ....... ...... ....... ...... ....... ....... ...... ....... ...... ....... ....... ...... ....... ...... ....... ...... ....... ....... ...... ....... ...... ....... ....... ...... ....... ...... ....... .. 42
COMPARISON OF A 2696 UI AND WIRELES S DEVICE REMO TE CONTROL APPLICATION FUN CTIONA LITY......... ....... ....... ...... ....... ...... ....... ....... ...... .... 42
SOFTWARE UP GRADE.. ...... ....... ....... ...... ....... ...... ....... ...... ....... ...... ....... ....... ...... ....... ...... ....... ...... ....... ...... ....... ....... ...... ....... ...... ....... ...... ....... ...... ....... ....... ...... ... 43
FACTORY RESE T........... ....... ...... ....... ...... ....... ...... ....... ....... ...... ....... ...... ....... ...... ....... ...... ....... ....... ...... ....... ...... ....... ...... ....... ...... ....... ....... ...... ....... ...... ....... ...... ... 43
ERROR MESS AGES.. ....... ...... ....... ....... ...... ....... ....... ...... ....... ....... ...... ....... ...... ....... ....... ...... ....... ....... ...... ....... ...... ....... ....... ...... ....... ....... ...... ....... ....... ...... ....... ...... 46
TRANSP ORTING THE DEVI CE..... ...... ....... ...... ....... ...... ...... ....... ...... ....... ...... ....... ...... ....... ...... ....... ...... ....... ...... ....... ...... ...... ....... ...... ....... ...... ....... ...... ....... ...... ... 47
KEEPIN G THE EXTERNAL CASE CLEA N..... ....... ....... ...... ....... ....... ...... ....... ...... ....... ....... ...... ....... ...... ....... ....... ...... ....... ...... ....... ....... ...... ....... ...... ....... ....... ...... .... 47
CLEANI NG THE DEVICE. ....... ...... ....... ...... ....... ...... ....... ...... ....... ...... ....... ...... ....... ...... ....... ...... ....... ...... ....... ...... ....... ...... ....... ...... ....... ...... ....... ...... ....... ...... ....... ... 47
Before use
Please read this instruction manual thoroughly before operating this device and retain it for further reference. Following and
heeding all the information found in this instruction manual will maintain this product in good condition and ensure its safe
operation. This instruction manual contains information on how to operate and maintain this device. Should a component
require maintenance, servicing or repair, then please consult a qualified dealer or service technician.
20. WARRANTY INFORMATION.....................................................................................................................................................50
Page 5
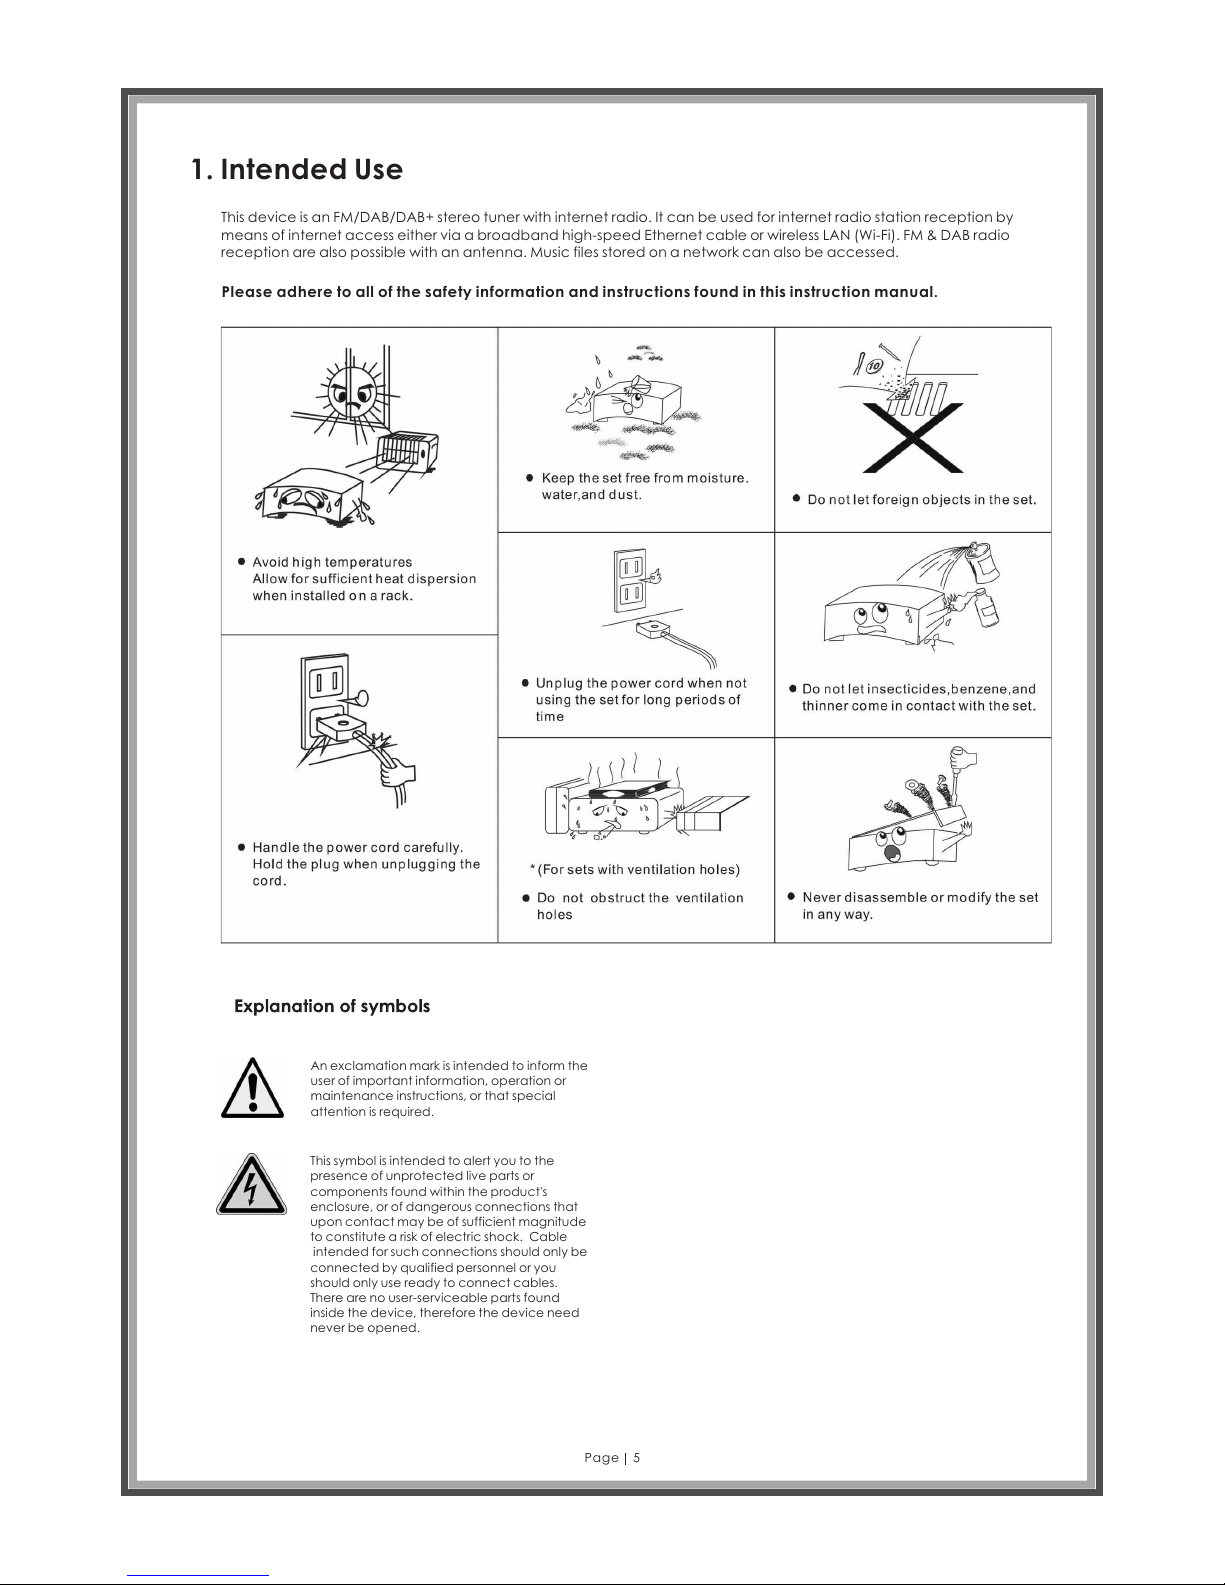
1. Intended Use
This device is an FM/DAB/DAB+ stereo tuner with internet radio. It can be used for internet radio station reception by
means of internet access either via a broadband high-speed Ethernet cable or wireless LAN (Wi-Fi). FM & DAB radio
reception are also possible with an antenna. Music files stored on a network can also be accessed.
Ple ase adh ere to all of the saf ety informat ion and instru ctions found in thi s instr uction manual.
This symbol is intended to alert you to the
presence of unprotected live parts or
components found within the product's
enclosure, or of dangerous connections that
upon contact may be of sufficient magnitude
to constitute a risk of electric shock. Cable
intended for such connections should only be
connected by qualified personnel or you
should only use ready to connect cables.
There are no user-serviceable parts found
inside the device, therefore the device need
never be opened.
An exclamation mark is intended to inform the
user of important information, operation or
maintenance instructions, or that special
attention is required.
Page 5
Page 6
2. Safety Information
The following safety and hazard warnings are not only
for the protection of your device, but also serve as a
protection against potential health hazards. Please
take time to read the following instructions carefully.
We assume no liability for personal or property
damage resulting from the failure to comply
with the safety instructions, or from improper
operation or handling. Under such
circumstances, all claims under warranty will
become void.
For safety and licensing (CE) reasons any
unauthorized modification and/or changes to
the device is prohibited and will void the
warranty and all warranty claims.
Any persons operating, installin g, setting up, or
servicing this device must be trained and
qualified accordingly, and obser ve these
operating instructions.
This is a protection class ll device. Make sure that
the voltag e supply of the power outlet used
meets the required voltage specifications
230V/~ 50 Hz.
Ensure that the device has been set up correctly
by following all the instructions found in the
instru ction manual
Power supp ly cables should be routed so that
they are not likely to be walked on, squas hed or
pinche d by items placed upo n or against them.
Pay partic ular attention to cords at plug s, power
outlet s, and at the point at which they exit from
the device . Avoid exposing the cable to
extrem e heat or cold. lgnoring the above
mentio ned instru ctions cou ld result in cable
damage and present the danger of an electric
shock.
Should any obvious damage be seen on the
device or on the connecti on cables , do not
contact them in any way. Switch of the
correspondi ng circui t breaker in the power
distributio n panel first, before car efully
unplugging the pow er plug from the wall outlet.
Do not operate the device further! Please
contact or take it to a qualified service
technician or spec ialty wor kshop.
In order to completely cut off the power supp ly
to the device, unplug the power plug from the
wall outlet. Merely turni ng the device off with the
ON/OFF button is not sufficie nt. Also make sure
that power outlets are easily acc essible.
Always pull on the plug’ s grips and never on the
cable to rem ove it from a wall outlet. Unpl ug the
device from the power ou tlet if not in use for a
longer period of time .
For safety reas ons, always unp lug the device
from the power outl et during thund er storms.
Eliminate potential tripping hazards by routing
cables in such a way that no one can trip or
stumble over them.
Never use the dev ice, if the power cab le or
device is damaged.
Keep packaging and protec tive foil away from
children at all times to avoid the danger of
suffocation.
The device should never come into contact with
water or moisture.
To prevent the risk of fire of electric sho ck make
sure that liqu ids, such as dripping or splashing
water, rai n or moisture, do not come in contact
with the devic e and power supply plug.
Operate this device in a moderate climate and
never expose it to extreme temperatures, such
as high humidity.
Condensation can build up suddenl y if the
device is brought from a colder area into a
warmer area (e.g. when transporting). Should
this happen, allow the device to warm up to
room tempera ture first before using.
Care should be taken so that liqu ids do not
come in conta ct with the interior, this is why
contai ners cont aining liquids, e.g. buckets , vases
or plants sho uld never be placed anywhere near
this product, including the power supply plug.
This could not only damage the device, but als o
presen t a fire hazard.
It is imperative to avoid contact with moisture,
e.g. never operate in the bathroo m.
Make sure the device is properly ventilated
during oper ation and never operate it in
constri cted areas, such as for example in a
bookcas e or shelf. Never block ventilation
opening s with magazines, tablecloths, curtains
or similar.
Make sure the device is pl aced on a firm and
stabl e surface.
Never place any sources of fire on top of or near
the device and power suppl y plug (e.g. lighted
candle ).
Please note tha t excessive sou nd pressure
created whe n listening to loud volume levels
with earpho nes or headphon es can lead to
permanent hearing damage.
Please adhere to the additional safety
information found in the individual chapters of
this instruction manual.
When connecting other devices, please refer to
the safety and operating instructions found in
the literature accompanying the device.
Please contact our technical hotline or a service
technician for further infor mation, should you be
in doubt about device operation, safety or when
making connections, or if any questions arise
that are not explained within this manual.
Contrib ute to a better environm ent by using a
designa ted recycling site for the disposal of
packagi ng material.
Page 6
Page 7
3. Accessories
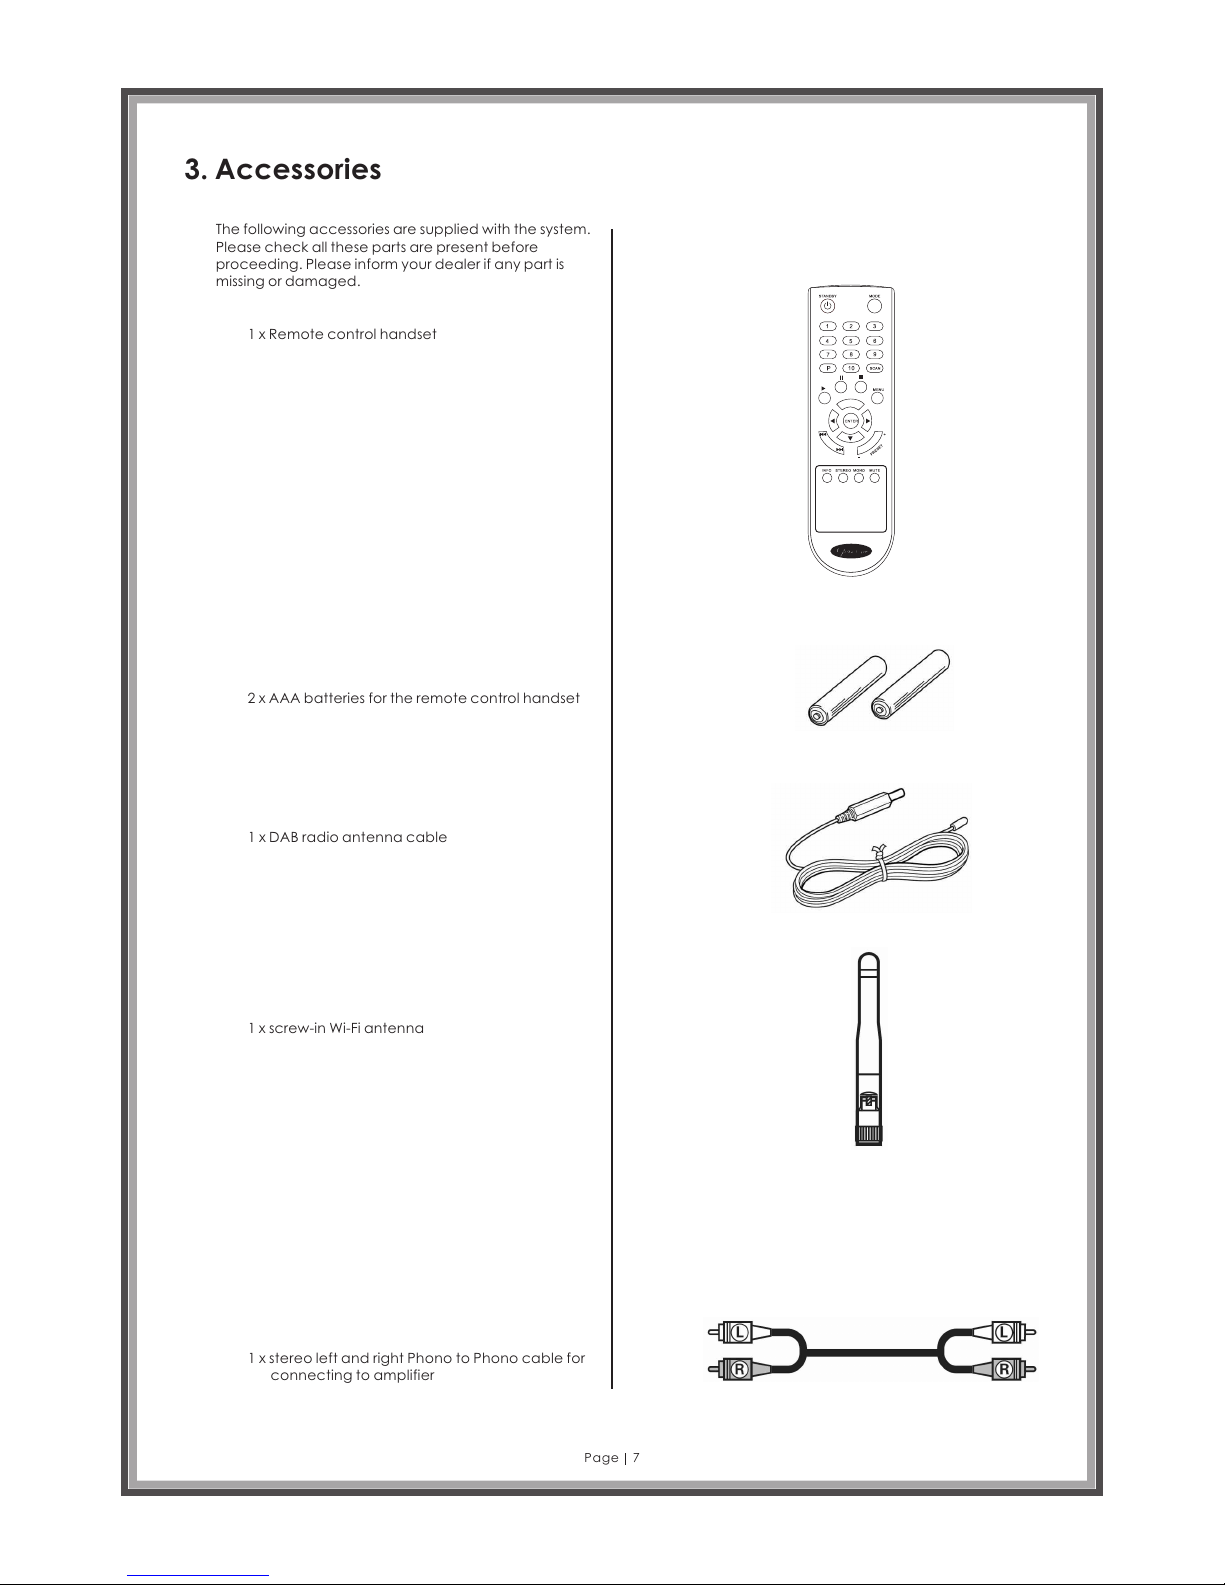
The following accessories are supplied with the system.
Please check all these parts are present before
proceeding. Please inform your dealer if any part is
missing or damaged.
1 x Remote control handset
2 x AAA batteries for the remote control handset
1 x DAB radio antenna cable
1 x screw-in Wi-Fi antenna
1 x stereo left and right Phono to Phono cable for
connecting to amplifier
Page 7
Page 8
4. Description of parts
Front Panel
Page 8
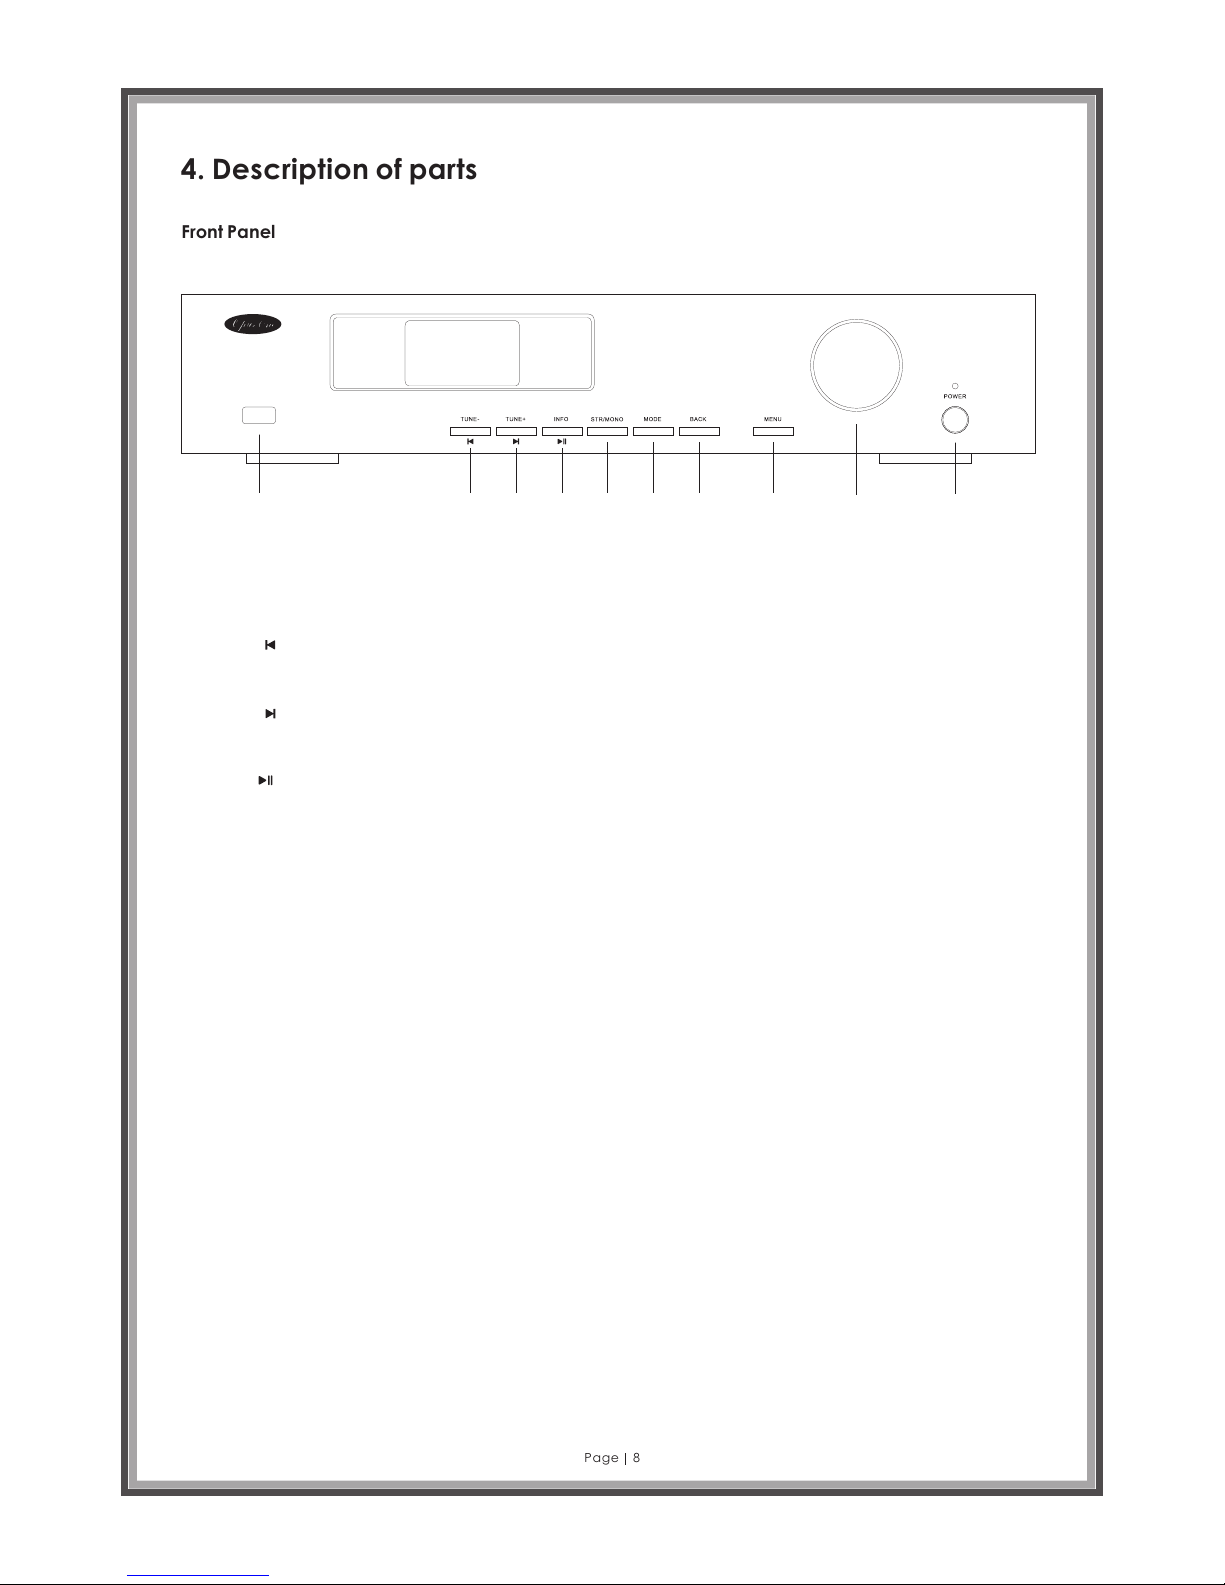
1 2 3 4 5 6 7 8 9 10
A 2696 Di gital ( DAB+) I ntern et FM Tune r
1. USB Port - Co nn ec t ma ss s to ra ge media like flash dri ve s or H ar d Dr iv es . Not suitable for keyb oa rd s, m ou se , an d
some MP3 pla ye rs n ot s up po rt ed.
2. TUNE - / : When ope ra ti ng m od e is F M Ra dio press to auto scan fo r pr ev io us s ta ti on.
When opera ti ng m od e is M us ic P layer, press to skip to p re vi ou s tr ac k.
3. TUNE + / : When ope ra ti ng m od e is F M Ra dio press to auto scan fo r ne xt s ta ti on .
When opera ti ng m od e is M us ic P layer press to skip to ne xt t ra ck .
4. INFO / : When ope ra ti ng m od e is F M Ra dio or DAB Radio press to s ee R DS / D LS i nf or ma tion on the current
station.
When opera ti ng m od e is M us ic P layer press to play, pr es s ag ai n to p au se .
5. STR / MONO: W he n op er at in g in F M Radio mode use this but to n to s wi tc h be tw ee n mono and stereo recep ti on .
NOTE: Some s ta ti on s ma y be M ON O only FM broadcasts.
6. MODE: Cha ng e op er at in g mo de. Press to select mod es e it he r DA B+ R ad io, FM Radio, Internet Ra di o or M us ic
Player.
7. BACK: Pre ss t o go t o Pr ev io us M en u screen. (This funct io n is a va il ab le from the Remote Contro l, b ut t he B AC K
button is no t in cl ud ed )
8. MENU: Pre ss t o go t o Me nu s cr ee n.
9. Jogwhee l: T hi s ac ts a s a vo lu me control, station s el ec to r or M en u fu nc tion selector. Turn l ef t or r ig ht t o sc ro ll
through me nu i te ms . Pr es s to c on firm the selection.
10. POWER: P re ss t o sw it ch t he u nit on or off.
Page 9
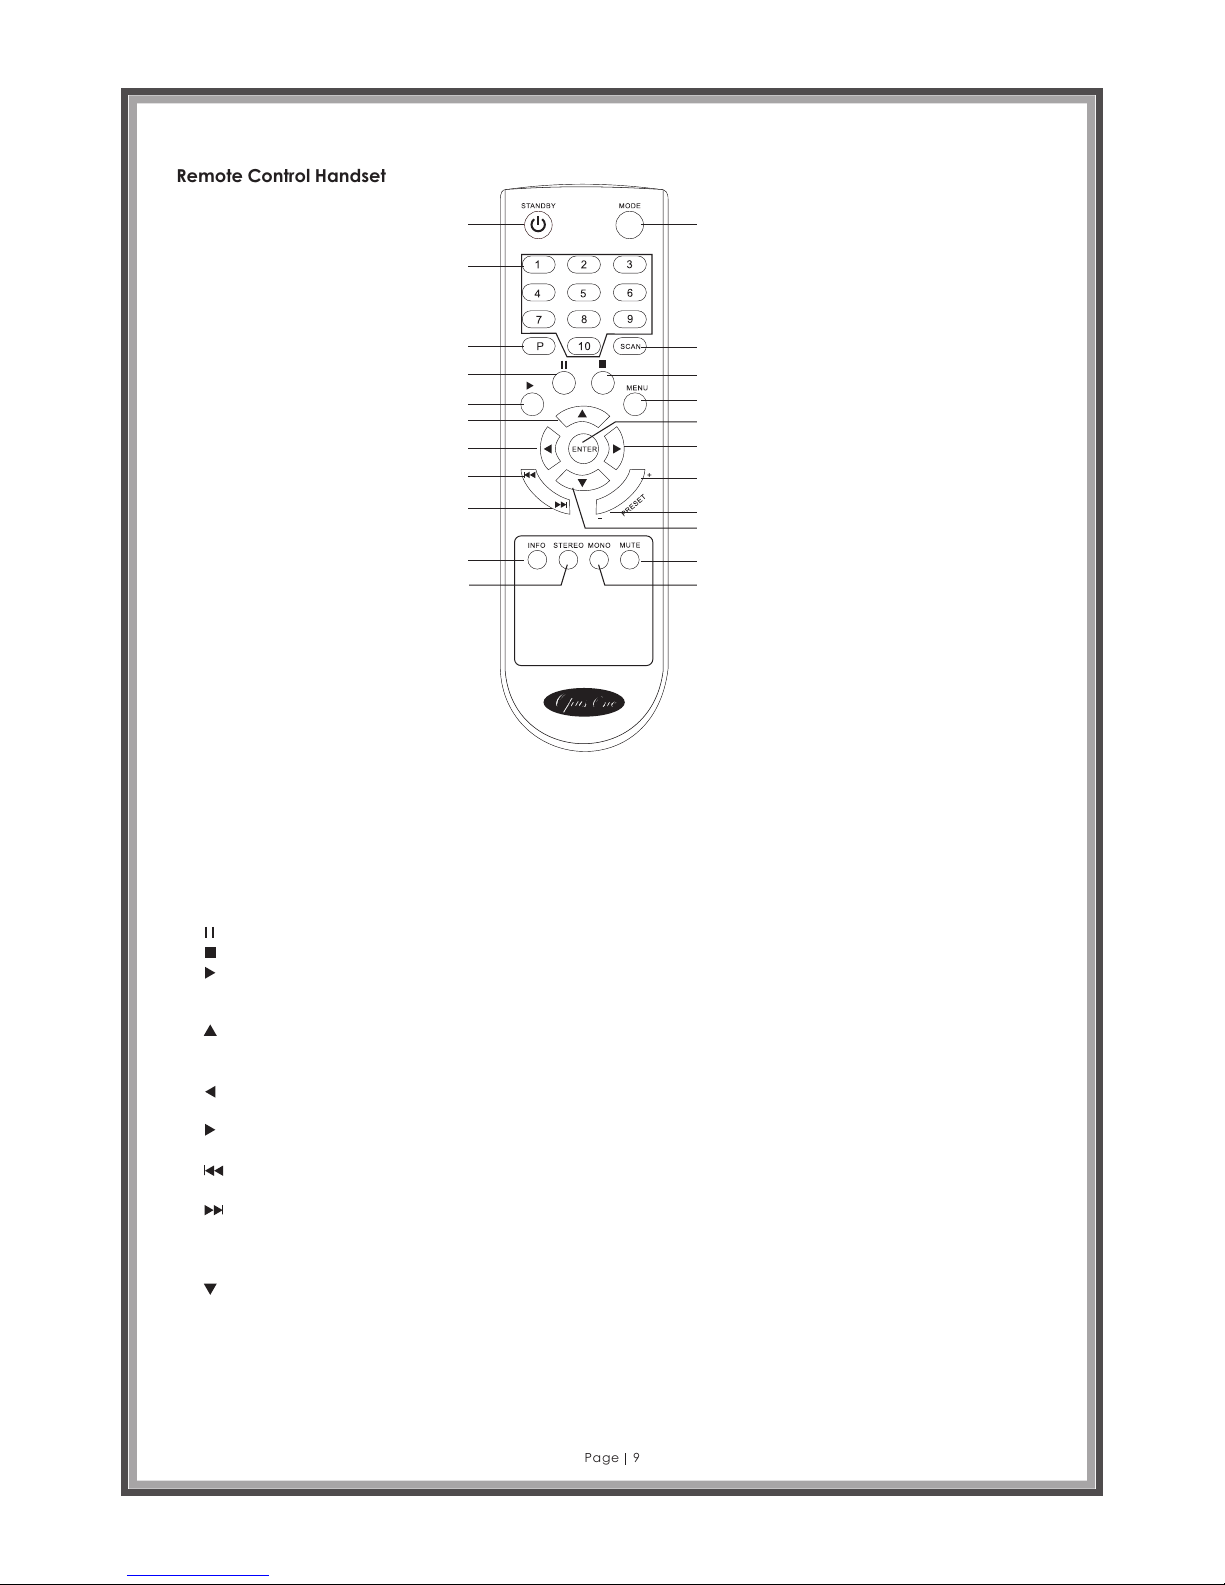
Remote Control Handset
Page 9
1
2
3
4
5
6
7
8
9
10
11
12
13
14
15
16
17
18
19
20
21
22
1. STANDB Y: P re ss t o tu rn u ni t on or off.
2. MODE: Pr es s to s el ec t on e mo de within DAB , FM , In te rn et r ad io, Media playe r, U SB .
3. Number s (1 -1 0) : In F M or D AB m odes, press and h ol d th e nu mb er b uttons to save st at io n or f re qu ency to a preset. O r pr es s a
button to s el ec t a st or ed s ta tion.
4. P: Press t o br ow se p re se t st ation list. Use u p/ do wn a rr ow k eys to highligh t a st at io n in t he l is t, and press EN TE R to s el ec t yo ur
preferr ed s ta ti on .
5. SCAN: Pr es s to a ut o se ar ch f or stations i n FM o r DA B+ m od es . In D AB mode, the sc an f un ct io n wi ll c apture all avai la bl e
station s an d ke ep t he m in m em ory to be selec te d at w il l, o r ch os en as favourite s in t he p re se ts l is t.
6. : PAUSE – Pr es s to p au se p la yb ack of track in M ed ia P la ye r mo de . Also acts as a menu c on tr ol .
7. : STOP –En d al l pl ay ba ck
8. : PLAY - Pre ss t o st ar t pl ay ba ck of track in Me di a Pl ay er m od e. A lso acts as a menu co nt ro l.
9. MENU: Pr es s to g o to m en u li st . Allows a user t o ch an ge a r an ge o f pa rameters an d co nt ro l ea ch m od e of operation fo r th e
A2696.
10. : When pl ay m od e is F M, p re ss u p to change fre qu en cy b y 0. 05 M Hz s teps. When in MEN U sc re en , pr es s to go up the list of
setting s to h ig hl ig ht a nd c hange. This c ur so r ca n al so b e us ed for characte r in pu t.
11. ENTER – O K or c on fi rm b ut to n.
12. : Left mo ve – W he n in M EN U sc reen, press to go b ac k to P RE VI OU S me nu screen or ca nc el a n ac ti on . Th is cursor can a ls o
be used for c ha ra ct er i np ut .
13. : Right m ov e - Wh en i n ME NU s cr een, press to g o fo rw ar d to N EX T me nu selectio n sc re en . Th is c ur sor can also be u se d fo r
charact er i np ut .
14. : When pl ay m od e is m ed ia p la yer, press to ski p to P RE VI OU S tr ack. When opera ti on m od e is t un er , press to auto s ca n fo r
previou s st at io ns .
15. : When pl ay m od e is m ed ia p la yer, press to ski p to N EX T tr ac k. W hen play mode is tu ne r, p re ss t o au to scan for next
station s.
16. PRESE T+ : pr es s to g o to n ex t preset stat io n.
17. PRESE T- : Pr es s to g o to p re vious preset st at io n.
18. : When pl ay m od e is F M, p re ss d own to change f re qu en cy b y 0. 05 M Hz steps. When in M EN U sc re en , pr ess to go down the
list of set ti ng s to c ha ng e. T his cursor ca n al so b e us ed f or c ha racter input.
19. INFO: I nf or ma ti on a bo ut current st at io ns o r tr ac ks
20. STERE O: W he n in F M mo de , pr ess to change f ro m mo no t o st er eo r eception (w or ks o nl y wh er e st ation is broadc as ti ng i n
stereo. S om e lo w- po we r FM s tation broa dc as t in m on o on ly !)
21. MUTE – Pr es s to t ur n au di o vo lume off and on a ga in .
22. MONO: W he n in F M mo de , ca nc els STEREO comm an d.
Page 10
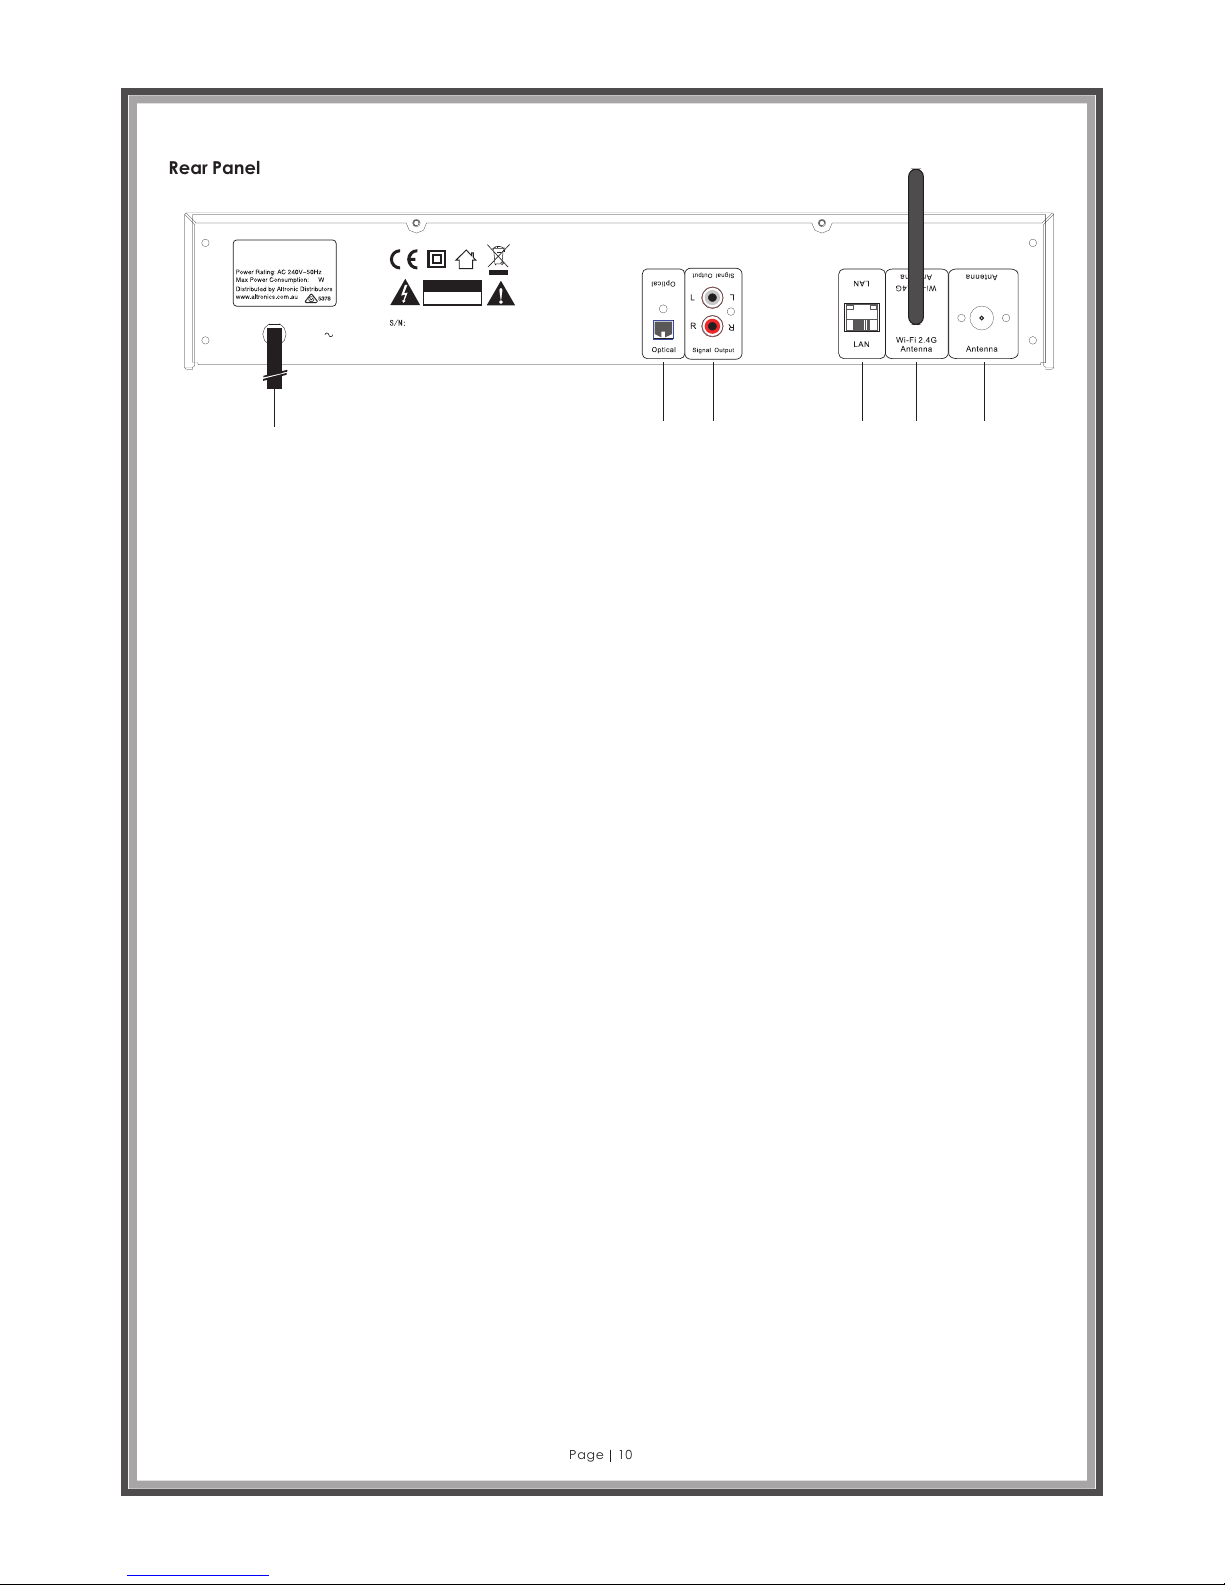
Rear Panel
Page 10
AC24 0V
A 2696
Digi tal (DA B+)
Inte rnet FM Tu ner
12
RISK OF ELECTRIC
SHOCK DO NOT OPEN
CA UT IO N
DAB/ FM
DAB/ FM
1 2
3
4
5
6
1. Power c or d.
2. Optic al : Connect an op ti cal cable ( no t su pplied) t o co nn ect to a digi ta l in put such as t he o pt ical inpu t on
amplif ie rs.
3. Signa l Ou tput: RCA ste re o ANALOGUE ou tp ut connecti on s. Connect RC A to R CA stereo pai r ca ble
(suppl ie d), ensurin g th e red connect or o n the cable is co nn ected to the re d co nnector on bo th t he A 2 696
and your a mp lifier.
4. LAN: Et he rnet cable co nn ection for co nn ecting betw ee n the A 2696 and a ro ut er (UTP Cable n ot s upplied).
5. Wi-Fi 2 .4 G Antenna: WL AN 2 .4 GHz Wi-Fi an te nna input jac k fo r internet ra di o (supplied ).
6. DAB/F M An tenna: 75 ohm T un er antenna fo r bo th FM and DAB+ ra di o reception ( su pplied).
DESC RI PT IONS
Opti ca l: U se this out pu t to c onnect a digi ta l amplifi er u si ng an optic al c ab le (also kn ow n as a n optical
wave gu id e or TOSlin k) . On e of the adva nt ag es of digit al t ra nsmissi on o f th e audio sig na l to t he amplif ie r is t hat
interf er ence cannot a ff ect the signa l an d reduce the qu al ity as can occu r wi th analogue t ra nsmissi on . Yo u can
also c on ne ct the optica l in put of a digita l re corder to thi s ou tput to save an d th en playba ck t he a udio.
This out pu t uses the S/PD IF ( Sony / Philip s Di gital Int er fa ce) proto co l. T his is a stan da rd p rotocol f or d ig ital
transm is sion of aud io s ig nals, whi ch i s su pported b y ju st a bout any de vi ce w ith a digit al i nt erface. B ef or e
maki ng t he a udio connec ti on to your ampl if ier, plea se m ak e sure the volu me i s at a suitab le l ev el to preve nt
dama ge t o yo ur hardware .
Signal O ut : The line outp ut o n the back of the d ev ice is intend ed t o be connecte d to t he Line input o f a Hi -Fi
ampl if ie r or a pair of ac ti ve s peakers ( sp ea kers with b ui lt -in ampli fi er s). The out pu t is d esigned f or a v ol tage
level of 2 V RM S. Before mak in g the audio con ne ction to your a mp lifier, ple as e make sure the v ol ume is at a
suitab le l evel to pre ve nt d amage to yo ur h ar dware.
LAN: Use t hi s port if you wou ld l ike to integr at e the A2696 int o yo ur network vi a a wi red connect io n. To
distin gu ish it from the w ir eless or WLAN c on nection, it i s fr equently re fe rred to as a LAN or E th ernet port. T he p ort
supp or ts d ata rates o f 10 a nd 1 00 Mbps.
To conne ct t he A2696 to you r ro uter in this ma nn er, use a stand ar d network cab le ( twisted pai r wi th RJ45 plugs ).
To conne ct t he A2696 dire ct ly to your desk to p PC or laptop, e it her use a netwo rk s witch (also k no wn as a
bridge ) or a h ub.
To conne ct t he A2696 with ou t any interme di ate devices , us e a crossov er c ab le instea d of a s ta ndard net wo rk
cable. T wo L EDs near the po rt s how the statu s of t he link: oran ge i ndicates a li ve c onnection t o th e network
juncti on ( node); netw or k traffic is si gn alled by a gr ee n LE D (usuall y fl ic kering) .
Wi-Fi 2. 4 GH z WLAN Antenn a: I f you have acce ss t o a 2.4 GHz Wirel es s LAN (WLAN) ro ut er, screw the a nt enna
provid ed o nto this conn ec tor. If possi bl e, ensure tha t th e antenna is se t to a v ertical pos it ion to ensure t he b est
poss ib le r eceptio n.
Page 11
Dear Cus to me r!
Not e:
Do not throw batte ries and
rec hargeable batterie s int o hou sehol d was te!
Consu me rs a re legall y ob ligated to re tu rn used and
recha rg ea ble batte ri es , whether the y co ntain
harmf ul s ub stances * or n ot, to desi gn at ed recycl in g
areas , di sp osal site s, o r stores wh er e batteries /
recha rg ea ble batte ri es c an be bou gh t. B y doing so,
you are f ul filling all l eg al batter y re cycling and
dispo sa l ob ligations a nd are contri bu ti ng to a bet te r
envir om en t. Make sur e ba tteries are c om pletly
disch ar ge d before di sp os ing!
*) ma rked wi th Cd=c admiu m Hg=me rcuri c Pb=le ad
Insertin g/ ch an gi ng b at teries
The remote control requires two “AAA” batteries to
operate. Remove the battery compartment lid carefully.
Remove the used batteries. Insert new batteries, observing
the correct polarity as displayed inside the remote.
Replace the battery lid carefully.
Informat io n on h an dl in g ba tt eries and recharg ea bl e
batterie s
Please adhere to the following information when handling
batteries and rechargeable batteries.
Keep batteri es o ut o f ch il dr en ’s r ea ch .
Batteries ar e ha za rd ou s an d do n ot
belong in househ ol d wa st e.
Ensure correct p ol ar it y wh en i ns er ti ng
batteries.
Always remov e ba tt er ie s wh en t he r em ot e
control is not in us e fo r lo ng p er io ds o f
time.
Never leave ba tt er ie s ly in g ar ou nd
unsupervis ed . If s wa ll ow ed t he se c ou ld
pose a choking haz ar d to c hi ld re n an d
pets. Seek emerg en cy m ed ic al c ar e
immediatel y, s ho ul d th is h ap pe n.
Never expose bat te ri es t o ex tr em e
temperatures , su ch a s su nl ig ht , fi re , ov en s,
etc. There is a risk o f ex pl os io n!
Make sure that bat te ri es a re n ot
dismantled , sh or t- ci rc ui te d or a re t hr ow n
into fire. Never r e- ch ar ge n on -
rechargeab le b at te ri es . Th er e is a r is k of
explosion!
Always follo w th e ma nu fa ct ur er ’s
instructio ns w he n re ch ar gi ng
rechargeab le b at te ri es .
Touching leaking or damaged batteries
could cause skin burns. Use protective
gloves suitable for handling such batteries.
Always ensur e th at t he d ev ic e ha s be en
turned off after u se .
Always chang e/ re pl ac e al l ba tt er ie s at
the same time.
If required cl ea n ba tt er y an d de vi ce
contacts bef or e in se rt in g.
Page 11
Page 12
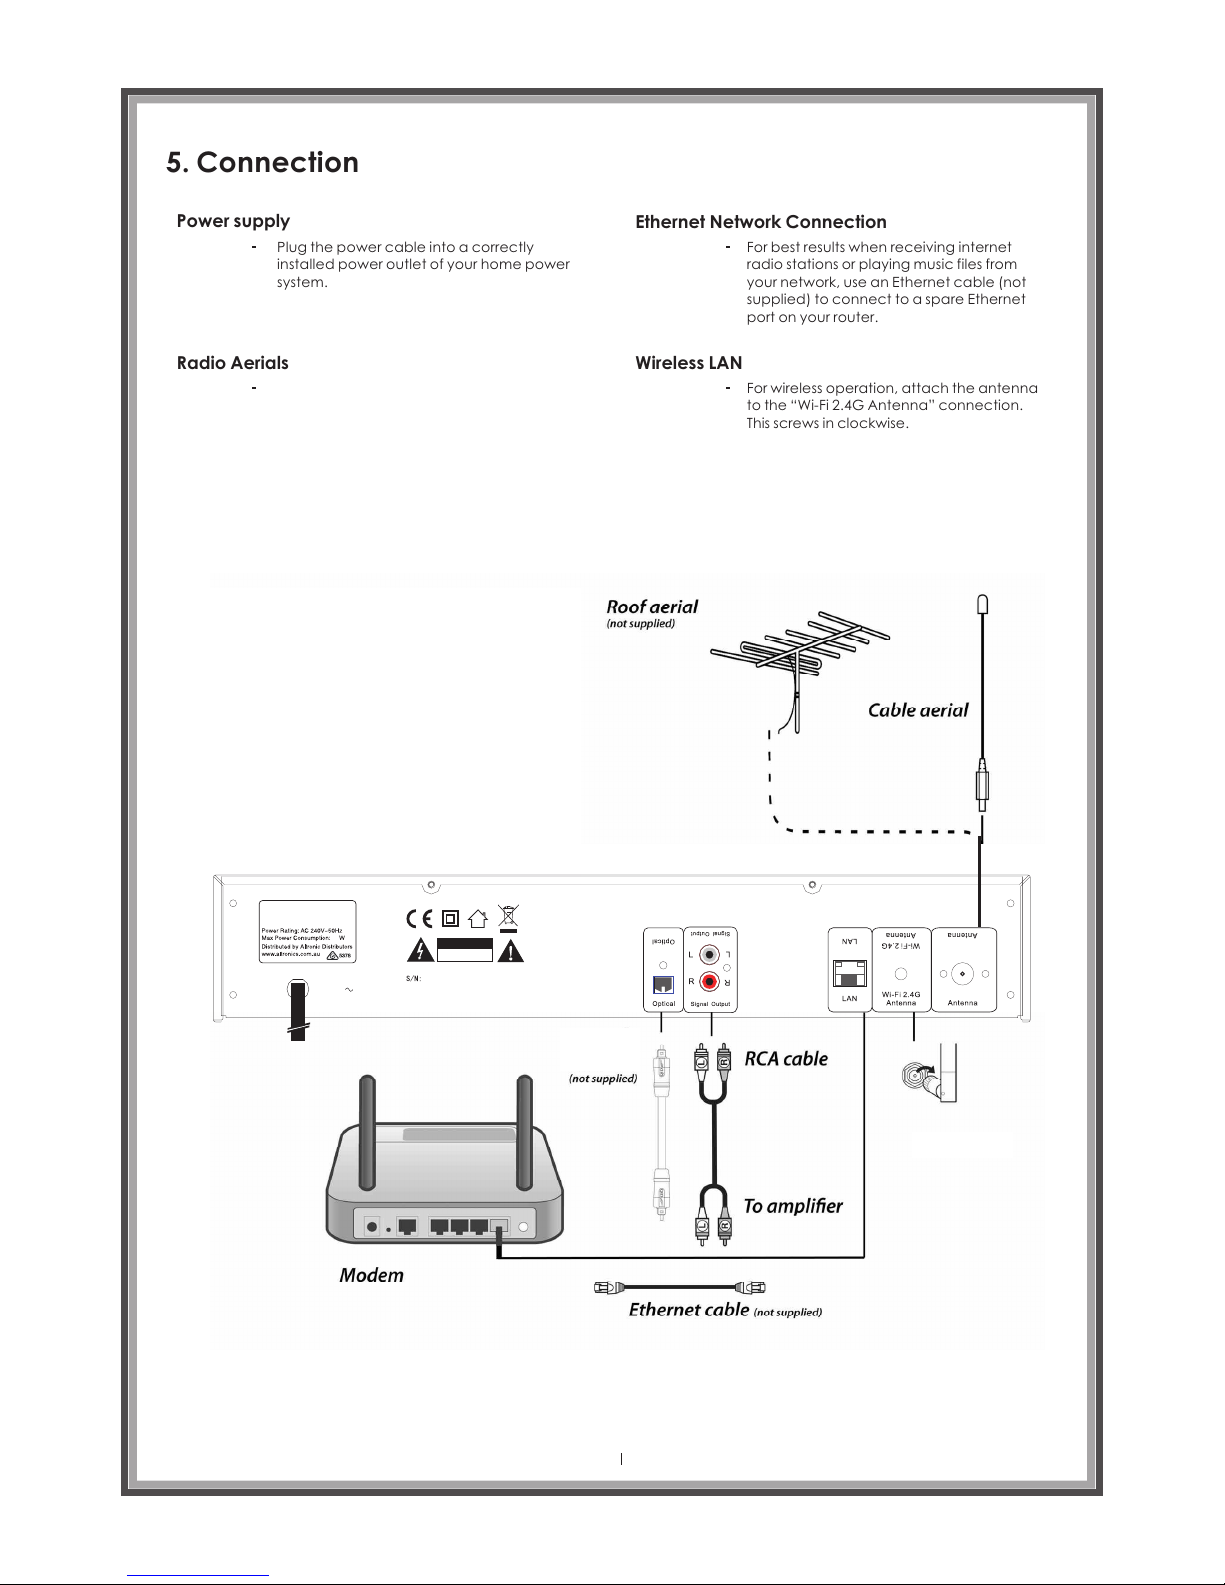
5. Connection
Power supply
Plug the power cable into a correctly
installed power outlet of your home power
system.
Radio Aerials
Ethernet Network Connection
For best results when receiving internet
radio stations or playing music files from
your network, use an Ethernet cable (not
supplied) to connect to a spare Ethernet
port on your router.
Wireless LAN
For wireless operation, attach the antenna
to the “Wi-Fi 2.4G Antenna” connection.
This screws in clockwise.
Page 12
AC24 0V
A 2696
Digi tal (DA B+)
Inte rnet FM Tu ner
12
RISK OF ELECTRIC
SHOCK DO NOT OPEN
CA UT IO N
DAB/ FM
DAB/ FM
Optical
cable
Wi-fi aerial
In order to receive DAB or FM radio
broadcasts it is necessary to connect
the supplied wire aerial to the screw
socket marked DAB/FM Antenna.
Alternatively, if you have an external aerial,
you can connect a suitable cable from the
socket marked DAB/FM Antenna to a wall
socket that connects to the roof aerial.
Page 13
6. Before Getting Started
Screens
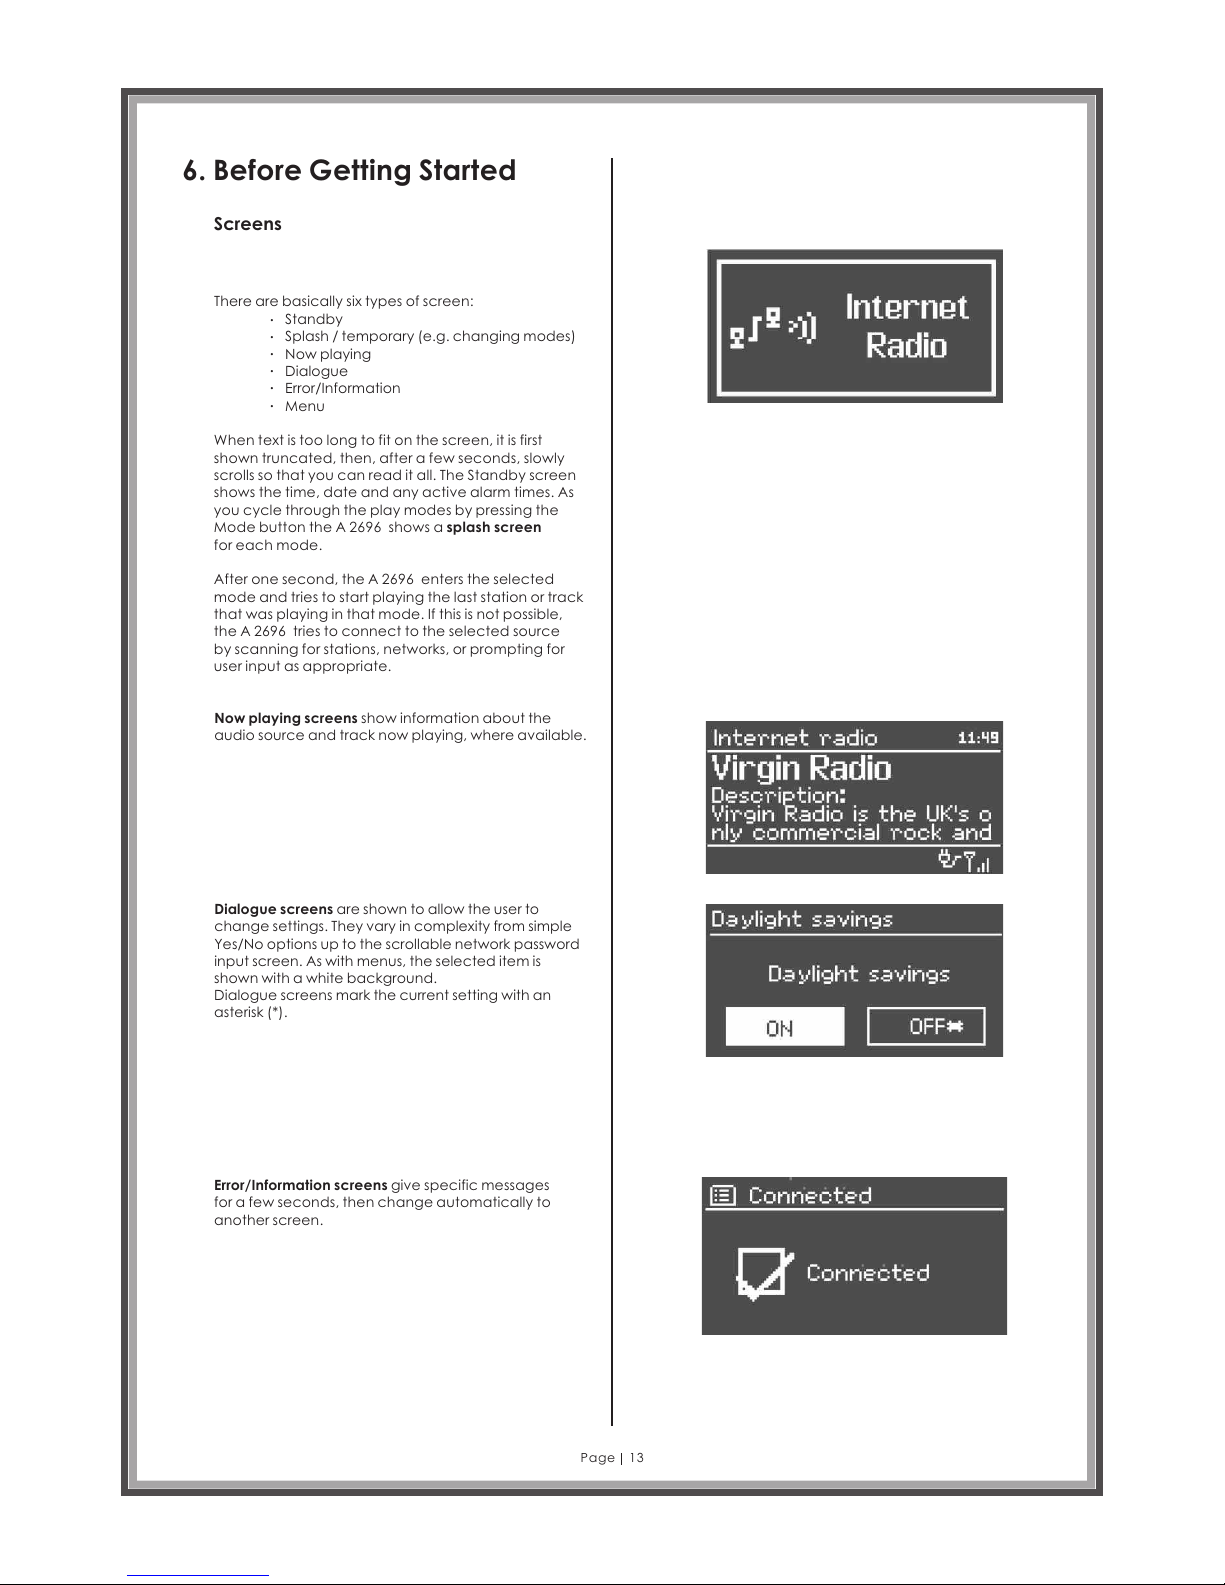
There are basically six types of screen:
Standby
Splash / temporary (e.g. changing modes)
Now playing
Dialogue
Error/Information
Menu
.
.
.
.
.
.
When text is too long to fit on the screen, it is first
shown truncated, then, after a few seconds, slowly
scrolls so that you can read it all. The Standby screen
shows the time, date and any active alarm times. As
you cycle through the play modes by pressing the
Mode button the A 2696 shows a
for each mode.
splash screen
After one second, the enters the selected
mode and tries to start playing the last station or track
that was playing in that mode. If this is not possible,
the A 2696 tries to connect to the selected source
by scanning for stations, networks, or prompting for
user input as appropriate.
A 2696
Now playing screens show information about the
audio source and track now playing, where available.
Dialogue screens are shown to allow the user to
change settings. They vary in complexity from simple
Yes/No options up to the scrollable network password
input screen. As with menus, the selected item is
shown with a white background.
Dialogue screens mark the current setting with an
asterisk (*).
Error/Information screens give specific messages
for a few seconds, then change automatically to
another screen.
Page 13
The screen shows various menus, dialo gues and
display s, as descri bed be low.
Page 14
Menus
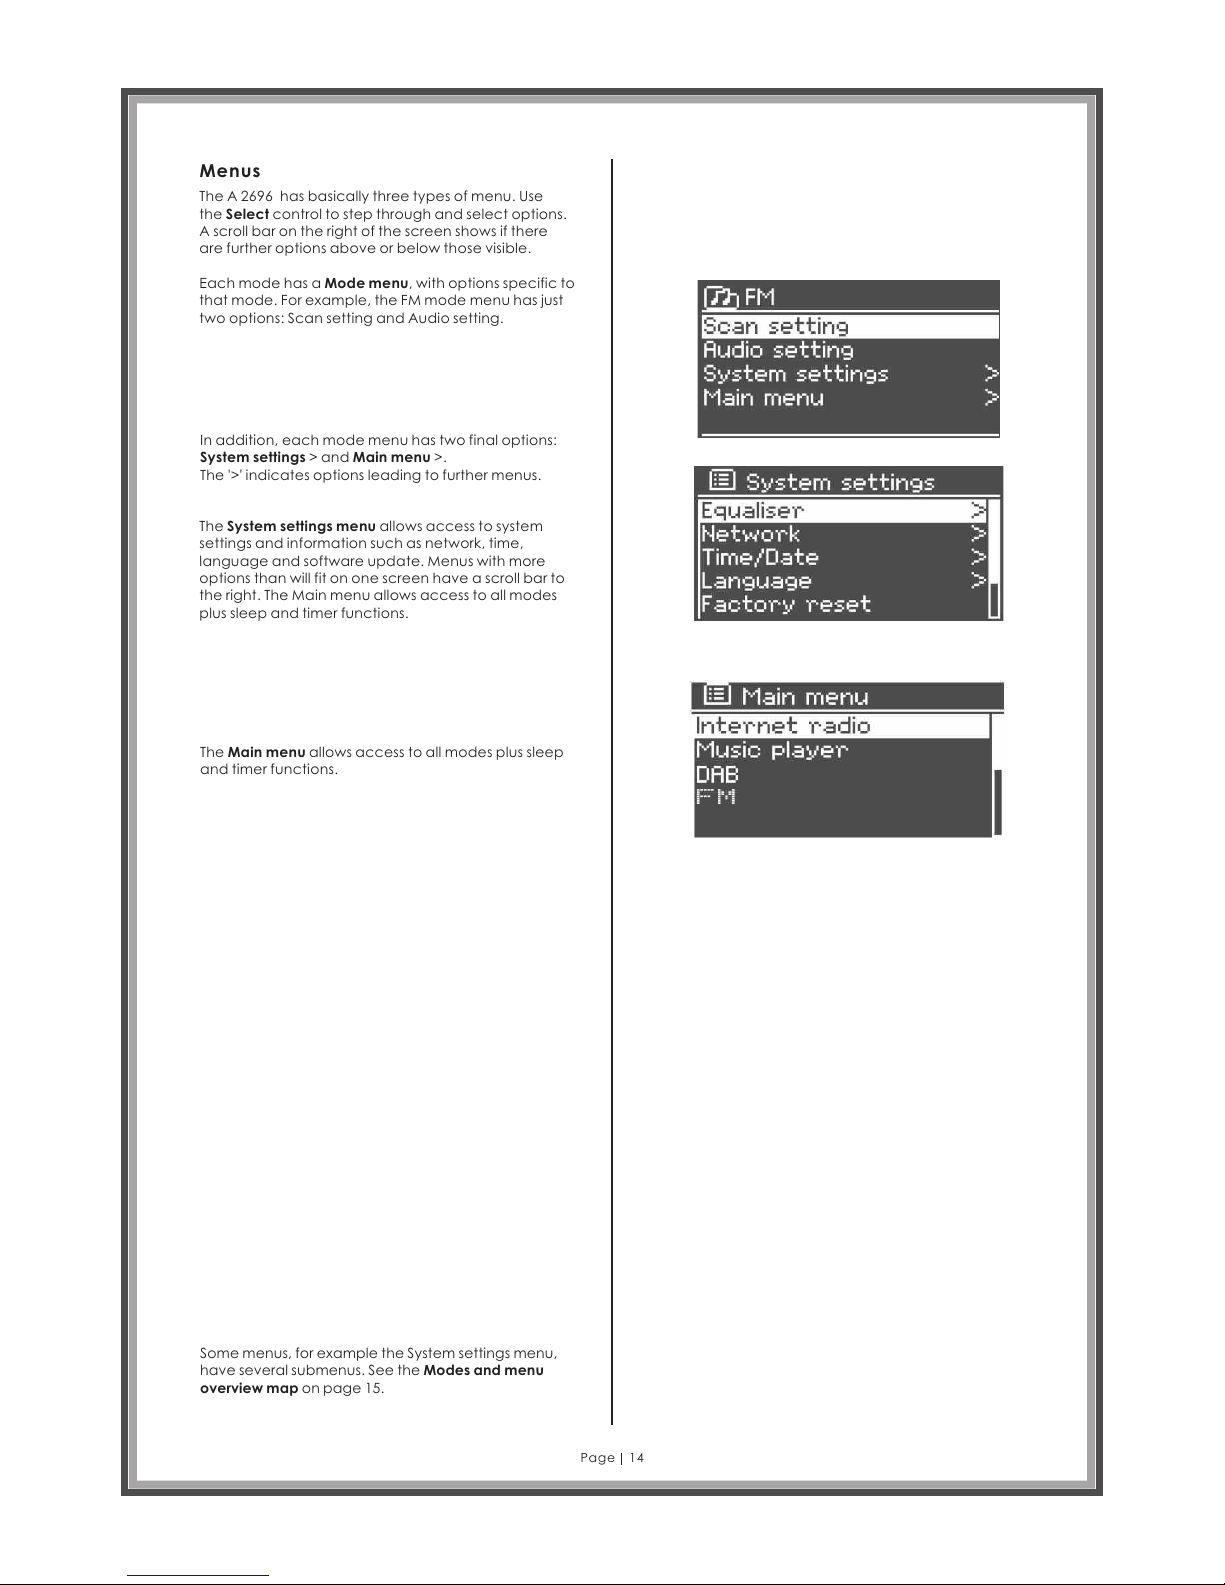
The has basically three types of menu. Use
the Select control to step through and select options.
A scroll bar on the right of the screen shows if there
are further options above or below those visible.
A 2696
Each mode has a Mode menu, with options specific to
that mode. For example, the FM mode menu has just
two options: Scan setting and Audio setting.
In addition, each mode menu has two final options:
System settings > and Main menu >.
The '>' indicates options leading to further menus.
The System settings menu allows access to system
settings and information such as network, time,
language and software update. Menus with more
options than will fit on one screen have a scroll bar to
the right. The Main menu allows access to all modes
plus sleep and timer functions.
The Main menu allows access to all modes plus sleep
and timer functions.
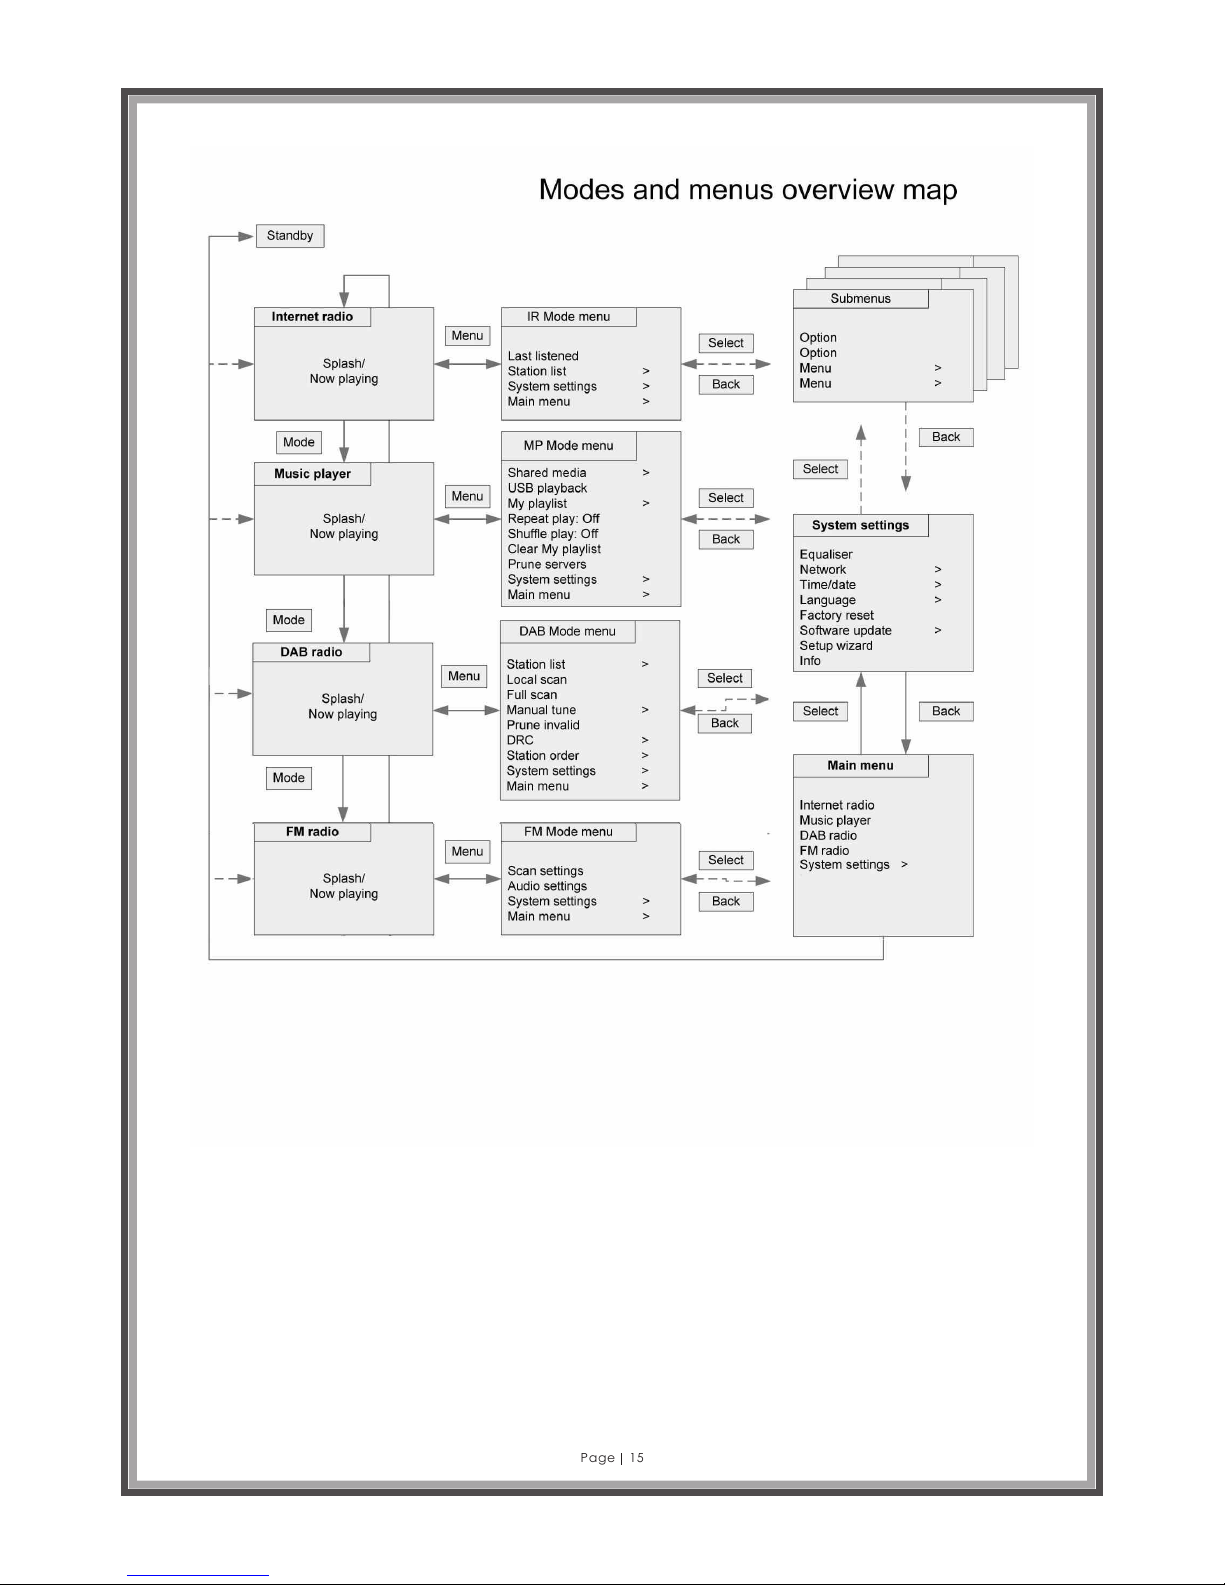
Some menus, for example the System settings menu,
have several submenus. See the Modes and menu
overview map on page 15.
Page 14
Page 15
Page 15
Page 16
7. Getting Started
Although the is sophisticated, getting
started is simple. After connecting your system to the
speakers, to play DAB or FM radio, all you need is a
power source (a 220~240 V mains supply).
A 2696
For Music Player mode, you need either a USB stick
containing compatible music files or a wired or
wireless Ethernet network and a UPnP music server
(e.g. a PC or a network attached storage (NAS) drive
containing your music library). For Internet-connected
modes such as Internet radio you also need a
broadband Internet connection.
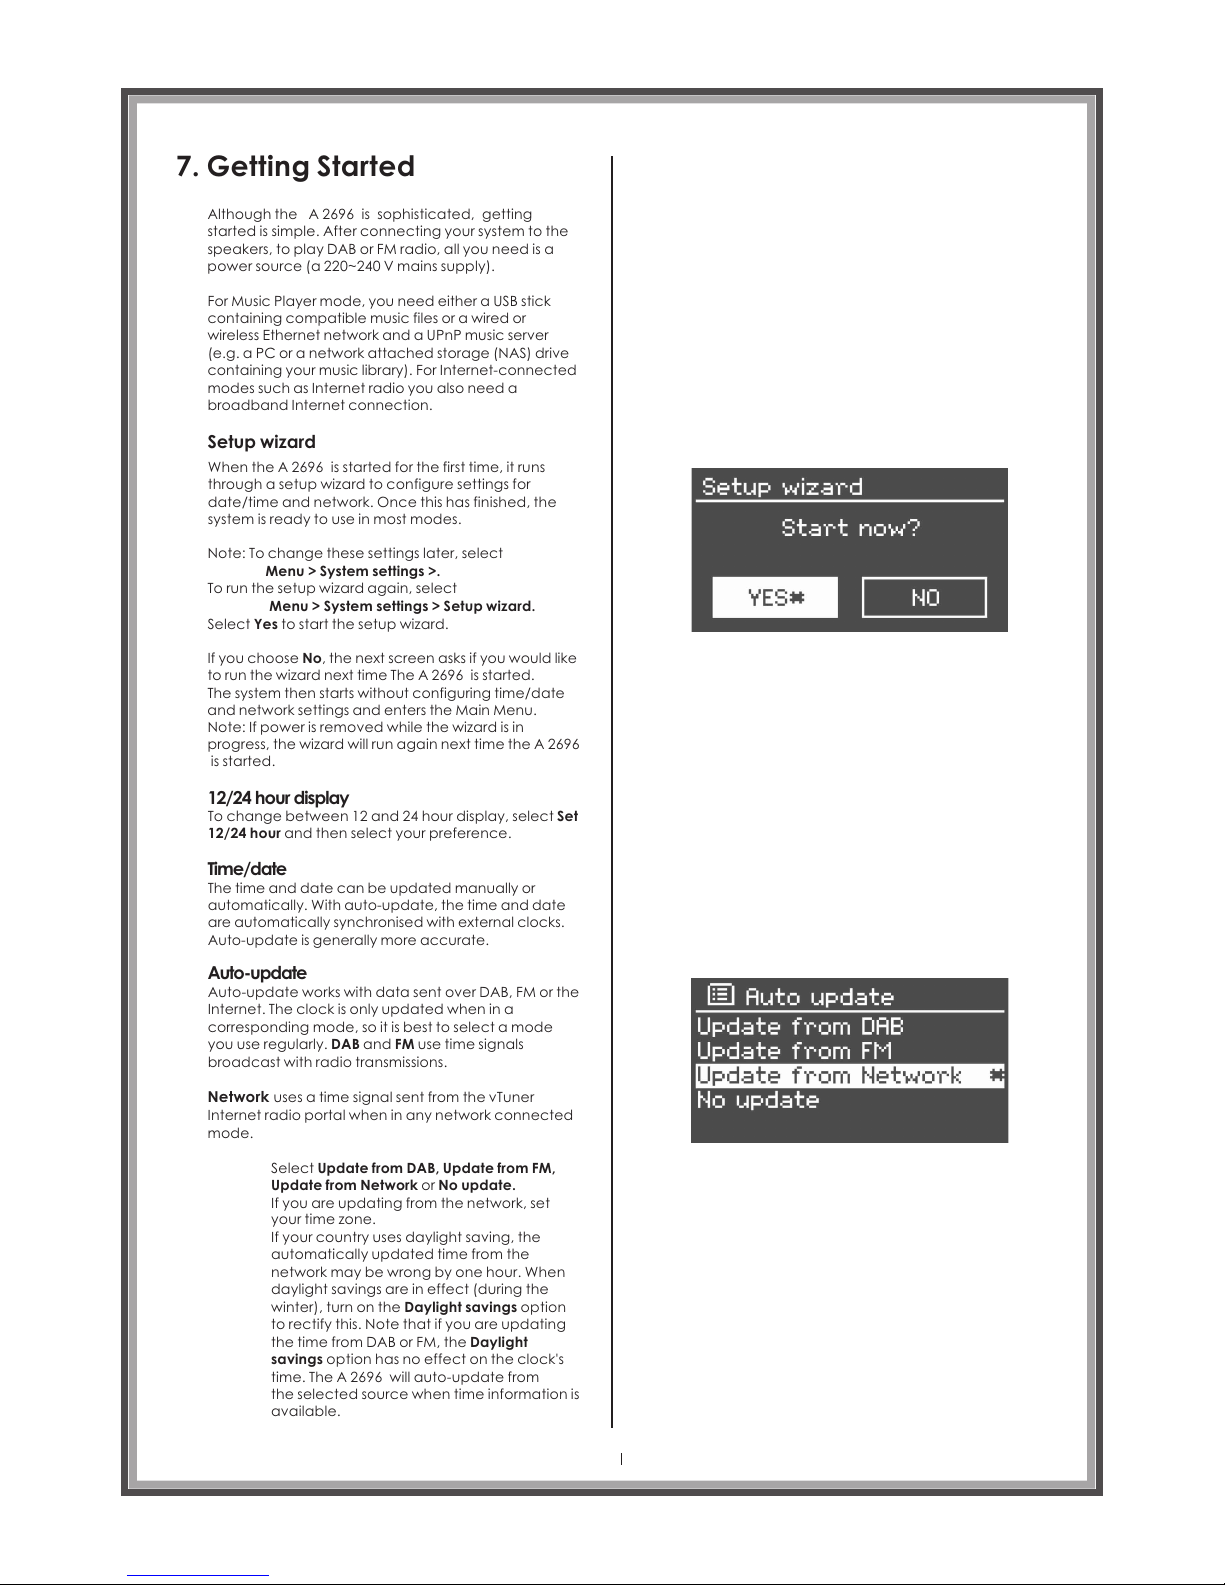
Setup wizard
When the is started for the first time, it runs
through a setup wizard to configure settings for
date/time and network. Once this has finished, the
system is ready to use in most modes.
A 2696
Note: To change these settings later, select
Menu > System settings >.
To run the setup wizard again, select
Menu > System settings > Setup wizard.
Select Yes to start the setup wizard.
If you choose No, the next screen asks if you would like
to run the wizard next time The A 2696 is started.
The system then starts without configuring time/date
and network settings and enters the Main Menu.
Note: If power is removed while the wizard is in
progress, the wizard will run again next time the A 2696
is started.
12/24 hour display
Time/date
Auto-update
To change between 12 and 24 hour display, select Set
12/24 hour and then select your preference.
The time and date can be updated manually or
automatically. With auto-update, the time and date
are automatically synchronised with external clocks.
Auto-update is generally more accurate.
Auto-update works with data sent over DAB, FM or the
Internet. The clock is only updated when in a
corresponding mode, so it is best to select a mode
you use regularly. DAB and FM use time signals
broadcast with radio transmissions.
Network uses a time signal sent from the vTuner
Internet radio portal when in any network connected
mode.
Select Update from DAB, Update from FM,
Update from Network or No update.
If you are updating from the network, set
your time zone.
If your country uses daylight saving, the
automatically updated time from the
network may be wrong by one hour. When
daylight savings are in effect (during the
winter), turn on the Daylight savings option
to rectify this. Note that if you are updating
the time from DAB or FM, the Daylight
savings option has no effect on the clock's
time. The A 2696 will auto-update from
the selected source when time information is
available.
Page 16
Page 17
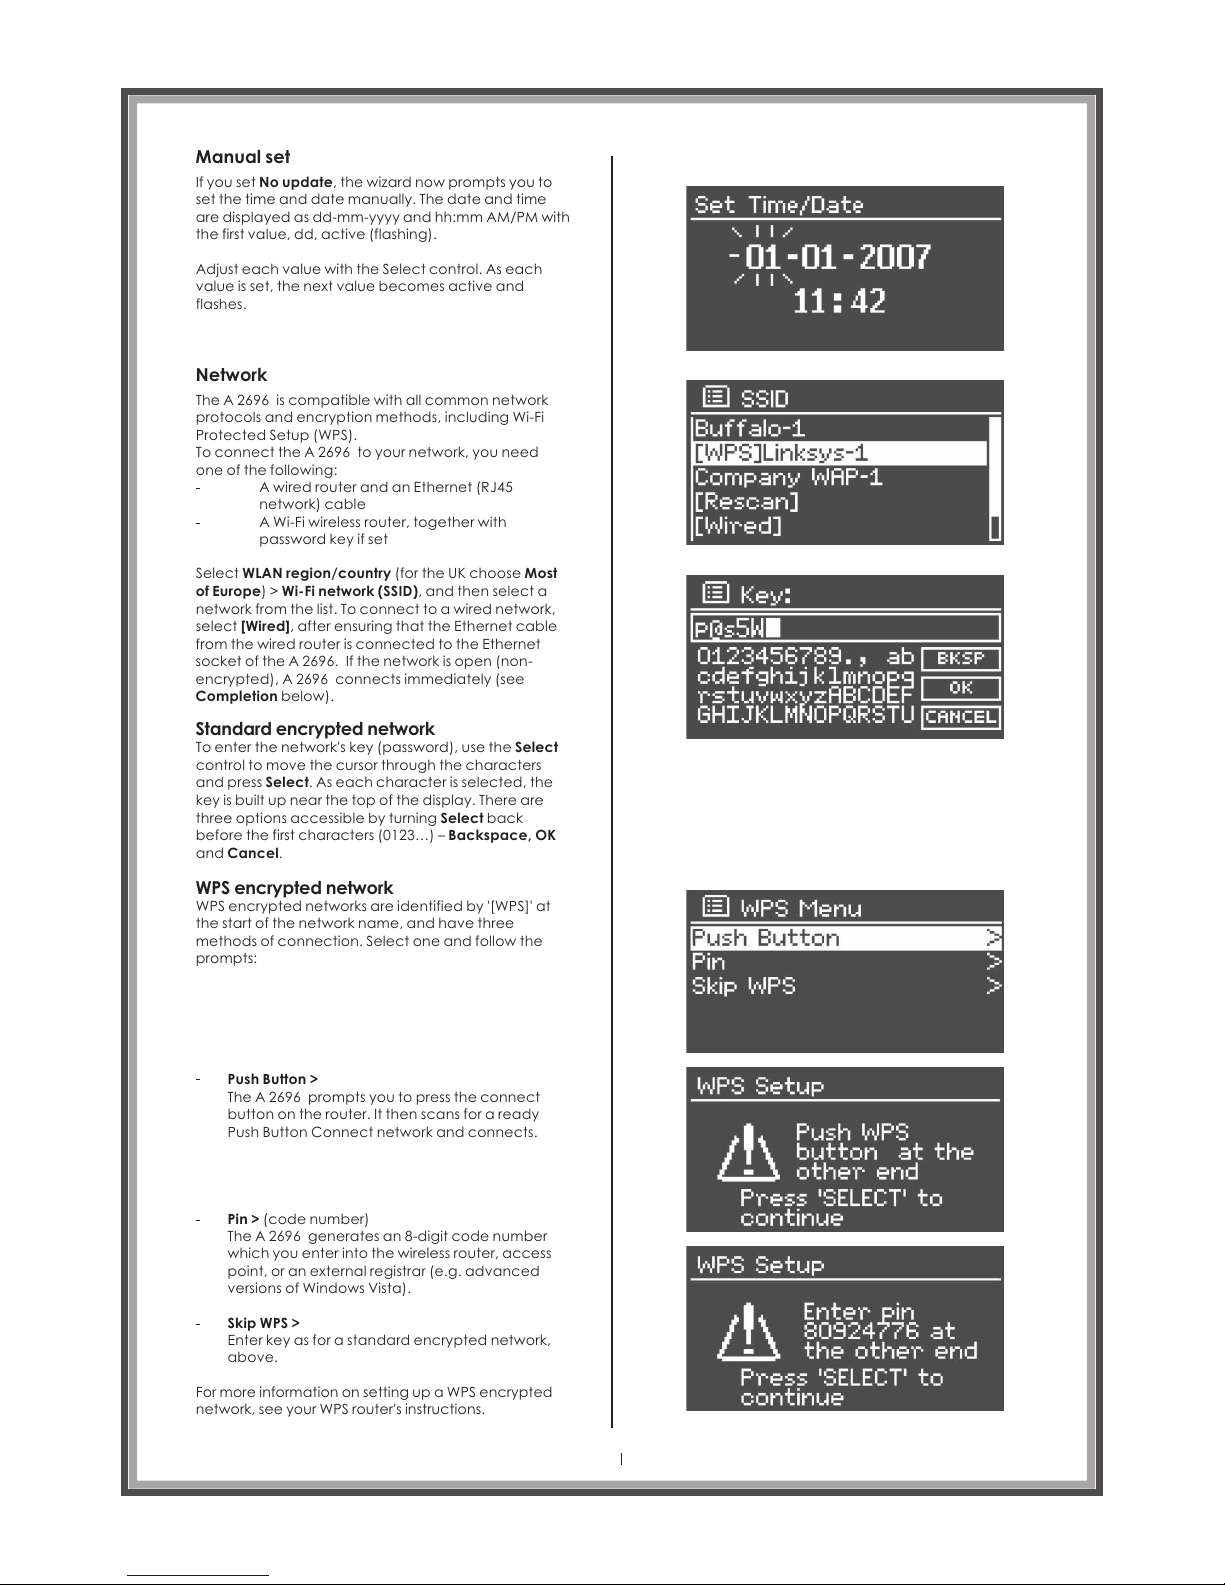
Manual set
If you set No update, the wizard now prompts you to
set the time and date manually. The date and time
are displayed as dd-mm-yyyy and hh:mm AM/PM with
the first value, dd, active (flashing).
Adjust each value with the Select control. As each
value is set, the next value becomes active and
flashes.
Network
The is compatible with all common network
protocols and encryption methods, including Wi-Fi
Protected Setup (WPS).
To connect the A 2696 to your network, you need
one of the following:
A 2696
A wired router and an Ethernet (RJ45
network) cable
A Wi-Fi wireless router, together with
password key if set
Select WLAN region/country (for the UK choose Most
of Europe) > Wi-Fi network (SSID), and then select a
network from the list. To connect to a wired network,
select [Wired], after ensuring that the Ethernet cable
from the wired router is connected to the Ethernet
socket of the A 2696. If the network is open (non-
encrypted), A 2696 connects immediately (see
Completion below).
Standard encrypted network
To enter the network's key (password), use the Select
control to move the cursor through the characters
and press Select. As each character is selected, the
key is built up near the top of the display. There are
three options accessible by turning Select back
before the first characters (0123…) – Backspace, OK
and Cancel.
WPS encrypted network
WPS encrypted networks are identified by '[WPS]' at
the start of the network name, and have three
methods of connection. Select one and follow the
prompts:
Push Button >
The prompts you to press the connect
button on the router. It then scans for a ready
Push Button Connect network and connects.
A 2696
Pin > (code number)
The generates an 8-digit code number
which you enter into the wireless router, access
point, or an external registrar (e.g. advanced
versions of Windows Vista).
A 2696
Skip WPS >
Enter key as for a standard encrypted network,
above.
For more information on setting up a WPS encrypted
network, see your WPS router's instructions.
Page 17
Page 18
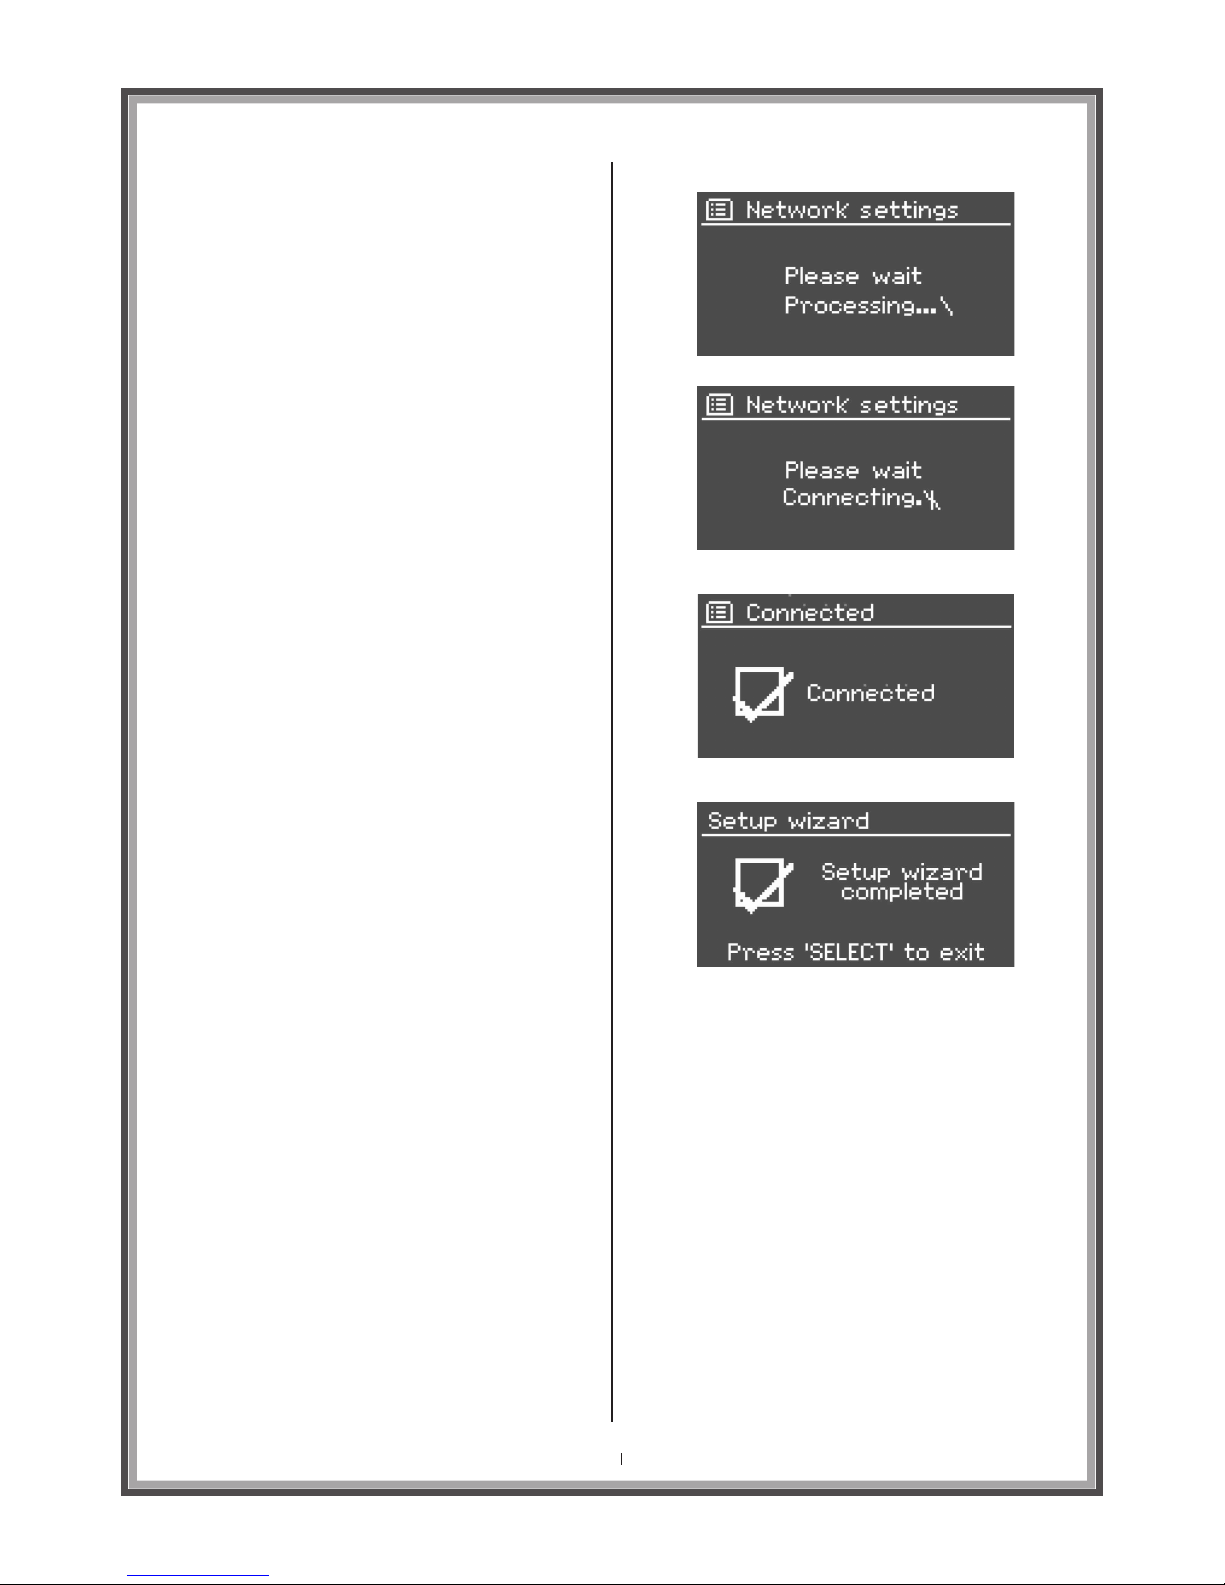
Completion
The attempts to connect to the selected
network.
A 2696
If connecting fails, the returns to a previous
screen to try again.
A 2696
If the network connection is lost, the will
automatically attempt to reconnect.
A 2696
If network connection is successful the Connected
screen will appear.
Upon completion of the process the Setup Wizard
confirms connection and setup up has been
successful
Page 18
Page 19

Netw ork
The A 2696 remembers the last four wireless networks
it has connected to, and automatically tries to
connect to whichever one of them it can find.
You can see the list of registered networks through
Menu > System settings > Network > Network profile >.
From here you can delete unwanted networks by
turning and pressing Select then confirming delete
Yes.
There are also other options for viewing and manually
altering network settings from
Menu > System settings > Network >
(for example setting up a wired network).
Users experienced with networking may find these
options useful for diagnosing and fixing network
problems.
Language
The default language is English. To change, select
Menu > System settings >Language >
then select your language.
Page 19
Page 20
Setting up a music server
In order for the to play music files from a
computer, the computer must be set up to share files
or media.
A 2696
UPnP media sharing allows devices like the
A 2696 to play music from a shared media library,
navigating through tag menus such as Artist, Album or
Genre. If you are running a suitable server system such
as a PC with Windows Media Player 10 or later (WMP),
and your music library is well-tagged, then it is
recommended to use media sharing. Only the UPnP
server needs to be set up.
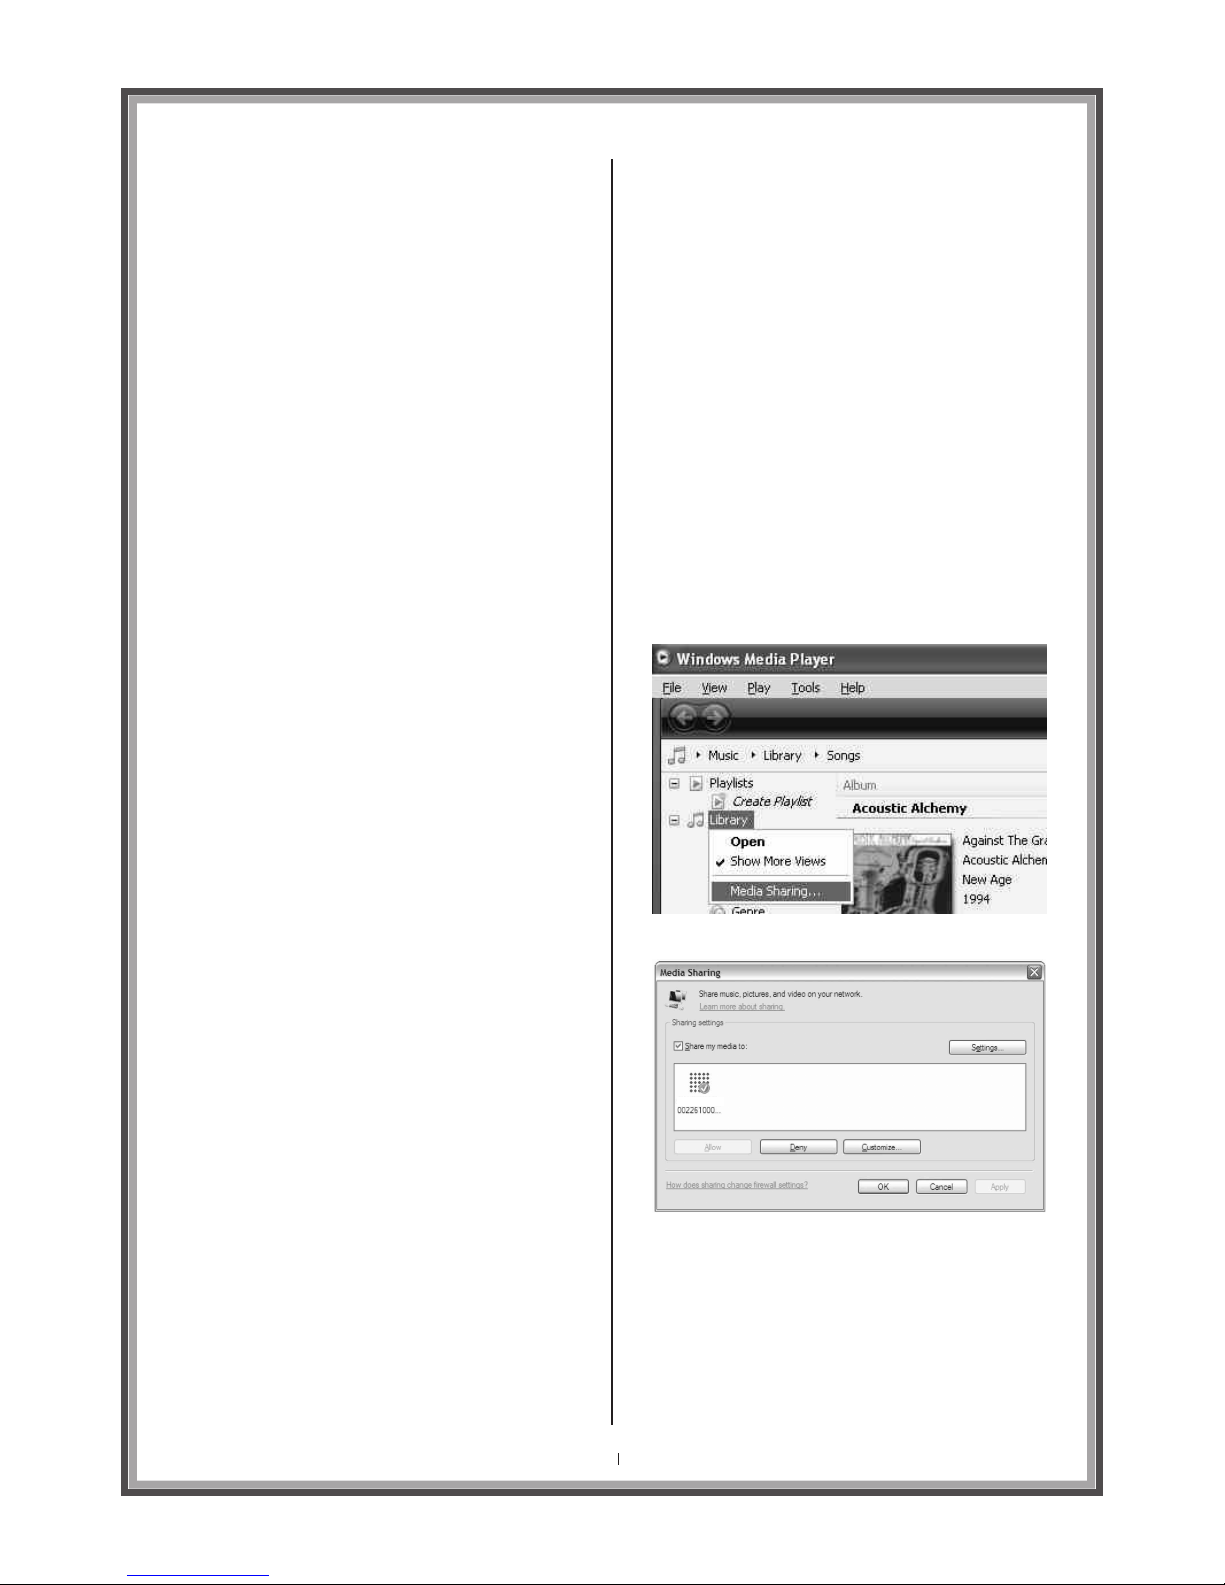
Sharing media with Windows Media Player
The most common UPnP server is Windows Media
Player (10 or later). Alternatively, other UPnP platforms
and servers may be used. To set up WMP for media
sharing, perform the following steps:
Ensure that the PC is connected to the network.
1.
2.
3.
4.
5.
Ensure that the is powered on and
connected to the same network.
A 2696
In WMP, add to the media library the audio files
and folders you want to share with The A 2696
(Library > Add to Library…).
In WMP, enable media sharing by right clicking
on the Library and then selecting Media
sharing…)
In the next dialogue box you'll see the
displayed. Click on the icon representing the
A 2696 and then click
A 2696
Allow
Your newly shared media library will now be listed
under Music Player > Shared Media on the A 2696
Note: The WMP UPnP service runs in the background; there is
no need to start WMP explicitly each time.
Note: iTunes does not currently work as a UPnP media server,
but there are add- ons available (such as Allegro Media
Server™ for Macintosh or PC) to work with an iTunes library.
Alternatively if you are a PC user simpl y install and run
Windows Media Player (10 or later) and add your iTunes lib rary
to the media libra ry in Windows Medi a Player. You will be able
to continue to use iTunes as your primar y source of music
library management and Windows Medi a Player will upda te
automatically making your music alw ays availa ble on the
A 2696.
Page 20
Opus O ne
Page 21
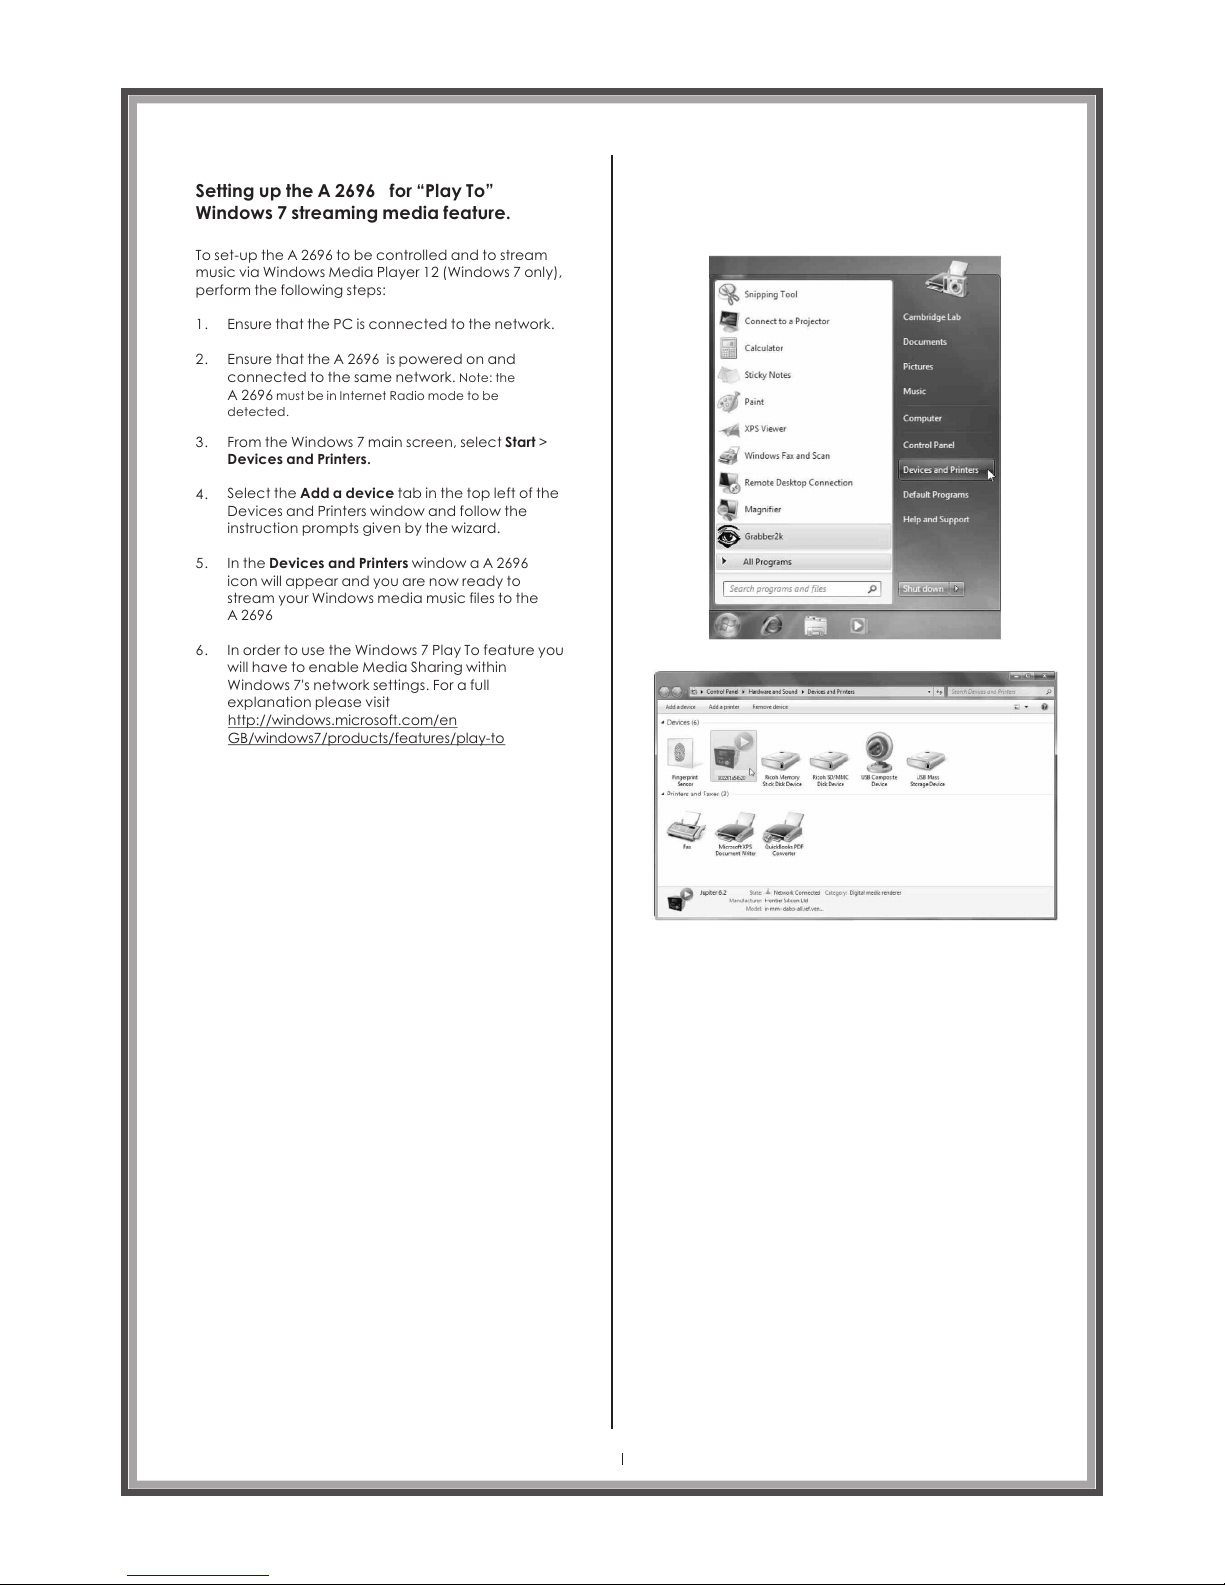
Setting up the for “Play To”
Windows 7 streaming media feature.
A 2696
To set-up the to be controlled and to stream
music via Windows Media Player 12 (Windows 7 only),
perform the following steps:
A 2696
Ensure that the PC is connected to the network.
Ensure that the is powered on and
connected to the same network. Note: the
A 2696 must be in Internet Radio mode to be
detected .
A 2696
From the Windows 7 main screen, select Start >
Devices and Printers.
Select the Add a device tab in the top left of the
Devices and Printers window and follow the
instruction prompts given by the wizard.
In the Devices and Printers window a A 2696
icon will appear and you are now ready to
stream your Windows media music files to the
A 2696
In order to use the Windows 7 Play To feature you
will have to enable Media Sharing within
Windows 7's network settings. For a full
explanation please visit
http://windows.microsoft.com/en
GB/windows7/products/features/play-to
1.
2.
3.
4.
6.
5.
Page 21
Opus One A 2696
Page 22
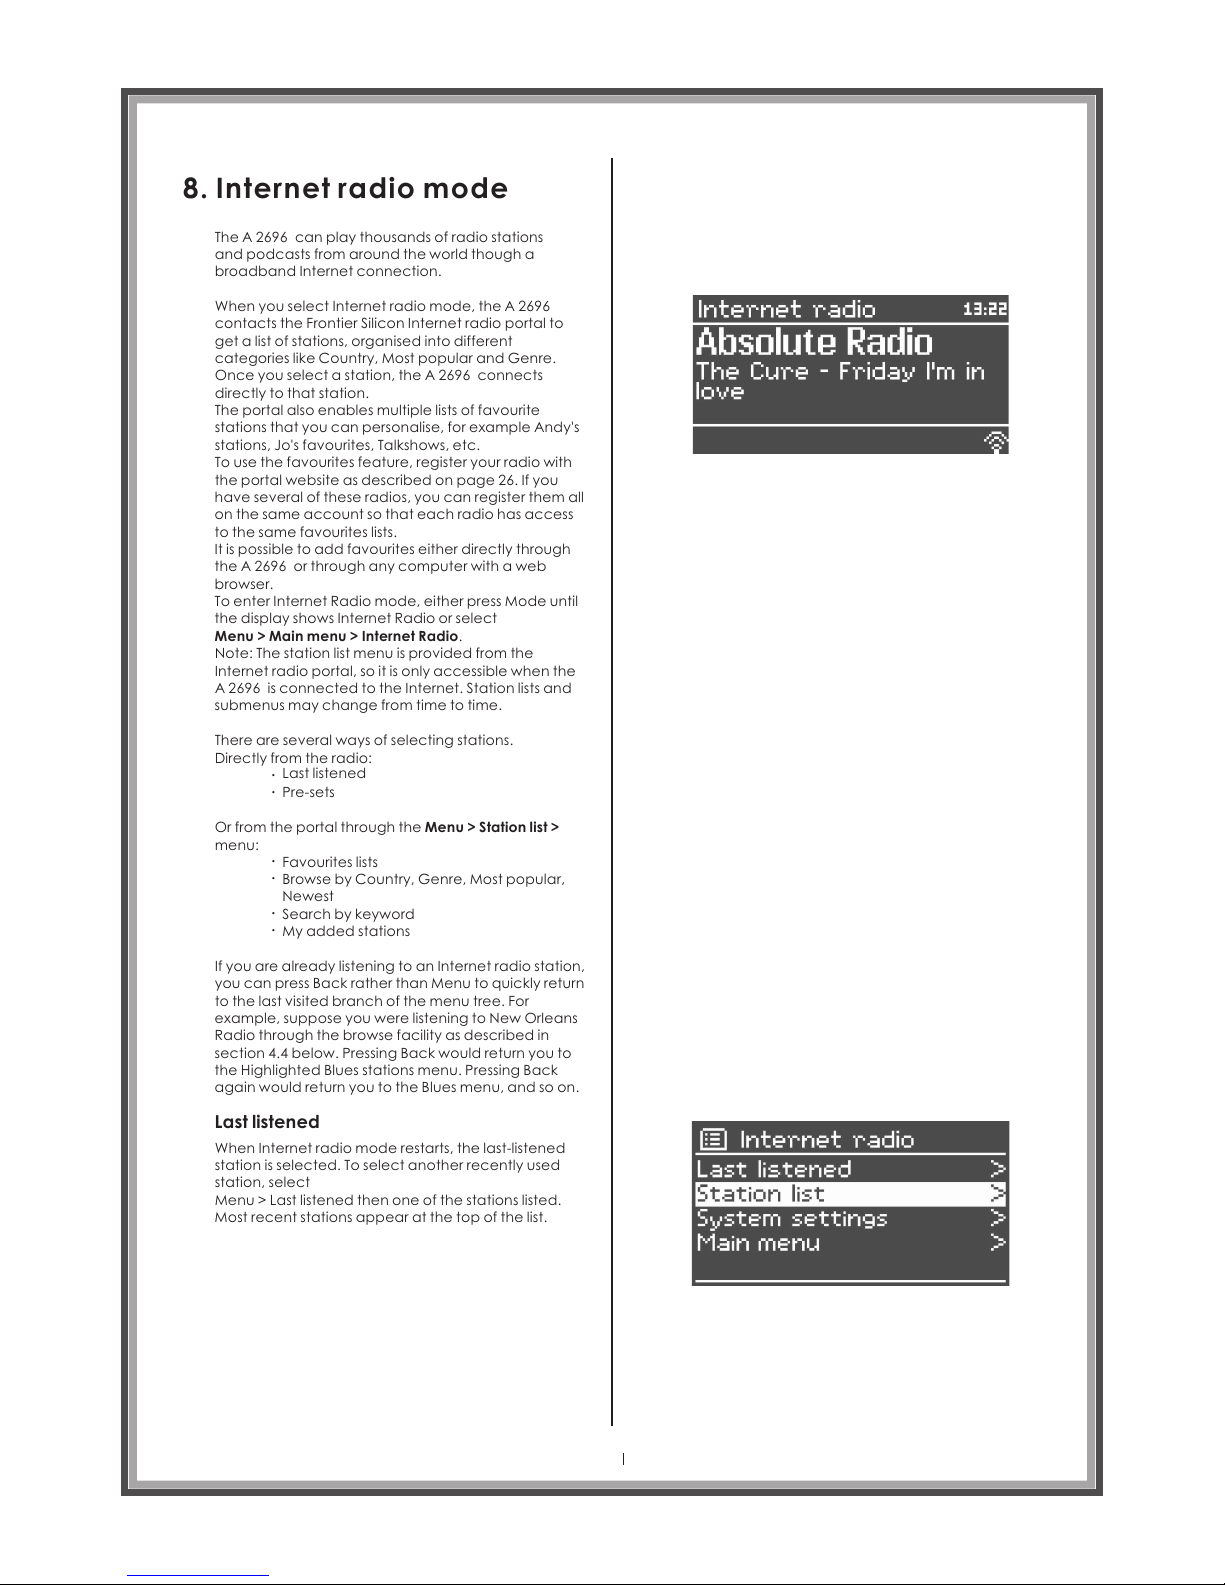
8. Internet radio mode
The can play thousands of radio stations
and podcasts from around the world though a
broadband Internet connection.
A 2696
When you select Internet radio mode, the
contacts the Frontier Silicon Internet radio portal to
get a list of stations, organised into different
categories like Country, Most popular and Genre.
Once you select a station, the A 2696 connects
directly to that station.
The portal also enables multiple lists of favourite
stations that you can personalise, for example Andy's
stations, Jo's favourites, Talkshows, etc.
To use the favourites feature, register your radio with
the portal website as described on page 26. If you
have , you can register them all
on the same account so that each radio has access
to the same favourites lists.
It is possible to add favourites either directly through
the A 2696 or through any computer with a web
browser.
To enter Internet Radio mode, either press Mode until
the display shows Internet Radio or select
Menu > Main menu > Internet Radio.
A 2696
several of these radios
Note: The station list menu is provided from the
Internet radio portal, so it is only accessible when the
A 2696 is connected to the Internet. Station lists and
submenus may change from time to time.
There are several ways of selecting stations.
Directly from the radio:
Last listened
Pre-sets
.
.
Or from the portal through the Menu > Station list >
menu:
Favourites lists
Browse by Country, Genre, Most popular,
Newest
Search by keyword
My added stations
.
.
.
.
If you are already listening to an Internet radio station,
you can press Back rather than Menu to quickly return
to the last visited branch of the menu tree. For
example, suppose you were listening to New Orleans
Radio through the browse facility as described in
section 4.4 below. Pressing Back would return you to
the Highlighted Blues stations menu. Pressing Back
again would return you to the Blues menu, and so on.
Last listened
When Internet radio mode restarts, the last-listened
station is selected. To select another recently used
station, select
Menu > Last listened then one of the stations listed.
Most recent stations appear at the top of the list.
Page 22
Page 23
Selecting a preset station
Presets are stored in the radio and cannot be
accessed from other radios. To store an Internet radio
preset, press and hold the P button on the remote
control handset until the display shows the Save to
Preset screen. Using the down or up keys on the
remote, select one of the 10 presets and press the
Enter button on the remote control handset to store
the currently playing station. To select a preset, press P
button briefly, then select one of the listed preset
stations. When a preset station is playing, it shows Pn
(P1, P2 etc) in the bottom of the screen.
Note: Operation of presets is identical for Internet
radio, DAB and FM.
Also press and hold (1-10) button can save station to preset
number.
There are different ways of selecting a preset
station.
Press a numeric button (1 – 10) on the remote
control handset to select the memory presets 1-10.
Presets
Press “P” to display a list of stored stations. Use the
▲ and ▼ buttons or turn the “CONTROL” dial to
select the preferred station. Press the “ENTER”
button or the “CONTROL” dial to confirm and
switch to the selected station. Press “t”, “P” or
“BACK” to exit this menu. The menu will close
automatically after a while.
Favourites
Favourites are different from Presets in that they can
be stored on the internet radio portal directly, not just
on the A 2696.
Before you set up an account on the portal from its
web interface (www.wifiradio-frontier.com), the
favourites are associated solely with A 2696.
After you set up a portal account, all the Favourites
from your different radios are merged into a
combined favourites list. This combined list is available
to all the radios on your account. (see page 26 for
details of how to register your A 2696 on the internet
radio portal)
To store a playing station as a Favourite, press and
hold Select until the display shows 'Favourite added'.
The station appears in the default Favourites list
Stations. To select a favourite, select
Menu > Station list > My favourites >[Favourites list] >
[Station].
Page 23
Page 24
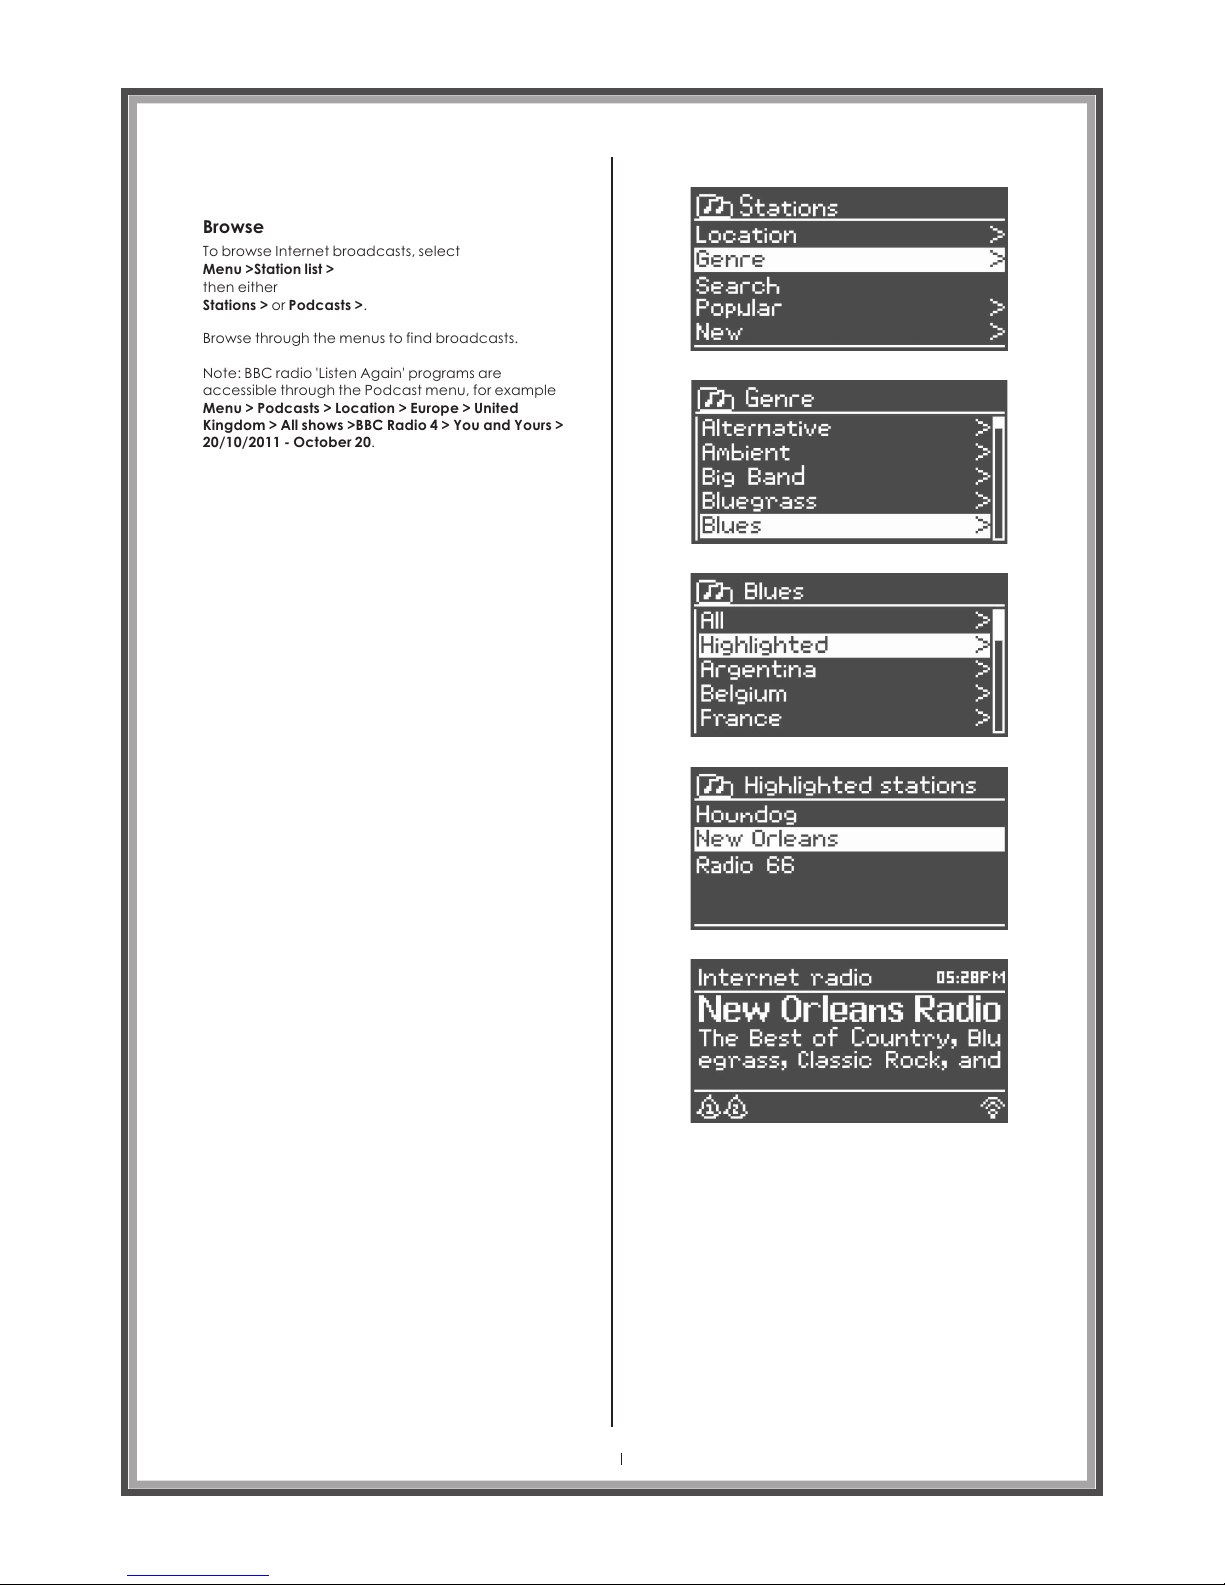
Browse
To browse Internet broadcasts, select
Menu >Station list >
then either
Stations > or Podcasts >.
Browse through the menus to find broadcasts.
Note: BBC radio 'Listen Again' programs are
accessible through the Podcast menu, for example
Menu > Podcasts > Location > Europe > United
Kingdom > All shows >BBC Radio 4 > You and Yours >
20/10/2011 - October 20.
Page 24
Page 25
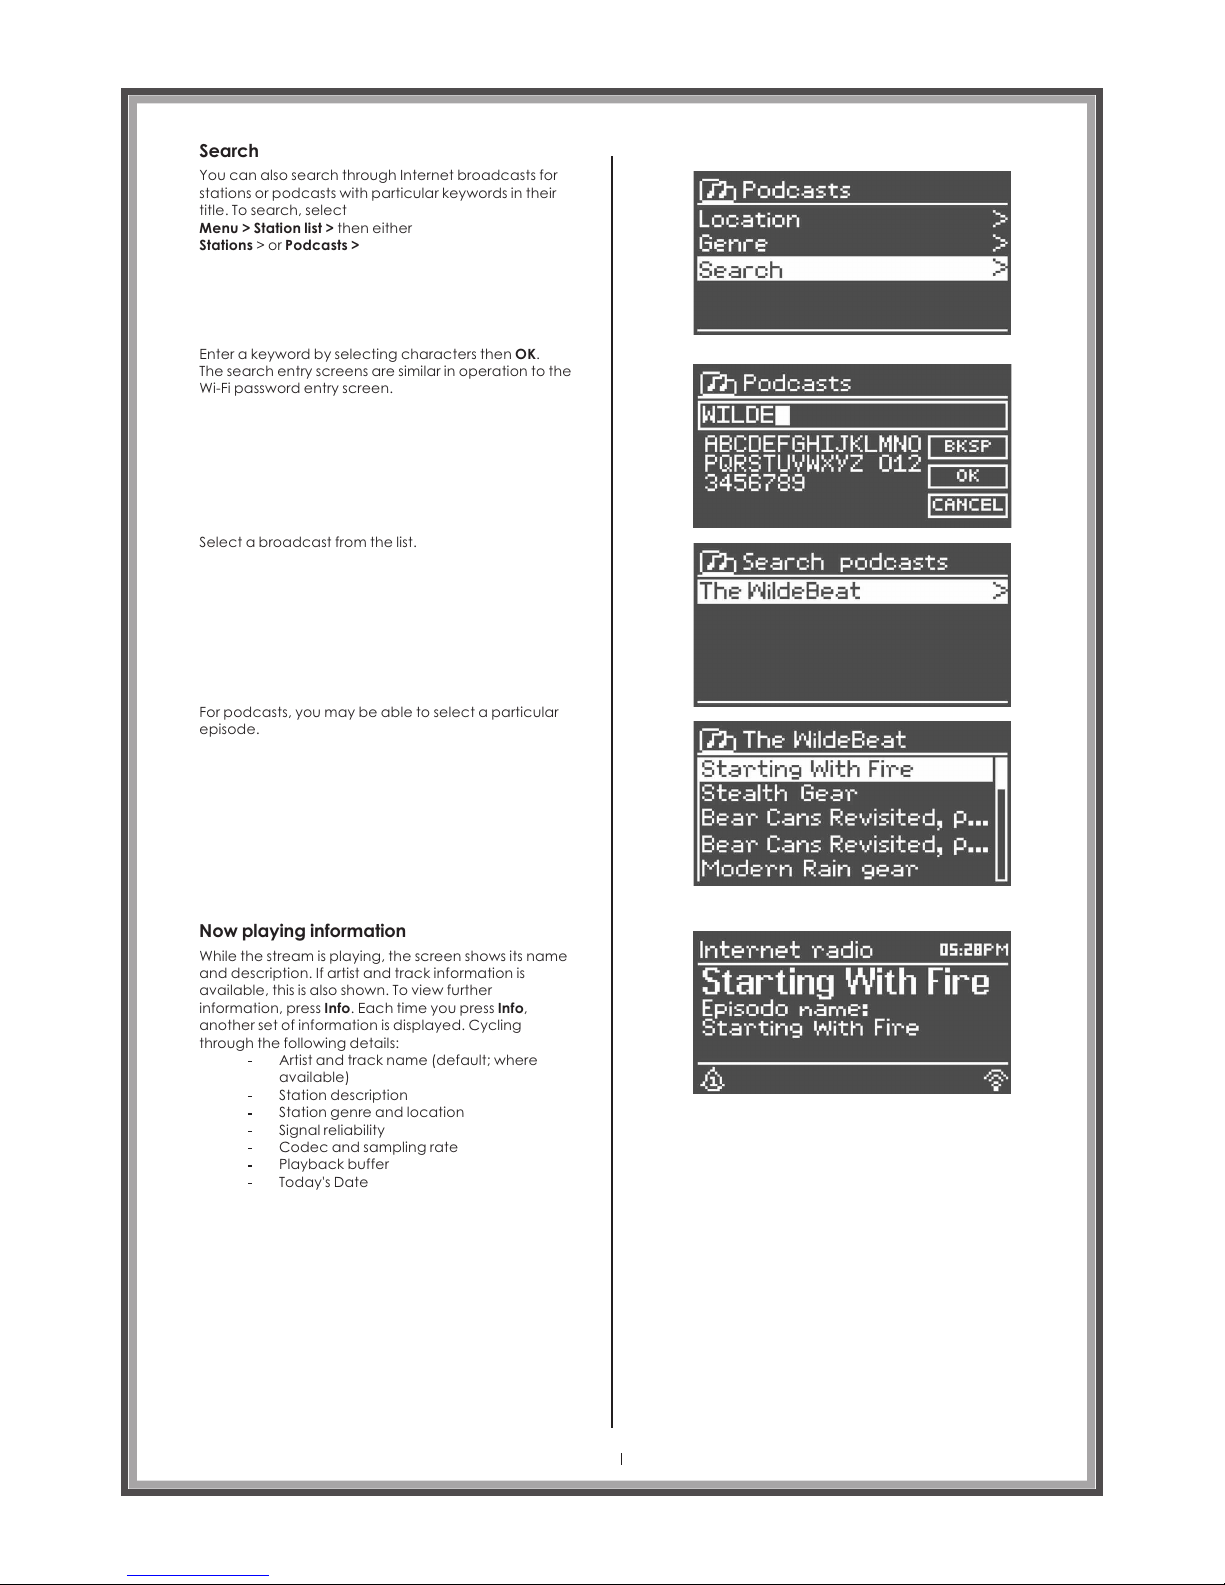
Search
You can also search through Internet broadcasts for
stations or podcasts with particular keywords in their
title. To search, select
Menu > Station list > then either
Stations > or Podcasts >
Enter a keyword by selecting characters then OK.
The search entry screens are similar in operation to the
Wi-Fi password entry screen.
Select a broadcast from the list.
For podcasts, you may be able to select a particular
episode.
While the stream is playing, the screen shows its name
and description. If artist and track information is
available, this is also shown. To view further
information, press Info. Each time you press Info,
another set of information is displayed. Cycling
through the following details:
Now playing information
Artist and track name (default; where
available)
Station description
Station genre and location
Signal reliability
Codec and sampling rate
Playback buffer
Today's Date
Page 25
Page 26
Page 26
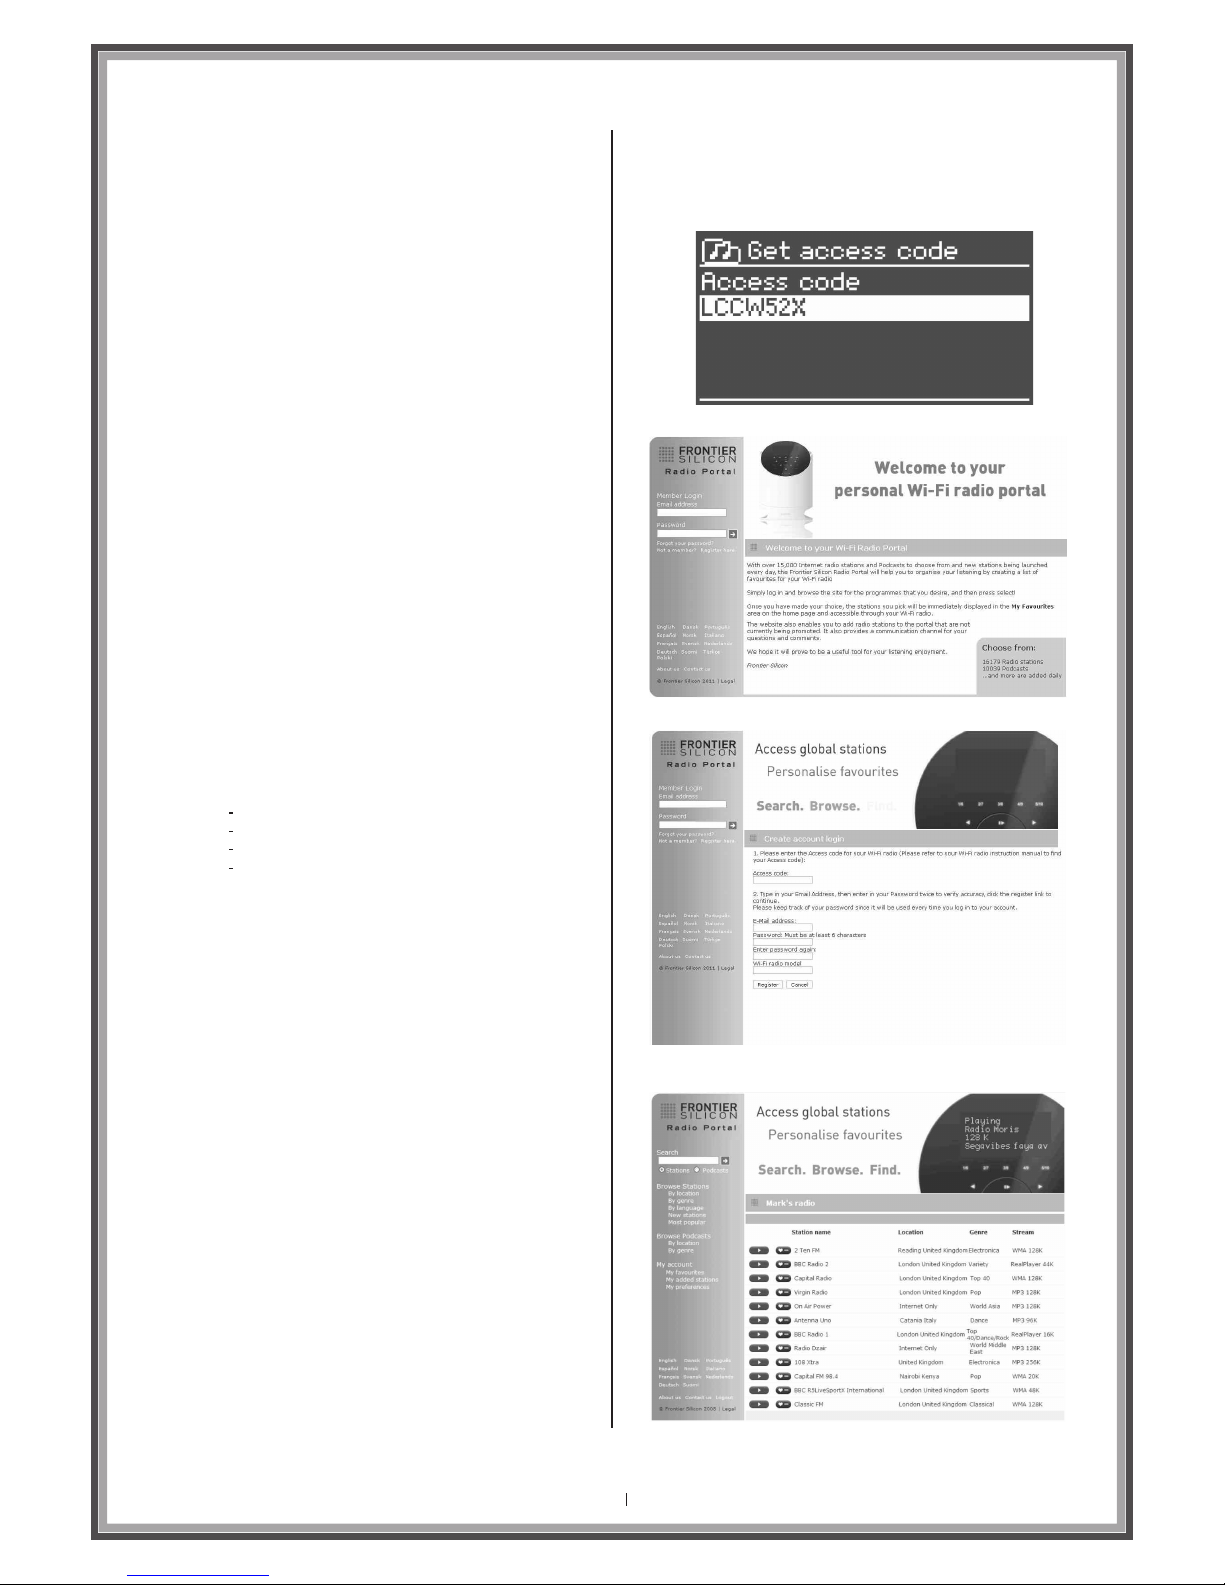
Internet radio portal registration
The Frontier Silicon Internet radio portal website allows
you to organise the 'favourites' lists displayed on your
internet radio devices and also listen to internet radio
directly from a computer.
Using the internet radio portal you can add your own
stations via the portal. These added stations are
accessible from the A 2696 by selecting
Menu > Station list > My added stations > [Station].
To register your with the portal, switch to
Internet radio mode as described in Section 4, and
then obtain your radio's unique portal access code
by selecting
Menu > Station list > Help >Get access code >.
A 2696
Write down the access code.
Note: Do not confuse the portal access code with the
Radio ID (from Menu >System settings > Info.)
Visit the portal website at www.wifiradio-frontier.com.
If this is your first visit to the portal, click register here
below login boxes to register for a new account.
You'll be asked for the following information:
access code
your e-mail address
password
radio model (A 2696)
If you already have an account and wish to add the
A 2696 , log in to your account and select M
preferences > Add another Wi-Fi radio.
y
Once your is registered with the portal, you
can immediately use the Internet radio favourites and
added stations features on the unit.
A 2696
My added stations
Page 27
Page 27
9. Music player mode
(network and USB)
Music Player mode plays a variety of audio file
formats such as MP3, AAC (Apple), WMA (Microsoft)
as well as the completely lossless formats WAV &
FLAC. These can be 'streamed' from a computer on
the local network, or from a USB Flash stick or a hard
drive on the network, known as a NAS drive (Network
attached storage).
To enter Music Player mode, either press Mode until
the display shows Music player, or select
Menu > Main menu > Music player.
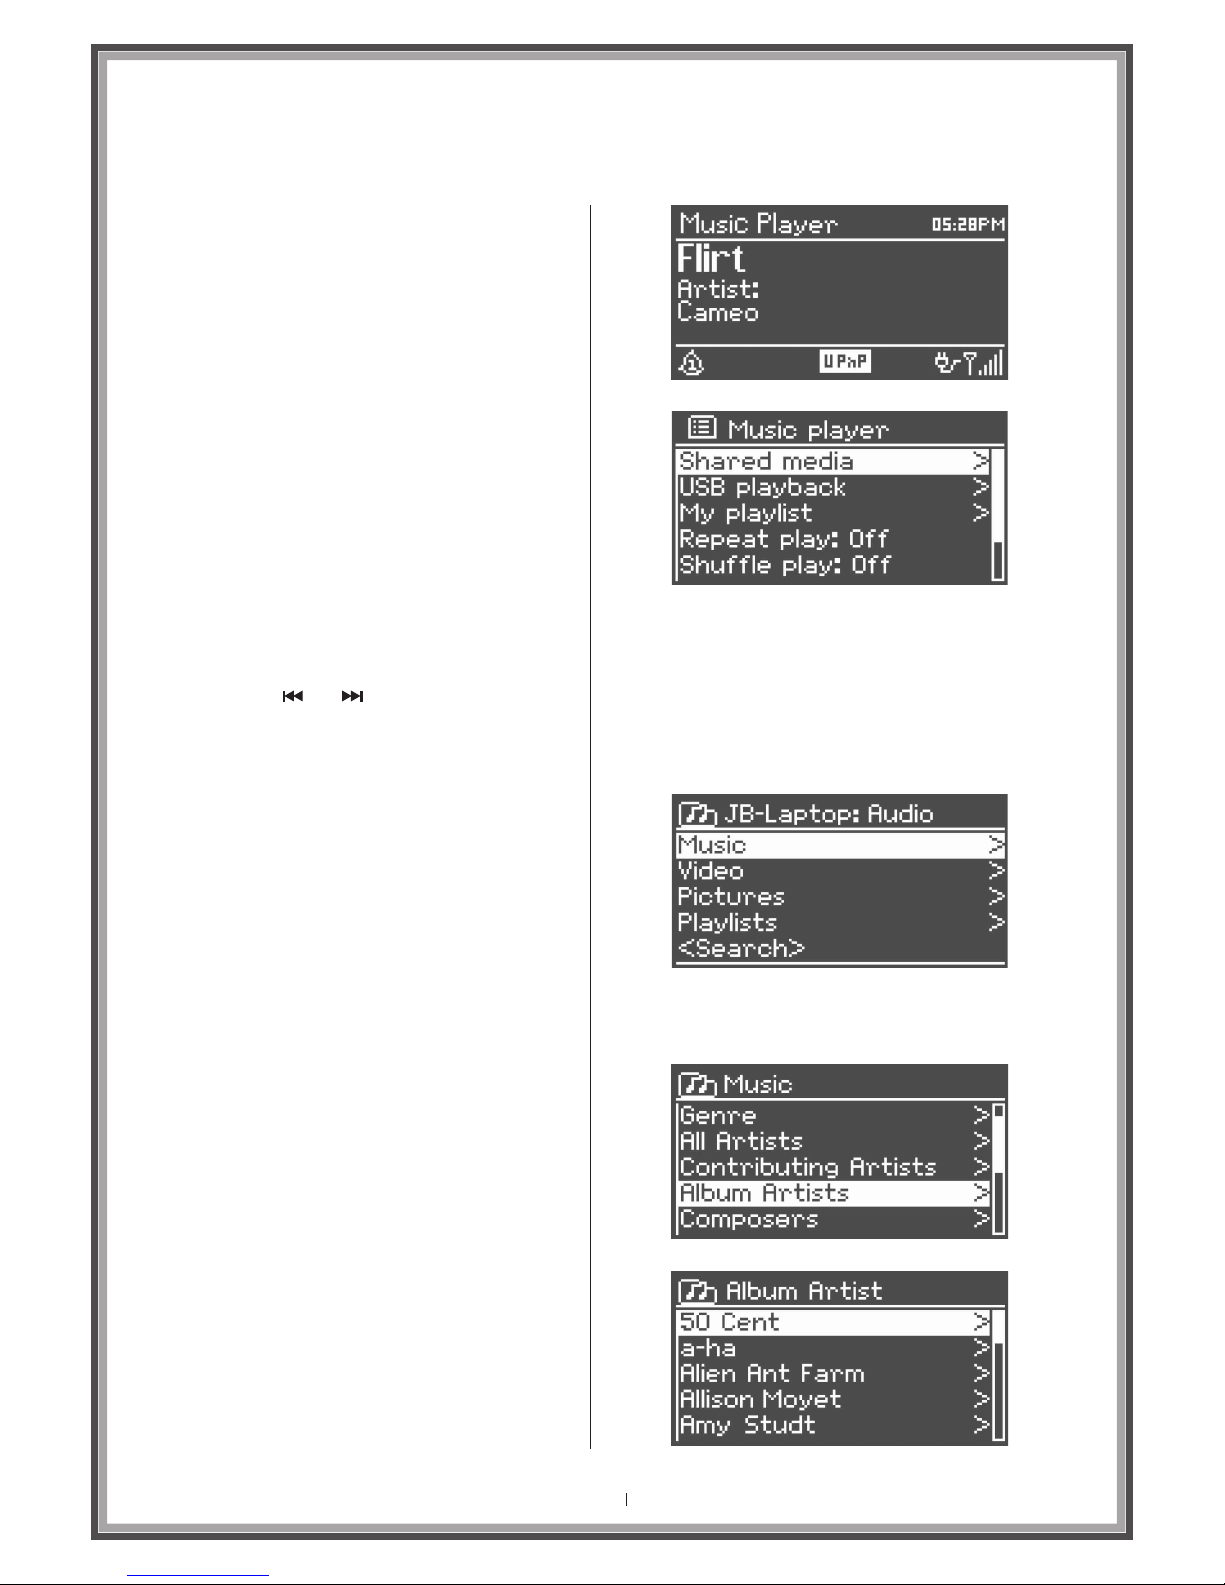
Once in Music Player mode, press Menu , then
select either Shared media or USB playback.
If you are already playing a music file, you can press
Back rather than Menu to quickly return to the last
visited branch of the menu tree.
For example, suppose you were listening to the track
Heat by the artist 50 Cent through browsing shared
media as described in section 5.1 below. Pressing
Back would return you to the track listing for the
album Get Rich or Die Tryin'. Pressing Back again
would list all 50 Cent albums. Pressing Back again
would list all album artists, and so on.
You can use and on the remote or on the
A 2696 itself to move through tracks. Press and hold
to rewind or fast forward and press quickly to select
previous or next track.
Shared media (from UPnP media server)
Select
Menu > Shared media >
If you have set up a music server (as described on
page 20), you should see an entry consisting of
<computer name>: <Shared media name>, for
example JB-Laptop: Audio
If you have more than one computer sharing media,
the alternatives are listed. Select the shared media
you want to play. From this point on, the menus are
generated from the shared media server (typically
Windows Media
Player). The first menu shows a list of media types, for
example Music, Video, Pictures and Playlists. The
A 2696 can only play music and playlists.
There is also a search function, which finds tracks in
a similar way to Internet radio search. (as described
on page 25.)
From Music, there are numerous ways of selecting
tracks, including:
Genre
All Artists
Contributing Artists
Album Artists
Composers
Album
Rating
.
.
.
.
.
.
.
Once you have found a track you want to play, press
Select . A short press plays the track immediately and
a long press adds the track to the playlist. You can
also add entire albums to the playlist. The A 2696
plays either the selected track or the playlist.
Page 28
Wake -on -LAN
If shared media is selected, a list of available
music servers will be displayed. If a question mark
appears before the server name, this indicates
that the server has been seen before and
supports Wake-on-LAN functionality, but cannot
currently be found on the network. If a server with
a question mark is selected by the user, the
device will try to wake the server up and connect
to it. In some instances this may not be possible as
the server may not be connected to the network
any more or may be switched off.
From time to time it may be necessary to remove
servers displaying question marks in front of the
server name from the server list. For example, if
the device is moved to a new network or if a
Wake-on-LAN server is removed from your current
network. To perform this function, go to
Menu > Prune servers > Yes
Prun e ser vers
USB playback
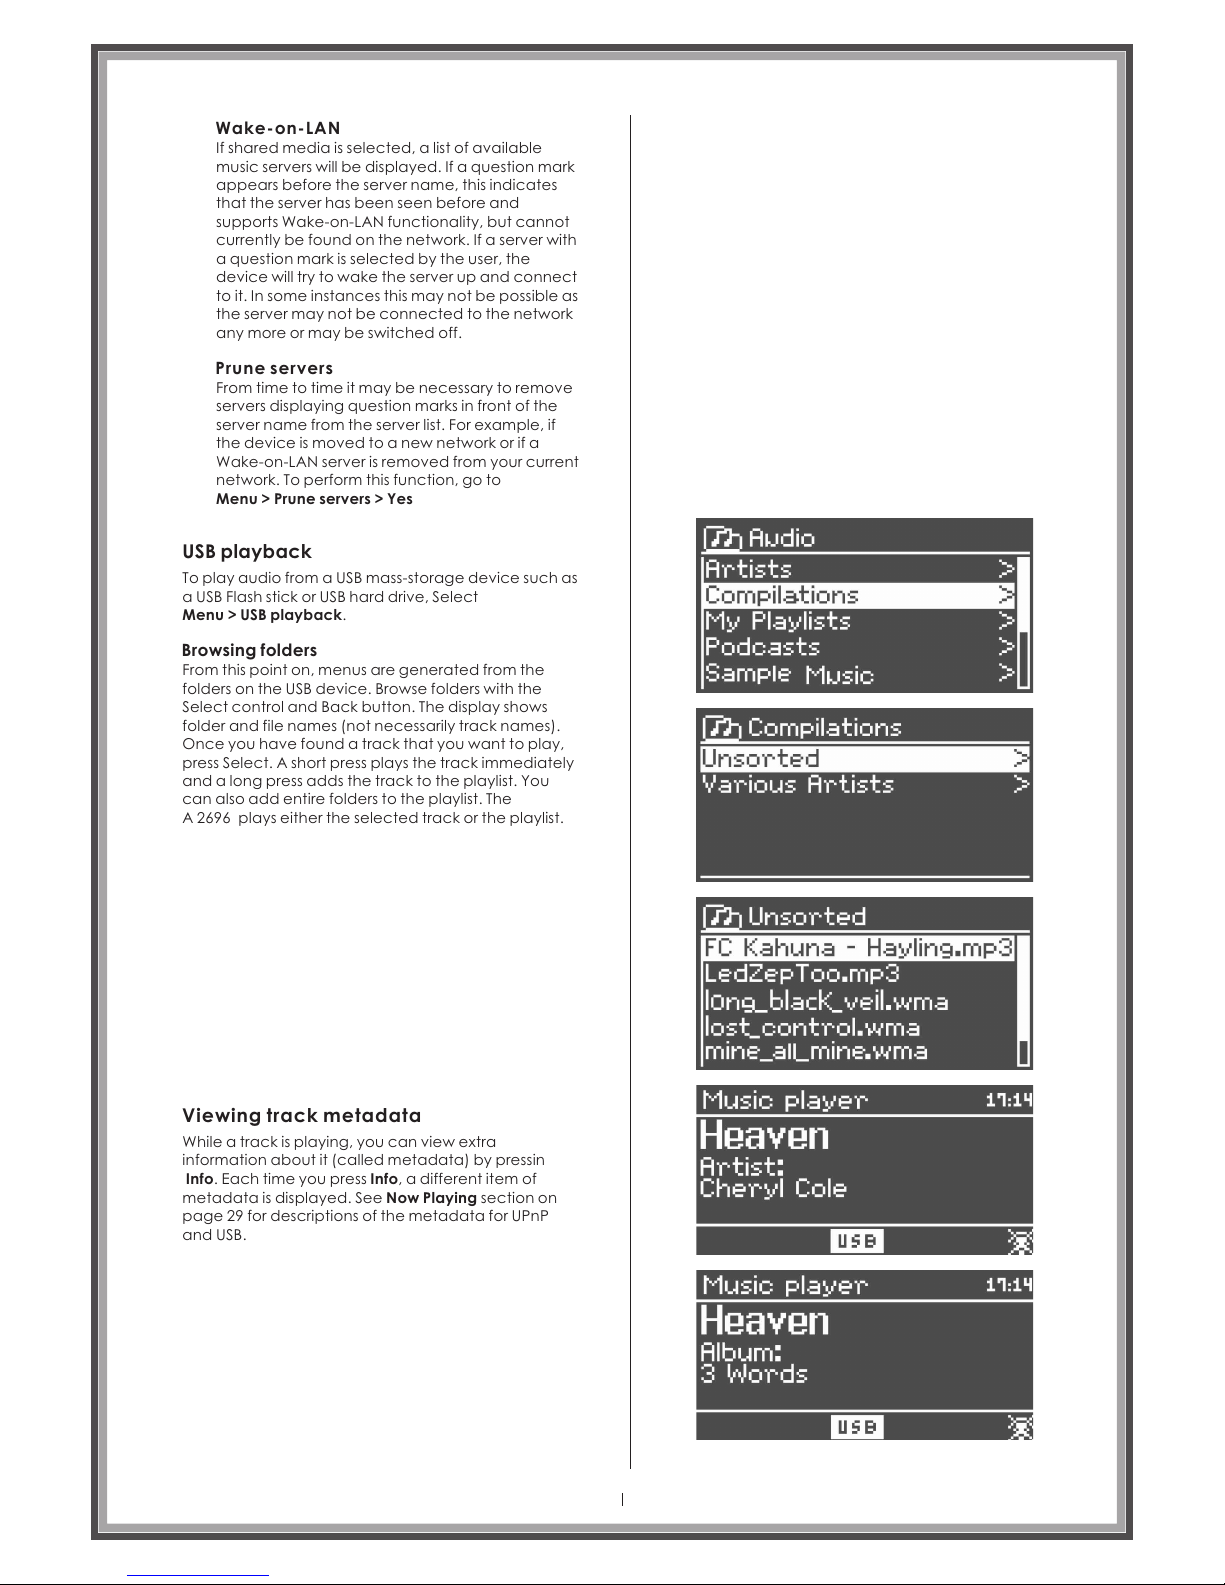
To play audio from a USB mass-storage device such as
a USB Flash stick or USB hard drive, Select
Menu > USB playback.
Browsing folders
From this point on, menus are generated from the
folders on the USB device. Browse folders with the
Select control and Back button. The display shows
folder and file names (not necessarily track names).
Once you have found a track that you want to play,
press Select. A short press plays the track immediately
and a long press adds the track to the playlist. You
can also add entire folders to the playlist. The
A 2696 plays either the selected track or the playlist.
Viewing track metadata
While a track is playing, you can view extra
information about it (called metadata) by pressin
Info. Each time you press Info, a different item of
metadata is displayed. See Now Playing section on
page 29 for descriptions of the metadata for UPnP
and USB.
Page 28
Page 29
Playlist s
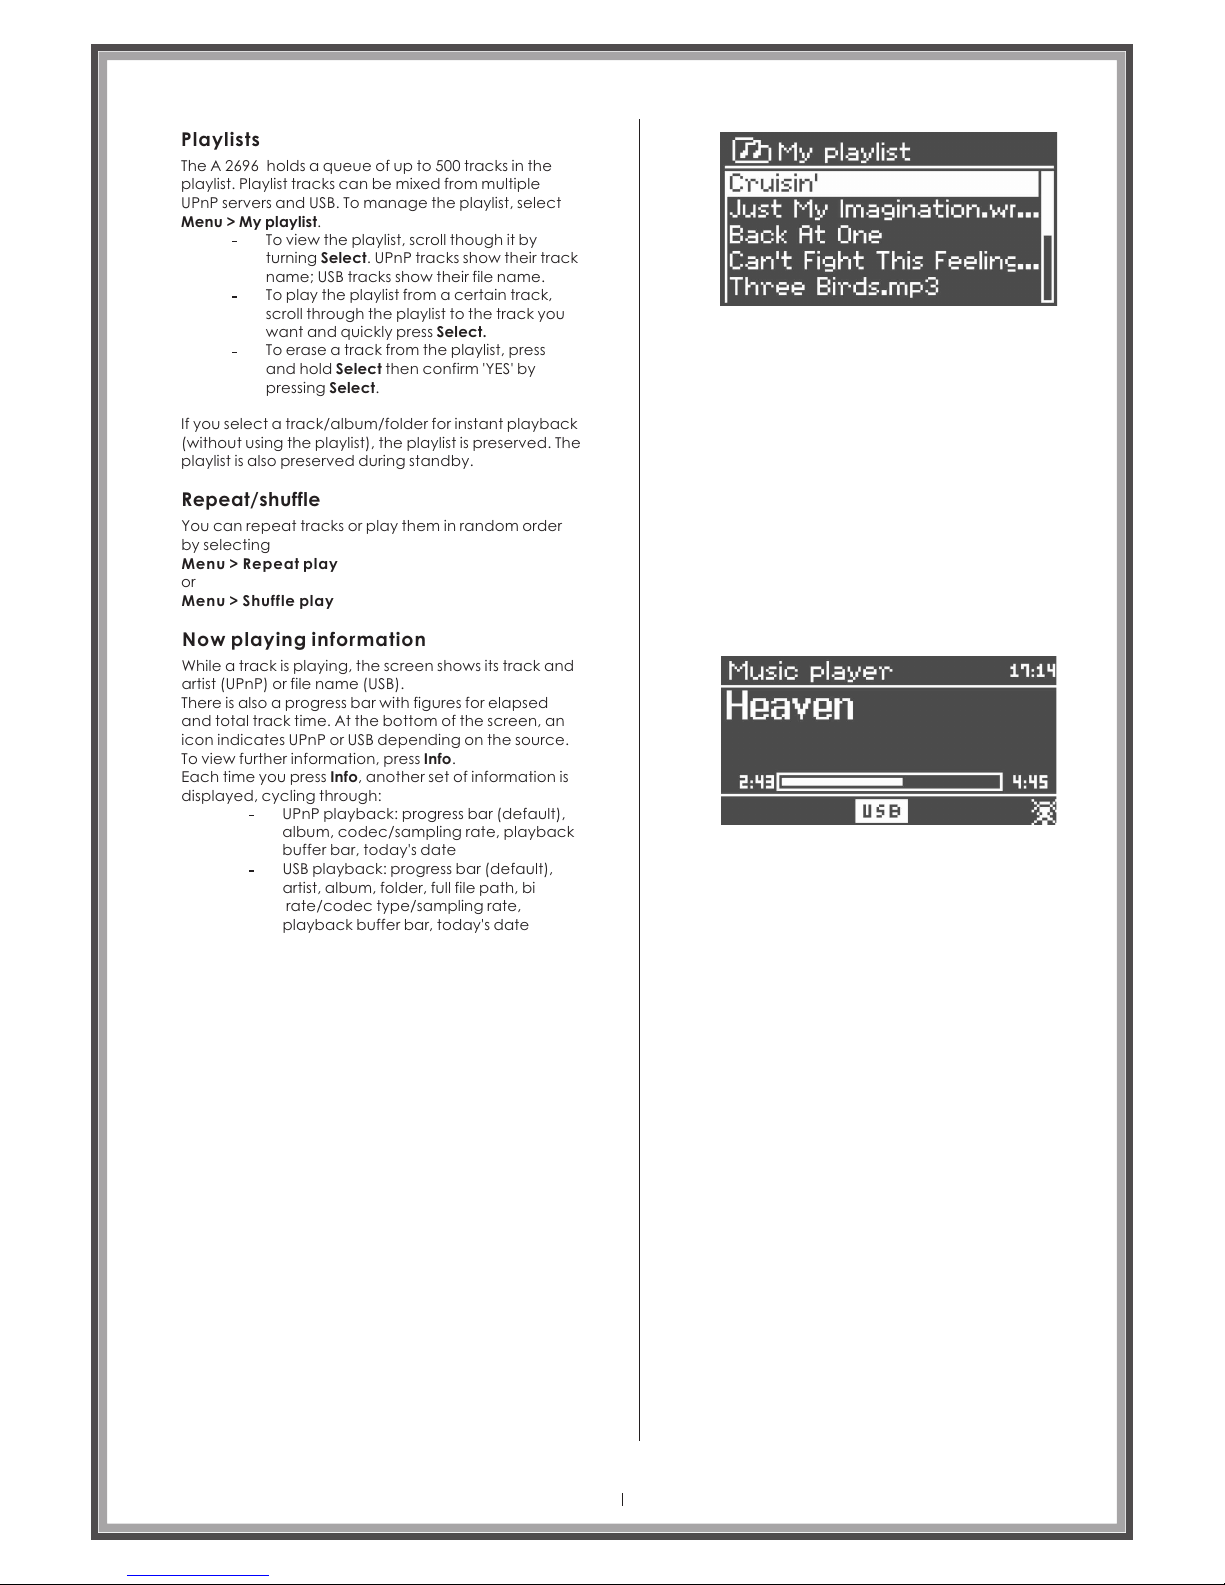
The holds a queue of up to 500 tracks in the
playlist. Playlist tracks can be mixed from multiple
UPnP servers and USB. To manage the playlist, select
Menu > My playlist.
A 2696
To view the playlist, scroll though it by
turning Select. UPnP tracks show their track
name; USB tracks show their file name.
To play the playlist from a certain track,
scroll through the playlist to the track you
want and quickly press Select.
To erase a track from the playlist, press
and hold Select then confirm 'YES' by
pressing Select.
If you select a track/album/folder for instant playback
(without using the playlist), the playlist is preserved. The
playlist is also preserved during standby.
Repeat/shuffle
You can repeat tracks or play them in random order
by selecting
Menu > R ep ea t play
or
Menu > S hu ff le play
Now playin g informatio n
While a track is playing, the screen shows its track and
artist (UPnP) or file name (USB).
There is also a progress bar with figures for elapsed
and total track time. At the bottom of the screen, an
icon indicates UPnP or USB depending on the source.
To view further information, press Info.
Each time you press Info, another set of information is
displayed, cycling through:
UPnP playback: progress bar (default),
album, codec/sampling rate, playback
buffer bar, today's date
USB playback: progress bar (default),
artist, album, folder, full file path, bi
rate/codec type/sampling rate,
playback buffer bar, today's date
Page 29
Page 30
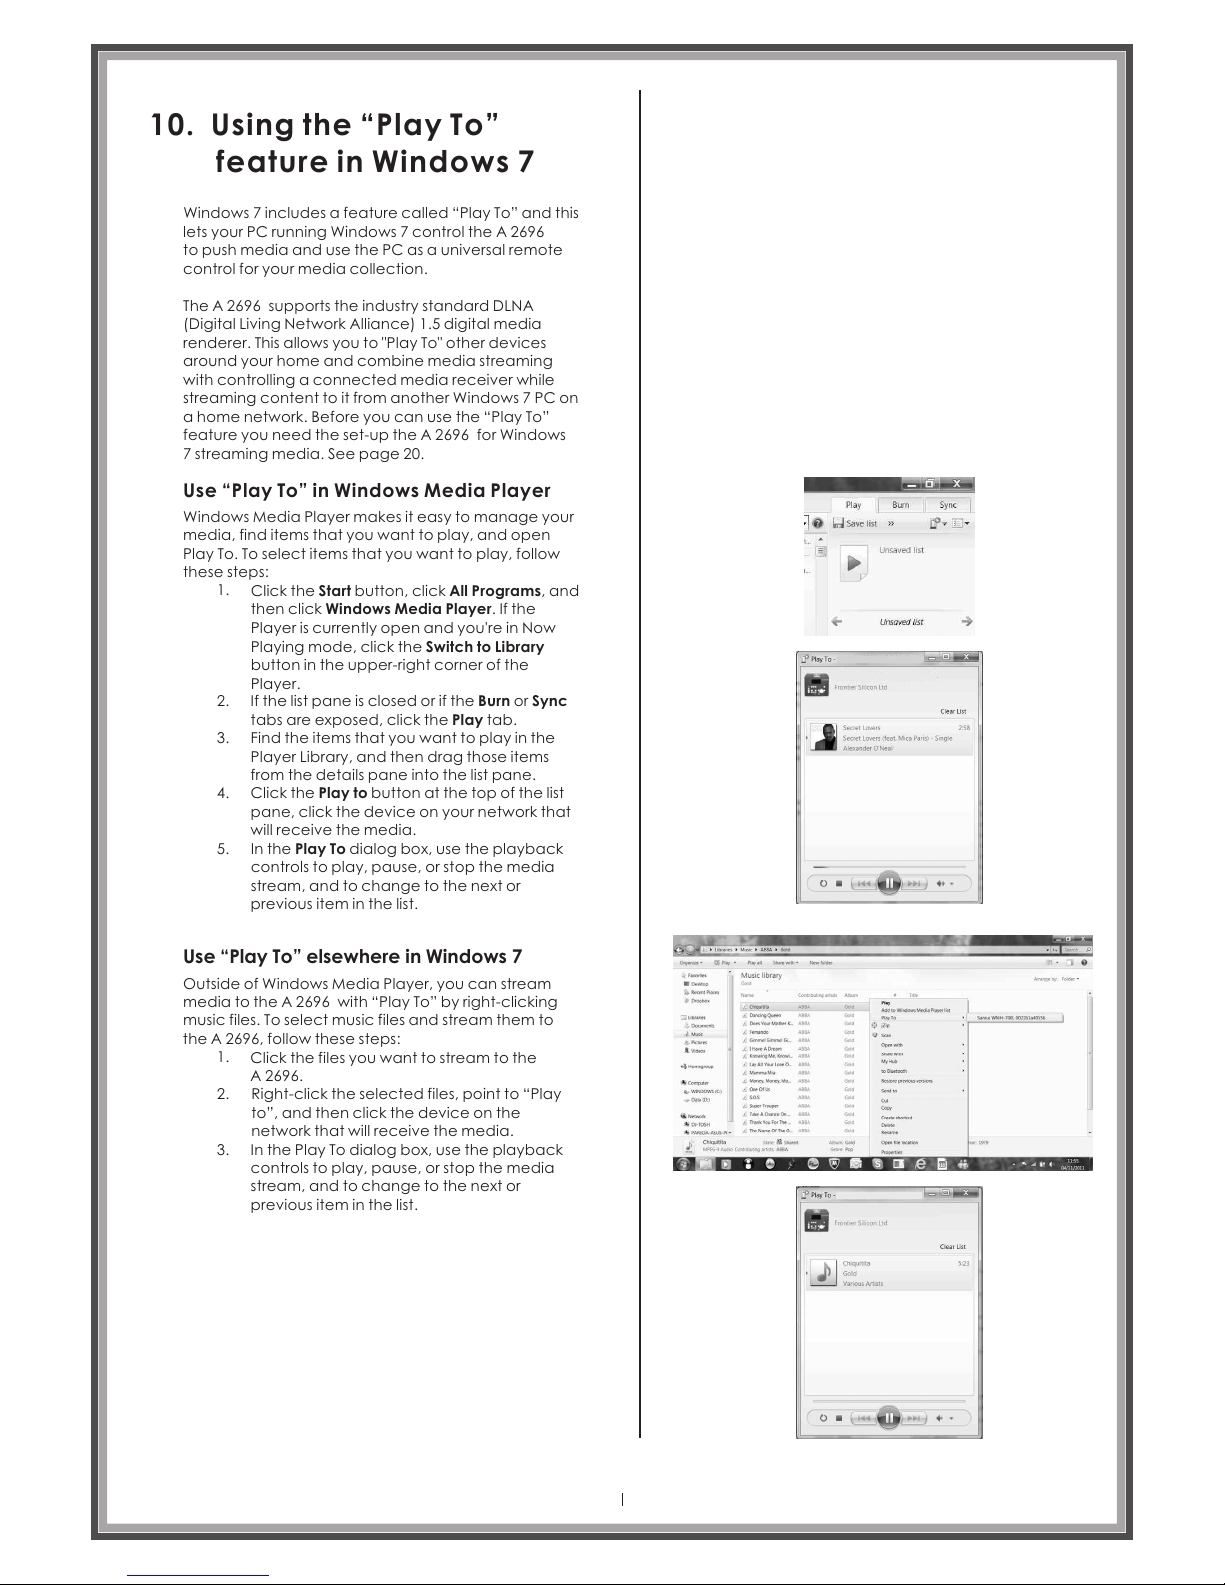
10. Using the “Play To”
feature in Windows 7
Windows 7 includes a feature called “Play To” and this
lets your PC running Windows 7 control the A 2696
to push media and use the PC as a universal remote
control for your media collection.
The supports the industry standard DLNA
(Digital Living Network Alliance) 1.5 digital media
renderer. This allows you to "Play To" other devices
around your home and combine media streaming
with controlling a connected media receiver while
streaming content to it from another Windows 7 PC on
a home network. Before you can use the “Play To”
feature you need the set-up the A 2696 for Windows
7 streaming media. See page 20.
A 2696
Use “Play To” in Windows Media Player
Windows Media Player makes it easy to manage your
media, find items that you want to play, and open
Play To. To select items that you want to play, follow
these steps:
Click the Start button, click All Programs, and
then click Windows Media Player. If the
Player is currently open and you're in Now
Playing mode, click the Switch to Library
button in the upper-right corner of the
Player.
If the list pane is closed or if the Burn or Sync
tabs are exposed, click the Play tab.
Find the items that you want to play in the
Player Library, and then drag those items
from the details pane into the list pane.
Click the Play to button at the top of the list
pane, click the device on your network that
will receive the media.
In the Play To dialog box, use the playback
controls to play, pause, or stop the media
stream, and to change to the next or
previous item in the list.
Use “Play To” elsewhere in Windows 7
Outside of Windows Media Player, you can stream
media to the A 2696 with “Play To” by right-clicking
music files. To select music files and stream them to
the A 2696, follow these steps:
Click the files you want to stream to the
A 2696.
Right-click the selected files, point to “Play
to”, and then click the device on the
network that will receive the media.
In the Play To dialog box, use the playback
controls to play, pause, or stop the media
stream, and to change to the next or
previous item in the list.
1.
2.
3.
1.
2.
3.
4.
5.
Page 30
Opus O ne A 2696
Opus O ne A 2696
Opus O ne A 2696
Opus O ne A 2696
Page 31
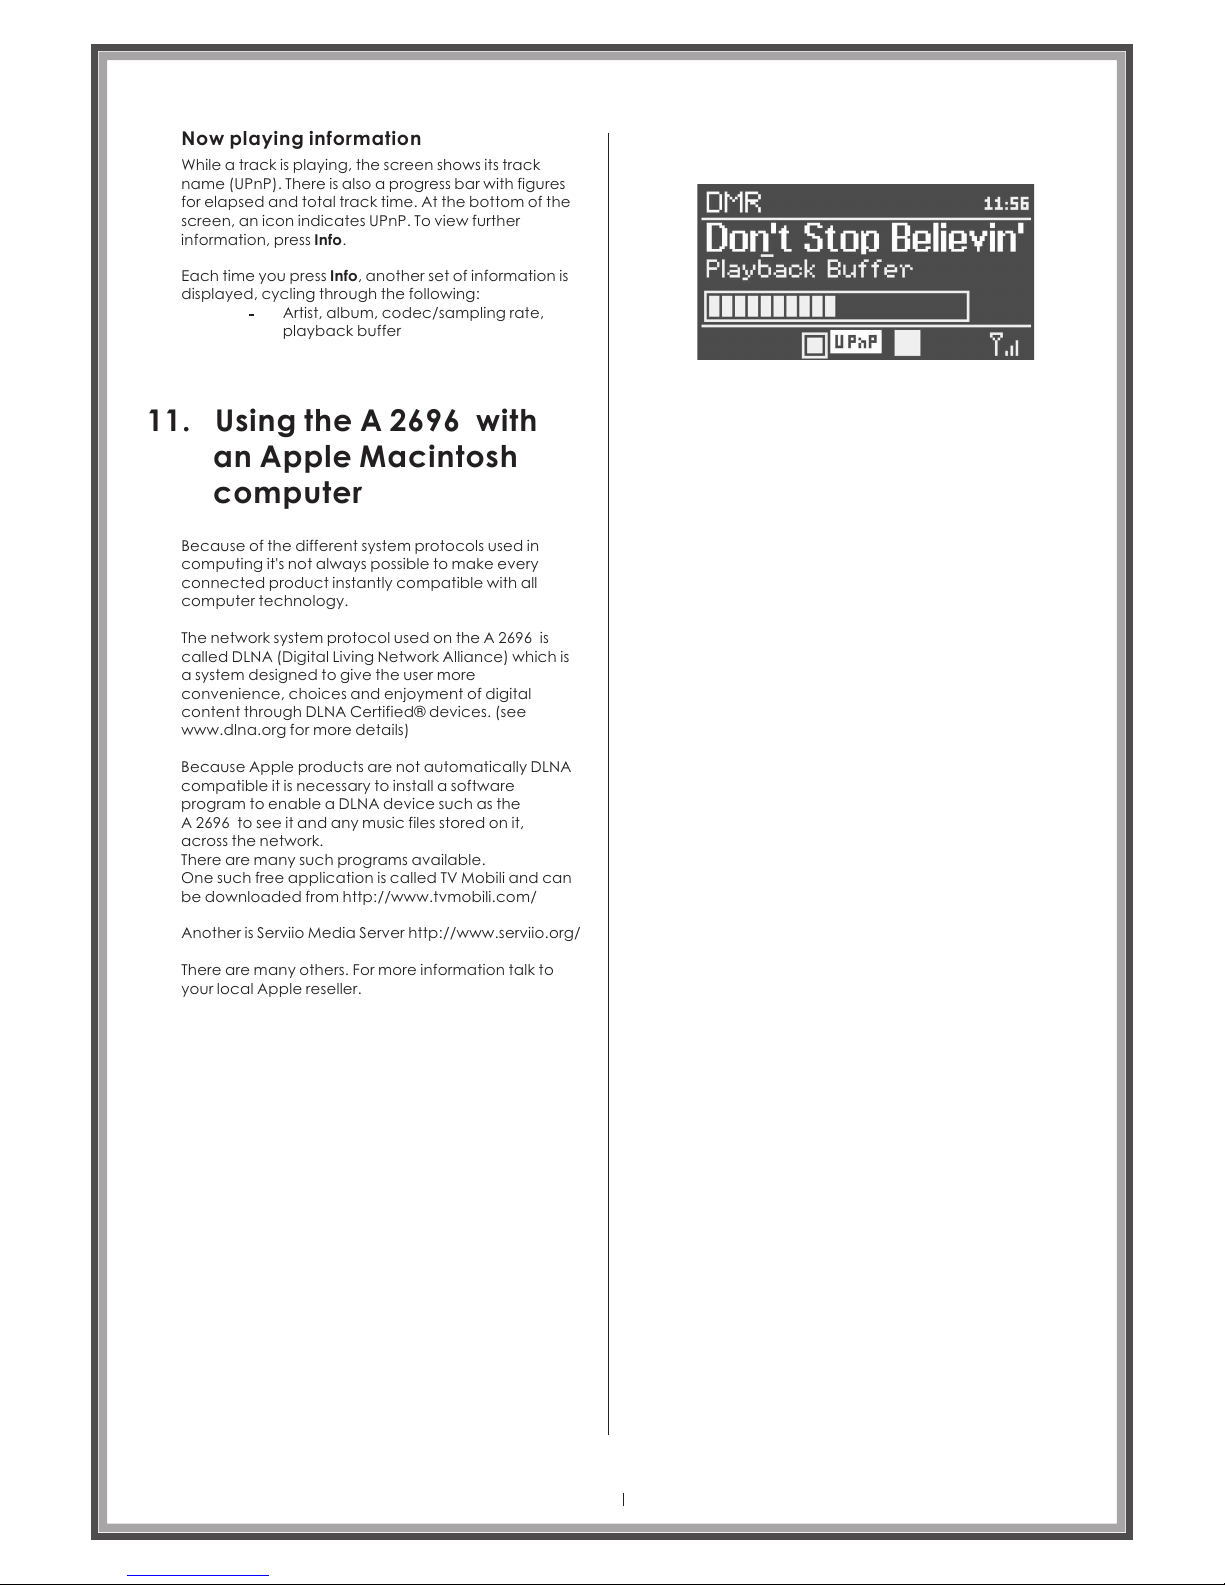
Now playing information
While a track is playing, the screen shows its track
name (UPnP). There is also a progress bar with figures
for elapsed and total track time. At the bottom of the
screen, an icon indicates UPnP. To view further
information, press Info.
Each time you press Info, another set of information is
displayed, cycling through the following:
Artist, album, codec/sampling rate,
playback buffer
11. Using the A 2696 with
an Apple Macintosh
computer
Because of the different system protocols used in
computing it's not always possible to make every
connected product instantly compatible with all
computer technology.
The network system protocol used on the is
called DLNA (Digital Living Network Alliance) which is
a system designed to give the user more
convenience, choices and enjoyment of digital
content through DLNA Certified® devices. (see
www.dlna.org for more details)
A 2696
Because Apple products are not automatically DLNA
compatible it is necessary to install a software
program to enable a DLNA device such as the
A 2696 to see it and any music files stored on it,
across the network.
There are many such programs available.
One such free application is called TV Mobili and can
be downloaded from http://www.tvmobili.com/
Another is Serviio Media Server http://www.serviio.org/
There are many others. For more information talk to
your local Apple reseller.
Page 31
Page 32
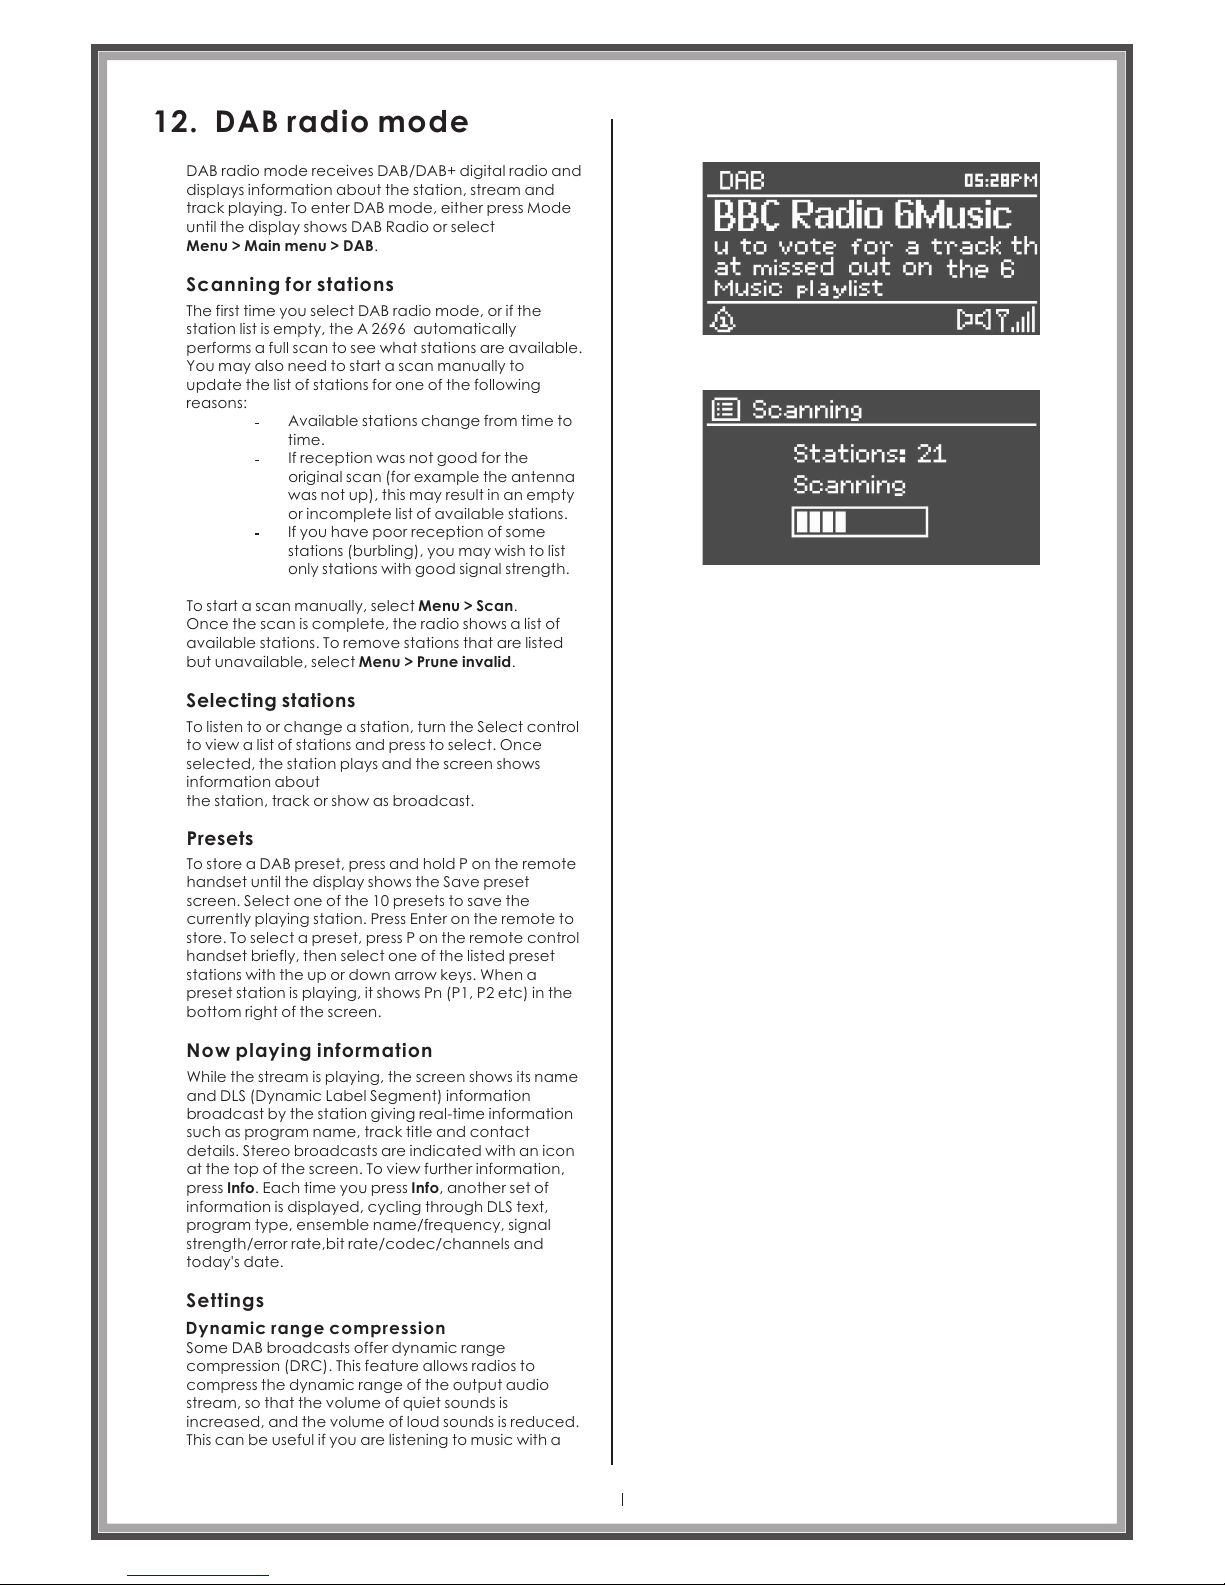
12. DAB radio mode
DAB radio mode receives DAB/DAB+ digital radio and
displays information about the station, stream and
track playing. To enter DAB mode, either press Mode
until the display shows DAB Radio or select
Menu > Main menu > DAB.
Sc anni ng for statio ns
The first time you select DAB radio mode, or if the
station list is empty, the A 2696 automatically
performs a full scan to see what stations are available.
You may also need to start a scan manually to
update the list of stations for one of the following
reasons:
Available stations change from time to
time.
If reception was not good for the
original scan (for example the antenna
was not up), this may result in an empty
or incomplete list of available stations.
If you have poor reception of some
stations (burbling), you may wish to list
only stations with good signal strength.
To start a scan manually, select Menu > Scan.
Once the scan is complete, the radio shows a list of
available stations. To remove stations that are listed
but unavailable, select Menu > Prune invalid.
Selecting stations
To listen to or change a station, turn the Select control
to view a list of stations and press to select. Once
selected, the station plays and the screen shows
information about
the station, track or show as broadcast.
Presets
To store a DAB preset, press and hold P on the remote
handset until the display shows the Save preset
screen. Select one of the 10 presets to save the
currently playing station. Press Enter on the remote to
store. To select a preset, press P on the remote control
handset briefly, then select one of the listed preset
stations with the up or down arrow keys. When a
preset station is playing, it shows Pn (P1, P2 etc) in the
bottom right of the screen.
No w playing inf orma tion
While the stream is playing, the screen shows its name
and DLS (Dynamic Label Segment) information
broadcast by the station giving real-time information
such as program name, track title and contact
details. Stereo broadcasts are indicated with an icon
at the top of the screen. To view further information,
press Info. Each time you press Info, another set of
information is displayed, cycling through DLS text,
program type, ensemble name/frequency, signal
strength/error rate,bit rate/codec/channels and
today's date.
Settings
Dy nam ic ran ge com pres sio n
Some DAB broadcasts offer dynamic range
compression (DRC). This feature allows radios to
compress the dynamic range of the output audio
stream, so that the volume of quiet sounds is
increased, and the volume of loud sounds is reduced.
This can be useful if you are listening to music with a
Page 32
Page 33
high dynamic range in a noisy environment (for
example, classical music while cooking).
To change the DRC of the A 2696, select
Menu > DRC, and then DRC high, DRC low or DRC off.
Note: The A 2696's DRC setting does have any
effect if DRC data is not included in the broadcast.
Stat ion o rder
You can choose the order of the DAB station list to be
either Alphanumeric, Ensemble or Valid. Ensemble lists
groups of stations that are broadcast together on the
same ensemble, for example BBC or South Wales
local. Valid lists valid stations first, alphanumerically,
then off-air stations.
To change station order, select
Menu > Station order > then Alphanumeric, Ensemble
or Valid.
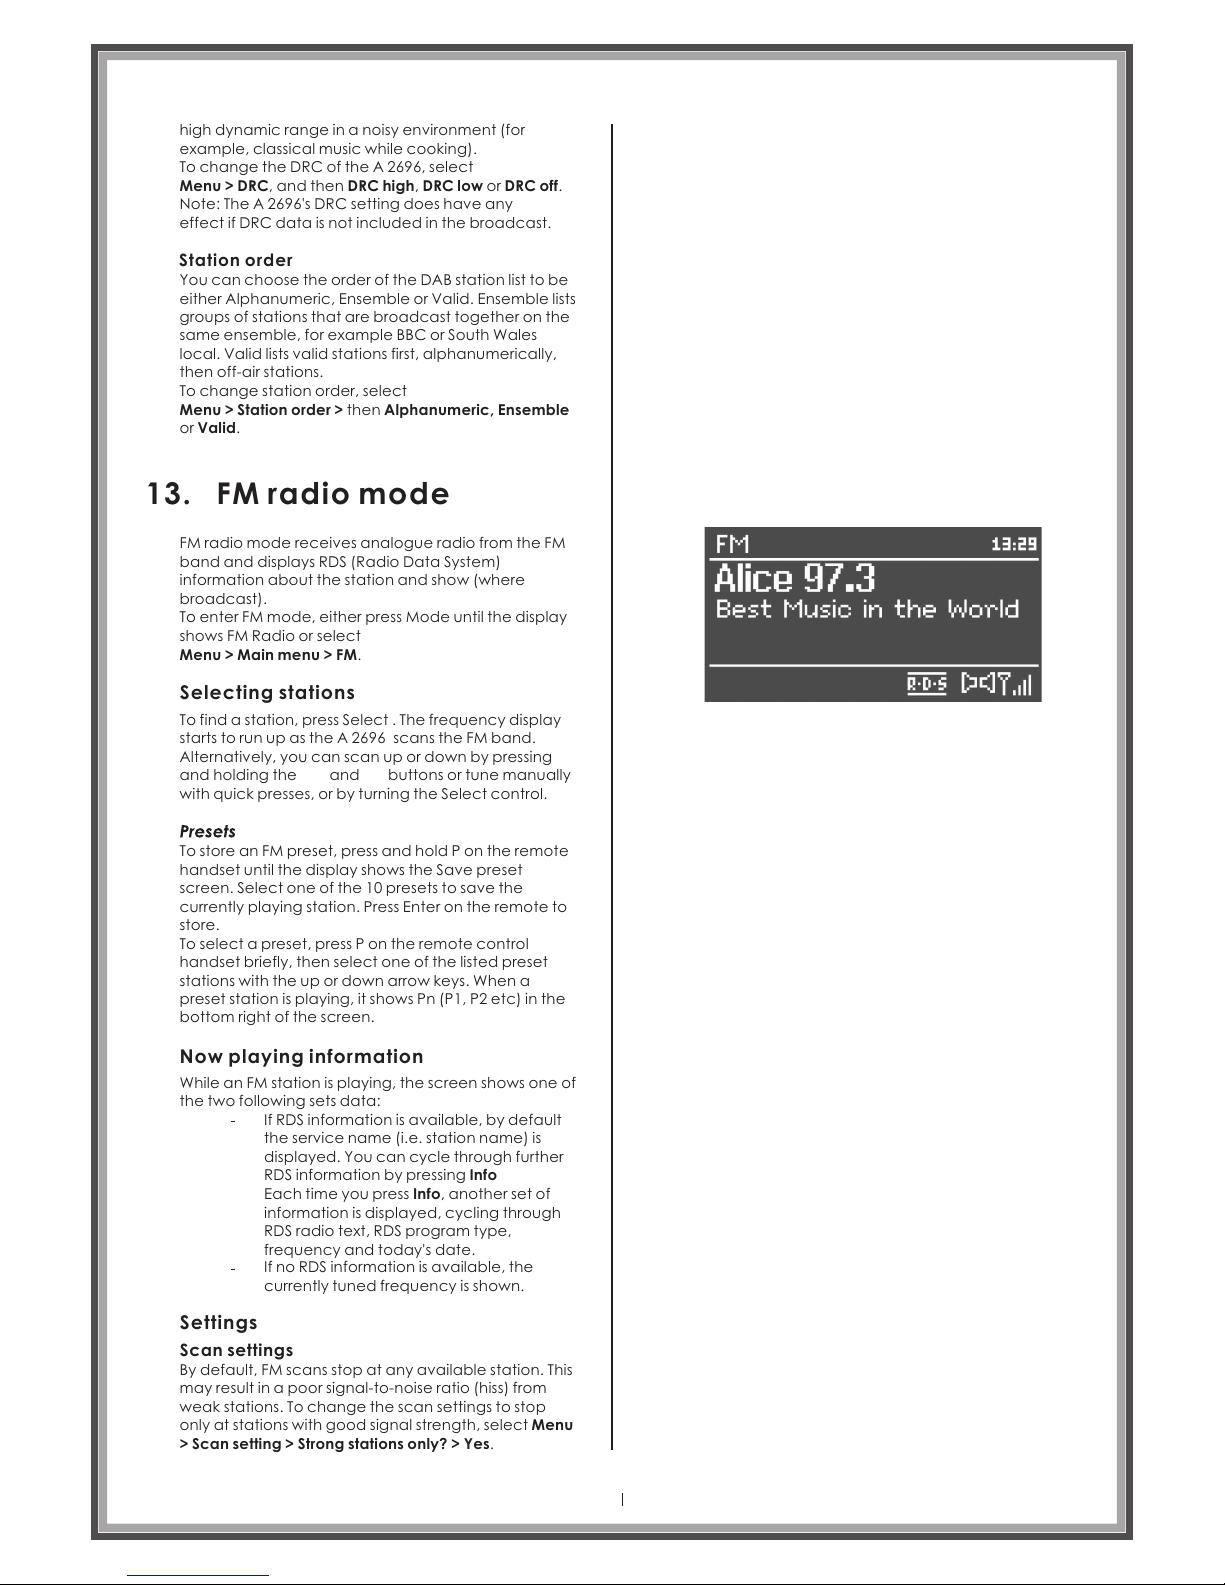
13. FM radio mode
FM radio mode receives analogue radio from the FM
band and displays RDS (Radio Data System)
information about the station and show (where
broadcast).
To enter FM mode, either press Mode until the display
shows FM Radio or select
Menu > Main menu > FM.
Selecting stations
To find a station, press Select . The frequency display
starts to run up as the A 2696 scans the FM band.
Alternatively, you can scan up or down by pressing
and holding the and buttons or tune manually
with quick presses, or by turning the Select control.
To store an FM preset, press and hold P on the remote
handset until the display shows the Save preset
screen. Select one of the 10 presets to save the
currently playing station. Press Enter on the remote to
store.
To select a preset, press P on the remote control
handset briefly, then select one of the listed preset
stations with the up or down arrow keys. When a
preset station is playing, it shows Pn (P1, P2 etc) in the
bottom right of the screen.
Now playin g informatio n
While an FM station is playing, the screen shows one of
the two following sets data:
If RDS information is available, by default
the service name (i.e. station name) is
displayed. You can cycle through further
RDS information by pressing Info
Each time you press Info, another set of
information is displayed, cycling through
RDS radio text, RDS program type,
frequency and today's date.
If no RDS information is available, the
currently tuned frequency is shown.
Settings
Scan settings
By default, FM scans stop at any available station. This
may result in a poor signal-to-noise ratio (hiss) from
weak stations. To change the scan settings to stop
only at stations with good signal strength, select Menu
> Scan setting > Strong stations only? > Yes.
Page 33
Page 34
Audi o set tings
By default, all stereo stations are reproduced in stereo.
For weak stations, this may result in a poor signal-to
noise ratio (hiss). To play weak stations in mono, select
Menu > Audio setting > FM weak reception: Listen in
mono only > Yes.
Page 34
Page 35
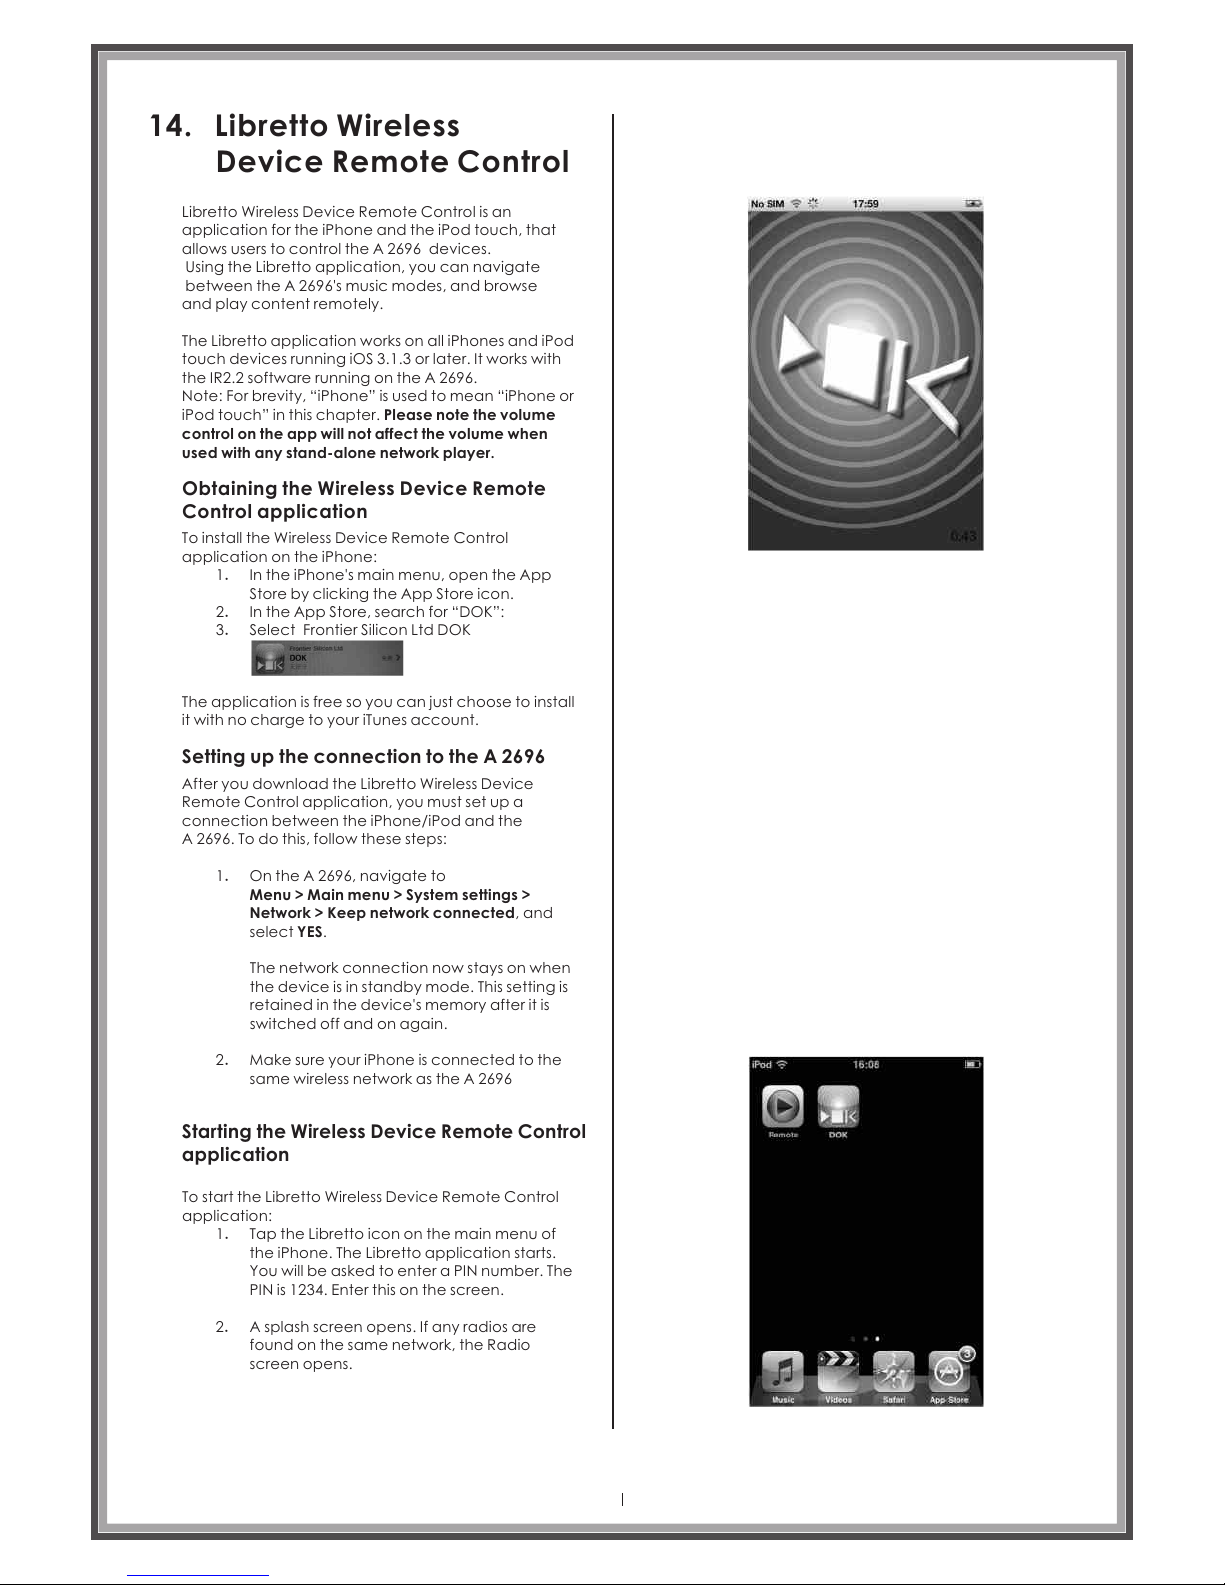
14. Libretto Wireless
Device Remote Control
Libretto Wireless Device Remote Control is an
application for the iPhone and the iPod touch, that
allows users to control the A 2696 devices.
Using the Libretto application, you can navigate
between the A 2696's music modes, and browse
and play content remotely.
The Libretto application works on all iPhones and iPod
touch devices running iOS 3.1.3 or later. It works with
the IR2.2 software running on the A 2696.
Note: For brevity, “iPhone” is used to mean “iPhone or
iPod touch” in this chapter. Please note the volume
control on the app will not affect the volume when
used with any stand-alone network player.
Obtaining the Wireless Device Remote
Control application
To install the Wireless Device Remote Control
application on the iPhone:
In the iPhone's main menu, open the App
Store by clicking the App Store icon.
In the App Store, search for “DOK”:
Select Frontier Silicon Ltd DOK
The application is free so you can just choose to install
it with no charge to your iTunes account.
Setting up the connection to the A 2696
After you download the Libretto Wireless Device
Remote Control application, you must set up a
connection between the iPhone/iPod and the
A 2696. To do this, follow these steps:
On the A 2696, navigate to
Menu > Main menu > System settings >
Network > Keep network connected, and
select YES.
The network connection now stays on when
the device is in standby mode. This setting is
retained in the device's memory after it is
switched off and on again.
Make sure your iPhone is connected to the
same wireless network as the A 2696
Starting the Wireless Device Remote Control
application
To start the Libretto Wireless Device Remote Control
application:
Tap the Libretto icon on the main menu of
the iPhone. The Libretto application starts.
You will be asked to enter a PIN number. The
PIN is 1234. Enter this on the screen.
A splash screen opens. If any radios are
found on the same network, the Radio
screen opens.
1.
2.
1.
2.
1.
2.
3.
Page 35
Page 36
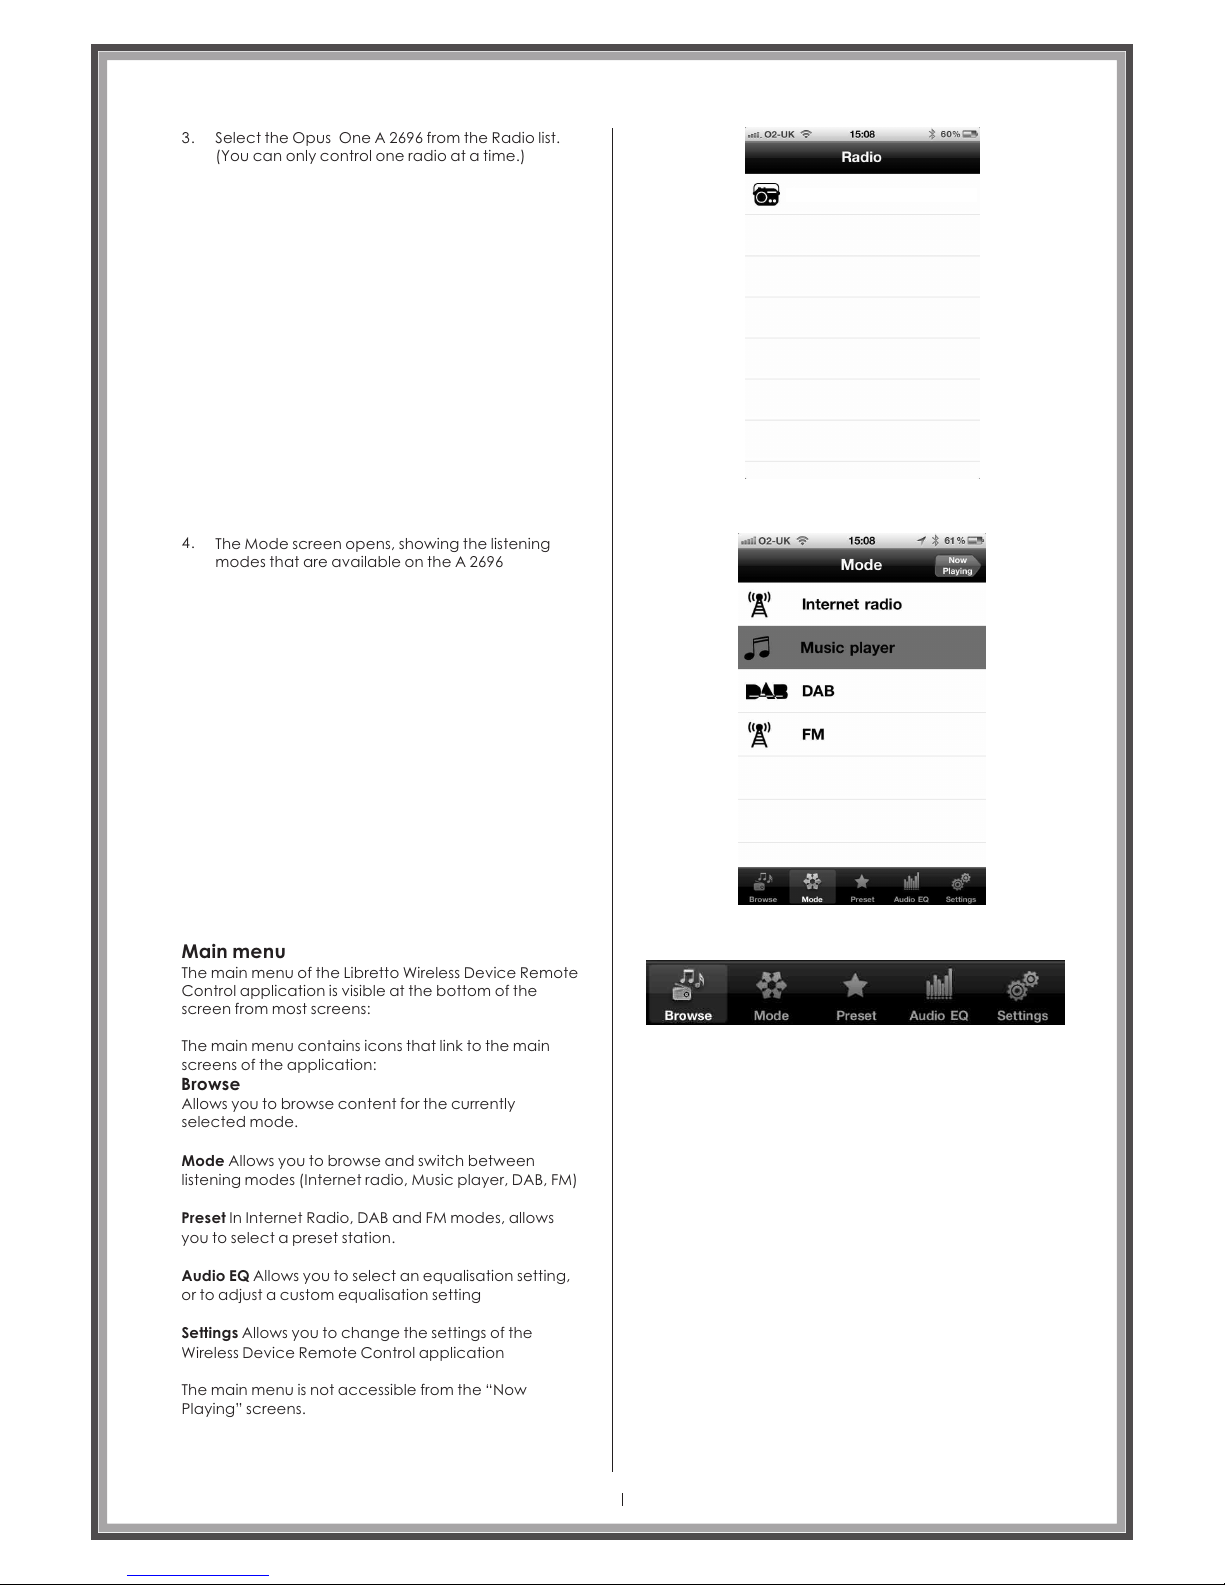
Select the Opus One from the Radio list.
(You can only control one radio at a time.)
A 2696
3.
4.
The Mode screen opens, showing the listening
modes that are available on the A 2696
Main menu
The main menu of the Libretto Wireless Device Remote
Control application is visible at the bottom of the
screen from most screens:
The main menu contains icons that link to the main
screens of the application:
Browse
Allows you to browse content for the currently
selected mode.
Mode Allows you to browse and switch between
listening modes (Internet radio, Music player, DAB, FM)
Preset In Internet Radio, DAB and FM modes, allows
you to select a preset station.
Audio EQ Allows you to select an equalisation setting,
or to adjust a custom equalisation setting
Settings Allows you to change the settings of the
Wireless Device Remote Control application
The main menu is not accessible from the “Now
Playing” screens.
Page 36
Opu s One A 2696
Page 37
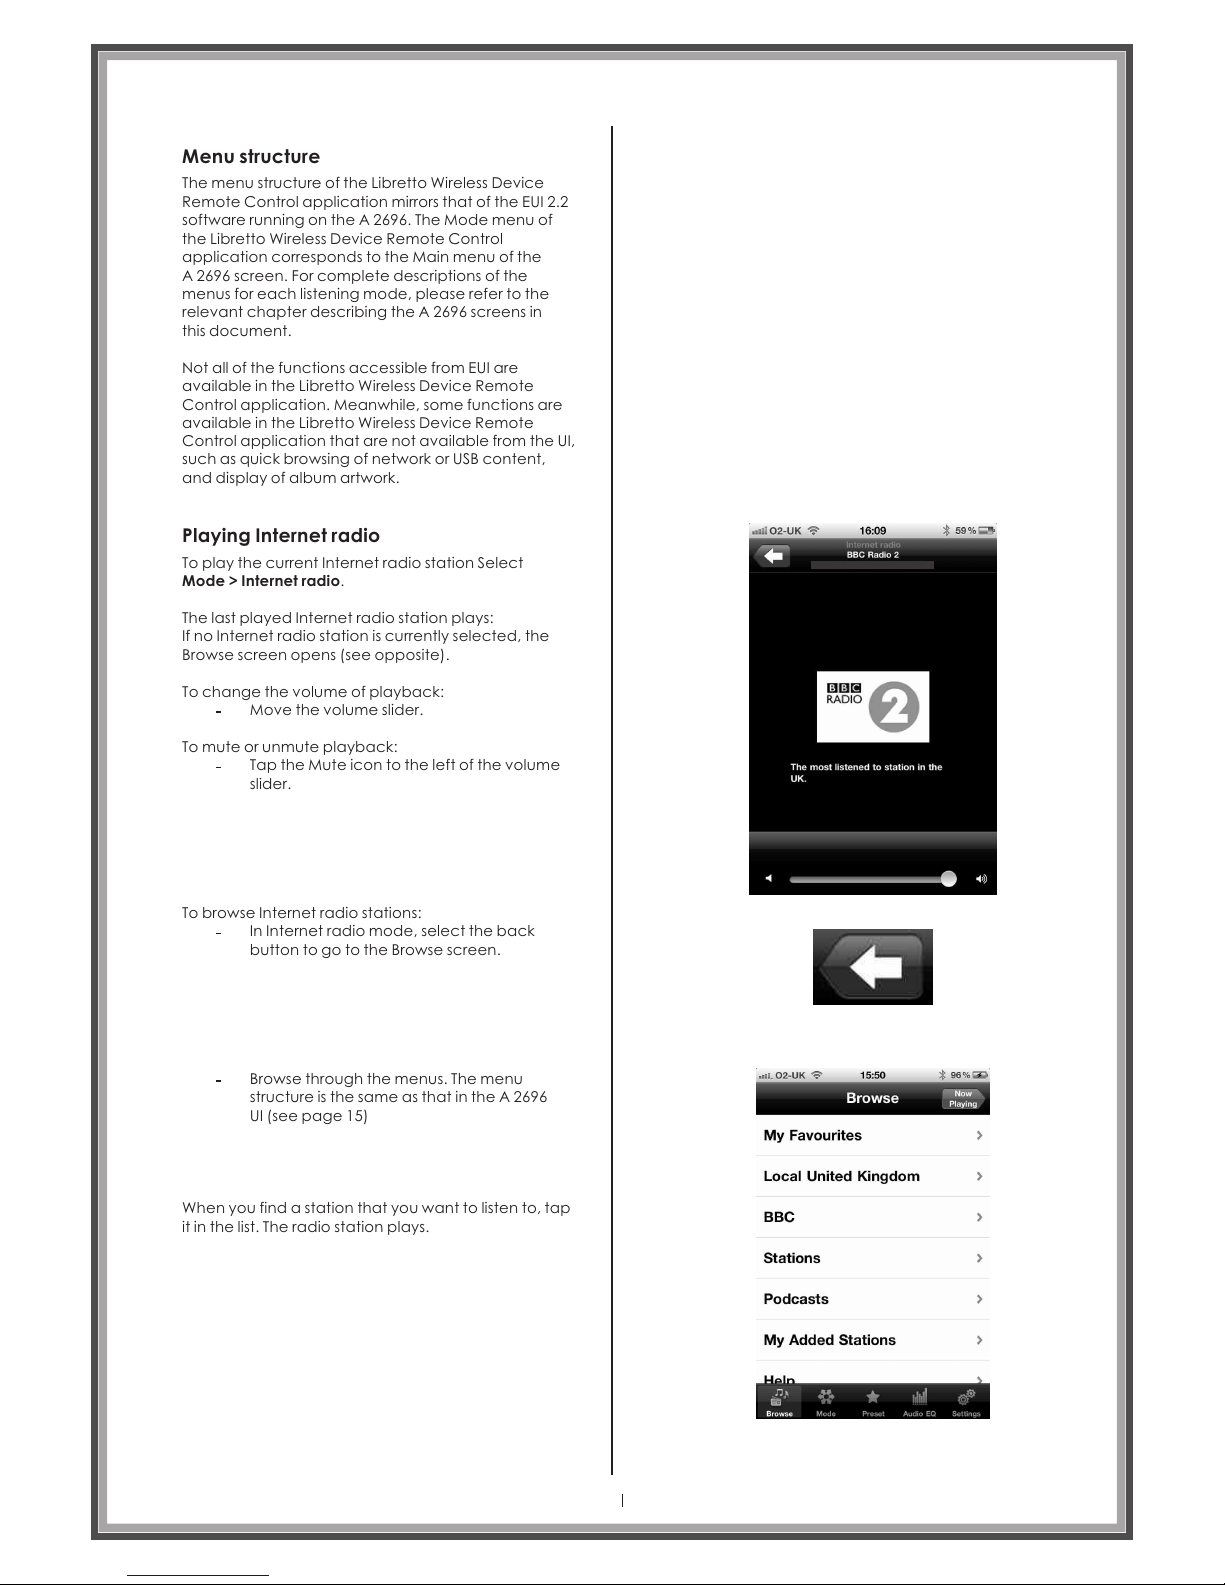
Menu structure
The menu structure of the Libretto Wireless Device
Remote Control application mirrors that of the EUI 2.2
software running on the A 2696. The Mode menu of
the Libretto Wireless Device Remote Control
application corresponds to the Main menu of the
A 2696 screen. For complete descriptions of the
menus for each listening mode, please refer to the
relevant chapter describing the A 2696 screens in
this document.
Not all of the functions accessible from EUI are
available in the Libretto Wireless Device Remote
Control application. Meanwhile, some functions are
available in the Libretto Wireless Device Remote
Control application that are not available from the UI,
such as quick browsing of network or USB content,
and display of album artwork.
Playing Internet radio
To play the current Internet radio station Select
Mode > Internet radio.
The last played Internet radio station plays:
If no Internet radio station is currently selected, the
Browse screen opens (see opposite).
To change the volume of playback:
To mute or unmute playback:
Move the volume slider.
Tap the Mute icon to the left of the volume
slider.
To browse Internet radio stations:
In Internet radio mode, select the back
button to go to the Browse screen.
Browse through the menus. The menu
structure is the same as that in the A 2696
UI (see page 15)
When you find a station that you want to listen to, tap
it in the list. The radio station plays.
Page 37
Opus O ne A 2696
Page 38
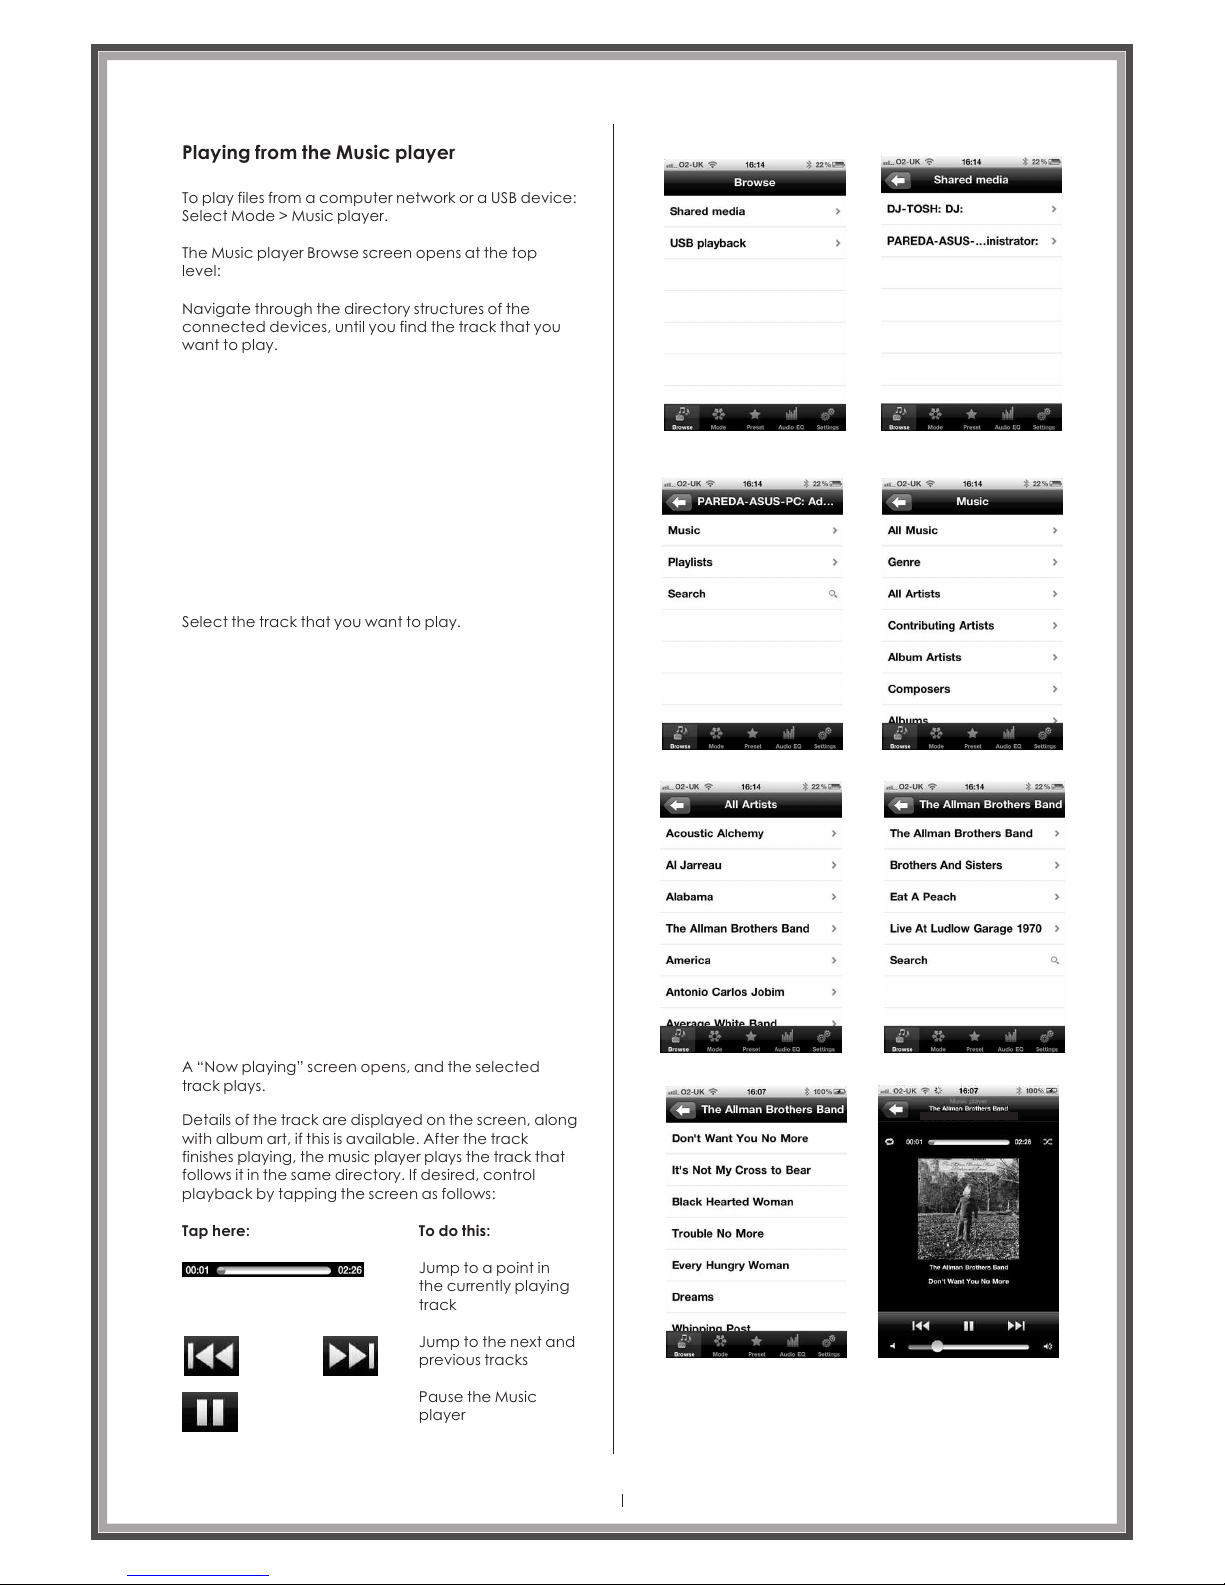
Playing from the Music player
To play files from a computer network or a USB device:
Select Mode > Music player.
The Music player Browse screen opens at the top
level:
Navigate through the directory structures of the
connected devices, until you find the track that you
want to play.
Select the track that you want to play.
A “Now playing” screen opens, and the selected
track plays.
Details of the track are displayed on the screen, along
with album art, if this is available. After the track
finishes playing, the music player plays the track that
follows it in the same directory. If desired, control
playback by tapping the screen as follows:
Tap here:
To do this:
Jump to a point in
the currently playing
track
Jump to the next and
previous tracks
Pause the Music
player
Page 38
Opus O ne A 2696
Page 39
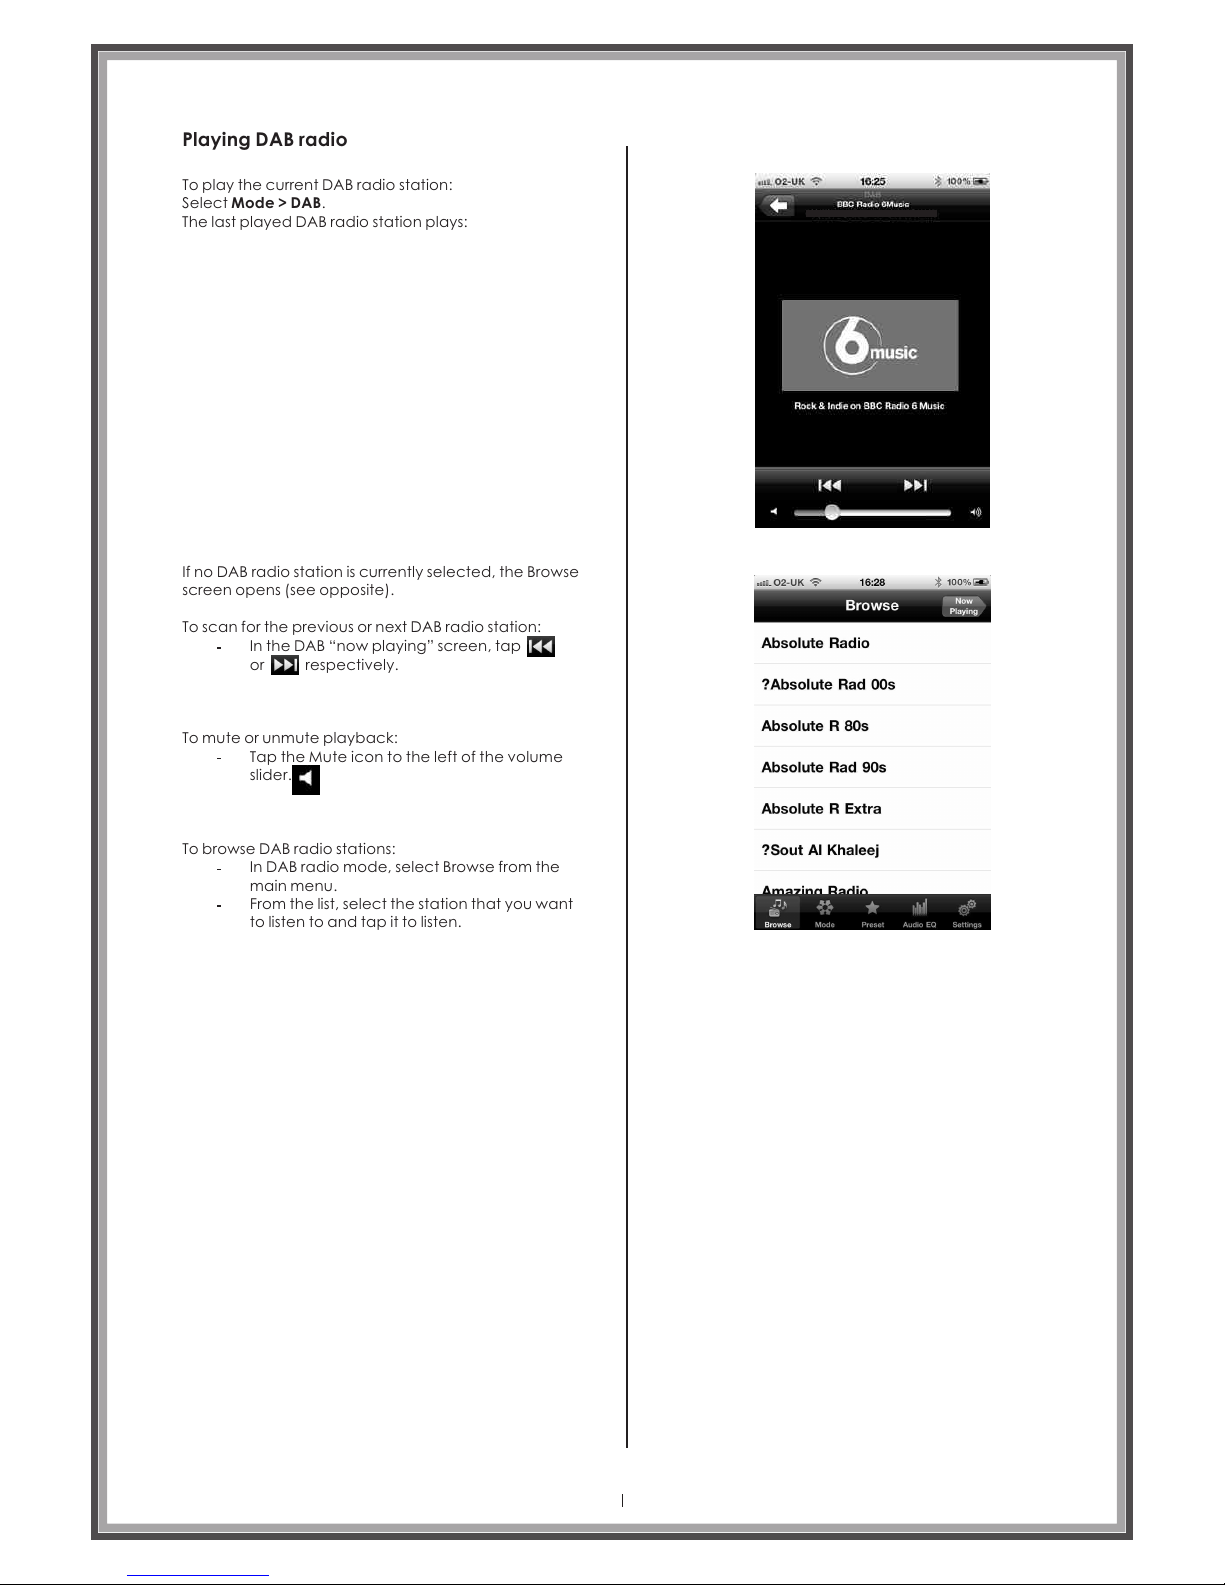
Playing DAB radio
To play the current DAB radio station:
Select Mode > DAB.
The last played DAB radio station plays:
If no DAB radio station is currently selected, the Browse
screen opens (see opposite).
To scan for the previous or next DAB radio station:
In the DAB “now playing” screen, tap
or respectively.
To mute or unmute playback:
Tap the Mute icon to the left of the volume
slider.
To browse DAB radio stations:
In DAB radio mode, select Browse from the
main menu.
From the list, select the station that you want
to listen to and tap it to listen.
Page 39
Opus O ne A 2696
Page 40
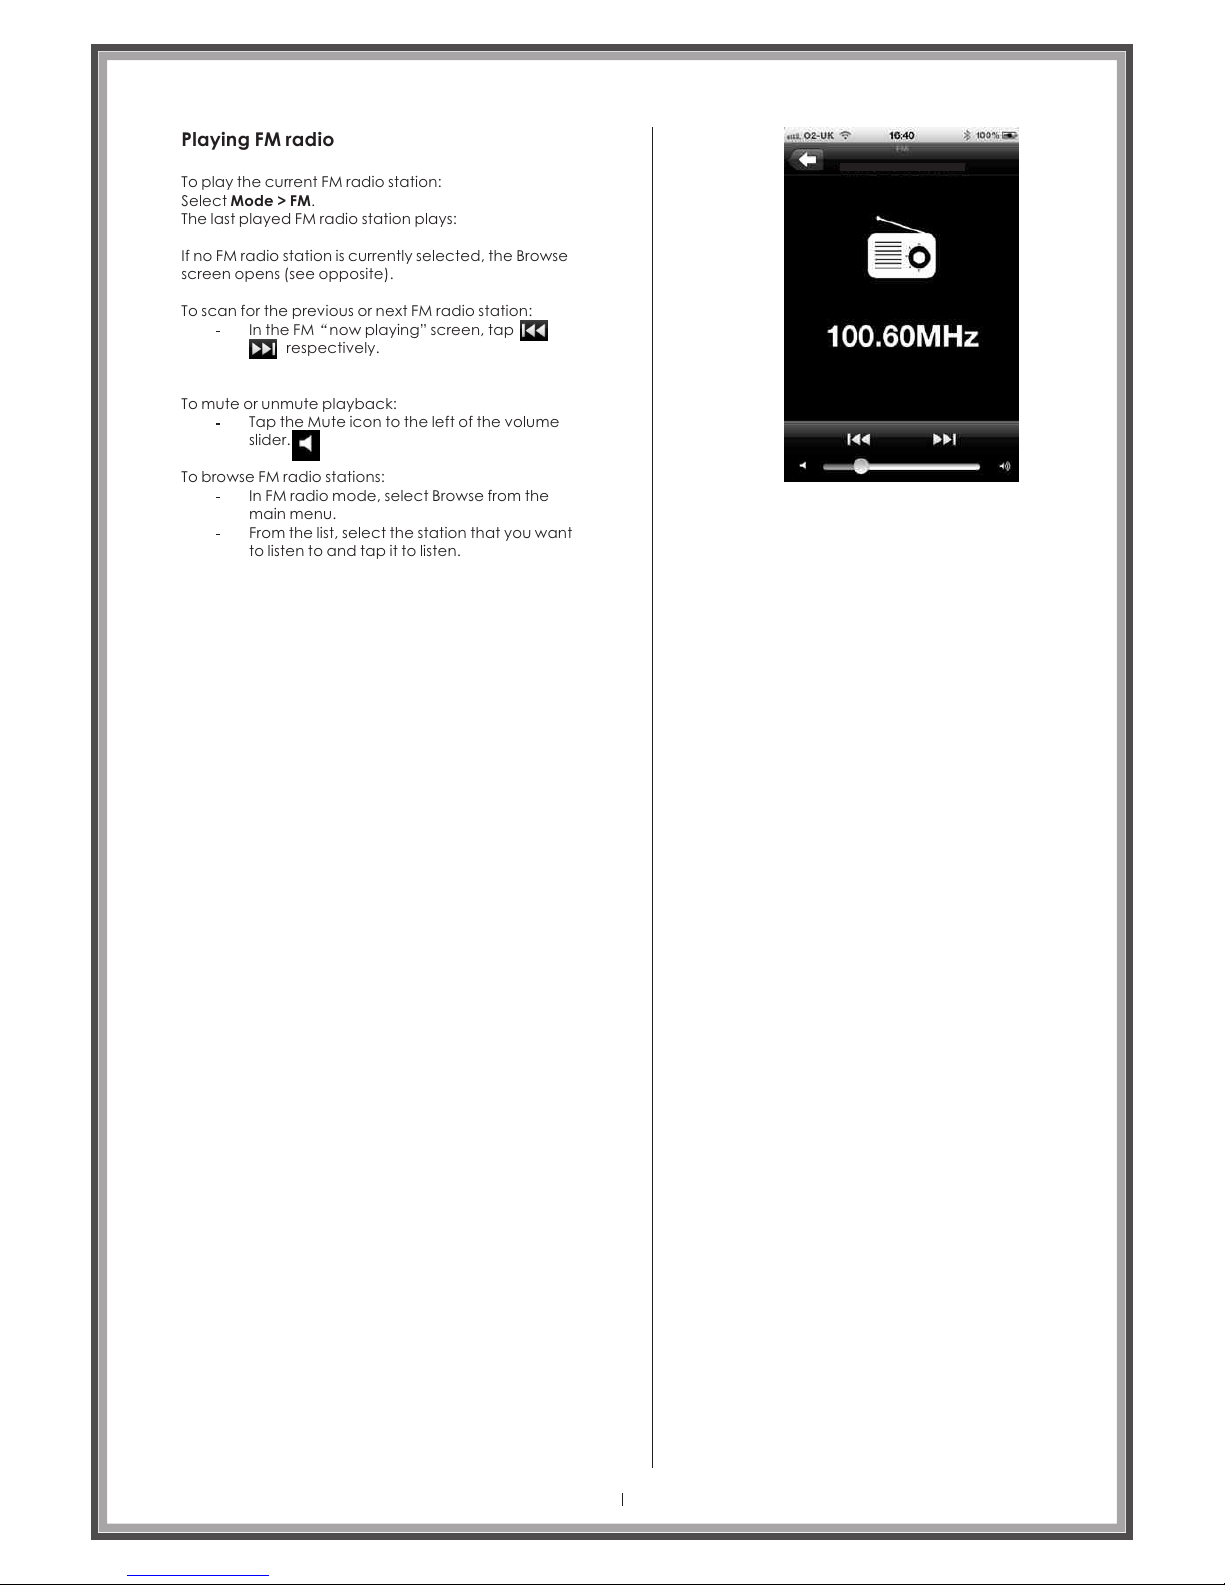
Playing FM radio
To play the current FM radio station:
Select Mode > FM.
The last played FM radio station plays:
If no FM radio station is currently selected, the Browse
screen opens (see opposite).
To scan for the previous or next FM radio station:
In the FM“now playing” screen, tap
respectively.
To mute or unmute playback:
Tap the Mute icon to the left of the volume
slider.
To browse FM radio stations:
In FM radio mode, select Browse from the
main menu.
From the list, select the station that you want
to listen to and tap it to listen.
Page 40
Opus O ne A 2696
Page 41
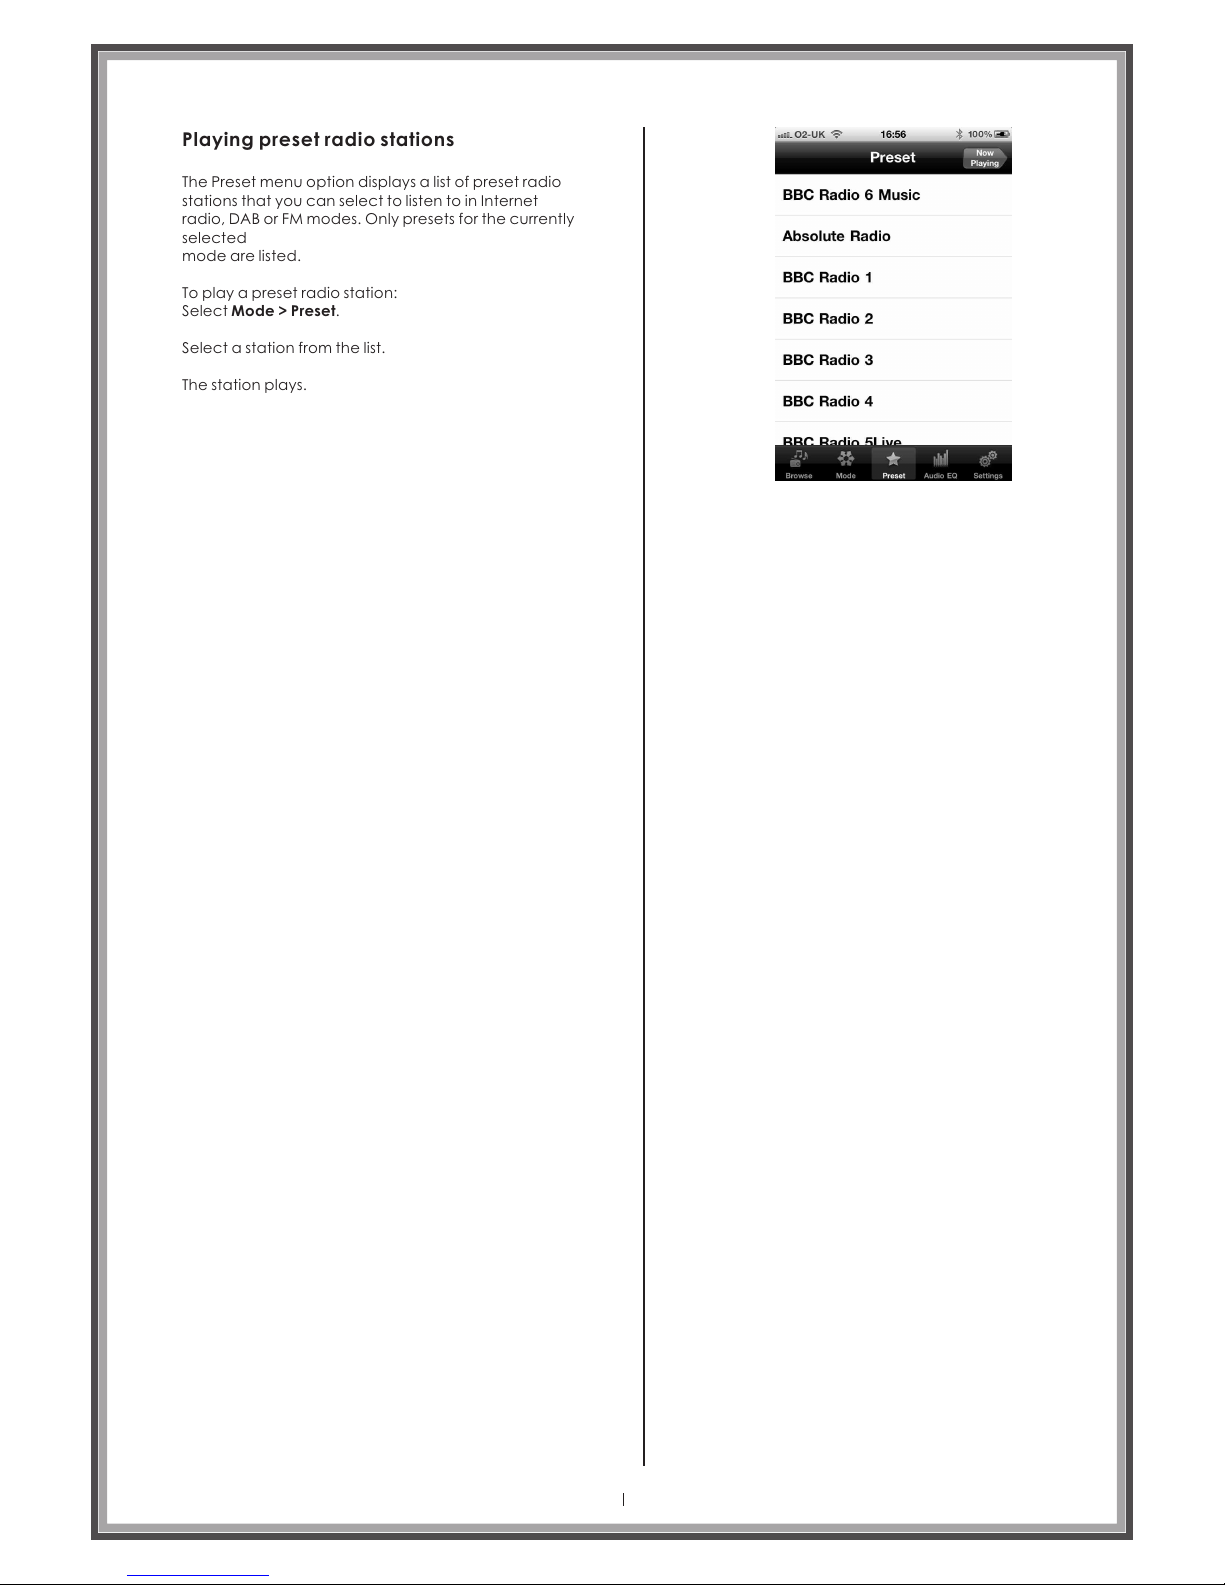
Playing preset radio stations
The Preset menu option displays a list of preset radio
stations that you can select to listen to in Internet
radio, DAB or FM modes. Only presets for the currently
selected
mode are listed.
To play a preset radio station:
Select Mode > Preset.
Select a station from the list.
The station plays.
Page 41
Page 42
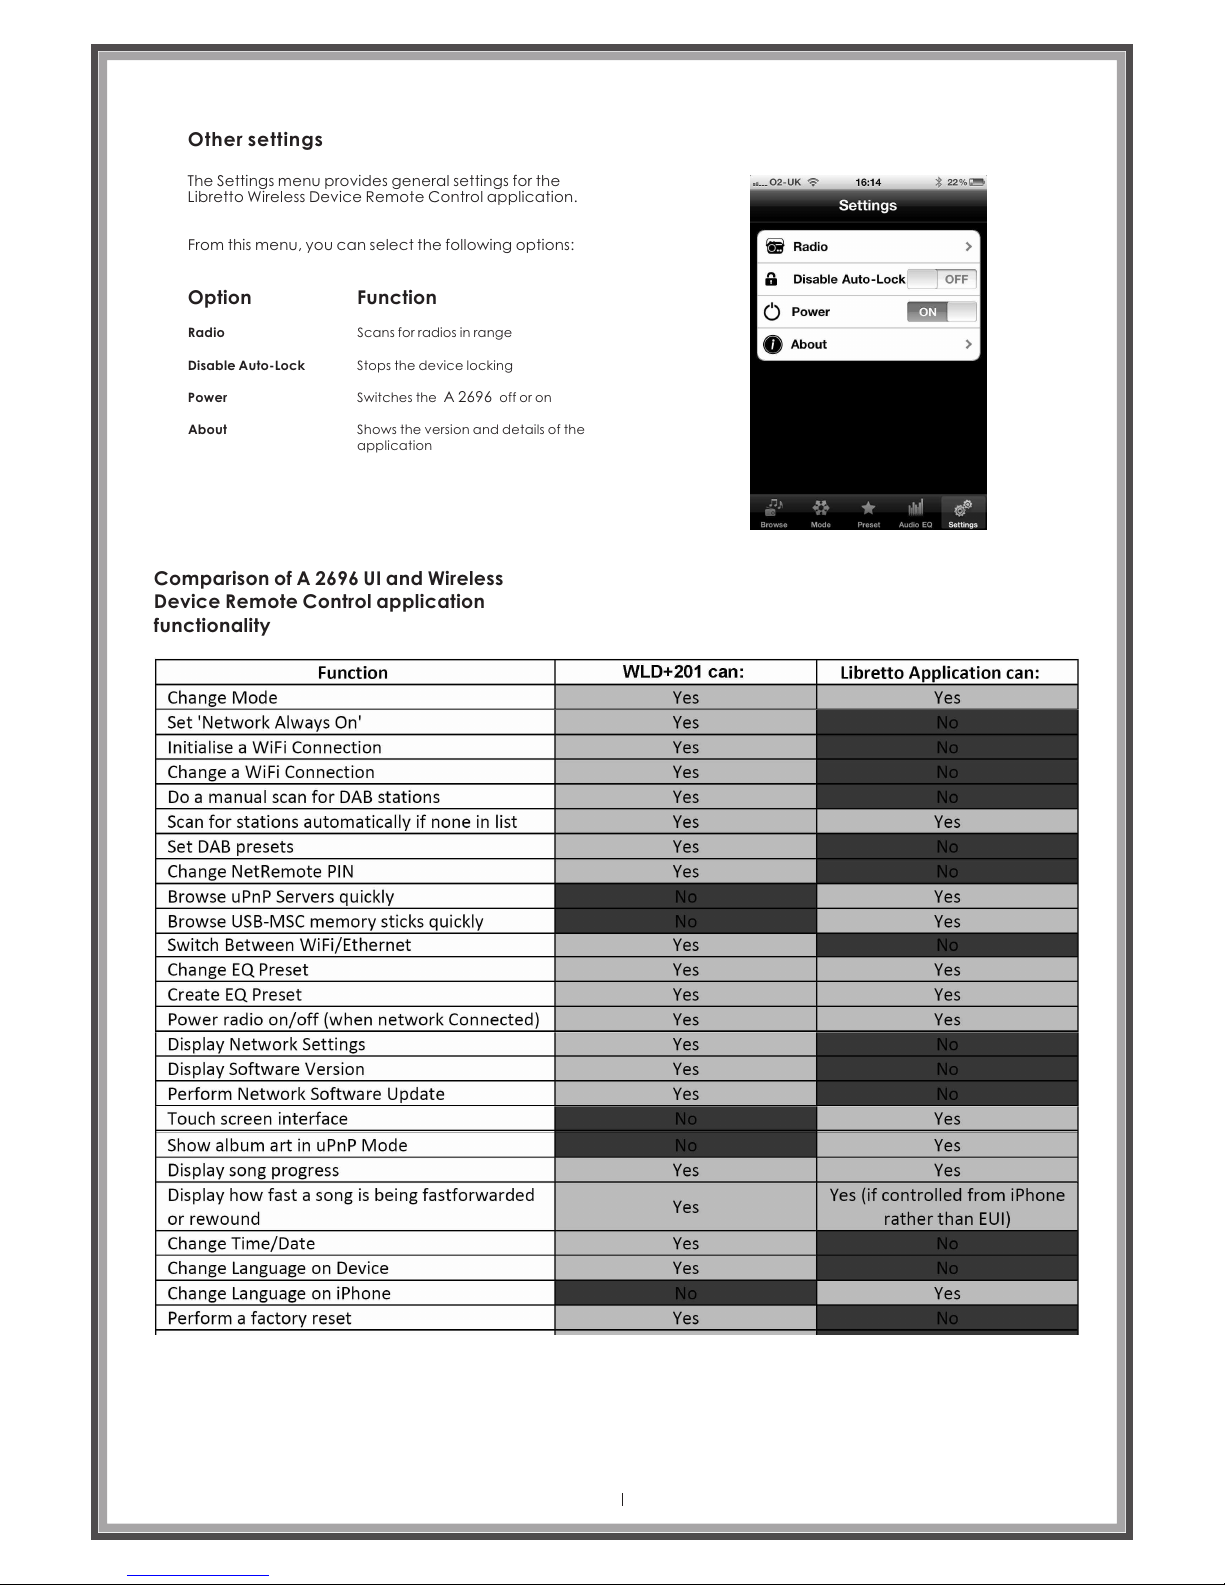
Other settings
The Settings menu provides general settings for the
Libretto Wireless Device Remote Control application.
From this menu, you can select the following options:
Option
Function
Radio
Disable Auto-Lock
Power
About
Scans for radios in range
Stops the device locking
Switches the off or on A 2696
Shows the version and details of the
application
Comparison of A 2696 UI and Wireless
Device Remote Control application
functionality
Page 42
Page 43
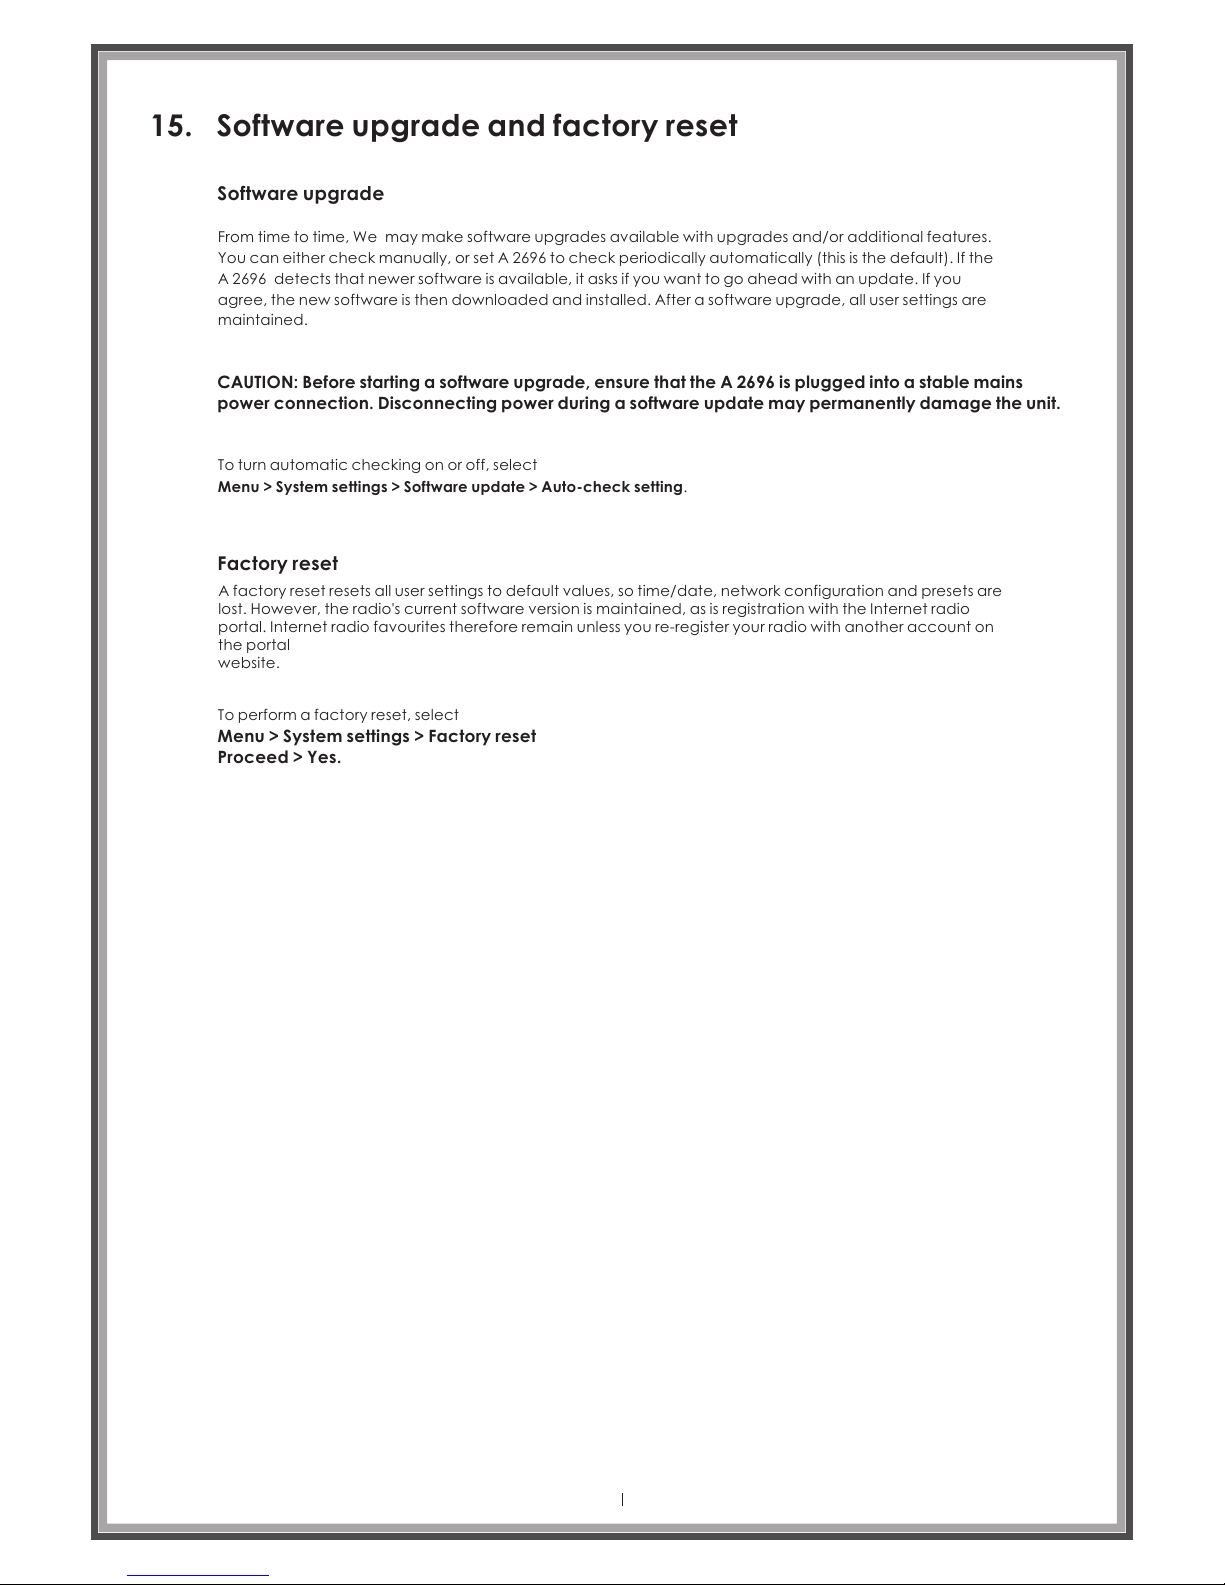
15. Software upgrade and factory reset
Software upgrade
From time to time, We may make software upgrades available with upgrades and/or additional features.
You can either check manually, or set A 2696 to check periodically automatically (this is the default). If the
A 2696 detects that newer software is available, it asks if you want to go ahead with an update. If you
agree, the new software is then downloaded and installed. After a software upgrade, all user settings are
maintained.
CAUTION: Before starting a software upgrade, ensure that the A 2696 is plugged into a stable mains
power connection. Disconnecting power during a software update may permanently damage the unit.
To turn automatic checking on or off, select
Menu > System settings > Software update > Auto-check setting.
Factory reset
A factory reset resets all user settings to default values, so time/date, network configuration and presets are
lost. However, the radio's current software version is maintained, as is registration with the Internet radio
portal. Internet radio favourites therefore remain unless you re-register your radio with another account on
the portal
website.
Menu > System settings > Factory reset
Proceed > Yes.
To perform a factory reset, select
Page 43
Page 44
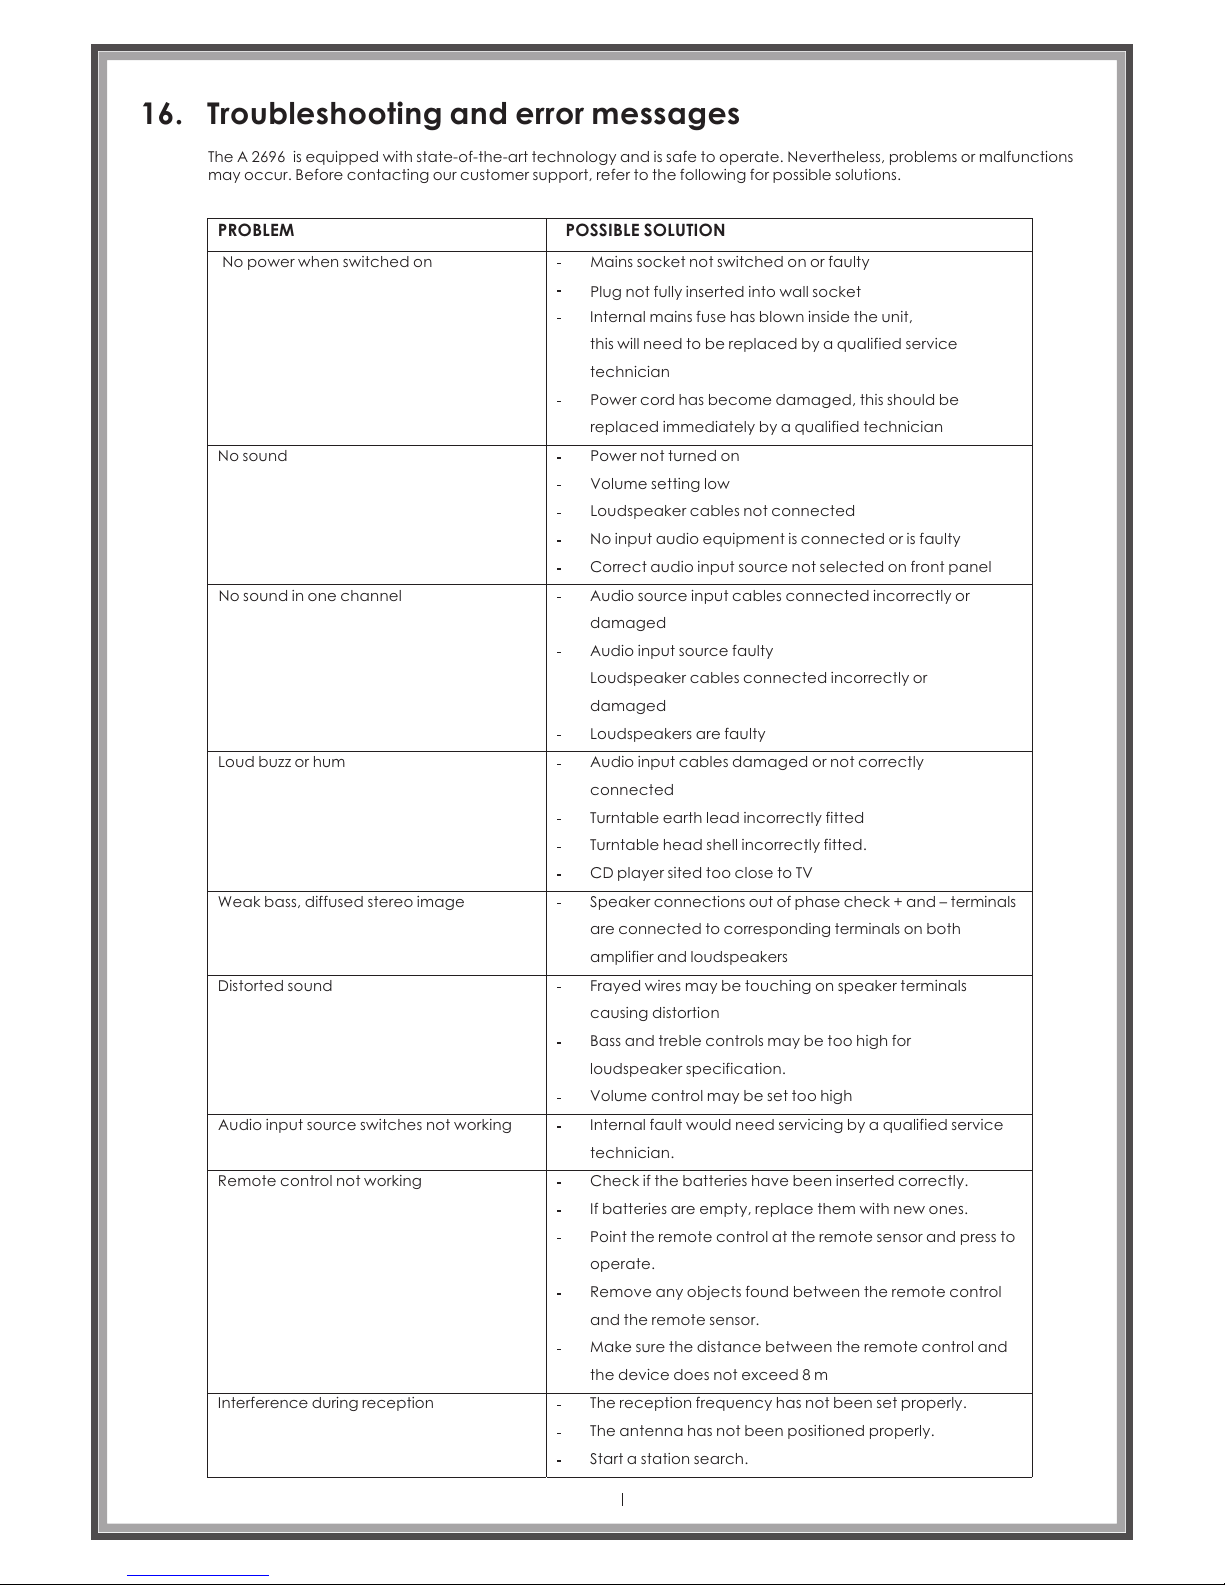
16. Troubleshooting and error messages
The is equipped with state-of-the-art technology and is safe to operate. Nevertheless, problems or malfunctions
may occur. Before contacting our customer support, refer to the following for possible solutions.
A 2696
PROBLEM
POSSIBLE SOLUTION
No power when switched on
Mains socket not switched on or faulty
Plug not fully inserted into wall socket
Internal mains fuse has blown inside the unit,
this will need to be replaced by a qualified service
technician
Power cord has become damaged, this should be
replaced immediately by a qualified technician
No sound
Power not turned on
Volume setting low
Loudspeaker cables not connected
No input audio equipment is connected or is faulty
Correct audio input source not selected on front panel
No sound in one channel
Audio source input cables connected incorrectly or
damaged
Audio input source faulty
Loudspeaker cables connected incorrectly or
damaged
Loudspeakers are faulty
Loud buzz or hum
Audio input cables damaged or not correctly
connected
Turntable earth lead incorrectly fitted
Turntable head shell incorrectly fitted.
CD player sited too close to TV
Weak bass, diffused stereo image
Speaker connections out of phase check + and – terminals
are connected to corresponding terminals on both
amplifier and loudspeakers
Distorted sound
Frayed wires may be touching on speaker terminals
causing distortion
Bass and treble controls may be too high for
loudspeaker specification.
Volume control may be set too high
Audio input source switches not working
Remote control not working
Internal fault would need servicing by a qualified service
technician.
Check if the batteries have been inserted correctly.
If batteries are empty, replace them with new ones.
Point the remote control at the remote sensor and press to
operate.
Remove any objects found between the remote control
and the remote sensor.
Make sure the distance between the remote control and
the device does not exceed 8 m
Interference during reception
The reception frequency has not been set properly.
The antenna has not been positioned properly.
Start a station search.
Page 44
Page 45
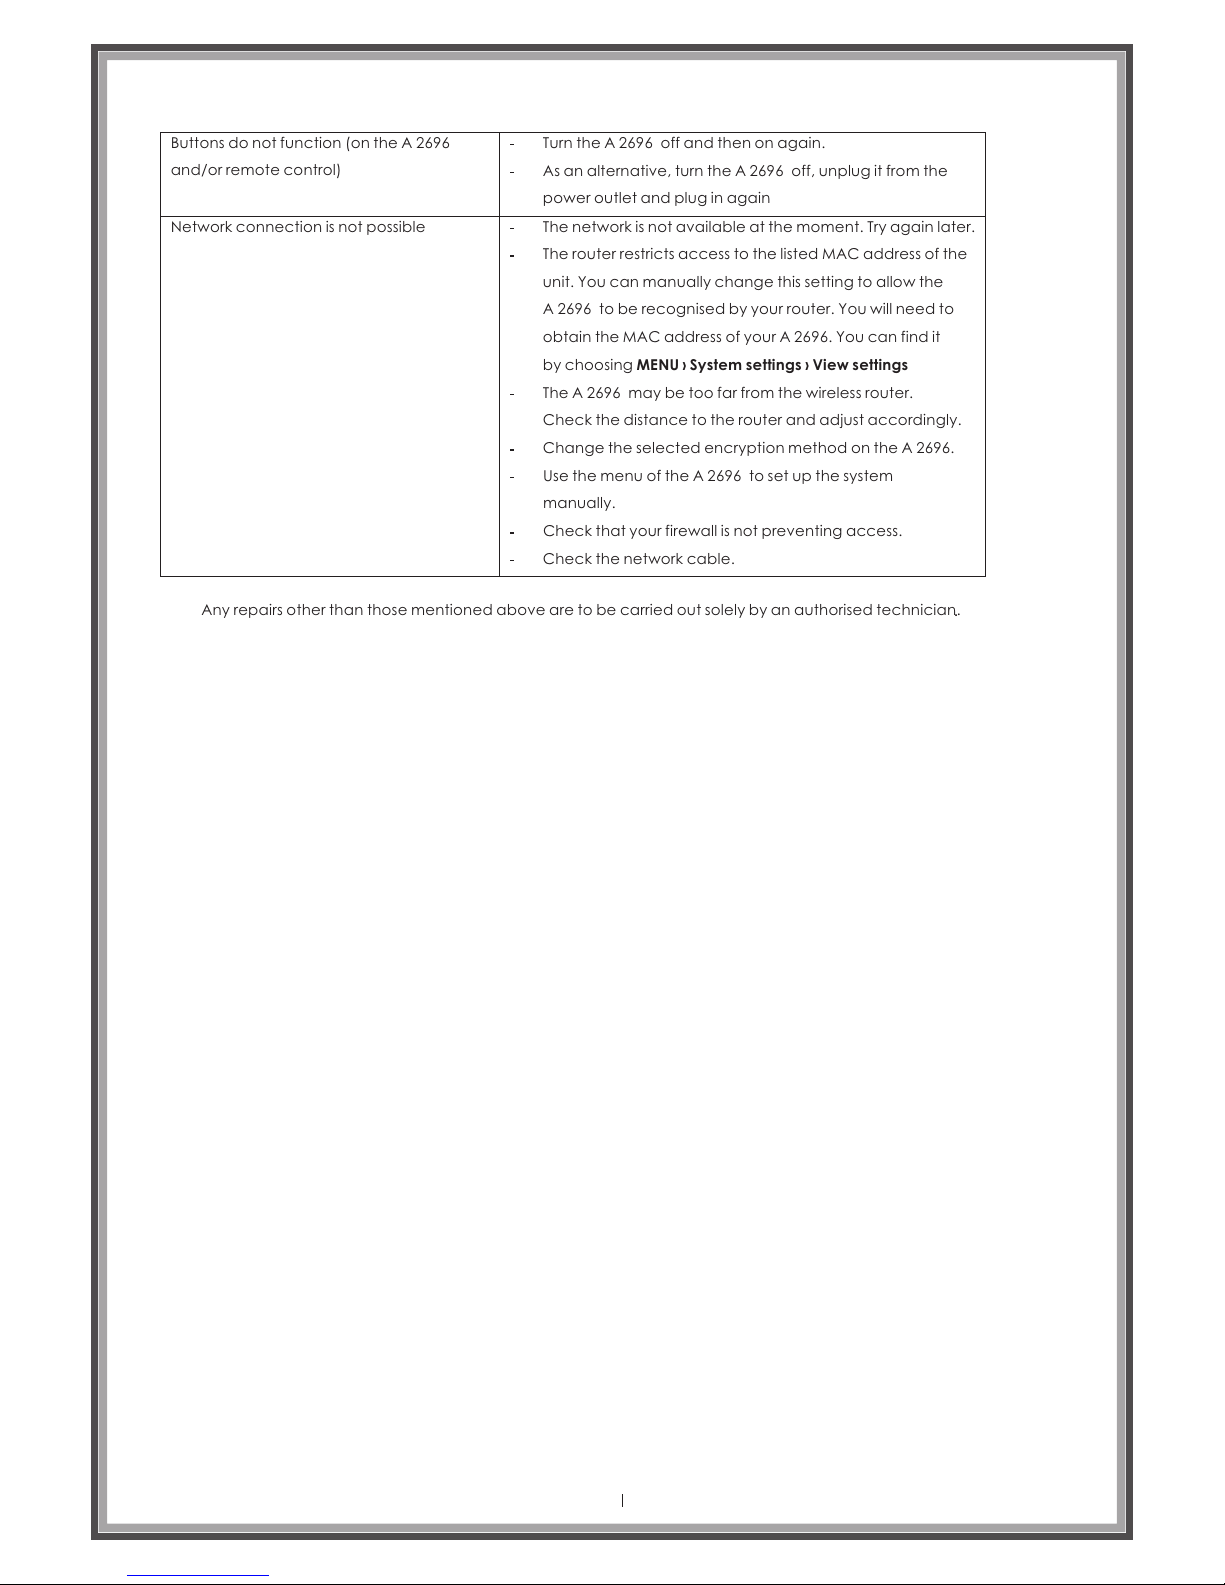
Buttons do not function (on the
and/or remote control)
A 2696
Network connection is not possible
Turn the off and then on again.A 2696
As an alternative, turn the off, unplug it from the
power outlet and plug in again
A 2696
The network is not available at the moment. Try again later.
The router restricts access to the listed MAC address of the
unit. You can manually change this setting to allow the
A 2696 to be recognised by your router. You will need to
obtain the MAC address of your A 2696. You can find it
by choosing MENU › System settings › View settings
The may be too far from the wireless router.
Check the distance to the router and adjust accordingly.
A 2696
Change the selected encryption method on the .A 2696
Use the menu of the to set up the system
manually.
A 2696
Check that your firewall is not preventing access.
Check the network cable.
Any repairs other than those mentioned above are to be carried out solely by an authorised technician.
Page 45
Page 46
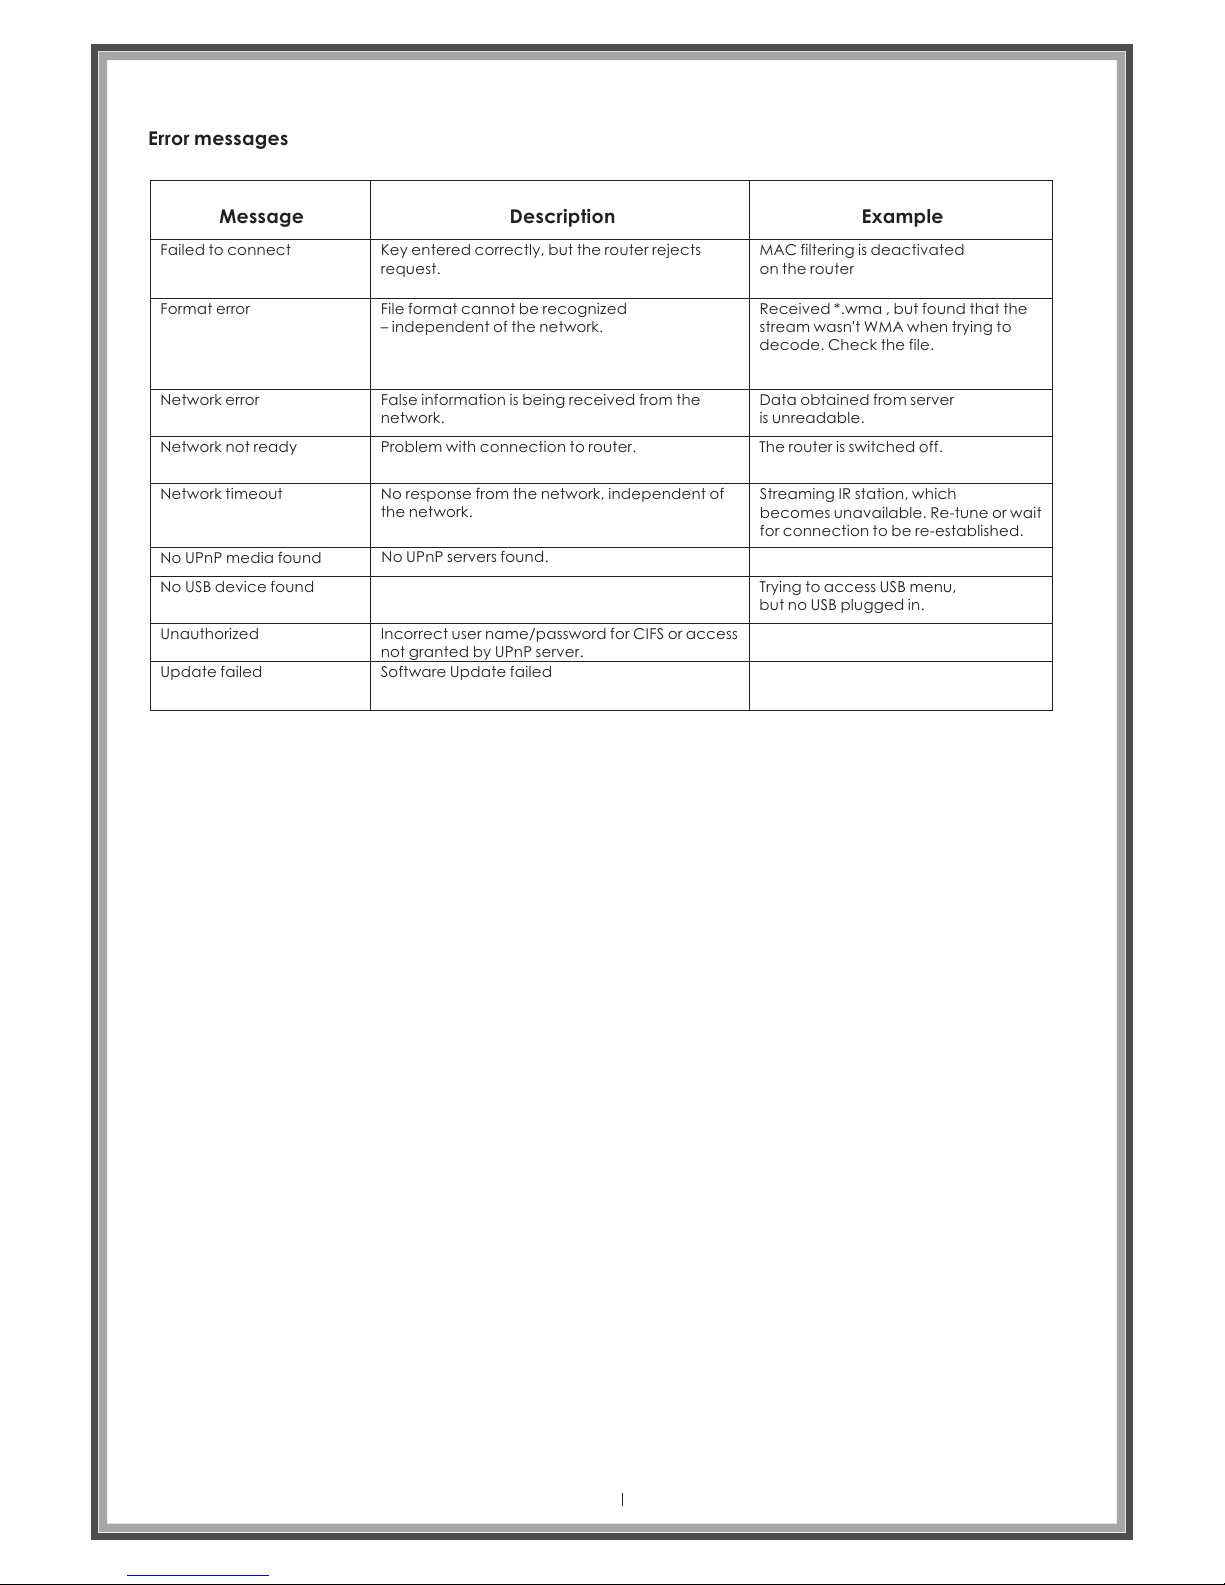
Error messages
Message Description Example
Failed to connect Key entered correctly, but the router rejects
request.
MAC filtering is deactivated
on the router
Format error
File format cannot be recognized
– independent of the network.
Received *.wma , but found that the
stream wasn't WMA when trying to
decode. Check the file.
Network error
False information is being received from the
network.
Data obtained from server
is unreadable.
The router is switched off.
Network not ready
Problem with connection to router.
Network timeout
No UPnP media found
No USB device found
Unauthorized
Update failed Software Update failed
Incorrect user name/password for CIFS or access
not granted by UPnP server.
No UPnP servers found.
No response from the network, independent of
the network.
Streaming IR station, which
becomes unavailable. Re-tune or wait
for connection to be re-established.
Trying to access USB menu,
but no USB plugged in.
Page 46
Page 47
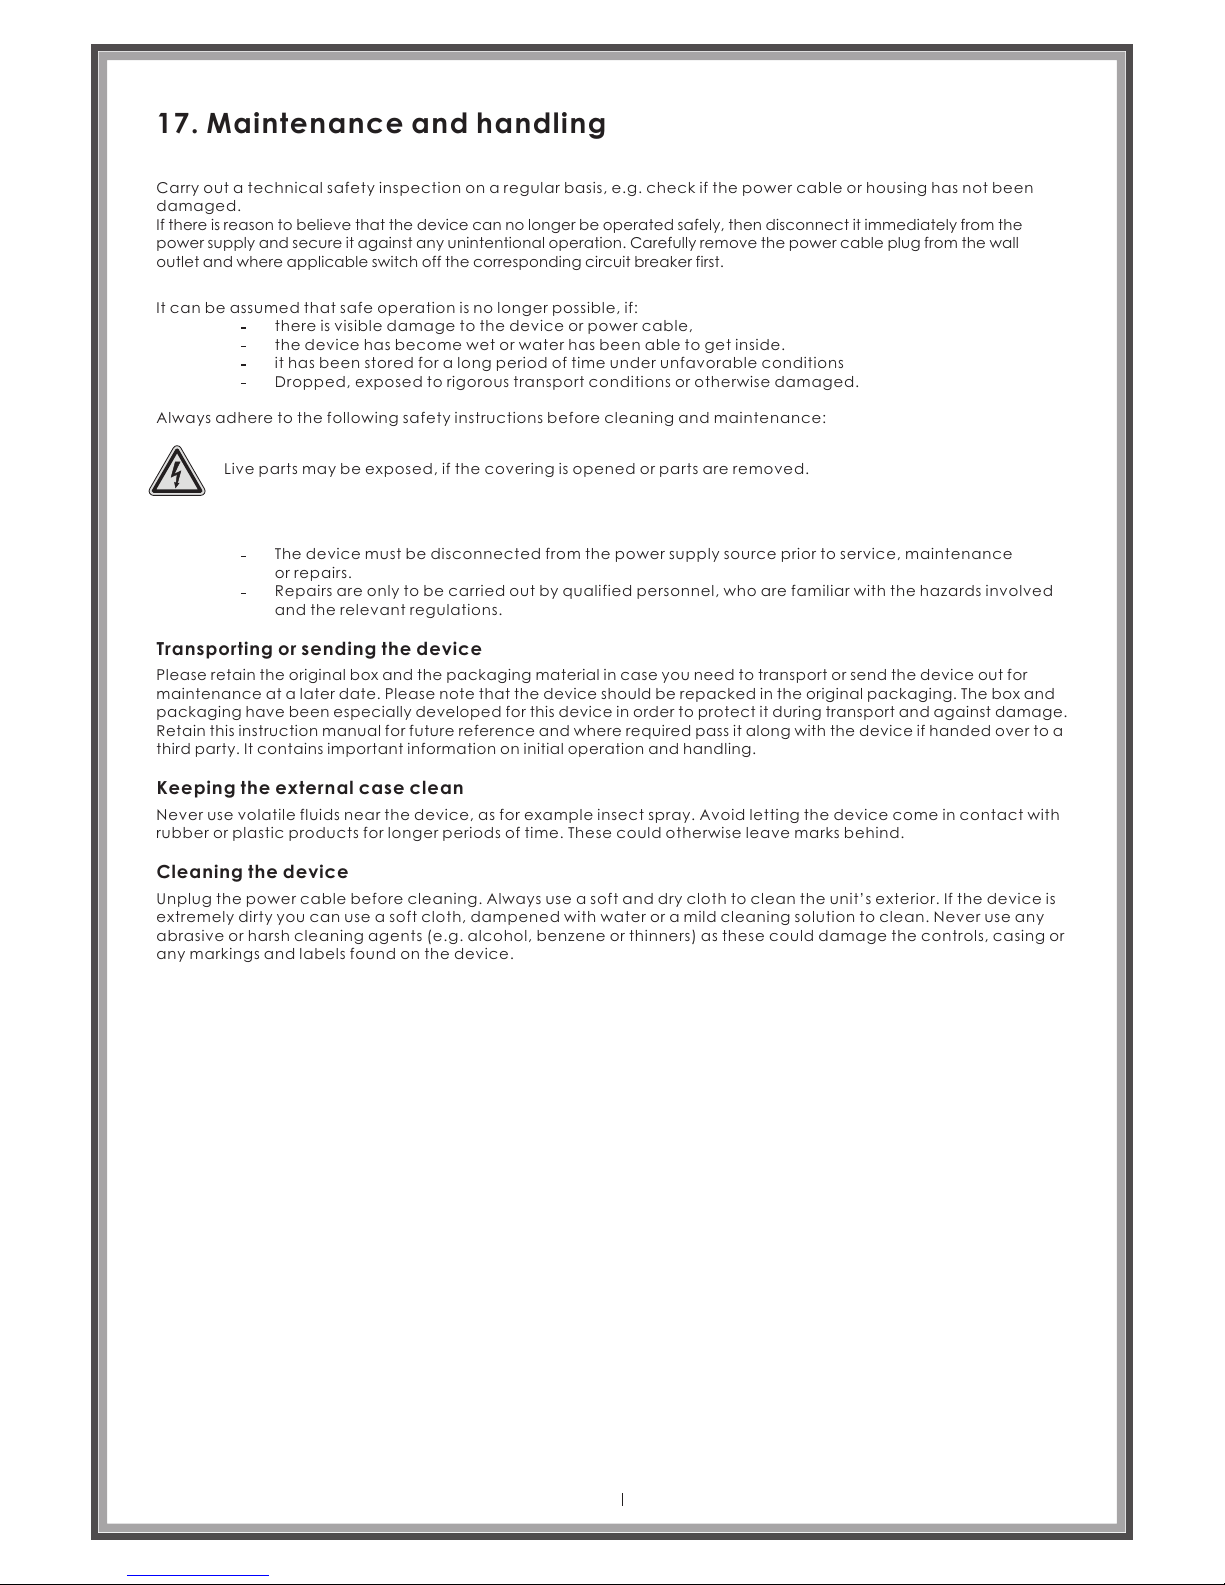
Carry ou t a te chnical saf et y in spectio n on a r eg ular basi s, e .g . check if the po we r ca ble or hous in g ha s not been
damage d.
If there is reason to believe that the device can no longer be operated safely, then disconnect it immediately from the
power supply and secure it against any unintentional operation. Carefully remove the power cable plug from the wall
outlet and where applicable switch off the corresponding circuit breaker first.
It can be as su med that safe o pe ra tion is no lo ng er p ossible , if :
there is v is ible damage t o th e de vice or pow er c ab le,
the devi ce h as become wet o r wa te r has been ab le t o ge t inside.
it has bee n st ored for a long p er io d of time und er u nf avorable co nd itions
Droppe d, e xposed to rig or ou s transpo rt c on ditions o r ot he rwise damag ed .
Always a dh ere to the foll ow in g safety in st ru ctions be fo re c leaning and m ai ntenance:
Live par ts m ay be exposed , if t he c overing i s op en ed or parts a re r em oved.
The devi ce m ust be discon ne ct ed from the p ow er s upply sourc e pr ior to servic e, m ai ntenanc e
or repai rs .
Repair s ar e only to be carr ie d ou t by qualif ie d pe rsonnel , wh o ar e familiar wi th t he hazards in vo lv ed
and the re le vant regula ti on s.
Transporting or sending the de vic e
Ple ase retain the or iginal box and the packa ging material in case yo u nee d to tr anspo rt or send the device ou t for
mai ntena nce at a later date. Ple ase note tha t the device should be repack ed in the original packa ging. The bo x and
pac kagin g have been especially develo ped for this device in order to prot ect it durin g transport and against damag e.
Ret ain this ins truct ion manual for future referen ce and where requ ired pass it along with the device if handed ove r to a
thi rd party. It cont ains importa nt information on initial ope ratio n and handli ng.
Keeping the external case clea n
Never us e vo latile flui ds n ea r the devic e, a s fo r example i ns ec t spray. Avoi d le tting the dev ic e co me in conta ct w it h
rubber o r pl astic produ ct s fo r longer pe ri od s of time. Thes e co uld otherwi se l ea ve marks be hi nd .
Cleaning the device
Unplug t he p ower cable be fo re c leaning . Al wa ys use a soft a nd d ry c loth to clean t he u ni t’s exter io r. I f the device is
extrem el y dirty you can u se a s of t cloth, da mp en ed with water o r a mi ld cleaning s ol ut ion to clea n. N ev er use any
abrasi ve o r harsh clean in g ag ents (e.g . al co hol, benz en e or t hinners) as t he se c ould dama ge t he c ontrols , ca si ng or
any mark in gs and labels f ou nd o n the devic e.
17. Maintenance and handling
Page 47
Page 48
Important N otice
Plea se note t ha t elect rical a nd electr onic de vices m us t never b e dispo sed of in reg ular ho useho ld waste!
Cons umers are l egall y ob ligat ed and resp onsib le for the pr oper disp osal of e lectron ic devi ce s by retu rning
them t o collect ion sit es d esign ated for th e recyc li ng of ele ctrical a nd elec tronic eq uipment w aste af ter the
usef ul life of th e devic e ha s come to a n end. For mo re info rm ation c oncerni ng coll ec tion si tes and cor rect
disp osal plea se cont ac t your lo cal autho rity or w aste mana gement co mpany . The prese nce of th e ab ove
symb ol on a devic e, or its p ac kagin g or within t he inst ru ction m anual ind icate s that the it em must not b e
disp osed of in no rmal un so rted mu nicipal w aste.
In doi ng so you are f ulfil li ng all re cycling a nd disp osal obli gatio ns a nd are op timisin g and con tr ibuti ng to a
bett er enviro nment . Th ese dis posal reg ulati on s apply t o batteri es and re chargea ble bat te ry disp osals as
well . Most batt eries c on tain ha zardous c hemic als which c an contam inate t he enviro nment a nd h uman
heal th if they ar e disca rd ed in ord inary hou sehol d wa ste. Ac cording t o legis lation ba tteri es a re to be
retu rned to the p lace of p ur chase o r dispose d of at a des ig nated r ecyclin g site.
Page 48
Page 49
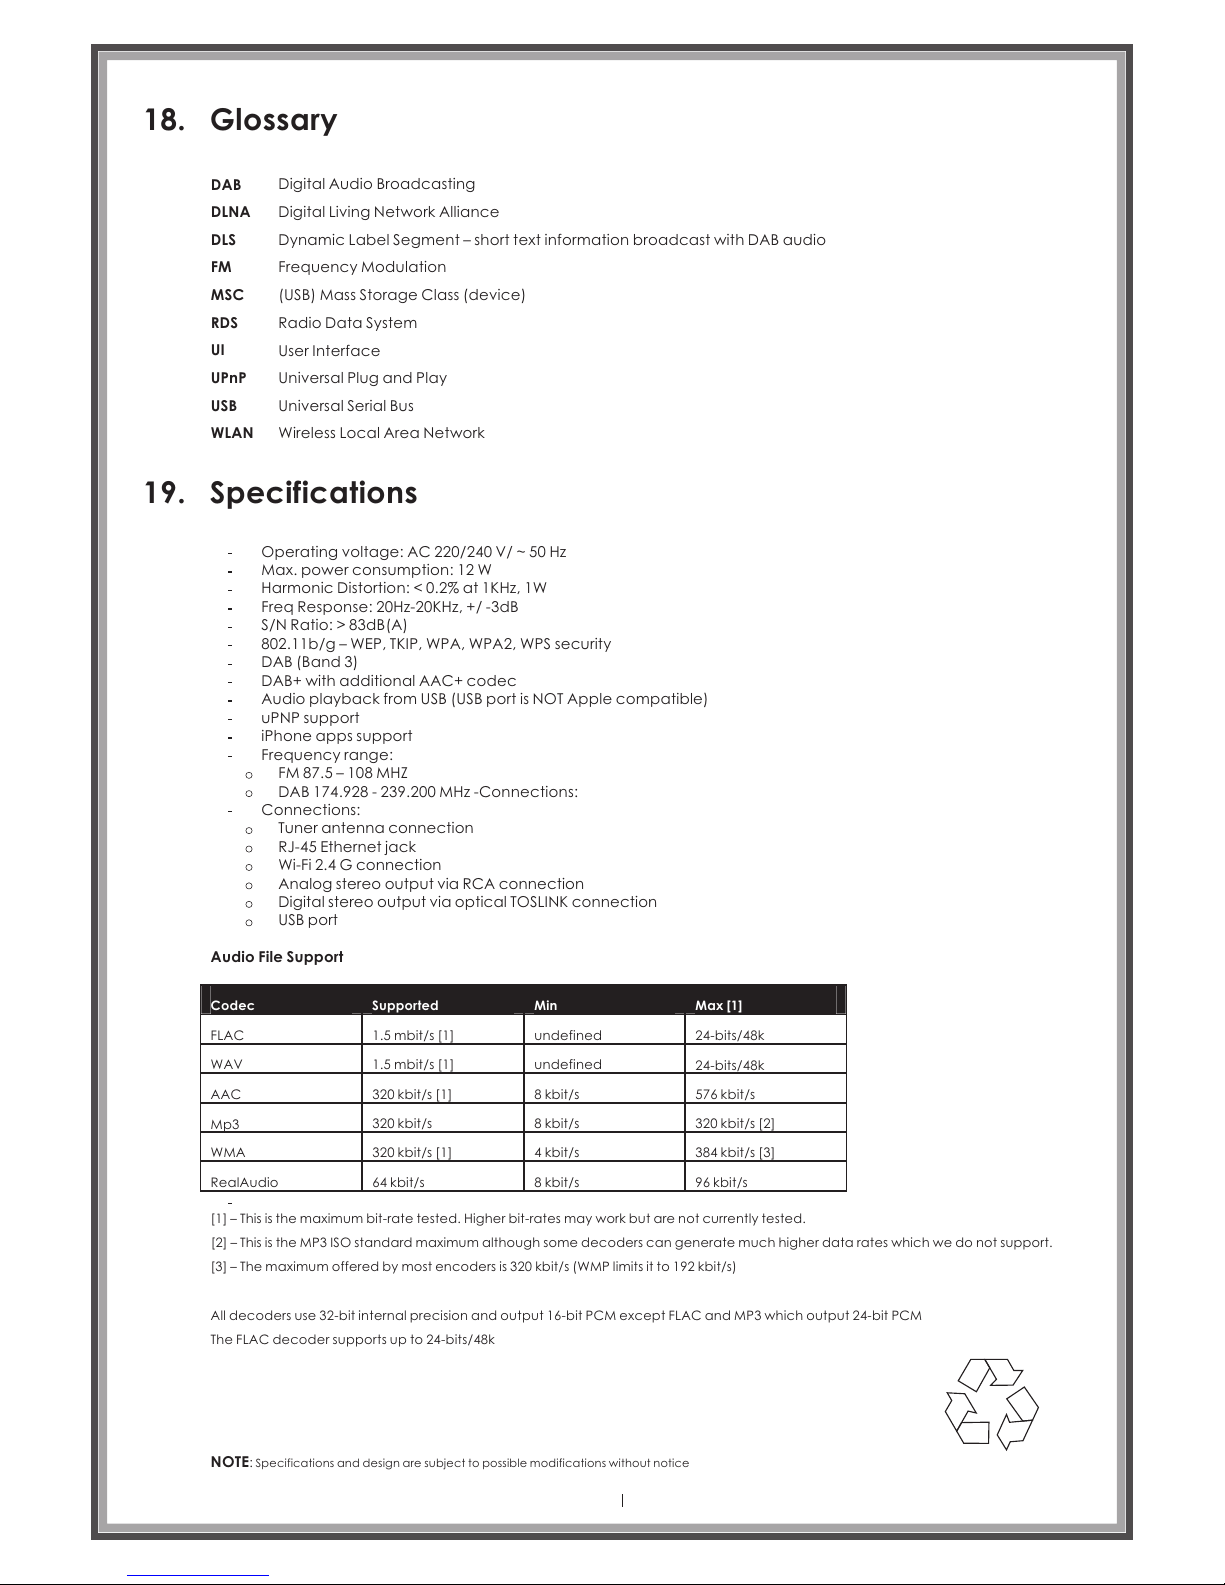
18. Glossary
DAB
DLNA
DLS
FM
MSC
RDS
UI
UPnP
USB
WLAN
Digital Audio Broadcasting
Digital Living Network Alliance
Dynamic Label Segment – short text information broadcast with DAB audio
Frequency Modulation
(USB) Mass Storage Class (device)
Radio Data System
User Interface
Universal Plug and Play
Universal Serial Bus
Wireless Local Area Network
19. Specifications
Operating voltage: AC 220/240 V/ ~ 50 Hz
Max. power consumption: 12 W
Harmonic Distortion: < 0.2% at 1KHz, 1W
Freq Response: 20Hz-20KHz, +/ -3dB
S/N Ratio: > 83dB(A)
802.11b/g – WEP, TKIP, WPA, WPA2, WPS security
DAB (Band 3)
DAB+ with additional AAC+ codec
Audio playback from USB (USB port is NOT Apple compatible)
uPNP support
iPhone apps support
Frequency range:
FM 87.5 – 108 MHZ
DAB 174.928 - 239.200 MHz -Connections:
Tuner antenna connection
RJ-45 Ethernet jack
Wi-Fi 2.4 G connection
Analog stereo output via RCA connection
Digital stereo output via optical TOSLINK connection
USB port
Audio File Support
Connections:
Codec
Supported
Min Max [1]
FLAC
WAV
AAC
Mp3
WMA
RealAudio
1.5 mbit/s [1]
1.5 mbit/s [1]
320 kbit/s [1]
320 kbit/s
320 kbit/s [1]
64 kbit/s 8 kbit/s
4 kbit/s
8 kbit/s
8 kbit/s
undefined
undefined 24-bits/48k
24-bits/48k
384 kbit/s [3]
320 kbit/s [2]
576 kbit/s
96 kbit/s
[1] – This is the maximum bit-rate tested. Higher bit-rates may work but are not currently tested.
[2] – This is the MP3 ISO standard maximum although some decoders can generate much higher data rates which we do not support.
[3] – The maximum offered by most encoders is 320 kbit/s (WMP limits it to 192 kbit/s)
All decoders use 32-bit internal precision and output 16-bit PCM except FLAC and MP3 which output 24-bit PCM
The FLAC decoder supports up to 24-bits/48k
NOTE: Specif ications and design are subject to possible modific ations without noti ce
Page 49
Page 50

Page 50
Altronic Distri but ors w arr ant s this product for one year from d ate o f pur cha se from Altronics or its
resellers to the co nsu mer. I f thi s ite m is part of an installation or an oth er pr odu ct, please contact the
installer or supp lie r for y our w arr anty.
During the warranty pe rio d, we u nde rtake to repair or replace you r pro duc t at no c har ge if found to be
defective due to a ma nuf act uri ng fa ult. Th e war ran ty excludes damage by misuse o r inc orr ect
installation (i .e. f ail ure t o ins tall and operate device acco rdi ng to s pec ifi cations in the supplied
instruction man ual ), ne gle ct, s hipping accident, or no faul t fou nd, n or by u se in a way or manner not
intended by the sup pli er.
For speakers, mis use i ncl ude s bur nt out voice coils.
For repair or servi ce pl eas e con tac t your PLACE OF PURCHASE.
If this item was purc has ed di rec tly from Altro nic s ple ase m ake a w arranty claim by:
1. FOR MAIL ORD ER CU STOME RS (i ncl udes school and trade orders ),
a) Ringing us on 1300 7 97 00 7 and q uot ing y our tax invoice number.
b) Upon contactin g Altr oni cs, w e will issue an R.A. (Return Auth ori sat ion ). As Alt ronics have a
number of serv ice a gen ts th rou ghout Australia, a copy of the R. A. wi ll be e mai led, faxed or
mailed to you wi th fu ll in str uct ions of how and where to send the go ods . The freigh t for
shipping goods ba ck to Al tro nic s for all repairs is at the custom er’s expense.
c) A copy of the R.A. fo rm, ( or at t he ve ry minimum, the R.A. number) m ust a cco mpa ny th e
goods to effect the repair.
d) Altronics will pa y the r etu rn fr eight to the customer where th e war ran ty cl aim has been
accepted.
e) Please quote the R .A. n umb er in a ny correspondence to us.
2. FOR OVER THE COUNTER PURCHAS ES; t o mak e a war ran ty claim, please return the go ods
to us in any of our st ore s, wi th a co py of y our proof of purchase (ta x inv oic e).
a) Upon leaving the g ood s at on e of ou r stores, an R.A. number will be i ssu ed to y ou.
b) Once repaired, y ou wi ll be c ont acted, advising that the goo ds ar e rea dy to b e col lected from
the store.
It is at Altronics dis cre tio n as to w het her the goods will be repaired o r rep lac ed (w hil st under warranty);
and as to whether ide nti cal g ood s wil l be used to replace the item due to c han ges o f mod els / p roducts.
Note: Under no circ ums tan ces s hou ld you attempt to repair the dev ice y our sel f or via a non-authorised
Altronics servi ce ce ntr e, as t his w ill invalidate the warrant y!
Our goods come with g uar ant ees t hat c annot be excluded under the Aus tra lia n Con sum er Law. You are
entitled to a repla cem ent o r ref und f or a major failure and for compe nsa tio n for a ny other reasonably
foreseeable loss or da mag e. You ar e als o ent itled to have the goods repair ed or r epl ace d if the goods
fail to be of accepta ble q ual ity a nd th e failure does not amount to a maj or fa ilu re.
20. Warranty Information
Page 51

For repair or service please contact your place of purchase.
Note: Under no circumstances should you attempt to repair the receiver yourself or via a non-authorised Altronics
service centre as this will invalidate the warranty! During the warranty period, we undertake to repair or replace your
product at no charge if found to be defective due to a manufacturing fault. The warranty excludes damage by misuse,
neglect, shipping accident, incorrect installation or no fault found.
NOT FIELD SERVICEABLE.
Distributed by Altronic Distributors Pty. Ltd. Perth. Western Australia.
Phone: 1300 780 999 Fax: 1300 790 999 Internet: www.altronics.com.au
 Loading...