

Page 1

Goldpress 4+
OPERATING, MAINTENANCE AND SAFE USAGE
MANUAL OF THE GOLDPRESS 4+ MACHINE
Page 2
SAFETY INSTRUCTIONS:
• Before putting the machine into operation please
read the safety precautions, manufacturer recommendations and the operation manual. The operation
manual should be easily available at any time for the
operator.
• The machine should be installed on sturdy and
level floor .
• The machine should be protected against dust
and moisture.
• The machine must not be placed near the heating
units or ventilation units.
• The machine should not be used in vicinity
of inflammable liquids or gases.
• The machine may be power supplied only through
the original cord. A mains socket should be provided
with an efficient earthing. The supply voltage should
be consistent with the parameters specified on the
technical plate located on the machine housing.
If this principle is not obeyed, then electric shock
and fire may occur.
• The supplying cable should be protected against
any damage, must not be used to pull the machine
or to remove the plug from a socket .
• Making any changes to the electric installation of the
machine or in the supplying cable causes the hazard
of electric shock.
• The machine is turned off completely after removing
the plug from a socket.
• During a long standstill or before replacing the
machine, the plug should be removed from a mains
socket.
• Before removing the housing from the machine,
remove the plug from a socket necessarily.
• The power pack module is installed in the machine
base and provided with a mains fuse (access from
the bottom of the machine). If replacement of the
fuse is necessary, this should be effected by a suitably
qualified person.
• Do not touch the heater –
bbuurrnn hhaazzaarrdd..
• Before replacement of fonts fixed in the frame, wait
5÷10 min to make sure that the elements are cool
–
bbuurrnn hhaazzaarrdd
.
• The machine includes a sharp device (knife to cut
off the foil) – pay special attention when using the
device or operating nearby.
• The machine should be kept away from children reach.
• The machine must not be used for any other purposes than those indicated in the operating manual
• It is necessary to check if the machine operates
correctly. In case of any malfunctions, contacting
the servicing point is required
• The machine must not be located outside, should be
operated in room temperature higher than +8C/46,4 F.
• The machine should be operated according to general
safety rules.
• Any repairs can be made only by trained staff.
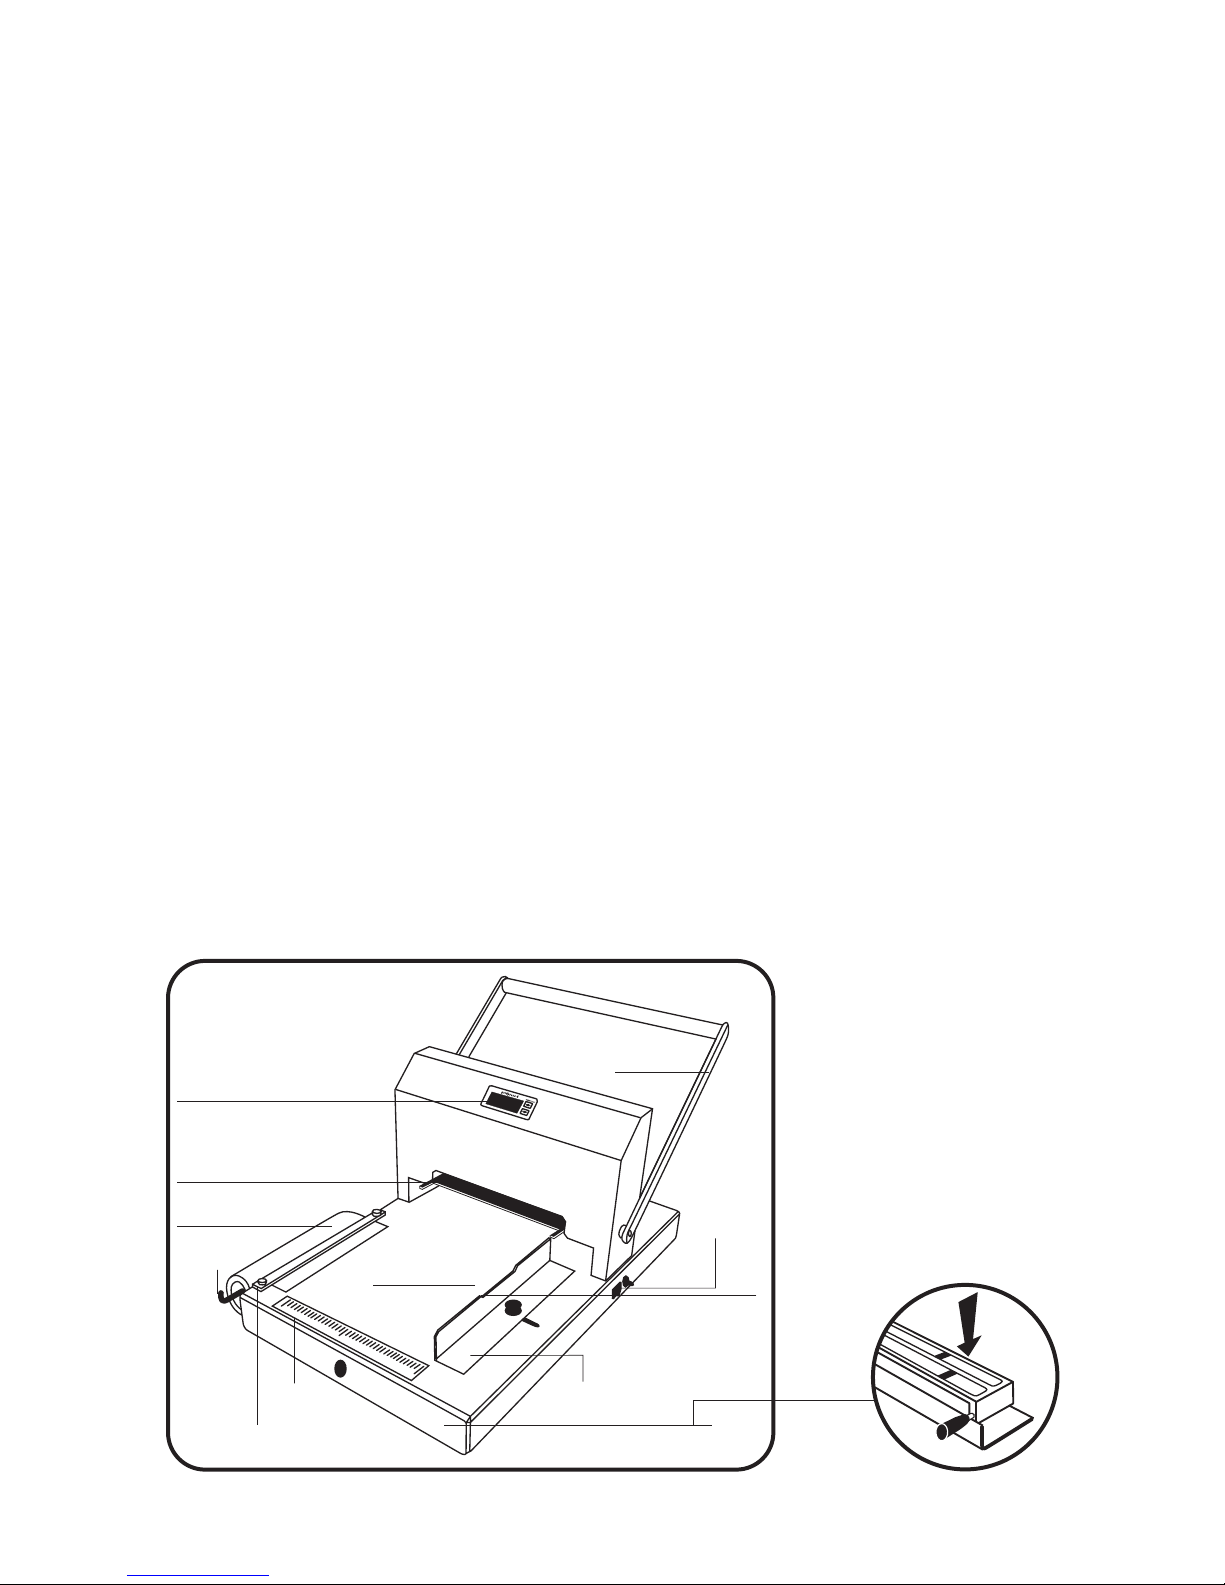
LCD display
heater + frame
foil
bail
scale
knife
to cut off the foil
ruler
arm
main
switch
guide
incision
in the guide wall
drawer
Design of the machine
holder to support
the frame
Page 3

General information
The GoldPress machine was designed to
make hot stampings on paper or card
board covers, as well as on covers coated
with glued paper sheets. It is also possible
to make hot stamps on plastic or plastic
coated materials, however the tests should
be carried out previously to check if the
material is suitable for the purpose.
The use of fonts makes it possible to compose any inscription (various kinds of fonts,
also in various languages and sizes, are
available) and to apply it on a cover or
another surface. It is also possible to prepare a special matrix (e.g. a logo) consistent with the GOLDCOVER standard. Also,
thanks to an O.Goldchannel Base device,
the imprintments on channels (backs of
OPUS covers) can be made.
The detailed information concerning extension of the possibilities of the machine can
be obtained from the supplier.
Operation of the machine does not need
special qualifications, however:
Before starting the work the operator
should read the manual carefully.
The GoldPress is built on the basis of an
eccentric press. It is fitted with a heater
(enabling to make hot stamps) and a microprocessor controller with a digital display to
maintain precisely a set temperature and
stamping time, which ensures constant
work conditions. A frame with a matrix or
fonts that form an inscription is mounted on
the heater. Side guide and a ruler make it
possible to position a cover in relation to
the central point of the frame. A movable
knife enables to cut off a required piece of
hot stamping foil.
A special container to store the fonts in
order is also available as an option.
Transport and storage:
• The GoldPress is an office device electrically supplied and adapted to operation
in office conditions. Both the machine
and its package should not be exposed
to moisture (e.g. rain).
• If moistened or flooded with water, the
machine should be delivered to a servicing point to carry out an inspection,
in order to avoid a risk of electric
shock.
• The machine should be stored in plus
Celsius temperatures (above 32F)
• Although the package protects the
machine, it should be handled with care.
Installation
• The machine does not need disassembling of transport protections.
• It is recommended to store the package
in case of repeated transportation
• The GoldPress is a machine adapted to
operating in office conditions.
• The machine does not work if the room
temperature is lower than +8 C/46,4 F
• The machine should be positioned on a
suitably tough, flat and stable surface.
• The rubber legs of the machine protect
the substrate against being scratched
and do not leave any traces.
• If the machine was exposed to minus
Celsius temperatures (below 32F), it may
be connected to mains after several
dozens of minutes due to condensation
of steam on cold metal elements.
• To ensure operator’s safety, the
machine may be supplied only
through the original cord. A mains
socket should be provided with efficient earthing. The supply voltage
must be consistent with the parameters specified on the technical plate
positioned on the machine housing.
Disobeying the above rule may result
in electric shock or fire.
Preparation for work:
1. Mount the back guide (the one without
the scale) at the back of the machine by
putting the screw of the guide into the
slot.
2. Insert the plug into a mains socket.
Note!
Make sure the temperature of the
room where the machine is placed
exceeds +8 C/46,4 F. If it does not, the
machine will not work.
Page 4

3. Mount a roll of foil on the bail located on
the left side of the machine.
4. Switch the power supply on (the main
switch is located on the right side of the
machine)
On the display the following will appear:
- control inscription “OPUS”
- set heater temperature (e.g. 100 C or
212F – if the temperature is set in
Fahrenheit degrees)
- set stamping time (e.g. 001,5 – means:
1,5 second)
- current heater temperature
If the current heater temperature differs
from the set one for more than +/- 3
degrees, the figures (which indicate the
current heater temp.) blink slowly and
change (aiming to the value of set temperature). Blinking stops when the current heater temperature reaches the set
temperature (including +/- 3 degrees
deviation).
Note!
The temperature can be measured
both in Celsius and Fahrenheit scales.
To change the scale from Celsius into
Fahrenheit, press (with the machine
switched off) the “:” button (downward arrow) and switch on the
machine at the same time. Keep
pressing the button for c.a. 4 seconds
until you see the inscription “St F” on
the display (means that the scale has
been changed).
When changing the scale from
Fahrenheit into Celsius, do the similar
pressing the ”<” button (upward
arrow), until the inscription “St C”
appears on the display.
5. Wait until the current heater temperature
reaches the set temperature and the figures on the display stop blinking.
6. The machine is ready to work.
Setting the temperature and
stamping time
The best results for hot stamping when
using Opus supplies (hot stamping foil and
covers) are obtained with the following settings:
• set heater temperature : 100 C/212 F
• set stamping time : 1,5-2 seconds
However, if the stamping results are not
satisfactory , a change in the settings may
be necessary.
To set the heater temperature, move the
arm maximally up. To change the temperature, press the ”
<” (upward arrow) or “:”
(downward arrow) button until you get the
required temperature. When setting the temperature, the figures on the display blink quickly.
After you get the temperature required, it is
saved in the memory of the Goldpress and
the machine returns to show the current
heater temperature (as already mentioned,
if the current temperature varies for more
than +/- 3 C from set temperature, the figures on the display blink slowly).
Set stamping time appears on the display
when the arm of the machine is maximally
put down. The counting down starts; after
the set time passes an inscription END
appears on the display. That means that
the arm should be lifted.
Stamping time can be set between 0,5 and
10 seconds. To set the suitable time, put
the arm maximally down. Then, pressing
the ”
<” (upward arrow) or “:” (downward
arrow) button set the required time. For a
moment the figures on the display blink
quickly and then an inscription END
appears. That means that new settings
have been saved in the memory.
Counter
The machine is equipped with a counter,
which reckons how many imprintments
have been made. The value of counter
appears for 2 seconds after lifting the arm.
If the arm was put down and then only the
settings of stamping time were changed ,
the counter does not recognize it as an
imprintment.
The value of counter is deleted every time
when switching off the machine.
Preparing the fonts
and matrixes
With the Goldpress machine you can hot
stamp inscriptions (with fonts) or logo, symbols, signs etc (with matrixes). Inscriptions
Page 5

can be made both on covers and, using the
O.Goldchannel Base, on channels (backs
of OPUS covers).
Note!
When hot stamping on channels, use
only 5,5mm or 6 mm fonts.
A. PREPARING THE FONTS
1.Take the frame out of the heating slot and
put it on a holder. This way you can comfortably put the fonts in and out of the
frame.
Note!
If the frame or the fonts were previously
used or located in the heating slot during the heating period, wait 5÷10 min
until they get cold. For that reason we
recommend having several sets of
fonts, frames and holders.
2. Compose a required text by putting suitable fonts into the frame.
Note!
The types should be put in and taken out
by means of a special pliers. The ends of
the pliers should be inserted into the
holes in the fonts (see the picture) or
embrace the fonts (in case of 4mm size).
The holes enable to distinguish between
the top and the bottom of a font. The bottom hole of a font is larger or located closer to the edge (4 mm high fonts,
because of their small measurements,
have only one hole – at the bottom)
If you prepare fonts to be hot stamped
on the channels, use only 5,5 mm
or 6 mm ones. Using smaller fonts may
result with their damage.
For 6 mm fonts use only 1L6 frame (with
1 line). For 5,5 mm fonts fix the inscription into the middle line of 3L5,5 frame.
Also, make sure the fonts are placed in
the frame frontally (not upside-down);
this also concerns stamping on channels.
3. Lock the text in the frame by means of
the stops.
4. Insert the frame into the heating slot and
wait about 3 min until the fonts are hot.
Note!
To make storing and keeping fonts in
order easier, we recommend using a
movable container (see the picture).
Storing the fonts in the container helps
to find a required letter quickly and prevents from losing the fonts.
B. PREPARING THE MATRIX
You can order a special, customized matrix
(O.Matrix) from OPUS, made according to
your own design. O.Matrix is suitable to use
with Goldpress machine.
You can also use your own matrix , if its
measurements do not exceed 35 mm x 179
mm (1,37 in. x 7,04 in.). However, in this
case you need to use also a special tape
(O.Mounting Tape) and a plate (O.Matrix
base) to mount it in Goldpress.
O.Matrix
(customized matrixes ordered in Opus)
1. Put the O.Matrix into a special frame
Page 6

(O.Matrix frame or O.Matrix/1L4 frame -
depending on the matrix size).
2. Insert the frame into the heating slot and
wait until the matrix is hot.
Customer`s matrix
1. Stick the tape to the back of your matrix
(by taking off the protection layer) and
cut it along the matrix edge.
2. Stick the matrix to O.Matrix Base
Note!
Before sticking the matrix, make sure
that the inscription/logo on the matrix is
parallel to the bottom edge of the plate
(O.Matrix Base)
3. Put the plate (O.Matrix Base) with the
matrix into the frame (O.Matrix frame)
4. Insert the frame into the heating slot and
wait until the matrix is hot.
Note!
The heating time of a matrix depends on
its size and can vary from few to tens of
minutes. Therefore it is necessary to
conduct a test to check if the matrix is
hot enough.
Preparing the document
for hot stamping
1. Center a cover with the ruler located
along the drawer edge.
2. Determine the height of the inscription
using the scale on the side guide and,
subsequently, set the rear and side
guides.
3. In order to cut foil off, pull a suitable
piece of foil under the knife (preferably,
the foil area should be larger than that of
the heater) and pull it vigorously
upwards. You can also remove the knife
and cut the foil in any other place.
4. Arrange the plates depending on the
type of covers to be hot stamped.
Preparing the plates
A. ADJUSTMENT
1.Lower the basic plate (3) by turning all its
knobs maximally counter-clockwise and
place it into the heating slot of the
Gopdpress 4+ machine.
Note!
The plate should be put directly into the
heating slot by lifting it up a little (do not slide
it into the slot).
2. On the basic plate (3) put the plate #1
and then plate #2.
Page 7

Note!
Plate #2 has pins, which should be placed
into the holes of plate#1 and basic plate (3)
3. On the top put the adjusting plate (4); its
bent wall should be placed down and
should face you.
4. Put the arm of the machine down.
5. Keeping the arm down, turn the knobs of
the basic plate (3) maximally clockwise
6. Lift the arm of the machine
Note!
Repeat steps 5, 6, 7 for several times.
7 Take the adjusting plate (4) off.
Note!
The process of adjusting should assure
the highest quality of hot stamping.
However, it may happen to be necessary
to increase the pressure on the cover
(e.g. pale dots within the embossed
area) or decrease the pressure (e.g.
blurred letters). In such case:
-turn the knobs of the basic plate (3)
clockwise – to increase the pressure
-turn the knobs of the basic plate (3)
counter-clockwise – to decrease
the pressure
Also, if the inscription is not uniformly
hot stamped (e.g. left side is hot
stamped correctly, while right side is
blurred) , turn the adequate knobs
clockwise or counter-clockwise (to
increase/decrease the pressure on the
adequate side of the basic plate (3)).
Note!
Adjustment does not have to be conducted every time when changing the
fonts or type of cover. It should be
repeated only after the hot stamping
result is not satisfactory.
B. ARRANGING THE PLATES DEPENDING ON THE TYPE OF COVER
Metalbind cover (set of two separated covers and a channel)
1. Put the basic plate (3) into the heating
slot, and then the plate #1 and plate#2
2. Put the cover to be hot stamped on the
plates.
C-bind cover (typical cover with a built-in
channel)
1. Put the basic plate (3) into the heating slot
and a plate #2 on it.
2. Put the C-bind cover with its channel up.
3. Inside the cover , in the place where you
are going to hot stamp, insert the CB
layer (4)
4. Put the cover (with the CB layer in) on
the plates
Preparing the channel for hot
stamping.
With the machine ONLY the O•CHANNELS
manufactured by OPUS can be hot
stamped.
To hot stamp on channels you need to use
O.GoldChannel Base
1. Fix the changeable part onto the channel
base (pins of the base should fix into the
holes in the changeable part). Make sure
that the size of the changeable part (indicated in front) must be same as the size
of the channel you want to hot stamp on.
2. Put the channel on the changeable part;
make sure the bent side wall of the channel is placed in front of you (see the picture). If necessary, centre the channel
using the scale sticked on the base
Page 8

3. Put the basic plate (3) into the heating slot.
4. Insert the base and the channel under
the heating slot.
Hot stamping
1. Put a cut off piece of foil in the place
where you want to make hot stamps.
2. Insert the cover under the heating slot.
Make sure that the foil strip is positioned
exactly under the frame.
3. Press the arm of the machine maximally
down until the counter starts to count
down the time
4. After the set time passes (inscription
END appears) lift the arm.
Note!
If the current heater temperature is too low – an
inscription LO appears. It is necessary then
wait the heater to get hot.
If the current heater temperature is too high –
an inscription HI appears. You need to wait until
the heater cools down.
5.Take the cover (channel) out and remove
the foil strip.
To change an inscription or a matrix,
remove the frame from the heating slot
(note: the frame is hot), put it away on the
holder, wait 5÷10 minutes until the frame
is cold and, subsequently, start composing
a new text or mounting a new matrix.
Note!
After hot stamping is done, we recommend to wipe
the hot stamped inscription with a soft cloth (in
order to get rid of the remainings of hot
stamping foil).
Maintenance:
The machine needs neither lubrication nor
perio-dical surveys. The points to be lubricated have been preserved in the factory.
The machine housing is coated with powder varnish. The machine can be cleaned
with detergents commonly available in the
market. Do not use any solvents!
Technical data:
Rated voltage:.................................. 230V 50 Hz
Max power consumption: .......................... 500W
Rated power consumption: ........................ 80W
Dimensions DxSxW (in.): .............. 546x362x278
Operating temperature: .......................... ~100°C
Temperature adjustment range: ........ 50-150°C
Temperature stabilization: ........ microprocessor
Maximum cover width (with the side stop): ...... 265mm
Maximum cover width (without the side stop): 305mm
Technical data: (North America)
Rated voltage: .................... 110-120V 50-60 Hz
Max power consumption: .......................... 250W
Rated power consumption: ........................ 50W
Dimensions DxSxW (in.): .......... 21,5x14,2x10,9
Operating temperature: ............................ ~212F
Temperature adjustment range: ........ 122÷302F
Temperature stabilization: ........ microprocessor
Maximum cover width (with the side stop): ........ 10,4 in
Maximum cover width (without the side stop): ...... 12 in
Page 9

DEFECT
The machine does
not switch on
The display does not indicate
a temperature
The device does not achieve a
desired temperature or exceeds
it significantly.
Pale dots appear within hot
stamped inscription
Stamped letters are blurred,
traces of paint are visible
beyond letter edges
POSSIBLE CAUSE
Temperature of the room
is lower than +8 C/46,4 F
The plug is not connected to mains
Lack of voltage in a socket
The device is damaged
Check what temperature
has been set
The device is damaged
Too low temperature
Too short time of stamping
Too low pressure
Too high temperature
Too long time of stamping
Too high pressure
REMEDY
Place the machine in a room
temperature higher than
+8C/46,4 F
Insert the plug to mains socket
Connect the machine to another socket
Contact the supplier
Set a suitable temperature
Contact the supplier
Increase temperature
Increase stamping time
Increase the pressure
(turn clockwise the knobs of the
basic plate (3)
Reduce temperature
Reduce stamping time
Lower the pressure
(turn counter-clockwise
the knobs of the basic plate (3)
25.04.05
 Loading...