

Page 1

OPUS Easy 120 • User guide
GB
OPUS Easy 120
User guide
GB
Page 2

1 - The back wall of the channel is bent in to clamp covers and pages
2 - Special covering for hot print stamping
3 - Shaped front edge to keep a perfected flat face to the front of the presentations
4 - The internal pages are protected against damage by the covers from the channel
5 - The front face of the channel is never misshaped always flat
6 - The special protrusions (on selected channels) at each end help to centre covers and papers of the
presentation document and stop them moving sideways in the channel
METALBIND SYSTEM
OPUS EASY 120 was designed for binding documents and covers using the
METALBIND SYSTEM of covers and channels. The pages of the presentation
document are placed between covers and than put into the METALBIND channel
and clamped together from the outside.
1
Contents:
1 METALBIND SYSTEM
DESCRIPTION
HEALTH & SAFETY
ASSEMBLEING AND PREPARATION
TO WORK
BINDING WITH METALBIND
CBIND SYSTEM
TECHNICAL DATA
1
2
4
3
5
6
Metalbind
Page 3
OPUS Easy 120 • User guide
GB
3
DESCRIPTION2
• Before operating the equipment read the Health & Safety precautions, manufacturers
recommendations and the operation/user manual
• The operation/user manual should be easily available at any time for the operator
• The equipment must be kept away and out of reach of children
• Equipment must be protected against dust and damp and should be positioned on a strong and sturdy
flat surface
• While binding, do not put ngers into the binding slot
• Be careful when moving the equipment it is very heavy
• The machine must not be used for any other purposes other than those indicated in the operating/
user manual
• It is necessary to check and supervise if the equipment is being used and operated correctly, before
reporting any malfunctions or problems to the service department or dealer
• Equipment must not be located outside or operated in temperatures under 8˚C / 46.4˚F and must be
operated in accordance with the general Health & Safety rules failure to do so could cancel
the guarantee
• Repairs must be carried out by authorized sta, during the guarantee period, failure to do so could
cancel the guarantee.
• Always leave the arm (1) in the open position
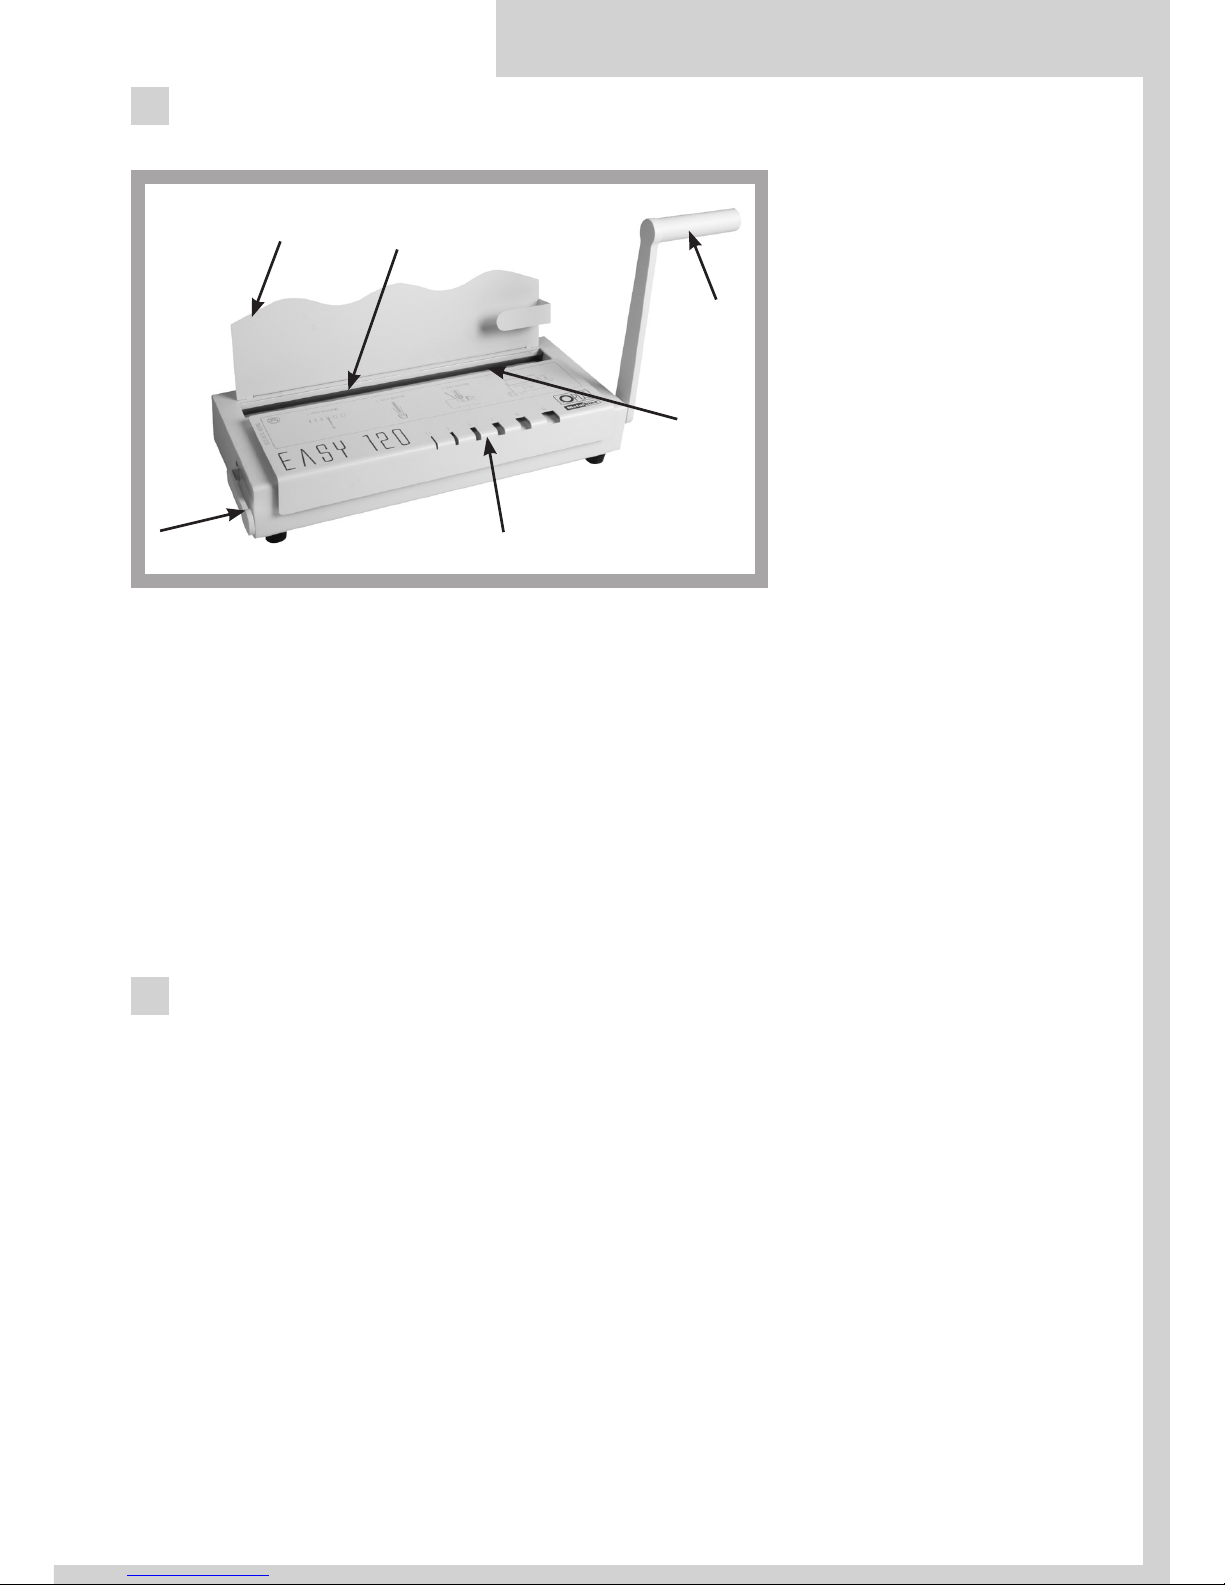
1 - Handle
2 - Clamp lever
3 - Binding slot
4 - Channel size selector graph with indentions
5 – Binding bar and jaw
6 - Extended back support
HEALTH & SAFETY
2
1
5
3
4
6
NOTE:
The binding bar is xed to the binding jaw by a magnet. When binding the binding bar
tilts forward slightly and drops back. Should the binding bar come out, by accident,
to replace it ensure that the notches on the binding bar t on the 2 square pins at each
end of the binding jaw.
Page 4
ASSEMBLEING AND PREPARATION TO WORK
No tools are required to assemble. After taking the device out of the packing box, start
assembling the equipment. Screw the handle to the arm(1). Install extended back support
(6) on the top at the back with the thumb screw supplied. The equipment is now ready for
work.
4
1. Use the channel selecting graph with indentions (4) or chats below to choose the channel
size.
H = hard cover. p = pages. T = transparent cover. S = soft cover. O = no cover.
Example: H/p/H =(H) hard cover/ (p)pages / (H) hard cover
5
Channel size H/p/H H/p/T S/p/S O/p/O
1,5 - - 1 - 15 1 - 15
3 - - 16 - 32 15 - 30
5 18 - 31 18 - 33 33 - 45 18 - 38
7 32 - 60 34 - 63 46 - 62 39 - 67
10 61 - 89 64 - 92 63 - 94 68 - 97
13 90 - 120 93 - 120 95 - 120 98 - 120
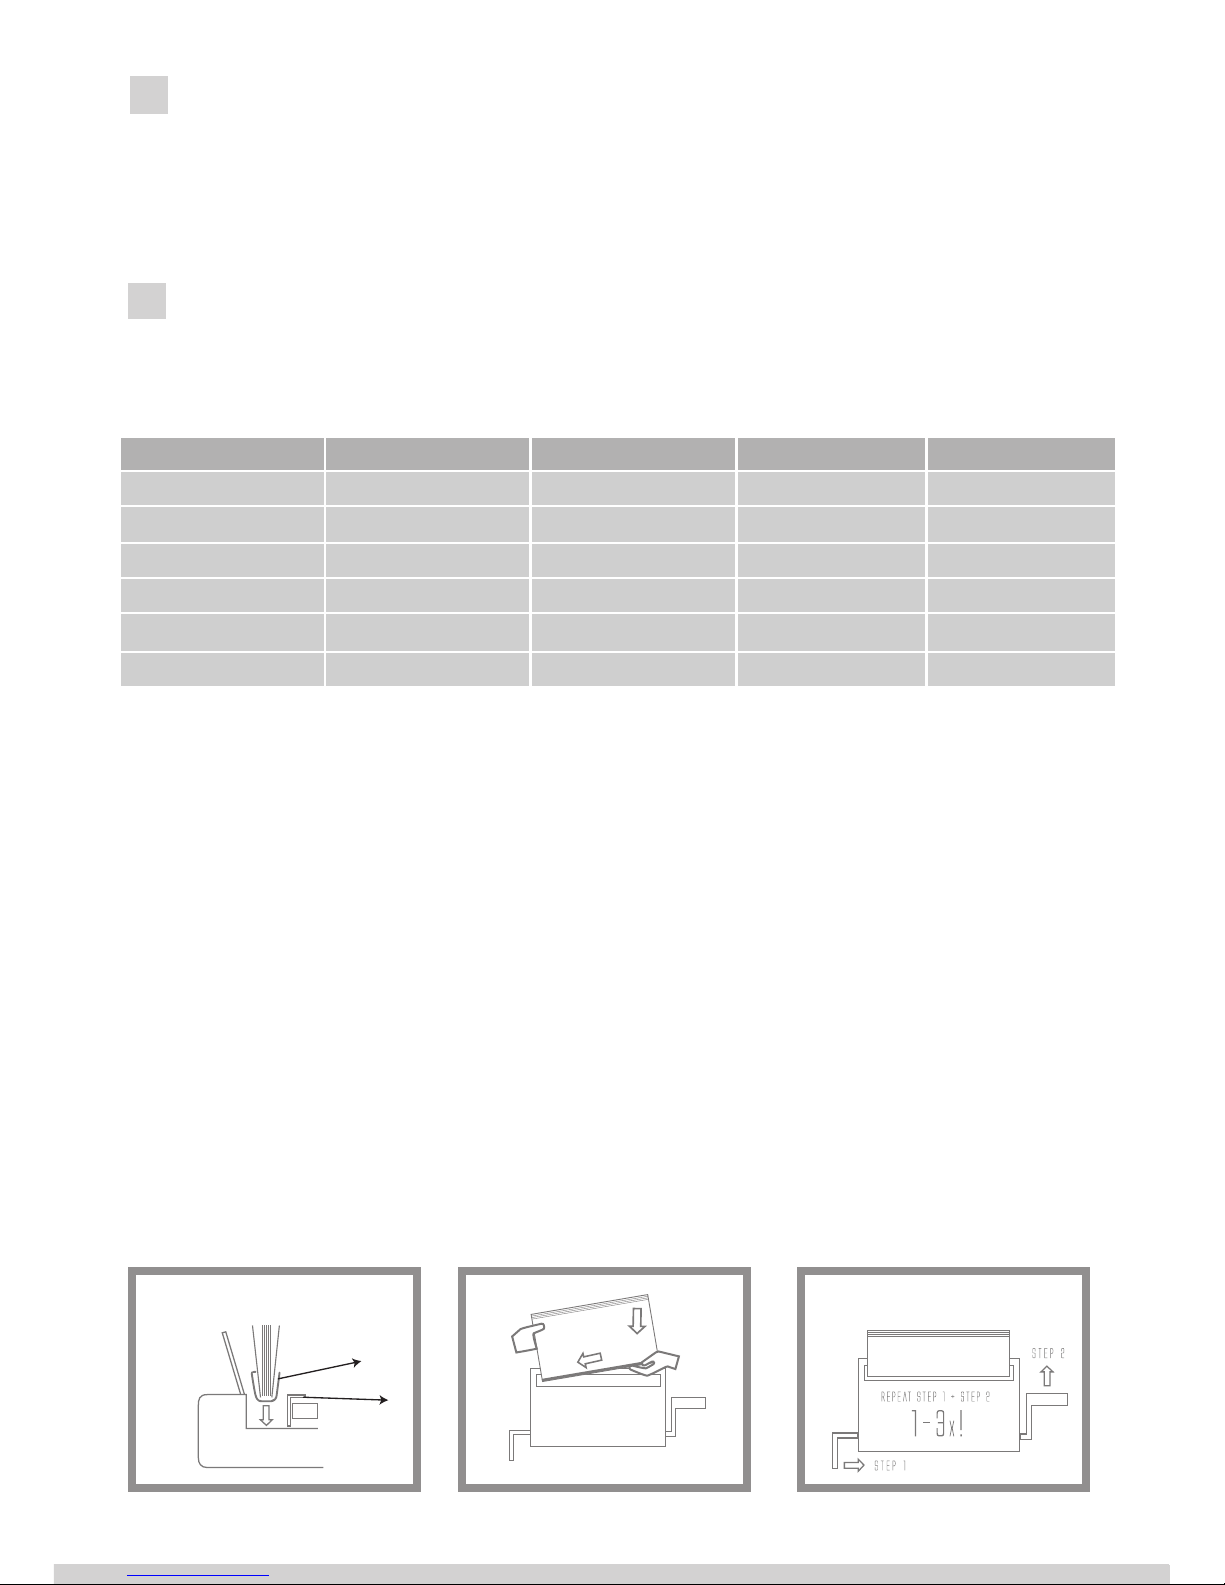
BINDING WITH METALBIND
2. Pull the bind handle up (1) to the open position, vertical.
3. Move the clamp lever (2) completely out to the left.
4. Prepare the documentation for binding:
A Method:
• Take the pile of documents insure they are even, put them between the covers, check
the pages are cantered between the edges of covers.
• Now take the documents and covers and push carefully into the channel, start with one
end.
• Put the channel (7) with documents start with one end at an angle, into the binding
slot as shown bellow. Ensure that all sizes of channels are in the centre of the binding
slot.
• Slid the clamp lever in (2) to the right until you can feel resistant’s on the lever.
7
5
Page 5

OPUS Easy 120 • User guide
GB
5. Push the handle (1) down.
6. Now pull up the bind handle (1) to the open
position, vertical and slide the clamp lever (2) to the
right in the same time.
7. Repeat points 5 and 6 until the document is bound,
(2-3 times)
8. You may remove bound document.
The device OPUS Easy 120 allowed you to bind the C-BIND system as well.
1. Use channel width selecting graph with indentions (4) or chat below to choose size of
channel.
The bound documentation must have a thickness of at least 1.8 mm (without cover).
If the documentation is thinner, you must use a lling strips (e.g. O.Filling Sticky
available at OPUS), to increase the thickness of bound documents.
When using the C-binding system, remember to rotate the covers 180o 2 or 4 times.
6
Channel size Number of sheets
AA
soft cover 15-40
hard cover 20-40
A
41-90
B
91-120
SYSTEM C-BIND
back cover
B Method:
• Put the channel (7) into the binding slot in the centre.
• Slid the clamp lever (2) in to the right until you can feel resistant’s on the lever.
• Take the pile of documents insure they are even, put them between the covers, check
the pages are cantered between the edges of covers.
• Now take the documents and covers and push carefully into the channel in the binding
slot, start with one end at an angle.
NOTE!
Make sure the back cover is facing you. Ensure you have the right channels for the
cover. If the channels have parturitions, ensure covers are between them.
Page 6

TECHNICAL DATA
• Binding capacity ................................................................................120 sheets*
• Net weight .............................................................................................8.7 kg
• Gross weight ...........................................................................................9.5kg
• Dimensions (H x W x D) ............................................................147 x 458 x 234 mm
* Tested on 80 g/m2 paper
06.09.2017 Opus sp. z o.o.
7
Page 7

OPUS Easy 120 • Instrukcja obsługi
PL
PL
OPUS Easy 120
Instrukcja obsługi
Page 8

1 - tylna ściana kanału jest pochylona aby przytrzymywać okładki i kartki dokumentacji
2 - kanał jest wykończony elegancką okleiną
3 - specjalny kształt kanału zapewnia perfekcyjny wygląd dokumentacji
4 - strony nie ulegają uszkodzeniu
5 - przednia ściana nie ulega deformacji
6 - ogranicznik kanału - specjalne ograniczniki ułatwiające dokładne wycentrowanie dokumentów
wraz z okładkami, jak również uniemożliwiające przemieszczanie się stron dokumentacji
wzdłuż kanału
SYSTEM METALBIND
Urządzenie bindujące OPUS EASY 120 jest przeznaczone do oprawiania dokumentacji (bindowania) przy użyciu okładek i kanałów wykonanych w systemie
Metalbind. Bindowanie polega na zaciskaniu pliku kartek wraz z okładkami od
zewnątrz przez metalowy kanał.
1
SPIS TREŚCI:
1 System METALBIND
2 Opis urządzenia
3 Zasady bezpieczeństwa
4 Przygotowanie
urządzenia do pracy
5 Bindowanie METALBIND
6 System C-BIND
7 Dane techniczne
1
2
4
3
5
6
Metalbind
Okładki oraz kartki są przytrzymywane przez kanał, co czyni METALBIND
najtrwalszym systemem bindowania.
Page 9

OPUS Easy 120 • Instrukcja obsługi
PL
3
OPIS URZĄDZENIA2
• przed rozpoczęciem pracy z urządzeniem należy zapoznać się z zasadami bezpieczeństwa, zaleceniami
producenta i instrukcją obsługi
• instrukcję tę należy zachować i korzystać z niej w przypadku jakichkolwiek wątpliwości dotyczących
obsługi urządzenia
• urządzenie należy chronić przed wilgocią i kurzem
• urządzenie należy trzymać poza zasięgiem dzieci
• urządzenie należy ustawić na stabilnej powierzchni o odpowiedniej wytrzymałości
• w trakcie zaciskania nie wkładać rąk do szczeliny bindującej!
• zachować ostrożność przy przenoszeniu urządzenia.
• nie wolno używać urządzenia do innych celów niż określone w instrukcji obsługi
• należy kontrolować sprawność urządzenia.
• w przypadku zauważenia jakichkolwiek nieprawidłowości w pracy, należy skontaktować się z serwisem
• urządzenie jest przeznaczone wyłącznie do pracy w pomieszczeniach zamkniętych
• urządzenie należy obsługiwać zawsze zgodnie z ogólnymi zasadami BHP
• wszelkich napraw urządzenia może dokonywać jedynie osoba uprawniona.
• nie pozostawiaj ramienia (1) w pozycji dolnej (opuszczonej), gdyż ramię pod obciążeniem może
samoistnie odskoczyć.
1 - ramię urządzenia
2 - uchwyt regulujący
rozwarcie szczęki
3 - szczelina bindująca
4 - przyrząd doboru
rozmiaru kanału/okładki
5 - listwa bindująca
6 - pałąk z ogranicznikiem
bocznym
ZASADY BEZPIECZEŃSTWA
Uwaga!
Listwa bindująca mocowana jest na szczęce bindującej za pomocą magnesu. Podczas
bindowania listwa ulega przechyleniu dostosowując się do kanału. W przypadku
odczepienia się listwy w trakcie użytkowania należy ją umieścić z powrotem na
szczęce bindującej zwracając uwagę aby wycięcia w listwie dopasować do wypustek
w szczęce bindującej.
2
1
5
3
4
6
Page 10

PRZYGOTOWANIE URZĄDZENIA DO PRACY
• Montaż urządzenia nie wymaga narzędzi.
• Po wyjęciu urządzenia z opakowania przykręć rączkę do ramienia urządzenia.
• Zainstaluj pałąk (6) na urządzeniu i przykręć go za pomocą dołączonej śruby.
• Urządzenie jest gotowe do pracy.
1. Przy pomocy przyrządu lub poniższej tabeli dobierz rozmiar kanału.
T/k/T – okładka twarda/plik kartek/okładka twarda
T/k/P – okładka twarda/plik kartek/okładka przezroczysta
M/k/M – okładka miękka/plik kartek/okładka miękka
B/k/B – plik kartek zbindowany jedynie za pomocą kanału
4
5
Rozmiar kanału T/k/T T/k/P M/k/M B/k/B
1,5 - - 1 - 15 1 - 15
3 - - 16 - 32 15 - 30
5 18 - 31 18 - 33 33 - 45 18 - 38
7 32 - 60 34 - 63 46 - 62 39 - 67
10 61 - 89 64 - 92 63 - 94 68 - 97
13 90 - 120 93 - 120 95 - 120 98 - 120
BINDOWANIE METALBIND
2.Podnieś ramię urządzenia (1) maksymalnie do góry.
3.Przesuń uchwyt regulujący rozwarcie szczek (2) maksymalnie w lewo.
4. Przygotuj dokumentację, którą chcesz oprawić:
SPOSÓB A:
• Wyrównany plik kartek włóż pomiędzy okładki i zwróć uwagę, aby kartki były wycentrowane względem brzegów okładek.
• Tak przygotowane pliki kartek wraz z okładkami włóż do kanału (7)
• Włóż kanał (7) wraz z dokumentacją pod kątem (przytrzymując jedną ręką kanał) do
szczeliny bindującej wg. załączonych rysunków.
• Uchwyt regulujący rozwarcie szczek (2) przesuń w prawo aż poczujesz opór.
7
5
Page 11

OPUS Easy 120 • Instrukcja obsługi
PL
5. Opuść ramie (1) w dół
6. Podnieś ramie (1) przesuwając jednocześnie w prawo
uchwyt rozwarcia szczek (2).
7. Punkt 5,6 należy powtarzać do całkowitego
zbindowana dokumentu (ok 1-3 razy)
8. Wyciągnij zbindowany dokument.
tylna
okładka
SYSTEM C-BIND
Urządzenie bindujące OPUS EASY 120 może również oprawiać dokumentacje w systemie
C-BIND.
1. Przy pomocy przyrządu lub tabeli dobierz rozmiar okładki.
Oprawiana dokumentacja musi mieć grubość co najmniej 1,8 mm. Jeśli dokumentacja
jest cieńsza, koniecznie użyj pasków wypełniających (np. O.lling Sticky dostępnych
w ofercie OPUS), tak aby zwiększyć grubość oprawianych dokumentów.
Bindowanie w systemie C-BIND należy przeprowadzić analogicznie jak w systemie
MetalBind obracając dokumentację o 1800 po każdym zaciśnięciu - (2-4razy).
6
Rozmiar okładki Ilość oprawianych kartek
AA
okładka miękka 15-40
okładka twarda 20-40
A
41-90
B
91-120
Uwaga!
Upewnij się, ze tylna okładka znajduje się przodem do Ciebie.
W niektórych kanałach znajdują się ograniczniki, które uniemożliwiają przemieszczanie
się papieru wzdłuż kanału. W tym wypadku należy włożyć plik kartek pomiędzy
te ograniczniki.
SPOSÓB B:
• Włóż kanał (7) do szczeliny bindującej.
• Uchwyt regulujący rozwarcie szczek (2) przesuń w prawo aż poczujesz opór.
• Wyrównany plik kartek włóż pomiędzy okładki i zwróć uwagę, aby kartki były wycentrowane względem brzegów okładek.
• Tak przygotowane pliki kartek wraz z okładkami włóż pod kątem do kanału (7)
Page 12

DANE TECHNICZNE
• maksymalna ilość oprawianych kartek ....................................................120 kartek*
• waga netto .............................................................................................8,7 kg
• waga brutto ............................................................................................9,5 kg
• wymiary (W x S x G) ..................................................................147 x 458 x 234 mm
*próby wykonano na papierze o gramaturze 80 g/m²
06.09.2017 Opus sp. z o.o.
7
 Loading...