

Page 1
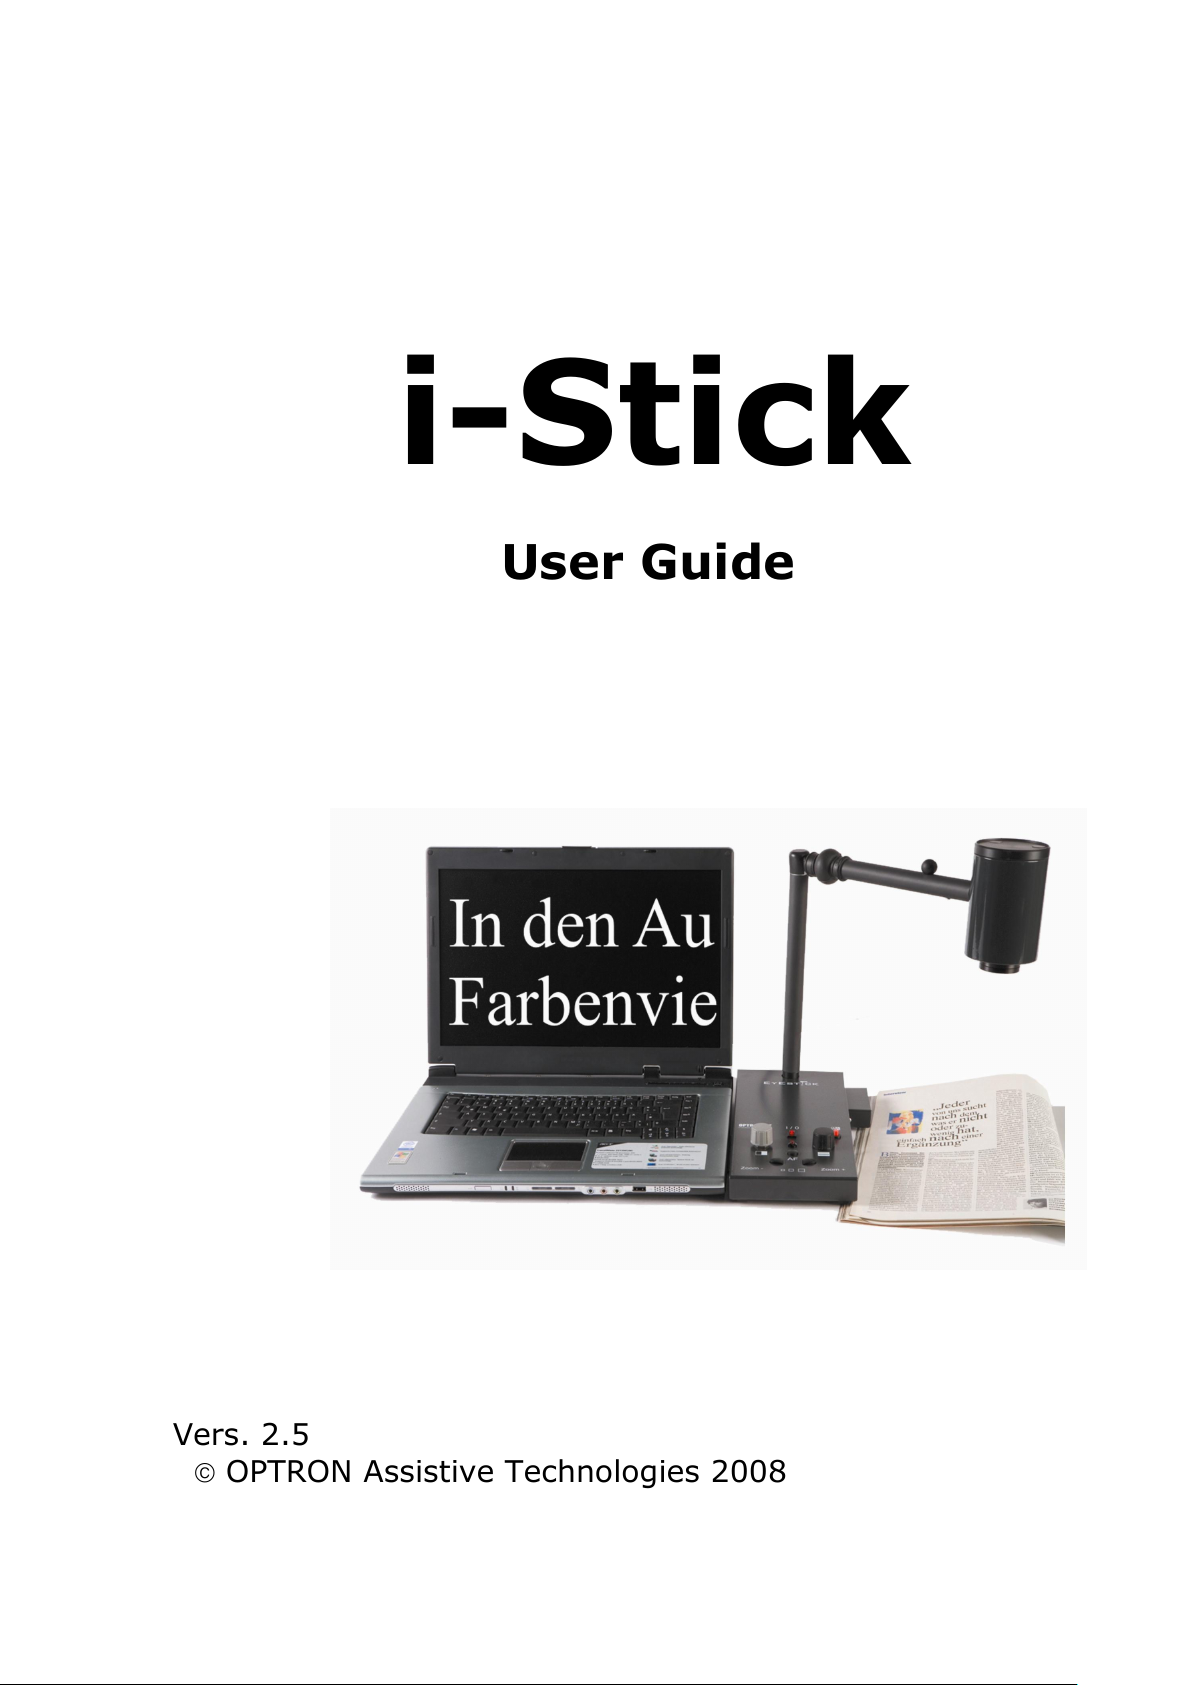
i-Stick
User Guide
Vers. 2.5
OPTRON Assistive Technologies 2008
Page 2

Need Help? Please call 1-888-567 8766 1
___________________________________________________________________
PLEASE READ AND UNDERSTAND THIS
USER GUIDE COMPLETELY BEFORE USING
THE i-STICK.
For questions and more information please contact your local
dealer or:
OPTRON Assistive Technologies Inc
P.O. Box 5454
Morton, IL 61550
USA
Phone: 1-888-567-8766
Email: info@optronusa.com
Web: www.optronusa.com
©2008 OPTRON Assistive Technologies. All rights reserved.
Microsoft, Windows XP and Windows Vista are registered
trademarks of Microsoft Corporation in the United States
and/or other countries.
ZoomText is a registered trademark of Ai Squared Company.
All other company/product names and service marks may be
trademarks or registered trademarks of their respective
companies.
If at any time in the future you should need to dispose of this
product please note that Waste Electrical Products should not
be disposed of with household waste. Please recycle where
facilities exist. Check with your local authority, your OPTRON
dealership or OPTRON Assistive Technologies for recycling
advice (Waste Electrical and Electronic Equipment Directive).
Page 3
Need Help? Please call 1-888-567 8766 2
___________________________________________________________________
Index
Safety Instructions ................................................... 4
Battery Safety Instructions ....................................... 5
System Requirements ............................................... 6
Contents .................................................................... 7
i-Stick – Parts and Elements ..................................... 8
Setting up the i-Stick ................................................ 9
Base Unit - Control Panel ........................................ 11
Positioning the Camera ........................................... 14
TwistCam™ and Distance Viewing ........................... 14
Close Up Lens ...................................................... 15
Desktop Reading .................................................. 15
Distance Viewing Option 1 ..................................... 16
Distance Viewing Option 2 ..................................... 16
Reading Books ..................................................... 17
Working with a Laptop ............................................ 18
Software Installation ............................................. 18
Starting the i-Stick ............................................... 21
Closing OPTRON View II ........................................ 22
Image Size and Position (F2 Key) ........................... 22
Magnification 1: Camera Magnification .................... 22
Magnification 2: Digital Magnification
(page up/page dn Keys) ........................................ 22
Contrast (F5 and F6 Keys) ..................................... 23
Brightness (F7 and F8 Keys) .................................. 23
Reset Standard Settings (F3 Key) ........................... 23
Page 4
Need Help? Please call 1-888-567 8766 3
___________________________________________________________________
Image Modes: Reversed Polarity (Negative Image) and
Monochrome Colors (F4 Key) ................................. 23
Auto Focus Lock ................................................... 24
Moving the Image on the Screen ............................ 24
Help File .............................................................. 24
Toggling between Applications ................................ 25
Still Images ......................................................... 25
Organizing Still Images ......................................... 25
Software Uninstallation .......................................... 28
Troubleshooting .................................................... 29
Working with a VGA Monitor ................................... 30
Magnification ........................................................ 30
Brightness ........................................................... 30
Black and White Image.......................................... 30
Reading Line ........................................................ 30
Reversed Polarity / Negative Image Contrast ........... 31
Auto Focus Lock ................................................... 31
Working with a Television (Composite Video-In) .... 32
Magnification ........................................................ 32
Brightness / Contrast ............................................ 32
Auto Focus Lock ................................................... 32
Battery .................................................................... 34
Charging the Battery ............................................. 34
Discharging the Battery ......................................... 35
Defective Battery .................................................. 35
Page 5
Need Help? Please call 1-888-567 8766 4
___________________________________________________________________
S
AFETY INSTRUCTIONS
Do not open any of the i-Stick’s components. Any unauthorized
opening of the i-Stick or its components can cause death or
serious injuries and will automatically void any warranty.
The battery must removed from the base unit when the i-Stick
is packed in a case, bag or container. When traveling with the
i-Stick, always keep battery and base unit separate.
Do not use the i-Stick near water or in moist/rainy situations
(hazard of electric shock).
Always follow these instructions when setting up, using and
packing the i-Stick.
Charging and using the i-Stick simultaneously is only possible
with the standard battery charger. Never use the i-Stick
without the battery correctly inserted.
Do not use the i-Stick in a dusty or extremely humid
environment (above 70% humidity). Do not expose the i-Stick
to temparatures above 90° F (35° C) or under 50° F (10° C).
When connecting the cables to the i-Stick make sure that the
plugs sit firmly in the sockets and that the cords are not tense.
Make sure that cords and cables connected to the i-Stick
cannot cause tripping or stumbling.
Data on your PC’s hard disk is stored magnetically. Make sure
that there is no interfering magnetic or electromagnetic
influence to your PC or laptop when using it with the i-Stick.
Page 6
Need Help? Please call 1-888-567 8766 5
___________________________________________________________________
B
ATTERY SAFETY INSTRUCTIONS
Do not disassemble, puncture, modify, drop, throw, or cause
other unnecessary shocks to batteries.
To run the i-Stick and to charge the batteries, use the supplied
battery charger and original i-Stick batteries only. Using
products other than the supplied battery charger and original
i-Stick batteries can cause death, serious injuries and severe
damage to your i-Stick.
Do not dispose of batteries in a fire or trash incinerator, or
leave batteries in hot places such as an automobile under
direct sunlight. Do not store batteries near an oven, stove, or
other heat source.
Do not connect batteries directly to an electrical source, such
as a building outlet or automobile power-point. Do not place
batteries into a microwave oven, or into any other high-
pressure container.
Do not immerse batteries in water or otherwise get them wet.
Do not use batteries, or charge rechargeable batteries, that
appear to be leaking, discolored, rusty, abnormally hot,
deformed; emit an odor; or are otherwise abnormal.
Do not touch leaking or abnormally hot batteries directly; wear
protective material to remove the batteries and dispose of
them properly immediately or contact Optron Assistive
Technologies at 1-888-567-8766.
Page 7
Need Help? Please call 1-888-567 8766 6
___________________________________________________________________
S
YSTEM REQUIREMENTS
If the i-Stick is used with a computer/laptop, the following
system requirements have to be met to assure proper
functioning of the i-Stick and its software:
Operating System: Windows XP, SP2 or higher
Ports: 1 free USB 2.0 or higher
Resolution: 800x600 at 32 bit
Processor: PC with 1 Gigahertz or higher processor
clock speed
Memory: Min. 1 GB for Windows XP
Min. 2 GB for Windows Vista
Graphics Card: Min. 64 MB for Windows XP
Min. 128 MB for Windows Vista
Others: At least 30 MB free hard disk space for
OPTRON View. Additional space is
recommended for saving images and
recordings.
Recommendation: Please update your computer's
graphic card driver before installing the OPTRON View
software. Updating other drivers is also recommended.
Please note: OPTRON Assistive Technologies cannot be
responsible for incorrect installation or defective
computer systems or any kind of damage resulting
thereof. Based on the large variety of available hardware
and software configurations, OPTRON Assistive
Technologies cannot guarantee proper function on every
PC. For more information, please contact OPTRON
Assistive Technologies (1-800-567-8766).
Page 8
Need Help? Please call 1-888-567 8766 7
___________________________________________________________________
C
ONTENTS
Before installing your i-Stick please make sure that you have
received the following items:
• Carrying bag
• i-Stick Base unit
• Folding camera arm with camera head
• Base stabilizer (attached magnetically to the bottom side
of the base unit)
• RCA cable for TV connection
• USB adapter
• Standard battery charger
• CD-ROM "OPTRONView Software"
• CD-ROM "i-Stick User Guide"
• 1 Battery
Please contact your local dealer or OPTRON Assistive
Technologies if any of the parts listed above are missing.
Page 9
Need Help? Please call 1-888-567 8766 8
___________________________________________________________________
I
-S
TICK – PARTS AND ELEMENTS
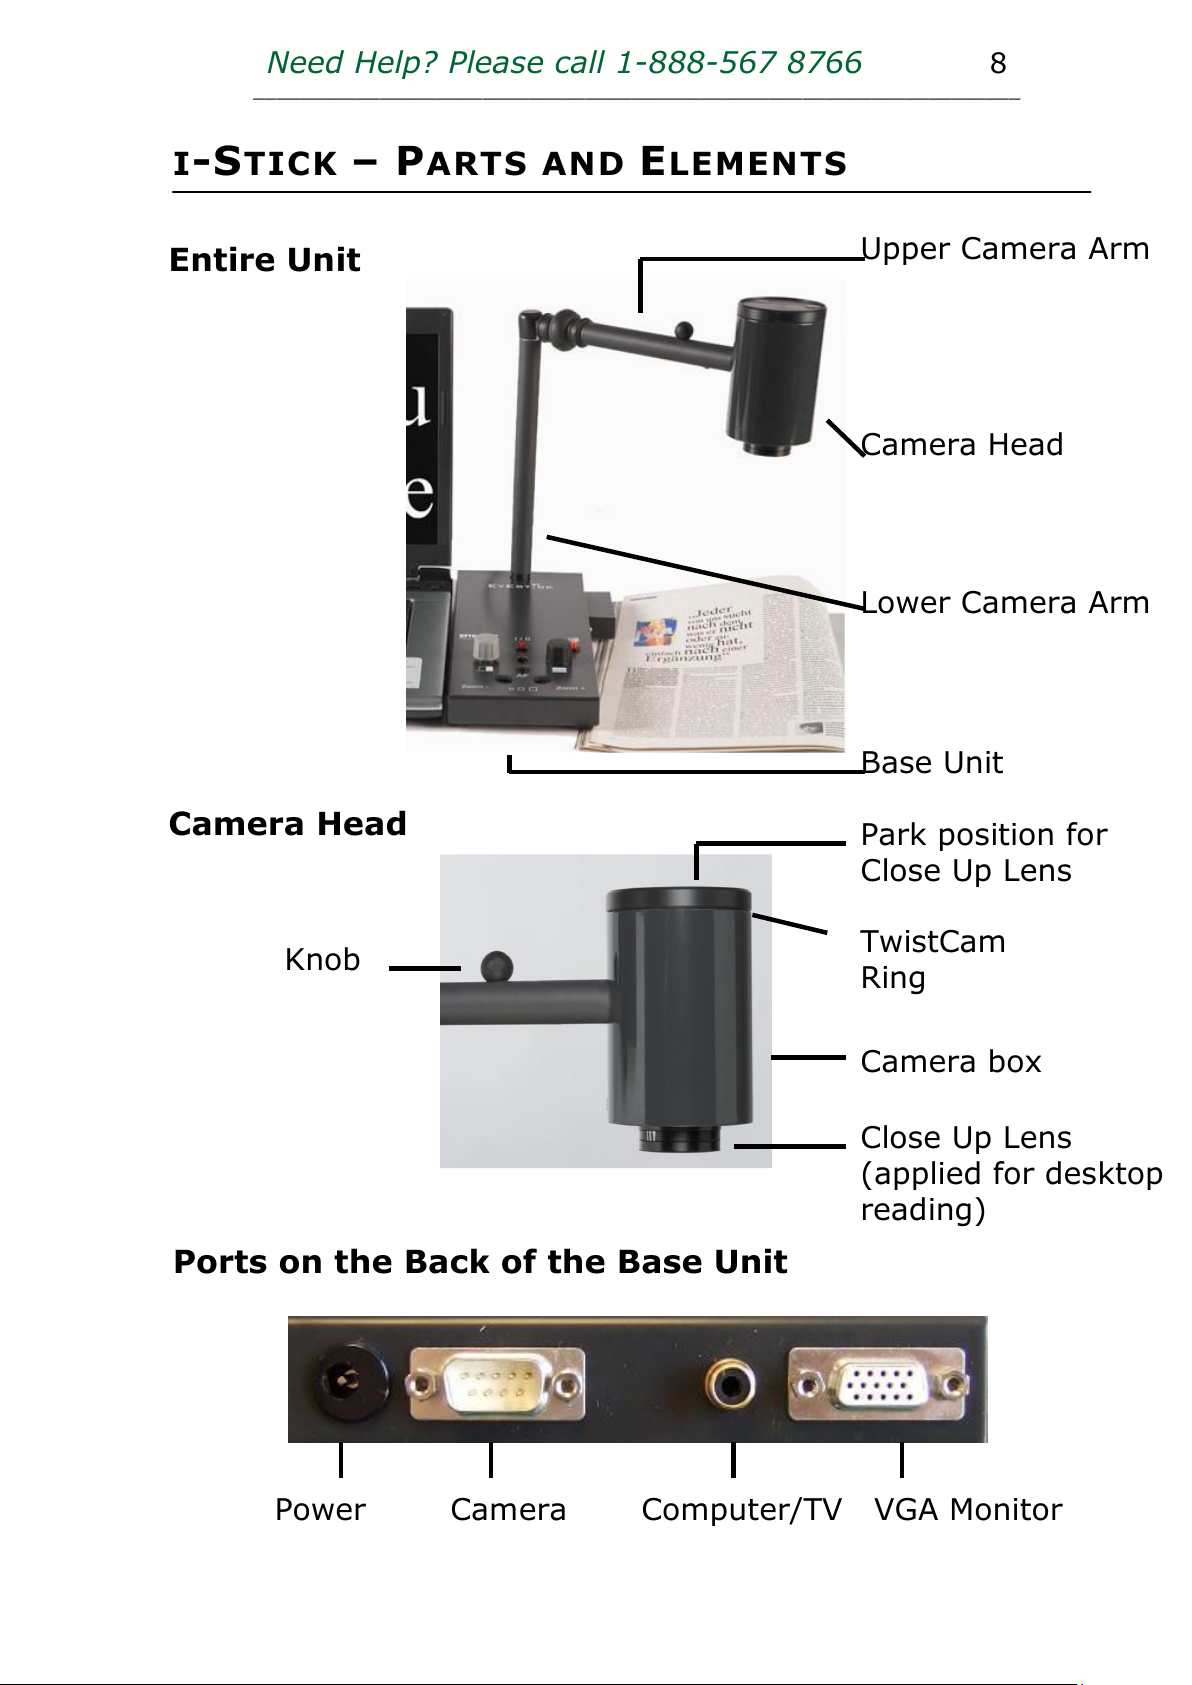
Ports on the Back of the Base Unit
Upper Camera Arm
Camera Head
Lower Camera Arm
Base Unit
Close Up Lens
(applied for desktop
reading)
TwistCam
Ring
Knob
Camera box
Park position for
Close Up Lens
Power Camera Computer/TV VGA Monitor
Camera Head
Entire Unit
Page 10
Need Help? Please call 1-888-567 8766 9
___________________________________________________________________
S
ETTING UP THE I
-S
TICK
Please follow these steps to prepare
your i-Stick for use:
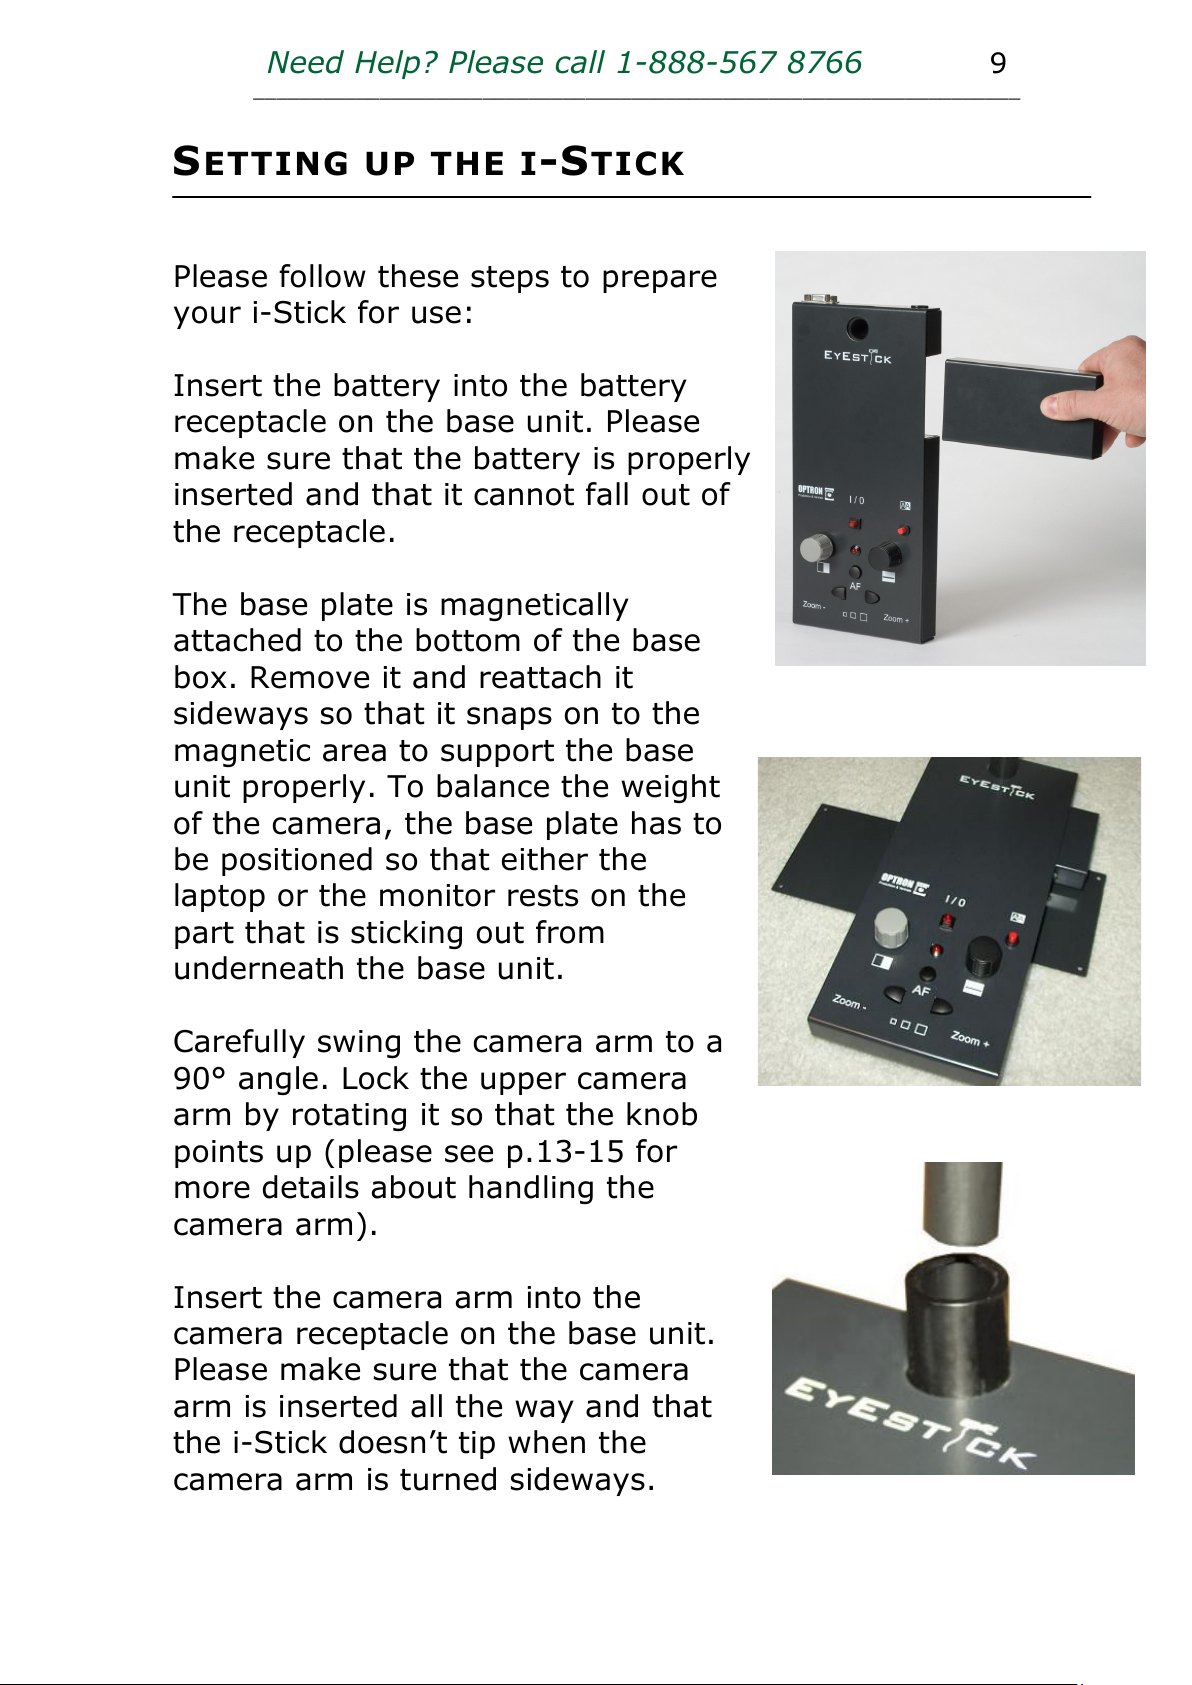
Insert the battery into the battery
receptacle on the base unit. Please
make sure that the battery is properly
inserted and that it cannot fall out of
the receptacle.
The base plate is magnetically
attached to the bottom of the base
box. Remove it and reattach it
sideways so that it snaps on to the
magnetic area to support the base
unit properly. To balance the weight
of the camera, the base plate has to
be positioned so that either the
laptop or the monitor rests on the
part that is sticking out from
underneath the base unit.
Carefully swing the camera arm to a
90° angle. Lock the upper camera
arm by rotating it so that the knob
points up (please see p.13-15 for
more details about handling the
camera arm).
Insert the camera arm into the
camera receptacle on the base unit.
Please make sure that the camera
arm is inserted all the way and that
the i-Stick doesn’t tip when the
camera arm is turned sideways.
Page 11
Need Help? Please call 1-888-567 8766 10
___________________________________________________________________
Please note: When the camera arm is set in the
receptacle, always check carefully that the i-Stick cannot
tip. If the i-Stick tends to tip, either put more weight on
the free area of the base plate for stronger support or
take the camera arm out of the receptacle and rearrange
the base plate to a position which gives stronger support
to the i-Stick.
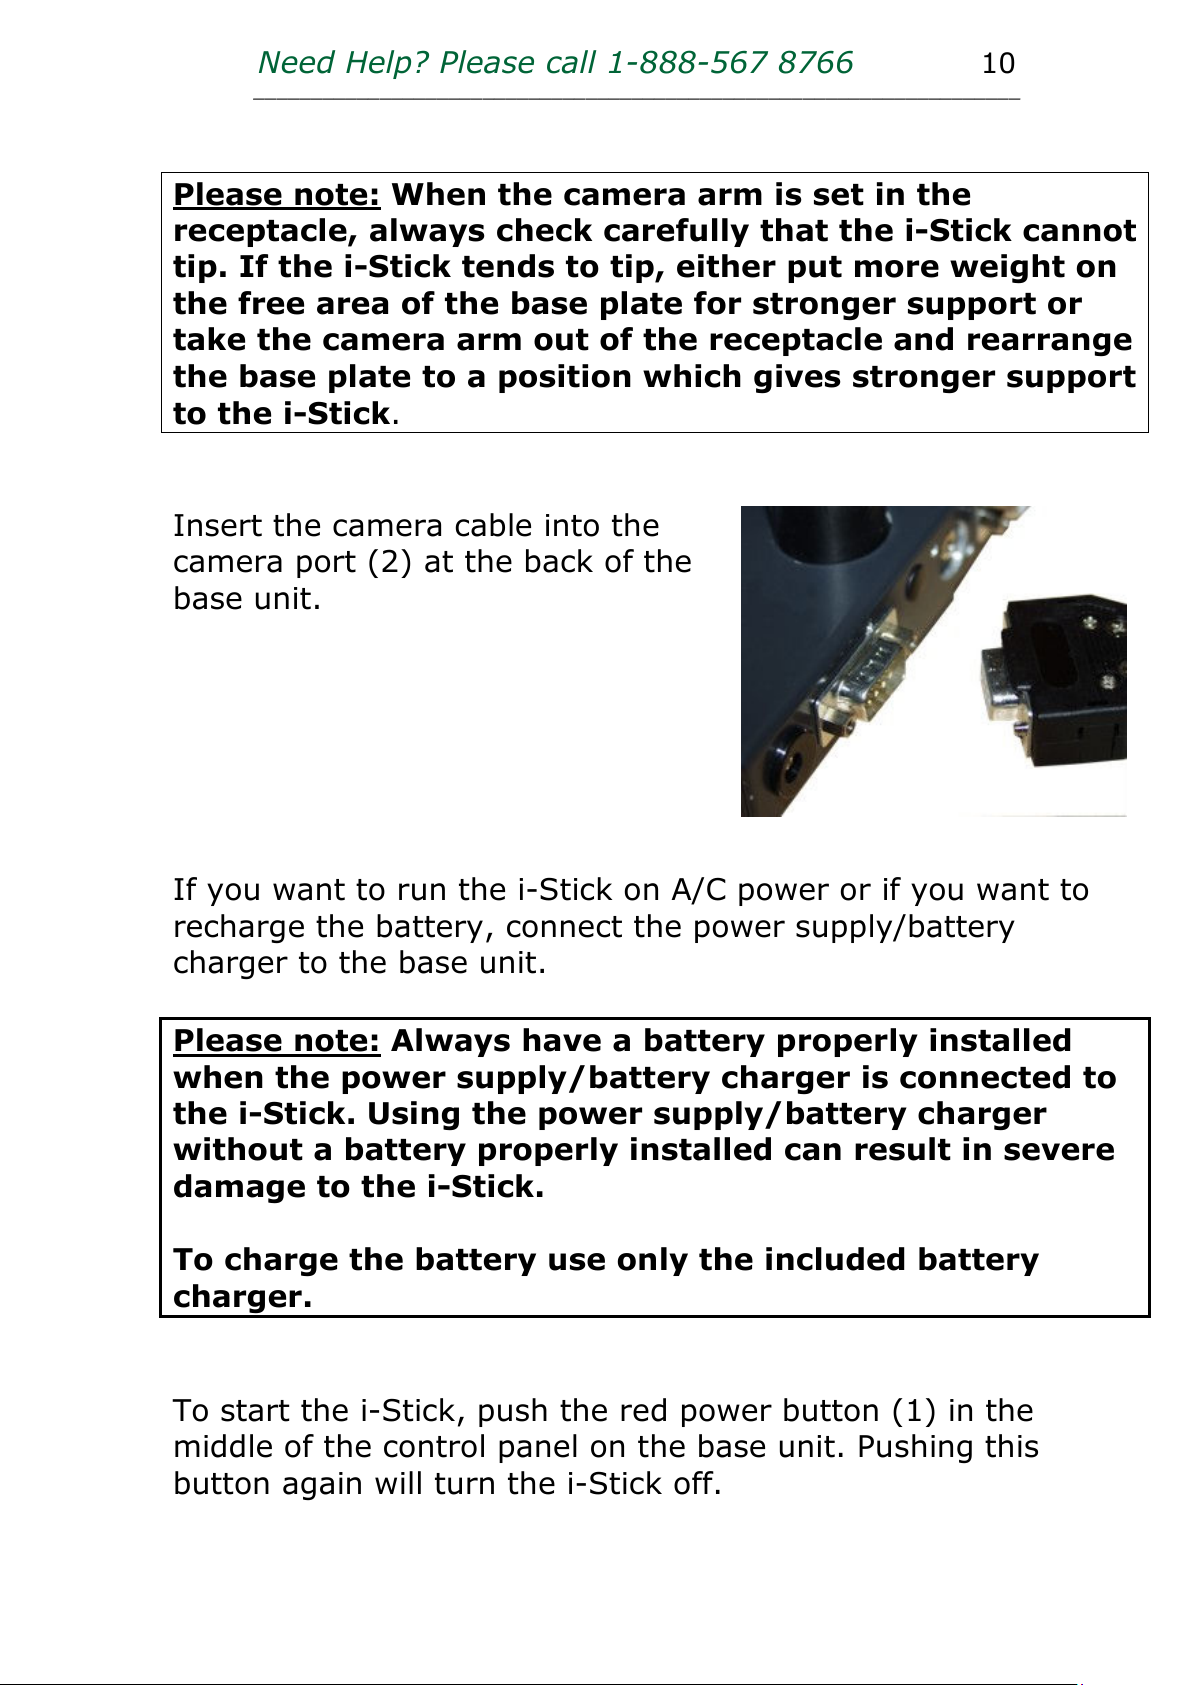
Insert the camera cable into the
camera port (2) at the back of the
base unit.
If you want to run the i-Stick on A/C power or if you want to
recharge the battery, connect the power supply/battery
charger to the base unit.
Please note: Always have a battery properly installed
when the power supply/battery charger is connected to
the i-Stick. Using the power supply/battery charger
without a battery properly installed can result in severe
damage to the i-Stick.
To charge the battery use only the included battery
charger.
To start the i-Stick, push the red power button (1) in the
middle of the control panel on the base unit. Pushing this
button again will turn the i-Stick off.
Page 12
Need Help? Please call 1-888-567 8766 11
___________________________________________________________________
B
ASE UNIT - CONTROL PANEL
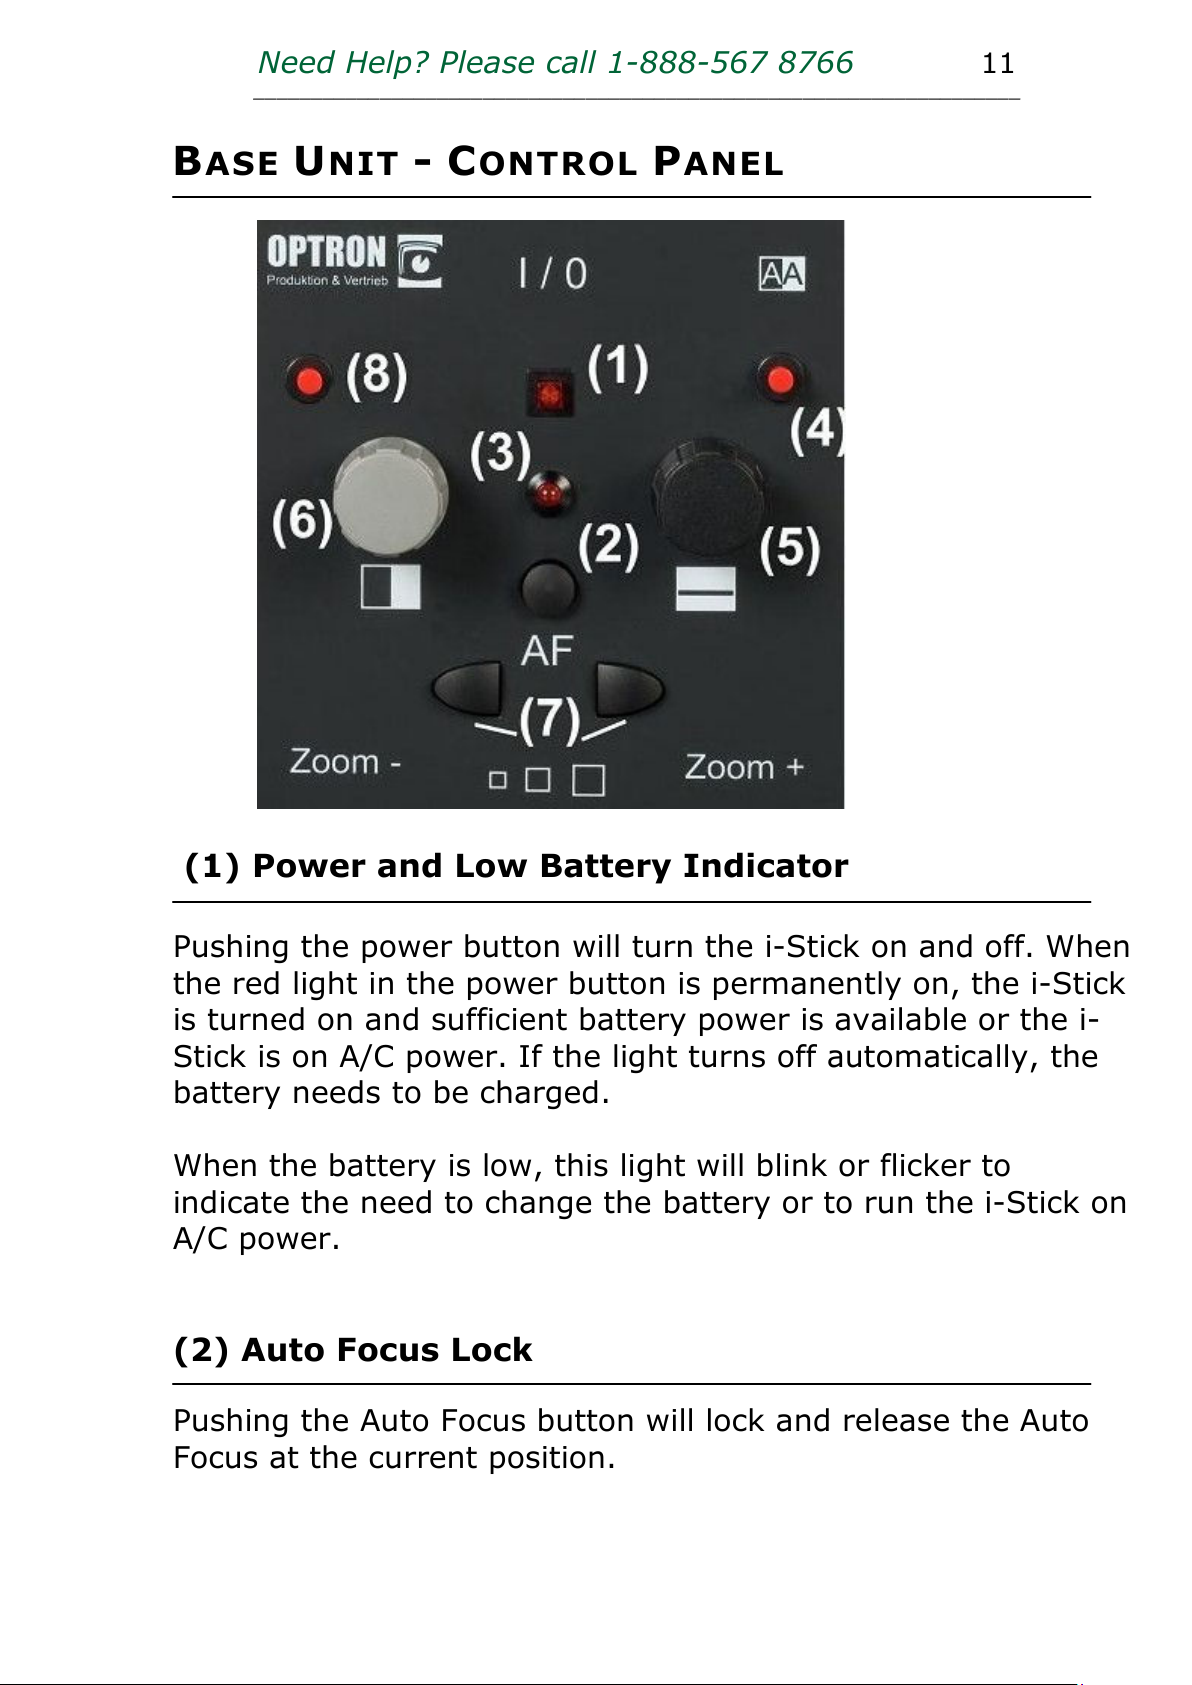
(1) Power and Low Battery Indicator
Pushing the power button will turn the i-Stick on and off. When
the red light in the power button is permanently on, the i-Stick
is turned on and sufficient battery power is available or the i-
Stick is on A/C power. If the light turns off automatically, the
battery needs to be charged.
When the battery is low, this light will blink or flicker to
indicate the need to change the battery or to run the i-Stick on
A/C power.
(2) Auto Focus Lock
Pushing the Auto Focus button will lock and release the Auto
Focus at the current position.
Page 13
Need Help? Please call 1-888-567 8766 12
___________________________________________________________________
(3) Control Light for Auto Focus
The LED control light is on when the Auto Focus is activated. It
will turn off, when the Auto Focus is locked.
(4) Reversed Polarity/Inverted Colors (VGA monitor
only)
When the i-Stick is connected to a VGA monitor, pushing the
button for reversed polarity/inverted colors will turn black
colors into white and white into black. Pushing the button again
will return the image to the positive color mode.
(5) Reading Line (VGA monitor only)
When the i-Stick is connected to a VGA monitor, a horizontal
reading line can be moved up and down or entirely out of the
image by turning this knob.
(6) Brightness Adjustment (VGA monitor only)
When the i-Stick is connected to a VGA monitor, turning this
knob will adjust the brightness of the image.
(7) Zoom Keys
The Zoom keys control the magnification. Zoom – (left) will
zoom out, Zoom + (right) will zoom in. You can keep the zoom
key pushed until the desired magnification is displayed.
Page 14

Need Help? Please call 1-888-567 8766 13
___________________________________________________________________
(8) Full Color and High Contrast Black and White
Mode (VGA monitor only)
When the i-Stick is connected to a VGA monitor, pushing this
button will toggle between the full color and the high
contrast/black and white image mode.
Page 15
Need Help? Please call 1-888-567 8766 14
___________________________________________________________________
P
OSITIONING THE CAMERA
TwistCam™ and Distance Viewing
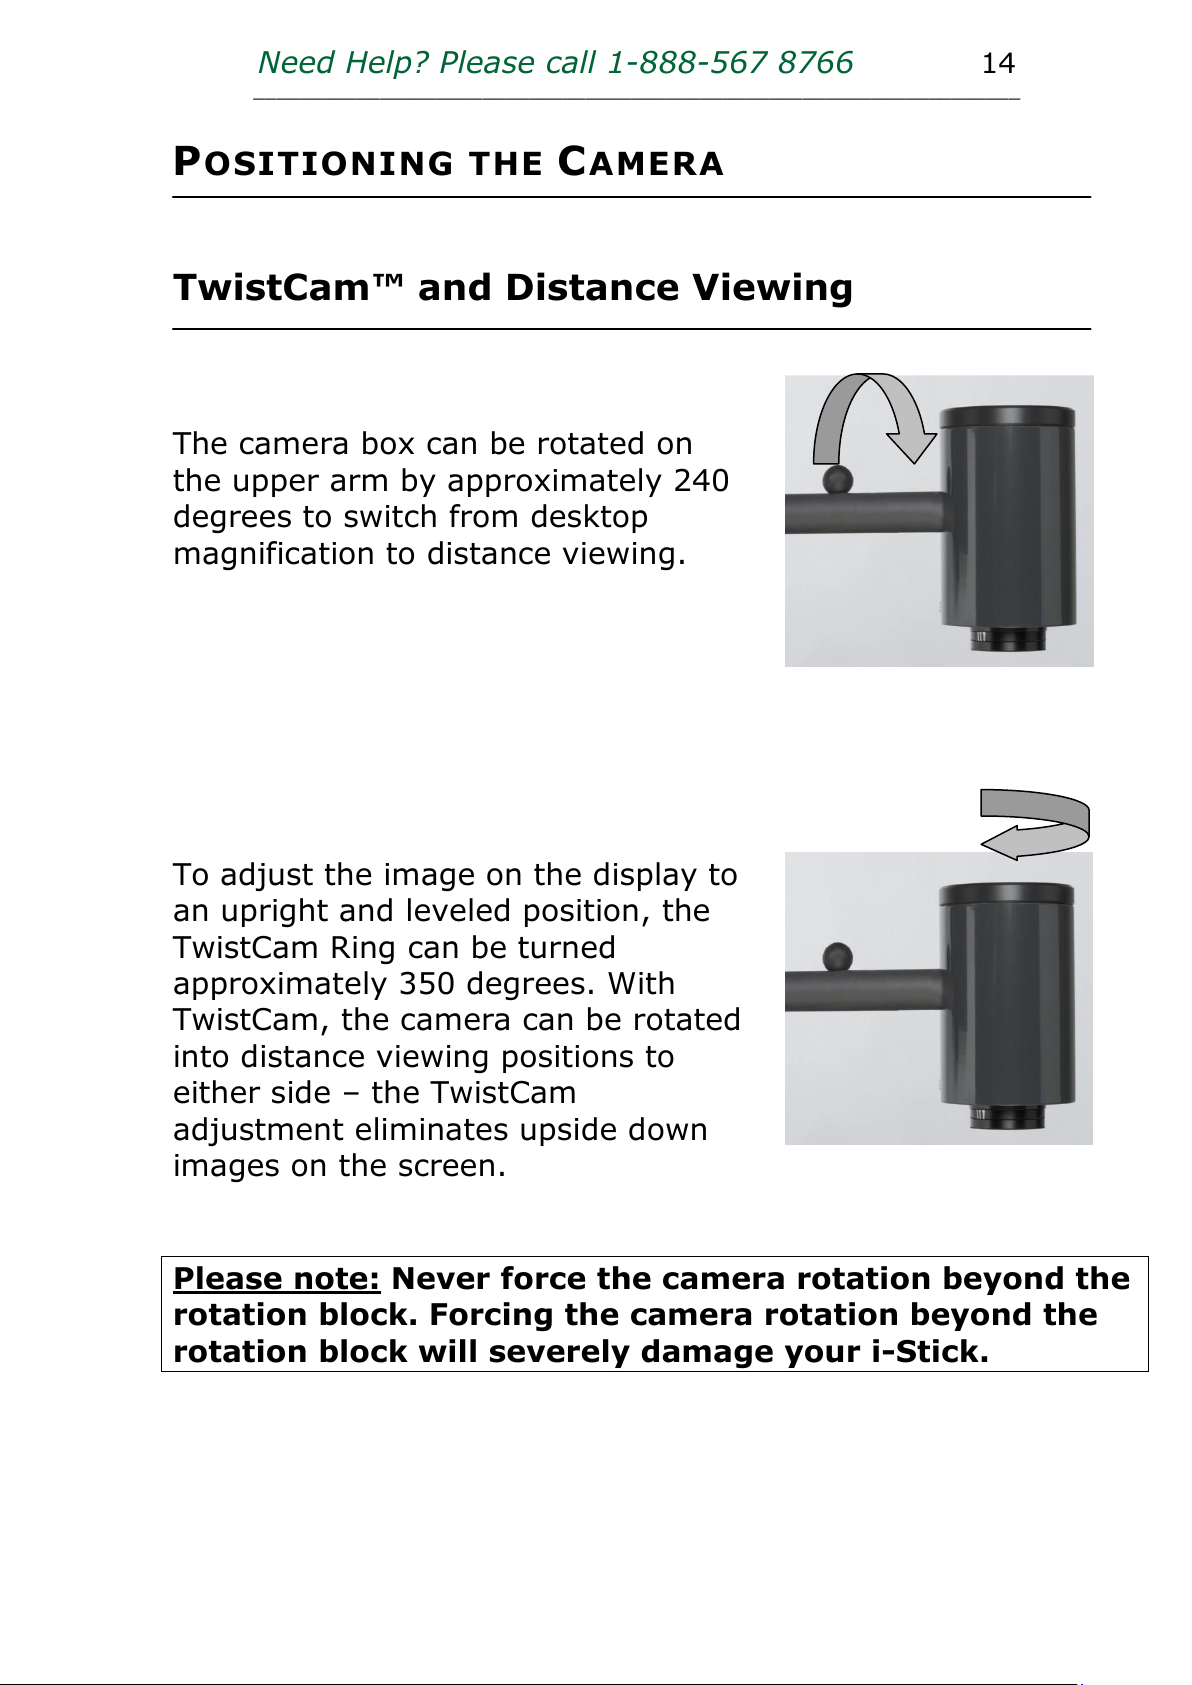
The camera box can be rotated on
the upper arm by approximately 240
degrees to switch from desktop
magnification to distance viewing.
To adjust the image on the display to
an upright and leveled position, the
TwistCam Ring can be turned
approximately 350 degrees. With
TwistCam, the camera can be rotated
into distance viewing positions to
either side – the TwistCam
adjustment eliminates upside down
images on the screen.
Please note: Never force the camera rotation beyond the
rotation block. Forcing the camera rotation beyond the
rotation block will severely damage your i-Stick.
Page 16
Need Help? Please call 1-888-567 8766 15
___________________________________________________________________
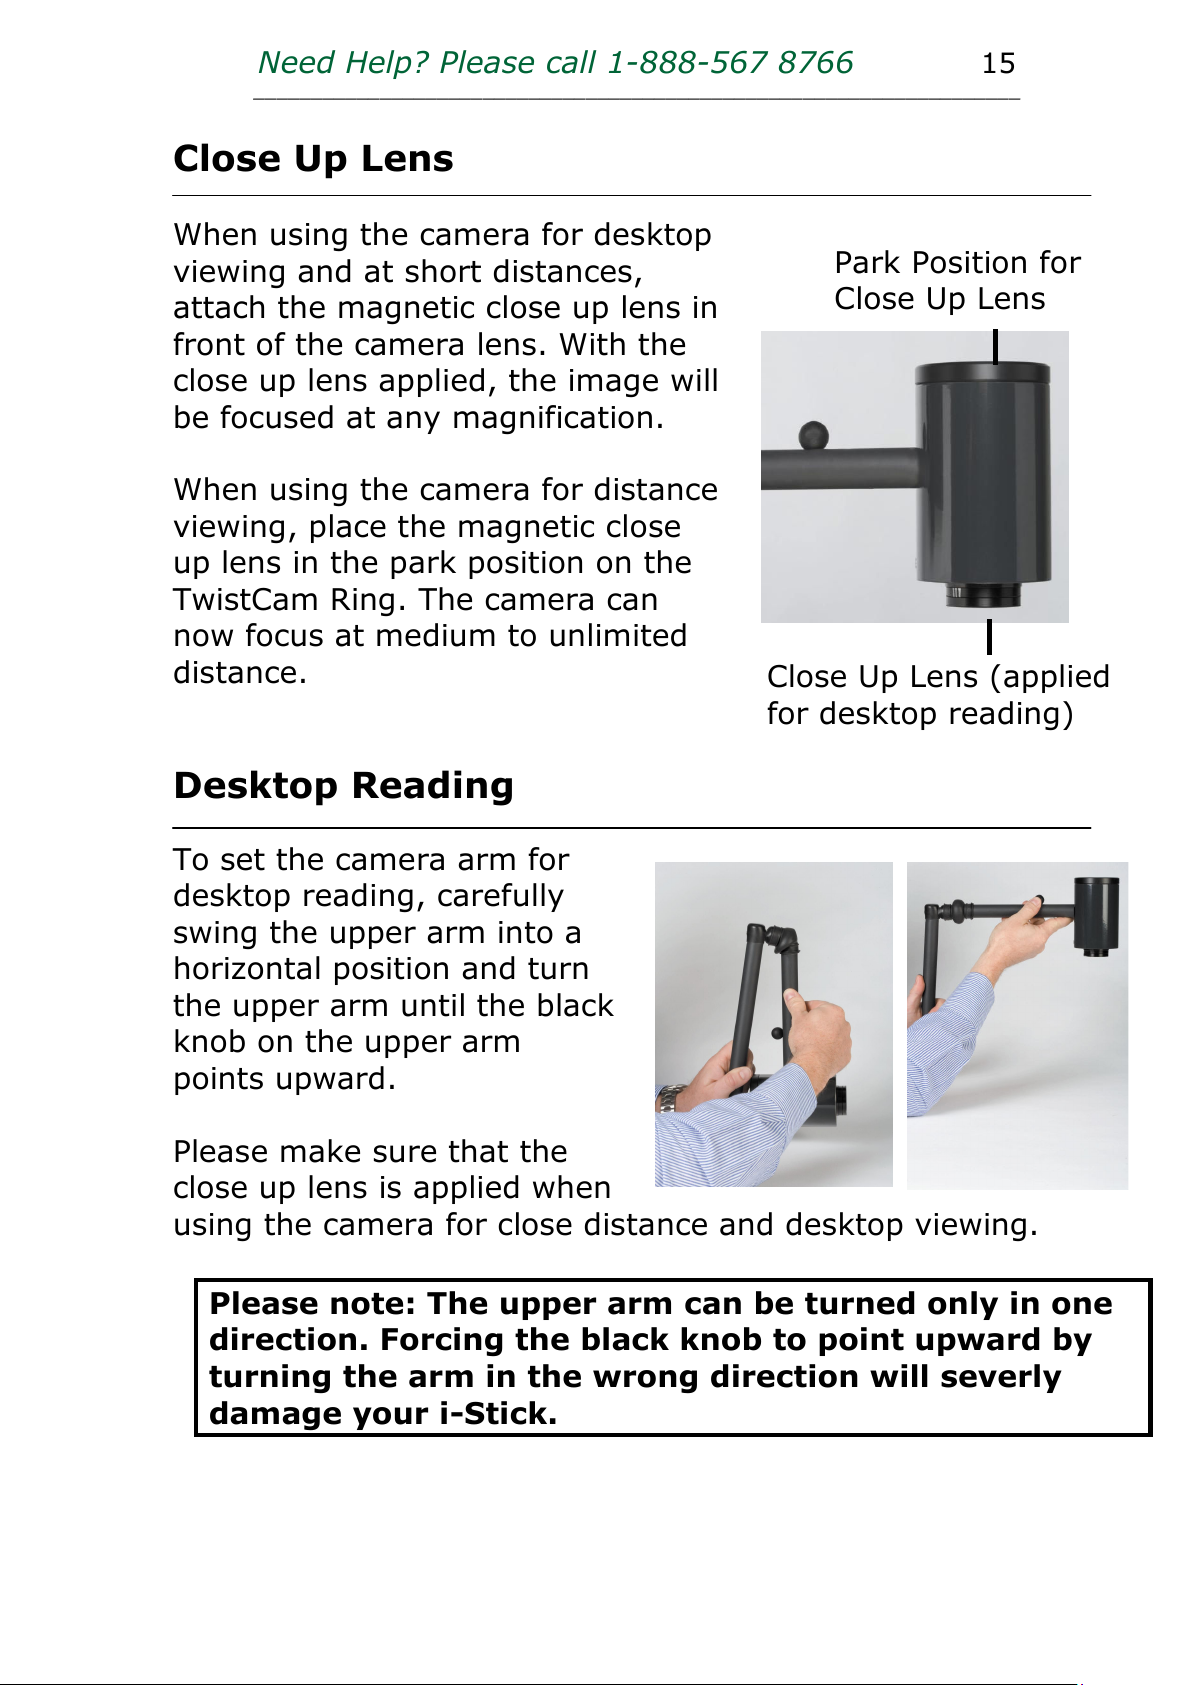
Park Position for
Close Up Lens
Close Up Lens (applied
for desktop reading)
Close Up Lens
When using the camera for desktop
viewing and at short distances,
attach the magnetic close up lens in
front of the camera lens. With the
close up lens applied, the image will
be focused at any magnification.
When using the camera for distance
viewing, place the magnetic close
up lens in the park position on the
TwistCam Ring. The camera can
now focus at medium to unlimited
distance.
Desktop Reading
To set the camera arm for
desktop reading, carefully
swing the upper arm into a
horizontal position and turn
the upper arm until the black
knob on the upper arm
points upward.
Please make sure that the
close up lens is applied when
using the camera for close distance and desktop viewing.
Please note: The upper arm can be turned only in one
direction. Forcing the black knob to point upward by
turning the arm in the wrong direction will severly
damage your i-Stick.
Page 17
Need Help? Please call 1-888-567 8766 16
___________________________________________________________________
Distance Viewing Option 1
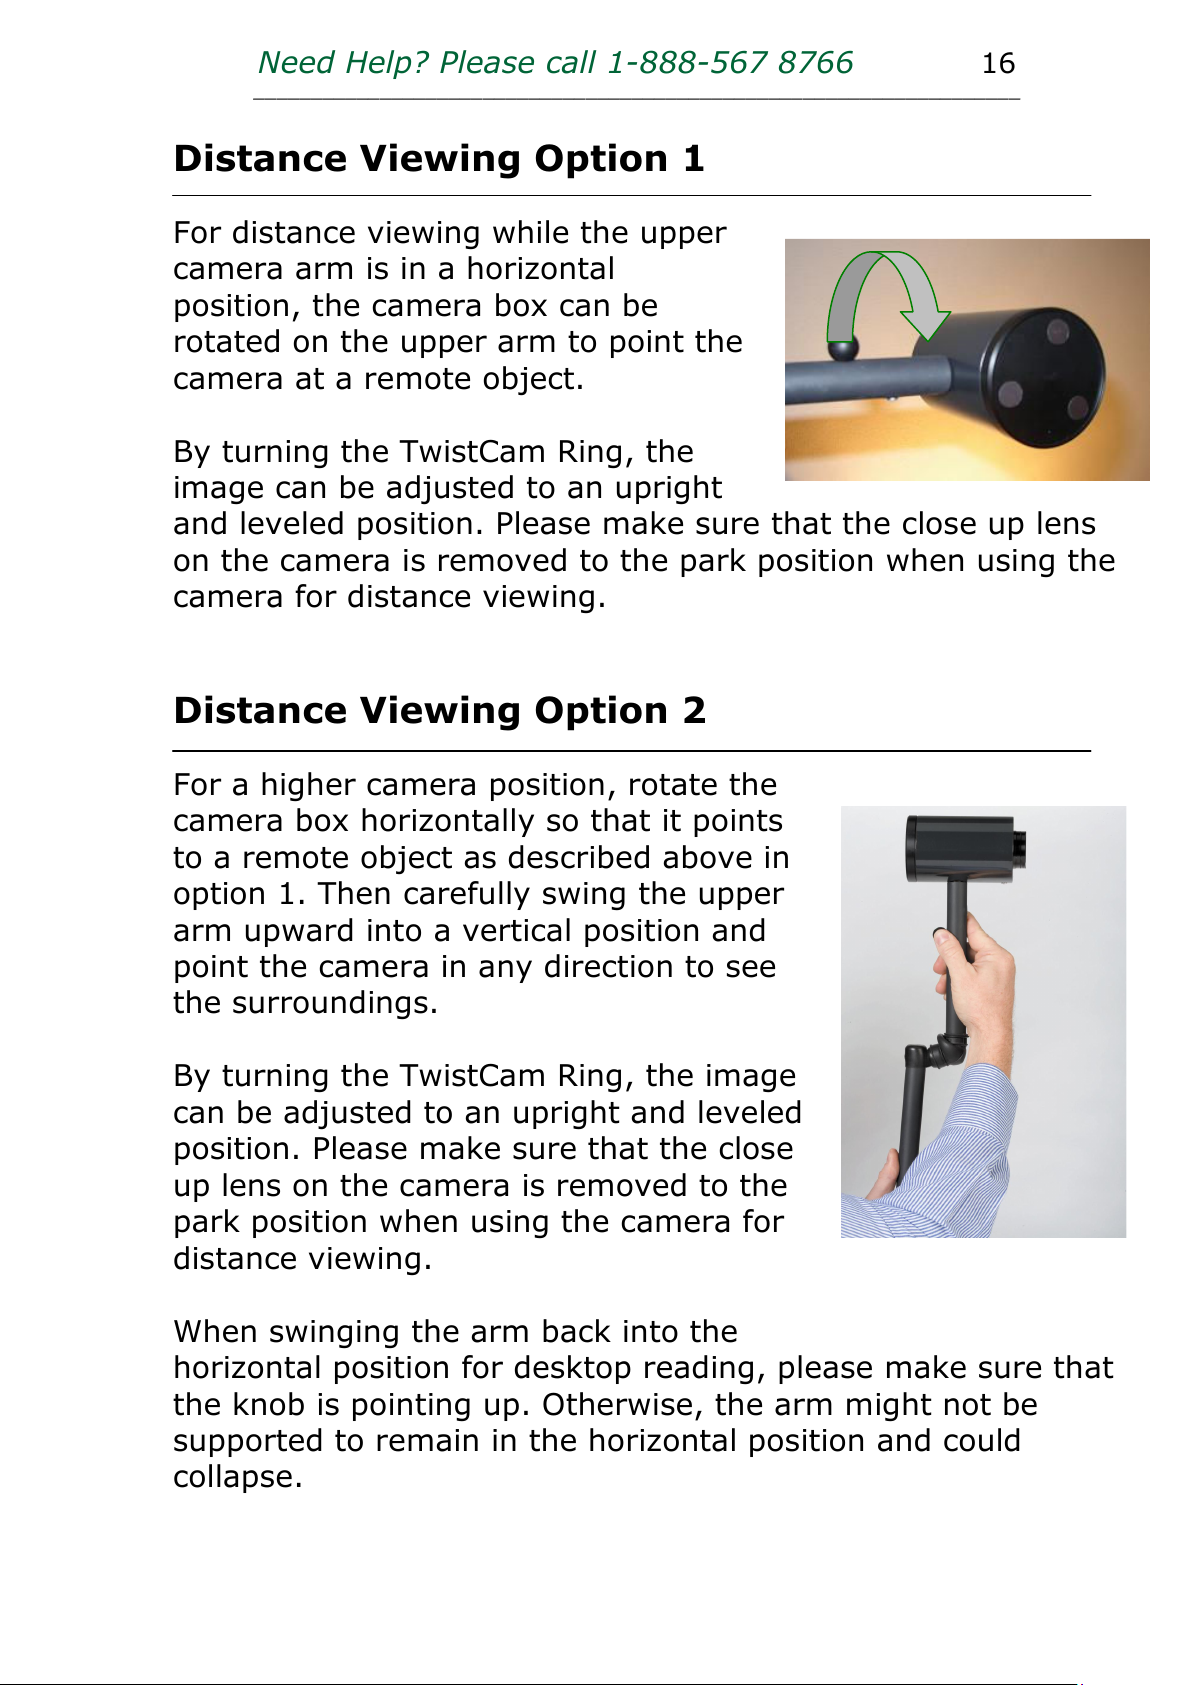
For distance viewing while the upper
camera arm is in a horizontal
position, the camera box can be
rotated on the upper arm to point the
camera at a remote object.
By turning the TwistCam Ring, the
image can be adjusted to an upright
and leveled position. Please make sure that the close up lens
on the camera is removed to the park position when using the
camera for distance viewing.
Distance Viewing Option 2
For a higher camera position, rotate the
camera box horizontally so that it points
to a remote object as described above in
option 1. Then carefully swing the upper
arm upward into a vertical position and
point the camera in any direction to see
the surroundings.
By turning the TwistCam Ring, the image
can be adjusted to an upright and leveled
position. Please make sure that the close
up lens on the camera is removed to the
park position when using the camera for
distance viewing.
When swinging the arm back into the
horizontal position for desktop reading, please make sure that
the knob is pointing up. Otherwise, the arm might not be
supported to remain in the horizontal position and could
collapse.
Page 18
Need Help? Please call 1-888-567 8766 17
___________________________________________________________________
Reading Books
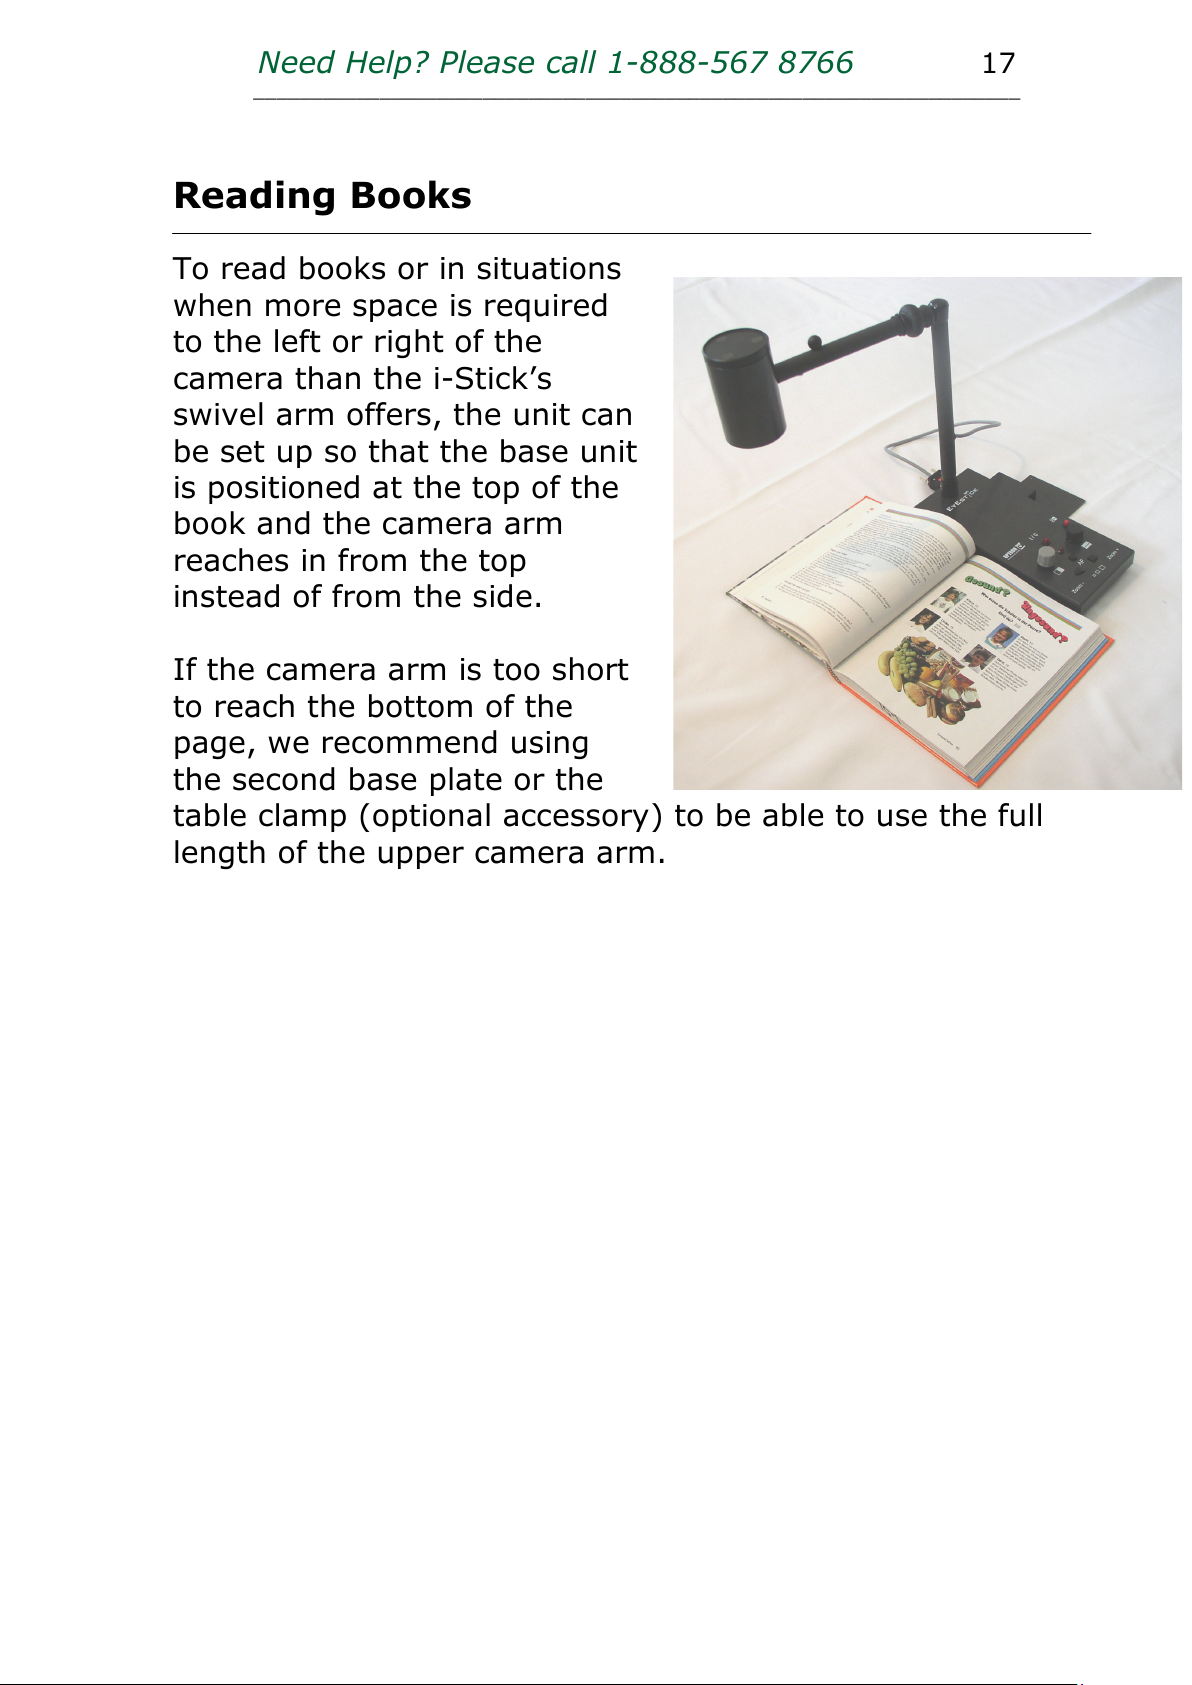
To read books or in situations
when more space is required
to the left or right of the
camera than the i-Stick’s
swivel arm offers, the unit can
be set up so that the base unit
is positioned at the top of the
book and the camera arm
reaches in from the top
instead of from the side.
If the camera arm is too short
to reach the bottom of the
page, we recommend using
the second base plate or the
table clamp (optional accessory) to be able to use the full
length of the upper camera arm.
Page 19
Need Help? Please call 1-888-567 8766 18
___________________________________________________________________
W
ORKING WITH A LAPTOP
Software Installation
Before starting the installation, please make sure that:
• The USB converter is not plugged into the USB port
on your computer
• All other programs are closed (including Zoomtext).
Insert the "OPTRON View Software" CD-ROM into your
computer’s CD-Drive (please make sure that you are using the
correct disk for your operating system). If the installation
screen doesn’t start automatically after approximately 30
seconds, proceed as follows:
• Click on "Start"
• Select "Run"
• Click on "Browse"
• Double click on your CD-Drive (usually D:\)
• Select the file "Setup" and click "OK".
The program installation will now start.
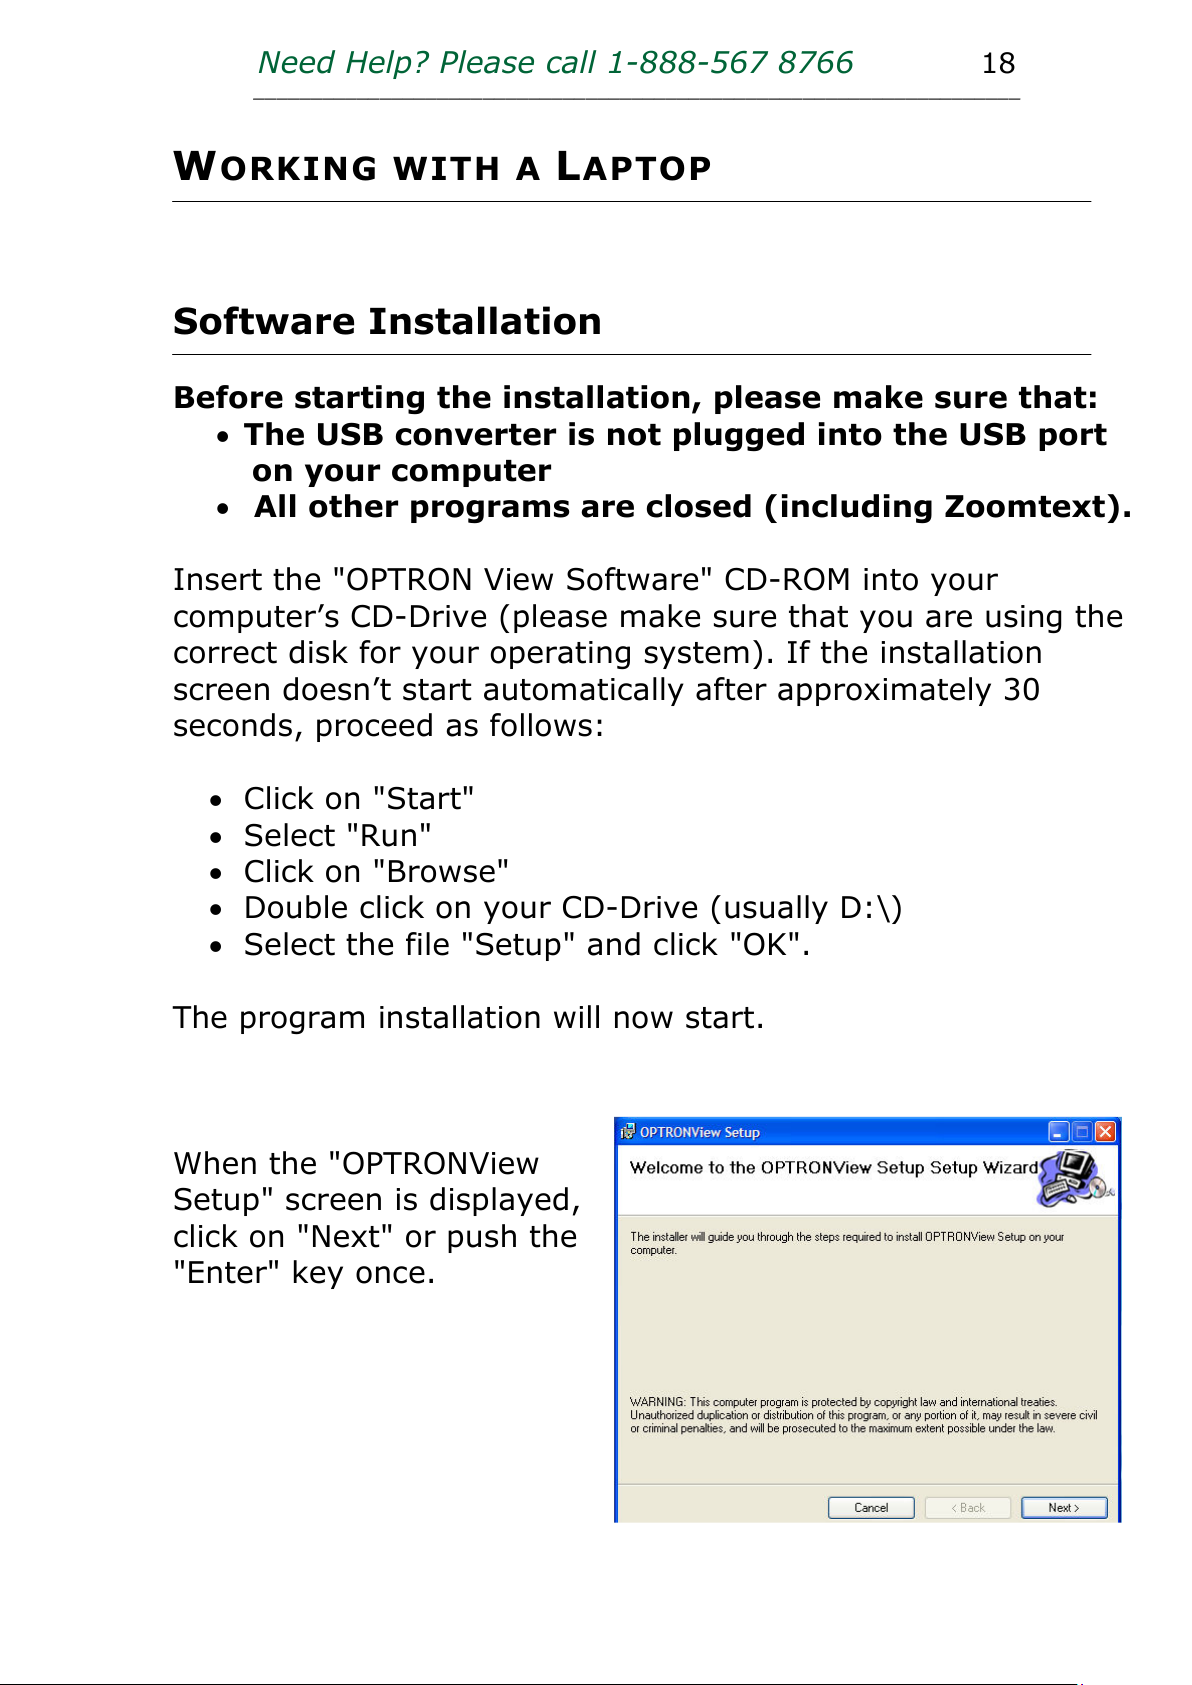
When the "OPTRONView
Setup" screen is displayed,
click on "Next" or push the
"Enter" key once.
Page 20
Need Help? Please call 1-888-567 8766 19
___________________________________________________________________
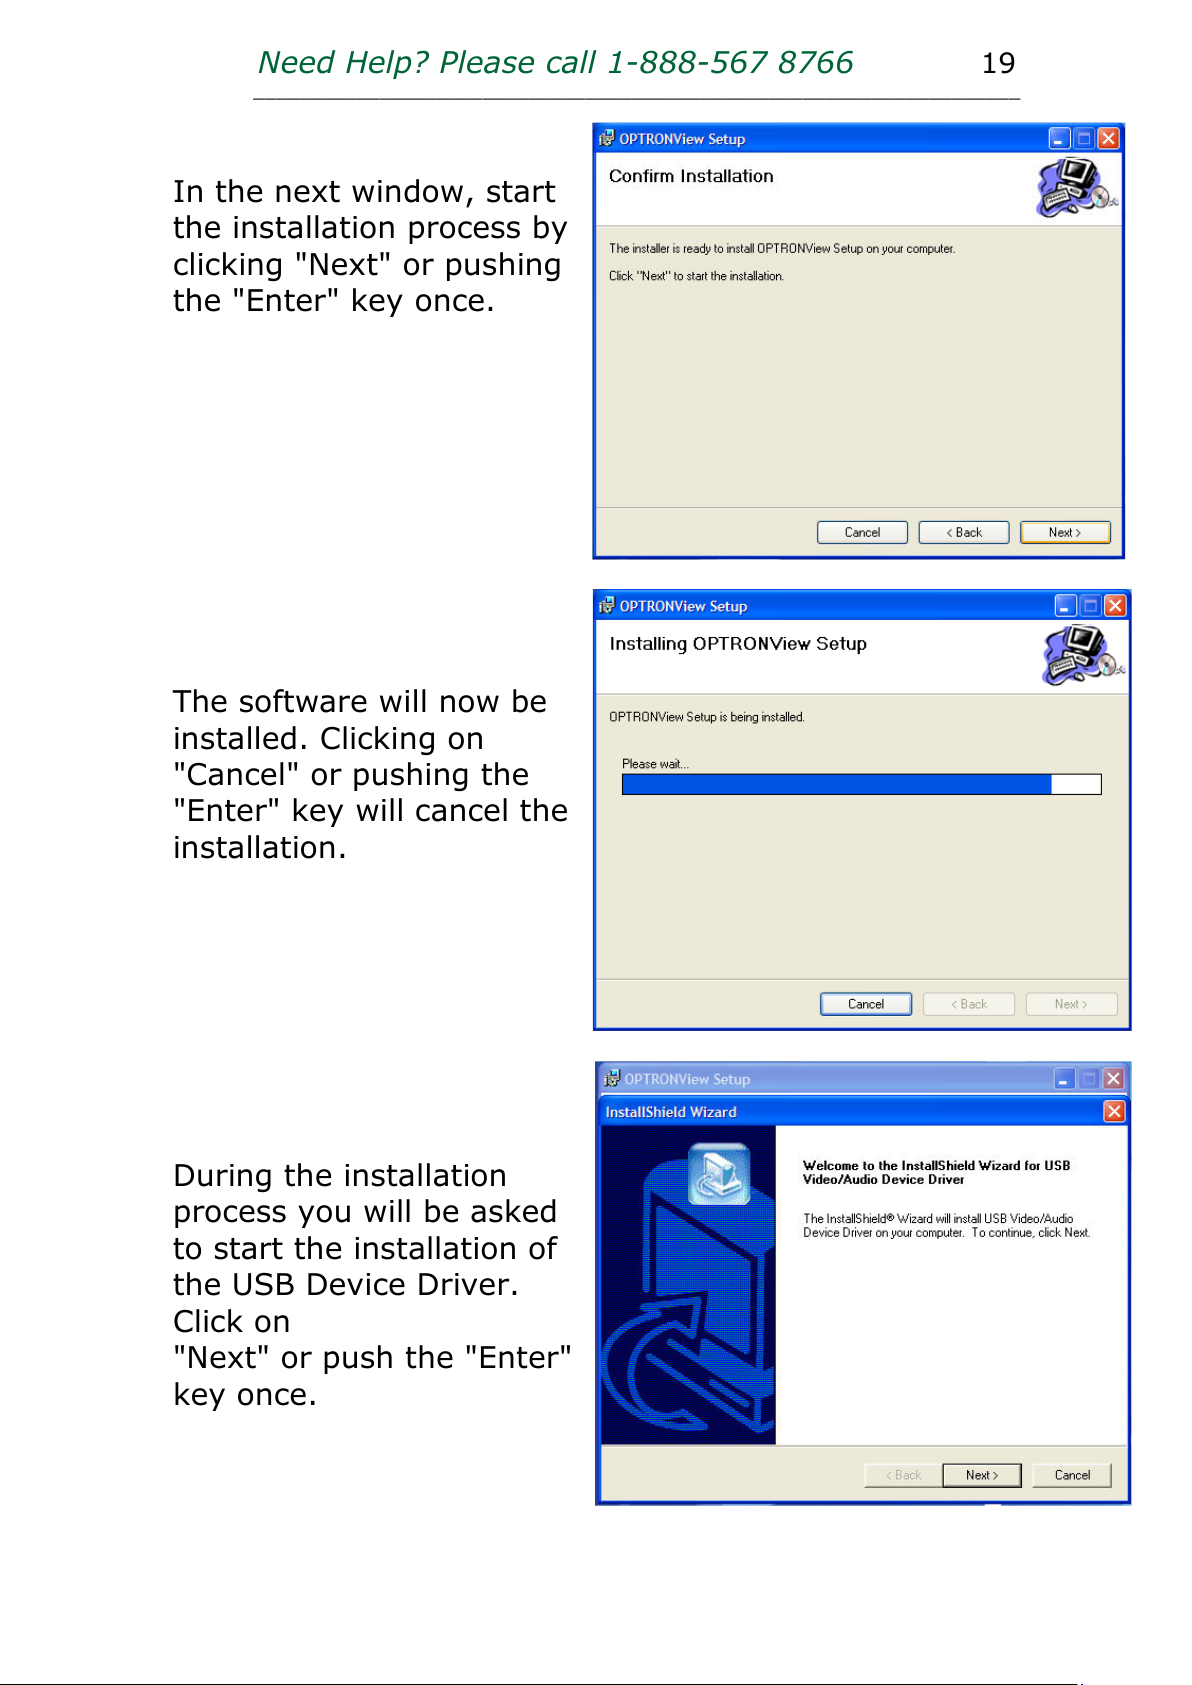
In the next window, start
the installation process by
clicking "Next" or pushing
the "Enter" key once.
The software will now be
installed. Clicking on
"Cancel" or pushing the
"Enter" key will cancel the
installation.
During the installation
process you will be asked
to start the installation of
the USB Device Driver.
Click on
"Next" or push the "Enter"
key once.
Page 21
Need Help? Please call 1-888-567 8766 20
___________________________________________________________________
Please note: If your computer is running under an
operating system other than Windows XP, it is
possible that the Install Shield Wizard for the USB
Driver will be hidden underneath the OPTRON View
Setup frame. If the Install Shield Wizard is displayed
in your taskbar, but not showing on the desktop
screen, either click on the task in the taskbar or push
"Alt"+"Tab" to move it on top of the OPTRON View
Setup frame.
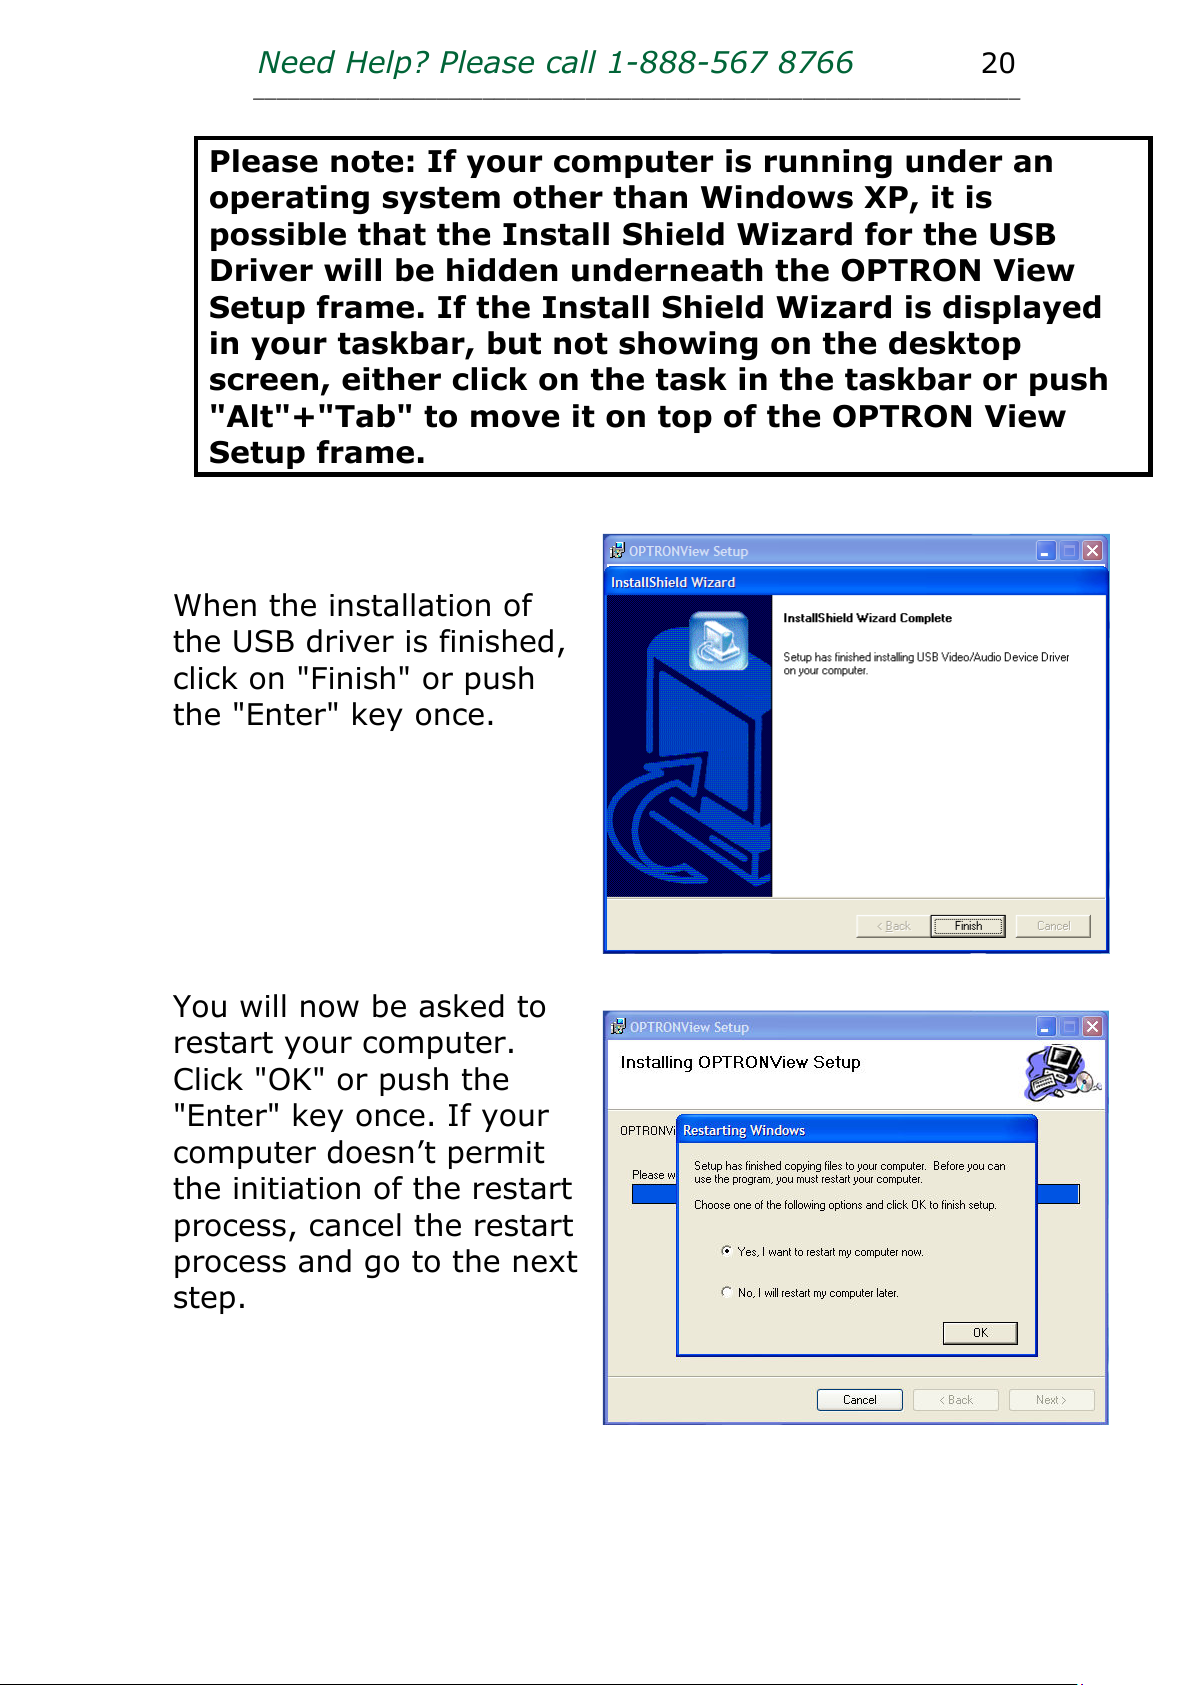
When the installation of
the USB driver is finished,
click on "Finish" or push
the "Enter" key once.
You will now be asked to
restart your computer.
Click "OK" or push the
"Enter" key once. If your
computer doesn’t permit
the initiation of the restart
process, cancel the restart
process and go to the next
step.
Page 22
Need Help? Please call 1-888-567 8766 21
___________________________________________________________________
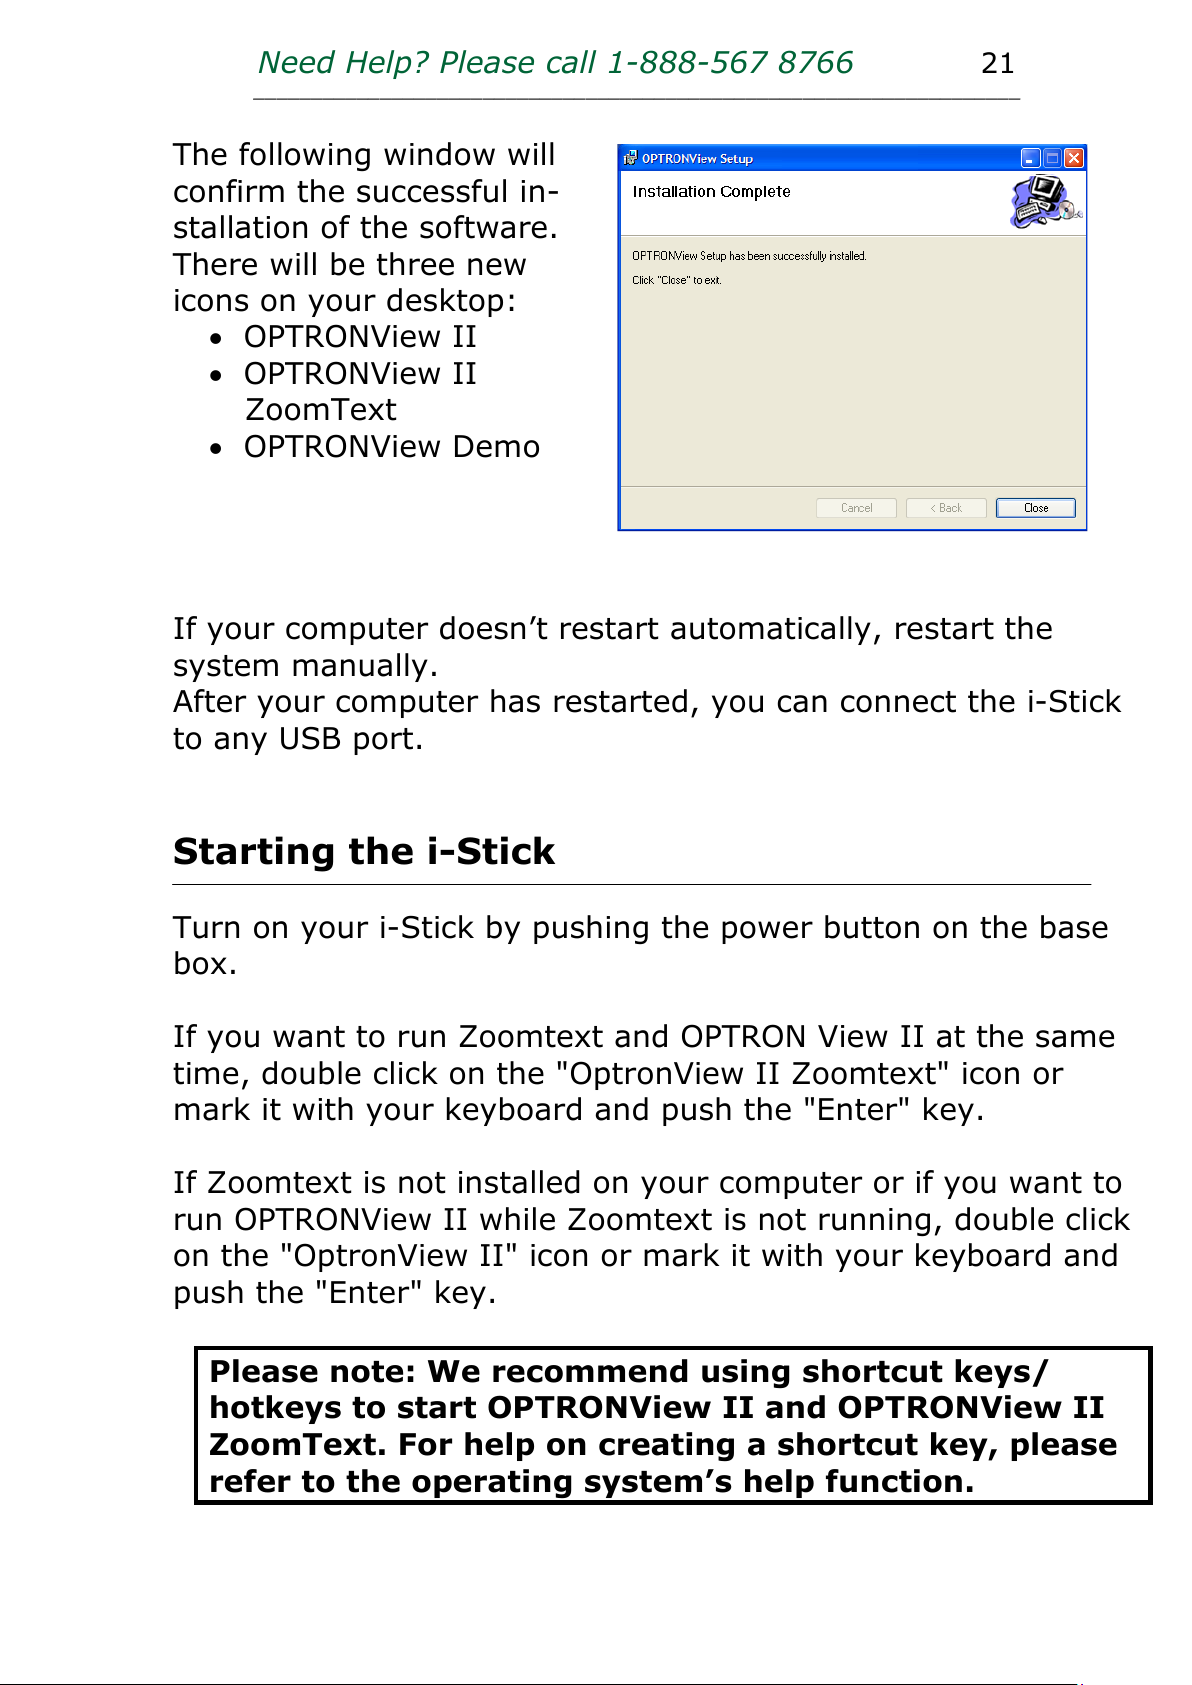
The following window will
confirm the successful in-
stallation of the software.
There will be three new
icons on your desktop:
• OPTRONView II
• OPTRONView II
ZoomText
• OPTRONView Demo
If your computer doesn’t restart automatically, restart the
system manually.
After your computer has restarted, you can connect the i-Stick
to any USB port.
Starting the i-Stick
Turn on your i-Stick by pushing the power button on the base
box.
If you want to run Zoomtext and OPTRON View II at the same
time, double click on the "OptronView II Zoomtext" icon or
mark it with your keyboard and push the "Enter" key.
If Zoomtext is not installed on your computer or if you want to
run OPTRONView II while Zoomtext is not running, double click
on the "OptronView II" icon or mark it with your keyboard and
push the "Enter" key.
Please note: We recommend using shortcut keys/
hotkeys to start OPTRONView II and OPTRONView II
ZoomText. For help on creating a shortcut key, please
refer to the operating system’s help function.
Page 23
Need Help? Please call 1-888-567 8766 22
___________________________________________________________________
Closing OPTRON View II
To exit the software push either the "ESC" key or the key
combination Alt+F4.
Image Size and Position (F2 Key)
Push the F2 key to toggle between 7 preset image sizes and
positions ("OptronView II"). If "OptronView II" is closed before
the camera is turned off when leaving the program, the
software will restart in the image size and position which was
selected before the program was closed.
In the "OptronView II Zoomtext" mode, four preset image sizes
and positions are available.
Magnification 1: Camera Magnification
The Zoom keys on the i-Stick base unit control the
magnification of the camera. Zoom – (left) will zoom out,
Zoom + (right) will zoom in. You can keep the zoom key
pushed until the desired magnification is displayed.
Magnification 2: Digital Magnification (page
up/page dn Keys)
In addition to the camera magnification, the image can be
digitally magnified by pushing the "page up" key. Pushing the
"page dn" key will reduce the image. As the optical zoom
described in the above paragraph provides the better quality
magnification, we recommend using the "page up/dn" keys
magnification not as the primary magnification mode.
Page 24
Need Help? Please call 1-888-567 8766 23
___________________________________________________________________
Please note: To reach the best image quality, we re-
commend using the optical magnification of the
camera (magnification 1) and only use the digital
magnification (magnification 2) if additional
enlargement is required.
Contrast (F5 and F6 Keys)
Use the F5 and F6 key to adjust the contrast. F5 will increase
the contrast, F6 will reduce the contrast of the image.
Brightness (F7 and F8 Keys)
Use the F7 and F8 key to adjust the brightness. F7 will increase
the brightness, F8 will reduce the brightness of the image.
Reset Standard Settings (F3 Key)
Pushing the F3 key will reset the image to full color mode and
standard settings.
Image Modes: Reversed Polarity (Negative
Image) and Monochrome Colors (F4 Key)
Push the F4 key to toggle between various image modes:
White/black– black/blue – black/green – black/red –
yellow/black – black/white). To return directly to the full color
image you can also push the F3 key.
Page 25
Need Help? Please call 1-888-567 8766 24
___________________________________________________________________
Auto Focus Lock
You might encounter a situation when you want the Auto Focus
to remain locked to a certain distance or object. For example
when writing, a hand or a pen in the image area can constantly
distract the Auto Focus. Push the Auto Focus Lock (2) button
on the base unit once. The Auto Focus Control Light (3) will
turn off and the Auto Focus will be locked to this focus
distance.
To activate the Auto Focus, push the Auto Focus Lock button
again. The Auto Focus Control Light will turn on again.
Please note: Whenever the i-Stick is first turned on,
the Auto Focus will be active and the Auto Focus
Control Light will be on.
Moving the Image on the Screen
The camera image on the screen can be moved by pushing the
"Alt" key in combination with an arrow key (or the
corresponding number on the key pad):
Alt + [Left Arrow/4 on keypad]: Move image to the left
Alt + [Right Arrow/6 on keypad]: Move image to the right
Alt + [Up Arrow/8 on keypad]: Move image upwards
Alt + [Down Arrow/2 on keypad]: Move image downwards
This function is not supported in the ZoomText mode.
Help File
To access the help file, push F1. The help file will appear in a
separate window and will list the OPTRON View II key
commands. To close the help file push Alt+F4.
Page 26
Need Help? Please call 1-888-567 8766 25
___________________________________________________________________
Toggling between Applications
To toggle between OPTRON View II and other Windows
applications which are currently running on your computer,
push the key combination "Alt" + "Tab" until the desired
program is highlighted in the message box or click in the frame
you want to have active.
Although the camera picture will be displayed when
OPTRONView II is not active, the keyboard functions as
described above will only apply when OPTRONView II is active.
Still Images
Pushing the F9 key captures the current image as bitmap file to
the "OPTRON View Demo" folder on your desktop. The first file
will be allocated the file name "Bitmap00001.bmp". If you are
capturing more images on your desktop, the files will be saved
under the same name with an increasing number. When all
files have been removed from the desktop, the file
enumeration will start again at 1.
Organizing Still Images
Please note: Screen appearance, commands and folder
names might slightly differ under operating systems
other than Windows XP. For more information please
refer to your Windows help file or call us at 888 567
8766.
To better organize your still images, you can save the images
under different topics or subjects, for example Math or English.
The following steps will help you create new topic folders:
Page 27
Need Help? Please call 1-888-567 8766 26
___________________________________________________________________
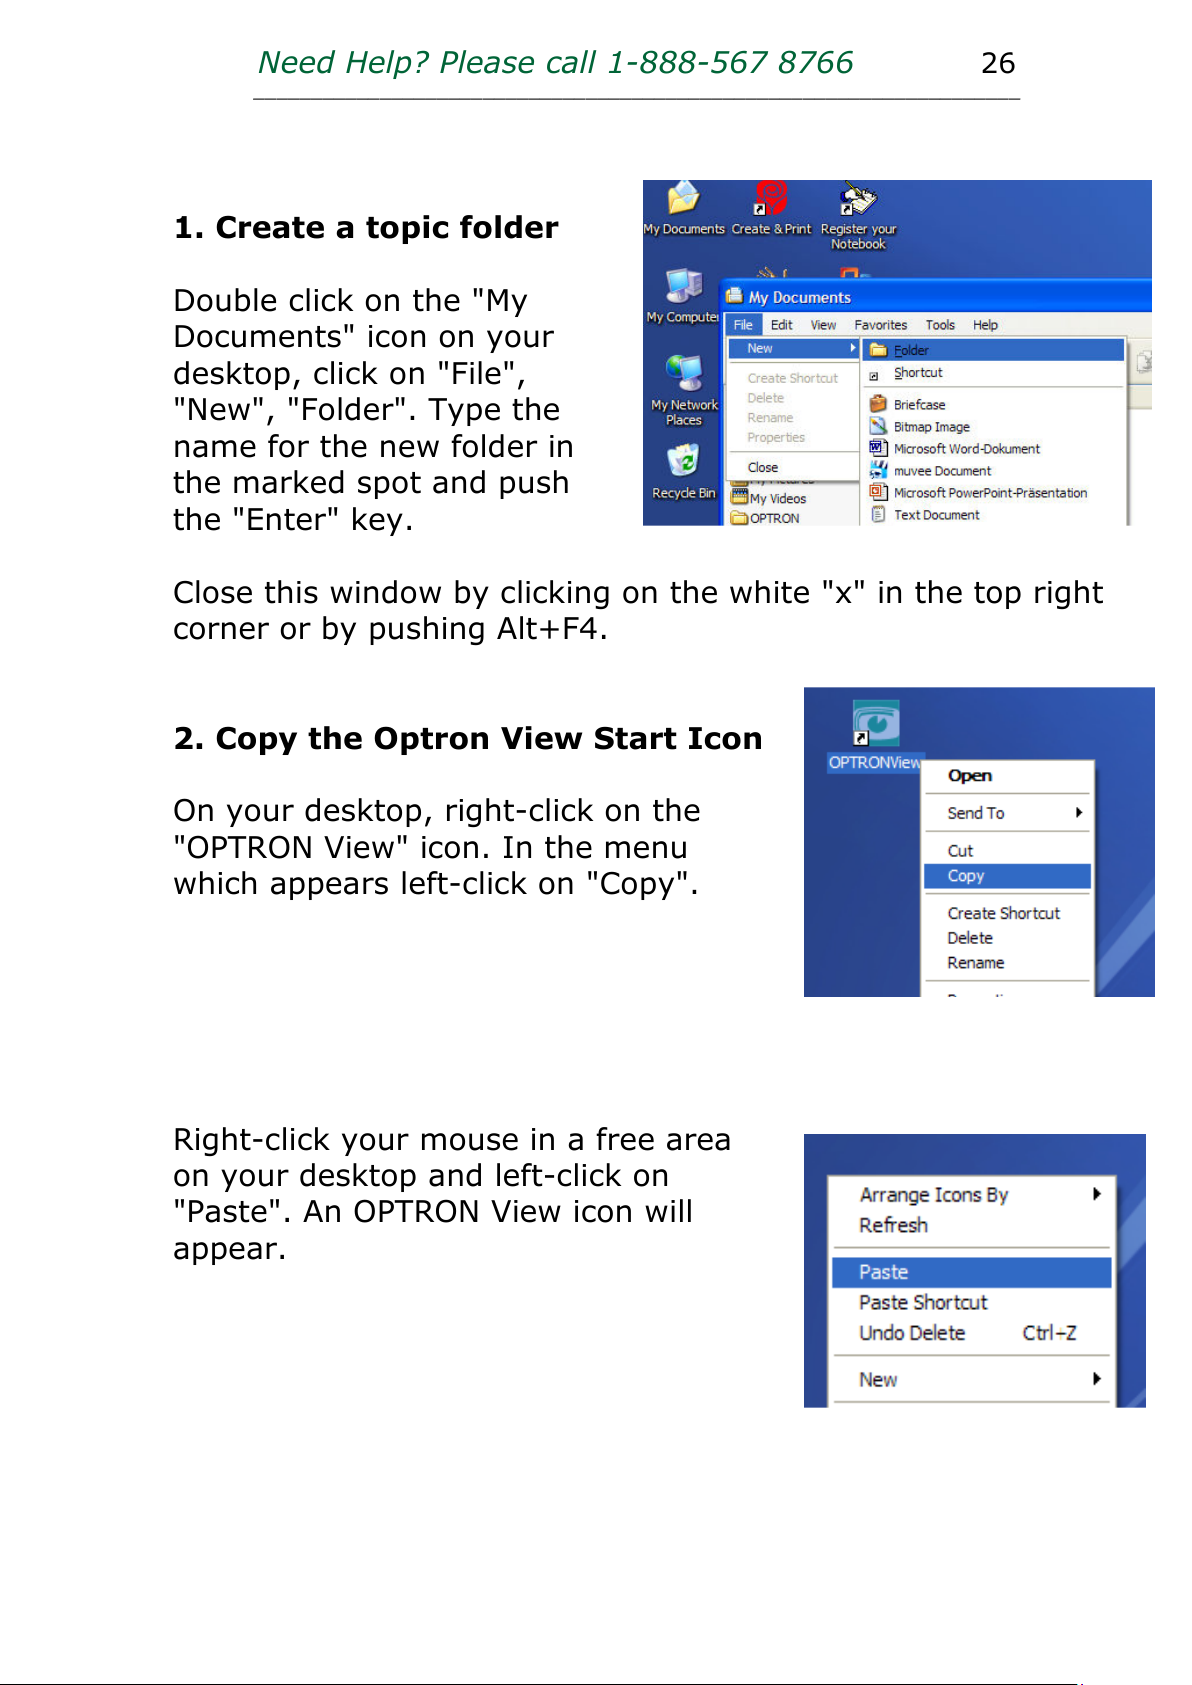
1. Create a topic folder
Double click on the "My
Documents" icon on your
desktop, click on "File",
"New", "Folder". Type the
name for the new folder in
the marked spot and push
the "Enter" key.
Close this window by clicking on the white "x" in the top right
corner or by pushing Alt+F4.
2. Copy the Optron View Start Icon
On your desktop, right-click on the
"OPTRON View" icon. In the menu
which appears left-click on "Copy".
Right-click your mouse in a free area
on your desktop and left-click on
"Paste". An OPTRON View icon will
appear.
Page 28
Need Help? Please call 1-888-567 8766 27
___________________________________________________________________
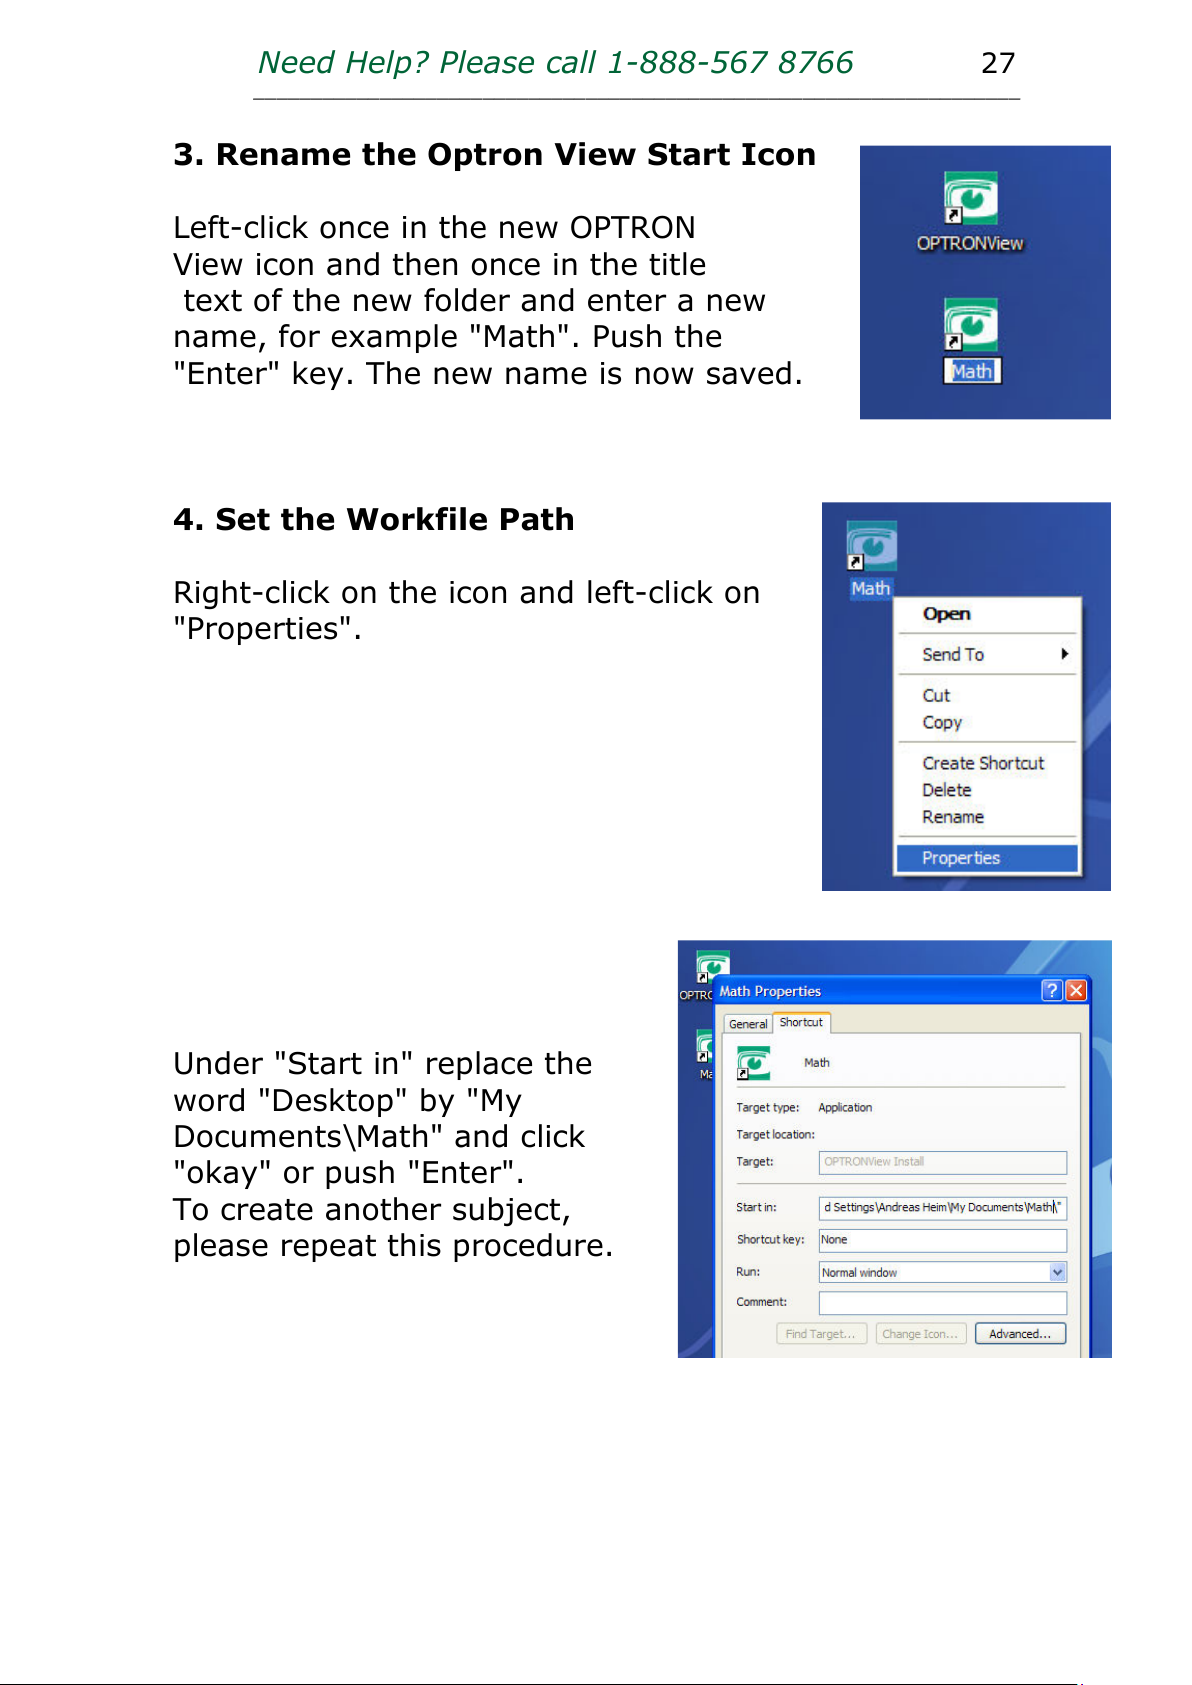
3. Rename the Optron View Start Icon
Left-click once in the new OPTRON
View icon and then once in the title
text of the new folder and enter a new
name, for example "Math". Push the
"Enter" key. The new name is now saved.
4. Set the Workfile Path
Right-click on the icon and left-click on
"Properties".
Under "Start in" replace the
word "Desktop" by "My
Documents\Math" and click
"okay" or push "Enter".
To create another subject,
please repeat this procedure.
Page 29
Need Help? Please call 1-888-567 8766 28
___________________________________________________________________
Please note: To organize subjects for OPTRONView II
Zoomtext, please follow the steps described above using
the OPTRONView II ZoomText icon instead of using the
OPTRONView II icon.
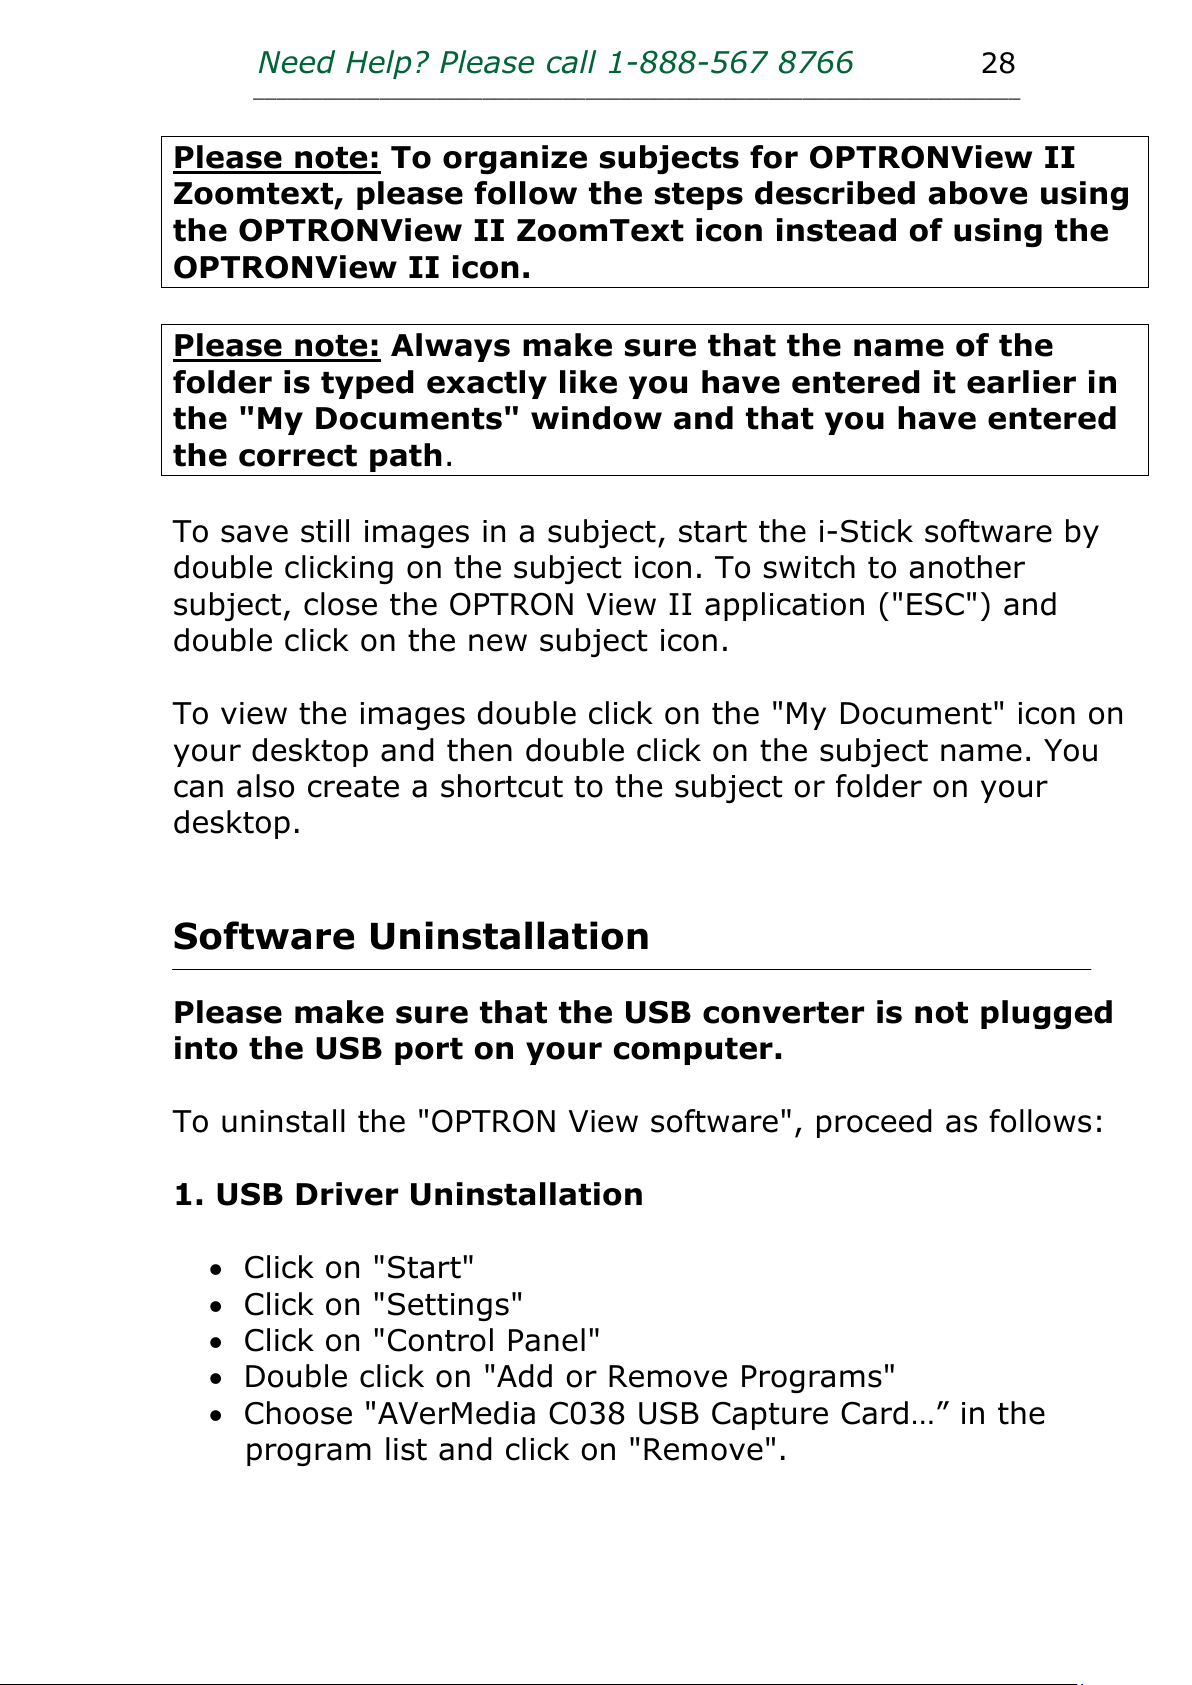
Please note: Always make sure that the name of the
folder is typed exactly like you have entered it earlier in
the "My Documents" window and that you have entered
the correct path.
To save still images in a subject, start the i-Stick software by
double clicking on the subject icon. To switch to another
subject, close the OPTRON View II application ("ESC") and
double click on the new subject icon.
To view the images double click on the "My Document" icon on
your desktop and then double click on the subject name. You
can also create a shortcut to the subject or folder on your
desktop.
Software Uninstallation
Please make sure that the USB converter is not plugged
into the USB port on your computer.
To uninstall the "OPTRON View software", proceed as follows:
1. USB Driver Uninstallation
• Click on "Start"
• Click on "Settings"
• Click on "Control Panel"
• Double click on "Add or Remove Programs"
• Choose "AVerMedia C038 USB Capture Card…” in the
program list and click on "Remove".
Page 30
Need Help? Please call 1-888-567 8766 29
___________________________________________________________________
2. "OPTRON View" Uninstallation
In the "Add or Remove Programs" frame ("Start" → "Settings"
→ "Control panel" → "Add or Remove Programs"), choose
"Optron View Setup" and click on "Remove".
Confirm this action by clicking on the "Remove" bullet in the
next screen.
When the "Installation complete" screen is displayed, the
program is deleted. Click on "Close" or push the "Enter" key
once.
Troubleshooting
If you encounter difficulties with the installation of the OPTRON
View II software, please contact us at 1 888 567 8766.
Page 31
Need Help? Please call 1-888-567 8766 30
___________________________________________________________________
W
ORKING WITH A
VGA M
ONITOR
To use a VGA monitor as the display screen for your i-Stick,
please connect the monitor cable to the VGA port (4) at the
back of the base unit and turn on the monitor and the i-Stick.
To adjust the image, use the control panel on the base unit as
follows:
Magnification
The Zoom keys on the i-Stick base unit control the
magnification. Zoom – (left) will zoom out, Zoom + (right) will
zoom in. You can keep the zoom key pushed until the desired
magnification is displayed.
Brightness
Adjust the image brightness by turning the brightness control
knob (6).
Black and White Image
Push the red button in the top left corner (8) of the control
panel on the base box. To switch back to color, push it again.
Reading Line
Adjust the position of the reading line by turning the Reading
Line Knob (5).
Page 32
Need Help? Please call 1-888-567 8766 31
___________________________________________________________________
Reversed Polarity / Negative Image Contrast
Push the red button in the top right corner (4) of the control
panel on the base box to turn the image into the reversed
polarity or negative mode. This will turn black into white and
white into black. Pushing this button again will return the
image to the natural colors.
Auto Focus Lock
You might encounter a situation where you want the Auto
Focus to remain locked to a certain distance or object, like
writing for example, when a hand or a pen in the image area
can constantly distract the Auto Focus. Push the Auto Focus
Lock (2) button once. The Auto Focus Control Light will turn off
and your Auto focus will be locked to this focus distance.
To turn the auto focus function back on, push the Auto Focus
Lock button again. The Auto Focus Control Light will turn on
again.
Please note: When the i-Stick is turned on, the Auto
Focus will be active and the Auto Focus Control Light
will be on.
Page 33
Need Help? Please call 1-888-567 8766 32
___________________________________________________________________
W
ORKING WITH A TELEVISION
(C
OMPOSITE
V
IDEO
-IN)
To use a television or a device with a composite Video-In
connection (some portable DVD players, for example) as the
display screen for your i-Stick, please connect the Composite
cable adapter to Computer/TV port (3) at the back of the base
unit and turn on the television and the i-Stick. To adjust the
image, use the control panel on the base unit as follows:
Magnification
The Zoom keys on the i-Stick base unit control the
magnification. Zoom – (left) will zoom out, Zoom + (right) will
zoom in. You can keep the zoom key pushed until the desired
magnification is displayed.
Brightness / Contrast
To adjust the image brightness and contrast, please use the
adjustment options on your television.
Auto Focus Lock
You might encounter a situation where you want the Auto
Focus to remain locked to a certain distance or object, like
writing for example, when a hand or a pen in the image area
can constantly distract the Auto Focus. Push the Auto Focus
Lock (2) button once. The Auto Focus Control Light will turn off
and your Auto focus will be locked to this focus distance.
To turn the auto focus function back on, push the Auto Focus
Lock button again. The Auto Focus Control Light will turn on
again.
Page 34

Need Help? Please call 1-888-567 8766 33
___________________________________________________________________
Please note: When the i-Stick is turned on, the Auto
Focus will be active and the Auto Focus Control Light
will be on.
Page 35
Need Help? Please call 1-888-567 8766 34
___________________________________________________________________
BATTERY
Please note: To run the i-Stick and to charge the
batteries, use the supplied battery charger and
original Stick batteries only. Using products other than
the supplied battery charger and original i-Stick
batteries can cause death, serious injuries and severe
damage to your i-Stick.
Charging the Battery
To charge the battery, insert a battery to the base unit.
Connect the battery charger to the back of the base unit and
plug the battery charger into a wall socket. The battery
charging time may vary and take up to several hours.
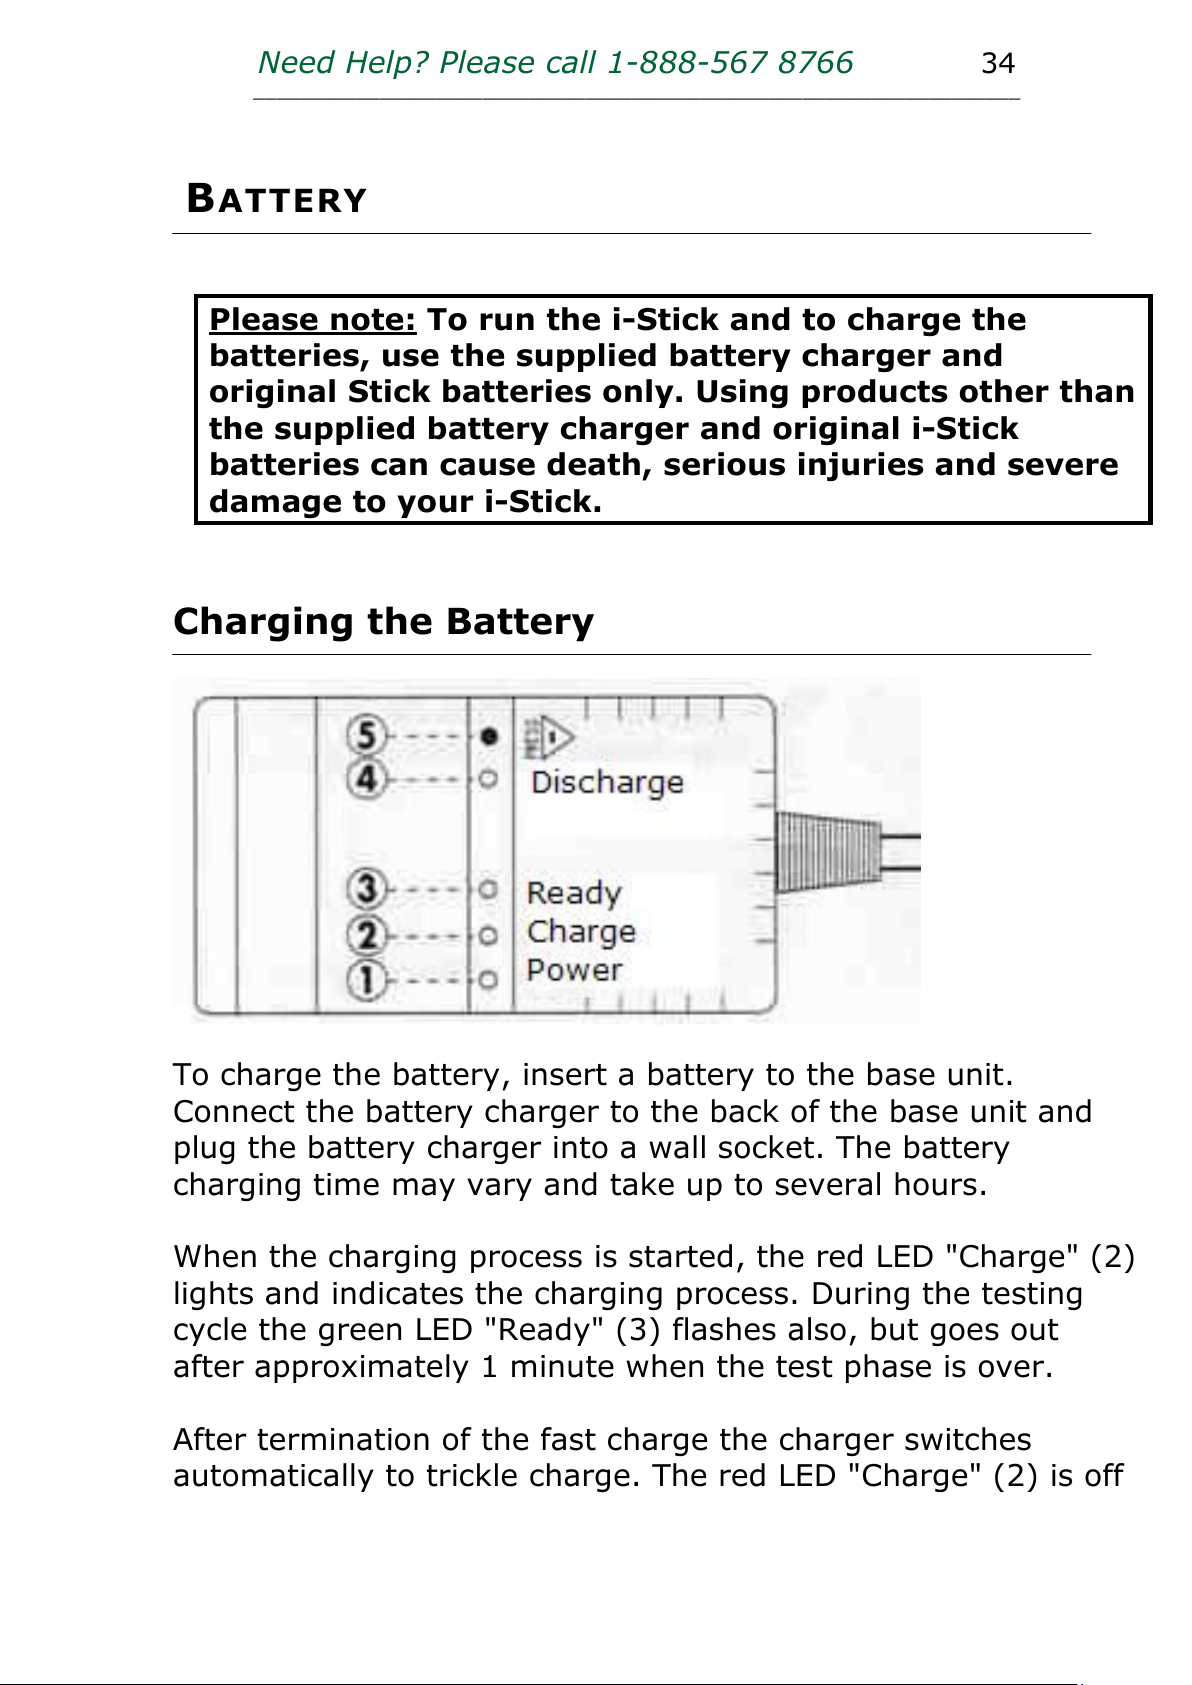
When the charging process is started, the red LED "Charge" (2)
lights and indicates the charging process. During the testing
cycle the green LED "Ready" (3) flashes also, but goes out
after approximately 1 minute when the test phase is over.
After termination of the fast charge the charger switches
automatically to trickle charge. The red LED "Charge" (2) is off
Page 36
Need Help? Please call 1-888-567 8766 35
___________________________________________________________________
and the green LED "Ready" (3) is constantly on for
approximately 2 minutes. After around 2 minutes the "Ready"
(3) indicator changes to green flashing. The battery pack can
be removed at this time or left connected to keep topped up
until use.
Discharging the Battery
If over time the battery loses storage capacity, discharging the
battery first and then recharging it may improve the battery’s
storage capacity.
This procedure can be started by pressing the yellow button for
discharging (5) for about 2 seconds. The yellow LED
"Discharge" (4) lights and indicates the discharging procedure.
During the first minute the green LED ,,Ready" (3) flashes but
should turn off after the test phase. After discharging, which
can in some cases last for several hours, the charger
automatically switches over to fast charging.
Defective Battery
If the "Charge" LED (2) and "Ready" LED (3) are flashing and
the steady light "Ready"(3) does not light permanently, the
battery pack is defective and cannot be recharged at all. In this
case the battery pack has to be replaced.
 Loading...