

Page 1
USB Server Gigabit – Quick Start Guide
ACPIUSBSGB-QSG-E2017-07-A
1/8
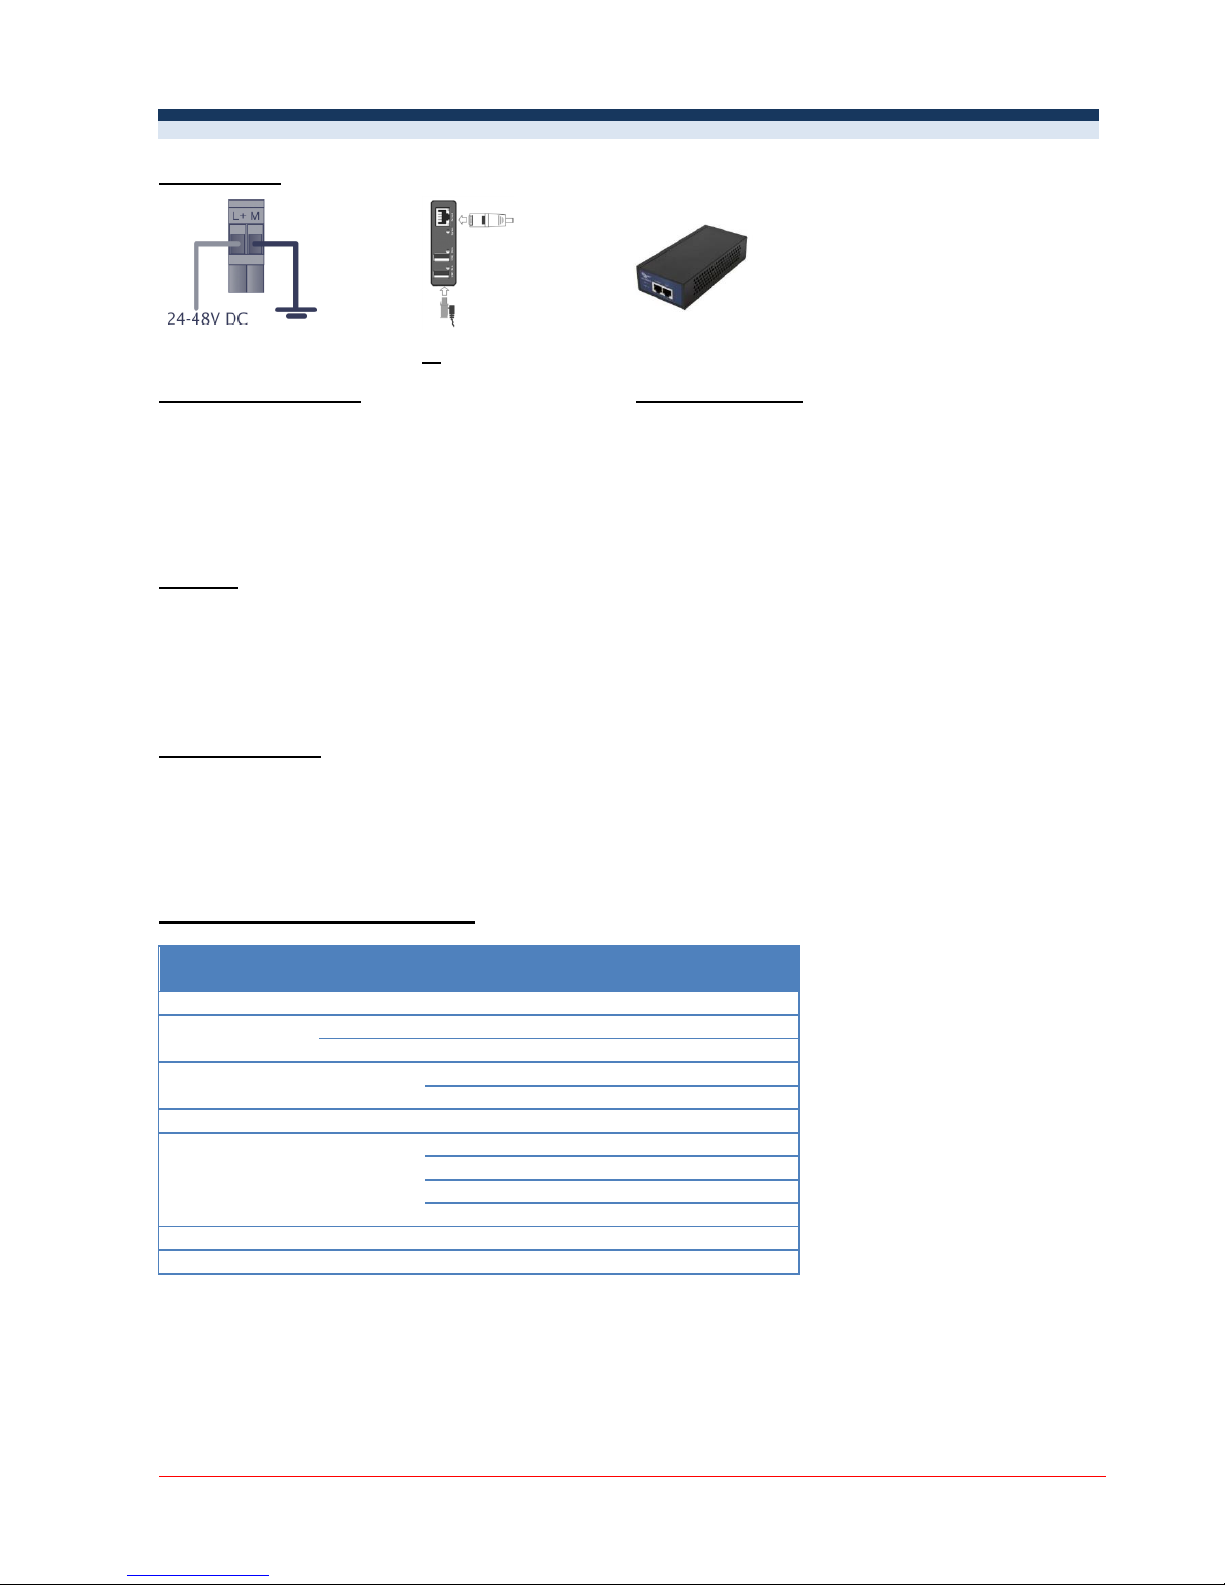
Power supply
24 V power supply
or
Power over Ethernet [Part-No.: ACPIPOE]
System-LED (green/ orange)
State-LEDs (green/ red)
GREEN ON
Power supply and system OK
GREEN ON
USB port in use
GREEN flashing
System start
RED ON
The USB server has been disconnected the power
supply of the port e.g. due to overload or temporary
disconnecting of the USB device
ORANGE flashing
Current firmware update or reset to factory
settings
ORANGE ON
Reset to factory settings finished; Restart
required
Software
Install the software programs from the Software-CD (folder: USB-Server):
WuTility
USB Redirector
Scope of Supply
USB Server Gigabit
24 V power supply
Ethernet cable, 1m
Quick Start Guide
Connection variants USB server
Model
Channel
max. speed
max. number of units
on one USB server
PI 160
IR
120 Hz
2
PI 2xx
IR+VIS
128 Hz
1
IR
128 Hz
2
PI 4xx
IR
80 Hz
1
27 Hz
2
PI 6xx
IR
32 Hz
1
PI 1M/ 05M
IR
27 Hz
2
32 Hz
1
80 Hz
1
1 kHz
1
Pyrometer
IR - 2
PI + Pyrometer
IR - 2
Page 2
USB Server Gigabit – Quick Start Guide
ACPIUSBSGB-QSG-E2017-07-A
2/8
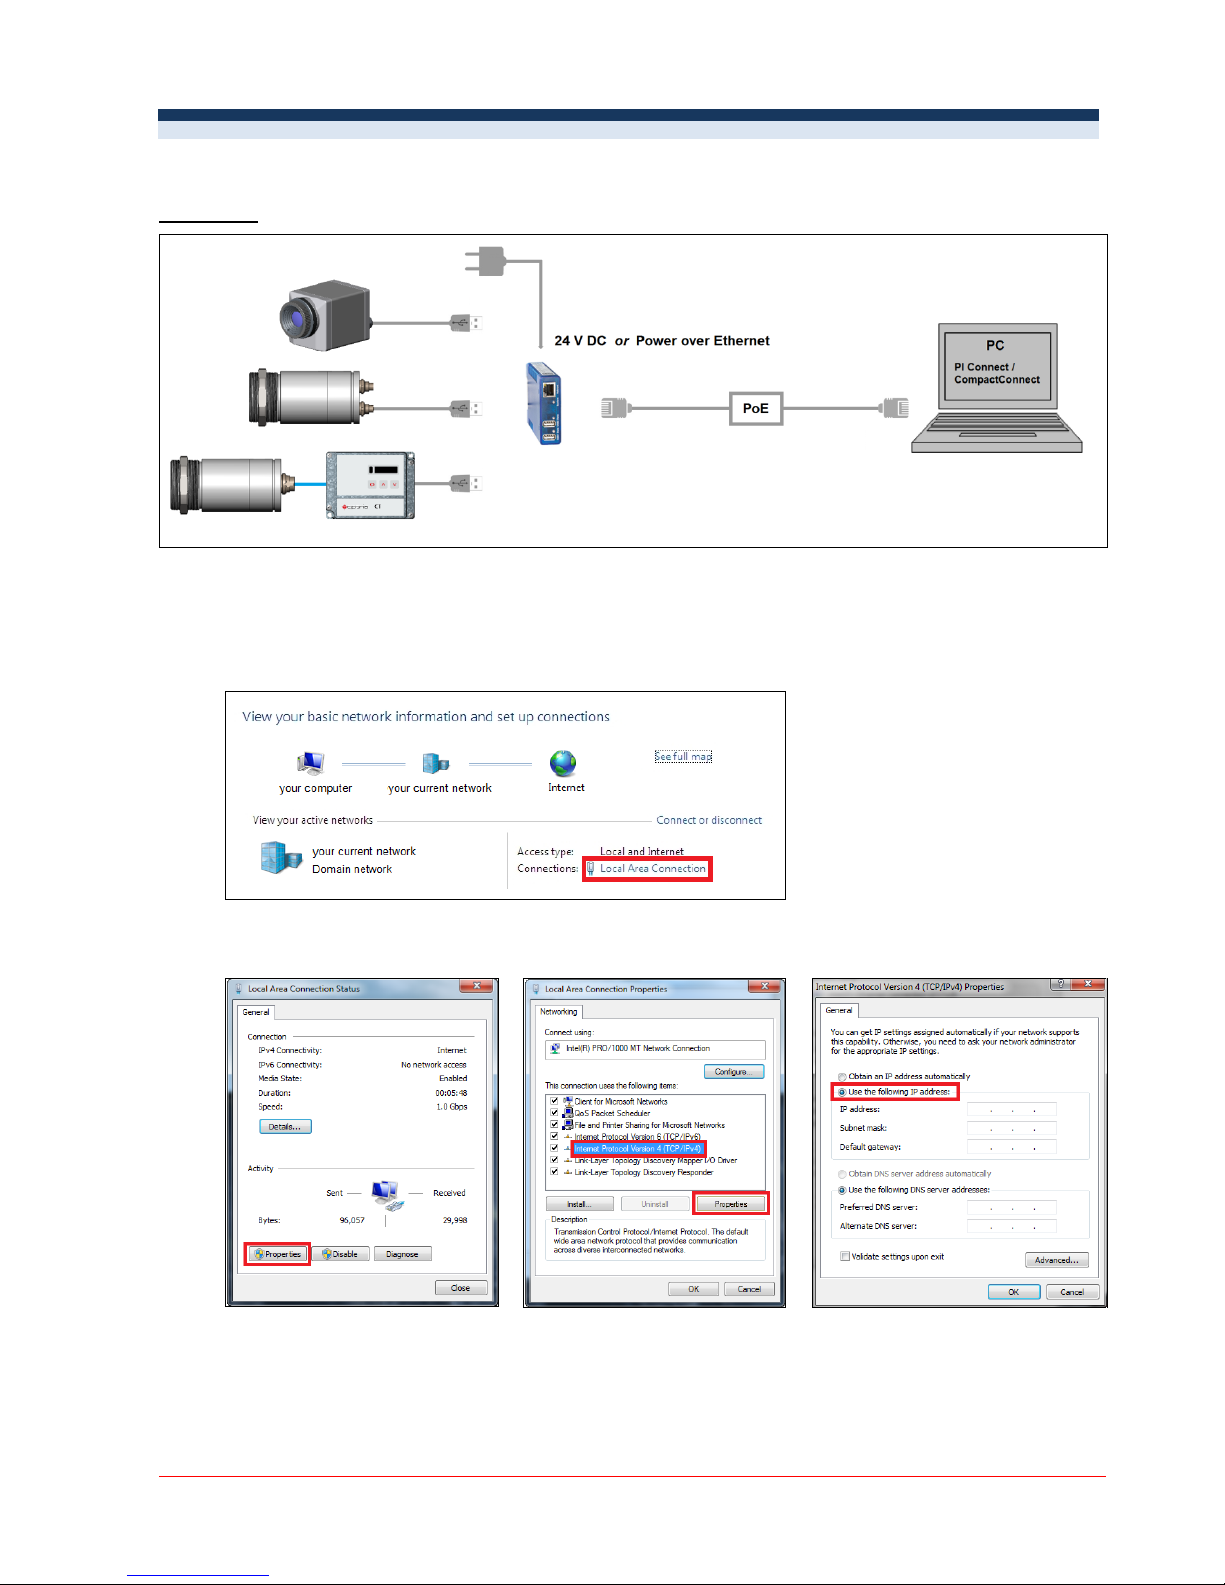
1. Direct Connection USB Server Gigabit [ACPIUSBSGB] (Point-to-Point-Network)
Installation
On a direct connection to a PC both, the USB server as well as the PC must use a fixed IP address. There is no
DHCP server available. Accomplish the following settings on your PC once (depending on the operating system
the procedure can differ from the here shown – the following description refers to a Windows 7 system).
1. Go to Control Panel; open Network and Sharing Center.
2. Enter Local Area Connection – status screen [1] is shown and subsequently Properties.
3. Mark Internet protocol Version 4 (TCP/IPv4) [2] and go to Properties again.
[1]
[2]
[3]
4. In the register card General enable the checkbox Use the following IP address [3]
5. Now enter a user defined IP address for your PC, for example 192.168.0.1.
Page 3
USB Server Gigabit – Quick Start Guide
ACPIUSBSGB-QSG-E2017-07-A
3/8
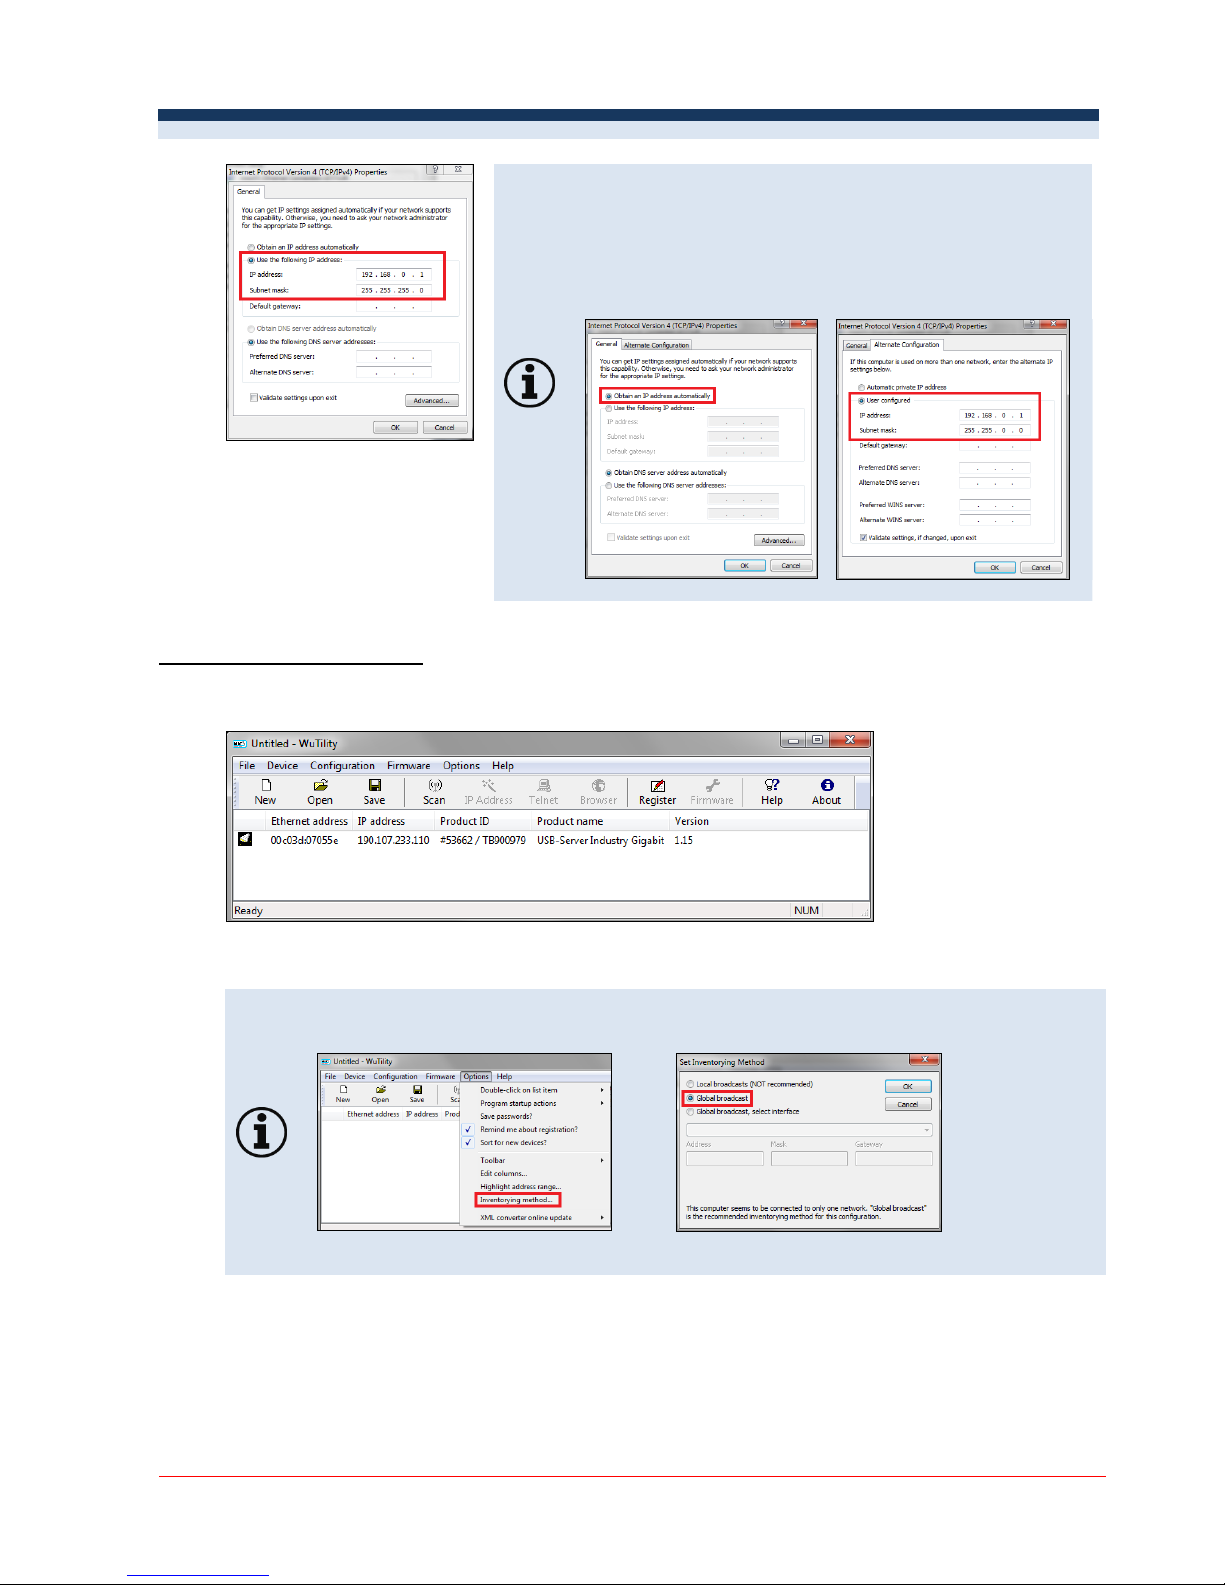
If you want to switch between a user-defined IP address and
a DHCP server, the following alternative configuration is
recommended: Under the General tab choose Obtain an
IP address automatically, and on the Alternate
Configuration tab, click User configured and enter a
user defined IP address:
Starting the program WuTility
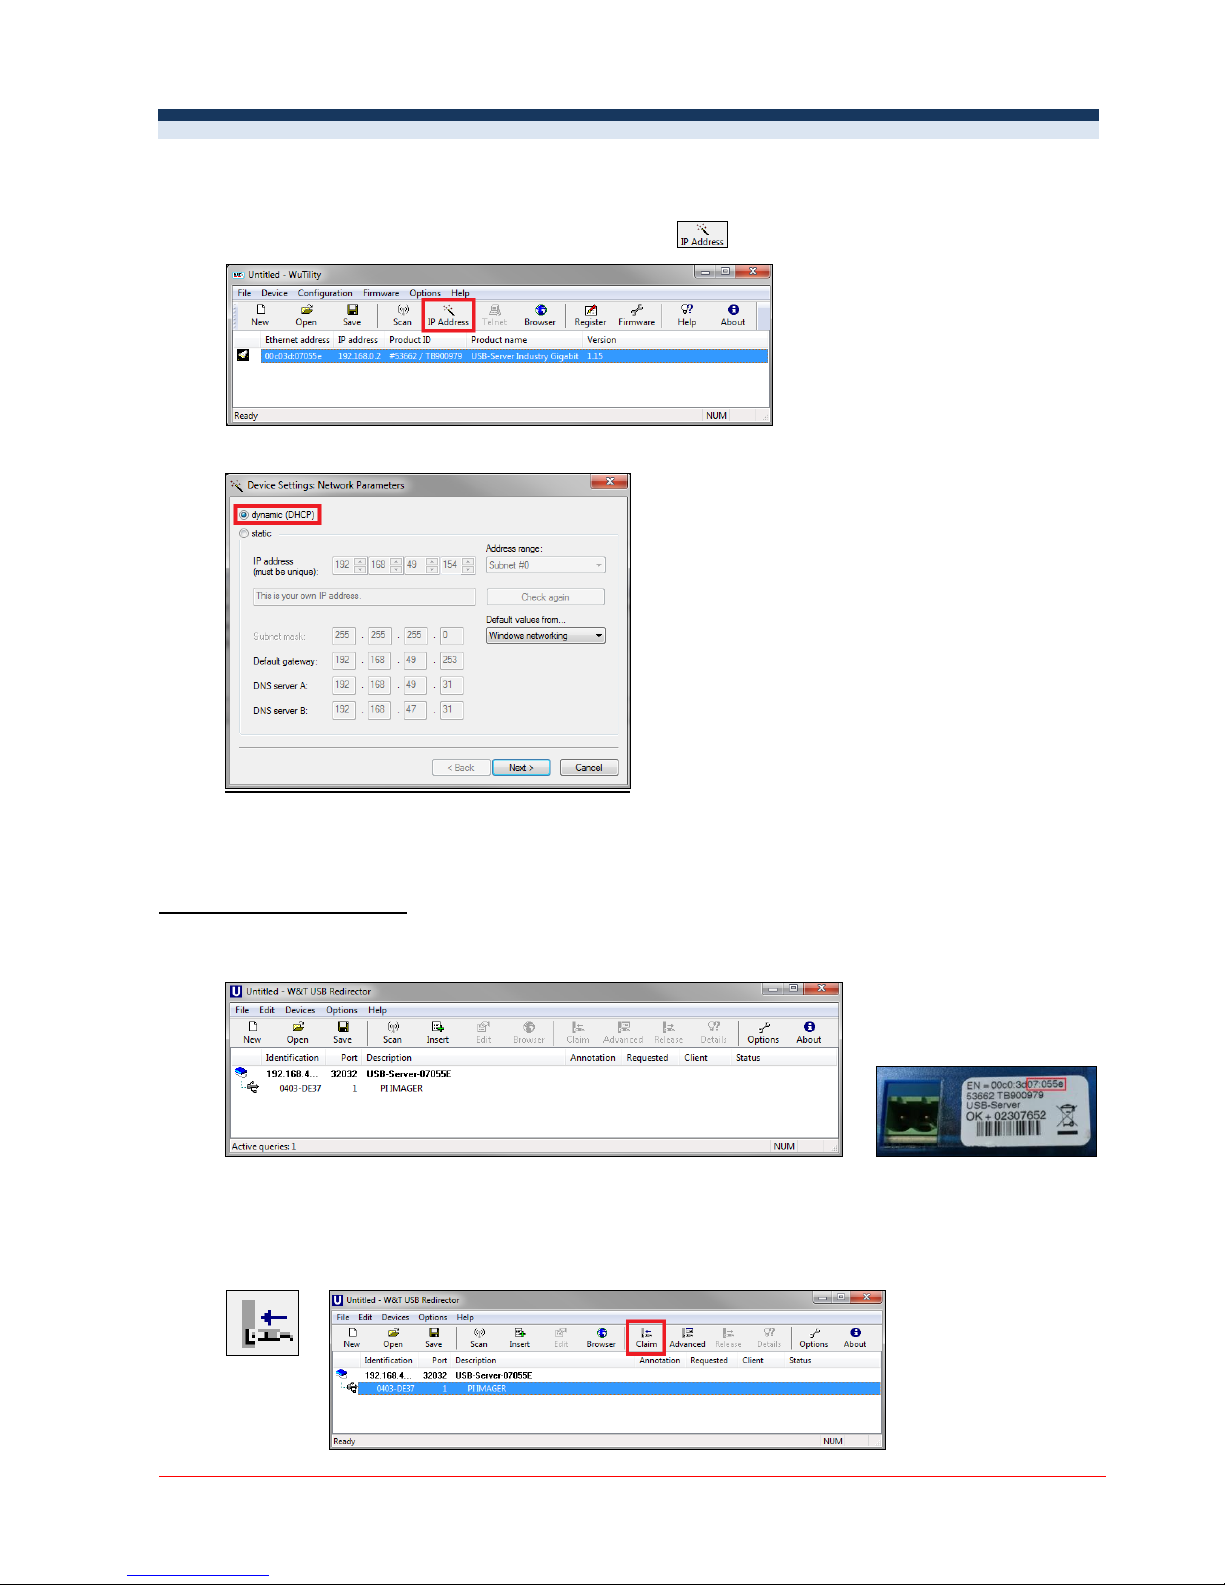
6. To change the network settings of the USB server start the WuTility program:
Independent on the current network settings of the USB server the device is displayed now (if not, refresh
the current view with Scan).
If there is any problem in the WuTility software with the detection of connected USB server,
check the following setting:
1. Go to Options/Inventorying method and choose Global broadcast.
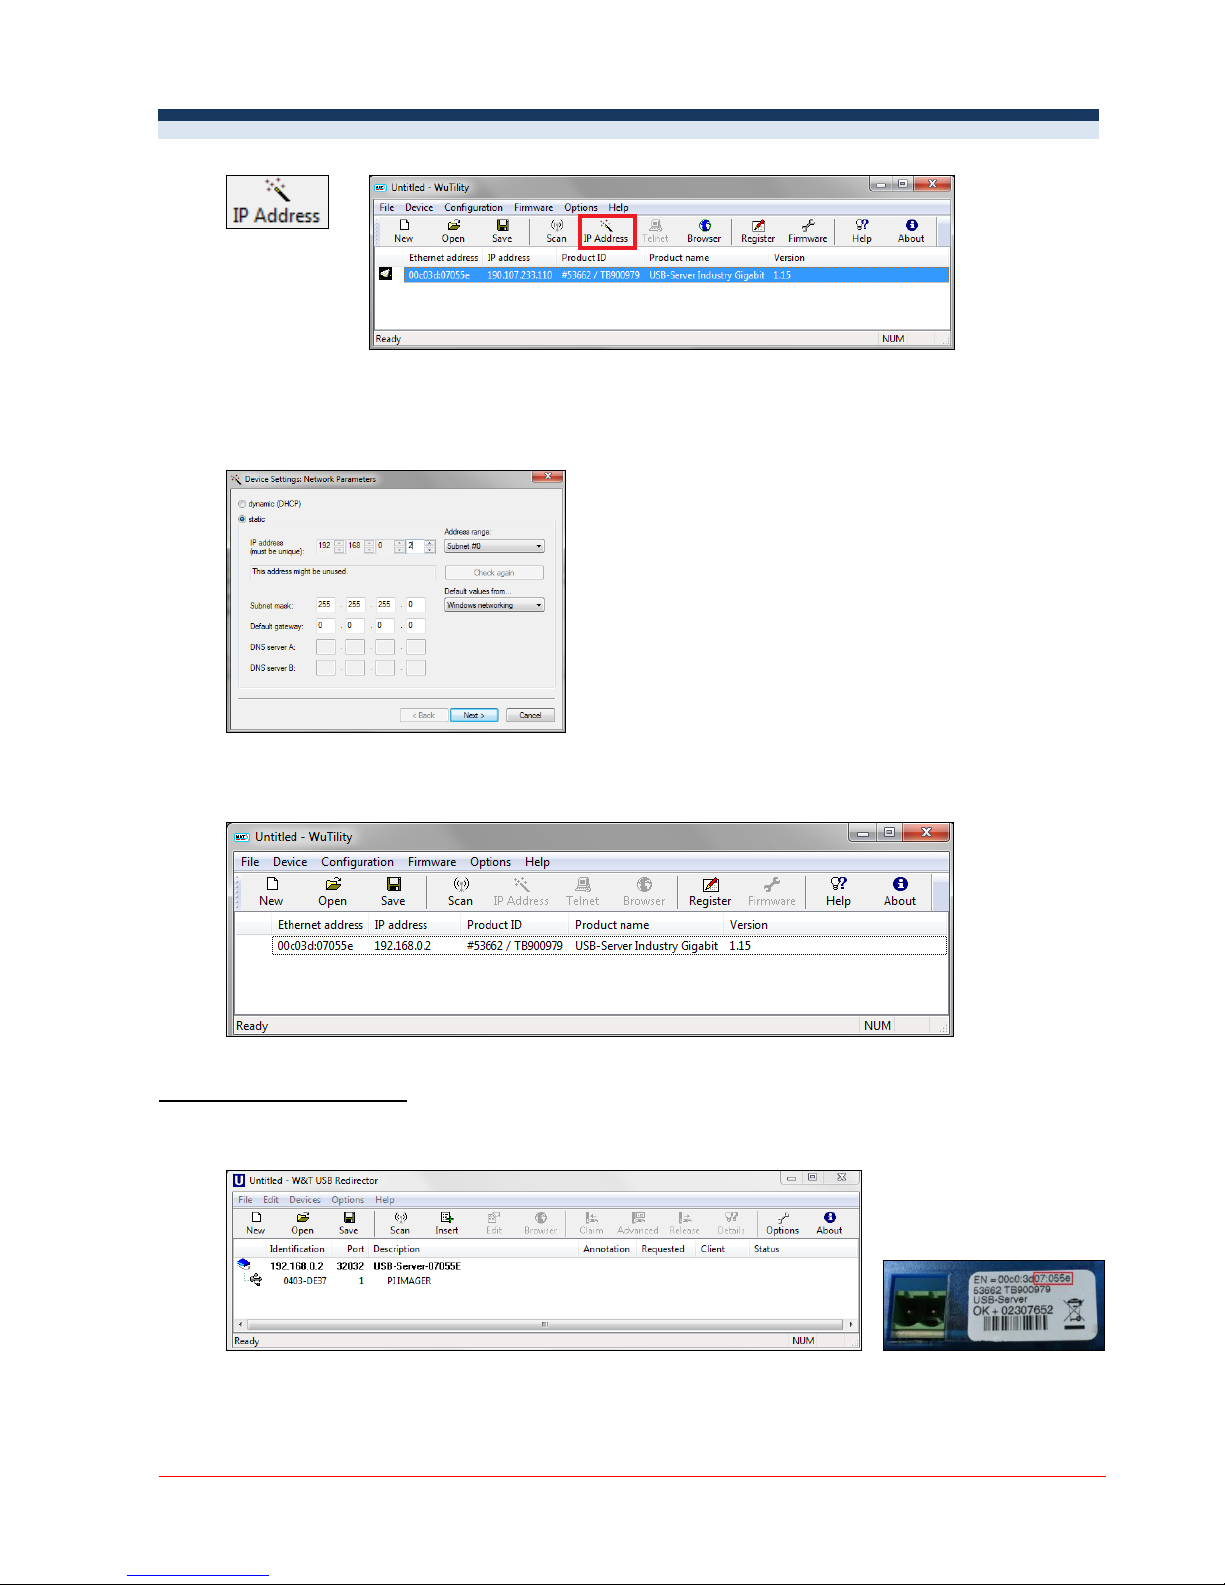
7. Mark the USB server and then press IP Address:
Page 4
USB Server Gigabit – Quick Start Guide
ACPIUSBSGB-QSG-E2017-07-A
4/8
8. The standard setting of the USB server is DHCP. On a direct connection to a PC set a static IP address to
the device. Take care that the network part of the address is identical to the network part of the IP
address of the connected PC (therefore: 192.168.0). The host part must have a different digit than the
user-defined IP address of your PC (for example: 192.168.0.2):
9. Now press Next and then Finish. The network connection between PC and USB server will be
established and you can perform the USB Redirector as described previously. Close the WuTility
software.
Starting the USB Redirector
10. Start the USB Redirector. The local network will be automatically scanned for available USB servers (if
not, refresh the current view with File/ New).
If several USB servers are in your network you can identify your own by the number you find in the
overview of Redirector (under Description) as well as on the serial number label of your device(e.g.: USB
server-07055e).
Page 5
USB Server Gigabit – Quick Start Guide
ACPIUSBSGB-QSG-E2017-07-A
5/8
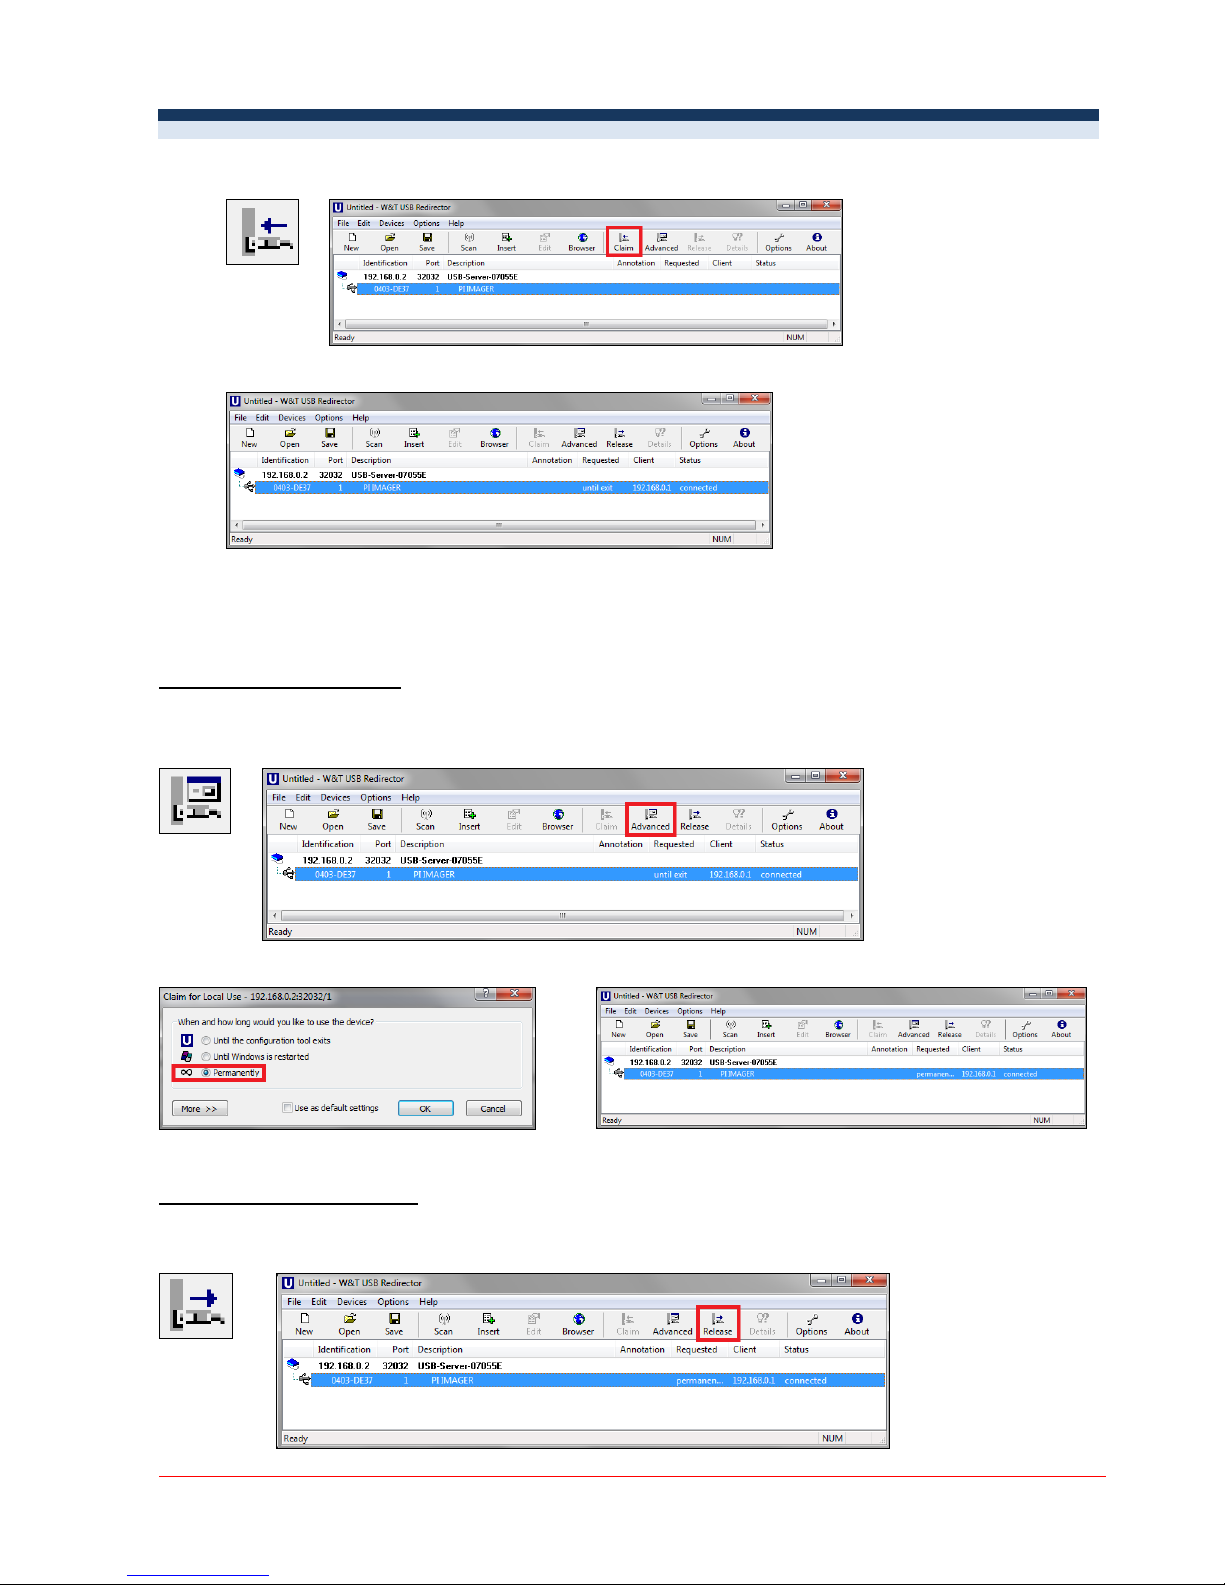
11. You see in the Redirector the connected USB device. Mark it and press the Claim button.
The status is changing now to Connected. You can see the IP address of your local PC under Client:
The device (IR camera PI, CTvideo or CSvideo) can now be used in the same way as it would be
connected directly to a local USB port of your PC.
The program Redirector can be minimized – the connection will be determined if you close the window.
Automated USB Redirector
Open the Redirector and mark the connected device.
Then press Advanced:
Select permanently:
Stopping the USB Redirector
To stop the connection between the USB Redirector and the device, start the Redirector and press the Release
button:
Page 6

USB Server Gigabit – Quick Start Guide
ACPIUSBSGB-QSG-E2017-07-A
6/8
2. Connection USB Server Gigabit [ACPIUSBSGB] via Network
Installation
On a connection to a PC both over the network, the USB server as well as the PC must use an automatic IP
address. Here the DHCP server is available. Review the following settings on your PC once (depending on the
operating system the procedure can differ from the here shown – the following description refers to a Windows 7
system).
1. Go to Control Panel; open Network and Sharing Center.
2. Enter Local Area Connection – status screen [1] is shown and subsequently Properties.
3. Mark Internet protocol Version 4 (TCP/IPv4) [2] and go to Properties again.
[1]
[2]
[3]
4. In the register card General enable the checkbox Obtain an IP address automatically [3]
The default setting for the USB server is DHCP. If you have not previously used the WuTility program, you do not
have to start it. If you have already used it before, e.g. a direct connection, make sure that the following setting is
configured:
Page 7
USB Server Gigabit – Quick Start Guide
ACPIUSBSGB-QSG-E2017-07-A
7/8
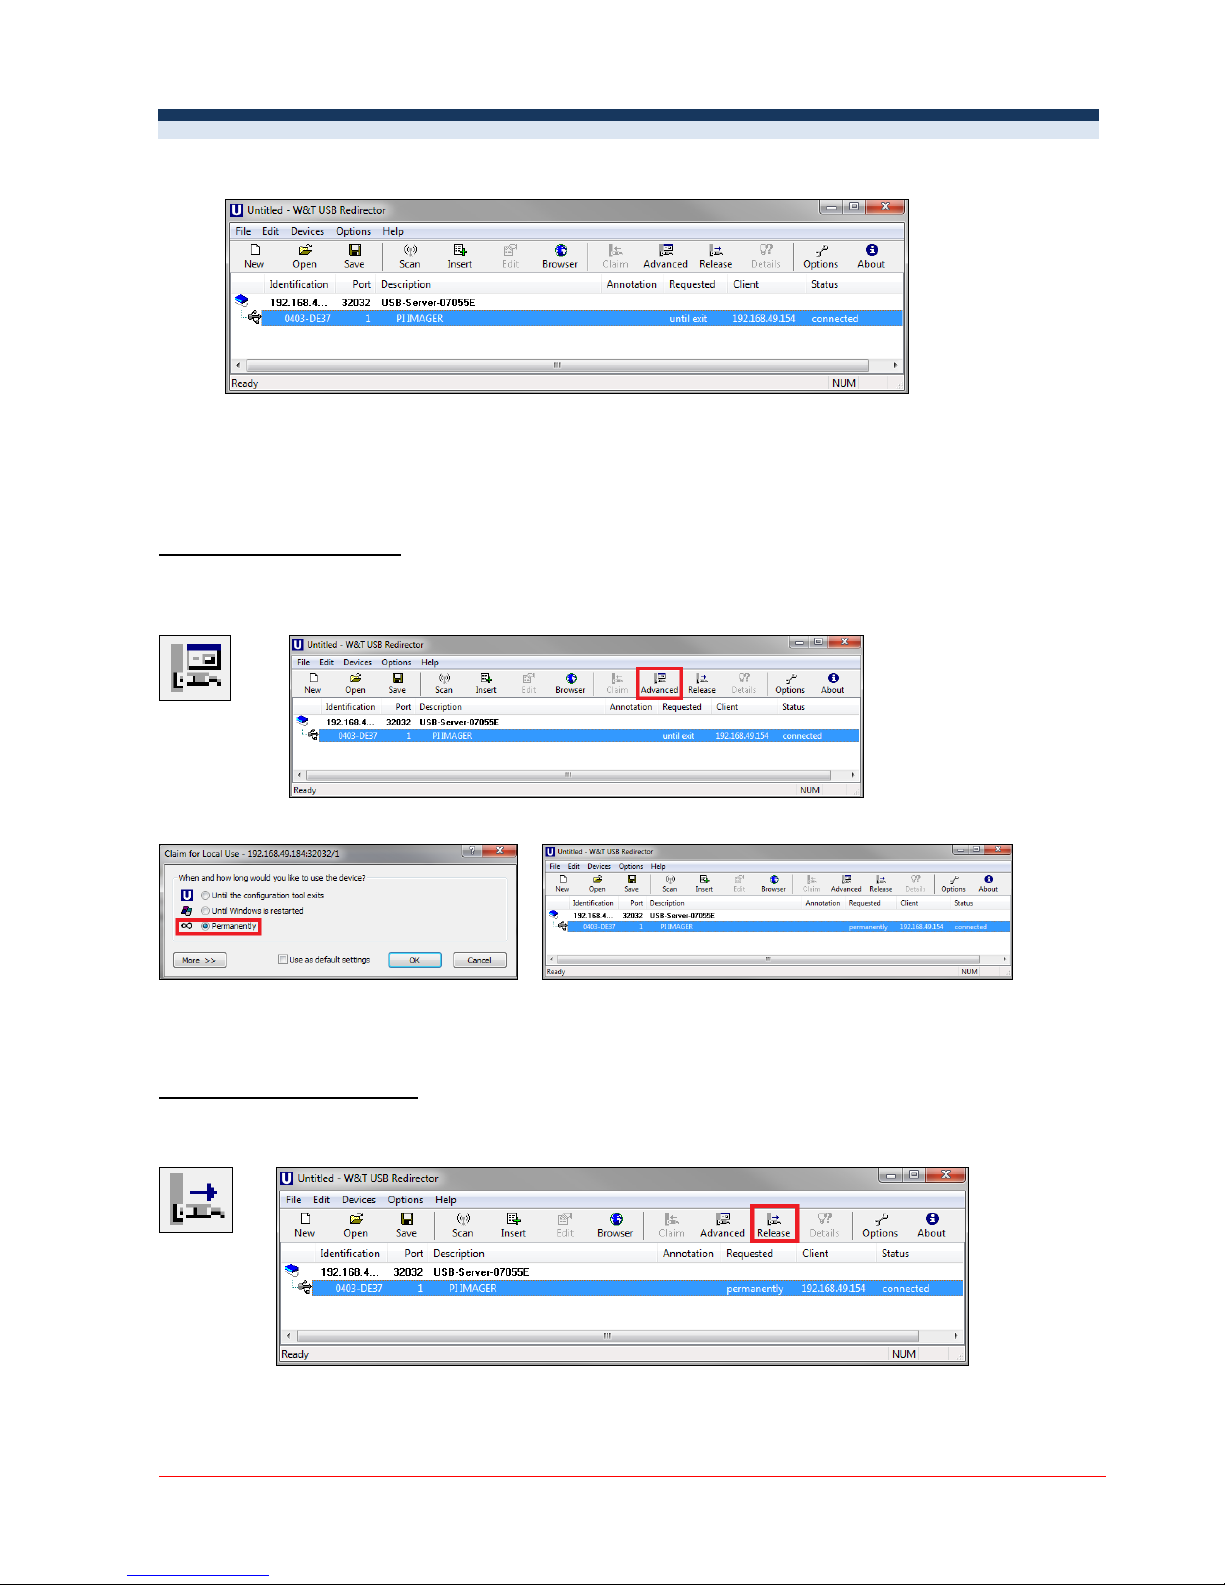
Start the WuTility program. Regardless of the network settings of the USB server, this is now displayed (if
not, simply update the view with Scan).
Select the USB server and then press the IP address:
The setting of the USB server must be set to dynamic (DHCP).
Now press Next and then Finish. The network connection between PC and USB server will be
established and you can close the WuTility software.
Starting the USB Redirector
5. Start the USB Redirector. The local network will be automatically scanned for available USB servers (if
not, refresh the current view with File/ New).
If several USB servers are in your network you can identify your own by the number you find in the
overview of Redirector (under Description) as well as on the serial number label of your device(e.g.: USB
server-07055e).
6. You see in the Redirector the connected USB device. Mark it and press the Claim button.
Page 8
USB Server Gigabit – Quick Start Guide
ACPIUSBSGB-QSG-E2017-07-A
8/8
The status is changing now to connected. You can see the IP address of your local PC under Client:
The device (IR camera PI, CTvideo or CSvideo) can now be used in the same way as it would be
connected directly to a local USB port of your PC.
The program Redirector can be minimized – if you close the window, the Redirector will be automatically
terminated.
Automated USB Redirector
Open the Redirector and mark the connected device.
Then press Advanced:
Select permanently:
The connection is now kept also if the program Redirector will be closed. If the PC and/ or the USB server are
restarted, the connection will be recovered automatically.
Stopping the USB Redirector
To stop the connection between the USB Redirector and the device, start the Redirector and press the Release
button:
 Loading...