

Page 1
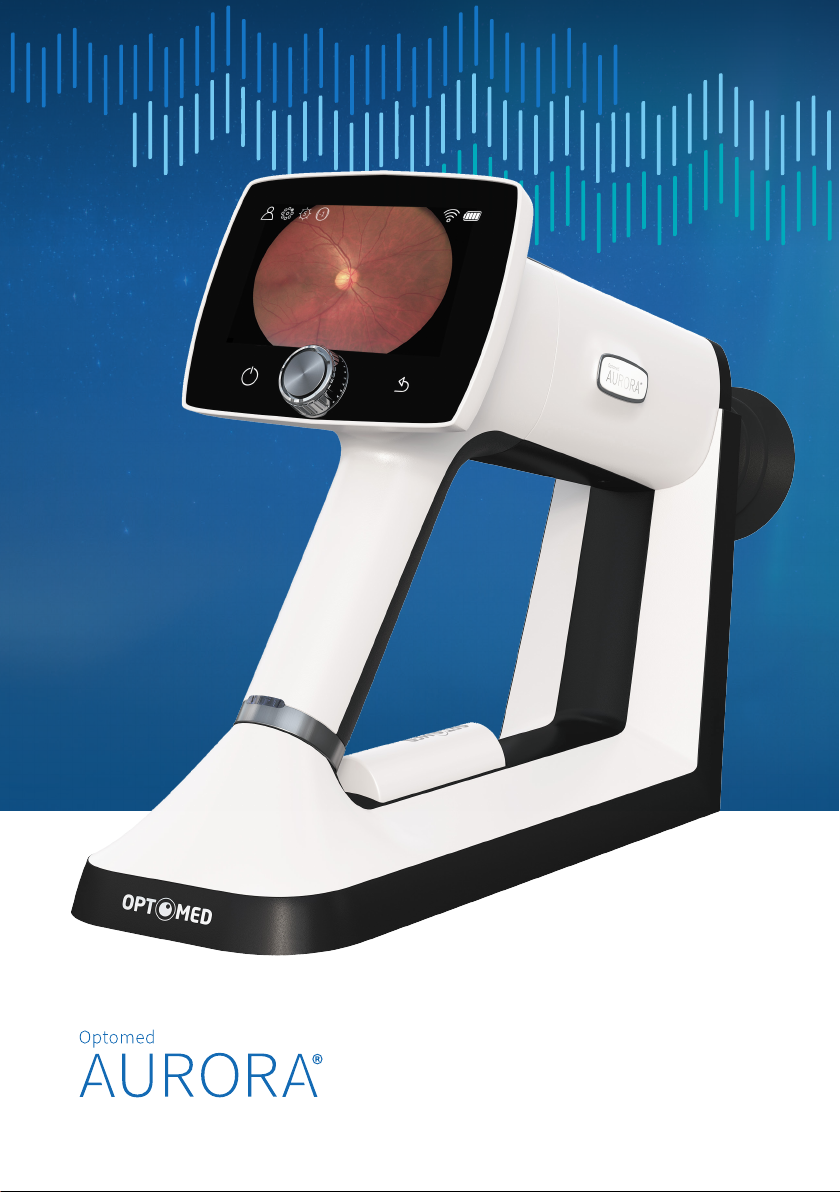
USER MANUAL
Page 2

Page 3

Optomed Aurora
User manual for Optomed Aurora ophthalmic camera
Manufacturer:
Optomed Oy (Ltd)
Yrttipellontie 1,
FI-90230 Oulu
Finland
Tel: +358 20 741 3380
[email protected]
www.optomed.com
English 60000888
R 6.0
2019 07 01
Page 4

Page 5

CONTENTS
1 Safety 6
1.1 Symbols 6
1.2 Intended use 10
1.3 Contraindication 10
1.4 Precautions 11
2 Device overview 13
2.1 Controls and display icons 14
3 Getting started 16
3.1 Part list and unpacking 16
3.2 Preparations 16
4 Features 19
4.1 Quick menu 19
4.2 Camera settings 21
4.3 Optics settings for Aurora Retinal Module 23
4.4 Optics settings for Aurora Anterior Module 25
5 Imaging with Aurora 26
5.1 Retinal Module 27
5.2 Anterior Module 28
5.3 Aer imaging 29
6 Important information 30
6.1 Environmental conditions 30
6.2 Error messages 30
6.3 Cleaning 31
6.4 Service and repair 32
6.5 Battery 33
6.6 Disposal 34
6.7 Technical description 34
6.8 Electromagnetic compatibility 37
6.9 Compliance 41
6.10 Warranty 42
A Appendix - WLAN 43
A.1 Wireless settings 43
A.2 Optomed Client PC soware 44
Notes 45
Index 46
Page 6
1. Safety
The information in this manual applies to the Optomed Aurora ophthalmic camera. The specifications in
this manual are subject to change without prior notice due to continuing product development. The latest
version of this manual can be downloaded at www.optomed.com/support where you can also find more
training materials.
This user manual explains the safety precautions and introduces the device and its proper operation. The
device must be used according to this user manual. The user manual and other documentation enclosed
with the Optomed Aurora should be kept accessible to users at all times to ensure that the information
required for use of the device is readily available.
CAUTION!
Read the user manual carefully before commissioning this device. It contains important information
regarding user and patient safety.
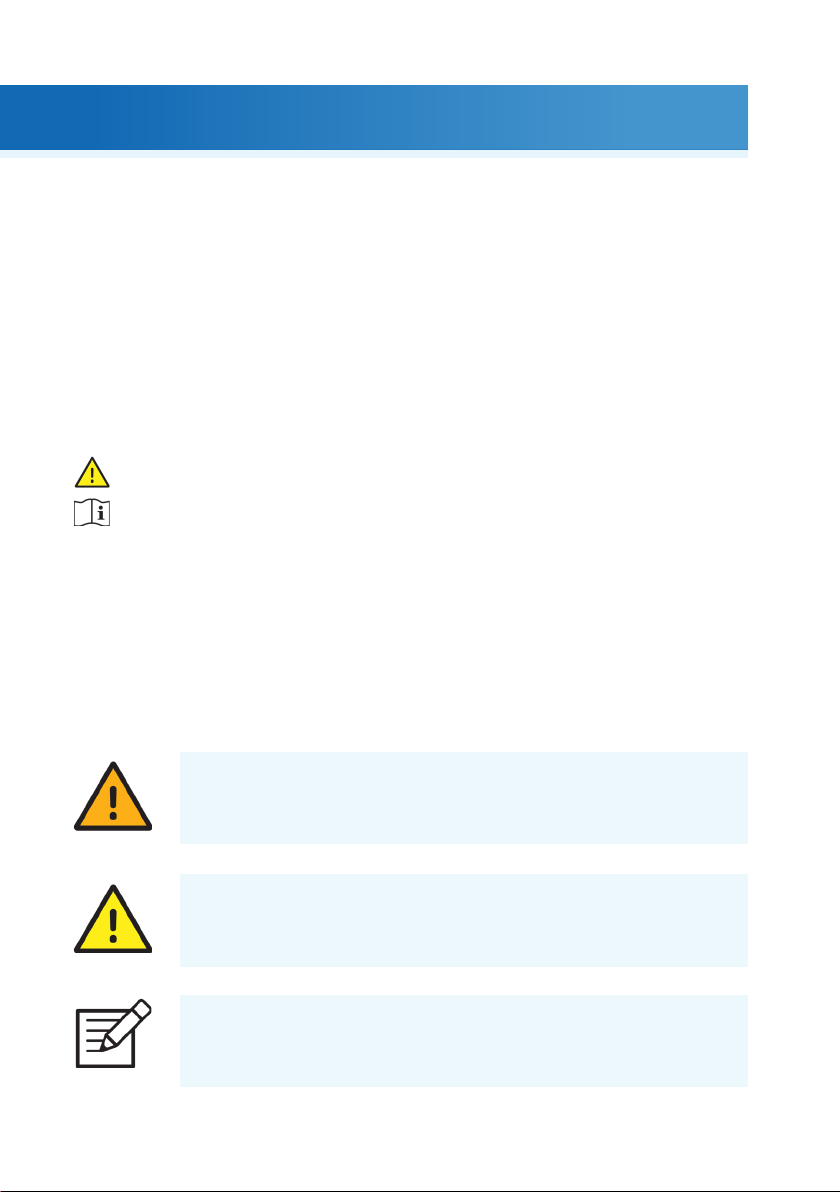
1.1 Symbols
The symbols used in this user manual or on device labels refer to important safety information
or manufacturing information. Whenever you see these symbols, read the accompanying information
carefully and observe all safety notes and information in this user manual and on device labels.
WARNING!
Indicates a hazardous situation which could result in patient injury, harm or death
if appropriate safety precautions are not followed.
CAUTION!
Indicates a situation which could result in device harm, damage or malfunction if
the appropriate precautions are not followed.
NOTE!
Important information: please read carefully.
6 Optomed Aurora
| Safety
Page 7
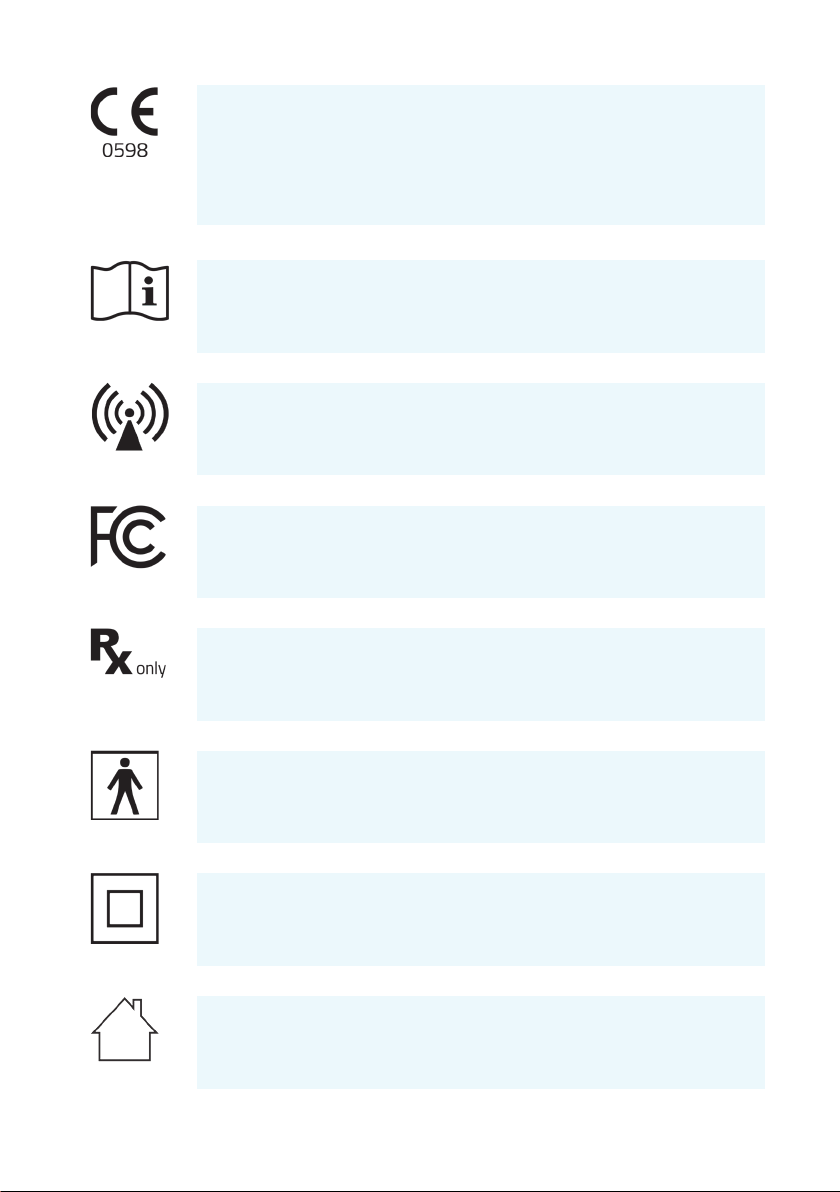
European certificate of conformity
The CE marking with notified body identification numbering indicates the conformity
of 93/42/ EEC Medical Device Directive for class IIa devices and CE marking without
notified body identification numbering indicates the conformity of 93/42 EEC
Medical Device Directive for class I devices.
Read the instructions for use carefully
Failure to follow these instructions could place the patient or operator at risk.
Radio frequency radiation
The device has WLAN functionality. Electromagnetic interference may occur in
the vicinity of equipment.
FCC Declaration of conformity
The device emits RF radiation. Electromagnetic interference from the device is
under limits approved by the Federal Communications Commission.
Prescription device
Symbol for : “Caution: Federal law restricts this device to sale by or on the order
of a physician or licensed practitioner.”
Type BF applied parts
The eye cup which is in physical contact with the patient, is electrically isolated
and protected against electric shock.
Class II power supply
For indoor use only
Power supply designed primarily for indoor use only according to IEC 60417
Optomed Aurora 7
Safety |
Page 8
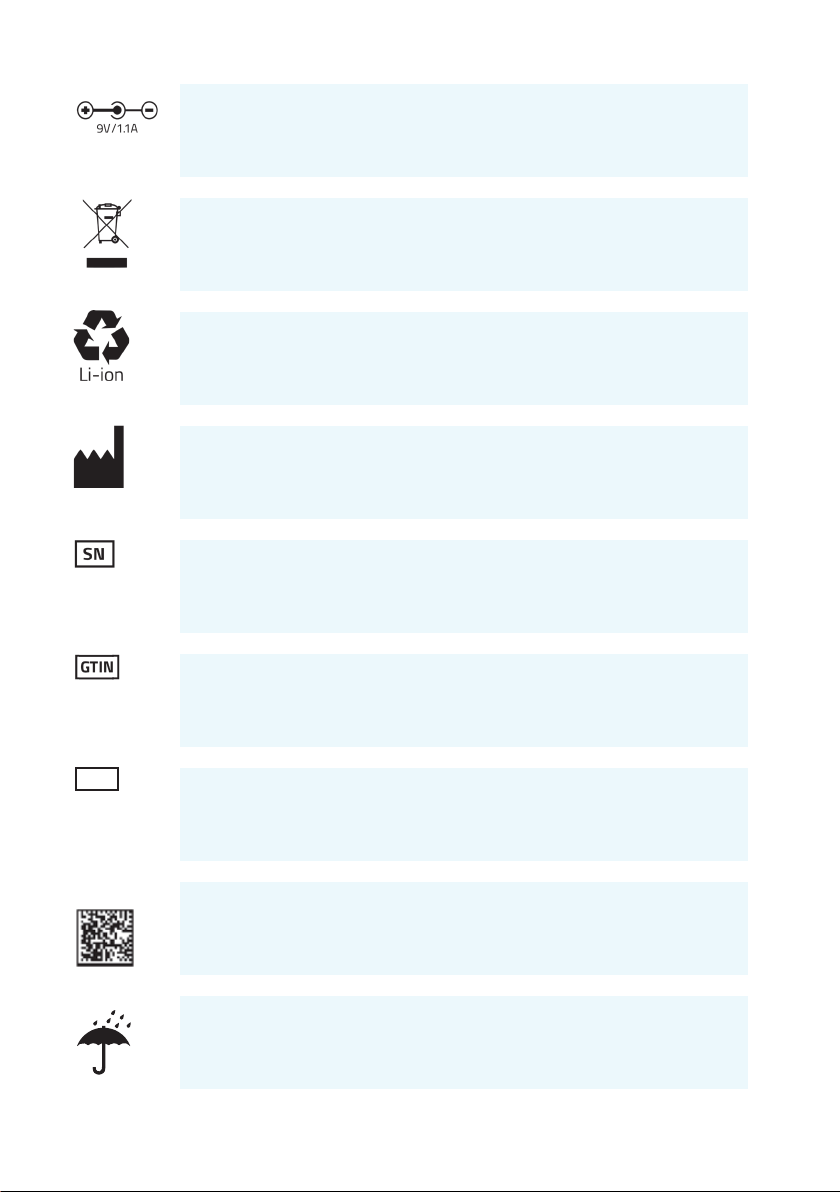
Plug socket for power supply (Positive polarity)
Voltage and current
Disposal specification
European directive on waste electrical and electronic equipment (WEEE)
2012/19/EU specifies the disposal.
Battery disposal specification
The device has a rechargeable lithium-ion battery which can be recycled.
Manufacturer
The symbol is accompanied by the date of the manufacture, and the name and
the address of the manufacturer.
Serial number
The first four digits of the serial number indicates the week (digits 1-2) and year
(digits 3-4) of the manufacture.
Global trade item number
REF
Reference number
GS1 Unique Device Identification
Keep away from water
8 Optomed Aurora
| Safety
Page 9

Fragile
Handle with care.
Do not use hand hooks
Keep out of direct sunlight
Number of units packed
Temperature limitations
Humidity limitations
Atmospheric pressure limitations
Optomed Aurora 9
Safety |
Page 10

1.2 Intended use
Optomed Aurora Camera is a medical digital camera that is used with dedicated optics modules intended to capture images and video of the fundus of the eye and surface of the eye.
Optomed Aurora Camera with Optomed Aurora Retinal Module is intended to capture digital images and
video of the fundus of the human eye.
Optomed Aurora Camera with Optomed Aurora Anterior Module is intended to capture digital images and
video of the surface of the human eye and surrounding areas.
1.3 Contraindication
Optomed Aurora is classified as Group 2 based on standard ISO 15004-2:2007. The daily usage time and
maximum allowed number of pulses presented below is calculated on the basis of optical classification results.
WARNING!
The light emitted from this instrument is potentially hazardous. The longer the duration of exposure
and the greater the number of pulses, the greater the risk of ocular damage. Exposure to light
from this instrument when operated at maximum output will exceed the safety guideline aer:
Pulsed light
• 6300 still images / eye / day for Aurora Retinal Module
• 250 still images / eye / day for Aurora Anterior Module
Or alternatively continuous light
• 90 min video recording / eye / day for Aurora Retinal Module
• 8 min video recording / eye / day for Aurora Anterior Module
Please note that the exposure time in video recording and the number of pulses in still imaging from all
light sources are cumulative and additive. If the intensity of any of the light sources is reduced to half of
the maximum output, the exposure time or number of pulses for that light source to reach the exposure
safety guideline is doubled.
Since prolonged intense light exposure can cause ocular damage, the use of the device for ocular examination
should not be unnecessarily prolonged, and the brightness setting should not exceed what is needed to
provide clear visualization of the target structures. Infants, persons withaphakia or diseased eyes will be
at greater risk of ocular damage. The risk may also be increased if the person being examined has had any
exposure with the same instrument or any other ophthalmic instrument using a visible light source during
the previous 24 hours.
10 Optomed Aurora
| Safety
Page 11
1.4 Precautions
WARNING!
Optomed Aurora is not suitable for use in explosion risk areas or in the presence of flammable
anesthetics.
WARNING!
Place the PC and Aurora Charging Station outside the patient environment (at a distance of at least
1.5 meters from the patient).
WARNING!
To avoid contamination, clean the eye cup before each use with a new patient.
WARNING!
Do not leave the eye cup in direct sunlight as it may heat up and cause burns.
WARNING!
In order to avoid touch current during imaging, do not touch the system connector and the
patient simultaneously.
CAUTION!
Optomed Aurora is intended for use inside, in normal room temperature, and normal humidity.
Do not use the device in an environment where there is a possibility of water condensation on or
inside the device.
CAUTION!
The device may only be used for the specified purpose and according to national regulations,
consistent with the applicable industry standards and occupational safety and accident prevention
regulations.
CAUTION!
Federal law restricts this device to sale by or on the order of a physician or licensed practitioner.
CAUTION!
No modification of this equipment is allowed.
CAUTION!
Only use accessories and battery provided by Optomed with this product.
Optomed Aurora 11
Safety |
Page 12
CAUTION!
Only use USB cable and the power source provided by Optomed with this product.
If you need replacement USB cable or power source, please contact the manufacturer or your
local distributor. USB cable must be connected only to the USB port of a PC that complies with the
IEC 60950 standard. Only connect Aurora Charging Station to an electricity supply which corresponds
to the supply voltage of the device.
CAUTION!
The connection between the camera and the PC is USB and/or WLAN. Any authorization procedures should
be carried out in the PC. If the PC is connected to a customer network, make sure the appropriate
safety measures are applied, such as Antivirus and Firewall protection.
CAUTION!
If there are breaks in device covers or other visual defects, contact Optomed Customer Service or
an Optomed-certified service facility.
CAUTION!
Repair and maintenance work may only be performed by authorized specialists. Contact your
Optomed representative for repairs and maintenance work on the device.
12 Optomed Aurora
| Safety
Page 13
2. Device overview
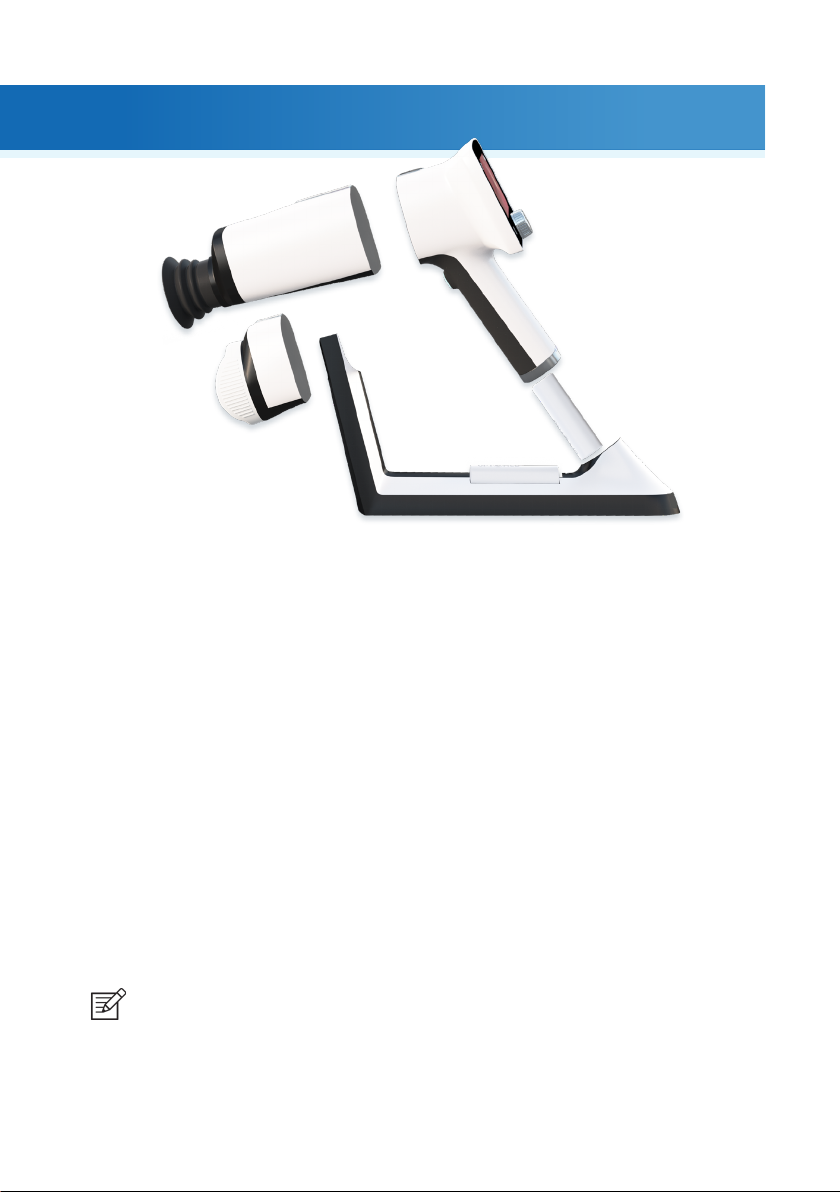
Optomed Aurora is a modular ophthalmic camera that is designed for use in a medical environment. It is
intended to capture digital images and video of the fundus of the eye and surface of the eye for documentation
and consultation. Aurora Camera is used with interchangeable optics modules Aurora Retinal Module and
Aurora Anterior Module. Optics modules are attached to the camera with bayonet connectors.
Aurora Camera has a WLAN module which enables wireless data transfer to a PC. Captured images and
recorded videos can also be transferred to a PC via USB connection when the camera is placed on Aurora
Charging Station. In addition, Aurora Charging Station is a dual charger used for charging the battery inside
the camera and spare battery.
Aurora Retinal Module is intended for non-mydriatic fundus imaging. In non-mydriatic imaging no mydriasis
is needed because infrared light is used for targeting the fundus and white light is flashed when an image
is taken. The pupil does not respond to the infrared light so examination is convenient for the patient. With
small pupils it is recommended to use mydriatic drops. Aurora Retinal Module has nine internal fixation targets
for the patient to fixate on during imaging. The middle fixation target provides a macula-centred image.
Aurora Anterior Module is intended for imaging the surface of the eye and surrounding areas. Aurora Anterior
Module has two light sources for imaging: white and cobalt blue. Cobalt blue light enables capturing of
fluorescent images. There are four focus windows to focus the image.
NOTE!
The device may only be operated by persons who have been properly trained or who have the
required knowledge and experience to do so. The device may only be used in accordance with
its intended use.
Device overview |
Optomed Aurora 13
Page 14
Patient
Battery level
Fixation target
Brightness level
Diopter value
Power button
Optoroller
WLAN indicator
Back button
Battery charging
indicator LED
14 Optomed Aurora
Dual action shutter
Eject button
Page 15
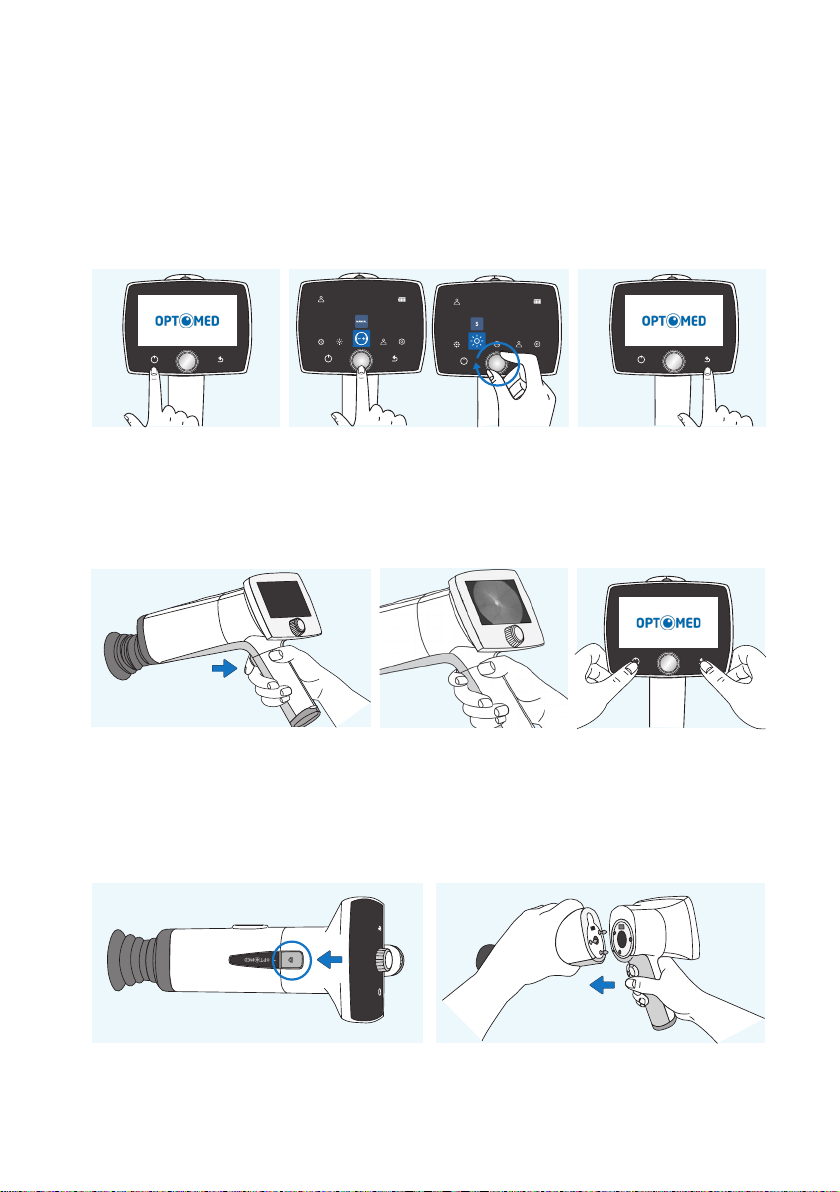
2.1 Controls and display icons
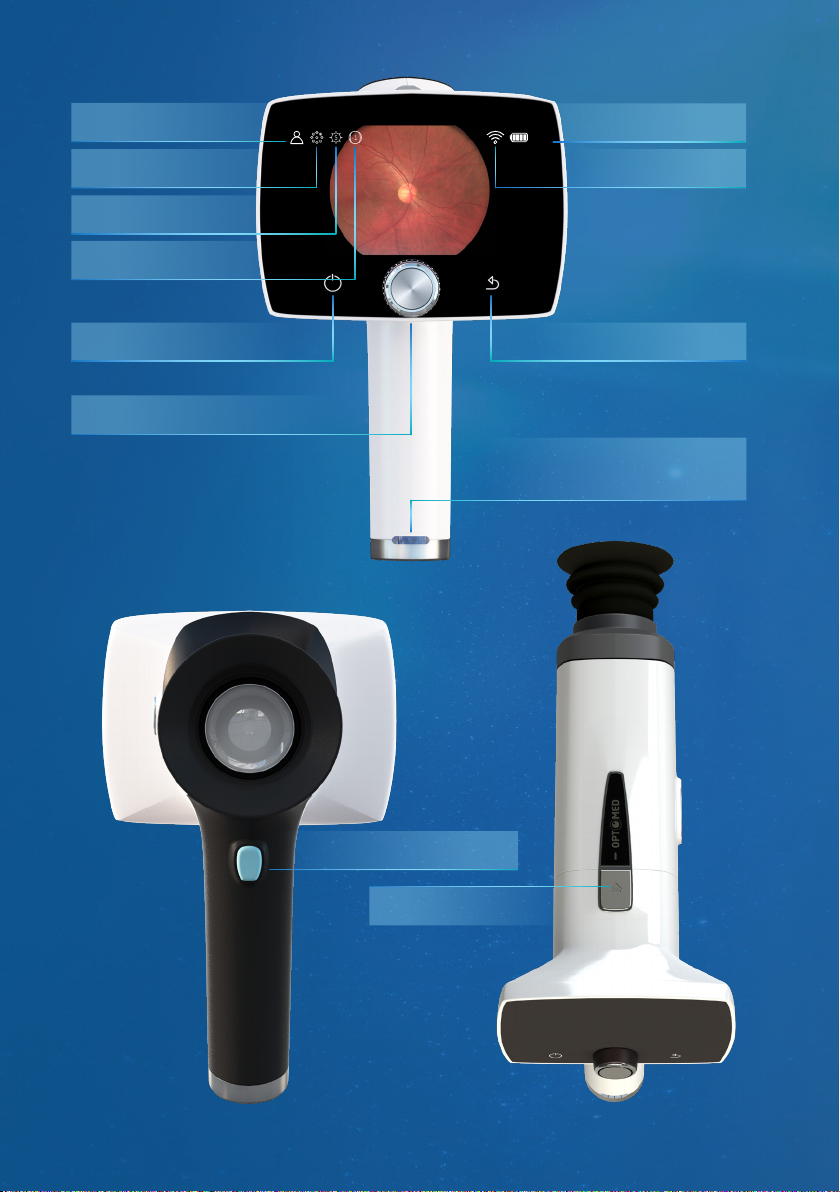
Battery level, WLAN, patient, fixation target, brightness level and diopter value indicators are shown on the
camera display.
Aurora Camera is powered on and o by pressing the power button. Opening the camera menu is done by
pressing Optoroller, which is also used for navigating in the menu together with back button.
Power on Back button
Images are captured by pressing the dual action shutter. If the performance of Aurora Camera is abnormal,
it can be forced to shut down by pressing the power and back buttons simultaneously for seven seconds
or longer.
Shutter button for image capture
The battery charging indicator LED is on when the camera is placed on Aurora Charging Station for charging.
There is also an LED indicator in Aurora Charging Station for indicating spare battery charging.
Optics modules are detached by pressing the eject button on the top of the camera.
Open camera menu and navigate
Forced shutdown
Press eject button
Detach the module
Device overview |
Optomed Aurora 15
Page 16
3. Getting started
3.1 Part list and unpacking
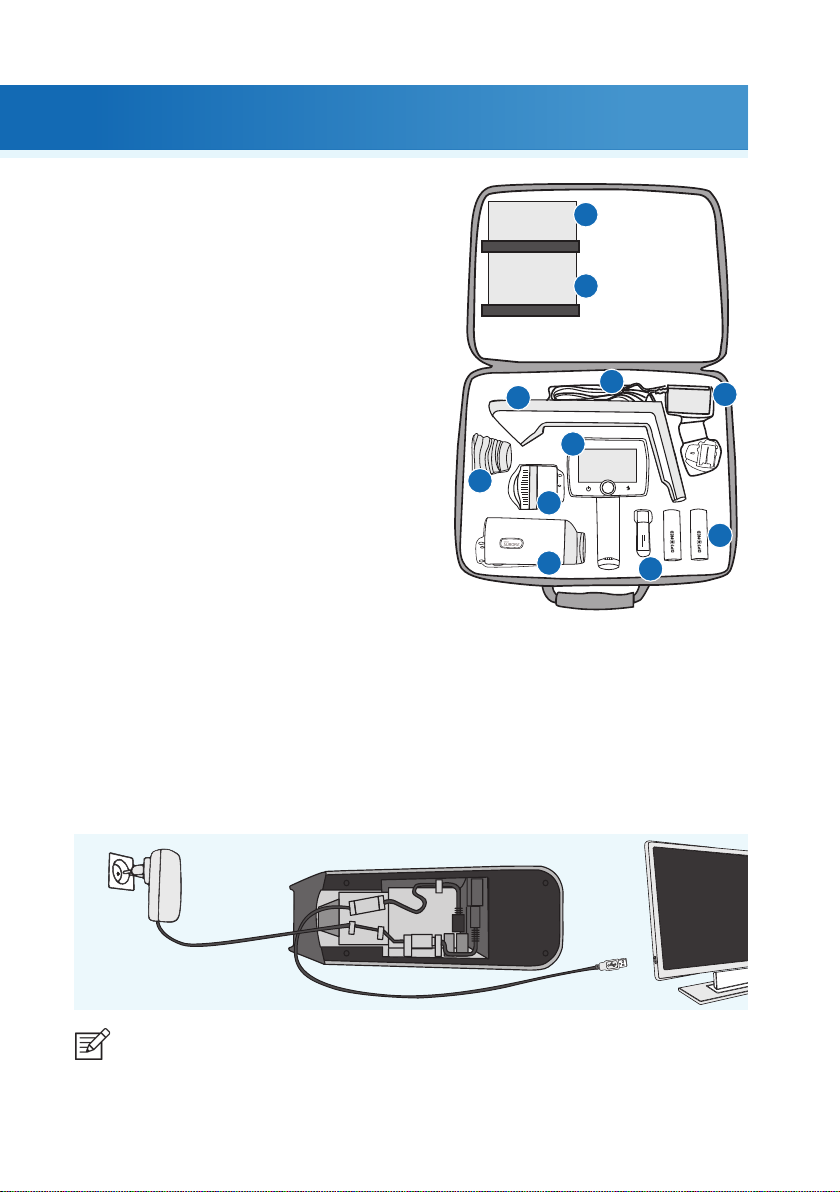
The Optomed Aurora sales package contains the
following items:
DEVICES
1. Camera
2. Retinal Module
3. Anterior Module
ACCESSORIES
4. Charging Station
5. USB Cable
6. Power Supply
7. Eye Cup (2 pcs)
8. Battery (2 pcs)
9. USB Flash Drive
10. Cleaning Cloth
11. User Manual and other material
Open the sales packaging. Remove Optomed Aurora and accessories from the sales package and check that
all parts are present and undamaged. Packaging materials should be retained for future relocation or repair.
4.
7.
11.
10.
5.
1.
3.
2.
9.
6.
8.
3.2 Preparations
Place Charging Station (4) next to the PC. Charging Station must be outside the patient environment at a
distance of least 1.5 meters from the patient. Connect the USB cable (5) and the power supply cable (6)
to Charging Station and to the PC and to the mains.
NOTE!
Position the power supply so that the mains plug is easily disconnected.
16 Optomed Aurora
| Getting started
Page 17
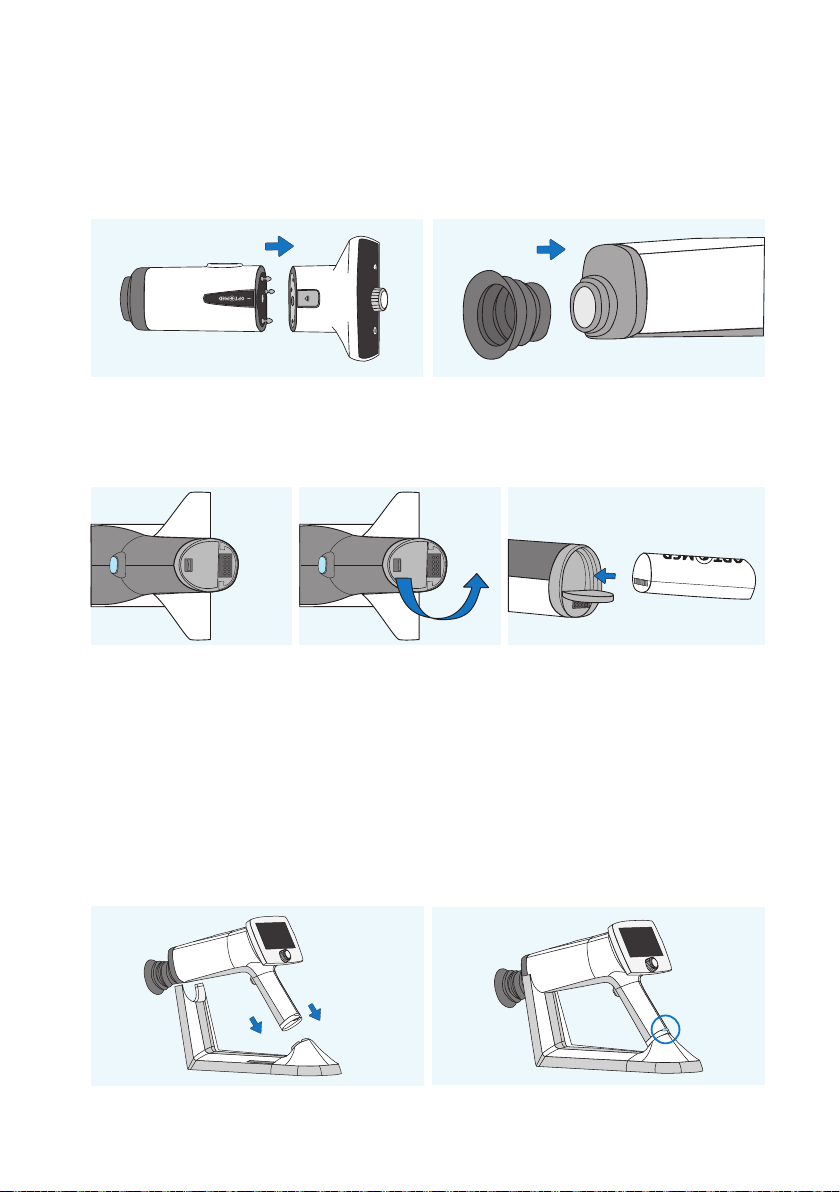
Both Retinal Module (2) and Anterior Module (3) are attached to Aurora Camera (1) by connecting firmly
the bayonet legs of the optics module to the bayonet holes of the camera. Avoid touching the camera lens
with bayonet legs in order to prevent scratches. To detach the optics module, press the eject button on the
top of the camera and take the camera and optics module apart.
Place the eye cup (7) on the optics ring of Aurora Retinal Module (2).
Install the battery (8) in Aurora Camera (1). Ensure that the camera is powered o when placing the battery.
Open the battery cover by sliding the battery cover release knob.
Insert the battery and press the cover firmly into place.
Place the camera on Charging Station (4) for charging. The camera will fit on Charging Station when Retinal
Module (2) is attached. Place the handle of the camera carefully onto the connector of Charging Station and
move the front part of the optics module onto the support. Excessive force should be avoided in order to
prevent the camera and Charging Station connectors from breaking. Aurora Camera is in power save mode
while placed on Aurora Charging Station and it is powered on when lied from Aurora Charging Station.
The battery charging indicator LEDs on the handle of the camera blink when the battery is being charged.
When the battery is fully charged, all indicator LEDs are lit. When charging for the first time, charge the
battery fully. In daily use, charge the battery when the battery level is low. Charging the battery at any level
is not harmful for the battery.
Getting started |
Optomed Aurora 17
Page 18
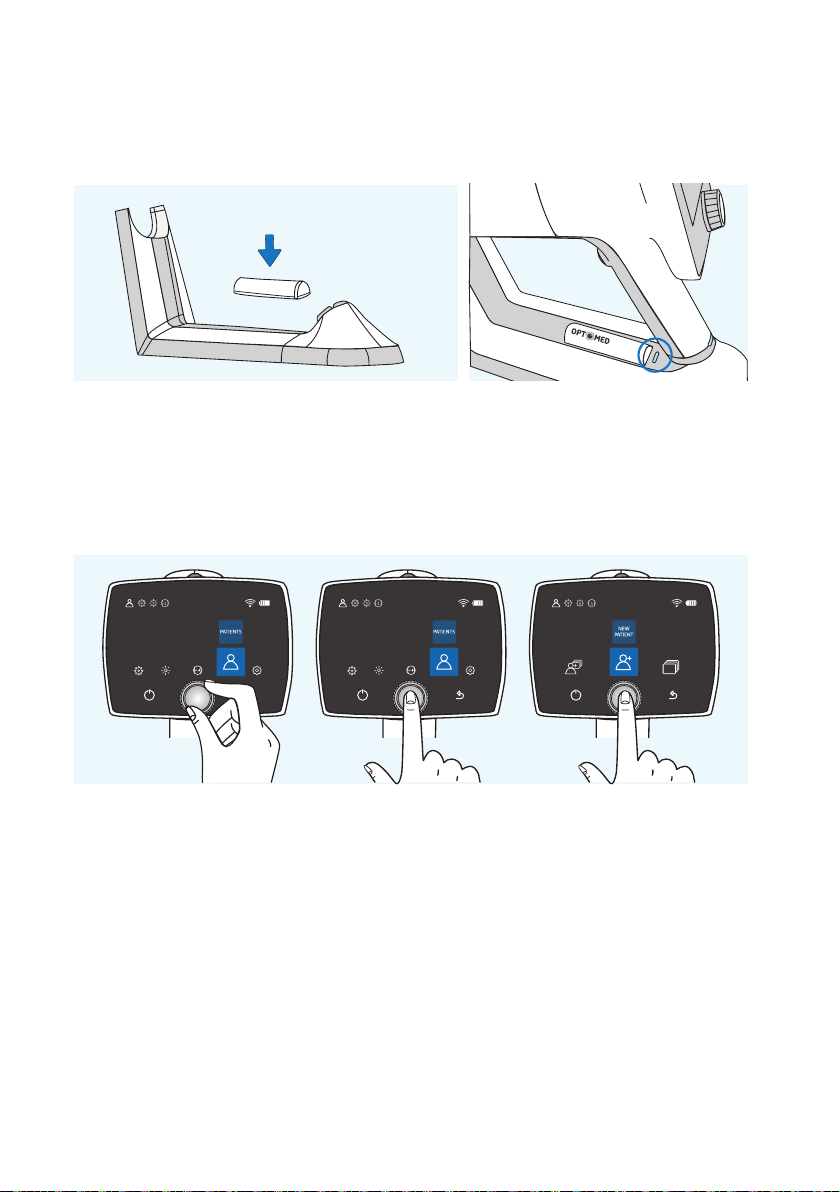
Aurora Charging Station can be used as an external charger for the spare battery. Set the spare battery (8)
connectors to the Charging Station (4) connectors and put the spare battery in place. The spare battery
charging indicator LED on Charging Station blinks when the battery is being charged, and is lit when the
spare battery is fully charged.
Remove Aurora Camera from Charging Station by first liing the optics module from the support and then
liing carefully the handle of the camera from the Charging Station connectors.
It is recommended to create a new study for each patient. A new study is created in the
patients menu
by
selecting the ‘New patient study’ item. It is also recommended that image data storage is always erased
between patients aer the images have been transferred to the PC.
If Aurora Camera is not used for more than two minutes, the device will go into power save mode. It is
powered on from power save mode by using any control button. Aurora Camera will power o if not used
for more than 10 minutes.
Aurora Camera has a WLAN module which enables wireless data transfer to the PC. The separate PC soware
needs to be installed on the PC to allow wireless data transfer. Instructions on the operation of wireless
settings and PC soware are in Appendix A.
18 Optomed Aurora
| Getting started
Page 19
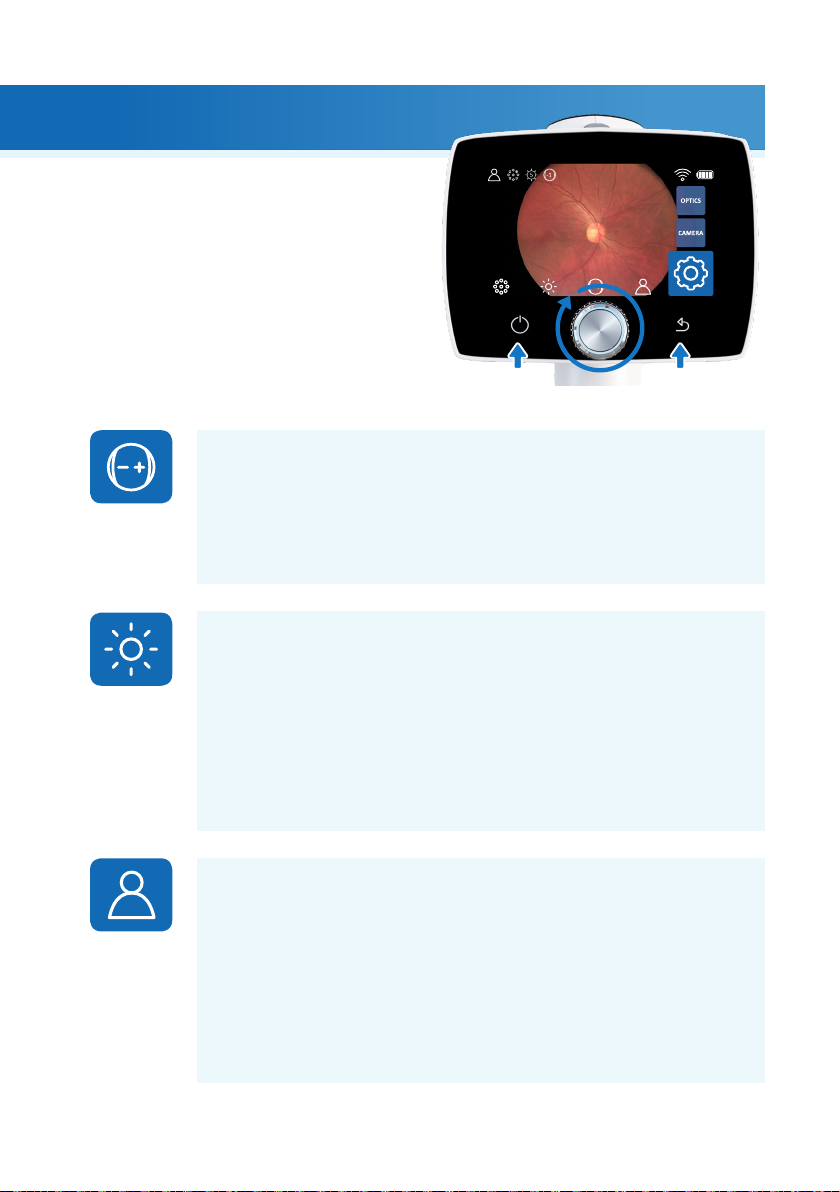
4. Features
When Aurora Camera is powered on, enter the
menu by either pressing or rotating Optoroller.
To move between menu items, turn Optoroller to
the le or right. Press Optoroller to select the item.
Exit the menu level by pressing the back button.
4.1 Quick menu
FOCUS
Change focus mode by selecting the focus item by pressing Optoroller and choose
either manual or autofocus. When focus mode is set to manual, a diopter scale is
shown on the screen and focus can be adjusted from –20 to +20 diopters.
Accept the selection by pressing Optoroller. In autofocus mode, the camera finds
correct focus automatically. The autofocus range is from -15 to +10 diopters.
BRIGHTNESS
Imaging light brightness for Aurora Retinal Module can be adjusted from 0 to 10
and the default value is 5. It is also possible to reduce the brightness setting below
1, to 0.8, 0.6, 0.4, and 0.2, if needed. To adjust brightness, select the brightness item,
choose a suitable value by turning Optoroller and press Optoroller to set the value.
For Aurora Anterior Module, it is possible to change the imaging LED between
white and blue. When the desired LED is selected, the imaging light brightness can
be adjusted from 0 to 10 in a similar way as described above.
PATIENTS
In the
captured images or to select four image sequence (only when Optomed Aurora
Retinal Module is used).
A new study is recommended for each patient. Select the ‘
by pressing Optoroller to create a new study. An anonymous study is created for
the patient unless there is a patient list where you can select the patient by
using Optoroller. A patient can also be deleted from the patient list.
patients menu
, it is possible to create a new study for images, to preview
New patient study
Optomed Aurora 19
Features |
’ item
Page 20
Select the ‘
To view the latest captured images in current patient study, select ‘
Image browser’
item by pressing Optoroller to preview captured images.
IMG
’. If you want
to preview images from other studies, select first the study/patient whose images
you wish to preview. Then select the desired image from the selected study by
using the Optoroller. When the image is shown, the image can be zoomed by
pressing the Optoroller. It is also possible to delete complete studies or
single images.
When imaging with Optomed Aurora Retinal Module, there is a possibility to select
the ‘
Four image sequence
’ item by pressing Optoroller. By selecting four image
sequence, a new patient study is created and the camera will guide to take both
macula and disc centered images from patient’s right and le eyes. Aer each
capture, the image can be zoomed, retaken or you can choose to continue to the
next sequence.
TARGET LEDS FOR AURORA RETINAL MODULE
Optomed Aurora Retinal Module has nine internal fixation targets for the patient to
fixate on during imaging. The middle fixation target is on by default and it provides a
macula centred image. To change the fixation target, select the target LEDs item, then
turn Optoroller le or right to choose the suitable LED and press Optoroller to set the
fixation target.
FOCUS WINDOWS FOR AURORA ANTERIOR MODULE
Optomed Aurora Anterior Module has four focus windows for the user to focus
the image on dierent areas during autofocus imaging. The right focus window is
selected by default and the image is focused to the right side. To change the
focus window, select the focus window item, then turn Optoroller le or right to
choose a suitable area and press Optoroller to set the focus window area.
SETTINGS
To change camera- or optics-specific settings, select the ‘
Optoroller. Camera- and optics-specific settings are described in the following
chapters.
20 Optomed Aurora
| Features
Settings’
item by pressing
Page 21
4.2 Camera settings
RESET
To restore settings to factory defaults, choose the reset item by pressing Optoroller.
The camera prompts a question “
camera needs to be restarted to reset.
LANGUAGE
There are nine language options in Optomed Aurora:
Japanese, Portuguese, Spanish, Chinese and German,
English. To change language, press Optoroller, then turn le or right to choose the
desired language and set the language by pressing Optoroller. The camera needs
to be restarted to activate the new language.
ERASE IMAGE MEMORY
that you have transferred images and videos to a safe location before erasing the
image memory.
To erase images and videos from the camera’s memory card, press Optoroller. Ensure
WIRELESS
Optomed Aurora has a WLAN module that enables wireless connection to a PC.
To change wireless settings, press Optoroller. Appendix A provides instructions for
wireless settings.
Restore default settings
English, Finnish, French, Italian,
and the default language is
?” for confirmation. The
ADVANCED CAMERA SETTINGS
To see more camera-specific settings, press Optoroller. The advanced camera
settings include Date & Time, USB write protection, Camera information, and Start
query options, which are described below.
DATE & TIME
To change the date and time settings, press Optoroller. To set the day, month, year,
hours and minutes, turn Optoroller le or right and press Optoroller to select the
next field. The date format is exceptionally MM DD YYYY for Japanese and Chinese.
Time is shown in the 24-hour format.
Optomed Aurora 21
Features |
Page 22

USB WRITE PROTECTION
USB write protection can be enabled or disabled, by default USB write protection
is on. When USB write protection is on, modifying the memory card content is
prevented. Copying files from the memory card to PC is possible.
CAMERA INFORMATION
Check camera information by pressing Optoroller. To browse soware version,
WLAN soware version, HW version and camera serial number (ID), press Optoroller.
START QUERY
Choose the start query from erasing image memory, creating a new study, starting
four image sequence or no query at all. The camera prompts the start query
aer powering on the device. When the ‘Erase’ query is chosen, the camera will
ask whether all images and videos should be deleted. When the ‘Study’ query is
chosen, the camera will ask if a new study should be created. If ‘
sequence
centered images from patient’s right and le eyes. If ‘
’ is selected, the camera will guide to take both macula and disc
No query’
camera will go directly to live view aer powering on or when removed from
Aurora Charging Station.
Four image
is selected, the
22 Optomed Aurora
| Features
Page 23
4.3 Optics settings for Aurora Retinal Module
QUICK IMAGING
Quick imaging can be enabled or disabled. When quick imaging is on, the camera
returns to live view immediately aer image capturing, and when it is o, instant
preview with dierent choices is shown aer imaging. In instant preview, it is possible
to zoom, mark the imaged eye (le/right) and delete the image. Quick imaging is o
by default.
HALF PRESS CAPTURE
Half press capture can be enabled or disabled. Half press capture is o by default.
When half press capture is on, the functionality of dual action shutter is changed to:
• Manual focus: image is captured when the dual action shutter is pressed half
way down
• Autofocus: image is captured aer focusing when the dual action shutter is
kept pressed half way down
CAPTURE MODE
There are two capture modes in Optomed Aurora: still imaging and video recording.
To choose capture mode, use Optoroller.
ADDITIONAL IMAGE
In addition to color image, there are two alternative imaging modes in Optomed
Aurora: Red-free and Low-red. When either one is selected, the camera saves an
additional image (Red-free or Low-red) together with the original image. To save
only the original image, choose ‘None’. In the Red-free setting, the camera uses only
the green channel to save the image, and in the Low-red setting the camera saves a
red reduced image in addition to the original image.
ADVANCED OPTICS SETTINGS
To see more optics-specific settings, press Optoroller. The advanced optics settings
include Capture settings in image, automatic IR contrast stretching, IR image,
image quality analysis and centering options.
Optomed Aurora 23
Features |
Page 24
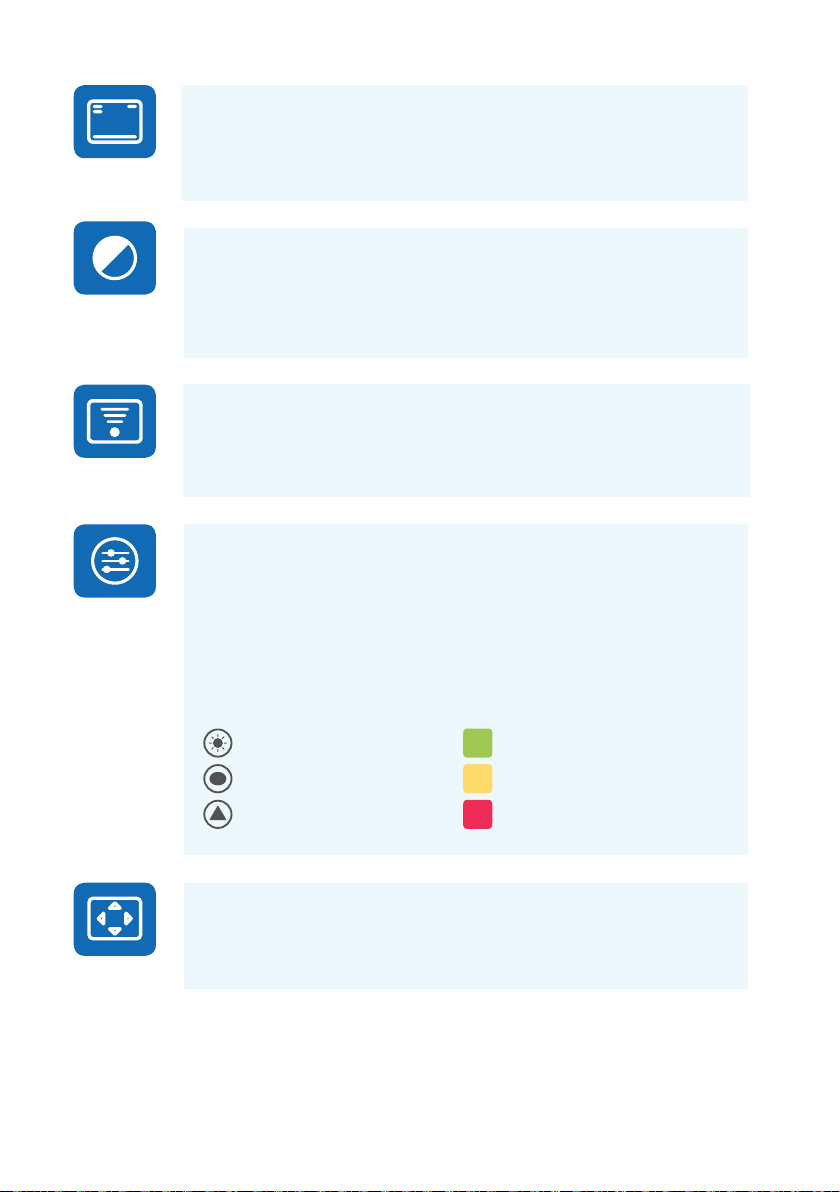
CAPTURE SETTINGS IN IMAGE
Writing capture settings to the image can be enabled or disabled. If it is on, the
brightness level and diopter value are written in the lower right-hand corner of the
image. The writing capture settings in image is o by default.
AUTOMATIC IR CONTRAST STRETCHING
Automatic IR contrast stretching can be enabled or disabled. If automatic IR
contrast stretching is on, the infrared live view brightness and contrast is adjusted
automatically according to the image content. Automatic IR contrast stretching is
o by default.
IR IMAGE
In addition to color image, there is also the possibility to capture an IR image. Use
Optoroller to choose whether to aim and to capture the image with IR light. Only
image captured with IR light will be saved.
IMAGE QUALITY ANALYSIS
The image quality analysis assists to evaluate the image quality of the captured
image. The analysis level can be set to be ‘
Optoroller. The image quality analysis is o by default.
Aer an image is taken, brightness, reflection and shadowing, and sharpness are
analyzed to assist the evaluation of the quality of the captured image. The results
are shown with the symbols and with three dierent colors presented below.
Basic’, ‘Strict’
or
‘Very strict’
by using
Brightness
Reflection and shadowing
Sharpness
No reductions in image
Some reductions in image
Much reductions in image
CENTERING
Centering allows adjustment of the imaging area to correspond with the view area.
First select vertical or horizontal adjusting by using Optoroller. Move the image to
the middle of the screen by turning Optoroller.
24 Optomed Aurora
| Features
Page 25
4.4 Optics settings for Aurora Anterior Module
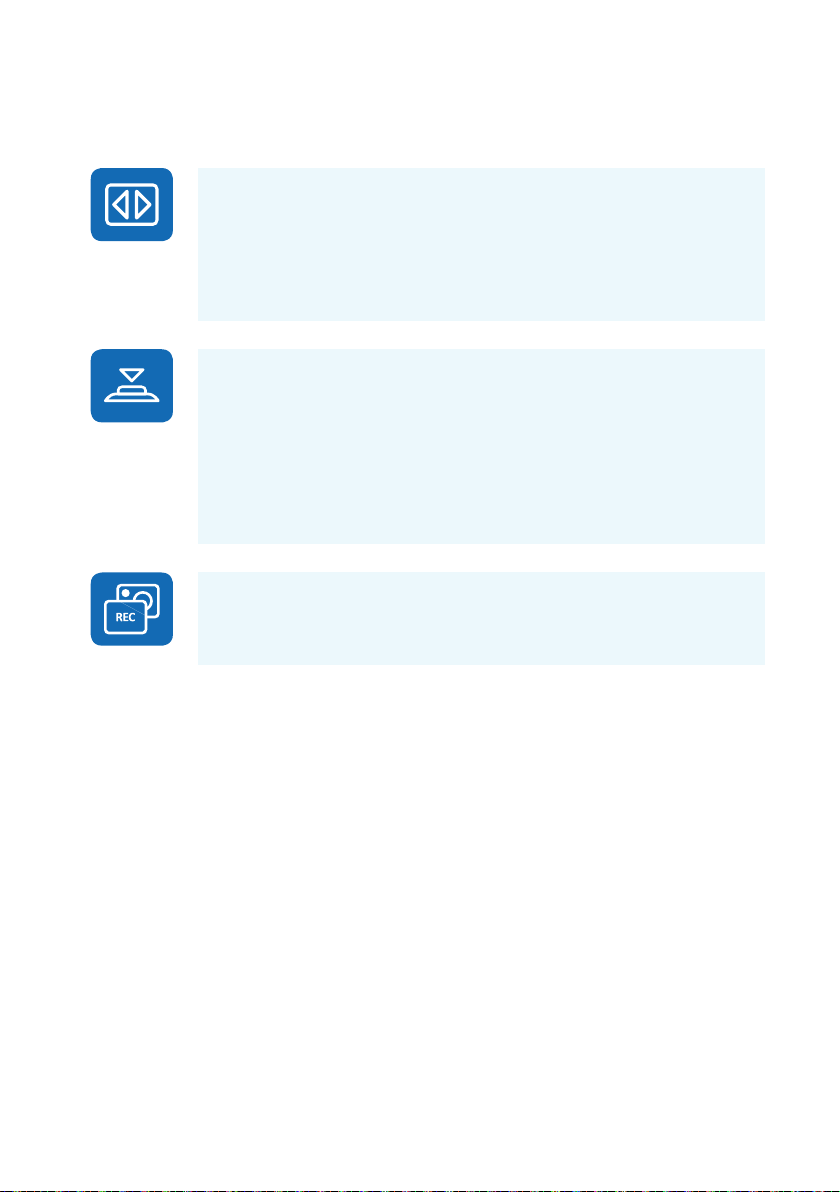
QUICK IMAGING
Quick imaging can be enabled or disabled. When quick imaging is on, the camera
returns to live view right aer image capturing and when it is o, instant preview
with dierent choices is shown aer imaging. In instant preview, it is possible to
zoom, mark the imaged eye (le/right), and delete the image. Quick imaging is o
by default.
HALF PRESS CAPTURE
Half press capture can be enabled or disabled. Half press capture is o by default.
When half press capture is on, the functionality of the dual action shutter is
changed to:
• Manual focus: image is captured when the dual action shutter is pressed half
way down
• Autofocus: image is captured aer focusing when the dual action shutter is kept
pressed half way down
CAPTURE MODE
There are two capture modes in Optomed Aurora: still imaging and video recording.
To choose capture mode, use Optoroller.
Features |
Optomed Aurora 25
Page 26
5. Imaging with Aurora
Aurora Camera is used with interchangeable optics modules Aurora Retinal Module and Aurora Anterior
Module. Use Aurora Retinal Module to capture fundus images and Aurora Anterior Module to capture images
of the surface of the eye and surrounding areas.
Optomed Aurora has two capture modes: still imaging and video recording. When recording video with
Aurora Retinal Module, the patient’s eyes need to be dilated. Capture mode is selected from the opticsspecific settings in the menu.
Select focus mode to manual or autofocus from the quick menu. When focus mode is set to manual, a diopter
scale is shown on the screen and focus can be adjusted. In autofocus mode, the camera finds correct focus
automatically.
• For Aurora Retinal Module, it is recommended to use manual focus. Manual focus is adjusted according
to the patient’s refractive error. When the patient has hyperopia, set the focus to be positive by turning
Optoroller to right, and when the patient has myopia, set the focus to be negative by turning Optoroller le.
• For Aurora Anteror Module, it is recommended to use autofocus.
Adjust imaging light brightness from the quick menu.
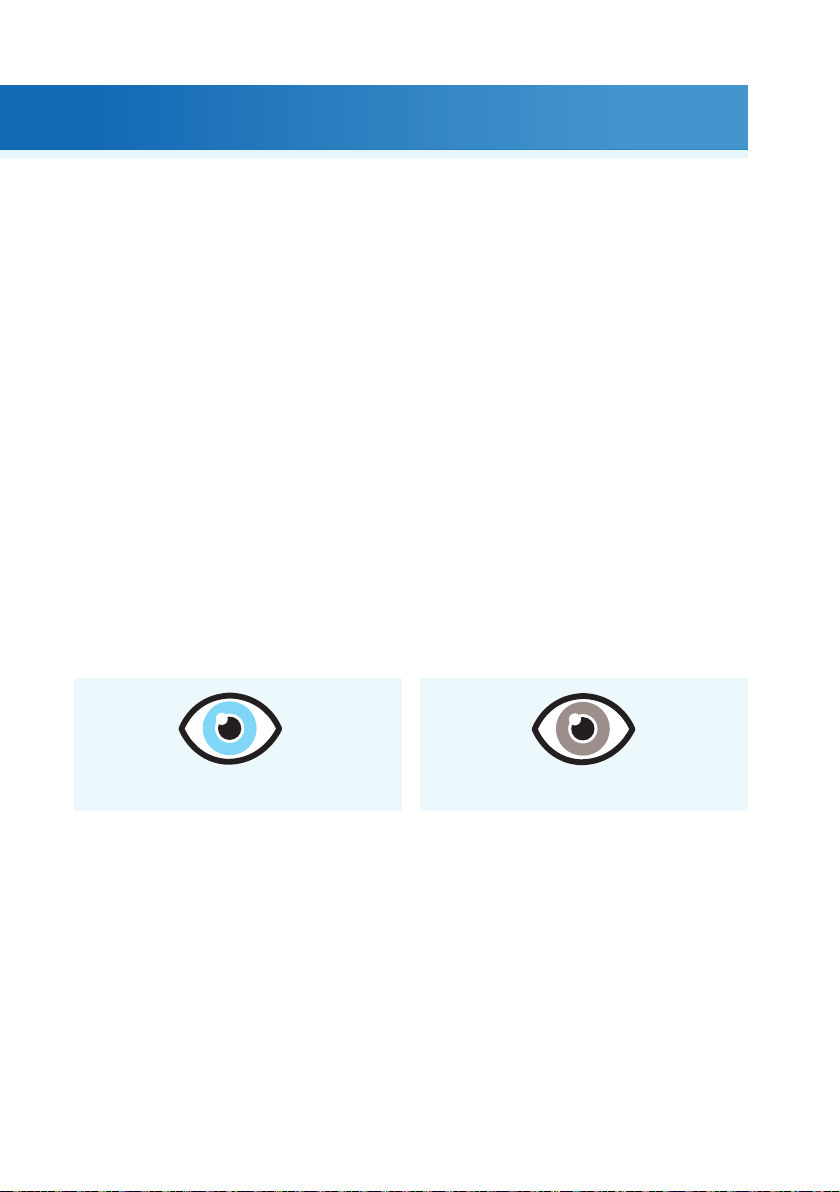
• When imaging with Aurora Retinal Module, the suitable brightness setting depends on the pigment
of the patient’s eye and age of the patient. For adult patients with blue or green eyes, the right setting
is approximately 3 to 5 and for patients with brown eyes 6 to 8. If images are too bright, it is possible
to reduce brightness below 3. Respectively, brightness can be increased up to 10, if images are too dark.
3-5 6-8
• When imaging with Aurora Anterior Module, first select the imaging light to be white or blue and then
set the brightness. The default value is 5, which is suitable for most imaging situations.
Aurora Retinal Module has nine internal fixation targets for the patient to fixate on during imaging. The
middle fixation target is automatically on and it provides a macula center image. Change the fixation target
from the quick menu.
There are four focus windows in Aurora Anterior Module to focus the image on dierent areas during
autofocus imaging. The right focus window is selected by default. Change the focus window from the
quick menu.
Create a new study for each patient from the ‘Patients’ menu.
26 Optomed Aurora
| Imaging with Aurora
Page 27

5.1 Retinal Module
When imaging with Aurora Retinal Module, the examination room
should be as dim as possible. It is recommended that both the patient
and the examiner are seated during the examination. It is also possible
to perform the examination when the patient is lying down.
Ask the patient to keep the eye aligned with the target light and to
cover the other eye. Approach the pupil and stabilize the camera
by supporting the optics module on your thumb and place your
fingers on the patient’s forehead. Press the eye cup firmly around
the examined eye. The pupil is approached until the reflection from the eye fundus can be seen. The right
imaging distance is about 2 cm (0.8 inch).
The aim help circle on the display guides when to capture an image. When the retina is not fully in view,
the circle is red. Once the aim is good and the retina fully appears on the screen, the circle turns green.
CAPTURING STILL IMAGES:
• Manual focus: Capture a still image by pressing the dual action shutter all the way down.
• Autofocus: Automatic focusing begins when the dual action shutter is pressed half way down.
Aer successful focusing, an image is captured when the dual action shutter is pressed all the way
down. An alternative way to capture an autofocused image is to keep the dual action shutter pressed
all the way down when the camera first focuses and then captures an image.
RECORDING VIDEOS:
• Manual focus: To record a video keep the dual action shutter pressed all the way down. When the dual action
shutter is released, the recording ends.
• Autofocus: Automatic focusing starts when the dual action shutter is pressed half way down. Aer
successful focusing, a video is recorded when the dual action shutter is pressed all the way. When the dual
action shutter is released, the recording ends. An alternative way to record an autofocused video is to keep
the dual action shutter pressed all the way down when the camera first focuses and then begins a video
recording. When the dual action shutter is released, the recording ends.
Imaging with Aurora |
Optomed Aurora 27
Page 28

5.2 Anterior Module
It is recommended that both the patient and the examiner are seated
during imaging with Aurora Anterior Module. Place the eye cup of
Anterior Module around the patient’s eye. Stabilize the camera by
supporting the optics module on your thumb and place your fingers
on the patient’s forehead. Aim the image so that reflection of imaging
light on eye is outdside of the focus window shown on the display.
Ask the patient to look in dierent directions so that dierent areas
can be imaged.
CAPTURING STILL IMAGES:
• Manual focus: Capture a still image by pressing the dual action shutter all the way down.
• Autofocus: Automatic focusing begins when the dual action shutter is pressed half way down. Aer
successful focusing, an image is captured when the dual action shutter is pressed all the way down.
An alternative way to capture an autofocused image is to keep the dual action shutter pressed all the way
down when the camera first focuses and then captures an image.
RECORDING VIDEOS:
• Manual focus: To record a video, keep the dual action shutter pressed all the way down. When the dual action
shutter is released, the recording ends.
• Autofocus: Automatic focusing starts when the dual action shutter is pressed half way down. Aer
successful focusing, a video is recorded when the dual action shutter is pressed all the way. When the dual
action shutter is released, the recording ends. An alternative way to record an autofocused video is to keep
the dual action shutter pressed all the way down when the camera first focuses and then begins a video
recording. When the dual action shutter is released, the recording ends.
28 Optomed Aurora
| Imaging with Aurora
Page 29
5.3 After imaging
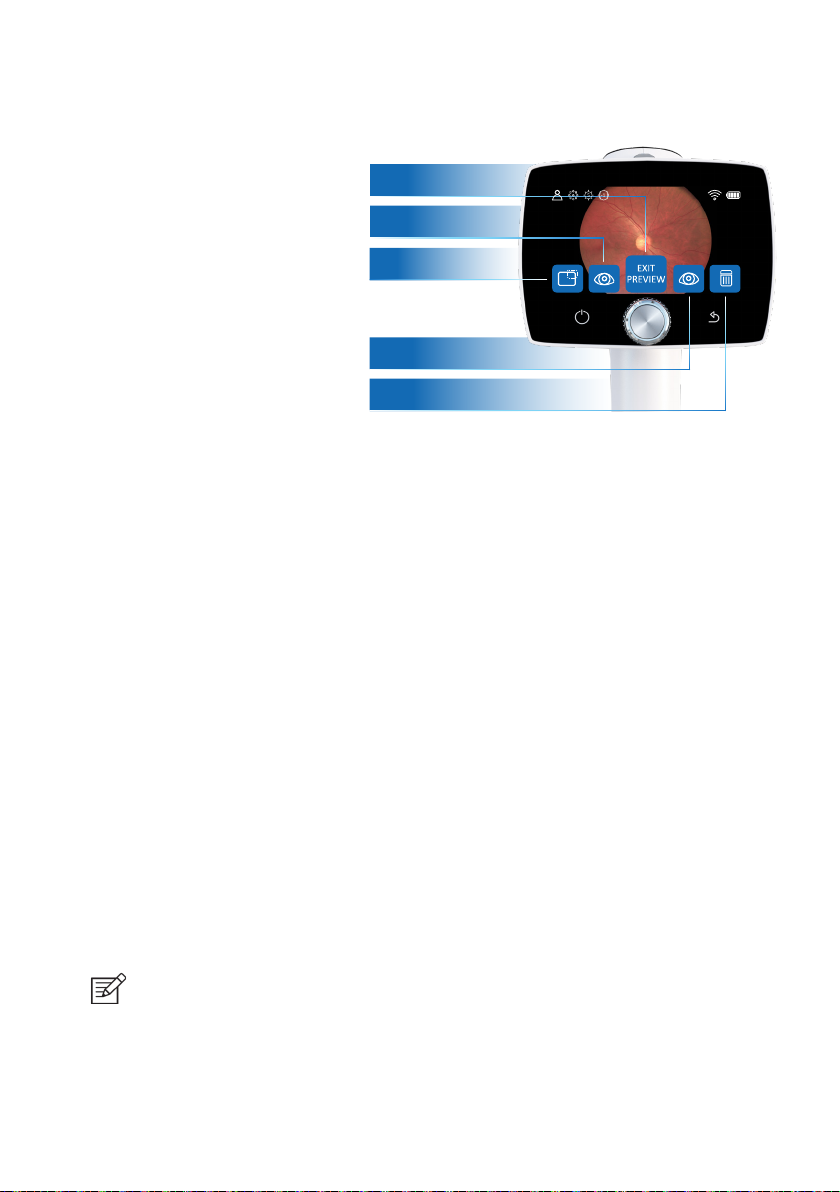
Aer capturing a still image, the image
preview is shown on camera display.
The image specific query is shown
aer pressing or rotating Optoroller. In
preview query there is the possibility
to zoom the captured image, select
a side of imaged eye and delete the
captured image.
No eye selection
Right eye selection
Zoom image
EXIT
PREVIEW
When the image is zoomed by pressing
Optoroller, first the center of image
is displayed as zoomed. To view the
periphery of the image as zoomed,
turn Optoroller le or right. Note that
the zoomed areas overlap.
There is also a possibility to select the side of the imaged eye in image preview by choosing either ‘Le’
(OS) or ‘Right’ (OD) by using Optoroller. In addition, the captured image can be deleted in image preview.
Note that if the image is deleted, it is not transferred over WLAN or saved to the memory card. To exit from
image preview without selecting the side of the imaged eye, select ‘Exit preview’. The Image is then saved
to the memory card and transferred over WLAN.
Captured images and recorded videos are saved to the memory card. When WLAN is used, Aurora Camera
transfers captured images and recorded videos to the PC automatically immediately aer imaging. Please
note that wireless transfer is paused if the camera is placed on Aurora Charging Station during wireless
transfer. The camera will continue wireless transfer when removed from Aurora Charging Station.
Images and videos can also be transferred to PC from the memory card when the camera is placed on Aurora
Charging Station. Aurora Camera will display a ‘Connected’ message when the device is connected to a PC
via USB. The image data transfer method to PC is similar as with any other USB mass storage device. The
device does not need any drivers to be installed on the PC. Writing to the memory card from PC is disabled
by default. When the Aurora Camera is not used, it may be stored on Aurora Charging Station. Storing the
device on Charging Station is not harmful for the battery.
When the memory card or image counter is full, Aurora Camera will display a message with request to erase
the image memory. First copy the images to a safe location and then select ‘Erase image memory’ from the
device menu to erase images and videos from the camera memory card. The image counter will also be reset.
Left eye selection
Delete image
NOTE!
If images are corrupted or not transferred to the PC, the original images are saved to the memory
card. Please try again to transfer images to the PC via USB.
Imaging with Aurora |
Optomed Aurora 29
Page 30

6. Important information
6.1 Environmental conditions
The device is intended for use indoors. Do not store or use the device in ambient conditions other than
those prescribed.
USE STORAGE TRANSPORTATION
Temperature +10 °C to +35 °C –20 °C to +35 °C –20 °C to +50 °C
Relative humidity 10 % to 80 % 10 % to 85 % 10 % to 85 %
Atmospheric pressure 800 hPa to 1060 hPa 500 hPa to 1060 hPa 500 hPa to 1060 hPa
NOTE!
THIS INSTRUMENT DOES NOT MEET THE REQUIREMENTS OF ISO 15004-1 FOR STORAGE. DO NOT
STORE THIS INSTRUMENT IN CONDITIONS WHERE THE TEMPERATURE MAY RISE ABOVE +35 °C OR
FALL BELOW -20 °C.
Please also note that electromagnetic compatibility information and recommended separation distances
between portable and mobile RF communications equipment and Optomed Aurora are given in Chapter 6.8.
Protection against harmful ingress of water or particulate matter is defined as IPX0 (Equipment not protected
against the ingress of water).
6.2 Error messages
Optomed Aurora will display error messages to indicate error situations. An error message is always displayed
with an explanatory message providing information about possible actions.
ERROR MESSAGE POSSIBLE ACTION
Optics failure # Please detach the optics module and restart the camera.
Error code # identifies the error and it may be needed by
customer service.
Light source temperature too high This indicates that the light source temperature exceeds
the safety limits. Please wait until the camera cools down.
This may take several minutes.
Image storage not found This indicates that there is a problem with the memory card.
Please contact customer service for more information.
Battery failure The battery is either not properly in place or has been damaged.
Please try reinstalling or replacing the battery and restart.
30 Optomed Aurora
| Important information
Page 31

Optics module not detected The camera is not able to detect the optics module.
Please detach the optics module and restart the camera.
Patient list upload failure This indicates that there is a problem with patient list
uploading. Please retry. If the problem persists, please
contact customer service.
Unable to create new study The patient already has five studies and it is not possible to
create a new study. Copy images to a safe location and select
‘Erase image memory’ from Camera settings.
Charging failure This indicates that Aurora Camera is not properly
connected to Charging Station. Please reconnect the
camera to Charging Station.
Optics communication failure This indicates that there is a problem with the optics module.
Please reattach the optics module.
Autofocus calibration needed Optomed Aurora needs to be calibrated. Please hold
the camera horizontally and press Optoroller to calibrate.
Memory erasing failed This indicates that there is a problem with memory erasing.
Please retry. If the problem persists, please contact customer
service.
System memory not available This indicates that there is a problem with the system
memory. Please restart the camera.
Image counter full Aurora Camera can store 9,999 images. Once the image
counter is full, copy the images to a safe location and select
‘Erase image memory’ from Camera settings.
If the device behaves abnormally, Aurora Camera can be forced to shut down by pressing the power and
back buttons simultaneously for seven seconds or longer.
The manufacturer of Optomed Aurora will provide soware updates as needed throughout the lifecycle of
Optomed Aurora to continue to guarantee its safety and eectiveness.
NOTE!
If a malfunction cannot be rectified, please contact your local distributor or Optomed customer
service.
Important information |
Optomed Aurora 31
Page 32

6.3 Cleaning
CAUTION!
Do NOT use aggressive or abrasive cleaning agents or the following chemicals for cleaning:
• Mineral spirits, paint thinner, benzene, gasoline, lamp oil
• Strong / corrosive acids (such as sulphuric acid)
• Strong / corrosive bases (such as sodium hydroxide)
• Bleaching agents
• Nail polish remover
Use of ammonia-based cleaners on the liquid crystal display (LCD) may cause damage to the display.
The Optomed Aurora is a precision optics instrument that should be handled with care. Please note the
following cleaning instructions:
• Shut down the device before cleaning
• Remove Charging Station from mains before cleaning
• Disinfect device parts with so cloth moistened with alcohol (e.g. 70% ethanol).
Avoid touching lenses and system connectors in Aurora Camera and Aurora Charging Station.
• Lenses may be cleaned with a cleaning cloth. A moist-cleaning tissue can also be used.
Cleaning the screen:
• Clean the screen using a so, clean cloth moistened with neutral cleaning agents or ethanol
• Do not use any chemical solvents, acids or alkaline solutions
Clean the eye cup before each use on a new patient:
• Disinfect the eye cup with a so cloth moistened with alcohol (e.g. 70% ethanol); or
• Soak the eye cup in a glutaraldehyde-based solution or hydrogen peroxide and peracetic acid solution
• Rinse the eye cup under running water
• Dry the eye cup (e.g. with clean paper towel) before subsequent use
If a replacement eye cup is needed, please contact customer service or your local distributor. The eye cup
should be replaced when:
• Discolored
• Deteriorated
• Shattered, cracked or disintegrated
NOTE!
Optomed Aurora is not intended to be sterilized.
NOTE!
Ensure that no moisture penetrates the system during cleaning and disinfection.
32 Optomed Aurora
| Important information
Page 33
6.4 Service and repair
The user of the device is allowed to replace the battery and clean the device, which are instructed in
this user manual. There are no other maintenance procedures that can be carried out by the user. All
servicing and repairs other than replacing the battery and cleaning the device must be carried out by
Optomed or Optomed-authorized service facilities and service personnel. Optomed will make available
work instructions to repair those parts of medical electrical equipment that Optomed has designated as
repairable by service personnel.
If your device requires a warranty, extended warranty or non-warranty repair service, contact Optomed
Customer Service ([email protected]) or your local distributor. Estimates for non-warranty repairs
are provided at the currently valid charge; however the device must be sent to Optomed for an estimate.
When you contact customer service, the representative will record all necessary information and will
provide a Return Authorization Number. Prior to returning any product for repair, a Return Authorization
Number must be obtained.
6.5 Battery
CAUTION!
Only use the battery provided by Optomed with this product. Do not use a damaged or leaking
battery. Do not disassemble, modify, crush or destroy the battery pack. Doing so can cause
battery fluid leakage, heat generation, burns, fire and/or explosion.
CAUTION!
Charge the battery with Aurora Charging Station only. Use of an unrecommended charger may
cause battery fluid leakage, overheating of the battery, or may cause the battery to explode.
Aurora Camera has a rechargeable Li-ion battery that is charged when the camera is placed on Aurora
Charging Station, which is connected to the mains. Aurora Charging Station can also be used as an external
battery charger for the spare battery included in sales case. The battery pack is specially designed and
manufactured for this device. Optomed Customer Service or your local distributor provide suitable battery
packs. The label on the battery includes the following information:
Li-ion Rechargeable Battery 3.63 V / 2600 mAh / 9.438 Wh
50000655, 1ICR19/65, ICR18650-26J, WWYY (WW is week and YY is year of manufacture)
Provided for Optomed Oy by Celltech Oy, Finland
Li-ion Rechargeable Battery 3.65 V / 2750 mAh / 10.038 Wh
50001508, 1INR19/65, 1INR18650-29E, WWYY
Assembled by Celltech (Zhongshan) Ltd.)
Normal battery service life is expected to be 1–2 years. When the battery is at the end of its service life, the
usage time of the device is reduced. It is recommended to remove the battery if the device is stored for
more than 2 months.
Important information |
Optomed Aurora 33
Page 34
6.6 Disposal
NOTE!
Electrical and electronic devices must be disposed of separately from household waste.
The device contains electronic components. At the end of its lifetime, the device and its integrated batteries
should be disposed of in accordance with relevant national regulations.
DISPOSAL OF THE PRODUCT WITHIN THE EU:
Prepare the device for reuse or separate collection as specified by Directive 2012/19/EU of the
European Parliament and Council of the European Union on Waste Electronic and Electrical Equipment
(WEEE). If this product is contaminated, this directive does not apply.
In accordance with applicable EU guidelines and national regulations at the time at which the
product was brought onto the market, the product specified on the consignment note is not to
be disposed of via the domestic waste disposal system or communal waste disposal facilities.
For further information on disposal of this product, please contact your Optomed representative.
This will guarantee that no hazardous substances enter the environment and that valuable raw
materials are recycled.
Where the product or its components are resold, the seller must inform the buyer that the
product is to be disposed of in accordance with the currently applicable national regulations.
NOTE!
Packaging materials should be retained for future relocation or repair.
If you decide to dispose of the packaging material, submit it to a recognized collection system for recycling.
6.7 Technical description
CAUTION!
Only use the USB cable, battery and power source provided in the sales package. If you need
replacement USB cable, battery or power source, please contact the manufacturer or your local
distributor.
CAUTION!
The development, production and maintenance of this device, together with associated risks, are
based on an expected device life time of five years. Modifications to the product or failure to follow
the manufacturer’s instructions may substantially reduce the expected service life and significantly
increase the risks associated with the use of this device.
34 Optomed Aurora
| Important information
Page 35

CAMERA
Model: Optomed Aurora Camera
Image sensor: CMOS, 5.0 Megapixels
Image memory type: Internal 8 GB memory
Display: 4’’, TFT-LCD, 800x480 pixels, 16.7 M colors
Image format: JPEG (file extension: jpg)
Video format: MPEG-4 (640 x 480)
USB Connectivity: USB 1.1, compatible with USB 2.0 and 3.0
WLAN Connectivity: 802.11 bgn, wpa2
Operating frequency range: 2412 – 2472MHz (Channels 1-13)
Modulation: OFDM (802.11 a/g/n), DSSS/CCK (802.11b)
Maximum output power: 17.25 dBm
Maximum antenna gain: 1.9 dBi
Operating systems: Microso Windows 7®, Windows 8.1®, Windows 10®.
macOS (three latest versions)
No driver installation needed.
Dimensions: 122 (w) x 202 (h) x 97 (d) mm
Weight: 473 g
Battery:
Type 1. 50000655, 3.63V, 2600 mAh
Rechargeable Li-Ion battery
Li-Ion cell with integrated safety circuit
Type 2. 50001508, 3.65V, 2750 mAh
Rechargeable Li-ion battery
Li-ion cell with integrated safety circuit
Usage time: Approximately 2 h
Device life time: Approximately five years
OPTICS FOR RETINAL IMAGING
Model: Optomed Aurora Retinal Module
Dimensions: 69 (w) x 74 (h) x 160 (d) mm
Weight: 324 g
Illumination: Infrared LED for aiming. Visible white LED for imaging,
10 illumination brightness levels. 9 red LEDs for internal
fixation targeting
Maximum luminance: 3.0 cd/cm2
Important information |
Optomed Aurora 35
Page 36
Field of view: 50 x 40⁰
Diopter compensation: from -20 D to +20 D
Image resolution: 2368 x 1776 pix (total 4.2 Mpix, eective area 3.38 Mpix)
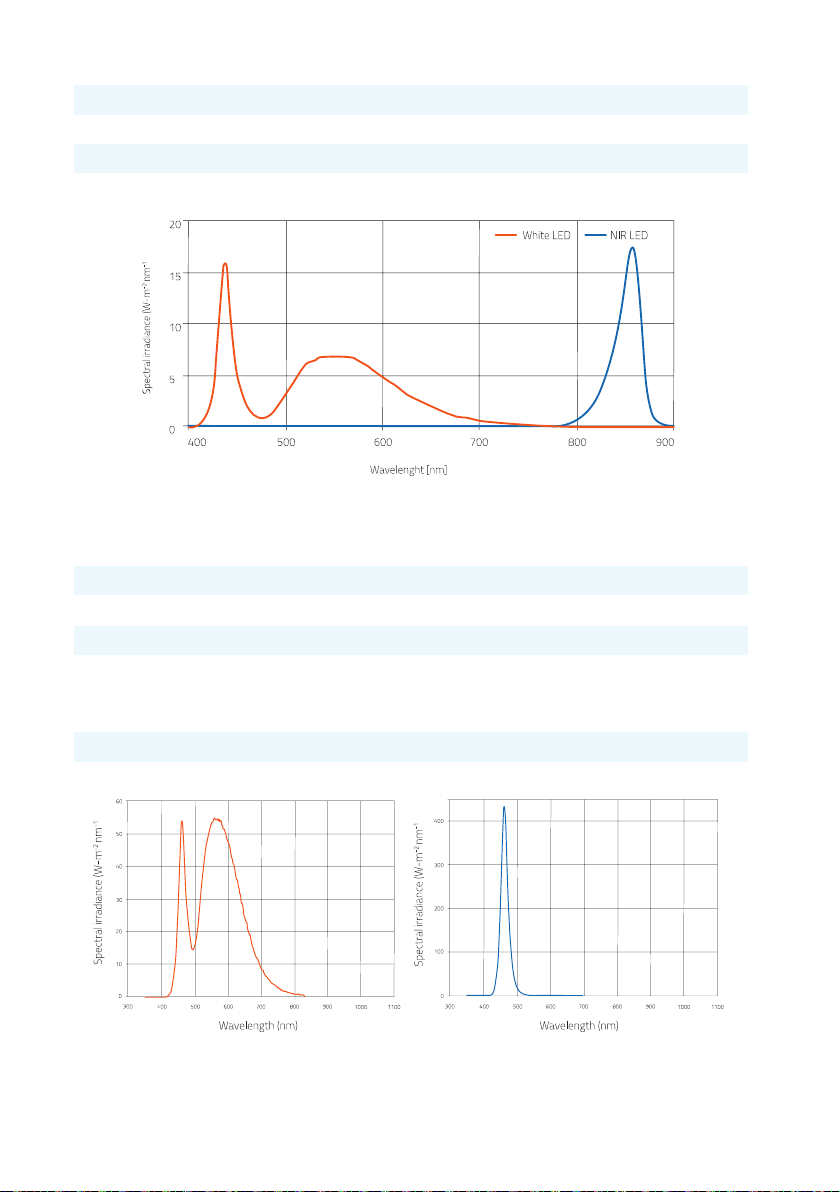
Spectral output at working distance:
White and Infrared LED when operated in continuous mode
OPTICS FOR ANTERIOR IMAGING
Model: Optomed Aurora Anterior Module
Dimensions: 71 (w) x 80 (h) x 78 (d) mm
Weight: 105 g
Illumination: Visible white and cobalt blue LED for imaging,
10 illumination brightness levels
Maximum luminance output level towards eye: 192 cd/cm2
Image resolution: 2560 x 1920 pix
Spectral output at working distance:
White LED when operated in continuous mode Blue LED when operated in continuous mode
36 Optomed Aurora
| Important information
Page 37

CHARGING STATION
Model: Optomed Aurora Charging Station
Dimensions: 107 (w) x 147 (h) x 300 (d) mm
Weight: 683 g
Switching power supply
Type 1: CINCON TRG10R090
Input: 100 ─ 240 V, ~0.4 A, 47 ─ 63 Hz
Output: 9 V, 1.1 A, 10 W
Type 2: XP Power ACM12US09
Input: 100-240 V, 0.5 A, 50-60 Hz
Output: 9 V, 1.33 A, 12 W
USB cable:
Type: A to mini B
Length: 1.5 m
MEMORY STICK
Memory stick including Optomed Client PC Soware and Instructions for use.
CLEANING CLOTH
Cleaning cloth for cleaning lens and display.
INTELLECTUAL PROPERTY RIGHT INFORMATION
Windows 7, Windows 8.1 and Windows 10 are trademarks of Microso Corporation.
macOS is a trademark of Apple Inc.
Camera soware: This soware is based in part on the work of the Independent JPEG Group.
PATENT INFORMATION
This product is protected by the following patent numbers and their corresponding national
rights: US 8,078,667, US 8,960,910, US 9,033,507, ZL200880006260.2, ZL200880101934.7,
ZL201180045540.6, ZL201380000912.2, EP2122560, EP2699144, EP2197334, FI122533,
FI119531, FI126159, JP5171845, JP5658371, JP6084284, TW468147, KR10-1522115, HK184041.
Additional patent applications are pending.
6.8 Electromagnetic compatibility
This device has been tested and found to comply with the limits for medical devices to the IEC 60601-12:2014. Special precautionary measures apply to this device with regard to electromagnetic compatibility
Important information |
Optomed Aurora 37
Page 38
(EMC). To avoid electromagnetic disturbances, the device may only be operated and serviced in accordance
with the user manual and using the components supplied by Optomed.
If the performance of Optomed Aurora is lost or degraded due to electromagnetic disturbances, it may
cause unexpected or adverse operation of this device. If a malfunction cannot be rectified, please contact
your local distributor or Optomed customer service.
CAUTION!
Use of this equipment adjacent to or stacked with other equipment should be avoided because it
could result in improper operation. If such use is necessary, this equipment and the other equipment
should be observed to verify that they are operating normally.
The device should not be operated in the vicinity of high-frequency surgical equipment.
CAUTION!
Use of accessories, transducers and cables other than those specified or provided by the manufacturer
of this equipment could result in increased electromagnetic emissions or decreased electromagnetic
immunity of this equipment and result in improper operation.
CAUTION!
Portable RF communications equipment (including peripherals such as antenna cables and external
antennas) should be used no closer than 30 cm (12 inches) to any part of the Optomed Aurora
including cables specified by the manufacturer. Otherwise, degradation of the performance of this
equipment could result.
Replacement cables may only be purchased at Optomed. The use of accessories, any converters or cables
which are not specified in this user manual or have not been purchased as spare parts from Optomed can
result in increased emissions or reduced immunity of the device.
MANUFACTURER’S DECLARATION – ELECTROMAGNETIC IMMUNITY
Optomed Aurora maintains basic safety and performance when used in the electromagnetic environment
specified below. The customer or the user of the device should ensure that it is used in such an environment.
IMMUNITY TEST IEC 60601 TEST LEVEL COMPLIANCE LEVEL ELECTROMAGNETIC ENVIRONMENT – GUIDANCE
Electrostatic
discharge (ESD)
IEC 61000-4-2
38 Optomed Aurora
±8 kV contact
±15 kV air
| Important information
±2 kV, ±4 kV,
±6 kV, ±8 kV
indirect
contact
±2 kV, ±4 kV,
±6 kV, ±8 kV
contact
±2 kV, ±4 kV, ±8
kV, ±15 kV air
Floors should be wood, concrete or ceramic
tile. If floors are covered with synthetic
material, the relative humidity should
be at least 30%.
Page 39

Electrical fast
transient/burst
IEC 61000-4-4
±2 kV for power
supply lines
±2 kV for AC
power supply
Mains power quality should be that of
a typical commercial or hospital
environment.
Surge
IEC 61000-4-5
Voltage dips,
short interruptions
and voltage
variations on
power supply
input lines
IEC 61000- 4-11
Power frequency
(50/60 Hz)
magnetic field
IEC 61000-4-8
Conducted RF
IEC 61000-4-6
Radiated RF
IEC 61000-4-3
±1 kV line(s) to line(s)
±2 kV line(s) to earth
±1 kV dierential
mode
±2 kV common
mode
0% UT for 0.5
at 8 ф angles;
0% 1 cycle;
70% UT for 25
cycles;
0% for 5 sec
0 % UT for 0.5 at
8 ф angles;
0% 1 cycle;
70% UT for 25
cycles;
0% for 5 sec
30 A/m 30 A/m
3 Vrms
150 kHz to 80
MHz & 6 Vrms
ISM frequency
3 V/m
80 MHz to 2.7 GHz
AM Modulation
& 9–28 V/m
385 MHz to
6.0 GHz
Pulse Modulation
3 Vrms
150 kHz to 80
MHz & 6 Vrms
ISM frequency
3 V/m
80 MHz to 2.7 GHz
AM Modulation
& 9–28 V/m
385 MHz to
6.0 GHz
Pulse Modulation
Mains power quality should be that
of a typical commercial or hospital
environment.
Mains power quality should be that of a
typical commercial or hospital environment.
If the user of the Optomed Aurora requires
continued operation during power mains
interruptions, it is recommended that the
device be powered from an uninterruptible
power supply or a battery.
Power frequency magnetic fields
should be at levels characteristic
of a typical location in a typical
commercial or hospital environment.
Portable and mobile RF communications
equipment should be used no closer to
any part of Optomed Aurora, including
cables, than the recommended separation
distance calculated from the
equation applicable to the frequency
of the transmitter.
Recommended
separation distance
d = 1.2 √P
d = 1.2 √P 80 MHz to 800 MHz
d = 2.3 √P 800 MHz to 2.7 GHz,
where P is the maximum output
power rating of the transmitter in
watts (W) according to the transmitter
manufacturer and d is the recommended
separation distance in meters (m).
Field strengths from fixed RF transmitters,
as determined by an electromagnetic site
survey A, should be less than the compliance
level in each frequemcy range B.
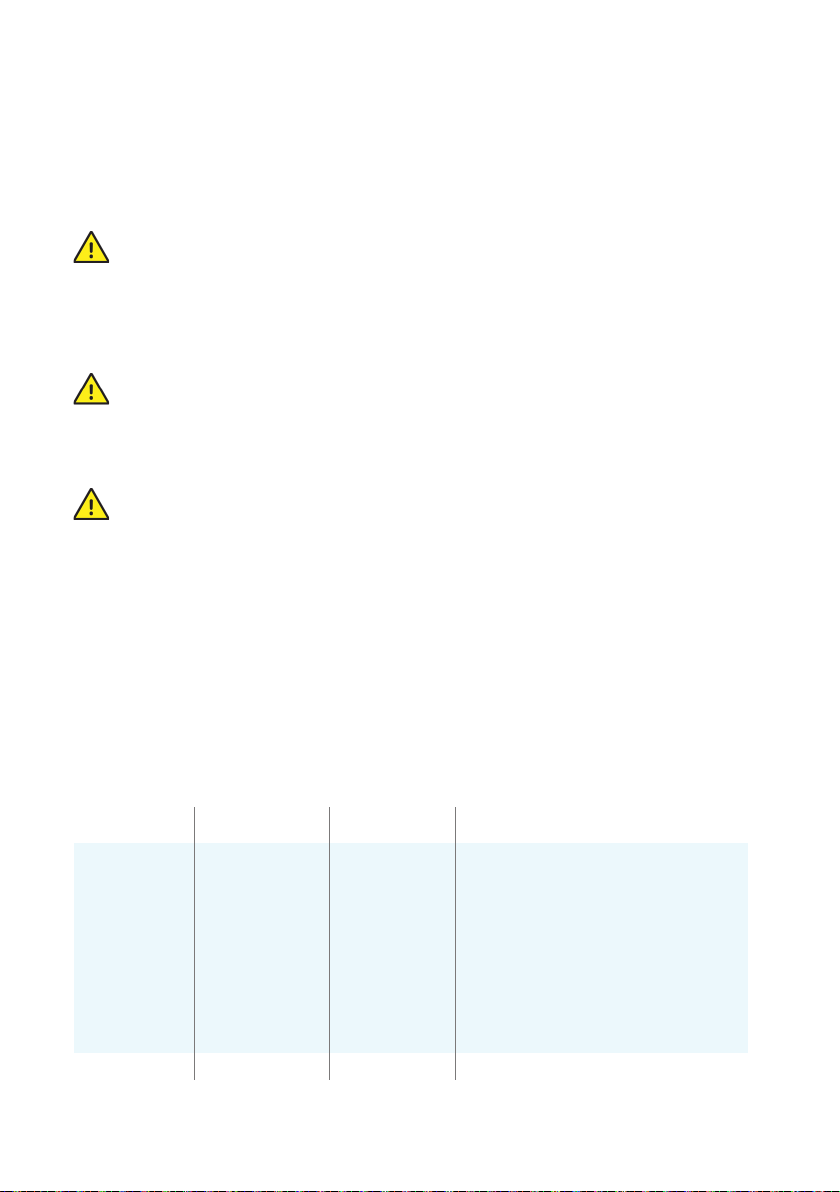
Interference may occur in the
vicinity of equipment marked
with the following symbol:
Important information |
Optomed Aurora 39
Page 40

NOTE 1 UT is the AC mains voltage prior to application of the test level
NOTE 2 At 80 MHz and 800 MHz, the higher frequency range applies.
NOTE 3 The ISM (industrial, scientific and medical) bands between 0.15 MHz and 80 MHz are
6.765–6.795 MHz; 13.553–13.567 MHz; 26.957–27.283 MHz and 40.66–40.70 MHz.
NOTE 4 These guidelines may not apply in all situations. Electromagnetic propagation is aected
by absorption and reflection from structures, objects and people.
A) Field strengths from fixed transmitters, such as base stations for radio (cellular/cordless) telephones
and land mobile radios, amateur radio, AM and FM radio broadcast and TV broadcast cannot be
predicted theoretically with accuracy. To assess the electromagnetic environment due to fixed RF
transmitters, an electromagnetic site survey should be considered. If the measured field strength in
the location in which the Optomed Aurora is used exceeds the applicable RF compliance level above,
Optomed Aurora should be observed to verify normal operation. If abnormal performance is obser ved,
additional measures may be necessary, such as re-orienting or relocating the Optomed Aurora.
B) Over the frequency range 150 kHz to 80 MHz, field strengths should be less than 3 V/m.
MANUFACTURER’S DECLARATION – ELECTROMAGNETIC EMISSIONS
Optomed Aurora maintains basic safety and performance when used in the electromagnetic environment
specified below. The customer or the user of the device should ensure that it is used in such an environment.
Emission test Compliance level Electromagnetic environment – guidance
RF emissions
CISPR 11
RF emissions
CISPR 11
Harmonic emissions
IEC 61000- 3-2
Voltage
fluctuations/
flicker emissions
IEC 61000-3-3
40 Optomed Aurora
Group 1 Optomed Aurora uses RF energy only for its internal function.
Class B
Not applicable
Complies
| Important information
Therefore, its RF emissions are very low and are not likely
to cause any interference in nearby electronic equipment.
Optomed Aurora is suitable for use in all establishments,
including domestic establishments and those directly
connected to the public low-voltage power supply network
that supplies buildings used for domestic purposes.
Page 41

SEPARATION DISTANCES
Optomed Aurora maintains basic safety and performance when used in the electromagnetic environment
in which radiated RF disturbances are controlled. The customer or the user of Optomed Aurora can help
prevent electromagnetic interference by maintaining a minimum distance between portable and mobile
RF communications equipment (transmitters) and Optomed Aurora as recommended below, according to
the maximum output power of the communications equipment.
Rated maximum
output power
of transmitter
(W)
0.01
0.1
1
10
100
For transmitters rated at a maximum output power not listed above, the recommended separation
distance d in meters (m) can be estimated using the equation applicable to the frequency of the
transmitter, where P is the maximum output power rating of the transmitter in watts (W) according to
the transmitter manufacturer.
NOTE 1: At 80 MHz and 800 MHz, the separation distance for the higher frequency range applies.
NOTE 2: These guidelines may not apply in all situations. Electromagnetic propagation is aected
by absorption and reflection from structures, objects and people.
Separation distance according to frequency of transmitter (m)
from 150 kHz to 80 MHz
d = 1.2 √P
0.12
0.38
1.2
3.8
12
from 80 MHz to 800 MHz
d = 1.2 √P
0.12 0.23
0.38 0.73
1.2 2.3
3.8
12 23
from 800 MHz to 2.7 GHz
d = 2.3 √P
7.3
6.9 Compliance
The classification of Optomed Aurora according to the standard IEC 60601-1:2005+A1:2012
• Optomed Aurora is internally powered ME equipment
• Optomed Aurora has type BF applied parts
• Protection against harmful ingress of water or particulate matter is classified as IPX0
• Optomed Aurora is not intended to be sterilized
• Optomed Aurora is not intended for use in an oxygen rich environment
• Optomed Aurora is classified for continuous operation
Optomed Aurora complies with EU Medical Device Directive 93/42/EEC and its national implementation in the
form of the Finnish Medical Devices Act (629/2010). The valid Declaration of Conformity can be downloaded
at www.optomed.com/support.
Important information |
Optomed Aurora 41
Page 42

Aurora Aurora Aurora Aurora
Camera Retinal Module Anterior Module Charging Station
EU Directive
93/42/EEC
FDA
21 CFR 886.1120
ISO 10940:2009
ISO 15004-1:2006
ISO 15004-2:2007 Group 2 Group 2
IEC 62471:2006
Class I Class IIa Class 1 Accessory
Class 1 Class 2 Class 1 Accessory
– Complies – –
– Complies Complies –
–
– Exempt Group
Exempt Group
–
–
This declaration shall be rendered invalid if changes are made to the product without the manufacturer’s
authorization.
6.10 Warranty
Optomed Aurora is covered by a limited warranty granted by Optomed Oy.
SUBMITTING A CLAIM
Any claim under this warranty must be submitted in writing before the end of warranty period to Optomed
Oy. The claim must include a written description of the failure to the device.
WARRANTY DOES NOT COVER
Products that have been subjected to abuse, accident, alternation, modification, tampering, misuse, faulty
installation, lack of reasonable care, repair or service in any way that is not contemplated in the documentation
of the product, or if the model or serial number has been altered, tampered with, defaced or removed. The
warranty does not cover damage caused by dropping the device or damage caused by normal wear. Repair
or service done by a non-Optomed-authorized service facility is not covered by the warranty.
42 Optomed Aurora
| Important information
Page 43
A. Appendix - WLAN
A.1 Wireless settings
Aurora Camera has a WLAN module that enables wireless connection to a PC or other client device. In order
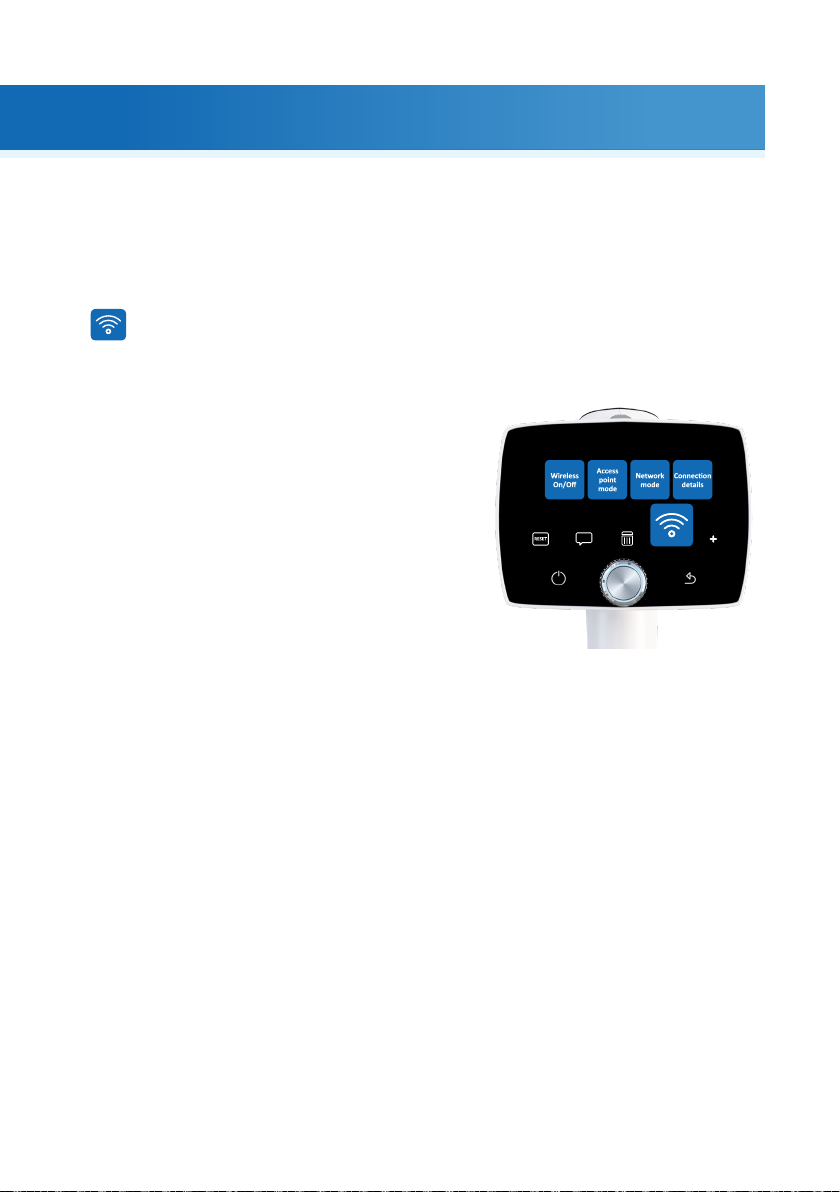
to change wireless settings, open the wireless menu from camera settings by using Optoroller
WIRELESS
In wireless menu, there are four options: Wireless, Access point mode, Network mode
and Connection details.
Wireless
First you need to set wireless connection to on to enable
WLAN. When wireless connection is set to on, either access
point mode or network mode can be used, but not at the
same time.
Connection details menu shows the information of
established connection. The information consists of
network name and camera IP and MAC addresses.
Access point mode
In access point mode Aurora Camera sets up a cameraspecific access point to which the PC can connect. First set access point on in camera menu. Then connect
PC to the created access point. Aer connection is done, open Optomed Client for image transfer.
Network mode
In network mode Aurora Camera can connect to available networks. Set network mode on in the camera
menu, then browse available networks and select the desired network by using Optoroller. Aer selecting
the network, enter the network password to the camera. Aer connection is done, open Optomed Client
for image transfer.
Wireless communication issues
In case the wireless communication between the camera and the PC delays, the images will transfer slowly.
You can follow the progress of the transfer from Optomed Client PC soware. Optomed Client PC soware
will inform, if the wireless communication between the camera and the PC failures and images cannot be
transferred. In case, the wireless transfer will not be completed, images can be transferred via USB connection.
To improve wireless communication between the camera and the PC, you can move the camera closer to
the PC and ensure that there are no large obstacles between the camera and the PC. Check, that there are
no other RF sources near the camera or the PC. You can also change the network in order to try to improve
the wireless communication.
Appendix - WLAN |
Optomed Aurora 43
Page 44
A.2 Optomed Client PC software
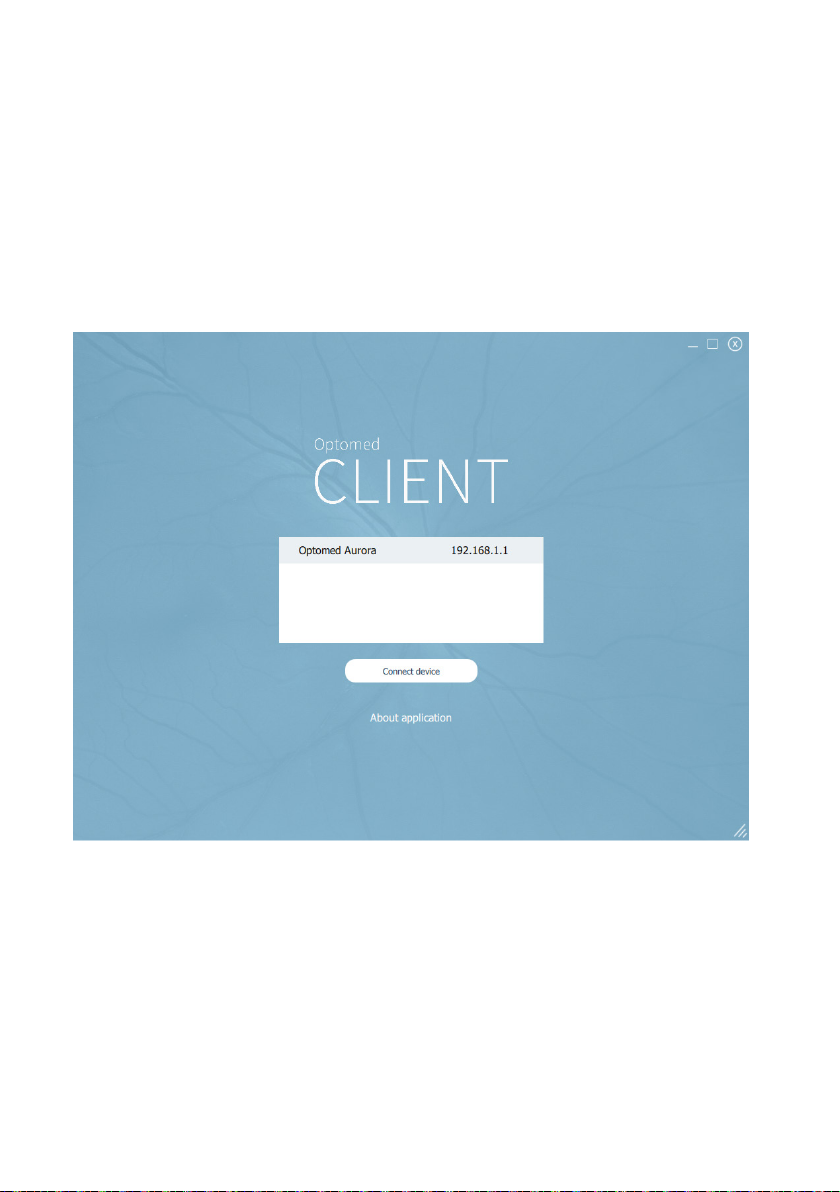
The PC soware Optomed Client enables WLAN connectivity from PC or other client device to Aurora Camera.
With Optomed Client soware you can wirelessly connect PC or other client device to Aurora Camera and
define the image destination folder into which images will be transferred.
The memory stick provided with the device includes Optomed Client soware and Optomed Client Quick
Guide. The Quick Guide instructs more specifically how to use Optomed Client and how to install/uninstall
Optomed Client soware. Optomed Client has a support for Windows 7®, Windows 8.1® and Windows 10®
in addition to iPad with iOS 11.0 or newer and Android 7.1 Tablet or newer.
44 Optomed Aurora
| Appendix - WLAN
Page 45

Notes
Optomed Aurora 45
Notes |
Page 46

Index
Aim help 27
Charging battery 12, 17, 18
Field of view 35
Fluorescent images 13
Forced shut down 15,31
Image preview 20, 29
Imaging distance 27
Label 6, 33
Non-mydriatic imaging 13
Optoroller 15, 19, 29
PC soware 18, 37, 43
Power save 17, 18
Refractive error 26
Resolution 36
Saving to memory card 29
Select side of imaged eye 29
Serial number 8, 22
Soware version 22
Sterilization 32, 41
Transferring images to PC 13, 18, 29, 43
USB connection 13, 16, 29, 35
Wireless/WLAN connection 13, 18, 21, 29, 35, 43
Zoom 20, 29
46 Optomed Aurora
| Index
Page 47

Page 48

www.optomed.com
 Loading...