

Page 1
AV IN
FOCUS
P
P
o
o
o
c
i
o
c
k
e
t
P
r
o
o
j
e
c
r
o
t
Page 2
CLASS 1 LED PRODUCT
ey e Sa f e t y Wa r n I n g S
Avoid staring/facing directly into
the projector beam at all times.
Keep your back to the beam as
much as possible.
A stick or laser pointer is
recommended to avoid the need
for the user to enter the beam.
When projector is used in a
classroom, adequately supervise
students when they are asked to
point out something on the screen.
In order to minimize power, use
room blinds to reduce ambient
light levels.
Im p o r t a n t Sa f e t y In S t r u c t I o n
1. Do not block any ventilation openings.
To ensure reliable operation of the
projector and to protect from over
heating, it is recommended to install
the projector in a location that does not
block ventilation. As an example, do not
place the projector on a crowded coffee
table, sofa, bed, etc. Do not put the
projector in an enclosure such as a book
case or a cabinet that restricts air ow.
2. Do not use the projector near water or
moisture. To reduce the risk of re and/
or electric shock, do not expose the
projector to rain or moisture.
3. Do not install near heat sources such as
radiators, heaters, stoves or any other
apparatus such as ampliers that emits
heat.
4. Do not use the projector in direct
sunlight.
5. Do not use near any appliance
generating a strong magnetic eld.
6. Do not use the projector in areas
susceptible to excessive dust and dirt.
7. Turn off the product before cleaning.
8. Turn off the product before removing
the battery.
9. Disconnect the battery if the product is
not being used for a long period of time.
10. Ensure that the ambient room
temperature is within 5- 35°C.
11. Relative Humidity is 5 - 35°C, 80%
(Max.), non-condensing.
12. Do not expose the battery to
temperatures above +60°C (+140°F)
13. New or idle batteries can have shortterm reduced capacity. Fully charge the
battery before initial use.
14. Do not put the battery into your mouth.
15. Do not let the battery contacts touch
another metal object.
16. Do not drop, throw or try to bend your
product.
17. May explode if disposed of in re.
18. Clean only with dry cloth.
19. Only use attachments/accessories
specied by the manufacturer.
20. Do not use the unit if it has been
physically damaged or abused. Physical
damage/abuse would be (but not
limited to):
▀■ Unit has been dropped.
▀■ Charger or plug has been damaged.
▀■ Liquid has been spilled on to the
▀■ Projector has been exposed to rain or
▀■ Something has fallen in the projector
Do not attempt to service the unit
yourself. Opening or removing covers
may expose you to dangerous voltages
or other hazards. Please contact your
local reseller or service center before you
send the unit for repair.
21. Do not let objects or liquids enter the
projector. They may touch dangerous
voltage points and short out parts that
could result in re or electric shock.
22. See projector enclosure for safety related
markings.
23. The unit should only be repaired by
appropriate service personnel.
24. Do not touch the projector for a long
time while the projector is used.
25. CAUTION: Risk of Explosion if Battery
is replaced by an Incorrect Type.
26. Dispose of Used Batteries According to
the Instructions.
projector.
moisture.
or something is loose inside.
re g u l a t I o n & S a f e t y n o t I c e S
This appendix lists the general notices of
your Projector.
FCC notice
This device has been tested and found to
comply with the limits for a Class B digital
device pursuant to Part 15 of the FCC
rules. These limits are designed to provide
reasonable protection against harmful
interference in a residential installation.
This device generates, uses, and can radiate
radio frequency energy and, if not installed
and used in accordance with the instructions, may cause harmful interference to
radio communications.
However, there is no guarantee that interference will not occur in a particular installation. If this device does cause harmful
interference to radio or television reception,
which can be determined by turning the
device off and on, the user is encouraged
to try to correct the interference by one or
more of the following measures:
• Reorient or relocate the receiving
antenna.
• Increase the separation between the
device and receiver.
• Connect the device into an outlet on
a circuit different from that to which
the receiver is connected.
• Consult the dealer or an experienced
radio/television technician for help.
2
Notice: Shielded cables
All connections to other computing
devices must be made using shielded
cables to maintain compliance with
FCC regulations.
Caution
Changes or modications not
expressly approved by the manufacturer could void the user’s authority,
which is granted by the Federal
Communications Commission, to
operate this device.
Operation conditions
This device complies with Part 15 of the
FCC Rules. Operation is subject to the following two conditions:
Notice: Canadian users
This Class B digital apparatus complies with Canadian
ICES-003.
Remarque à l’intention des utilisateurs canadiens
Cet appareil numerique de la classe B est conforme a la
norme NMB-003 du Canada.
Declaration of Conformity for EU countries
1. this device may not cause harmful
interference, and
2. this device must accept any interference received, including interference
that may cause undesired operation.
• EMC Directive 2004/108/EC (including
amendments)
• Low Voltage Directive 2006/95/EC
• R & TTE Directive 1999/5/EC (if product has
RF function)
DI S p o S a l o f o l D el e c -
t r I c a l & el e c t r o n I c
eq u I p m e n t
(Applicable throughout the European
Union and other European countries
with separate collection programs)
This symbol found on your product or on
its packaging, indicates that this product
should not be treated as household waste
when you wish to dispose of it. Instead,
it should be handed over to an applicable
collection point for the recycling of electrical and electronic equipment. By ensuring
this product is disposed of correctly, you
will help prevent potential negative consequences to the environment and human
health, which could otherwise be caused by
inappropriate disposal of this product. The
recycling of materials will help to conserve
natural resources.
This symbol is only
valid in the European
Union.
If you wish to discard
this product, please
contact your local
authorities or dealer
and ask for the correct
method of disposal.
Page 3
3
VGA \ USB IN
AV IN
FOCUS
12
5
6
13
8
9
10
43
2
11
7
1
14
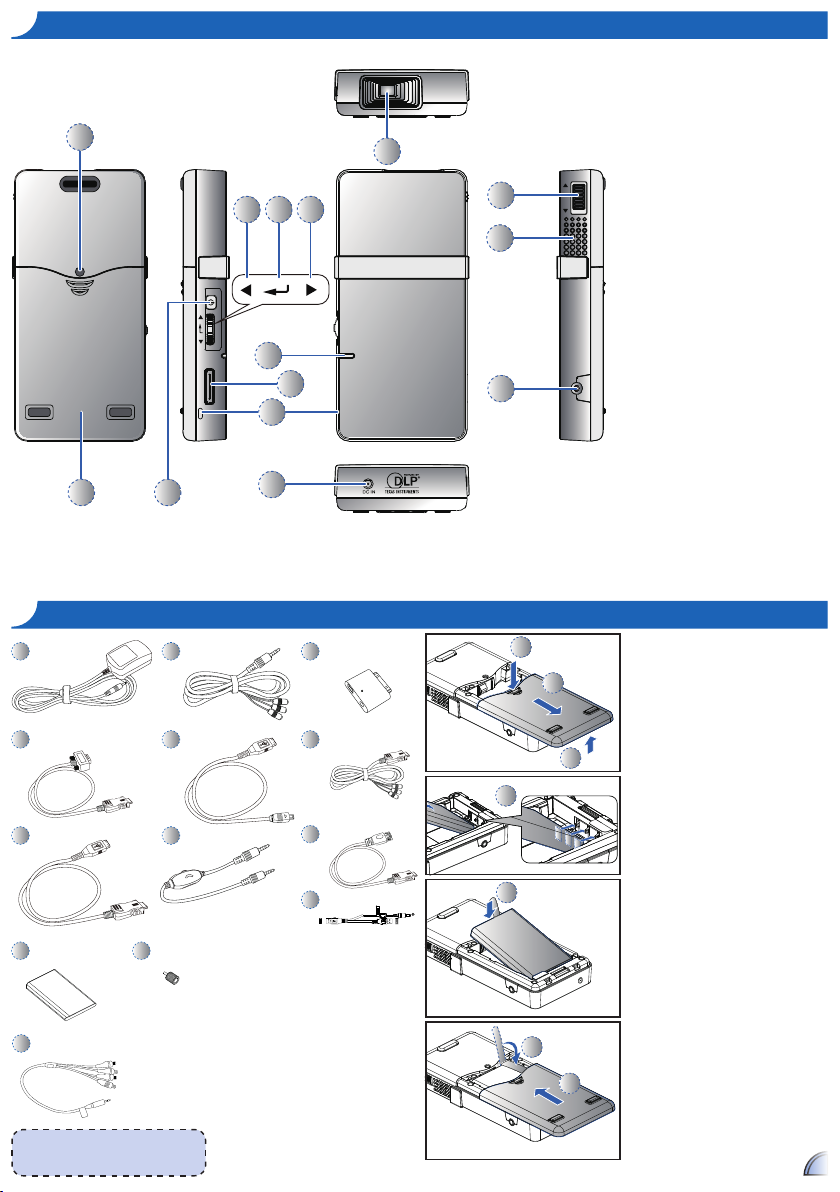
pr o D u c t ov e r v I e W
1
2
3
4
5
7
6
VOLUME CONTROL
1. Power Button
2. Volume +/Up
3. Menu/Enter/Back Button
4. Volume -/Down Button
5. LED Indicator
6. VGA/USB Input Connector
7. Through-hole for straps
8. Focus Dial
9. Speaker
10. AV Input Connector
11. Screw Hole for Tripod Convertor
12. Battery Cover
13. Lens
14. DC Input
pa c k a g e ov e r v I e W
1
2
3
4 5
6
<Note>
The standard accessories may vary in each
region due to different applications.
In S t a l l I n g t h e Ba t t e r y
7
10
1. Remove the battery cover. (
2. Insert battery with electrical contacts
facing downward and away from
lens. Slide under tab. ()
3. Ensure battery pull tab extends from
8
11
under battery. ()
4. Slide the battery cover back into
place over battery pull tab.(
9
12
13
Standard Accessory
1. Power adaptor with DC Jack
2. VGA cable
3. USB Male Cable
4. Battery
5. Tripod Adapter
Option Accessory
6. AV-II cable
7. AV Cable
8. USB Cable for iPod Connector
9. iPod Cable with volume control
10. iPod Connector
11. Component Cable
12. USB Female Cable
13. USB to DC jack cable
~
~
)
)
Page 4

4
2
1
4
VGA \ USB IN
DC IN
5
Ch a r g I n g t h e Ba t t e r y
VGA \ USB IN
DC IN
3
AV IN
FOCUS
1
2
AV IN
FOCUS
1
2
AV IN
FOCUS
1
2
iPod
VOLUME CONTROL
AV IN
FOCUS
1
2
VOLUME CONTROL
VGA \ USB IN
DC IN
1
2
VGA \ USB IN
DC IN
1
2
MOLEX
VGA \ USB IN
DC IN
1
2
VGA \ USB IN
DC IN
1
2
VGA \ USB IN
DC IN
MOLEX
MOLEX
1. Remove protection cap and insert
the plug. (
2. Connect the charger. (
3. During charging the LED indicator
~
)
)
~
lights red. ()
Projector will not charge while
operating.
4. The LED Charge Indicator will go off
when battery is fully charged. This
process may take up to 2.5 hours
<Note>
1. For more LED indicator, see page 7.
2. The indicator will ash red when no
battery is installed.
co n n e c t In p u t So u r c e - (vI D e o I n)
1. Connect the AV input source.
(
)
~
2. Connect to external speaker using
AVII cable (optional) and use the
toggle to disable/enable the PK102
internal speaker ( )
<Note>
1. All other brand and product names are
trademarks or registered trademarks of their
respective companies.
2. The connecting cable of video output
or
device is not supplied, please contact their
service center.
3. iPod nano/iPod touch/iPhone/iPod classic
(version 5 and above)
4. Designed for iPod/iPhone/Mobile phone/
PMP with TV out functions. Using with
device with audio signal voltage > 0.3Vrms
is not recommended.
<Optional>
The PK102 can also be charged via USB to
DC cable ( )
co n n e c t In p u t So u r c e - (vga/uSB/co m p o n e n t I n )
1. Connect the VGA/USB/
Component source device.
Insert universal connector
with arrow mark facing up.
<Note> Supported formats
VGA: 640x480@60Hz, 800x600@60Hz
or
<Note> Supported Files
Photos: bmp, jpeg
Video: M-JPEG, MPEG4, RMVB, RM, WMV,
Xvid, Mov by Optoma Video encoder
<Note>
USB device: Support USB Flash Drive up to
5V/150mA, but does not support USB Hard
Disk Drive
or
<Note> Supported formats
Component input resolution must be 480i/p
or
co n n e c t In p u t So u r c e Da t a t r a n S f e r
1. Connect laptop or PC for data
transfer to the PK102 internal
memory using supplied Male USB
Cable
<Note> The laptop/PC can only detect
the input source when the PK102 is switched
on. This should stop the projection at the mean
time.
or
Page 5

5
VGA \ USB IN
AV IN
FOCUS
uS I n g a tr I p o D St a n D
C
B
A
D
FOCUS
AV IN
FOCUS
1
VGA \ USB IN
1. Screw the supplied tripod adaptor
into the screw hole on the projector.
2. Attach a standard tripod to the
tripod adaptor.
SW I t c h o n
1. Press the Power button.
aD j u S t I n g t h e pr o j e c t e D Im a g e
Projection Distance (A) Screen Size - Width (B) Screen Size - Height (C) Screen Diagonal (D)
Meter inch (mm) (inch) (mm) (inch) (mm) (inch)
0.200 7.9 106 4.2 71 2.8 127 5.0
0.500 19.7 265 10.4 176 6.9 318 12.5
0.800 31.5 423 16.7 282 11.1 509 20.0
1.000 39.4 529 20.8 353 13.9 636 25.0
1.500 59.1 794 31.2 529 20.8 954 37.6
2.000 78.7 1058 41.7 705 27.8 1272 50.1
2.500 98.4 1323 52.1 882 34.7 1590 62.6
2.636 103.8 1395 54.9 930 36.6 1676 66.0
1. Adjust Focus () until image is
clear.
Do W n l o a D I n g op t o m a vI D e o en c o D e r
Only Video les that are converted using the Optoma Video Encoder
can be read by PK102.
1. Find the video converter at “Optoma Video Encoder” folder stored
in PK102
2. Download the video converter from PK102
3. Installation
4. After installation, the shortcut of the main program will be found in
the “Start/All programs” menu item.
5. Launch the main program of “Optoma Video Encoder”
6. Find the Optoma Video Encoder user guide in “Optoma Video
Encoder” folder in PK102
THIS PRODUCT IS LICENSED UNDER THE MPEG-4 VISUAL PATENT
PORTFOLIO LICENSE FOR THE PERSONAL AND NON-COMMERCIAL USE OF
A CONSUMER FOR (i) ENCODING VIDEO IN COMPLIANCE WITH THE MPEG4 VISUAL STANDARD ("MPEG-4 VIDEO") AND/OR (ii) DECODING MPEG-4
VIDEO THAT WAS ENCODED BY A CONSUMER ENGAGED IN A PERSONAL
AND NONCOMMERCIAL ACTIVITY AND/OR WAS OBTAINED FROM A VIDEO
PROVIDER LICENSED BY MPEG LA TO PROVIDE MPEG-4 VIDEO.
NO LICENSE IS GRANTED OR SHALL BE IMPLIED FOR ANY OTHER USE.
ADDITIONAL INFORMATION INCLUDING THAT RELATING TO PROMOTIONAL,
INTERNAL AND COMMERCIAL USES AND LICENSING MAY BE OBTAINED
FROM MPEG LA, LLC. SEE HTTP://WWW.MPEGLA.COM.
ho W t o US e t h e Me n u
Main menu
Item
1. Display the Main Menu. ( )
2. Highlight the desired option (
3. Enter the desired option. (
4. Highlight the desired item. (
5. Select the item. (
6. Press (
7. Select Exit to go to the main menu.
8. OSD disappears in 5 seconds if the
9. The projector will automatically shut
) and hold to go up one
directory.
button is not pressed
down if idling in main menu and le
browser for 3 minutes.
<Note>
Steps 6, 7, 8 applicable for connecting VGA,
Composite, and Component signals
<Note>
The rst time you use the projector, you can
select your preferred language from quick
menu after the startup screen display.
)
)
)
)
Page 6

6
ho W t o US e t h e Me n u - In t e r n a l
Playing Videos from the Internal Memory
Menu/Enter
Volume +/Up
Volume -/Down
<Note> Supported format
Photo: bmp, jpeg
Video: M-JPEG, MPEG4, RMVB, RM, WMV,
Xvid, Mov by Optoma Video encoder
Adjust Volume
Adjust Volume
Displaying Photos from the Internal Memory
Navigating the Settings Menu
ho W t o US e t h e Me n u - ex t e r n a l f o r uSB ho S t mo D e
Menu/Enter
Volume +/Up
Volume -/Down
Insert USB storage device using USB Female Cable (optional)
<Note> Supported format
Photo: bmp, jpeg
Video: M-JPEG, MPEG4, RMVB, RM, WMV,
Xvid, Mov by Optoma Video encoder
Play Movie
Brightness: sets the LED lamp power.
Bright: Full lamp power.
ECO: Standard lamp power.
Projection: select the projection mode.
Front Desktop.
Rear Desktop.
Play
Exit to File Browser
Rewind/Forward
Volume
Back: close the menu.
Slideshow duration: Off, 2 sec, 5 sec,
10 sec.
Exit: Back to File Browser
Front Inverted.
Rear Inverted.
Language: Select preferred
language for on-screen menus
Video Repeat: All, Single, Off
Exit: back to the previous menu.
1. File Browser will open automatically once
USB device is connected (see page 4)
2. The default folder is /USB.
3. All supported les will be displayed.
4. Select “Exit” to return to the Main Menu and
to access the internal memory (My Pico)
Refer to "ho W t o USe t h e Me n u In t e r n al " for more information on
playing videos and viewing photos.
1. The default folder is /Video.
2. Only *.avi les will be displayed.
1. The default folder is /Photo.
2. Only *.jpeg and *.bmp les will be
displayed.
1. The default folder is /USB.
2. Only *.avi les will be displayed.
Refer to "h
o W t o USe t h e Me n u
- In t e r n al ” for more information on
playing videos and viewing photos.
1. The default folder is /USB.
2. Only *.jpeg and *.bmp les will be
displayed.
Page 7

7
ho W t o US e t h e Me n u - ex t e r n a l So u r c e In p u t (co m p o S I t e av, vga, co m p o n e n t )
Menu/Enter
Volume +/Up
Volume -/Down
<Note> Supported format
Composite AV: NTSC, PAL
VGA: 640x480@60Hz, 800x600@60Hz
Component: 480i/p
Input signal source
Composite or
Component source
VGA source
tr o u B l e S h o o t I n g
If you experience a problem with your
projector, please refer to the following
information. If a problem persists, please
contact your local reseller or service
center.
Image Problems
No image appears on-screen
• Ensure the cables/charger/
battery are correctly and securely
connected.
• Ensure the pins of connectors are
not crooked or broken.
• Make sure the projector is
switched on.
Image is out of focus
• Adjust the Focus Dial.
• Make sure the projection screen
is between the required distance
7.9 to 103.8 inches (0.2 to 2.636
meters) from the projector. See
page 5.
Image is too small or too large
• Move the projector closer to or
further from the screen.
Image is reversed
• Select “Settings-->Projection” from
the OSD and adjust the projection
direction.
Audio Problems
No sound
• Press the VOLUME + button. (See
page 3.)
<Note>
Only for VGA input source.
Battery Problems
Battery capacity is low
• Remove the battery and clean the
connectors.
• The battery is worn out and needs
to be replaced. See page 3.
LED Indicator
Message
LED (Red)
Operation
Charge enabled without battery
Battery Charging
Charge Complete
• :Off / :Flash / :On
Message Reminders
• Out of the range
• High battery consumption
Please charge the battery. (See page
3)
or
Bright mode: Full lamp power.
ECO: Standard lamp power.
Front Desktop.
Rear Desktop.
Front Inverted.
Rear Inverted.
4x3 aspect ratio.
3x2 aspect ratio.
Battery is at full capacity.
Battery is at mid capacity
Battery is at low capacity
Image setting, you can adjust
Frequency, Phase and H. Position
functions.
H. Position: adjust the horizontal
position.
co m p a t I B I l I t y mo D e
Computer
Mode Resolution
VGA
SVGA
Video
NTSC: M(3.58MHz), 4.43MHz
PAL: B, D, G, H, I, M, N
V-Sync
(Hz)
640x480 60 31.5
800x600 60 37.9
H-Sync
(kHz)
Phase: change the display data
frequency to match the frequency
of your computer’s graphic card.
Use this function only if the image
appears to icker vertically.
Frequency: synchronize the signal
timing of the display with the
graphic card. If the image appears
to be unstable or ickers, use this
function to correct it.
 Loading...