

Page 1
Page 2

TABLE OF CONTENTS
SAFETY ............................................................................................... 4
Important Safety Instruction....................................................................................................... 4
Laser Radiation Safety Information ........................................................................................... 5
Copyright ................................................................................................................................... 7
Disclaimer .................................................................................................................................. 7
FCC ........................................................................................................................................... 7
Declaration of Conformity for EU Countries .............................................................................. 8
Declaration of Conformity for RED ............................................................................................ 8
WEEE ........................................................................................................................................ 8
UKCA ......................................................................................................................................... 8
RF Frequency Range ................................................................................................................ 9
RF EIRP..................................................................................................................................... 9
WLAN Function Restriction ....................................................................................................... 9
Cleaning the Lens..................................................................................................................... 10
INTRODUCTION ............................................................................... 11
Package Overview.................................................................................................................... 11
Product Overview ..................................................................................................................... 12
Connections.............................................................................................................................. 13
Remote Control ........................................................................................................................ 14
SETUP AND INSTALLATION ........................................................... 15
Installing the Projector .............................................................................................................. 15
Connecting Sources to the Projector ........................................................................................ 18
USING THE PROJECTOR ............................................................... 21
Placement................................................................................................................................. 21
Charge Your Projector .............................................................................................................. 22
Power On.................................................................................................................................. 22
....................................................................................................... 24
Remote Control Bluetooth Pairing ............................................................................................ 24
Network Settings ...................................................................................................................... 25
Focus Settings .......................................................................................................................... 26
Image Correction Settings ........................................................................................................ 27
Bluetooth Speaker Mode .......................................................................................................... 28
Google Assistant ...................................................................................................................... 29
Screen Mirroring with Google Cast™ and Apple AirPlay ......................................................... 30
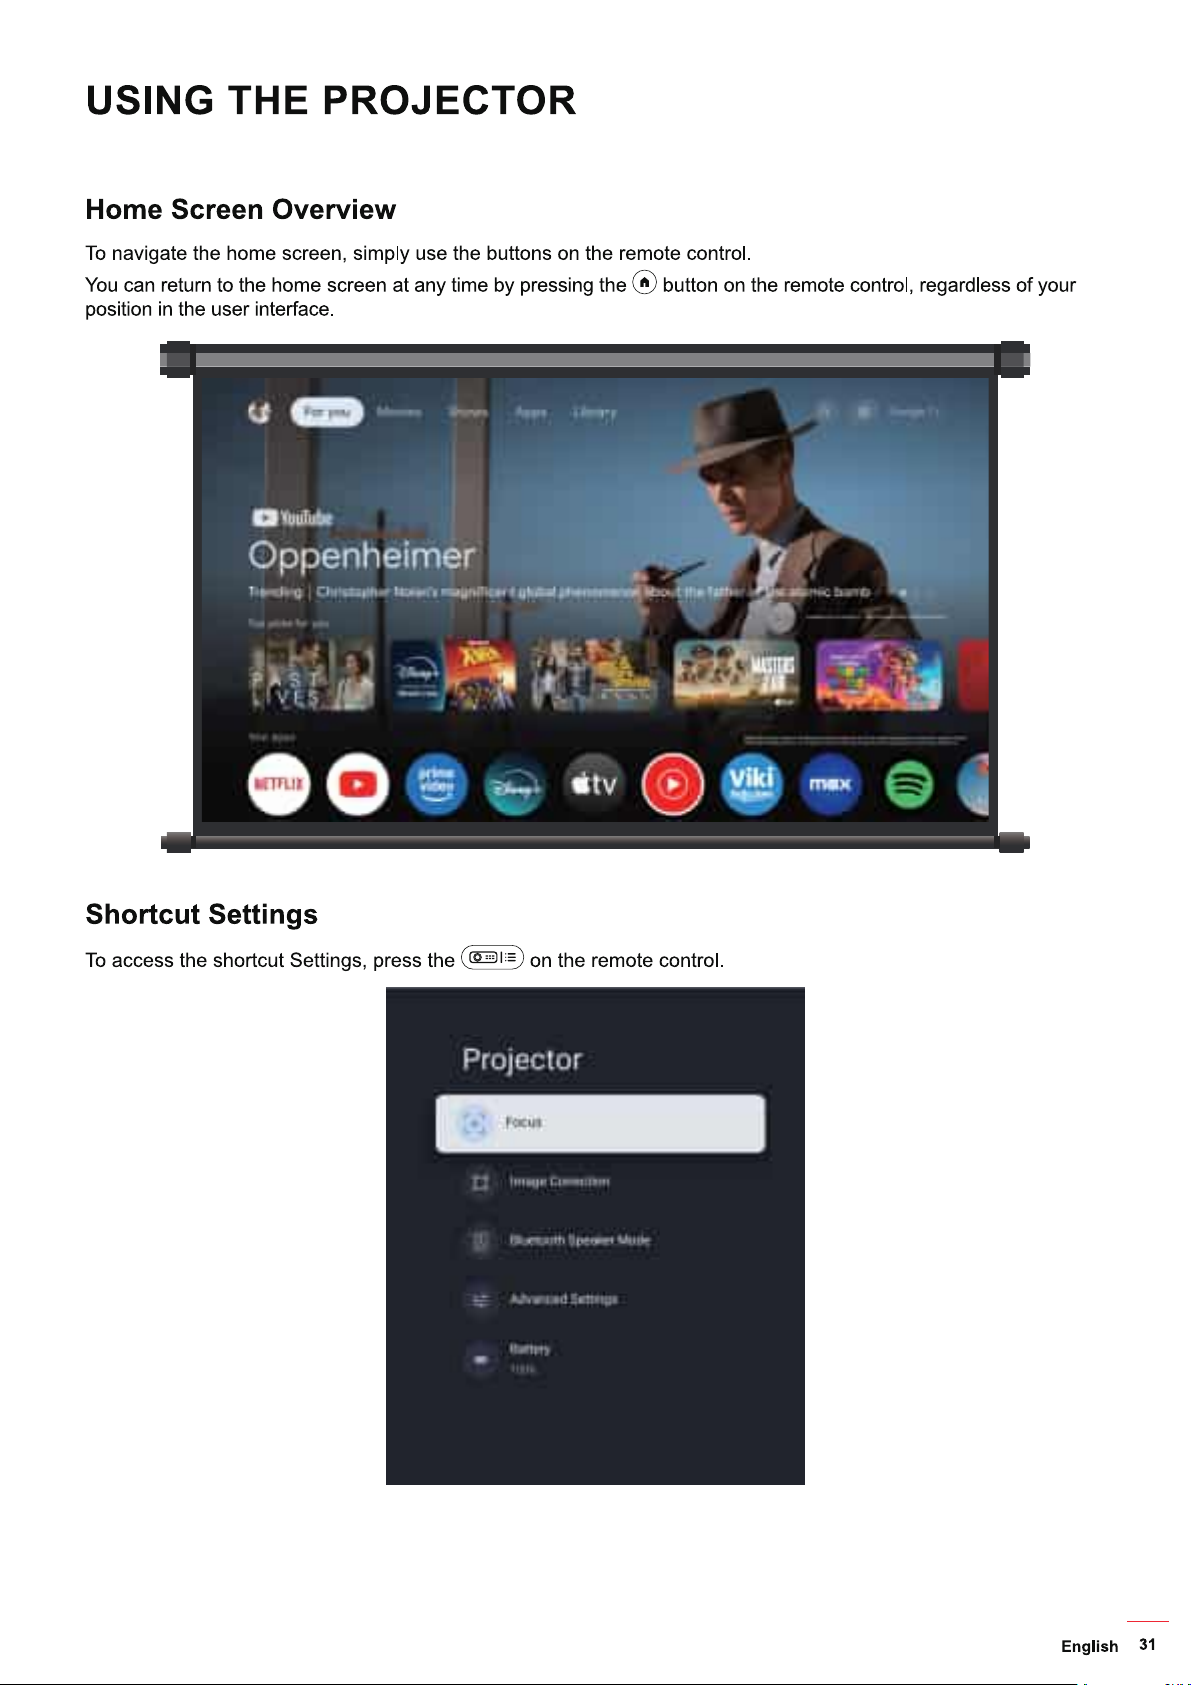
Home Screen Overview............................................................................................................ 31
Shortcut Settings ...................................................................................................................... 31
2
English
Page 3

Settings Menu........................................................................................................................... 32
OSD Menu tree .................................................................................................................... 33
Inputs menu ......................................................................................................................... 39
Projector menu ..................................................................................................................... 40
Display & Sound menu ......................................................................................................... 42
Network & Internet menu ..................................................................................................... 44
$FFRXQWV3UR¿OHVPHQX .................................................................................................... 44
Privacy menu ....................................................................................................................... 45
Apps menu ........................................................................................................................... 47
System menu ....................................................................................................................... 48
Accessibility menu ................................................................................................................ 50
Remotes & Accessories menu ............................................................................................. 51
Help & Feedback menu ........................................................................................................ 51
ADDITIONAL INFORMATION .......................................................... 52
Compatible Solutions................................................................................................................ 52
Image Size and Projection Distance......................................................................................... 54
Projector Dimensions and Ceiling Mount Installation ............................................................... 55
IR Remote Codes ..................................................................................................................... 56
Troubleshooting ........................................................................................................................ 58
Warning Indicators .................................................................................................................... 60
6SHFL¿FDWLRQV ........................................................................................................................... 61
2SWRPD*OREDO2FHV ............................................................................................................. 62
English
3
Page 4

SAFETY
7KHOLJKWQLQJÀDVKZLWKDUURZKHDGZLWKLQDQHTXLODWHUDOWULDQJOHLV
intended to alert the user to the presence of uninsulated "dangerous
YROWDJHZLWKLQWKHSURGXFWVHQFORVXUHWKDWPD\EHRIVXႈFLHQW
magnitude to constitute a risk of electric shock to persons.
7KHH[FODPDWLRQSRLQWZLWKLQDQHTXLODWHUDOWULDQJOHLVLQWHQGHGWRDOHUW
the user to the presence of important operating and maintenance
(servicing) instructions in the literature accompanying the appliance.
Please follow all warnings, precautions and maintenance as recommended in this user’s guide.
Important Safety Instruction
• Do not block any ventilation openings. To ensure reliable operation of the projector and to protect from
over heating, it is recommended to install the projector in a location that does not block ventilation.
$VDQH[DPSOHGRQRWSODFHWKHSURMHFWRURQDFURZGHGFRႇHHWDEOHVRIDEHGHWF'RQRWSXWWKH
SURMHFWRULQDQHQFORVXUHVXFKDVDERRNFDVHRUDFDELQHWWKDWUHVWULFWVDLUÀRZ
• 7RUHGXFHWKHULVNRI¿UHDQGRUHOHFWULFVKRFNGRQRWH[SRVHWKHSURMHFWRUWRUDLQRUPRLVWXUH'RQRW
LQVWDOOQHDUKHDWVRXUFHVVXFKDVUDGLDWRUVKHDWHUVVWRYHVRUDQ\RWKHUDSSDUDWXVVXFKDVDPSOL¿HUV
that emits heat.
• 'RQRWOHWREMHFWVRUOLTXLGVHQWHUWKHSURMHFWRU7KH\PD\WRXFKGDQJHURXVYROWDJHSRLQWVDQGVKRUW
RXWSDUWVWKDWFRXOGUHVXOWLQ¿UHRUHOHFWULFVKRFN
• Do not use under the following conditions:
– In extremely hot, cold or humid environments.
(i) Ensure that the ambient room temperature is within 0°C ~ 40°C
(ii) Relative humidity is 10% ~ 85%
(iii) Storage and transportation ambient temperature: -10°C ~ 50°C
(iv) Altitude is not higher than 5000m (air pressure not less than 80kPa)
– In areas susceptible to excessive dust and dirt.
– 1HDUDQ\DSSOLDQFHJHQHUDWLQJDVWURQJPDJQHWLF¿HOG
– In direct sunlight.
• 'RQRWXVHWKHXQLWLILWKDVEHHQSK\VLFDOO\GDPDJHGRUDEXVHG3K\VLFDOGDPDJHDEXVHZRXOGEH
(but not limited to):
– Unit has been dropped.
– Power supply cord or plug has been damaged.
– /LTXLGKDVEHHQVSLOOHGRQWRWKHSURMHFWRU
– Projector has been exposed to rain or moisture.
– Something has fallen in the projector or something is loose inside.
4
• Do not place the projector on an unstable surface. The projector may fall over resulting in injury or the
projector may become damaged.
• Do not block the light coming out of the projector lens when in operation. The light will heat the object
DQGPD\PHOWFDXVHEXUQVRUVWDUWD¿UH
• Please do not open or disassemble the projector as this may cause electric shock.
• Do not attempt to service the unit yourself. Opening or removing covers may expose you to dangerous
voltages or other hazards. Please call Optoma before you send the unit for repair.
• See projector enclosure for safety related markings.
• The unit should only be repaired by authorized service personnel.
• 2QO\XVHDWWDFKPHQWVDFFHVVRULHVVSHFL¿HGE\WKHPDQXIDFWXUHU
English
Page 5
• Do not look into straight into the projector lens during operation. The bright light may harm your eyes.
• This projector will detect the life of the light source itself.
•
disconnecting power. Allow 90 seconds for the projector to cool down.
•
• Use a soft dry cloth with mild detergent to clean the display housing. Do not use abrasive cleaners,
waxes or solvents to clean the unit.
• Disconnect the power plug from AC outlet if the product is not being used for a long period of time.
• Do not setup the projector in places where it might be subjected to vibration or shock.
• Do not touch the lens with bare hands.
• CAUTION
Risks of explosion if the battery is replaced by an incorrect type:
• replacement of a battery with an incorrect type that can defeat a safeguard.
•
result in an explosion.
• leaving a battery in an extremely high temperature surrounding environment that can result in an
• a battery subjected to extremely low air pressure that may result in an explosion or the leakage of
•
remote for long periods, they may leak.
• Do not use or store the projector in places where smoke from oil or cigarettes may be present, as it
•
projector performance.
• Use a power strip and or surge protector. As power outages and brown-outs can KILL devices.
Laser Radiation Safety Information
• Notice is given to supervise children and to never allow them to stare into the projector beam at any
distance from the projector.
•
This projector has built-in Class module. Disassembly or modification is very dangerous and should
never be attempted.
English
5
Page 6

• $Q\RSHUDWLRQRUDGMXVWPHQWQRWVSHFL¿FDOO\LQVWUXFWHGE\WKHXVHU¶VJXLGHFUHDWHVWKHULVNRI
hazardous laser radiation exposure.
• Notice is given to use caution when using the remote control for starting the projector while in front of
the projection lens.
• Notice is given to the user to avoid the use of optical aids such as binoculars or telescopes inside the
beam.
• When turning on the projector, make sure no one within projection range is looking at the lens.
• Keep any items (magnifying glass etc.) out of the light path of the projector. The light path being
projected from the lens is extensive, therefore any kind of abnormal objects that can redirect light
FRPLQJRXWRIWKHOHQVFDQFDXVHDQXQSUHGLFWDEOHRXWFRPHVXFKDVD¿UHRULQMXU\WRWKHH\HV
• $Q\RSHUDWLRQRUDGMXVWPHQWQRWVSHFL¿FDOO\LQVWUXFWHGE\WKHXVHU¶VJXLGHFUHDWHVWKHULVNRI
hazardous laser radiation exposure.
• Do not open or disassemble the projector as this may cause harm by exposure to possible laser
radiation.
• Do not stare into beam when the projector is on. The bright light may result in permanent eye damage.
• Not following the control, adjustment or operation procedure may cause damage by exposure to
possible laser radiation.
6
English
Page 7

Copyright
This publication, including all photographs, illustrations and software, is protected under international copyright
laws, with all rights reserved. Neither this manual, nor any of the material contained herein, may be reproduced
without written consent of the author.
©Copyright 2025
Disclaimer
The information in this document is subject to change without notice. The manufacturer makes no representations
RUZDUUDQWLHVZLWKUHVSHFWWRWKHFRQWHQWVKHUHRIDQGVSHFL¿FDOO\GLVFODLPVDQ\LPSOLHGZDUUDQWLHVRI
PHUFKDQWDELOLW\RU¿WQHVVIRUDQ\SDUWLFXODUSXUSRVH7KHPDQXIDFWXUHUUHVHUYHVWKHULJKWWRUHYLVHWKLVSXEOLFDWLRQ
and to make changes from time to time in the content hereof without obligation of the manufacturer to notify any
person of such revision or changes.
FCC
This device has been tested and found to comply with the limits for a Class B digital device pursuant to Part 15
of the FCC rules. These limits are designed to provide reasonable protection against harmful interference in a
UHVLGHQWLDOLQVWDOODWLRQ7KLVGHYLFHJHQHUDWHVXVHVDQGFDQUDGLDWHUDGLRIUHTXHQF\HQHUJ\DQGLIQRWLQVWDOOHGDQG
used in accordance with the instructions, may cause harmful interference to radio communications.
However, there is no guarantee that interference will not occur in a particular installation. If this device does cause
KDUPIXOLQWHUIHUHQFHWRUDGLRRUWHOHYLVLRQUHFHSWLRQZKLFKFDQEHGHWHUPLQHGE\WXUQLQJWKHGHYLFHRႇDQGRQLV
encouraged to try to correct the interference by one or more of the following measures:
• Reorient or relocate the receiving antenna.
• Increase the separation between the device and receiver.
• &RQQHFWWKHGHYLFHLQWRDQRXWOHWRQDFLUFXLWGLႇHUHQWIURPWKDWWRZKLFKWKHUHFHLYHULVFRQQHFWHG
• &RQVXOWWKHGHDOHURUDQH[SHULHQFHGUDGLRWHOHYLVLRQWHFKQLFLDQIRUKHOS
Notice: Shielded cables
All connections to other computing devices must be made using shielded cables to maintain compliance with FCC
regulations.
Caution
&KDQJHVRUPRGL¿FDWLRQVQRWH[SUHVVO\DSSURYHGE\WKHPDQXIDFWXUHUFRXOGYRLGWKHXVHUVDXWKRULW\ZKLFKLV
granted by the Federal Communications Commission, to operate this projector.
Operation Conditions
This device complies with Part 15 of the FCC Rules. Operation is subject to the following two conditions:
1. This device may not cause harmful interference and
2. This device must accept any interference received, including interference that may cause undesired operation.
Notice: Canadian users
This Class B digital apparatus complies with Canadian ICES-003.
5HPDUTXHjOLQWHQWLRQGHVXWLOLVDWHXUVFDQDGLHQV
&HWDSSDUHLOQXPHULTXHGHODFODVVH%HVWFRQIRUPHDODQRUPH10%GX&DQDGD
English
7
Page 8

Declaration of Conformity for EU Countries
• (0&'LUHFWLYH(8LQFOXGLQJDPHQGPHQWV
• /RZ9ROWDJH'LUHFWLYH(8
• 5('(8LISURGXFWKDV5)IXQFWLRQ
Declaration of Conformity for RED
+HUHE\2SWRPDFRUSRUDWLRQGHFODUHVWKDWWKHUDGLRHTXLSPHQWW\SHRIWKLVSURGXFWLVLQFRPSOLDQFHZLWK'LUHFWLYH
(88.5DGLR(TXLSPHQW5HJXODWLRQV6,7KHIXOOWH[WRIWKH(8'HFODUDWLRQRI
&RQIRUPLW\LVDYDLODEOHXSRQUHTXHVW
Please visit our website for the full text of the EU declaration of conformity.
WEEE
Disposal instructions
7KLVSURGXFWEHDUVWKHVHOHFWLYHVRUWLQJV\PEROIRU:DVWHHOHFWULFDODQGHOHFWURQLFHTXLSPHQW:(((
7KLVPHDQVWKDWWKLVSURGXFWPXVWEHKDQGOHGSXUVXDQWWR(XURSHDQGLUHFWLYH(8LQRUGHUWR
be recycled or dismantled to minimize its impact on the environment.
User has the choice to give his product to a competent recycling organization or to the retailer when he
EX\VDQHZHOHFWULFDORUHOHFWURQLFHTXLSPHQW
UKCA
6DWLV¿HVDOOWKHWHFKQLFDOUHJXODWLRQVDSSOLFDEOHWRWKHSURGXFWZLWKLQWKHVFRSHRI8.5DGLR(TXLSPHQW5HJXODWLRQV
6,8.(OHFWULFDO(TXLSPHQW6DIHW\5HJXODWLRQV6,DQG8.(OHFWURPDJQHWLF&RPSDWLELOLW\
5HJXODWLRQV6,
8
English
Page 9
RF Frequency Range
Bluetooth: 2402MHz – 2480MHz
*+]:L)L0+]±0+]
*+]:L)L0+]±0+]0+]±0+]0+]±0+]0+]±0+]
RF EIRP
Bluetooth: EIRP <20dBm
2.4GHz Wi-Fi: EIRP <20dBm
5GHz Wi-Fi:
• 5150-5250MHz: EIRP <23dBm
• 5250–5350MHz: EIRP <20dBm
• 0+](,53G%P
• ±0+](,53G%P
WLAN Function Restriction
This device complies with relevant RF radiation exposure limits when positioned at least 20cm away from your body.
Use Restriction: The WLAN function for this device is restricted to indoor use only when operating in the 5150 to 5350
0+]IUHTXHQF\UDQJHLQIROORZLQJFRXQWULHV
7KLVGHYLFHFDQEHRSHUDWHGLQDOO0HPEHU6WDWHVZLWKRXWLQIULQJLQJDSSOLFDEOHUHTXLUHPHQWVRQWKHXVHRIUDGLR
spectrum.
AT BE BG CH CY CZ DK DE EE EL ES FI
FR HR HU IE IS IT LI LT LU LV MT NL
NO PL PT RO SE SI SK TR UK(NI)
UK
English
9
Page 10
Cleaning the Lens
• %HIRUHFOHDQLQJWKHOHQVEHVXUHWRWXUQRႇWKHSURMHFWRUDQGXQSOXJWKHSRZHUFRUGWRDOORZLWWR
completely cool down.
• Use a compressed air tank to remove the dust.
• 8VHDVSHFLDOFORWKIRUFOHDQLQJOHQVDQGJHQWO\ZLSHWKHOHQV'RQRWWRXFKWKHOHQVZLWK\RXU¿QJHUV
• 'RQRWXVHDONDOLQHDFLGGHWHUJHQWVRUYRODWLOHVROYHQWVVXFKDVDOFRKROIRUFOHDQLQJOHQV,IWKHOHQVLV
damaged due to the cleaning process, it is not covered by the warranty.
:DUQLQJ'RQRWXVHDVSUD\FRQWDLQLQJÀDPPDEOHJDVHVWRUHPRYHGXVWRUGLUWIURPWKHOHQV7KLV
PD\FDXVHD¿UHGXHWRH[FHVVLYHKHDWLQVLGHWKHSURMHFWRU
:DUQLQJ'RQRWFOHDQWKHOHQVLIWKHSURMHFWRULVZDUPLQJXSDVWKLVPD\FDXVHWKHOHQV¶VXUIDFH¿OP
WRSHHORႇ
Warning: Do not wipe or tap the lens with a hard object.
Warning: Mount above the heads of childeren.The use of a ceiling mount is recommended with this
product to place it above the eyes of childen.
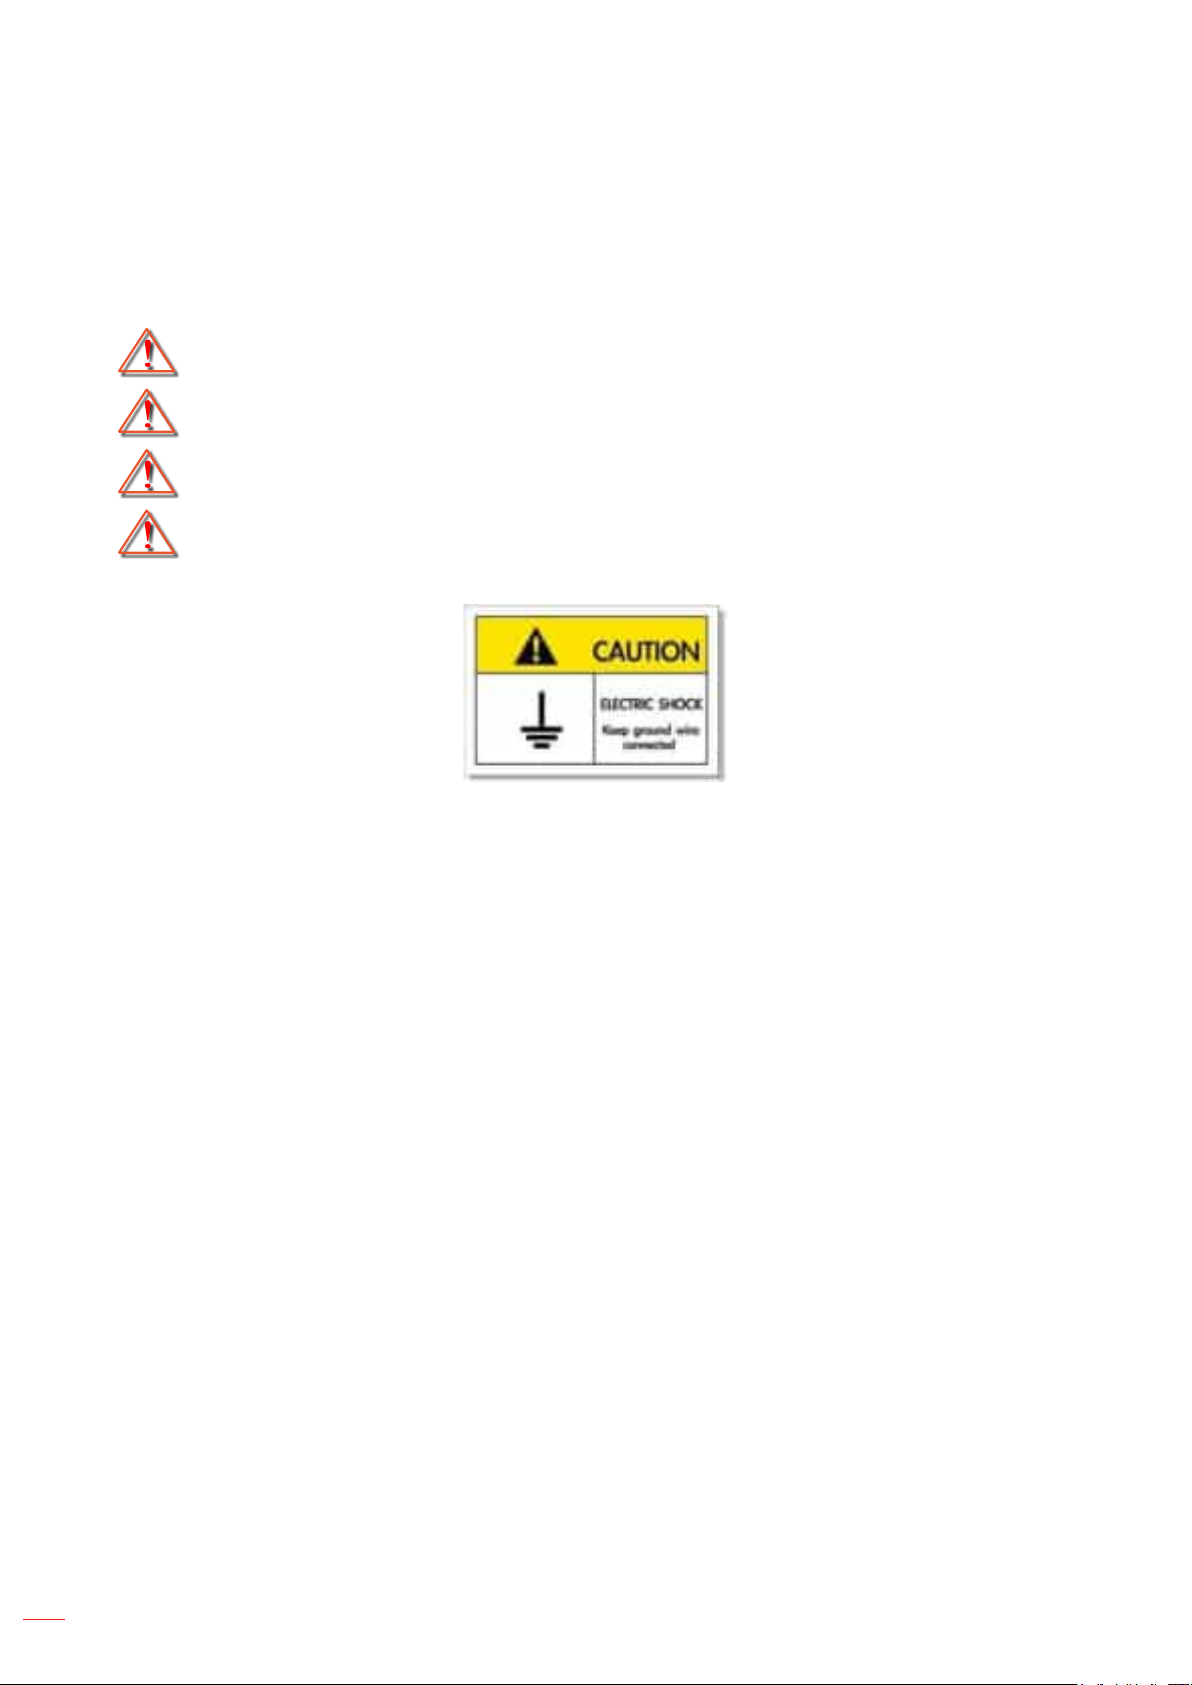
To avoid electric shock, the unit and its peripherals must be properly grounded (earthed).
10
English
Page 11
INTRODUCTION
Thank you for purchasing an Optoma laser projector. For full list of features please visit the product page on our
ZHEVLWHZKHUH\RXZLOODOVR¿QGDGGLWLRQDOLQIRUPDWLRQDQGGRFXPHQWDWLRQVXFKDV)$4V
Package Overview
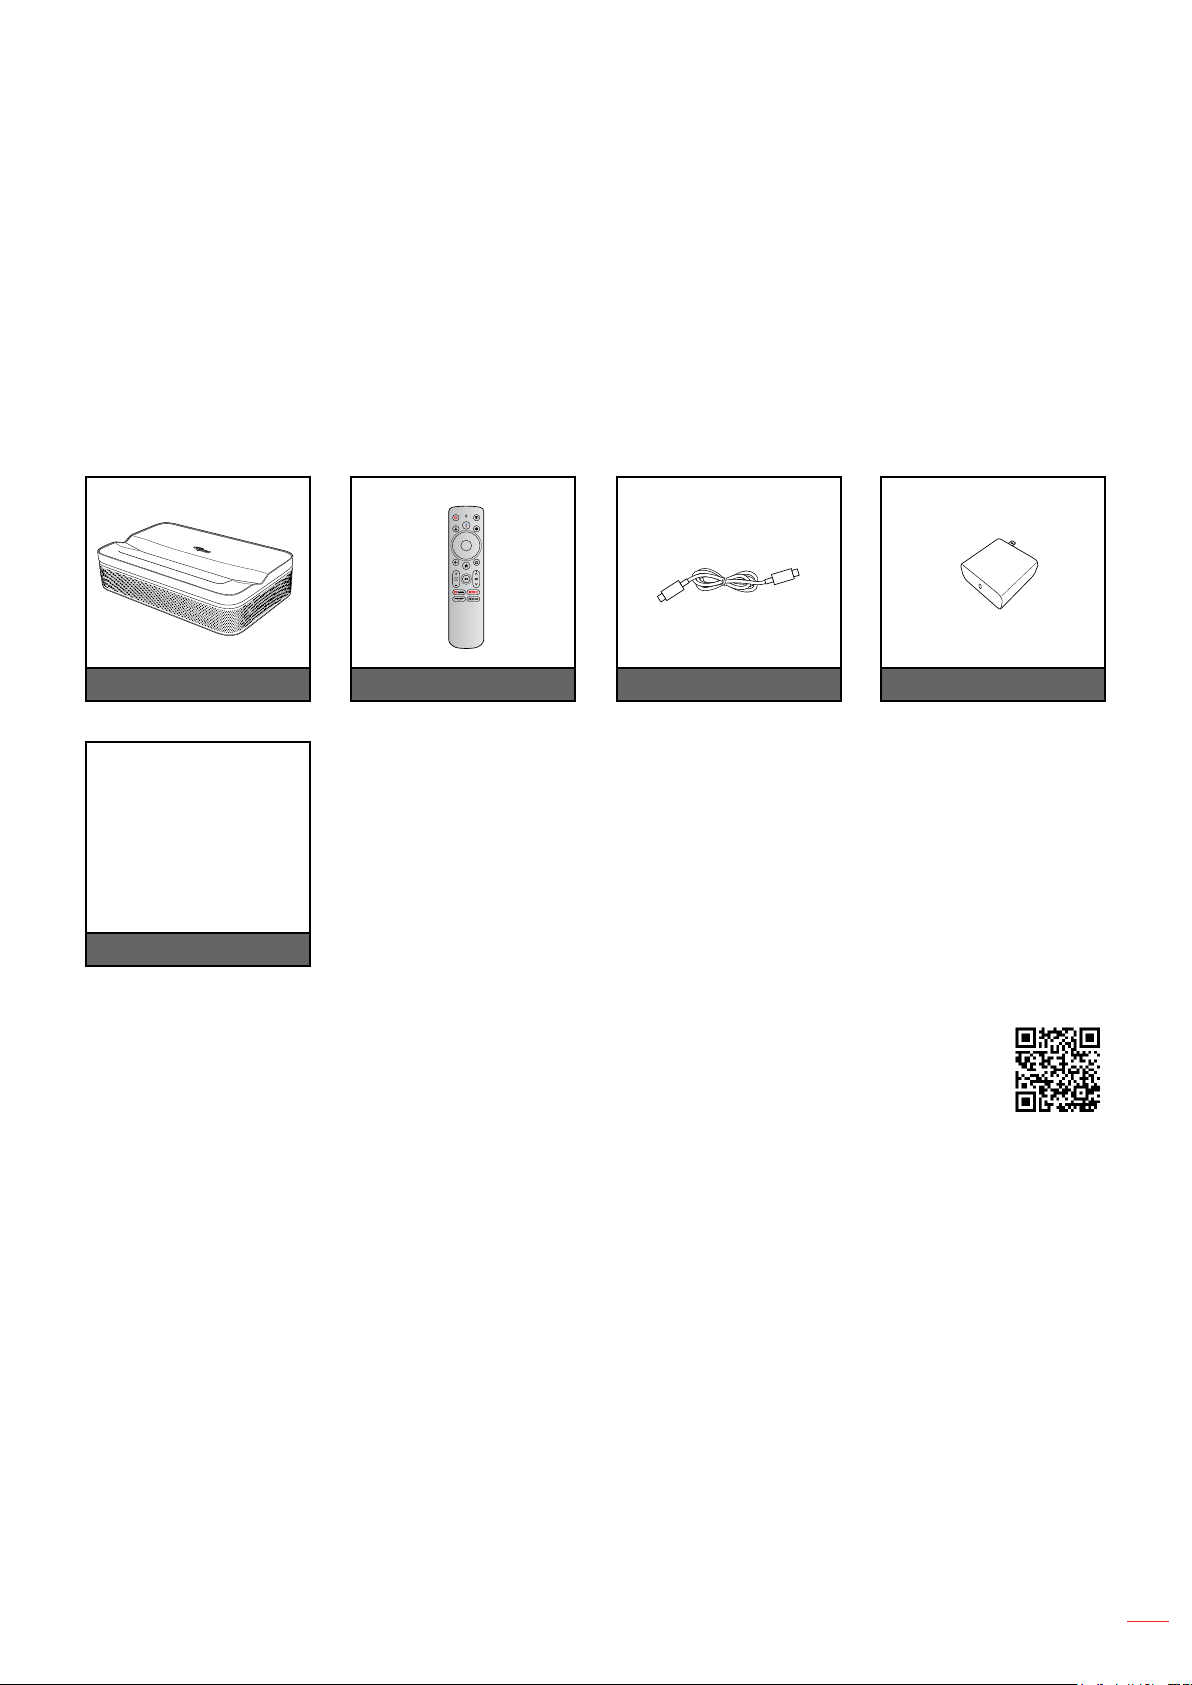
Carefully unpack and verify that you have the items listed below under standard accessories. Some of the items
XQGHURSWLRQDODFFHVVRULHVPD\QRWEHDYDLODEOHGHSHQGLQJRQWKHPRGHOVSHFL¿FDWLRQDQG\RXUUHJLRQRI
purchase. Please check with your place of purchase. Some accessories may vary from region to region.
7KHZDUUDQW\FDUGLVRQO\VXSSOLHGLQVRPHVSHFL¿FUHJLRQV3OHDVHFRQVXOW\RXUGHDOHUIRUGHWDLOHGLQIRUPDWLRQ
Standard accessories
Projector Remote control USB Type-C cable
4XLFNVWDUWXVHUPDQXDO
;
Documentation
Note:
•
For access to the setup information, user manual, warranty information, and product updates
– please scan the QR Code or visit the following URL:
https://www.optoma.com/support/download
• Power cable and optional accessories may vary by country.
Power adapter
English
11
Page 12
INTRODUCTION
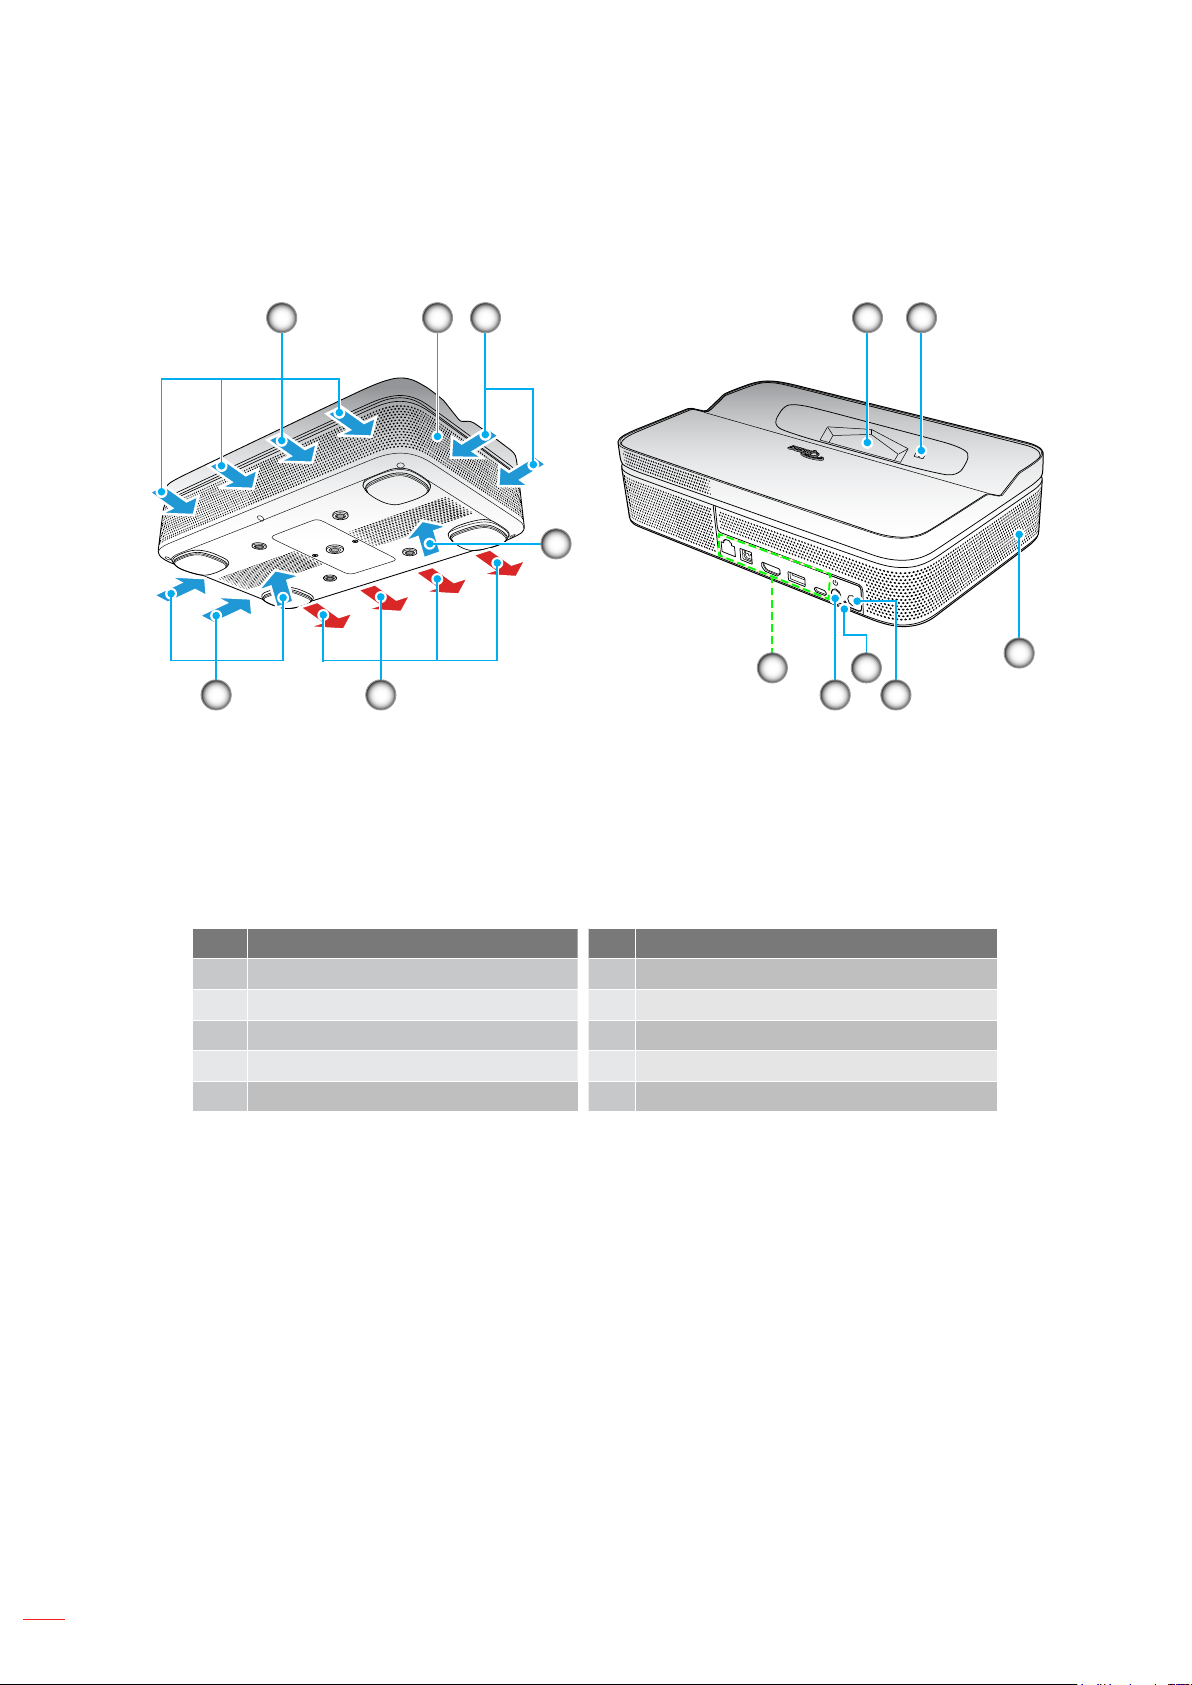
Product Overview
1 1
1 3
2
1
SPDIF
HDMI
USB
9
USB-C
(POWER)
IR
8 6
4
5
Note:
• Do not block projector intake and exhaust vents.
• When operating the projector in an enclosed space, allow at least 15 cm clearance around the intake
and exhaust vents.
2
No Item No Item
1. Ventilation (inlet) 6. IR Receiver
2. Speakers Power LED
3. Ventilation (outlet) 8. Power Button
4. Lens 9. ,QSXW2XWSXW
5. TOF Module
12
English
Page 13
INTRODUCTION
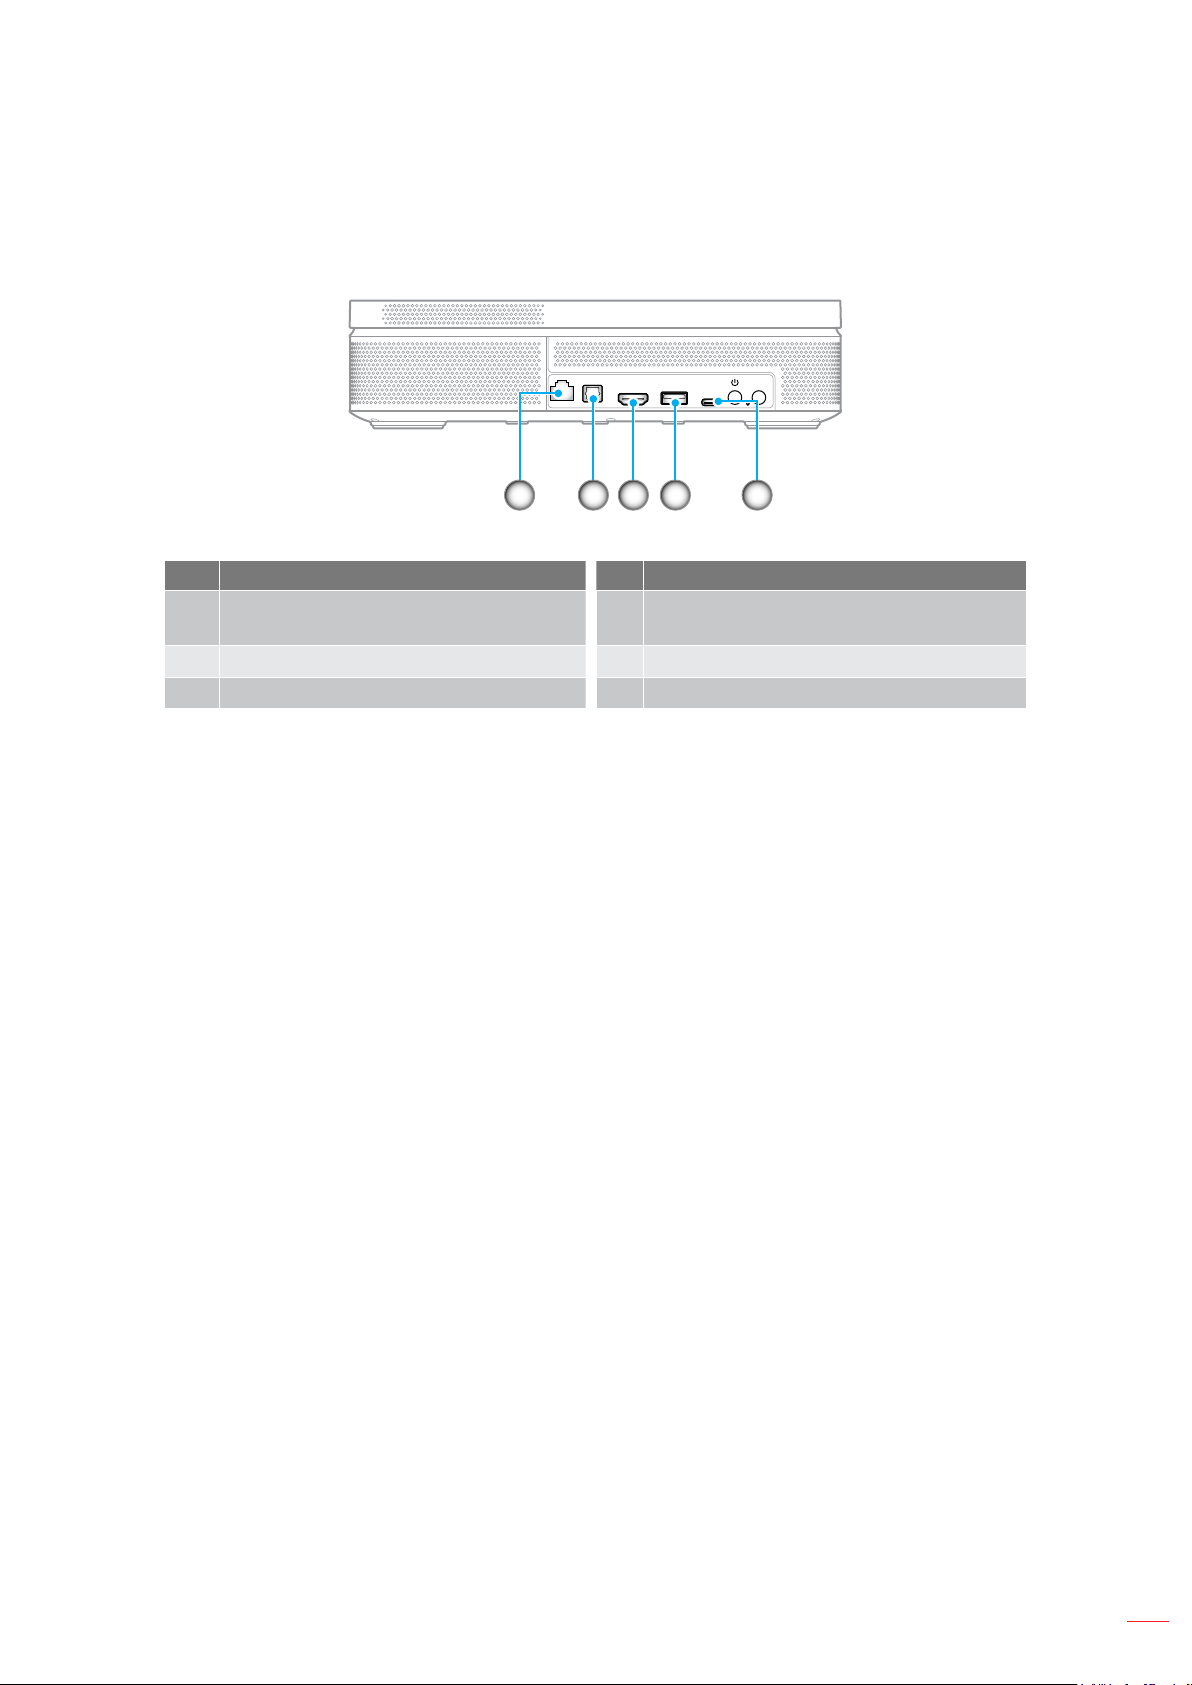
Connections
(POWER)
IRUSB-C
USBHDMISPDIF
4 5321
No Item No Item
1. RJ-45 Connector 4. 86%7\SH$3RZHU2XW9$
(For multi-media pen drive, FW upgrade)
2. SPDIF Connector 5. USB Type-C Connector (For Power input)
3. HDMI 2.0 Connector
English
13
Page 14
INTRODUCTION
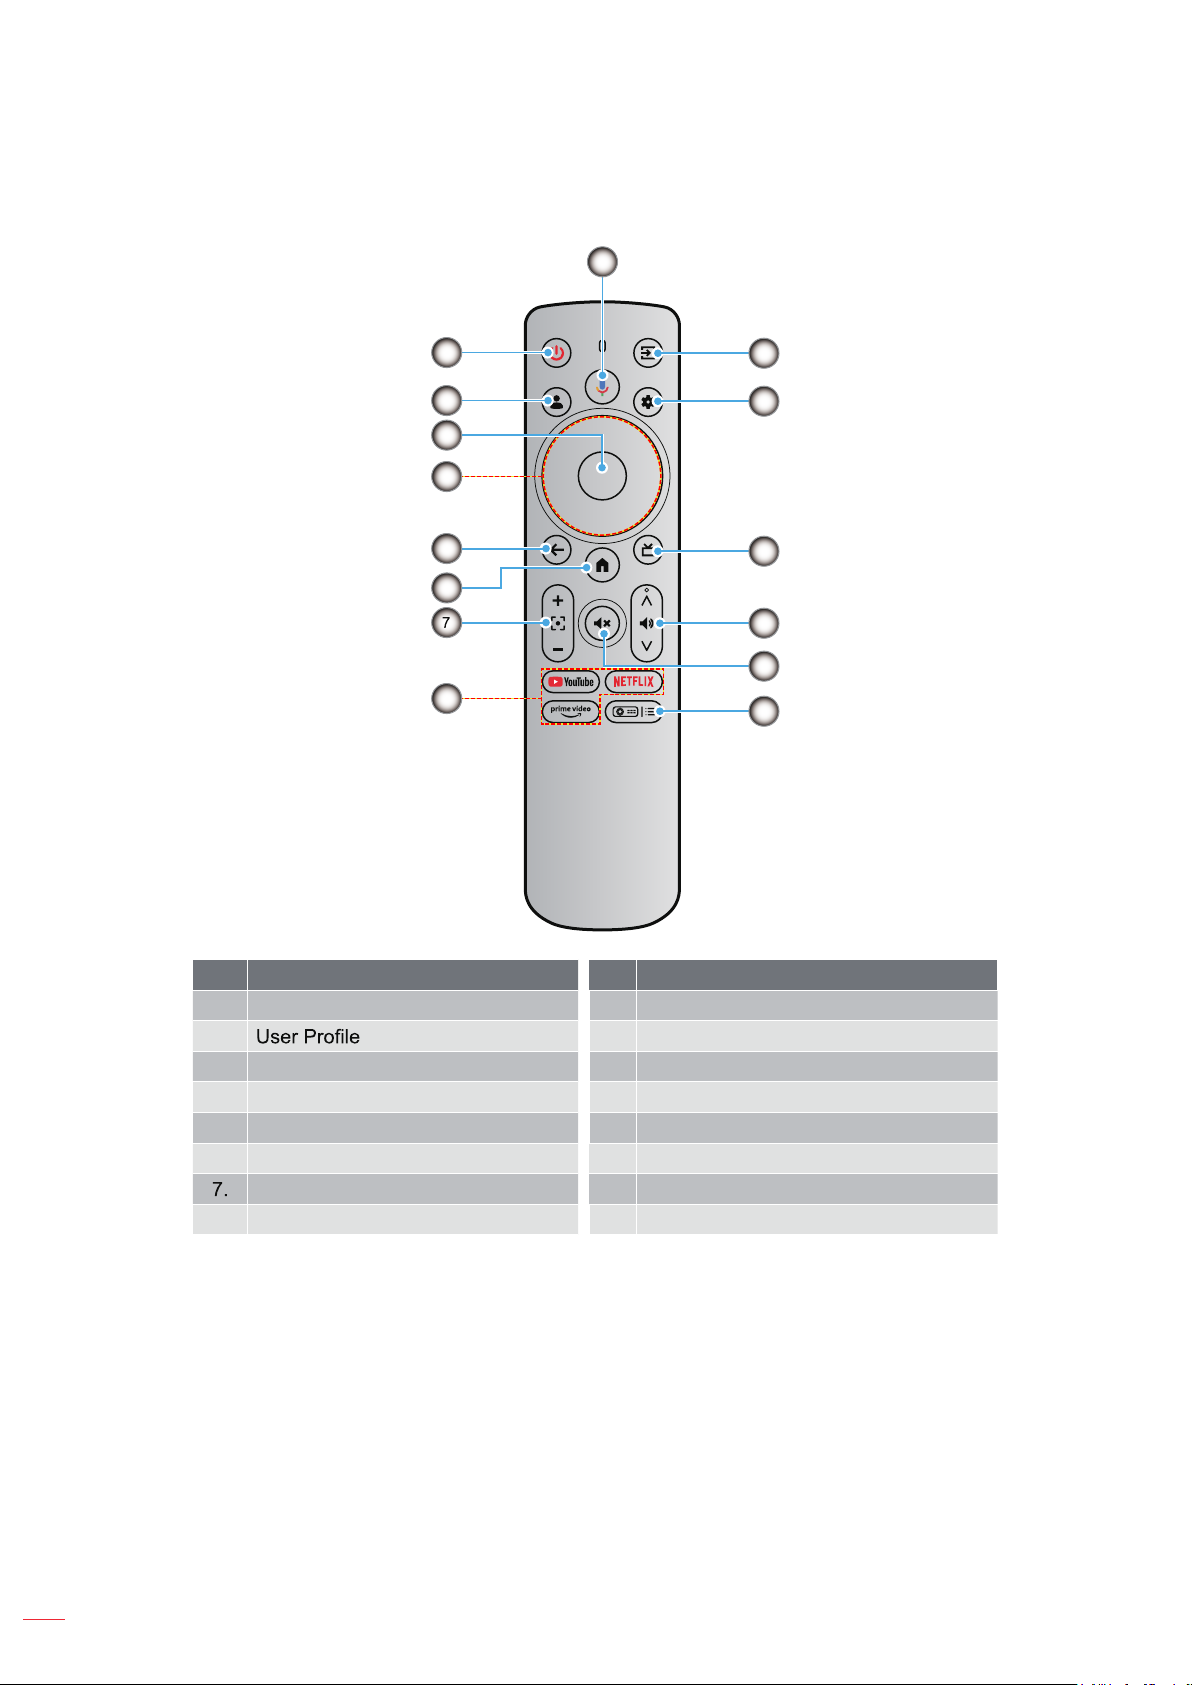
Remote Control
15
1
2
3
4
5
6
8
14
13
12
11
10
9
No Item No Item
1. Power 9. Projector Settings (Shortcut)
2. 10. Mute
3. OK 11. Volume
4. Four Directional Select Keys 12. Live TV*
5. Back 13. Settings (Dash board)
6. Home 14. Input Source
Focus 15. Google Assistant
8. Streaming Apps
Note: The remote control supports both infrared (IR) and Bluetooth transmissions.
*US Only. For regions where Live TV is unavailable, this key may direct to other input sources."
14
English
Page 15
SETUP AND INSTALLATION
Installing the Projector
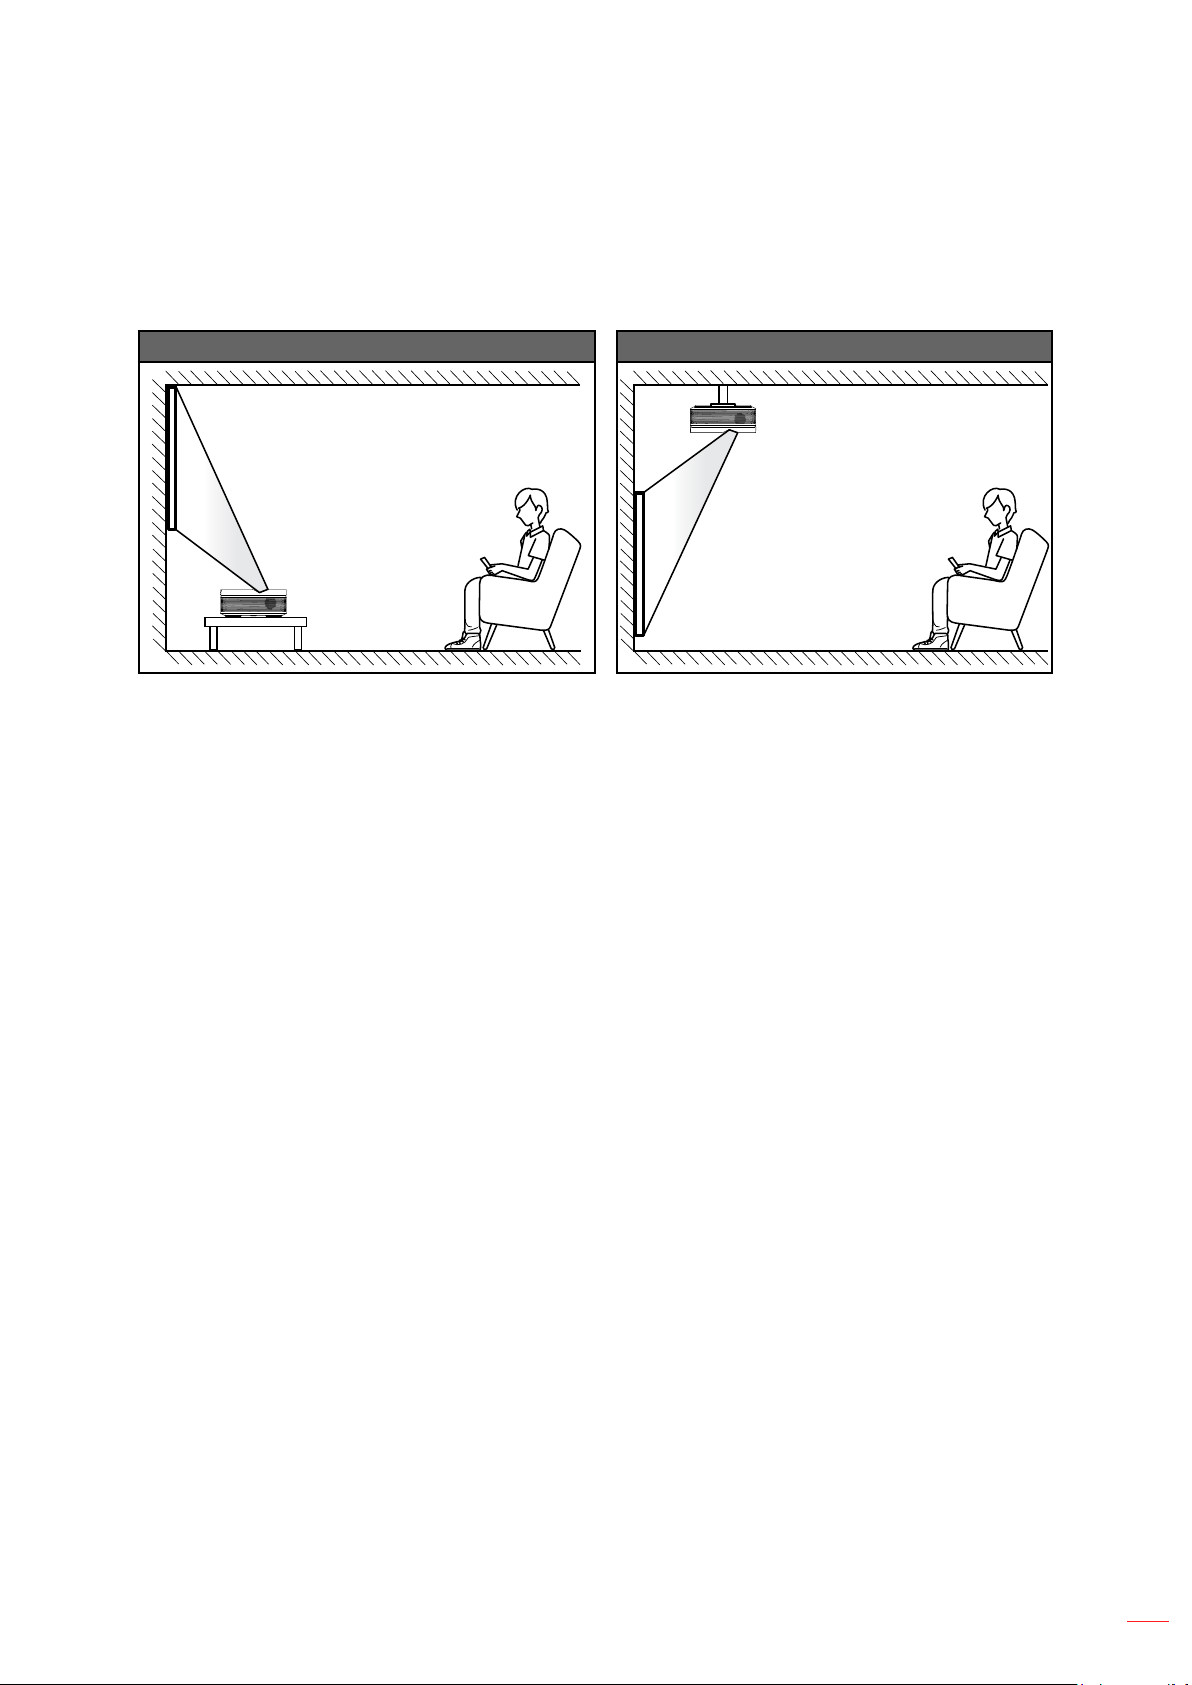
Your room layout or personal preference will dictate which installation location you select. Take into consideration
the size and position of your screen, the location of a suitable power outlet, as well as the location and distance
EHWZHHQWKHSURMHFWRUDQGWKHUHVWRI\RXUHTXLSPHQW
Table mount front Ceiling mount front
3URMHFWRUVKRXOGEHSODFHGÀDWRQDVXUIDFHDQGGHJUHHVSHUSHQGLFXODUWRWKHVFUHHQ
• To determine projector location for a given screen size, please refer to distance table on page 54.
• To determine screen size for a given distance, please refer to distance table on page 54.
Note: Placing the projector further from the screen or projection surface will proportionally increase the image size
DQGR௺VHW
English
15
Page 16

SETUP AND INSTALLATION
Note:
• (QVXUHWKDWWKHSURMHFWRULVSRVLWLRQHGDWWKHIROORZLQJVSHFL¿FDWLRQV
D7KHSURMHFWHGVXUIDFHLVÀDWDQGSHUSHQGLFXODUWRWKHJURXQG
b. (QVXUHWKDWWKHNH\VWRQHFRUUHFWLRQDQJOHLVZLWKLQWKHVSHFL¿FUDQJH
±10° horizontal, ±5° vertical, and ±10° roll.
c. The further away the projector is placed from the screen the projected image size
LQFUHDVHVDQGYHUWLFDOR௺VHWDOVRLQFUHDVHVSURSRUWLRQDOO\
d. Keep at least 15 cm clearance of the projected image from the border of the curtain or
obstacles.
Minimum 150mm (5.91 inches)
Projected Image
%RUGHURIFXUWDLQREVWDFOHV
16
English
Page 17
SETUP AND INSTALLATION
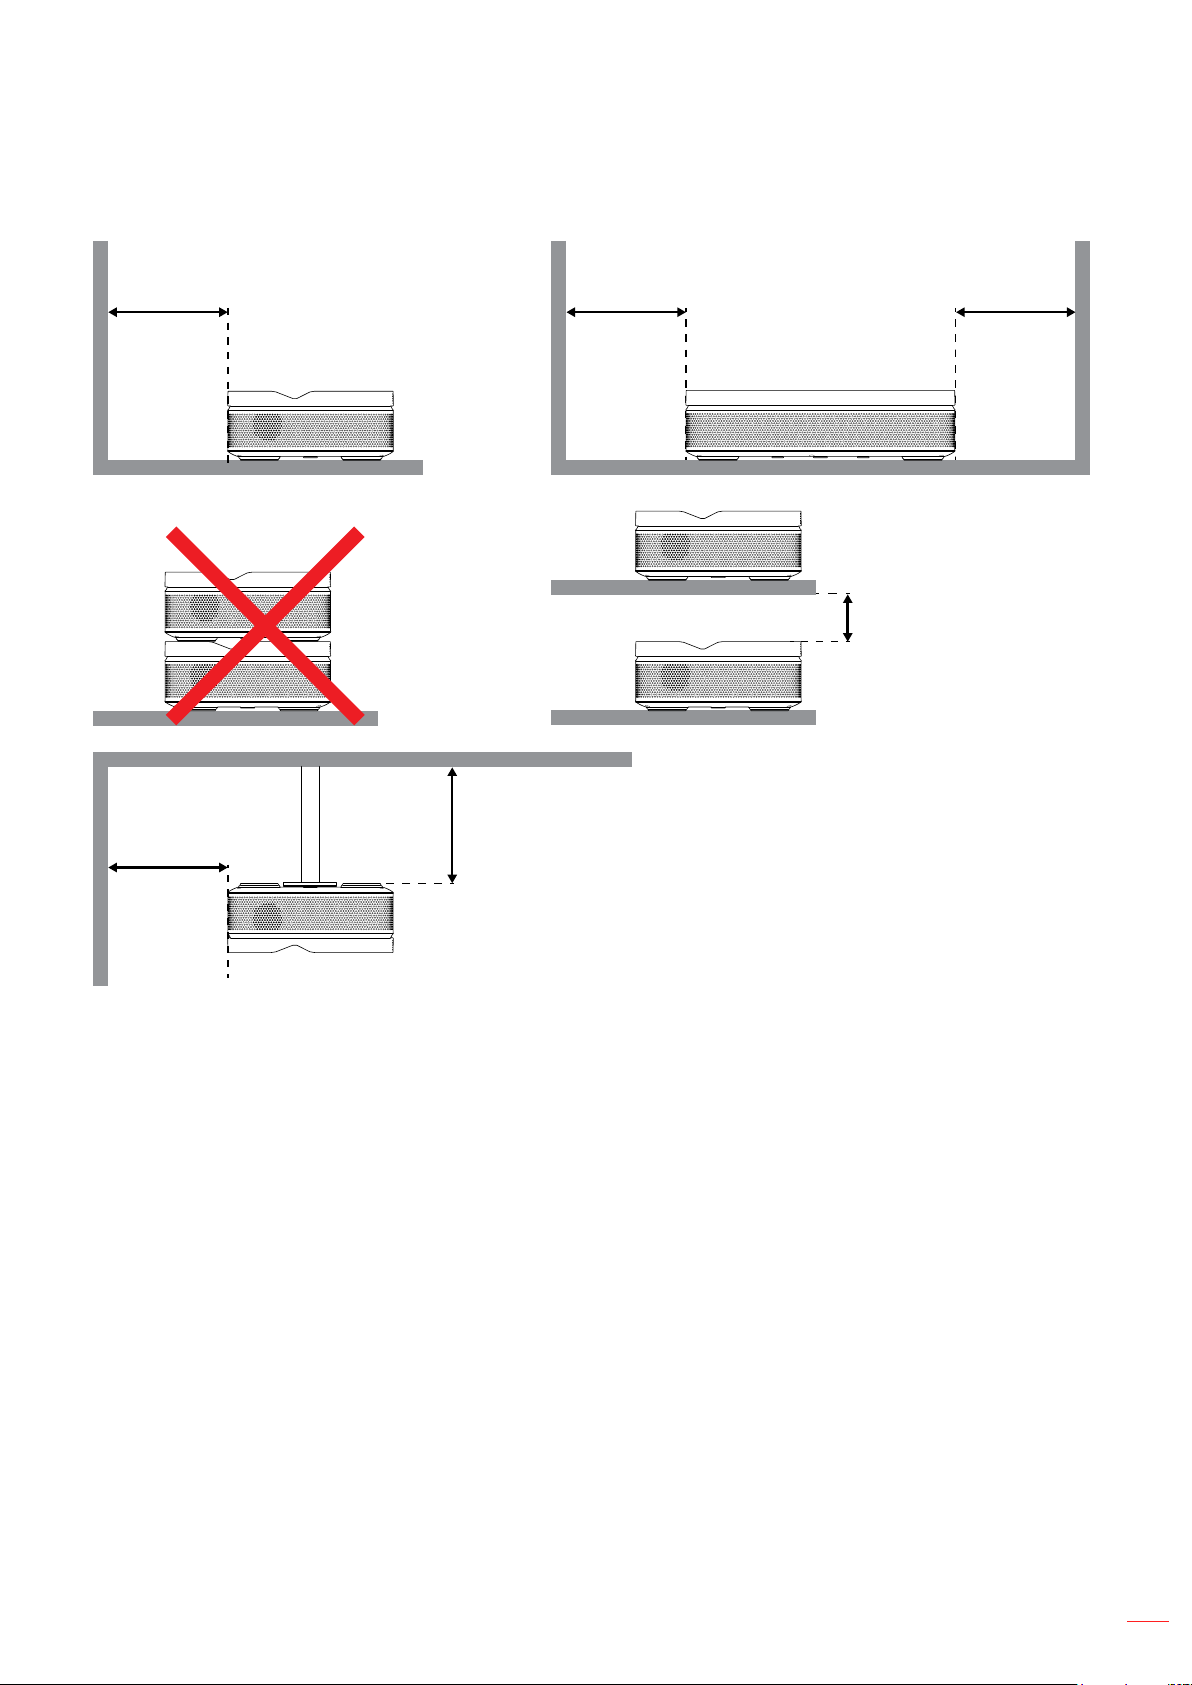
• Allow at least 15 cm clearance around the exhaust vent.
Minimum 150mm
(5.91 inches)
Minimum 150mm
(5.91 inches)
Minimum 150mm
(5.91 inches)
Minimum 150mm
(5.91 inches)
Minimum 150mm
(5.91 inches)
Minimum 150mm
(5.91 inches)
• Ensure that the intake vents do not recycle hot air from the exhaust vent.
• When operating the projector in an enclosed space, ensure that the surrounding air temperature within
the enclosure does not exceed operation temperature while the projector is running, and the air intake
and exhaust vents are unobstructed.
• $OOHQFORVXUHVVKRXOGSDVVDFHUWL¿HGWKHUPDOHYDOXDWLRQWRHQVXUHWKDWWKHSURMHFWRUGRHVQRWUHF\FOH
exhaust air, as this may cause the device to shutdown even if the enclosure temperature is with the
acceptable operation temperature range.
English
17
Page 18
SETUP AND INSTALLATION
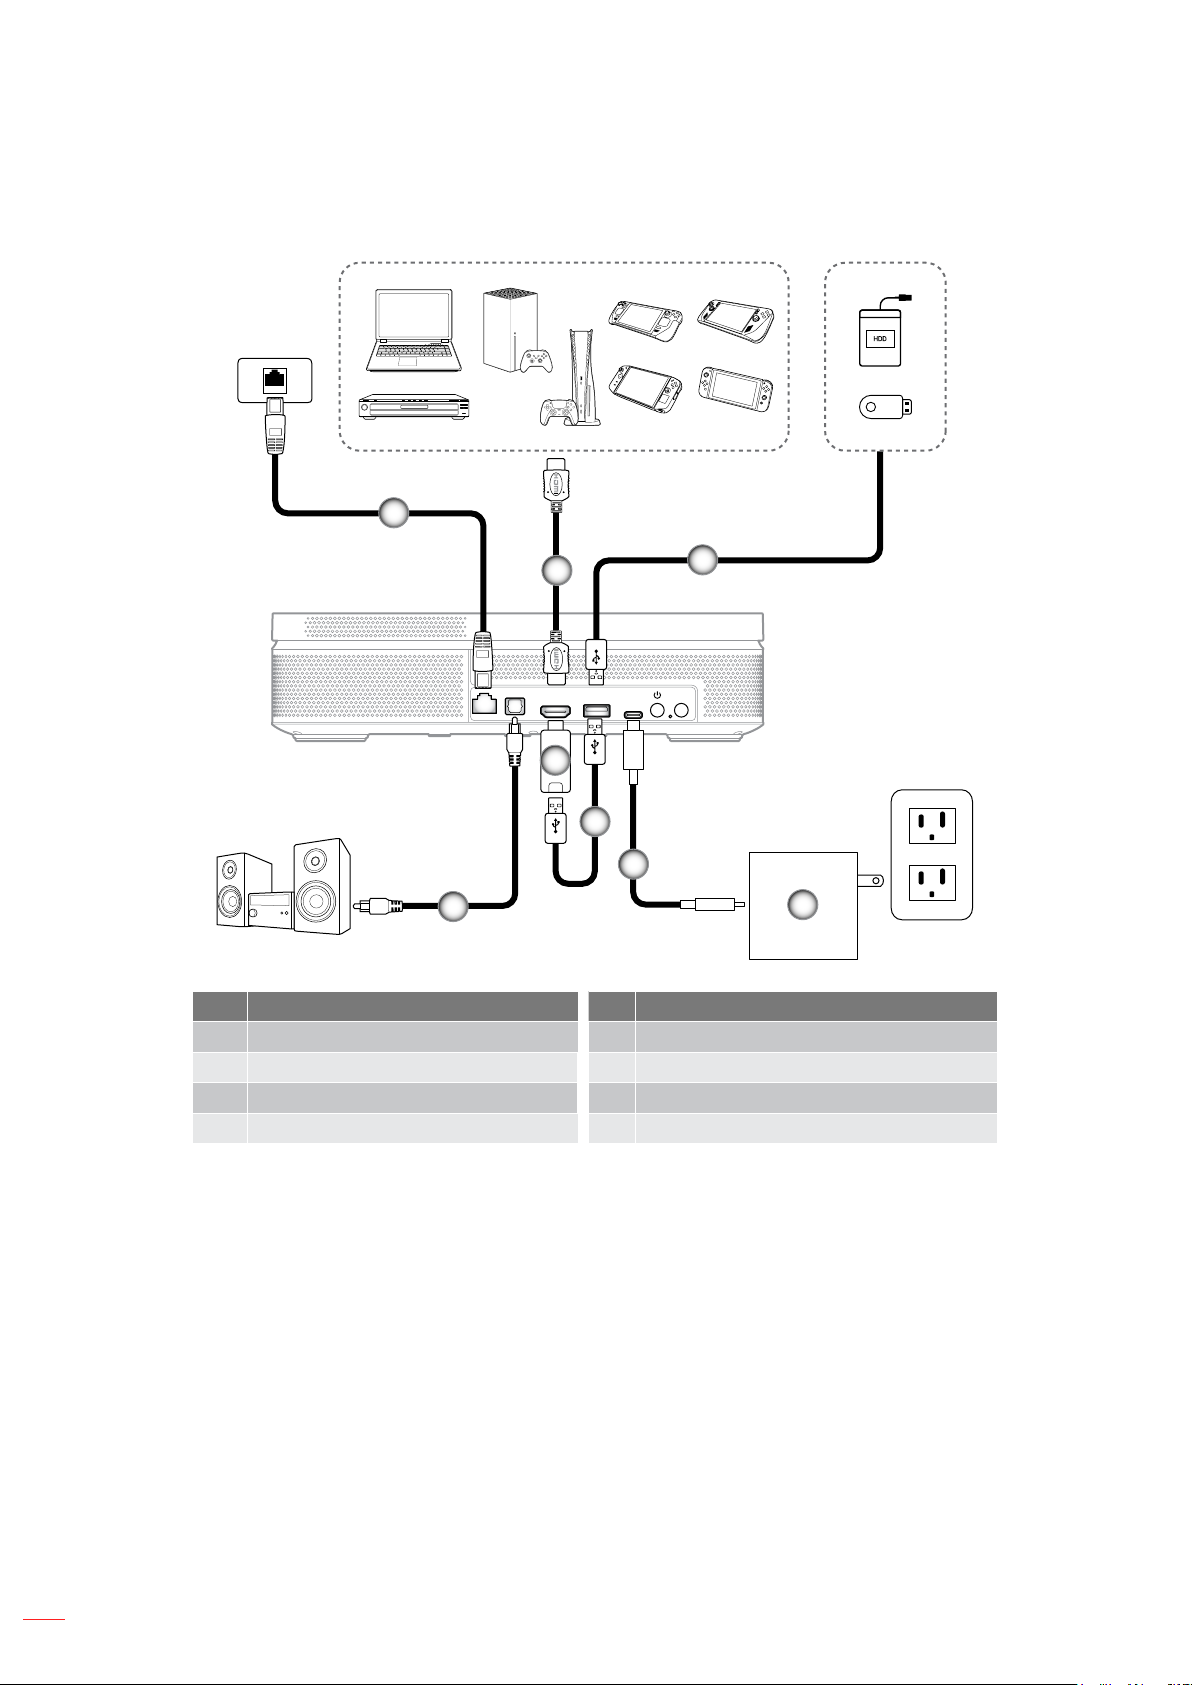
Connecting Sources to the Projector
1
2
USBHDMISPDIF
(POWER)
6
5
8
3
IRUSB-C
4
No Item No Item
1. RJ-45 Cable 5. USB Type-C Cable
2. HDMI Cable 6. USB Power Cable
3. USB Cable HDMI Dongle
4. Power Adapter 8. 63',)2XW&DEOH
Note: To ensure the best image quality and avoid connection errors, we recommend the use of “Ultra High Speed
+'0,&DEOH´ZLWK+'0,FHUWL¿FDWLRQXSWRPHWHUV
English
18
Page 19
SETUP AND INSTALLATION
AAA
AAA
AAA
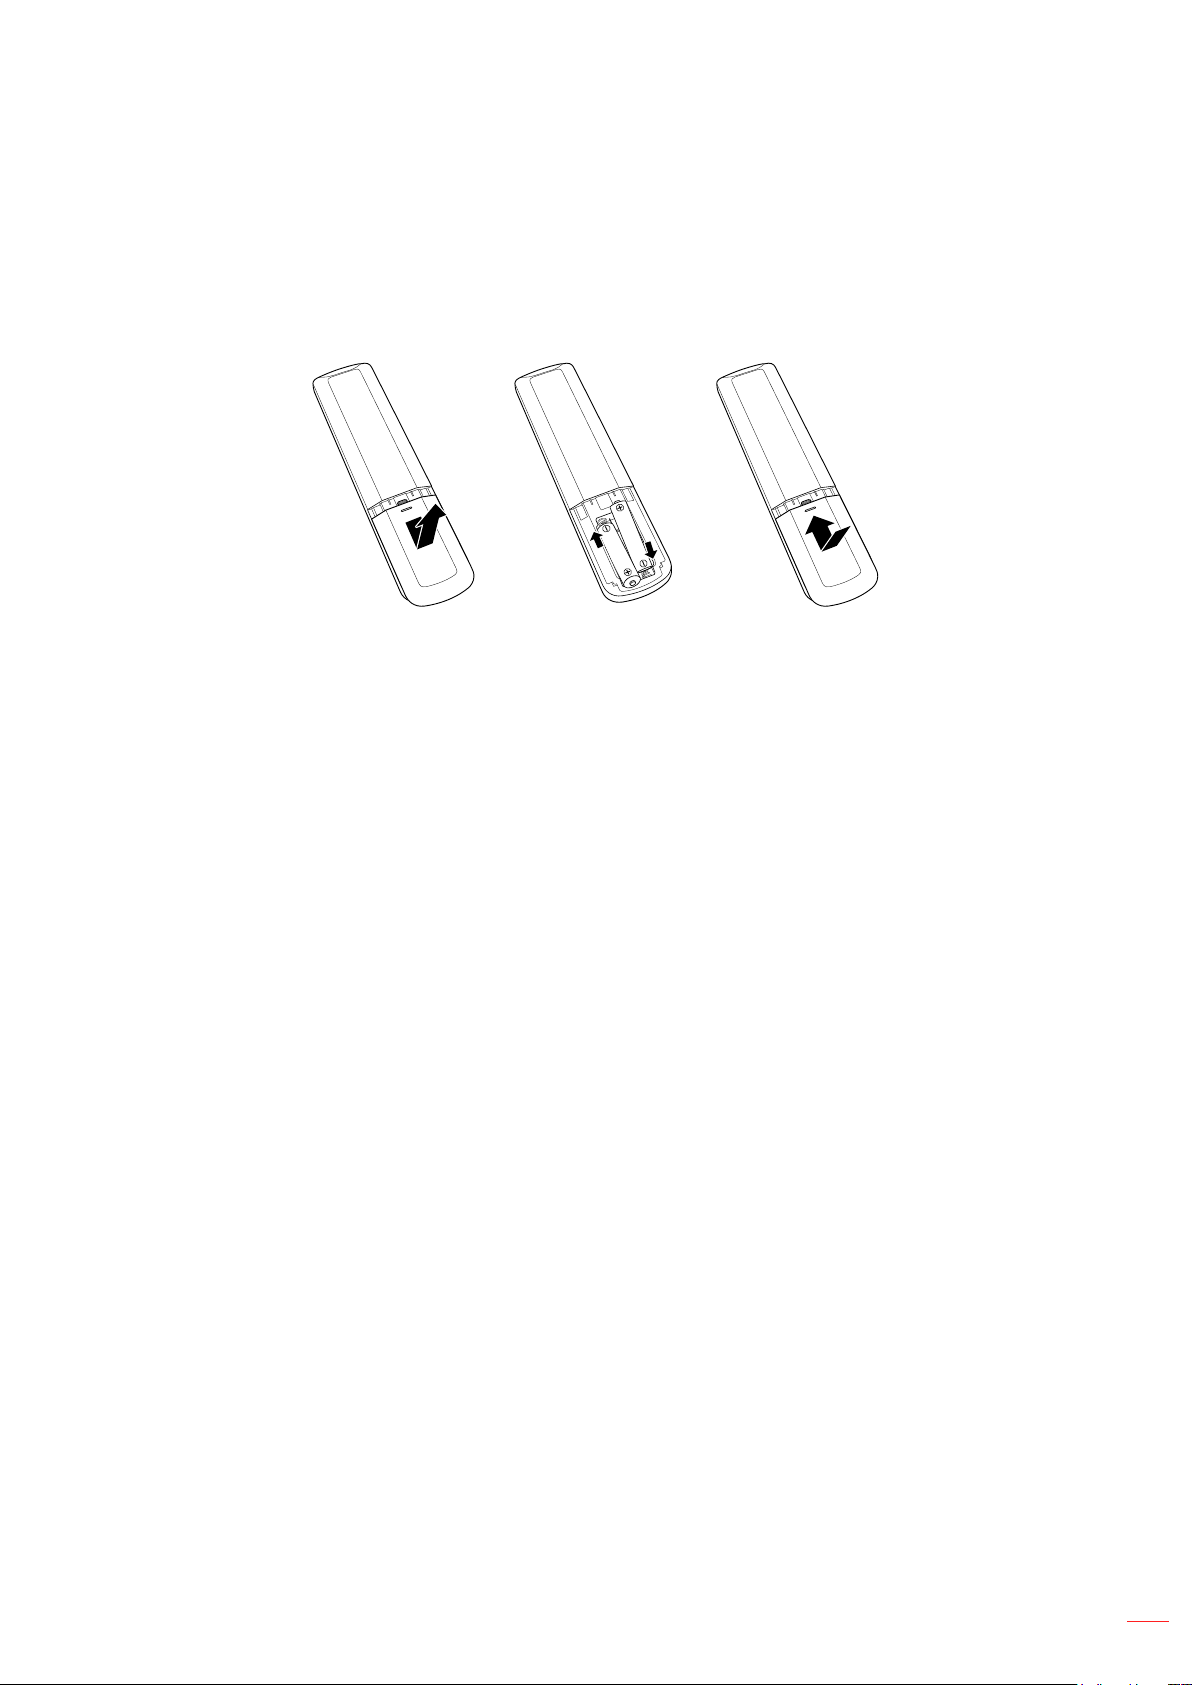
Installing / replacing the batteries
Two AAA size batteries are supplied for the remote control.
1. Remove the battery cover on the back of the remote control.
2. Insert AAA batteries in the battery compartment as illustrated.
3. Replace back cover on remote control.
AAA, 1.5V
AAA, 1.5V
AAA, 1.5V
AAA
AAA, 1.5V
Note: Replace only with the same or equivalent type batteries.
CAUTION: To ensure safe operation, please observe the following precautions:
• Replacement of a battery with an incorrect type that can defeat a safeguard (AAA size battery type).
• 'LVSRVDORIDEDWWHU\LQWRD¿UHKRWRYHQPHFKDQLFDOO\FUXVKLQJRUFXWWLQJRIDEDWWHU\PD\UHVXOWLQ
an explosion.
• Leaving a battery in an extremely high temperature surrounding environment that can result in an
H[SORVLRQRUWKHOHDNDJHRIÀDPPDEOHOLTXLGRUJDV
• A battery subjected to extremely low air pressure that may result in an explosion or the leakage of
ÀDPPDEOHOLTXLGRUJDV
• Do not mix old and new batteries. Mixing old and new batteries can shorten the life of new batteries or
cause a chemical leak in the old batteries.
• Remove batteries as soon as they are depleted. Chemicals that leak from a battery which comes into
FRQWDFWZLWK\RXUVNLQFDQFDXVHDUDVK,I\RX¿QGDQ\FKHPLFDOOHDNDJHZLSHWKRURXJKO\ZLWKDFORWK
• The batteries supplied with this product may have a shorter life expectancy due to storage conditions.
AAA, 1.5V
AAA, 1.5V
• If you are not using the remote control for an extended period of time, please remove the batteries to
reduce risk of chemical leak.
English
19
Page 20
SETUP AND INSTALLATION
(ႇHFWLYHUDQJH
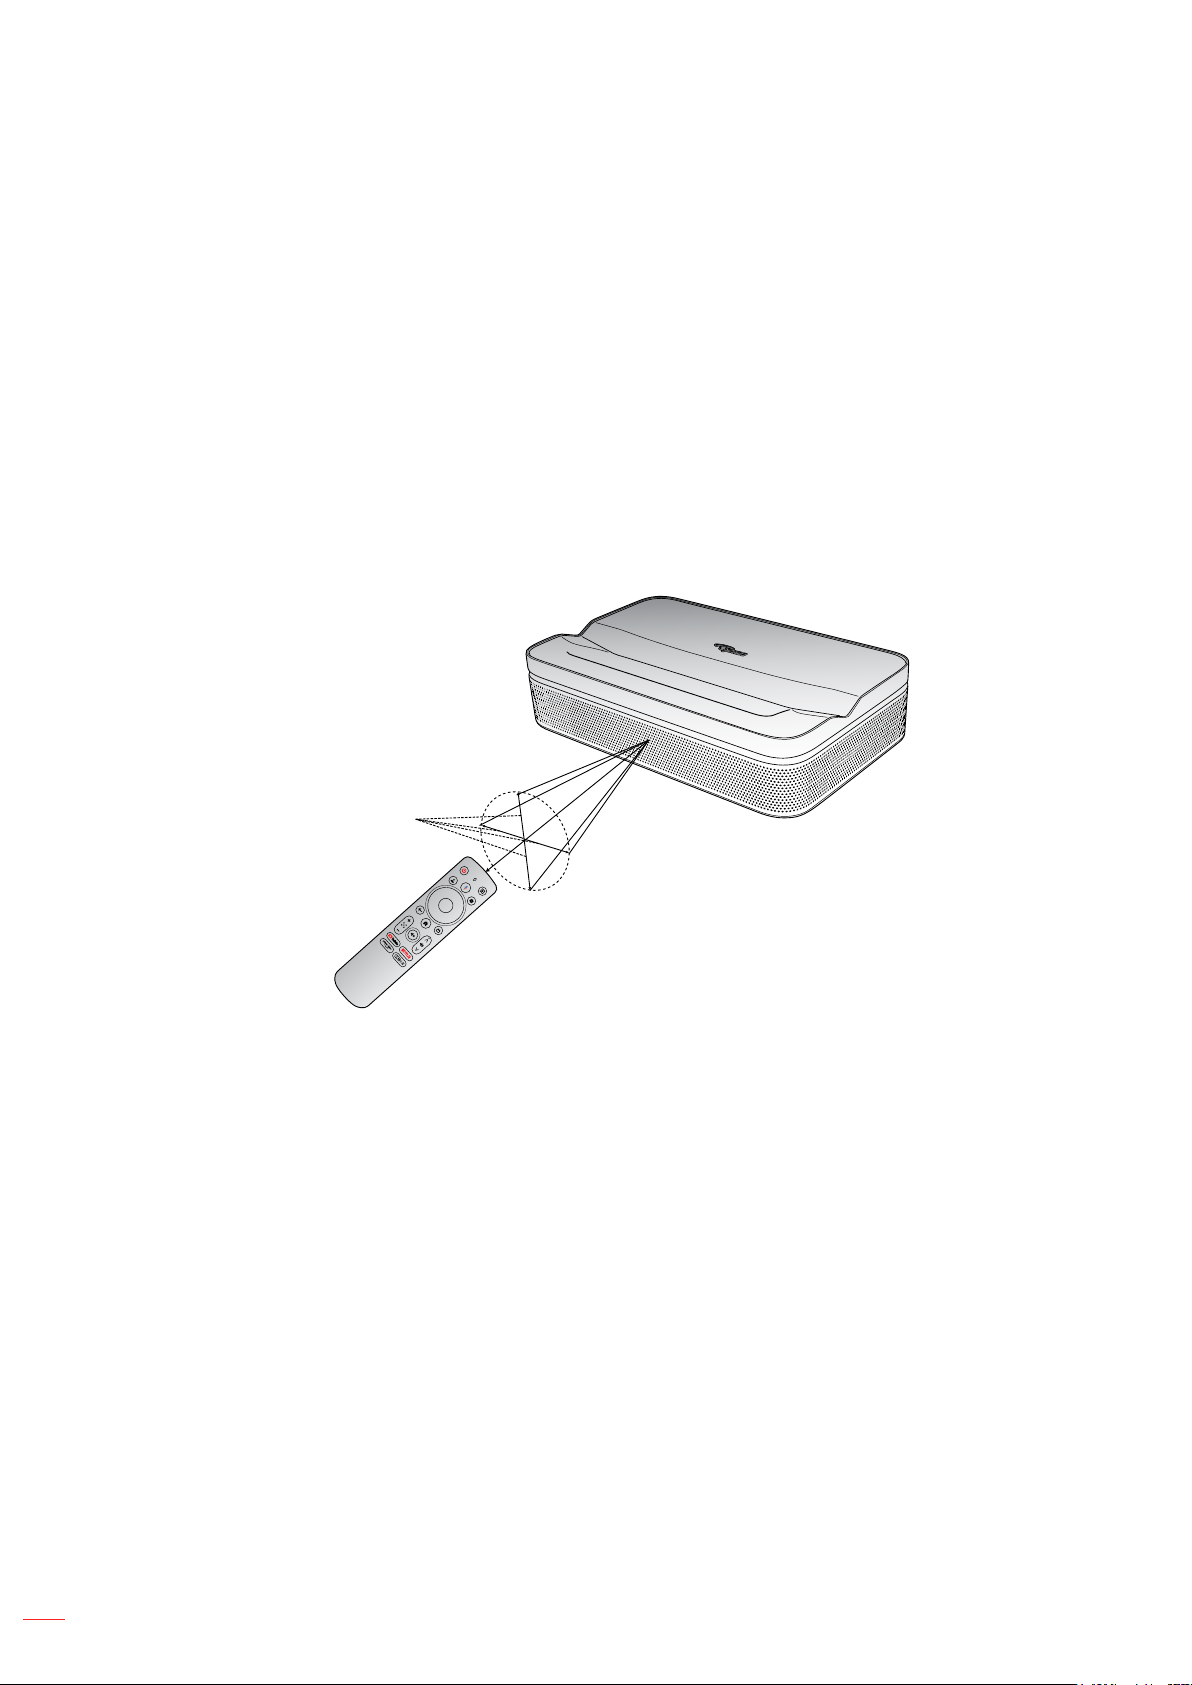
Infra-Red (IR) remote control sensor is located on the front and rear sides of the projector. Ensure that the remote
control is held at an angle 15 degrees perpendicular to the projector’s IR remote control sensor to ensure correct
functionality. The distance between the remote control and the sensor should not be longer than PHWHUVIHHW
• Make sure that there are no obstacles between the remote control and the IR sensor on the projector
that might obstruct the infra-red beam.
• Make sure the IR transmitter of the remote control is not being directly shined on by sunlight or
ÀXRUHVFHQWODPSV
• 3OHDVHNHHSWKHUHPRWHFRQWUROOHUDWOHDVWPDZD\IURPÀXRUHVFHQWODPSVRULWPD\PDOIXQFWLRQ
• ,IWKHUHPRWHFRQWUROLVFORVHWR,QYHUWHU7\SHÀXRUHVFHQWODPSVLWPLJKWEHFRPHLQHႇHFWLYHIURPWLPH
to time.
• If the remote control and the projector are within a very short distance of one another, the remote
FRQWUROPLJKWEHFRPHLQHႇHFWLYH
Approx. ± 15°
20
English
Page 21
USING THE PROJECTOR
Placement
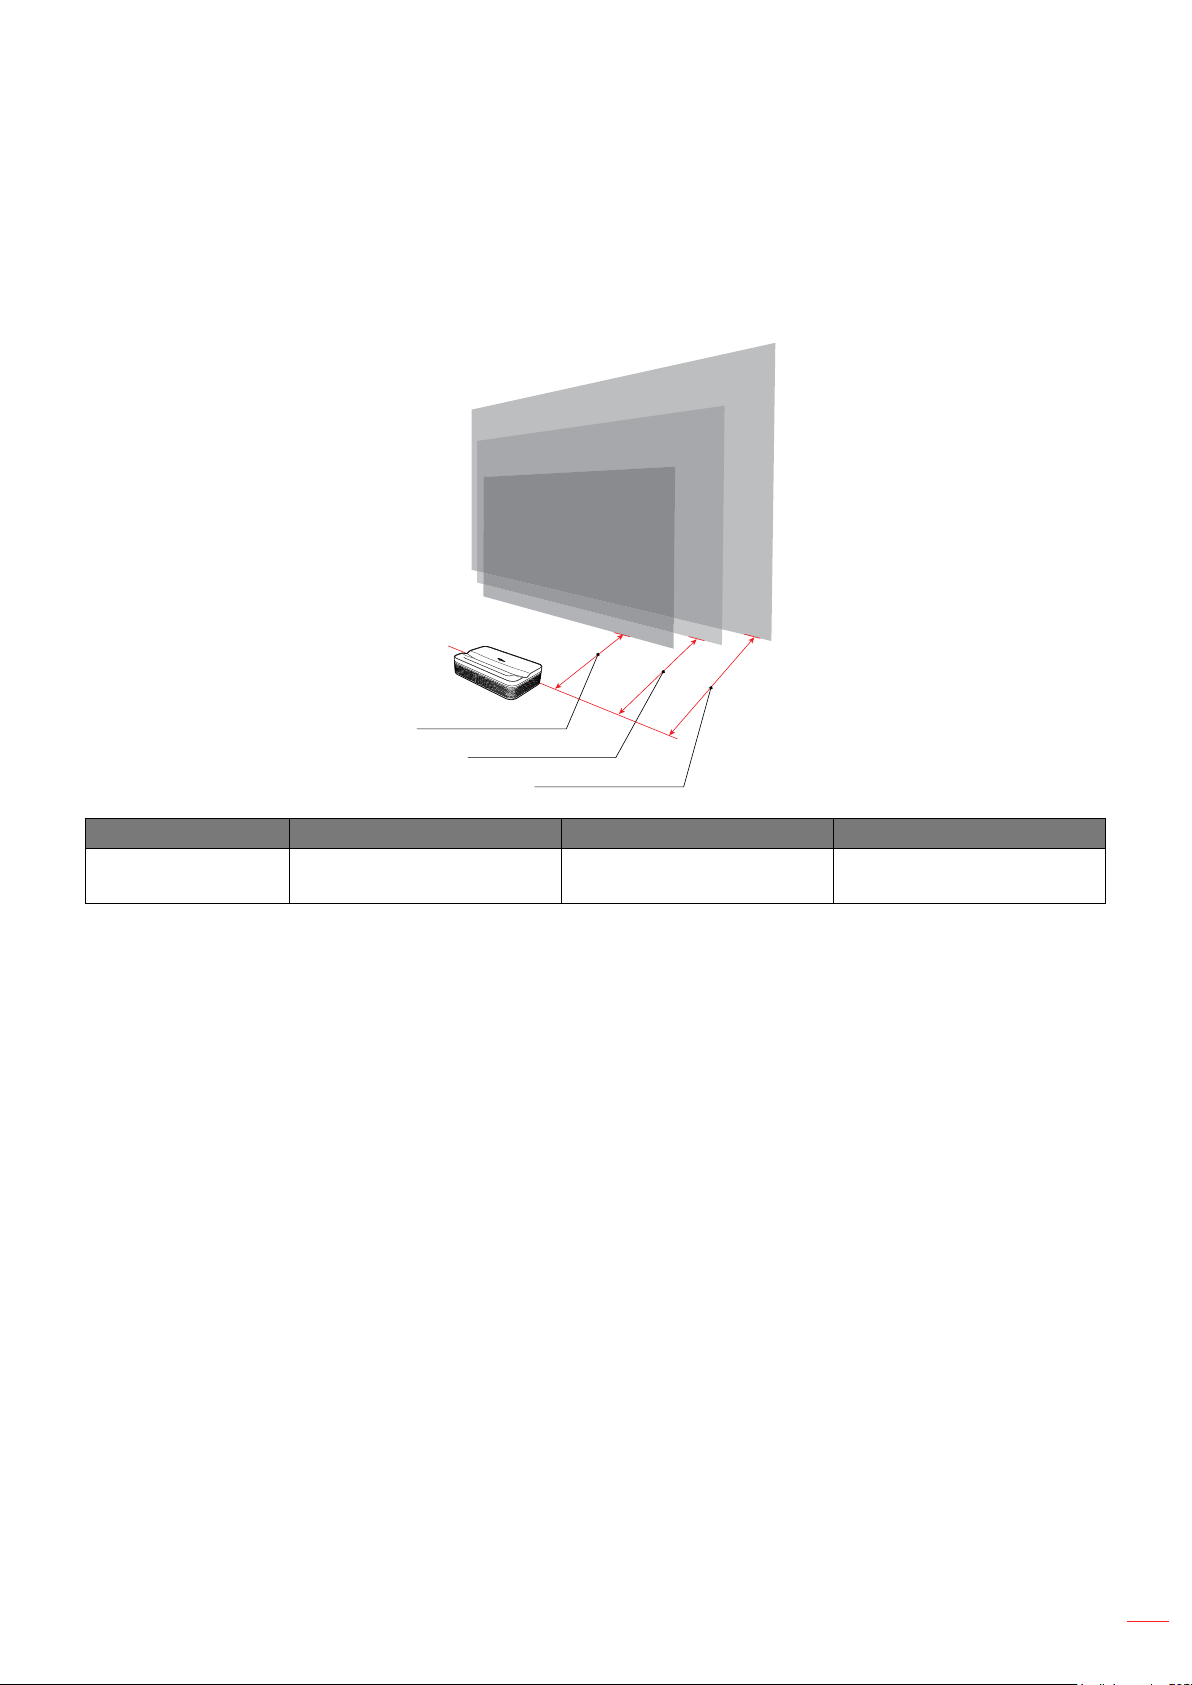
3ODFHWKHSURMHFWRURQDVWDEOHÀDWVXUIDFHLQIURQWRIWKHSURMHFWLRQVXUIDFH,WLVUHFRPPHQGHGWRXVHDÀDWDQG
white projection surface. Refer to the table below to determine the distance between the projector and the projection
surface, and the corresponding projection size:
100”
80”
60”
10.2cm (4.03 inch)
17.5cm (6.89 inch)
24.7cm (9.73 inch)
Size 60 inches 80 inches 100 inches
Screen
(Length x Width)
Note: The best recommended projection size is 80 inches.
[FP
(4.36 x 2.46 ft)
[FP
(5.8 x 3.28 ft)
21 x 124 cm
[IW
English
21
Page 22
USING THE PROJECTOR
Charge Your Projector
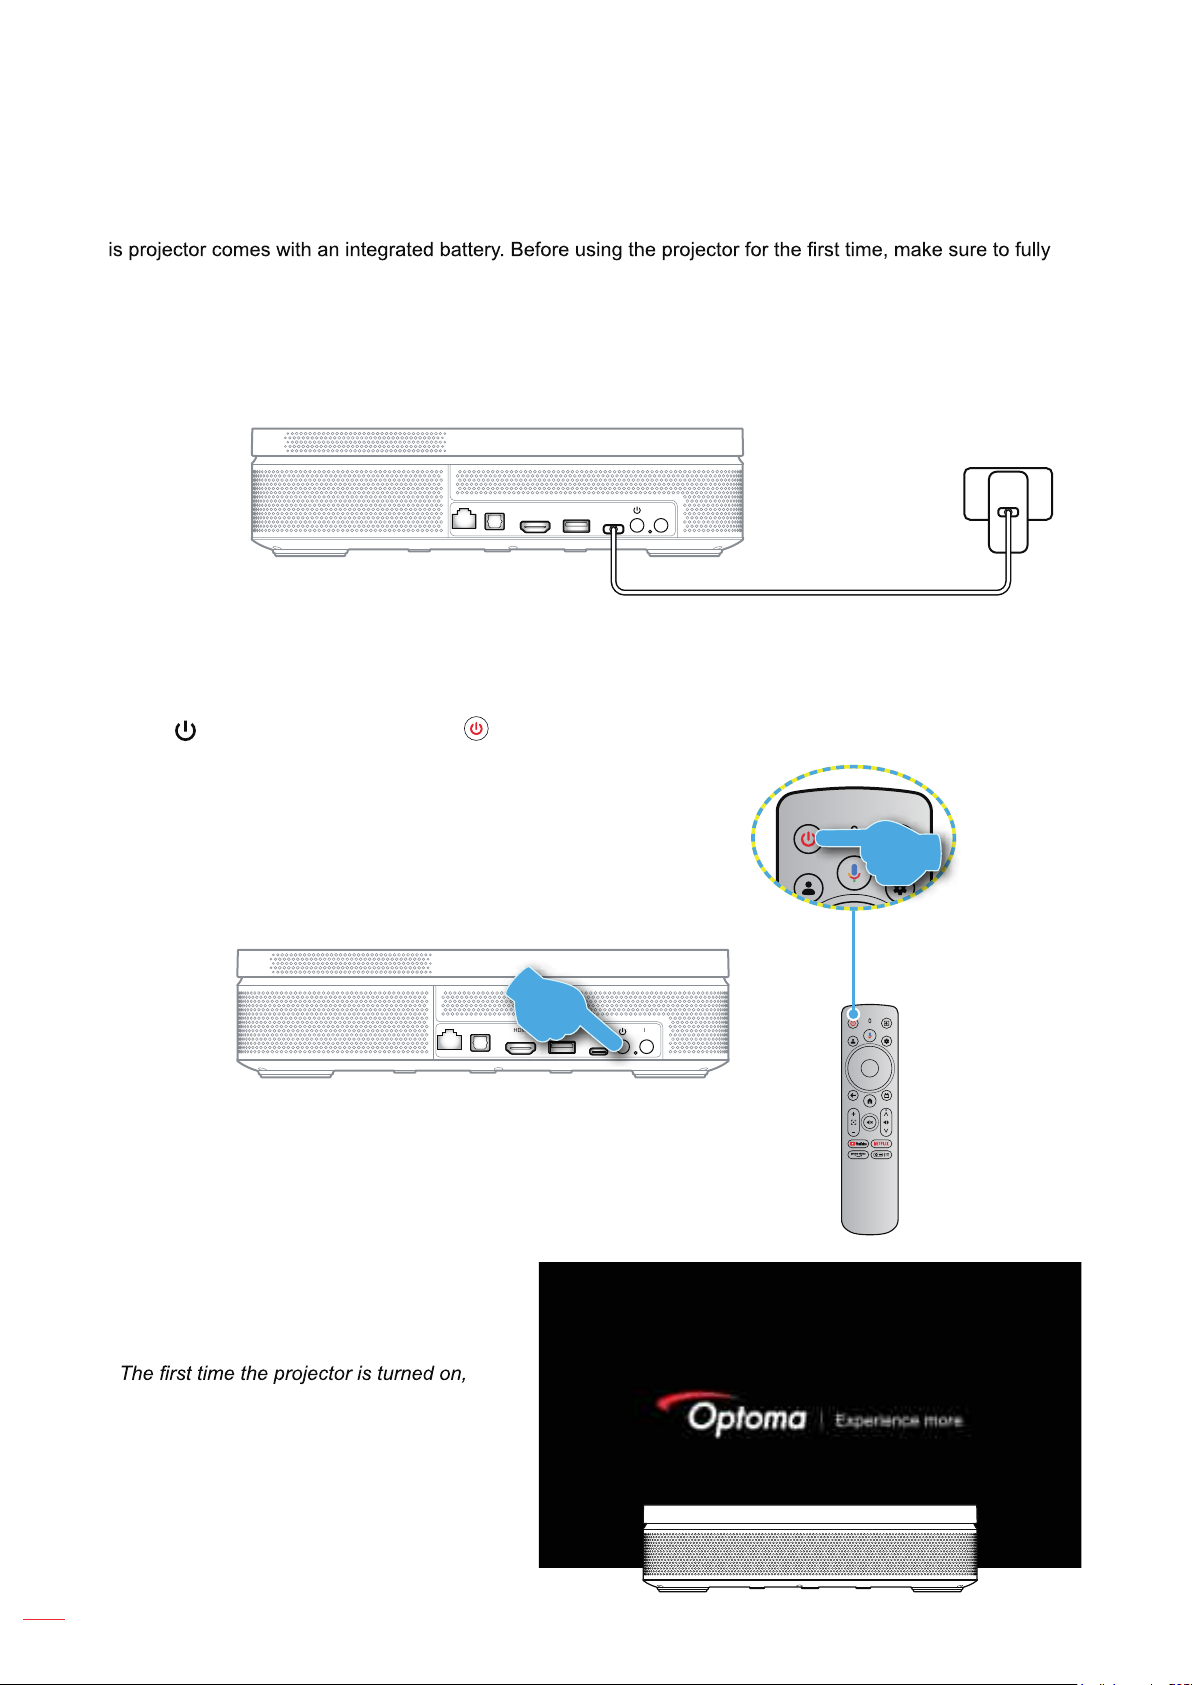
Th
charge the battery to 100%.
1. Connect one end of the USB Type-C cable to the power adapter. Then connect the other end of the
cable to the USB Type-C connector of the projector.
2. Plug the power adapter to the power outlet. The Power LED will light up (red), indicating the battery is
being charged.
(POWER)
IRUSB-C
USBHDMISPDIF
When the Power LED turns green, this indicates the battery is fully charged.
Power On
Press the button on the projector or the button on the remote control to turn on the projector.
or
(POWER)
IRUSB-C
USBHDMISPDIF
A start up screen will display in approximately
10 seconds.
Note:
•
you will be prompted to select the preferred
language, pair the remote control via
Bluetooth, and other settings.
• Although your remote has some
functionality via IR, Bluetooth pairing is
required for full functionality.
English
22
Page 23
USING THE PROJECTOR
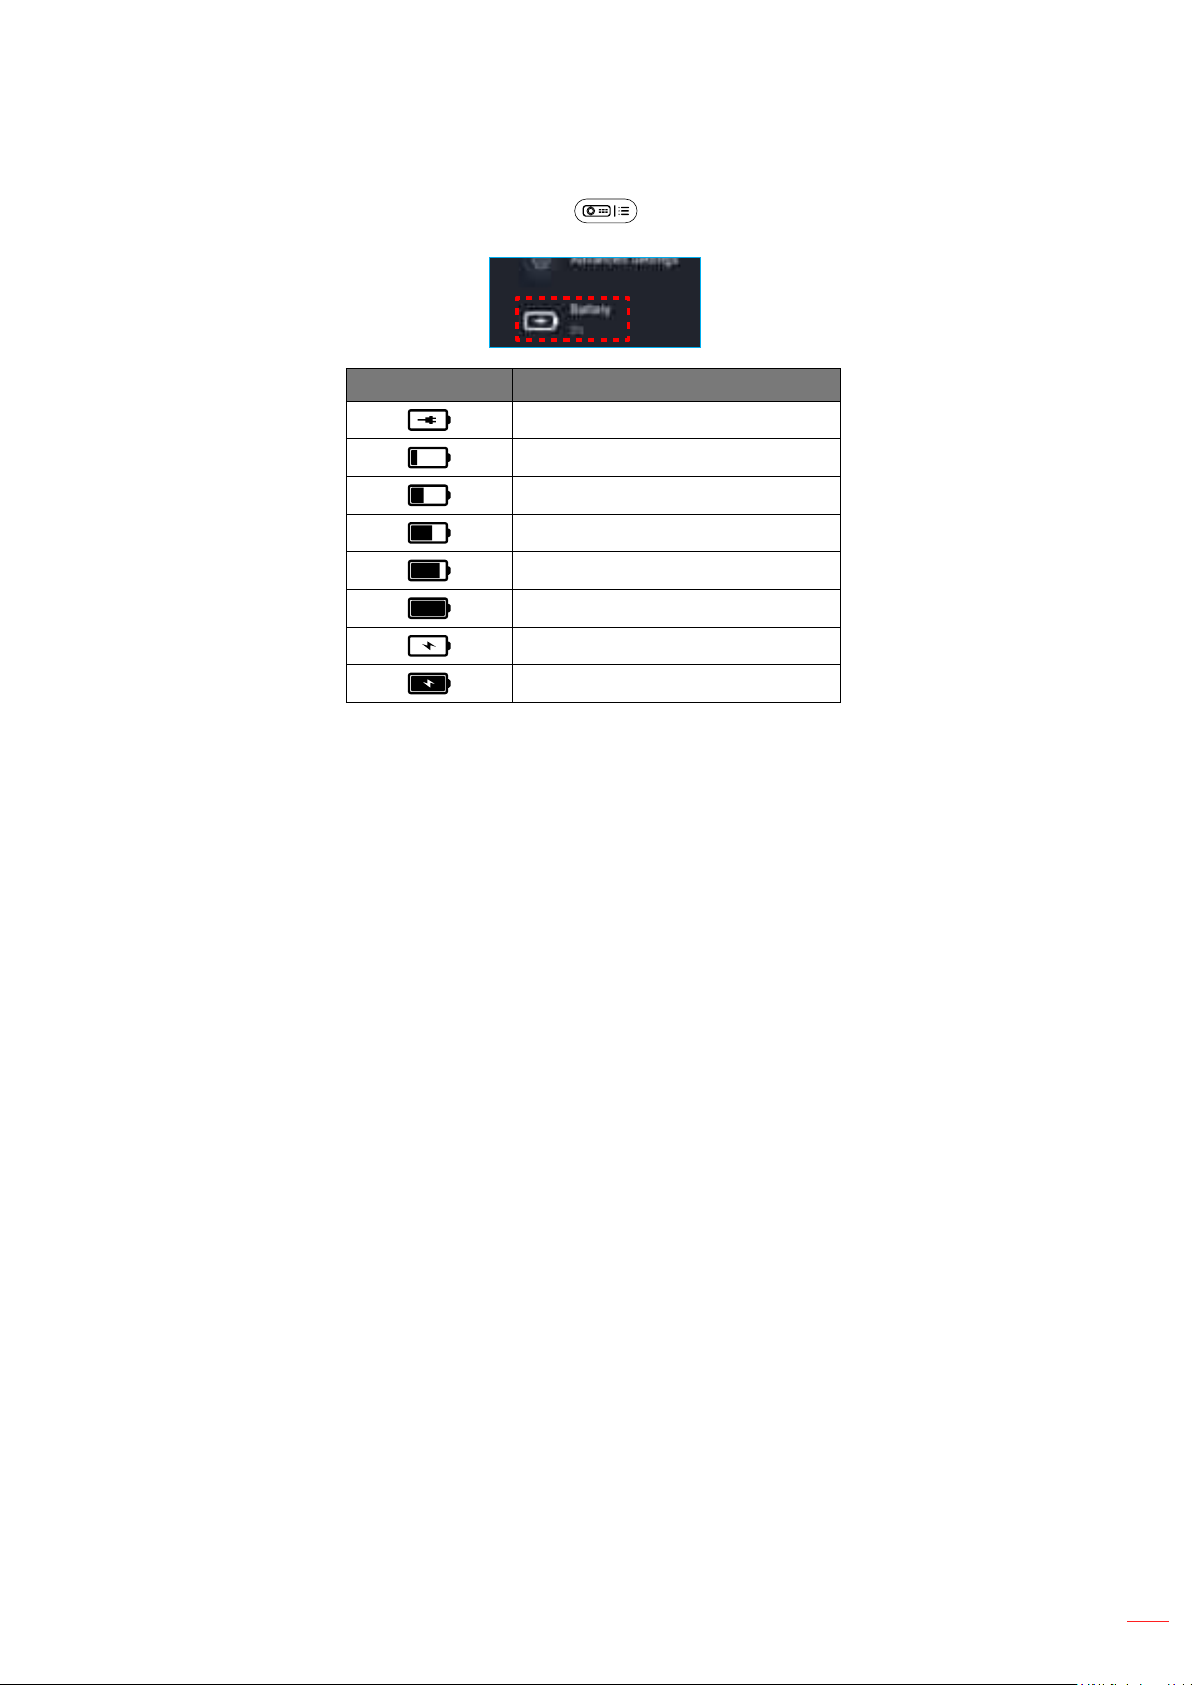
• To view the current battery status, simply press the on the remote control and check on the [Battery]
option.
Battery Icon Battery Status
Battery Level (0%-19%)
Battery Level (20-39%)
Battery Level (40-59%)
%DWWHU\/HYHO
Battery Level (80-99%)
Battery Level (100%)
Charging (0%-100%)
Fully Charged (100%)
English
23
Page 24
USING THE PROJECTOR
6WDQGE\0RGH3RZHU2ႇ
• Press the button on the projector or the button on the remote control to enter Standby mode.
• Press and hold the
projector.
button on the projector or the EXWWRQRQWKHUHPRWHFRQWUROIRUVHFRQGVWRWXUQRႇWKH
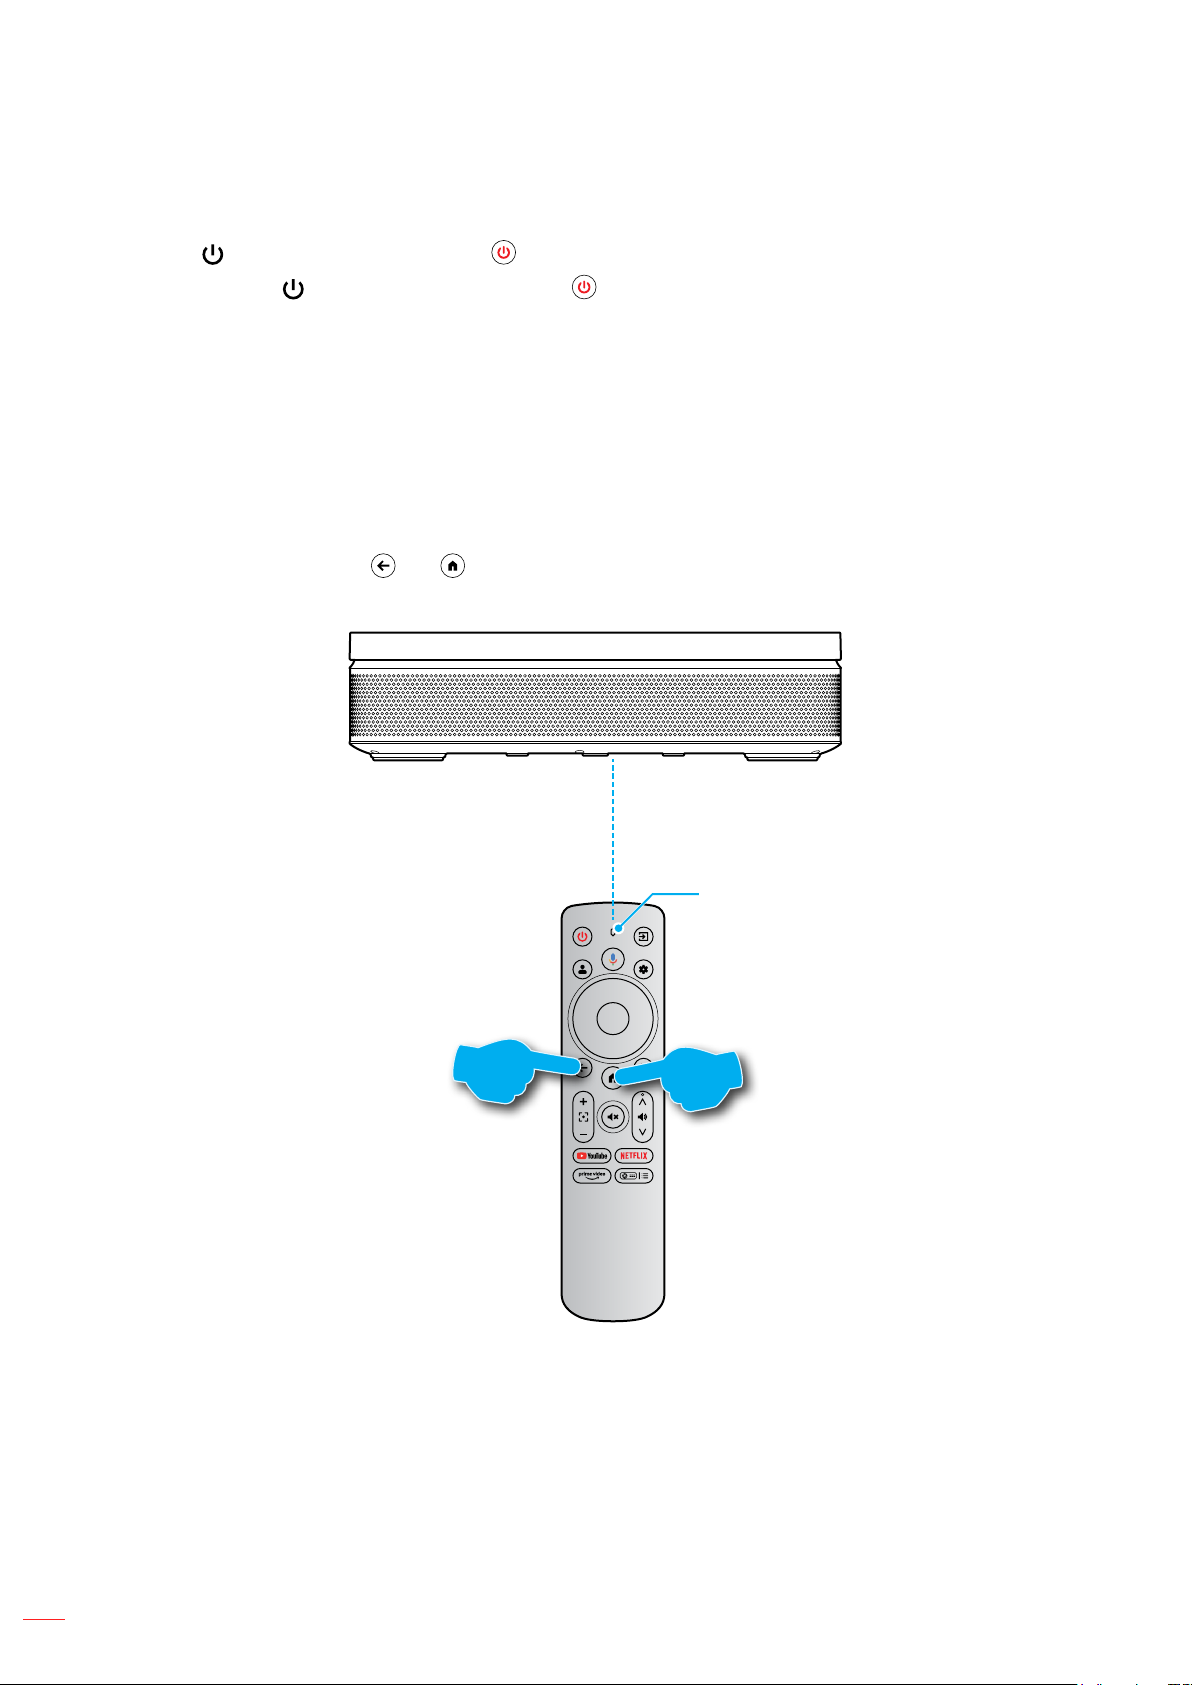
Remote Control Bluetooth Pairing
:KHQXVLQJWKHSURMHFWRUIRUWKH¿UVWWLPHIROORZWKHRQVFUHHQLQVWUXFWLRQVWRSDLUWKHUHPRWHFRQWUROYLD%OXHWRRWK
with your projector.
1. Wait for the Bluetooth pairing prompt on the screen. Then bring the remote control within 10 cm (0.33
ft) from the projector.
2. Press and hold the
VWDUWVÀDVKLQJ7KHQUHOHDVHERWKEXWWRQV
and buttons on the remote control simultaneously until the indicator light
10 cm
(0.33 ft)
Indicator light
3. When you see pairing successful message on screen, this indicates the remote control is successfully
paired.
Note:
• ,IWKHSDLULQJLVXQVXFFHVVIXOUHSHDWWKHDERYHVWHSVXQWLOWKHUHPRWHFRQWUROLQGLFDWRUOLJKWVWRSVÀDVKLQJ
• Voice search functionality on the remote control is only available after the remote control has been paired to the
projector by Bluetooth.
24
English
Page 25
USING THE PROJECTOR
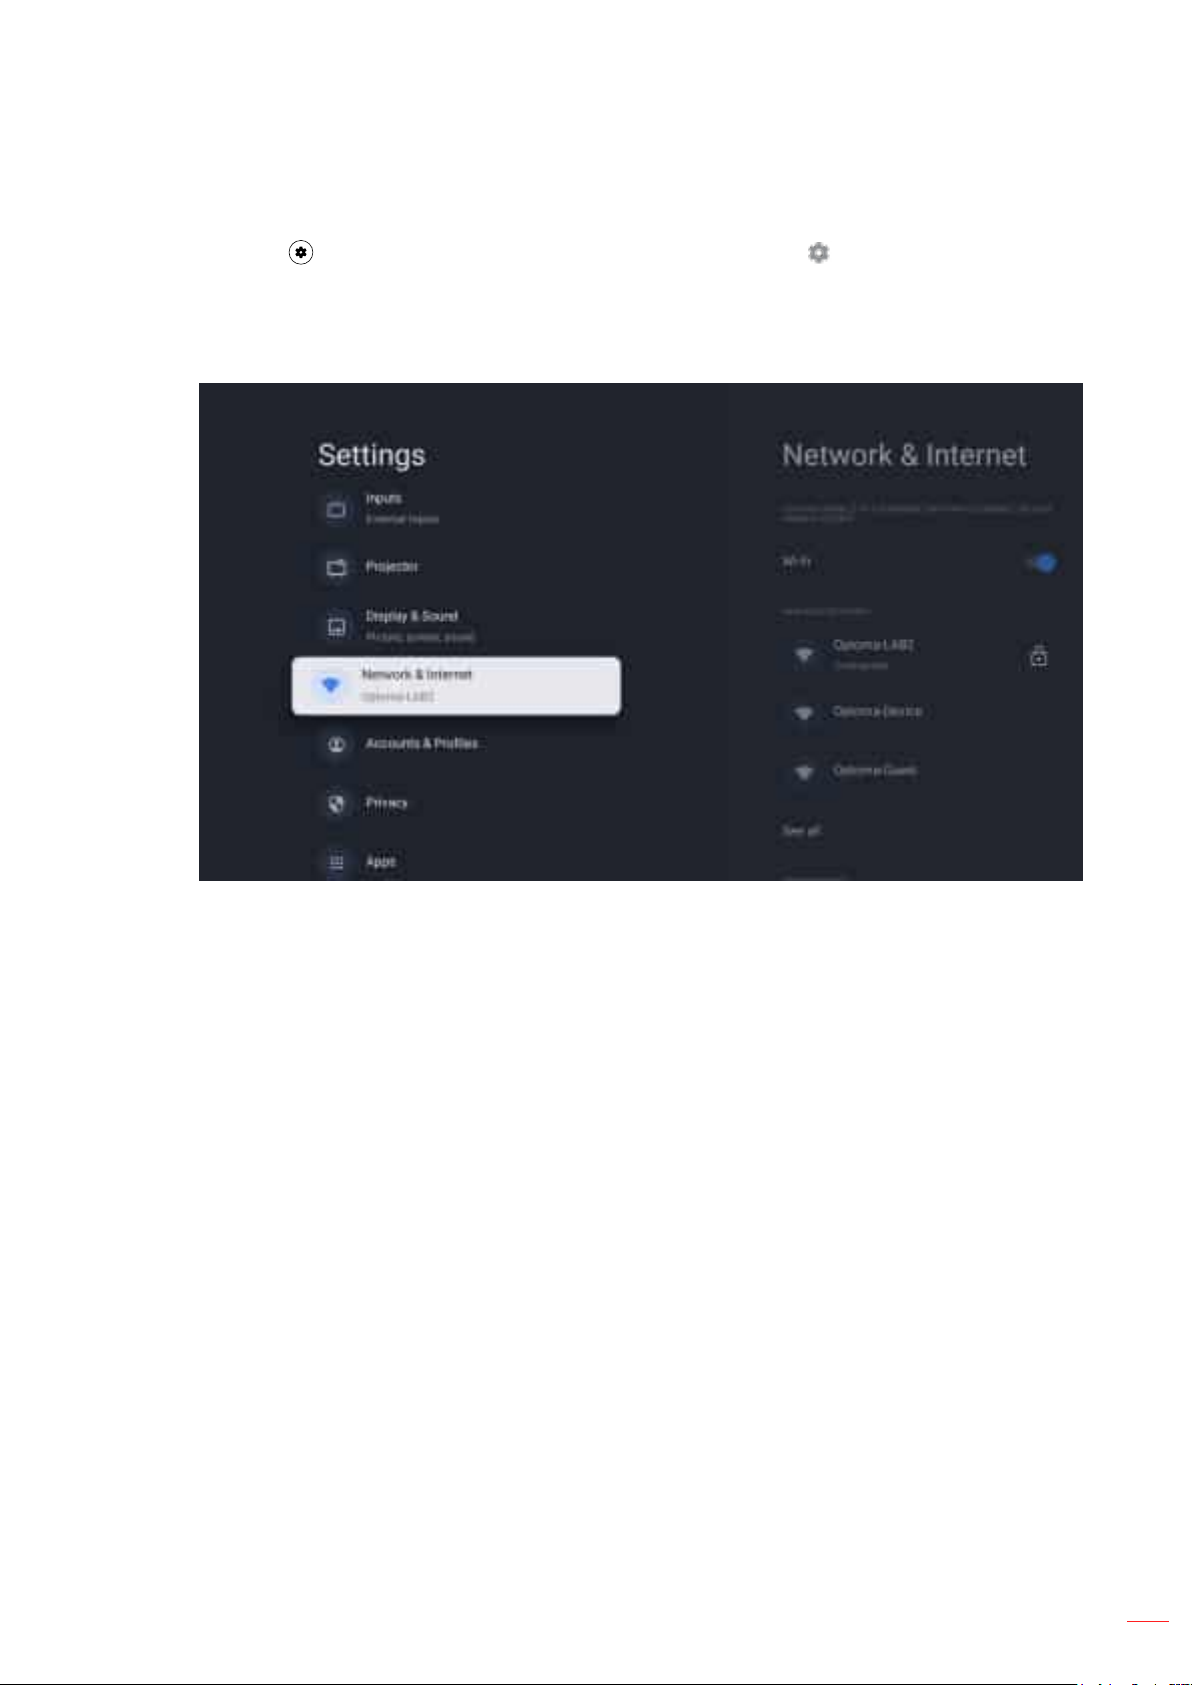
Network Settings
1. Press the button on the remote control. Then select [All settings ] > [Network & Internet].
2. Turn on the Wi-Fi function.
3. Choose your network to connect. Then enter the correct password.
Note: It is highly recommended to connect to 5GHz Wi-Fi network whenever possible.
English
25
Page 26
USING THE PROJECTOR
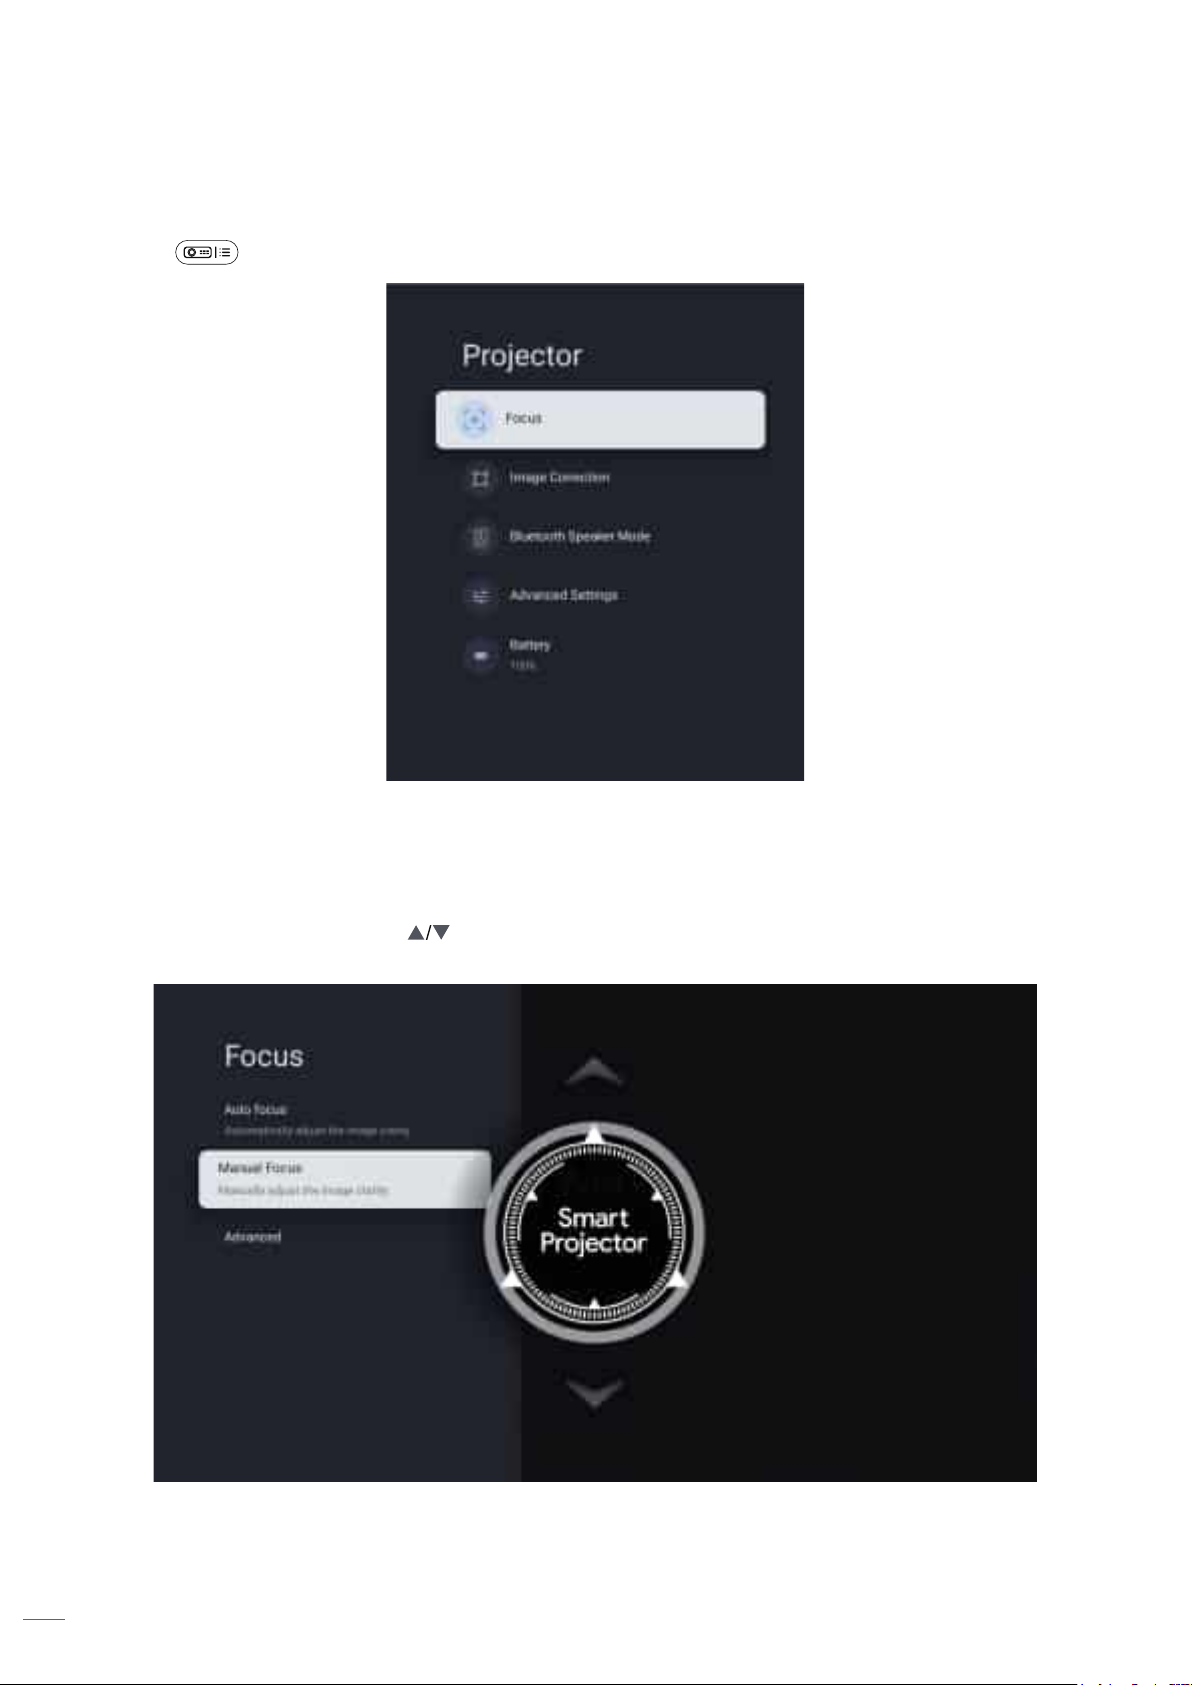
Focus Settings
Press the button on the remote control. Then select [Focus] and choose the focus adjustment type.
Auto focus
Select [Auto focus] to trigger the autofocus function. The projector will adjust focus automatically.
Manual focus
Select [Manual Focus] and use the button on the remote control to adjust the focus until the image is clear
and sharp.
26
English
Page 27
USING THE PROJECTOR
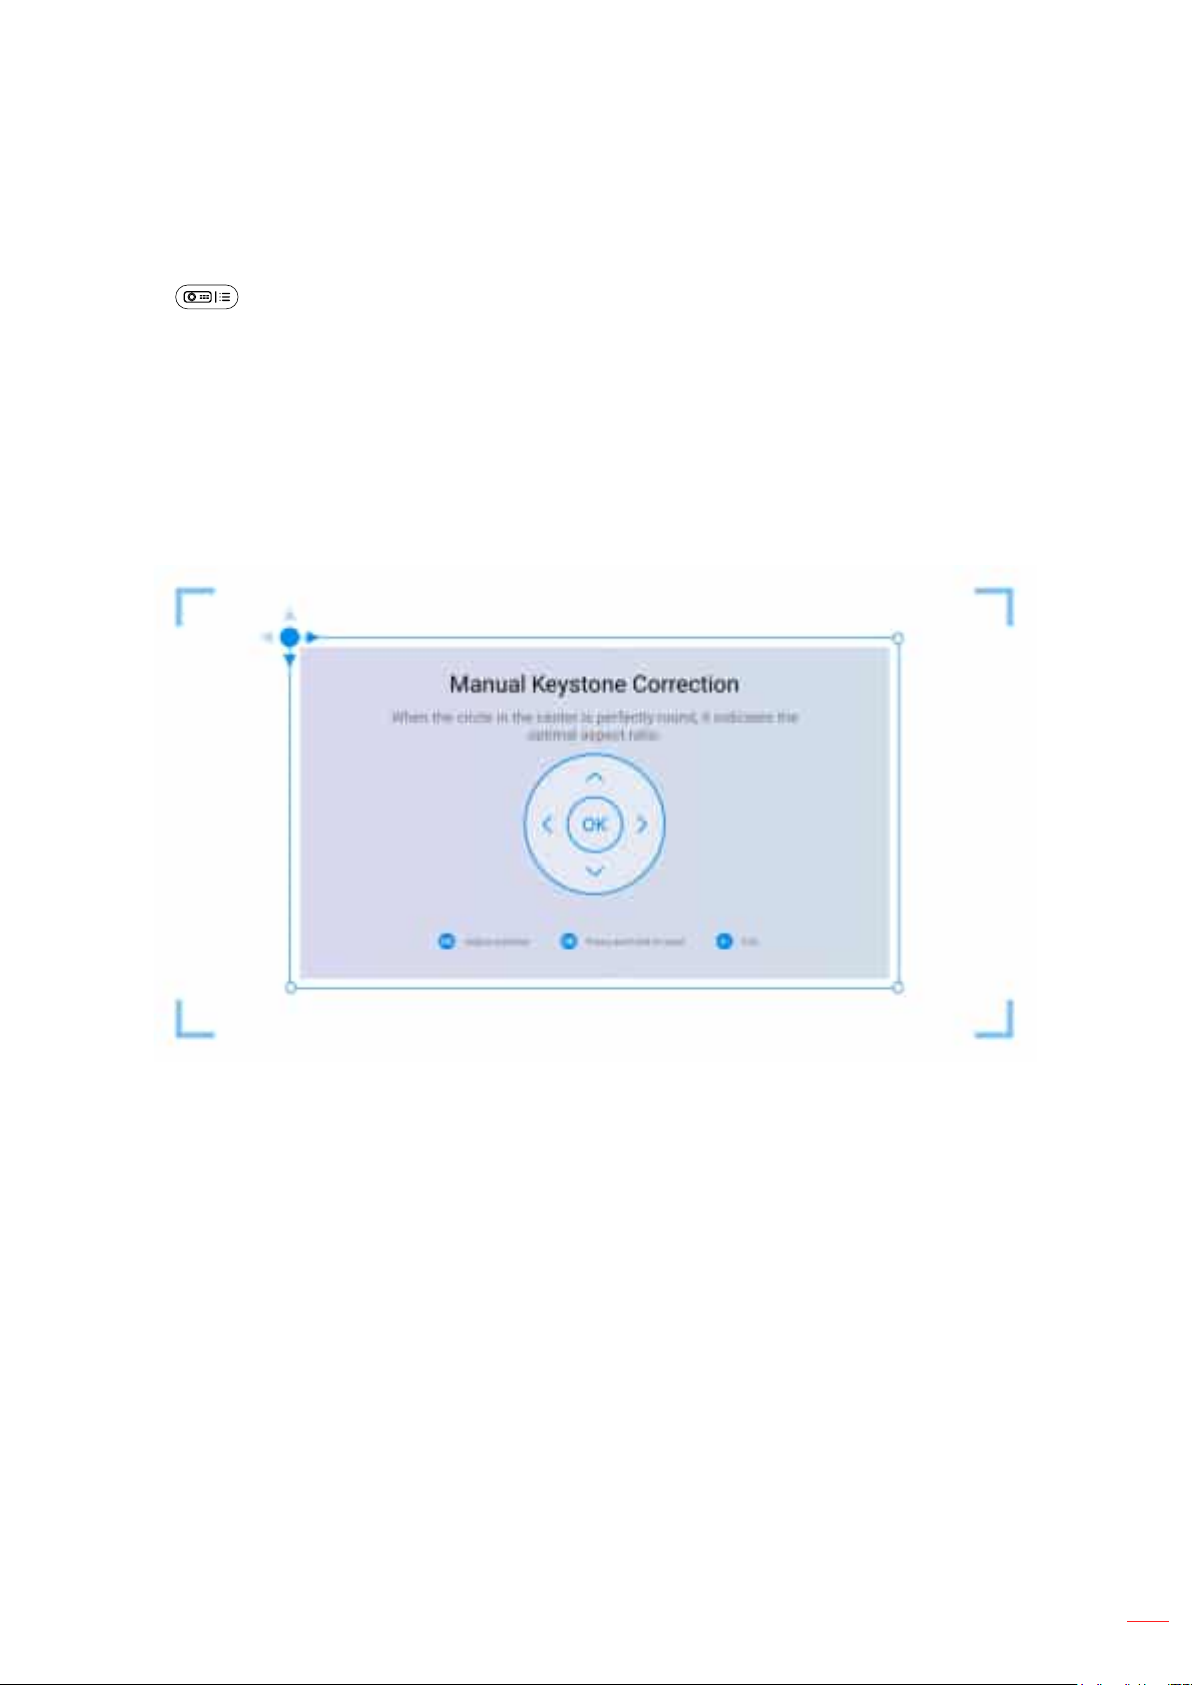
Image Correction Settings
Keystone Correction
Press the button on the remote control. Then select [Image Correction] and choose the keystone
correction type.
Auto Keystone Correction
Select [Auto Keystone Correction] to trigger the auto keystone function. The screen will automatically be
corrected.
Manual Keystone Correction
Select [Manual Keystone Correction] and use the STWX button to adjust the four points and the image
shape.
Auto Keystone Correction is an assist feature designed improve image alignment when projecting on
various projection surfaces. Optimal performance when using this feature depends on a few factors such as
projection angle, projector placement, and projection surface conditions.
English
27
Page 28
USING THE PROJECTOR
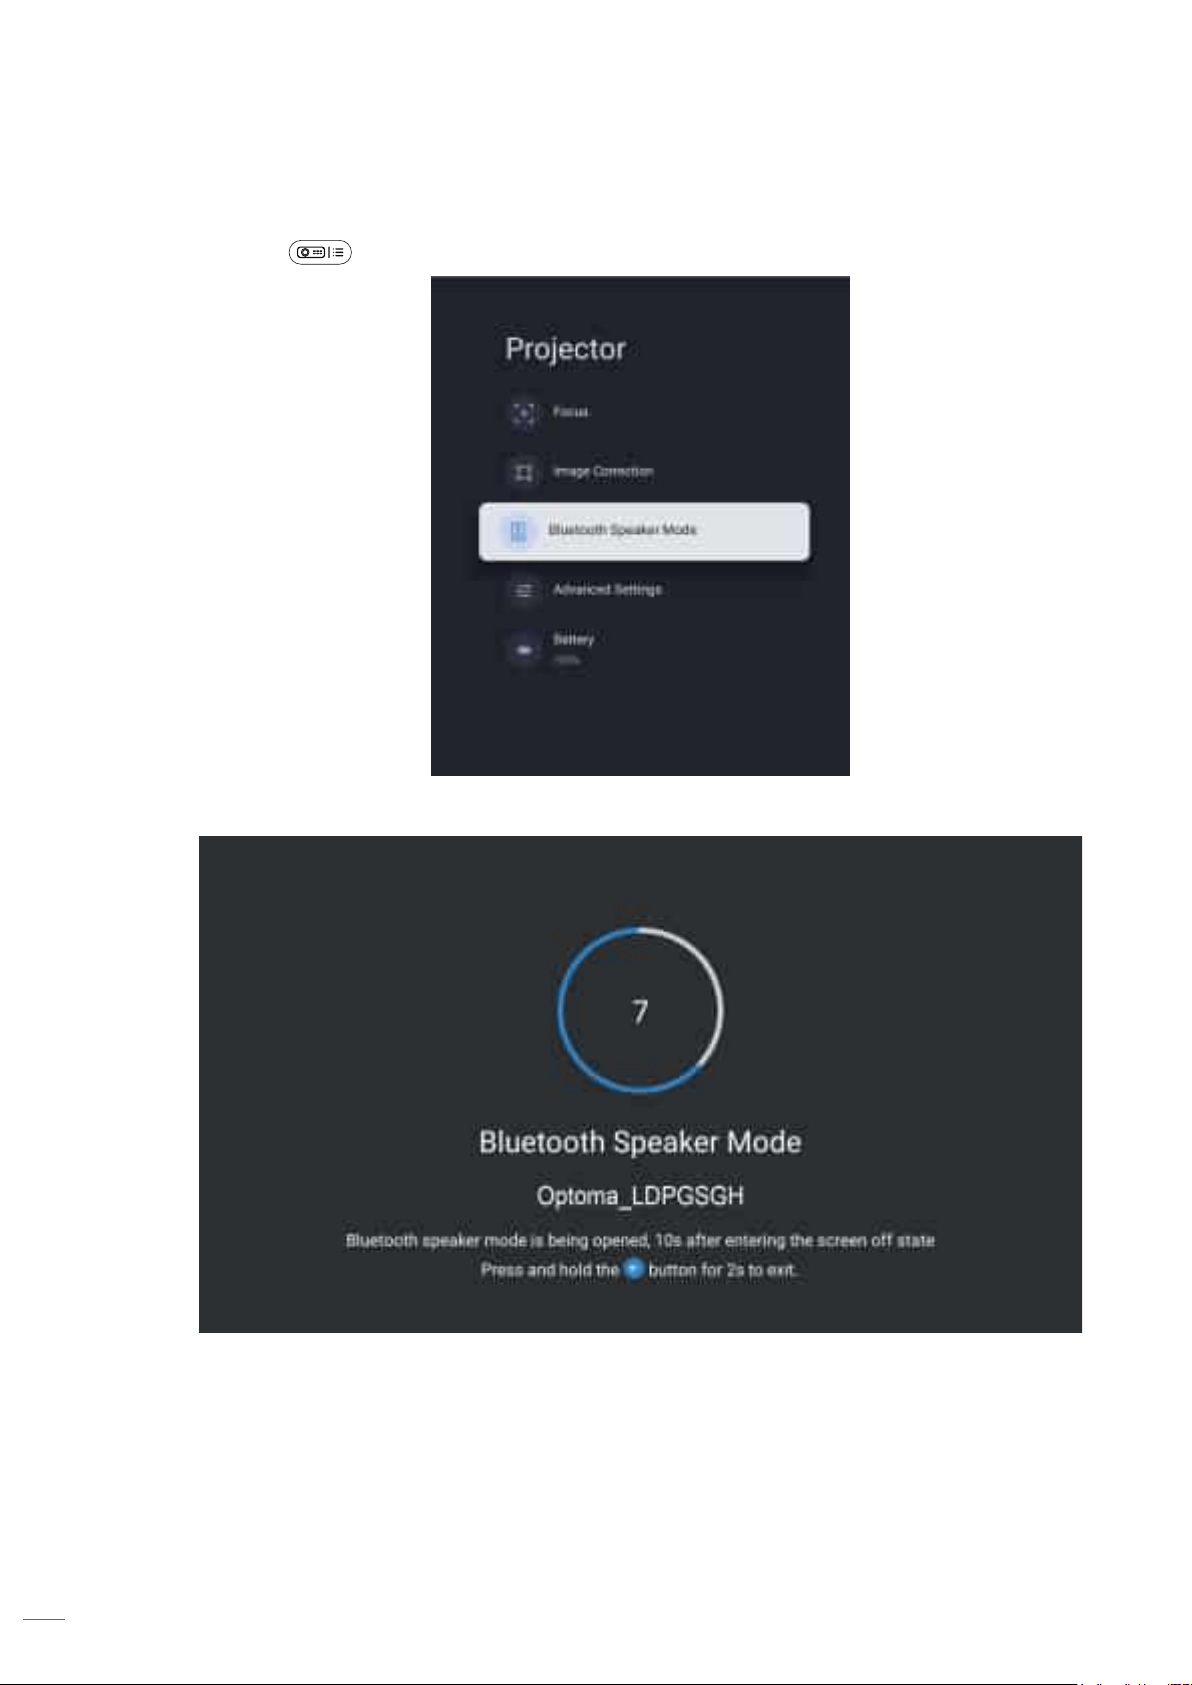
Bluetooth Speaker Mode
1. Press the button on the remote control. Then select [Bluetooth Speaker Mode].
2. Pair your mobile device with the projector using the Bluetooth function.
28
English
Page 29
USING THE PROJECTOR
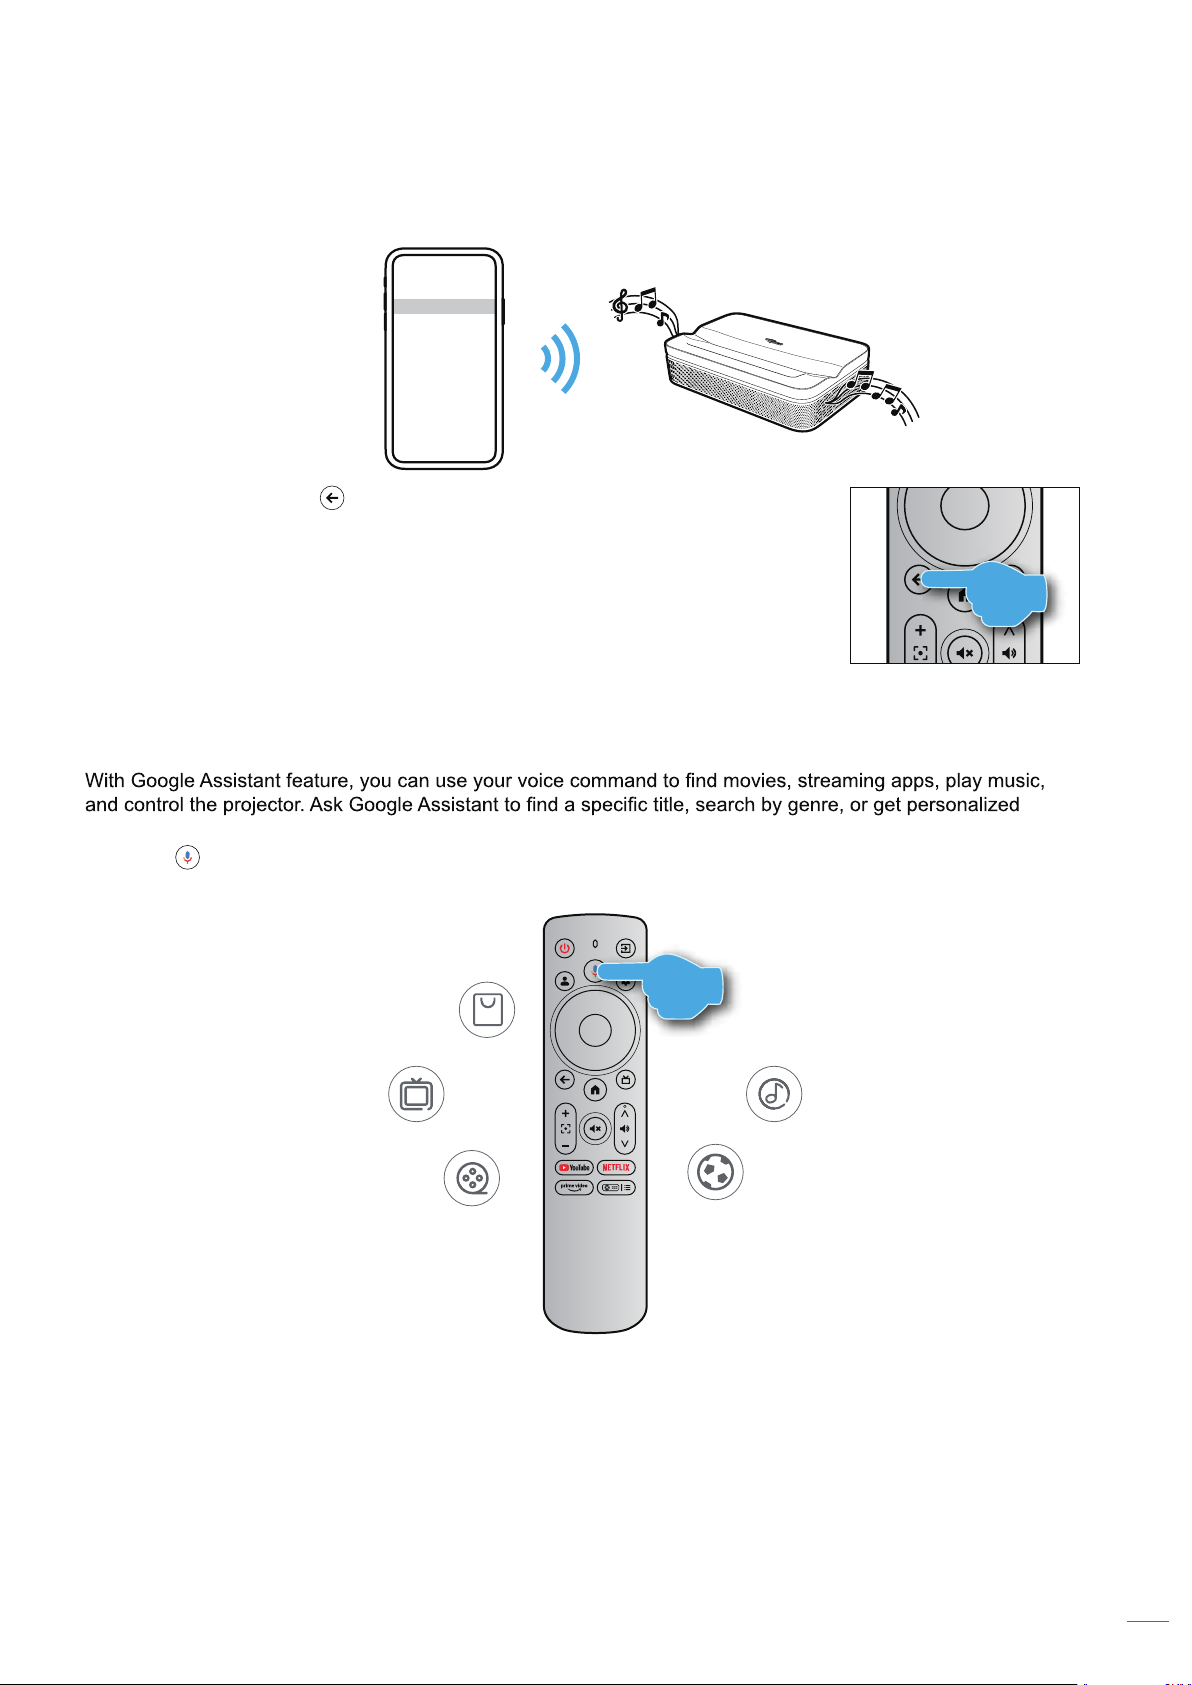
3. When you hear “Bluetooth connection successful”, the projector can play music from your mobile
phone.
Bluetooth
Optoma Projector
AirPods
HomePod mini
Note: Press and hold the key on the remote control for 2 seconds to disconnect
the Bluetooth connection.
Connected
Not Connected
Not Connected
Google Assistant
recommendations. Even get answers on screen, control smart home devices, and more.
Press the
button on the remote control to get started.
APP
English
29
Page 30

USI
NG THE PROJECTOR
Screen Mirroring with Google Cast™
Screen mirroring with Google Cast
With Google Cast, you can stream entertainment from your favorite apps on your phone, tablet, or laptop to your projector.
1. Connect your device and the projector to the same wireless network.
2. Open a Google Cast-enabled app on your device.
3. Select the content you would like to cast, then tap the Cast icon .
4. Select [Optoma_LDPGSGH] to connect. The projector will display the video from your device.
Note: Due to copyright restrictions, certain content cannot be cast to the projector. You can stream the content on
the projector by installing same applications from Apps tab.
( )
30
English
Page 31
Page 32
USING THE PROJECTOR
Settings Menu
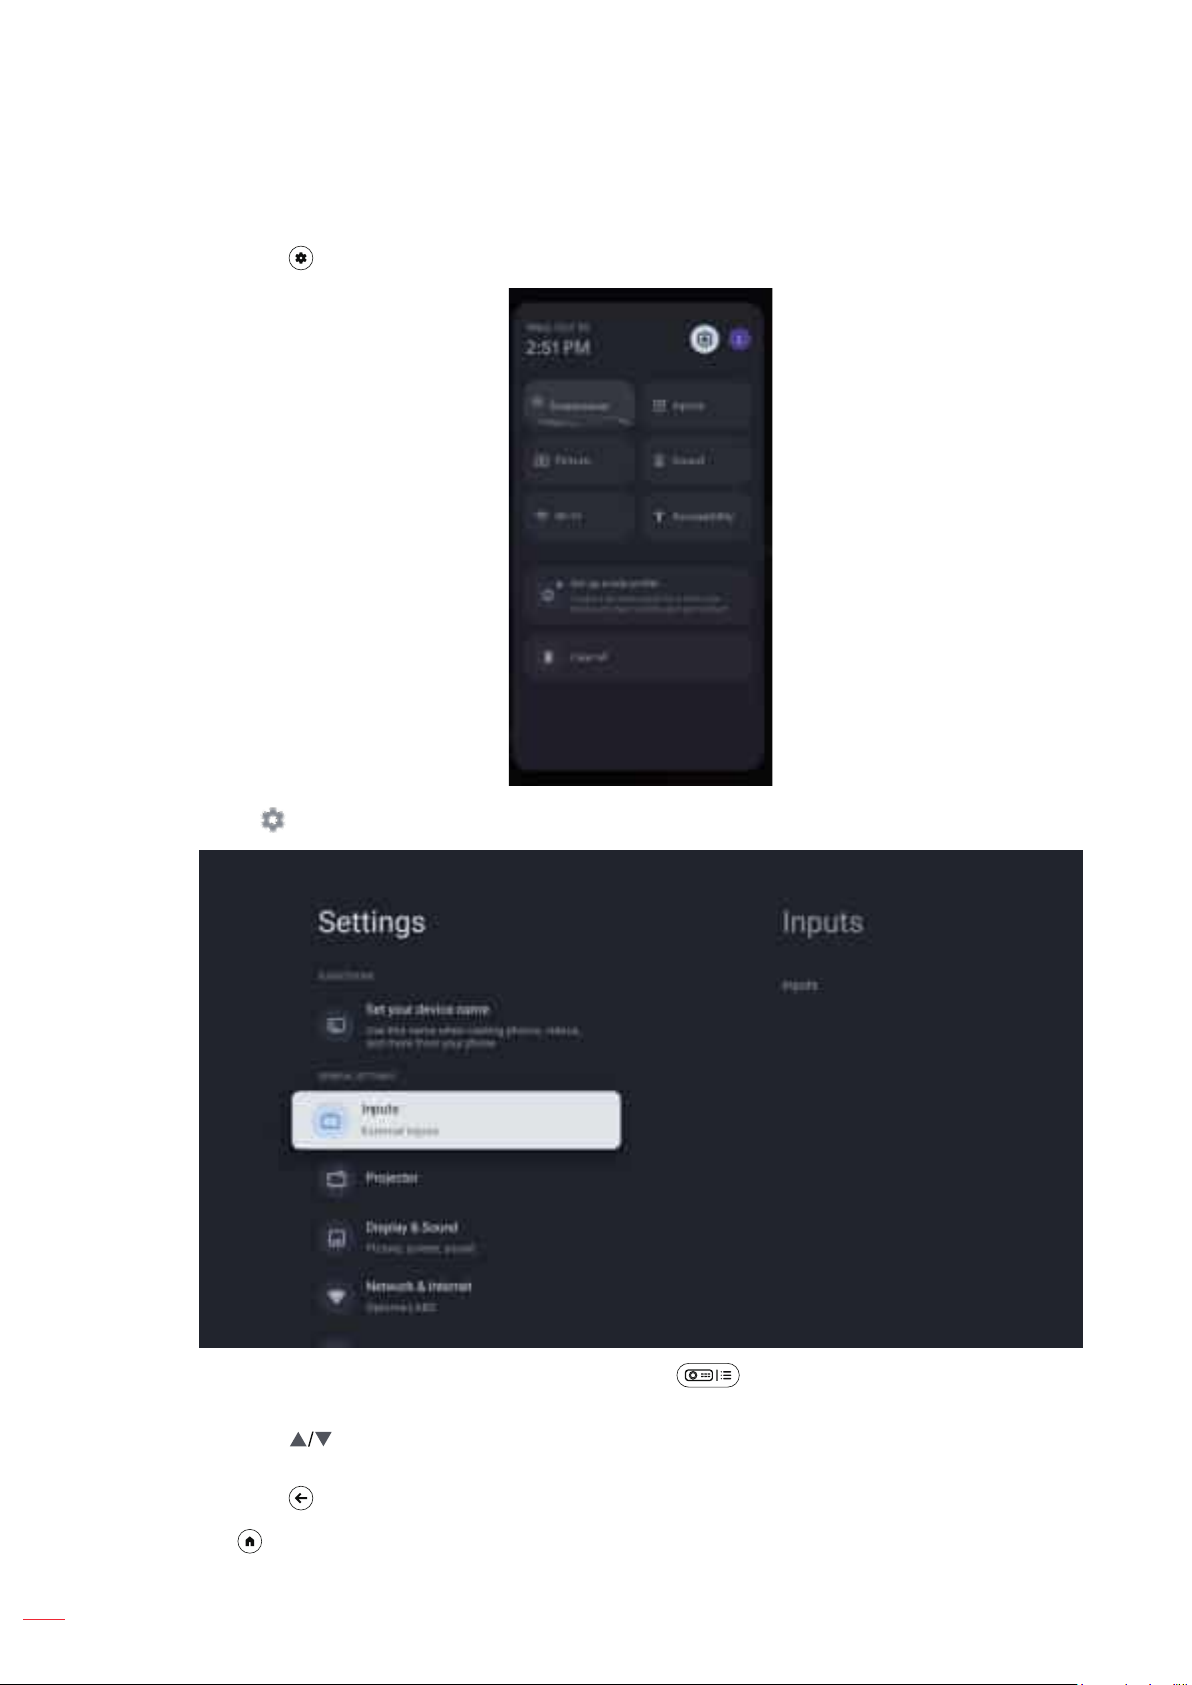
1. Press the button on the remote control. The dash board appears on the screen.
2. Select and press the OK button to enter the All settings menu.
Note: You can also access this menu by pressing the on the remote control. Then select [All
Settings].
Note: Press the
English
32
3. Press the button to select menu options. Then press the
corresponding submenu.
4. Press the
button to return to the previous menu.
button to close the Settings menu and return to the home screen.
OK button to enter the option list or the
Page 33

USING THE PROJECTOR
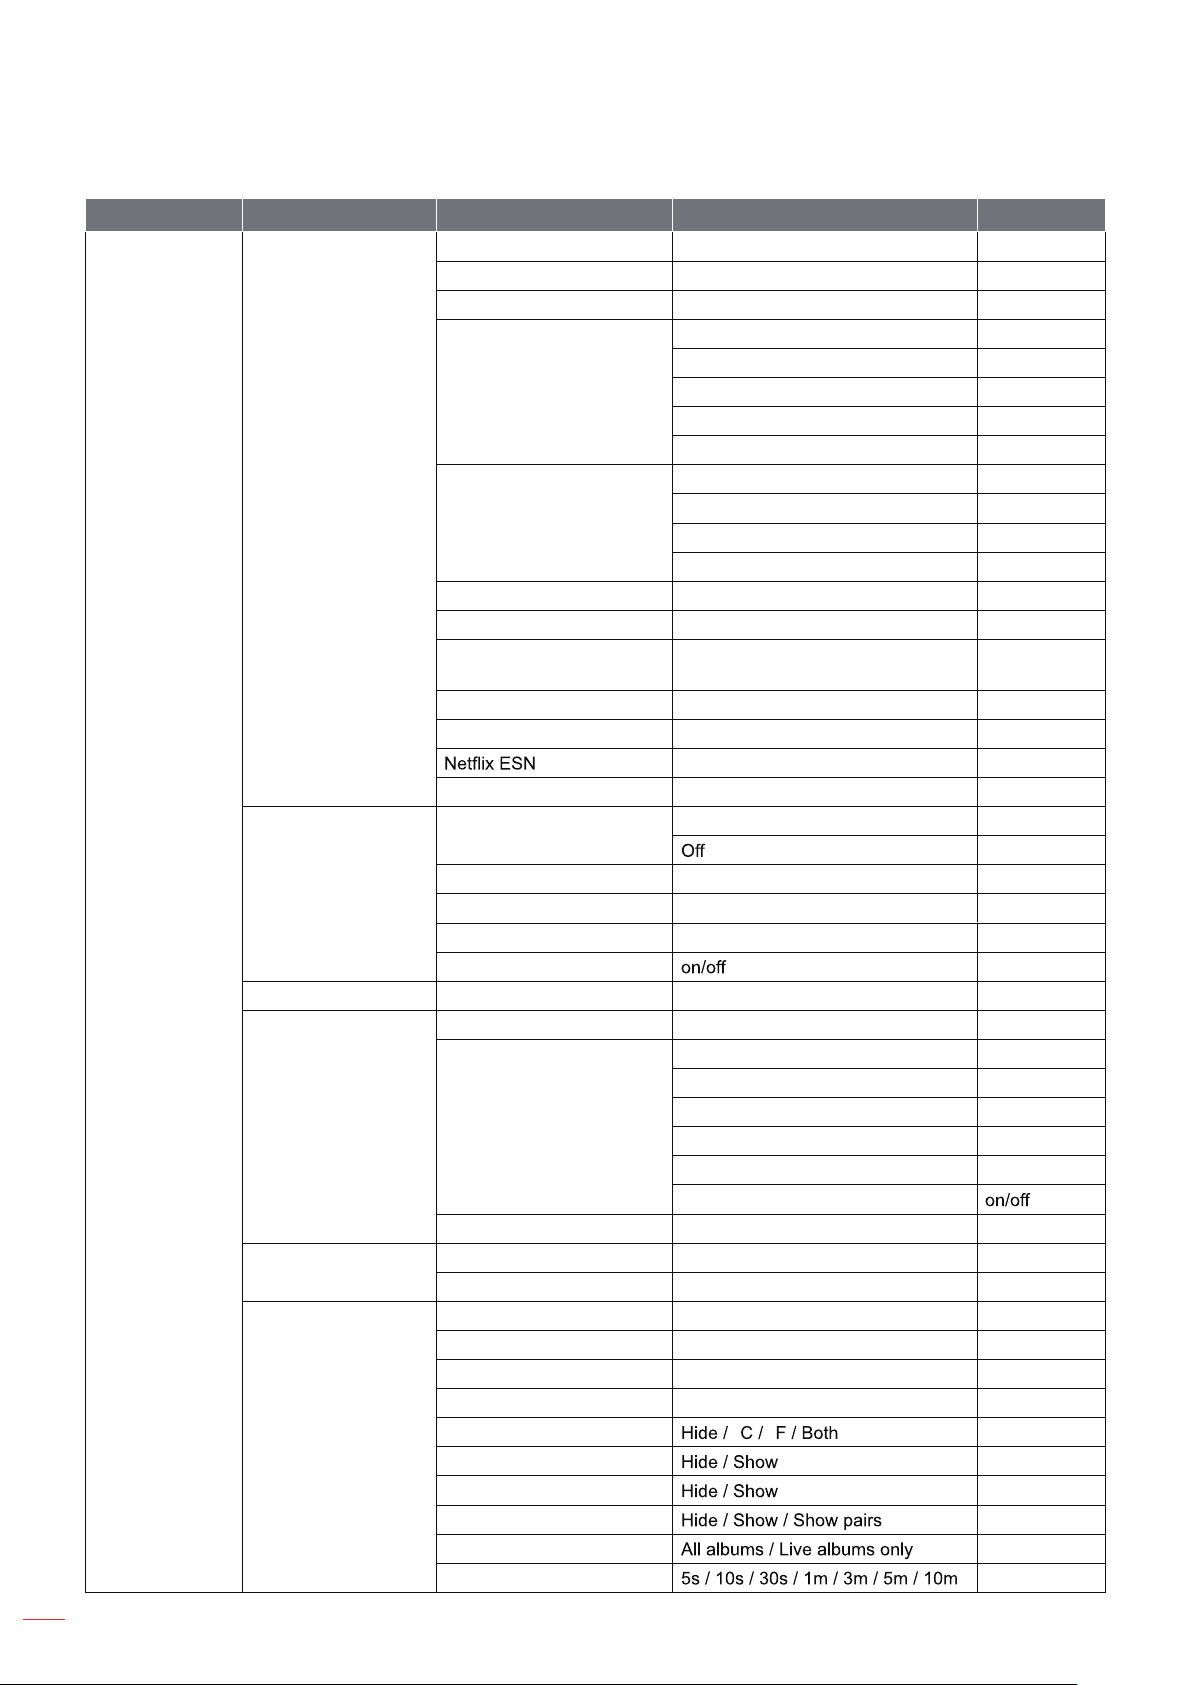
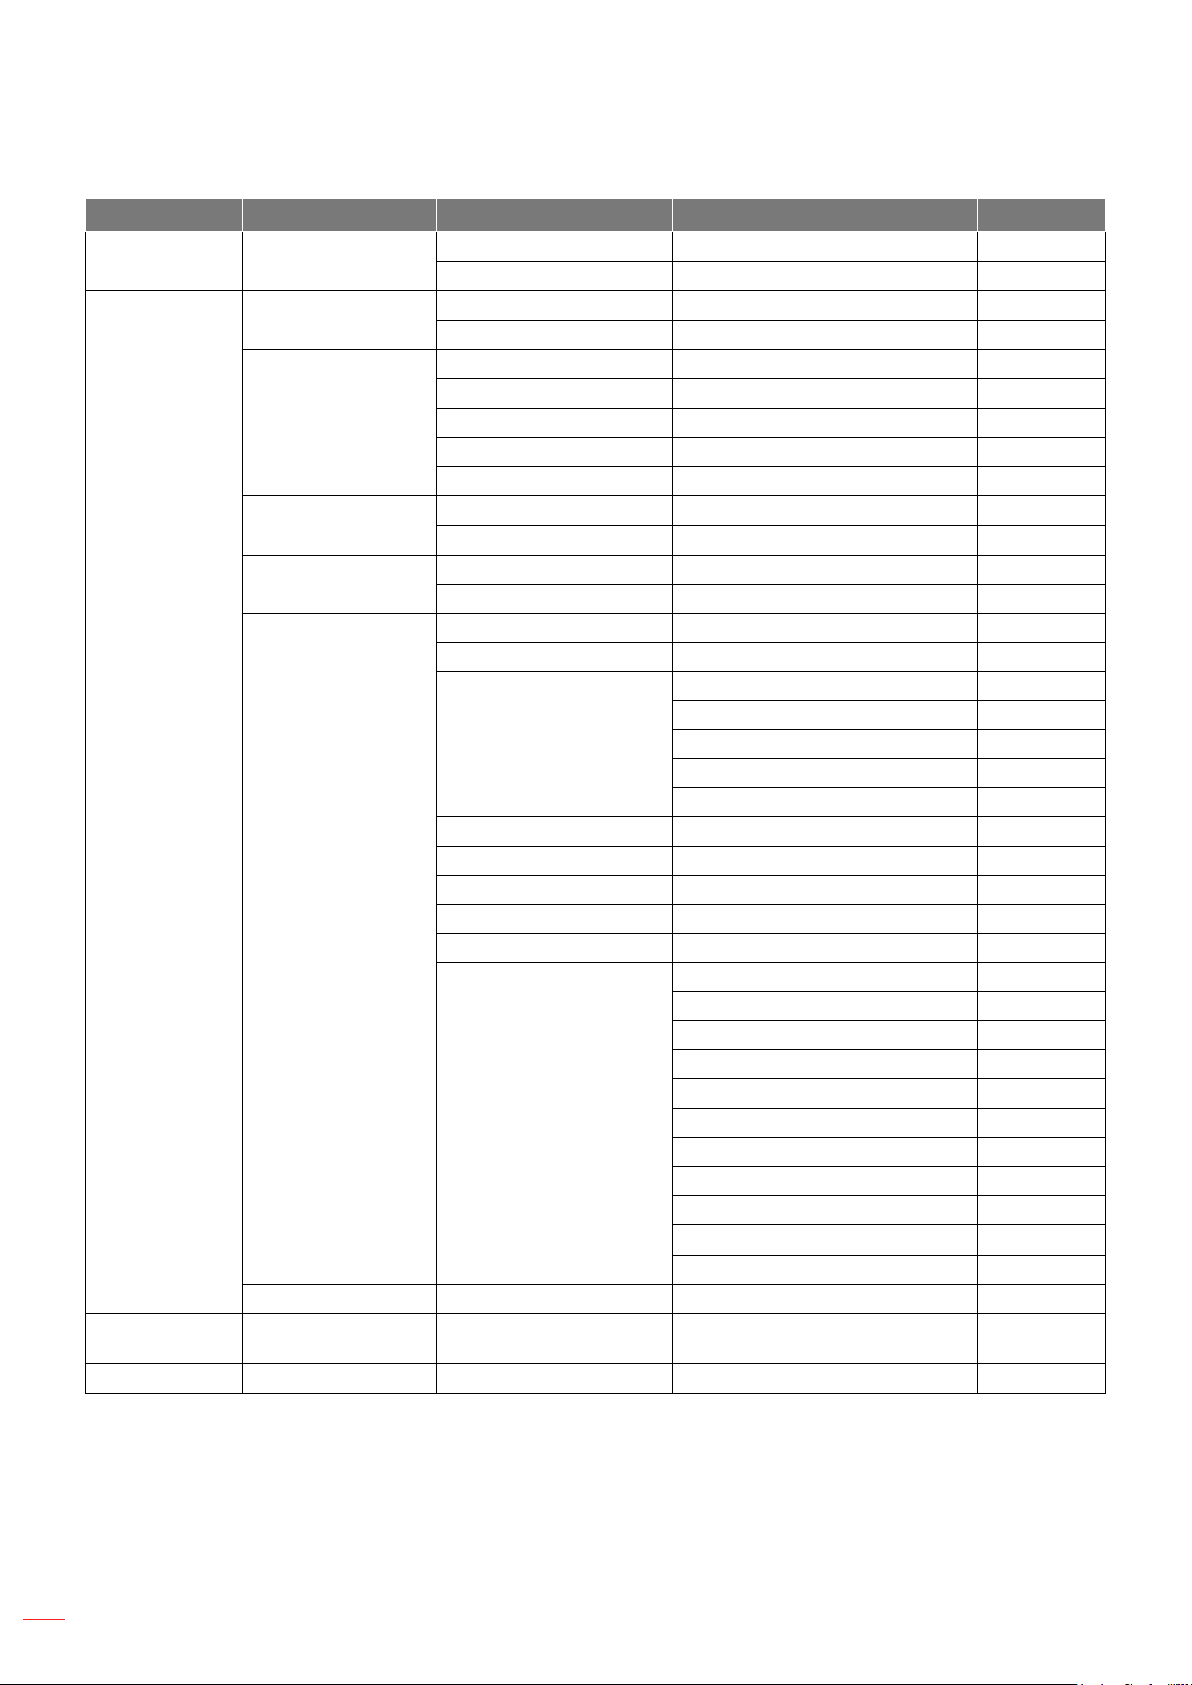
OSD Menu tree
Note: The OSD menu tree items and features are subject to models and region. Optoma reserve the right to add
or remove items to improve product performance without notice.
Main Menu Sub Menu Sub Menu 2 Sub Menu 3 Sub Menu 4
Show this input
HDMI1
Blu-ray
Cable
DVD
Game console
Aux
Custom name
Auto Focus at Startup RQRႇ
Auto Focus When Moving RQRႇ
Zoom
Image Reposition
Auto Keystone Correction At Startup RQRႇ
Auto Keystone Correction After
Movement
Front
Front Ceiling
Rear
Rear Ceiling
Remote Control Battery Level
Remote Control Version
Auto
Bright
Standard
Eco
RQRႇ
Inputs Inputs
Focus
Image Correction
Projector
Bluetooth Speaker
Mode
Advanced Settings
Battery
Display & Sound Picture
HDMI
HDMI control RQRႇ
'HYLFHDXWRSRZHURႇ RQRႇ
TV auto power on RQRႇ
HDMI EDID Version (','(','$XWR(','
CEC Device List
Auto focus
Manual Focus
Advanced
Auto Keystone Correction
Manual Keystone
Correction
Zoom & Shift
Reset to Default Image
Advanced
Projection Mode
Remote Control
Brightness
Standard
Vivid
Movie
Natural
English
33
Page 34

USING THE PROJECTOR
Main Menu Sub Menu Sub Menu 2 Sub Menu 3 Sub Menu 4
Contrast 0-100
Saturation 0-100
Sharpness 0-20
Color Gain Red Gain
Display & Sound
Network &
Internet
Custom
Picture
Game Mode RQRႇ
Reset to Default
Full
Unscaled
Screen
Sound
Audio Output
Wi-Fi RQRႇ
See all
Add new network
Data Saver RQRႇ
Data usage and alerts
Scanning always
available
ETHERNET
Proxy Settings
4:3
Movie expand 14:9
Movie expand 16:9
Standard
Movie
Music
Sport
Custom
Surround 2Q2ႇ
System Sound
Expert Settings
Digital Output
Digital Output Delay
Data usage
Date alerts
RQRႇ
None
Manual
Gamma Normal
Balance
Bass
Treble
2Q2ႇ
Auto Volume Control
Auto
Bypass
PCM
Dolby Digital Plus
Dolby Digital
0-250
(YHU\0%(YHU\0%
(YHU\*%Rႇ
1RW&RQQWHFWHG&RQQWHFWHG
Green Gain
Blue Gain
Dark
Bright
34
English
Page 35

USING THE PROJECTOR
Main Menu Sub Menu Sub Menu 2 Sub Menu 3 Sub Menu 4
IP settings
Network &
Internet
:DNHFRQ¿JV
Accounts &
3UR¿OHV
Location
Usage & diagnostics 2Q2ႇ
Ads
Google Assistant
Payment & Purchases Purchase authentication
Privacy
App permissions
Special app access
Security & Restrictions Unknown sources
See all apps
App permissions
Apps
Special app access
Security & Restrictions Unknown sources
DHCP
Static
WoW RQRႇ
WoL RQRႇ
WoC RQRႇ
Location status
Scanning always available RQRႇ
Voice Control
View permissions
Personal results RQRႇ
Searchable apps
6DIH6HDUFK¿OWHU RQRႇ
Contacts
Phone
Camera
Files and media
Other permissions
Energy optimization
Usage access
1RWL¿FDWLRQDFFHVV
$OO¿OHVDFFHVV
Display over other apps
Modify system settings
Turn screen on
Contacts
Phone
Camera
Files and media
Other permissions
Energy optimization
Usage access
1RWL¿FDWLRQDFFHVV
$OO¿OHVDFFHVV
Display over other apps
Modify system settings
Turn screen on
8VH:L)LWRHVWLPDWHORFDWLRQ2ႇ
2ႇ
RQRႇ
<HVZLWK3,1<HVZLWKSDVVZRUG
1HYHU
English
35
Page 36
USING THE PROJECTOR
Main Menu Sub Menu Sub Menu 2 Sub Menu 3 Sub Menu 4
System Update
Device name
Reset Factory reset
IP address
Device MAC address
About
Status
Legal Information
Model
Android TV™ OS version
Android TV OS security
patch level
Kernel version
Android TV OS build
Bluetooth address
Serial number
Up time
Open source licenses
Google legal
System WebView licenses
Consumer Information
System
Software Version
Automatic date & time
Date & Time
Language list
Keyboard
Storage
Ambient mode
Set date
Set time
Set time zone
Use 24-hour format
Current keyboard
Gboard Settings
Manage keyboards
Internal shared storage
Free up storage
Start now
Google Photos
Art gallery
Experimental
Weather ° °
Time
Personal photo data
Portrait Google Photos
Personal photo curation
Sideshow speed
Use network provided time
Current version
Languages
Terms of service
Privacy policy
Open source licenses
Share usege statistics
36
English
Page 37

USING THE PROJECTOR
Main Menu Sub Menu Sub Menu 2 Sub Menu 3 Sub Menu 4
Google TV home screen
Last used input
When inactive
$XWRPDWLFDOO\WXUQRႇ79
Sleep Timer
3LFWXUHRႇ
6ZLWFK2ႇ7LPHU
Auto Sleep
Power On Timer Type
Auto Power On Time
3RZHU2ႇ7LPHU7\SH
$XWR3RZHU2ႇ7LPH
15 minutes
20 minutes
30 minutes
1 hour
4 hours
8 hours
12 hours
24 hours
Never
2ႇ
10 Minutes
20 Minutes
30 Minutes
40 Minutes
50 Minutes
60 Minutes
90 Minutes
120 Minutes
2ႇ
30 Minutes
60 Minutes
90 Minutes
120 Minutes
150 Minutes
180 Minutes
210 Minutes
240 Minutes
Never
4 hours
6 hours
8 hours
2ႇ
On
Once
2ႇ
On
Once
System
Power on behavior
Power & Energy
Power & Energy
Power
Timer
Cast
System Sound RQRႇ
$OZD\V:KLOH&DVWLQJ
Never
English
37
Page 38
USING THE PROJECTOR
Main Menu Sub Menu Sub Menu 2 Sub Menu 3 Sub Menu 4
System Restart
TalkBack
Text to speech
Accessibility shortcut
Switch Access
Accessibility
Captions
High contrast text RQRႇ
Remotes &
Acessories
Help & Feedback Send feedback
Pair accessory Searching for accessories
Restart
Cancel
Enable
&RQ¿JXUDWLRQ
Speech Services by Google
(QJLQHFRQ¿JXUDWLRQ
Speech rate
Listen to an example
Defaut language status
Enable accessibility shortcut
Shotcut service 7DON%DFN6ZLWFK$FFHVV
Enable RQRႇ
&RQ¿JXUDWLRQ
Display RQRႇ
Language
Text size
CAPTION STYLE
White on black
Black on white
Yellow on black
Yellow on blue
Custom
RQRႇ
RQRႇ
Very small
Small
Normal
Large
Very large
Font family
Text color
Text opacity
Edge type
Edge color
Show backgraound
Background color
Background opacity
Show window
Window color
Window opacity
38
English
Page 39

USING THE PROJECTOR
Inputs menu
Inputs
&RQ¿JXUHWKHLQSXWVRXUFHWRUHODWHGVHWWLQJV
HDMI
Specify the HDMI device type connected to the HDMI port.
HDMI control
Enable this function to allow the projector to control the HDMI devices.
'HYLFHDXWRSRZHURႇ
(QDEOHWKLVIXQFWLRQWRSRZHURႇWKH+'0,GHYLFHZKHQWKHSURMHFWRUWXUQVRႇ
TV auto power on
Enable this function to power on the HDMI device when the projector turns on.
HDMI EDID Version
Select the HDMI EDID version.
CEC Device List
Display the CEC device list.
English
39
Page 40

USING THE PROJECTOR
Projector menu
Focus
%HIRUHPDNLQJWKHDGMXVWPHQWHQVXUHWKDWWKHSURMHFWRULVSRVLWLRQHGDWWKHIROORZLQJVSHFL¿FDWLRQV
D7KHSURMHFWRULVSODFHGRQDÀDWVXUIDFHDQGSDUDOOHOWRWKHJURXQG
E7KHSURMHFWHGVXUIDFHLVÀDWDQGSHUSHQGLFXODUWRWKHJURXQG
Auto focus
Automatically adjust the image clarity. For more information, see page 26.
Manual Focus
Manually adjust the image clarity. For more information, see page 26.
Advanced
&RQ¿JXUHWKHDGYDQFHGIRFXVDGMXVWPHQWVHWWLQJV
• Auto Focus at Startup: Enable this function to automatically adjust the focus when the projector
powers on.
• Auto Focus When Moving: Enable this function to automatically adjust the focus when you move the
projector.
Image Correction
Auto Keystone Correction
Automatically perform the keystone correction. For more information, see page 27.
Note:
• The image size will reduce slightly when adjusting the horizontal and vertical keystone.
• (QVXUHWKDWWKHSURMHFWHGVXUIDFHLVÀDW
Manual Keystone Correction
Manually adjust the image distortion caused by tilting the projector. For more information, see page 27.
Zoom & Shift
&RQ¿JXUHWKH]RRPDQGLPDJHVKLIWUHODWHGVHWWLQJV
• Zoom: Reduce or magnify an image on the projection screen.
• Image Reposition: Adjust the position of the projected image.
Reset to Default Image
Return the factory default setting for image correction settings.
Advanced
&RQ¿JXUHWKHDGYDQFHGDXWRNH\VWRQHFRUUHFWLRQVHWWLQJV
• Auto Keystone Correction At Startup: Enable this function to automatically perform the keystone
correction when the projector powers on.
40
• Auto Keystone Correction After Movement: Enable this function to automatically perform the
keystone correction when you move the projector.
English
Page 41

USING THE PROJECTOR
Bluetooth Speaker Mode
&RQ¿JXUHWKH%OXHWRRWKVSHDNHUPRGHE\SDLULQJ\RXUPRELOHGHYLFHZLWKWKHSURMHFWRUXVLQJWKH%OXHWRRWK
function. For more information, see page 28.
Advanced Settings
&RQ¿JXUHWKHSURMHFWLRQPRGHDQGYLHZWKHUHPRWHFRQWUROLQIRUPDWLRQ
• Projection Mode: Select the preferred projection mode. For more information, see page 15.
• Remote Control: View the battery level and version of the remote control.
Battery
View the battery level of the projector.
English
41
Page 42
USING THE PROJECTOR
Display & Sound menu
Picture
Brightness
Set the brightness mode based on the ambient brightness.
PICTURE MODE
There are many factory presets optimized for various types of images.
• Standard: Select this mode for optimizing the balance between brightness and color reproduction.
• Vivid: Select this mode for emphasizing color.
• Movie: Select this mode for home theater.
• Natural: Select this mode for natural-looking colors.
• Custom0DQXDOO\FRQ¿JXUHWKHSLFWXUHVHWWLQJVVXFKDVFRQWUDVWVDWXUDWLRQVKDUSQHVVFRORUJDLQ
and gamma.
Game Mode
Enable this function to increase the brightness and response time level for enjoying video games.
Reset to Default
Return the factory default setting for picture settings.
Screen
Select the aspect ratio of the displayed image.
• Full7KLVIRUPDW¿OOVWKHVFUHHQUHJDUGOHVVRIDVSHFWUDWLR
• Unscaled: This format displays the original image without any scaling.
• 4:3: This format is for 4:3 input sources.
• Movie expand 14:9: This format is for Movie expand 14:9 input sources, like HDTV and DVD
enhanced for Wide screen TV.
• Movie expand 16:9: This format is for Movie expand 16:9 input sources.
Note: This menu option is only available for HDMI input source.
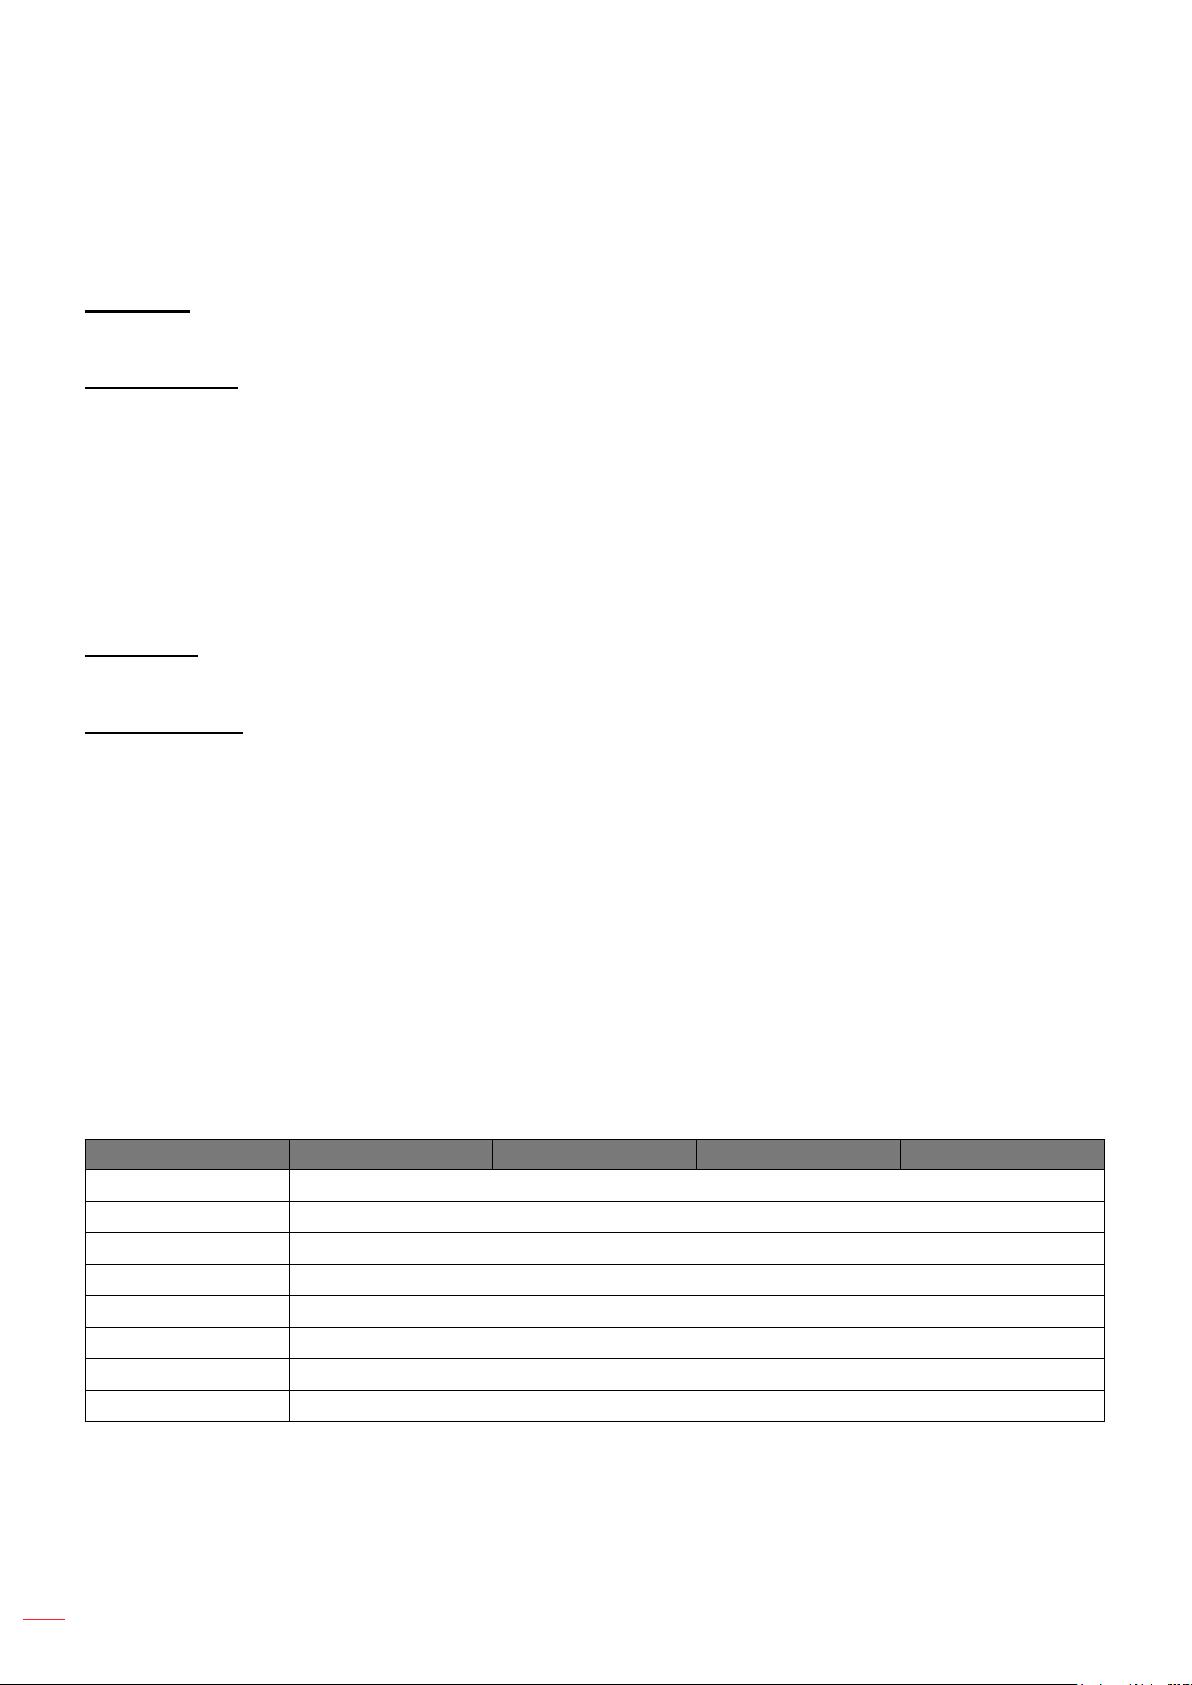
Scaling table:
16:9 screen 480i/p 576i/p 720p 1080i/p
4x3 Scale to 1440 x 1080
14x9 Scale to 1680 x 1080
16x9 Scale to 1920 x 1080
21x9 1$
32x9 1$
V-Stretch 1$
Full screen 1$
Auto If source is 4:3, auto resize to 1440 x 1080
42
English
Page 43
USING THE PROJECTOR
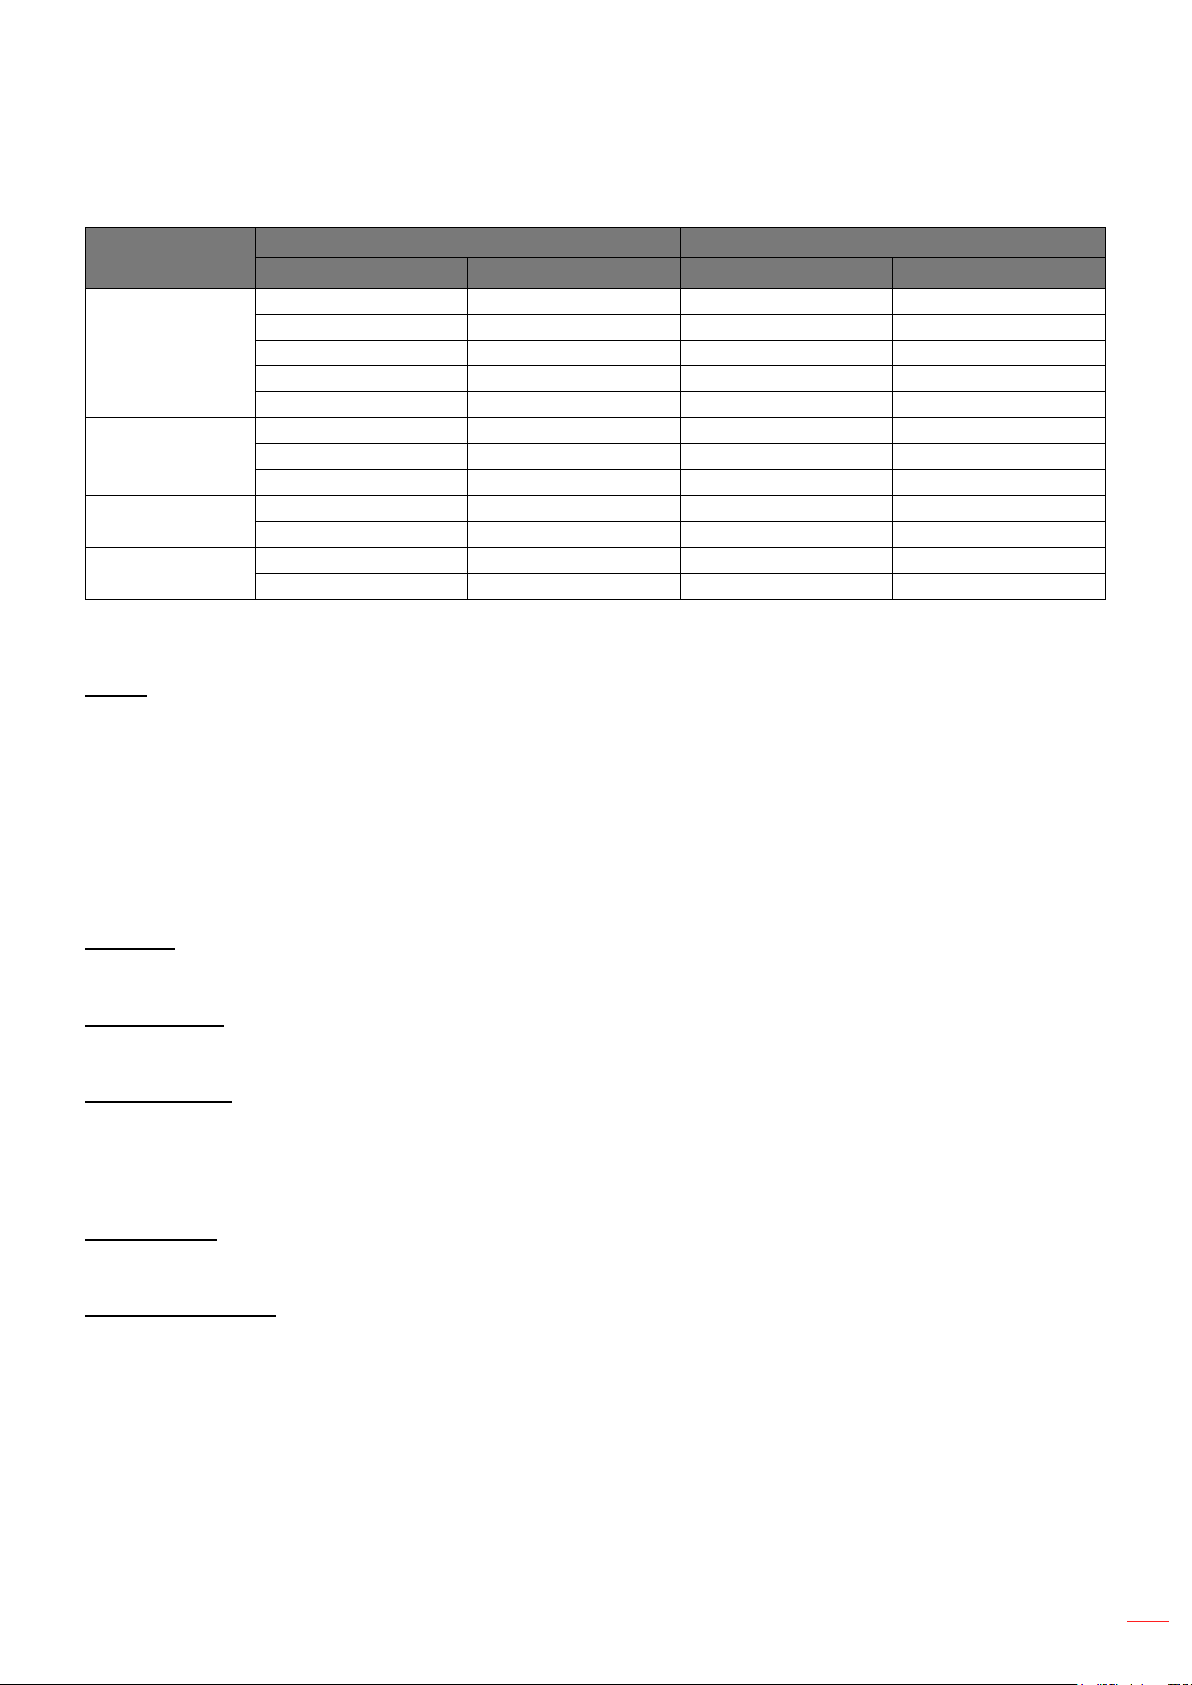
Auto mapping rule:
Auto
4:3
Wide Laptop
SDTV
HDTV
H-resolution V-resolution 1920 1080
800 600 1440 1080
1024 1440 1080
1280 1024 1440 1080
1400 1050 1440 1080
1600 1200 1440 1080
1280 1920 1080
1280 1800 1080
1280 800 1080
1350 1080
480 1620 1080
1280 1920 1080
1920 1080 1920 1080
Sound
Sound
Select the appropriate sound mode.
• Standard: Select this mode for music playback.
• Movie: Select this mode for watching a movie playback.
Input resolution Auto/Scale
• Music: Select this mode for regular music playback.
• Sport: Select this mode for watching sports events.
• Custom0DQXDOO\FRQ¿JXUHWKHDXGLRVHWWLQJVVXFKDVEDODQFHEDVVDQGWUHEOH
Surround
Select to enable surround sound audio.
System Sound
(QDEOHWKLVIXQFWLRQWRWXUQRQWKHV\VWHPVRXQGQRWL¿FDWLRQV
Expert Settings
Enable [Auto Volume Control] function to control volume automatically.
Audio Output
Digital Output
Set the audio output format.
Digital Output Delay
Adjust the delay of the digital audio output to synchronize the sound with the video.
English
43
Page 44
USING THE PROJECTOR
Network & Internet menu
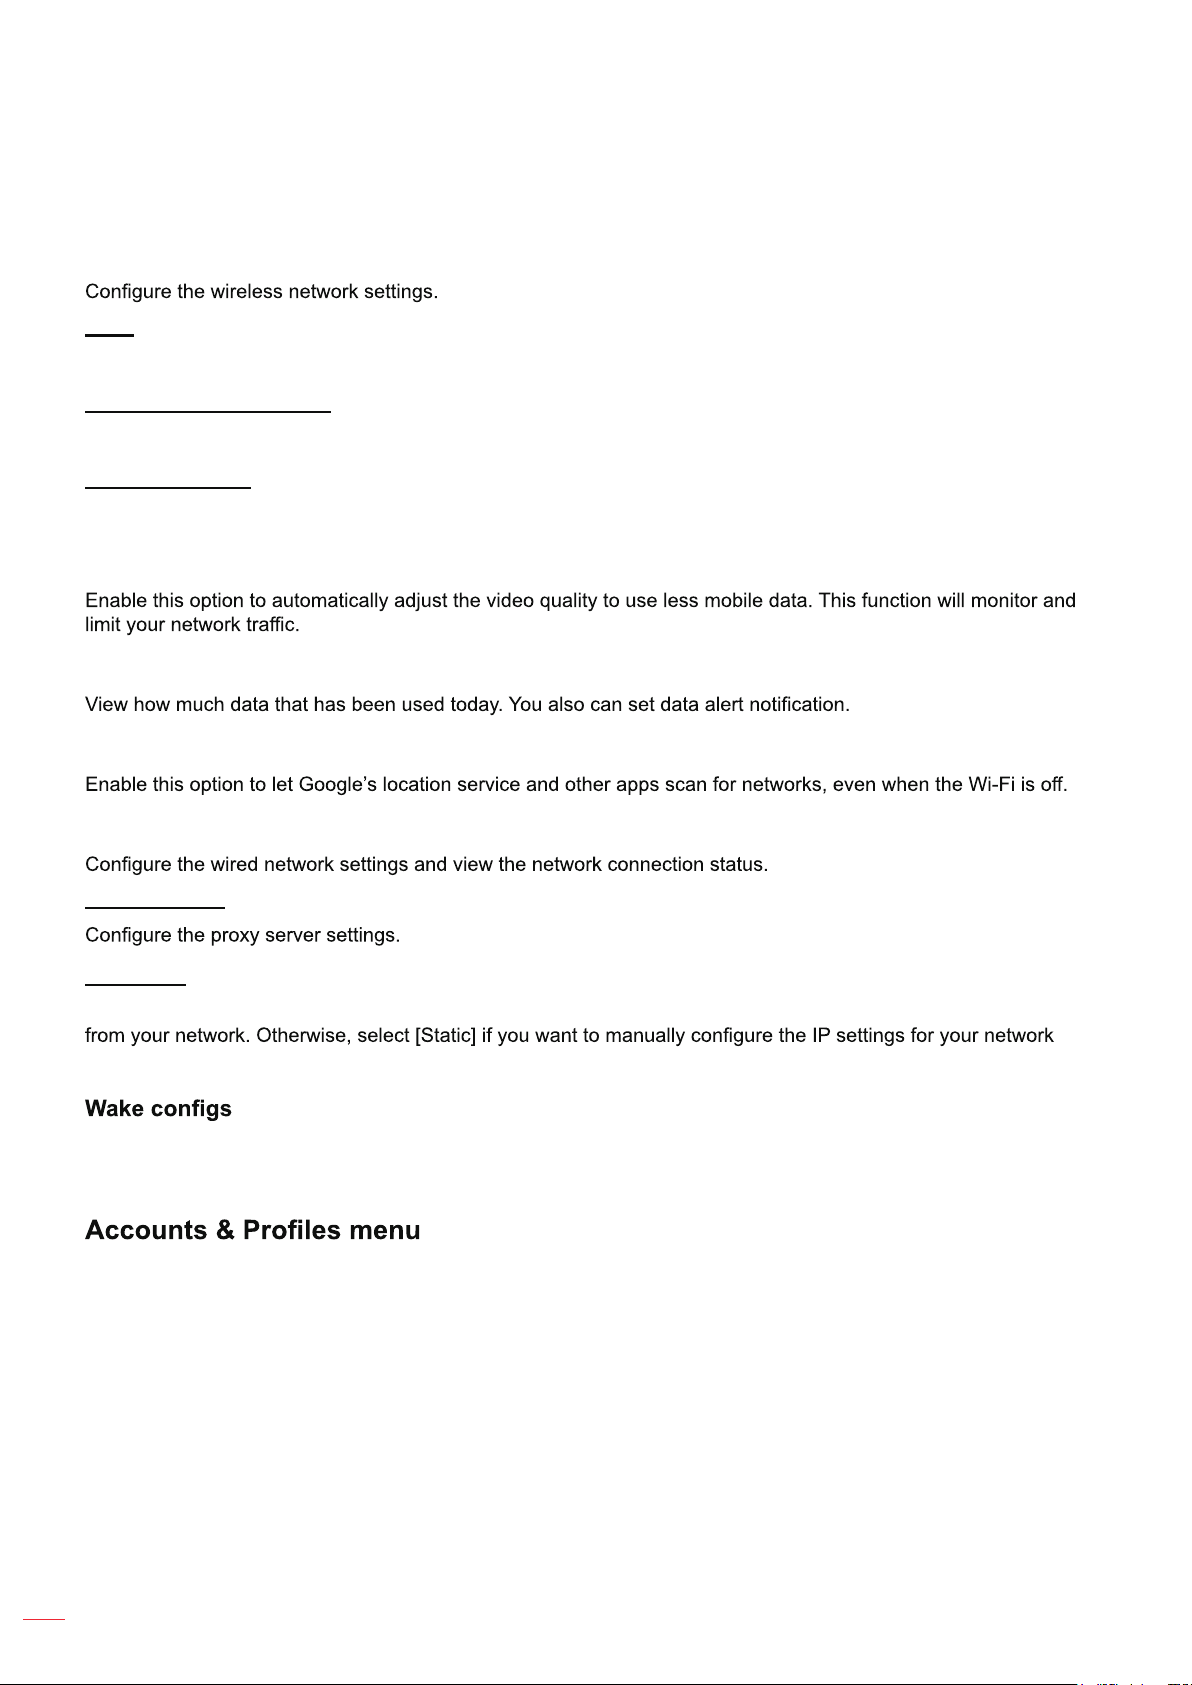
Wi-Fi
Wi-Fi
Enable this feature to turn on Wi-Fi.
AVAILABLE NETWORKS
Select your desired wireless access point. Select [See all] to display all the list.
Add new network
Manually enter a wireless network name, select the type of security mode, and enter password.
Data Saver
Data usage and alerts
Scanning always available
ETHERNET
Proxy Settings
IP settings
Select [DHCP] if you want the projector to obtain IP address and other connection parameters automatically
connection.
Enable the desired function to wake up the projector via wireless network (WoW), wake up the projector via
network control over LAN connection (WoL), or wake up the projector through Google Cast (WoC).
Sign in with your Google Account. After you are signed in, you can then manage user profiles and kids profiles.
44
English
Page 45
USING THE PROJECTOR
Privacy menu
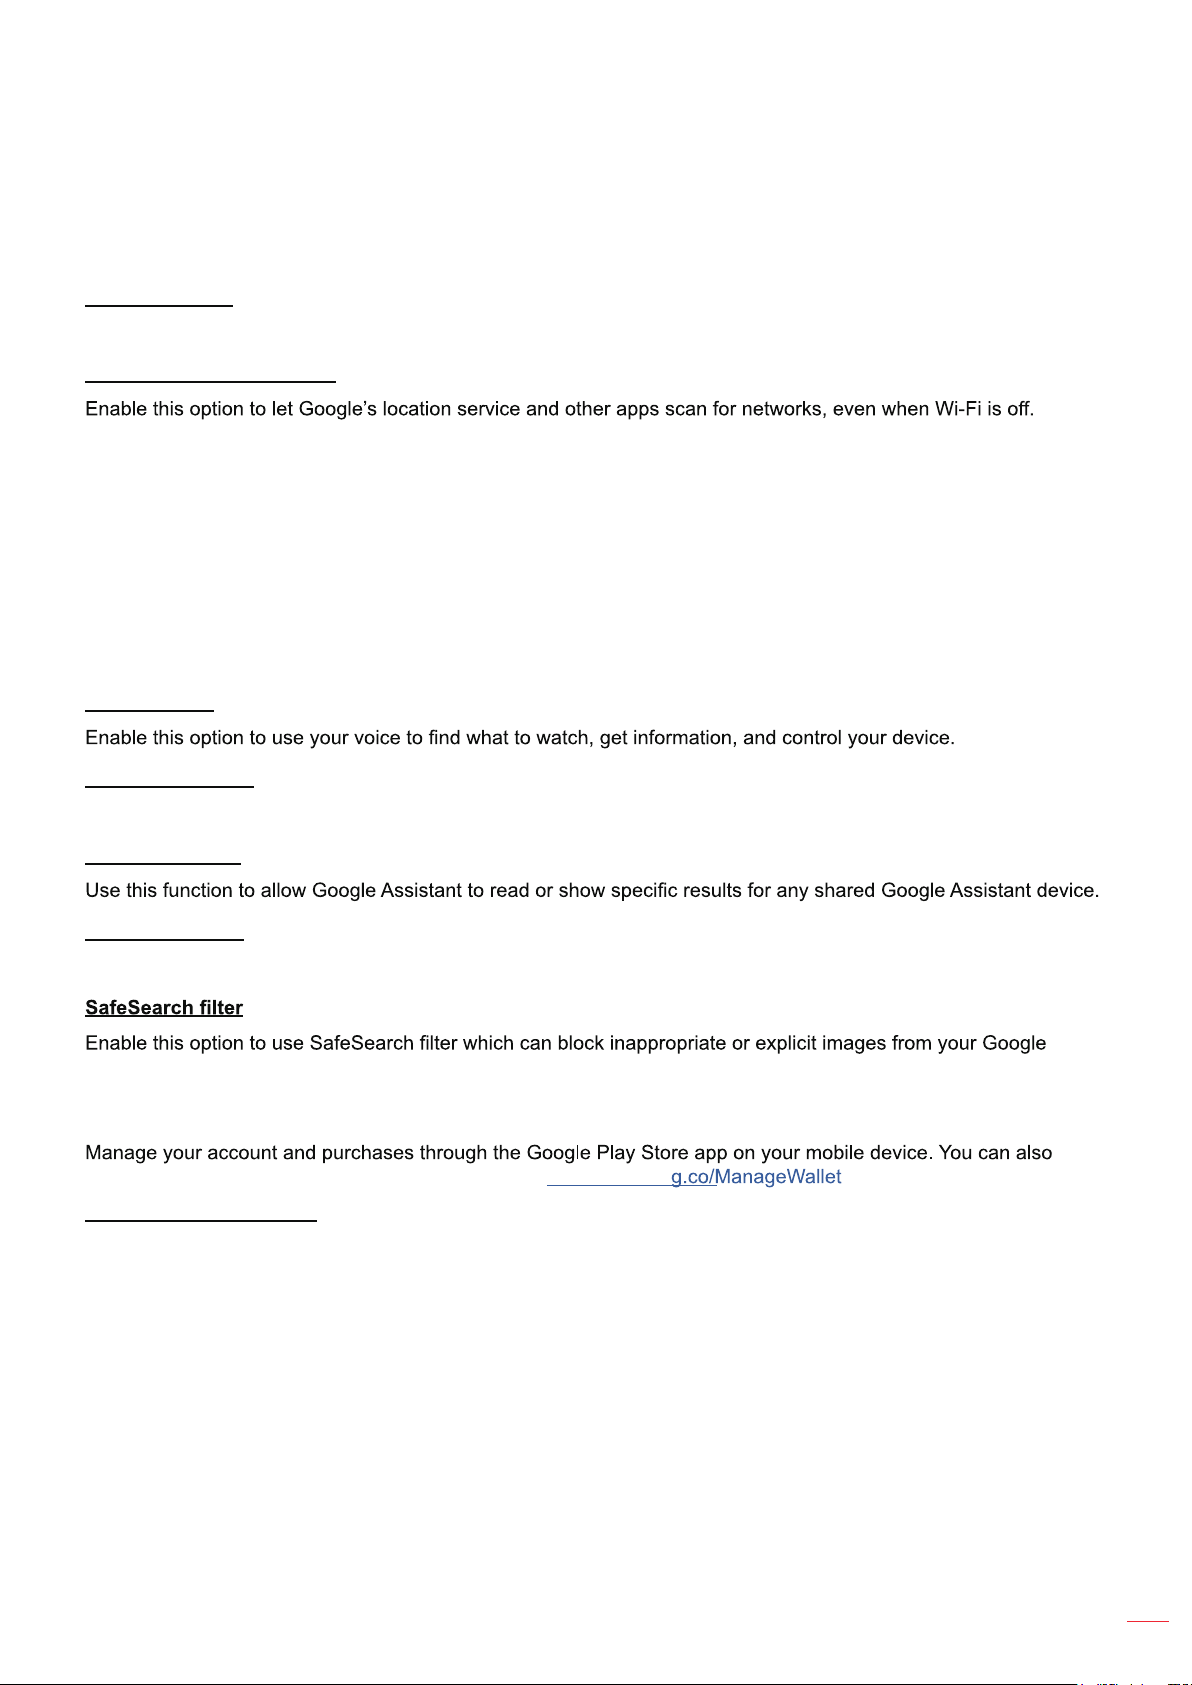
Location
Location status
Enable or disable the system to use the Wi-Fi function to estimate the projector location.
Scanning always available
Usage & diagnostic
Enable this option to automatically send the diagnostic information to Google, such as crash reports and usage
data from your device, app, and Google Cast. You can adjust these permisssions at any time from the device
settings.
Ads
Mamage your ads settings, such as resetting your advertising ID.
Google Assistant
Voice Control
View permissions
Use this function to review and manage your activity.
Personal results
Searchable apps
Select which apps to include in the search results.
Search results.
Payment & Purchases
settings by using a web browser (for example, go to configure the to set the payment methods).
Purchase authentication
Enable this option to prevent unauthorized purchases on this device.
App permissions
View the app permissions to access various features such as Contacts, Phone, Camera, Files and media, and
more.
English
45
Page 46
USING THE PROJECTOR
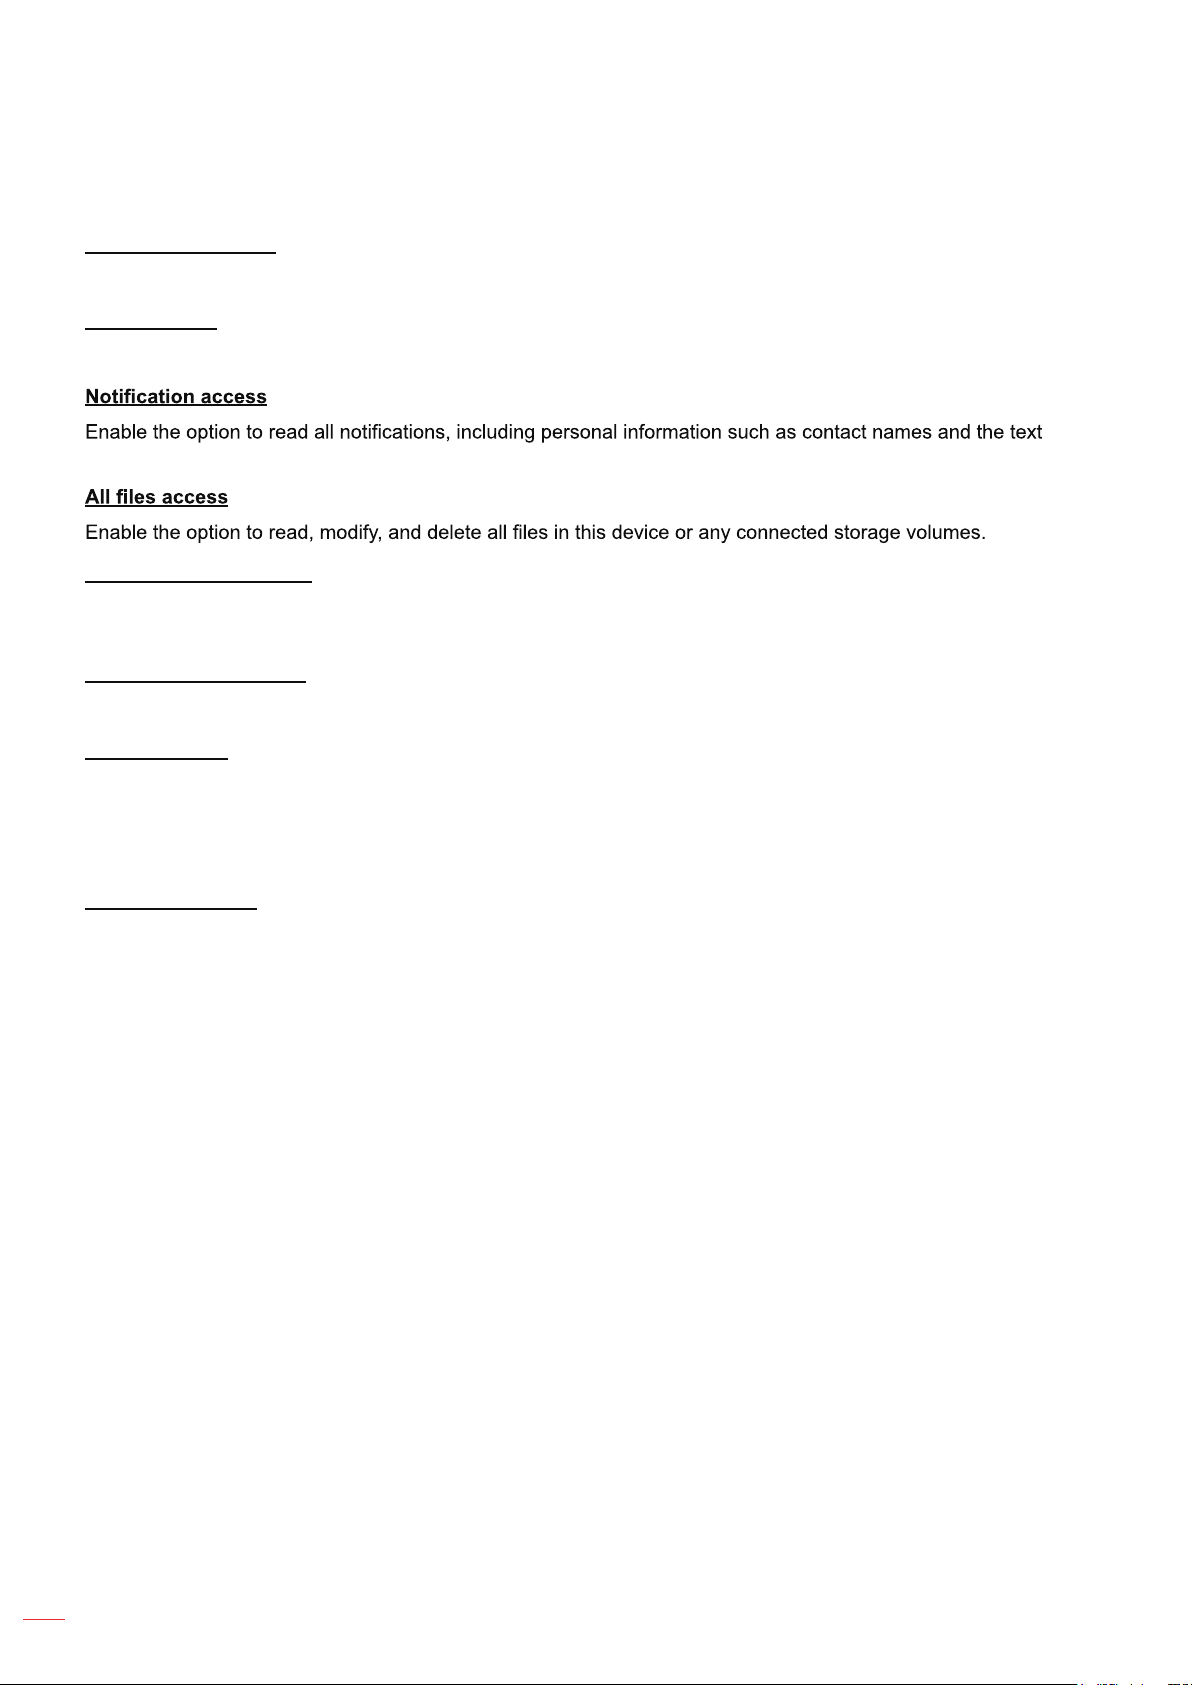
Special app access
Energy optimization
Enable the option to optimize the energy use.
Usage access
Enable the option to track what other apps you are using and how often.
messages you receive.
Display over other apps
Enable the option to display on top of other apps you are using. It may interfere with your use of those apps or
change the way they seem to behave or appear.
Modify system settings
Enable the option to modify the system settings.
Turn screen on
Enable the option to turn the screen on. If granted, the app may turn on the screen at any time without your explicit
intent.
Security & Restrictions
Unknown sources
Allow installation of apps from sources other. Your device and personal data are more vulnerable to attack
by apps from unknown sources.
46
English
Page 47

USING THE PROJECTOR
Apps menu
See all apps
View all apps that have been installed in the device.
App permissions
View the app permissions to access various features such as Contacts, Phone, Camera, Files and media, and
more.
Special app access
&RQ¿JXUHDSSSHUPLVVLRQVDQGDFFHVV)RUPore information, see page 46.
Security & Restrictions
Restrict the installation of apps from unknown sources. For more information, see page 46.
English
47
Page 48

USING THE PROJECTOR
System menu
About
&KHFNIRU¿UPZDUHXSJUDGHVDQGXSGDWHWKHV\VWHPYLHZDQGUHQDPHWKHGHYLFHSHUIRUPIDFWRU\UHVHWYLHZ
device status, view legal information, view the model name, view Android TV OS related information, and view the
software version.
Date & Time
Automatic date & time
Enable or disable automatic date and time.
Note: This settings only applies when connected to the Internet.
Set date
If the [Automatic date & time] setting is disabled, you can manually set the date.
Set time
If the [Automatic date & time] setting is disabled, you can manually set the time.
Set time zone
Select the time zone.
Use 24-hour format
Set the time format.
Language
Select the on-screen display language.
Keyboard
Current keyboard
View the current keyboard.
Gboard Settings
&RQ¿JXUH*ERDUG.H\ERDUG6HWWLQJV.
Manage keyboards
Manage available virtual keyboards.
Storage
Internal shared storage
View and manage the device storage.
Free up storage
)UHHXSWKHVWRUDJHVSDFHRQWKHGHYLFHE\FOHDULQJFDFKHWHPSRUDU\¿OHVRUXQLQVWDOOLQJXQZDQWHGDSSV
English
48
Page 49

USING THE PROJECTOR
Ambient mode
Start now
Activate a screen saver immediately.
CHANNELS
Select the photos source for the screen saver.
Weather
Display or hide the weather information in the screen saver.
Time
Display or hide the time of day in the screen saver.
Personal photo data
Display or hide the owner’s name and the album name.
Portrait Google Photos
Display or hide the portrait orientation photos from Google Photos.
Personal photo curation
Automatically curate the contents of your albums.
Sideshow speed
Set the slideshow speed.
Power & Energy
Power on behavior
Select the screen to start when powering on the projector.
Power & Energy
Set the countdown timer interval. When there is no signal being sent to the projector, the countdown timer will start.
Power
Timer
Google Cast
when casting from an external device.
System Sound
Restart
Restart the projector.
English
49
Page 50

USING THE PROJECTOR
Accessibility menu
TalkBack
Enable the option to use a screen reader<RXFDQDOVRFRQ¿JXUHWKH7DON%DFNUHODWHGVHWWLQJV
Text to speech
&RQ¿JXUH7H[WWR6SHHFKUHODWHGVHWWLQJV
Accessibility shortcut
Enable the option to use an accessible shortcut.
Note: To start an accessible feature, press and hold the and T buttons on the remote control at the same
time for 3 seconds.
Switch Access
Enable the option to turn on the switch function<RXFDQDOVRFRQ¿JXUHWKH6ZLWFK$FFHVVUHODWHGVHWWLQJV
Captions
Display
Enable the option to turn on the captions.
Language
Set the subtitle language.
Text size
Set the default font size for the the subtitle.
CAPTION STYLE
Set the caption related settings.
High contrast text
Enable the option to turn on the high-contrast text.
50
English
Page 51

USING THE PROJECTOR
Remotes & Accessories menu
Pair accessory
Search for Bluetooth accessories and pair them with your projector.
Note: To pair the remote control with your projector, see page 24.
Help & Feedback menu
Send feedback
Use the on-screen keyboard to describe the issue and send the feedback. Otherwise, press and hold the
button on the remote control to easily send the feedback.
Note: For more information, visit Google TV Help at g.co/tv/help.
English
51
Page 52
ADDITIONAL INFORMATION
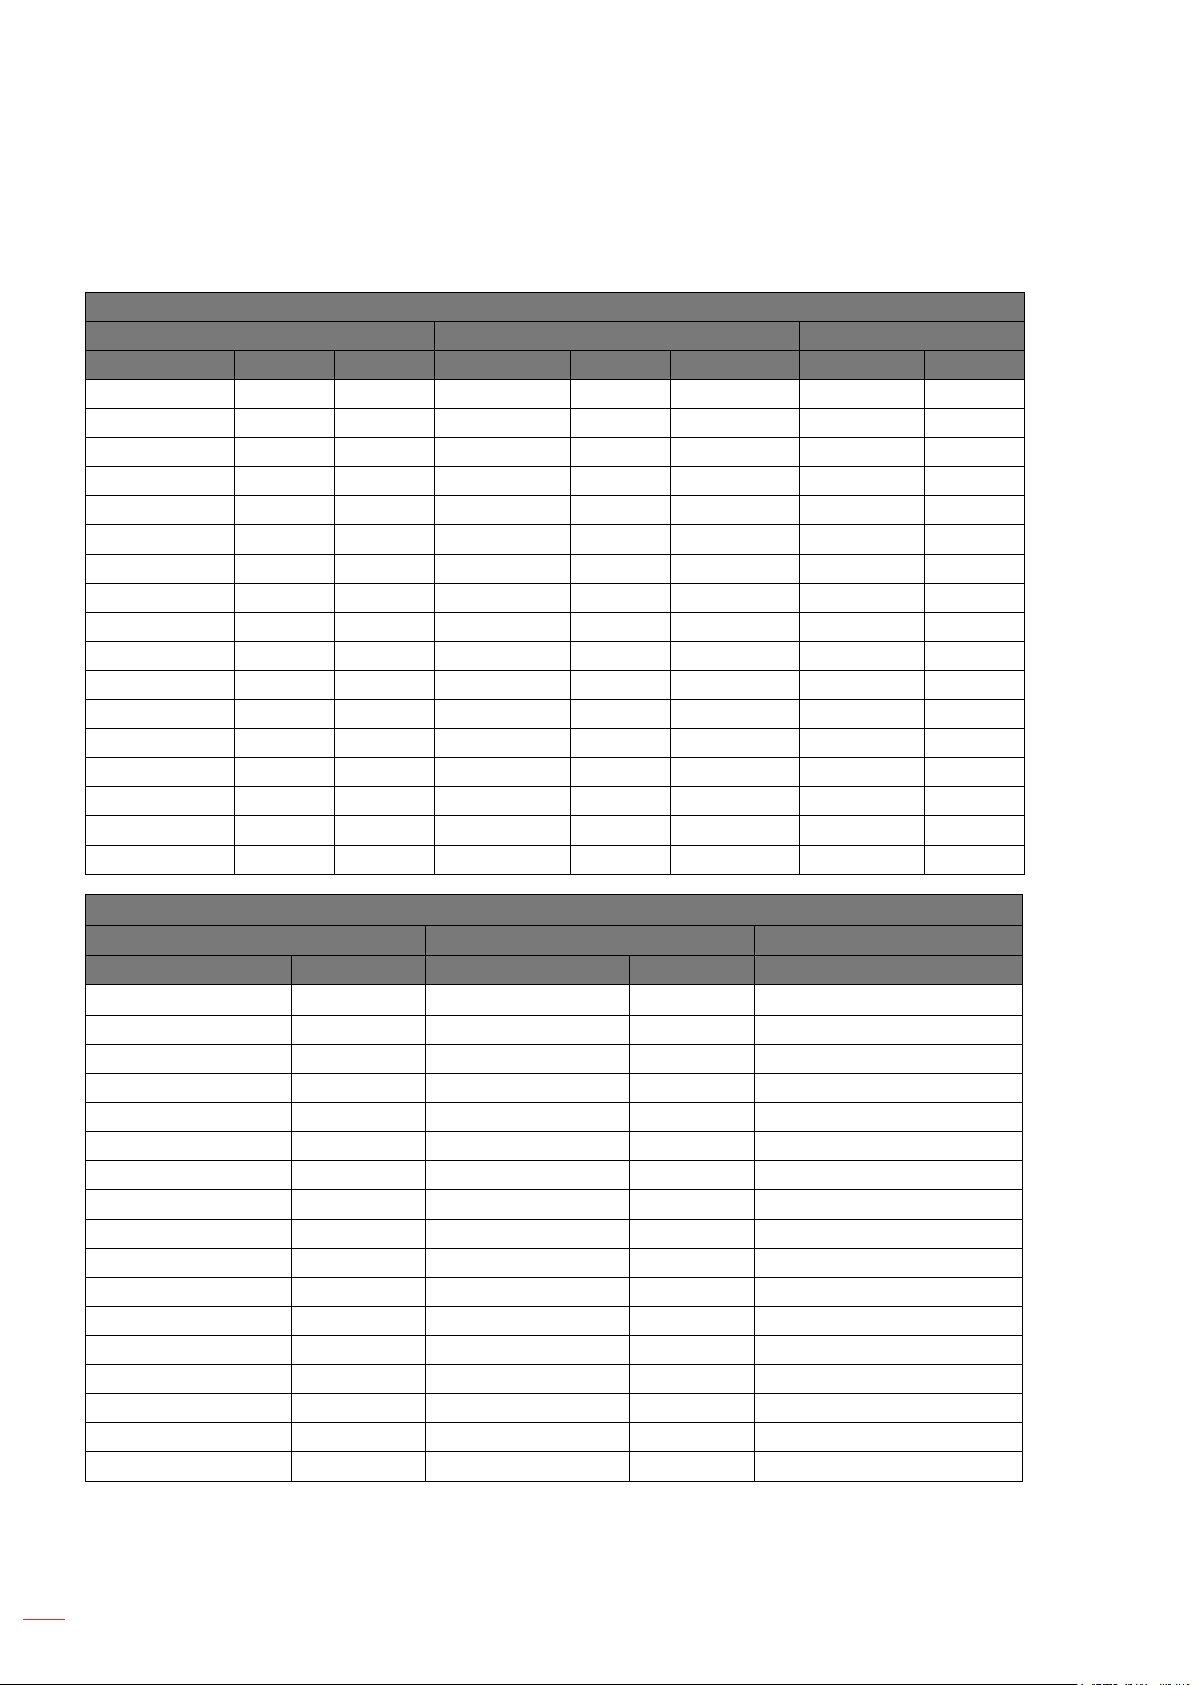
Compatible Solutions
EDID (Digital)
HDMI 1.4 (2K)
B0/Established Timing B0/Standard Timing B0/Detail Timing
Resolution V [Hz] H [Hz] Resolution V [Hz] Aspect ratio Resolution V [Hz]
[ 31.5 1280x1024 60.0 5:04 1920x1080 60.0
[ 88.0 39.6 800x600 60.0 4:03
640x480 60.0 31.5 [ 60.0 4:03
640x480 34.9 1440x1152 60.0 16:10
640x480
640x480
800x600 56.0 35.1
800x600 60.0
800x600 48.1
800x600 46.9
832x624 46.9
[
[ 60.0 48.4
[ 56.5
[ 60.0
1280x1024 80.0
[
HDMI 1.4 (2K)
B1/Video Mode B1/Detail Timing Audio Data
Resolution V [Hz] Resolution V [Hz] Format
640x480p 4:3 60.0 [S 60.0 LPCM(IEC 60958 PCM[30,31]
[S 60.0 [S 50.0 AC-3
[S 60.0 [S 50.0 Dolby Digital+(E_AC3)
1920x1080i 16:9 60.0
[L 60.0
1920x1080p 16:9 60.0
[S 50.0
[S 50.0
1920x1080i 16:9 50.0
[L 50.0
1920x1080p 16:9 50.0
1920x1080p 16:9 24.0
1920x1080p 16:9 30.0
[S 60.0
[L 60.0
[S 50.00
[L 50.00
52
English
Page 53
ADDITIONAL INFORMATION
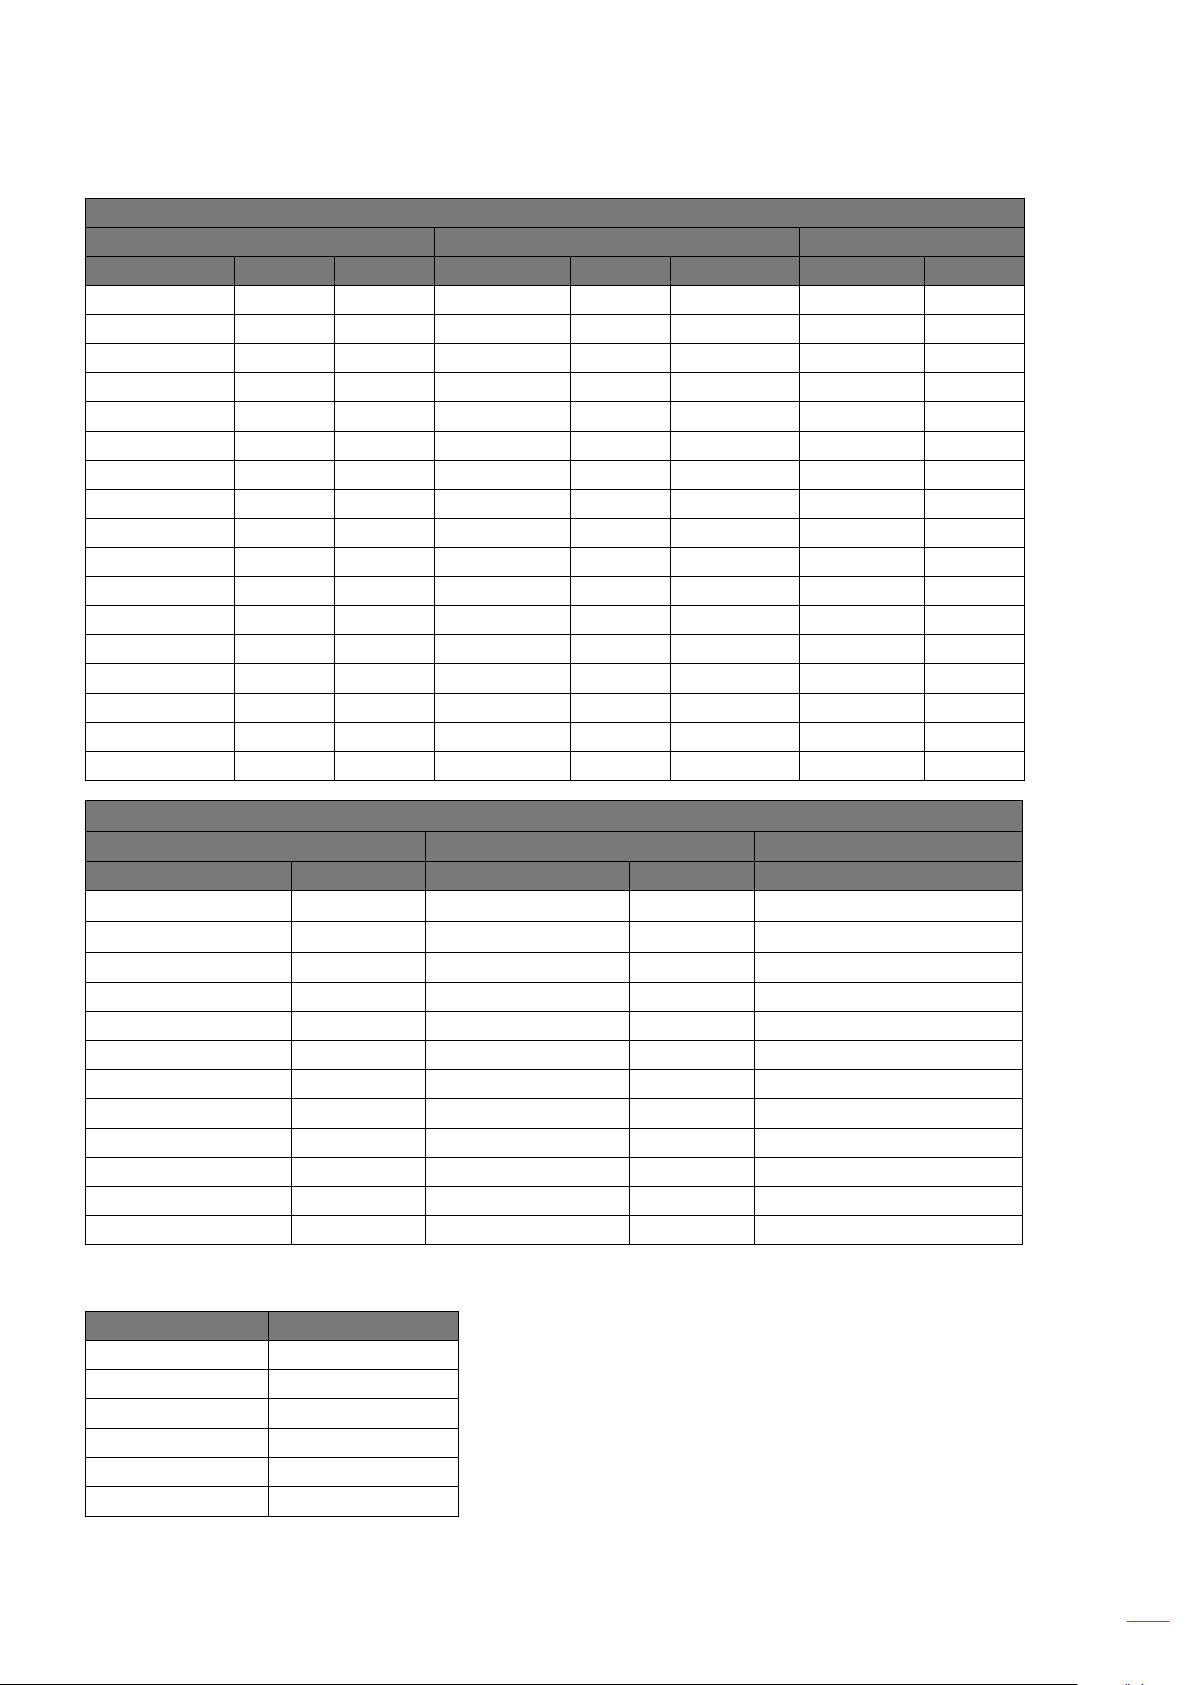
HDMI 2.0 (4K)
B0/Established Timing B0/Standard Timing B0/Detail Timing
Resolution V [Hz] H [Hz] Resolution V [Hz] Aspect ratio Resolution V [Hz]
[ 31.5 256x192 123.0 16:09 3840x2160 60.0
[ 88.0 39.6 256x192 123.0 16:09 3840x2160 24.0
640x480 60.0 31.5 2288x1430 61.0 16:10
640x480 34.9 256x192 92.0 16:10
640x480
640x480
800x600 56.0 35.1
800x600 60.0
800x600 48.1
832x624 46.9
800x600 46.9
[
[ 60.0 48.4
[ 56.5
[ 60.0
1280x1024 80.0
[
HDMI 2.0 (4K)
B1/Video Mode B1/Detail Timing Audio Data
Resolution V [Hz] Resolution V [Hz] Format
1920x1080i 16:9 60.0 [S 60.00 LPCM(IEC 60958 PCM[30,31]
[S 50.0 AC-3
[S 50.0 Dolby Digital+(E_AC3)
640x480p 4:3 60.0
[S 50.0
[S 50.0
1920x1080i 16:9 50.0
[L 50.0
1920x1080p 16:9 60.0
1920x1080p 16:9 50.0
1920x1080p 16:9 24.0
1920x1080p 16:9 30.0
MAC
Resolution V [Hz]
640 x 480 60
[ 50
800 x 600 60
[
[S
1920 x 1080p
English
53
Page 54
ADDITIONAL INFORMATION
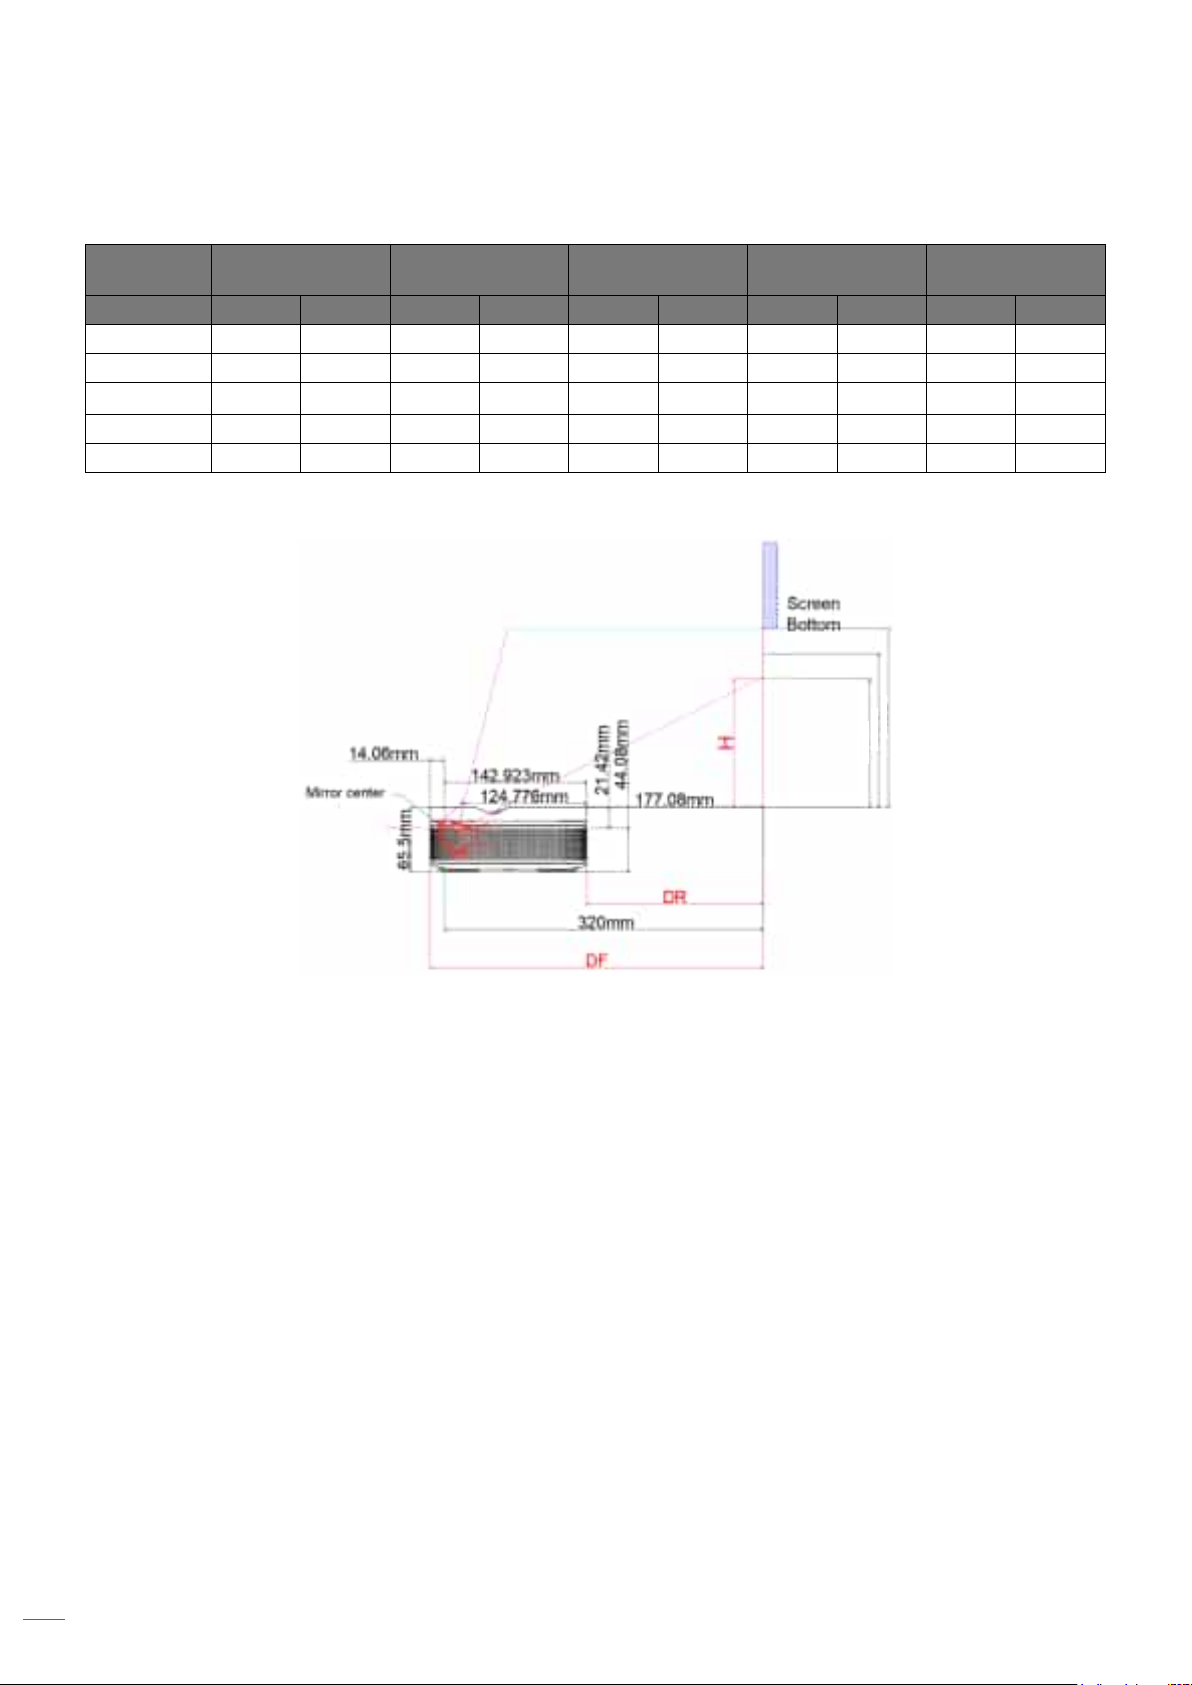
Image Size and Projection Distance
Image Size
DF
Tolerance: 0
DR
H
2ႇVHW
H
2ႇVHW
H
2ႇVHW
inch m inch m inch m inch m inch m inch
60" 0.259 0.102 0.091 3.569 0.109 4.305 0.128 5.040
0.296 11.656 0.139 0.109 4.305 0.131 5.163 0.153 6.021
80" 0.332 6.893 0.128 5.044 0.153 6.025
90" 0.369 14.530 0.212 8.349 6.888 0.203
100" 0.404 15.908 0.166 6.522 0.228
Note: All projectors will have tolerance. If you need the most accurate value, please measure the device directly.
178.49mm
153.25mm
128.08mm
Distance
54
English
Page 55
ADDITIONAL INFORMATION
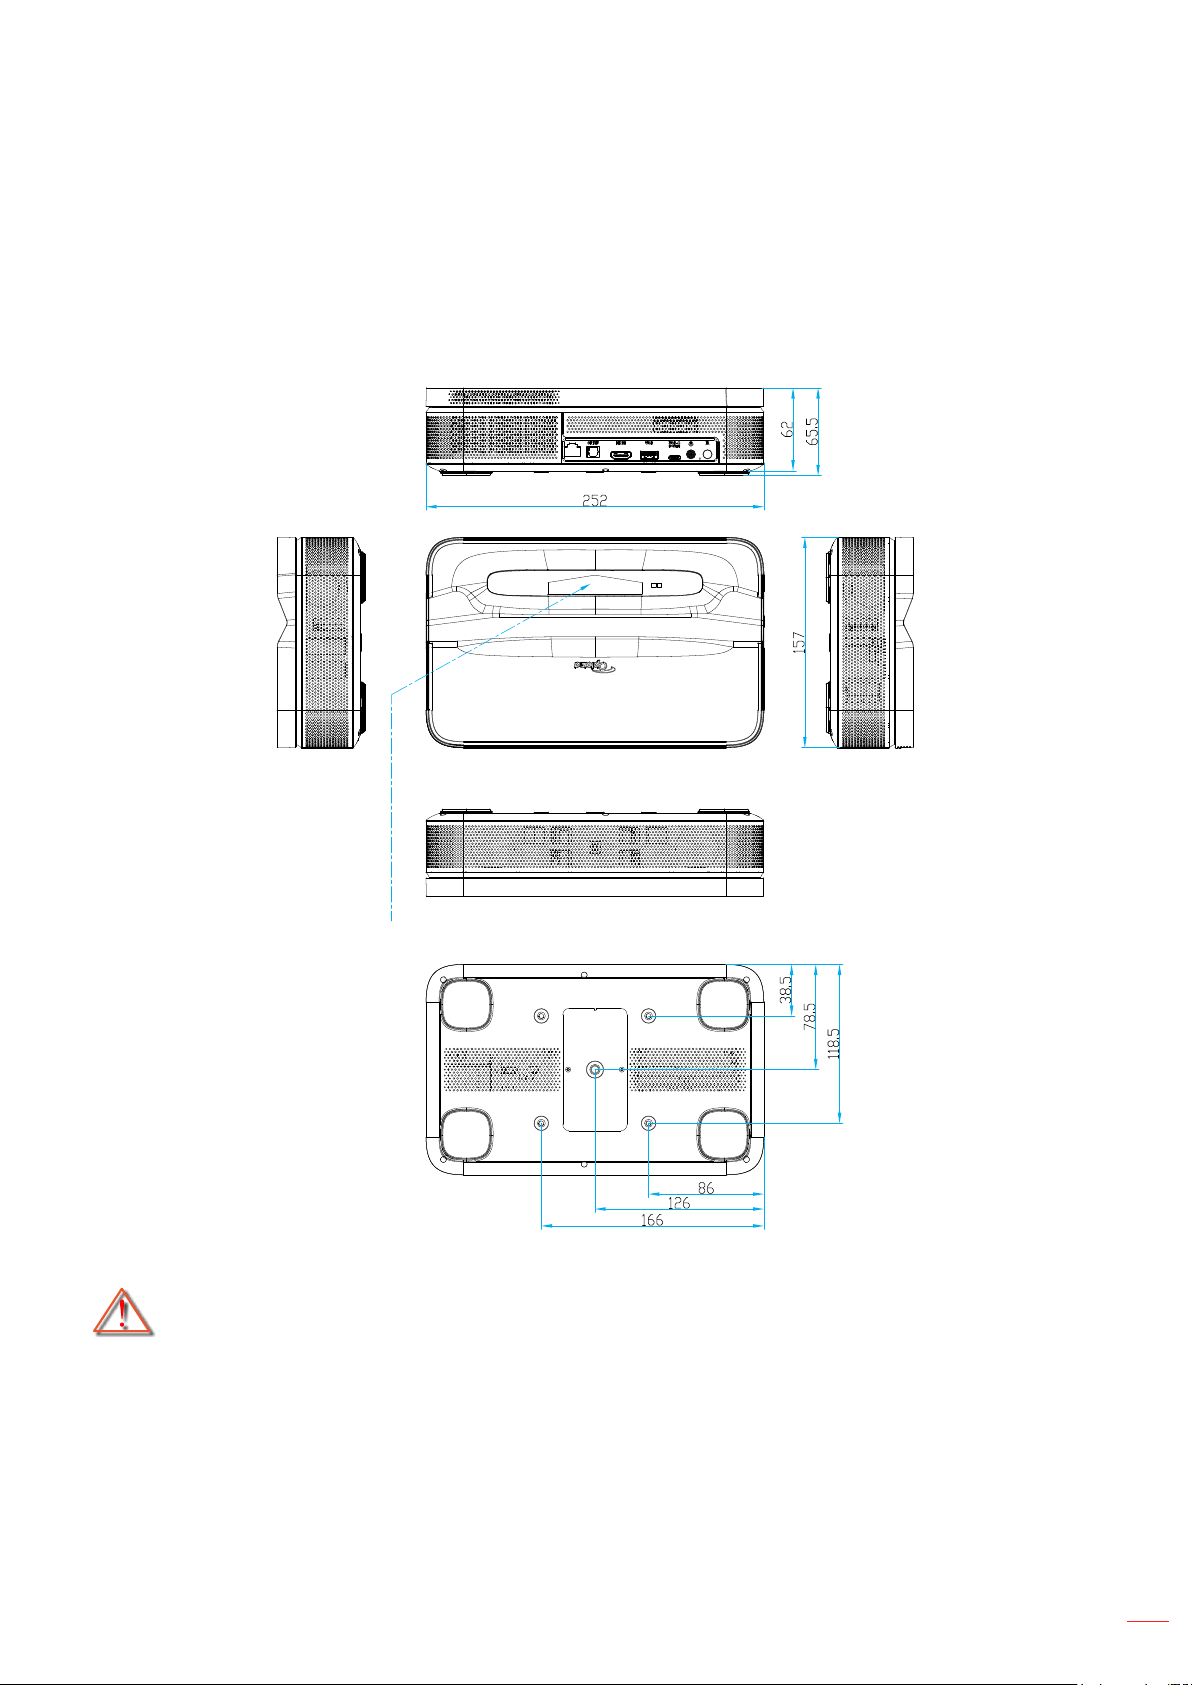
Projector Dimensions and Ceiling Mount Installation
Ceiling screw socket:
• 8VH0PPWR¿[
PTZ bracket socket:
• 8VHPP%ULWLVKWKUHDGVFUHZVWR¿[
Lens
Unit:mm
Note: Please note that damage resulting from incorrect installation will void the warranty.
Warning:
• Be sure to keep at least 15 cm gap between the ceiling and the bottom of the projector.
• Avoid installing the projector near a heat source.
English
55
Page 56
ADDITIONAL INFORMATION
IR Remote Codes
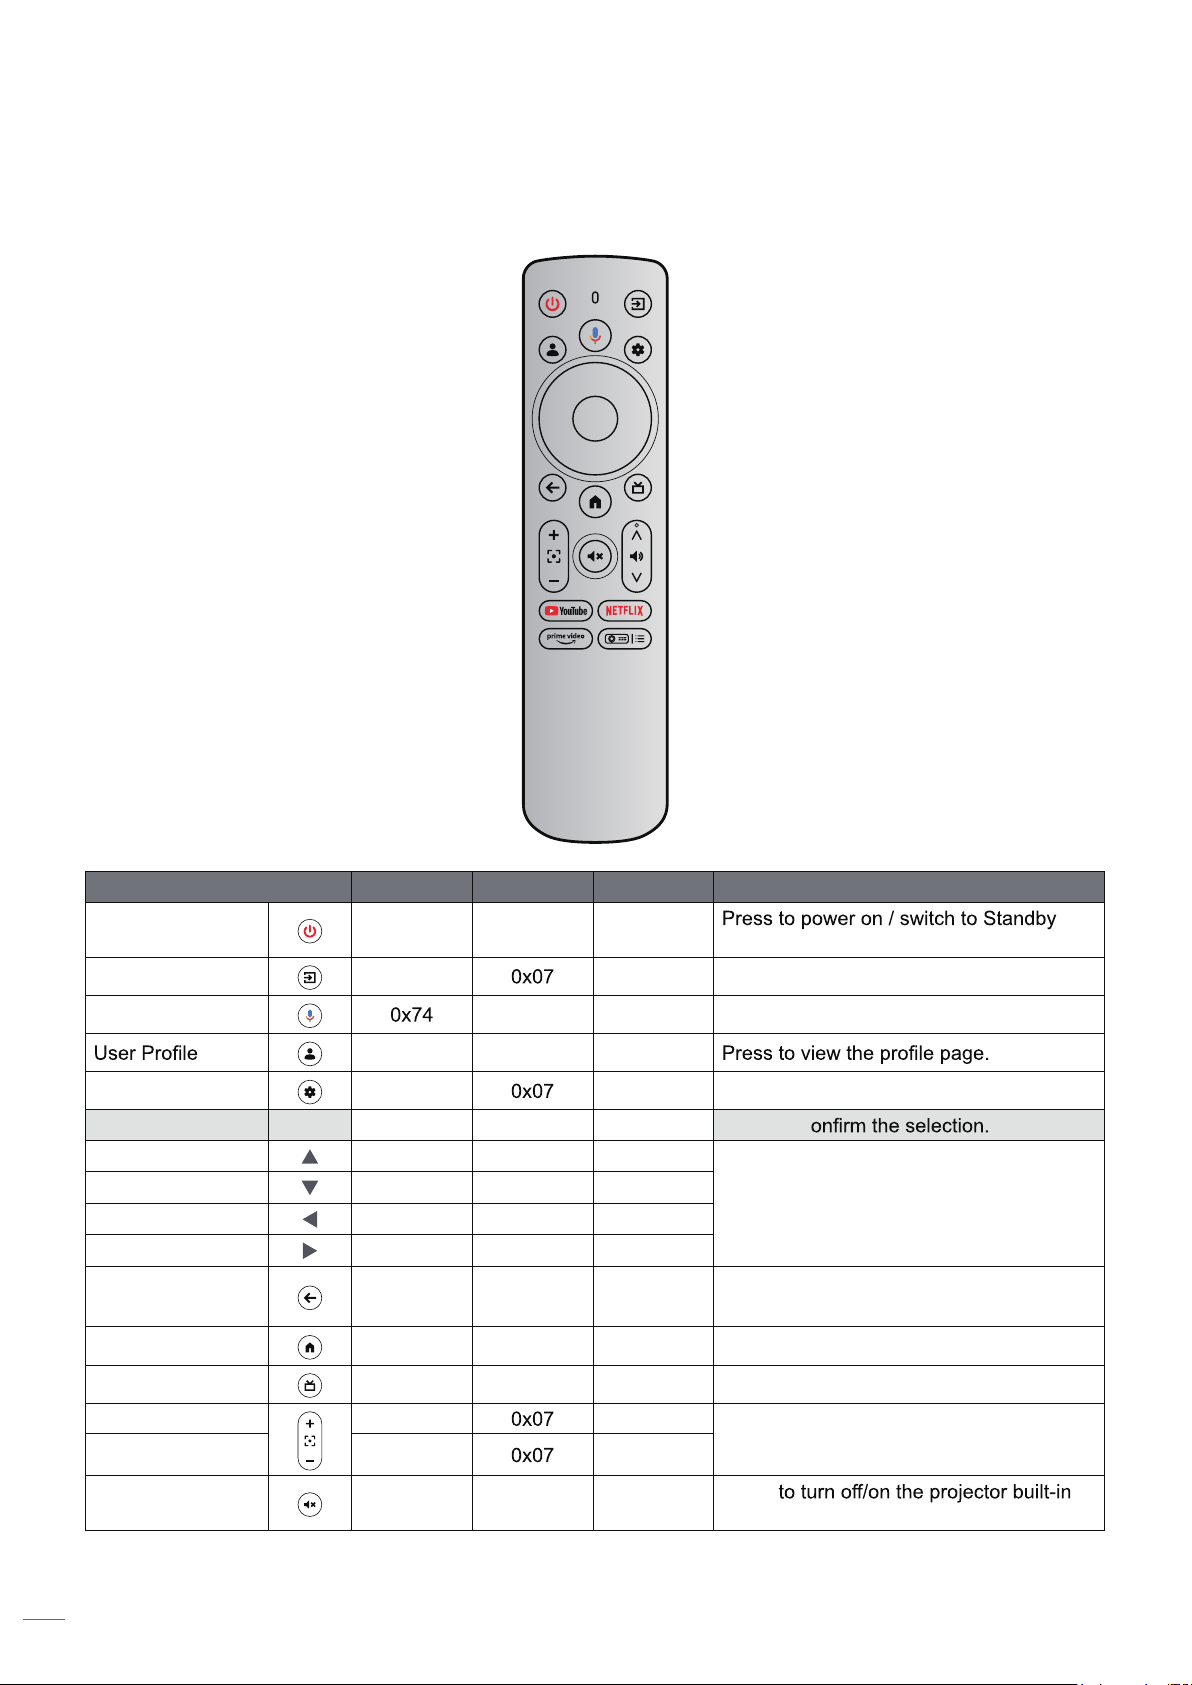
Key IR Code Usage Page Usage ID Description
Power
Input Source
Google Assistant
Settings
OK
Up 0x00 0x0C 0x0042
Down 0x01 0x0C 0x0043
Right 0x02 0x0C 0x0045
Left 0x03 0x0C 0x0044
Back
Home
Live TV*
Focus +
Focus - 0x43 0x006D
OK
0x0A 0x0C 0x0030
0x08 0x0041 Press to select an input signal.
0x0C 0x0221 Press and hold the button while speaking.
0x59 0x0C 0x019C
0x61 0x006E Press to access the Settings dash board.
0x1F 0x0C 0x0041 Press to c
0x1C 0x0C 0x0224 Press to return to the previous page.
0x0C 0x0C 0x0223 Press to access the Home Screen.
0x1E 0x0C 0x008D Press to enter the live guide page.
0x42 0x006C
mode.
Use the buttons to select item or make
adjustment according to your selection.
Press to adjust the focus.
Mute
*US Only. For regions where Live TV is unavailable, this key may direct to other input sources.
English
56
0x0D 0x0C 0x00E2
Press
speaker.
Page 57

ADDITIONAL INFORMATION
Key IR Code Usage Page Usage ID Description
Volume + 0x58 0x0C 0x00E9
Volume - 0x5D 0x0C 0x00EA
Press to adjust the volume level.
YouTube
NetFlix
Prime Video
Projector Settings
(Shortcuts)
0x4D 0x0C [ Press to launch the video streaming app.
0x4E 0x0C 0x0008 Press to launch the video streaming app.
0x2E [ 0x003E Press to launch the video streaming app.
0x38 [ 0x003F
Press to access projector setting shortcut
menu.
English
57
Page 58

ADDITIONAL INFORMATION
Troubleshooting
If you experience a problem with your projector, please refer to the following information. If a problem persists,
please contact customer support or local service center.
No audio output
• Check if the projector is in mute mode. If so, press the
unmute projector.
• Check if your mobile device is successfully paired with the projector via Bluetooth. For more
information, see page 28.
No image output
• Press the
enters the projection mode successfully.
• (QVXUHWKDWWKHSRZHUDGDSWHUKDVVSHFL¿HGSRZHURXWSXW
No network
• Check the internet connection status in the [Network & Internet] option. For more information, see
page 25.
• Ensure that the network cable is correctly inserted to the RJ-45 connector of the projector.
• (QVXUHWKDWWKHURXWHULVFRUUHFWO\FRQ¿JXUHG
Fuzzy image
• Adjust the focus or keystone correction of the projector.
• 0DNHVXUHWKHSURMHFWLRQGLVWDQFHLVLQWKHHႇHFWLYHIRFDOUDQJHRIWKHSURMHFWRUFor more information,
see page 54.
button at the rear of the projector. The power indicator light will turn on if the projector
button on the remote control again to
• Remove the dust or dirt from the lens with a blower or soft-bristled brush.
Non-rectangular image
• 3ODFHWKHSURMHFWRUSHUSHQGLFXODUWRWKHVFUHHQZDOOLIWKHNH\VWRQHFRUUHFWLRQIXQFWLRQLVQRWXVHG
• Use the keystone correction function to adjust the image shape. For more information, see page 27.
Automatic keystone correction failure
• Make sure the TOF module on the front glass cover of the projector is not blocked or smudged.
• Move the projector until it is perpendicular to the projection surface and try again.
Automatic focus failure
• Make sure the TOF module on the front glass cover of the projector is not blocked or smudged.
• Move the projector back and forth until the projector is in recommended projection distance. For more
information, see page 54.
58
English
Page 59

ADDITIONAL INFORMATION
Remote control unresponsive
• Make sure the batteries are installed correctly and not drained.
• Remove any obstructions between your projector and remote control.
• Ensure the remote control is successfully paired with the projector via Bluetooth.
• Make sure no button is pressed or stuck and check if the power indicator is still on. If yes, please
contact the customer support or local service center.
Connect the Bluetooth devices
• Press the
[Remotes & Acessories] option to check the Bluetooth device list. Then select [Pair accessory] to
pair with other Bluetooth device.
Cannot power on the projector
• The projector will enter the protection mode if the internal battery runs out. In this case, make sure
the projector is connected to power supply and then press and hold the
the button on the remote control for 3 seconds to power on the projector. In other cases, please
contact customer support or local service center.
Others
• Please feel free to contact us.
button on the remote control and select to enter the All settings menu. Open the
button on the projector or
English
59
Page 60
ADDITIONAL INFORMATION
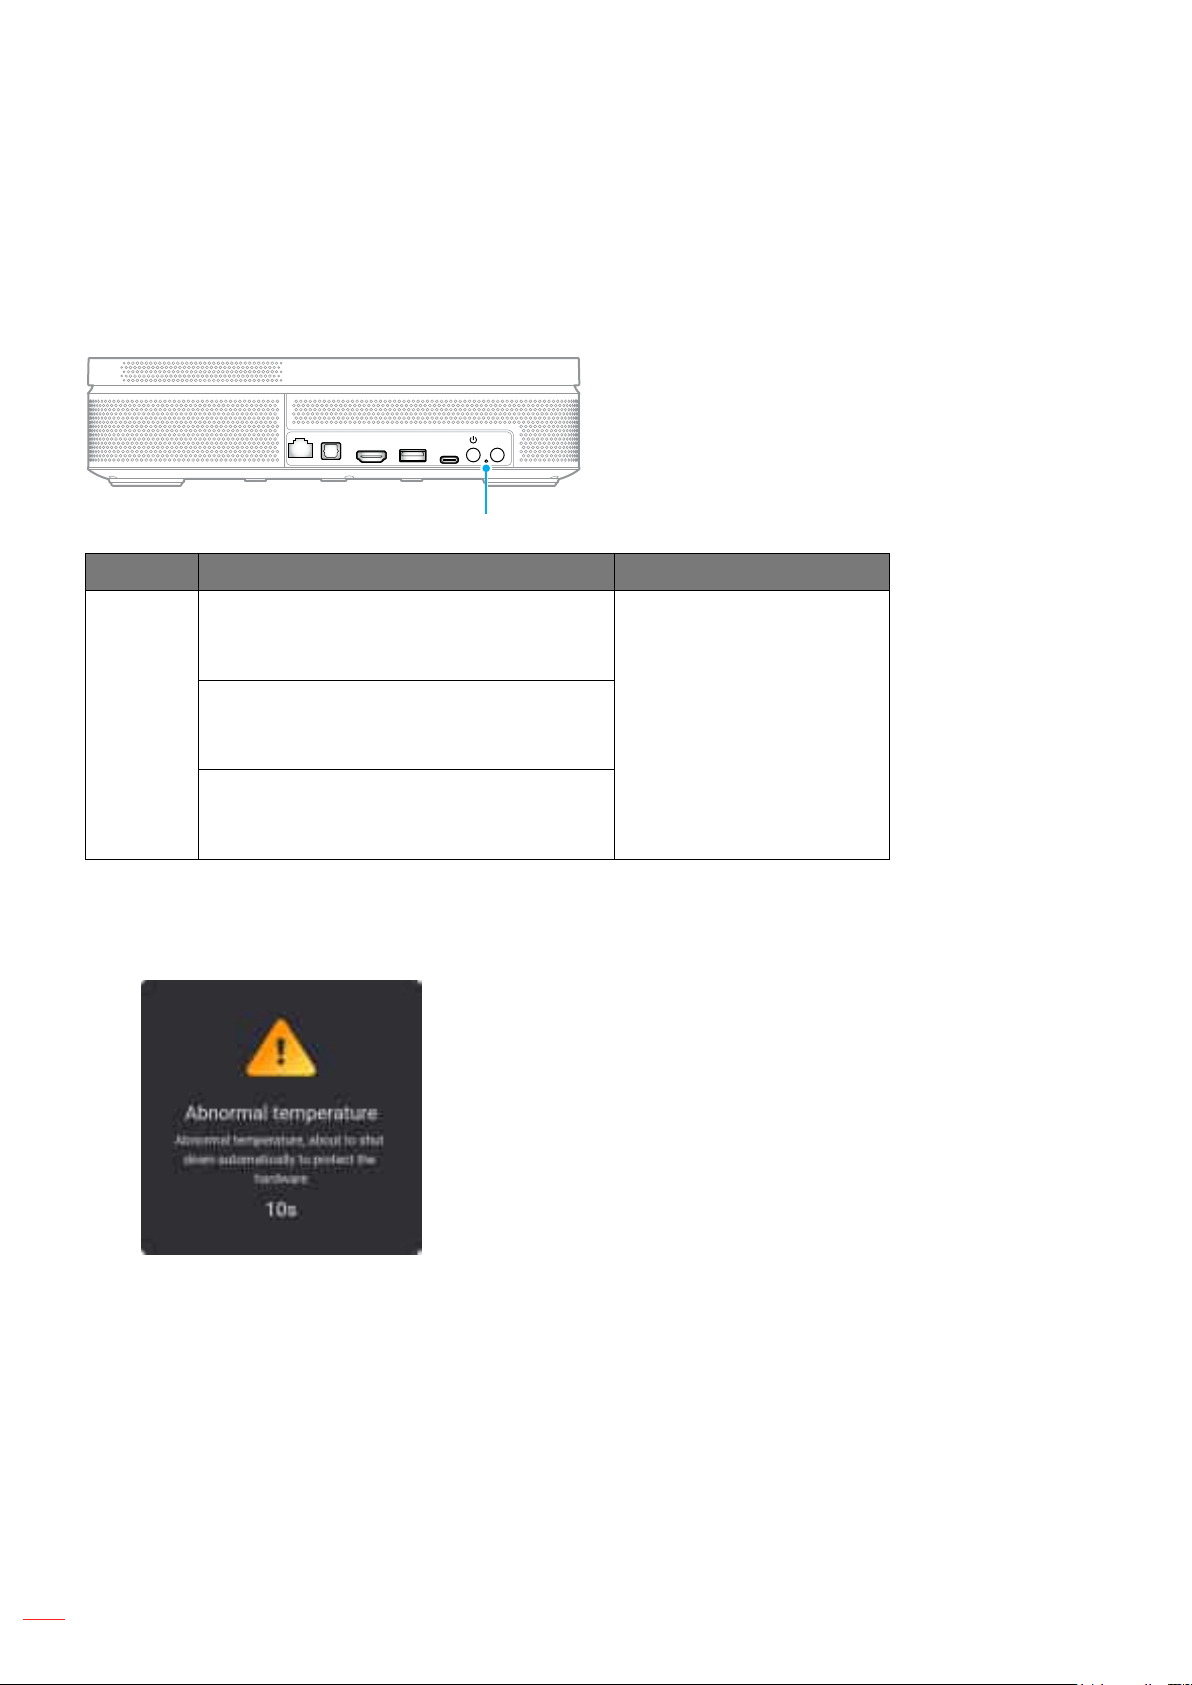
Warning Indicators
Refer to the “Troubleshooting” section for the common issues. If the problem persists, please contact your nearest
service center for assistance.
Power LED Indicator Guide
USBHDMISPDIF
LED Status On 2ႇ
Power on (Battery mode):
blue)
red)
red)
green)
Description
• in projection (
• battery low (
Power on (Plug in the adapter):
• LQSURMHFWLRQEDWWHU\FKDUJLQJ
• LQSURMHFWLRQEDWWHU\IXOO\FKDUJHG
3RZHURႇ:
• battery charging (
• battery fully charged (
IRUSB-C
(POWER)
Power LED
red)
3RZHURႇ6WDQGE\
green)
Warning Message
• Projector Overheating
60
English
Page 61
ADDITIONAL INFORMATION
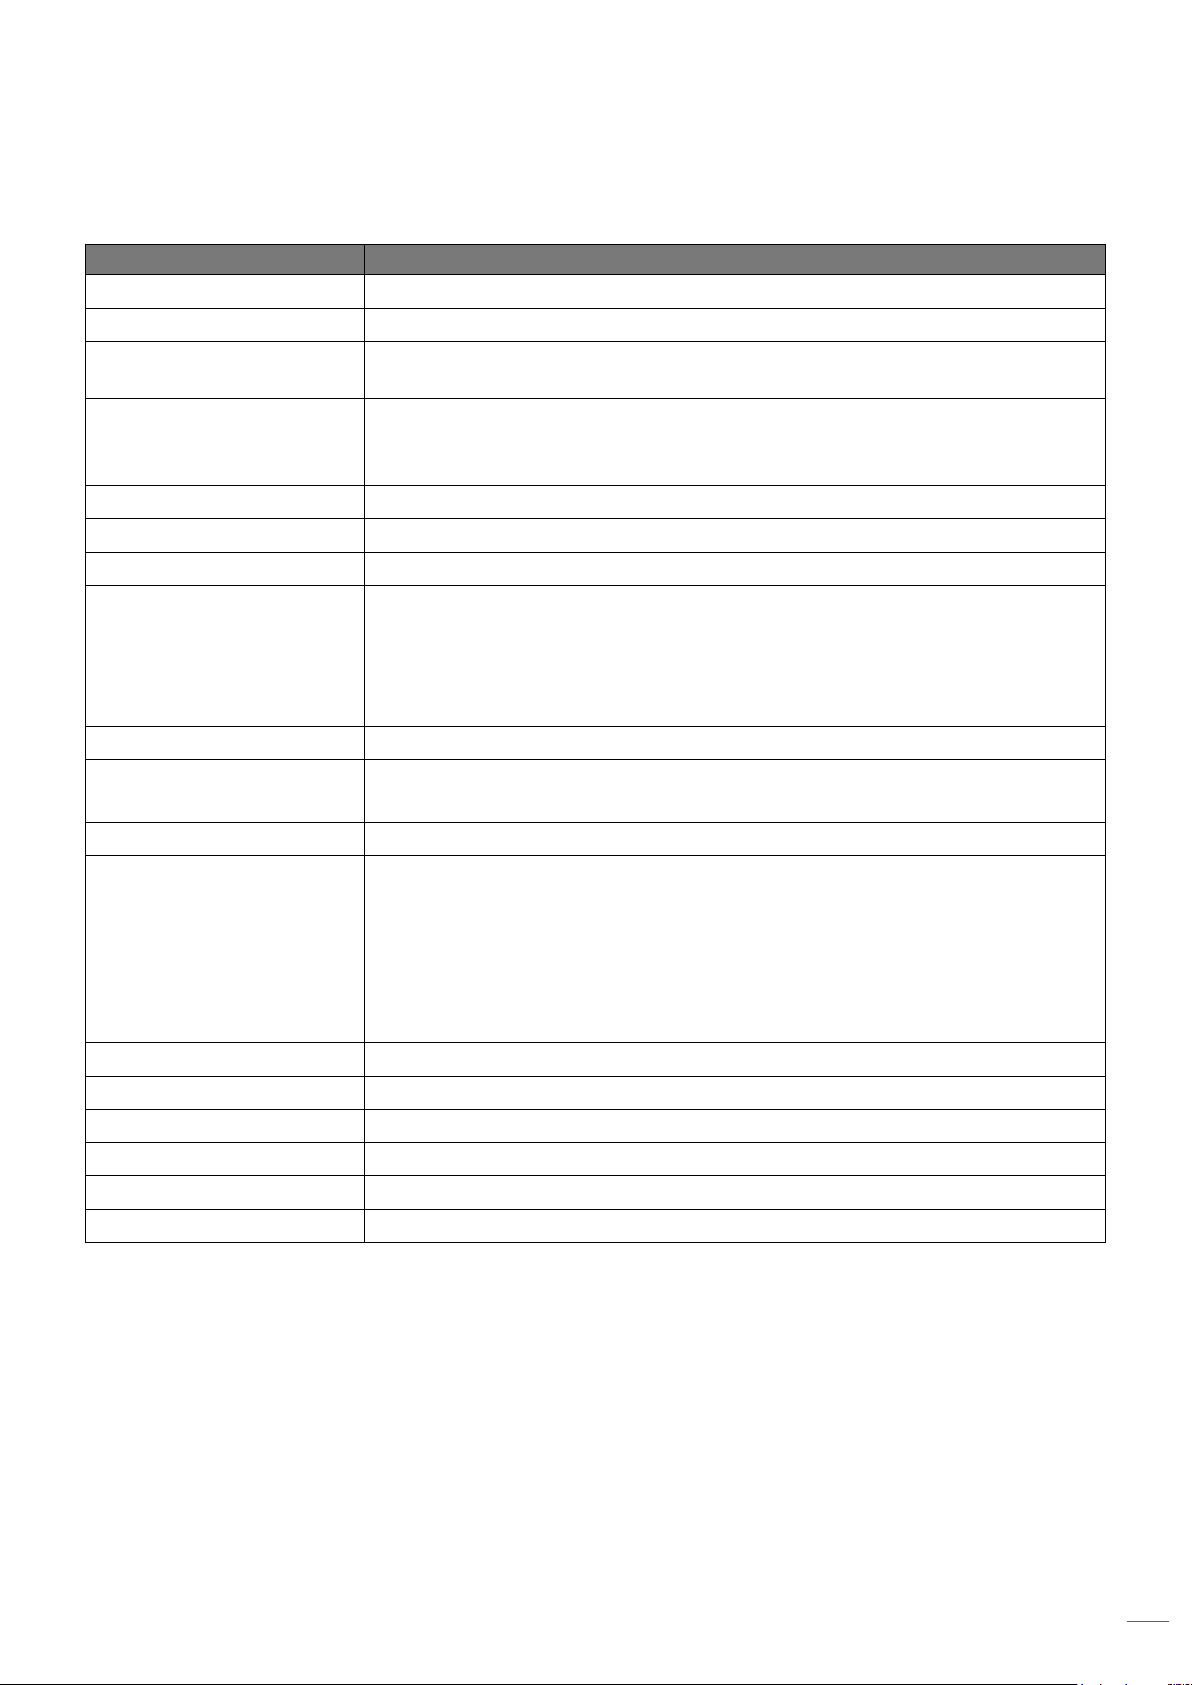
6SHFL¿FDWLRQV
Item Description
Technology Texas Instrument DMD, 0.23” 1080p DMD
Output resolution 1080p Full HD (1920x1080)
Maximum input resolution
Lens
2ႇVHW 135% ±5%
Image size 60” ~ 100”
Projection distance 26cm ~ 40cm (10.2” ~ 15.9”)
Lens
Colour 0LOOLRQFRORU
Scan rate
Speaker :[PD[RXWSXW:
Power consumption
3RZHUUHTXLUHPHQW A&a9+]
Input power 20V 5A
Installation orientations Front, Rear, Ceiling-top, Rear-top
Dimensions (W x D x H) 252 x x 62 mm (99.21 x 61.81 x 24.41 inches)
Weight NJOEV
Environmental Operating in 0°~40°C, 10% to 85% humidity (non-condensing)
Graphic up to 3840 x 2160 @60Hz (HDMI port) 4K HDR Input is supported with
external HDMI Source. Projector will display content in 1080p HDR.
• Throw ratio: 0.18
• F-stop: 2.1
• Focal length: 0.9143 mm
• HDMI 2.0 x1
• 86%$[9$
• 63',)
• LAN
• USB C x1 (power in)
• Horizontal scan rate: 15 kHz – 135 kHz
• Vertical scan rate: 24 ~ 60Hz (60Hz for 1080P)
97\SLFDO:%78
• :QRWHLQFOXGHFKDUJLQJ%78KU
• :QRWHLQFOXGHFKDUJLQJ%78KU
97\SLFDO:%78):
• :QRWHLQFOXGHFKDUJLQJ%78KU
• :QRWHLQFOXGHFKDUJLQJ%78KU
Note: $OOVSHFL¿FDWLRQVDUHVXEMHFWWRFKDQJHZLWKRXWQRWLFH
English
61
Page 62
ADDITIONAL INFORMATION
2SWRPD*OREDO2ႈFHV
)RUVHUYLFHRUVXSSRUWSOHDVHFRQWDFW\RXUORFDORႈFH
USA
Optoma Technology, Inc.
:HVWLQJKRXVH'ULYH
Fremont, Ca 94539 [email protected]
Canada
Optoma Technology, Inc.
:HVWLQJKRXVH'ULYH
Fremont, Ca 94539 [email protected]
Latin America
Optoma Technology, Inc.
:HVWLQJKRXVH'ULYH
Fremont, Ca 94539 [email protected]
Europe
1 Bourne End Mills
Hemel Hempstead
Hertfordshire
HP1 2UJ
United Kingdom +44 (0) 1923 691 800
www.optoma.eu +44 (0) 1923 691 888
Service Tel : +44 (0)1923 691865 [email protected]
Benelux BV
Optoma Benelux BV +31 (0) 36 8200 250
(XURSDODDQ' +31 (0) 36 548 9052
1363BM Almere
The Netherlands
www.optoma.nl
Japan
https://www.optoma.com/jp/
Taiwan
KWWSVZZZRSWRPDFRPWZ
China
Room 2001, 20F, Building 4,
No.1398 Kaixuan Road,
Changning District www.optoma.com.cn
Shanghai, 200052, China
Australia
KWWSVZZZRSWRPDFRPDX
France
Bâtiment E +33 1 41 46 12 20
81-83 avenue Edouard Vaillant +33 1 41 46 94 35
92100 Boulogne Billancourt, France [email protected]
Spain
&-RVp+LHUUR2I& +34 91 499 06 06
Rivas VaciaMadrid, Spain
Deutschland
Am Nordpark 3 +49 (0) 2161 68643 0
41069 Mönchengladbach +49 (0) 2161 68643 99
Deutschland [email protected]
Scandinavia
Postboks 9515 Åskollen
Kniveveien 29
Drammen [email protected]
3036
Norway
Korea
KWWSVZZZRSWRPDFRPNU
62
English
Page 63

www.optoma.com
 Loading...