

Page 1

Roll Type PCT User Manual
PCT Interactive Roll User Guide
2017/05/25
Page 2

Roll Type PCT User Manual
2
Table of Contents
PRECAUTION ....................................................................................................................................................................................................................... 3
1. PRODUCT INTRODUCTION ................................................................................................................................................................................................. 5
1-1 Specifications ............................................................................................................................................................................................................ 6
1-2 Computer Requirement ............................................................................................................................................................................................. 7
1-3 Operation System Requirement ................................................................................................................................................................................. 8
1-4 Environment Requirement ........................................................................................................................................................................................ 8
2. PROJECTOR AND PCT INSTALLATION ASSESMENT .............................................................................................................................................................. 11
3. SUGGESTED PROJECTOR AND WALL MOUNT INSTALLATION .............................................................................................................................................. 13
3-1 101” ROLL TYPE PCT + Suggested Projector .............................................................................................................................................................. 13
3-2 138” ROLL TYPE PCT + Suggested Projector .............................................................................................................................................................. 16
3-3 Wall Plate Installation ............................................................................................................................................................................................. 19
3-4 Cable Management ................................................................................................................................................................................................. 20
3-5 Installation Projector On Arm .................................................................................................................................................................................. 21
3-6 Projection Image Adjustment .................................................................................................................................................................................. 22
4. ROLL TYPE PCT INSTALLATION ......................................................................................................................................................................................... 33
5. CALIBRATION ................................................................................................................................................................................................................. 44
6. TROUBLE SHOOTING....................................................................................................................................................................................................... 52
7. PRODUCT LIST ................................................................................................................................................................................................................ 61
Page 3

Roll Type PCT User Manual
3
PRECAUTION
• Assembly or disassembly of Roll type PCT product should be only performed by professional installers.
• Roll type PCT Product is an indoor use only product, long-term exposure of the sunlight or in humid environment might damage the Roll type PCT.
• Roll type PCT Product should be installed away from fire source.
• Roll type PCT is not water repellent. Installation of PCT should be away from water leaking source.
• Roll type PCT installation should be 30cm away from the power switch and 50cm away from transformer box to prevent interference.
• Ensure that any cables extending across the floor to your Roll type PCT Product are properly bundled and marked to avoid a trip hazard.
• Do not stand (or allow children to stand) on a chair to touch the surface of your Roll type PCT Product.
• Do not climb (or allow children to climb) on Roll type PCT Product. Climbing on the interactive roll type PCT could result in personal injury or product damage.
• You must connect the USB cable that came with your Roll type PCT Product to a computer. For extending USB cable length over 5m, a certified active
extension USB cable is required. In addition, the USB source computer must be compliant with CSA/UL/EN 60950 and bear the CE mark and CSA
and/or UL Mark(s) for CAS/UL 60950. This is for operating safety and to avoid damage to the Roll type PCT Product.
Page 4
Roll Type PCT User Manual
4
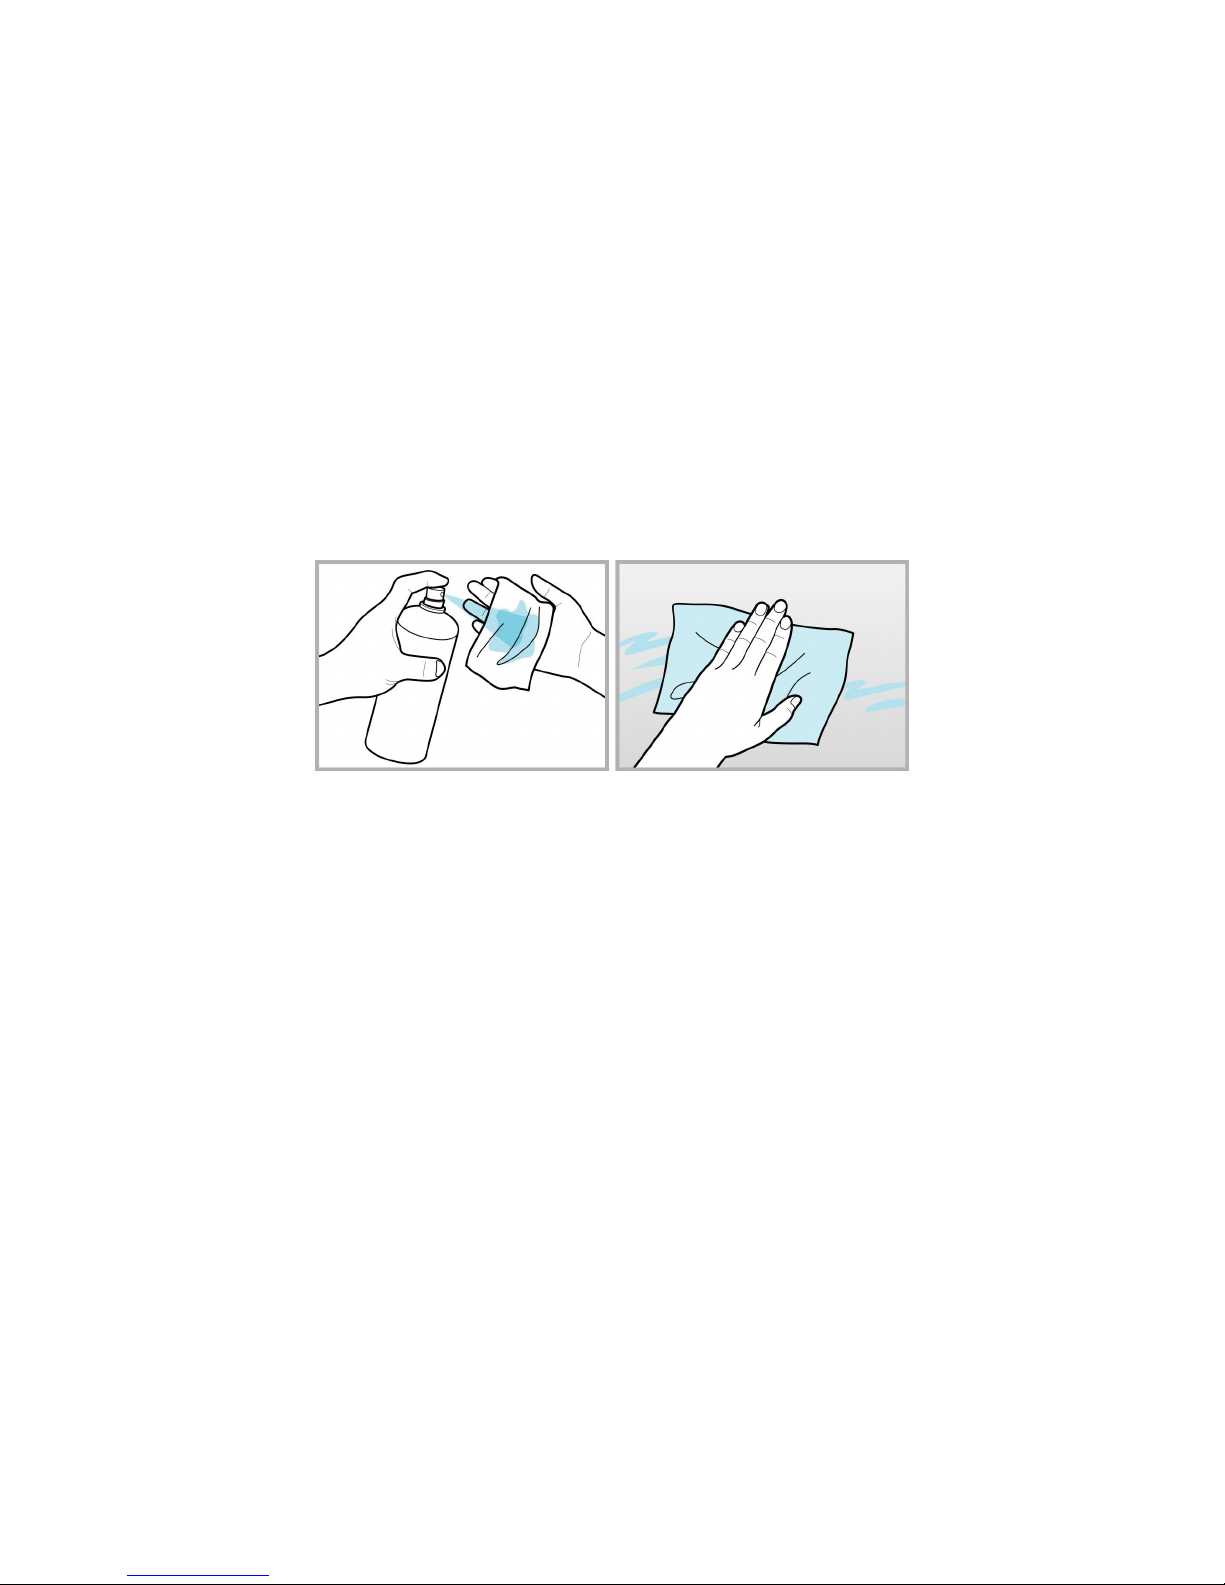
Maintenance: If necessary, gently clean the Roll type PCT Product with a microfiber cloth and Clean water. Dampen a microfiber cloth with a clean water then
wipe the screen gently until ink is wiped clean, then use another clean and dry microfiber cloth to wipe whole surface again.
If using the whiteboard cleaner for cleaning, users need to take a clean and dry microfiber cloth to wipe whole surface until the solvent is removed.
Roll type PCT Product is not a water-proof product, splashing water should be forbidden.
Page 5
Roll Type PCT User Manual
5
1. PRODUCT INTRODUCTION
PCT interactive whiteboard is a series multi-touch giant electric whiteboard to be associated with computer, projector and software providing education and
corporate a total collaboration solutions.
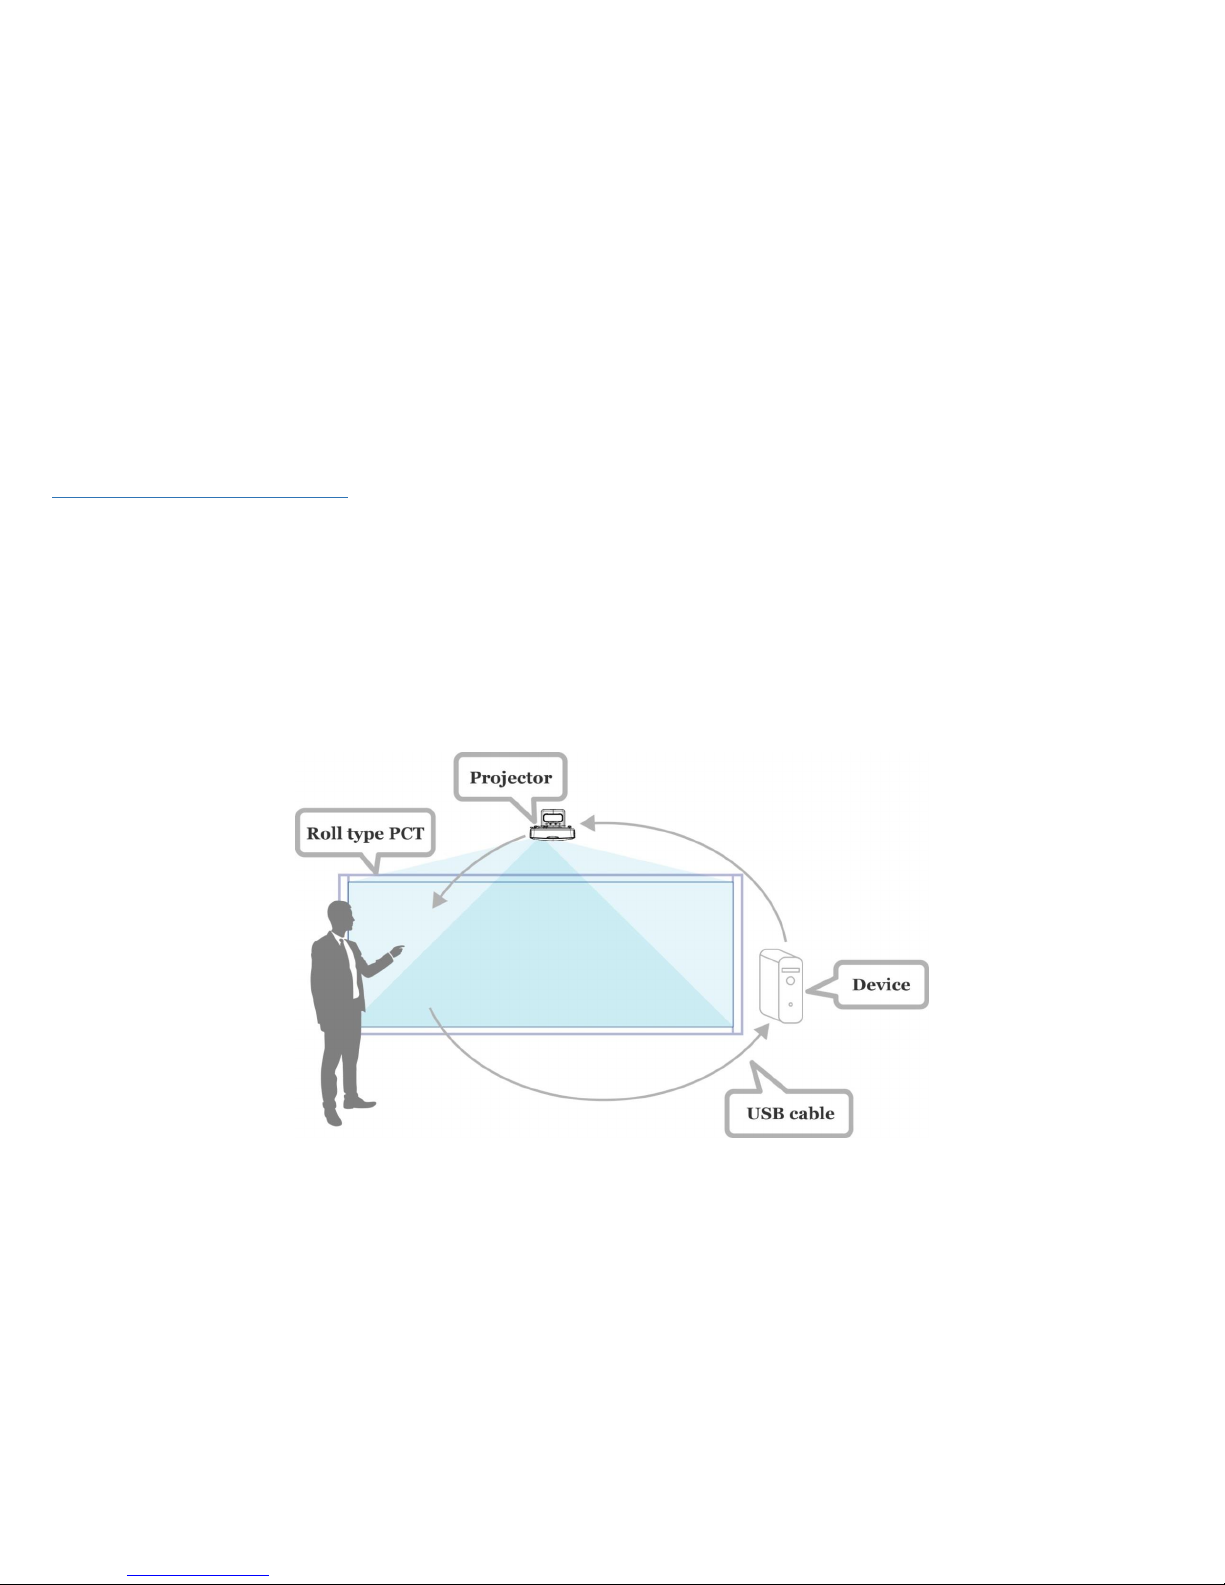
The image will be projected to PCT via projector, also, the touch function will be enabling through USB cable which is connected to the device (computer,
tablet, etc.), therefore, this simply makes projector, device, PCT a touch system. Meanwhile, PCT is able to be considered as an input device (like touch pad)
as well as a huge monitor for your devices
PCT is a light-interference free touch product if compares with IR matrix or Optical touch products, and it also supports up to 30 points touch, in short, the
touch function works just like I-Pad-high accuracy and sensitivity.
PCT, Device, Projector Connections
Page 6
Roll Type PCT User Manual
6
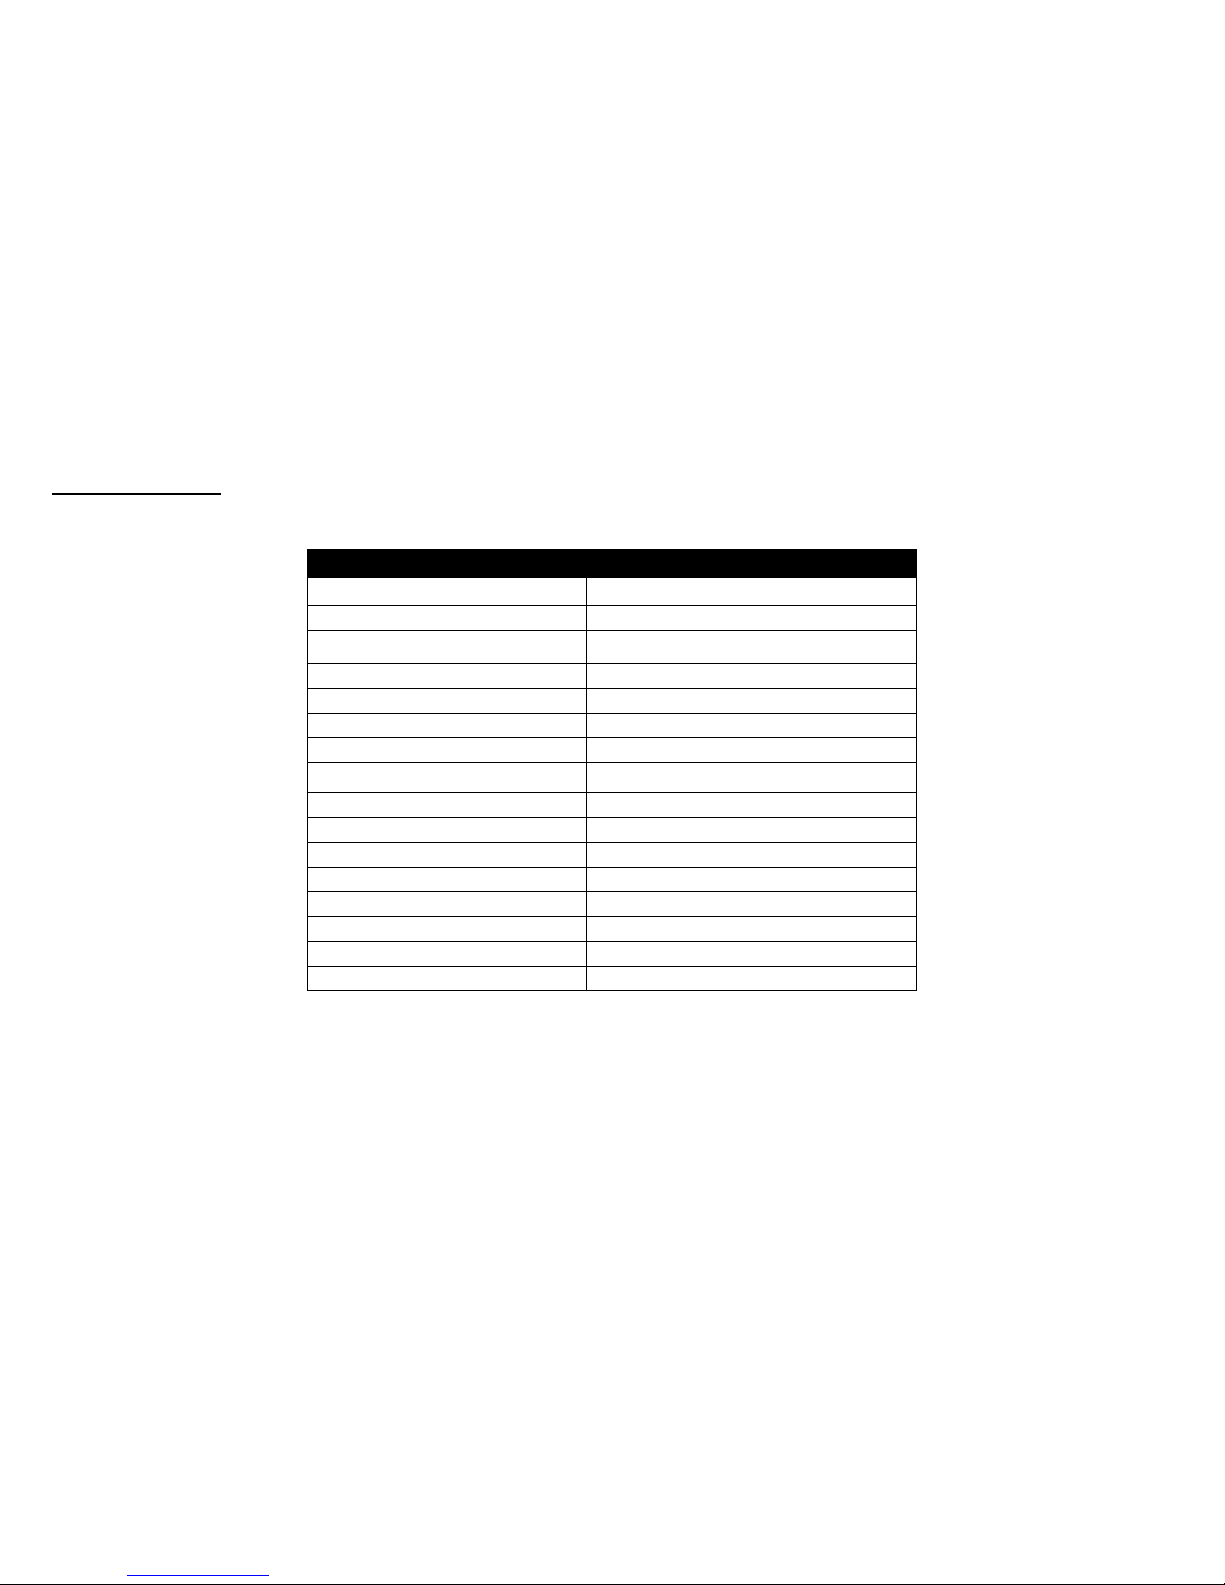
1-1 Specifications
101” ROLL TYPE PCT
項目
規格
Size
101” (16:9), 2248 x 1295 mm
Touch Sensor Size
94” (16:9), 2096 x 1174 mm
Touch Tech
Projected Capacitive Touch
Touch Points
30 points
Report Rate
>100Hz
Latency
≦100 ms
Accuracy
± 2mm typical
Touch Height
< 0.5 mm
Passive Stylus Nib Size
> 8 mm
Calibration
4 / 9 points Calibration
Power Consumption
< 2.5 W
Dry Erase Surface
Optional
Weight
< 15kg
Operation Temp.
0°C ~ +40°C
Storage Temp.
-20°C ~ +60°C
Humidity
20–90%
Page 7

Roll Type PCT User Manual
7
138” ROLL TYPE PCT
項目
規格
Size
138” (16:6), 3282 x 1295 mm
Touch Sensor Size
132” (16:6), 3130 x 1174 mm
Touch Tech
Projected Capacitive Touch
Touch Points
30 points
Report Rate
>100Hz
Latency
≦100 ms
Accuracy
± 2mm typical
Touch Height
< 0.5 mm
Passive Stylus Nib Size
> 8 mm
Calibration
9 / 36 points Calibration
Power Consumption
< 2.5 W
Dry Erase Surface
Optional
Weight
< 20kg
Operation Temp.
0°C ~ +40°C
Storage Temp.
-20°C ~ +60°C
Humidity
20–90%
1-2 COMPUTER REQUIREMENT
CPU: Intel CoreTM i3 or above
Memory: 4GB+
Page 8
Roll Type PCT User Manual
8
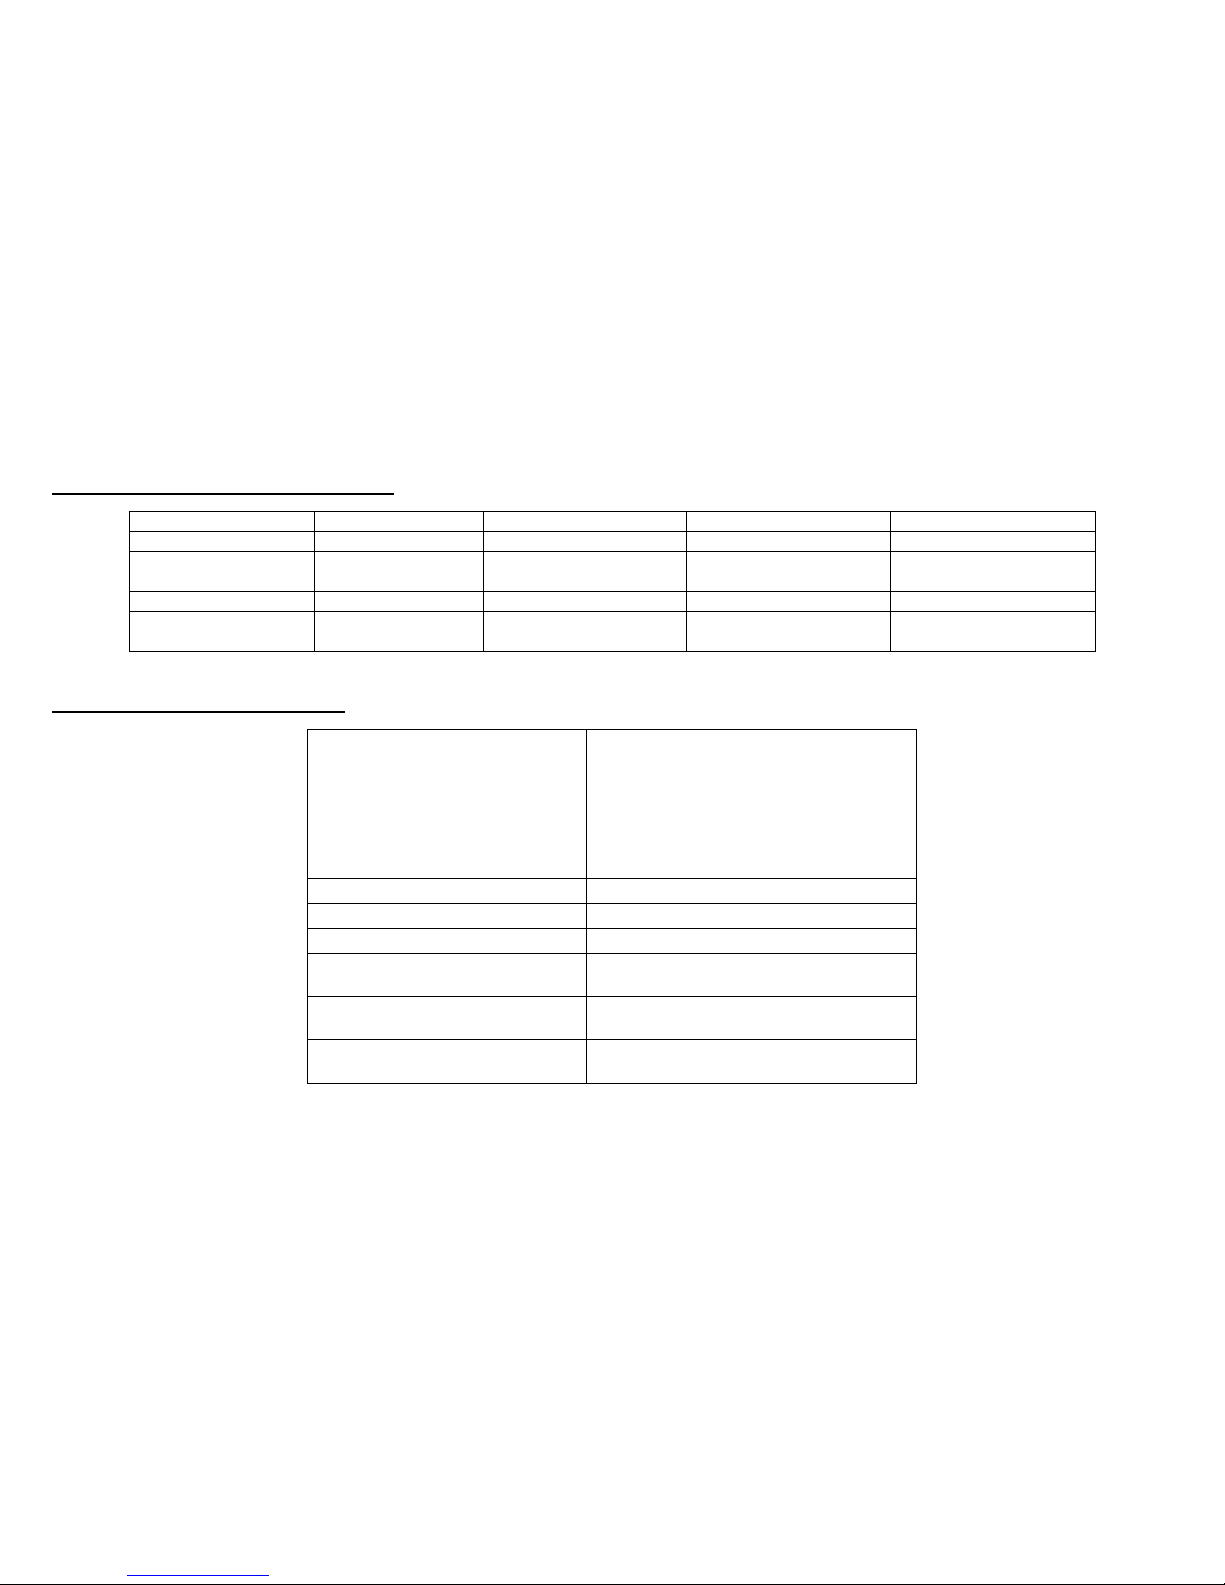
1-3 Operation System Requirement
Windows
MAC OS X
Chromebook
Android
OS Version
Win7; Win8; Win10
10.9; 10.10; 10.11
51.0.2704.103(64-bit)
(Kernel version 4.0+)
Touch Points
30 points
Single (Limited by MAC OS
X)
16 points (Limited by
Chrome OS)
10 points (Limited by
Android OS)
Driver Required
Not Required
Required
Not Required
Not Required
Calibration Tool
Support
Non-Support (Please use
Windows Calibration Tool.)
Non-Support (Please use
Windows Calibration Tool.)
Non-Support (Please use
Windows Calibration Tool.)
1-4 Environment Requirement
Wall Selection
1. Firm and stable flat wall. Magnetic Surface
or any metallic surface which can be
attached by magnet is highly suggested.
2. Space
138”: 3.5m width, 2.5m height (at least)
101”: 2.5m width, 2.5m height (at least)
3. Wall Surface: Please refer to below section
Operation Temp.
0°C ~ +40°C
Storage Temp.
-20°C ~ +60°C
Humidity
20%~80%
Water Resistance
1. In-Door Use Only.
2. Keep PCT surface dry all the time.
ESD
EN61000-4-2, No damage up to 4kV for direct
(contact) discharge
EMI
EN55022/CISPR 22, Class B & EN55032/CISPR
32, Class B
Page 9
Roll Type PCT User Manual
9
1. Roll type PCT installation should be 30cm away from the water leaking source such as an opened window, a faucet, and should be 30cm away power
switch and 50cm away from transformer box to prevent interference.
2. Wall surface requirement
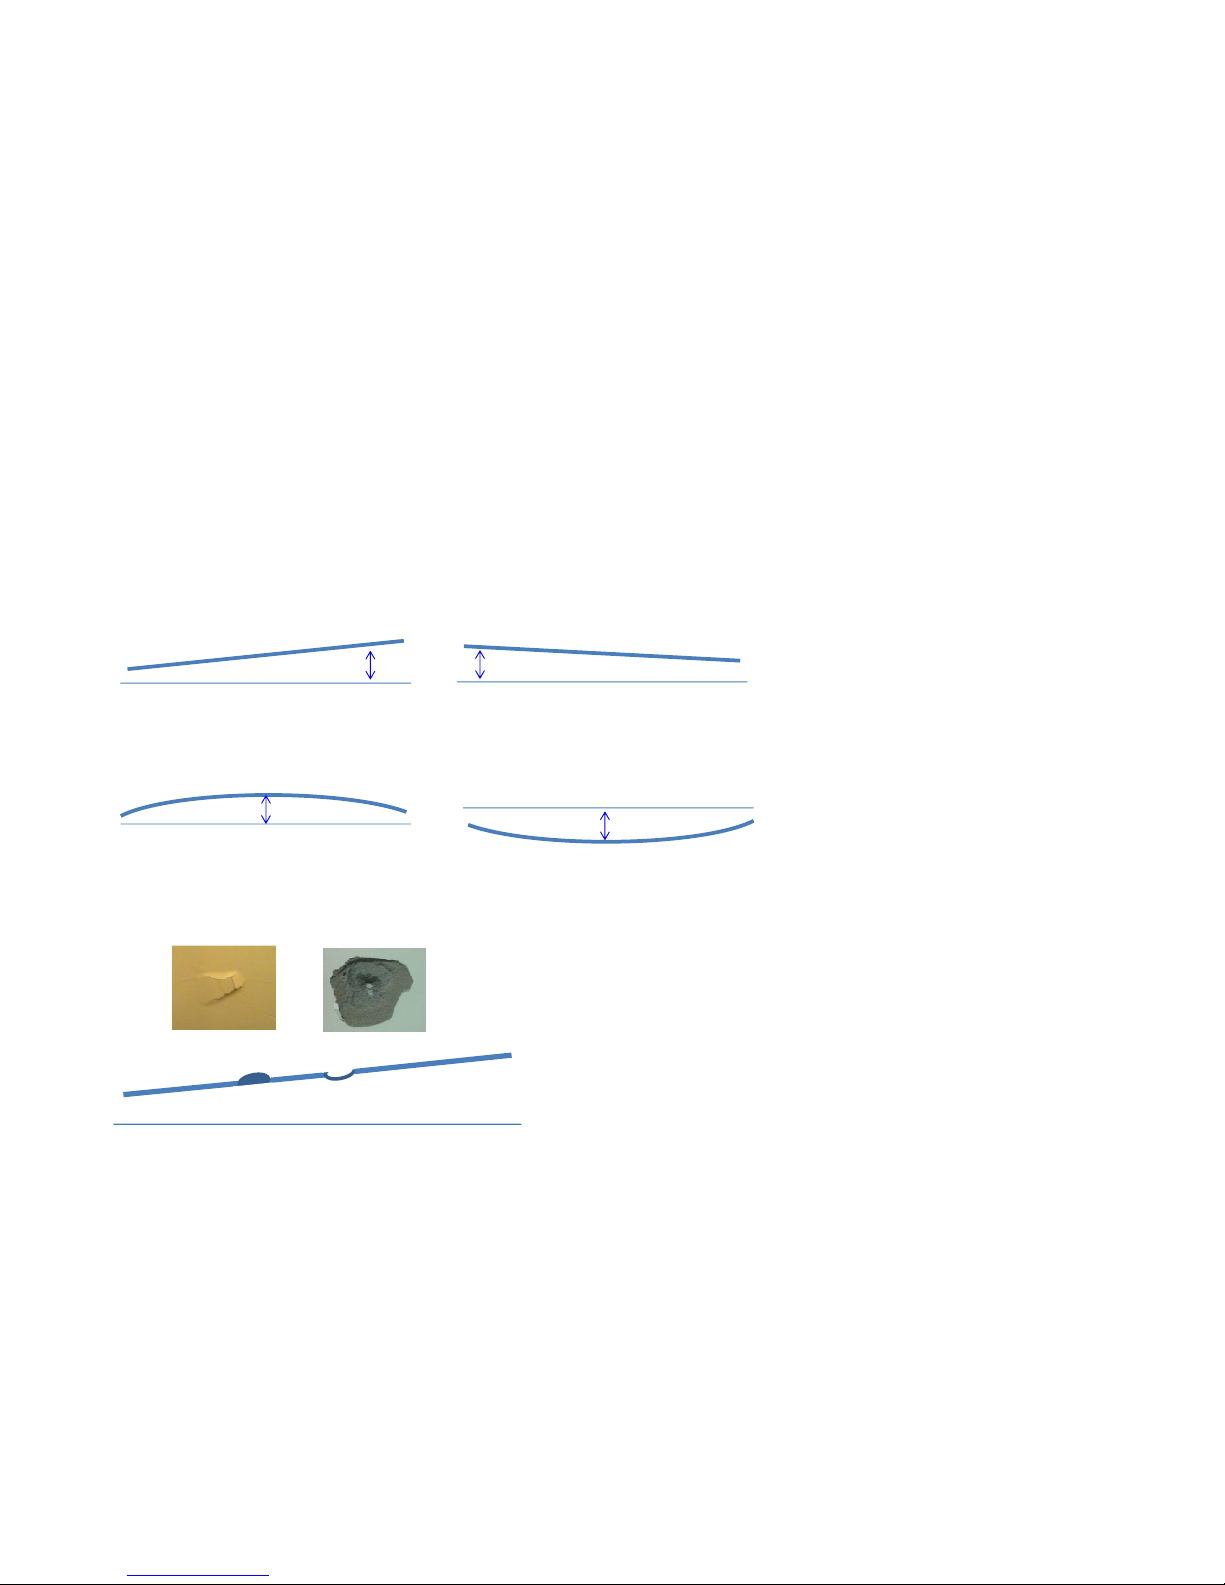
2.1 Non-flatness: Suggest non-flatness (d) is less than 10mm for better user experience.
The distance between the highest position and lowest position of the wall should be less than 10mm.
2.2 Wall surface condition:
There should not be protruding with height over 0.5mm or concave with depth over 0.5mm on the wall surface.
Case C
Horizontal line
d
Horizontal line
Case A
d
Case D
d
Horizontal line
Horizontal line
Case B
d
protruding
Horizontal line
concave
Wall surface
Page 10
Roll Type PCT User Manual
10
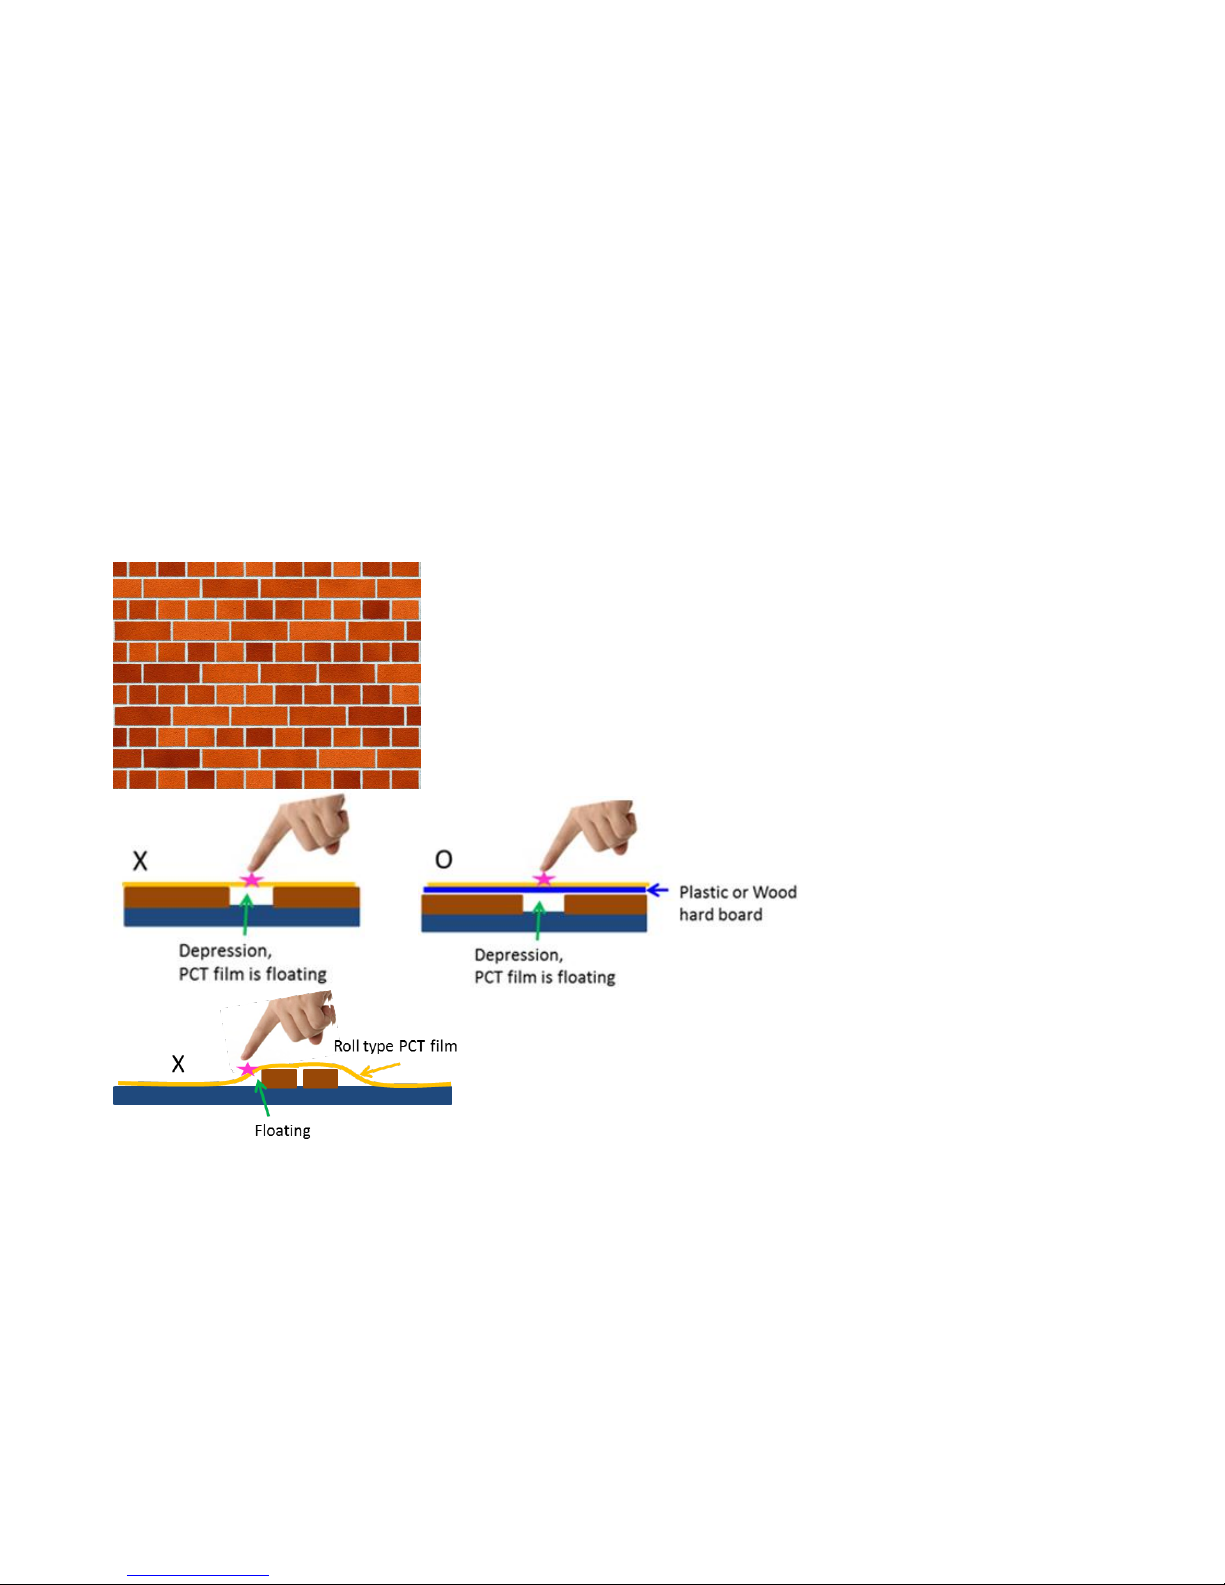
PCT should not be installed on a brick wall directly as the gap between bricks because floating PCT will impact capacitor field, which might result in
error touch event.
When installing on a brick wall is necessary, it is suggested to attach a non-metal hard board with 2-3mm thickness to the brick wall first, then install
the roll type PCT.
Page 11
Roll Type PCT User Manual
11
2. PROJECTOR AND PCT INSTALLATION ASSESMENT
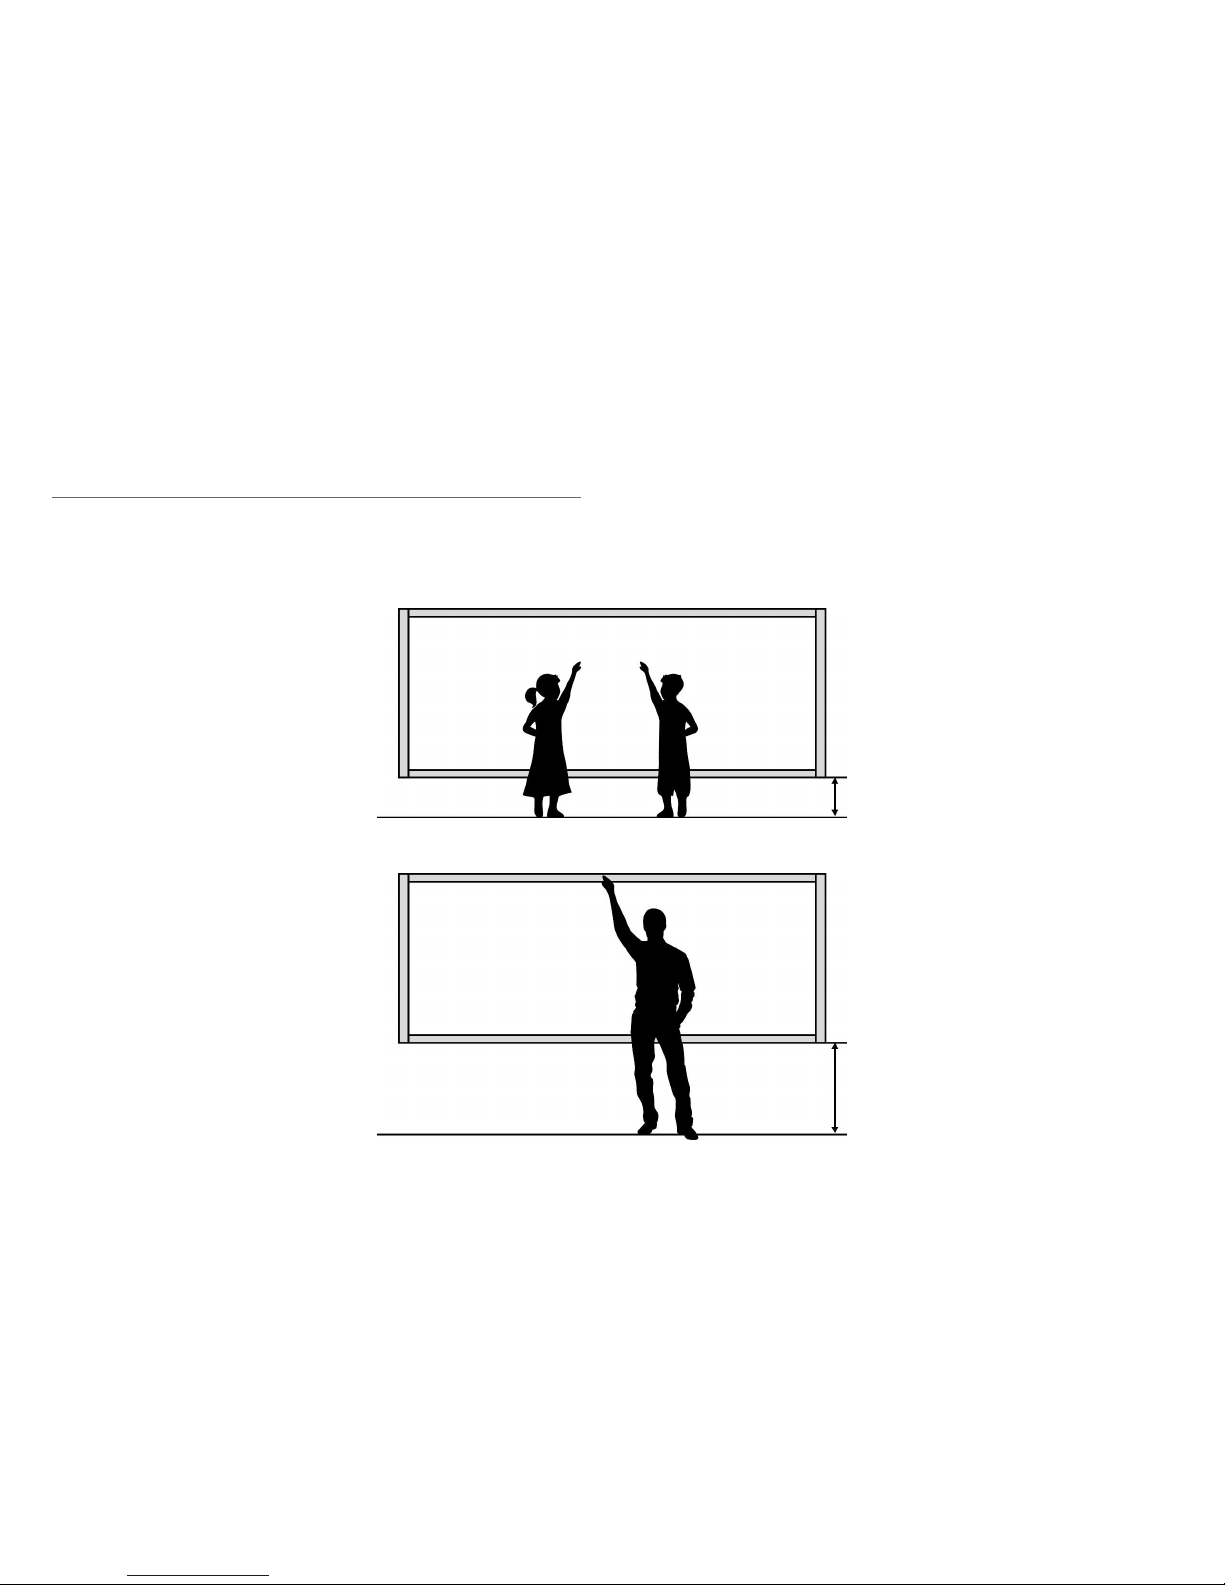
Please kindly be aware of the height between ROLL bottom and ground before installing, too high or too low will cause inconvenience for users while using,
the suggested height is as following,
For children: the height between ground and ROLL bottom is suggested to be 40 ~ 60cm.
For adult: the height between ground and ROLL bottom is suggested to be 70 ~ 90cm.
40cm-60cm
70cm-90cm
Page 12
Roll Type PCT User Manual
12
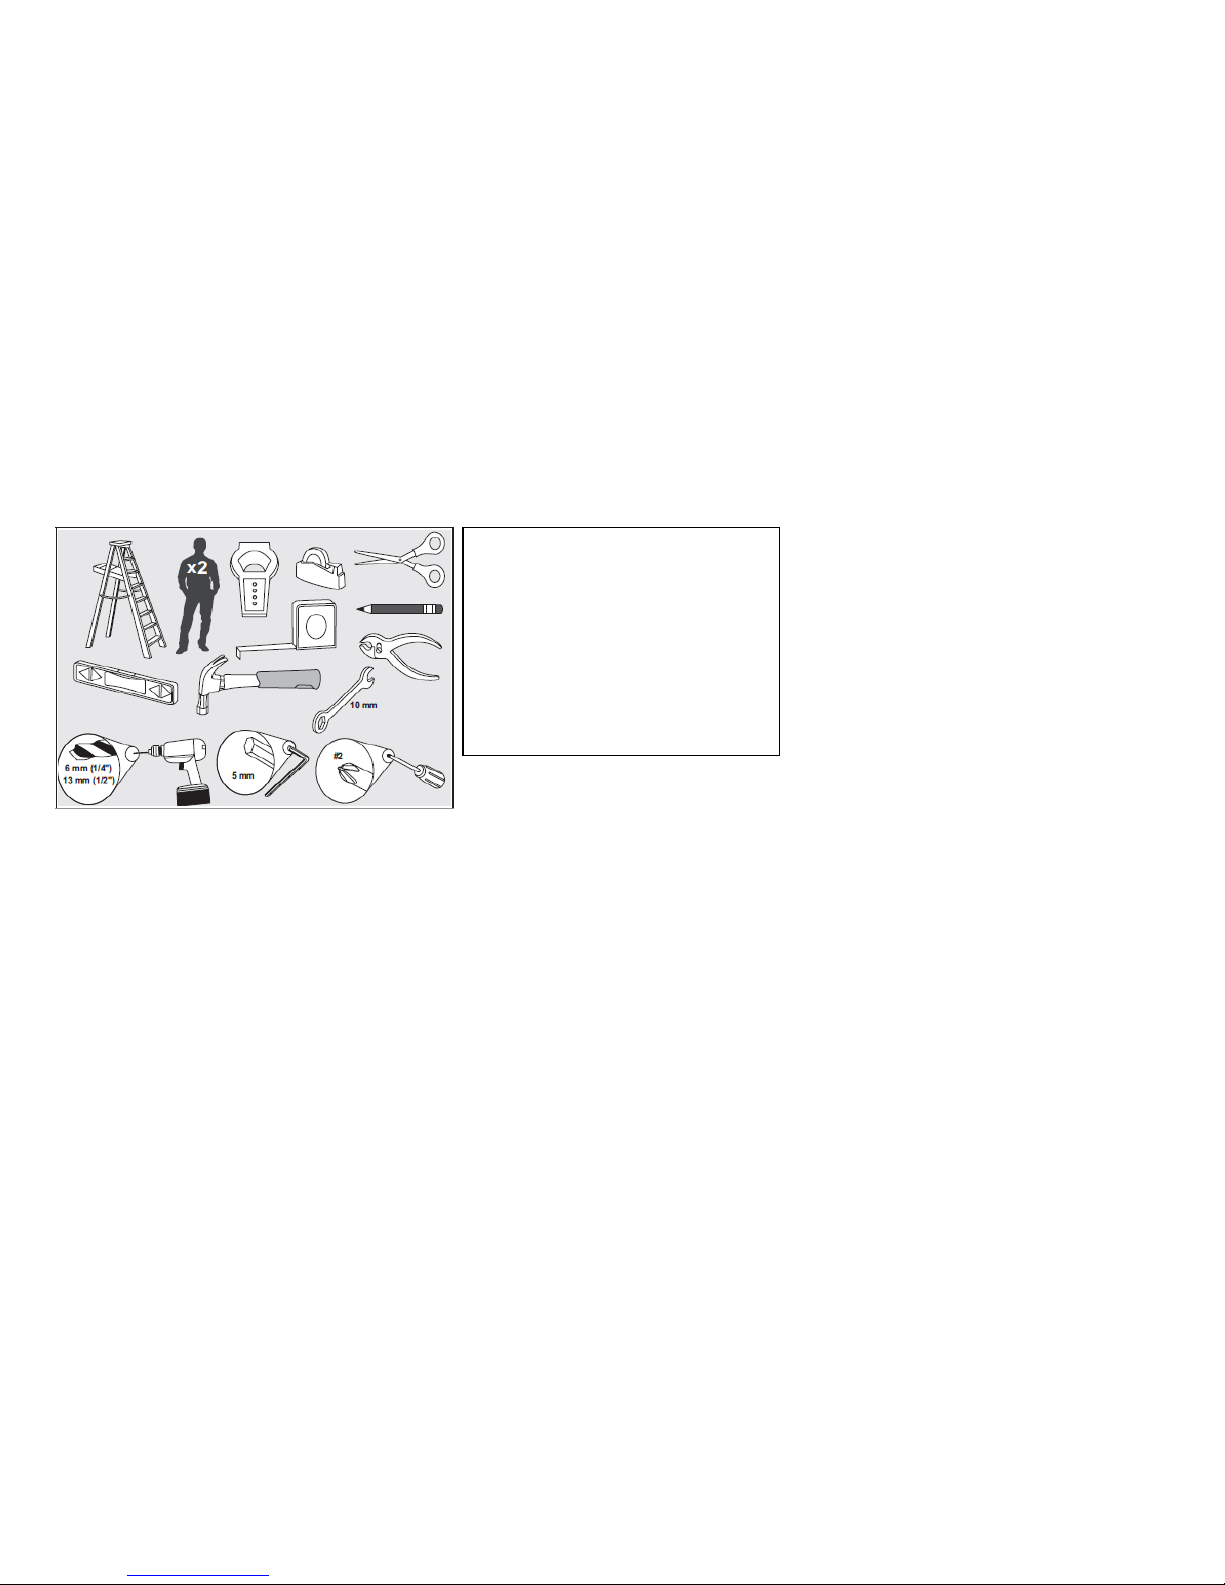
Please check your own projector’s installation guide if you did not get your projector and Roll PCT as a complete system. If you do, please check the
instructions as following,
Tools
• Wrench
• Hexagonal
• Screwdriver
• Phillips Screwdriver
• Electric drill
• Hammer
• Carpenter’s Level or Laser leveler
• Ruler
• Ladder
Page 13
Roll Type PCT User Manual
13
3. SUGGESTED PROJECTOR AND WALL MOUNT INSTALLATION
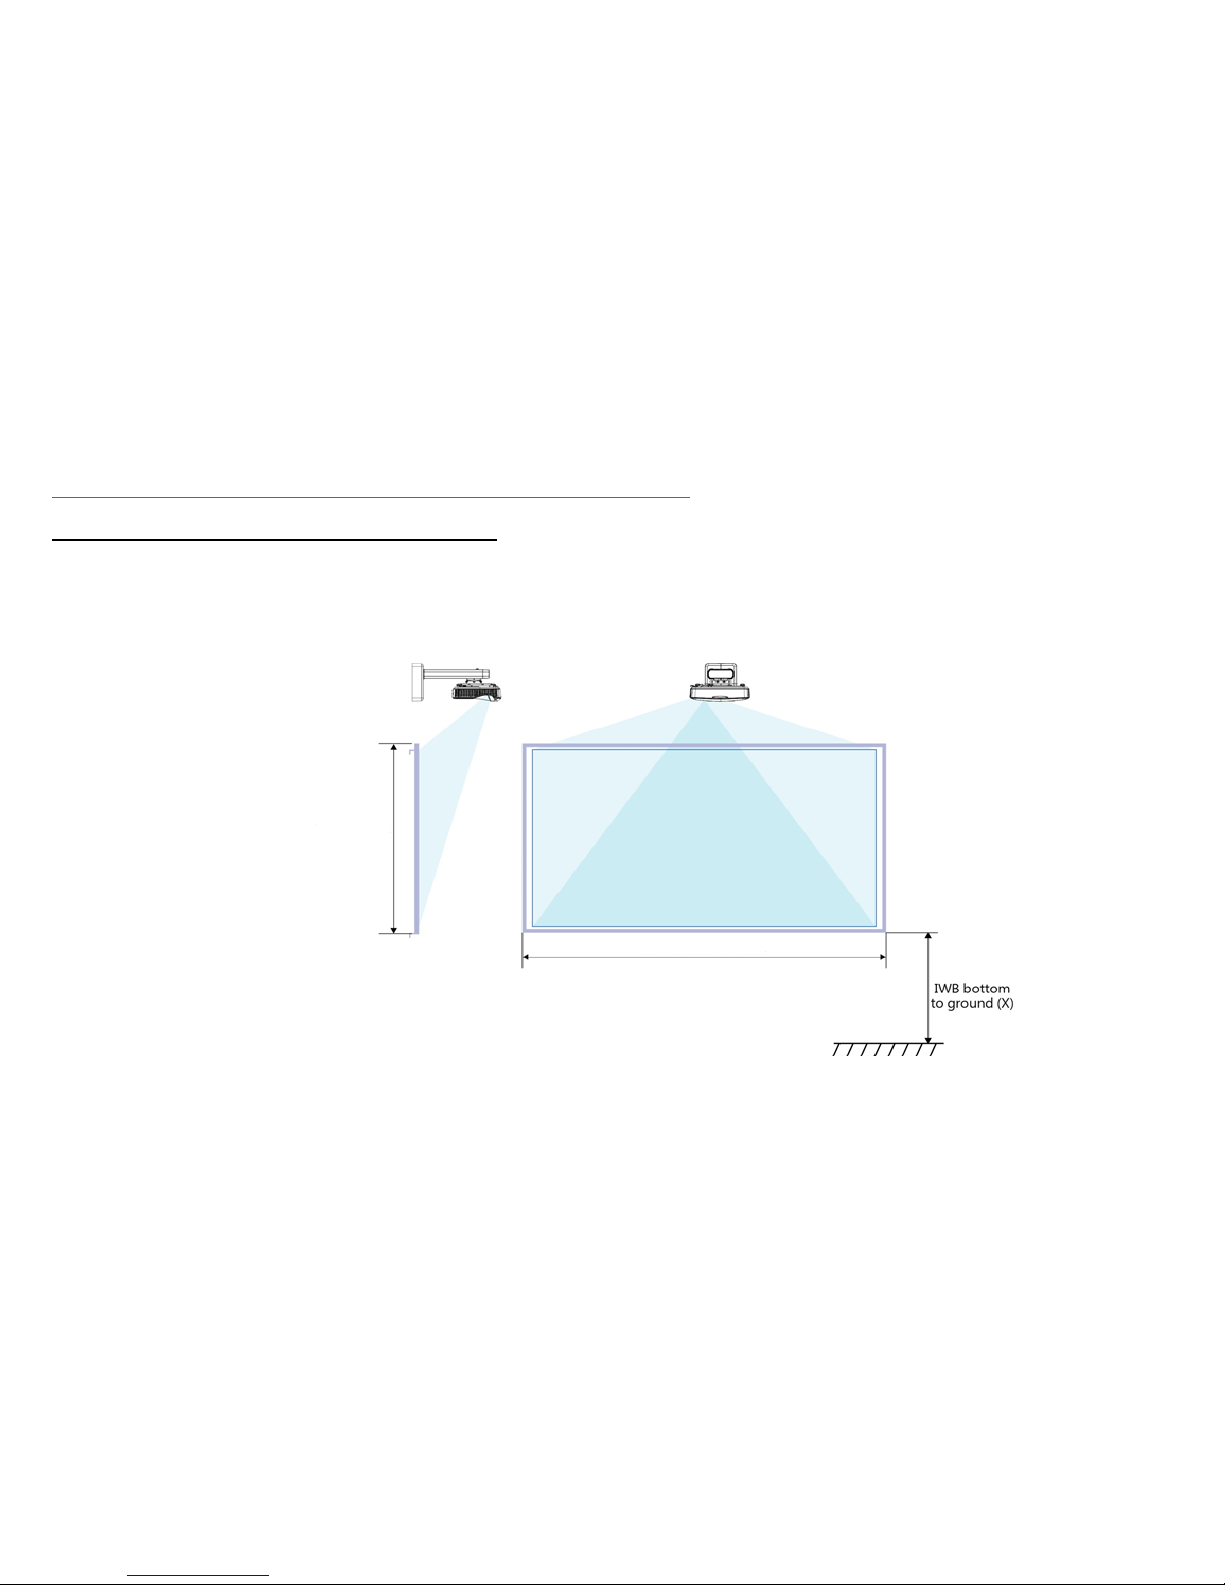
3-1 101” ROLL TYPE PCT + Suggested Projector
Step 1. Define Projector Wall Mount Position
1. Define Projector Wall Mount vertical Position.
1-a. Distance (X) is the distance from Interactive White Board bottom edge to the ground. If the Interactive White Board is mainly for children,
distance X will be 40cm to 60cm. If the Interactive White Board is for adult, distance X will be 70cm to 90cm.
Height: 1295mm
Width: 2248mm
Page 14
Roll Type PCT User Manual
14
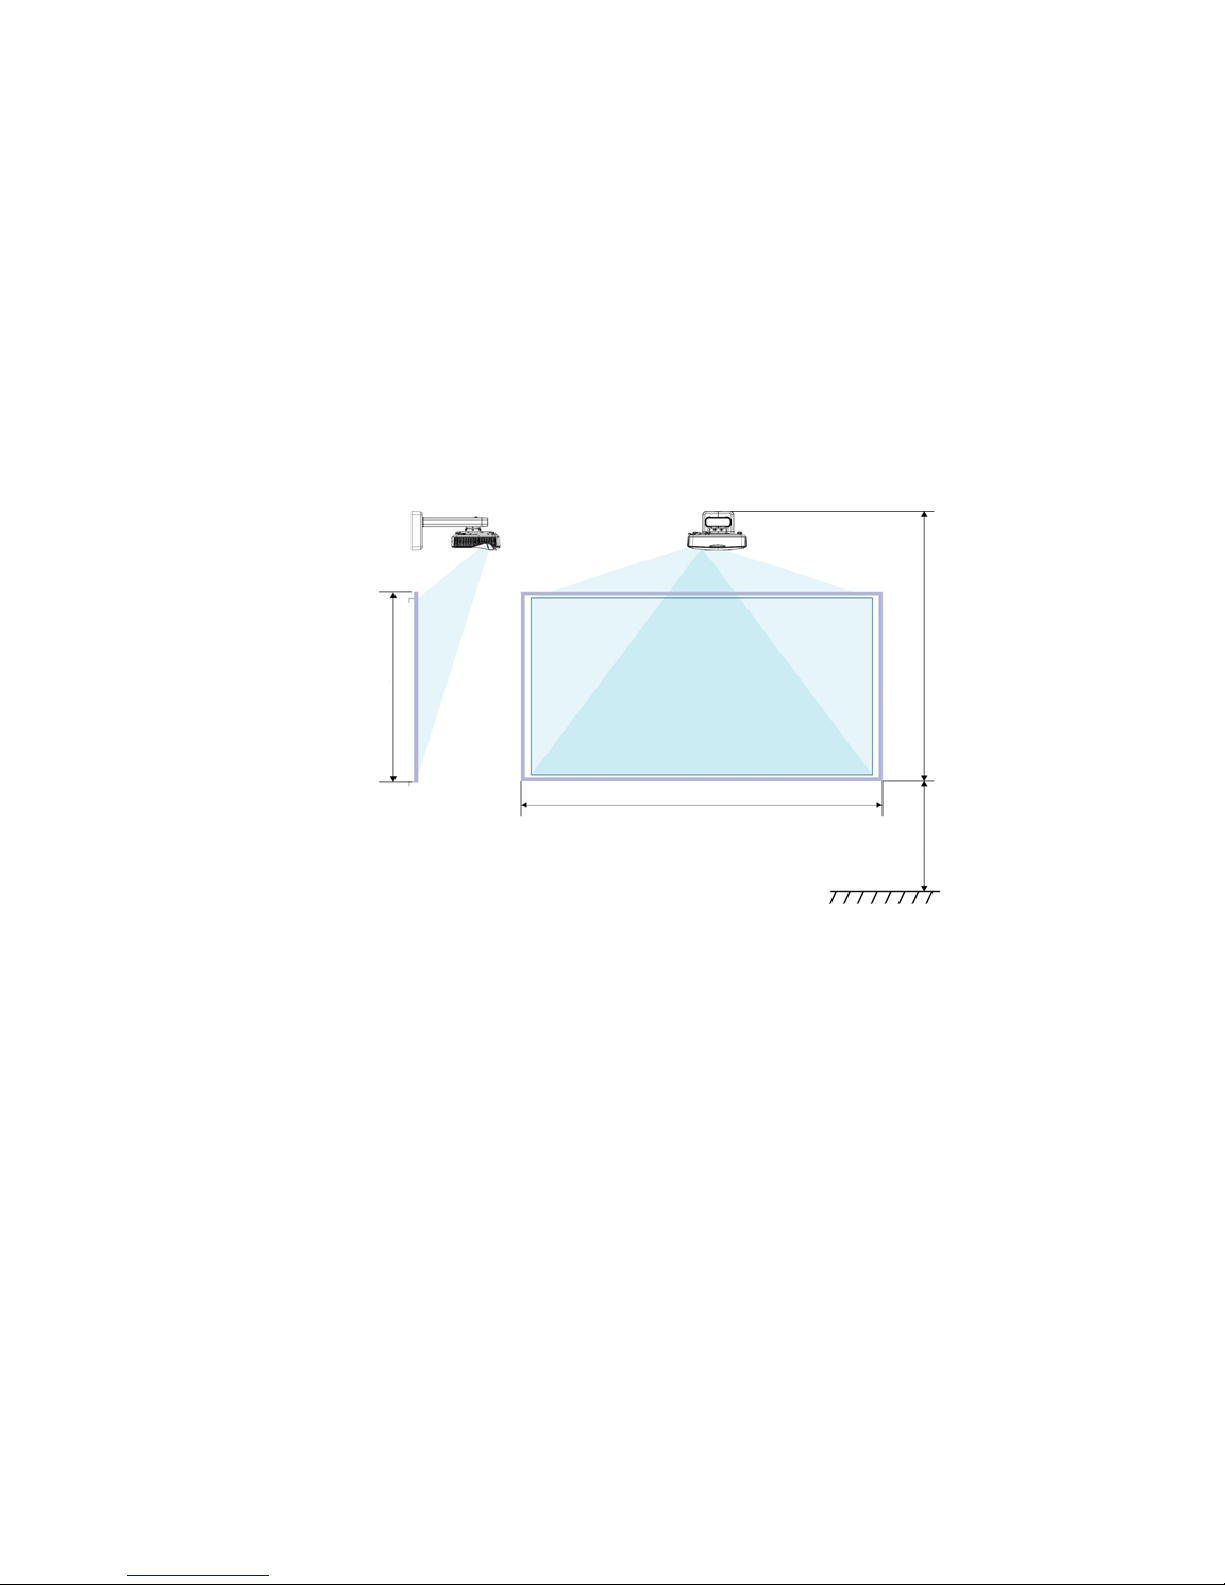
1-b. The distance between the top edge of the wall mount to the ground is X +1615mm. That is the height of wall mount)
2. Define Projector Wall Mount horizontal Position.
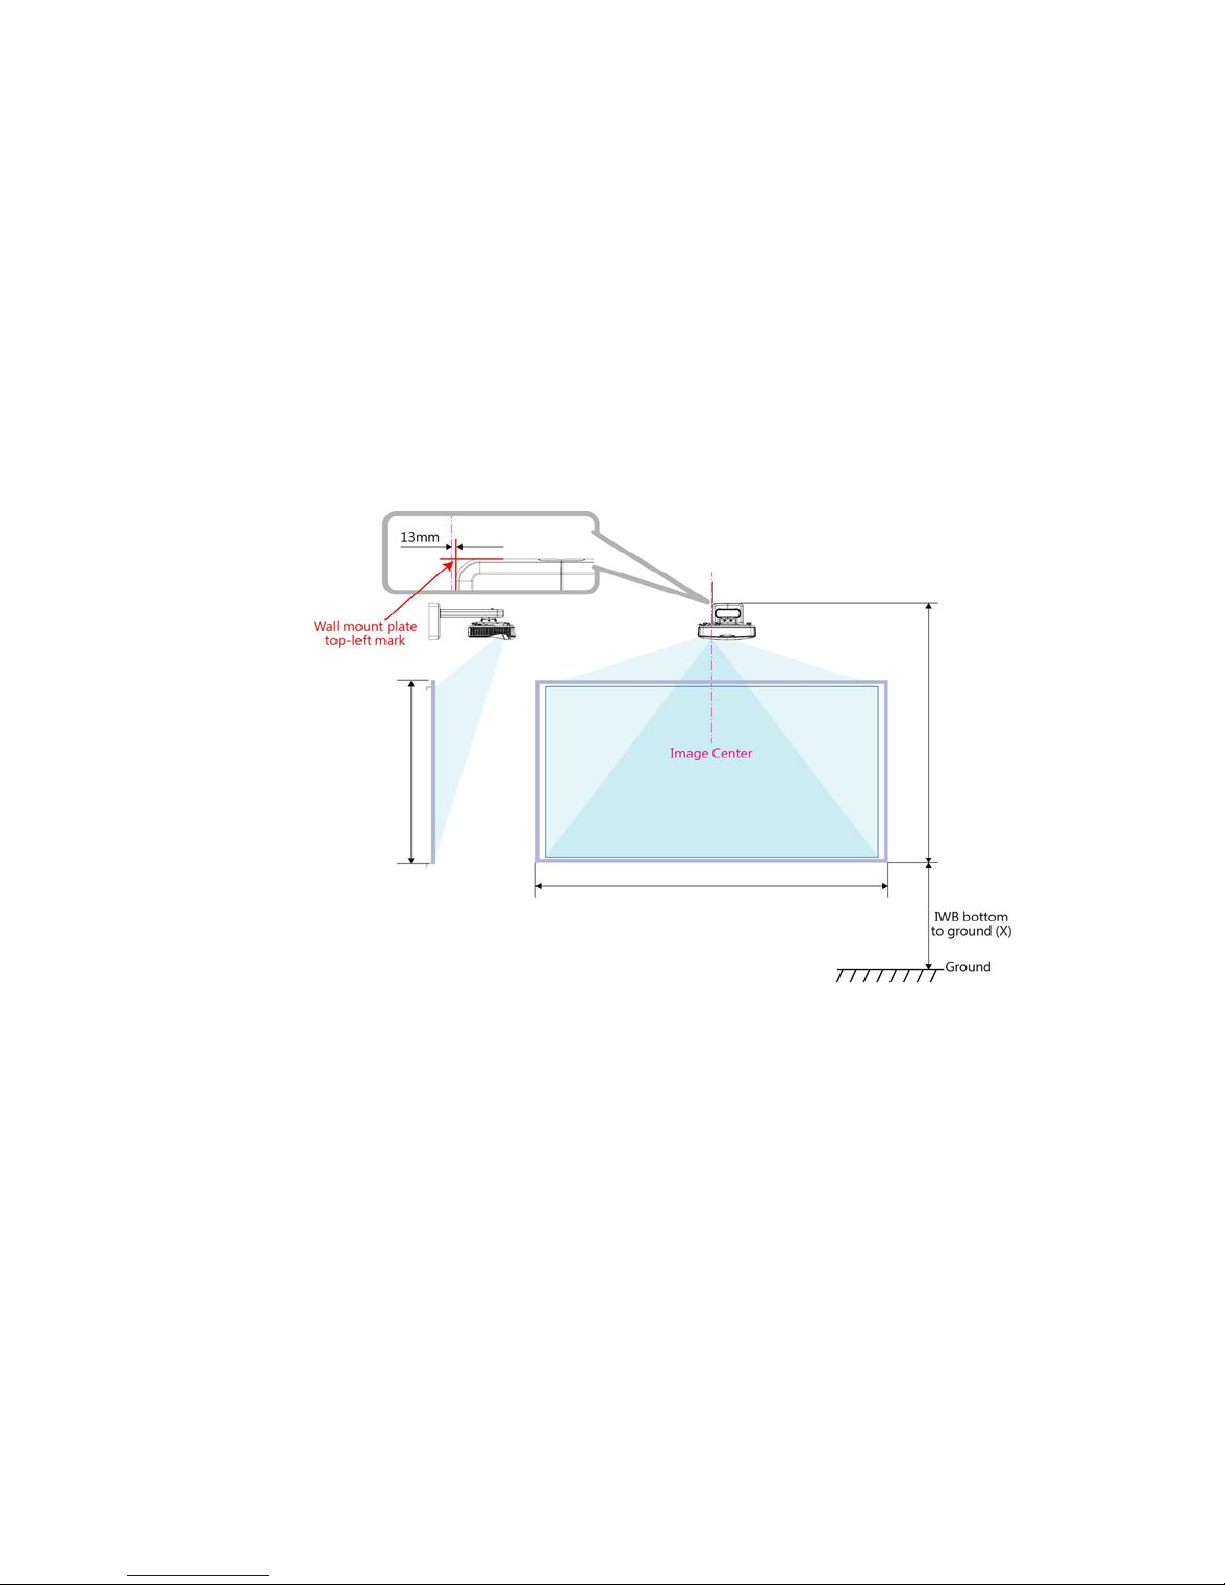
According the environment and determine the expected Image Center position, then right edge of the wall mount should be 13mm away from
the expected image center line. (That is the horizontal position of wall mount)
Height: 1295mm
Projector wall
mount upper
edge to PCT
bottom: 1615mm
Width: 2248mm
IWB bottom
to ground (X)
Page 15
Roll Type PCT User Manual
15
3. Therefore, the projector wall mount position can be defined based upon 2 & 3 above.
Height: 1295mm
Projector wall
mount upper
edge to PCT
bottom: 1615mm
Width: 2248mm
Page 16
Roll Type PCT User Manual
16
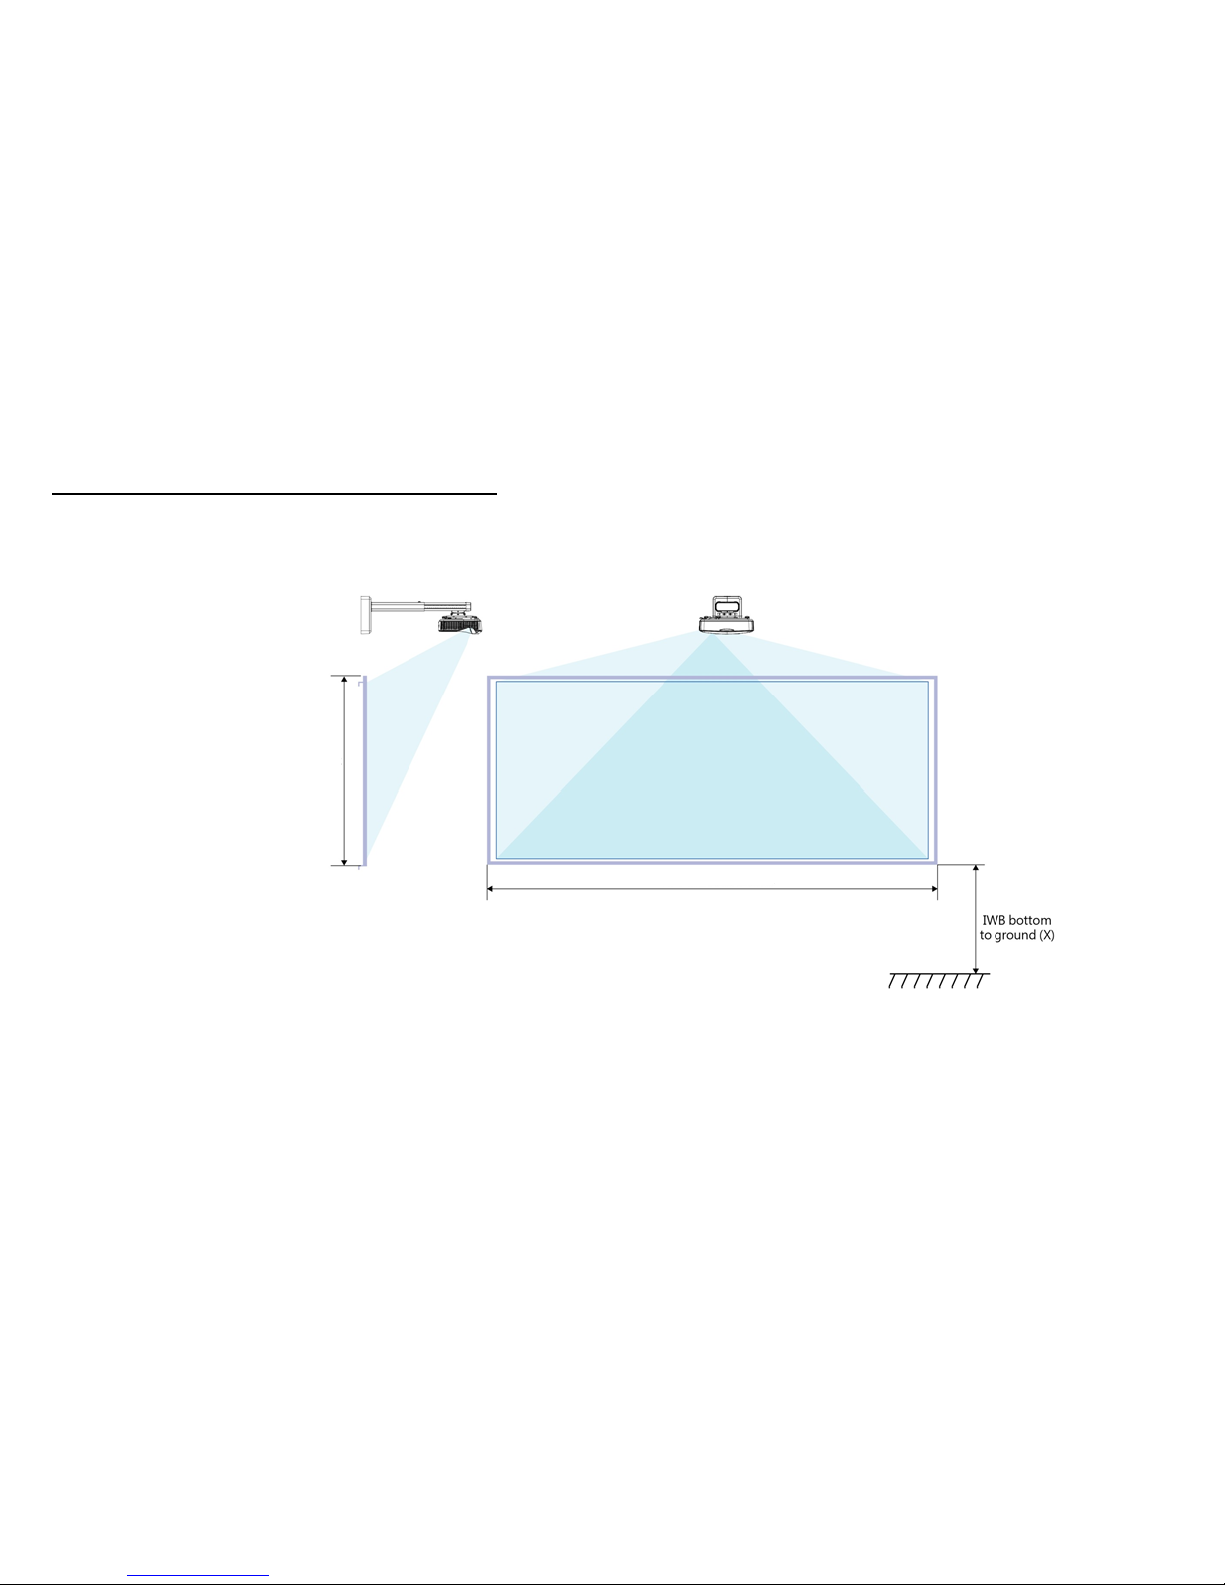
3-2 138” ROLL TYPE PCT + Suggested Projector
Step 1. Define Projector Wall Mount Position
1. Define Projector Wall Mount vertical Position.
1-a. The distance (X) between Interactive White Board bottom and ground will be based upon main users (children or adult).
Width: 3282mm
Height: 1295mm
Page 17
Roll Type PCT User Manual
17
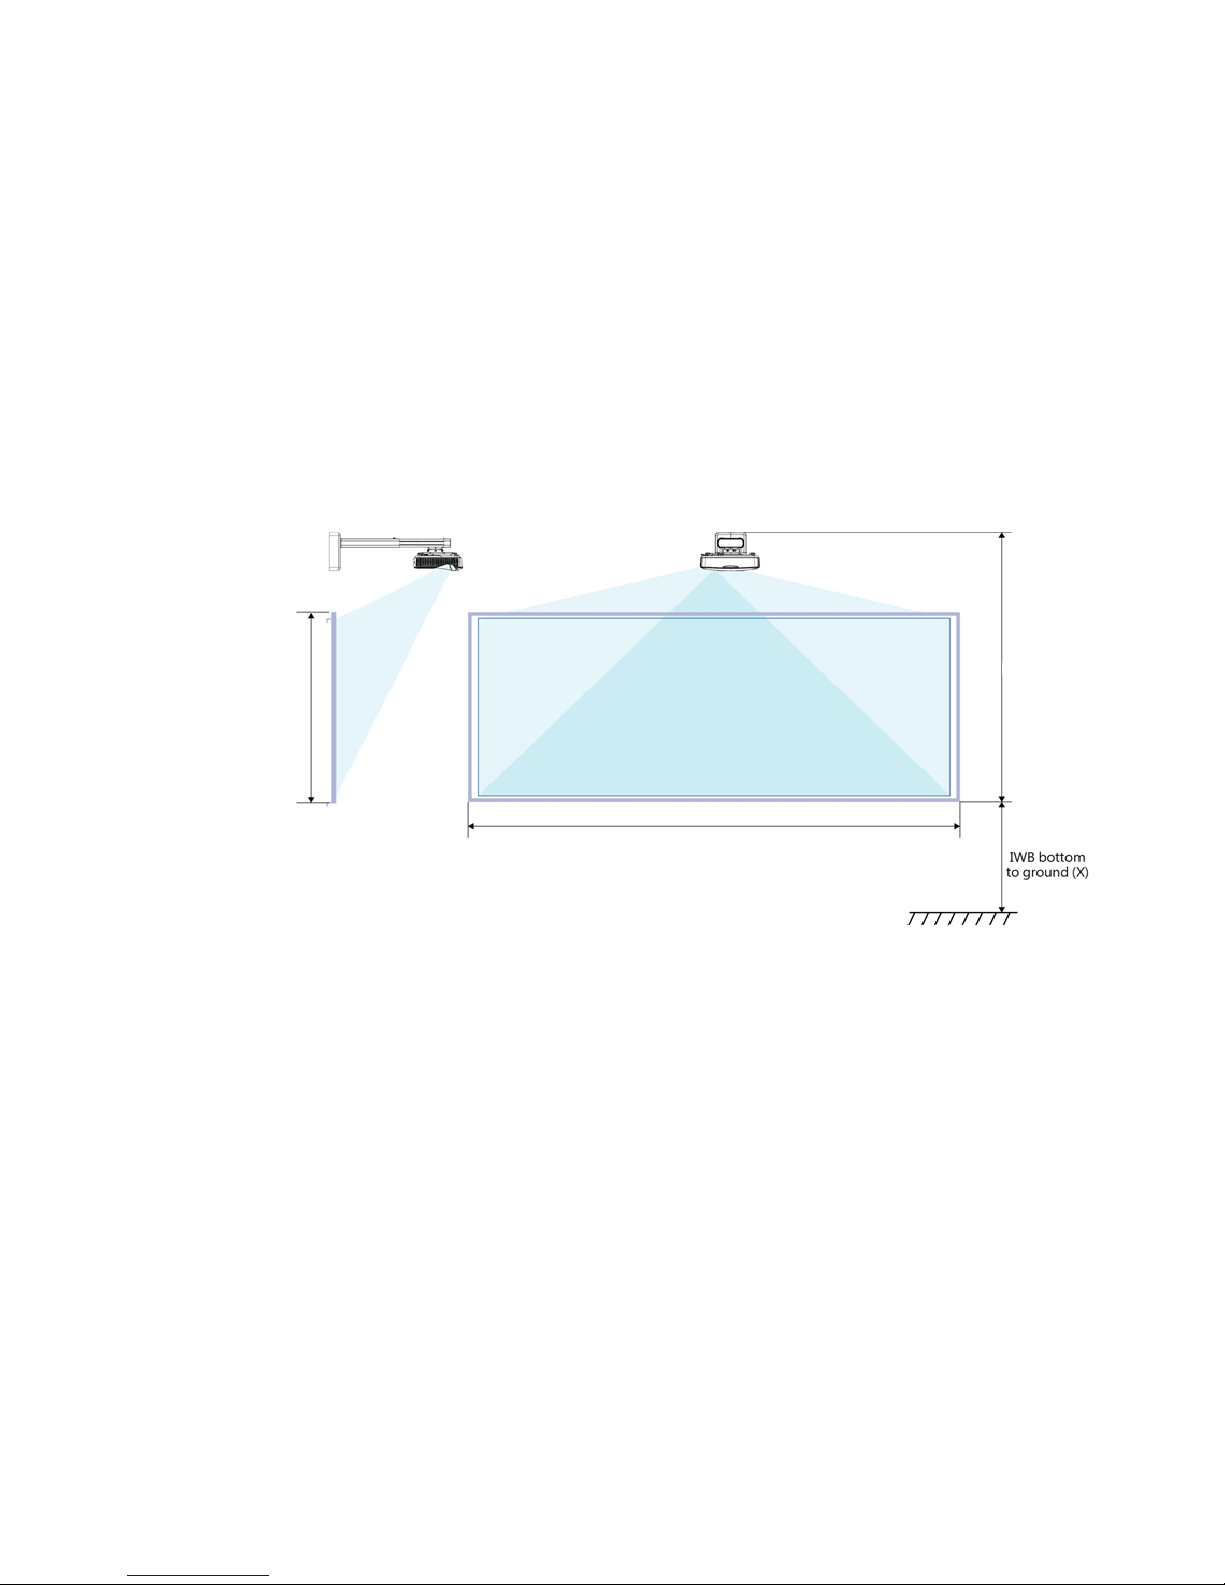
1-b. X + 1748 mm will be the distance between projector wall mount and ground. (That is the height of wall mount)
2. Define Projector Wall Mount horizontal Position.
According the environment and determine the expected Image Center position, then right edge of the wall mount should be 13mm away from
the expected image center line. (That is the horizontal position of wall mount)
Height: 1295mm
Projector wall
mount upper
edge to PCT
bottom: 1748mm
Width: 3282mm
Page 18
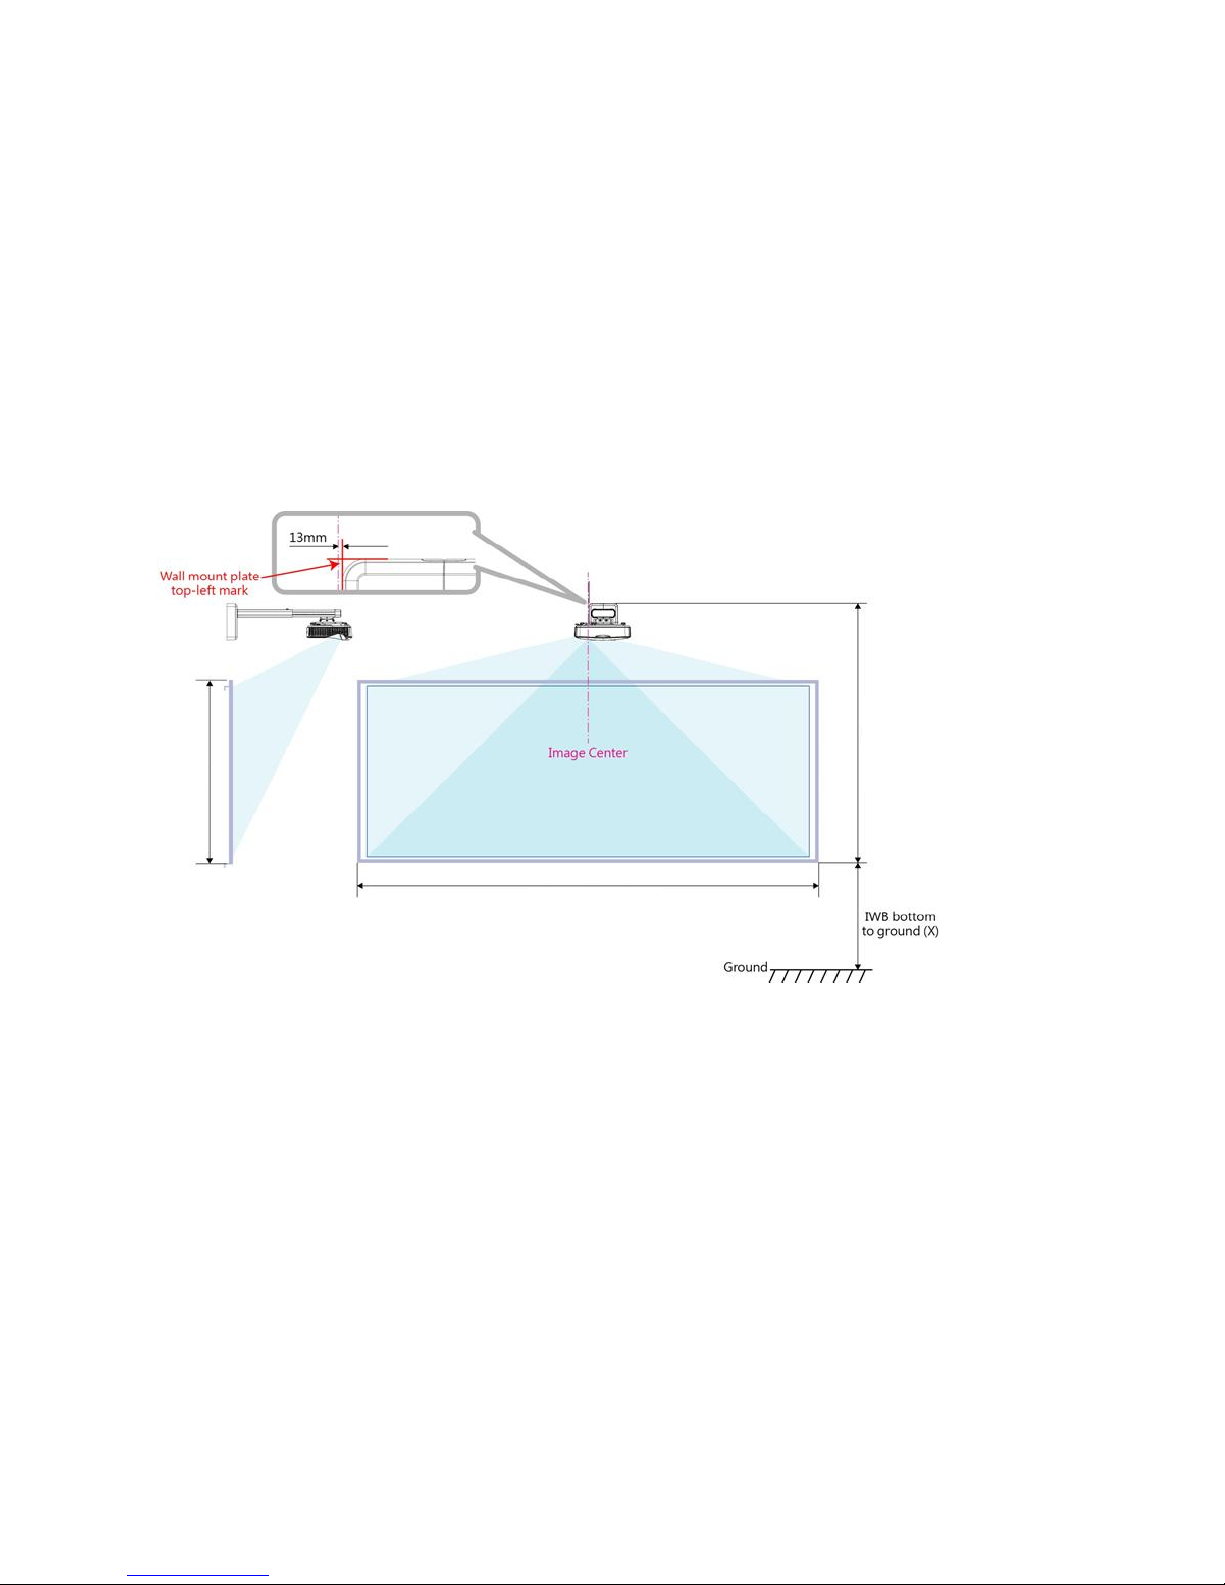
Roll Type PCT User Manual
18
3. Therefore, the projector wall mount position can be defined based upon 2 & 3 above.
Projector wall
mount upper
edge to PCT
bottom: 1748mm
Height: 1295mm
Width: 3282mm
Page 19
Roll Type PCT User Manual
19
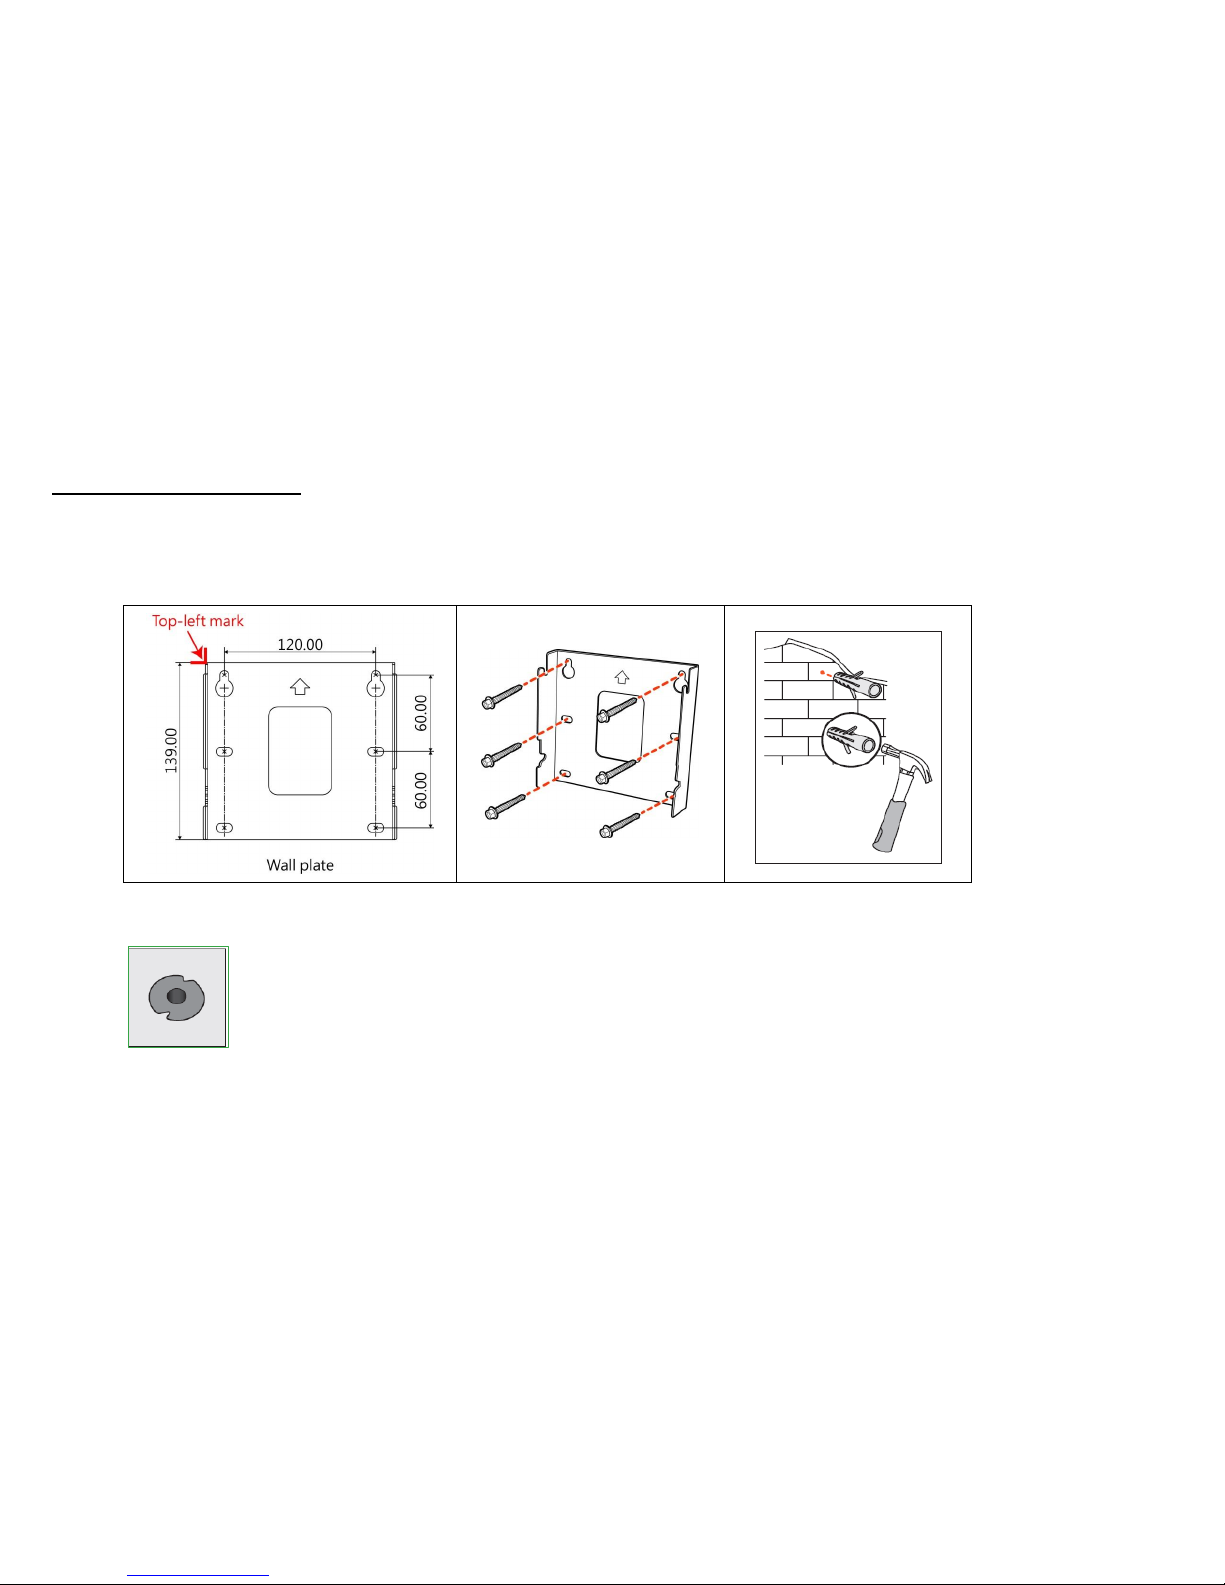
3-3 Wall Plate Installation
Wall plate is aligned with the wall mount top-left mark, then mark drill holes position.
Drill holes at the ‘marked position’ with an electric drill and drilling bit.
Level wall plate using attached bubble level.
Keep level wall plate before fastener screws.
NOTE:
Uses bit according wall material.
Page 20
Roll Type PCT User Manual
20
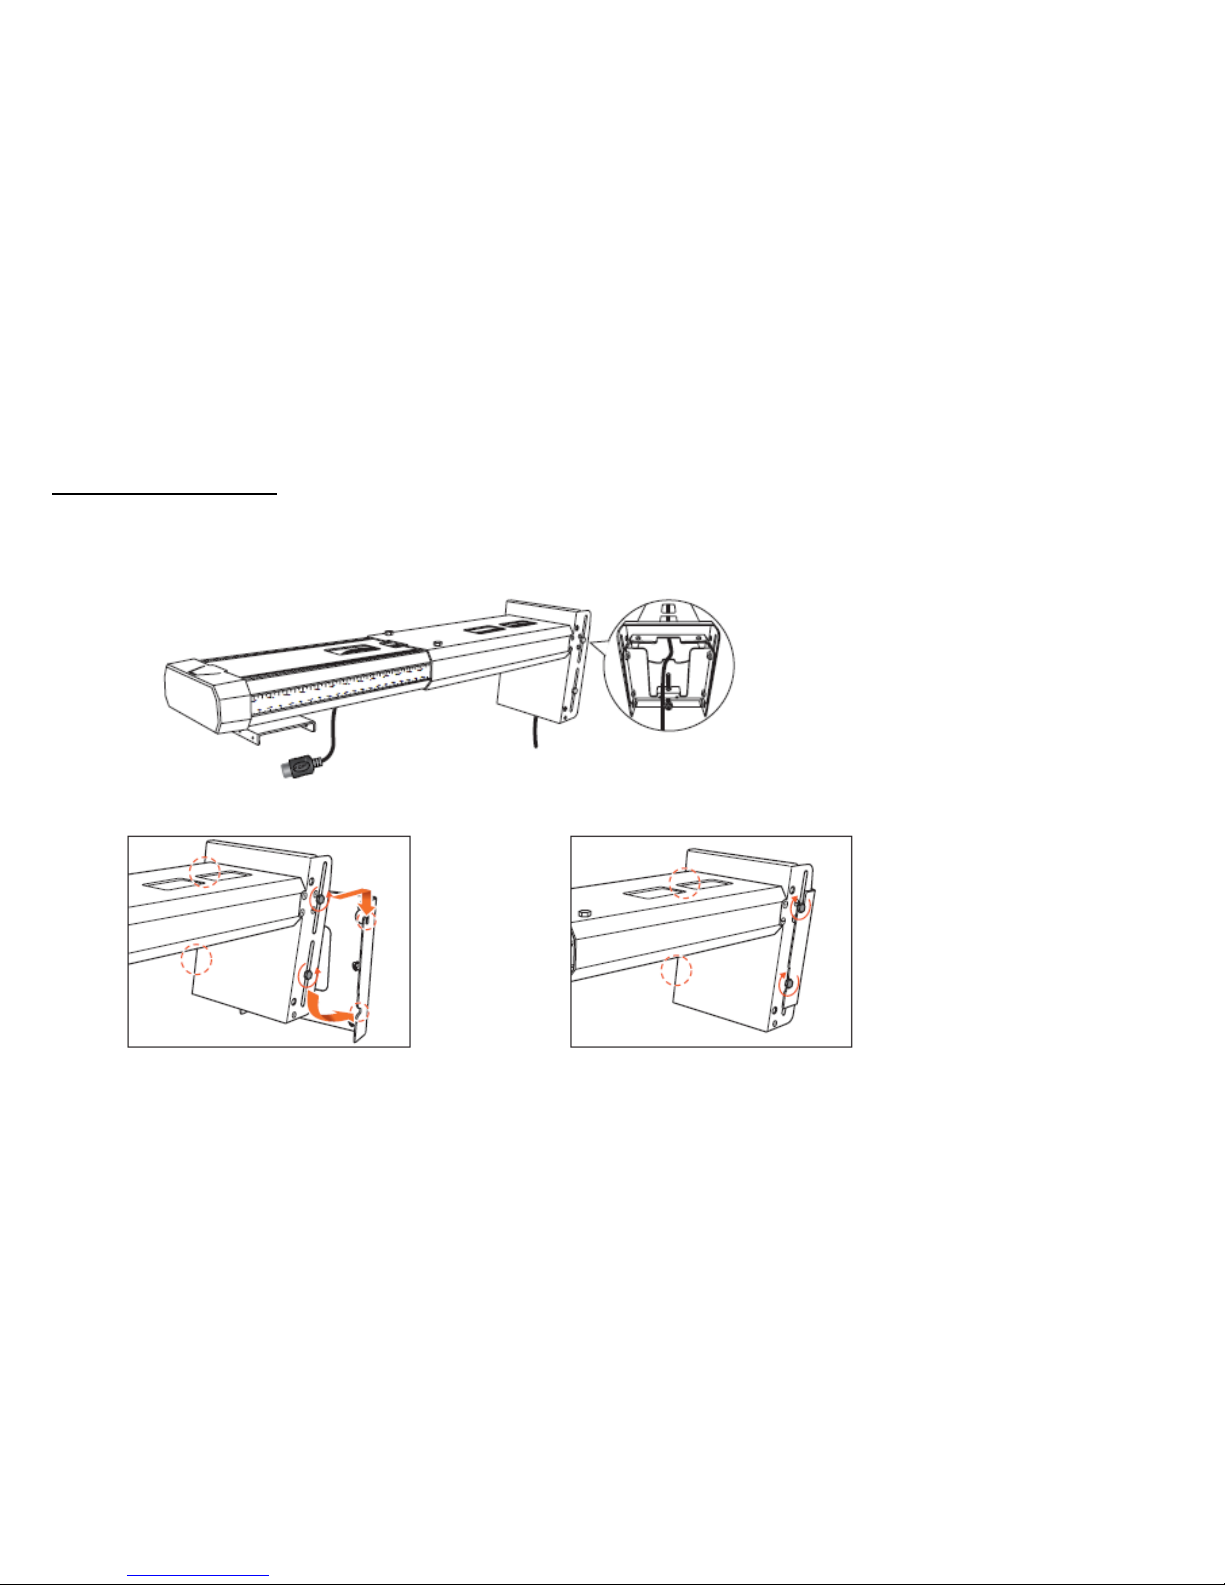
3-4 Cable Management
1. Insert all cables (HDMI/VGA/Power cord) inside the arm.
2. Direct all cables toward designated position (wall or devices).
Ex: VGA cable /HDMI cable/Power cord
3. Install arm on wall mount plate.
Page 21
Roll Type PCT User Manual
21
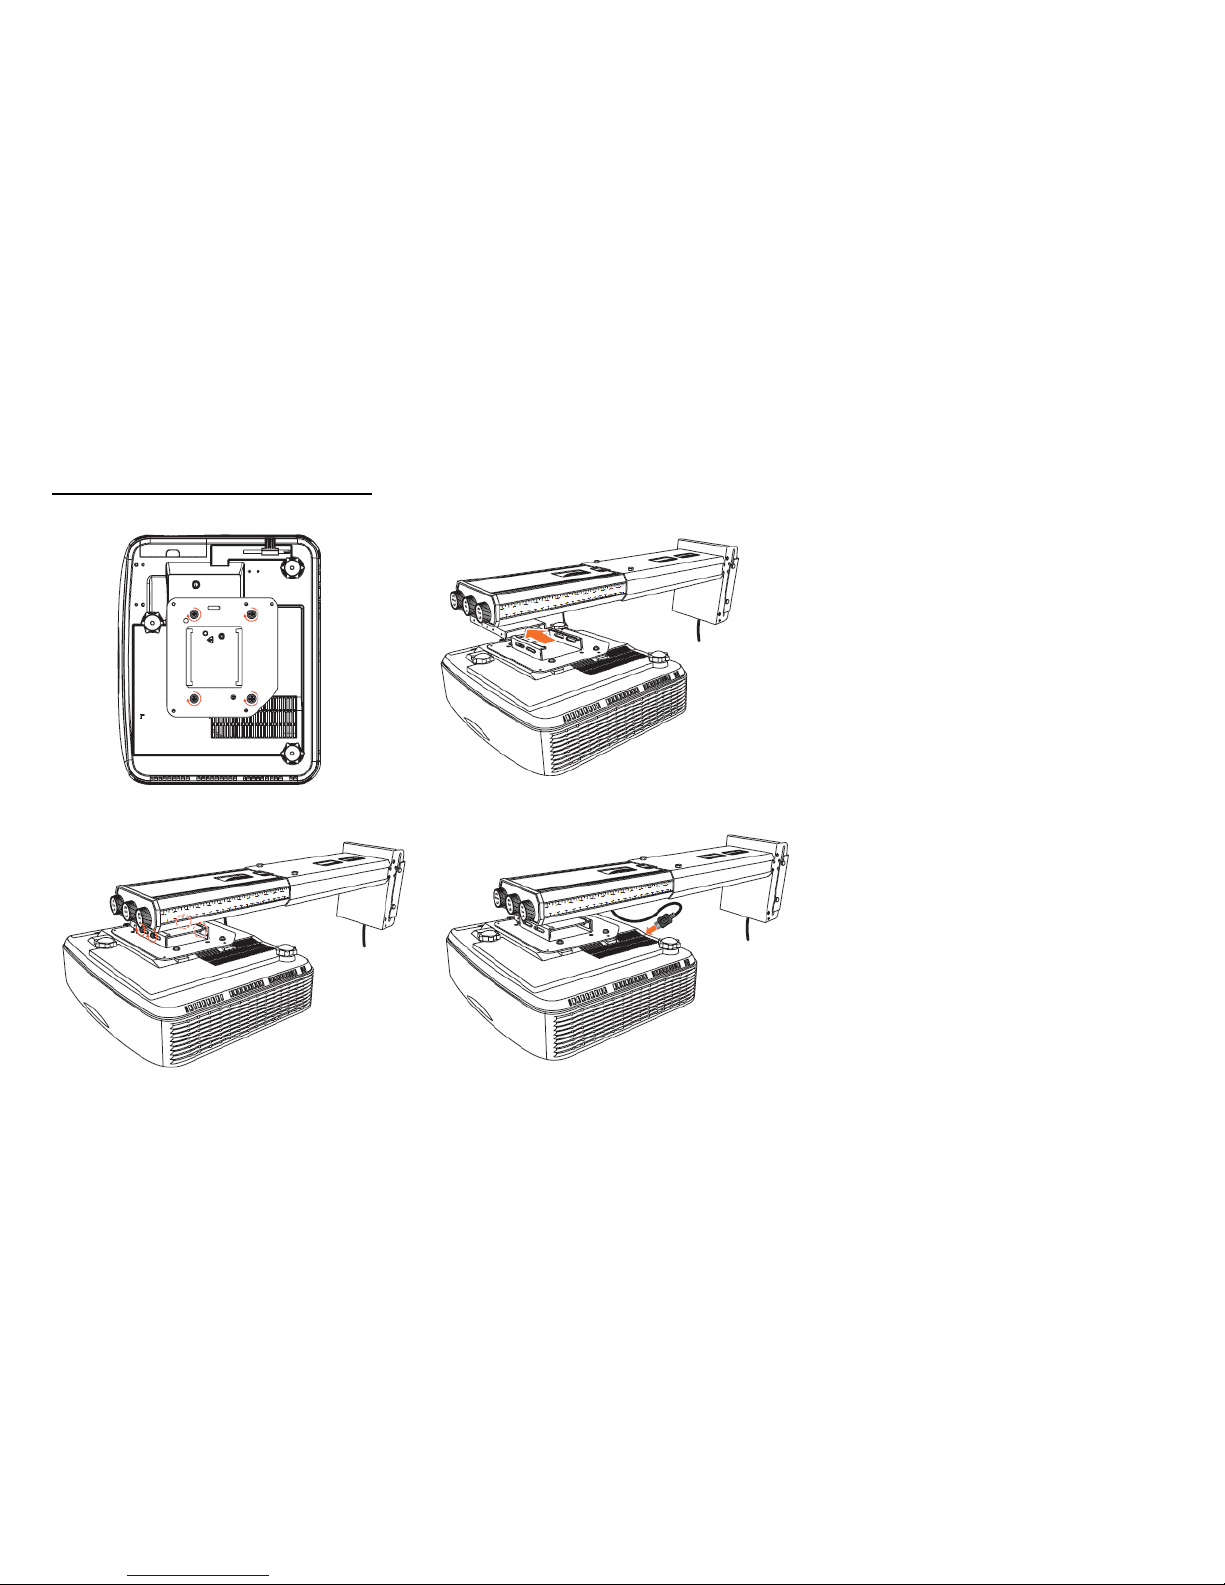
3-5 Installation Projector On Arm
Step 1
Step 2
Step 3
Step 4
Page 22
Roll Type PCT User Manual
22
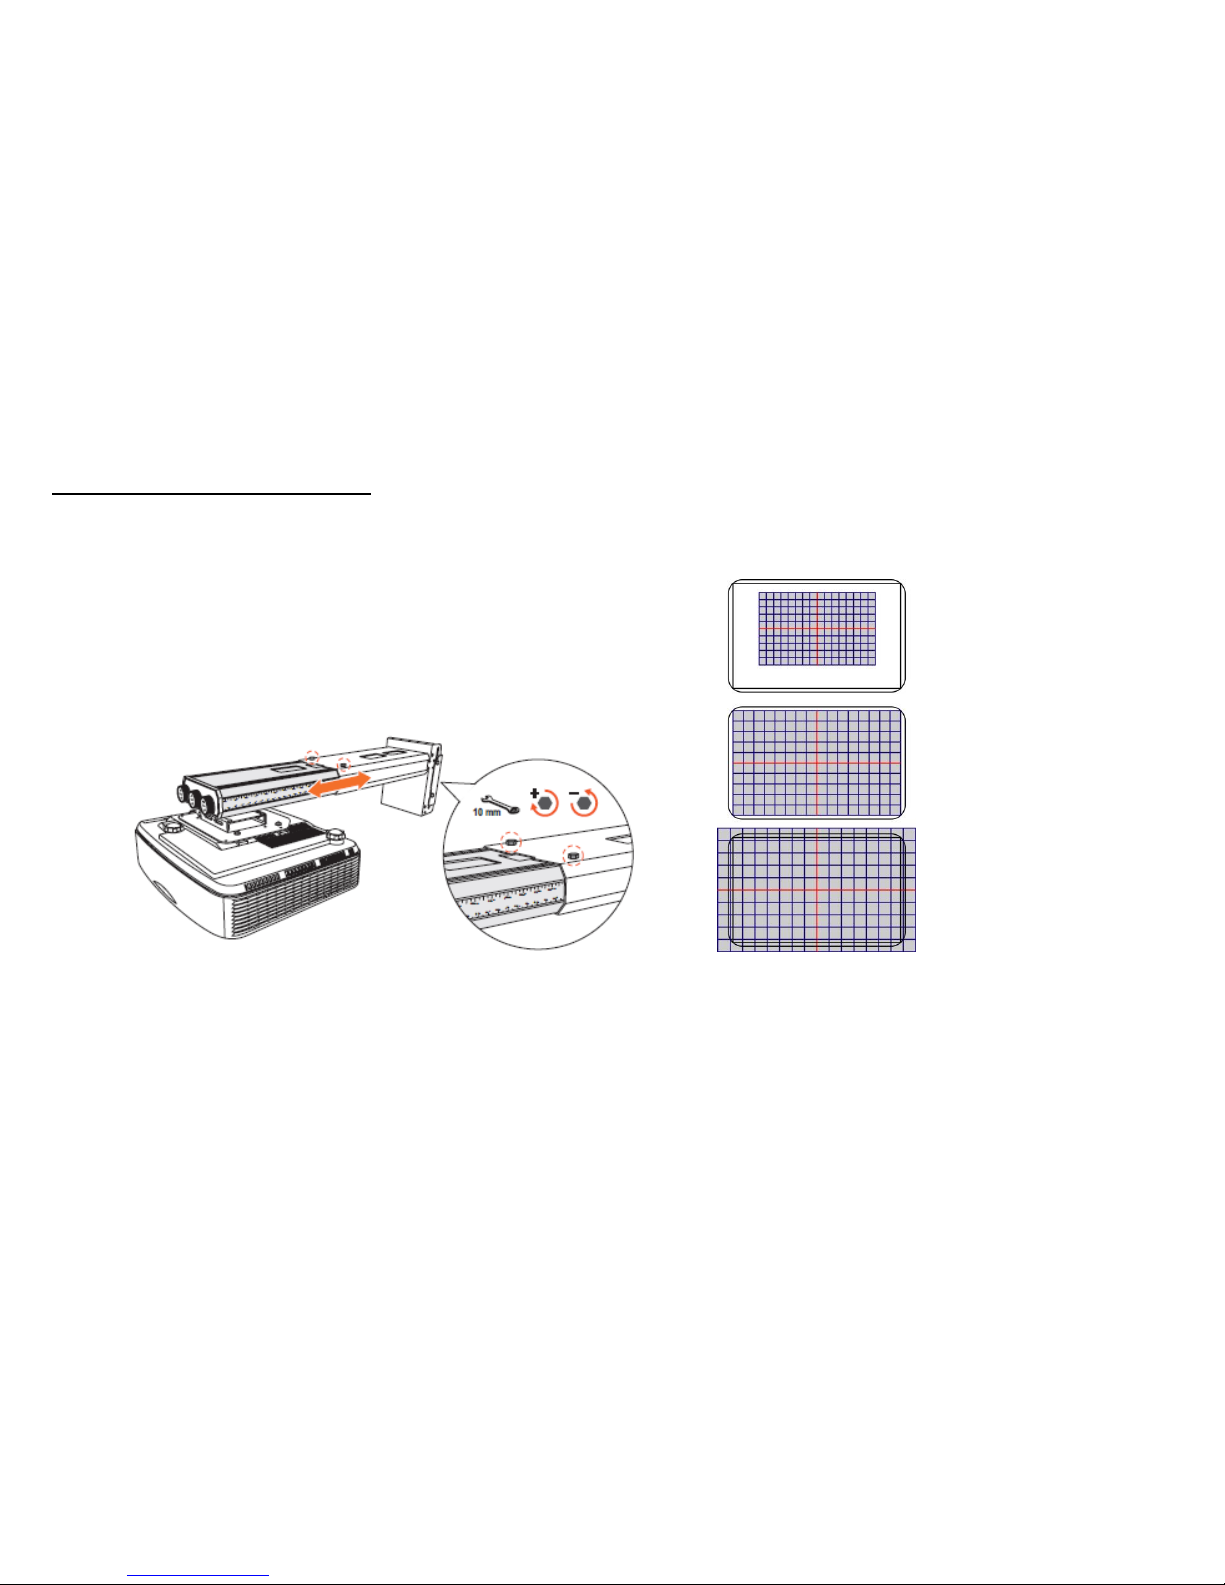
3-6 Projection Image Adjustment
1. To avoid image shift, synchronizing check projection position/size…period of fastener screws.
Extend arm for Projection size adjustment (92” for 101” PCT, 132” for 138” PCT)
Page 23
Roll Type PCT User Manual
23
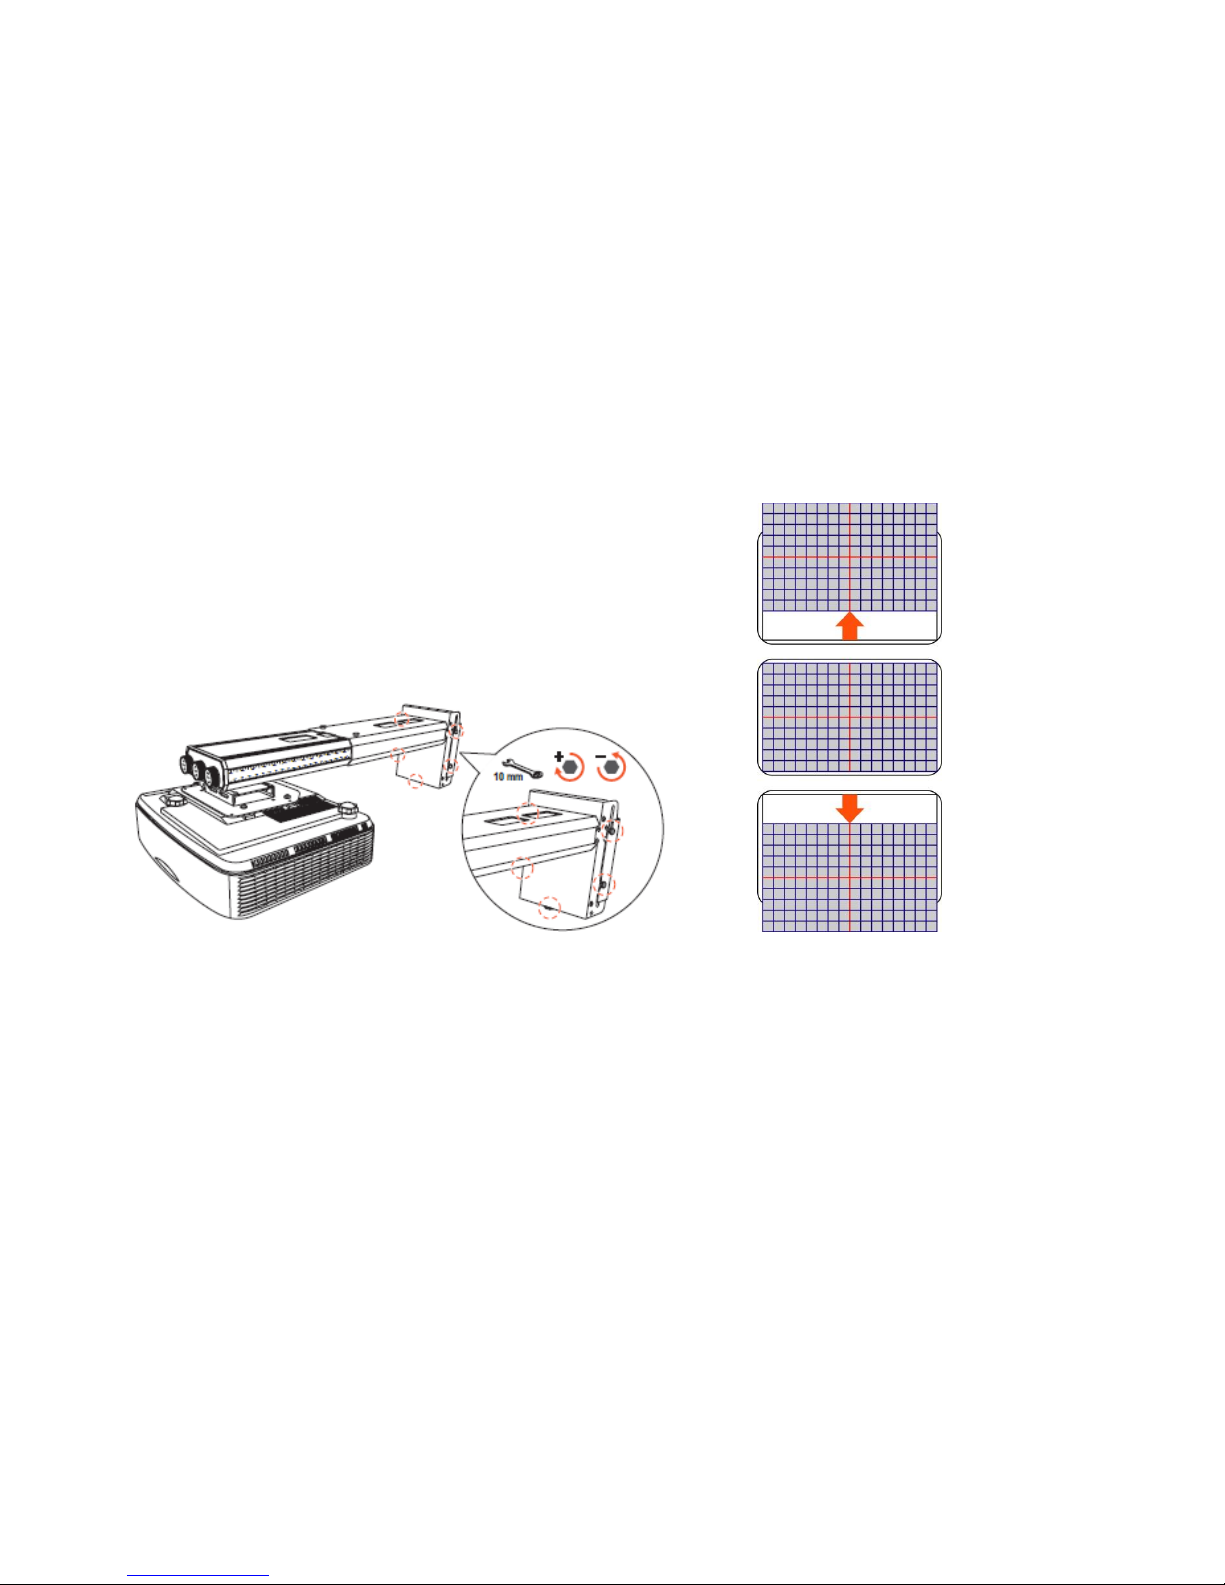
Adjust projector height
Page 24
Roll Type PCT User Manual
24
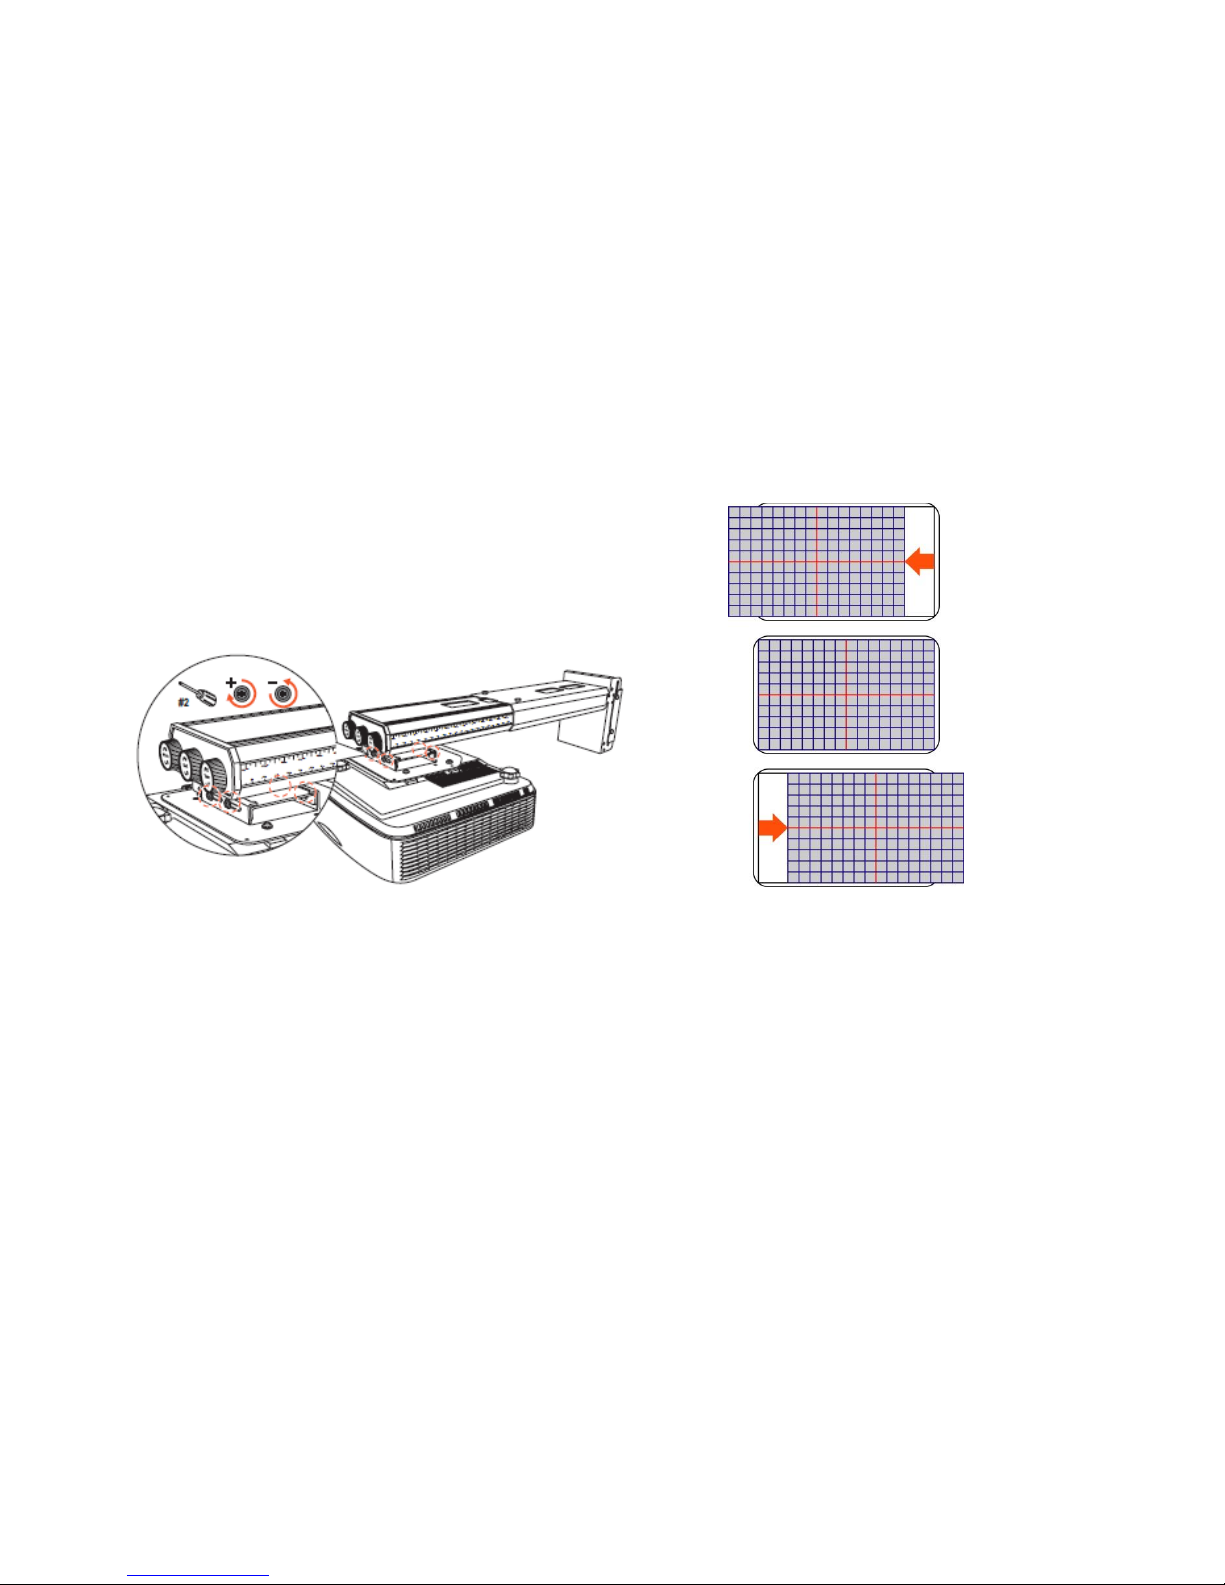
Adjust projector left & right position
Page 25
Roll Type PCT User Manual
25
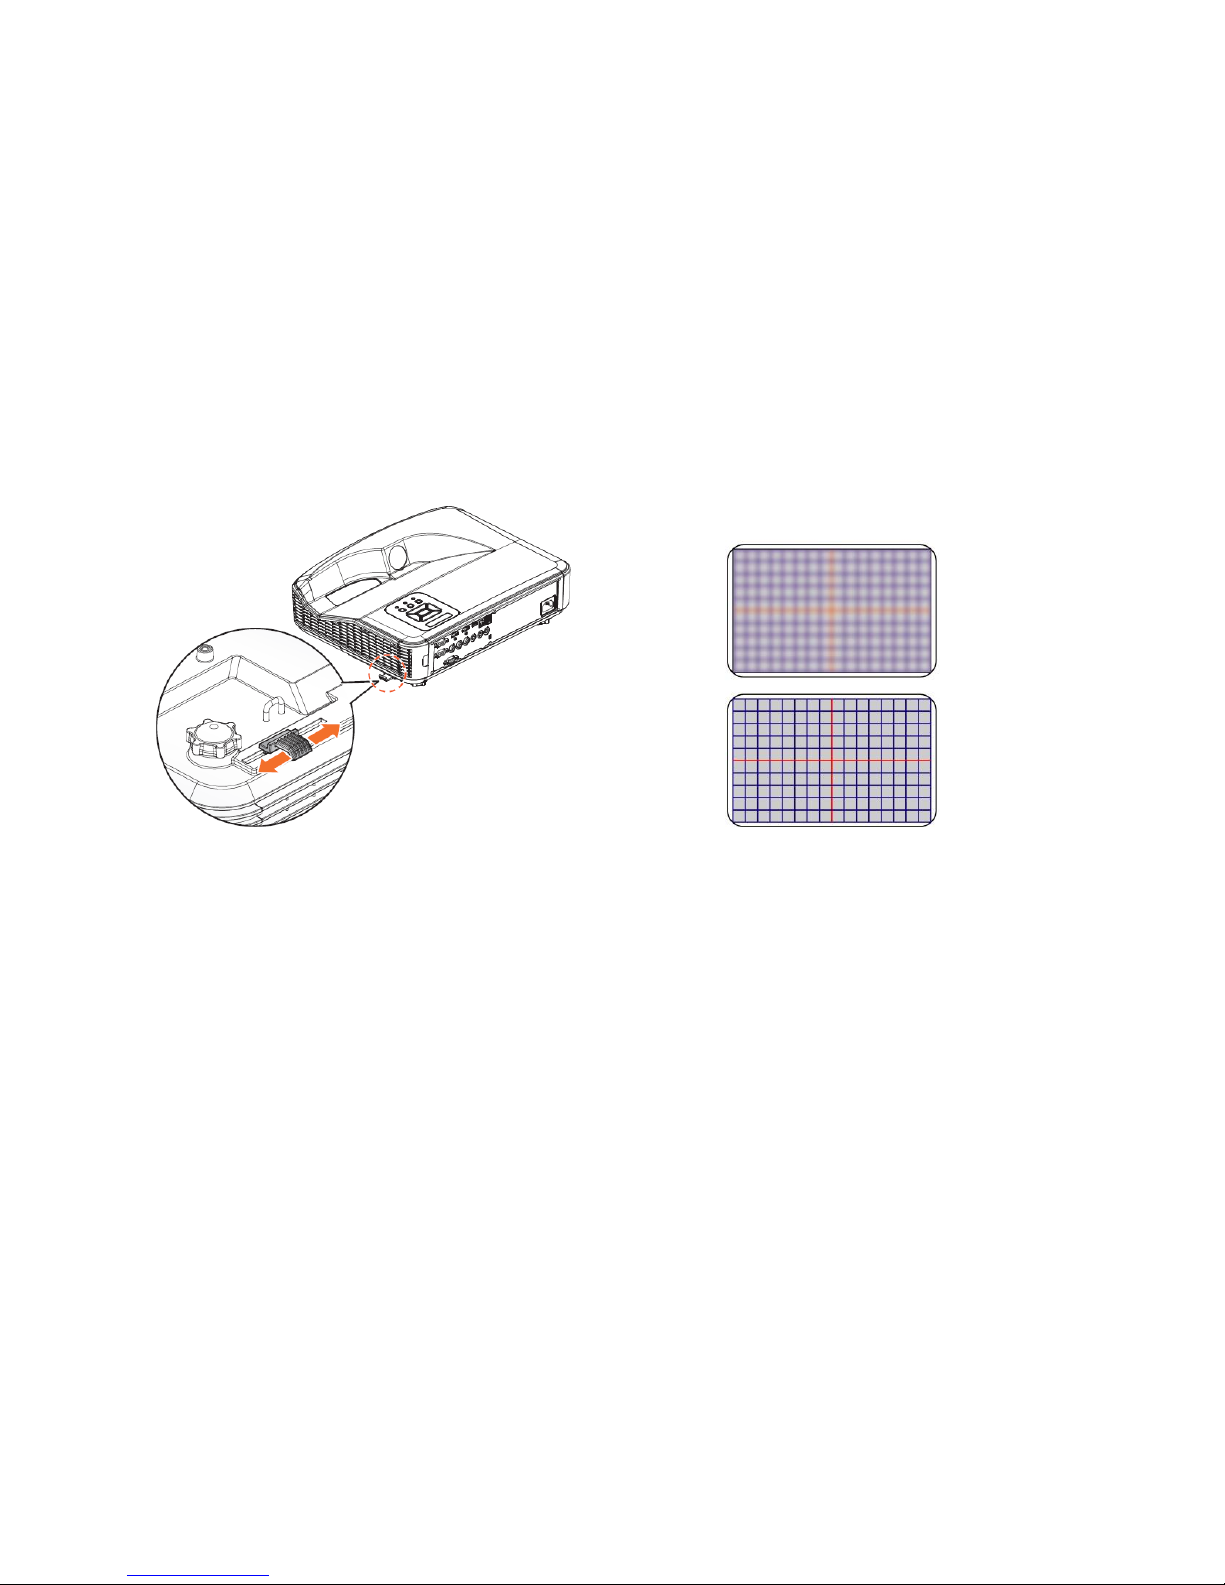
Adjust focus
Page 26
Roll Type PCT User Manual
26
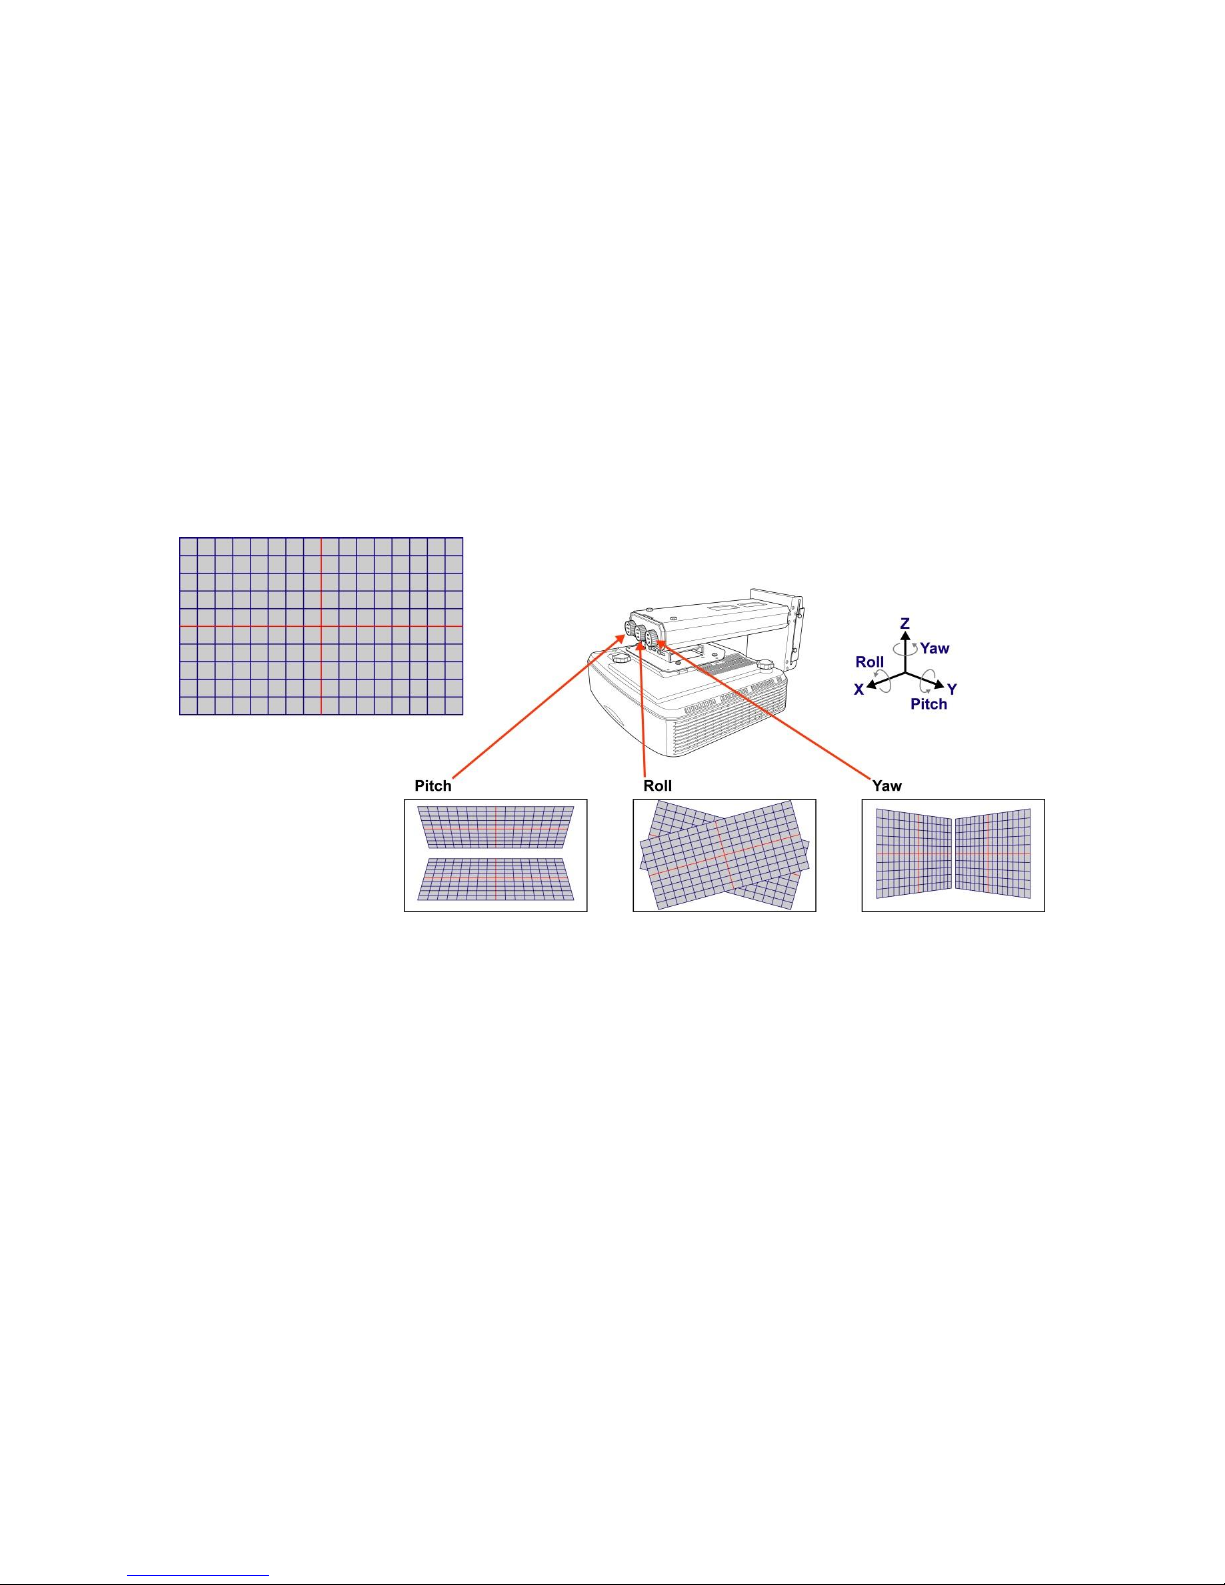
2. Suggest projecting an alignment pattern to make image alignment easier.
3. Adjust the knobs of pitch, roll and yaw adjustment to make the image to be rectangle.
Page 27
Roll Type PCT User Manual
27
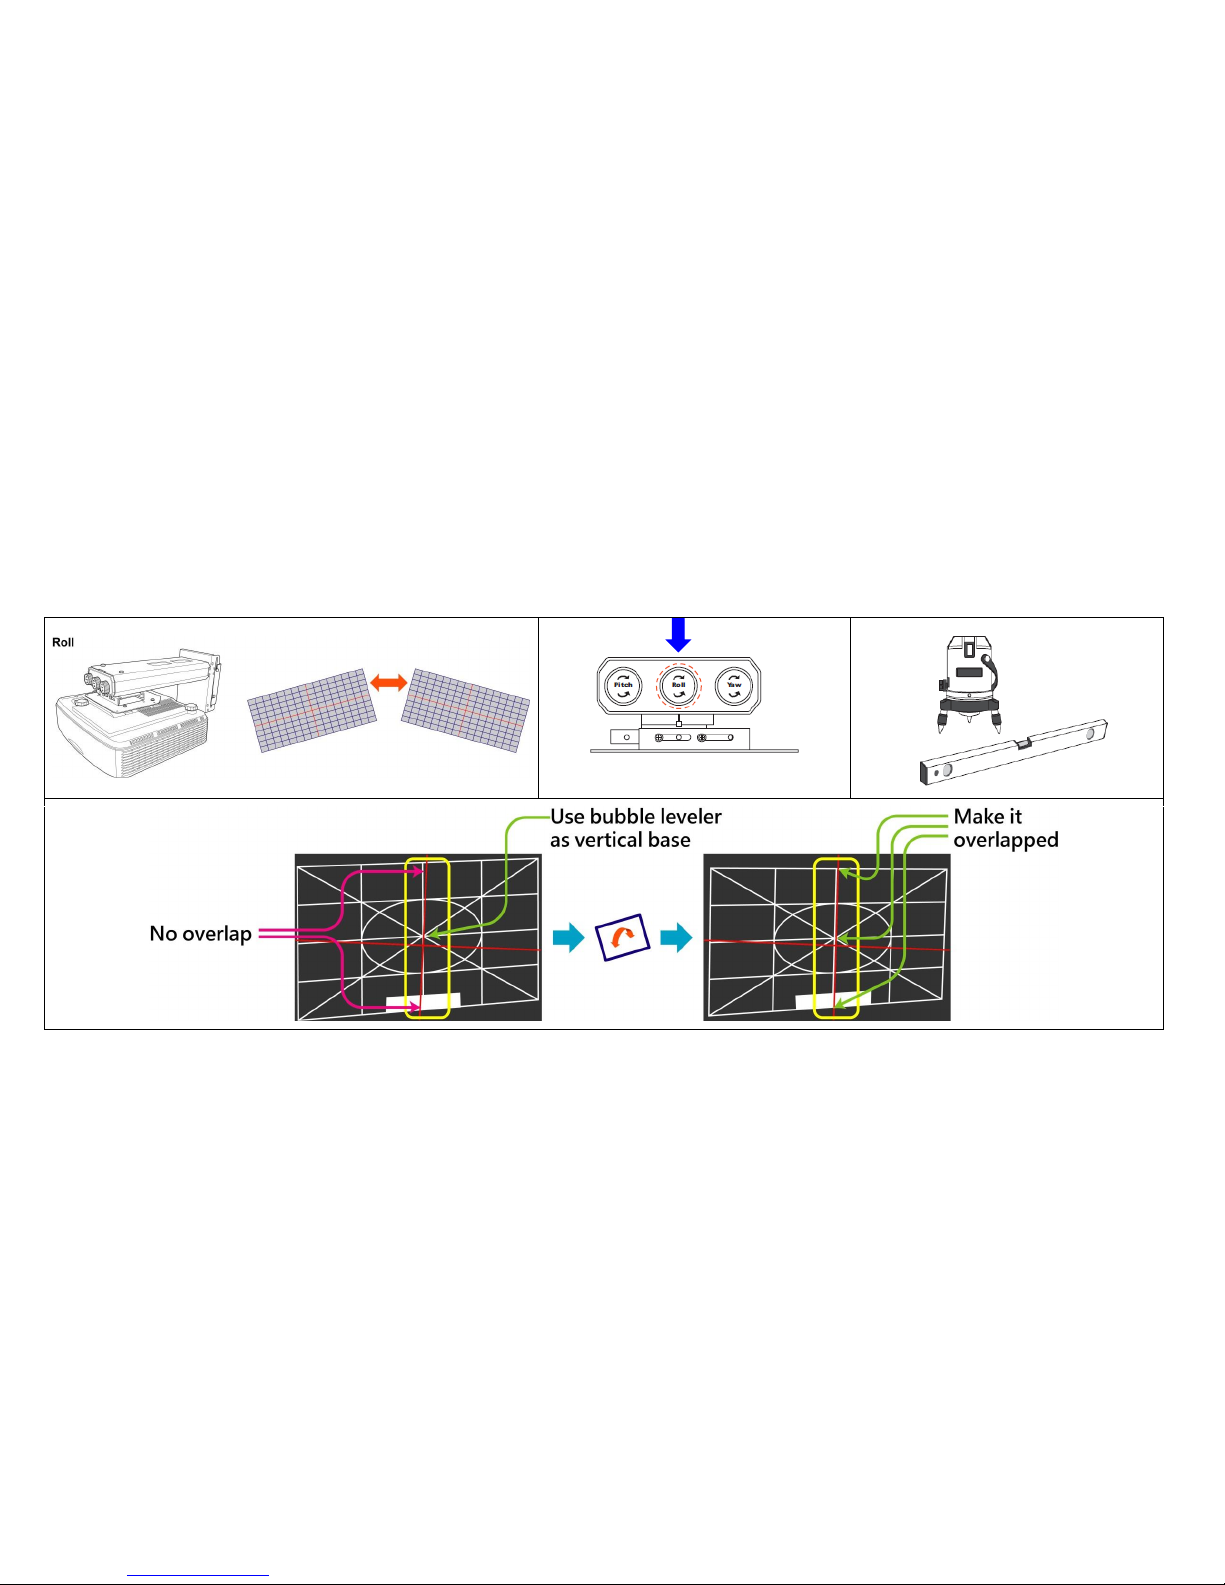
Step 1. Roll image adjustment
1) Project full screen test pattern
2) Align leveler with vertical line at center of test pattern.
3) Adjust Roll knob, until leveler and vertical line of test pattern center are overlapped.
Page 28
Roll Type PCT User Manual
28
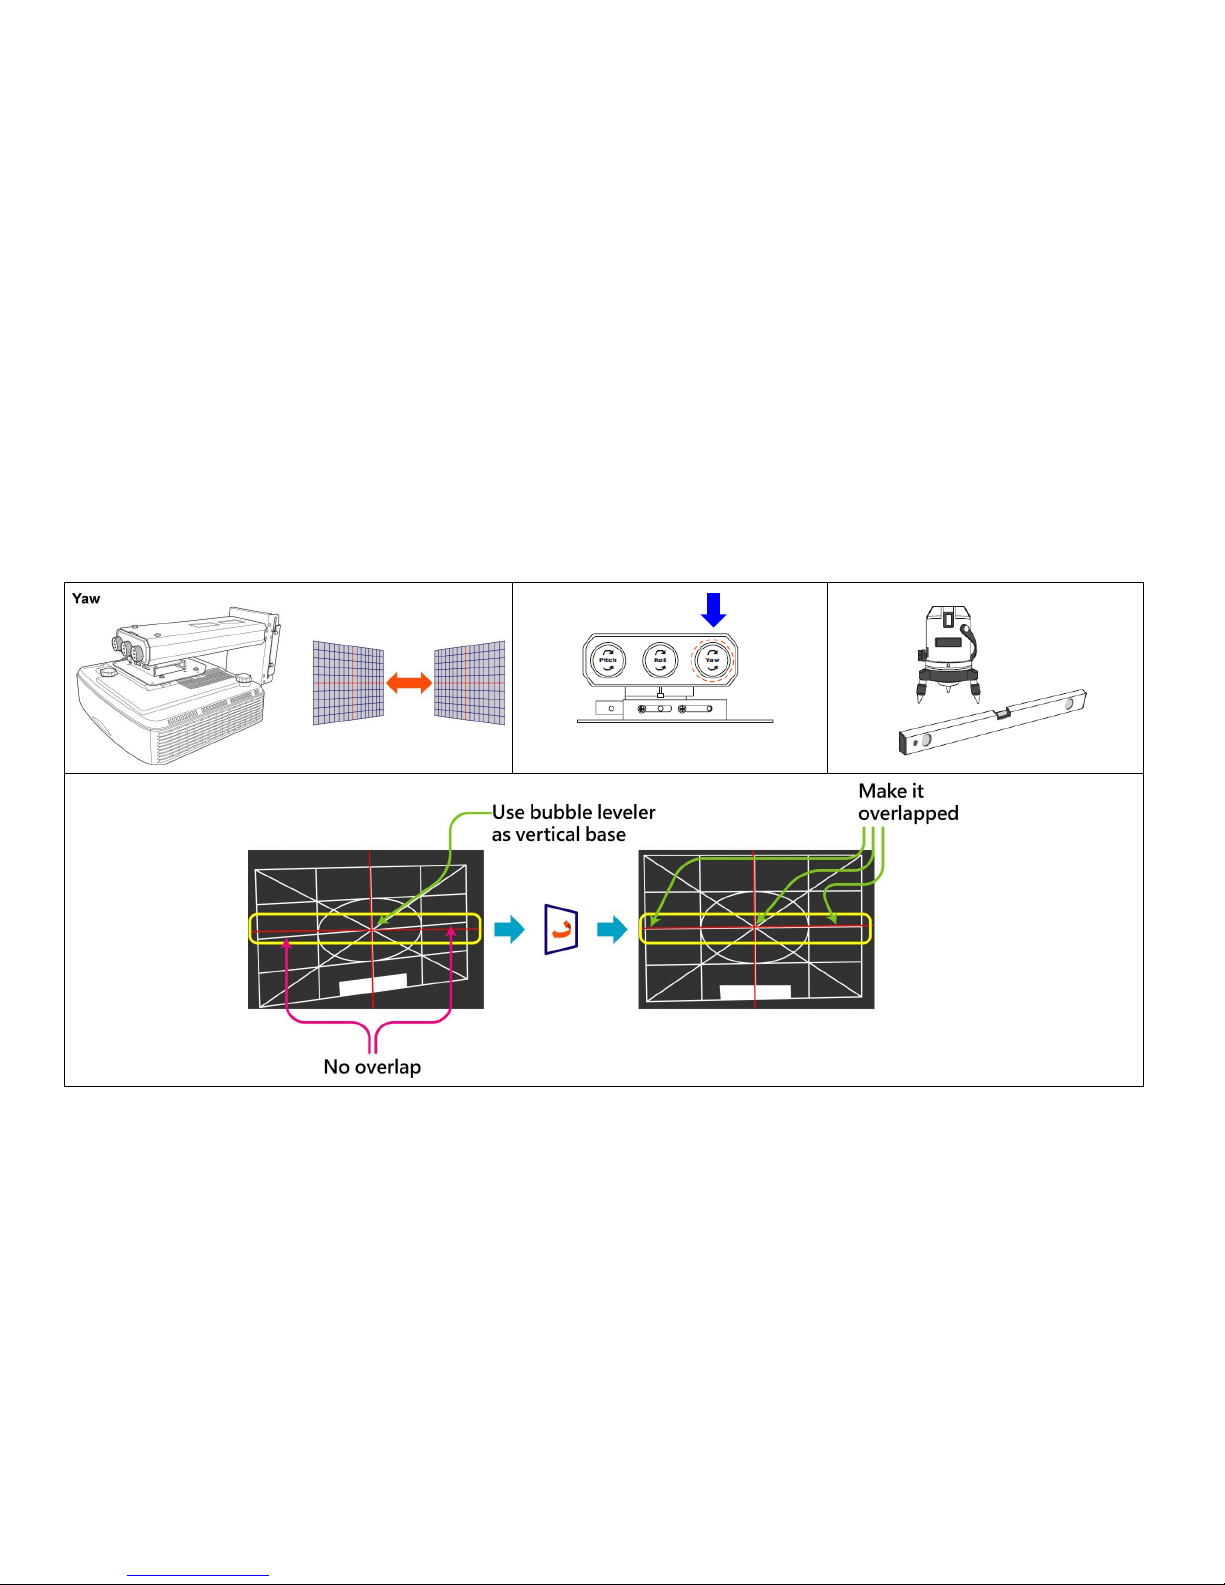
Step 2. Yaw image adjustment
1) Align leveler with horizontal line at center of test pattern.
2) Adjust Yaw knob, until leveler and horizontal line of test pattern center are overlapped.
Page 29
Roll Type PCT User Manual
29
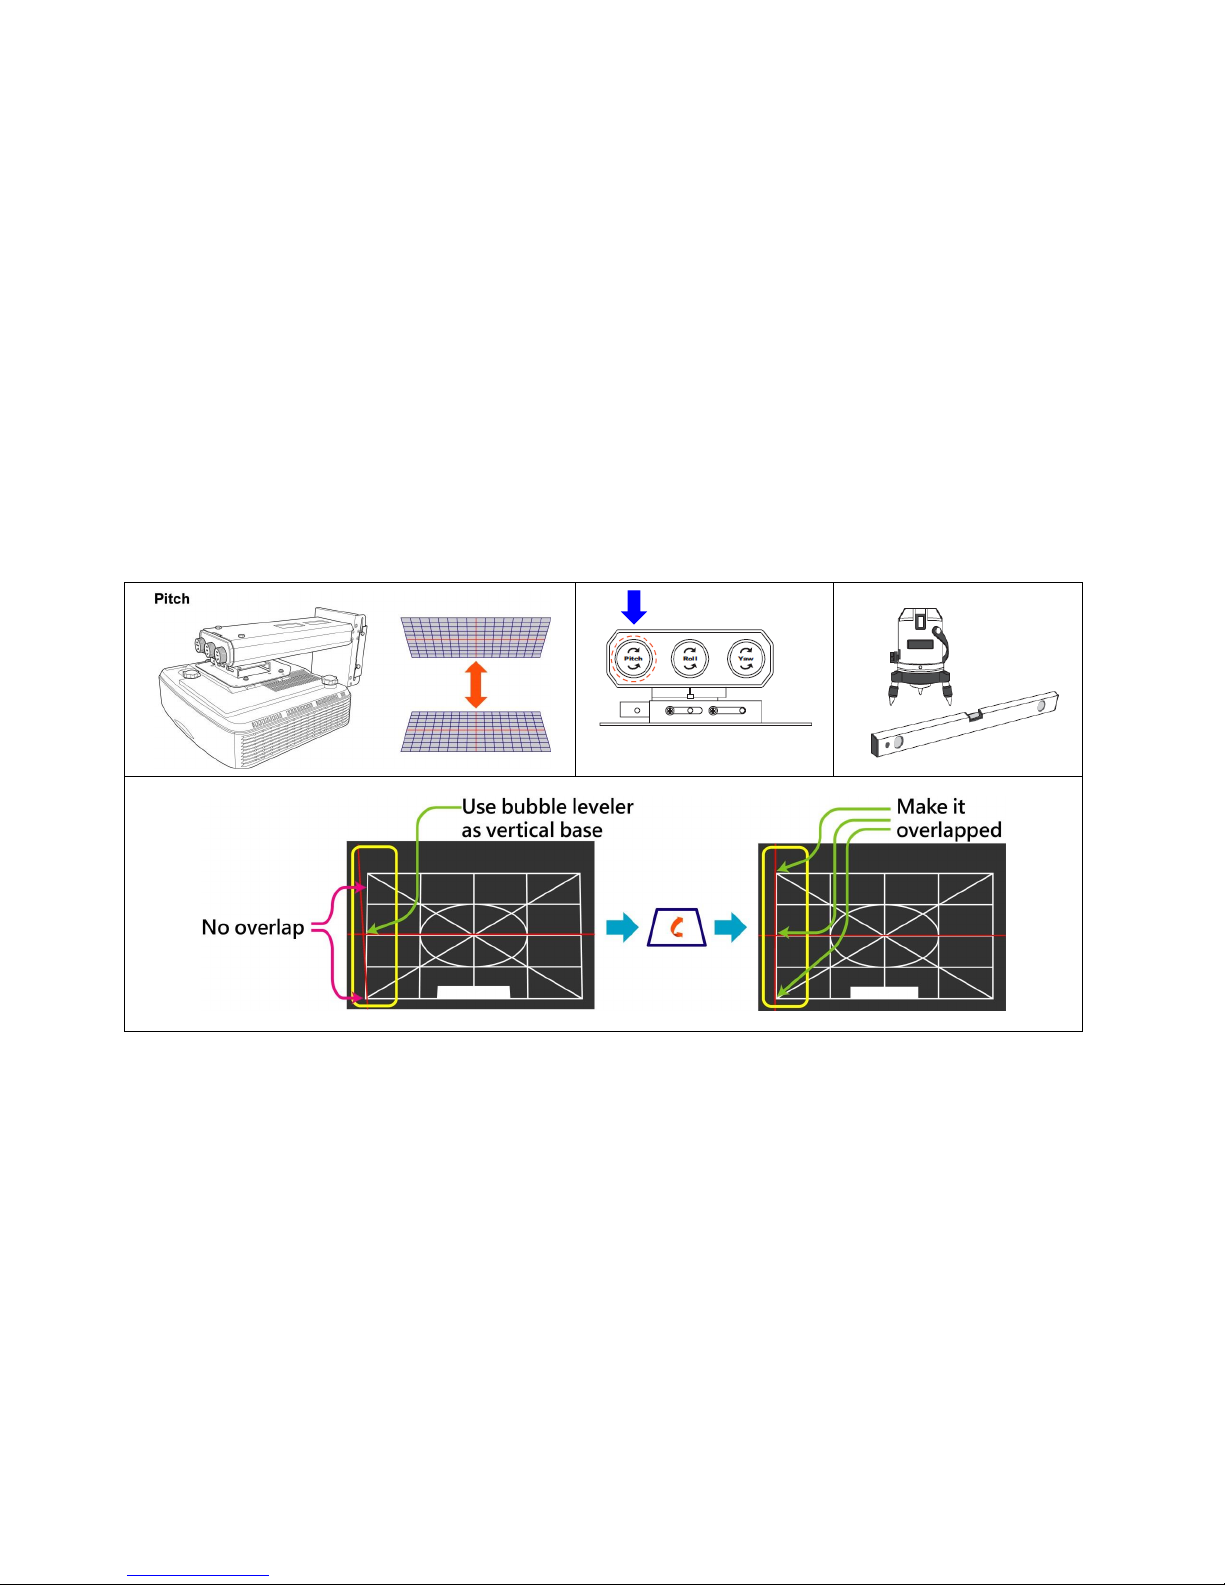
Step 3. Pitch image adjustment
1) Align leveler with vertical line of test pattern at left side of WB.
2) Adjust Pitch knob, until leveler and vertical line of test pattern left side are overlapped.
Page 30
Roll Type PCT User Manual
30
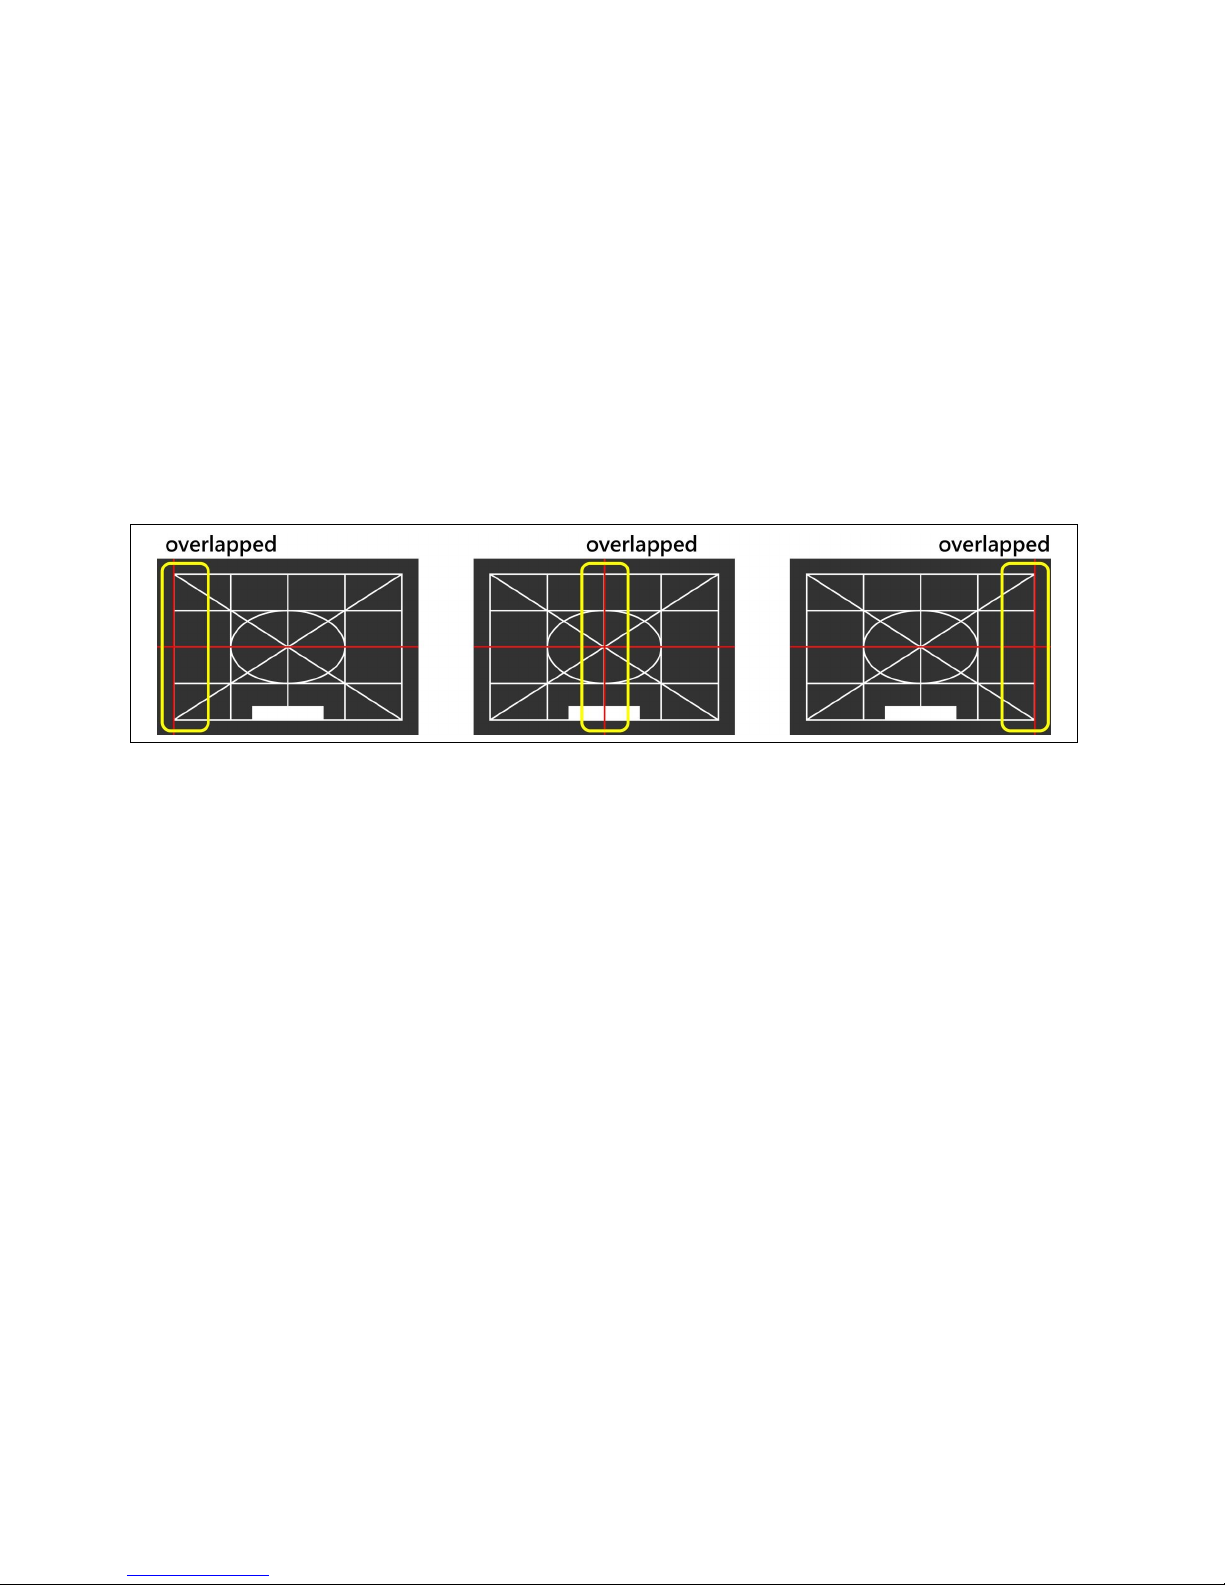
Step 4. Check result
Double check with leveler, making sure overlapped with vertical lines of test pattern at left/central/right.
Page 31
Roll Type PCT User Manual
31
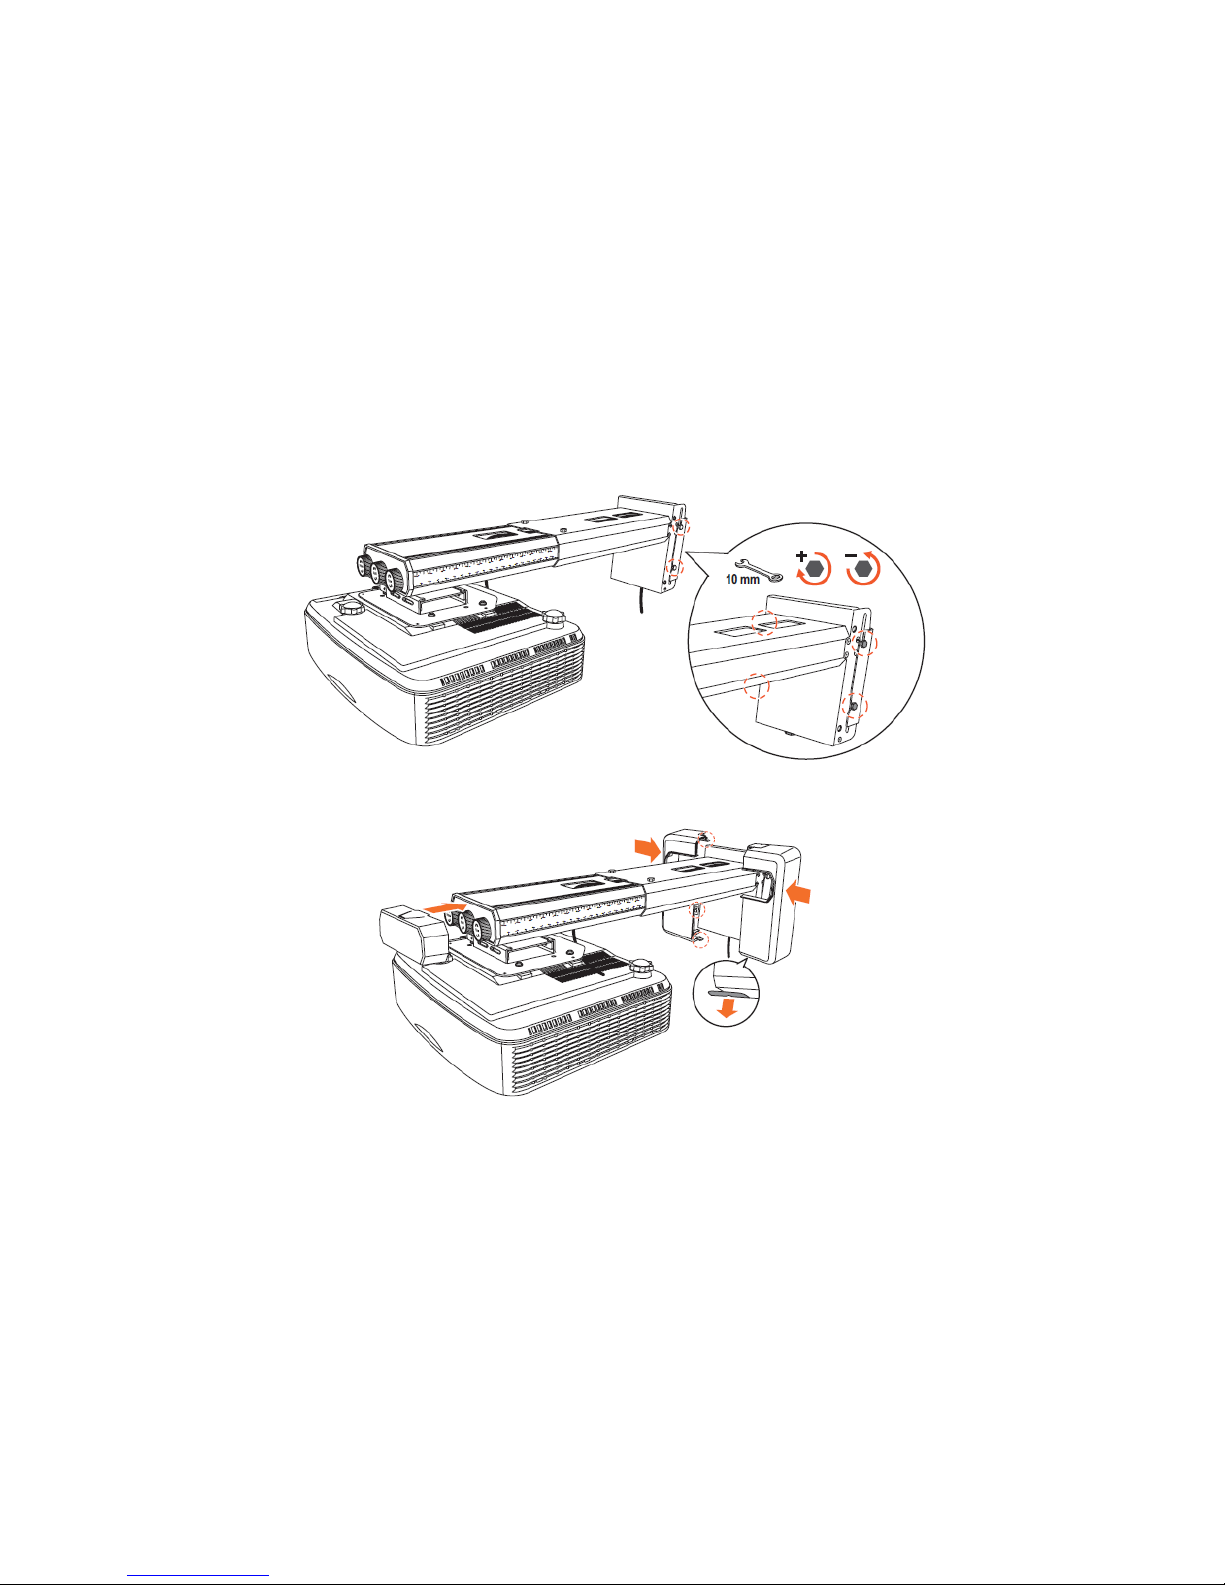
Step 5: Lock screws and assembly wall mount covers.
Page 32

Roll Type PCT User Manual
32
ORGIONAL PROJECTOR AND WALL MOUNT INSTALLATION
Please make sure your projector is able to project 94” (16:9) or 132” (16:6) image before PCT installation.
Then adjust the projection size to 94” or 132”.
Page 33
Roll Type PCT User Manual
33
4. ROLL TYPE PCT INSTALLATION
Step 1. Please refer to the section 1-4 (Environment Requirements) then make sure the wall size and surface if suitable for installation roll type PCT.
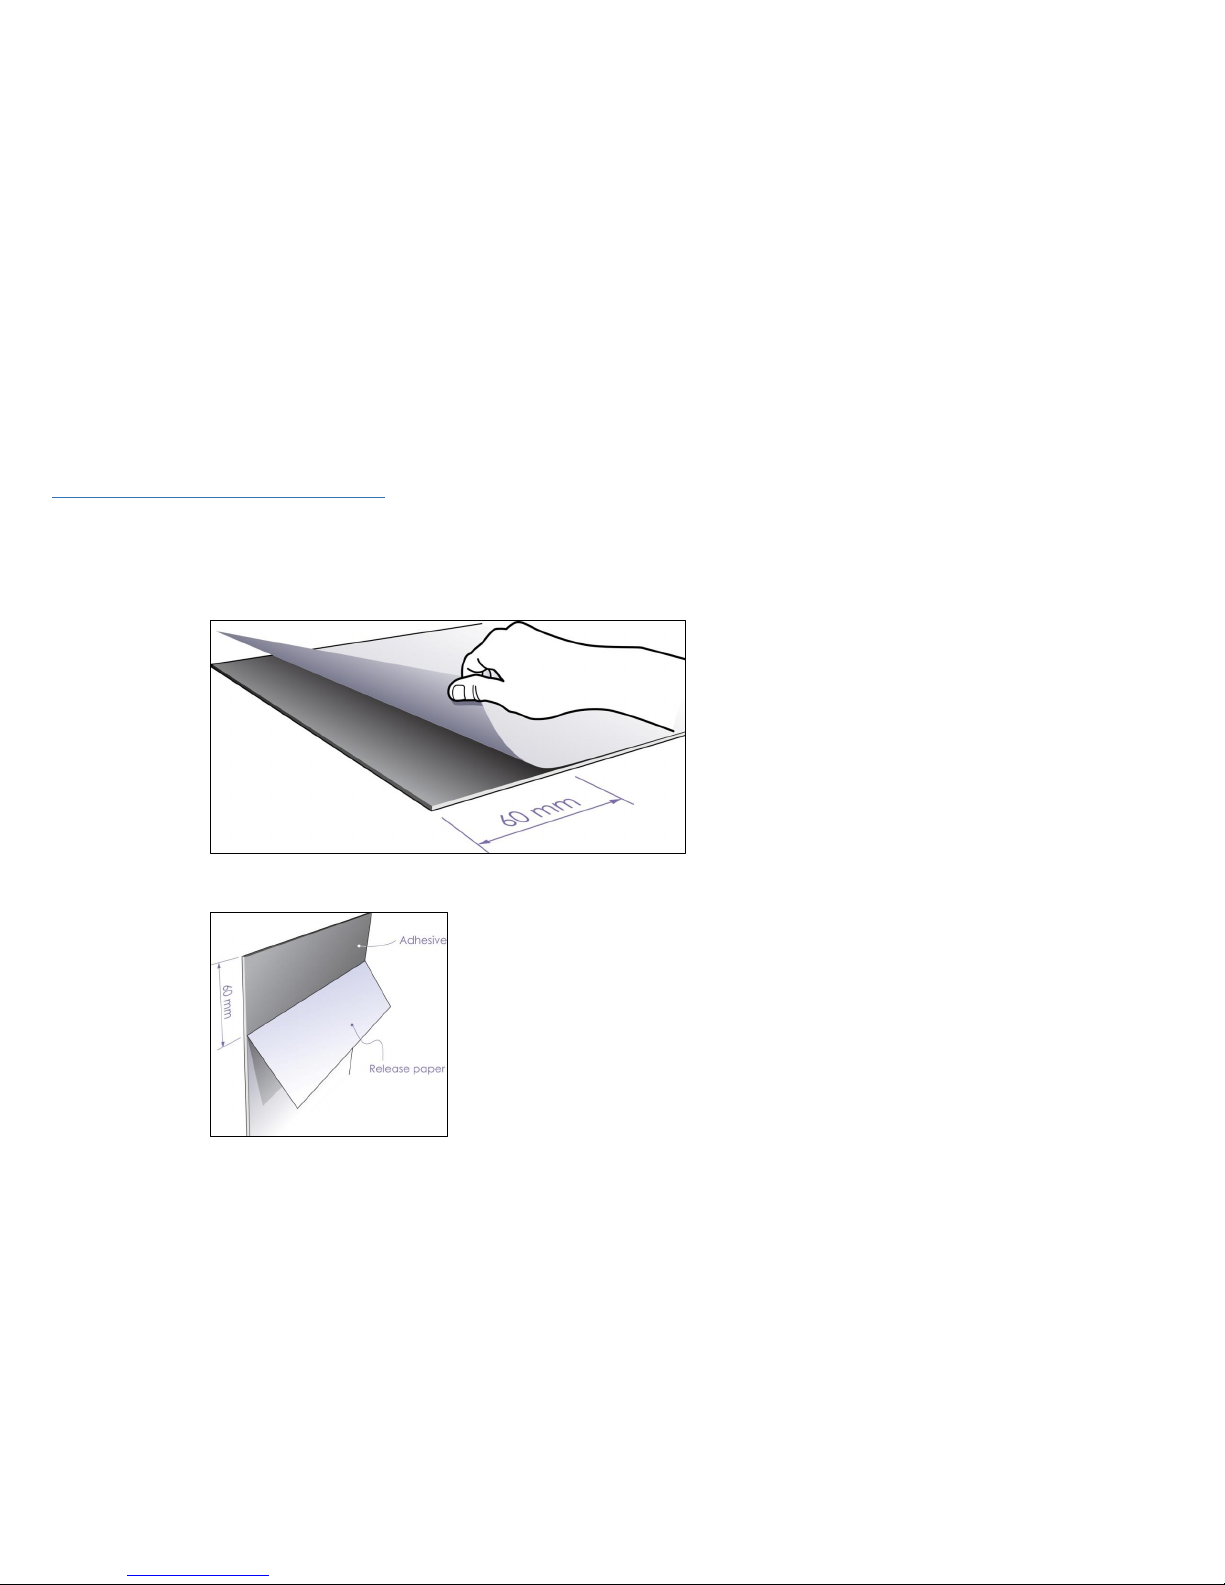
Step 2. Attach steel papers (If this area could not be magnetized by magnet, please follow steps as below to paste steel papers on wall).
2-1 Peel off the release paper from steel papers around 60mm.
2-2 After peeled off release paper around 60mm, folded up it as following figure.
Page 34
Roll Type PCT User Manual
34
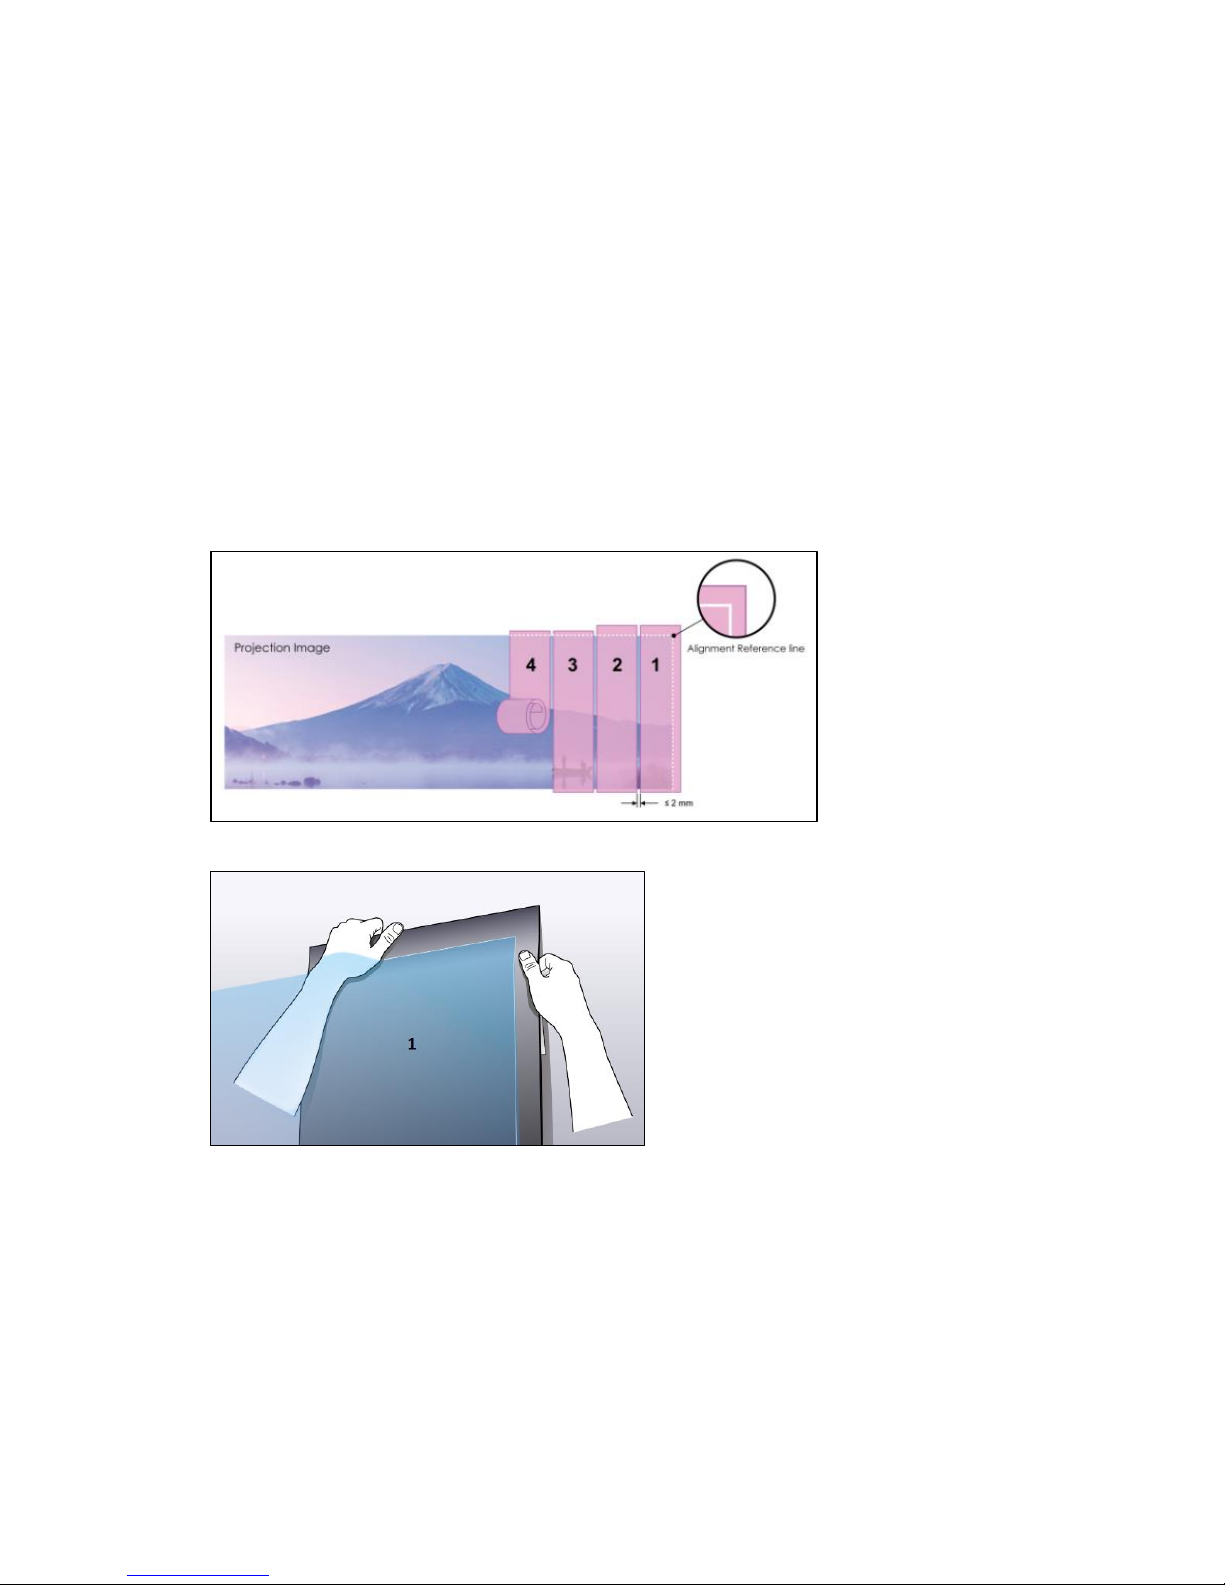
2-3 There is a right angle line on number 1 of steel paper. When pasting no.1 steel paper, please align the right angle line with right top of
projection image. To remove the release paper of double side tape on the back of steel paper then align the position line and paste it
on wall.
2-4 Steel papers have serial numbers and positioning line. Please paste steel papers by serial numbers.
Page 35
Roll Type PCT User Manual
35
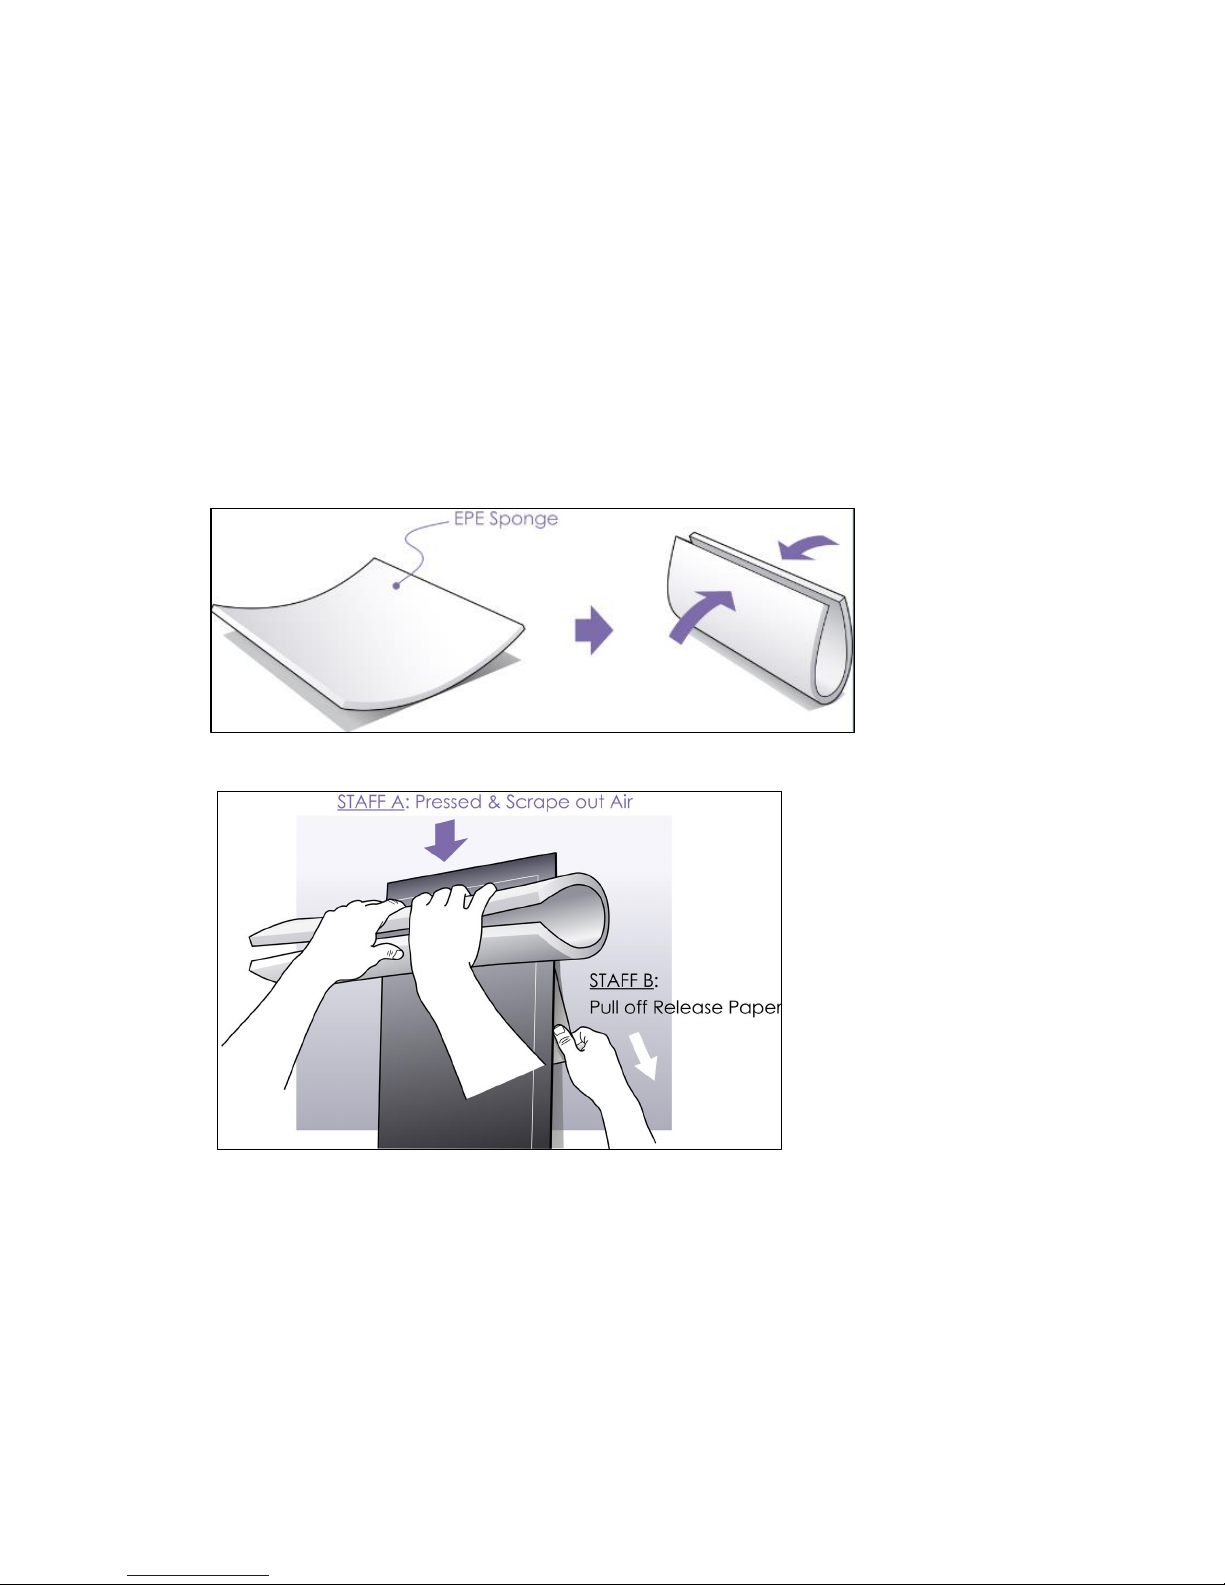
2-5 There is an EPE sponge in carton box. Please fold up EPE sponge as following figure.
2-6 Using folded EPE sponge to press and scrape out air (by staff A) and pull off release paper (by staff B) in the same time.
Page 36
Roll Type PCT User Manual
36
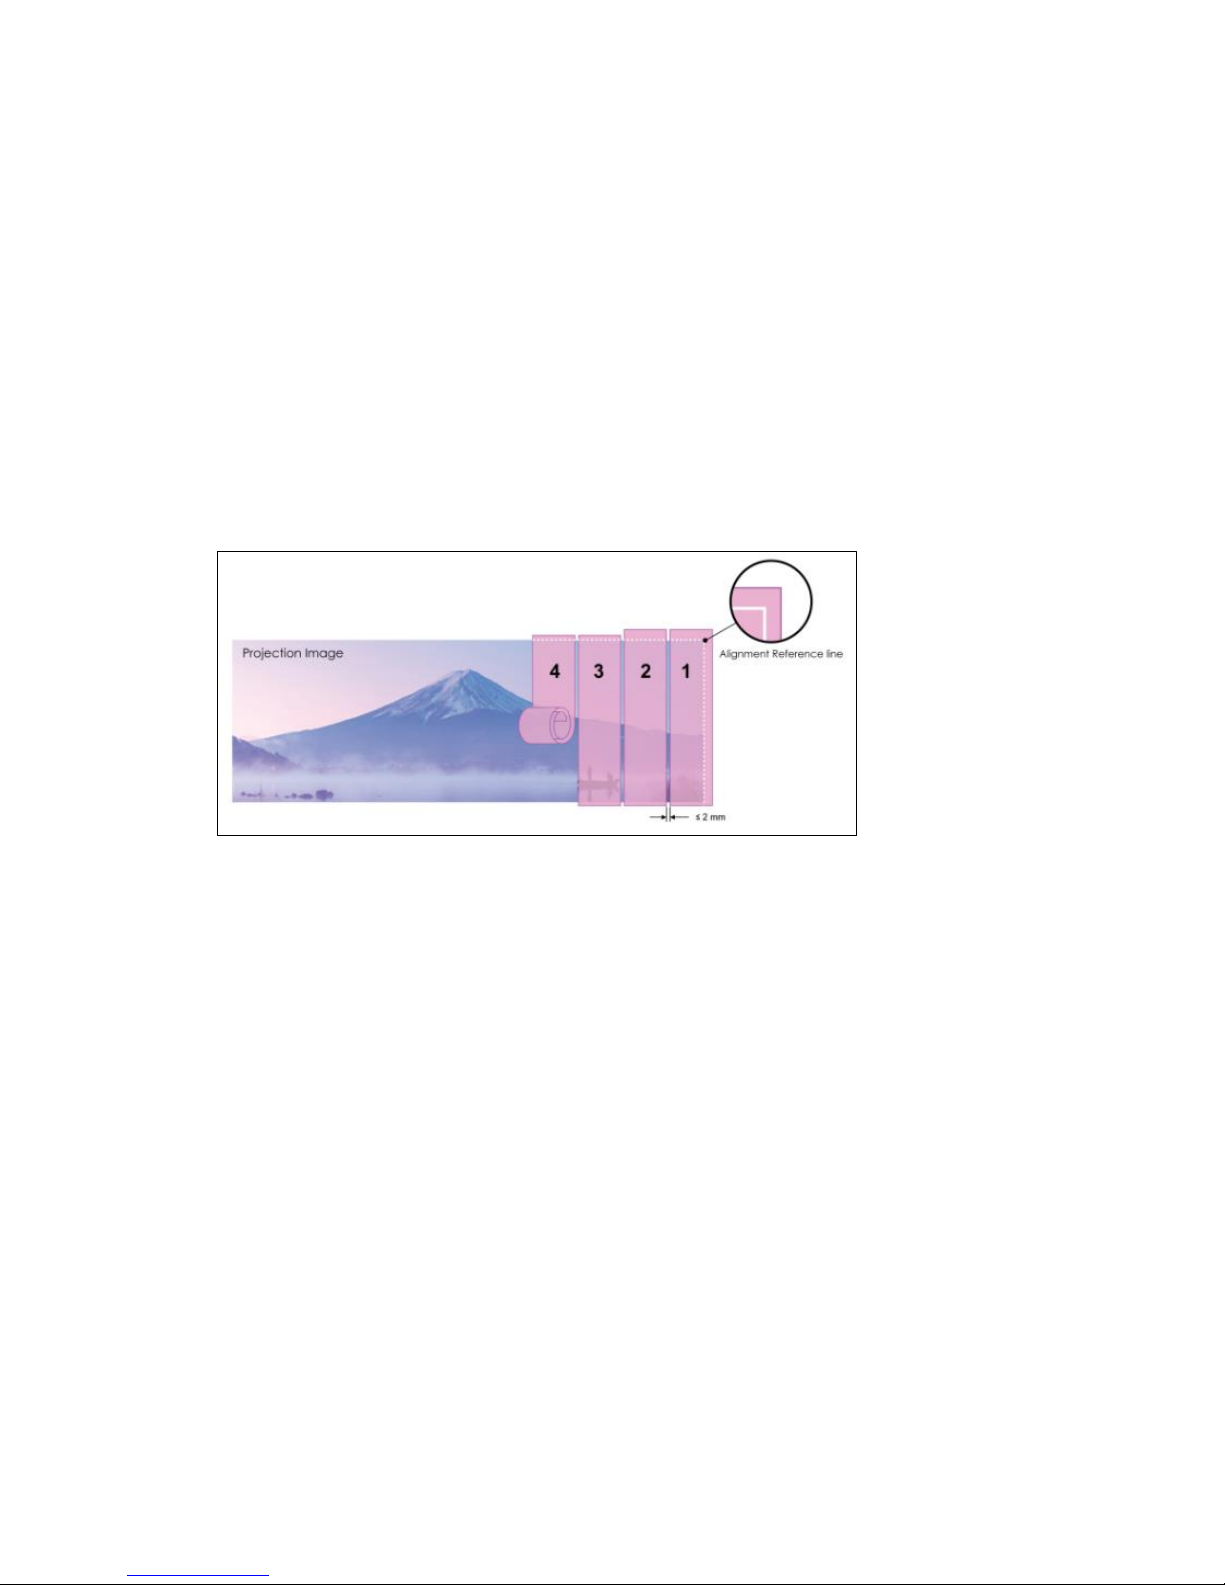
2-7 Please align the horizontal line of steel paper 2 with top projection image, and remove the release paper of double side tape on the
back of steel paper, then paste the steel paper from top to bottom, then right to left side. (The gap of each steel paper is better to less
than 2 mm). Following step 2-1 to 2-6.
2-8 The steel paper of No.1 & 2 are longer 1cm than others. Please paste other steel papers by serial numbers on steel paper as step 2-7.
Page 37
Roll Type PCT User Manual
37
Step 3. Paste the PCT.
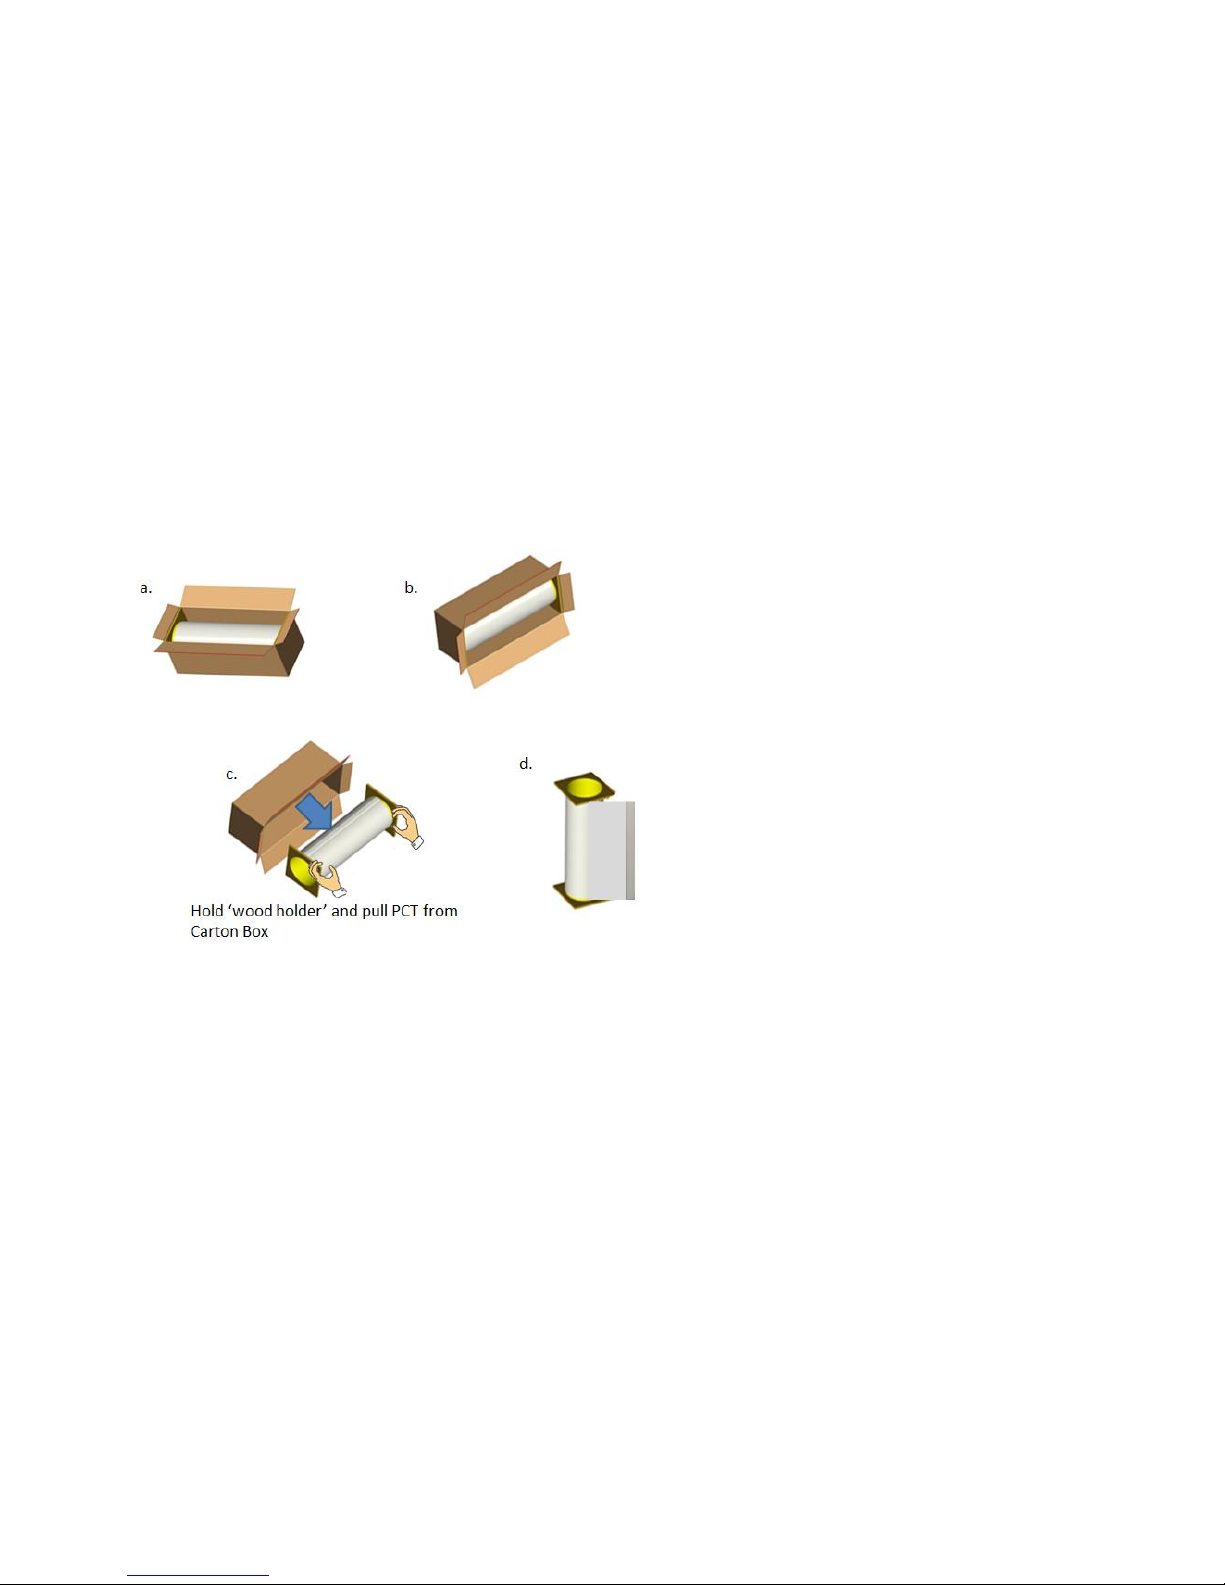
3-1 Please take out PCT from ‘Carton Box’.
3-2 Unroll the PCT from the ‘Paper tube’.
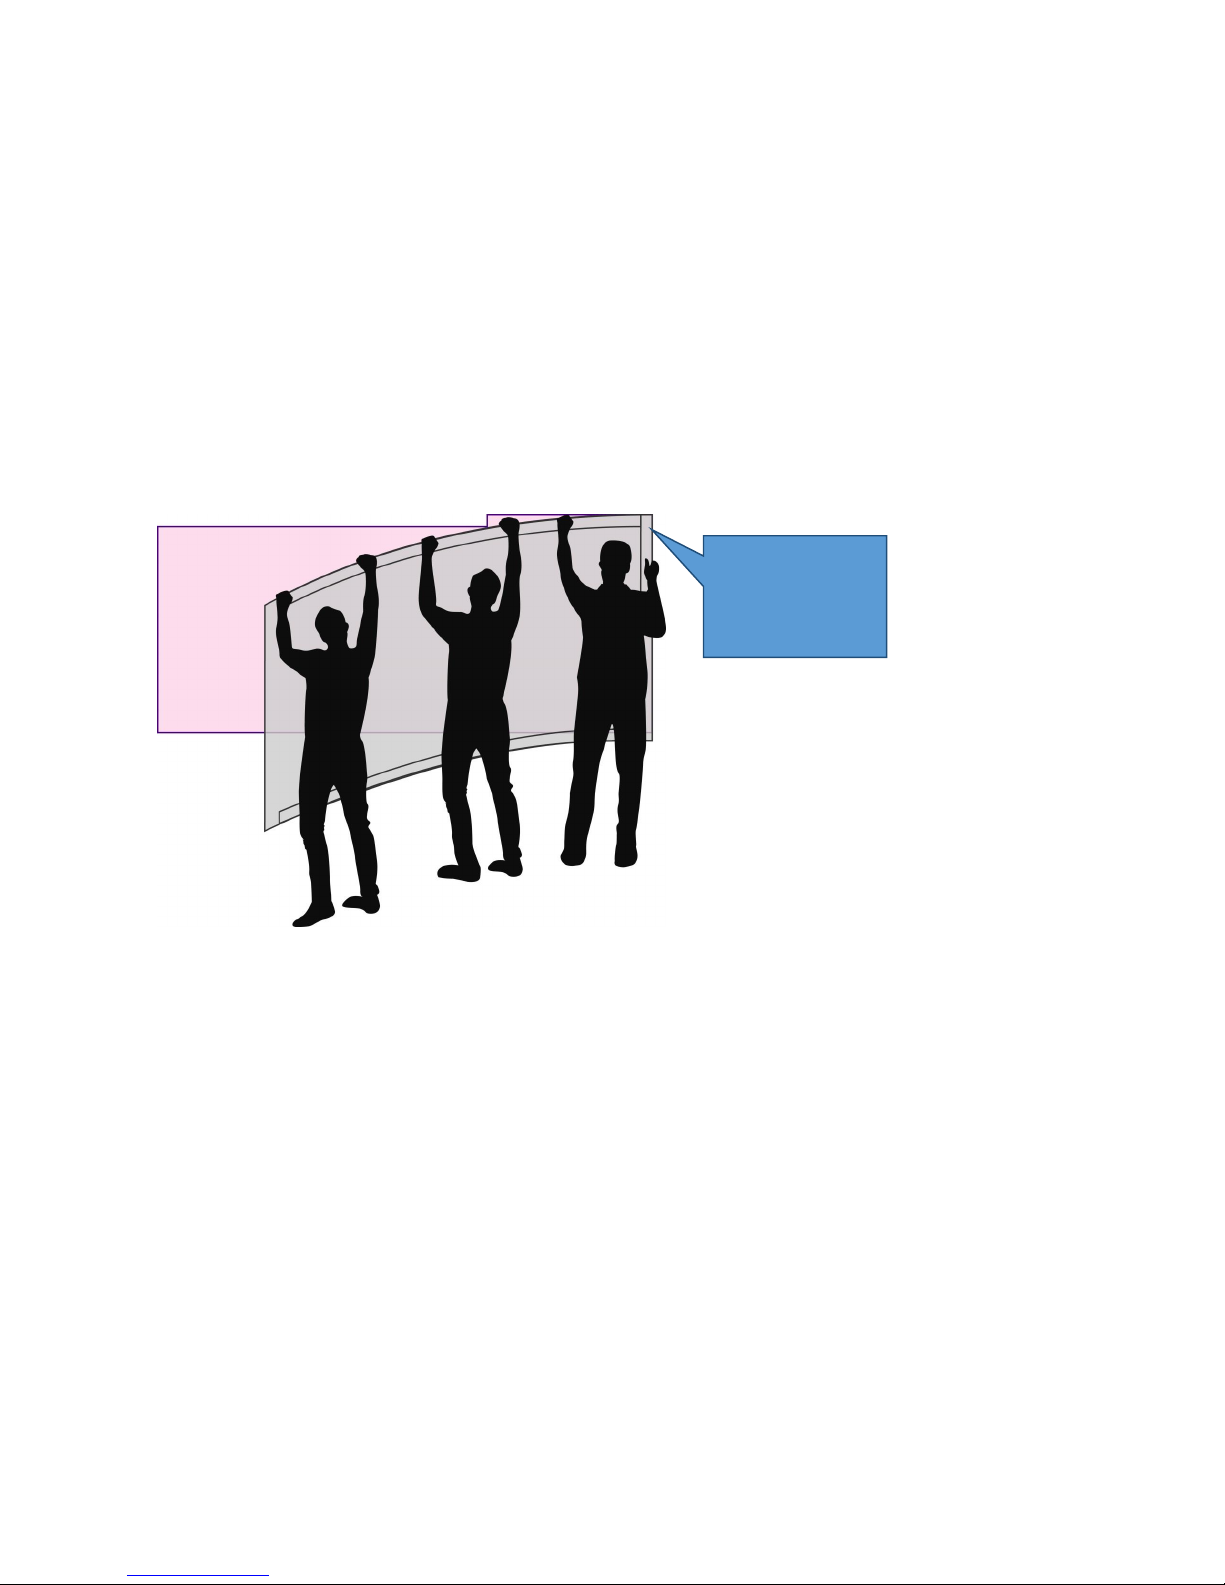
3-3 Suggest 3 manpower to take the PCT towards to the steel paper / magnetized wall.
Remark: 101”: suggest 2 manpower
138”: suggest 3 manpower
Page 38
Roll Type PCT User Manual
38
3-4 Please align and paste the PCT right top outline to outline of no.1 & no.2 steel paper.
Please align with No. 1
& No. 2 steel paper
when you attach PCT
start from right top
corner
Page 39
Roll Type PCT User Manual
39
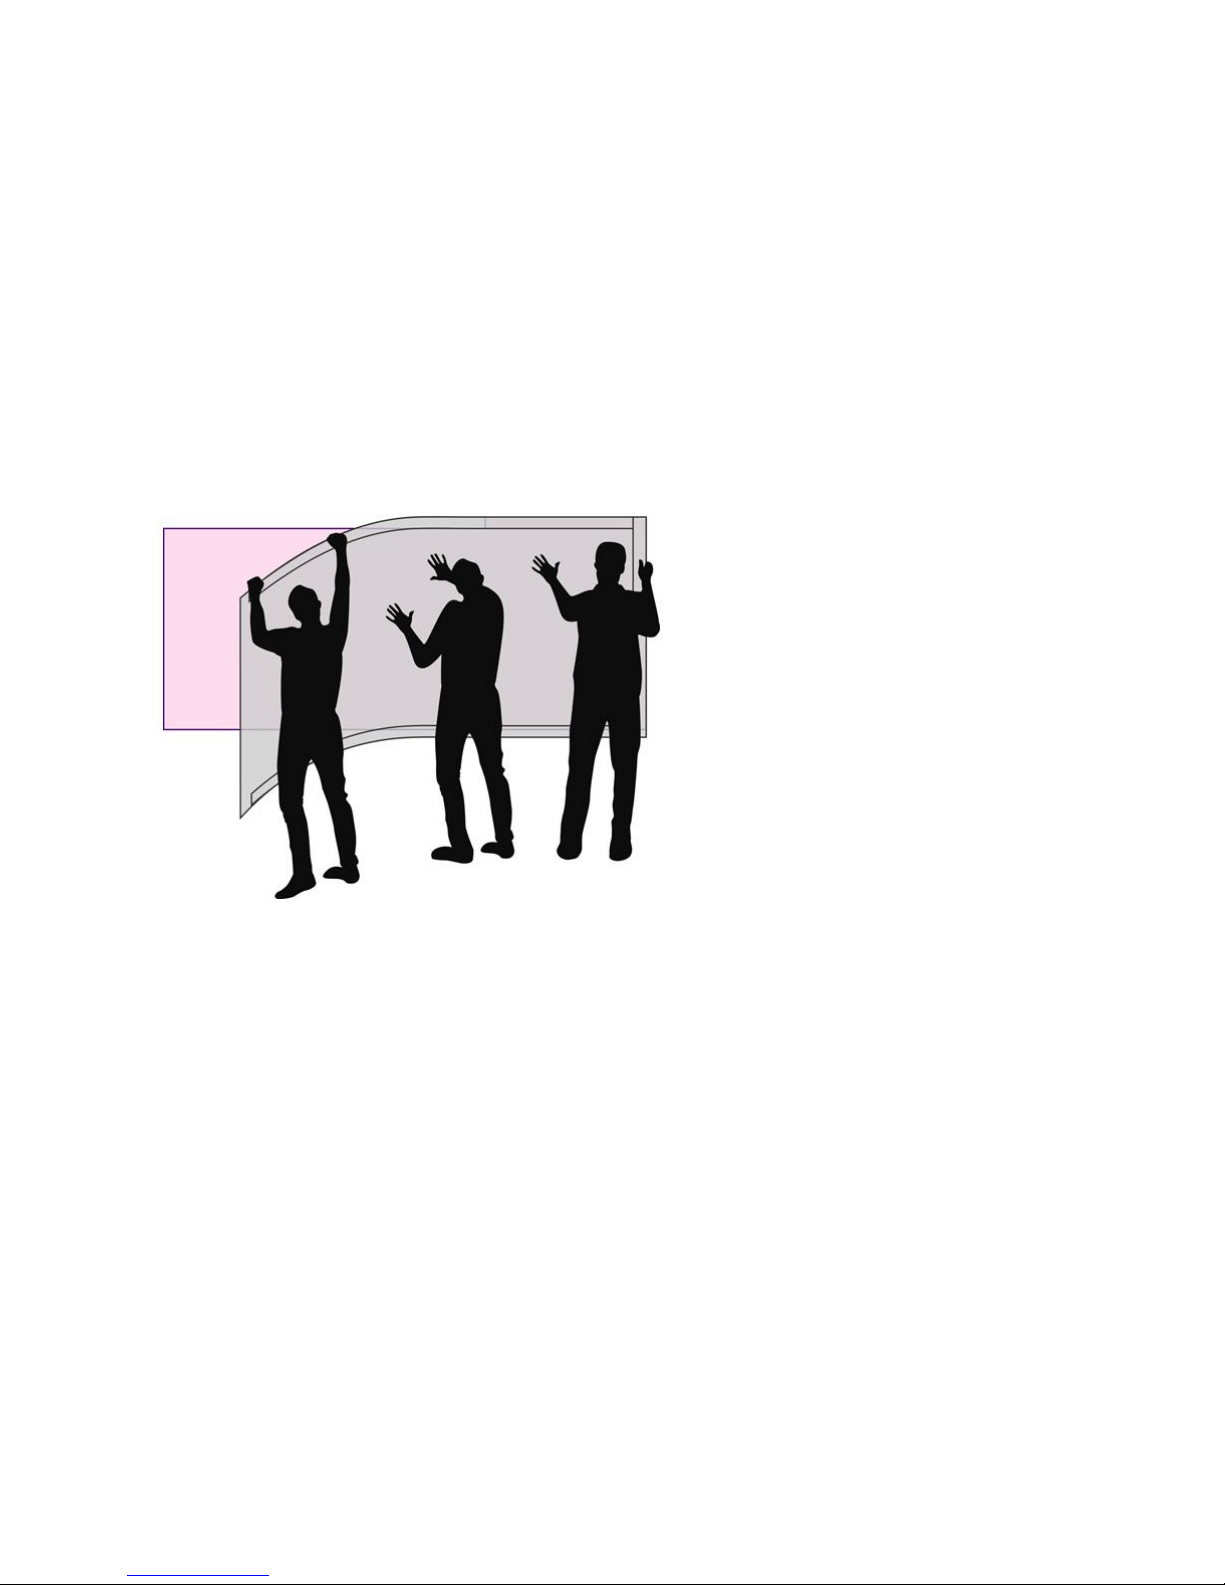
3-5 Paste the PCT from right to left side completely.
Step 4. Make sure to keep surface smooth during paste process, which means no dents/wrinkles/ridges.
Page 40
Roll Type PCT User Manual
40
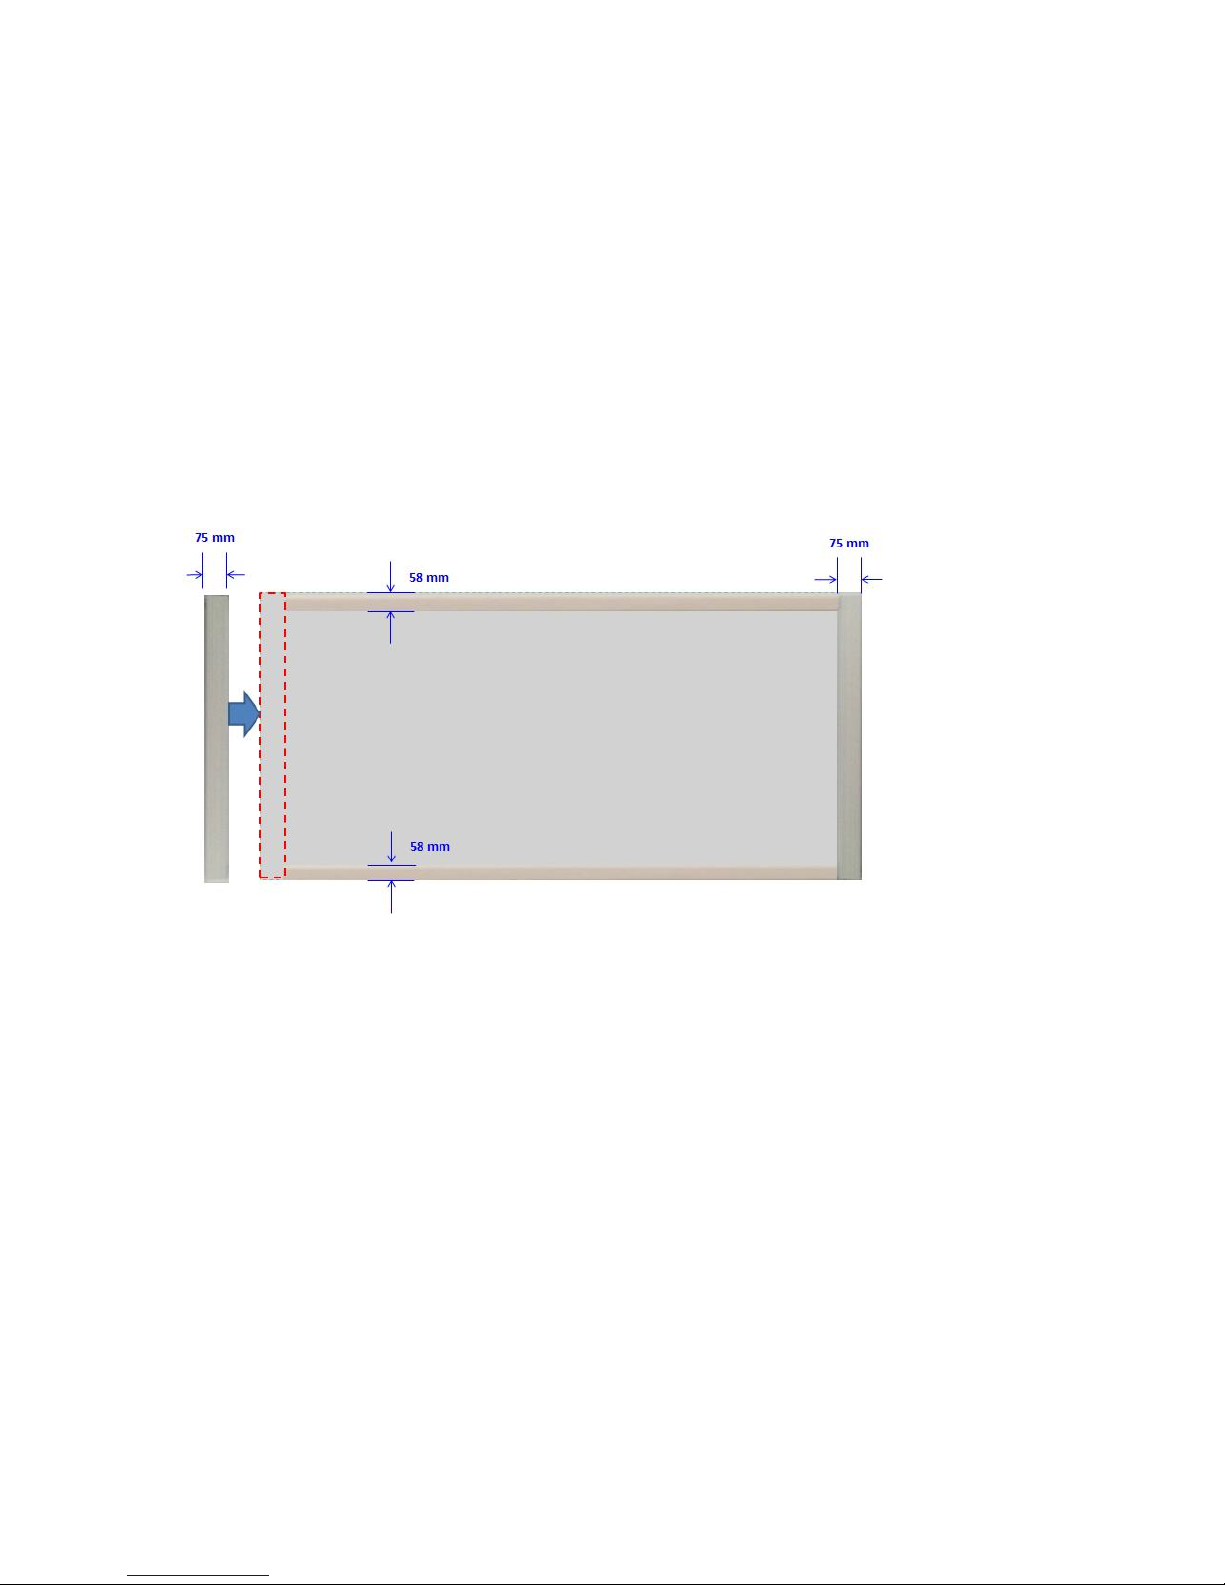
Step 5. Please paste the left frame as below red area position.
Step 6: May projection image is not suitable with PCT, please adjust the projection image as chapter 3-4 Projection Image Adjustment.
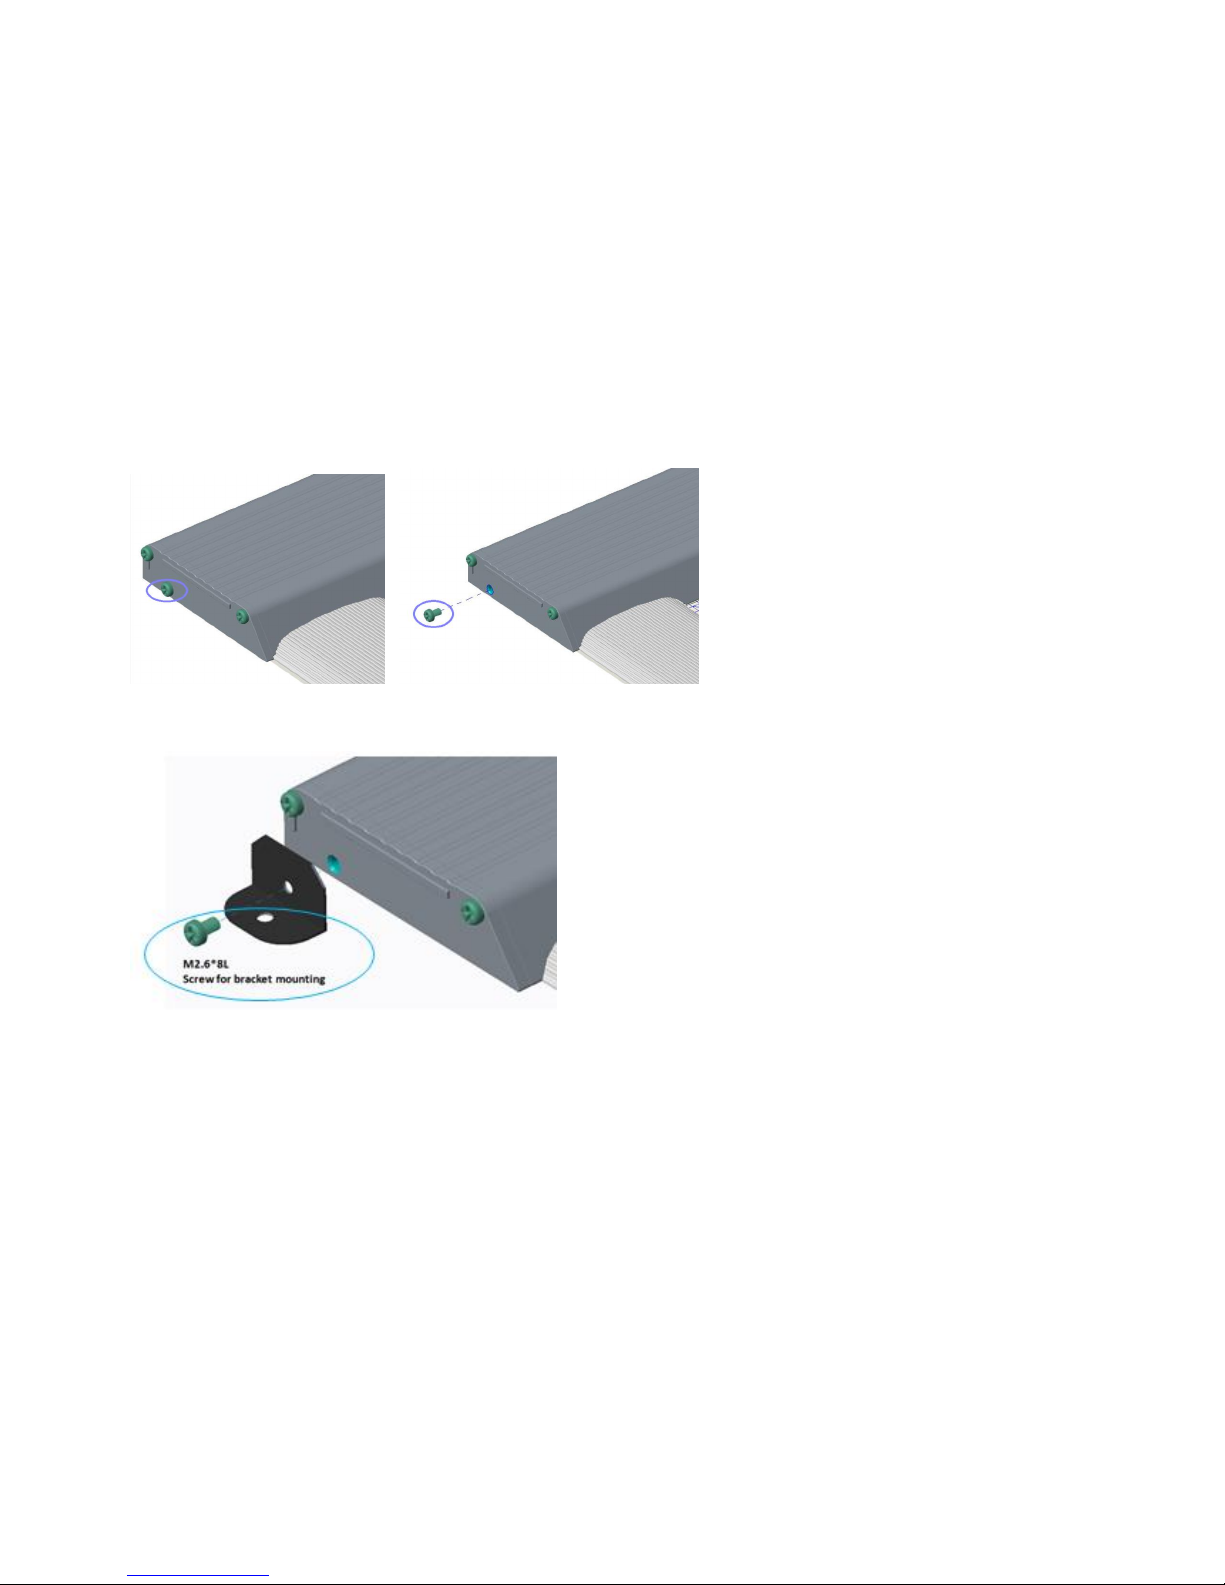
Step 7: Install bracket to fix left/right metal frame.
7-1 Unscrew the screw from frame
Page 41
Roll Type PCT User Manual
41
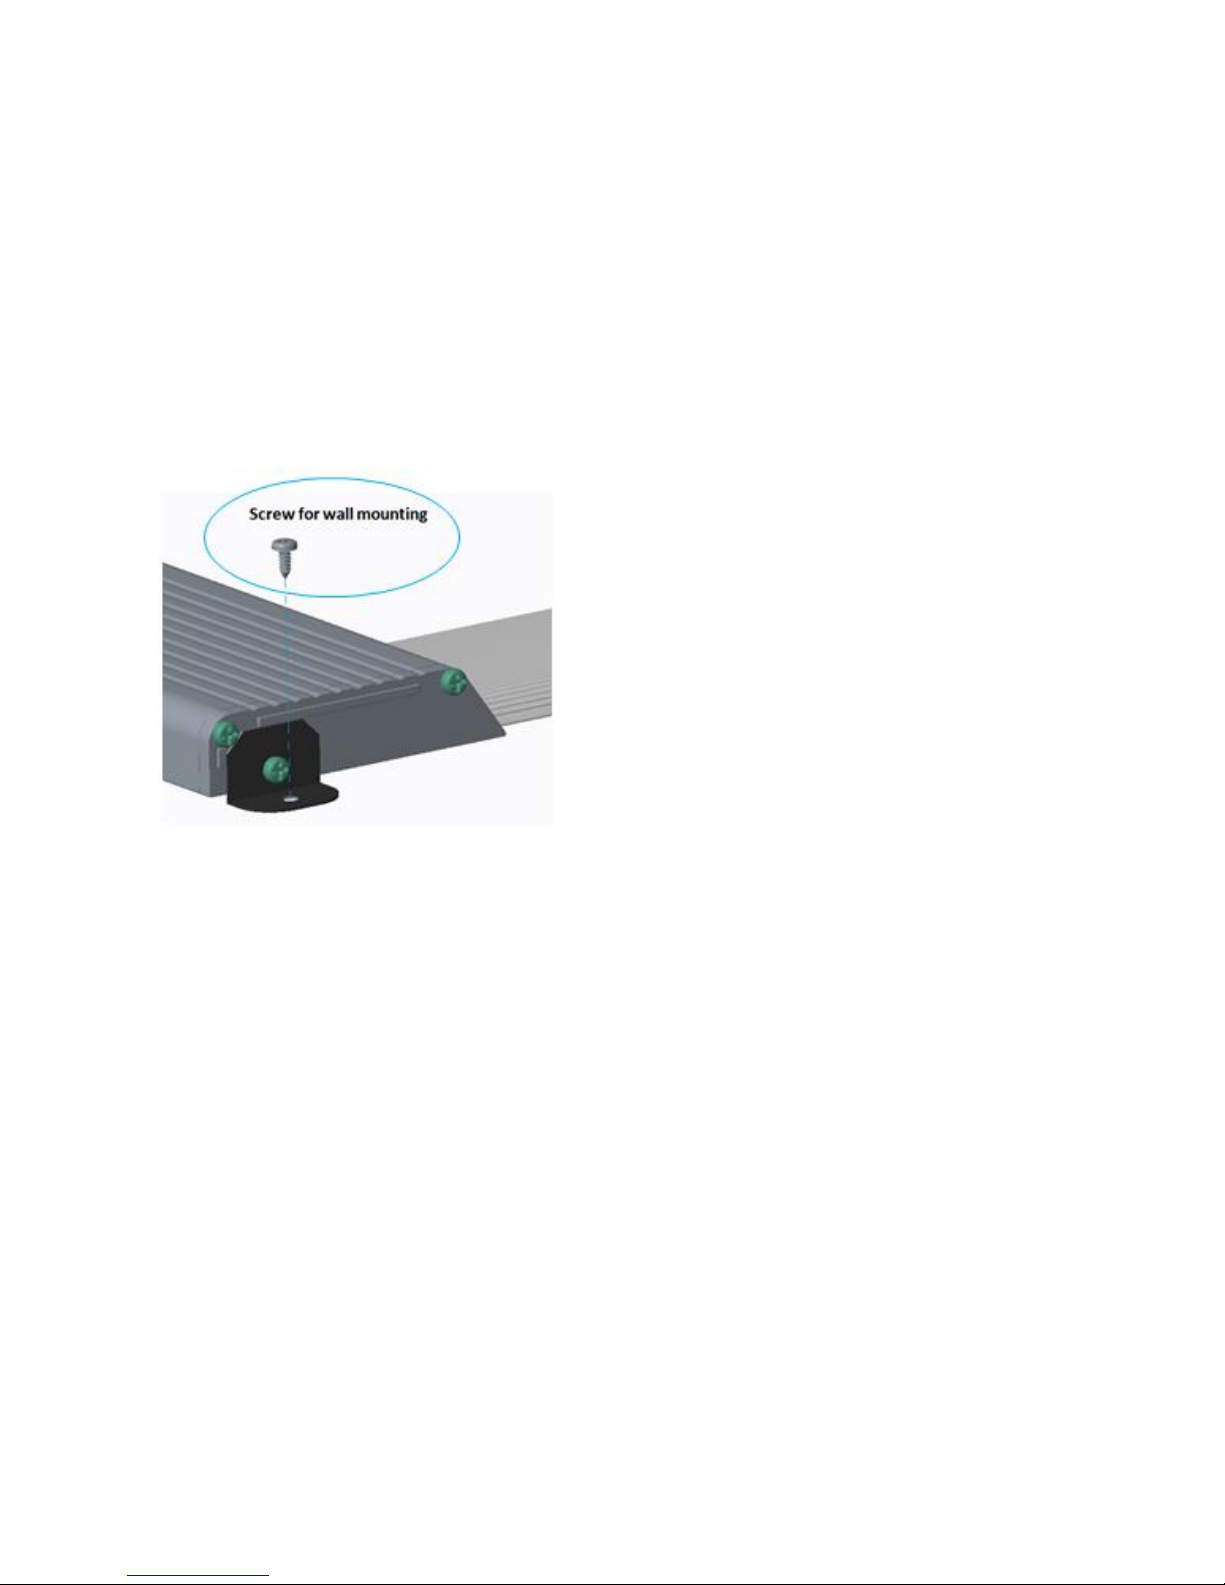
7-2 Install the bracket mounting screw (M2.6*8L) to frame.
7-3 Fix the bracket on wall with screw.
Page 42
Roll Type PCT User Manual
42
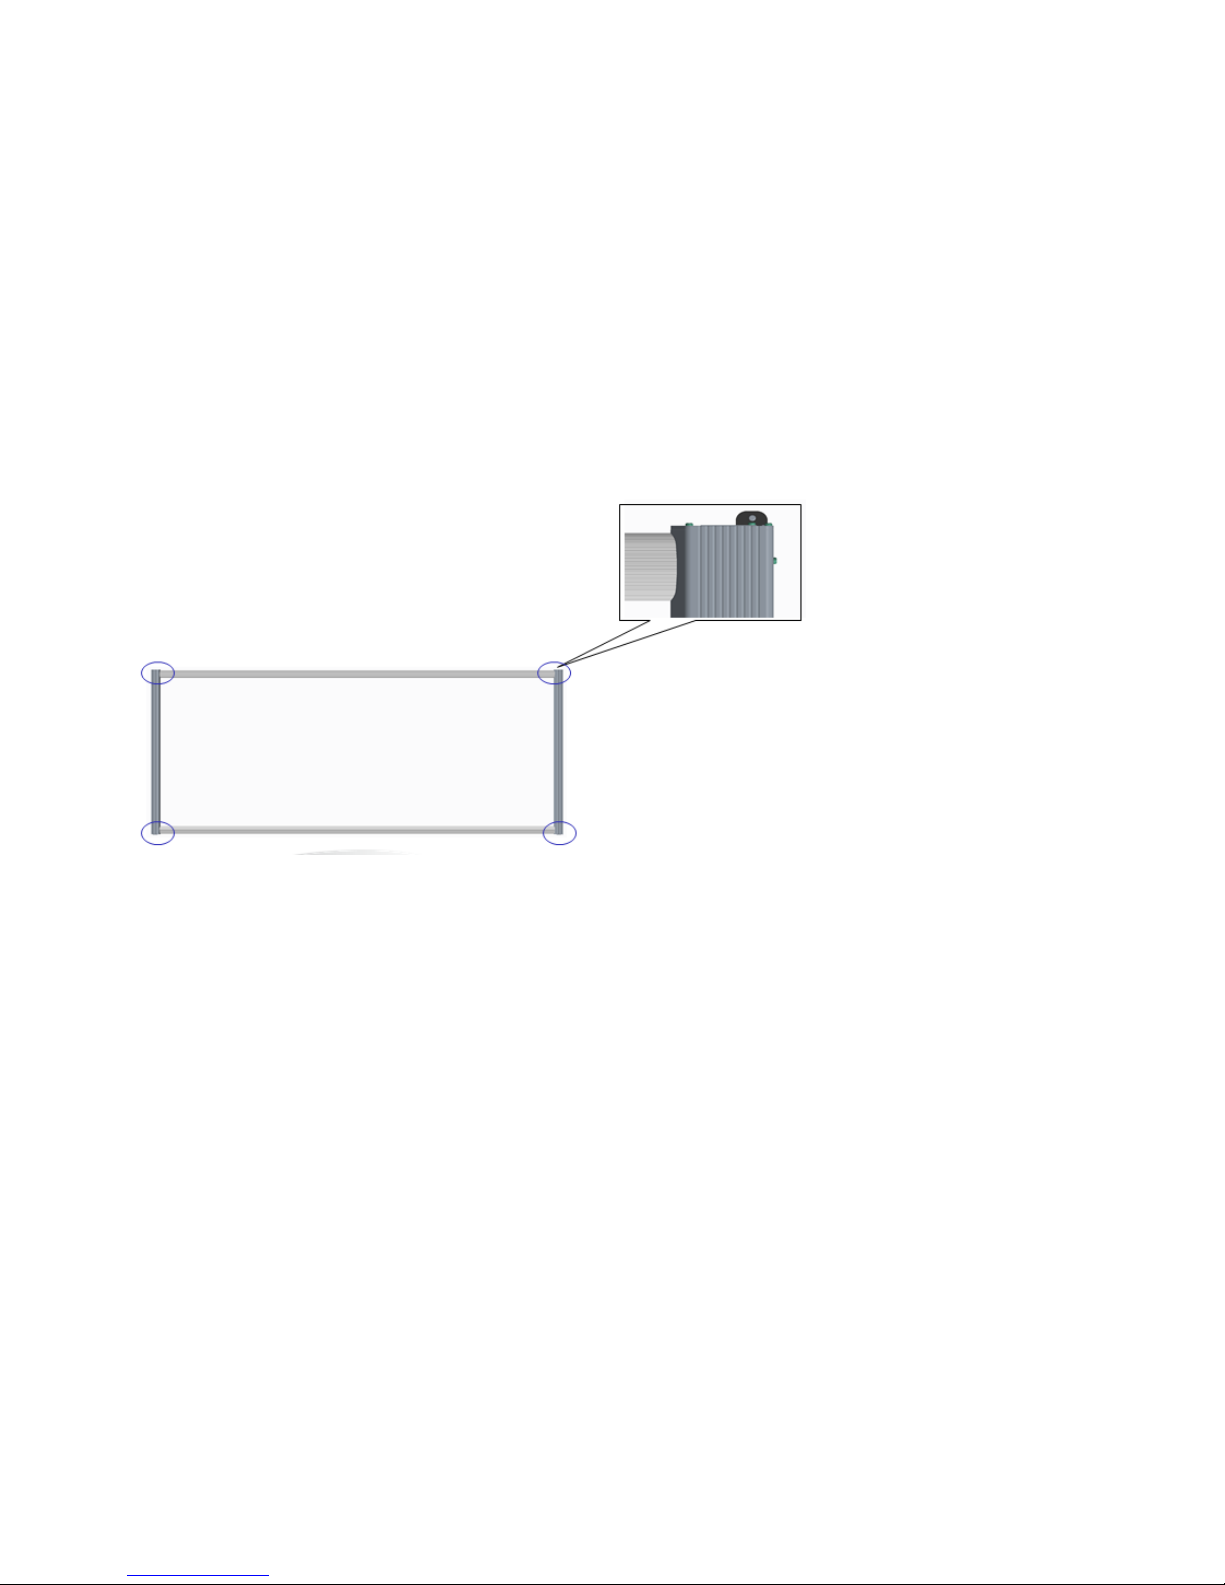
7-4 Follow 7-1 to 7-3 step then install the rest of brackets for other corner.
Page 43
Roll Type PCT User Manual
43
Page 44
Roll Type PCT User Manual
44
5. CALIBRATION
The calibration tool provides 4 / 9 / 36 points calibration functions. Please use 9 points to plane projection PCT and 36 points to curve projection PCT for the
best accuracy.
Please use PCT Utility to calibrate. Do not use Windows built-in features to calibrate and it may cause poor mouse accuracy.
Step 1. Connect the USB cable of the PCT board to a Windows OS Notebook or PC.
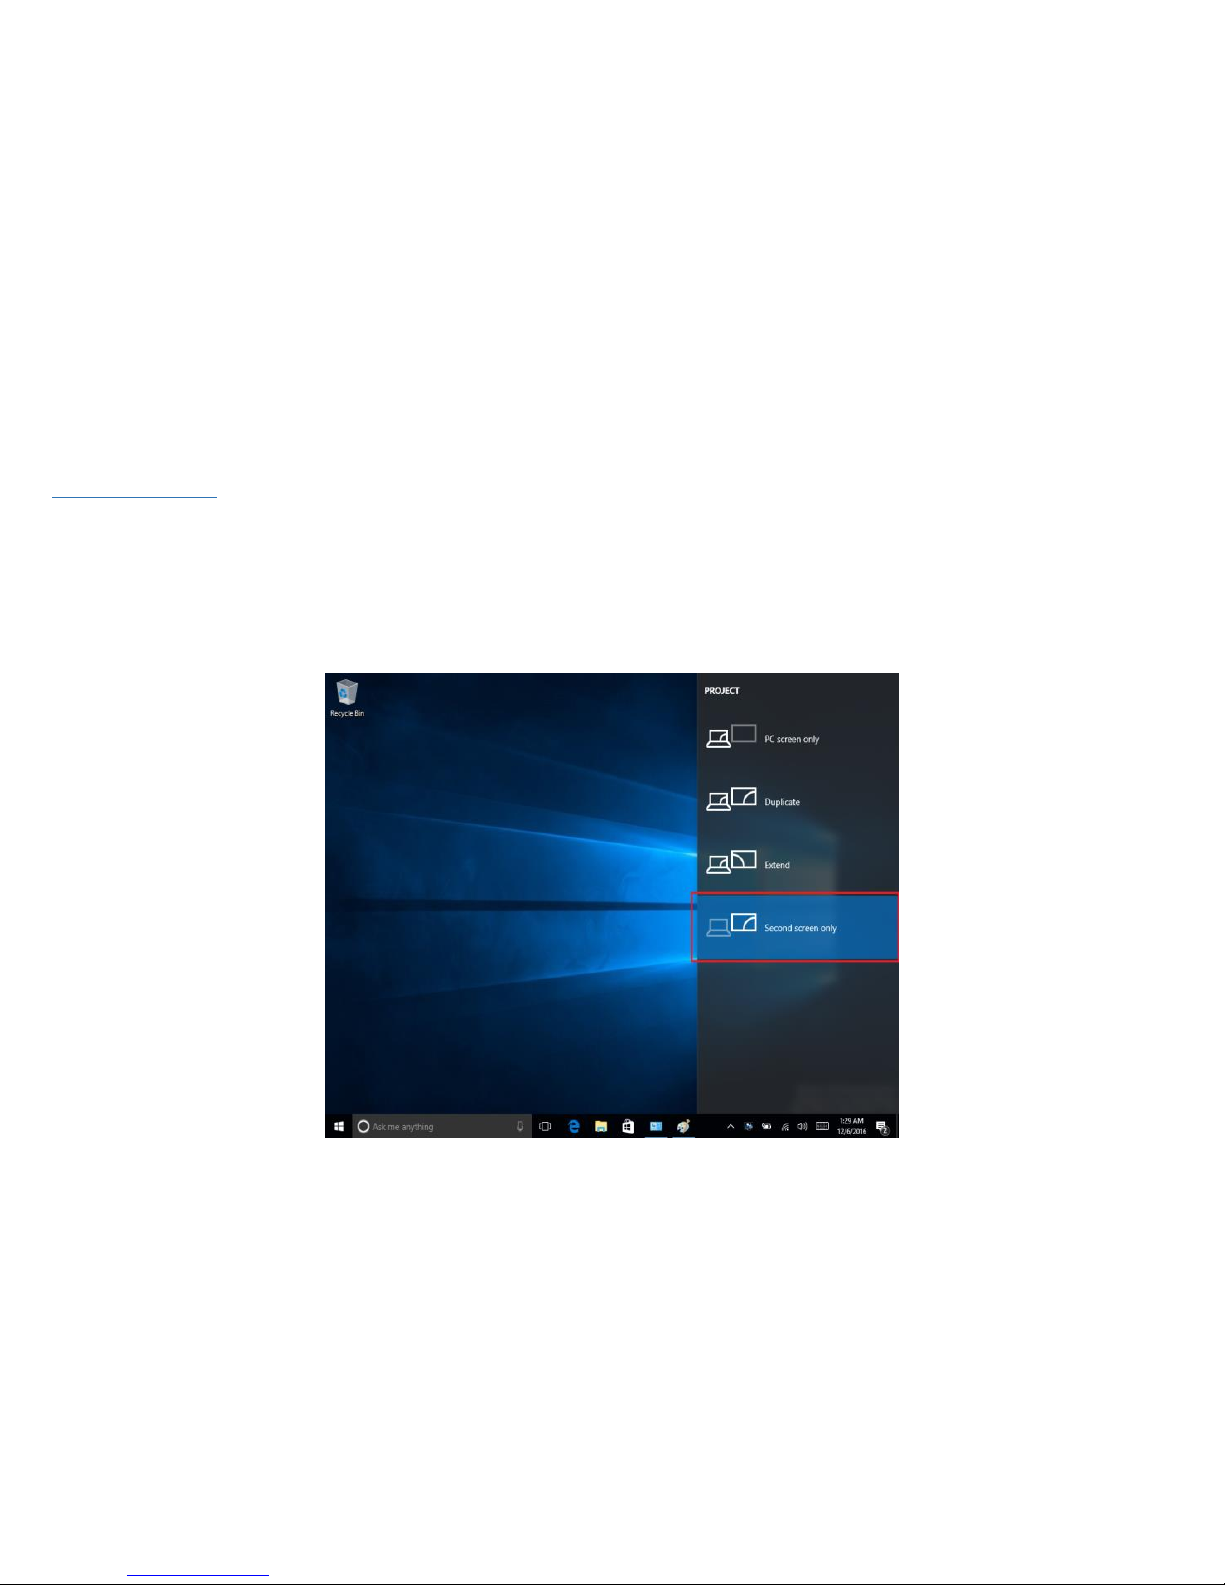
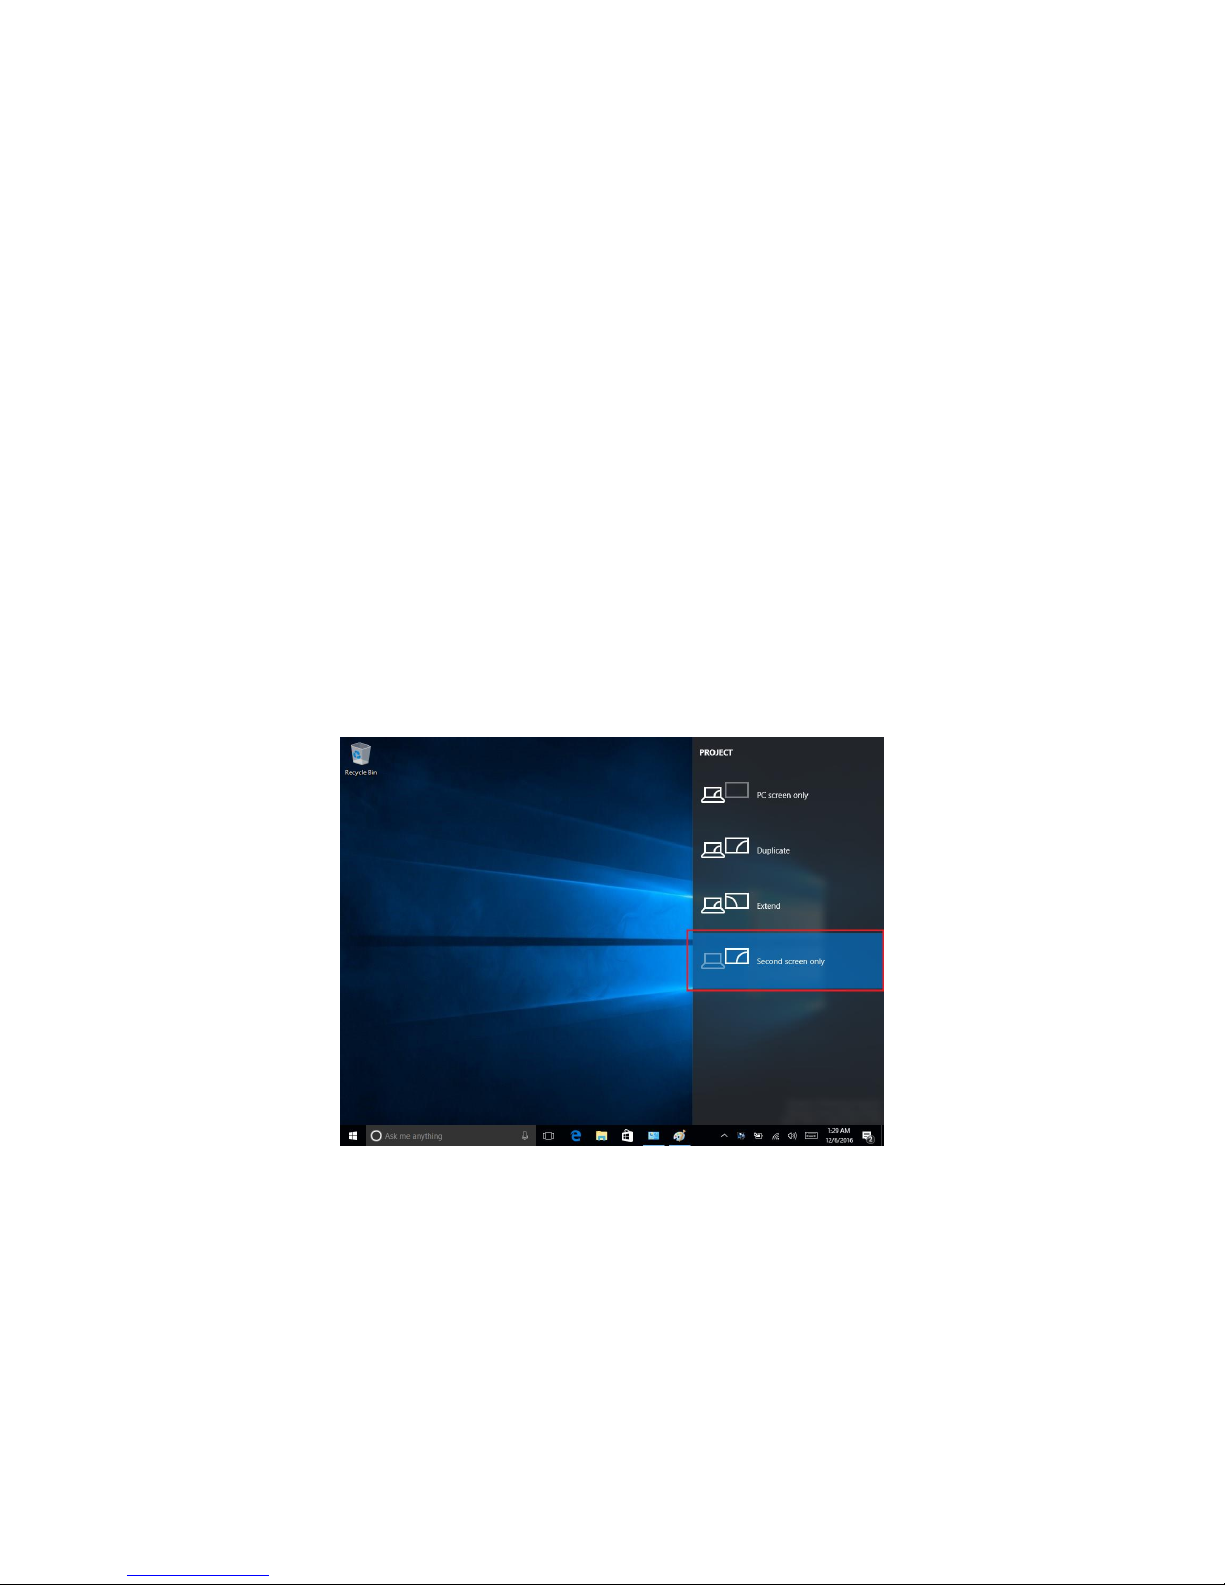
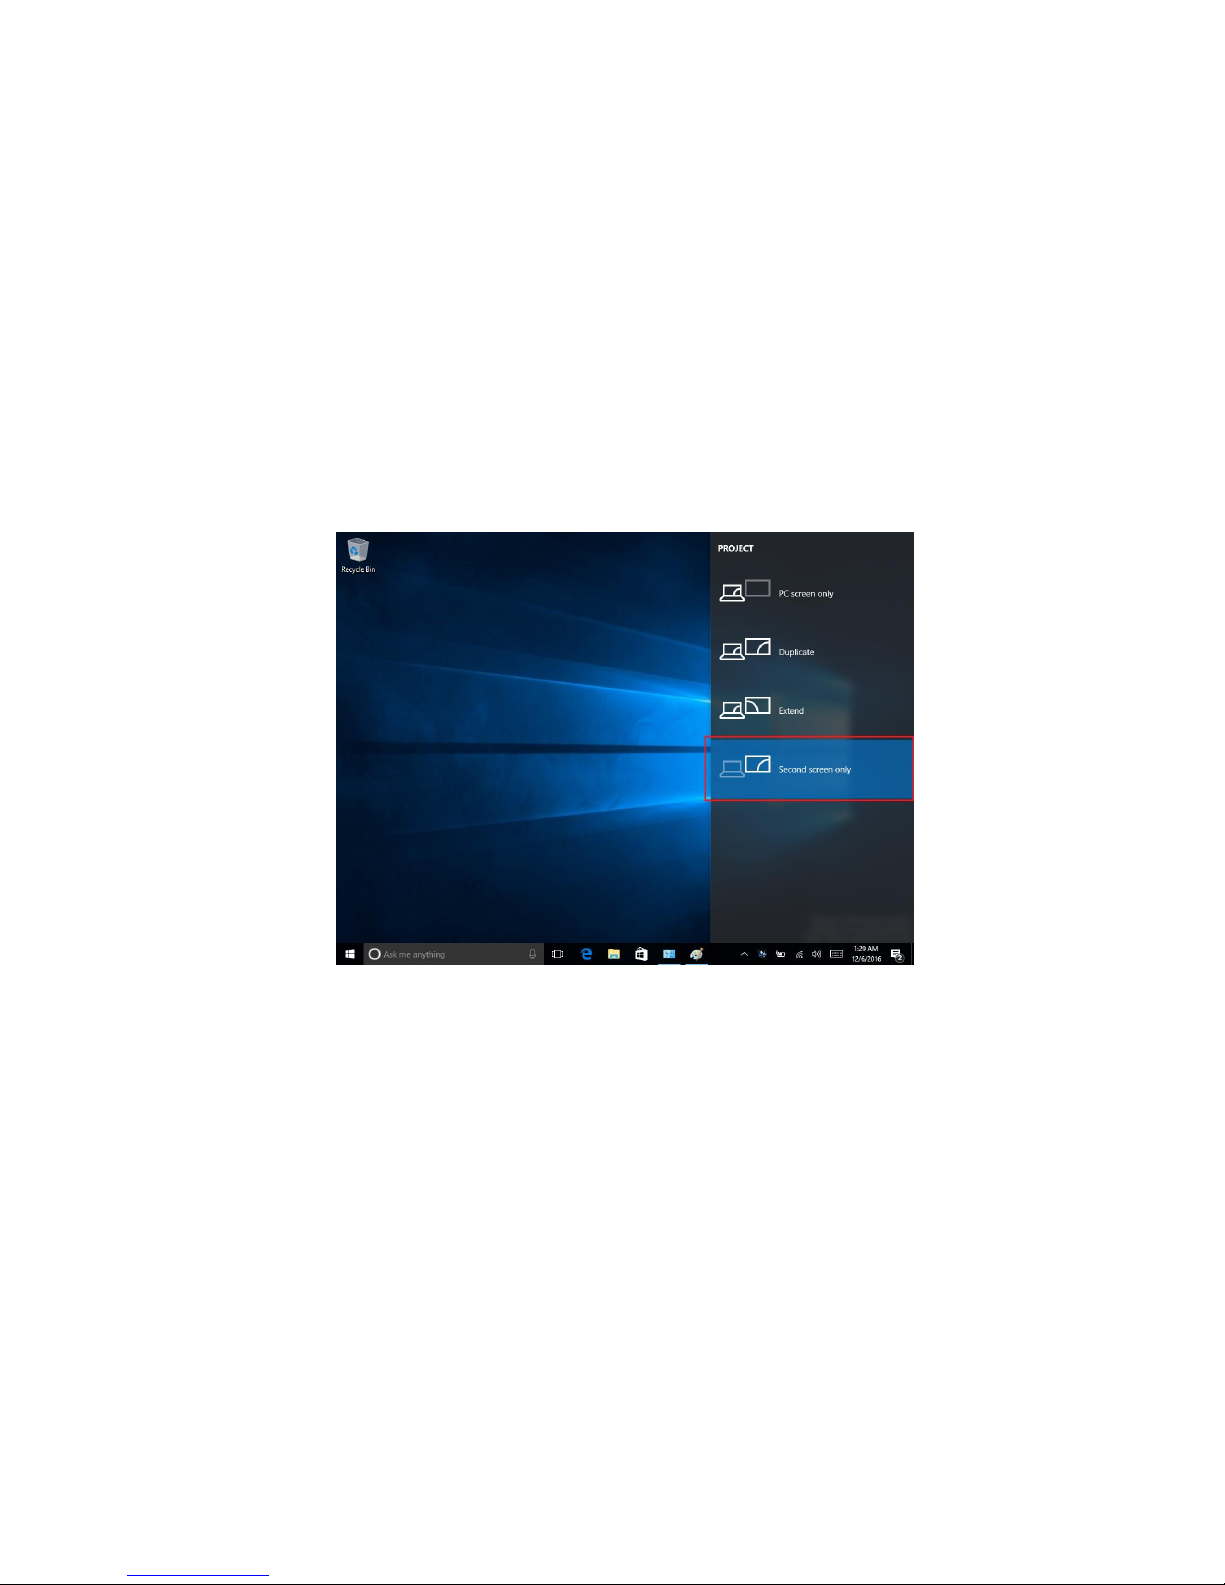
Step 2. Please switch the display setting to “Second screen only” mode while calibrating. Do not set to “Duplicate mode”.
Page 45
Roll Type PCT User Manual
45
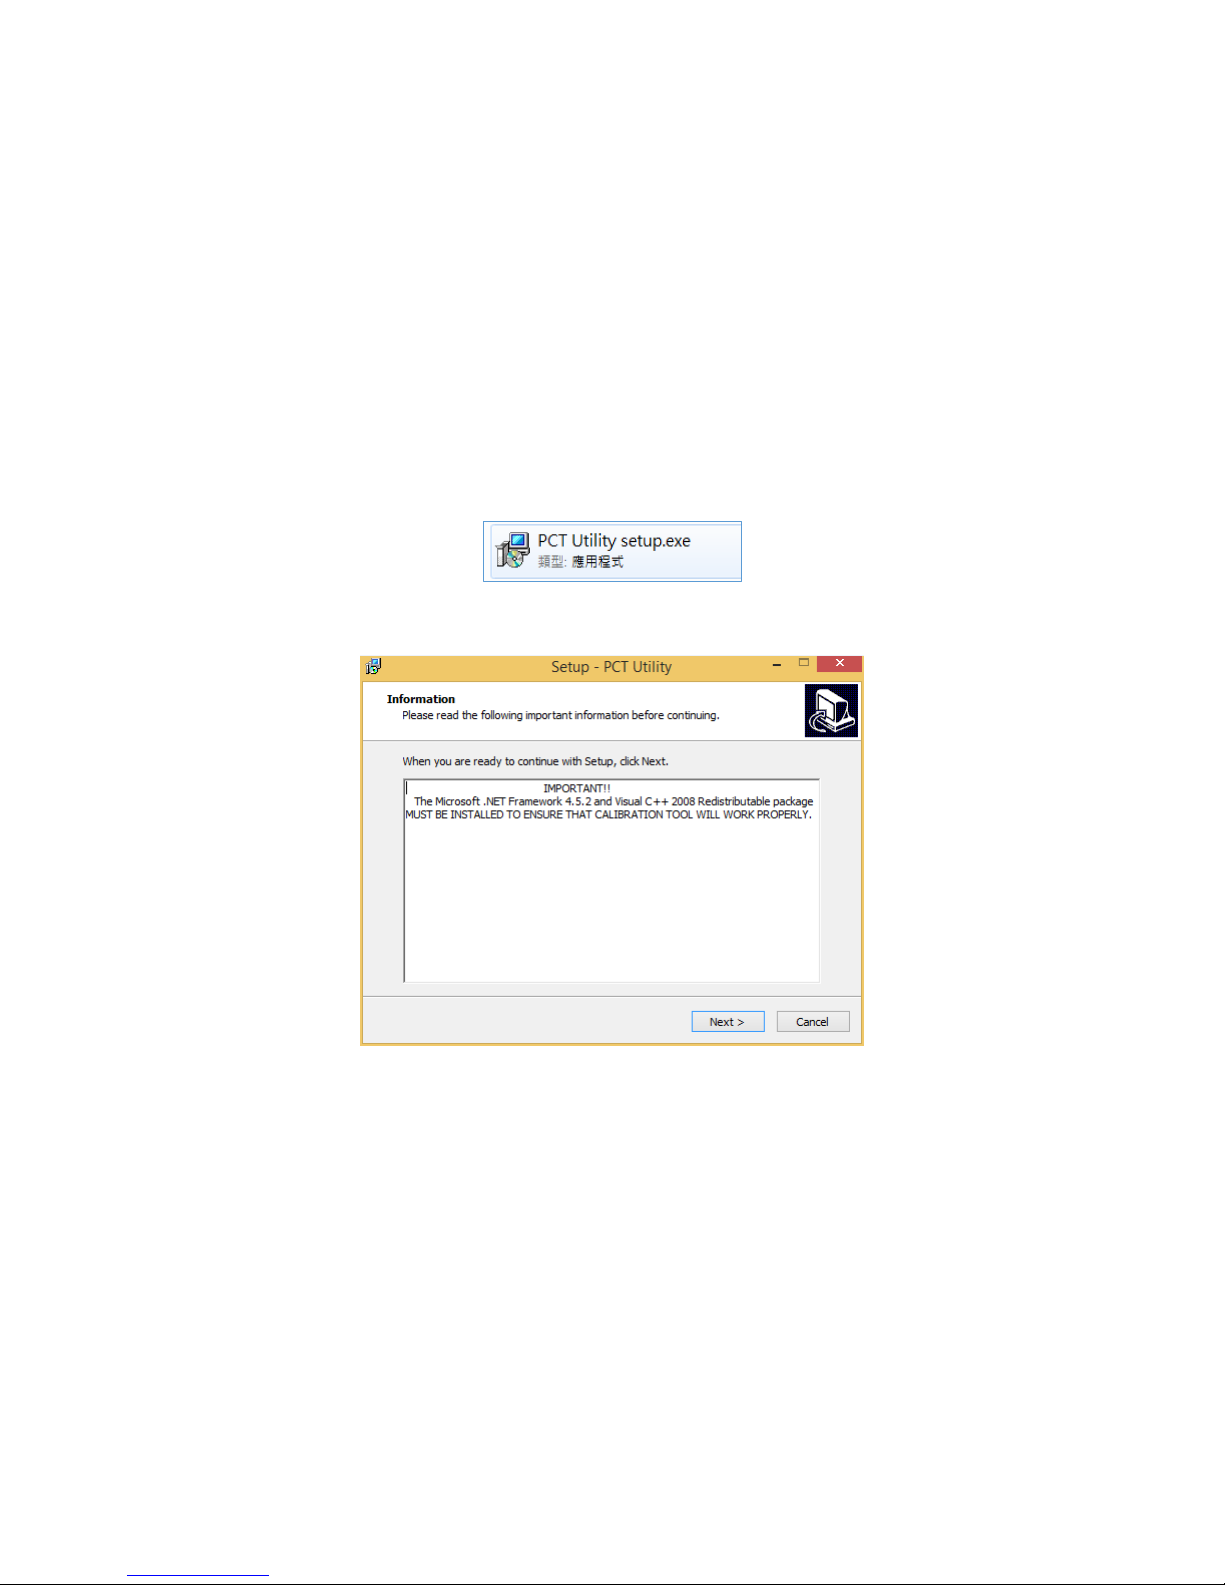
Step 3. To install PCT Utility, double click “PCT Utility setup.exe”.
• Step3.1. The Microsoft .NET Framework 4.5.2 and Visual C++ 2008 Redistributable package MUST BE INSTALLED TO ENSURE THAT
CALIBRATION TOOL WILL WORK PROPERLY. Please select ‘Next’.
Page 46
Roll Type PCT User Manual
46
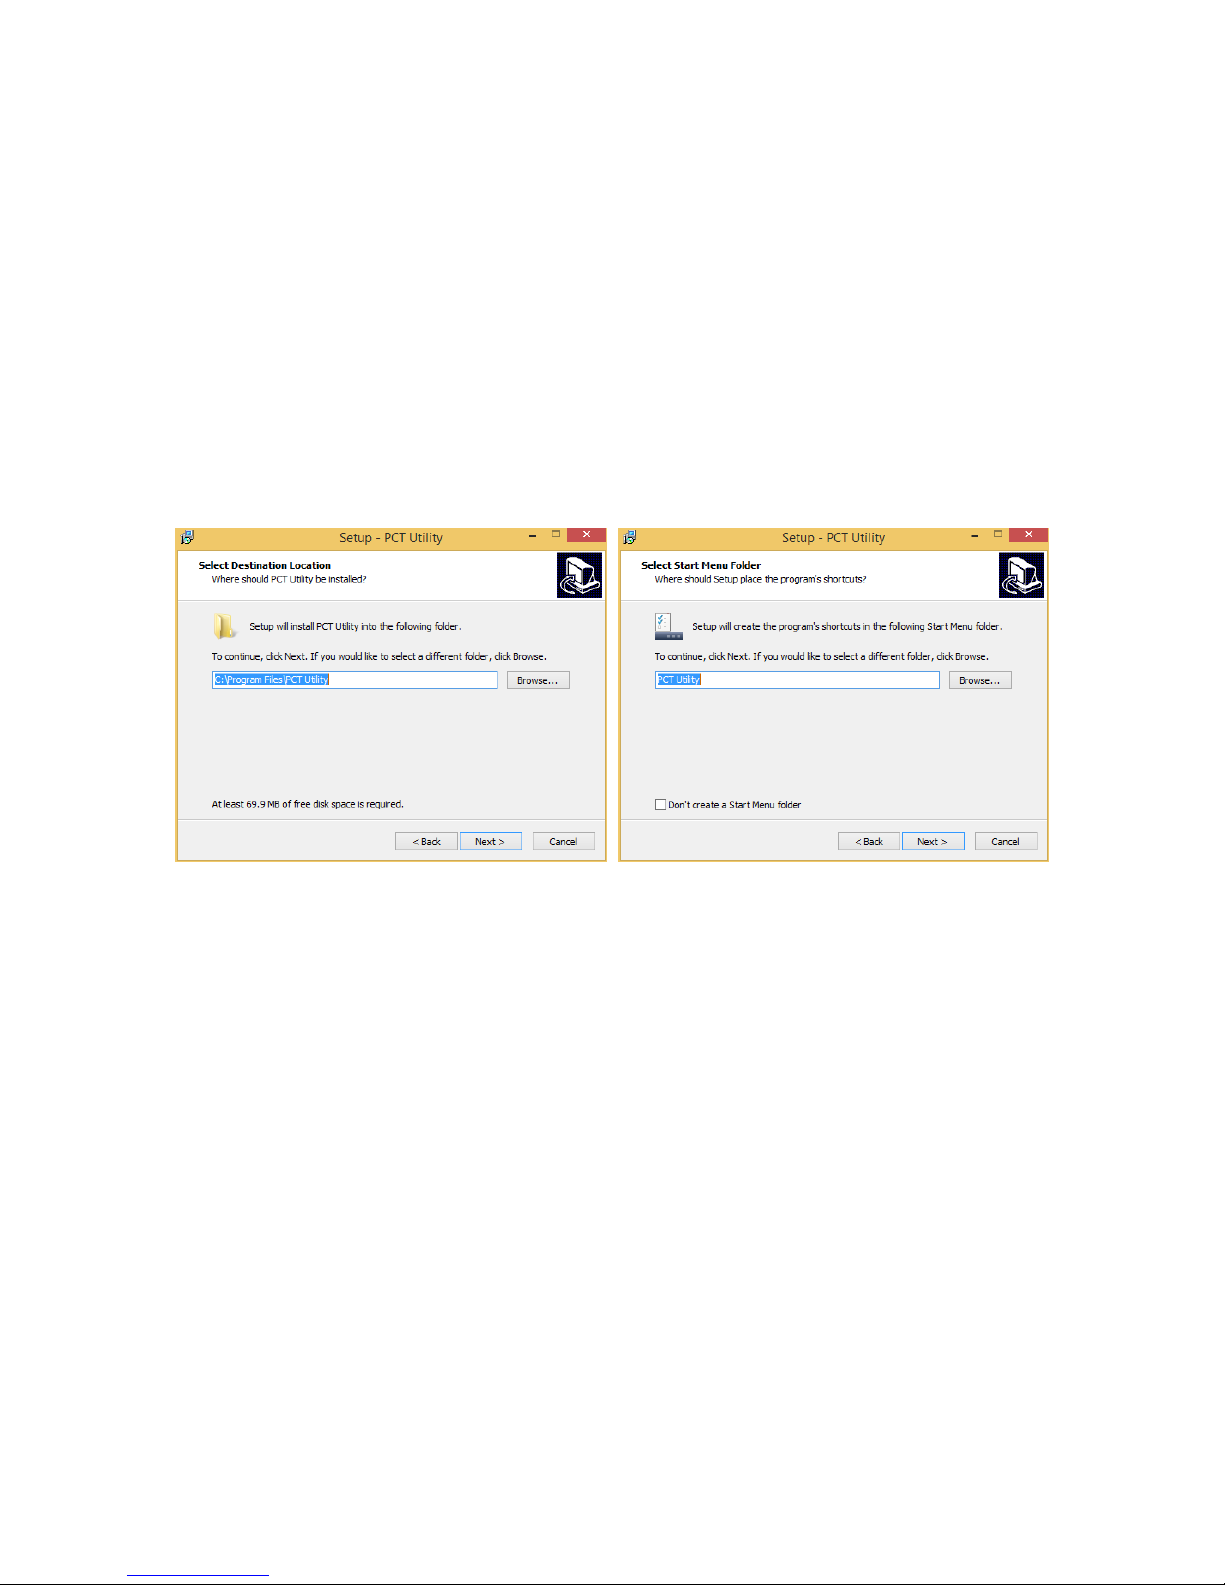
• Step 3.2. Select install path. Select Start Menu Folder.
Page 47
Roll Type PCT User Manual
47
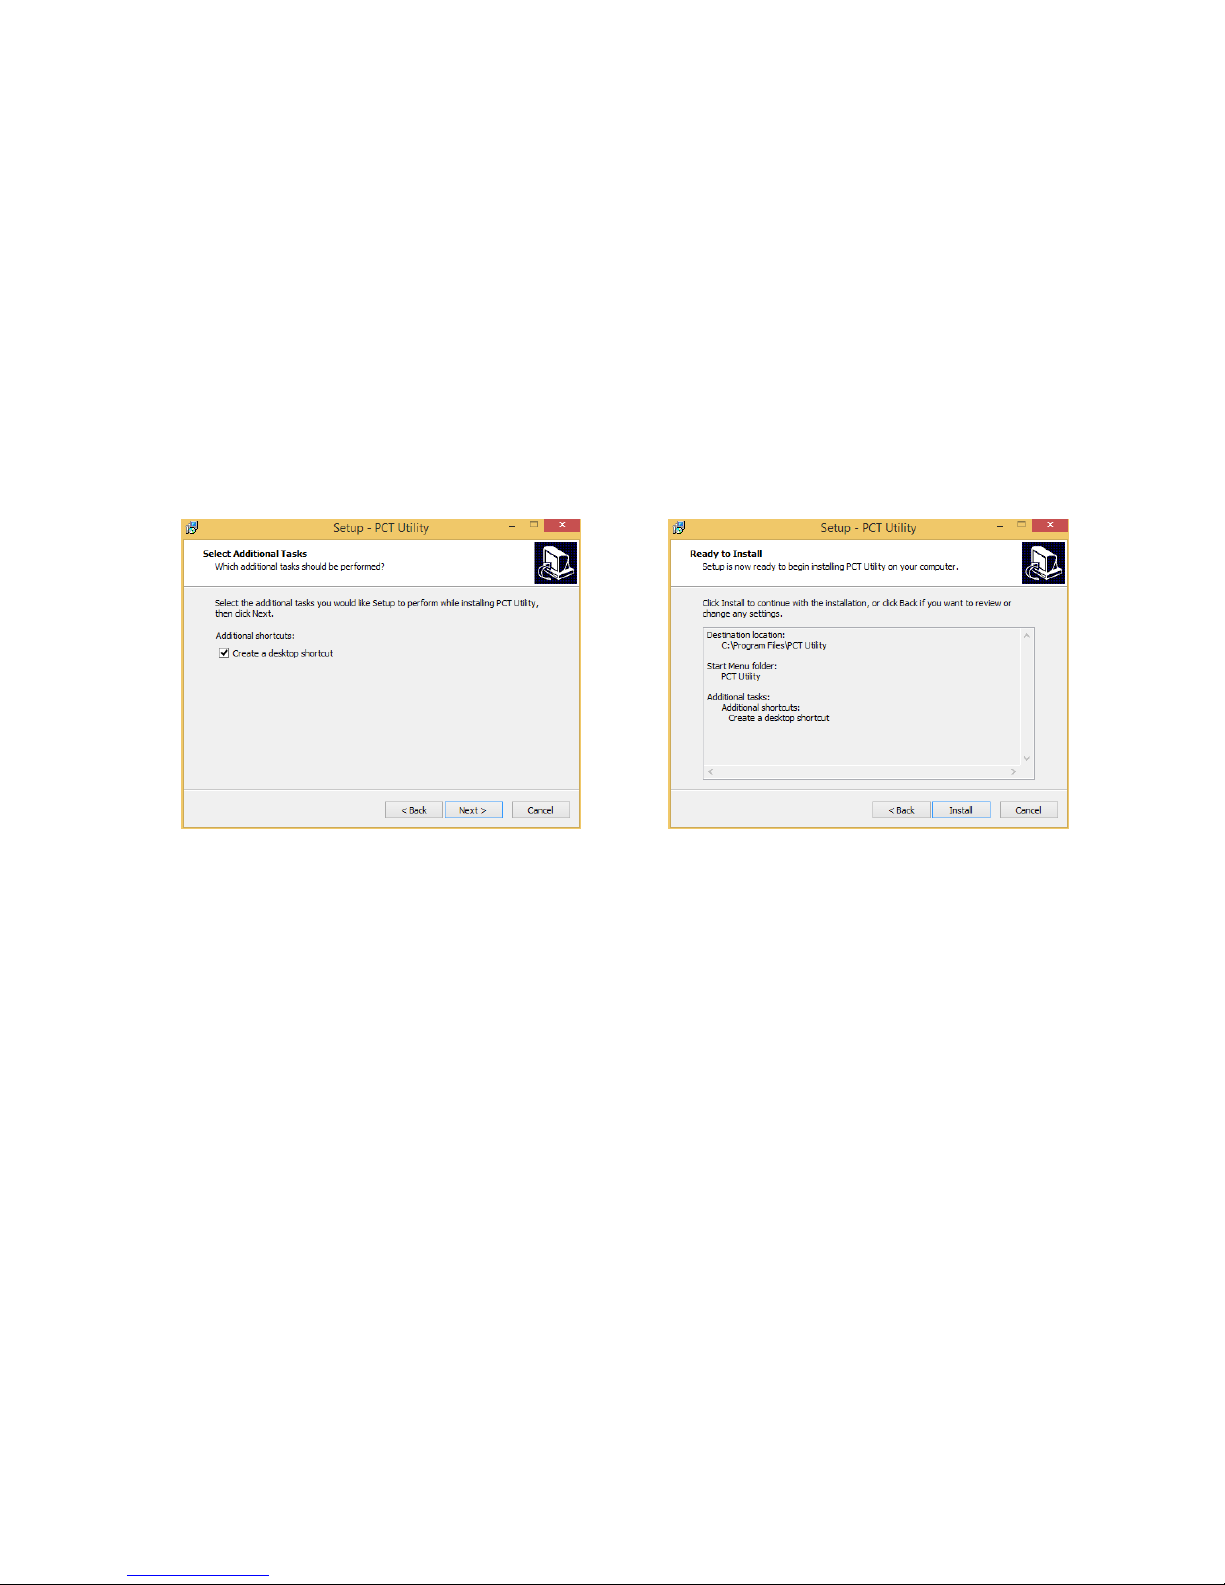
• Step 3.3. Create a desktop shortcut.
Page 48
Roll Type PCT User Manual
48
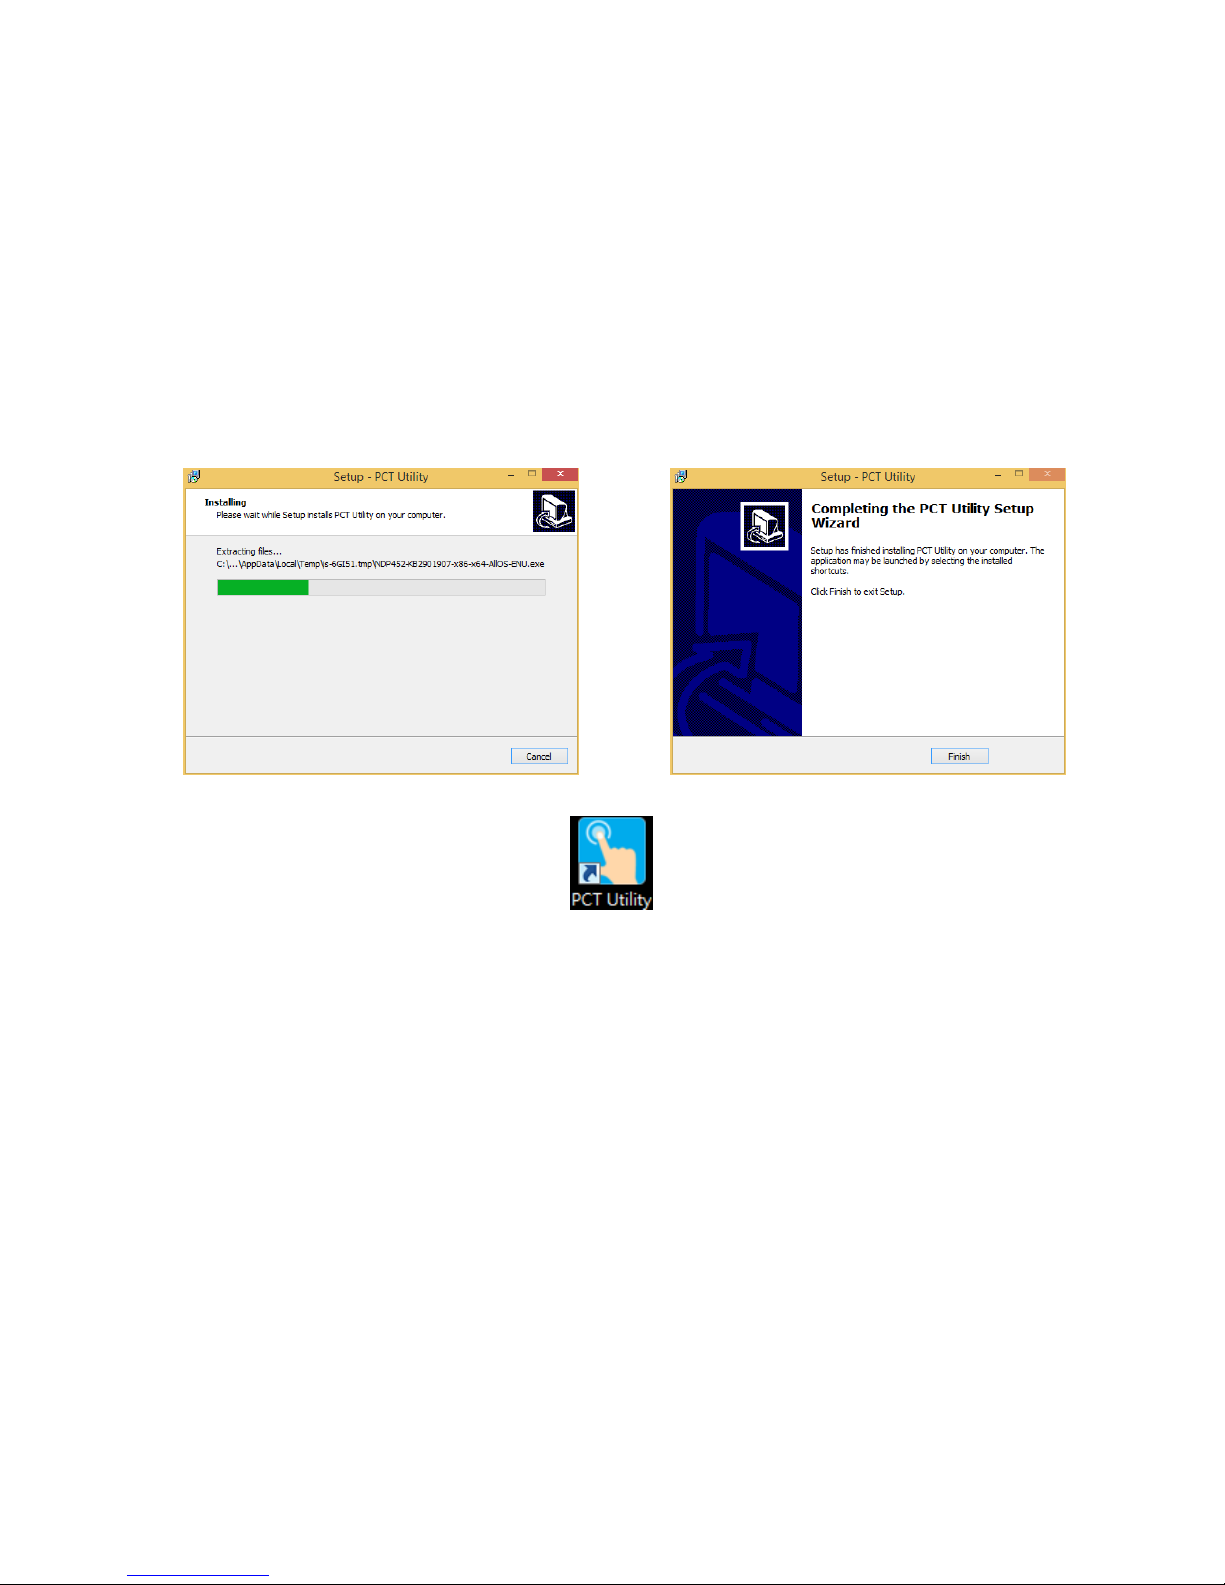
Step 4. After installation, launch PCTUtility.exe
Page 49
Roll Type PCT User Manual
49
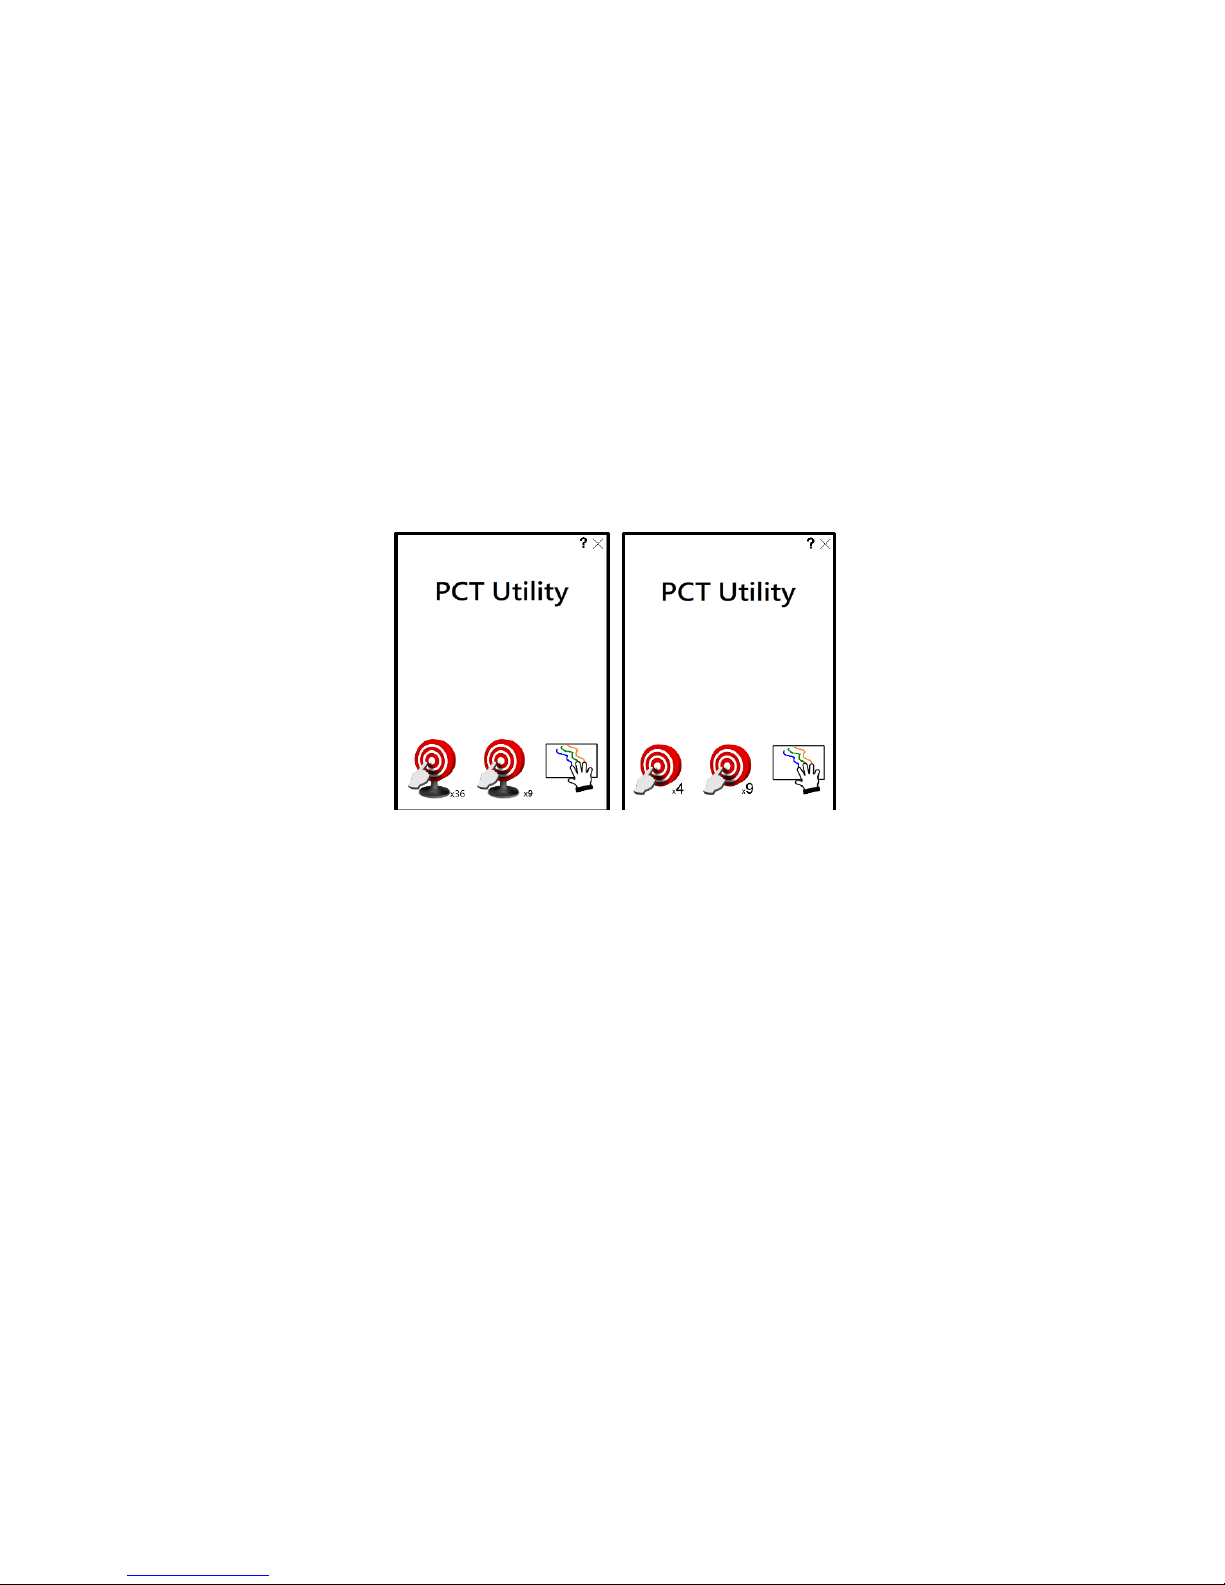
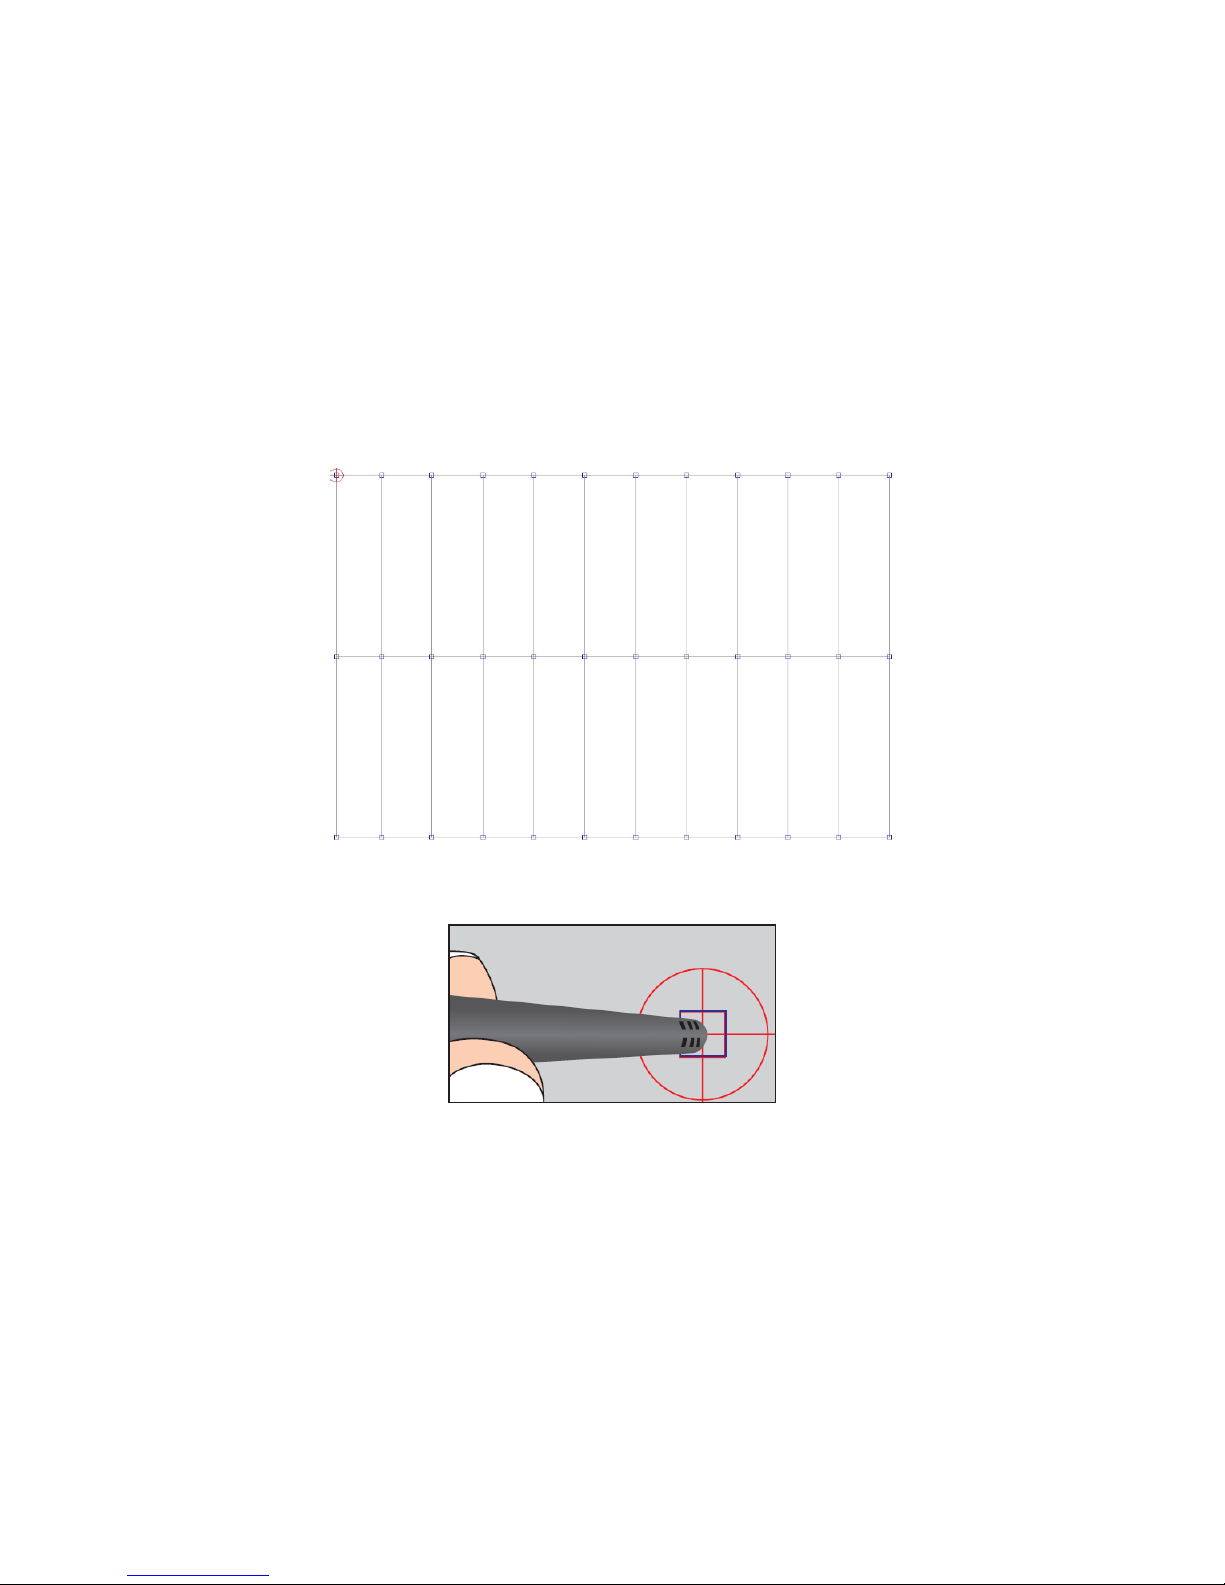
Step 5. Please use 9 points selection for better accuracy. Curved surface (example: chalk board) application suggest for 36 points calibration. Touch
the calibration points following instructions step by step. PCT Utility will recognize which PCT type then provide the accordingly calibration points.
Page 50
Roll Type PCT User Manual
50
36 points calibration
Page 51
Roll Type PCT User Manual
51
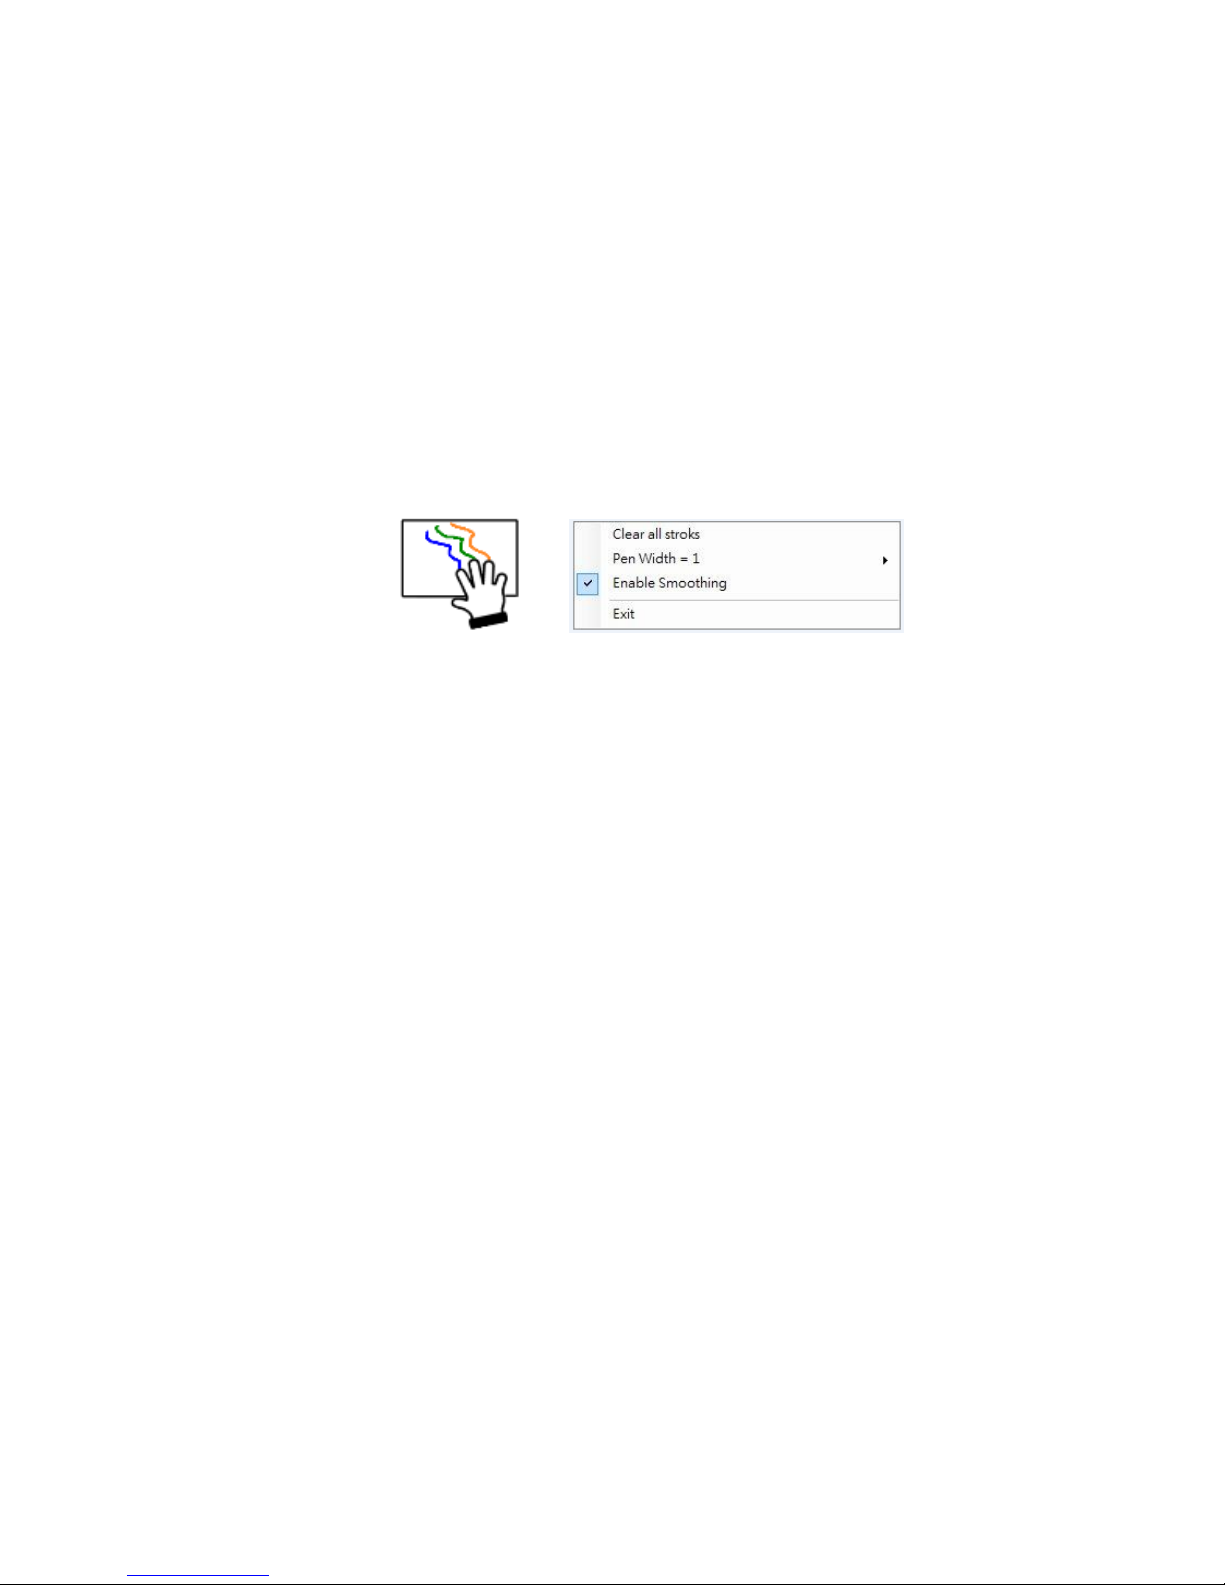
Step 6. Use the drawing function to test accuracy after calibration is done. To exit drawing mode, please press surface of PCT continually then
select Exit. (Optional)
Step 7. Please calibrate again if you are not satisfied with accuracy (this might happen if you did not touch the exact position while calibrating.)
Page 52
Roll Type PCT User Manual
52
6. TROUBLE SHOOTING
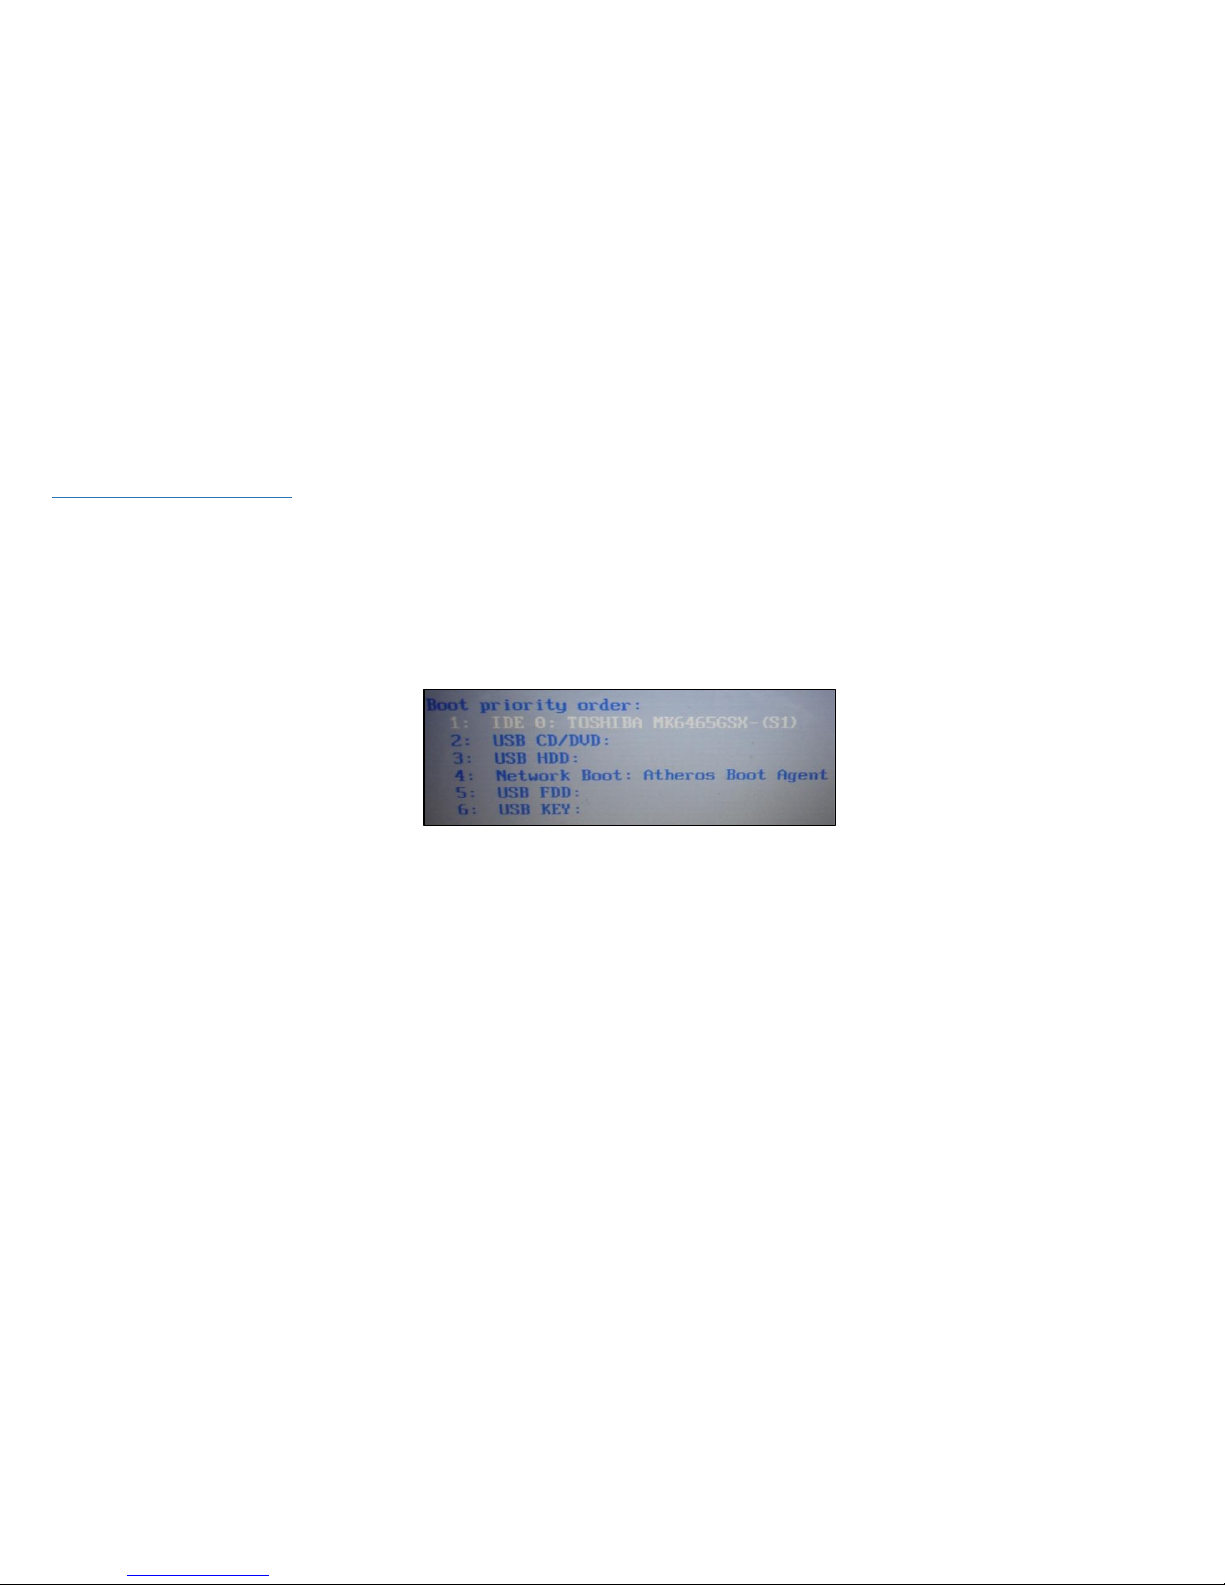
Q1: Why cannot the PC boot when the USB cable which connects PC and projector is already plugged in?
How to resolve this situation?
A:
1. Unplug USB cable from PC; or
2. Go to BIOS setup page of PC and modify the “Boot priority order.” Choose Hard disk as top priority, save the change and reboot PC.
Q2 What to do when Windows system cannot identify the USB device?
A:
1. Unplug/re-plug in the USB cable and check again.
2. Switch to another USB port and check again.
3. Restart your computer and check again.
Page 53
Roll Type PCT User Manual
53
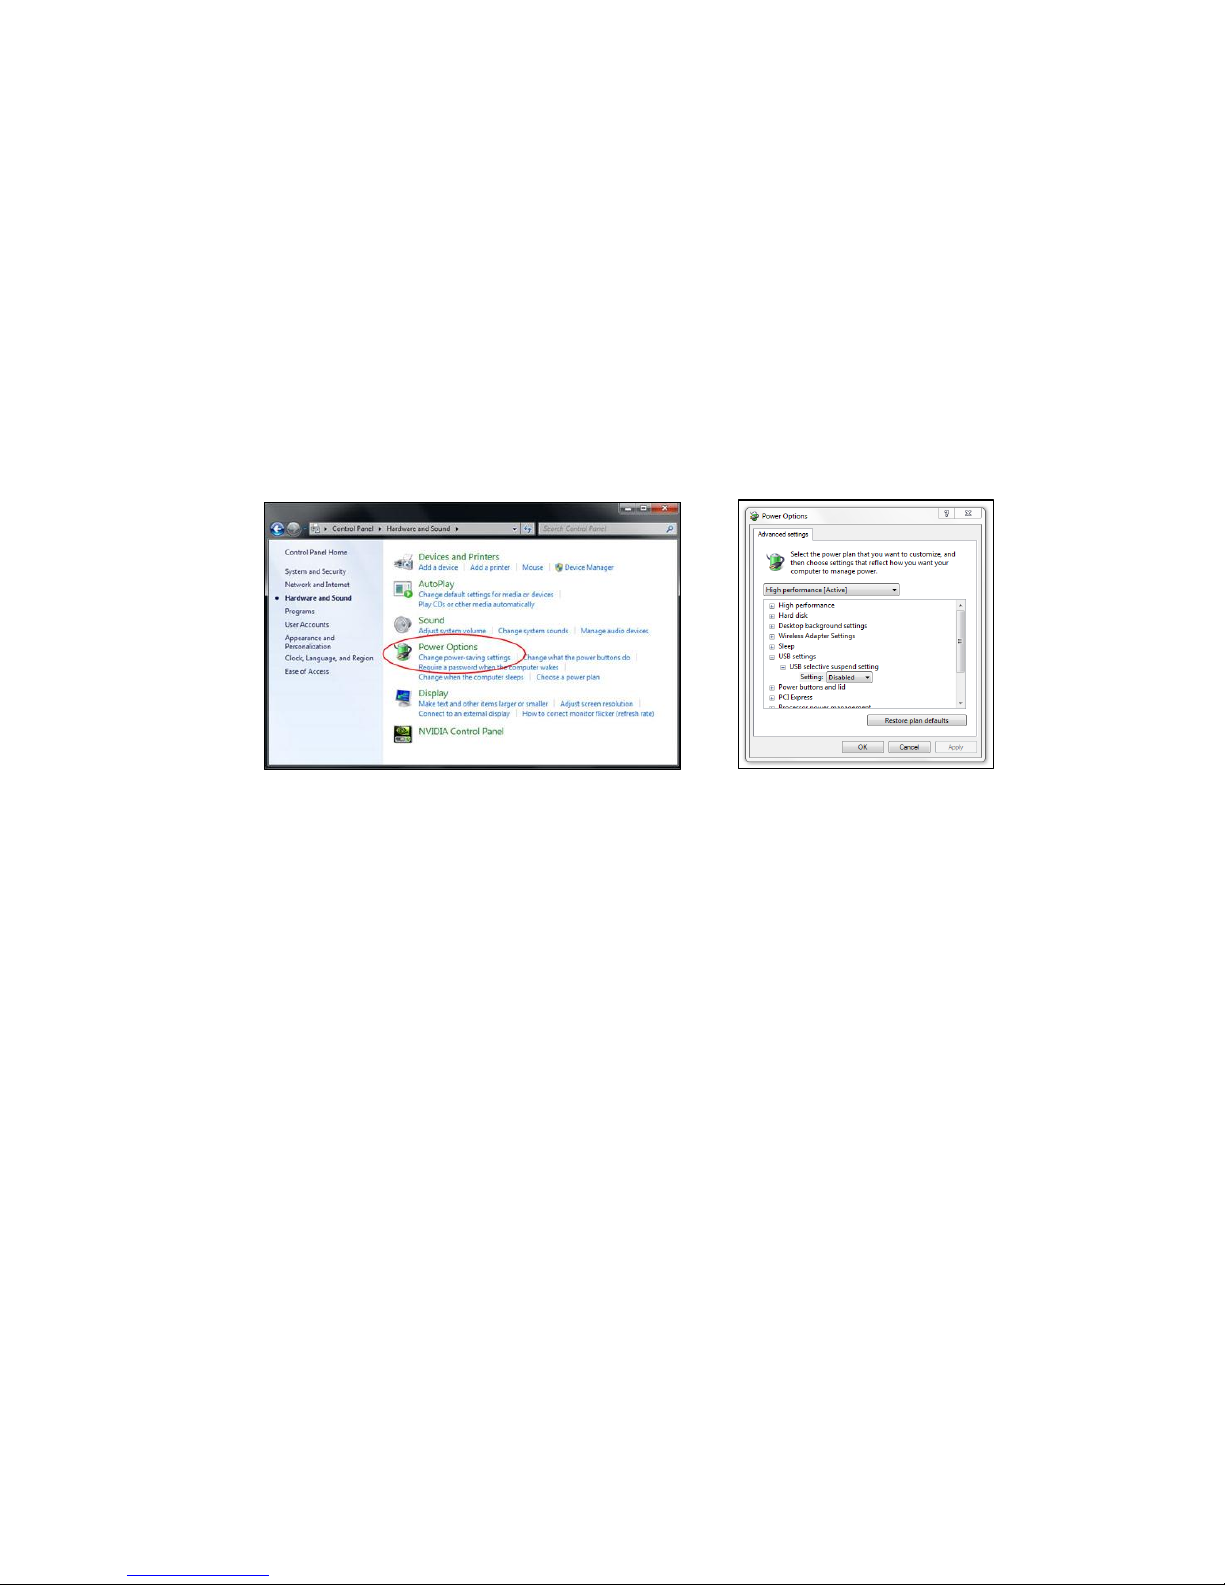
4. Go to Power Options in Control Panel, check USB selective suspend settings status in USB settings under Advance Settings. Switch to “Disabled”.
5. Go to official website of the laptop/PC manufacturer, and update USB driver to latest version.
6. Use the accessory default USB cable and check again. If an USB extension is needed, please contact your distributor.
7. Go to official website of the laptop/PC manufacturer, and update the BIOS driver to the latest version.
8. The USB port of your computer maybe not working. Please contact your IT staff.
Page 54
Roll Type PCT User Manual
54
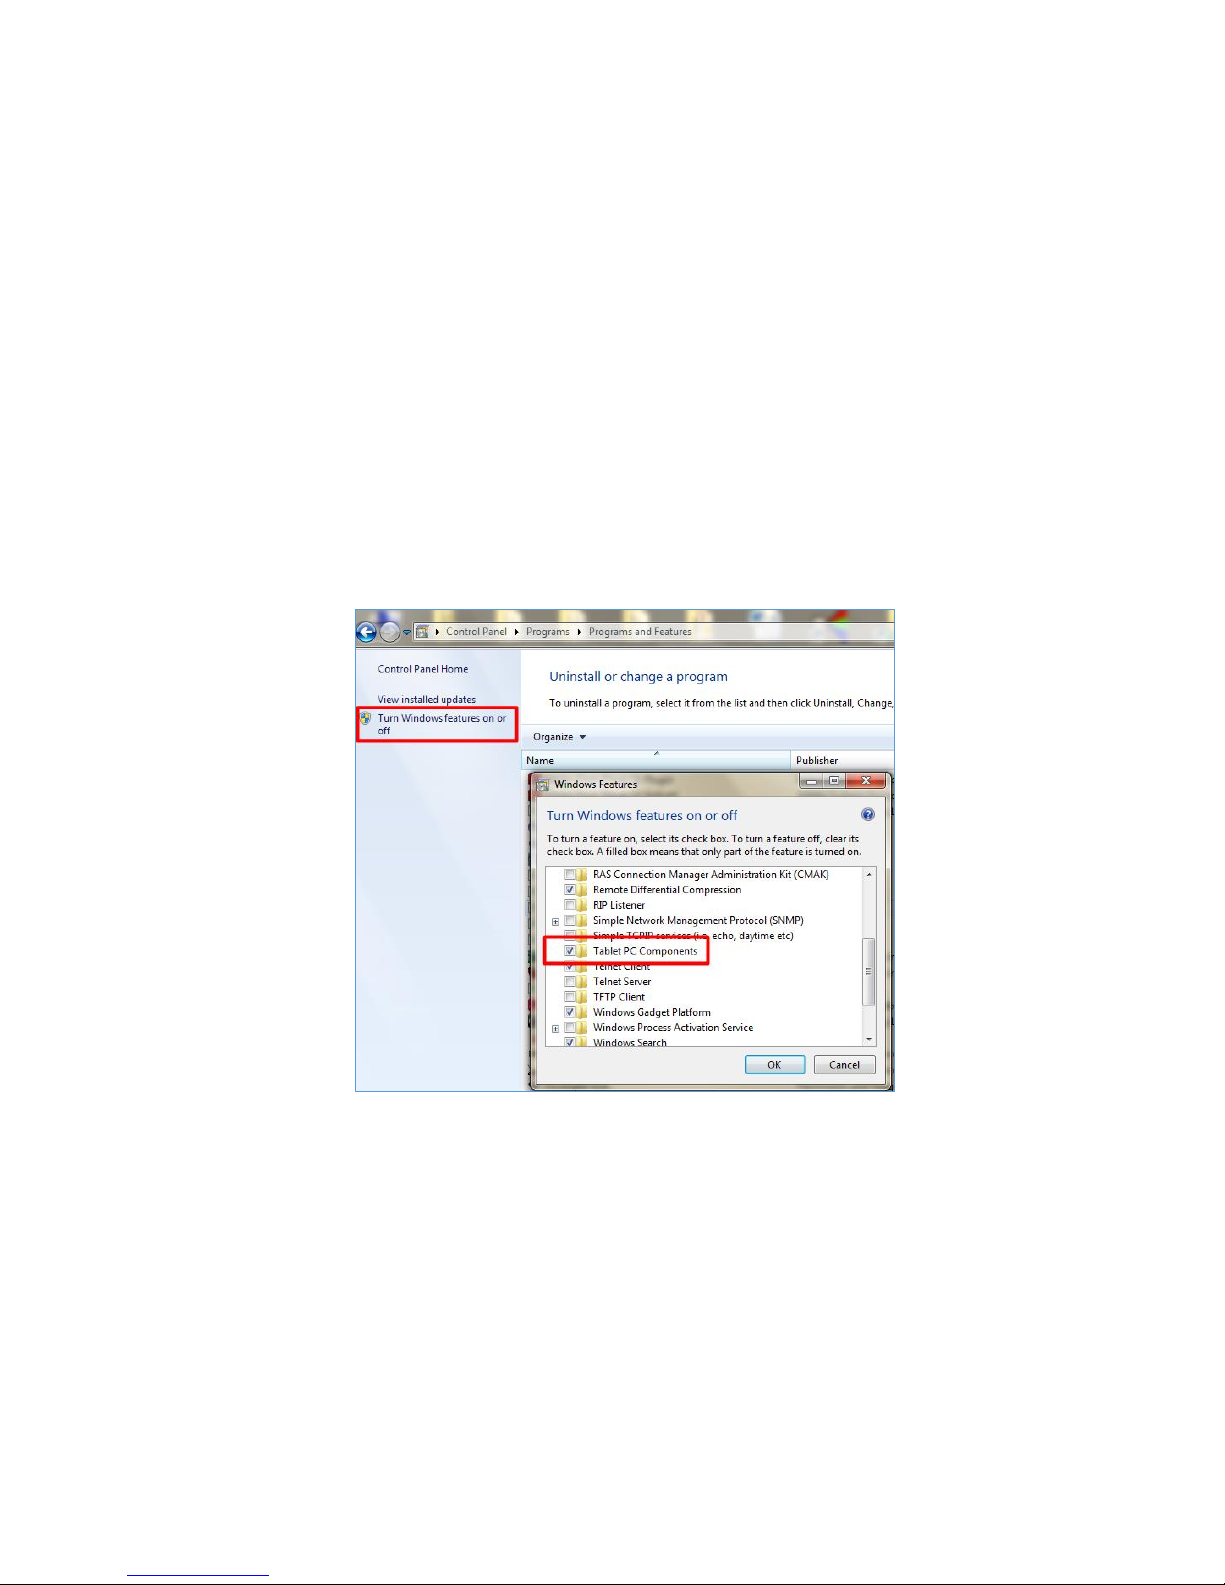
Q3 What to do when there is only single touch point?
A:
1. Re-plug USB cable from PC.
2. Go to “Control Panel” and make sure “Tablet PC Components” is selected.
Page 55
Roll Type PCT User Manual
55
Q4 When does should calibration be done?
A:
Please perform Calibration during first installation. If projector or whiteboard is moved, Calibration should be performed again. For better accuracy, please do
9 point Calibration.
Q5 What to do if the touch is not accurate?
A:
1. Please switch the display setting to “Second screen only” mode while calibrating. Do not set to “Duplicate mode”.
Page 56
Roll Type PCT User Manual
56
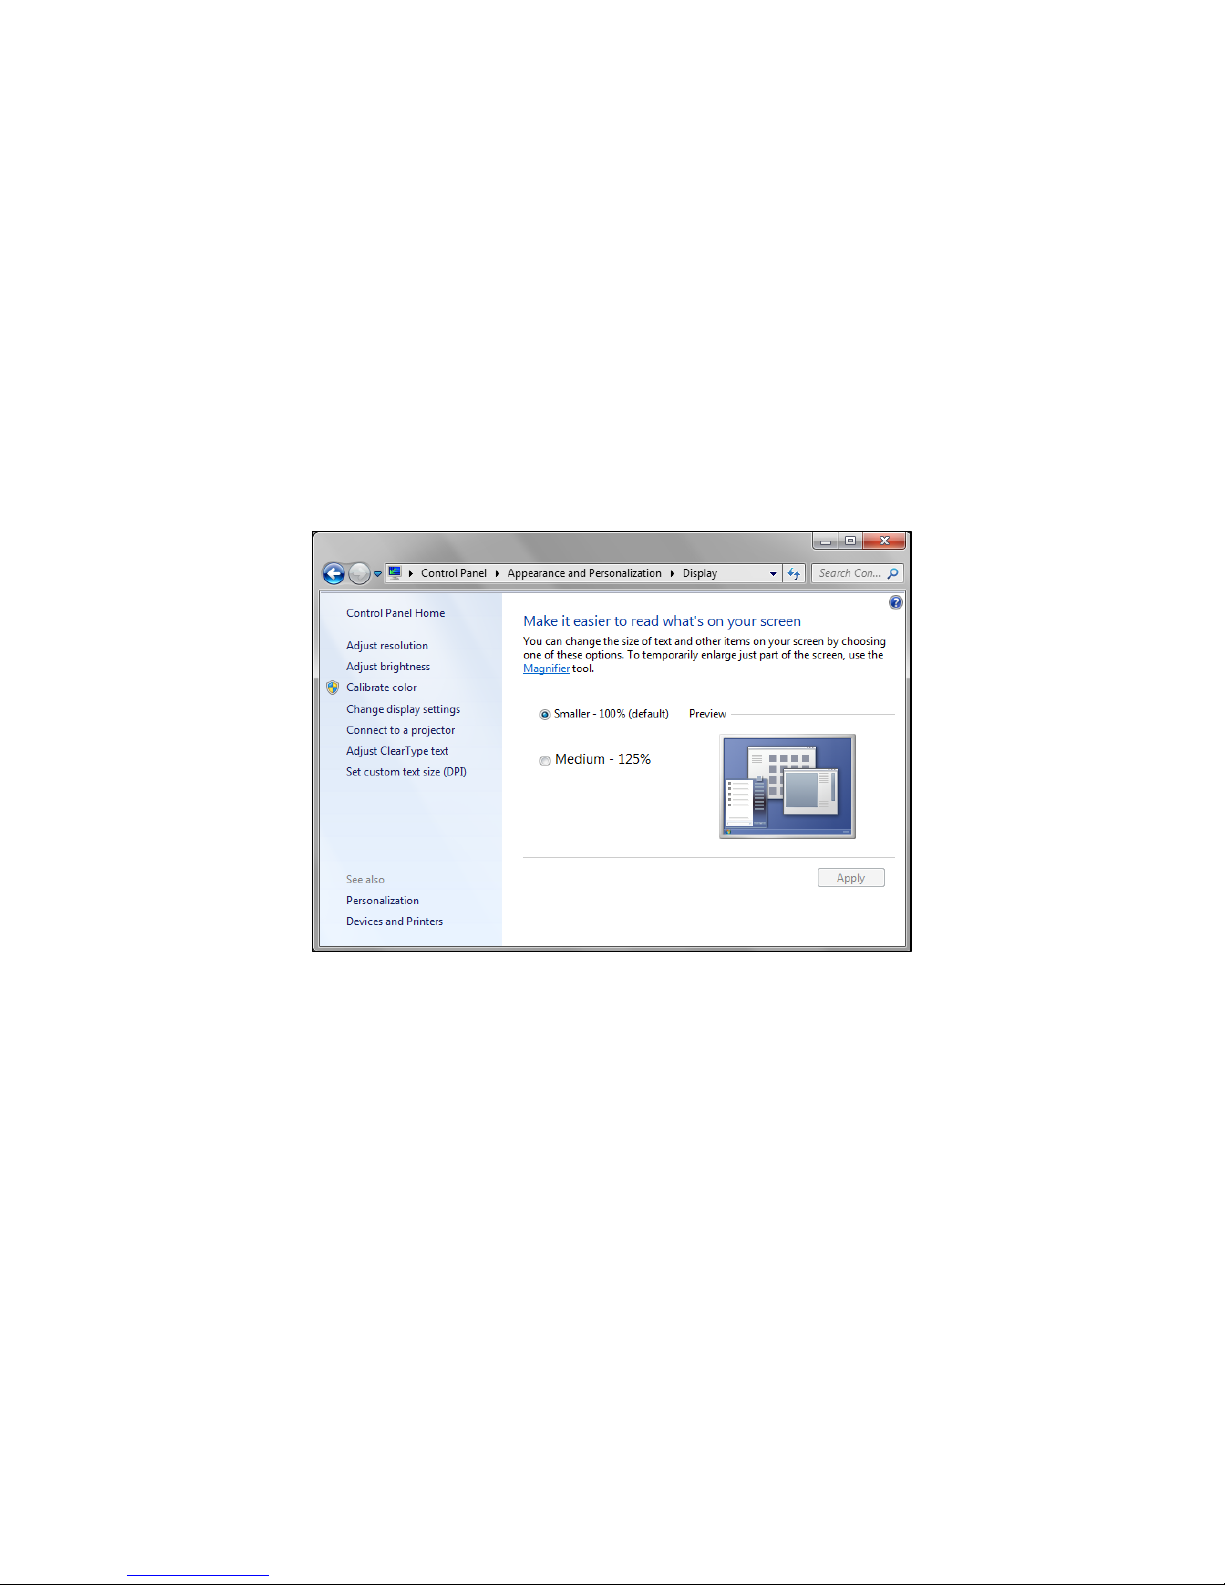
2. If the default setting of Windows is changed, the touch accuracy might be impact.
Go to setting page<choose Control Panel/Appearance and Personalization>
Select “Smaller(s) - 100%(default)”,then click “Apply”。
3. Please reset the built-in feature settings. Go to setting page and choose < Control Panel/Tablet PC > , click “Reset” button. Using “9-point calibration” in
PCT utility to calibrate again.
Step 1. Connect the USB cable of the PCT board to a Windows OS Notebook or PC.
Page 57
Roll Type PCT User Manual
57
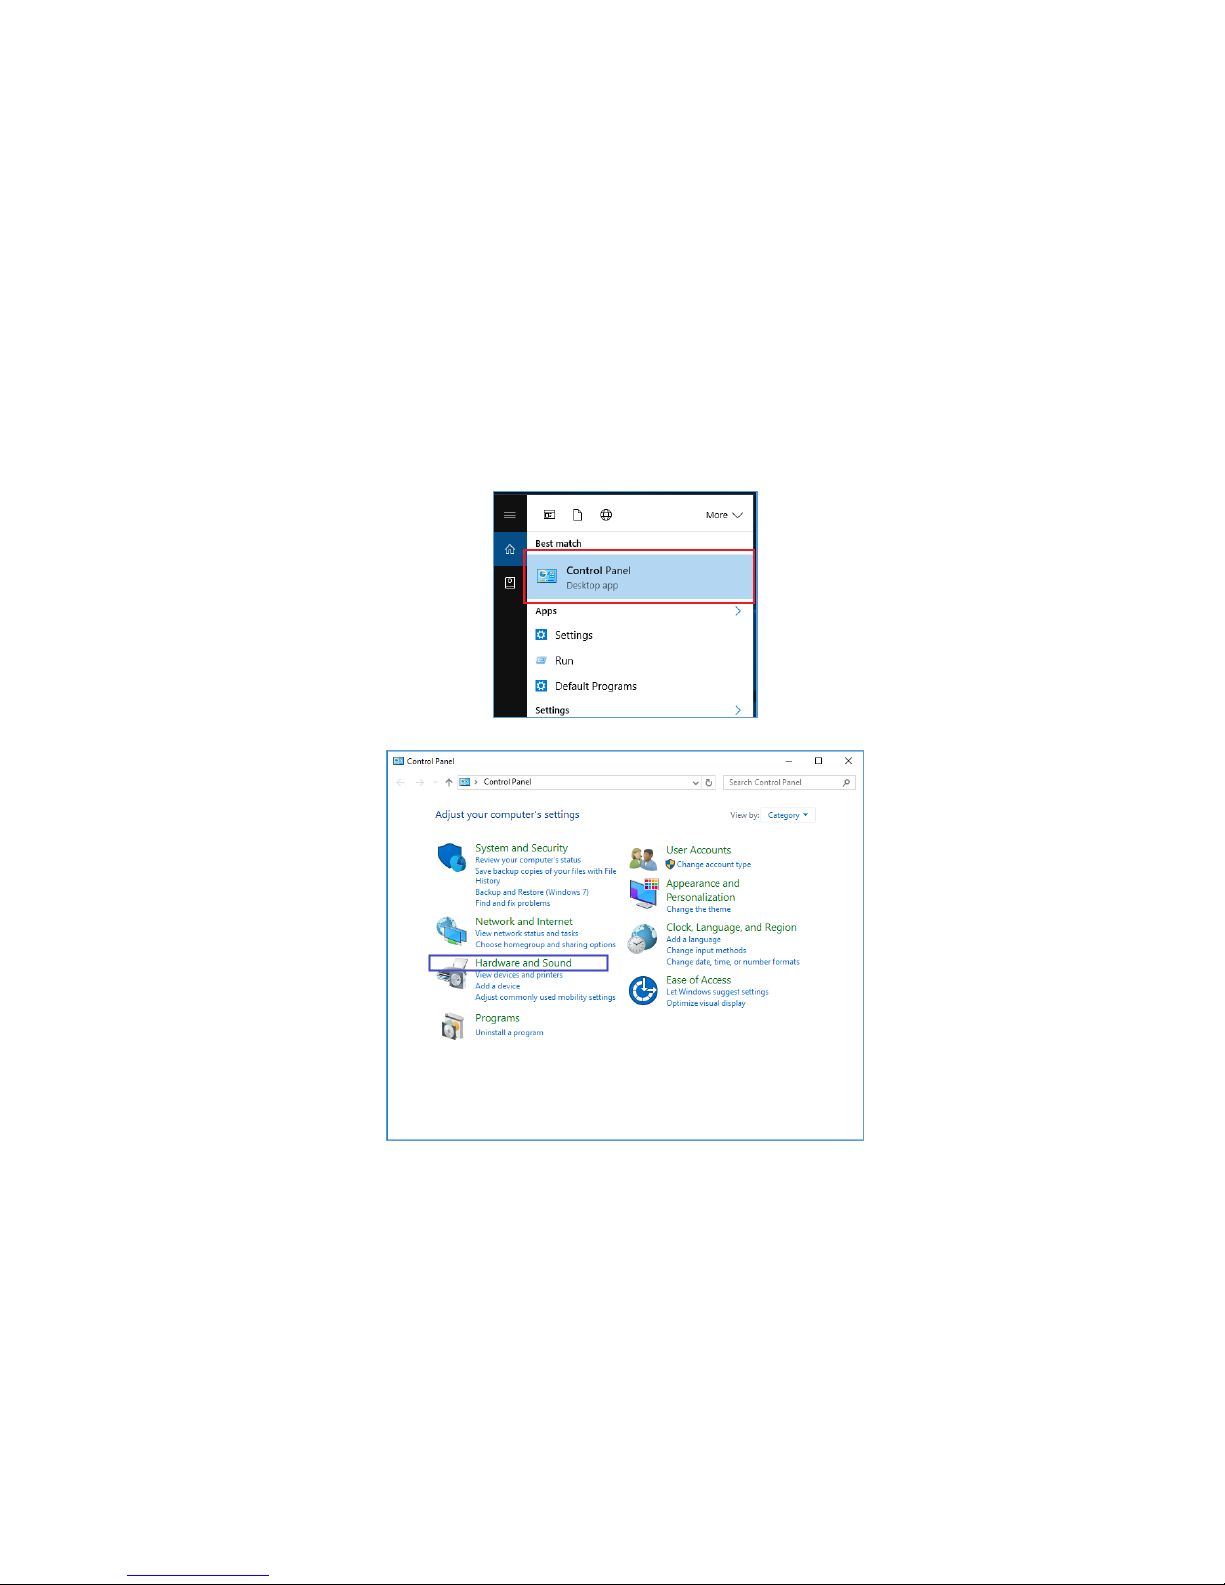
Step 2. Go to “Control Panel”.
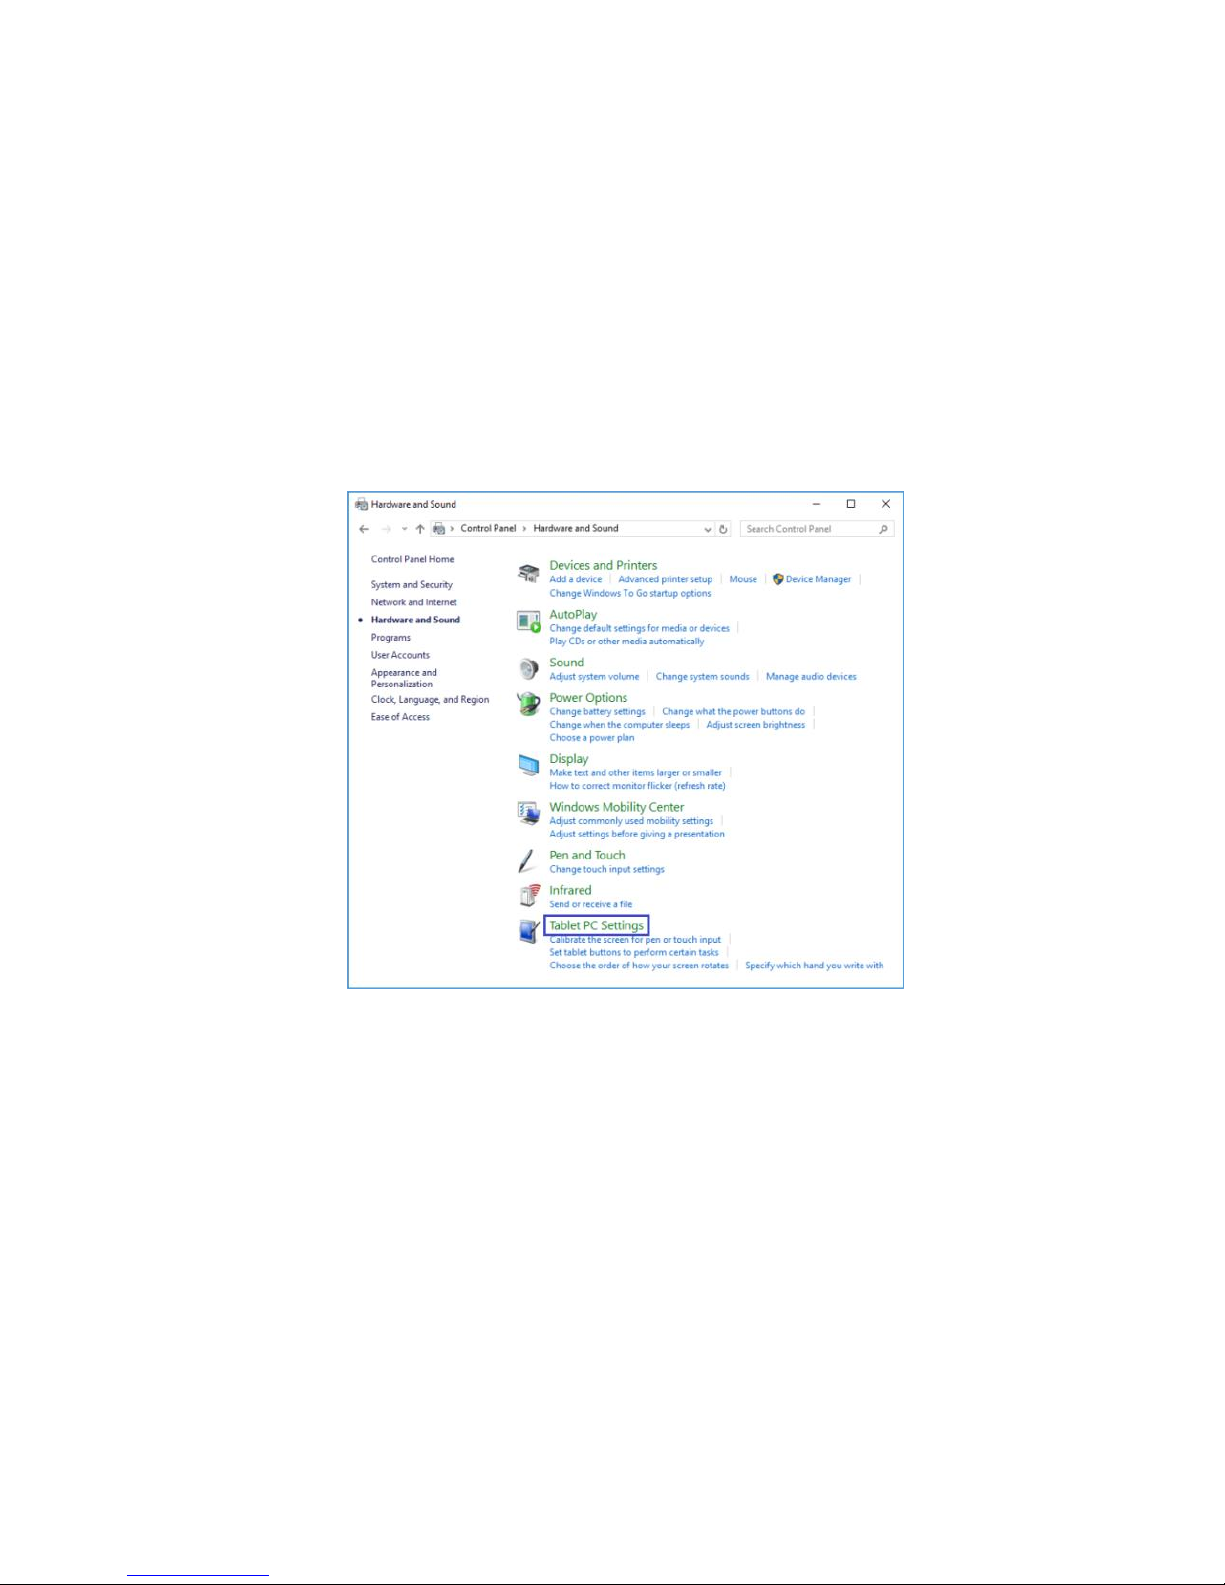
Step 3. Select “Hardware and Sound”.
Page 58
Roll Type PCT User Manual
58
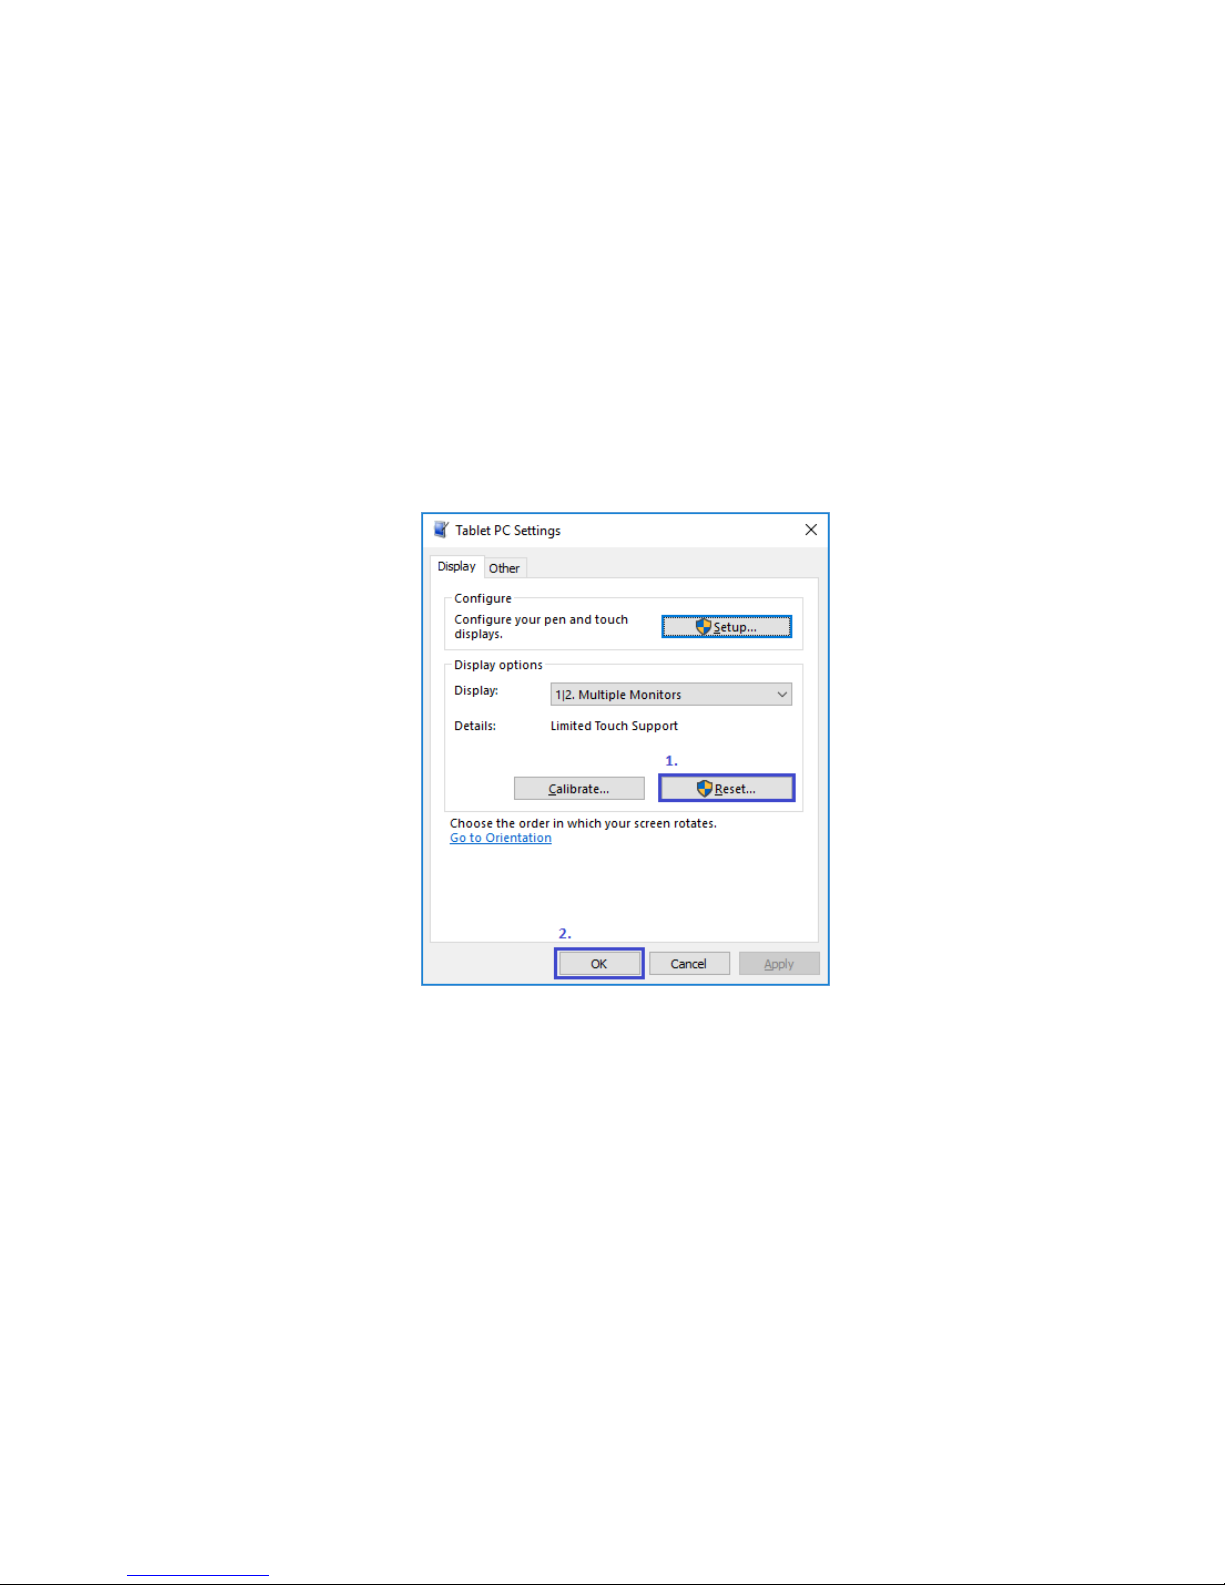
Step 4. Select “Tablet PC Settings”.
Page 59
Roll Type PCT User Manual
59
Step 5. Click “Reset” to reset the calibration value to zero.
Page 60
Roll Type PCT User Manual
60
Step 6. Press “Windows + P” to switch display setting to “Second screen only” mode then use 9-point calibration in PCT utility to calibrate.
Page 61
Roll Type PCT User Manual
61
7. PRODUCT LIST
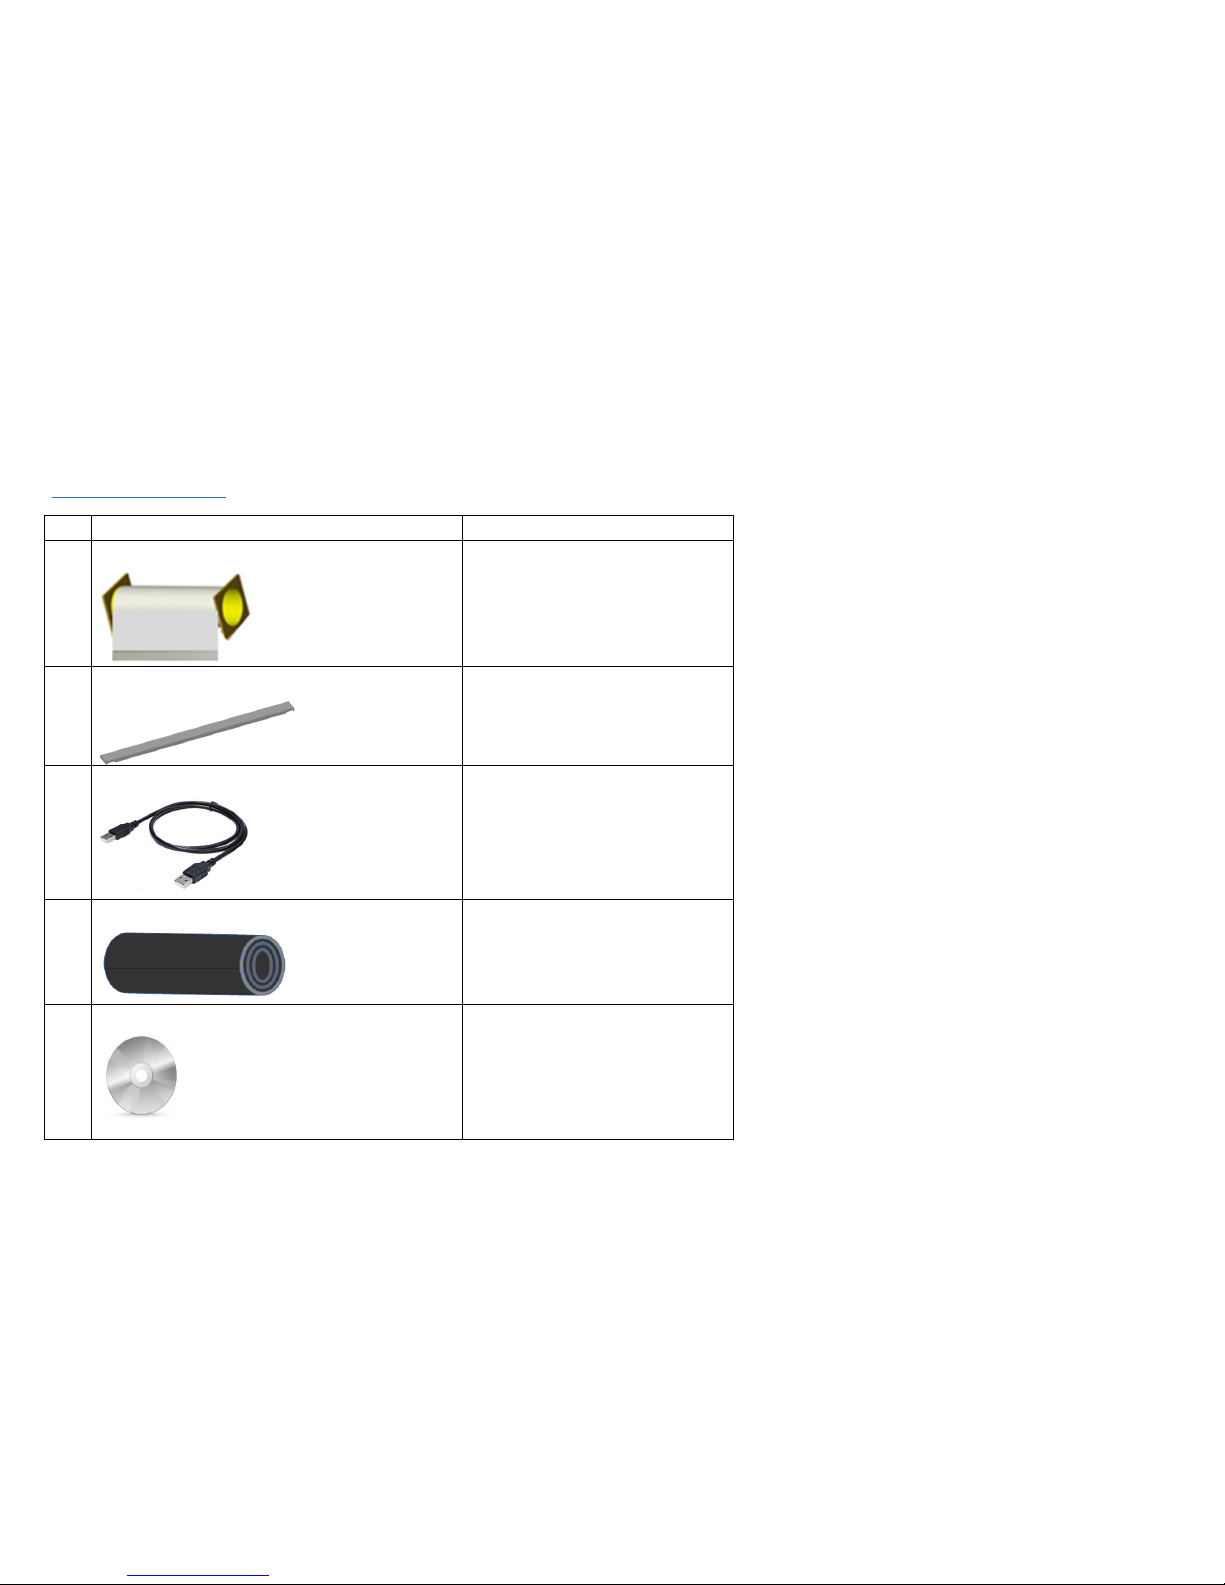
Item
Description
Quantity
1
Roll Type PCT 1
2
Left Frame Module 1
3
5m USB A to USB A cable
1
4
Steel Papers 1 (sets)
5
CD for User Manual and Utility Software
1
Page 62
Roll Type PCT User Manual
62
6
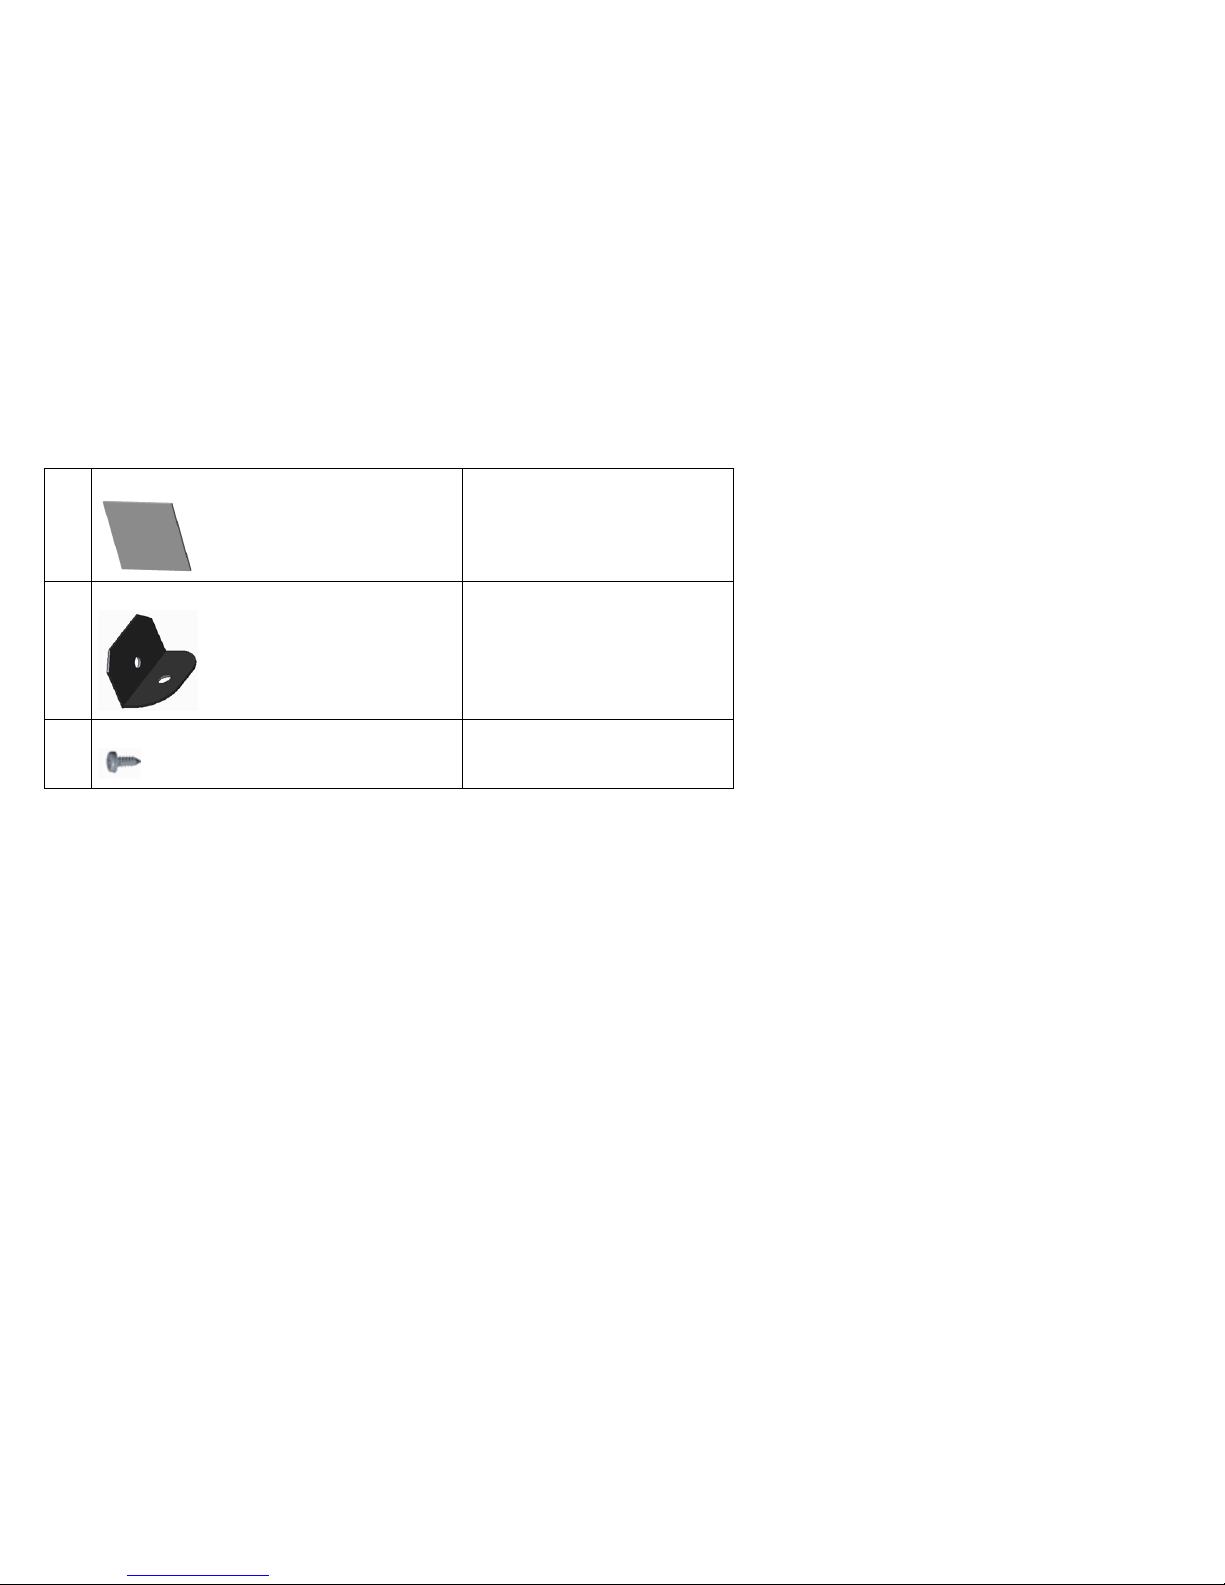
EPE Sponge
1
7
Bracket to fix PCT frame and Wall
4
8
Wall screw for bracket 4
 Loading...