

Page 1
MOUNTING INSTRUCTIONS FOR
SHORT THROW PROJECTOR MOUNT
MODEL No. OWM855/OWM855W
FN. OWM855/OWM855W
Max Weight Loading 15Kgs
Ÿ
READ THESE INSTRUCTIONS CAREFULLY BEFORE INSTALLING YOUR EQUIPMENT.
Ÿ
INSTALL THE MOUNT IN A SUITABLE LOCATION USING FIXINGS WHICH ARE APPROPRIATE FOR THE WALL
MATERIAL AND STRUCTURE. CONSULT A QUALIFIED BUILDER IF YOU ARE IN ANY DOUBT AS TO THE
STRUCTURAL INTEGRITY OF THE WALL.
USE ALL AVAILABLE FIXING POINTS.
Ÿ
DO NOT ATTEMPT TO ALTER OR MODIFY ANY PART OF THE WALL MOUNT OR IT'S ATTACHMENTS.
Ÿ
DO NOT USE IF ANY PARTS ARE BROKEN OR APPEAR TO BE DAMAGED.
Ÿ
TIGHTEN ALL BOLTS AND FIXINGS SECURELY. ONLY USE FIXINGS PROVIDED WITH THIS BRACKET.
Ÿ
DO NOT MOUNT YOUR PROJECTOR NEAR TO SOURCES OF HEAT OR MOISTURE.
Ÿ
ALWAYS HAVE A MINIMUM OF TWO PERSONS TO INSTALL THE PROJECTOR AND THE MOUNT.
Ÿ
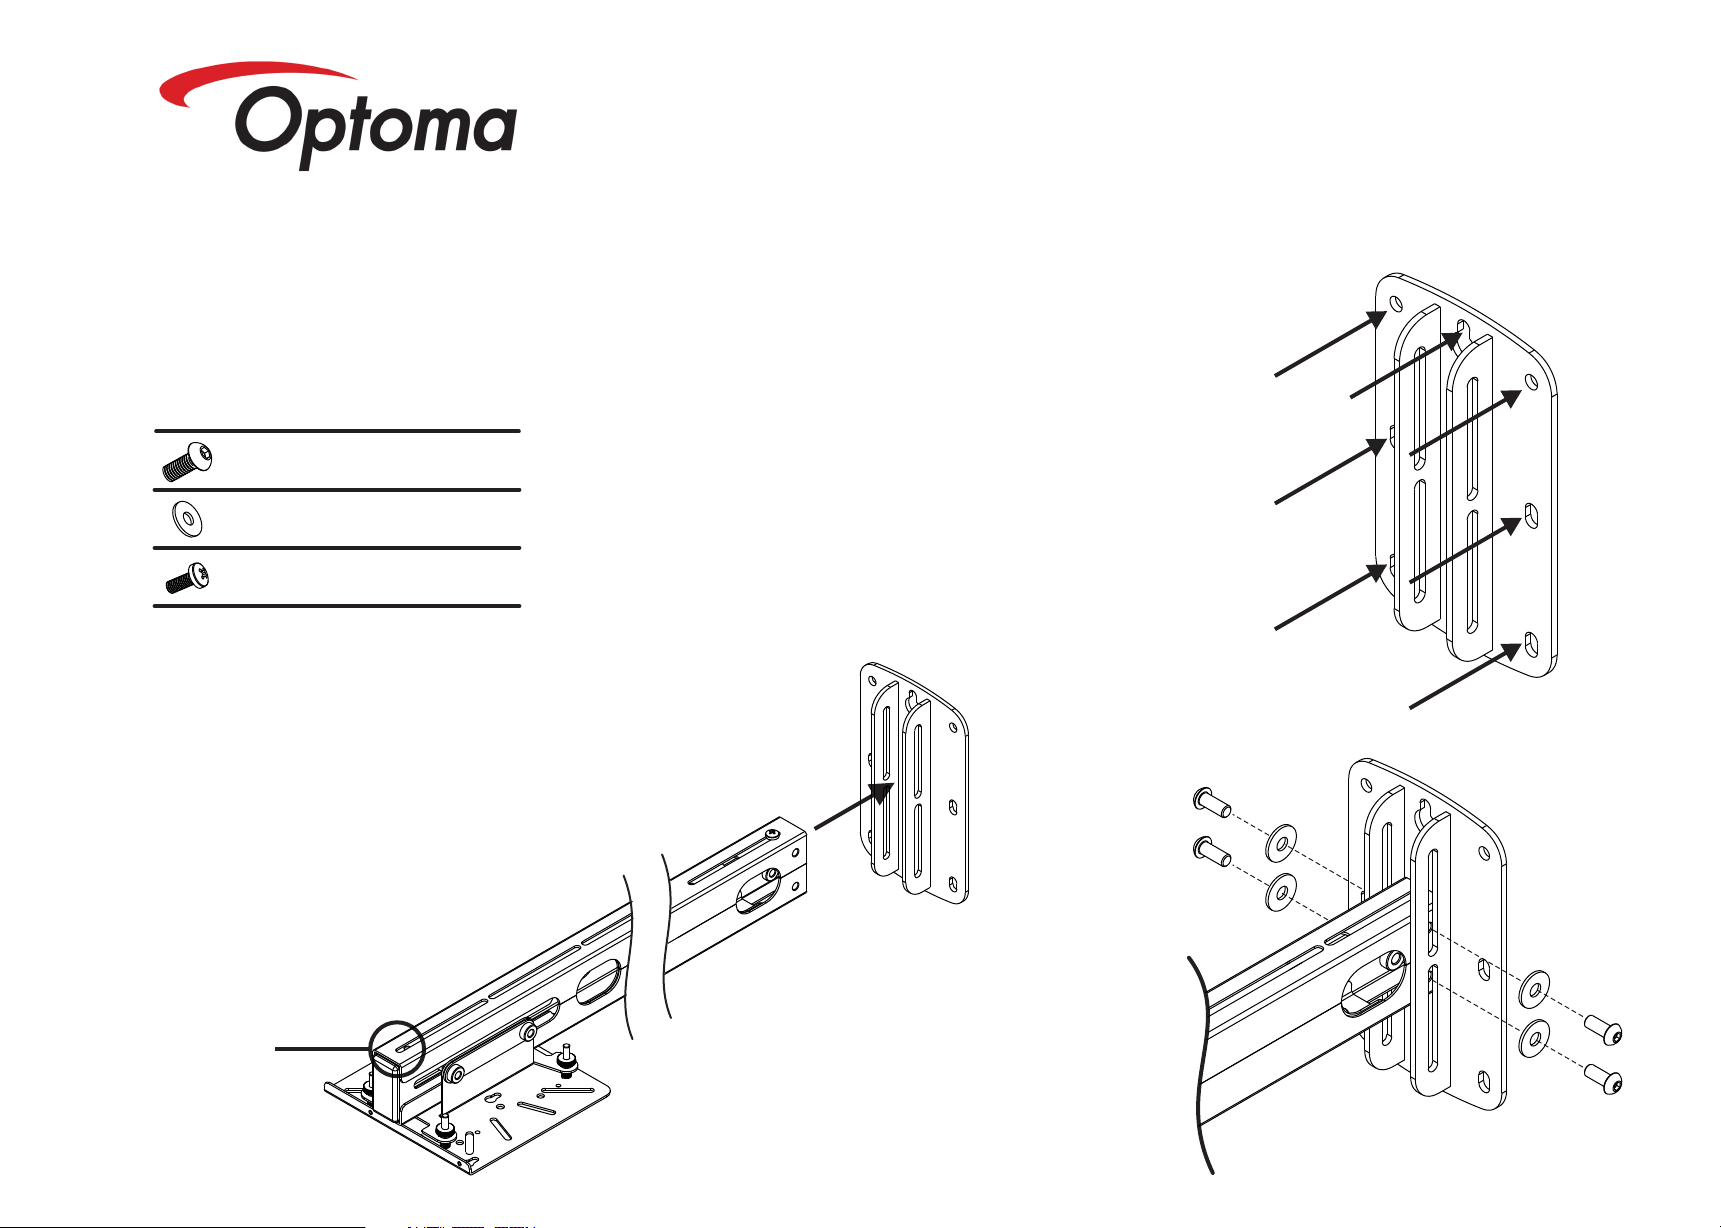
Attach Wall Plate To Wall
Projector Mount Assembly Kit
A - M8 x 16mm
B - M8 / M6
C - M6 x 12mm
Secure Boom Arm To Wall Plate
2
CAUTION NOTE!
This mount is designed to take projectors up to a
weight of 15Kgs. For safety reasons the mount
has been tested with a dead weight loading of
75Kgs. It is recommended that if the installation is
at risk of being subjected to greater loads then
you should additionally tether the mount to the
ceiling using the tether point (highlighted below).
The tether point uses an M6 thread which can
accept any M6 fixing such as an eye bolt or hook.
x4
x4/x3
x2
1
NOTE: Refer to supplied drilling template
for mounting Optoma 610ST, 605ST, 210ST,
X305ST, W305ST, X306ST & W306ST Models
Ÿ For ease of installation mount bracket on wall using position 1
and mark other positions using a spirit level. Then remove
fixing from position 1, remove bracket and drill other positions
Ÿ Use Fixings suitable for your type of wall construction.
Ÿ Use All available fixing points.
Ÿ If in any doubt of the suitability of the wall, it's construction or
what type of fixings to use, consult a qualified builder or installer.
a
b
1
Ax4
Bx4
Tether Point
NOTE:
Ÿ Attach boom arm to wall plate at
required height.
Ÿ To adjust height once the mount is
installed refer to Stage 6
Page 2

Adjust Length Of Mount
Attaching Optoma 210/305/306/605/610ST Projectors
3
a
C x2
B x3
FIRST REMOVE
TRANSIT SCREW
4
a
Dx3
Ex3
Optoma Series Fixing Kit605ST, 610ST, 212ST, 305ST, 306ST
Optoma 605ST, 610ST, 212ST
D - M3 x 20mm
Optoma 305ST, 306ST
D - M4 x 20mm
x3
E - Mounting Bobbin
F - 2.5mm Allen Key
G - M4 x 16mm
Also Required
x3
x2
Page 3

b
Attaching Other Projectors
4
Gx2
5
Universal Projector Fixing Kit
H - M3 x 10mm
J - M4 x 10mm
L - M5 x 10mm
N - M6 x 10mm
P - M3 Washer
R - M4 Washer
T - M5 x 15mm
U - M5 x 15mm
V - Extension Arm
W - M5 x 10mm
Also Required
I - M3 x 25mm
K - M4 x 25mm
M - M5 x 25mm
O - M6 x 25mm
Q - M5 Washer
S - M6 Washer
NOTE:
Use universal fixing kit as demonstrated below using bolts,
x4
extension arms and/or spacers to attach to third party
projector models. Use relevant fixings in all available fixing
points on projector.
x4
x4
x4
x4
W
c
V
To Projector
H~O
T~U
Page 4

6
Fine Adjust Position
The following adjustments (labelled below) can be
made to fine tune position to correct any discrepancy
in the installation or mounted surface;
a To fine tune the length and tilt of the mount, loosen
bolts, slide mount to required position and re-tighten
bolts.
b To fine tune the level of the projector use the four
adjustment thumb wheels on the spring loaded cradle.
Do not fully unwind the thumb wheels.
c To fine tune height position of the projector, loosen
the boom assembly screws and slide the projector to
required position. Then re-tighten all four screws.
d The integrated level indicates that the mount arm
is at 0°.
This does not necessarily mean the projector is level
with the screen so other adjustments may need to be
made.
Compatibility Universal
Up to 270mm x 270mm
Min 690mm / Max 1375mm
+/- 100mm
215mm
130mm
c
b
a
d
a
Specifications;
Throw distance - 535mm to 1350mm
(Approx dependent on fixing positions)
Adjustment - 100mm Fine length adjustment
+/- 5° Tilt Adjustment with integral level
4-point vernier adjustment tilt and yaw
100mm Height Adjustment at wall
Compatibility - Optoma
EW610ST, EX610ST, EX605ST, EW610ST, EW605ST, EX525ST
ZW210ST, ZX210ST, X305ST, W305ST, X306ST & W306ST
Hitachi
ED-D10N, ED-D11N, CP-D10
ED-A100*, ED-A101*, ED-A111*, CP-A100*
NEC
NP1XXX, NP2XXX, NP3XXX, NP4XXX,
UNIVERSAL
Up to 270mm x 270mm
*Screen size limited to 80" to 110"
Page 5

Drilling template for Optoma
610ST, 605ST, 210ST, 305ST
& 306ST Projectors
NOTE:
For use with Optoma 610ST, 605ST, 210ST, 305ST & 306ST
Projectors. When mounted on this bracket, the centre of the lens will
be 80mm to the right of the centre of the wall plate. Use this
template to ensure correct positioning of projector lens in line with
screen
80mm
Centre of
Wall Mount Plate
Centre of
Projector Lens
 Loading...