

Page 1

Table of Contents
Usage Notice
Precautions .......................................................................................... 2
Introduction
About the Product................................................................................. 3
Package Overview ............................................................................... 4
English
1
Installation
Product Overview ................................................................................. 5
Connecting the Projection Display ....................................................... 8
Powering On/Off the Projection Display ............................................... 9
Adjusting the Image Size ...................................................................... 10
User Controls
User Controls ....................................................................................... 12
OSD Menus ......................................................................................... 14
Appendices
Troubleshooting .................................................................................... 18
Maintenance......................................................................................... 20
Specifications ....................................................................................... 23
Compatibility Modes............................................................................. 24
Page 2
English
2
Usage Notice
!
Warning- Do not look into the lens. The bright light may hurt your eyes.
Warning- To reduce the risk of fire or electric shock, do not expose this
!
Warning- Please do not open or disassemble the product as this may cause
!
Warning- When changing the lamp, please allow unit to cool down and follow
!
!
Warning- This product will detect the life of the lamp itself. Please be sure to
!
Warning- After changing a new lamp, please reset the lamp life timer from
product to rain or moisture.
electric shock.
all changing instruction.
change the lamp when it shows warning messages.
OSD menu.
Warning- Before switching off the product, please keep the cooling fan
!
running for a few minutes.
Precautions
Follow all warnings, precautions and maintenance as recommended in this
user’s manual to maximize the life of your unit.
Do:
q Turn off the product before cleaning.
q Use a soft cloth moistened with mild detergent to clean the display housing.
q Disconnect the power plug from AC outlet if the product is not being used for a
long period of time.
Don’t:
q Block the slots and openings on the unit provided for ventilation.
q Use abrasive cleaners, waxes or solvents for your cleaning.
q Use under the following conditions:
- Extremely hot, cold or humid environment.
- In areas susceptible to excessive dust and dirt.
- Near any appliance generating a strong magnetic field.
- Place in direct sunlight.
Page 3

English
Introduction
About the Product
This product, designed with a high-powered UHP lamp, is an SVGA data/video
portable projection display. The outstanding feature of it are listed as follows:
q 8.9 lbs. (4.0 kgs) lightweight compact design
q True SV GA, 800 x 600 a ddre ssable pixels
q With XGA compression and VGA resizing
q Mac / NEC PC-98 / FM Towns compatible
q NTSC / PAL / SECAM compatible
q Dual Data Input
q Real plug and play with auto-image function
3
q User-friendly multilingual on-screen display menu adjustment
q Advanced electronic keystone correction function
q Luxurious carrying case with detachable wheels & handle
Page 4
English
4
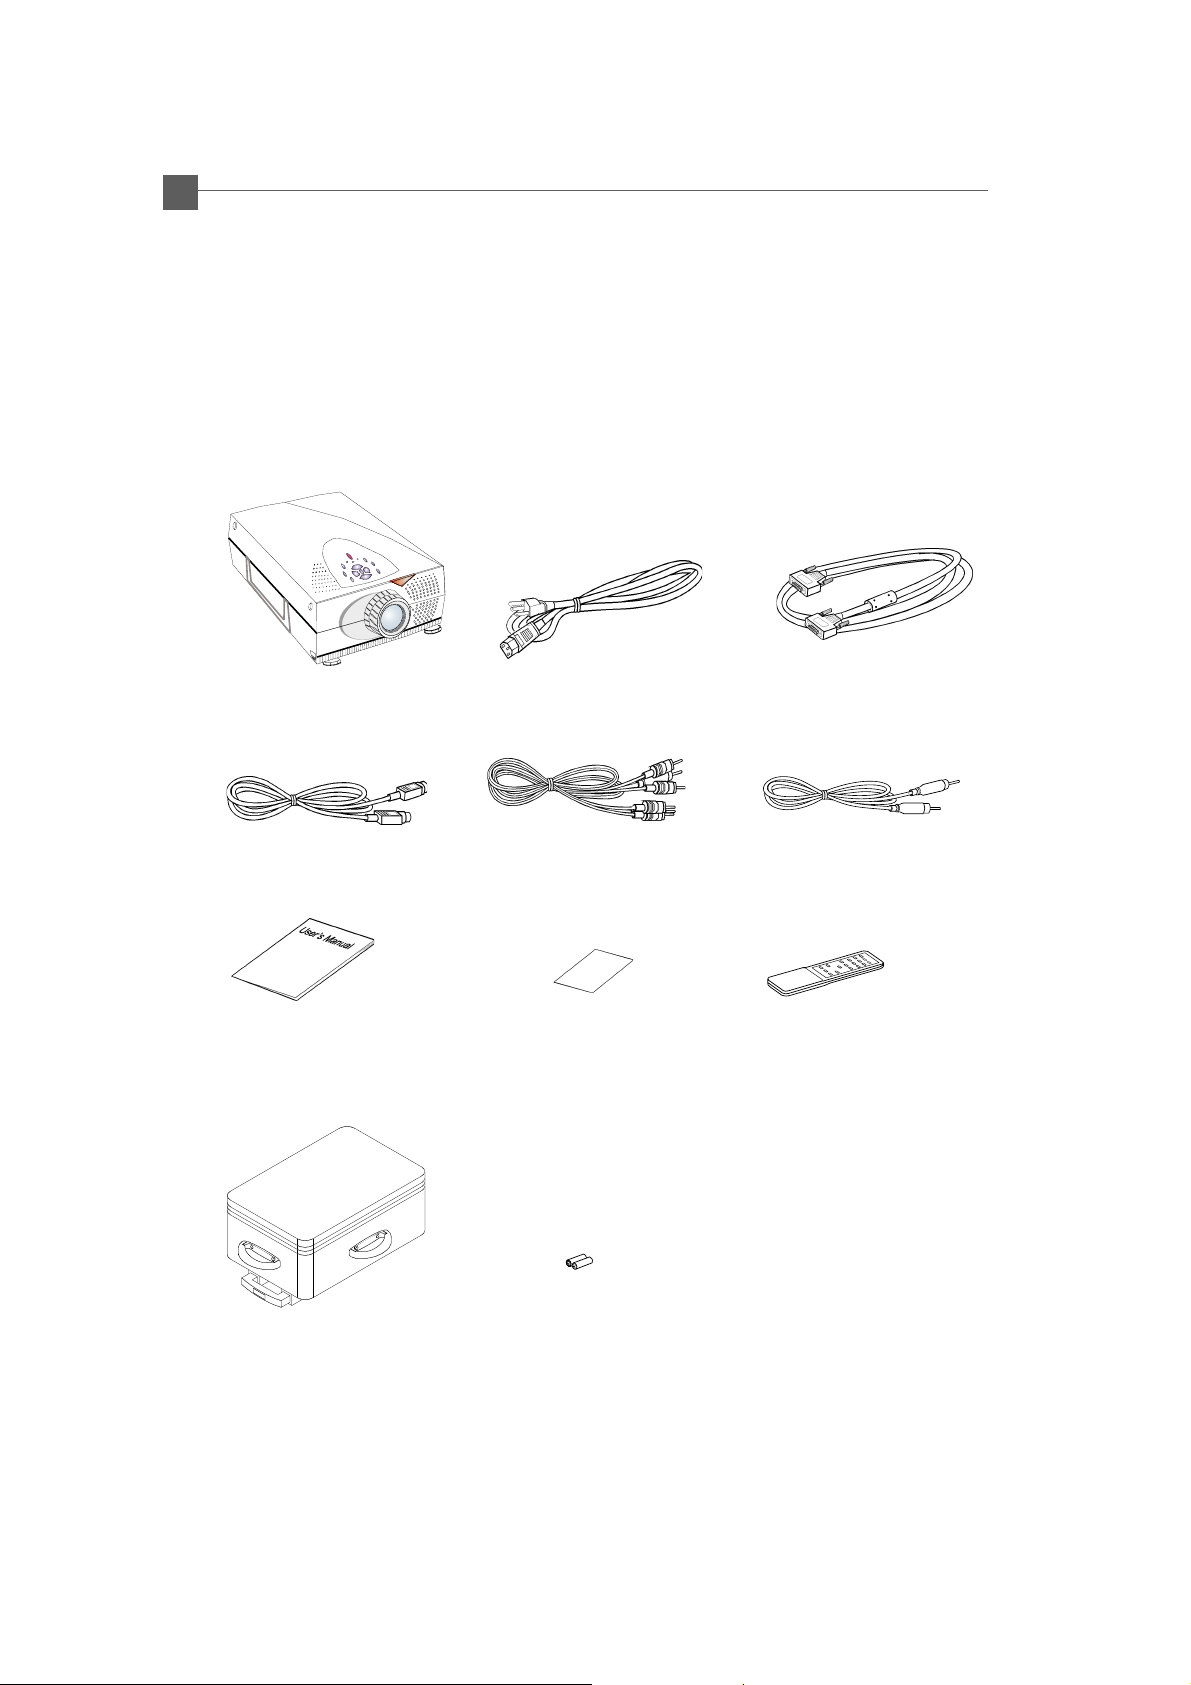
Package Overview
This projection display comes with all the items shown below. Check to make
sure your unit is complete. Contact your dealer immediately if anything is
missing.
LCD Projection Display
S-Video Cable RCA Audio/ Video Cable
User’s Manual
Power Cord
Warranty Card
VGA Cable X 2
Audio-in Cable for
Computer
Remote Control
Hard Carrying Case
With Detachable Wheels &
Handle
Batteries X 2
Page 5
Installation
Product Overview
English
5
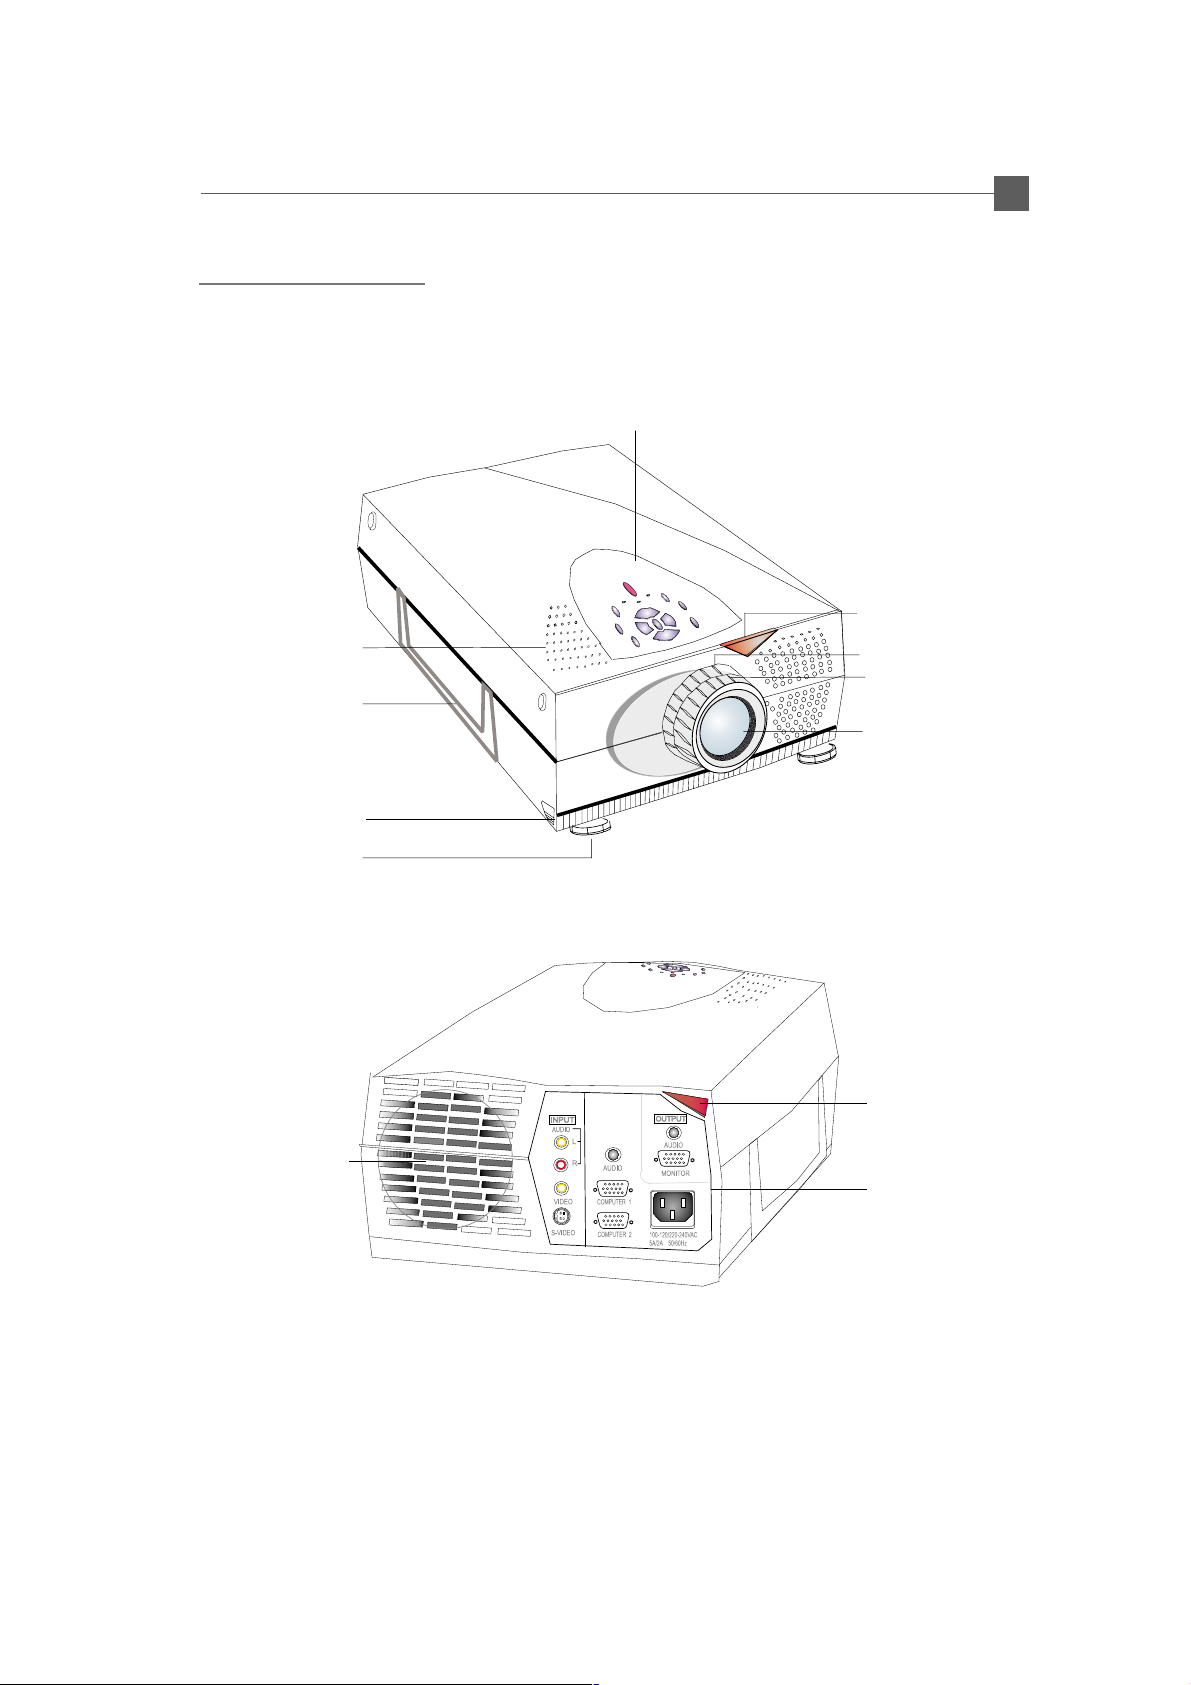
w Main Unit
Speakers
Carrying Handle
Elevator
Releasing Button
Elevator Foot
Panel Controls
Remote Control Receiver
Zoom Ring
Focus Ring
Projection Lens
Remote Control
Receiver
Air Filter
Connector Ports
* There are two elevator releasing buttons and elevator feet on both sides.
* There are also two remote control receivers on the front and the rear side.
Page 6
English
6
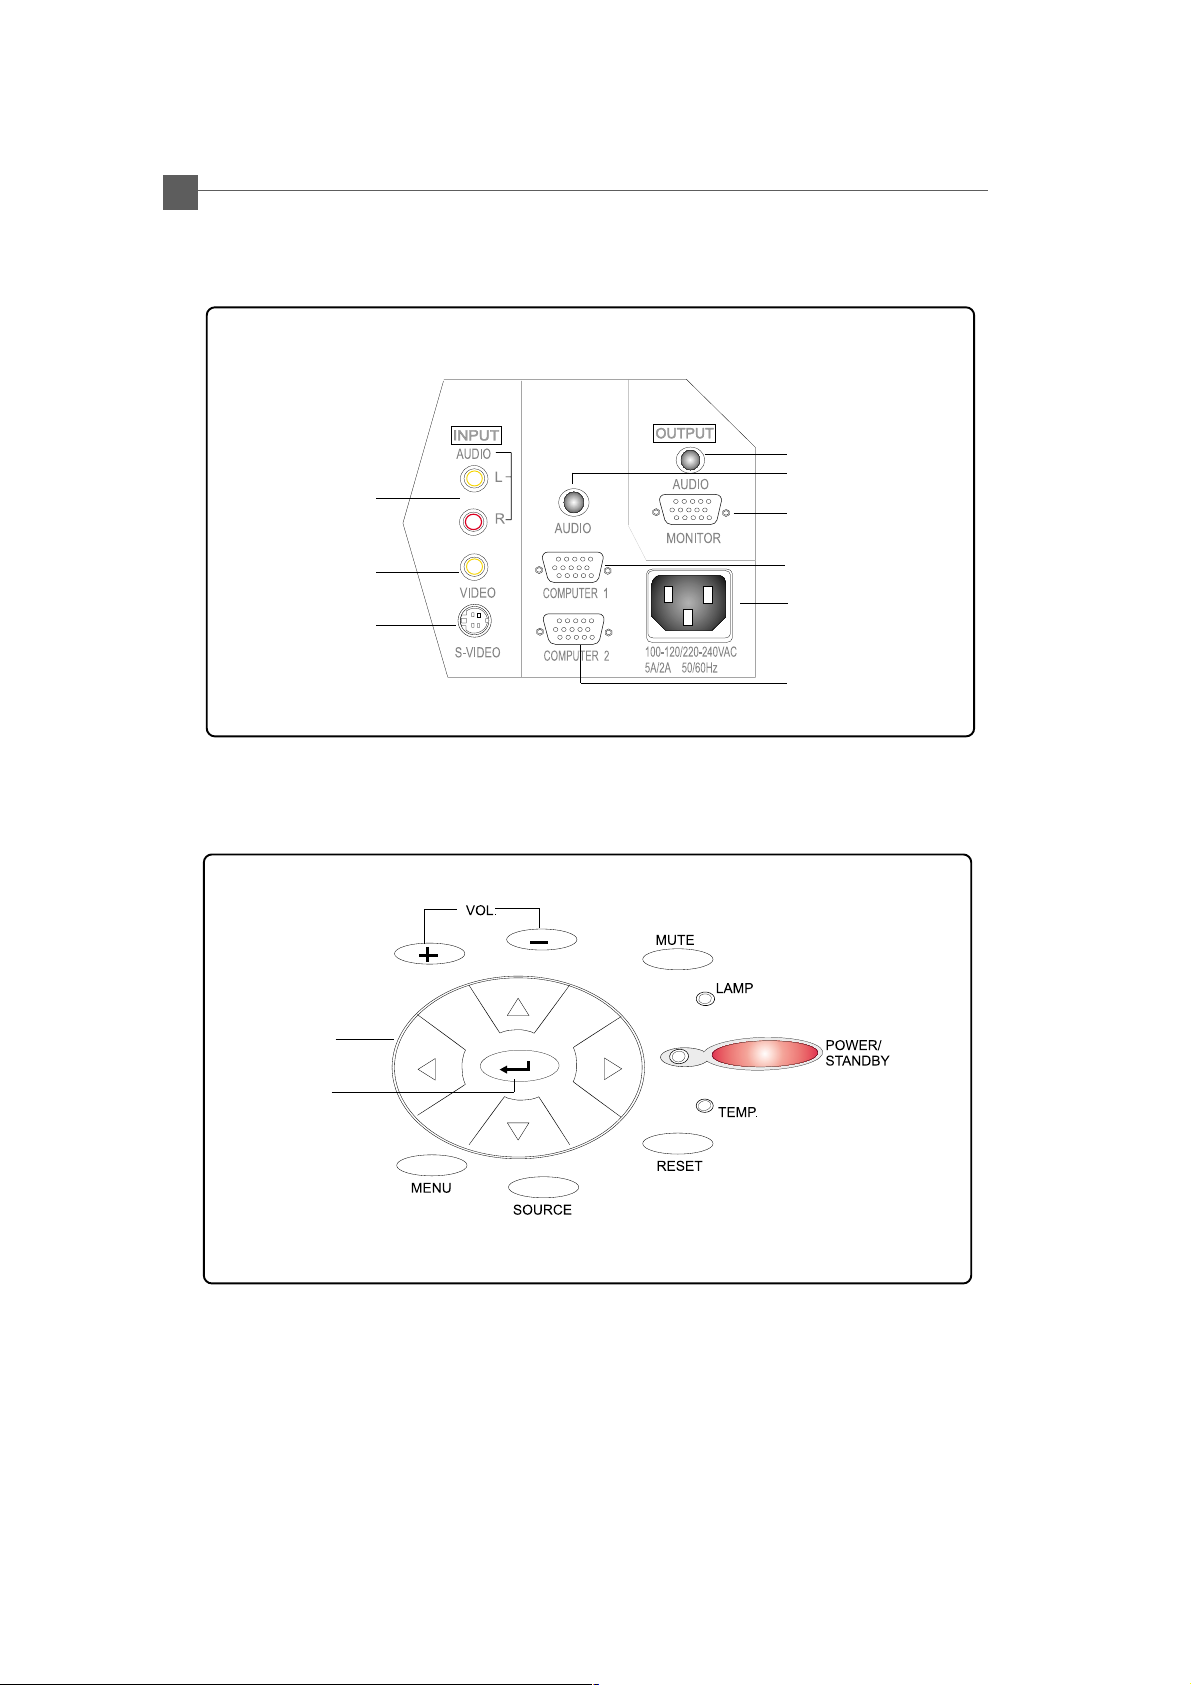
w Connection Ports
Audio Input
for Computer
Audio Output Connector
Audio Input Connector
Monitor Loop-Through
Connector
Composite Video
Connector
S-Video
Connector
ww
w Panel Controls
ww
Four Directional
Select Keys
Enter
Computer 2
Input Connector
Power Connector
Computer 1
Input Connector
Page 7
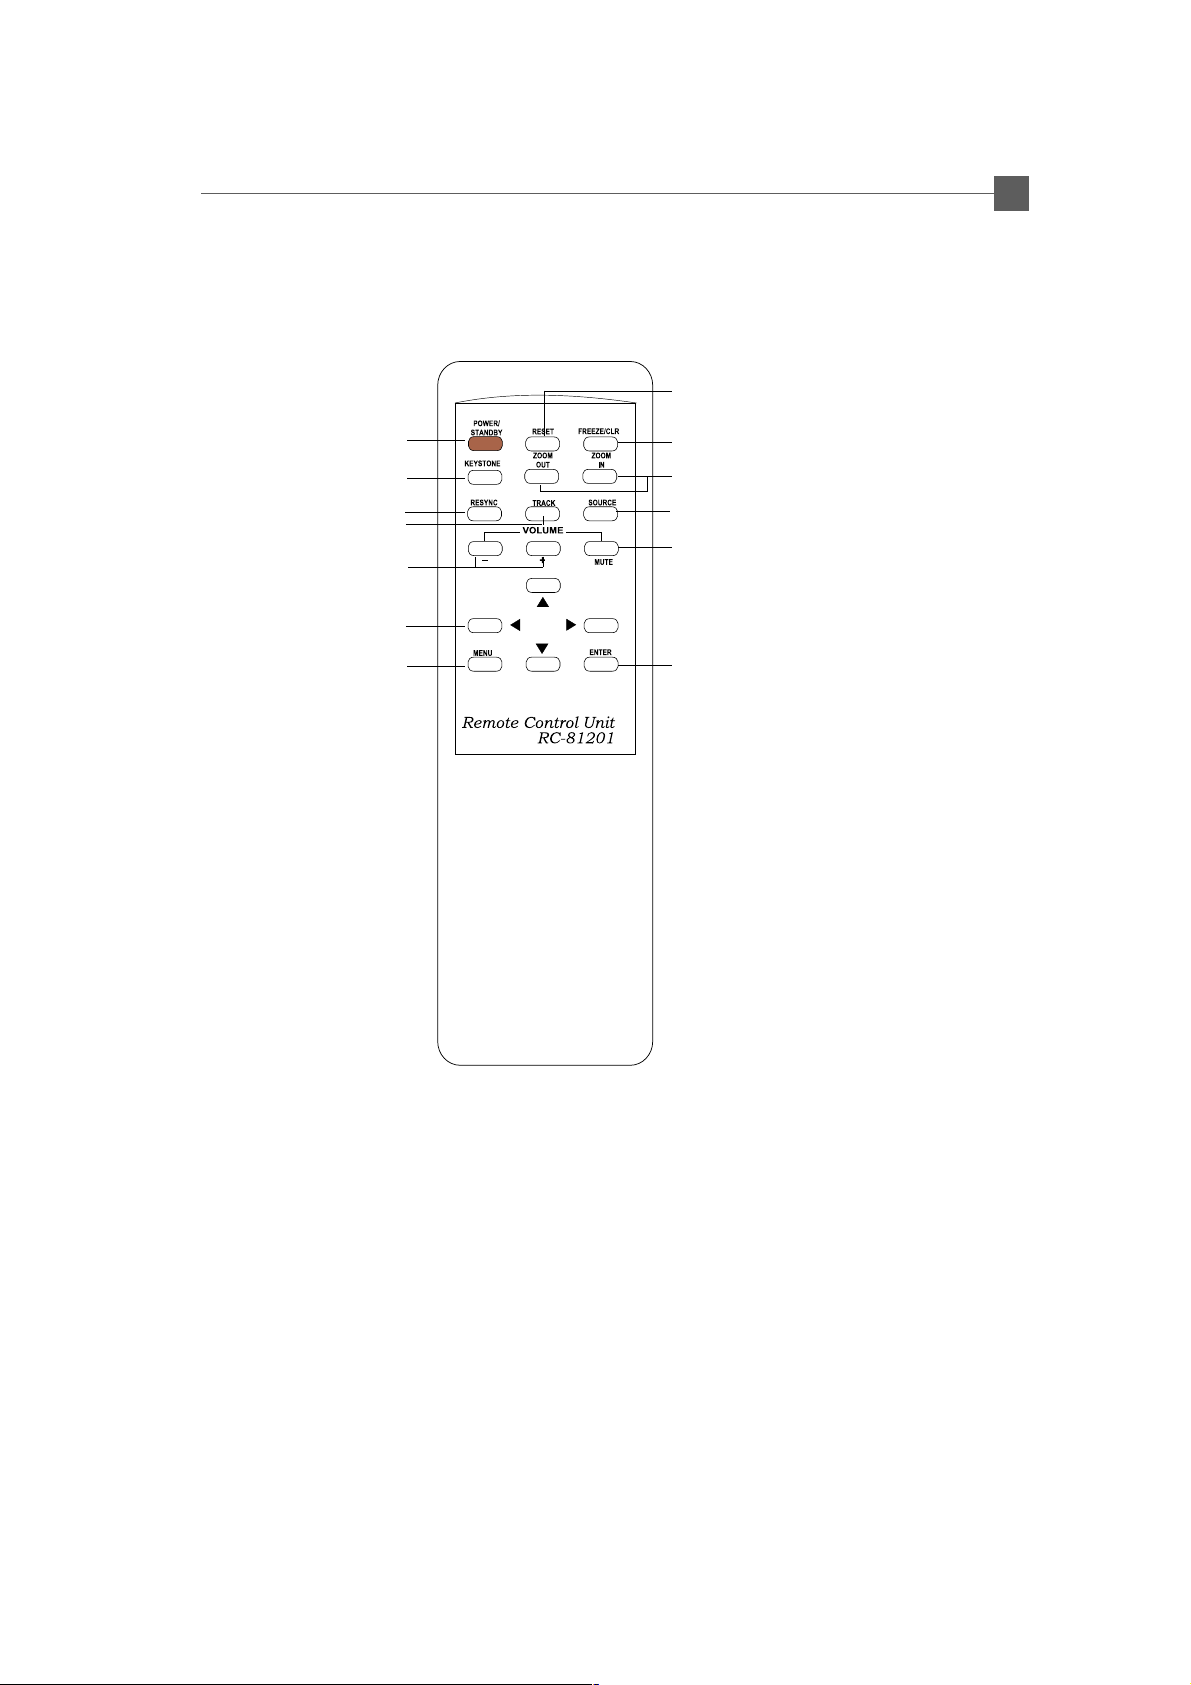
w Remote Control
English
7
Reset
Power/Standby
Keystone
Resync
Tracking
Volume
Four Directional Select Keys
Menu
Freeze/CLR
Zoom In / Zoom Out
Source
Mute
Enter
Page 8
English
8
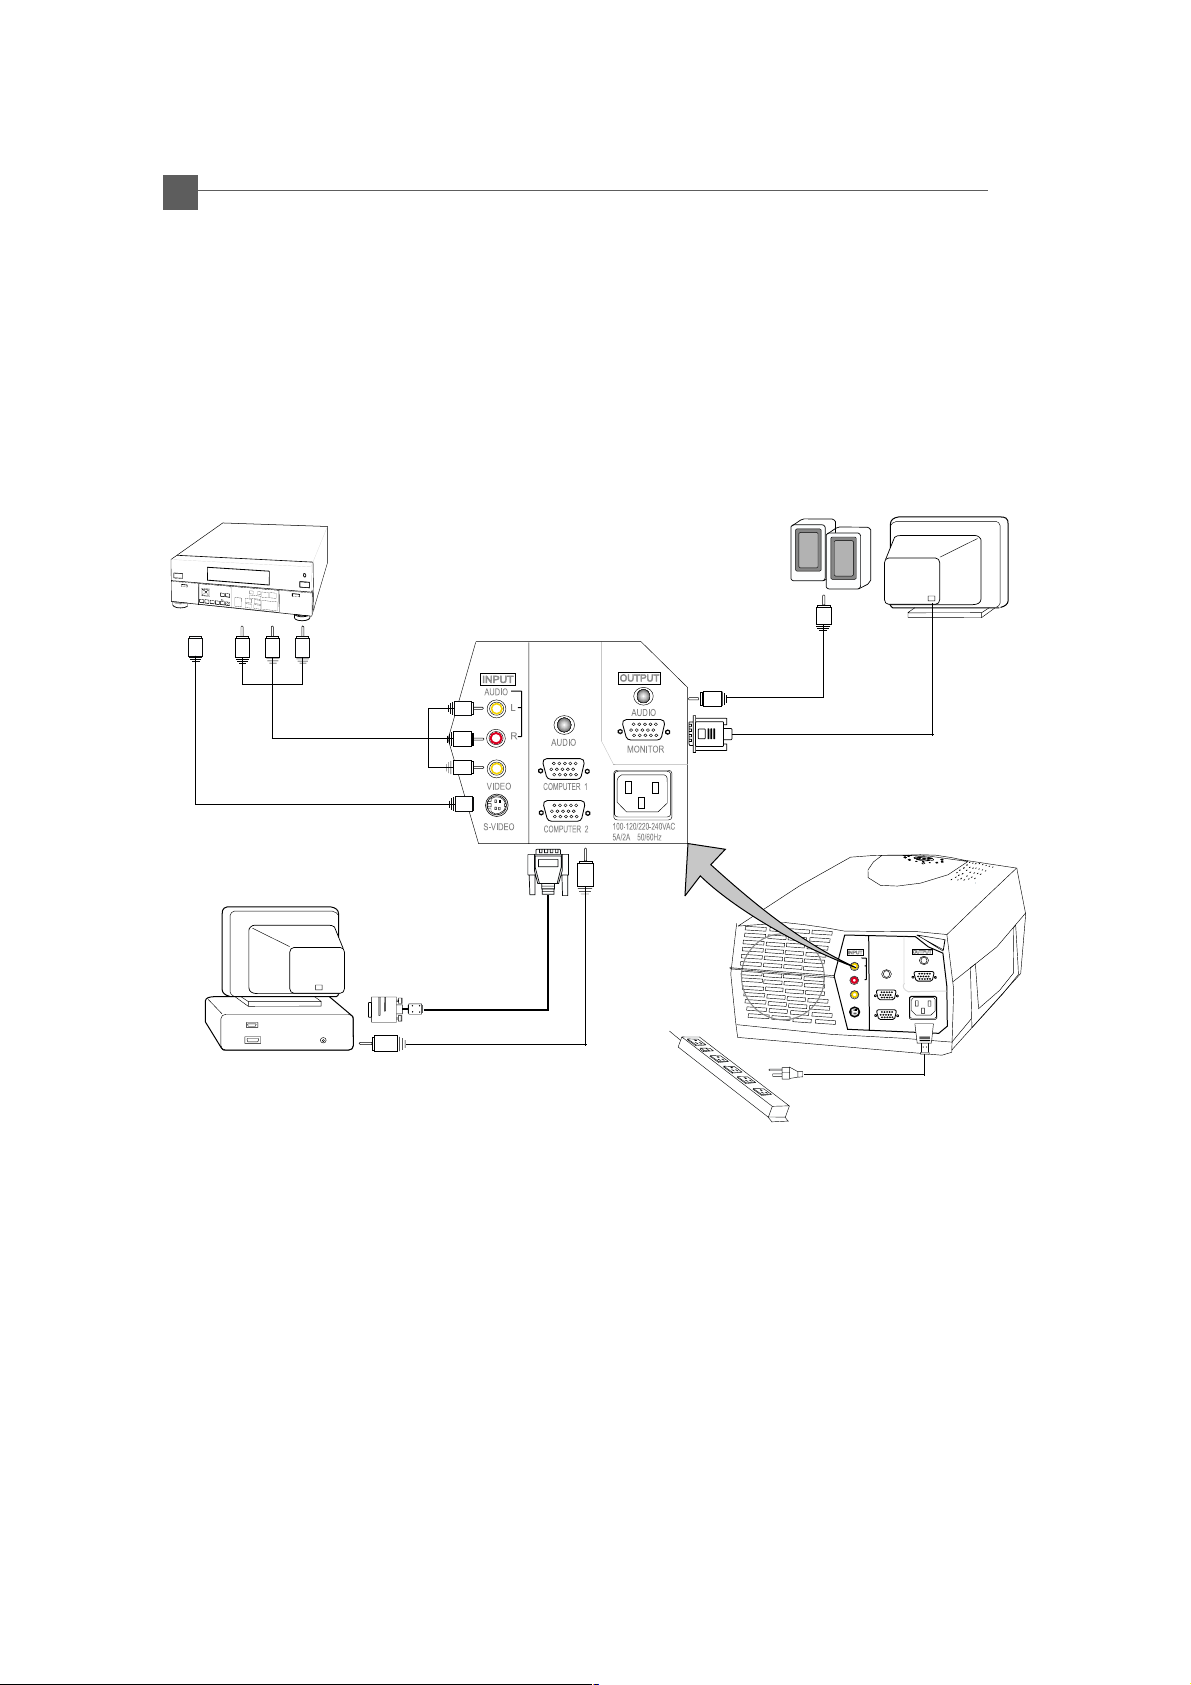
Connecting the Projection Display
RCA Audio
Video Cable
Audio Cable
Monitor Cable
S-Video Cable
VGA Cable
Audio Cable
Power Cord
Page 9

English
Powering On/Off the Projection Display
uu
u Powering On the Projection Display.
uu
1. Remove the lens cover
2. Plug the power cord into the back of the projector and plug it into the electrical outlet.
The “POWER/STANDBY” LED indicator will flash green.
3. Turn on the lamp by pressing “ POWER/STANDBY” button.
The startup screen displays and starts 30 seconds countdown for lamp .
The “POWER/STANDBY” LED indicator will lit green a nd stop flashing.
The “LAMP” LED indicator will flash amber for 30 seconds.
4. Make sure the computer or video signal is well connected. The projector will detect
your computer source automatically.
5. If necessary, make adjustments to the image from the projector’s On-Screen Display
(OSD)menus.
9
uu
u Powering Off the Projection Display.
uu
Turn off the lamp by pressing “ POWER/STANDBY” button. The confirmation message, ”Power off
the lamp? ” will show up. Plea se select “Yes” to turn off the lamp. “LAMP” LED indicator will flash
amber for about one minute. After the “LAMP” LED indicator stops flashing, you may unplug the
power cord.
Warning:
* When the “LAMP” LED indicator lit amber for a long period of time, please change the lamp
module. Please contact your local dealer or distributor for replacement lamp and refer to “
Changing the lamp”(Page 21) in the manual.
* When the “TEMP” LED indicator lit amber, it indicates the display has been overheated. The
display will automatically shut itself down. While the “TEMP” LED indicator turns “off”, the
display can be switched on again for your presentation.
Page 10

English
10
Adjusting the image size
ww
w
Adjust the height of projected image
ww
Raise the projection display to the desired angle and then press the elevator
release buttons to release the elevator foot.
Fine-tune the height by manually turnig each foot.
(Refer to the following figures below)
Screen
Elevator Foot
Elevator
Releasing Button
Page 11

ww
w Adjusting the Image Size
ww
English
11
[ ] Maximum
( ) Minimum
[27”]
(20”)
Max.
27”
Screen
(inch)
Min.
Distance(ft.)
Screen Size
(W x H) inch
*The graph is for user’s reference only.
20”
3.8’
20”
16 x 12 49 x 36 80 x 60 120 x 90
[60”]
(45”)
60”
45”
8.4’ 14’
60” 100”
100”
76”
[100”]
(76”)
[150”]
(114”)
150”
114”
21’ 28’
150”
160 x 120
200”
153”
200”
[260”]
[200”]
(197”)
(153”)
260”
197”
36’
260”
208 x 156
ww
w Focus the image
ww
You may adjust zoom ring to zoom in/out 1.3 times of the image size.
To focus the image, rotate the focus ring until the image is clear.
FOCUS
RING
ZOOM
RING
Page 12

English
12
User Controls
User Control Overview
There are two ways for you to control the functions: panel control and remote control.
w Panel Control
w Remote Control
Page 13

English
Power/Standby
Power the lamp on and off when the main power switch is turned on.
4
Menu
Press “Menu” to open the on-screen display (OSD) menus and to switch among different menus.
4
T o exit OSD, pre ss the “Freeze/CLR” button or select the “ Exit Menu” icon and press “Enter”
button. The projector saves any changes you made automatically.
Source
Press “Source” to choose between video and computer sources.
4
Reset
When you press “Reset” button, the OSD menus shows message “Reset All Yes/NO ? ”.
4
Select “Yes” to confirm or select “ No” to cancel.This function will reset all user
adjustable parameters to factory default settings.
Enter
Press “Enter” for confirming your selection.
4
Four Directional Select Keys
Use “Up” or “Down” to select items. Use “Right”or “Left”to make adjustments for your
4
selection.
Use “Up” or “Down” button to change the vertical positioning of the image; and use “Right”or
4
“Left” button to change the horizontal positioning of the image.
Resync
Automatically synchronizes the projector to the input source.
4
Volume
13
To turn up the volume, press “+” button.
4
To turn down the volume, press “-” button.
4
To mute the volume, press “Mute” button.
4
Freeze/CLR
Press “Freeze/CLR” button to still the screen image.
4
When the OSD displayed, press “Freeze/CLR” button to exit the OSD.
4
Tracking (Computer mode only)
Choose “Tracking” item to synchronize the signal timing of the display with that of the graphic
4
card. When you experience an unstable or flikering image, use this function to correct it.
Zoom In (Computer mode only)
Press “Zoom In” button to enlarge the projected image.
4
When the “Zoom” icon is displayed, you can use four directional select keys to change the
4
vertical or horizontal positioning of the image.
Zoom Out(Computer mode only)
Diminish the zoom in image.
4
When the “Zoom” icon displayed, you can use four directional select keys to change the
4
vertical or horizontal positioning of the image.
Keystone
Adjust image distortion caused by tilting the projector.
4
Page 14

English
14
OSD Menus
How to operate
The Projector has the multilingual On-Screen Display(OSD) menus that allows you
4
to make image adjustments and change a variety of settings. When in computer
source, the OSD will be the “Computer OSD”. When in Video source, the OSD will
be the “ Video OSD”. The projector will detect the source automatically.
To open the OSD menus, press the “Menu” button on the Remote Control or Panel
4
Control.
To select among different menus, press the” Menu” buttn again. Then use “Up”&
4
“Down” keys to select different items and use “Right” & “Left” to adjust your
selection.
To exit the OSD, press the “Freeze/CLR” button or choose the “Exit Menu” and
4
press “Enter” button.
Language
Language
4
You can display the multilingual OSD . User “ Up” and “ Down” key to select. The menus redrew
immediately.
Display
Brightness
4
Adjusting the brightness of the image.
l Press the left key to darken the image.
l Press the right key to lighten the image.
Contrast
4
The contrast controls the degree of difference between the lightest and darkest parts of the
picture. Adjusting the contrast to change the amount of black and white in the image.
l Press the left key to decrease the contrast.
l Press the right key to increase the contrast
Keystone Correction
4
Adjusts image distortion caused by tilting the projector.
Color T e mperature
4
Adjusts the color temperture. The range is from 5000°K to 9300°K . The factory default is 7900°K .
With the higher temperature, the screen looks colder; with the lower temperature, the screen
looks warmer.
Page 15

English
Tint (Video mode only)
4
The tint adjusts the red-green color balance in the projected image.
l Press the left key to increase the amount of green in the image.
l Press the right key to increase the amount of red in the image.
Color (V ideo mode only)
4
The color setting adjusts a video image from black and white to fully saturated color.
l Press the left key to decrease the amount of color in the image.
l Press the right key to increase the amount of color in the image.
Image (Computer mode only)
Tracking
4
Choose “ Tracking “ item to synchronize the signal timing of the display with that of the graphic
card. When you experience an unstable or flickering image, use this function to correct it.
Frequency
4
“Frequency” is for changing the display data frequency to match the frequency of your
computer’s graphic card. When you experience a vertical flickering bar, use this function to make
an adjustment.
Auto-Image
4
The projector automatically adjusts tracking, frequency and vertical and horizontal
position for most computers.
15
* The image options are available only for computer sources. The projector can set these options
automatically for video sources.
Audio
Volume
4
l Press the left button to decrease the volume.
l Press the right button to increase the volume.
Bass
4
The Bass setting controls the lower frequencies of your audio source.
l Press the left button to decrease the bass.
l Press the right button to increase the bass.
Page 16

English
16
Treble
4
The treble setting controls the higer frequencies of your audio source.
l Press the left button to decrease the volume.
l Press the right button to increase the volume
Mute
4
l Choose the left icon to make the volume function ineffective.
l Choose the right icon to make the volume function effective.
Mono / Stereo / Stereo-enhance
4
l Mono: Mono sound effect.
l Stereo: Stereo sound effect.
l Stereo-enhance: Stereo-enhance sound effect.
Projection
Front-Desktop
4
The factory default setting.
Rear-Desktop
4
When you select this function, the projector reverses the image so you can project behind a
translucent screen.
Front-Ceiling
4
When you select this function, the projector truns the image upside down for ceiling-mounted
projection.
Rear-Ceiling
4
When you select this function, the projector reverses and truns the image upside down at same time.
You can project from behind a translucent screen with ceiling mounted projection.
416 : 9 (V ideo mode only)
You can select this function to fit your DVD aspect ratio type.
44 : 3 (V ideo mode only)
You can select this function to fit your DVD aspect ratio type.
Page 17

English
Lamp
Lamp W arning
4
Choose this function to show or hide the warning message when the lamp changing warning
message displayed.
Lamp Reset
4
Reset the lamp setting only when the lamp changing is done.
Exit Menu
Exit Menu
4
When you like to close the OSD menus, choose this item and select “ YES” to exit menu.
Reset All
4
Choose “ Yes” to retrun the display parameters of the current mode to its factory default settings.
17
Page 18

English
18
Appendices
Troubleshooting
If you are experiencing trouble with the projection display, refer to the following. If the
problem persists, please contact your local dealer or our service center.
Problem: No image appears on screen.
Ensure all the cables and power connections are correctly and securely connected
4
as described in the “Installation” section.
If the projector is plugged into a power strip, make sure the power strip is turned on.
4
Ensure the pins of connectors are not crooked or broken.
4
Check if the projection lamp has been securely installed. Please refer to the “Changing
4
the lamp” section.
Make sure you have removed the lens cap and the projector is switched on.
4
Problem: Partial, scrolling or incorrectly displayed image.
4Press the “Resync”button on the Remote Control.
If you are using a PC:
4
If the resolution of your computer is higher than 800 x 600. Follow the steps
outlined below to reset the resolution.
For Windows 3.x:
1. In the Windows Program Manager, click the “Windows Setup” icon in the Main
group.
2. Verify that your display re solution setting is less than or equal to 800x 600.
For Windows 95:
1. Open “My Computer” icon, the “Control Panel” folder, and then double click the
“Display” icon.
2. Select the “Setting” tab.
3. In the “Desktop Area” you will find the resolution setting. Verify that the
resolution setting is less than or equal to 800 x 600 resolution.
If the projection display is still not projecting the whole image, you will need
to also change the monitor display you are using. Refer to the following steps.
Page 19

English
4. Follow above steps 1~2. Click on the “Advanced Properties ” button.
5. Select the “Change” button under the “Monitor” tab .
6. Click on “ Show all devices ”. Then select “ Standard monitor types ” under the
“ Manufactures ” box; choose the resolution mode you need under the “ Models”
box.
7. V erify that the resolution setting of the monitor display is le ss than or equal to
800 x 600.
If you are using a Notebook PC:
4
1. Y ou are required to implement above steps of resolution setting of computer first.
2. Switch the Notebook PC display to the “external display only” or “CRT only”
mode.
If you are experiencing difficulty in changing resolutions or your monitor freezes,
4
restart all the equipment and the projection display.
Problem: The screen of the Notebook or PowerBook computer is not displaying
your presentation.
If you are using Notebook PC:
4
Some Notebook PCs may deactivate their own computers’ screens when a
second display device is in use. Each of them has different way to be reactivated.
Refer to your computer’s documentation for detailed information.
If you are using an Apple PowerBook:
4
In Control Panels, open the PowerBook Display to select Video Mirroring “On”.
19
Problem: Image is unstable or flickering
Use “Tracking” to correct it.
4
Change the monitor color setting from your computer.
4
Problem: Image has vertical flickering bar
Use “Frequency” to make an adjustment.
4
Check and reconfigure the display mode of your graphic card to make it compatible
4
with the product.
Problem: Image is out of focus
Adjust the Focus Ring on the projector lens.
4
Make sure the projection screen is between the required distance (1.2m - 11m) from the
4
projector.
Page 20

English
20
Problem : The screen is outstretched when displaying 16:9 DVD.
The projector itself will automatically detect 16:9 DVD and adjust the aspect ratio by
digitization to full screen with 4:3 default setting.
If the projection display is still outstretched, you will also need to a djust the aspect ratio
by referring to the following:
4 Please select 4:3 aspect ratio type on your DVD player if you are playing a 16:9 DVD.
4 If you can not select 4:3 aspect ratio type on your DVD player, please select 4:3 On-
Screen-Display(OSD) function of the projector for your display.
Page 21

Maintenance
ww
w Cleaning the Air Filter
ww
Cleaning Procedure:
4
1. Turn off the power.
2. Remove the air filter cover.
3. Remove the air filter from the filter cover.
4. Clean the air filter with a vacuum cleaner.
5. Place the air filter back in position. Make sure the air filter is fully inserted.
English
21
Air Filter
Air Filter Cover
Air Filter
Do not clean the filter with water. Doing so may damage the air filter.
!
Do not operate the projection display with air filter removed.
Page 22

English
22
w Changing the lamp
The projection display will detect the lamp life itself. It will show you a warning
message when the lamp is used over working hours. When you see this message,
change the lamp as soon as possible.
Make sure the projection display has been cooled for at least 60 minutes before
changing the lamp.
!
Warning: Lamp compartment is hot! Allow it to cool before changing
lamps!
Lamp Changing Procedure:
4
1. Turn off the power and allow the projection display to cool down.
2. Disconnect the power cord.
3. Unscrew the 2 screws of the lamp cover and remove the cover.
Lamp Cover
Lamp Cover
Screws
Page 23

English
4. Unscrew the 2 screws of the lamp module and pull out the lamp module by the
handle.
Lamp Handle
Lamp Screws
23
5. Replace the new lamp module by the handle and tighten the screws.
Lamp Handle
6. Place the lamp cover back in position and lock the 2 screws.
7. Remember to reset the lamp life timer from OSD menus.
Page 24

English
24
Specifications
LCD panel - active matrix TFT color LCD
Lamp - 150-watt UHP lamp
Number of Pixels - 800 pixels (H) X 600 lines (V)
Displayable Color - 16.7M colors
Projection Lens - F1.8 ~2.0, f 38~50mm w/ 1.3 X zoom & focus
Image Size - adjustable 20” to 260”
Projection Distance - 3.8 ft. to 36 ft. / 1.2 m to 11 m
Computer Compatibility - VESA VGA 640 x 350, 70/85Hz
Video Compatibility - NTSC / PAL / SECAM compatible
H. Frequency - 15kHz~69kHz horizontal scan
V. Frequency - 50Hz~85Hz vertical refresh
Multimedia Audio - internal speakers with 3 watt x 1 output
Power Supply - auto switch
I/O Connectors - power: AC power input socket
Weight - 8.9 Ibs / 4.0 kgs
Dimensions (W x H x D) - 8.8 x 4.3 x 14.1” / 224 x 109 x 359 mm
Environmental - operating temperature: 10o~35oC/50o~104oF
Safety Regulation - FCC, CE, VCCI,BSMI, UL, CUL, TUV
- 0.9” poly-silicon panels x 3
- tr=12ms, tf=30ms response time
- 350:1 contrast ratio
- VESA VGA 640 x 480, 60/72/75/85Hz
- VESA VGA 720 x 400, 70/85Hz
- VESA SVGA 800 x 600, 56/60/72/75/85Hz
- XGA 1024 x 768 Compressed ,
60/70/75/85Hz
- Apple Macintosh LC 13” 640 x 480, 67Hz
- Apple Macintosh II 13” 640 x 480, 67Hz
- Apple Macintosh 16” 832 x 624, 75Hz
- Apple Macintosh 19” 1024 x 768, 75Hz Compressed
- NEC PC-98 series 640 x 400, 57Hz
640 x 480, 60/70Hz
- F M TOWNS 640 x 480, 55/60 Hz
- composite video & s-video capability
- built-in amplifier with 3 watt x 1 output
- input AC 100-240V, 50-60Hz
- computer input: HDB 15-pin female connector x 2
- computer output: HDB 15-pin female connector
- video input: composite video RCA jack x 1 / S-Video jack x 1
- audio input: 2 pairs of L/R RCA jacks
- audio output: 1 pair of L/R RCA jacks
humidity: 80% maximum
storage temperature: -20o~60oC/ -4o~140oF
humidity: 80% maximum
Page 25

Compatibility Modes
English
25
H.Frequency
Mode
AGVASEV&MBI053x0465.1307
AGVASEV&MBI053x0469.7358
AGVASEV&MBI084x0465.1307
AGVASEV&MBI084x0469.7358
AGVASEV&MBI004x0275.1307
AGVASEV&MBI004x0279.7358
AGVASEV&MBI084x0465.1306
AGVASEV&MBI084x0469.7327
AGVASEV&MBI084x0465.7357
AGVASEV&MBI084x0463.3458
AGVSASEV006x0082.5365
AGVSASEV006x0089.7306
AGVSASEV006x0081.8427
AGVSASEV006x0089.6457
Resolution
(kHz)
V.Frequency
(Hz)
AGVSASEV006x0087.3558
AGXASEV*867x42014.8406
AGXASEV*867x42015.6507
AGXASEV*867x42010657
AGXASEV*867x42019.8658
"31CLhsotnicaMelppA084x04689.4366.66
"31IIhsotnicaMelppA084x04600.5386.66
"61hsotnicaMelppA426x23827.9455.47
"91hsotnicaMelppA*867x420142.0657
89CP004x04638.4224.65
89CP084x0465.1307
89CP084x0465.1306
snwoTMF084x04673.4273.55
snwoTMF084x0465.1306
*: Compressed
 Loading...