

Page 1
English
TS-82-907-90040
TS-82-907-90041
Page 2
Install
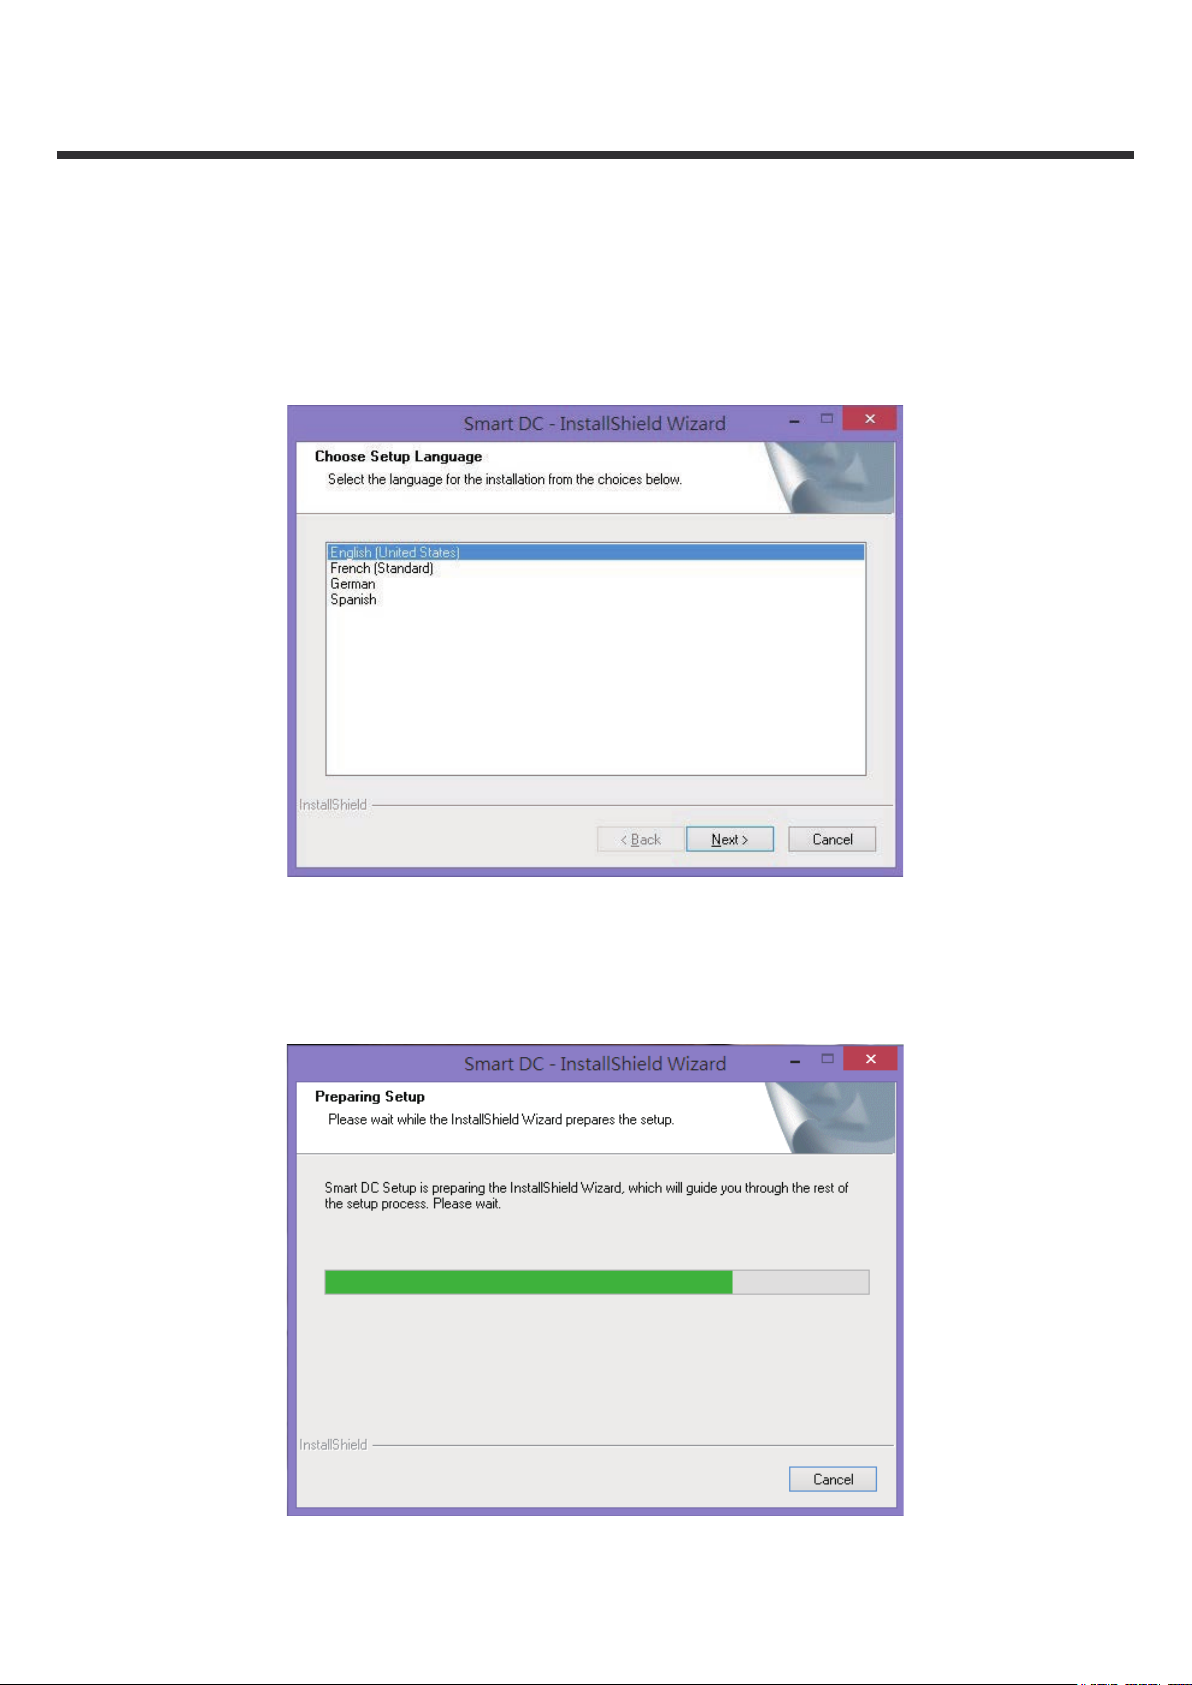
Please nd your Smart DC in the accessory CD.
Click the "Smart DC" key and select the software OSD language(In case the
auto run dose not start, please go to the CD folder and nd "Smart DC.exe")
Smart DC
The installation will start as pic below:
1
Page 3
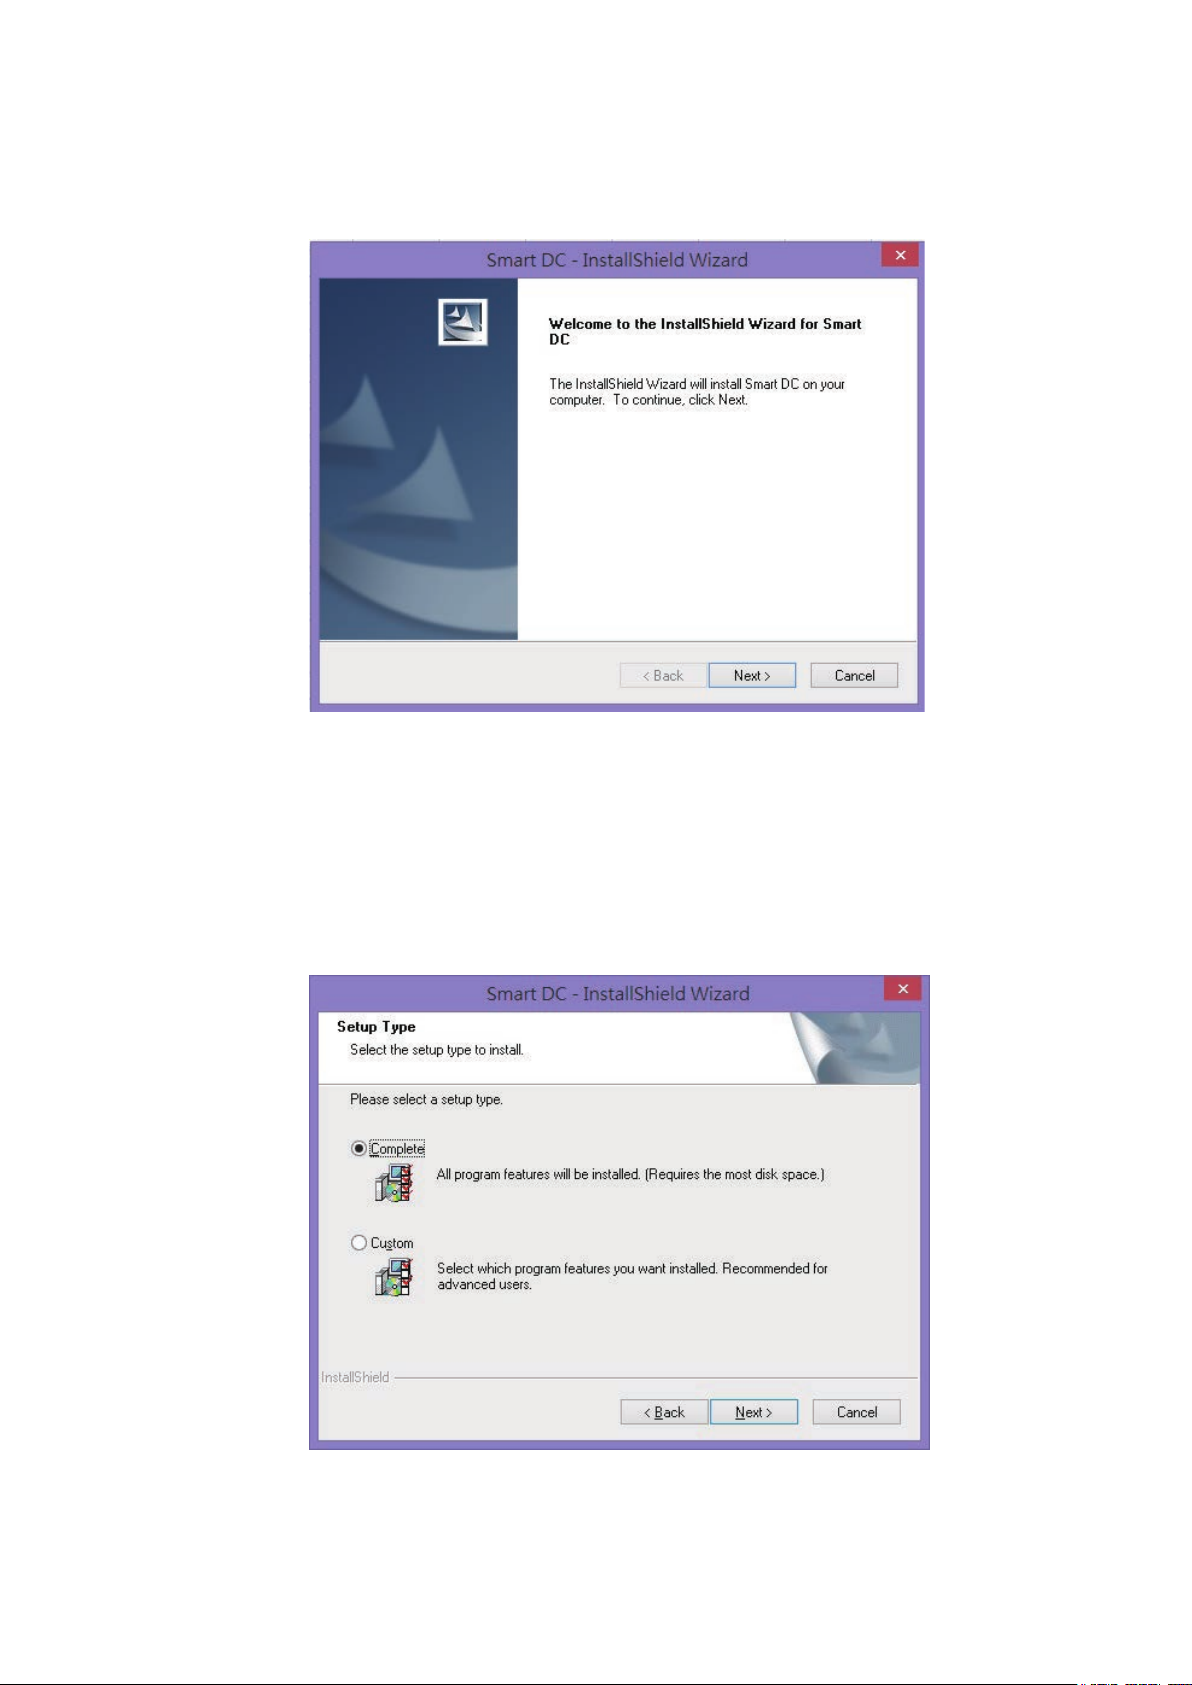
Please select "next" to continue installation process
It is recommended to choose "Complete" for the installation
2
Page 4
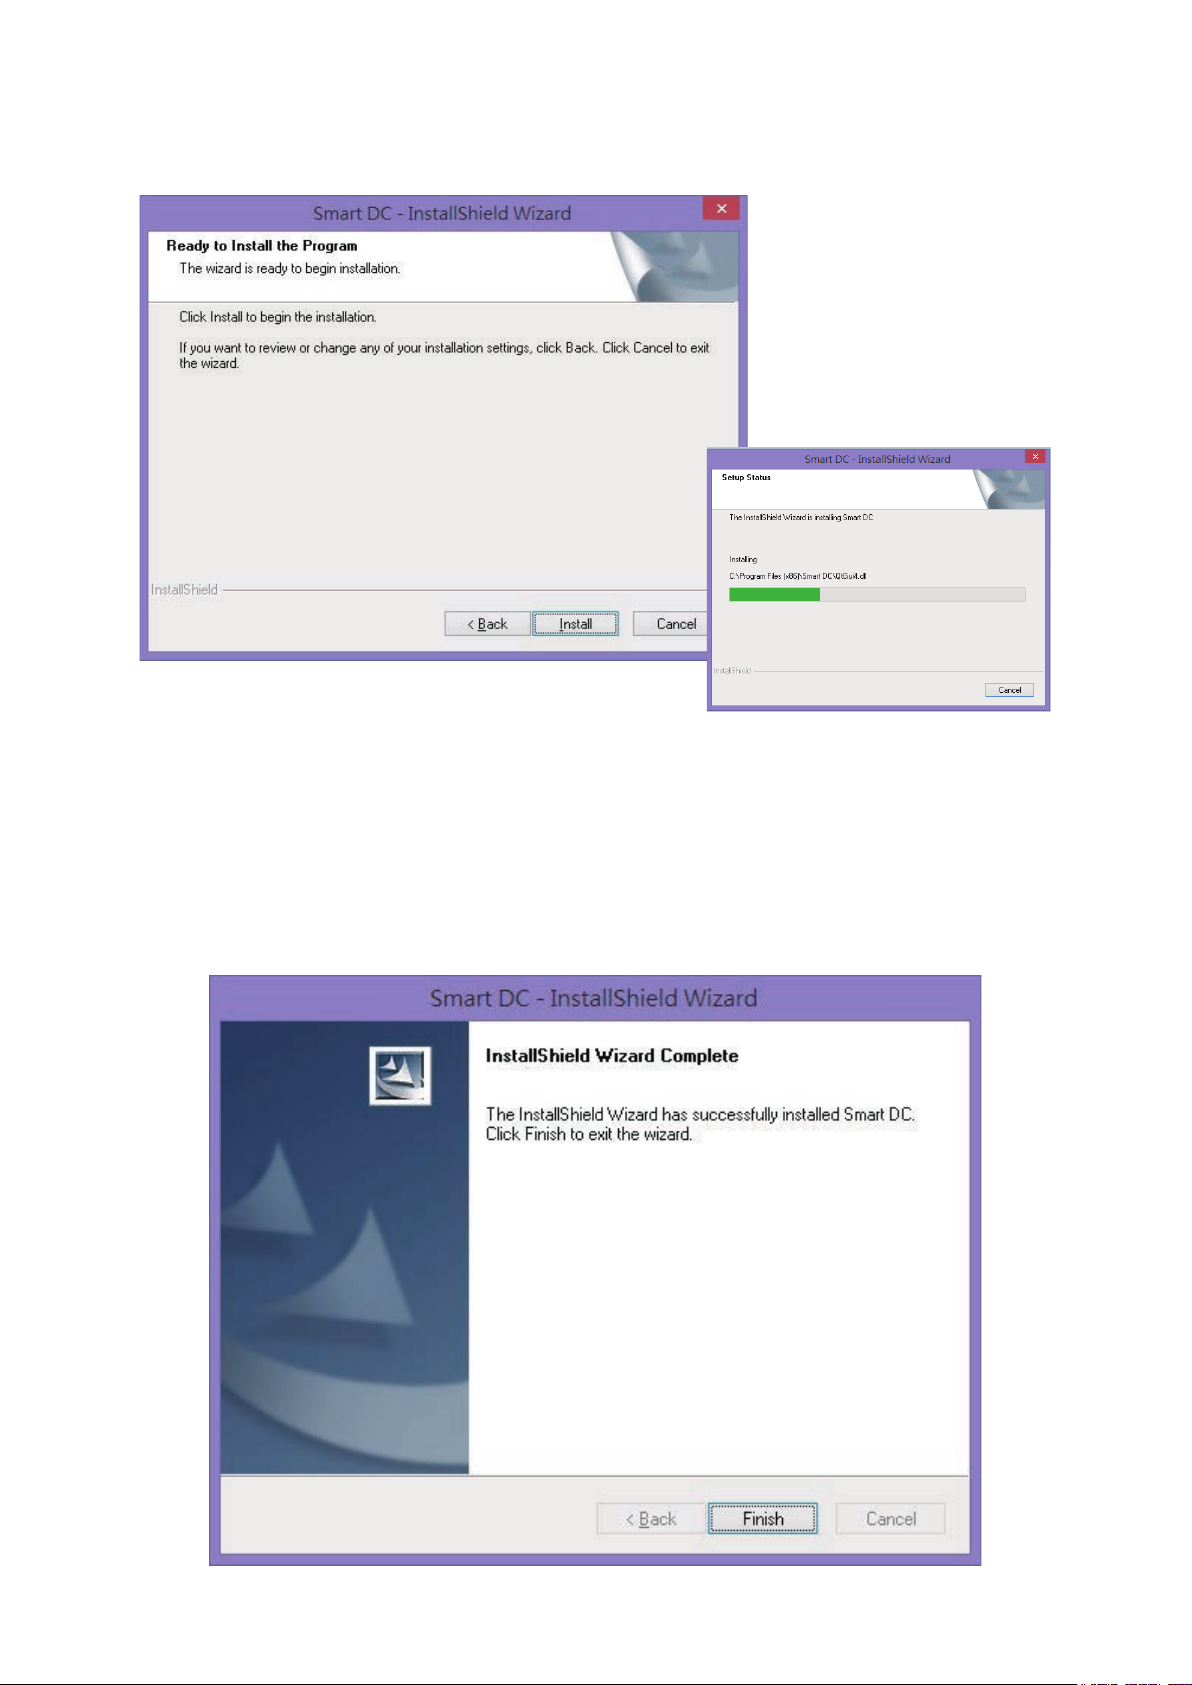
Please click "Install" to start Smart DC installation
Please click "Finish" to finish the Smart DC installation and enjoy "Smart
DC"
3
Page 5
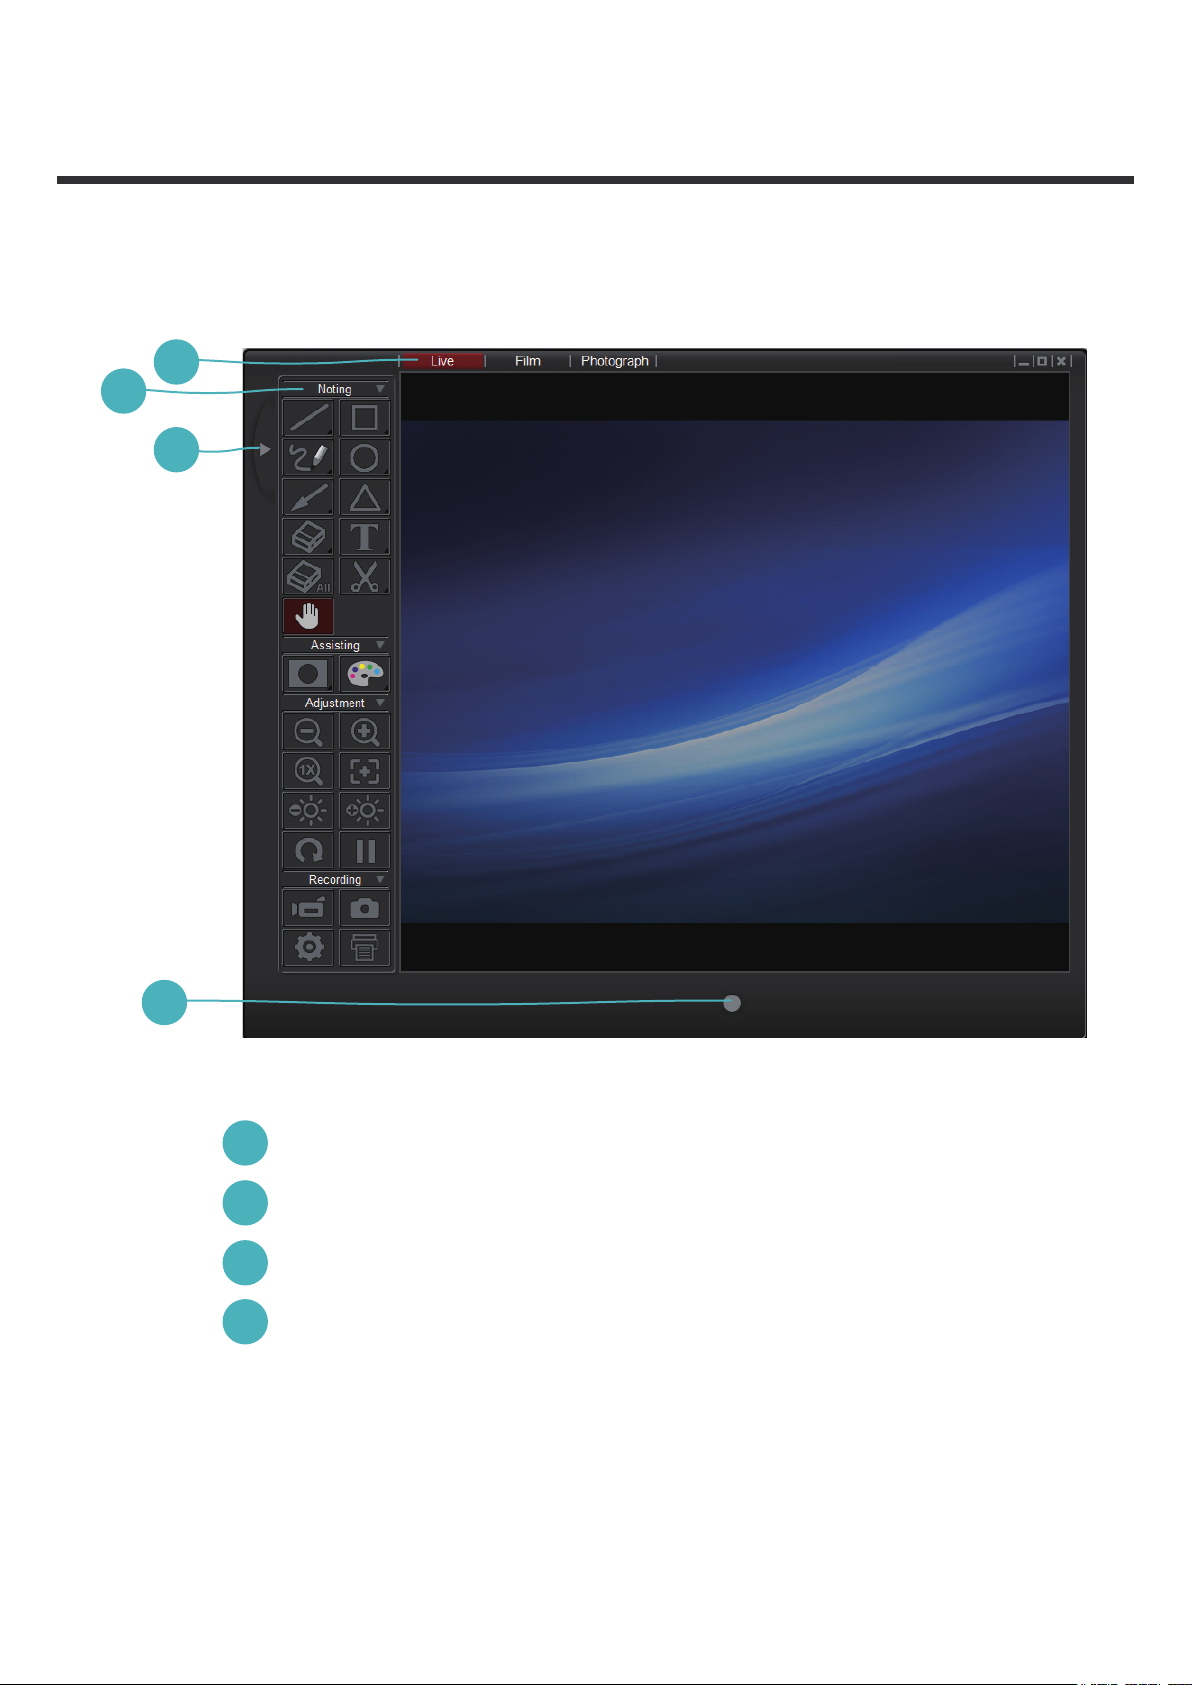
There
are three modes ( Live/ Film/ Photograph )
in Smart DC
a
b
c
d
a Mode Switch ( Switch between live, film and photograph mode. )
b Control Panel
c Hide / Show Control Panel
d Recording button ( Start to record a video. )
4
Page 6
a
c
e
g
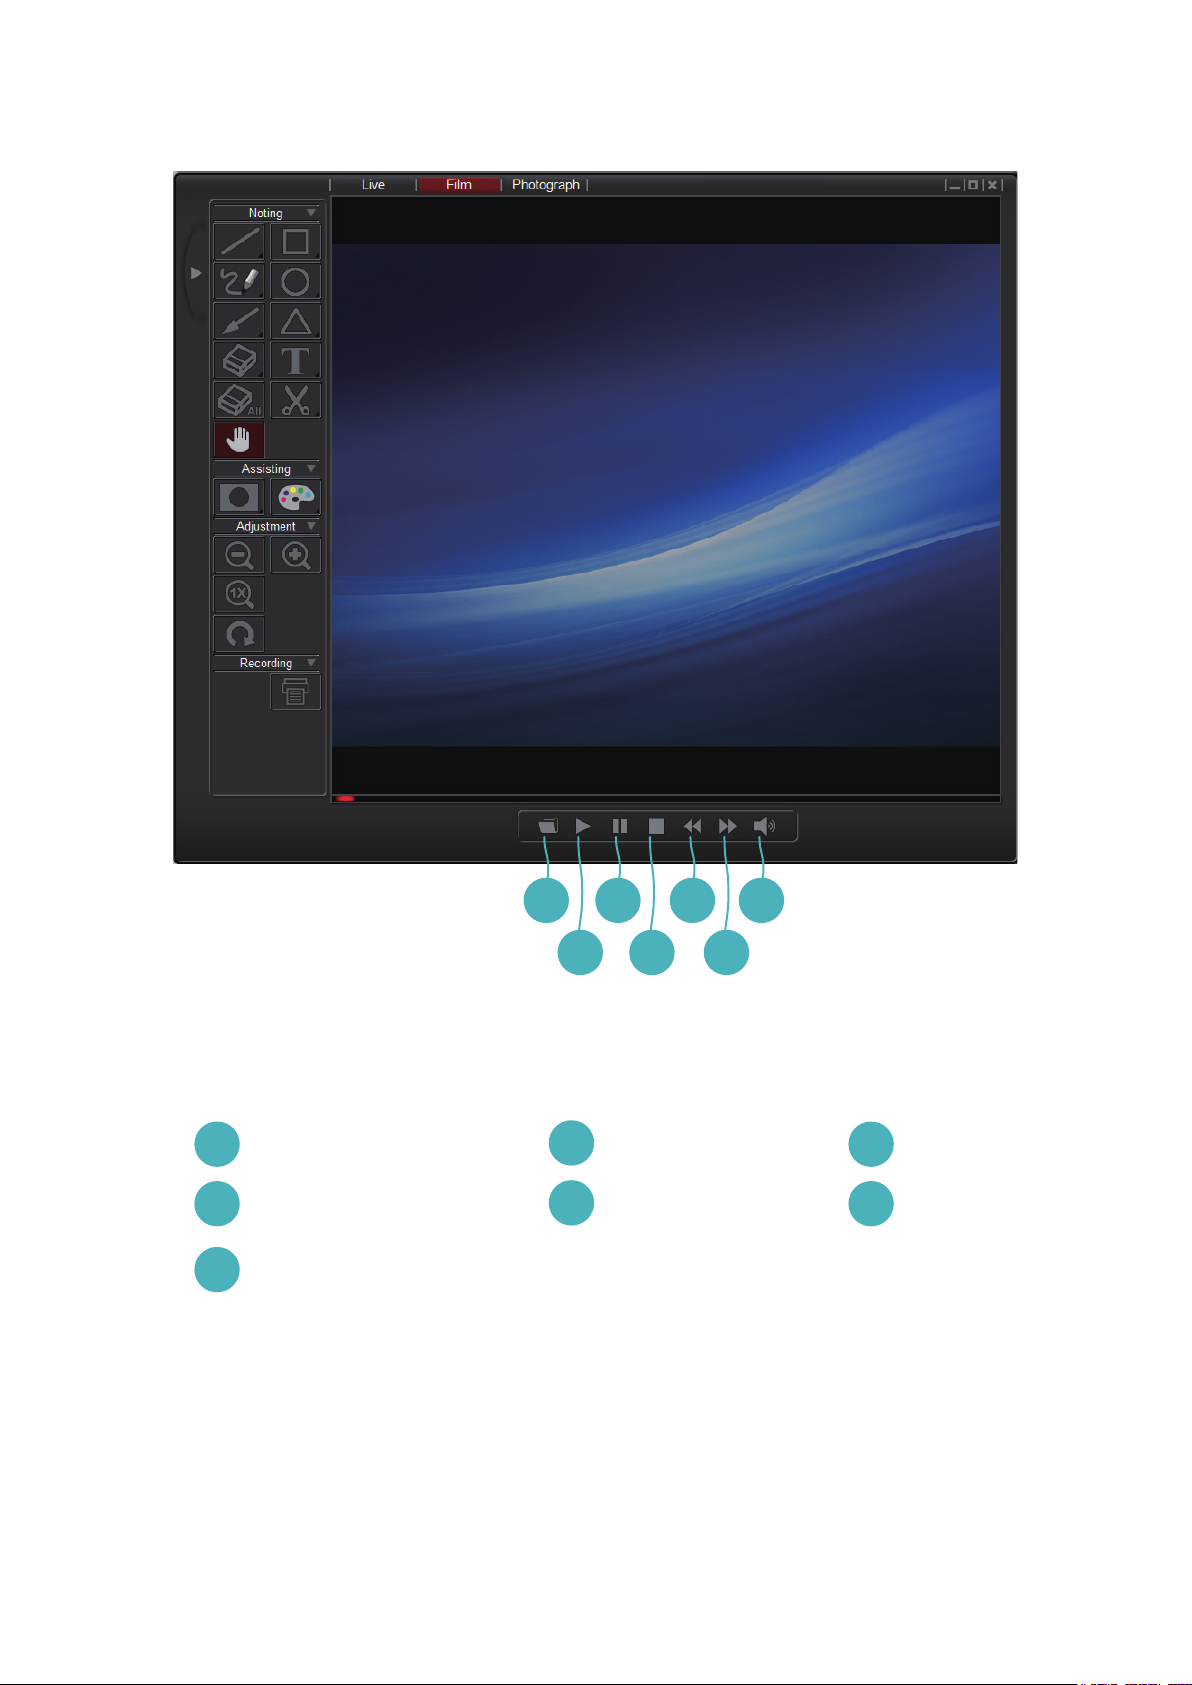
a Select the file to play
b Start to play
c Pause video
b
d Stop the video
e Backward
d
f
f Fast forward
g Play Volume
5
Page 7
a
c
e
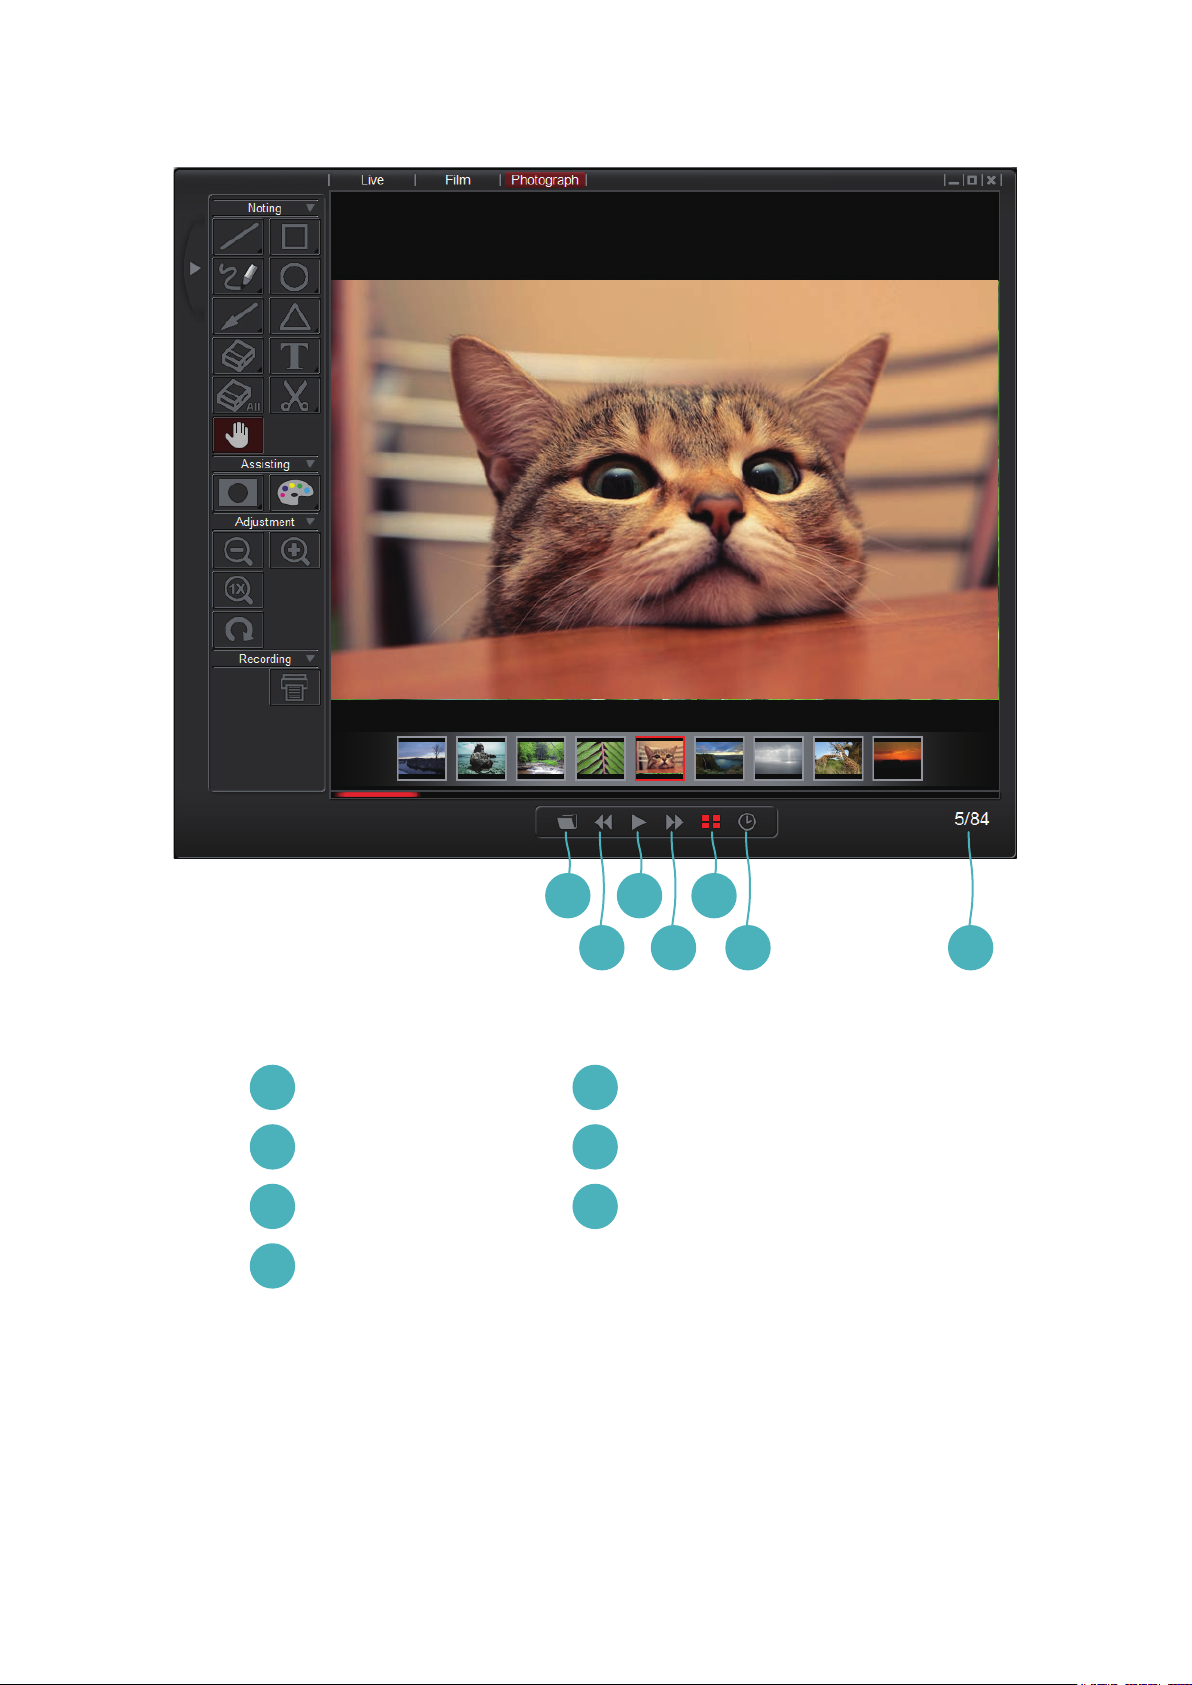
a Select folder
b Previous photo
c Slideshow
d Next photo
b
e Show / Hide thumbnail bar f
f Slideshow time interval f
g Current file / Total file numberf
d
f g
g
6
Page 8
On
the control panel, you will see 3 groups of
functions.
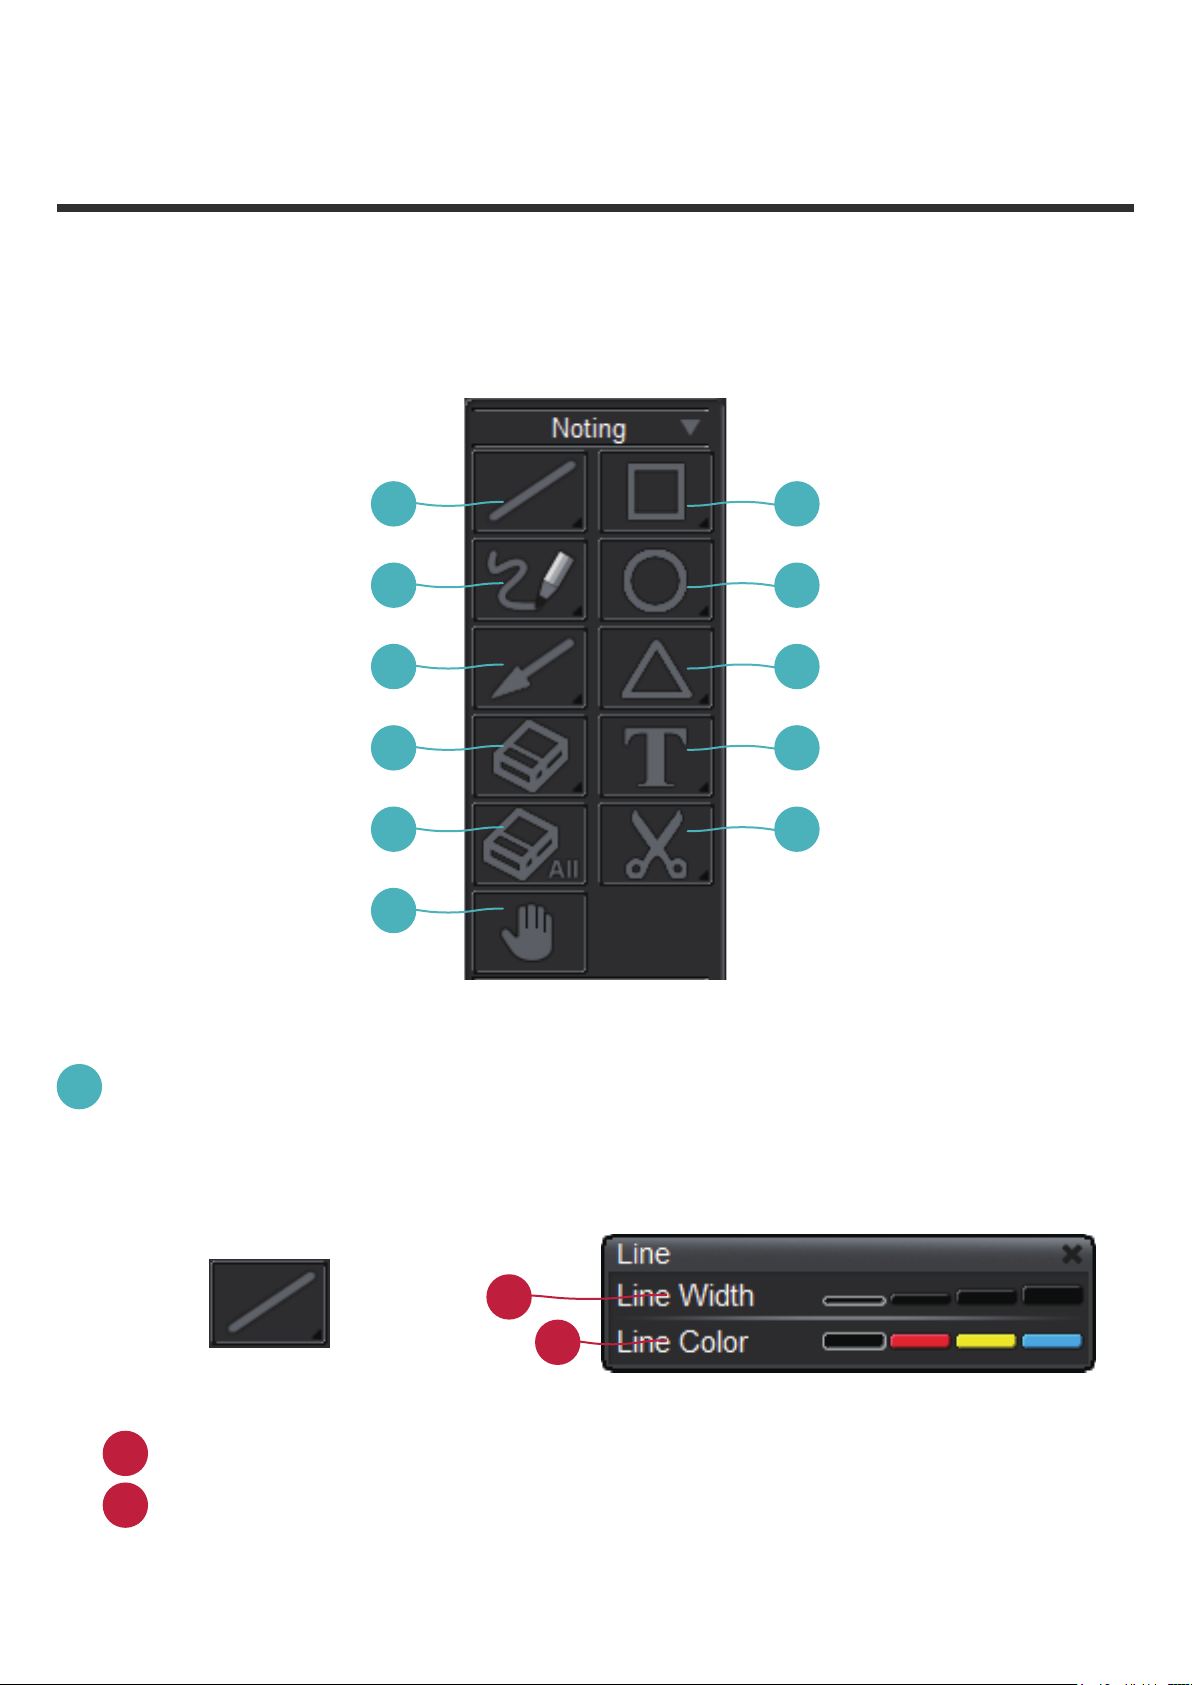
1.
Noting group
a b
c d
e f
g h
i j
k
a
Line-Select to draw a straight line
* Long press Line key to show the control panel.
a
a
Change the line width
b
Change the line color
b
7
Page 9
b
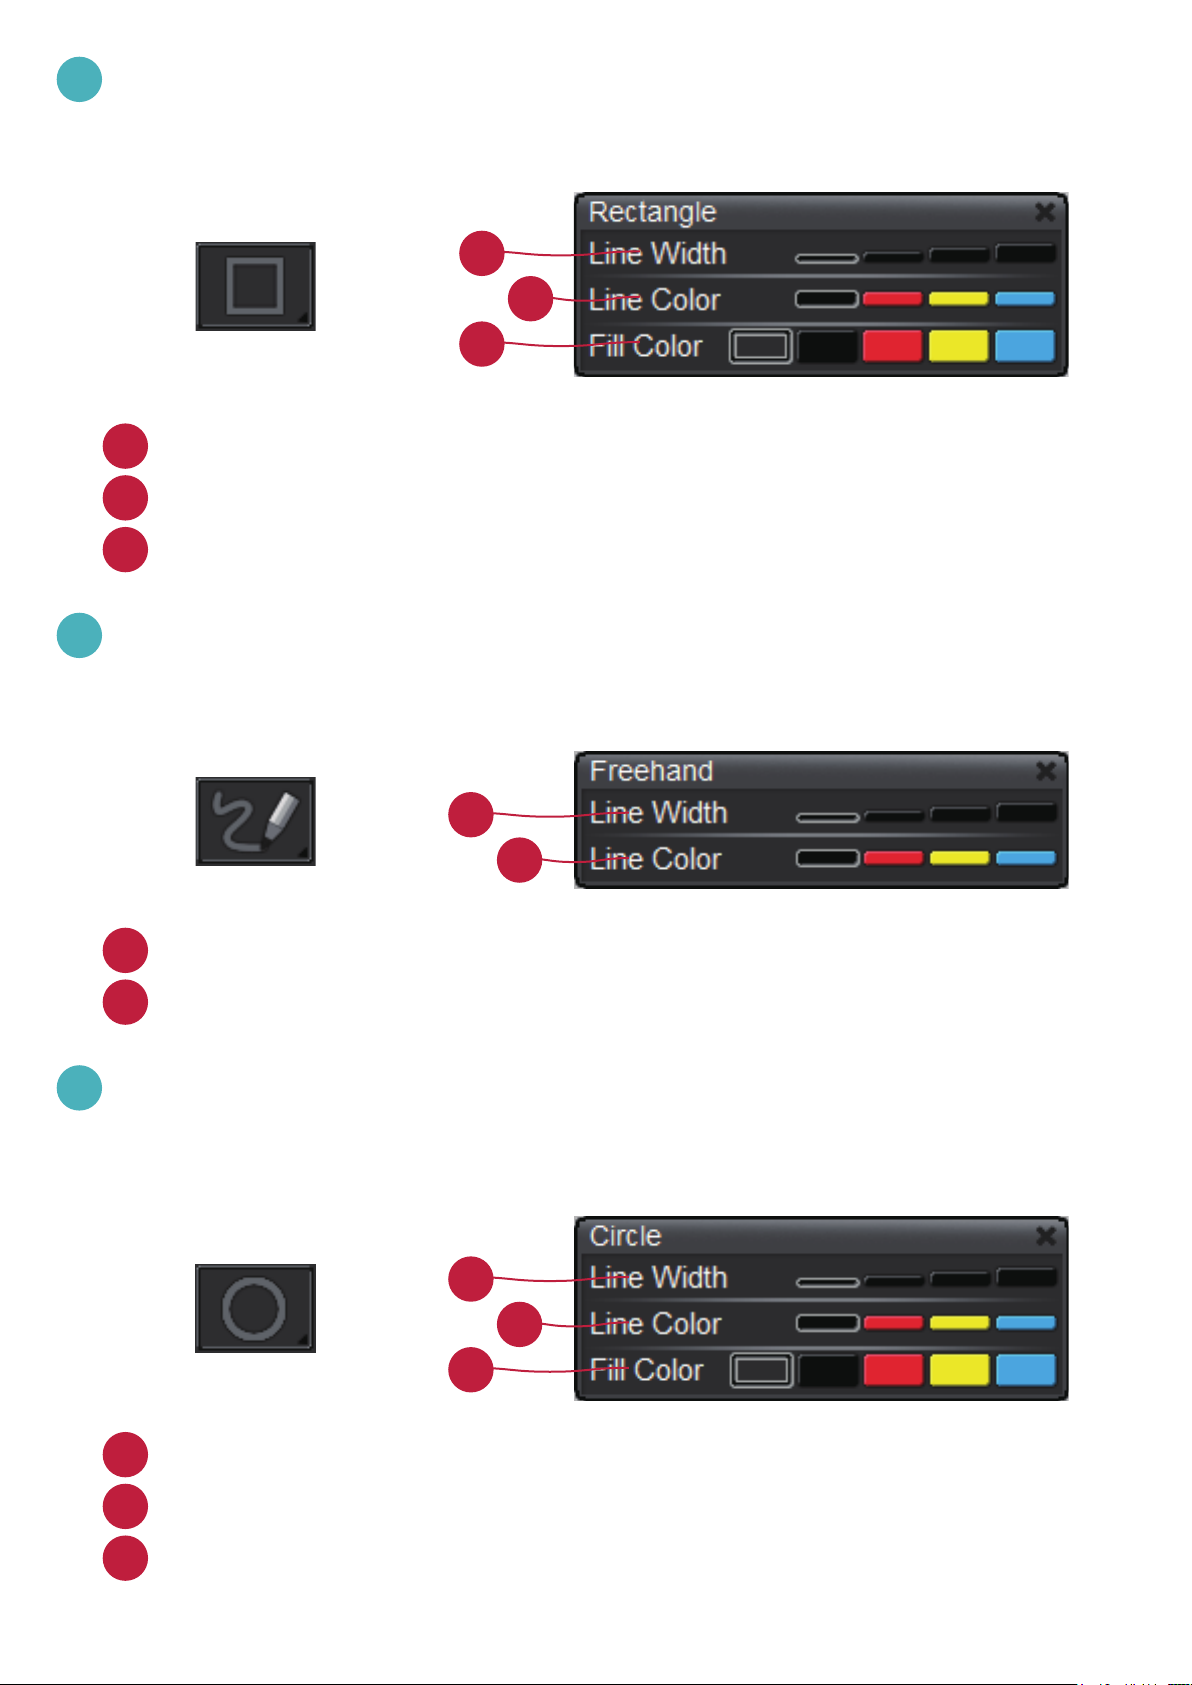
Rectangle- select to rectangular draw shape
* Long press Rectangle key to show the control panel.
a
b
c
a
Change the outline width
b
Change the outline color
c
Change the ll color
c
Freehand-Select to draw freeform line
* Long press Freehand key to show the control panel.
a
b
a
Change the line width
b
Change the line color
d
Circle- Select to draw circular shape
* Long press Circle key to show the control panel.
a
a
Change the outline width
b
Change the outline color
c
Change the ll color
b
c
8
Page 10
e
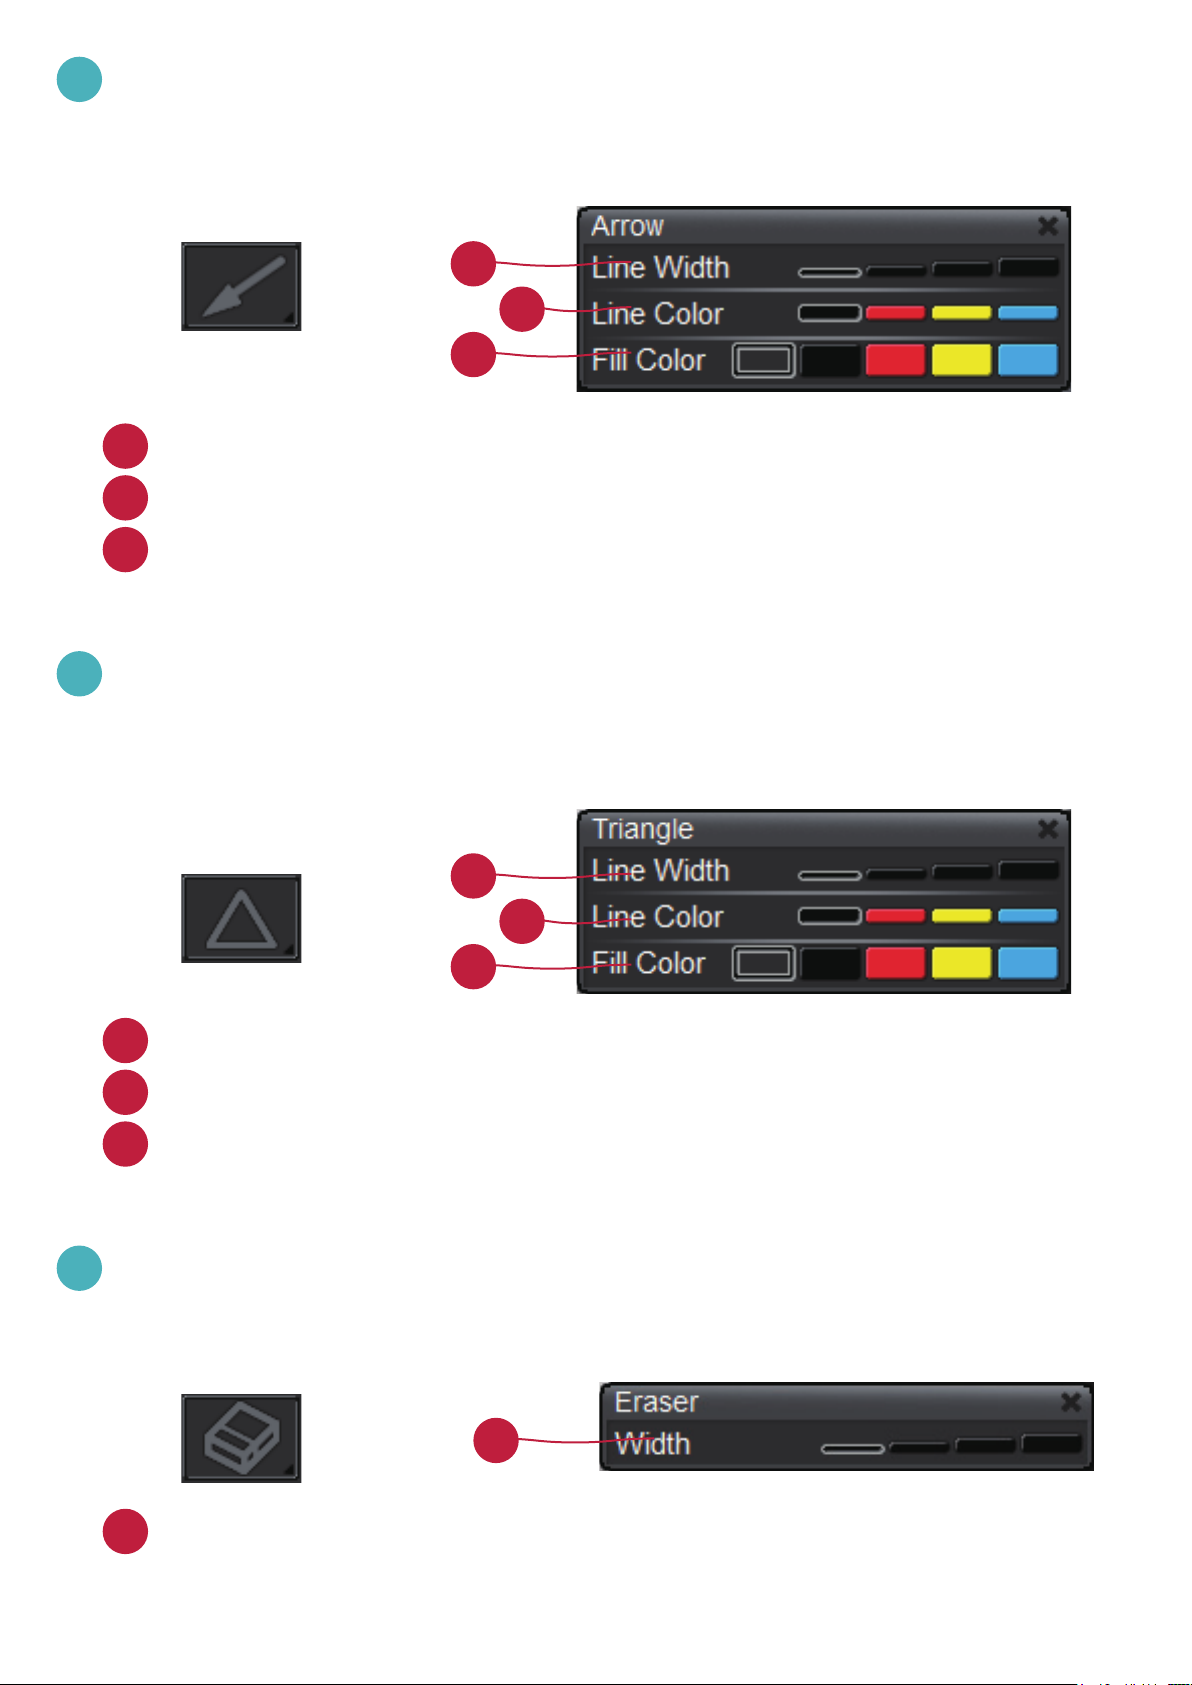
Arrow-Select to draw arrow shape
* Long press Arrow key to show the control panel.
a
b
c
a
Change the outline width
b
Change the outline color
c
Change the ll color
f
Triangle-Select to draw triangle shape
*Long press Triangle key to show the control panel.
a
b
c
a
change the outline width
b
change the outline color
c
change the ll color
g
Eraser-Click-hold and point on the area you wish to delete .
* Long press Eraser key to show the control panel.
a
a
Change the eraser width
9
Page 11
h
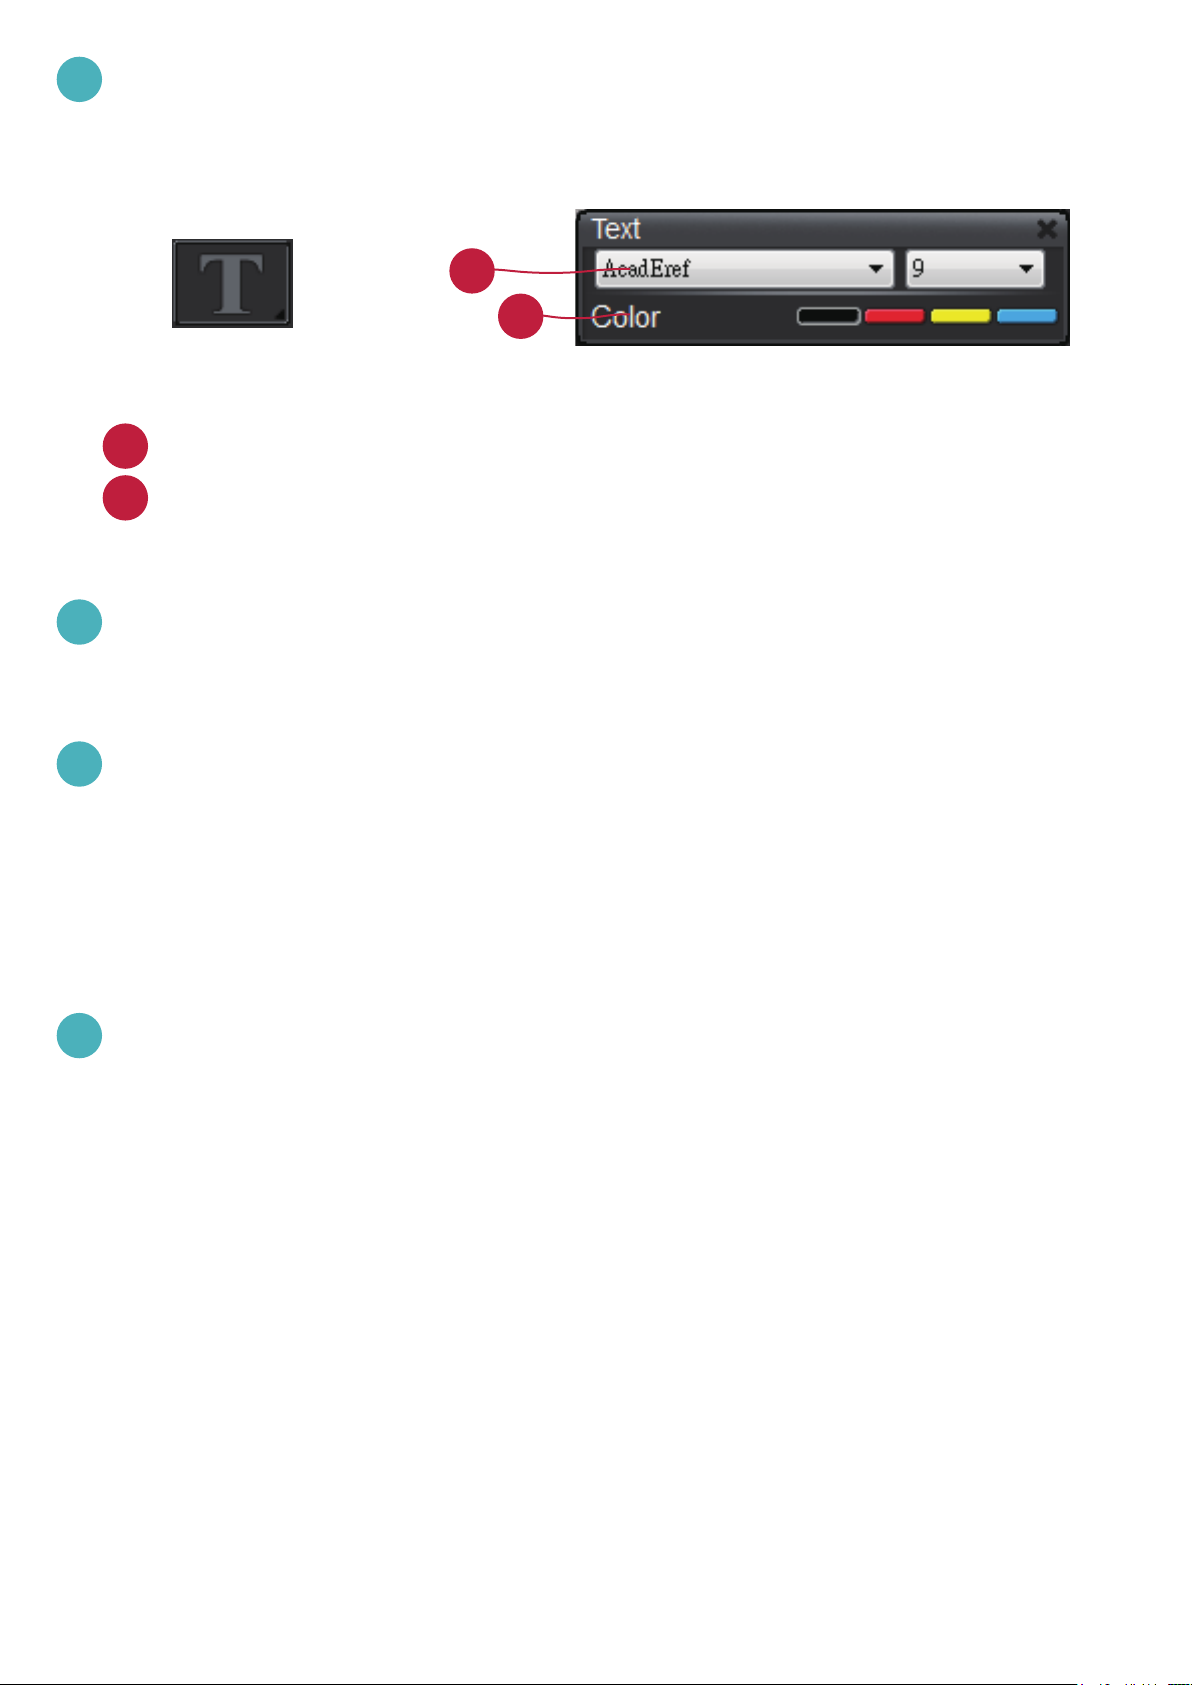
Text-Select to type text
* Long press Text key to show the control panel.
a
b
a
Choose text font and size
b
Change the text color
i
Erase all-Erase all noting effects
j
Clip Image- Capture an area on screen and temporarily save it.
The saved image can be paste on an image software i.e. Microsoft
Word, Paint..etc. To capture an area, click and drag a rectangular
on the screen
k
Hand-Drag on-screen image when zoom-in the image
10
Page 12
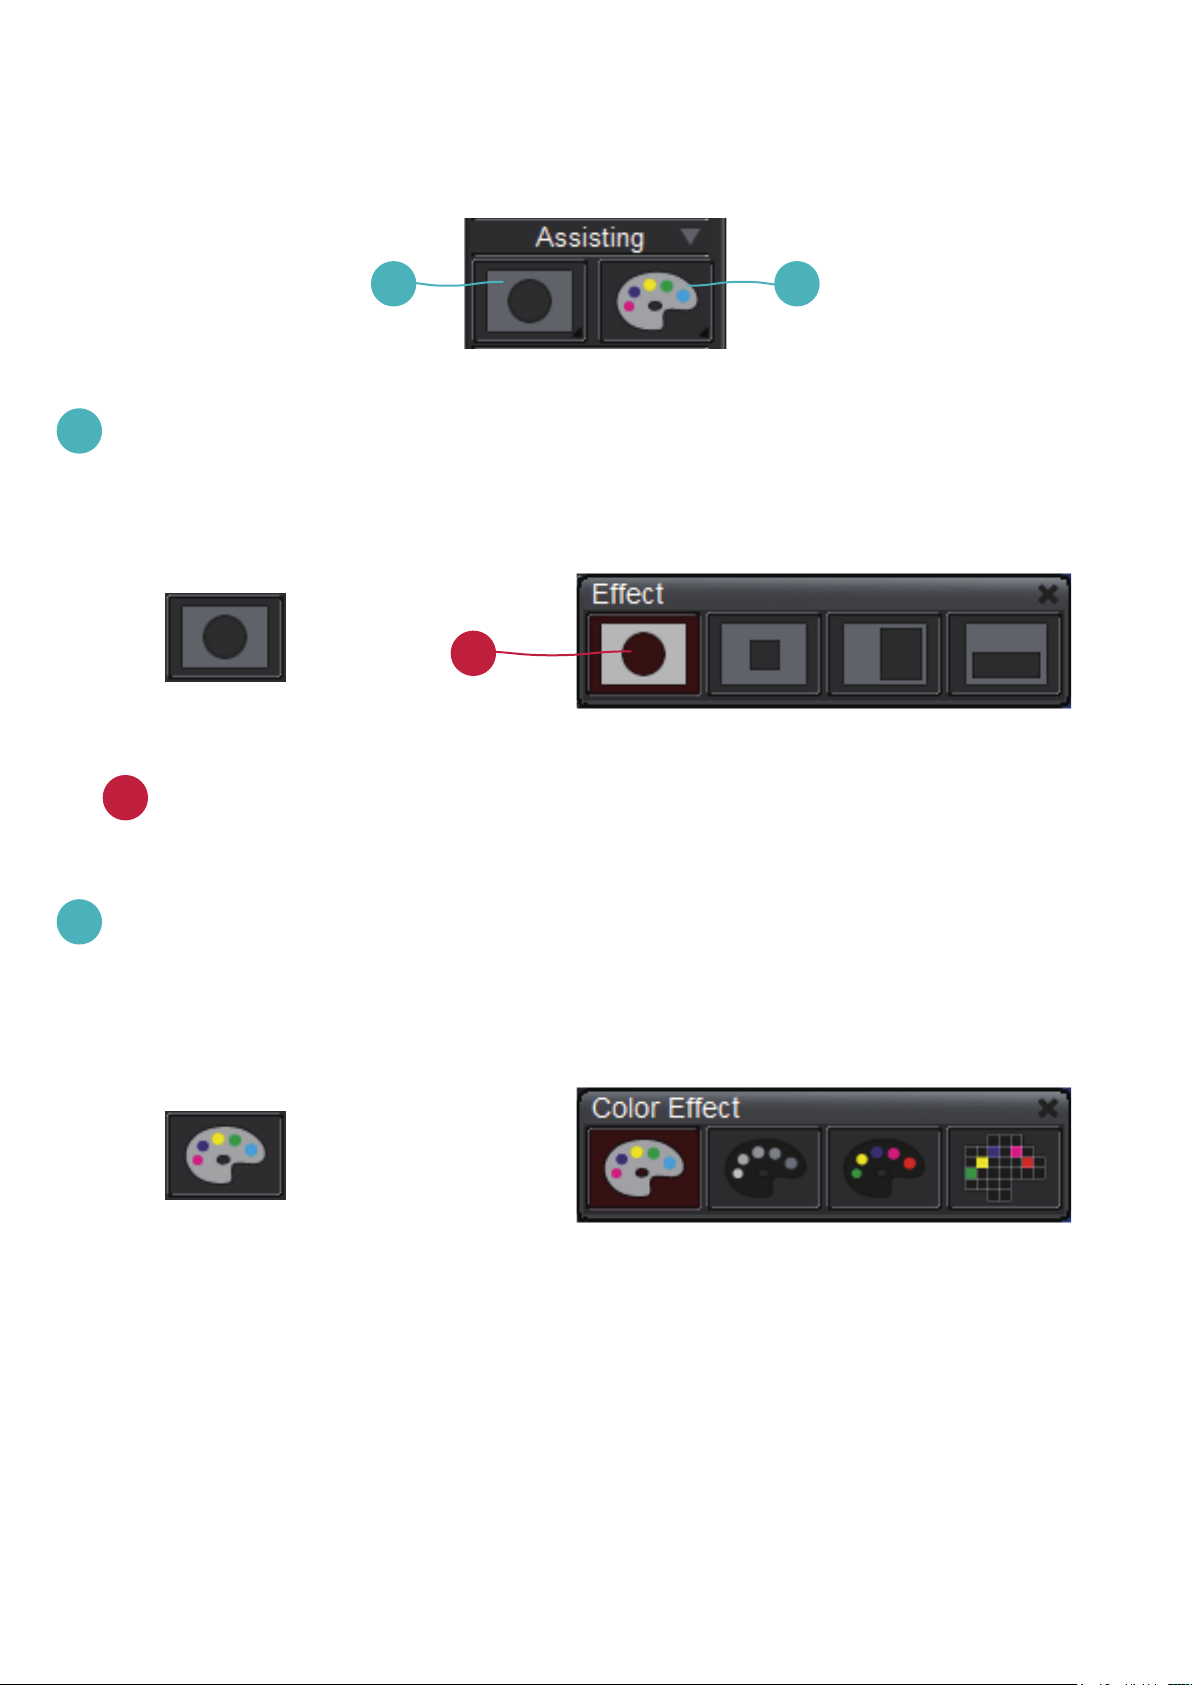
2. Assisting Group
a b
a
Mask-Mask a section of the screen image
* Long press Mask key to show the control panel.
a
a
change different masked area / shape
b
Color Effect-Adjust color effect to different purposes.
* Long press Color Effect key to show the control panel to
change different color effect
11
Page 13
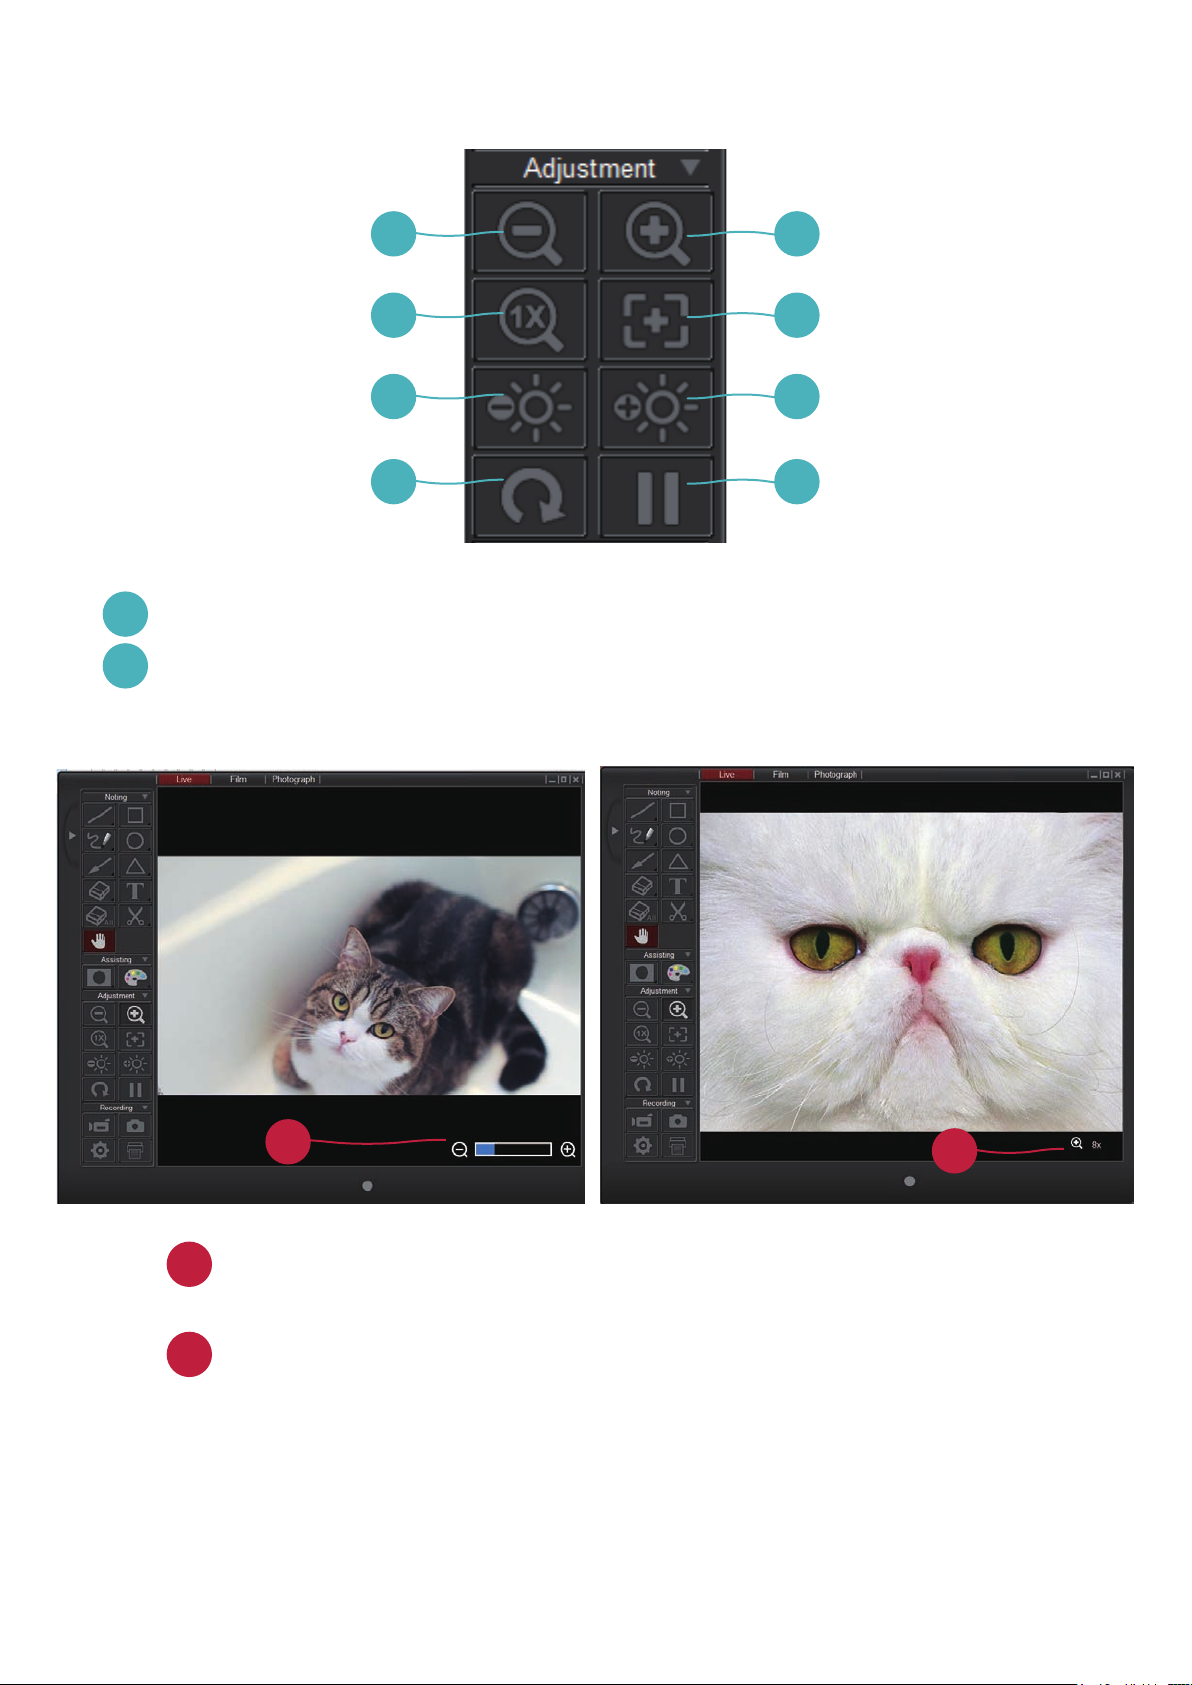
3. Adjustment Group
a b
c d
e f
g h
a
Zoom out- Zoom out the image
b
Zoom in- Zoom in the image
a
a
A zoom bar will show at the bottom right corner of the image
b
when in optical zoom
b
When in digital zoom, there will be an icon which indicates digital
zoom multiple
12
Page 14
c
Reset zoom- Return to normal view (1X)
d
Auto Focus- Adjust the focus automatically
e
Brightness down- Decrease the brightness
f
Brightness up-Increase the brightness
g
Rotate-Rotate the image (90°→180°→270°→0°)
h
Freeze-Pause the video
a b
c d
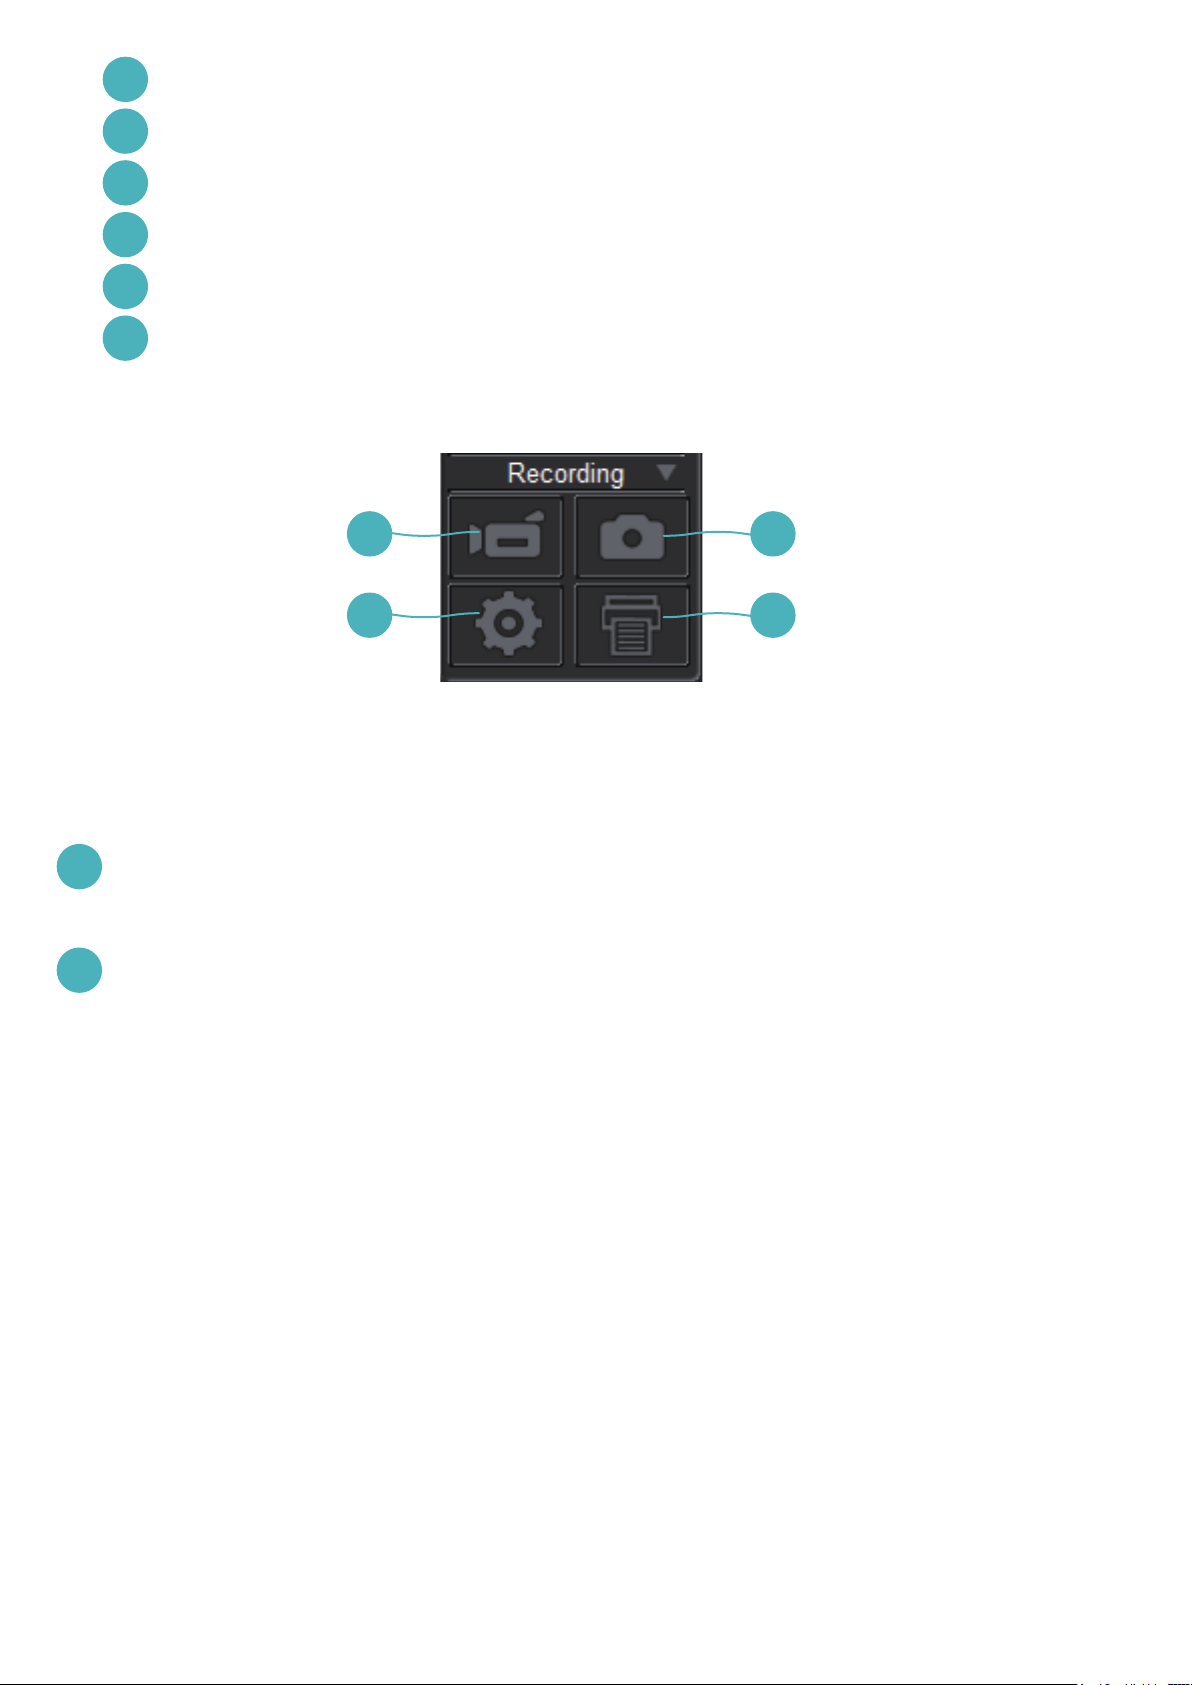
4. Recording Group
a
Record-Start/Stop video recording
b
Capture- Capture the screen image
13
Page 15
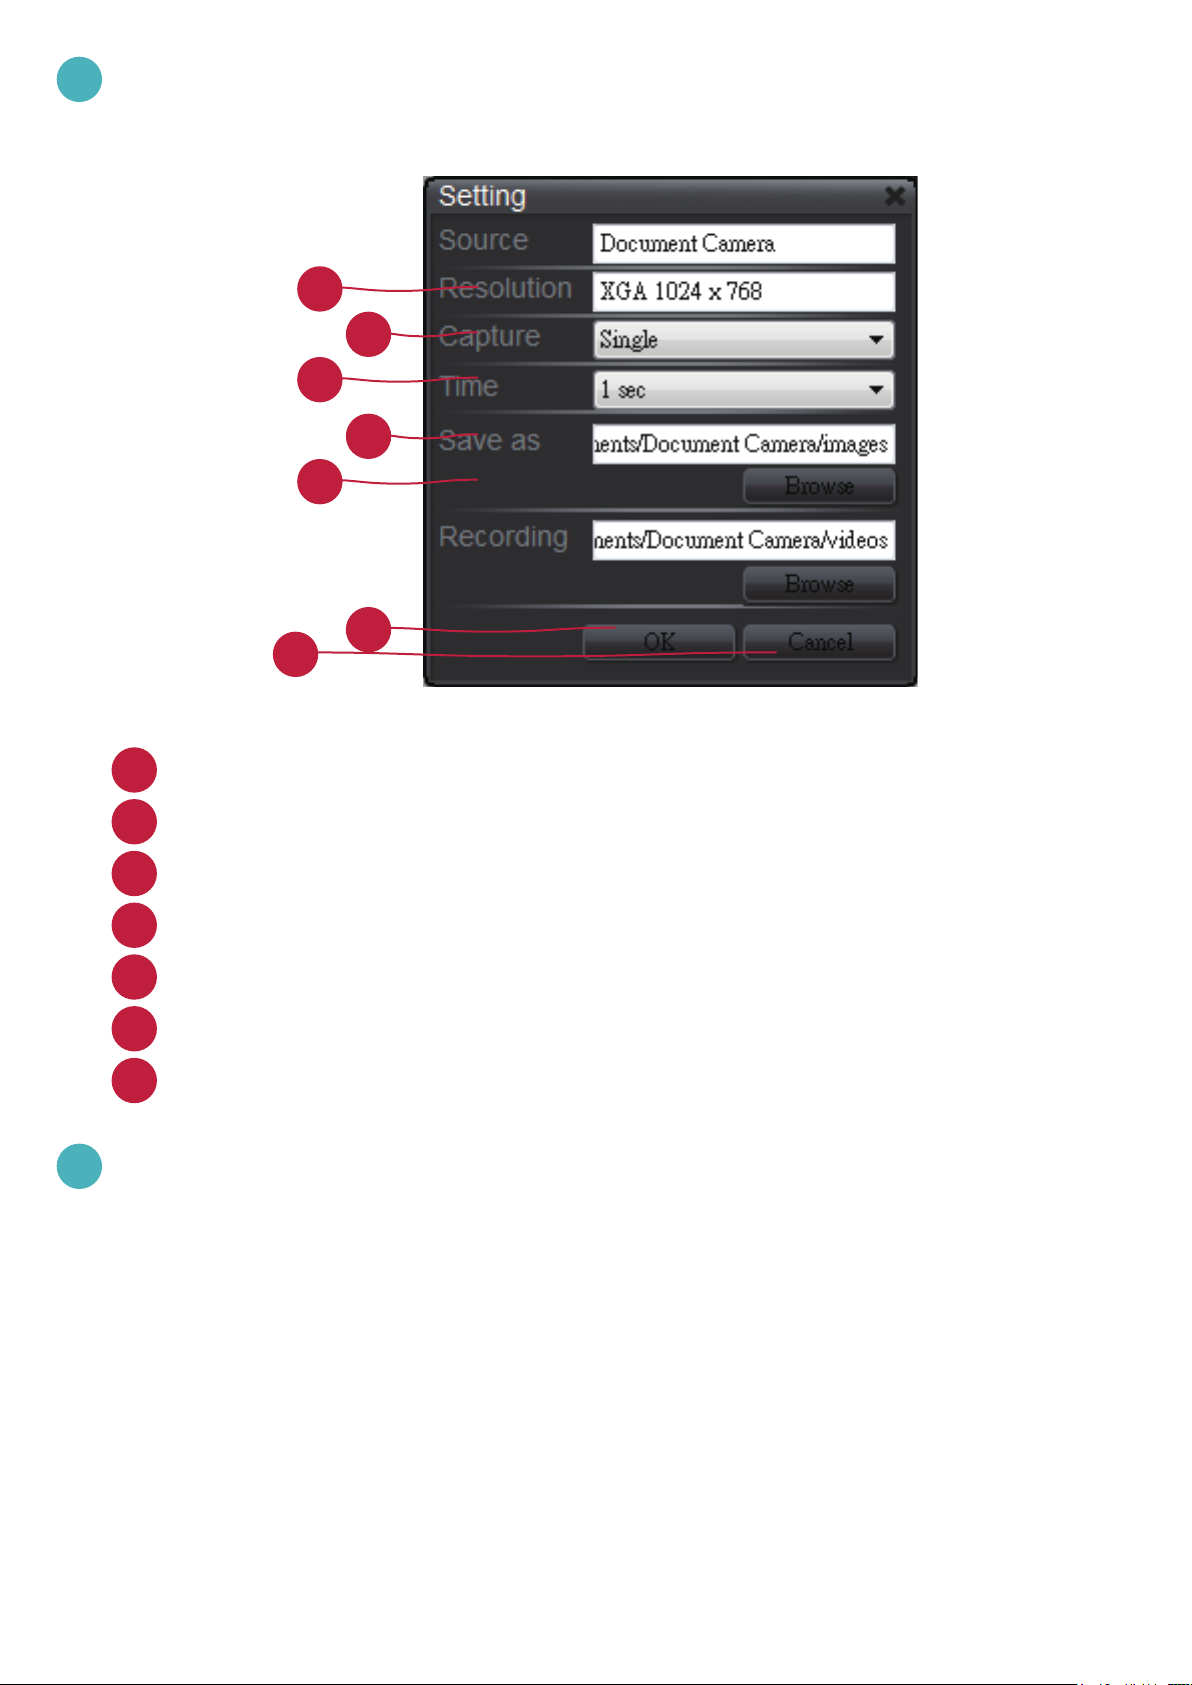
c
Setting-Click the setting key to show setting box
a
b
c
d
e
f
g
a
Switch resolutions between XGA(1024x768) and HD (1280x720)
b
Switch between single/continuous capture
c
Setting the continous capture time interval
d
Capture les folder, click browse to change from the root folder
e
Recording les folder, click browse to change from the root folder
f
Click OK to nish setting and leave the settings box
g
Cancel any changes of setting and leave the settings box
d
Printing- Print out the screen image.
14
Page 16
Bedienungsanleitung
Deutsch
TS-82-907-90040
TS-82-907-90041
Page 17
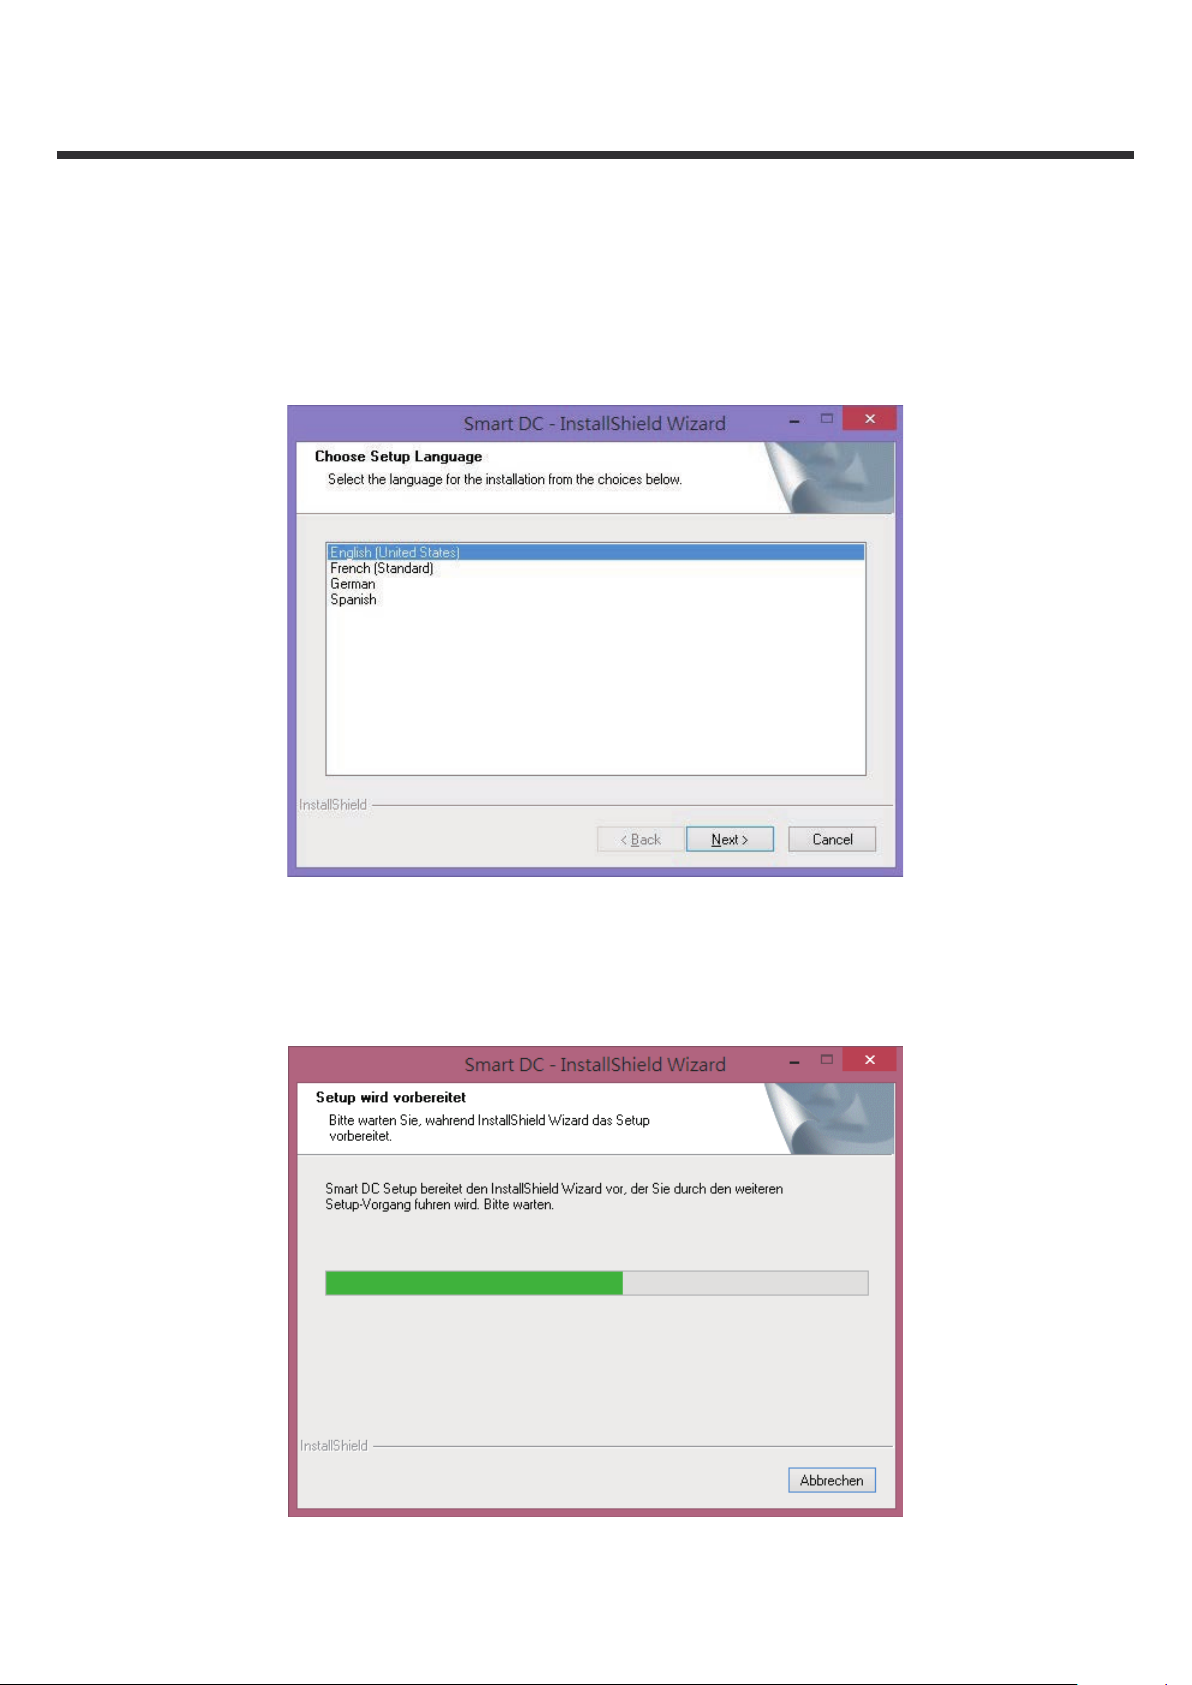
Installation
Smart DC nden Sie auf der CD im Zubehör.
Klicken Sie auf "Smart DC" und wählen Sie die OSD Sprache aus.
(Falls die CD nicht automatisch starten sollte, gehen Sie bitte in das
Verzeichnis der CD und starten "Smart DC.exe")
Smart DC
Die Installation startet wie auf dem Bild unten zu sehen:
1
Page 18
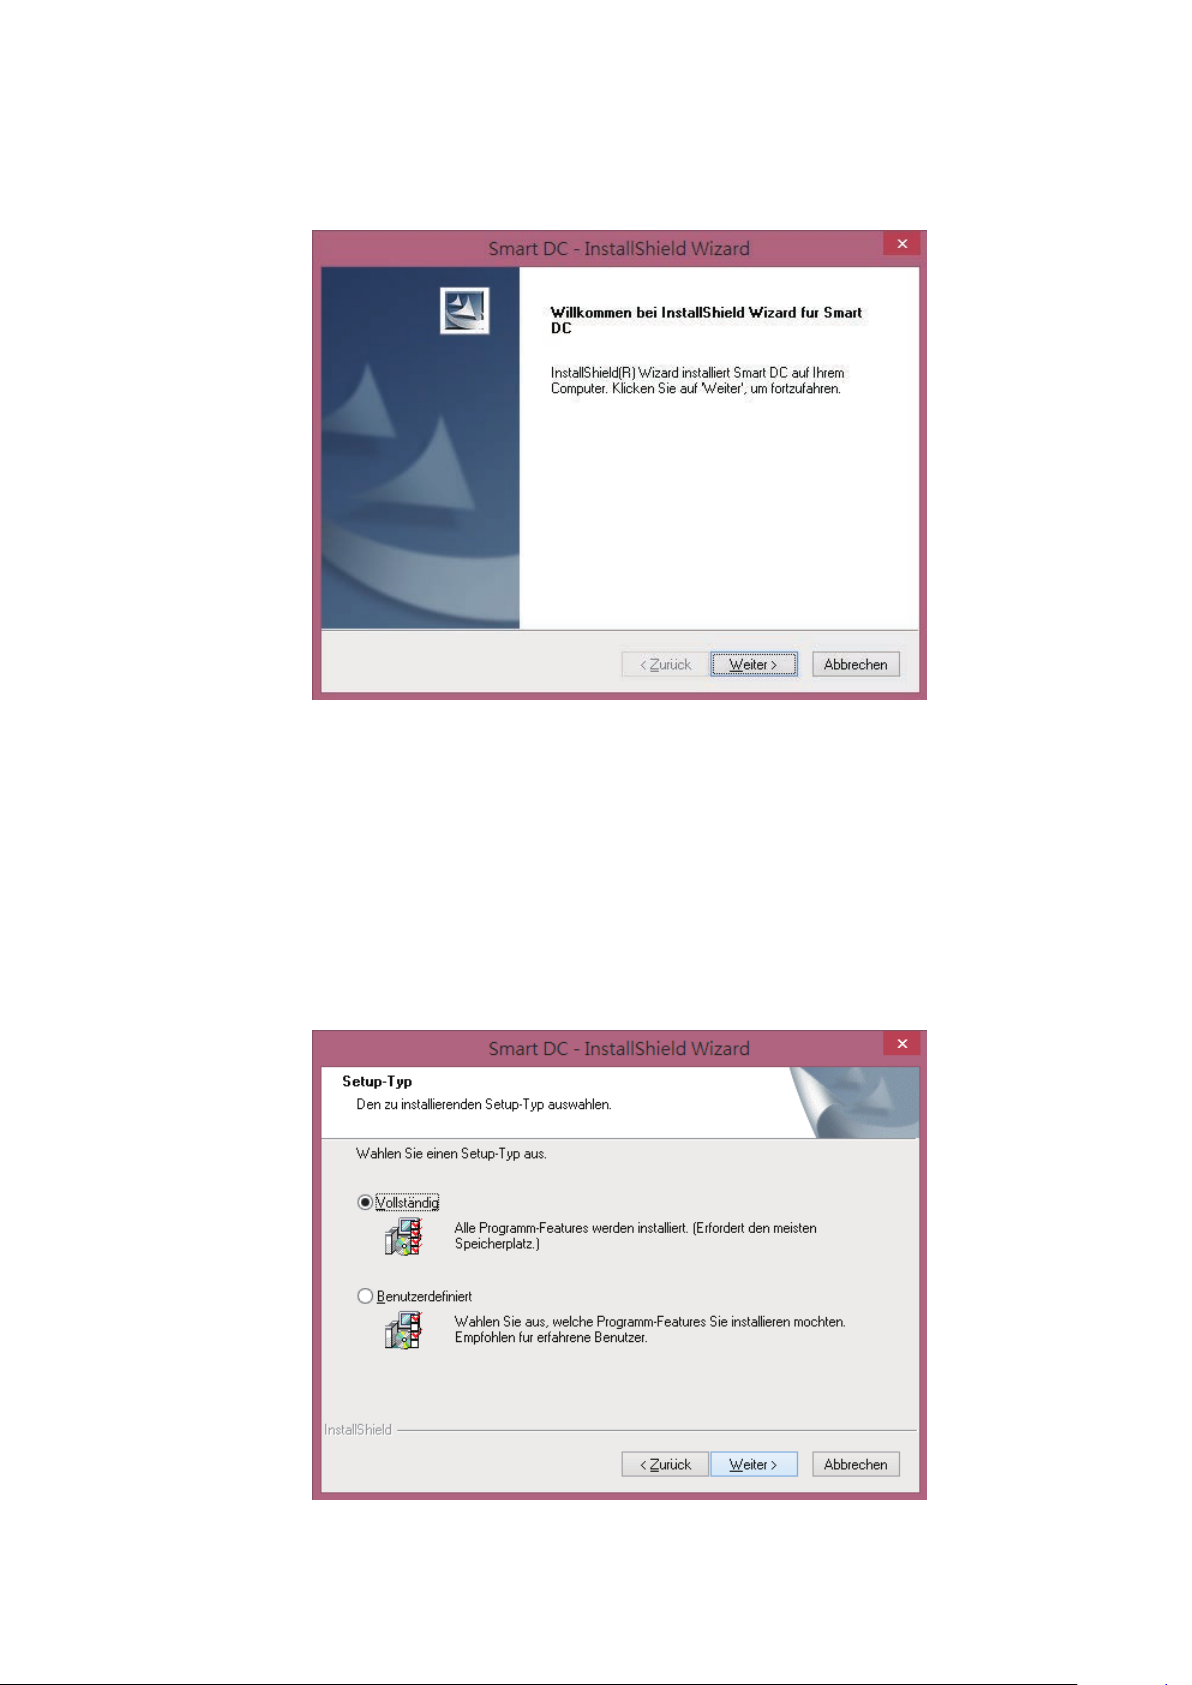
Bitte wählen Sie “Weiter” um die Installation fortzuführen
Bitte wählen Sie die Installationsart “Vollständig”
2
Page 19

Bitte klicken Sie auf “Installieren” um die Installation zu starten
Bitte klicken Sie auf “Fertigstellen” um die Installation von Smart DC
abzuschließen
3
Page 20

Es
gibt drei Modi ( Live/ Film/ Foto ) bei Smart DC
a
b
c
d
a
Mode Switch (Schaltet zwischen Live, Film und Foto Modus.)
b
Bedienfeld
c
Bedienfeld Ein-/Ausblenden
d
Aufnahme
Taste ( Startet die Aufnahme eines Videos )
4
Page 21

a
c
e
g
a
Datei auswählen
b
Abspielen
c
Pause
b
d
e
d
Stopp V
Zurück Lautstärke
f
f
g
orwärts
5
Page 22

a
c
e
b
a
Datei auswählen V
b
Vorheriges Foto Slideshow Zeitintervall
c
Slideshow Aktuelle Datei / Gesamtzahl der Dateien
d
Nächstes Foto
e
f
g
d
orschau Bilder anzeigen / verbergen
f g
6
Page 23

Auf
der Bedienoberäche sehen Sie 3
Funktionsgruppen
1.
Werkzeuge
a b
c d
e f
g h
i j
k
a
Linie auswählen, um eine gerade Linie zu zeichnen
* Linie Icon gedrückt halten, um das Control Panel anzuzeigen.
a
a
Ändert die Breite der Linie
b
Ändert die Farbe der Linie
b
7
Page 24

b
Rechteck auswählen, um ein Rechteck zu zeichnen
* * Rechteck Icon gedrückt halten, um das Control Panel anzuzeigen
a
b
c
a
Ändert die Breite der Kontur
b
Ändert die Farbe der Kontur
c
Ändert die Füllfarbe
c
Freihand auswählen für Freihandzeichnen
* Freihand Icon gedrückt halten, um das Control Panel anzuzeigen.
a
b
a
Ändert die Breite der Linie
b
Ändert die Farbe der Linie
d
Kreis auswählen, um runde Formen zu zeichnen
* Kreis Icon gedrückt halten, um das Control Panel anzuzeigen.
a
c
a
Ändert die Breite der Kontur
b
Ändert die Farbe der Kontur
c
Ändert die Füllfarbe
b
8
Page 25

e
Pfeil –Auswählen zum zeichnen von Pfeilen
* Pfeil Icon gedrückt halten, um das Control Panel anzuzeigen.
a
b
c
a
Ändert die Breite der Kontur
b
Ändert die Farbe der Kontur
c
Ändert die Füllfarbe
f
Dreieck auswählen, um dreieckige Formen zu zeichnen
* Dreieck Icon gedrückt halten, um das Control Panel anzuzeigen.
a
b
c
a
Ändert die Breite der Kontur
b
Ändert die Farbe der Kontur
c
Ändert die Füllfarbe
g
Radiergummi gedrückt halten und auf die zu löschende Fläche gehen.
* Radiergummi Icon gedrückt halten, um das Control Panel anzuzeigen.
a
a
Ändern der Breite des Radiergummis
9
Page 26

h
Text auswählen, um Text einzufügen
* Text Icon gedrückt halten, um das Control Panel anzuzeigen.
a
b
a
Auswählen für Schriftart und Größe
b
Ändern der Textfarbe
i
Alles löschen
j
Bild ausschneiden – Bildausschnitt markieren und temporär
speichern. Das gespeicherte Bild kann z.B. in Microsoft Word,
Paint, etc. eingefügt werden.
k
Um zu zoomen, ziehen Sie das Bild mit der Maushand
10
Page 27

2. Effekte
a b
a
Maskieren Sie einen Teil des Bildes
* Maskierungs Icon gedrückt halten, um das Control Panel anzuzeigen.
a
a
Ändert Maskierungstyp
b
Farb-Effekt-Einstellung der Farben für unterschiedliche Zwecke.
* Maskierungs Icon gedrückt halten, um das Control Panel anzuzeigen.
11
Page 28

3. Einstellungen
a b
c d
e f
g h
a
Herauszoomen
b
Hineinzoomen
a
b
a
Eine Zoomleiste an der rechten unteren Ecke des Bildes
erscheint, sobald der optische Zoom aktiviert ist.
b
Wenn der Digitalzoom aktiviert ist, zeigt hier ein Symbol den
Zoomfaktor an.
12
Page 29

c
Zoom zurücksetzen – Normale Ansicht (1X)
d
Autofokus – Automatische Fokuseinstellung
a b
c d
e
Helligkeit erhöhen
f
Helligkeit reduzieren
g
Bild drehen (90°→180°→270°→0°)
h
Standbild
13
Page 30

4. Aufnehmen
a
c
e
b
d
g
a
Start / Stop Videoaufnahme
b
Foto- Bildschirmfoto aufnehmen
c
Einstellung-Klicken Sie auf Einstellung
a
Umschaltung der Auflösung zwischen XGA (1024x768) und HD
f
(1280x720)
b
Umschaltung zwischen Einzel- / Daueraufnahme
c
Einstellung des Zeitintervall für Daueraufnahmen
d
Einzelbild Speicherdatei, klicken Sie auf Durchsuchen, um den
Stammordner zu ändern
e
Videoaufnahmen Speicherdatei, klicken Sie auf Durchsuchen, um aus
den Stammordner zu ändern
f
Drücken Sie OK um die Einstellungen zu beenden und den
Menüpunkt zu verlassen
g
Abbrechen aller Änderungen und Verlassen des Einstellmenüs
d
Drucken- Bildschirmbild drucken.
14
Page 31

Conseils d'utilisation
Française
TS-82-907-90041
TS-82-907-90040
Page 32

Installer
Smart DC se trouve sur le CD fourni avec votre produit.
Cliquez sur l’icône "Smart DC" et sélectionnez le langage (si l’exécution
automatique ne fonctionne pas, ouvrez le dossier du CD et cliquez sur
"Smart DC.exe")
Smart DC
La barre d’état ci-dessous apparaîtra :
1
Page 33

Veuillez cliquer sur "next" pour poursuivre l’installation
Il est recommandé de cocher "Complete" pour l’installation
2
Page 34

Veuillez cliquer "Install" pour démarrer l’installation de Smart DC
Cliquez "Finish" pour terminer l’installation et utiliser "Smart
DC"
3
Page 35

y a trois modes dans Smart DC
Il
(Caméra/Vidéo/Photo )
a
b
c
d
a
Changer de mode (caméra, vidéo ou photo)
b
Panneau de contrôle
c
Afcher/Masquer le panneau de contrôle
d
Bouton enregister (démarrer un enregistrement)
4
Page 36

a
c
e
g
Sélectionner le chier
a
b
Lecture
c
Pause
b
d
e
d
Stop A
Retour Volume
f
f
g
vance rap
5
Page 37

a
c
e
b
a
Sélectionner Afcher/Masquer les vignettes
b
Précédent Intervalles du diaporama
c
Diaporama Fichier actuel / Nombre total
d
Suivant
e
f
g
d
f g
6
Page 38

y a trois types de fonctions sur le panneau
Il
de contrôle
1.
Annotations
a b
c d
e f
g h
i j
k
a
Ligne : Tracer une ligne
* Clic prolongé sur l’icône pour afcher le panneau de contrôle.
a
a
Changer l’épaisseur du contour
b
Changer la couleur du contour
b
7
Page 39

b
Rectangle – Sélectionnez pour dessiner un rectangle
* Clic prolongé sur l’icône pour afcher le panneau de contrôle.
a
b
c
a
Changer l’épaisseur du contour
b
Changer la couleur du contour
c
Changer la couleur de remplissage
c
Crayon – Sélectionnez pour dessiner un trait
* Clic prolongé sur l’icône pour afcher le panneau de contrôle.
a
b
a
Changer l’épaisseur du contour
b
Changer la couleur du contour
d
Cercle – Sélectionnez pour dessiner un cercle
* Clic prolongé sur l’icône pour afcher le panneau de contrôle.
a
a
Epaisseur du contour
b
Couleur du contour
c
Remplissage
b
c
8
Page 40

e
Flèche – Sélectionnez pour dessiner une èche
* Clic prolongé sur l’icône pour afcher le panneau de contrôle.
a
b
c
a
Epaisseur du contour
b
Couleur du contour
c
Remplissage
f
Triangle – Selectionner pour dessiner un triangle
*Clic prolongé sur l’icône pour afcher le panneau de contrôle.
a
b
c
a
Epaisseur du contour
b
Couleur du contour
c
Remplissage
g
Effaceur – Cliquez et allez sur la surface à effacer
* Clic prolongé sur l’icône pour afcher le panneau de contrôle.
a
a
Changer l’épaisseur
9
Page 41

h
Texte – Sélectionnez pour écrire un texte
* Clic prolongé sur l’icône pour afcher le panneau de contrôle.
a
b
a
Changer la police et la taille
b
Changer la couleur du texte
i
Effacer tout – Effacer toutes les annotations
j
Capture – Capturer une partie de l’écran pour l’enregistrer
temporairement. L’image enregistrée peut ensuite être collée
dans un autre programme comme Microsoft Word, Paint... Pour
capturer une zone, sélectionnez-la sur l’écran
k
Déplacez l’image avec le curseur
10
Page 42

2. Effets
a b
a
Masque – Masquez une partie de l’image
* Clic prolongé sur l’icône pour afcher le panneau de contrôle.
a
a
Modiez la surface masquée
b
Effet sur les couleurs – Ajustez les couleurs
* Clic prolongé sur le bouton pour appliquer des effets de couleur.
11
Page 43

3. Ajustement
a
Zoom -
a b
c d
e f
g h
b
Zoom +
a
b
a
Une barre de zoom s’afchera en bas à droite de l’image lors de
l’utilisation du zoom optique.
b
Lors de l’utilisation du zoom numérique, une icône indiquant le
pultiple du zoom s’afchera.
12
Page 44

c
Remise à zéro du zoom
d
Autofocus
a b
c d
e
Baisser la luminosité
f
Augmenter la luminosité
g
Rotation
h
Freeze – Pause
13
Page 45

4. Enregistrement
a
b
c
d
e
g
a
Enregistrer – Démarrer/Arrêter un enregistrement
b
Capture – Capturer l’image à l’écran
c
Réglages – Cliquer pour accéder aux réglages
a
Choisissez entre la résolution XGA (1024x768) et la résolution HD
f
(1280x720)
b
Choisissez entre la capture simple et la capture continue
c
Réglage de l’intervalle de capture continue
d
Dossier des fichiers de capture, cliquez pour changer le dossier de
sauvegarde
e
Dossier des chiers d'enregistrement, cliquez pour changer le dossier
de sauvegarde
f
Cliquez sur OK pour valider et quitter la fenêtre des réglages
g
Cliquez sur Annuler pour annuler les changements et quitter la
fenêtre des réglages
d
Impression – Imprimer l’image à l’écran
14
Page 46

Como usar
Español
TS-82-907-90040
TS-82-907-90041
Page 47

Instalar
Encuentre su Smart DC en el CD accesorio.
Haga Click en la tecla "Smart DC" y seleccione el software lenguaje OSD
(en el caso de que el auto funcionamiento no comience, por favor vaya a la
carpeta CD y busque "Smart DC.exe")
Smart DC
La instalacion comenzará como ve abajo:
1
Page 48

Por favor seleccione “siguiente” para continuar el proceso de instalación
Se recomienda elegir “complete” para la instalación
2
Page 49

Por favor haga click en “Instalar” para comenzar la instalación de Smart DC
Por favor haga click en “Finalizar” para terminar con la instalación de Smart
DC y disfrutar de “Smart DC”
3
Page 50

Hay
tres modos ( Vida/ Película/ Fotograa)en
Smart DC
a
b
c
d
a
Cambio de Modo ( Cambia entre modo vivo, película y fotografía. )
b
Panel de control
c
Mostrar / Ocultar Panel de Control
d
Botón de grabación ( Comienza a grabar un vídeo. )
4
Page 51

a
c
e
g
Selecciona un
a
archive para reproducirlo
b
Comienza a reproducir
c
Pausa el video
b
d
e
d
Para el video A
Hacia atrás Reproducir Volumen
f
f
vance rápido
g
5
Page 52

a
c
e
b
a
Seleccionar carpeta Mostrar / Ocultar barra de miniaturas
b
Foto previa Intervalo de tiempo de presentación
c
Presentación Archivo actual / Numero total de archivos
d
Foto siguiente
e
f
g
d
f g
6
Page 53

En
el panel de control, veras 3 grupos de
funciones
1.
Grupo Noting
a b
c d
e f
g h
i j
k
a
Seleccione Línea para dibujar una línea recta
* Pulsación continua la tecla línea para mostrar el panel de control.
a
a
Cambiar el ancho de la línea
b
Cambiar el color de la línea
b
7
Page 54

b
Seleccione Rectangulo- para dibujar dando forma rectangular
* Pulsación continua en la tecla Rectangulo para mostrar el panel de
control
a
b
c
a
Cambiar el ancho de la linea exterior
b
Cambiar el color de la linea exterior
c
Cambiar el color de relleno
c
Seleccione estilo libre para dibujar una linea de forma libre
a
b
* Pulsación continua en tecla de estilo libre para mostrar el panel de
control.
a
Cambiar el ancho de la línea
b
Cambiar el color de la línea
d
Seleccione Circulo para dibujar de forma circular
a
b
c
* Pulsación continua en tecla Circulo para mostrar el panel de control.
a
Cambiar el ancho de la linea exterior.
b
Cambiar el color de la linea exterior.
c
Cambiar el color del relleno
8
Page 55

e
Seleccione Flecha para dibujar en forma de echa
* Pulsacion continua en tecla de Flecha para mostrar el panel de control.
a
b
c
a
Cambia el ancho de la linea exterior
b
Cambia el color de la línea exterior
c
Cambia el color del relleno
f
Selecciona triangulo para dibujos en forma triangular
*Pulsación continua en la tecla de Triangulo para mostrar el panel de
control.
a
b
c
a
Cambia el ancho de la linea exterior
b
Cambia el color de la linea
c
Cambia el color de relleno
g
Haga Click en el Borrador y señale el area que desea borrar.
* Pulsación continua en la tecla Borrador para mostrar el panel de control.
a
a
Cambia el ancho del borrador
9
Page 56

h
Seleccione Texto para ver tipo de texto
* Pulsación continua la tecla texto para mostrar el panel de control.
a
b
a
Elegir fuente de texto y tamaño
b
Cambia el color del texto
i
Borrar todo-Borrar todo ningun efecto
j
Clip Imagen- Capture un area en la pantalla y guardelo
temporalmente. La imagen guardada puede ser pegada en
una imagen de software ejem. Microsoft Word, Paint..etc. Para
capturer un area, haga click y haga un rectangulo en la pantalla
k
Arrastra la mano en la imagen de la pantalla cuando para hacer
zoom en la imagen
10
Page 57

2. Grupo de Asistencia
a b
a
Mascara-Enmascara una sección de la imagen de la pantalla
* Pulsación continua en tecla de mascara para mostrar el panel de
control.
a
a
cambia diferentes areas / dar forma enmascarada
b
Efectos de color-Ajusta el efecto de color para diferentes
propósitos.
* Pulsación continúa en la tecla de Efectos de color para mostrar el
panel de control para cambiar diferentes efectos de color.
11
Page 58

3. Grupo de Ajustes
a b
c d
e f
g h
a
Zoom fuera- Zoom aleja la imagen
b
Zoom dentro- Zoom agranda la imagen
a
b
a
Una barra de zoom se mostrará en la esquina inferior derecha
de la imagen cuando esté el zoom óptico
b
Cuando se use el zoom digital , se mostrará un icono que
indicará multiple zoom digital
12
Page 59

c
Restablecer zoom- Volver a una vista normal (1X)
d
Auto Enfoque- Ajusta el enfoque automaticamente
a b
c d
e
Baja luminosidad- Decrece la luminosidad
f
Sube luminosidad-Incrementa la luminosidad
g
Rota-Gira la imagen (90°→180°→270°→0°)
h
Congela-Pausa el video
13
Page 60

4. Grupo de Grabación
a
b
c
d
e
g
a
Grabación-Comienza/Para la grabación de un video.
b
Captura- Captura la imagen de la pantalla.
c
Conguración-Click en la tecla de conguración para mostrar la
f
caja de conguración
a
Cambiar resolución entre XGA ( 1024x768 ) y HD ( 1280 x 720 )
b
Cambiar entre captura única o contínua
c
Congurar intervalo de tiempo en captura contínua.
d
Capturar archivos de carpeta , pincha en browse para cambiar desde
el directorio raíz.
e
Grabar archivos de carpeta , pincha en browse para cambiar desde
el directorio raíz.
f
Pinche en OK para nalizar la conguración y cerrar la ventana
g
Cancelar cualquier cambio de conguración y cerrar la ventana.
d
Imprimiendo- imprime la imagen de la pantalla.
14
 Loading...