

Page 1

User Manual
Optoma NuForce Bluetooth BE Live5
In Ear Headphones
Regulatory model name: APBELIVEU
1
Page 2

Contents
WHAT’S IN THE BOX
BE LIVE5 EARPHONES
THE BASICS
Charging your BE Live5
Checking battery level
Bluetooth pairing
Power On/ Power Off
Wearing your BE Live5
Handling phone calls
Listening to music
Pairing with a laptop
Pairing with a Mac
MISCELLANEOUS
Multipoint connections
Restoring factory settings
Voice prompts list
Disclaimer
FCC Interference statement
Specification
2
Page 3
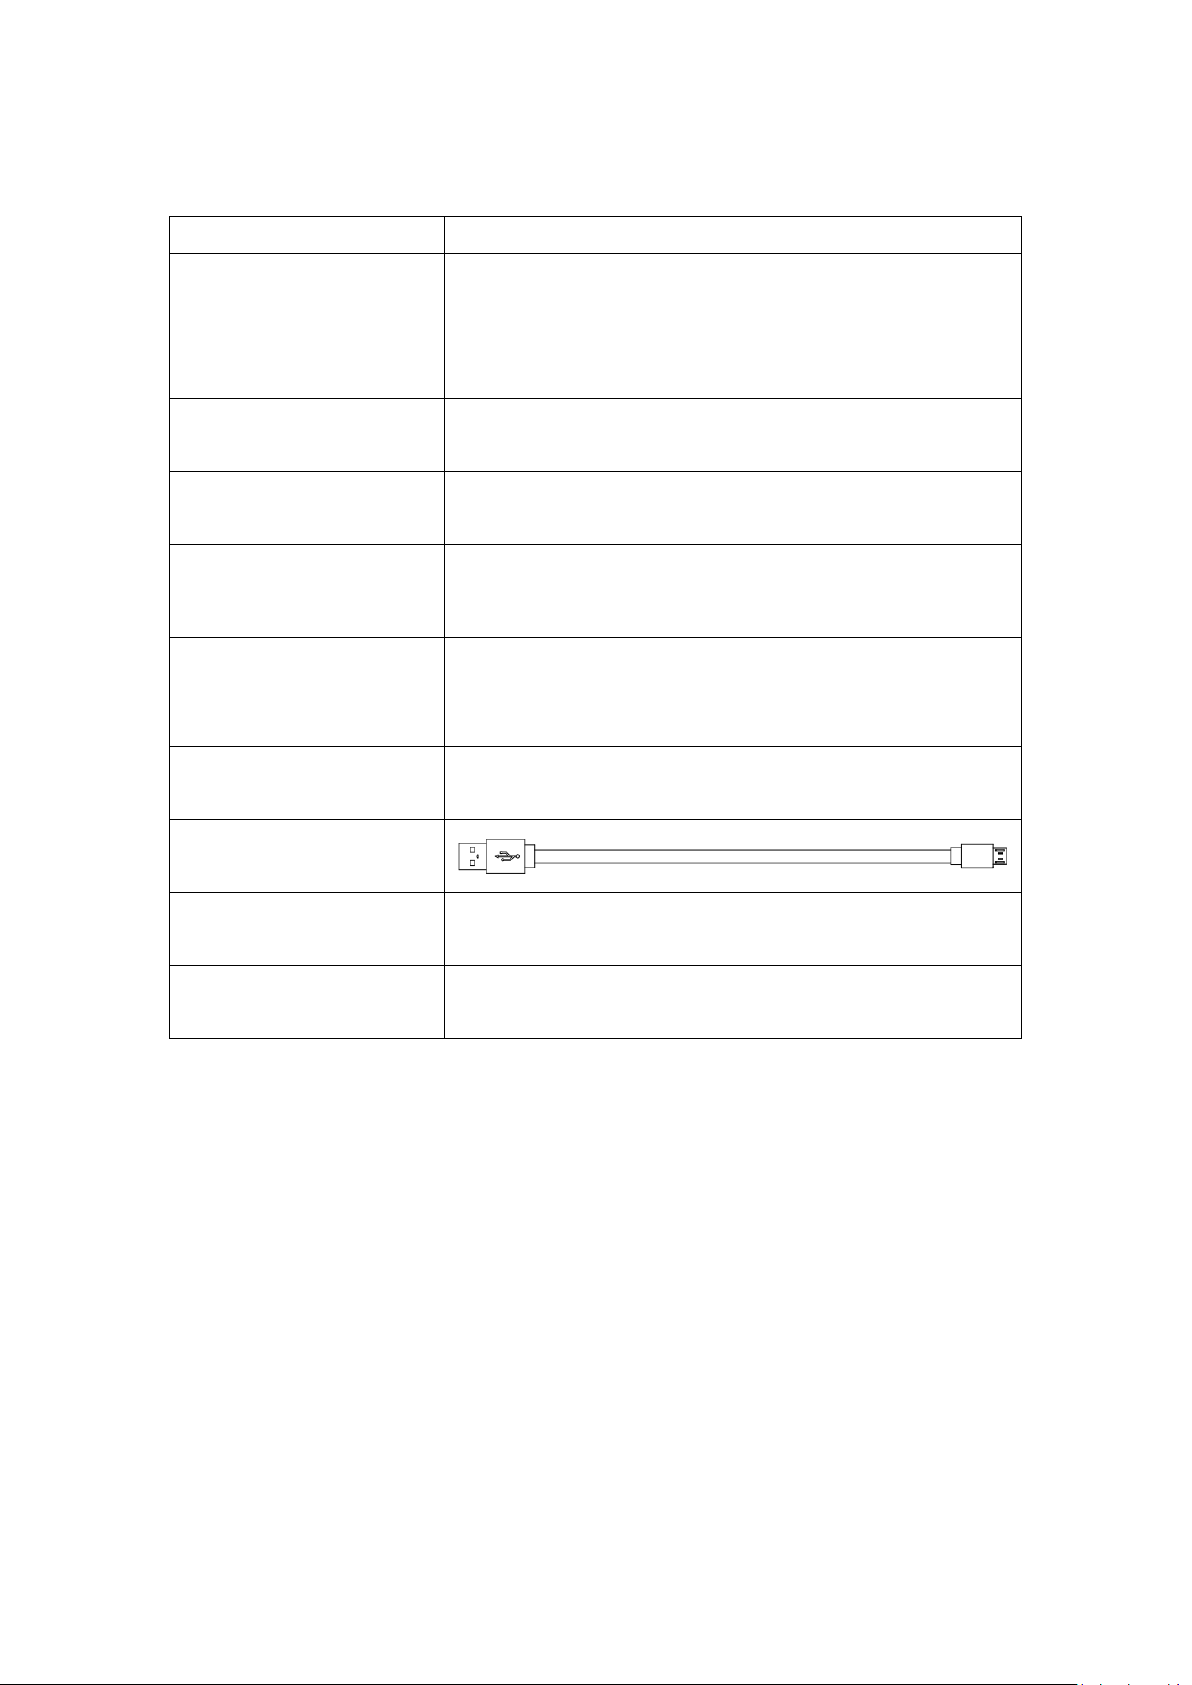
WHAT’S IN THE BOX
BE Live5 earphones
(with inline controller
and microphone)
3pairs of silicon tips
(in S/M/L)
2pair of foam tips
(M/L)
3pairs of stabilizers
(in S/M/L)
Cable loop for
adjusting the length
of cable
Pouch
Charging cable
(Micro-USB)
Basic user’s manual
Safety Instruction
BE Live5 EARPHONES
3
Page 4
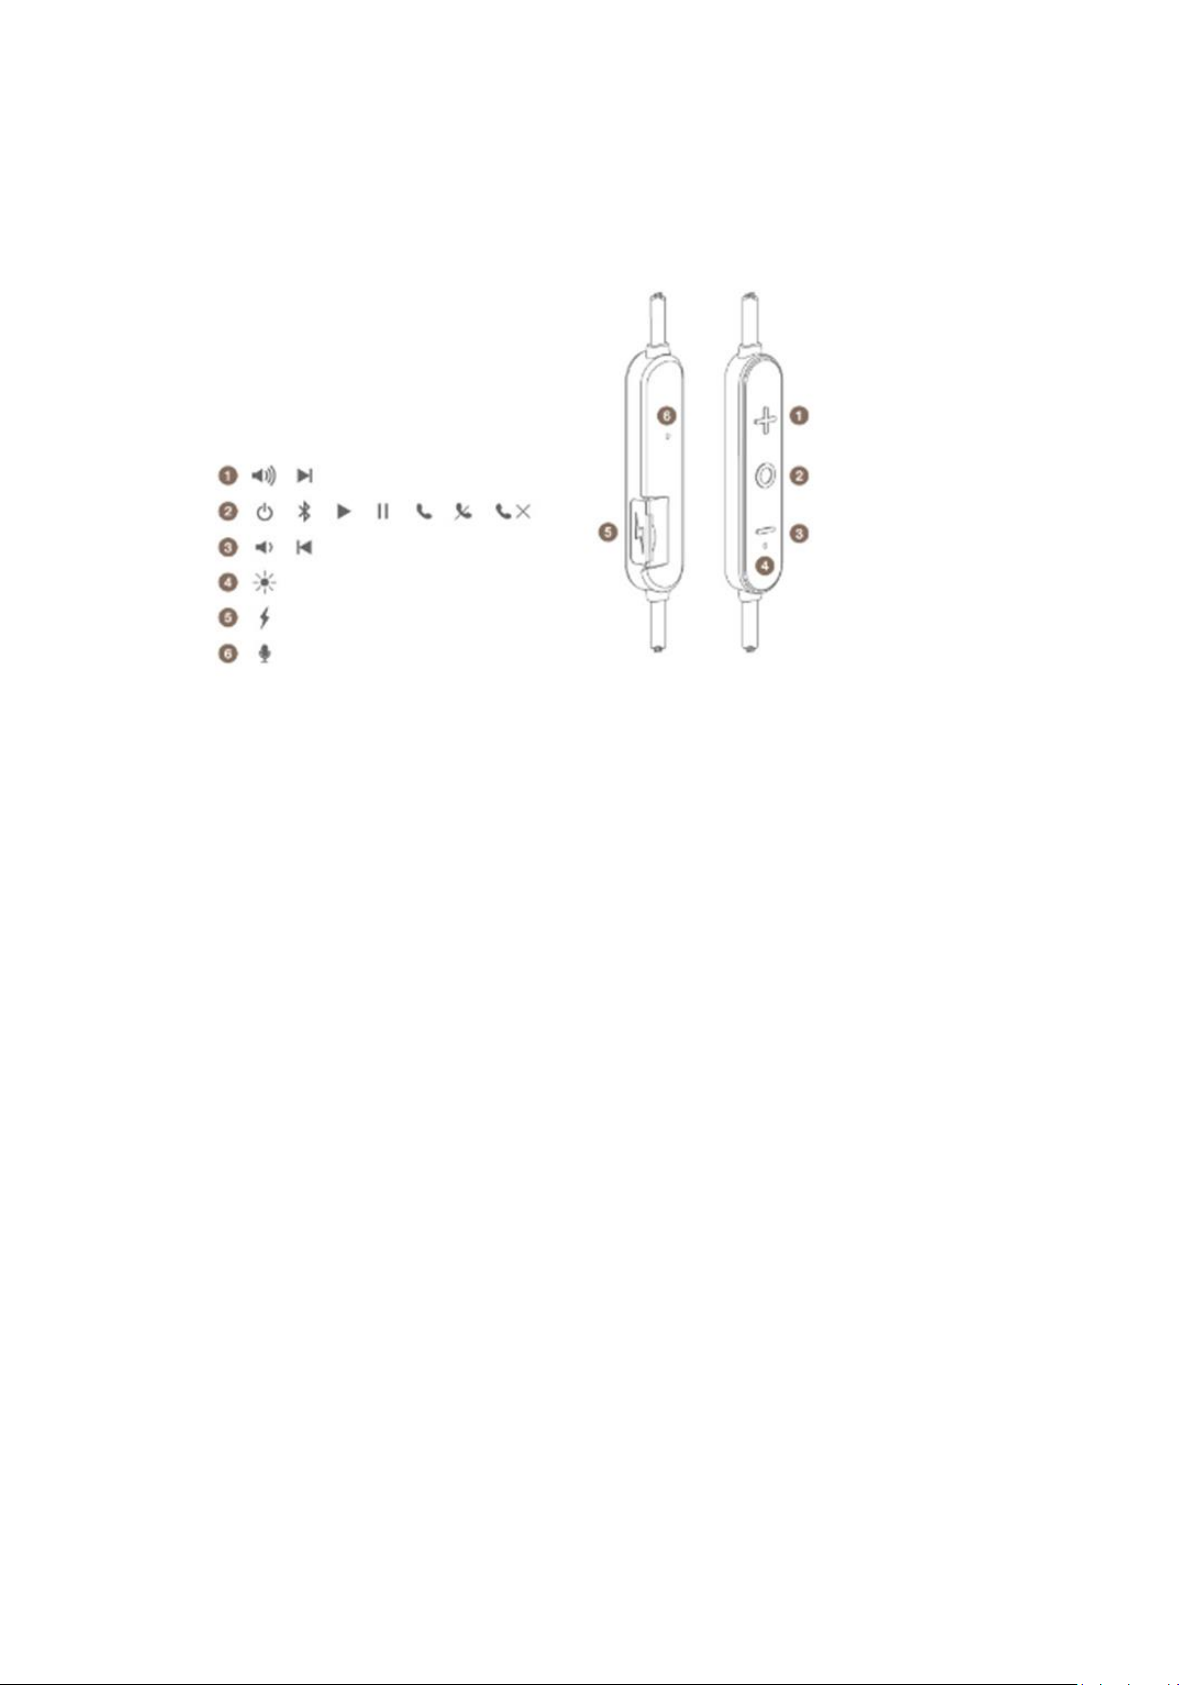
1. Volume Up Button
2. Power/Function Button
3. Volume Down Button
4. LED Indicator
5. Charging port
6. Microphone
4
Page 5
The BASICS
1
2
3
4
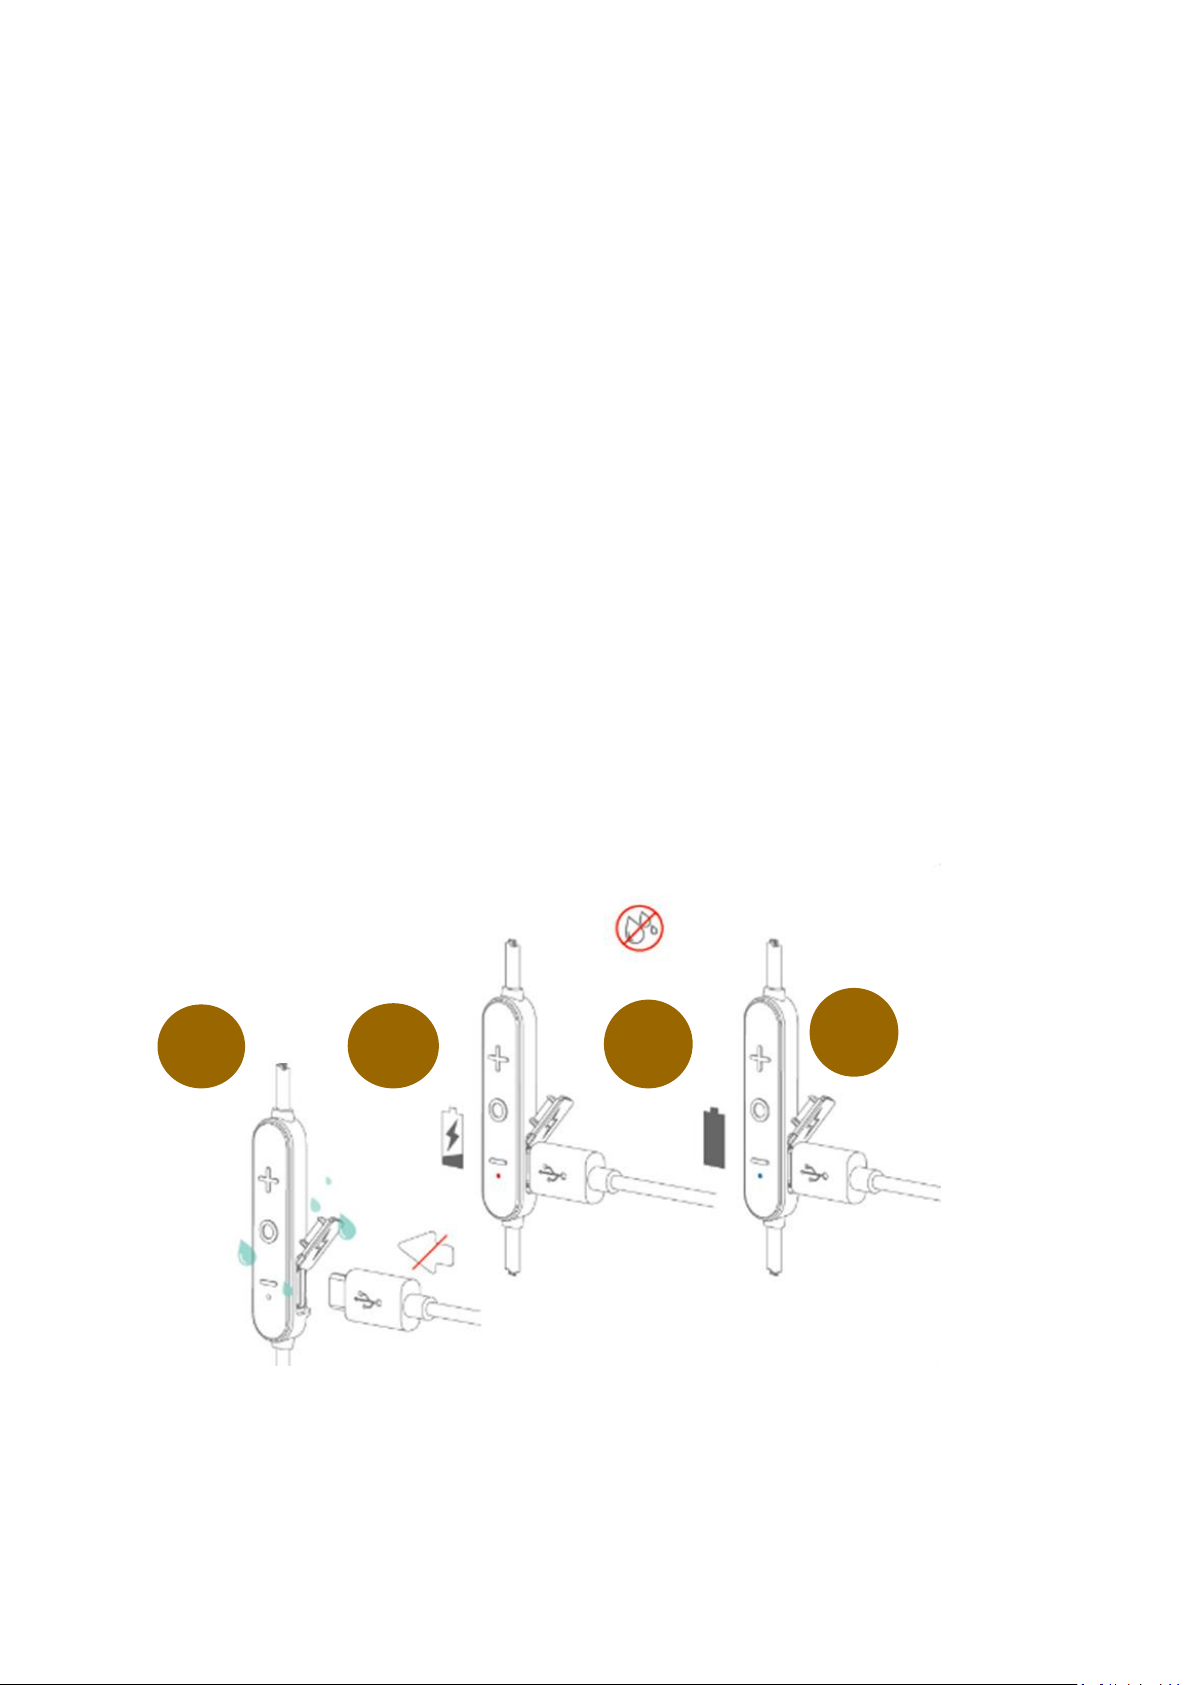
Charging Your BE Live5
Although your BE Live5 in-ear headphones come with a partially charged
battery, it is recommended that you fully charge your BE Live5 before
first use.
1. Open the charge port cover on the in line controller.
2. The charge cable should be connected to the charge port and
either to a PC or a dedicated USB charger.
3. When charging, the LED indicator is red.
4. LED Indicator turns blue once charging is complete.
NOTE: It takes up to 1.5 hours to fully charge the BE Live5.
Checking Battery Level
5
Page 6

You can check the battery level of your BE Live5 with the LED indicator
Number of flashes
Voice prompts(enable)
2
Battery low
3
Battery at 50%
5
Full battery
To check battery level:
1. Press the Power/Function, volume up, and volume down buttons
simultaneously.
2. The LED indicator will flash red and blue simultaneously. The
battery level will be indicated by the number of flashes, as
described in the table below:
Number of Flashes Battery Level
NOTE: When the battery level is very low, you will hear a beep or a
“Battery Low” voice prompt from your BE Live5 every 2 minutes when the
estimated battery reserve remaining time is under 15minutes.
IN ADDITION:
1. When the Voice prompts are switched off you will hear a beeping
sound (A short double tone) every two minutes.
2. Users with iOS devices and some Android models will be able to
view the battery status on their device’s display
*On some Android and all Windows operated devices you cannot check
the battery level for your BE Live5 when you listen to music, in the middle
of a phone call or in pairing mode.
6
Page 7

1
2
3
Bluetooth Pairing
Using your BE Live5 for first time
Pairing BE Live5 with source device
1. Press and hold the BE Live5’s Power/Function button for 4
seconds until the LED indicator light flashes blue/red. Your BE Live5
is now in pairing mode.
2. Turn on Bluetooth® on your source device, then select “Optoma
NuForce BE Live5” once it appears on the device list.
NOTE: Consult your source device’s user manual for instructions on activating
Bluetooth.
3. Once successfully paired, the LED indicator will flash blue and
you hear “Primary device connected” (when voice prompt enabled)
from your BE Live5, or a beep if voice prompt is not enabled.
Please note:
A. You must always enter “Pair” mode from a powered-off state.
7
Page 8

Otherwise, pushing the Power/Function button for more than 3
seconds from a powered-on state turns the BE Live5 off.
B. If left inactive in pairing mode, your BE Live5 will automatically
power off after 3 minutes.
C. Your BE Live5 can store pairing information for up to eight
devices.
To pair additional devices to your BE Live5 ensure that your BE
Live5 is not concurrently connected to any device, then repeat the
steps 1,2,3 outlined above.
In case where your BE Live5 have already stored pairing
information for eight devices and a ninth device is paired, the
stored information for the very first device will be deleted.
Power On/Power Off
To power on your BE Live5, press Power/Function button for about 2
seconds until the LED indicator flashes blue and you hear the “Power on”
when voice prompt is activated or a beep if the voice prompt is not used.
NOTE:
Once you have successfully paired the BE Live5 to a Bluetooth-enabled
device, the BE Live5 will automatically connect with that device once it is
powered on again. For more information check “Bluetooth Pairing”
section.
If you have stored pairing information for multiple devices and more than
one of those devices is Bluetooth enabled, the BE Live5 will automatically
connect with the most recently paired device and will also enable
multipoint connection.
8
Page 9

For more information read section “Multipoint Connections”.
Call option
Status
Action
Answer a call
Incoming call
Tap the Power/Function button
Decline a call
Incoming call
Press the Power/Function button for 2 seconds
End a call
In a call/outgoing call
Tap the Power/Function button
To turn the BE Live5 to OFF, push Power/Function button for about 4
seconds until the LED indicator turns red and you hear the “Power off” ”
when voice prompt be activated or a beep if the voice prompt is not
used.
Wearing Your BE Live5
To ensure a secure and comfortable fit when wearing your BE Live5:
1. Install the stabilizers on the BE Live5 after removing the ear
tips already placed on the boxed new set.*
2. Select right size of ear tips and install tips on BE Live5.
3. Rotate the stabilizers and place the BE Live5 into each ear so
that they are positioned comfortably.
*Please note, 3 different sizes of Ear wings are provided to offer optimal user’s comfort
Magnetic caps at the end of the earphones let users lock the
earphones together and secure them around user’s neck for ease of
use.
Handling Phone Calls
When your BE Live5 are connected to a Bluetooth-enabled smartphone
you can handle your phone calls directly using your BE Live5 in ear
headphones.
The followings describe phone call options:
9
Page 10

Redial the last number
Standby/connected
Double tap the Power/Function button
Mute on or mute off microphone
In a call/outgoing call
Tap the Volume Up and Volume Down simultaneously
Switching handset/earphone voice
In a call
Press the Volume Up and Volume Down buttons
simultaneously for 2 seconds
Adjust the volume
Tap the Volume Up or Volume Down button
Activate Siri (iOS) or Google Voice
Search (Android)
Standby/Connected
Tap the Power/Function and Volume Up buttons
simultaneously
Audio option
Action
Play or pause audio
Tap the Power/Function button
Skip to next track
Press the Volume Up button for 2 seconds
Play previous track
Press the Volume Down button for 2 seconds
Adjust the volume
Tap the volume up or volume down button
Listening to Music
You can enjoy and control Audio through the in line controller on your BE
Live5.
*Please note: when muting the BE Live5 or reactivating it from MUTE there will be a very slight
delay
Pairing with a Laptop
The connection instructions below apply to owners of Windows 7, 8, 8.1
and 10.
1. Power your PC/Laptop
2. Find “Bluetooth Settings”
3. Switch your laptop Bluetooth to “On”
4. Turn the BE Live5 to “Pairing Mode”
5. When the BE Live5 is discovered by your laptop left click on “Pair”
6. Right click on the speaker symbol at the bottom right side of the
screen
7. From the dropdown menu right click on the “Playback Device”
8. Please choose and right click the “Optoma NuForce BE Live5 stereo
ready” (see image below text)
9. Click on HEADPHONES to set the “Headphones Optoma NuForce
BE Live5” as default device
10
Page 11

10. Press OK
Pairing with a Mac
The connection instructions below apply to owners of all current and
recent iOS versions
1. Power your Mac
2. Open “System Preferences”
3. Click on the Bluetooth symbol
11
Page 12

4. Turn the Optoma NuForce BE Live5 to “Pairing Mode”
5. When the Optoma NuForce BE Live5 is discovered by your Mac
click on “Pair”
6. Your Mac is now ready to play audio via the BE Live5
MISCELLANEOUS
Multipoint Connections
If you have stored pairing information for multiple devices and more
than one of those devices have Bluetooth enabled at the same time,
your BE Live5 will enable multipoint connection.
Multipoint connection allows your BE Live5 to hold connections with two
devices at the same time while playing audio signal from only one of the
two devices.
Multipoint connection works in the following ways:
• Your BE Live5 automatically connects with the most recently paired
device (“Primary device”).
• You must manually connect the second device (“Secondary device”) to
your BE Live5 via its operating system.
12
Page 13

• The BE Live5 will prioritize the audio from Primary device.
Audio option
Action
Activate voice prompts
Press the Power/Function and Volume Up buttons simultaneously for 2 seconds
• You can control Primary device using the BE Live5 in line controller.
• When Primary device is idle, your BE Live5 can receive audio from
Secondary device.
• Secondary device must be controlled directly from its operating
system.
• Simultaneous audio from both devices is disabled.
Restore Factory Settings
When you restore the BE Live5 to its factory settings, the paired devices
stored will be deleted.
To restore factory settings:
1 Ensure that your BE Live5 are not connected to any device.
2 Put the BE Live5 in pairing mode.
3 Press simultaneously the Power/Function, Volume Up, and Volume
Down buttons for 2 seconds until the LED indicator flashes red five times
and you hear five short tones from the BE Live5.
Because all pairing information is deleted after restoring factory settings,
the BE Live5 will directly enter pairing mode once powered on.
Voice Prompts list
The BE Live5 are pre-loaded with English voice prompts
“Power On”
“Power Off”
“Full Battery”
“Battery at 50%”
“Battery Low”
“Primary device connected”
“Secondary device connected”
“Pairing Mode Activated”
“Voice Dial”
13
Page 14

Turn off voice prompt
Press the Power/Function and Volume Down buttons simultaneously for 2
seconds
Disclaimer
Please be advised, the BE Live5 is equipped with the latest technology however
functionality may vary by device.
Manufacture: Optoma Corporation.
12F.,No.213,Sec.3, Beixin Rd.,Xindian Dist., New Taipei City, Taiwan
Federal Communication Commission Interference
Statement
1. This device complies with Part 15 of the FCC Rules. Operation is subject to the
following two conditions:
(1) This device may not cause harmful interference.
(2) This device must accept any interference received, including interference
that may cause undesired operation.
Note: The grantee is not responsible for any changes or modifications not expressly approved by the party
responsible for compliance. Such modifications could void the user’s authority to operate the equipment.
NOTE: This equipment has been tested and found to comply with the limits for a
14
Page 15

Class B digital device, pursuant to Part 15 of the FCC Rules. These limits are
designed to provide reasonable protection against harmful interference in a
residential installation.
This equipment generates uses and can radiate radio frequency energy and, if not
installed and
used in accordance with the instructions, may cause harmful interference to radio
communications. However, there is no guarantee that interference will not occur in
a particular installation. If this equipment does cause harmful interference to radio
or television reception, which can be determined by turning the equipment off and
on, the user is encouraged to try to correct the interference by one or more of the
following measures:
Reorient or relocate the receiving antenna.
Increase the separation between the equipment and receiver.
Connect the equipment into an outlet on a circuit different from that to
which the receiver is connected.
Consult the dealer or an experienced radio/TV technician for help.
FCC Radiation Exposure Statement
This equipment complies with FCC RF radiation exposure limits set forth for an uncontrolled environment
Max RF power
BT BR+EDR(2402-2480MHz): 2.7-4.7dBm
RF exposure information: The EIRP power of the device at maximal case is below the exemt condition,
20mW specified in EN62479: 2010.
RF exposure assessment has been performed to prove that this unit will not generate the harmful EM
emission above the reference level as specified in EC Council Recommendation(1999/519/EC).
CAUTION RISK OF EXPLOSION IF BATTERY IS REPLACED BY AN INCORRECT TYPE.
DISPOSE OF USED BATTERIES ACCORDING TO THE INSTRUCTIONS
Excessive sound pressure from earphones and headphones can cause hearing loss.
15
Page 16

Regulatory Conformance
Hereby, Optoma Corporation. declares that the radio equipment type (Bluetooth earphones, APBELIVEU)
is in compliance with Directive 2014/53/EU. The full text of the EU declaration of conformity is available at
the following internet address:www.Optoma.com
Notice: This device may be used in each member state in EU
NCC
依據低功率電波輻射性電機管理辦法
第十二條
※經型式認證合格之低功率射頻電機,非經許可,公司、商號或使用者均不
得擅自變更頻率、加大功率或變更原設計之特性及功能。
第十四條
※低功率射頻電機之使用不得影響飛航安全及干擾合法通信;經發現有干擾
現象時,應立即停用,並改善至無干擾時方得繼續使用。
-前項合法通信,指依電信法規定作業之無線電通信。
-低功率射頻電機須忍受合法通信或工業、科學及醫療用電波輻射性電機設
備之干擾。
Administrative Regulations on Low Power Radio Waves Radiated Devices
warning:
Article 12
not allowed to change frequency, enhance transmitting power or alter original
characteristic as well as performance to a approved low power radio-frequency
devices.
Article 14
and interfere legal communications; If found, the user shall cease operating
immediately until no interference is achieved.
compliance with the Telecommunications Act.
interference from legal communications or ISM radio wave radiated
Without permission granted by the NCC, any company, enterprise, or user is
The low power radio-frequency devices shall not influence aircraft security
The said legal communications means radio communications is operated in
The low power radio-frequency devices must be susceptible with the
16
Page 17

Specification
Connection type
Bluetooth 2.4Ghz
Bluetooth type
V4.1
Bluetooth profile
HSP 1.2, HFP 1.6, A2DP 1.2, AVRCP 1.4
A2DP Codec
SBC, Qualcomm® aptX™ audio, AAC
Cable length
580 +/- 20 mm
Driver Type
Dynamic
Driver size
8 mm
Impedance
16 Ohm
Battery life (estimated)
Up to 8 hours
Battery type
Lithium-ion battery, Cylindrical Type, Typical
3.7V/55mAh x2 pcs
Microphone sensitivity
Frequency response
Sensitivity
power consumption
Range
Weight
Grams
-42 +/-3 dB
20Hz - 20kHz
99dB +/-3dB at 1KHz
15mA at A2DP mode
Up to 10m
16
Operation temperature
0--45 degrees Celsius
Qualcomm aptX is a product of Qualcomm Technologies International, Ltd. Qualcomm is a trademark of Qualcomm
Incorporated, registered in the United States and other countries, used with permission. aptX is a trademark of Qualcomm
Technologies International, Ltd., registered in the United States and other countries, used with permission.
17
 Loading...