

Page 1

Table of Contents
Table of Contents ....................................................................................... 1
Usage Notice ............................................................................................... 2
Safety Information .................................................................................................2
Do .....................................................................................................................................2
Do Not ..............................................................................................................................2
Class B emissions limits ................................................................................................... 2
Viewing 3D PROJECTOR using the 3D function ............................................................. 2
Introduction................................................................................................. 4
Features ................................................................................................................4
Package Overview ................................................................................................ 4
Product Overview .................................................................................................. 4
Control Panel ........................................................................................................5
I/O and Switch Panel .............................................................................................5
LED Indicators .......................................................................................................6
Installation .................................................................................................. 7
Connecting to the Devices .................................................................................... 7
Installing the Power Plug .......................................................................................8
User Controls .............................................................................................. 9
Using the 3D Projector Adapter .............................................................................9
Using the 3D Glasses(*) ...................................................................................... 11
Appendices ............................................................................................... 12
Trouble Shooting ................................................................................................. 12
Compatibility Modes ............................................................................................ 13
Video Compatibility ........................................................................................................13
Computer Compatibility .................................................................................................. 13
RS232 Control Protocols .....................................................................................14
Optoma Global Ofces ........................................................................................ 15
Certication & Safety Notices ..............................................................................17
FCC Notice .....................................................................................................................17
Declaration of Conformity for EU countries .................................................................... 18
1
English
Page 2

English
2
Usage Notice
Safety Information
Do
Read, keep, and follow these instructions.
•
Heed all warnings.
•
Turn off and unplug the power plug from the AC outlet before cleaning
•
the unit.
Use a soft dry cloth with mild detergent to clean the display housing.
•
Only use attachments/accessories specied by the manufacturer.
•
Refer all servicing to qualied service personnel. Servicing is required
•
when the apparatus has been damaged in any way, such as powersupply cord or plug is damaged, liquid has been spilled or objects
have fallen into the apparatus, the apparatus has been exposed to
rain or moisture, does not operate normally, or has been dropped.
Do Not
Use this apparatus near water.
•
Use abrasive cleaners, waxes or solvents to clean the unit.
•
Install near any heat sources such as radiators, heat registers,
•
stoves, or other apparatus (including ampliers) that produce heat.
To reduce the risk of re or electric shock, do not expose this unit to
•
rain or moisture.
Open or disassemble the unit as this may cause electric shock.
•
Near any appliance generating a strong magnetic eld.
•
Use in direct sunlight.
•
To reduce the risk of re or electric shock, do not expose this appli-
•
ance to rain or moisture. Dangerous high voltages are present inside
the enclosure. Do not open the cabinet. Refer servicing to qualied
personnel only.
Class B emissions limits
This Class B digital apparatus meets all requirements of the Canadian
Interference-Causing Equipment Regulations.
Viewing 3D PROJECTOR using the 3D function
IMPORTANT SAFETY INFORMATION. READ THE FOLLOWING
WARNINGS BEFORE YOU OR YOUR CHILD USE THE 3D FUNCTION
Warning
Children and teenagers may be more susceptible to health issues
associated with viewing in 3D and should be closely supervised when
viewing these images.
Page 3

Usage Notice
Photosensitive Seizure Warning and Other Health Risks
Some viewers may experience an epileptic seizure or stroke when
exposed to certain ashing images or lights contained in certain Projector pictures or video games. If you suffer from, or have a family history
of epilepsy or strokes, please consult with a medical specialist before
using the 3D function.
Even those without a personal or family history of epilepsy or stroke
may have an undiagnosed condition that can cause photosensitive
epileptic seizures.
Pregnant women, the elderly, sufferers of serious medical conditions,
those who are sleep deprived or under the inuence of alcohol should
avoid utilizing the unit’s 3D functionality.
If you experience any of the following symptoms, stop viewing 3D pic-
tures immediately and consult a medical specialist: (1) altered vision;
(2) light-headedness; (3) dizziness; (4) involuntary movements such as
eye or muscle twitching; (5) confusion; (6) nausea; (7) loss of awareness; (8) convulsions; (9) cramps; and/ or (10) disorientation. Children
and teenagers may be more likely than adults to experience these
symptoms. Parents should monitor their children and ask whether they
are experiencing these symptoms.
Viewing 3D PROJECTOR may also cause motion sickness, perceptual
after effects, disorientation, eye strain and decreased postural stability.
It is recommended that users take frequent breaks to lessen the potential of these effects. If your eyes show signs of fatigue or dryness or if
you have any of the above symptoms, immediately discontinue use of
this device and do not resume using it for at least thirty minutes after
the symptoms have subsided.
Watching 3D PROJECTOR while sitting too close to the screen for an
extended period of time may damage your eyesight. The ideal viewing
distance should be at least three times the screen height. It is recommended that the viewer's eyes are level with the screen.
Watching 3D PROJECTOR while wearing 3D glasses for an extended
period of time may cause a headache or fatigue. If you experience a
headache, fatigue or dizziness, stop viewing 3D PROJECTOR and
rest.
Do not use the 3D glasses for any other purpose than for viewing 3D
PROJECTOR. Wearing the 3D glasses for any other purpose (as general spectacles, sunglasses, protective goggles, etc.) may be physically
harmful to you and may weaken your eyesight.
Viewing in 3D may cause disorientation for some viewers. Accordingly,
DO NOT place your 3D PROJECTOR near open stairwells, cables,
balconies, or other objects that can be tripped over, run into, knocked
down, broken or fallen over.
3
English
Page 4
English
4
Introduction
ST
ANDBY
/
ON
SBS
MODE
HDMI
1
HDMI
2
SOURCE
NOTE
Features
Convert 3D video from several popular formats for display on DLP-
•
Link 3D ready projectors.
Compatible with HDMI 1.4a 3D formats including side-by-side, etc.
•
Pass 2D images unaltered for normal display.
•
Environment conditions:
•
Temperature:
-
Altitude:
-
Package Overview
The following parts are included in the carton.(*)
3D projector adapter
Due to different
applications in each
country, some regions
may have different
accessories.
•
3D glasses
•
Battery (CR2032)
•
Power plug and power adapter
•
Interchangeable nosepieces (large, small)
•
User’s guide (CD)
•
Quick start card
•
Warranty card
•
WEEE card
•
Operating: 5°C ~ 40°C (41°F ~ 104°F)
Non-operating: -20°C ~ 60°C (-4°F ~ 140°F)
Operating: Sea level to 10,000 feet
Non-operating: Sea Level to 30,000 feet
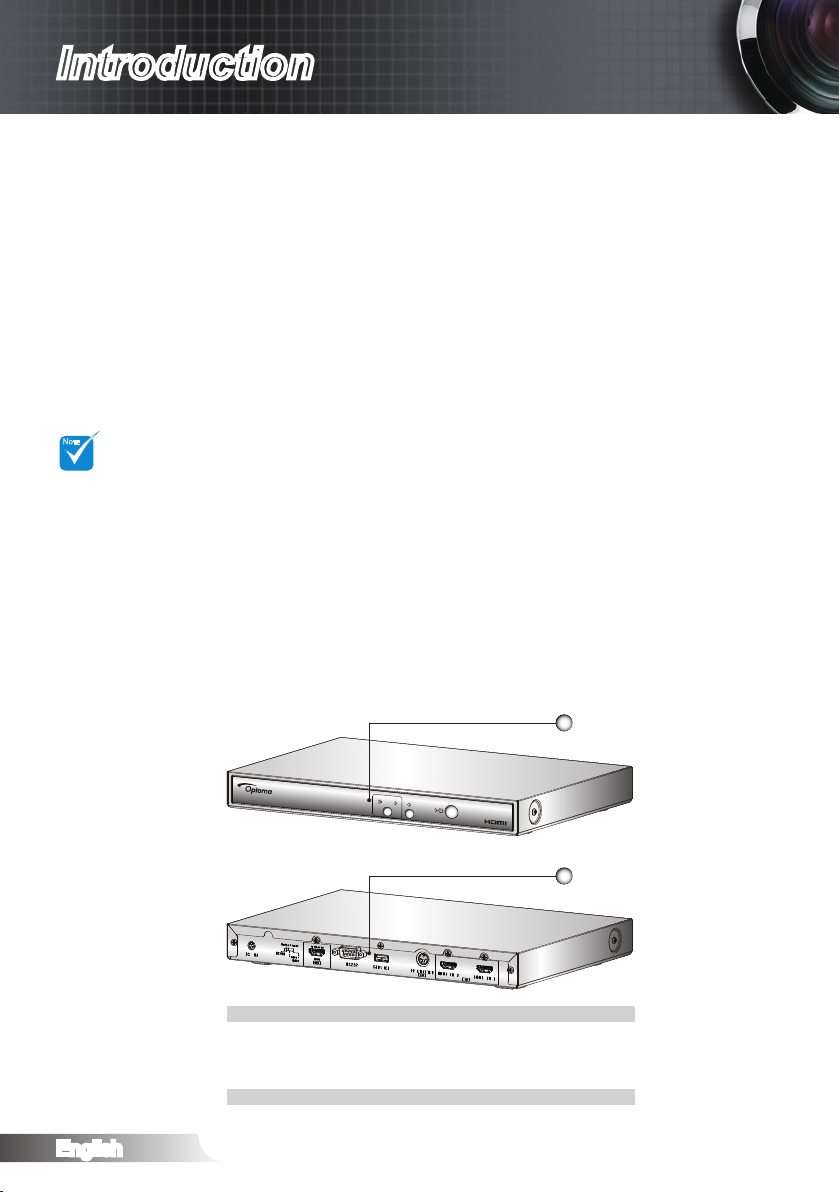
Product Overview
1
2
Front Side: Control panel and LED indicators
1.
Back Side: Input / Output and switch panel
2.
Page 5
Introduction
STANDBY/ON
SBS MODE
HDMI 1
HDMI 2
SOURCE
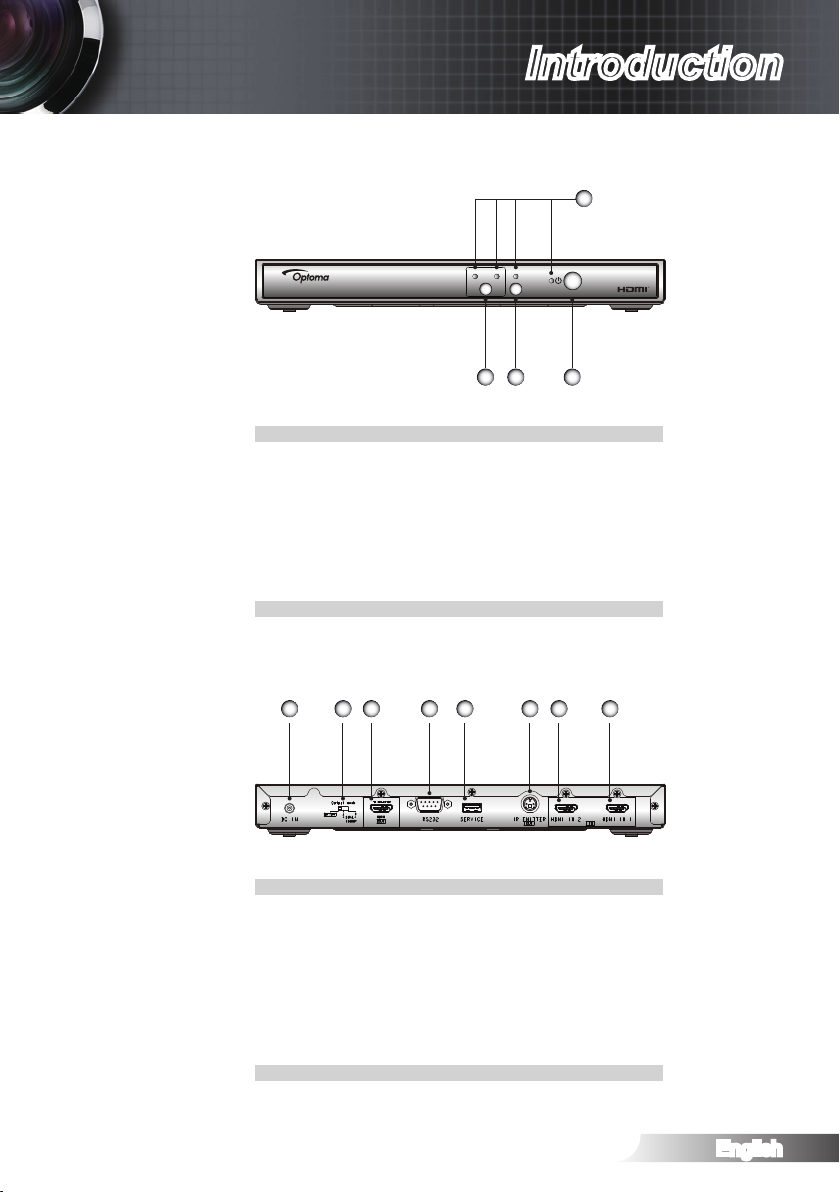
Control Panel
1
2 3 4
LED indicators: Include HDMI 1, HDMI 2, SBS MODE
1.
and Power LEDs.
Source button: Allow manual selection of source.
2.
SBS MODE button: Allow manual selection of 3D
3.
format conversion.
Power button (STANBY/ON): Control the system
4.
power.
I/O and Switch Panel
1 2 3 4 5 6 7 8
DC power input
1.
Output mode (3D 720p / 1080p L / 1080p R)
2.
HDMI OUT (TO PROJECTOR)
3.
RS232
4.
SERVICE
5.
IR EMITTER (OUT)
6.
HDMI IN 2
7.
HDMI IN 1
8.
5
English
Page 6
English
6
Introduction
LED Indicators
Power LED is bi-color (Green and Red).
1.
SBS MODE LED is green when this feature is selected.
2.
HDMI 1 LED is green when this input source is selected and detected.
3.
HDMI 2 LED is green when this input source is selected and detected.
4.
Message
Standby state
(Input power cord)
Power on Off Steady light Off Off Off
Power on & HDMI 1 source
is selected but source is
searching
Power on & HDMI 2 source
is selected but source is
searching
Power on & HDMI 1 source
is selected and source is
found
Power on & HDMI 2 source
is selected and source is
found
Power on & HDMI 1 is found
& SBS mode is “Off”
Power on & HDMI 2 is found
& SBS mode is “Off”
Power on & HDMI 1 is found
& SBS mode is “On”
Power on & HDMI 2 is found
& SBS mode is “On”
Power LED
Steady light Off Off Off Off
Power LED
(Red)
Off Steady light Off
Off Steady light Off Off
Off Steady light Off Steady light Off
Off Steady light Off Off Steady light
Off Steady light Off Steady light Off
Off Steady light Off Off Steady light
Off Steady light Steady light Steady light Off
Off Steady light Steady light Off Steady light
(Green)
SBS MODE
(Green)
HDMI 1
(Green)
Flashing
0.5 sec. off
0.5 sec. on
HDMI 2
(Green)
Flashing
0.5 sec. off
0.5 sec. on
Off
Page 7

Installation
Connecting to the Devices
Power Socket 3D Capable DLP® Projector 3D Video DeviceComputer (for Control Purposes)
1 2 3 4
Power adapter
1.
HDMI cable (OUT)
2.
RS232 cable
3.
HDMI cable (IN)
4.
7
English
Page 8

English
8
Installation
Installing the Power Plug
1 2
3 4
Power plug
1.
Power adapter
2.
Slide the power plug into the power adapter in the direction of the
3.
arrow until it clicks.
Press the “PUSH” button and push the power plug in the direction
4.
of the arrow to remove it.
Page 9

The 3D video source
NOTE
NOTE
device must be powered
on before the 3D
projector adapter.
If input video is normal
2D, please press SBS
mode to “Off”.
If SBS mode is active,
2D video content will
not display correctly.
User Controls
Using the 3D Projector Adapter
Once you have connected your devices together with HDMI cables, as
shown in the diagram, you are ready to begin. Power ON your 3D video
source, 3D projector adapter and your 3D projector.(*)
PlayStation® 3 Games
Make sure that you have updated your console to the latest software
•
version in PlayStation® 3.
Go to the “Settings menu -> Display settings -> Video output -> HDMI”.
•
Select “Automatic” and follow the on-screen instructions.
Insert your 3D game disc. Alternatively you can download games (and
•
3D updates) via the PlayStation® network.
Launch the game. In the in-game menu, select “Play in 3D”.
•
3D Blu-ray™ Player
Make sure that your player can support 3D Blu-ray™ disc and that 3D
•
output is enabled.
Insert the 3D Blu-ray™ disc into the player, press “Play”.
•
3D TV (e.g. SKY 3D)
Contact your TV service provider to enable any 3D channels on your
•
channel package.
Once enabled, switch to the 3D channel.
•
You should see two images side-by-side.
Press the “SBS Mode” button on the front of the 3D projector adapt-
•
er.(*)
3D Device (e.g. 3D DV/DC) with 2D 1080i side by side signal output
Connect your 3D device and switch to out 3D content with 2D side-by-
•
side output to 3D Projector Adapter.
You should see two images side-by-side.
-
Press the “SBS Mode” button on the front of the 3D projector adapter.
•
When you see “3D” in the top right hand corner of the screen, enable your
projector’s 3D mode, turn on your 3D glasses and put them on.
If necessary, use your projector’s 3D Sync-Invert option to optimize your
3D experience. The option is located in the “Display” section of the projector OSD menu.
3D Projector Adapter has been tested by Optoma as of 09/25/2010 that is compatible with some
other types of source devices launched before such date, ex. PlayStation® 3, 3D Blu-ray, 3D TV
source device with 3D technology incorporated. Compatibility with other manufacturer’s DLP
display devices (see Optoma website for info) has been tested as of Oct. 2010. Due to variations
in hardware and rmware version(s) throughout a product’s lifecycle, Optoma cannot guarantee
compatibility with models and source devices supplied by other manufacturers.
All other product names, company names and trade names used herein are for identications
purposes only and may be trademarks or registered trademarks of their respective owners. All
images have been simulated.
9
English
Page 10

English
10
User Controls
ST
ANDBY
/
ON
SBS
MODE
HDMI
1
HDMI
2
SOURCE
3D Broadcast 3D Blu-ray™ Disc 3D Console Games
SKY+HD, cable/satellite box 3D Blu-ray™ Player PlayStation® 3
3D Projector Adapter
3D Capable DLP® Projector
All other product names, company names and trade names used herein are for identi cations
purposes only and may be trademarks or registered trademarks of their respective owners. All
images have been simulated.
3D Glasses
Page 11

For more detailed
NOTE
information, please
refer to the 3D glasses
user’s guide.
User Controls
Switch the “Output Mode” to change output signal.•
3D 720p (Default value): When input 3D signal, system
will output HQFS signal @120Hz.
Switch the “Output Mode” to change output signal in two 3D Projector
•
Adapters applications.
L: When input 3D signal, system will output
1080p@60hz(L) signal.
R: When input 3D signal, system will output
1080p@60hz(R) signal.
Using the 3D Glasses(*)
To turn ON 3D glasses: Press the “Power” button and the LED will
1.
ash one time indicating the glasses are ready to use 3D mode.
Verify that 3D content is being sent to the projector and signal is com-
2.
patible with projector specications.
Turn on “3D Mode” (DLP-Link) in projector OSD menu. 3D mode is
3.
located in the “Display” section.
Turn on 3D glasses and verify image appears in 3D without eyestrain.
4.
If the image does not appear in 3D, please check 3D device set up
5.
well to send out 3D image or not. Or SBS mode should turn on when
input signal is 2D 1080i side-by-side and repeat previous steps 1 ~ 4.
If necessary, use your projector’s 3D Sync-Invert option to optimize
6.
your 3D experience. The option is located in the “Display” section of
the projector OSD menu.
For additional setup information, please refer to the projector user’s
7.
guide, or manufacturer's Website.
To turn OFF 3D glasses: Press the “Power” button and hold until the
8.
LED switches off.
11
English
Page 12

English
12
Appendices
Trouble Shooting
No image appears on screen.
Ensure all the cables and power connections are correctly and
securely connected as described in the “Installation” section.
Ensure all the pins of connectors are not bent or broken.
Make sure you have powered on all the devices.
Blurry double image.
Press “SBS Mode” button to “Off” to avoid normal 2D image is
blurry double image.
Two images, side-by-side format.
Press “SBS Mode” button to “On” for input signal is HDMI 1.3 2D
1080i side-by-side.
Pseudo-3D Image or uncomfortable depth of eld inside the image.
Use you projector’s “3D Sync. Invert” option.
Image does not display in 3D.
Check if the battery of 3D glasses is drained.
Check if the 3D glasses is turned on.
Check if the 3D mode (DLP-Link) of projector is turned on. 3D
mode is located in the “Display” section of OSD menu.
Check if the “Output Mode” on the 3D projector adapter is
switched to 3D 720p.
When the input signal is HDMI 1.3 2D (1080i side-by-side half),
turn on the “SBS Mode” on the 3D projector adapter.
My 3D glasses do not operate.
Replace the battery if it is drained.
Focus your 3D glasses toward the projector front. Make sure that
the distance from the projector to the glasses is less than 20 feet
in a straight line.
The LED on 3D glasses blinks continually.
The battery is drained. Replace it with a new one.
Page 13

Compatibility Modes
Video Compatibility
Video Input Resolutions Video Output Resolutions
1280 X 720p @ 50Hz Top-and-Bottom
1280 X 720p @ 60Hz Top-and-Bottom
1280 X 720p @ 50Hz Frame packing
HDMI 1.4a (3D)
HDMI 1.4a (3D)
HDMI 1.3 (2D)
1280 X 720p @ 60Hz Frame packing
1920 X 1080i @ 50 Hz Side-by-Side (Half)
1920 X 1080i @ 60 Hz Side-by-Side (Half)
1920 X 1080p @ 24 Hz Top-and-Bottom
1920 X 1080p @ 24 Hz Frame packing
1280 X 720p @ 50Hz Top-and-Bottom
1280 X 720p @ 60Hz Top-and-Bottom
1280 X 720p @ 50Hz Frame packing
1280 X 720p @ 60Hz Frame packing
1920 X 1080i @ 50 Hz Side-by-Side (Half)
1920 X 1080i @ 60 Hz Side-by-Side (Half)
1920 X 1080p @ 24 Hz Top-and-Bottom
1920 X 1080p @ 24 Hz Frame packing
1920 x 1080i @ 50Hz Side-by-Side (Half) 720p @ 120 Hz
1920 x 1080i @ 60Hz Side-by-Side (Half) 720p @ 120 Hz
1920 x 1080i @ 50Hz Side-by-Side (Half) 1080p @ 60 Hz
1920 x 1080i @ 60Hz Side-by-Side (Half) 1080p @ 60 Hz
480i Pure 2D Timing 480p
480p Pure 2D Timing 480p
576i Pure 2D Timing 576p
576p Pure 2D Timing 576p
720p (50/60Hz) Pure 2D Timing 720p (50/60Hz)
1080i (50/60Hz) Pure 2D Timing 1080p (50/60Hz)
1080p (24/50/60Hz) Pure 2D Timing 1080p (24/50/60Hz)
Appendices
720p @ 120 Hz Output mode is 3D 720p.
1080p @ 60 Hz
Output mode is 1080p L / R for dual 1080p
(application).
Output mode is 3D 720p for HDMI 1.3 2D
(1080i side-by-side half) to 3D with SBS
mode is “On”.
Output mode is 1080p L / R for dual 1080p
(application): For HDMI 1.3 2D (1080i side-
by-side half) to 3D with SBS mode is “On”.
Output mode is pure 2D timing.
Computer Compatibility
Computer Input Resolutions Computer Output Resolutions
640 x 480 @ 60Hz 640 x 480 @ 60Hz
800 x 600 @ 60Hz 800 x 600 @ 60Hz
1024 x 768 @ 60Hz 1024 x 768 @ 60Hz
1280 x 720 @ 60Hz 1280 x 720 @ 60Hz
1280 x 800 @ 60Hz 1280 x 800 @ 60Hz
1280 x 1024 @ 60Hz 1280 x 1024 @ 60Hz
1400 x 1050 @ 60Hz 1400 x 1050 @ 60Hz
1440 x 900 @ 60Hz 1440 x 900 @ 60Hz
1680 x 1050 @ 60Hz 1680 x 1050 @ 60Hz
1600 x 1200 @ 60Hz 1600 x 1200 @ 60Hz
1920 x 1080 @ 60Hz 1920 x 1080 @ 60Hz
13
English
Page 14

English
14
Appendices
NOTE
RS232 Control Protocols
Lead Code 3D Projector Adapter ID Command ID space variable carriage return
~ X X X X X n CR
Fix code Set in 3D Projector Adapter Dened by Optoma One Digit Per item Fix code
One Digit
RS232 Command Table(*)
Baud Rate: 9600
There is a <CR> after
all ASCII commands
0D is the HEX code for
<CR> in ASCII code
XX=01-99, 3D projector
adapter's ID, XX=00
is for all 3D projector
adapters
Parity Check: None
Flow Control: None
UART 16550 FIFO: Disable
3D projector adapter Return (Fail): F
3D projector adapter Return (Pass): P
SEND to 3D projector adapter
ASCII Code HEX Code Function Description
~XX00 1 7E 30 30 30 30 20 31 0D Power ON
~XX00 0 7E 30 30 30 30 20 30 0D Power OFF
~XX12 1 7E 30 30 31 32 20 31 0D Direct Source Command HDMI 1
~XX12 15 7E 30 30 31 32 20 31 35 0D Direct Source Command HDMI 2
~XX501 n 7E 30 30 35 30 31 20 a 0D SBS Mode n= 0 (a=30) Off, n= 1 (a=31) On
~XX502 n 7E 30 30 35 30 32 20 a 0D 3D Projector Adapter ID n = 00 (a=30 30) ~ 99 (a=39 39)
SEND from 3D projector adapter automatically
ASCII Code HEX Code Function 3D Projector Adapter Return Description
READ / Return Information from 3D projector adapter
ASCII Code HEX Code Function 3D Projector Adapter Return Description
~XX121 1 7E 30 30 31 32 31 20 31 0D Input Source OKn n: 0/1/15 = None/HDMI 1/HDMI 2
~XX122 1 7E 30 30 31 32 32 20 31 0D Software Version OKdddd dddd: FW version
~XX124 1 7E 30 30 31 32 34 20 31 0D Power State OKn n: 0/1 = Off/On
~XX151 1 7E 30 30 31 35 31 20 31 0D Model Name OKn n: 1 = 3D-XL
~XX152 1 7E 30 30 31 35 32 20 31 0D RS232 Version No. OKn n: RS232 version No.
~XX504 1 7E 30 30 35 30 34 20 31 0D Output 3D State OKn n: 0/1 = 2D/3D
~XX505 1 7E 30 30 35 30 35 20 31 0D SBS State OKn n: 0/1 = Off/On
00~99
Two Digit
Data Bits: 8
Stop Bits: 1
when Standby/Warming INFOn n: 0/1 = Standby/Warming
2 or 3 Digit
See the follow content
Denition One digit
Page 15

English
15
Appendices
Optoma Global Of ces
USA
3178 Laurelview Ct.
Fremont, CA 94538, USA
www.optomausa.com
Canada
2420 Meadowpine Blvd., Suite 105
Mississauga, ON L5N 6S2, Canada
www.optoma.ca
Europe
42 Caxton Way, The Watford Business Park Watford, Hertfordshire,
WD18 8QZ, UK
www.optoma.eu
Service Tel : +44 (0)1923 691865
France
Bâtiment E 81-83 avenue Edouard
Vaillant 92100 Boulogne Billancourt, France
Spain
C/ José Hierro,36 Of. 1C 28522
Rivas VaciaMadrid, Spain
Deutschland
Werftstrasse 25 D40549 Düsseldorf, Germany
Scandinavia
Lerpeveien 25 3040 Drammen
Norway
PO.BOX 9515 3038 Drammen
Norway
For service or support please contact your local of ce.
888-887-5001
510-897-8601
services@optoma.com
888-887-5001
510-897-8601
services@optoma.com
+44 (0) 1923 691 800
+44 (0) 1923 691 888
service@tsc-europe.com
+33 1 41 46 12 20
+33 1 41 46 94 35
savoptoma@optoma.fr
+34 91 499 06 06
+34 91 670 08 32
+49 (0) 211 506 6670
+49 (0) 211 506 66799
info@optoma.de
+47 32 98 89 90
+47 32 98 89 99
info@optoma.no
Page 16

English
16
Appendices
Latin America
3178 Laurelview Ct.
Fremont, CA 94538, USA
www.optoma.com.br
www.optoma.com.mx
Korea
WOOMI TECH.CO.,LTD.
4F,Minu Bldg.33-14, Kangnam-Ku,
seoul,135-815, KOREA
Japan
東京都足立区綾瀬3-25-18
株式会社オーエスエム
www.os-worldwide.com
Taiwan
5F., No. 108, Minchiuan Rd.
Shindian City, Taipei Taiwan 231,
R.O.C.
www.optoma.com.tw
asia.optoma.com
Hong Kong
Unit A, 27/F Dragon Centre, 79
Wing Hong Street, Cheung Sha
Wan, Kowloon, Hong Kong
www.optoma.com.hk
China
5F, No. 1205, Kaixuan Rd.,
Changning District Shanghai,
200052, China
www.optoma.com.cn
888-887-5001
510-897-8601
services@optoma.com
+82+2+34430004
+82+2+34430005
0120-465-040
0120-380-496
info@osscreen.com
+886-2-2218-2360
+886-2-2218-2313
services@optoma.com.tw
+852-2396-8968
+852-2370-1222
+86-21-62947376
+86-21-62947375
Page 17

Appendices
Certication & Safety Notices
This appendix lists the general notices of your projector.
FCC Notice
This device has been tested and found to comply with the limits for a
Class B digital device pursuant to Part 15 of the FCC rules. These limits
are designed to provide reasonable protection against harmful interference in a residential installation. This device generates, uses and can radiate radio frequency energy and, if not installed and used in accordance
with the instructions, may cause harmful interference to radio communications.
However, there is no guarantee that interference will not occur in a particular installation. If this device does cause harmful interference to radio or
television reception, which can be determined by turning the device off
and on, the user is encouraged to try to correct the interference by one or
more of the following measures:
Reorient or relocate the receiving antenna.
•
Increase the separation between the device and receiver.
•
Connect the device into an outlet on a circuit different from that to
•
which the receiver is connected.
Consult the dealer or an experienced radio/television technician for
•
help.
Notice: Shielded cables
All connections to other computing devices must be made using shielded
cables to maintain compliance with FCC regulations.
Caution
Changes or modications not expressly approved by the manufacturer
could void the user’s authority, which is granted by the Federal Communications Commission, to operate this projector.
Operation Conditions
This device complies with Part 15 of the FCC Rules. Operation is subject
to the following two conditions:
This device may not cause harmful interference and
1.
This device must accept any interference received, including interfer-
2.
ence that may cause undesired operation.
Notice: Canadian users
This Class B digital apparatus complies with Canadian ICES-003.
Remarque à l’intention des utilisateurs canadiens
Cet appareil numerique de la classe B est conforme a la norme NMB-003
du Canada.
17
English
Page 18

English
18
Appendices
Declaration of Conformity for EU countries
EMC Directive 2004/108/EC (including amendments)
•
Low Voltage Directive 2006/95/EC
•
R & TTE Directive 1999/5/EC (if product has RF function)
•
Disposal instructions
Do not throw this electronic device into the trash when
discarding. To minimize pollution and ensure utmost protection of the global environment, please recycle it.
 Loading...