

Optiva VODN4623IR Installation Manual

VODN46xxIR
IR Speed Dome
Installation manual
V1.0.0
Distributor:
VOLTA Ltd
Jutrzenki Street 94; 02-230 Warsaw
www.volta.com.pl

IR Speed Dome Installation Manual
1
This manual is furnished under license and may be used or copied only in accordance with the terms of such license. The content of
this manual is furnished for informational use only, is subject to change without notice, and should not be construed as a
commitment by our company. We assume no responsibility or liability for any errors or inaccuracies that may appear in the book.
Except as permitted by such license, no part of this publication may be reproduced, stored in a retrieval system, or transmitted, in any
form or by any means, electronic, mechanical, recording, or otherwise, without the prior written permission of our company.
WE MAKE NO WARRANTIES, EXPRESS OR IMPLIED, INCLUDING WITHOUT LIMITATION THE IMPLIED WARRANTIES OF
MERCHANTABILITY AND FITNESS FOR A PARTICULAR PURPOSE, REGARDING THE SOFTWARE. WE DO NOT WARRANT, GUARANTEE, OR
MAKE ANY REPRESENTATIONS REGARDING THE USE OR THE RESULTS OF THE USE OF THE SOFTWARE IN TERMS OF ITS CORRECTNESS,
ACCURACY, RELIABILITY, CURRENTNESS, OR OTHERWISE. THE ENTIRE RISK AS TO THE RESULTS AND PERFORMANCE OF THE
SOFTWARE IS ASSUMED BY YOU. THE EXCLUSION OF IMPLIED WARRANTIES IS NOT PERMITTED BY SOME STATES. THE ABOVE
EXCLUSION MAY NOT APPLY TO YOU.
IN NO EVENT WILL OUR COMPANY, ITS DIRECTORS, OFFICERS, EMPLOYEES, OR AGENTS BE LIABLE TO YOU FOR ANY CONSEQUENTIAL,
INCIDENTAL, OR INDIRECT DAMAGES (INCLUDING DAMAGES FOR LOSS OF BUSINESS PROFITS, BUSINESS INTERRUPTION, LOSS OF
BUSINESS INFORMATION, AND THE LIKE) ARISING OUT OF THE USE OR INABILITY TO USE THE SOFTWARE EVEN IF WE HAVE BEEN
ADVISED OF THE POSSIBILITY OF SUCH DAMAGES. BECAUSE SOME STATES DO NOT ALLOW THE EXCLUSION OR LIMITATION OF
LIABILITY FOR CONSEQUENTIAL OR INCIDENTAL DAMAGES, THE ABOVE LIMITATIONS MAY NOT APPLY TO YOU.
IR Speed Dome Installation Manual
2
Regulatory Information
FCC Information
FCC compliance: This equipment has been tested and found to comply with the limits for a digital device, pursuant to part 15 of the
FCC Rules. These limits are designed to provide reasonable protection against harmful interference when the equipment is operated
in a commercial environment. This equipment generates, uses, and can radiate radio frequency energy and, if not installed and used
in accordance with the instruction manual, may cause harmful interference to radio communications. Operation of this equipment in
a residential area is likely to cause harmful interference in which case the user will be required to correct the interference at his own
expense.
FCC Conditions
This device complies with part 15 of the FCC Rules. Operation is subject to the following two conditions:
1. This device may not cause harmful interference.
2. This device must accept any interference received, including interference that may cause undesired operation.
EU Conformity Statement
This product and - if applicable - the supplied accessories too are marked with "CE" and comply therefore with the
applicable harmonized European standards listed under the Low Voltage Directive 2006/95/EC, the EMC Directive
2004/108/EC.
2002/96/EC (WEEE directive): Products marked with this symbol cannot be disposed of as unsorted
municipal waste in the European Union. For proper recycling, return this product to your local supplier
upon the purchase of equivalent new equipment, or dispose of it at designated collection points. For more
information see: www.recyclethis.info.
2006/66/EC (battery directive): This product contains a battery that cannot be disposed of as unsorted
municipal waste in the European Union. See the product documentation for specific battery information. The
battery is marked with this symbol, which may include lettering to indicate cadmium (Cd), lead (Pb), or
mercury (Hg). For proper recycling, return the battery to your supplier or to a designated collection point. For
more information see: www.recyclethis.info.
Description on Laser Specification
The optical disc drive such as DVD Super Multi (Double Layer) Drive 22X that is used in this computer is equipped with laser. The
classification label with the following sentence is affixed to the surface of the drive.
CLASS 1 LASER
PRODUCT TO IEC60825-1
LASER KLASSE 1
The drive with the above label is certified by the manufacturer that the drive complies with the requirement for laser product on the
date of manufacturing pursuant to article 21 of Code of Federal Regulations by the United States of America, Department of Health &
Human Services, Food and Drug Administration.
In other countries, the drive is certified to comply with the requirement pursuant to IEC 60825-1 and EN 60825-1 on class 1 laser
product.
This computer is equipped with the optical disc drive in the following list according to the model.
IR Speed Dome Installation Manual
3
Safety Warnings and Cautions
Please pay attention to the following warnings and cautions:
Hazardous Voltage may be present:
Special measures and precautions must be taken when using
this device. Some potentials (voltages) on the device may present a hazard to the user. This device should only
be used by employees from our company with knowledge and training in working with these types of devices
that contain live circuits.
Power Supply Hazardous Voltage:
AC mains voltages are present within the power supply assembly. This device must be
connected to a UL approved, completely enclosed power supply, of the proper rated voltage and current. No user serviceable parts
inside the power supply.
System Grounding (Earthing):
To avoid shock, ensure that all AC wiring is not exposed and that the earth grounding is
maintained. Ensure that any equipment to which this device will be attached is also connected to properly wired grounded
receptacles and are approved medical devices.
Power Connect and Disconnect:
The AC power supply cord is the main disconnect device to mains
(AC power).The socket outlet shall be installed near the equipment and shall be readily accessible.
Installation and Maintenance:
Do not connect/disconnect any cables to or perform
installation/maintenance on this device during an electrical storm.
Power Cord Requirements:
The connector that plugs into the wall outlet must be a grounding-type male plug designed for
IR Speed Dome Installation Manual
4
use in your region. It must have certification marks showing certification by an agency in your region. The connector that plugs into
the AC receptacle on the power supply must be an IEC 320, sheet C13, female connector. See the following website for more
information http://kropla.com/electric2.htm.
Lithium Battery:
This device contains a Lithium Battery. There is a risk of explosion if the battery is
replaced by an incorrect type. Dispose of used batteries according to the vendor’s instructions and in
accordance with local environmental regulations.
Perchlorate Material:
Special handling may apply. See
www.dtsc.ca.gov/hazardouswaste/perchlorate. This notice is required by California Code of Regulations,
Title 22, Division 4.5, Chapter 33: Best Management Practices for Perchlorate Materials. This device includes a battery which contains
perchlorate material.
Taiwan battery recycling:
Please recycle batteries.
Thermal and Mechanical Injury:
Some components such as heat sinks, power regulators, and
processors may be hot; care should be taken to avoid contact with these components.
Electro Magnetic Interference:
This equipment has not been tested for compliance with
emissions limits of FCC and similar international regulations. This device is not, and may not be, offered for sale or lease, or sold, or
leased until authorization from the United States FCC or its equivalent in other countries has been obtained. Use of this equipment in
a residential location is prohibited. This equipment generates, uses and can radiate radio frequency energy which may result in
harmful interference to radio communications. If this equipment does cause harmful interference to radio or television reception,
which can be determined by turning the equipment on and off, the user is required to take measures to eliminate the interference or
discontinue the use of this equipment.
Lead Content:
Please recycle this device in a responsible manner. Refer to local environmental regulations for
proper recycling; do not dispose of device in unsorted municipal waste.
IR Speed Dome Installation Manual
5
Safety Instruction
These instructions are intended to ensure that the user can use the product correctly to avoid danger or property loss.
The precaution measure is divided into ‘Warnings’ and ‘Cautions’:
Warnings: Serious injury or death may be caused if any of these warnings are neglected.
Cautions: Injury or equipment damage may be caused if any of these cautions are neglected.
Warnings Follow these safeguards to prevent serious
injury or death.
Cautions Follow these precautions to prevent potential
injury or material damage.
Warnings
In the use of the product, you must strictly comply with the electrical safety regulations of the nation and region.
Please use the power adapter which is provided by normal company. The adapter should be AC 24V/3A according to dome
model.
Do not connect several devices to one power adapter as an adapter overload may cause over-heating and can be a fire hazard.
Please make sure that the power has been disconnected before you wire, install or dismantle the speed dome.
When the product is installed on a wall or ceiling, the device should be firmly fixed.
If smoke, odor, or noise rise from the device, turn off the power at once and unplug the power cable, then contact the service
center.
If the product does not work properly, please contact your dealer or the nearest service center. Never attempt to disassemble
the camera yourself. (We shall not assume any responsibility for problems caused by unauthorized repair or maintenance.)
Cautions
Do not drop the dome or subject it to physical shock, and do not expose it to high electromagnetism radiation. Avoid the
equipment installation on vibrations surface or places subject to shock (ignorance can cause equipment damage).
Do not place the dome in extremely hot, cold (the operating temperature shall be -30°C ~ +65°C), dusty or damp locations, or
fire or electrical shock will occur otherwise.
The dome cover for indoor use shall be kept from rain and moisture.
Exposing the equipment to direct sun light, low ventilation or heat source such as heater or radiator is forbidden (ignorance can
cause fire danger).
Do not aim the camera at the sun or extra bright places. A blooming or smear may occur otherwise (which is not a malfunction
however), and affecting the endurance of sensor at the same time.
Please use the provided glove when open up the dome cover, avoid direct contact with the dome cover, because the acidic
sweat of the fingers may erode the surface coating of the dome cover.
Please use a soft and dry cloth when clean inside and outside surfaces of the dome cover, not to use alkaline detergents.
Do not stare at infrared lights closely to avoid hurting your eyes when the infrared lights are on.
Improper use or replacement of the battery may result in hazard of explosion. Replace with the same or equivalent type only.
Dispose of used batteries according to the instructions provided by the battery manufacturer.

IR Speed Dome Installation Manual
6
Preparation for Installation
Basic requirements.
All the electronic operation should be strictly compliance with the electrical safety regulations, fire prevention regulations
and other related regulations in your local region.
Check whether all the accessories are included according to the packing list. Make sure that the installation place and mode
conform to the demands. If not, please contact the supplier.
Please use this product according to the requirement of working environment.
Check installation space.
Make sure the place have enough space to install the speed domes and its accessories.
Check the intensity of conformation at the installation location.
Please make sure that the ceilings or walls are strong enough to withstand four times the weight of speed dome and its
accessories.
Preparation of cables.
Choose the video cable according to the transmission distance. The video should meet the least demands as: 75Ω
resistance; 100% copper core conducting wire; 95% weaving copper shield.
RS485 communication cable, please refer to Appendix 2
24V AC power cable, please refer to Appendix 3
Please keep all wrappers.
Please keep all wrappers after unpack them for future use. In case of any failure occurred, you need to return the speed dome to
the factory with the original wrapper.
Note: Transportation without the original wrapper may result in damage on the speed dome and lead to additional costs.

IR Speed Dome Installation Manual
7
Table of Contents
Chapter 1
Installation............................................................................................................................................ 8
1.1 Installation and Cabling ........................................................................................................................................ 8
1.1.1 Installing the Speed Dome ............................................................................................................................... 8
1.1.2 Connecting the Cables ................................................................................................................................... 11
1.2 DIP Switch Settings ............................................................................................................................................. 11
1.2.1 Address Settings ............................................................................................................................................. 12
1.2.2 Baudrate Settings ........................................................................................................................................... 14
1.2.3 Number 9 DIP Switch ..................................................................................................................................... 14
1.2.4 Terminal Resistor Settings .............................................................................................................................. 14
1.3 Power Cable Requirement ................................................................................................................................. 14
Chapter 2
Mount Dimension ................................................................................................................................ 16
2.1 Long Wall Mount ................................................................................................................................................ 16
2.2 Short Wall Mount ............................................................................................................................................... 17
2.3 Corner Adapter ................................................................................................................................................... 18
2.4 Pole Adapter ....................................................................................................................................................... 18
Chapter 3
Mounting Instructions ......................................................................................................................... 19
3.1 Wall Mounting .................................................................................................................................................... 19
3.1.1 Components ................................................................................................................................................... 19
3.1.2 Mounting with a Long Mount ........................................................................................................................ 20
3.1.3 Mounting with a Power Supply Box ............................................................................................................... 21
3.2 Corner Mounting ................................................................................................................................................ 22
3.1.1 Components ................................................................................................................................................... 23
3.1.2 Corner Mounting Instructions ........................................................................................................................ 24
3.3 Pole Mounting Applications ............................................................................................................................... 25
3.1.3 Mounting Components .................................................................................................................................. 26
3.1.4 Pole Mounting Instructions ............................................................................................................................ 27
Appendix 1 Lightning and Power Surge Protection ...................................................................................................... 30
Appendix 2 RS485 Bus Connection .............................................................................................................................. 32
Appendix 3 Wire Gauge Standards .............................................................................................................................. 35

IR Speed Dome Installation Manual
8
Chapter 1 Installation
Before you start:
Check the package contents and make sure that the device in the package is in good condition and
all the assembly parts are included.
Note: The adapter should be AC 24V/3A.
1.1 Installation and Cabling
1.1.1 Installing the Speed Dome
Steps:
1. Install the mount for the speed dome. Please refer to the chapter 2, 3, 4 and 5 for details about
the installing steps.
Notes:
For cement wall mounting, you need to use the expansion screw to fix the mount. The
mounting hole of the expansion pipe on the wall should align with the mounting hole on the
mount.
For wooden wall mounting, you can just use the self-tapping screw to fix the bracket.
2. Install the speed dome to the mount. The wall mount is taken as an example below.
1) Wrap the thread compound to the thread of the mounting adapter. The mounting adapter
is shown in Figure 1-1.
Figure 1-1 Mounting Adapter
2) Rotate the mounting adapter to the wall mount. Secure the mounting adapter to the wall
mount tightly with lock screw as shown in Figure 1-2.
Lock Screw
Hook for
S
afety
R
ope
Thread

IR Speed Dome Installation Manual
9
Figure 1-2 Secure the Mounting Adapter
3) Tear off the protective sticker as shown in Figure 1-3.
4) Set the address, baudrate, protocol, etc. by switching the DIP switch in the speed dome. For
the details about DIP switch settings, please refer to section 1.2 DIP Switch Settings.
Figure 1-3 Tear off the Protective Sticker
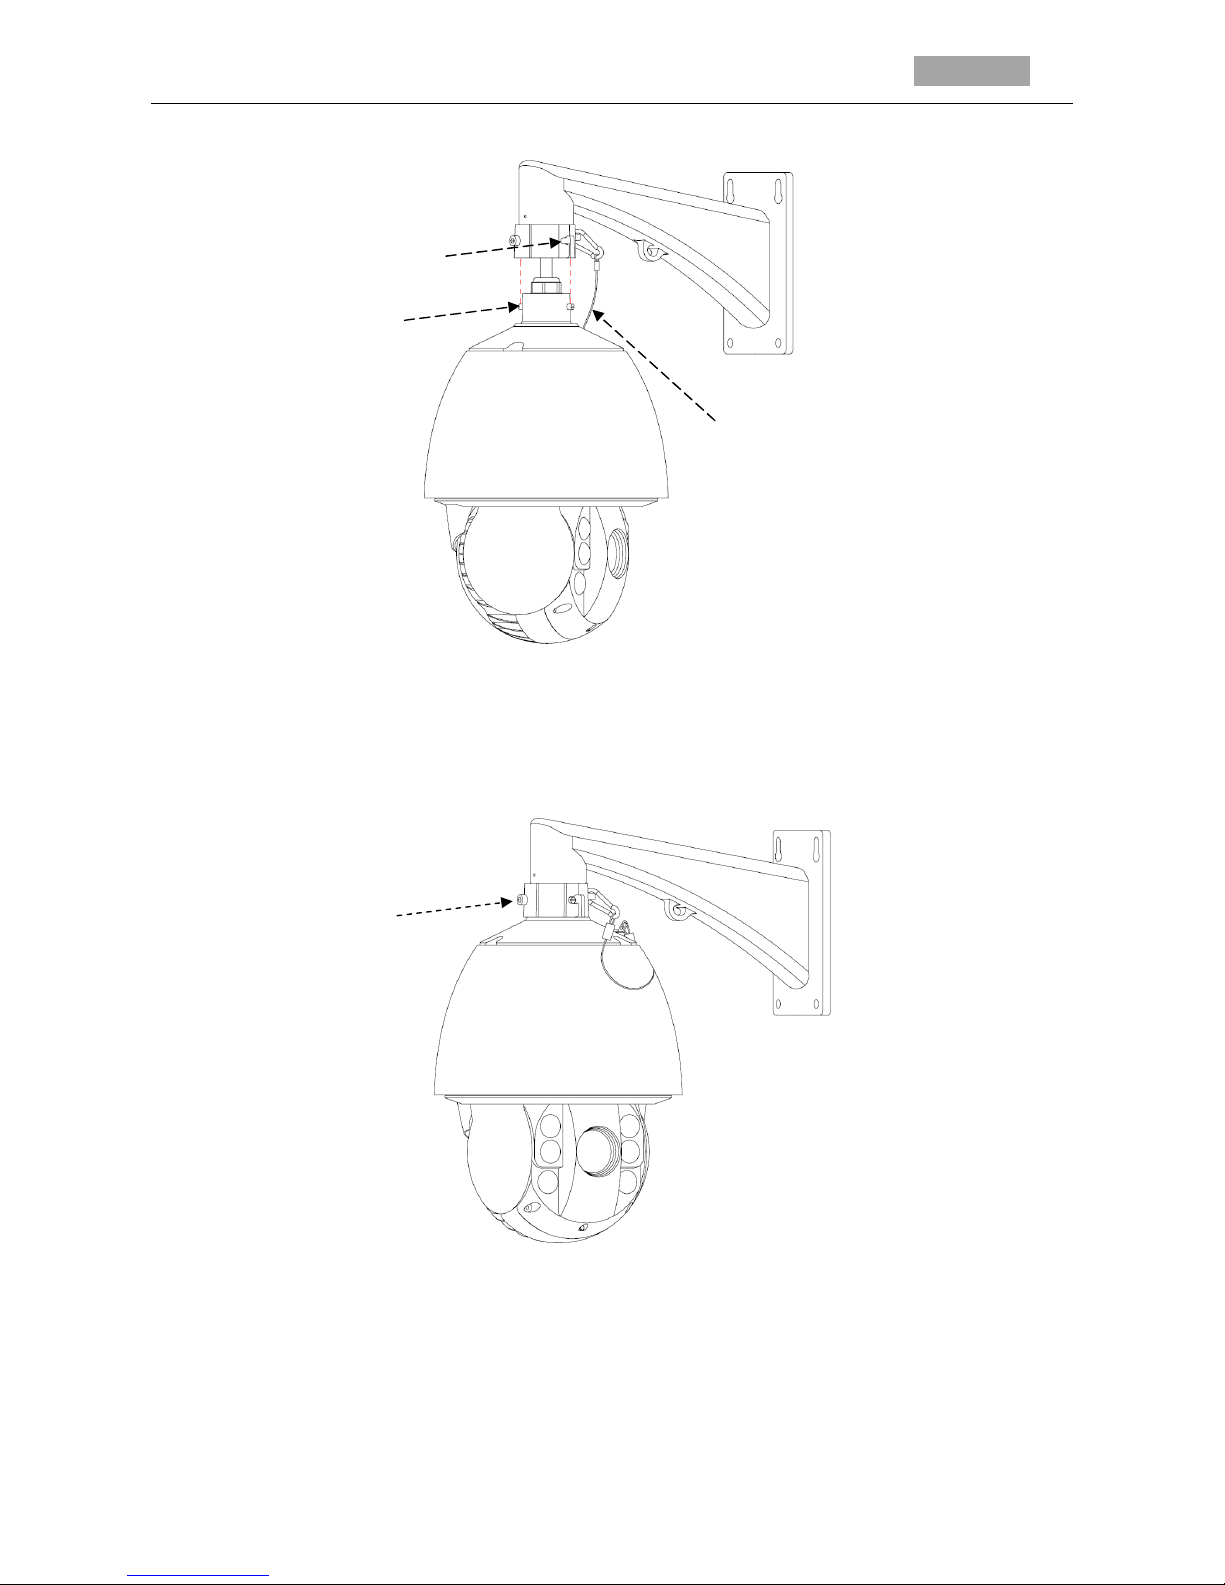
5) Hang the safety rope to the speed dome and the hook on the mounting adapter as shown
in Figure 1-4.
6) Route the cables of the speed dome through the wall mount.
7) Insert the hangers on the speed dome to the grooves on the mounting adapter. Rotate the
speed dome clockwise to snap the hangers into the grooves as shown in Figure 1-4.
Protective
Sticker
Lock Screw
IR Speed Dome Installation Manual
10
Figure 1-4 Install the Speed Dome
8) Use the allen key to tighten the lock screw on the mounting adapter for ensuring the speed
dome is secured tightly.
Figure 1-5 Secure the Speed Dome
Hangers
Lock Screw
Safety Rope
Grooves
 Loading...