

Page 1

Table of Contents
Welcome 1
1 Important Things to Know about Your
Optium Xceed Diabetes Monitoring System
3
Intended Use 3
How Your Optium Xceed Diabetes
Monitoring System Works 4
Optium Xceed Kit Contents 4
Getting to Know Your Meter’s Features 5
2 Setting Up Your Optium Xceed Meter 7
Buttons to Use 7
Setup Options 7
How to Set the Beeper, Date, Time, & View
Measurement Units 8
Set Beeper 8
Set Time 9
Set Date 10
Set Time Format 12
Set Date Format 12
Blood Glucose Measurement Units 13
3 Calibrating Your Optium Xceed Meter 14
Why Calibrate Your Meter? 14
When to Calibrate Your Meter 14
What You Will Need 14
How to Calibrate Your Meter 14
How to Recall the LOT Number 17
4 Monitoring Your Blood Glucose 18
What You Will Need 18
Important Information about Monitoring
Your Blood Glucose 18
How to Monitor Your Blood Glucose 19
Understanding Your Result 24
5 Monitoring Your Blood β-Ketone 27
What You Will Need 27
Important Information about Monitoring
Your Blood
β-Ketone 27
How to Monitor Your Blood
β-Ketone 29
Understanding Your Result 33
ART10825-Rev-A-Man.indd 1 11/10/06 1:08:42 PM
Page 2

6 Doing A Control Solution Test 36
Why Do A Control Solution Test? 36
When Is Doing A Control Solution Test Recommended? 36
Important Information about Control Solution Testing 36
What You Will Need 37
How to Do Control Solution Testing 37
Understanding Your Result 41
7 Reviewing & Using Your Results 42
What Can Your Meter Show You? 42
How to See Results in Memory 43
How to See Averages 45
Transferring Your Results to A Computer 46
8 Understanding & Troubleshooting
Error Messages 47
What An Error Message Means & 47
W
hat You Need to Do
9 Your Meter’s Specifications & Limitations 51
Important Information about Using Blood 53
Samples from the Forearm, Upper Arm,
or Base of t
he Thumb
10 Caring For Your Meter
54
Cleaning Your Meter 54
Replacing Your Meter’s Battery 54
11 Support & Guarantee 57
References 60
ART10825-Rev-A-Man.indd 2-3 11/10/06 1:08:42 PM
Page 3

Please contact your local Abbott Diabetes Care office or
distributor with any questions you may have about the
Optium Xceed Diabetes Monitoring System (please see
page 57 for Customer Support phone numbers). If you
cannot reach your local office or distributor, contact your
healthcare professional.
Please read the following items before using your Optium
Xceed Diabetes Monitoring System:
• User guide
• Blood glucose test strip instructions for use
• Blood β-Ketone test strip instructions for use
• Lancing device instructions for use and other information
• Warranty card
Welcome
Thank you for choosing the Optium™ Xceed
™
Diabetes
Monitoring System.
Important steps for using the System are inside this guide.
Please read it carefully.
Your new Optium Xceed Diabetes Monitoring System is
an important tool that can help you better manage your
diabetes. The System measures both blood glucose (sugar)
and blood β-Ketone. Blood glucose and blood β-Ketone
results can help you understand your diabetes and what
happens with:
• Food
• Exercise
• Stress and illness
• Diabetes medications
Always monitor your blood glucose and blood β-Ketone
according to your healthcare professional’s recommendations.
IMPORTANT:
Any user guide text shown in a shaded box like this one
is important information. Please pay special attention to
these boxes.
21
ART10825-Rev-A-Man.indd 4-5 11/10/06 1:08:43 PM
Page 4
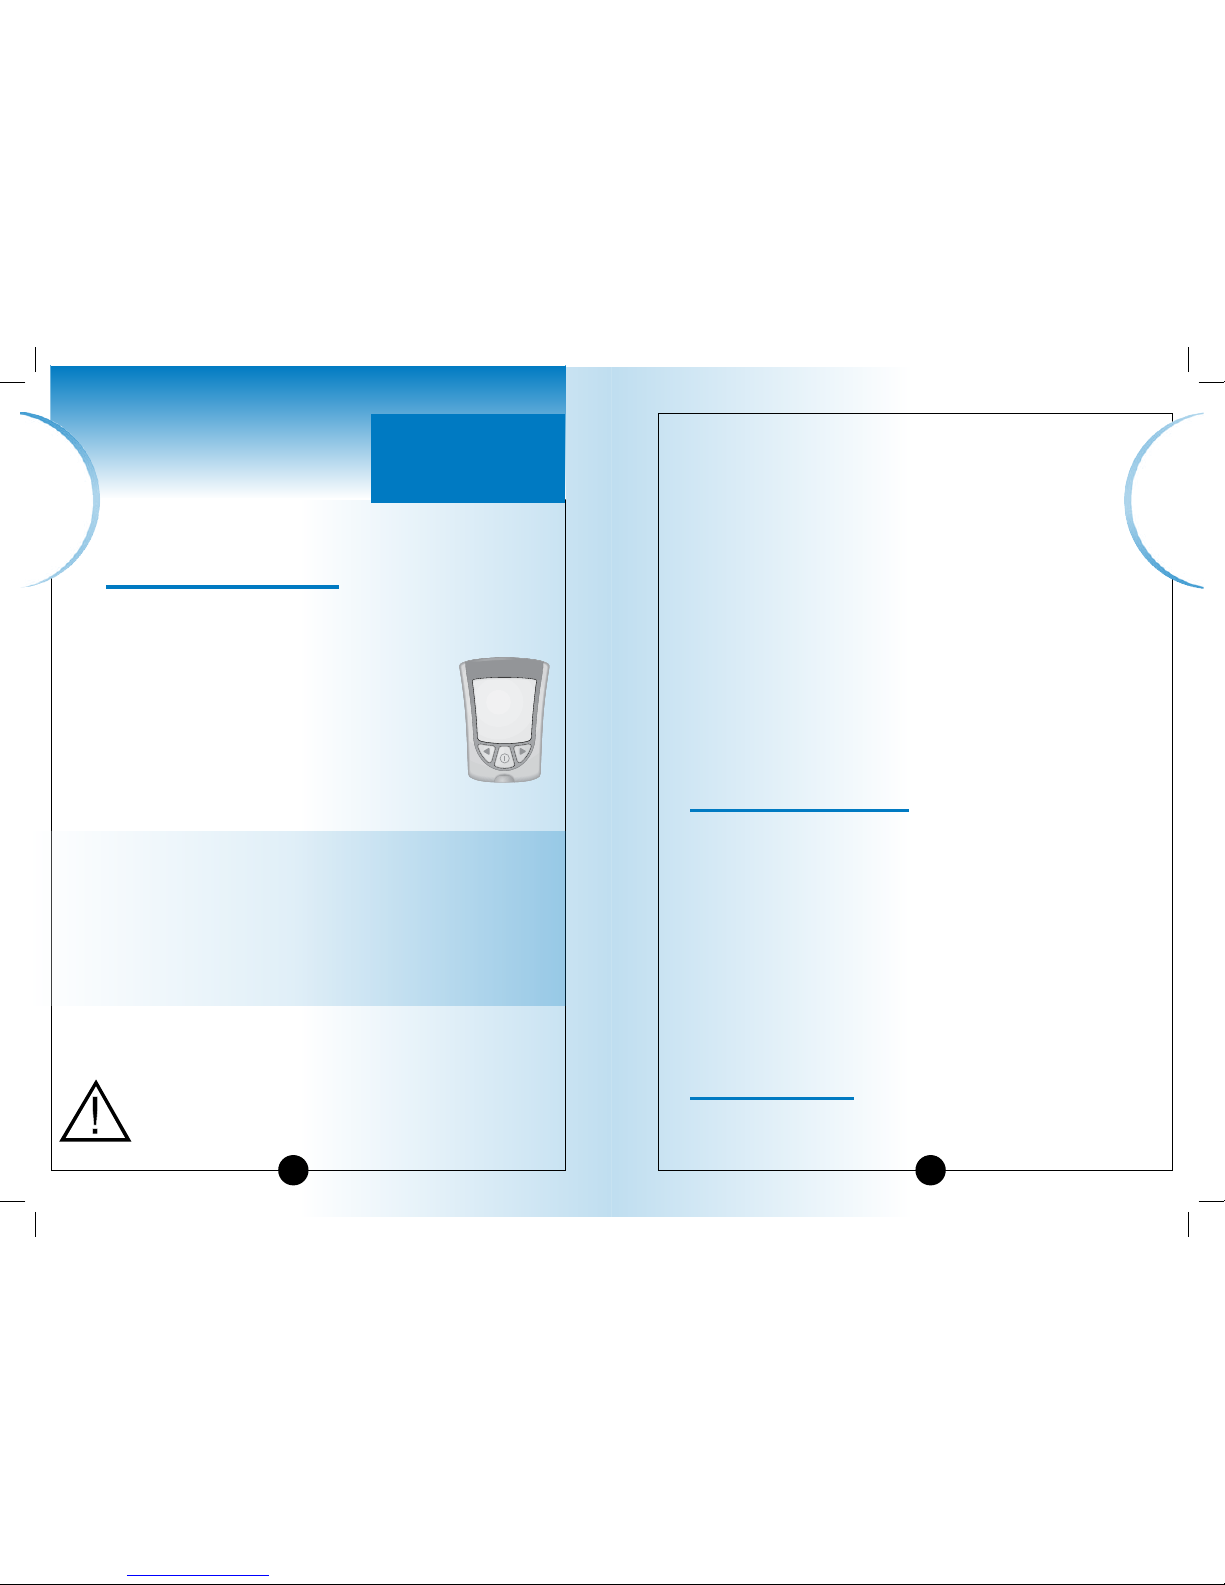
How Your Optium Xceed Diabetes Monitoring
System Works
When you insert a test strip into your meter, the Apply
Sample message shows on your meter’s display window.
When a blood sample or control solution sample is
applied to the test strip, the glucose or β-Ketone reacts
with the chemicals on the test strip. This reaction produces
a small electrical current that is measured. The result
shows on your meter’s display window.
Optium Xceed Kit Contents
Optium Xceed Meter
Optium Xceed User’s Guide
– Contains system information and directions.
Carrying Case
– Use this to store and carry your meter and other monitoring
supplies.
Your kit may also contain:
Optium Xceed Quick Reference Guide
– Gives the basic steps to calibrate your meter and monitor
your blood glucose.
Logbook
– Use this to record your test results, activities, and medications.
Limited Warranty Card
– Please fill this out and return to the address provided to start
your warranty. Filling out this card helps to ensure that you
receive any updates regarding your Optium Xceed meter.
Lancing Device, Lancets, Instructions for Use and
Other Information.
Blood Glucose Test Strips and Instructions for Use.
Items not included:
MediSense Control Solutions.
Blood β-Ketone Test Strips and Instructions for Use.
Data Management System.
Important
Information
▼
4
CHAPTER 1
Important Things
to Know about Your
Optium Xceed Diabetes
Monitoring System
Intended Use –
Your Optium Xceed System:
• Is indicated for home (lay user) or professional use in the
management of patients with diabetes.
• Is for self testing or healthcare professional
use outside the body (in vitro diagnostic use).
• Is for monitoring glucose in fresh whole
blood (for example, from the fingertip).
• Is for monitoring β-Ketone in fresh whole
blood from the fingertip.
• Measures β-hydroxybutyrate (β-Ketone), the
most important of the three ketone bodies
circulating in the bloodstream.
• Is for use only with Optium™ Blood Glucose Test Strips and
Optium™ Blood β-Ketone Test Strips.
• Optium™ and Optium™ POC Blood Glucose Test Strips are
different. Please refer to your test strip instructions for use
for important information about sample types that may be
used with these test strips.
• Optium™ POC Blood Glucose Test Strips are for use by
healthcare professionals only.
Healthcare professionals:
Please refer to the test strip instructions for use for more
information about sample types.
Potential Infection Risk:
Healthcare professionals performing blood tests with
this system on multiple patients must always wear
gloves and should follow the infection control policies
and procedures approved by their facility.
Questions? Call
Customer Support:
See page 57.
Important
Information
▼
▼
3
ART10825-Rev-A-Man.indd 6-7 11/10/06 1:08:46 PM
Page 5
Important
Information
65
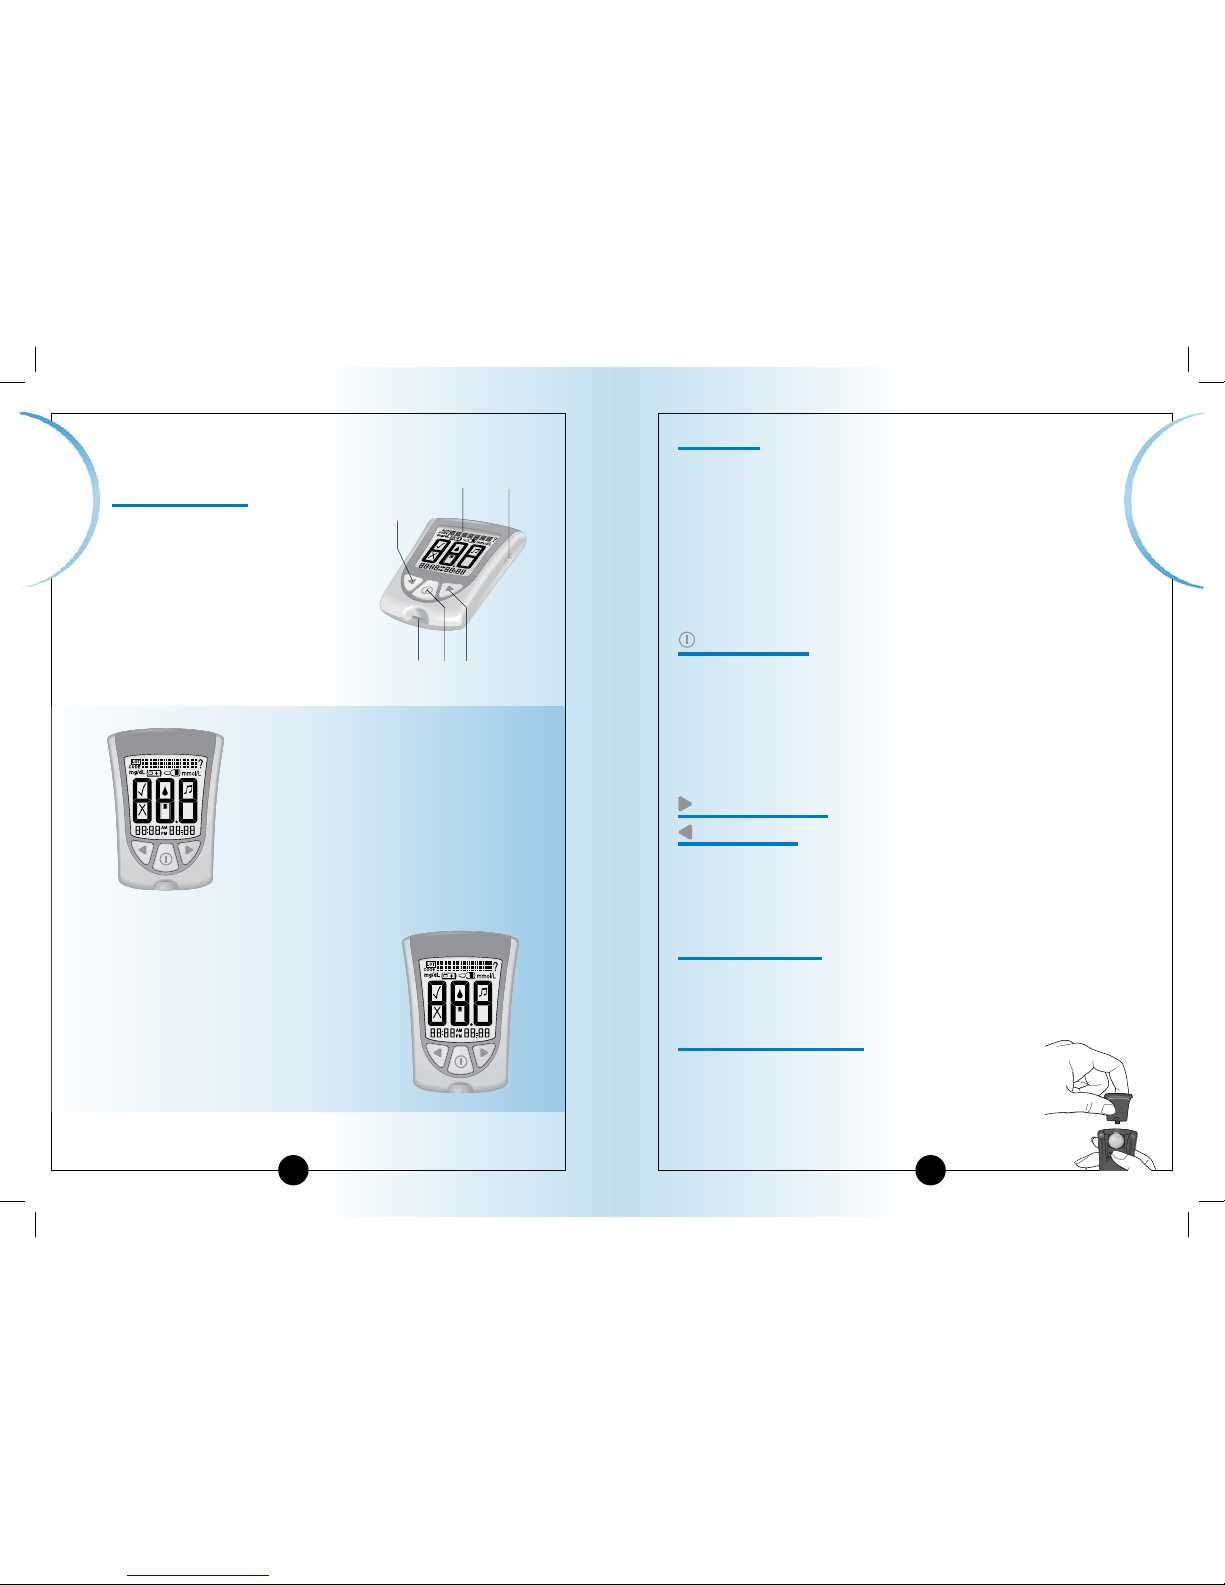
Strip Port
This is where you insert:
• A blood glucose test strip.
• A blood β-Ketone test strip.
• A glucose calibrator.
• A ketone calibrator.
• Data cable (not included) for uploading
results to a computer.
Mode Button
Use this button to:
• Turn meter ON and OFF.
• Access meter setup options.
• Access and save meter settings.
• Access previous results and averages.
Forward Button
Back Button
Use these buttons to:
• Review and select meter settings.
• Review results and averages.
Backlight Button
Use this button to:
• Turn backlight ON and OFF.
Battery Compartment
This is where the battery is installed.
• If your meter does not turn on, check that
your battery is installed properly.
• For new battery installation, see Chapter 10.
Important
Information
Getting to Know Your Meter’s Features
Display Window
This shows:
• Blood glucose and blood
β-Ketone results.
• Glucose and β-Ketone
LOT numbers.
• Previous test results and
error messages.
• Blood glucose averages.
IMPORTANT:
Each time you turn your meter on,
a full display shows. This is called a
Display Check. Look at the Display
Check each time it appears on your
meter’s display window, especially
before you monitor your blood glucose
or blood β-Ketone. The Display Check
shows on the display window briefly.
Do not use the meter if the meter
Display Check does not exactly match
the picture here (for example, if you
see a "3" instead of an "8"). The meter
may show an incorrect result when
you use it. Please call Customer
Support for assistance.
Back
Button
Backlight
Button
Display
Window
Strip
Port
Mode
Button
Forward
Button
▼
Display Check
ART10825-Rev-A-Man.indd 8-9 11/10/06 1:08:51 PM
Page 6
CHAPTER 2
Set Date Format
In "Set Date Format", you choose how the month and
day show on the meter’s display window.
Measurement Units
Blood glucose measurement units are factory-set in mg/dL
or mmol/L.
Blood β-Ketone measurement units are in mmol/L only.
Setting Up Your Optium
Xceed Meter
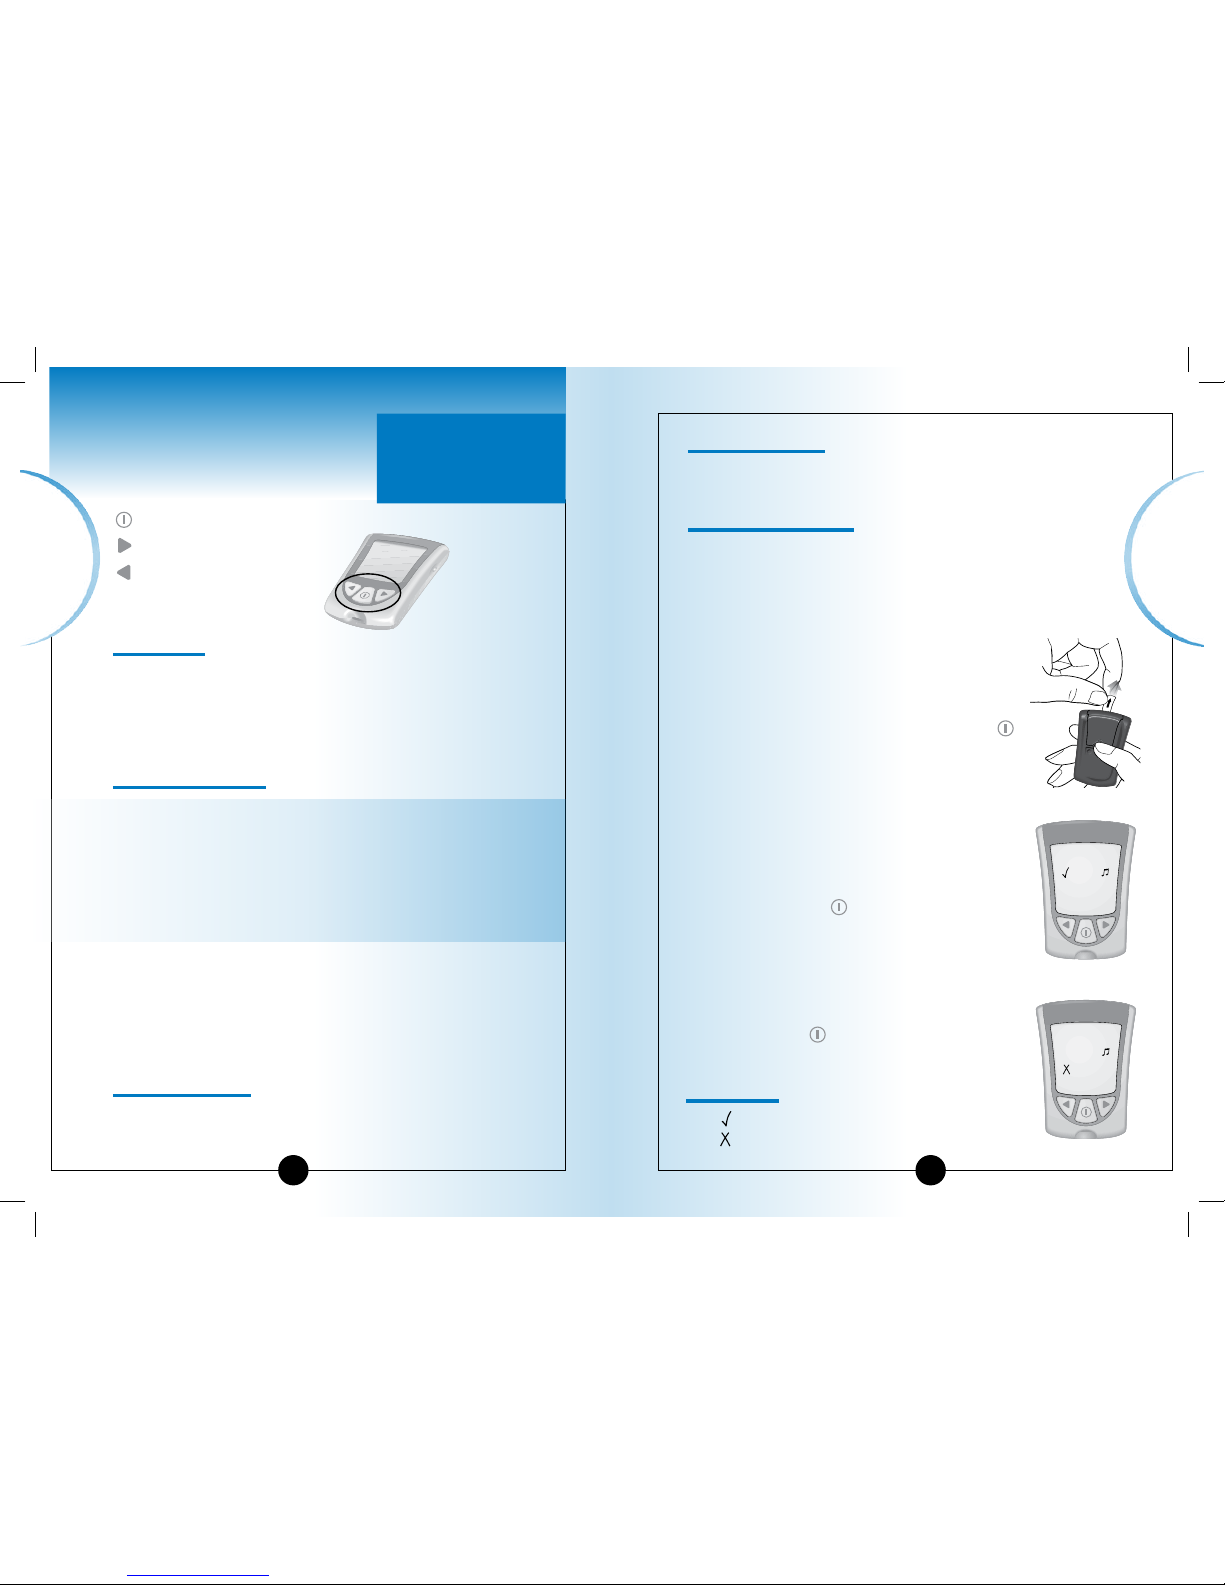
Buttons to Use
Mode Button.
Forward Button.
Back Button.
Setup Options
Set Beeper
If the beeper is set ON, it will beep when:
• The calibrator is fully inserted.
• The test countdown starts.
• The test countdown finishes.
Set Time, Set Date
IMPORTANT: Set the correct time and date before you
use the meter for the first time.
This will help you keep records of when you monitor
and will help you and your healthcare professional make
informed decisions about your care.
You must set the time and date to review averages.
You may need to re-set the time and date:
• After you replace the battery.
• When you travel between time zones or when the time
zone you are in changes.
In "Set Date", you set the year, month, and day.
Set Time Format
In "Set Time Format", you choose how the time shows on
the meter’s display window.
▼ ▼
Questions? Call
Customer Support:
See page 57.
How to Set the Beeper, Date, Time, &
View Measurement Units
To begin, pull the battery tab out. Your
meter should be turned OFF. You will
automatically be prompted to set the
time and date the first time you press the
button to turn your meter on (see Set Time
and Set Date sections in this chapter).
Before you start, please note: "Press and
Hold" means that you press the button in
for at least 2 seconds. "Press and Release"
means that you press the button and let it
go quickly.
Press and Hold the
button to turn the
meter off and save your settings at any
time. The meter automatically turns off after
30 seconds of no action.
If you like the setting that you see on your
meter and do not want to change it, Press
and Release the
button to move to the
next setup option.
Set Beeper
The means the beeper is ON.
The
means the beeper is OFF.
▼
Beeper OFF
Setting Up
Your Meter
8
Beeper ON
Setting Up
Your Meter
7
ART10825-Rev-A-Man.indd 10-11 11/10/06 1:08:56 PM
Page 7
9
Setting Up
Your Meter
1
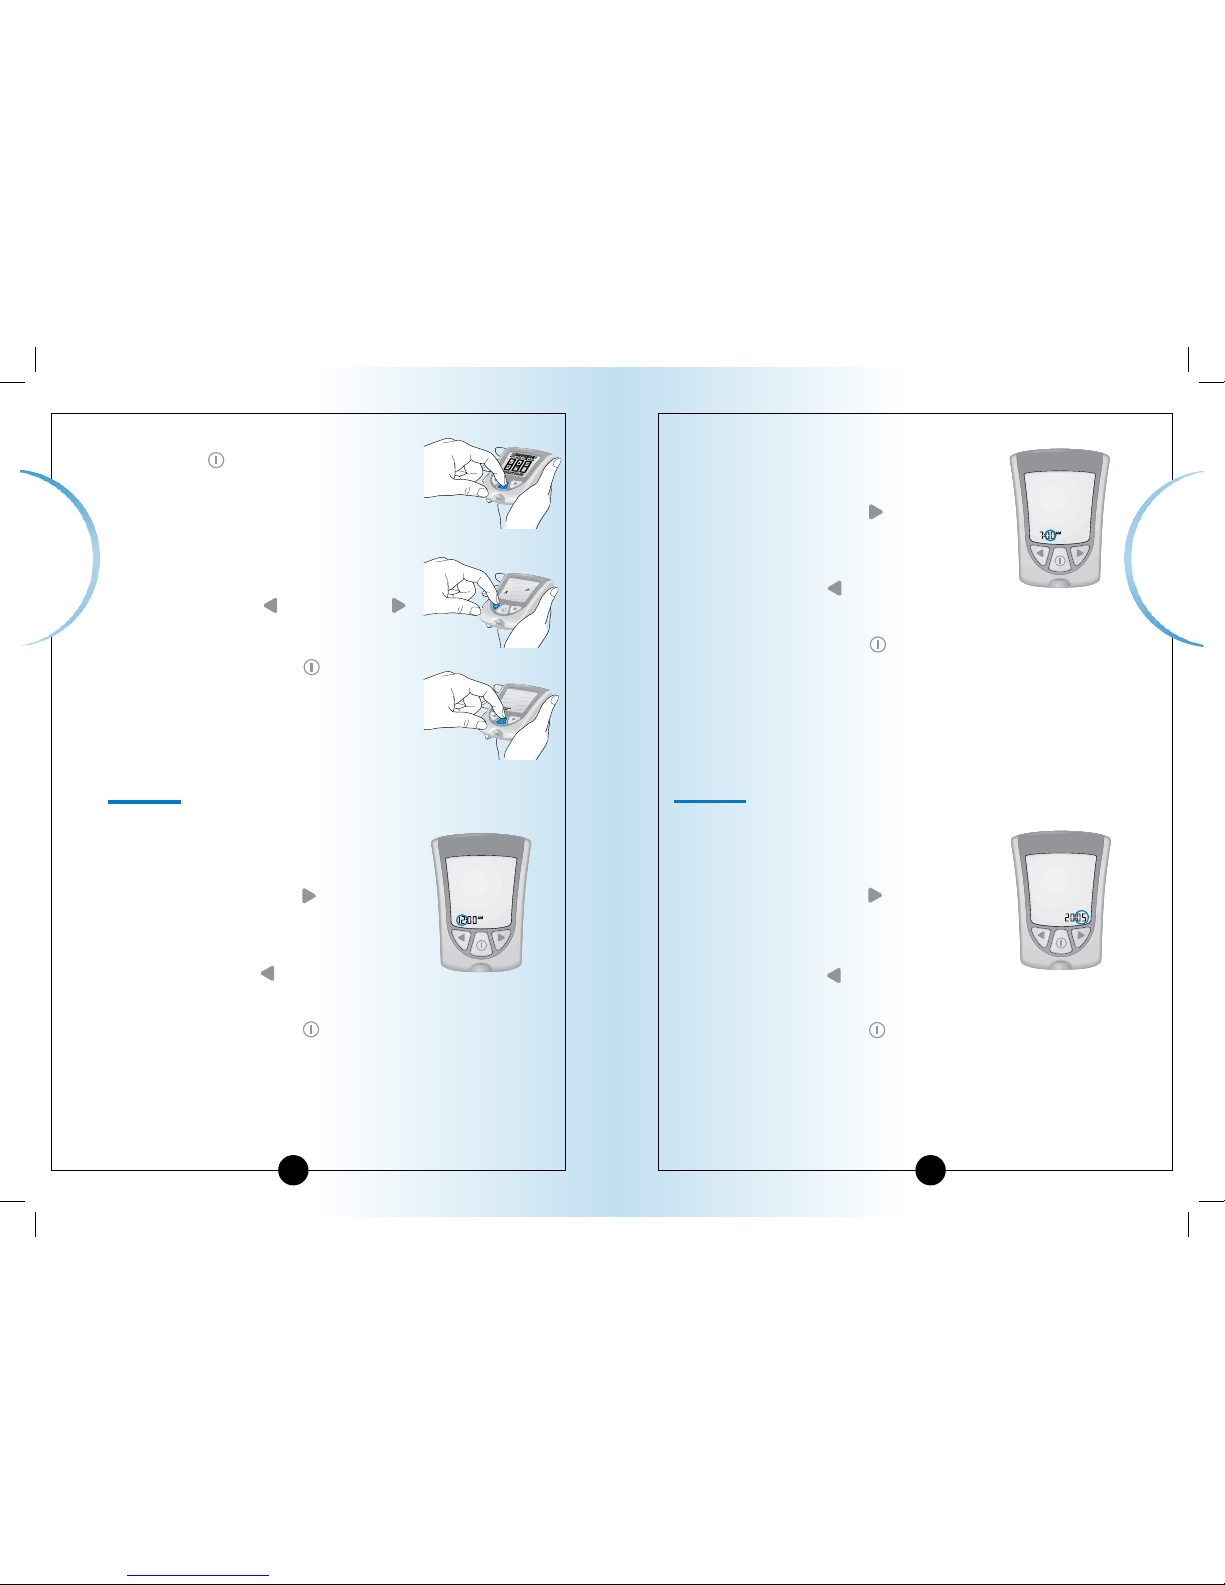
To turn your meter ON, Press and
Hold the
button.
The beeper ON message shows on
the display window. The musical
notes flash on and off, and the
meter beeps.
2
To change the beeper setting, Press
and Release the
button or the
button once.
3
Press and Release the button to
save the beeper setting and to move
to Set Time (Hour).
10
Setting Up
Your Meter
Set Time
Hour:
The Hour flashes on and off.
1
Press and Release the button to
move the hour forward.
2
If you go past the correct hour, Press
and Release the
button to move
the hour back.
3
Press and Release the button to
save the hour and to move to
Set Minutes.
Minutes:
The Minutes flash on and off.
1
Press and Release the button to
move the minutes forward.
2
If you go past the correct minute, Press
and Release the
button to move the
minutes back.
3
Press and Release the button to save
the minutes and to move to Set Date.
Set Date
Year:
The Year flashes on and off.
1
Press and Release the button to
move the year forward.
2
If you go past the correct year, Press
and Release the
button to move the
year back.
3
Press and Release the button to save
the year and to move to Set Month.
ART10825-Rev-A-Man.indd 12-13 11/10/06 1:09:02 PM
Page 8
Setting Up
Your Meter
11
Choice #1
Choice #2
Month:
The Month flashes on and off.
1
Press and Release the button to
move the month forward.
2
If you go past the correct month,
Press and Release the
button to
move the month back.
3
Press and Release the button to save
the month and to move to Set Day.
Day:
The Day flashes on and off.
1
Press and Release the button to
move the
day forward.
2
If you go past the correct day, Press
and Release the
button to move
the day back.
3
Press and Release the button to
save the day and to move to Set
Time Format.
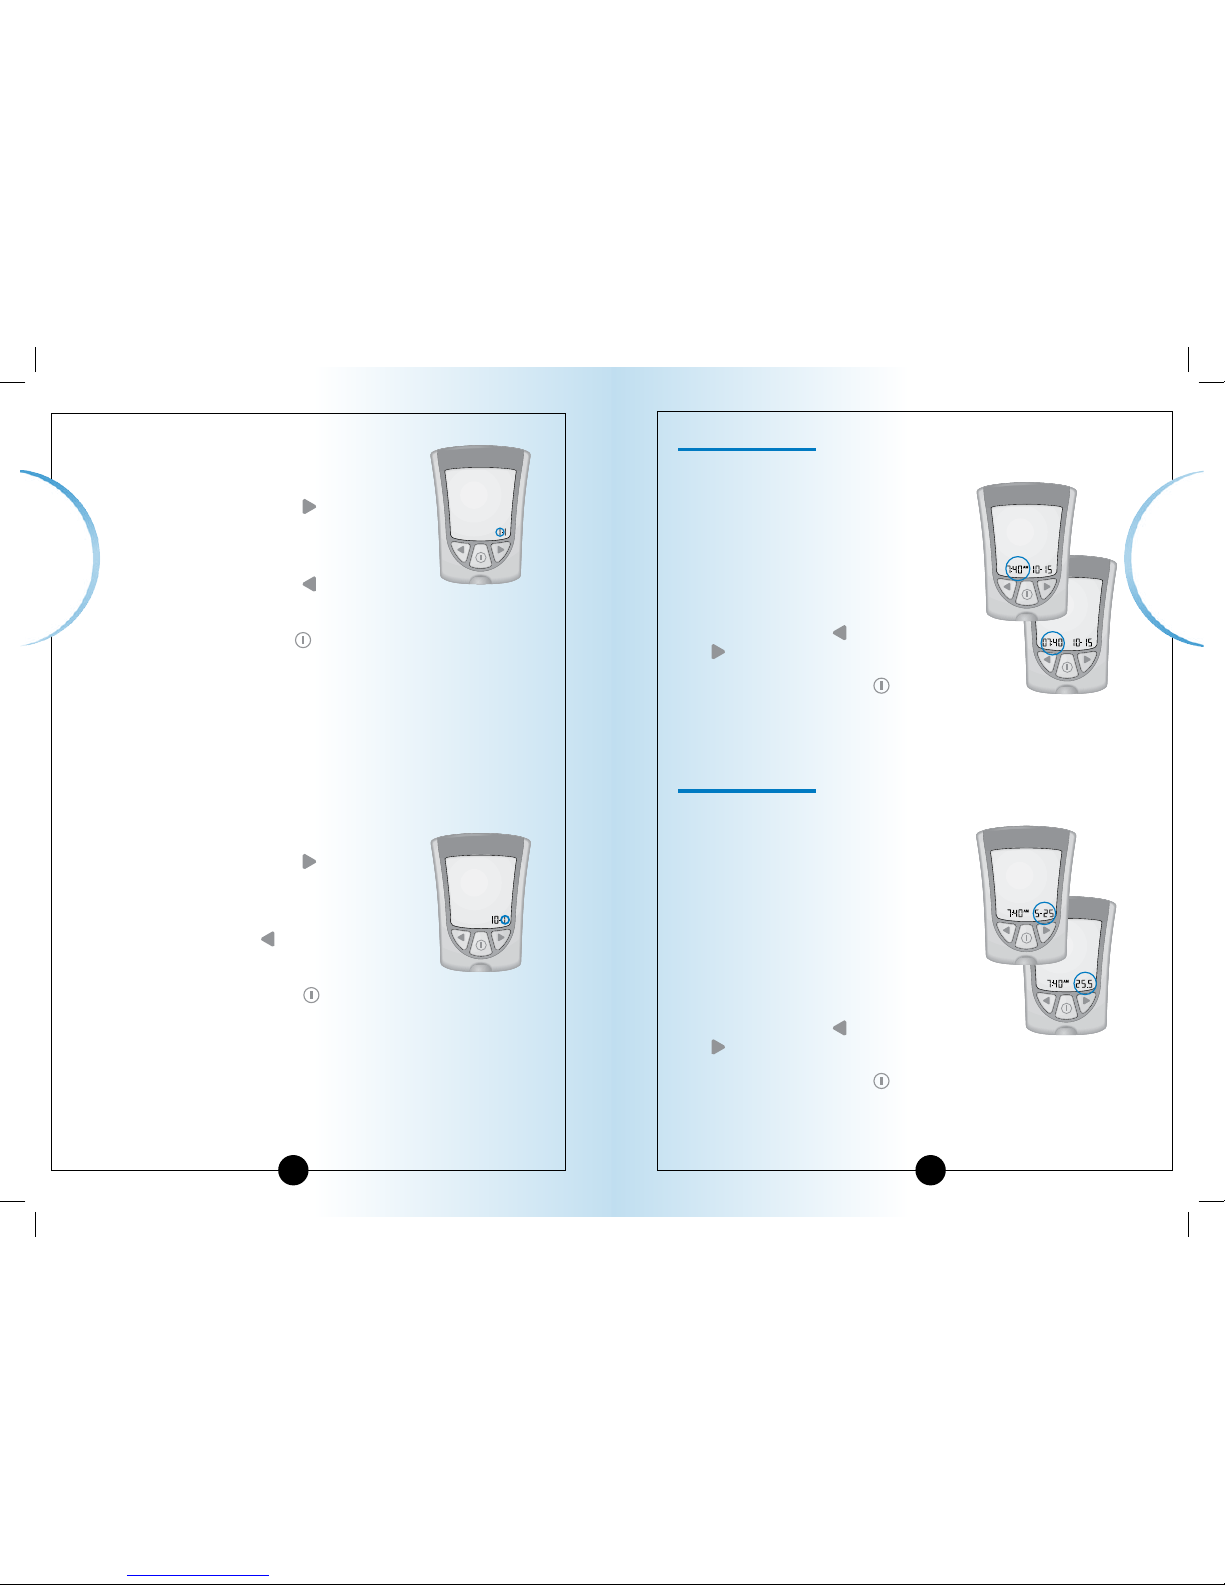
Set Time Format
You have two choices:
Choice #1: For the 12-hour format, AM
or PM shows.
Choice #2: For the 24-hour format, AM
or PM does not show.
1
To change the Time Format, Press
and Release the
button or the
button once.
2
Press and Release the button to
save the Time Format and to move
to Set Date Format.
Set Date Format
You have two choices:
Choice #1: For the month-day format,
"-" shows with the date.
Example: "25 May" shows as "5-25".
Choice #2: For the day.month format,
"•" shows with the date.
Example: "25 May" shows as "25.5".
1
To change the Date Format, Press
and Release the
button or the
button once.
2
Press and Release the button to
save the Date Format and to move
to Measurement Units.
Choice #1
Choice #2
Setting Up
Your Meter
12
ART10825-Rev-A-Man.indd 14-15 11/10/06 1:09:07 PM
Page 9
Setting Up
Your Meter
13
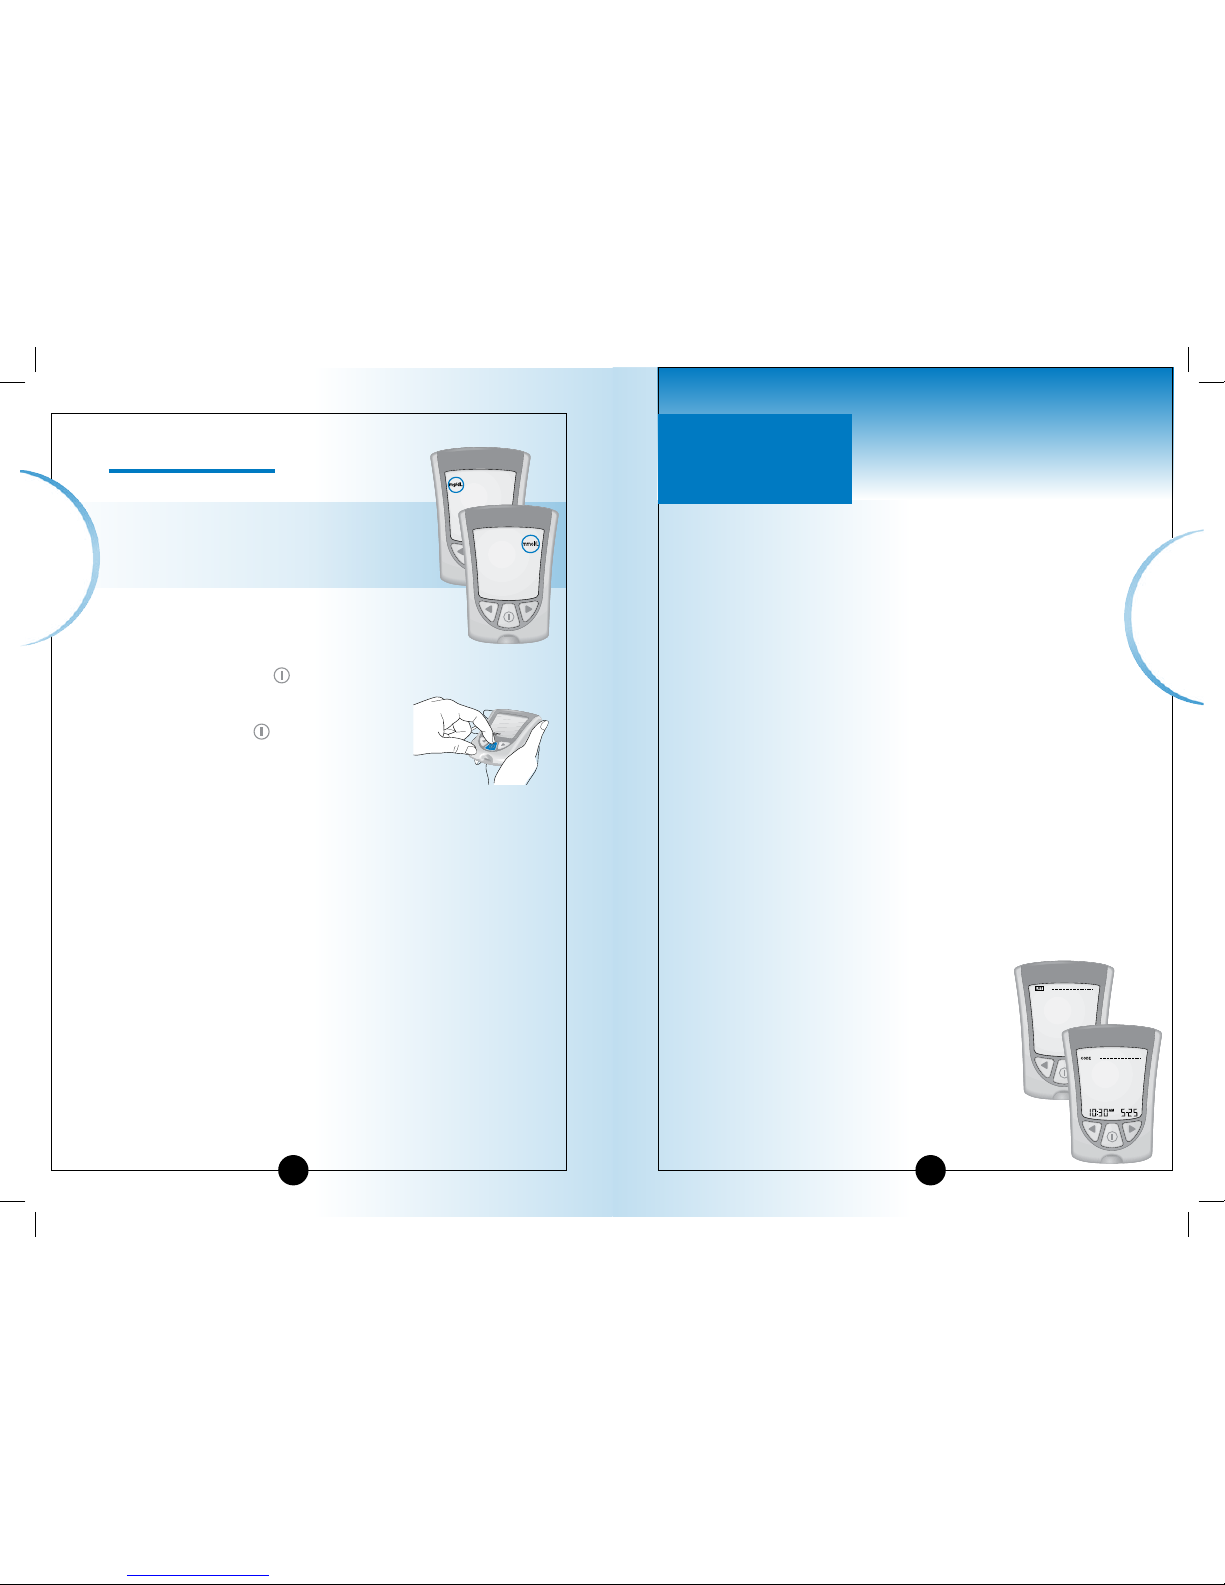
Blood Glucose
Measurement Units
Consult your healthcare professional
if you have any questions about the
blood glucose measurement units.
This screen shows the blood glucose
measurement units (mg/dL or mmol/L).
Press and Release the button to
return to Set Beeper.
Press and Hold the
button to turn
your meter off.
You have successfully set up your meter.
Calibrating
Your Meter
CHAPTER 3
Why Calibrate Your Meter?
Your Optium Xceed meter must be calibrated so that it can
recognize the test strip you are using. Calibration ensures
that your results are accurate.
When to Calibrate Your Meter
• When you use the meter for the first time.
• EACH time you open and use a new box of blood glucose
or blood β-Ketone test strips.
What You Will Need
• Optium Xceed meter.
• For glucose calibration:
- Blood glucose test strip.
- Blood glucose test strip instructions for use.
- Blood glucose test strip calibrator.
• For β-Ketone calibration:
- Blood β-Ketone test strip.
- Blood β-Ketone test strip instructions for use.
- Blood β-Ketone test strip calibrator.
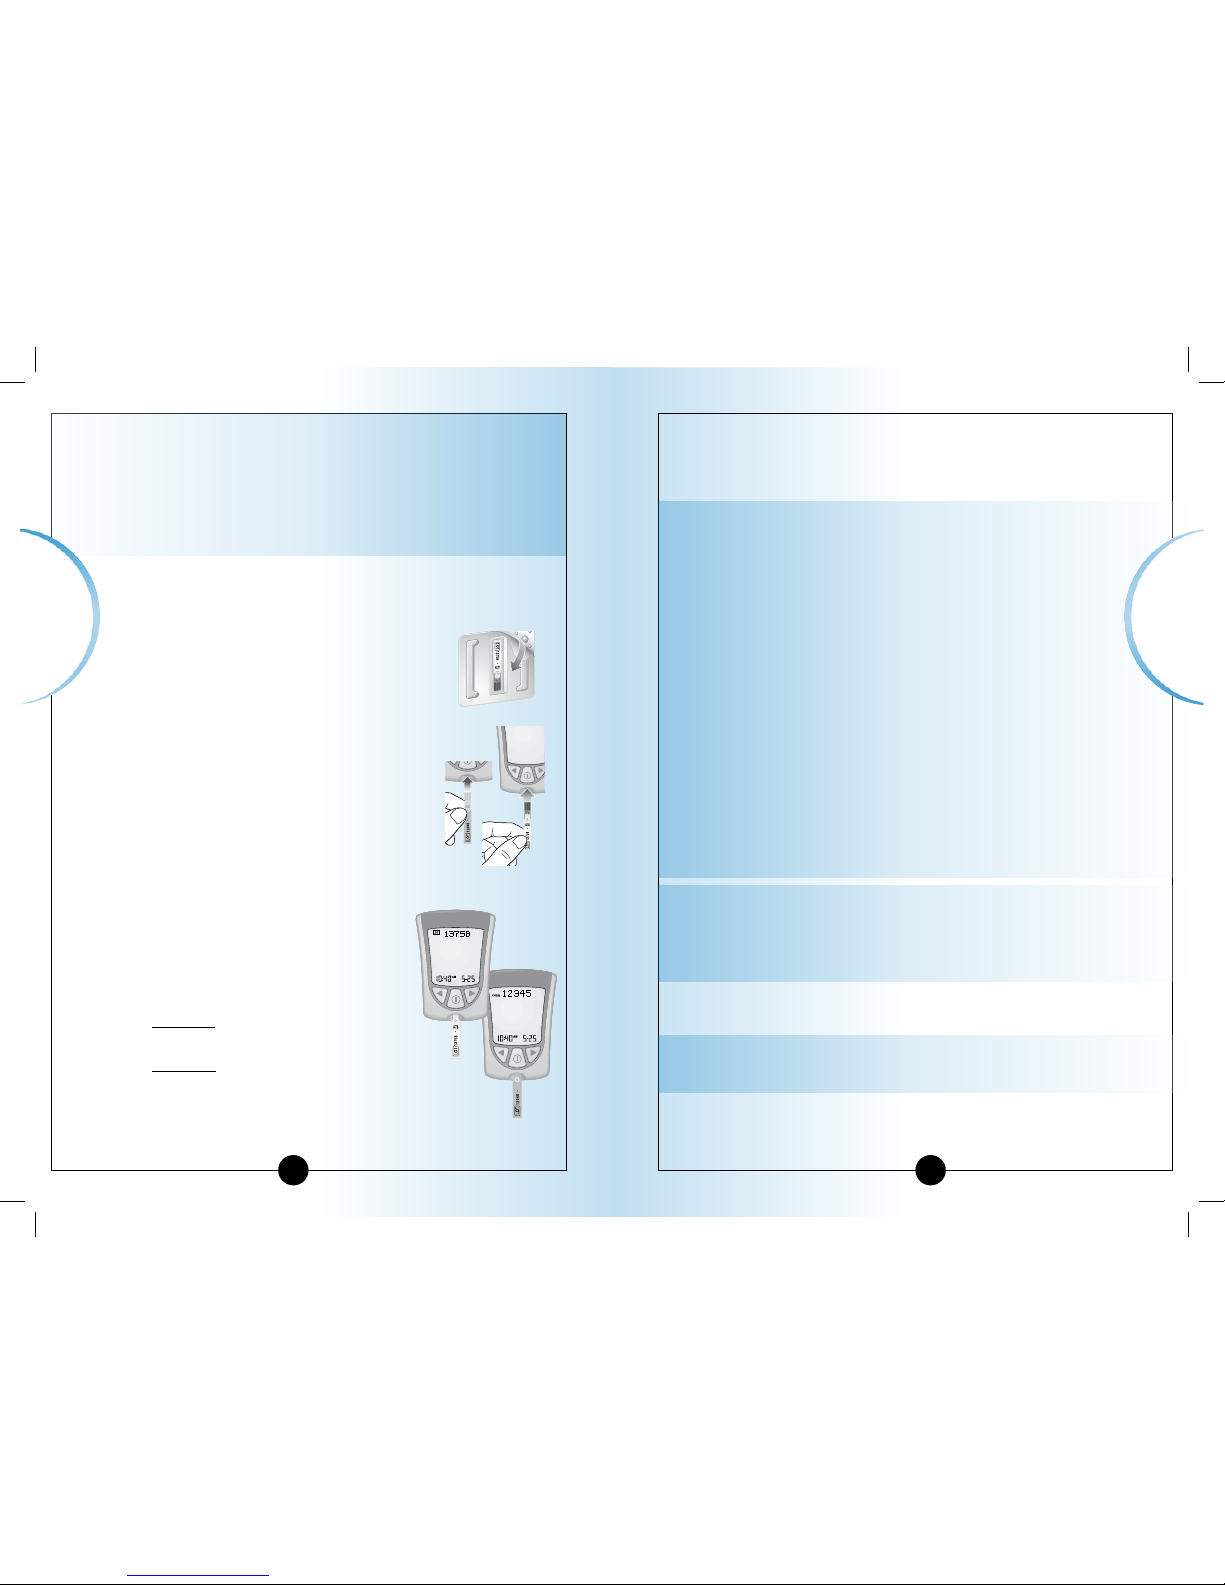
How to Calibrate Your Meter
When you insert a test strip for the
first time, the display window shows:
This means the meter is
not calibrated
for blood glucose monitoring.
This means the meter is
not calibrated
for blood β-Ketone monitoring.
▼
▼
Questions? Call
Customer Support:
See page 57.
▼
▼
Calibrating Your Optium
Xceed Meter
14
➡
➡
ART10825-Rev-A-Man.indd 16-17 11/10/06 1:09:10 PM
Page 10
Calibrating
Your Meter
Calibrating
Your Meter
IMPORTANT: Use only the calibrator that is packaged in
the box of test strips you are using.
Do not use test strips that have expired. Check the
expiration date on the test strip foil packet and test strip
box. If only the year and month are shown, the expiration
date is the last day of the month.
15
5
Check that the LOT number on all these items matches:
✓ Display window ✓ Test strip calibrator
✓ Test strip instructions for use ✓ Test strip foil packet
When the LOT number on all these
items matches:
What It Means:
Calibration is complete.
What to Do:
You may now monitor your blood glucose or
blood β-Ketone.
When the LOT number on all these items
DOES NOT match:
What It Means:
Your meter may not be calibrated for the box of test strips
you are using.
What to Do:
• Check that you are using the calibrator that came in the
box of test strips you are using.
• Try to calibrate again.
IMPORTANT: If the LOT number still does not match,
contact Customer Support.
Do not attempt to monitor
your blood glucose or blood β-Ketone. Your meter may
show an incorrect result.
6
Remove the calibrator from the meter and store it in your
meter’s carrying case.
IMPORTANT: Do not throw the calibrator away until you
have used all of the test strips in the box.
If you have any trouble calibrating your system, please
contact Customer Support.
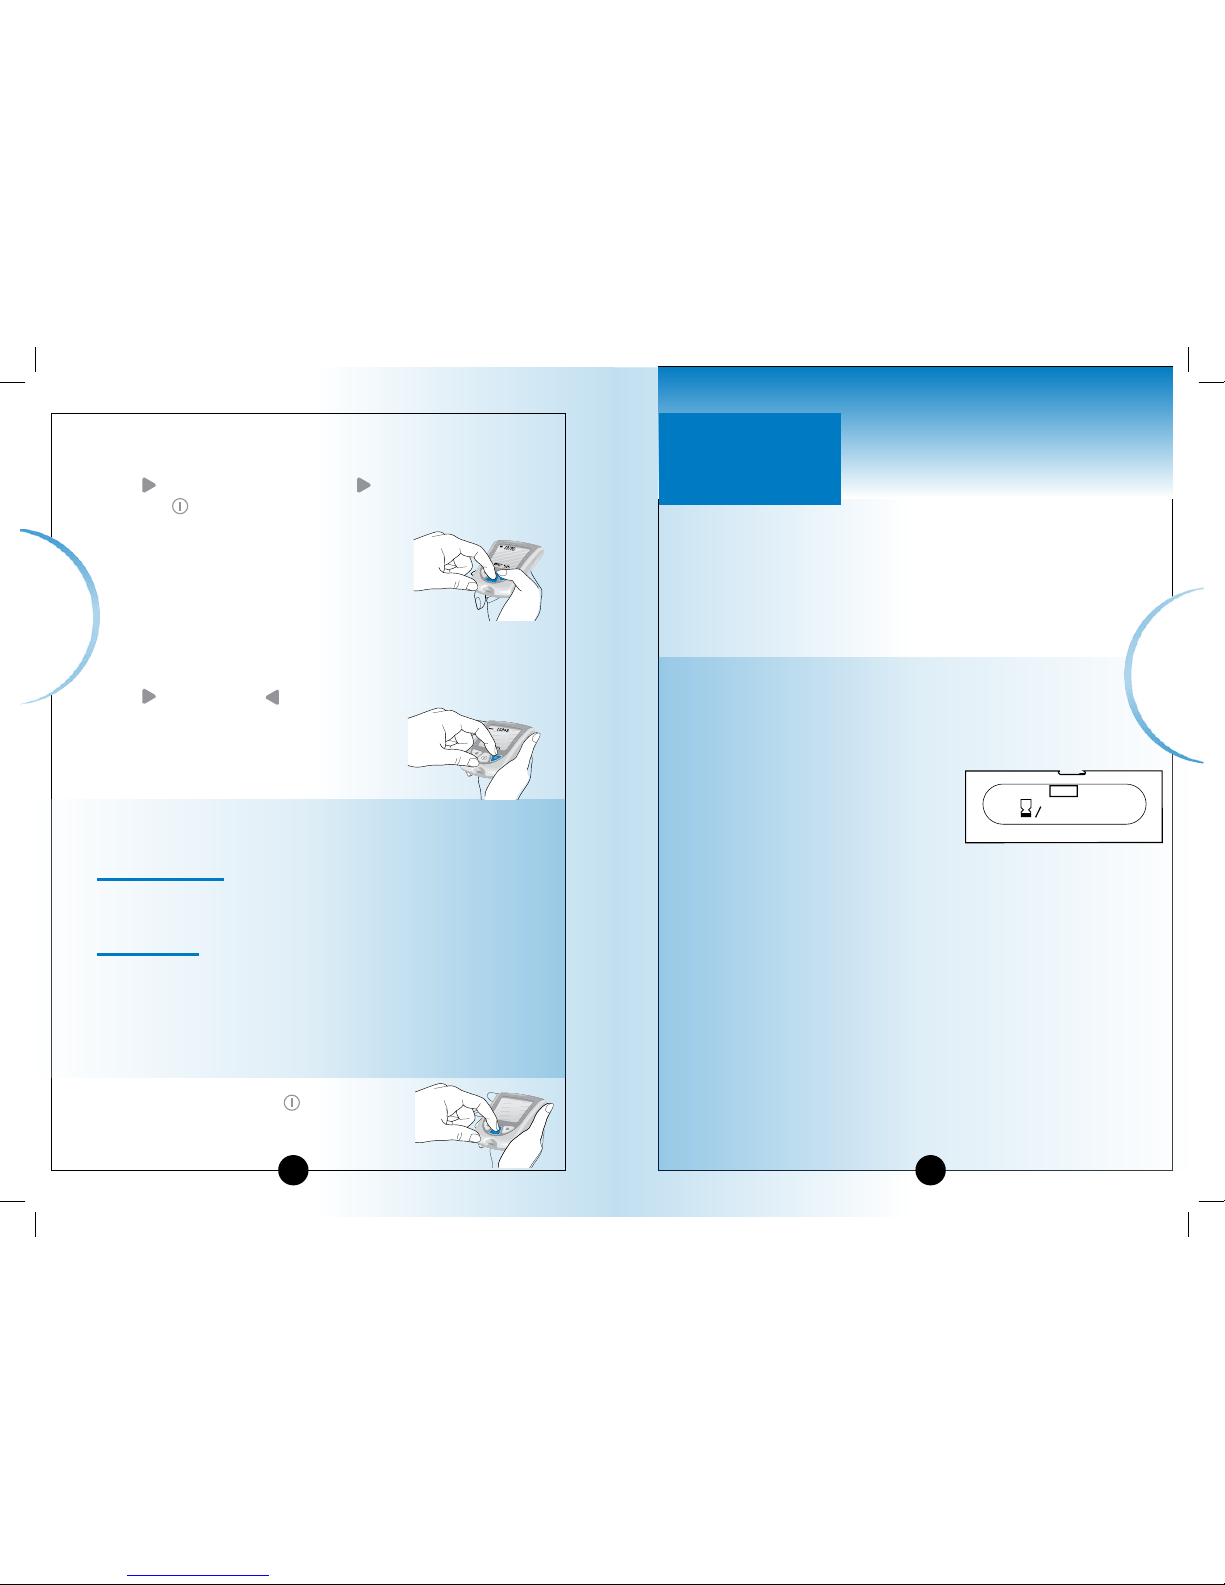
1
Remove the glucose or β-Ketone calibrator package
from the new box of test strips.
2
Open the calibrator package. Find the
three raised bumps on the calibrator
package. Peel the clear cover away from
the three raised bumps.
3
Hold the calibrator (white for glucose
and purple for blood β-Ketone) with the
LOT number facing you.
4
Insert the calibrator into the strip
port. Push it in until it stops.
The Display Check shows on the
display window, followed by the
time, month, and day.
Next, the LOT number shows on the
display window.
a. Example of glucose LOT number:
LOT 13758
b. Example of β-Ketone LOT number:
CODE 12345
Then you hear the beeper, if the
beeper is ON.
Glucose
β-Ketone
16
ART10825-Rev-A-Man.indd 18-19 11/10/06 1:09:15 PM
Page 11
Calibrating
Your Meter
17
How to Recall the LOT Number
1
To recall the glucose LOT number, Press and Hold the
button. While holding the button, Press and Hold
the button.
The Display Check shows on the
display window, then the glucose
LOT number shows with the
time, month, and day of the most
recent glucose calibration.
2
After the glucose LOT number is displayed, you can
recall the β-Ketone LOT number. Press and Release the
button or the button.
The β-Ketone LOT number shows
"CODE", the time, month, and day
of the most recent blood
β-Ketone calibration.
▼
Note: If the LOT number that shows on your meter’s
display window is not correct:
What It Means:
Your meter may not be calibrated for the box of test strips
you are using.
What To Do:
• Re-calibrate your meter.
• Check that you are using the calibrator that came in
the box of test strips you are using.
Remember, improper calibration will cause
incorrect results.
3
Press and Hold the button to
turn your meter off.
CHAPTER 4
Monitoring Your Blood Glucose
What You Will Need
• Blood glucose test strip with its instructions for use.
• Optium Xceed meter calibrated to match the LOT number
of the blood glucose test strip you are using.
• Lancing device and a new, sterile lancet.
Important Information about Monitoring Your
Blood Glucose
• Do not use out-of-date test strips. Check the expiration
date printed on the test strip box and on each test strip foil
packet. If only the month and year
are printed on the test strip, then
the expiration date is the last day
of that month.
• For more detailed information
about your test strip, please read
its instructions for use before
monitoring.
• Use the test strip immediately when you take it out of its
foil packet.
• Do not use a wet, bent, scratched, or damaged test strip.
• Do not use the test strip if its foil packet has a puncture or
tear in it.
• Before you monitor, allow your meter and test strip to
reach the recommended operating range of the test
strip. The test strip operating range is in the “What else do
I need to know?” section of your blood glucose test strip
instructions for use.
• Read the lancing device instructions for use.
Questions? Call
Customer Service.
See page 57.
▼▼
L O T
13758
EXP 2008/03
C5
Example:
Expiration date
March 31, 2008
Monitoring
Blood Glucose
18
L O T
13758
EXP 2008/03
C5
ART10825-Rev-A-Man.indd 20-21 11/10/06 1:09:22 PM
Page 12
Monitoring
Blood Glucose
19
Monitoring
Blood Glucose
20
How to Monitor Your Blood Glucose
Getting Started
1
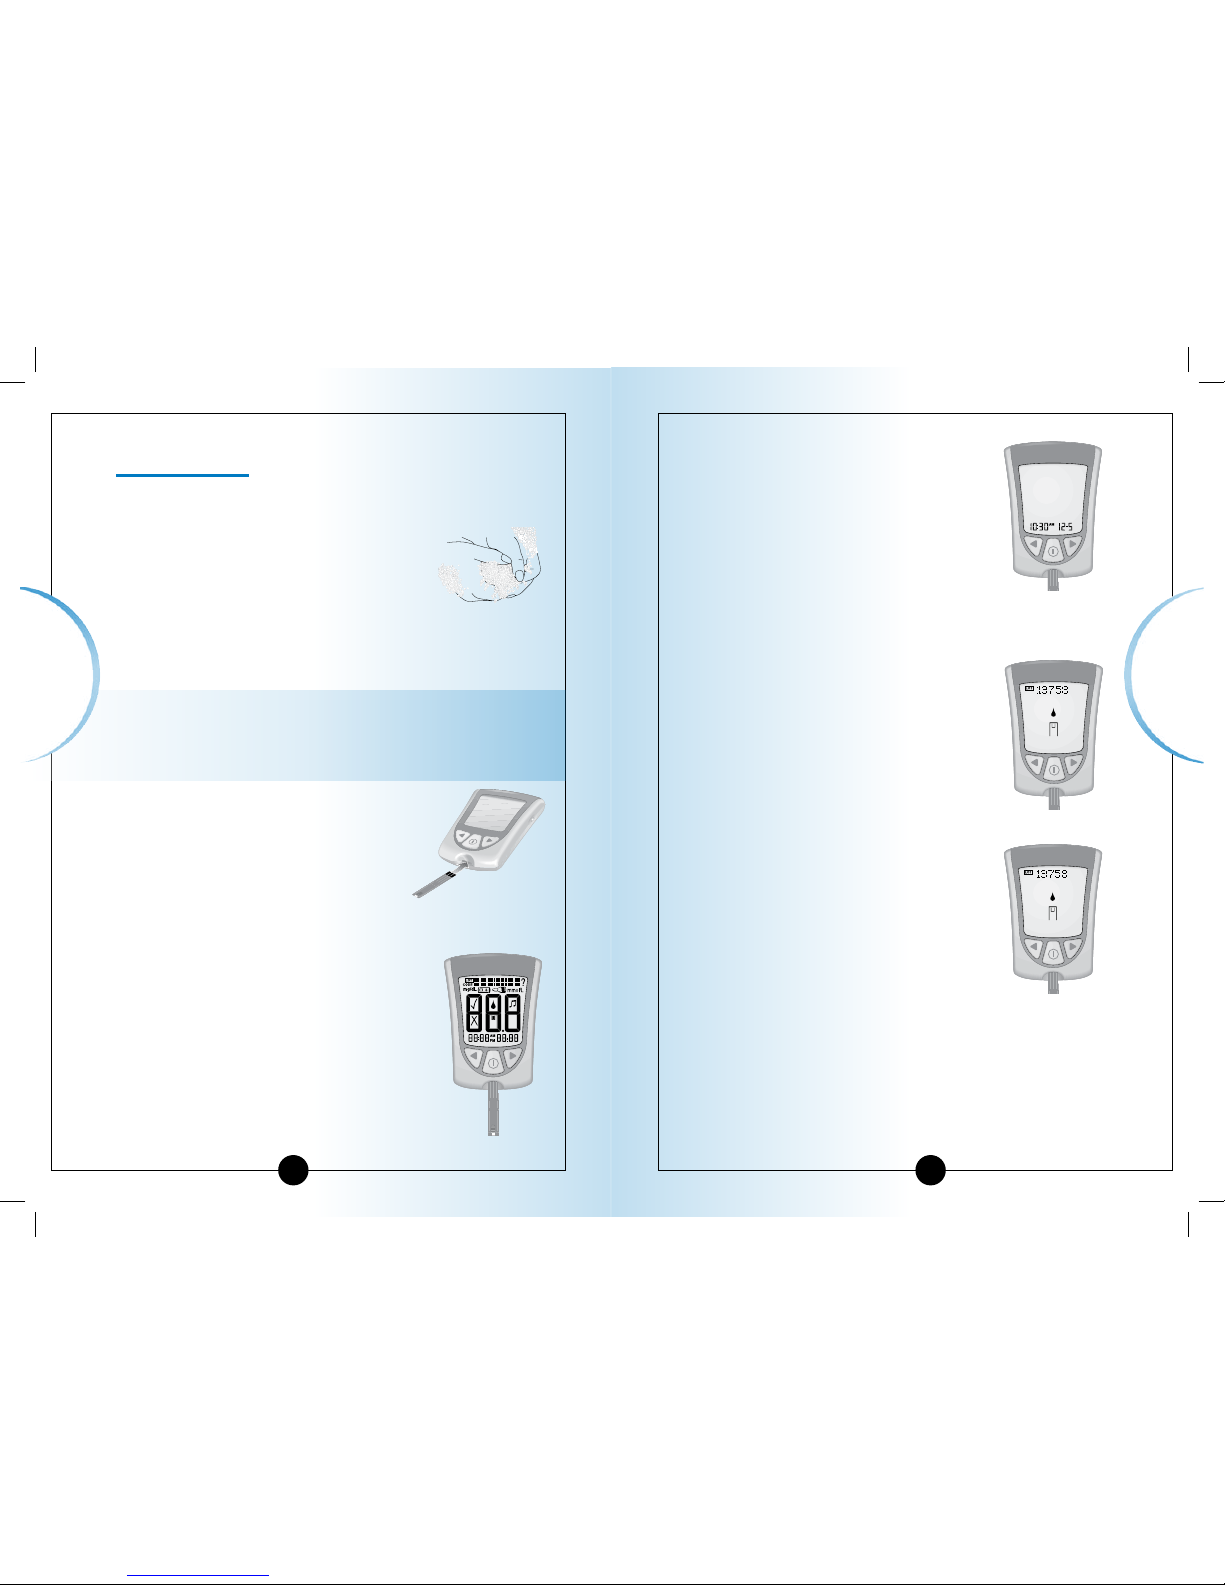
Prepare your lancing device.
2
Wash your hands using warm soapy
water and dry them completely.
3
Remove the test strip from its foil packet.
Note: For pictures that show how to open the blood
glucose test strip foil packet, please see the information
card in the box of blood glucose test strips.
4
Insert the three black lines at the end
of the test strip into the strip port.
5
Push the test strip in until it stops.
The meter turns on automatically.
These items show on the display
window, one after the other:
• Display Check – Remember to make
sure that all items in the picture
here show on the display window.
(See Chapter 1 for more information
about the Display Check.)
▼
• Time, month, and day (if set)
If date and time are not set, dashes
will show instead of numbers.
• LOT number for the box of blood
glucose test strips you are using.
• Apply Sample message, which tells
you that the meter is ready for you to
apply blood to the blood glucose
test strip.
ART10825-Rev-A-Man.indd 22-23 11/10/06 1:09:35 PM
Page 13
21
Monitoring
Blood Glucose
Monitoring
Blood Glucose
22
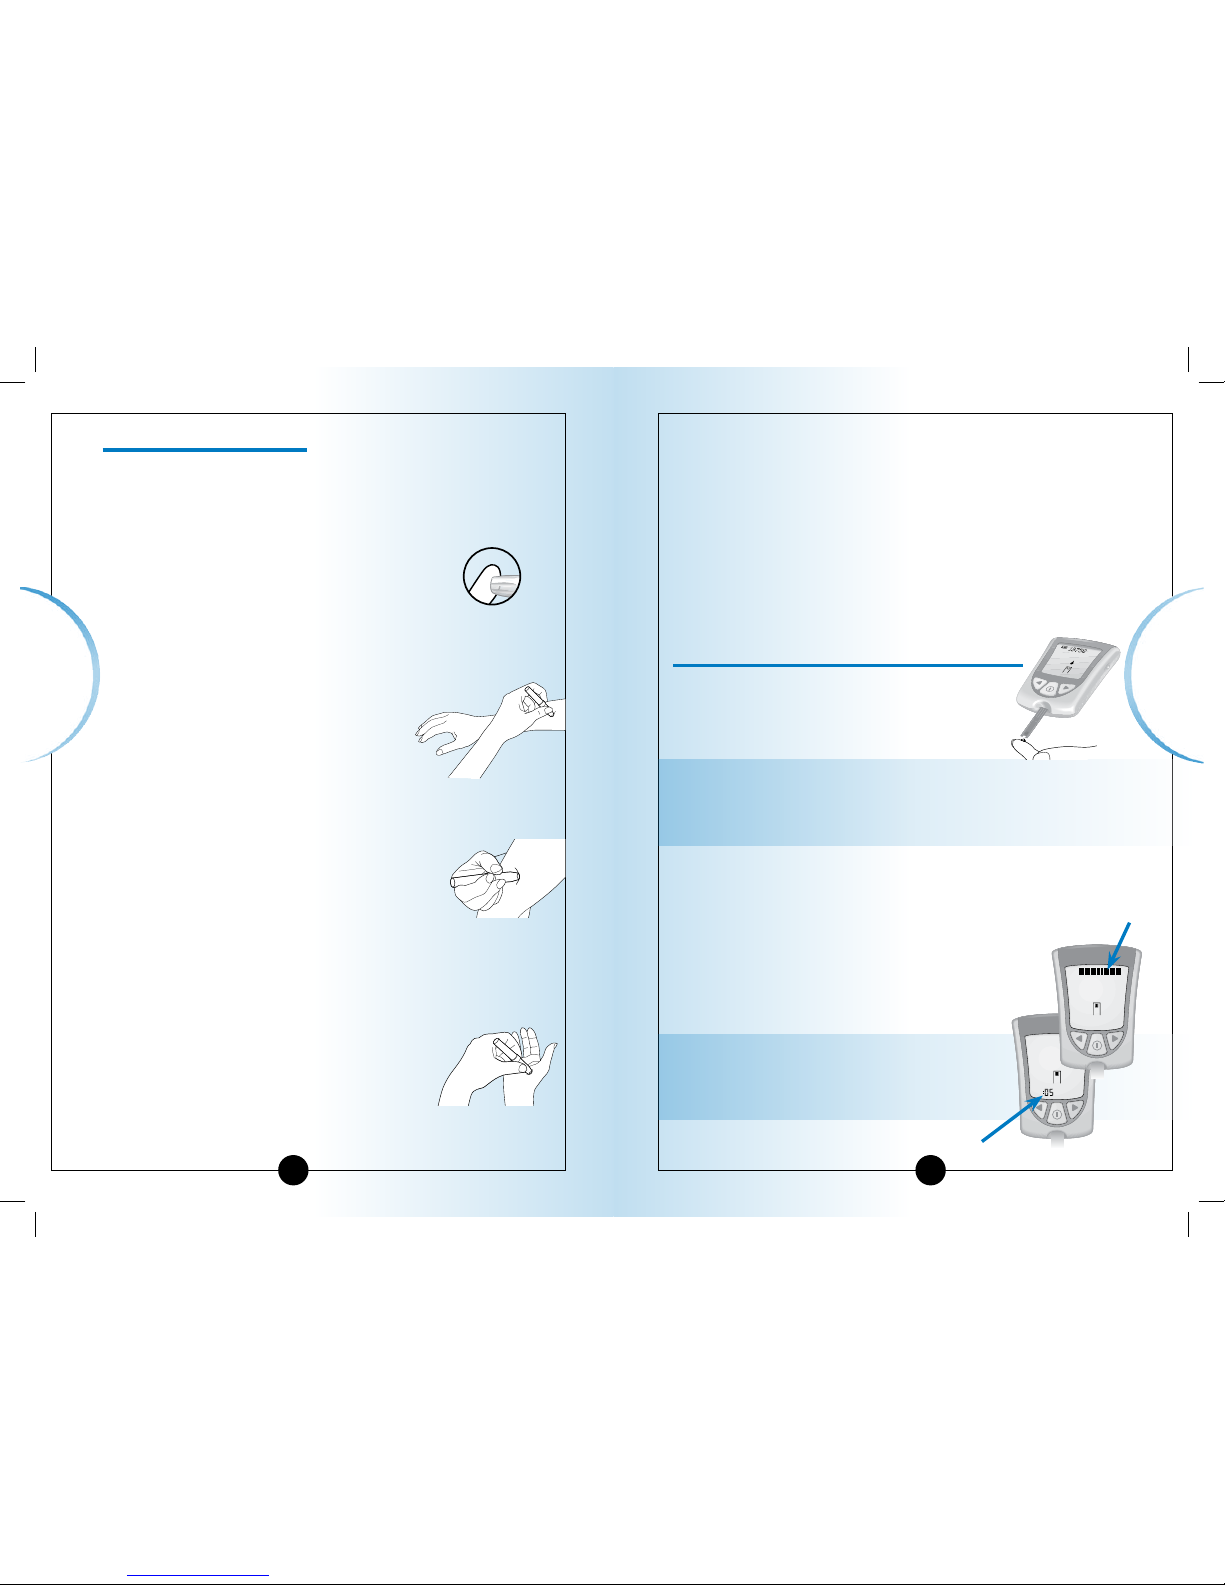
Obtaining A Blood Drop
Use your lancing device to obtain a blood drop.
Recommendations for Obtaining a Blood Drop
• To obtain a sample from an alternative site (forearm,
upper arm, or base of the thumb), use an
appropriate alternative site lancing device.
• Before you obtain a blood sample from the fingertip,
forearm, upper arm, or base of the
thumb, make sure the sample site is
clean, dry, and warm. To warm the
sample site, wash it in warm water, rub
the skin vigorously for a few seconds, or
apply a warm pad to it.
• Hang your arm down before pricking
your finger or the base of the thumb to
help blood flow.
• To obtain a blood sample from the arm, use a fleshy area
away from bone. Avoid areas where there
is a lot of hair.
• Avoid squeezing the puncture site.
• Apply the blood sample to the test strip
immediately.
Lancets and Lancing Device
• Lancets are for one-time use only. Use a new lancet
each time you monitor.
• Discard your used lancet properly. Put it in an
empty puncture-resistant container, such as a
plastic milk carton or detergent bottle.
• Never share your lancing device or lancet with
another person.
Applying the Blood Drop to the Test Strip
1
Touch the blood drop to the white area
at the end of the test strip. The blood is
drawn into the test strip.
Note: If the meter shuts off before you apply
blood to the test strip, remove the test strip from
the meter and try again.
2
Continue to touch the blood drop to the end of
the test strip until the meter begins the test. The
meter begins the test when:
• You hear the beeper, if the beeper is ON.
• The display window shows the status bar.
• Then the display window shows the
countdown.
Note: Do not remove the test strip
from the meter or disturb it during the
countdown.
Countdown
Status bar
Fingertip sampling
Upper arm sampling
Forearm sampling
Base of thumb
sampling
ART10825-Rev-A-Man.indd 24-25 11/10/06 1:09:42 PM
Page 14
23 24
Monitoring
Blood Glucose
Monitoring
Blood Glucose
Correct
✔
IMPORTANT:
If the countdown does not start:
What It Means:
You might not have applied
enough blood to the test strip.
What to Do:
• Apply a second drop of blood to
the test strip. Refer to your test strip
instructions for use for the number
of seconds you have to apply a
second drop.
• If the countdown still does not start,
or if the number of seconds you
have to apply a second drop have
passed, discard the test strip, turn
off your meter, and try again with
a new test strip.
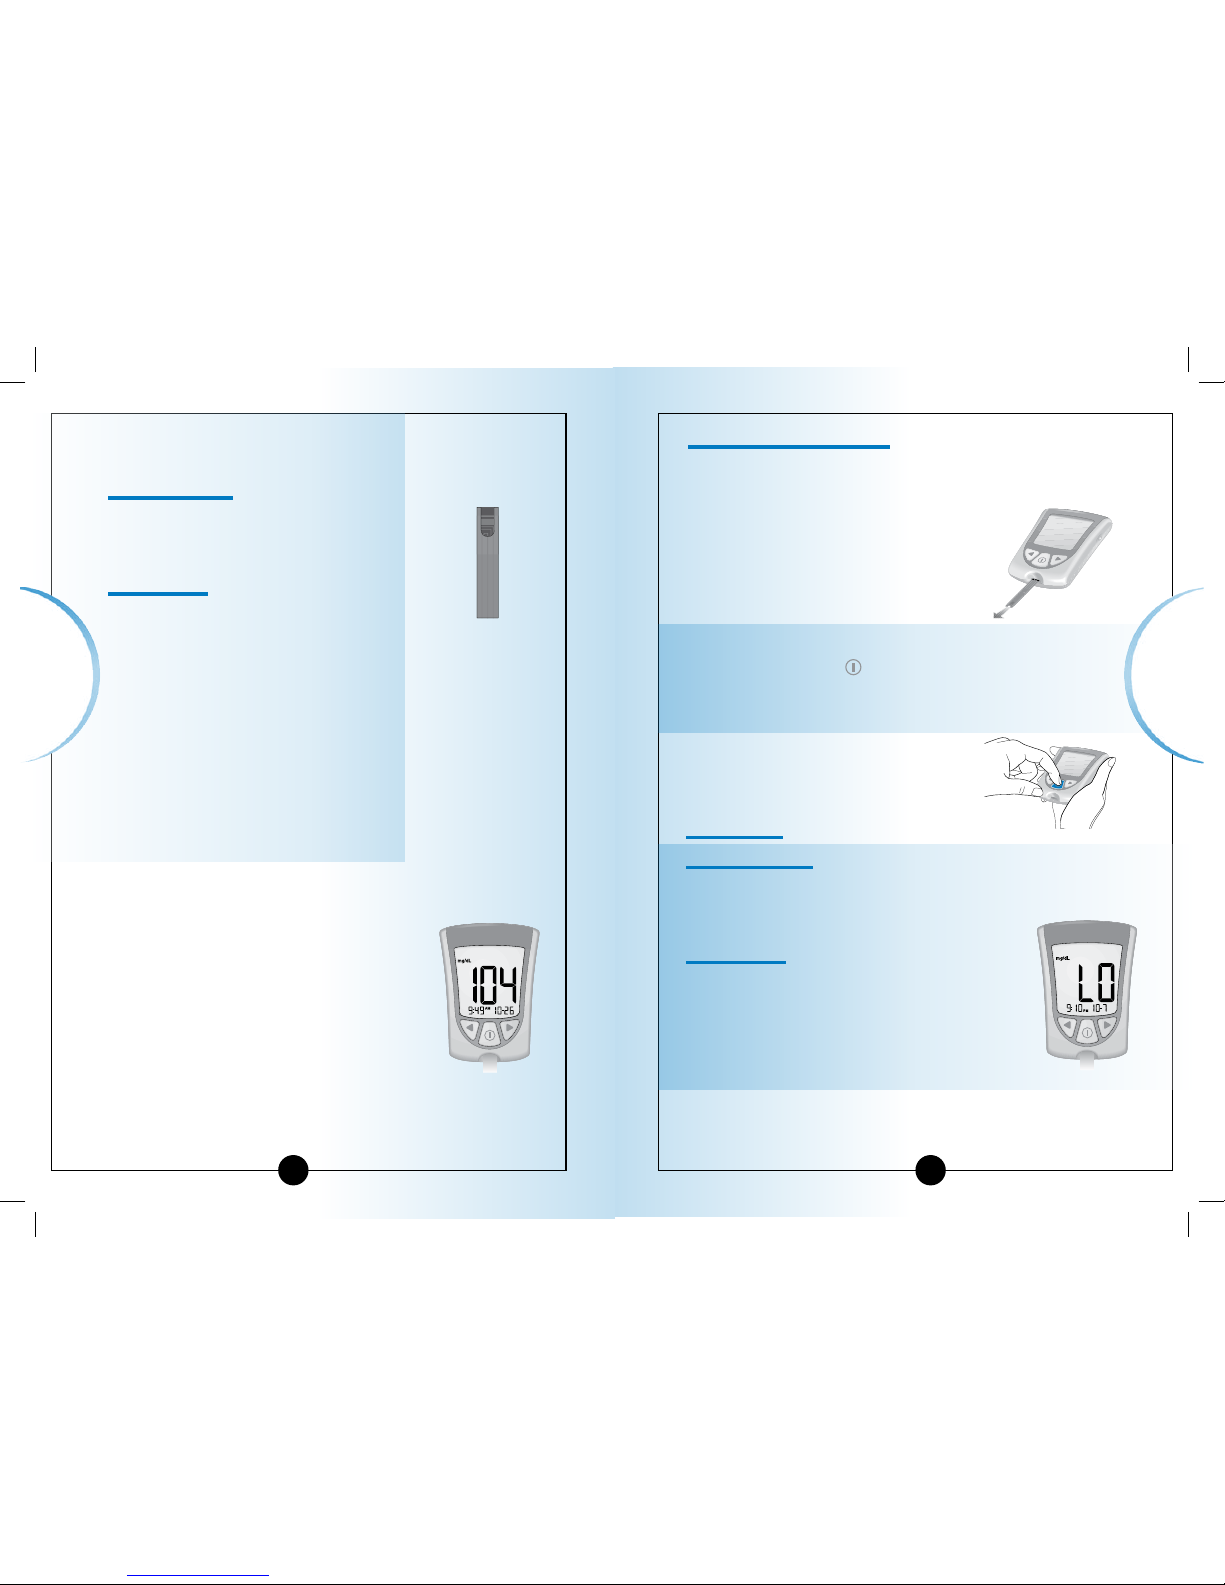
3
At the end of the countdown:
• If the beeper is ON, listen for
the beeper.
• The blood glucose result shows
on the display window.
• The result is stored in your meter’s
memory. You may also write the
result in your logbook.
Shutting Off Your Meter
1
Removing the test strip from the strip port turns off the
meter. You can use the opened foil packet to remove
and discard your used test strip.
2
Discard the test strip properly.
Note: You may also turn the meter off by Pressing
and Holding the
button. If you do not turn your
meter off or pull the test strip out, the meter shuts off
automatically after 60 seconds.
▼
Understanding Your Result
"LO" Result
What It Means:
Your meter has determined that your blood
glucose result is lower than 20 mg/dL (1.1 mmol/L)
or there may be a problem with the test strip.
What to Do:
Monitor your blood glucose again with a
new test strip. If
LO shows on the display
window again, contact your healthcare
professional
immediately.
ART10825-Rev-A-Man.indd 26-27 11/10/06 1:09:46 PM
Page 15
25
Monitoring
Blood Glucose
26
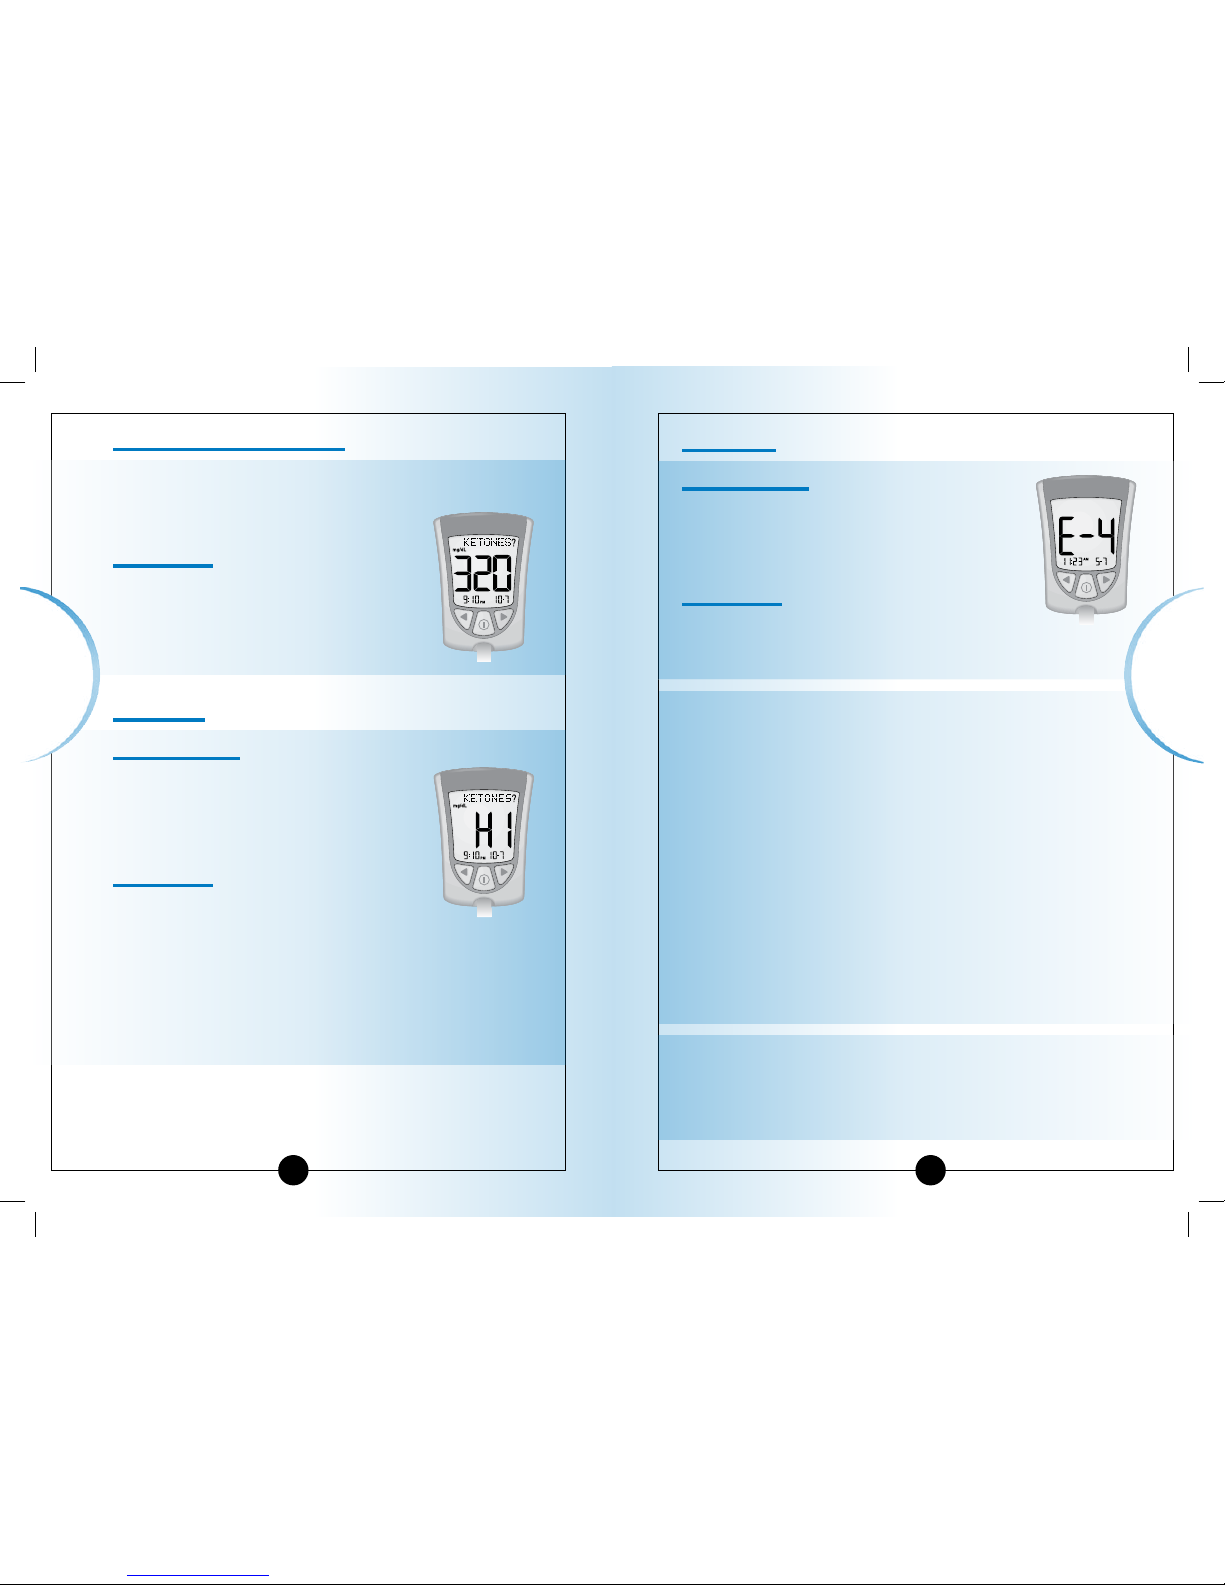
Result 300 mg/dL or Higher
When your blood glucose result is 300 mg/dL
(16.7 mmol/L) or higher,
KETONES? flashes on
and off on the display window.
What to Do:
If you check your ketones as part of your
diabetes management program, it is
recommended that you check your
blood β-Ketone.
"HI" Result
What It Means:
Your meter has determined that your
blood glucose result is higher than
500 mg/dL (27.8 mmol/L) or there
may be a problem with the test strip.
What to Do:
Monitor your blood glucose again with a
new test strip. If
HI shows on the display
window again, contact your healthcare
professional
immediately.
If you check your ketones as part of your diabetes
management program, it is recommended that you
check your blood β-Ketone.
"E4" Result
What It Means:
Your meter has determined that your
blood glucose may be too high to be read
by the system, or there may be a problem
with the test strip.
What to Do:
Monitor your blood glucose again with a new
test strip. If
E4 shows on the display window again,
contact your healthcare professional
immediately.
IMPORTANT:
It is recommended that you repeat the blood glucose test
with a new test strip when:
• LO shows on the display window.
• You obtain a low blood glucose result, but you do not have
symptoms of low blood glucose.
• Your meter displays a blood glucose result that is unusually
low, lower than 50 mg/dL (2.8 mmol/L).
• HI shows on the display window.
• You obtain a high blood glucose result, but you do not have
symptoms of high blood glucose.
• Your meter displays a result that is unusually high, higher
than 300 mg/dL (16.7 mmol/L).
• You question your result.
• Your monitor displays an error message (for example, E-4).
IMPORTANT:
A result that is incorrect may have a serious medical outcome.
Consult your healthcare professional before changing your
diabetes medication program.
Monitoring
Blood Glucose
ART10825-Rev-A-Man.indd 28-29 11/10/06 1:09:49 PM
Page 16
CHAPTER 5
Monitoring
Blood β-Ketone
28
Monitoring Blood
β-Ketone
27
Monitoring Your
Blood β-Ketone
It is important to
check your ketones when:
• You have an illness.
• Your blood glucose is
higher than 300 mg/dL (16.7 mmol/L).
• You are experiencing unusual blood glucose results.
• You and your healthcare professional determine that it
is necessary.
What You Will Need
• Blood β-Ketone test strip with its instructions for use.
• Optium Xceed meter calibrated to match the LOT
number of the blood β-Ketone test strip you are using.
• Lancing device and a new, sterile lancet.
Important Information about Monitoring Your
Blood β-Ketone
• For more detailed information about your blood β-Ketone
test strip, please refer to its instructions for use
before monitoring.
• Do not use out-of-date test strips. Check the expiration
date printed on the test strip box and on each test strip
foil packet.
• Do not put urine on the
blood β-Ketone test strip.
• Use the test strip immediately
when you take it out of its foil
packet.
Questions? Call
Customer Support:
See page 57.
▼▼
• Do not use a wet, bent, scratched, or damaged
test strip.
• Do not use the test strip if its foil packet has a puncture or
tear in it.
• Use each test strip only once.
• Before you monitor your blood β-ketone, allow your meter
and test strip to reach the recommended operating range of
the test strip. The test strip operating range is in the “What else
do I need to know?” section of your blood β-Ketone test strip
instructions for use.
• Read the lancing device instructions for use.
Example:
Expiration date
March 31, 2008
L O T
13758
EXP 2008/03
C5
ART10825-Rev-A-Man.indd 30-31 11/10/06 1:09:50 PM
Page 17
Monitoring
Blood β-Ketone
29
Monitoring Blood
β-Ketone
30
How to Monitor Your Blood β-Ketone
Getting Started
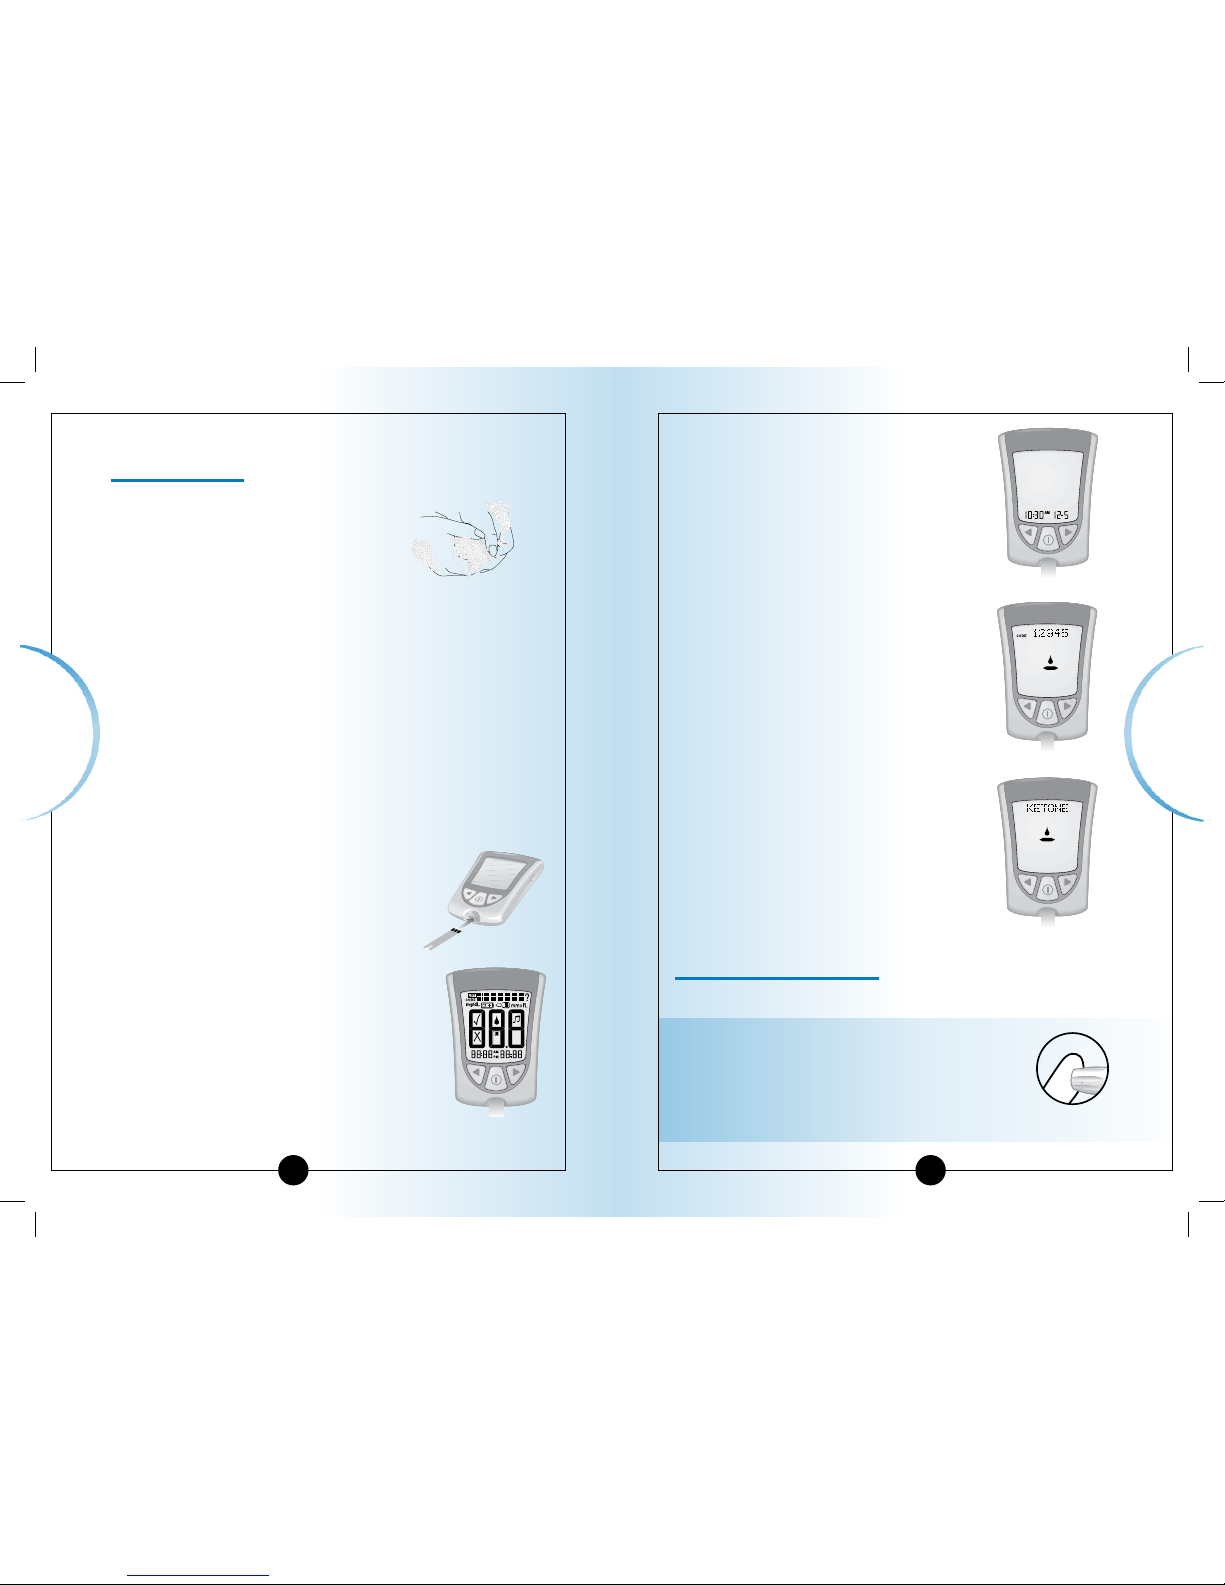
1
Prepare your lancing device.
▼
• Time, month, and day (if set)
If date and time are not set, dashes
will show instead of numbers.
• LOT number (CODE) for the box of blood
β-Ketone test strips you are using.
• KETONE and Apply Sample
message, which tell you that the
meter is ready for you to apply blood
to the blood β-Ketone test strip.
Obtaining A Blood Drop
Use your lancing device to obtain a blood drop.
IMPORTANT: Blood β-Ketone test strips
have not been evaluated for alternative site
monitoring.
Use only fingertip blood
samples for blood β-Ketone monitoring.
Fingertip sampling
2
Wash your hands using warm
soapy water and dry them
completely.
3
Remove the test strip from its foil packet.
Note: For pictures that show how to open the blood
β-Ketone test strip foil packet, please see the information
card in the box of blood β-Ketone test strips.
4
Insert the three black lines at the end of the test strip
into the strip port.
5
Push the test strip in until it stops.
The meter turns on automatically.
These items show on the display
window, one after the other:
• Display Check – Remember to make
sure that all items in the picture
here show on the display window.
(See Chapter 1 for more information
about the Display Check.)
ART10825-Rev-A-Man.indd 32-33 11/10/06 1:10:01 PM
Page 18
32
Monitoring Blood
β-Ketone
31
Recommendations for Obtaining A Blood Drop
• Before you obtain a blood sample from the fingertip,
make sure the sample site is clean, dry, and warm. To
warm the sample site, wash it in warm water or rub the
skin vigorously for a few seconds.
• Hang your arm down before pricking your fingertip to
help blood flow.
• Avoid squeezing the fingertip.
• Apply the blood sample to the test strip immediately.
Lancets and Lancing Device
• Lancets are for one-time use only. Use a new lancet each
time you monitor.
• Discard your used lancet properly. Put it in an empty
puncture-resistant container, such as a plastic milk
carton or detergent bottle.
• Never share your lancing device or lancet with
another person.
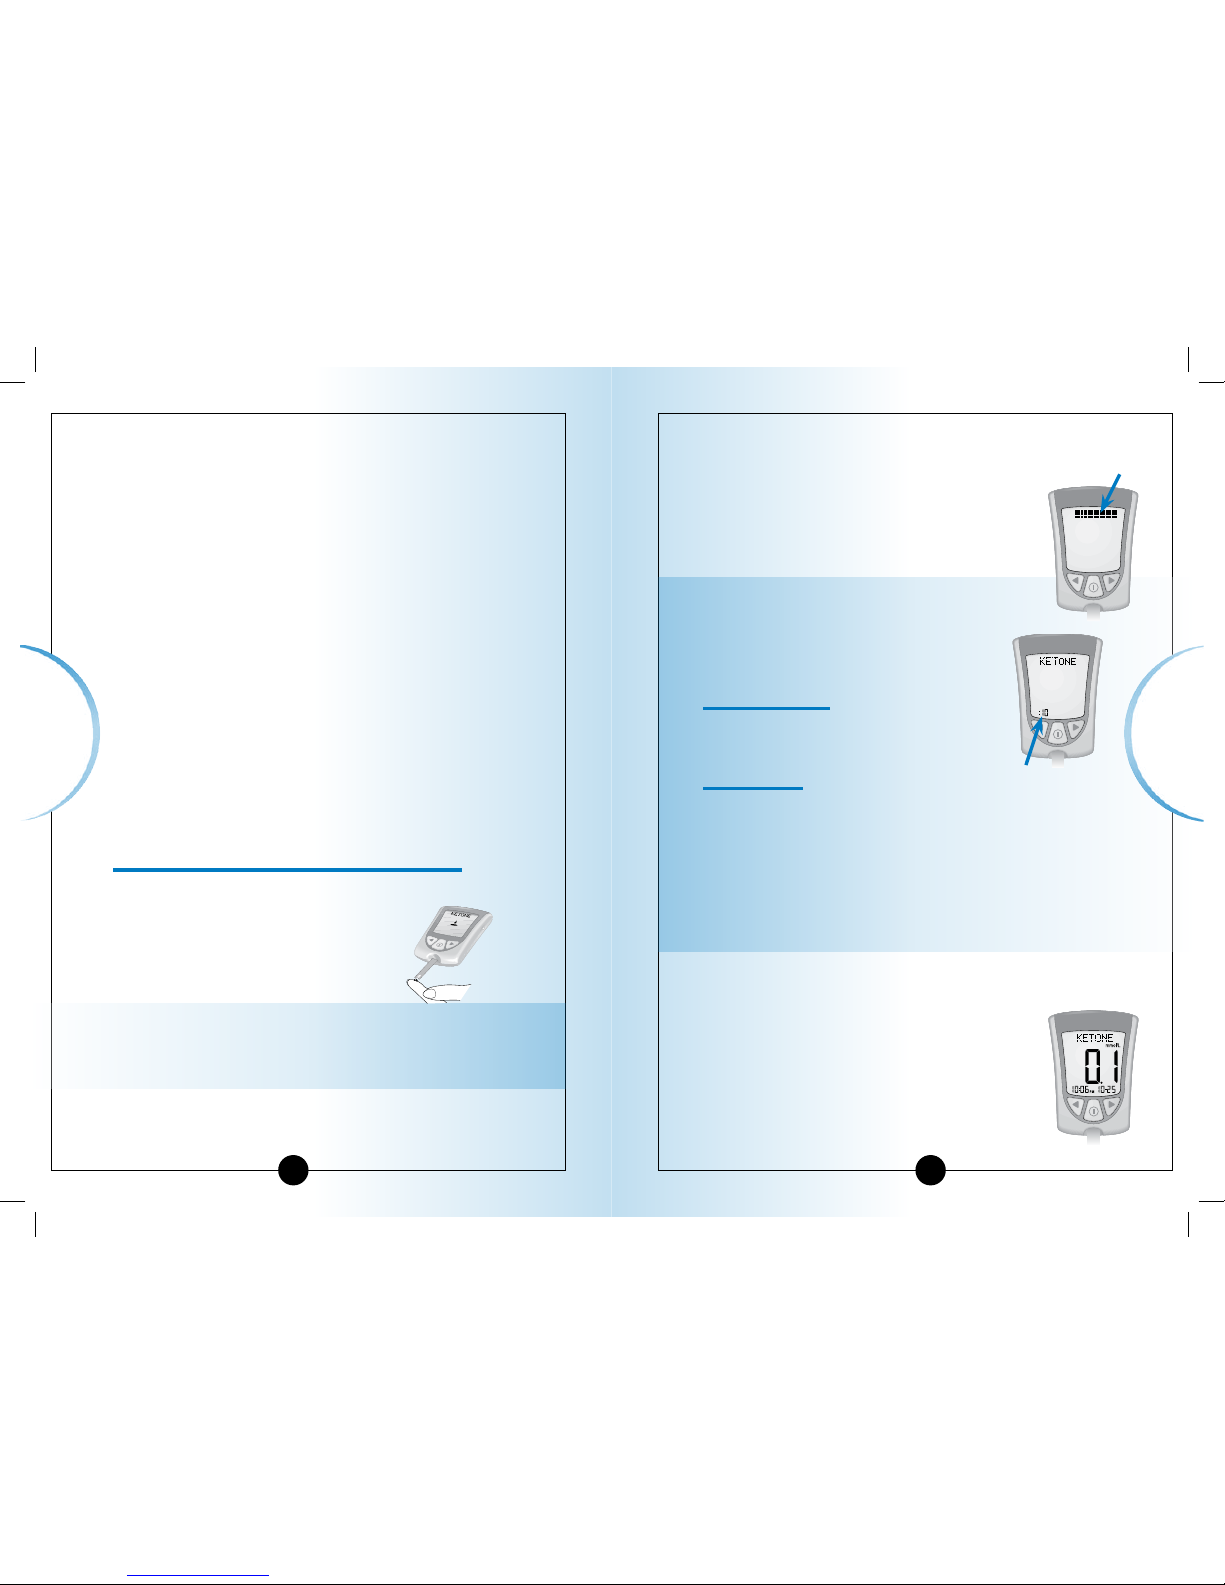
Applying the Blood Drop to the Test Strip
1
Touch the blood drop to the white area at the end
of the test strip. The blood is drawn
into the test strip.
Monitoring
Blood β-Ketone
2
Continue to touch the blood drop to the white
area at the end of the test strip until the meter
begins the test. The meter begins the test when:
You hear the beeper, if the beeper is ON.
• The display window shows the status bar.
• Then the display window shows the
countdown.
Note: Do not remove the test strip from the
meter or disturb it during the countdown.
IMPORTANT: If the countdown
does not start:
What It Means:
You might not have applied
enough blood to the test strip.
What to Do:
• Apply a second drop of blood to the test strip. Refer
to your test strip instructions for use for the number of
seconds you have to apply a second drop.
• If the countdown still does not start, or if the number of
seconds you have to apply a second drop have passed,
discard the test strip, turn off your meter, and try again
with a new test strip.
3
At the end of the countdown:
• If the beeper is ON, listen for the beeper.
• The blood β-Ketone result shows on the
display window with the word
KETONE.
• The result is stored in your meter’s
memory as a blood β-Ketone result. You
may also write the result in your logbook.
Countdown
Status bar
Note: If the meter shuts off before you apply blood to
the test strip, remove the test strip from the meter and
try again.
ART10825-Rev-A-Man.indd 34-35 11/10/06 1:10:06 PM
Page 19
34
Monitoring
Blood β-Ketone
Monitoring Blood
β-Ketone
Shutting Off Your Meter
1
Removing the test strip from the strip port turns off
the meter. You can use the opened
foil packet to remove and discard
your used test strip.
2
Discard the test strip properly.
Note: You may also turn the
meter off by Pressing and
Holding the
button. If you do
not turn your meter off or pull the
test strip out, the meter shuts off
automatically after 60 seconds.
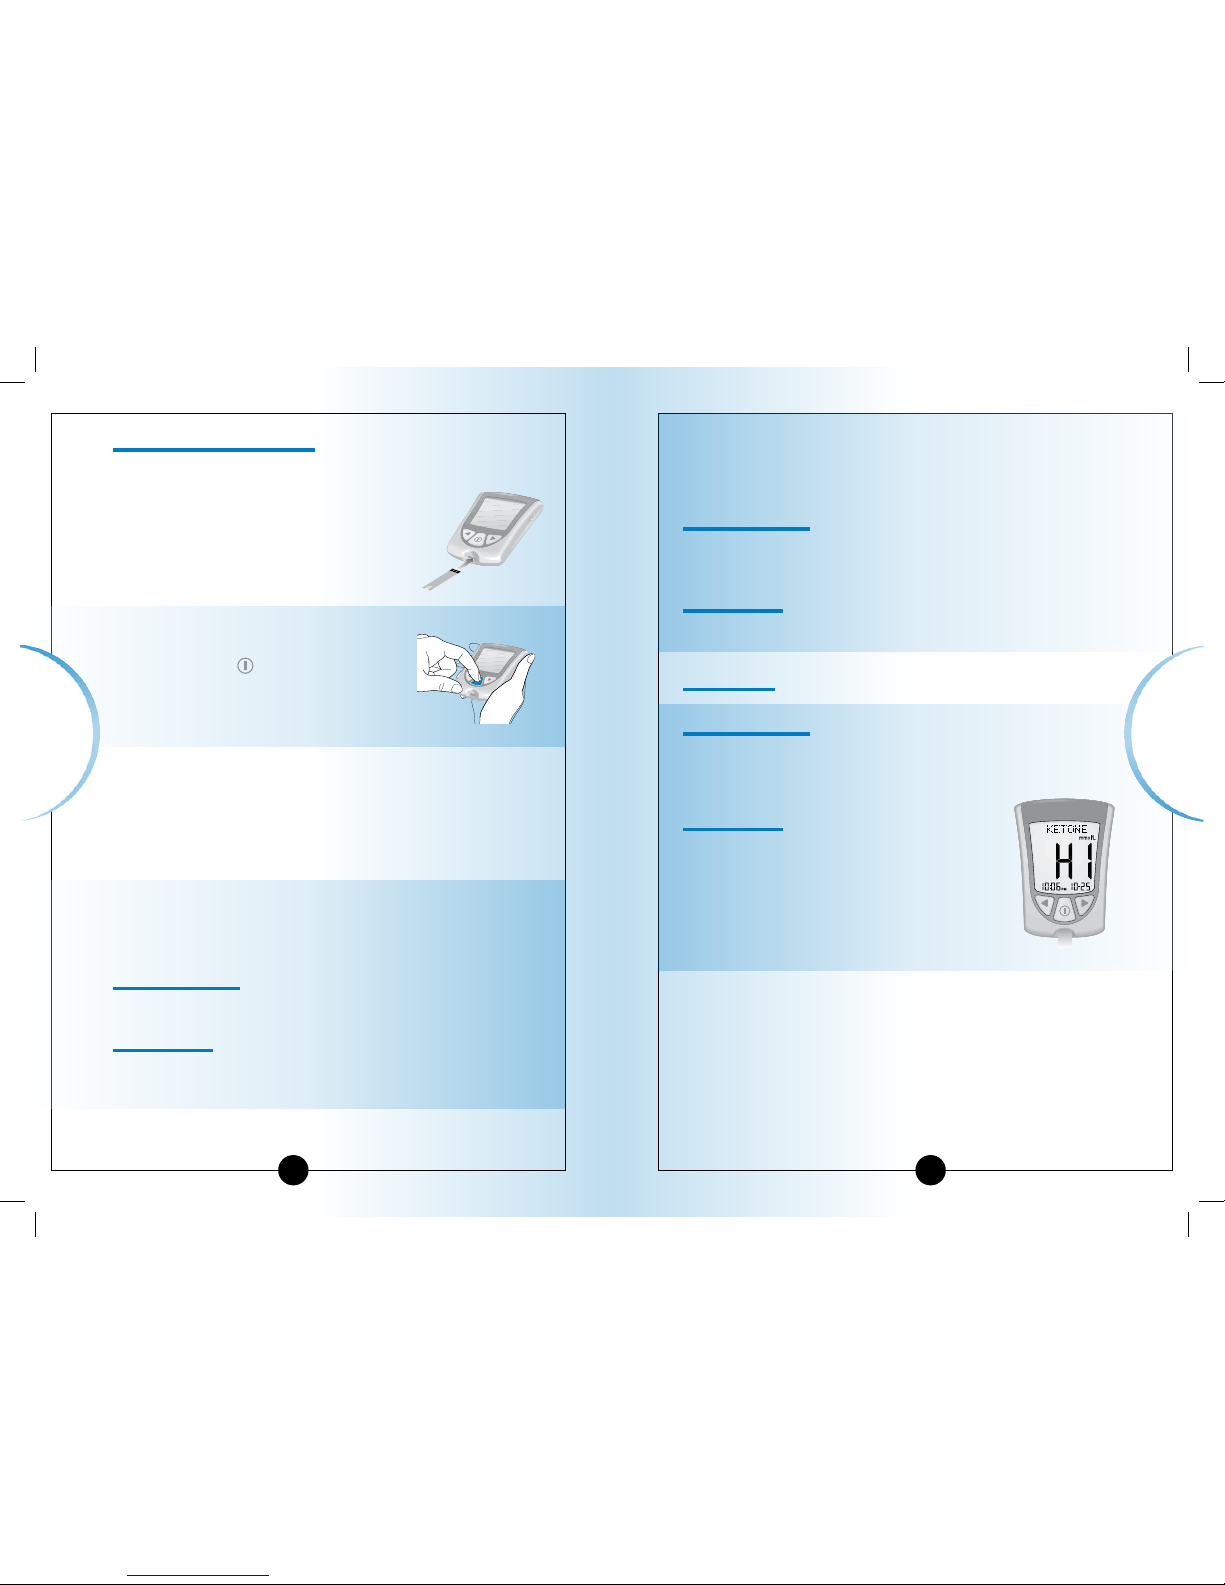
Understanding Your Result
Blood β-Ketone is expected to be lower than 0.6 mmol/L.2
Blood β-Ketone may be higher when a person is ill, is fasting,
exercises vigorously, or if blood glucose levels are not
controlled.
1-3
When:
• Blood β-Ketone result is between 0.6 and 1.5 mmol/L and
blood glucose result is 300 mg/dL (16.7 mmol/L) or higher:
What It Means:
A problem requiring medical assistance may be occurring.
What to Do:
Contact your healthcare professional. Follow his or her
instructions for sick day management.
33
When:
• Blood β-Ketone result remains high or becomes higher
than 1.5 mmol/L:
What It Means:
You may be at risk of developing diabetic ketoacidosis
(DKA).
2-6
What to Do:
Contact your healthcare professional immediately.
"HI" Result
What It Means:
Your meter has determined that your blood β-Ketone
result is higher than 8.0 mmol/L, or there may be a
problem with the test strip.
What to Do:
Monitor your blood β-Ketone again with
a new test strip. If
HI shows on the display
window again, contact your healthcare
professional immediately.
ART10825-Rev-A-Man.indd 36-37 11/10/06 1:10:08 PM
Page 20
Monitoring Blood
β-Ketone
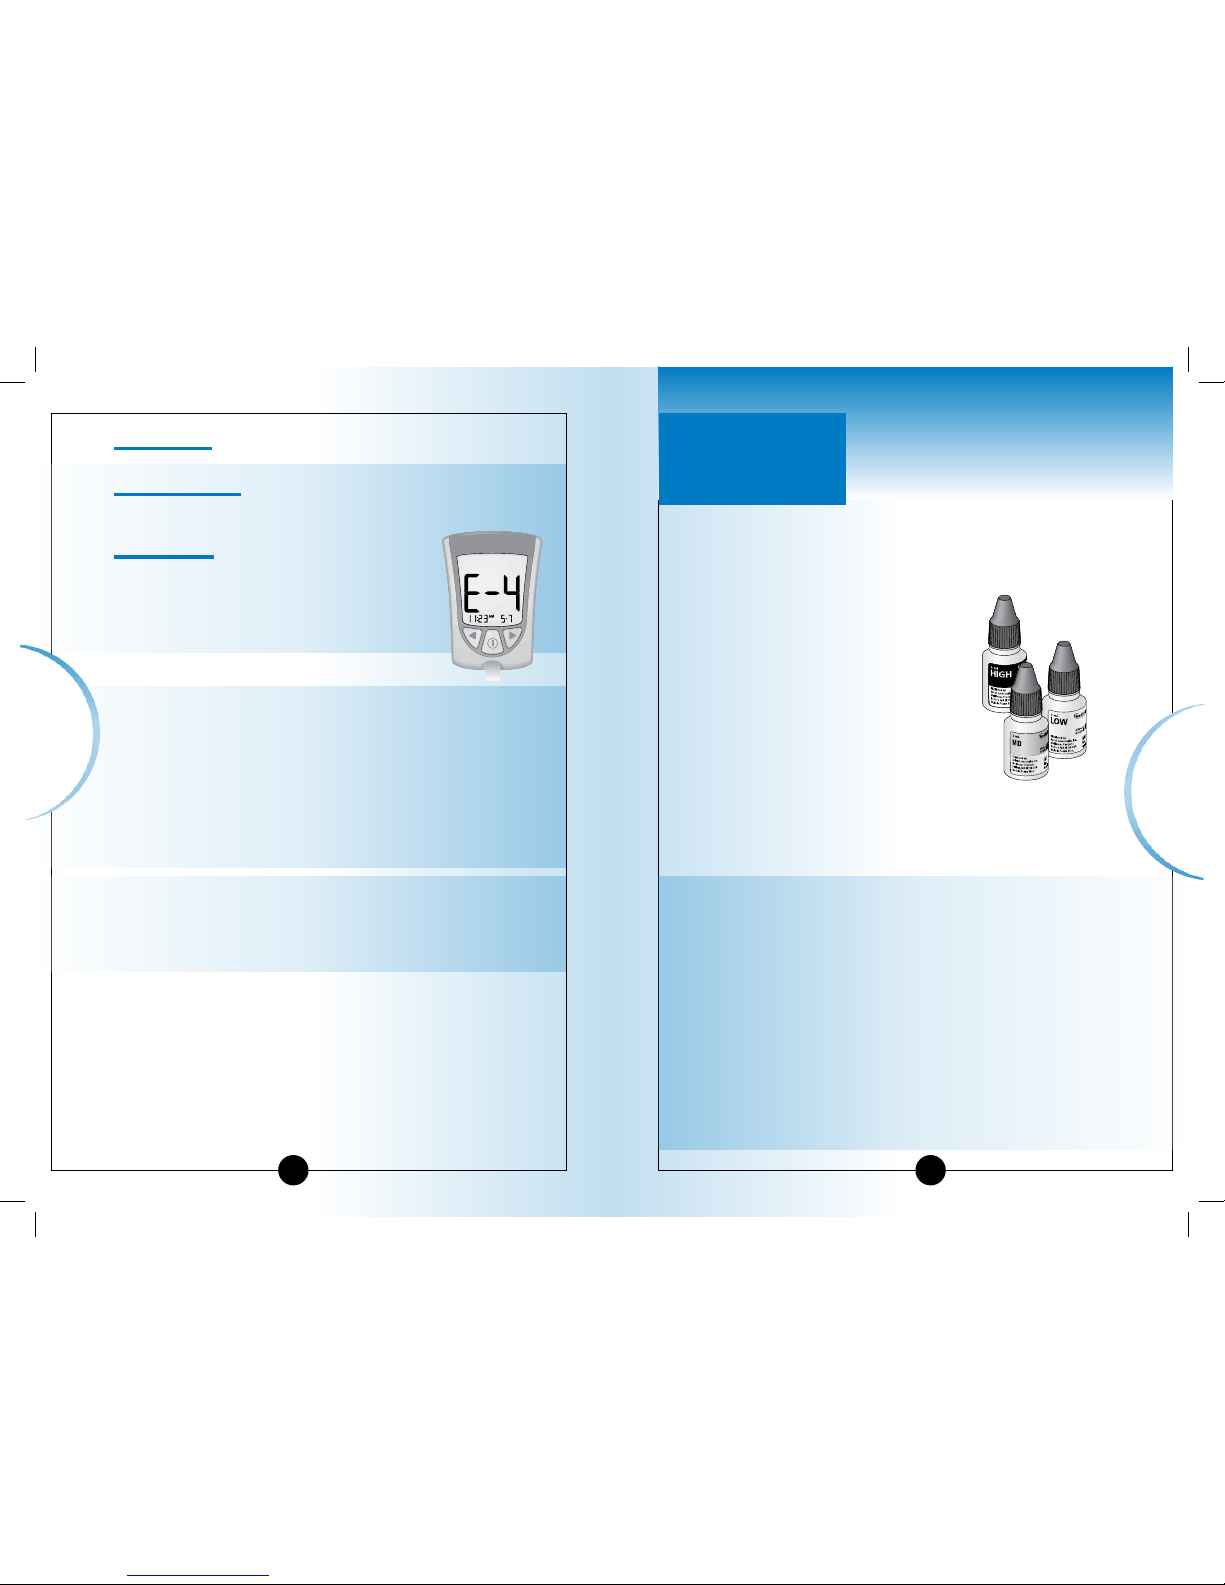
"E-4" Result
What It Means:
There may be a problem with the test strip.
What to Do:
Monitor your blood β-Ketone again with a
new test strip. If
E-4 shows on the display
window again, contact your healthcare
professional
immediately.
IMPORTANT: It is recommended that you repeat the
blood β-Ketone test with a new test strip when:
• HI appears in the display window.
• Your result is unusually high.
• You question your result.
• You obtain a 0.0 mmol/L blood β-Ketone result BUT your
blood glucose is higher than 300 mg/dL (16.7 mmol/L).
IMPORTANT: A result that is incorrect may have a serious
medical outcome. Consult your healthcare professional
before changing your diabetes medication program.
35 36
CHAPTER 6
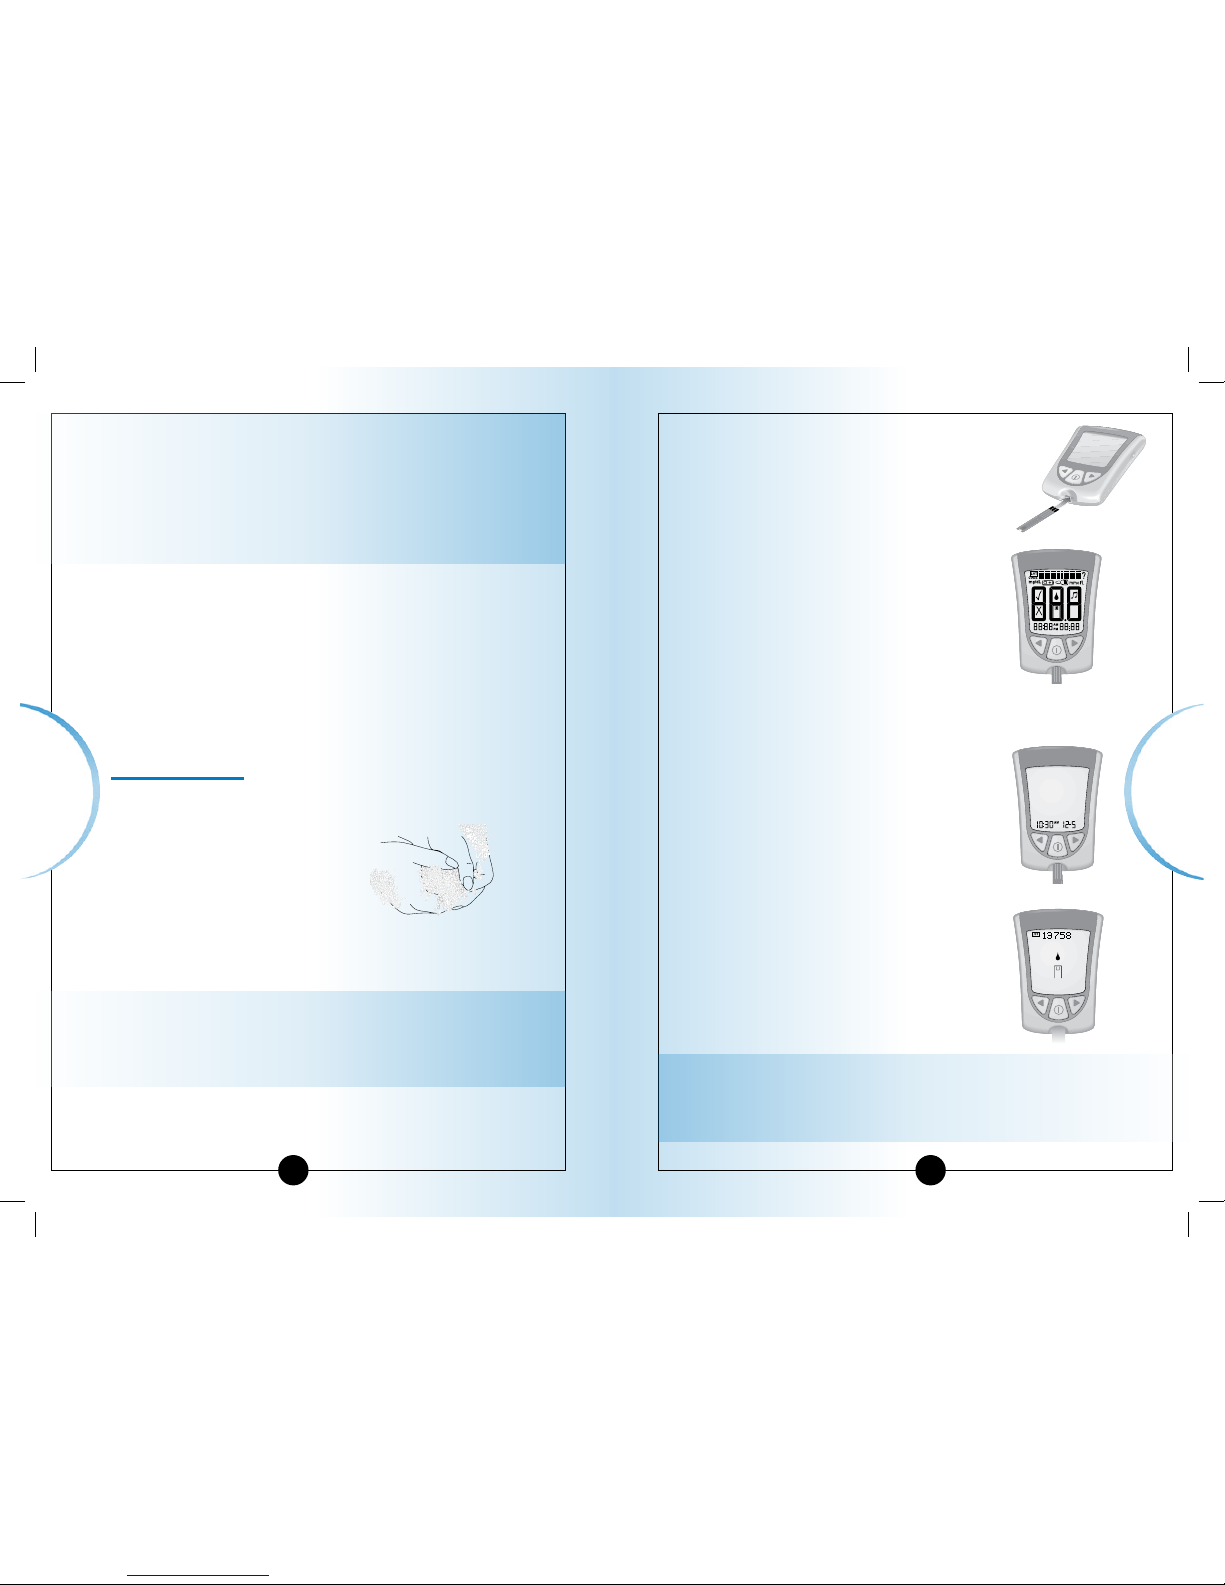
Doing A Control Solution Test
Why Do A Control Solution Test?
The control solution test tells you that your meter and test
strips are working correctly. A control solution test is similar
to when you monitor your blood
glucose or blood β-Ketone, except
you use a MediSense Control Solution.
You do not use a drop of blood in
a control solution test.
When Is Doing A Control Solution
Test Recommended?
• When you question your results.
• To make sure that your meter and
test strips are working properly.
Important Information about Control Solution Testin
g
• For more detailed information on how to obtain control solutions,
please contact Customer Support, see page 57.
• For more detailed information about control solutions, read the
control solution instructions for use.
•MediSense Control Solutions may be used for glucose or
ketone control solution testing.
• Do not use the control solution if the expiration date has
passed. Check the expiration date printed on the control
solution bottle.
• When you open a control solution bottle for the first time,
count forward 90 days and write this date on the control
solution bottle using a pen that won’t smear or wipe off.
Throw away any remaining solution after this date.
Control
Solution Testing
▼
Questions? Call
Customer Support:
See page 57.
▼▼
ART10825-Rev-A-Man.indd 38-39 11/10/06 1:10:11 PM
Page 21
37
Control Solution
Testing
38
3
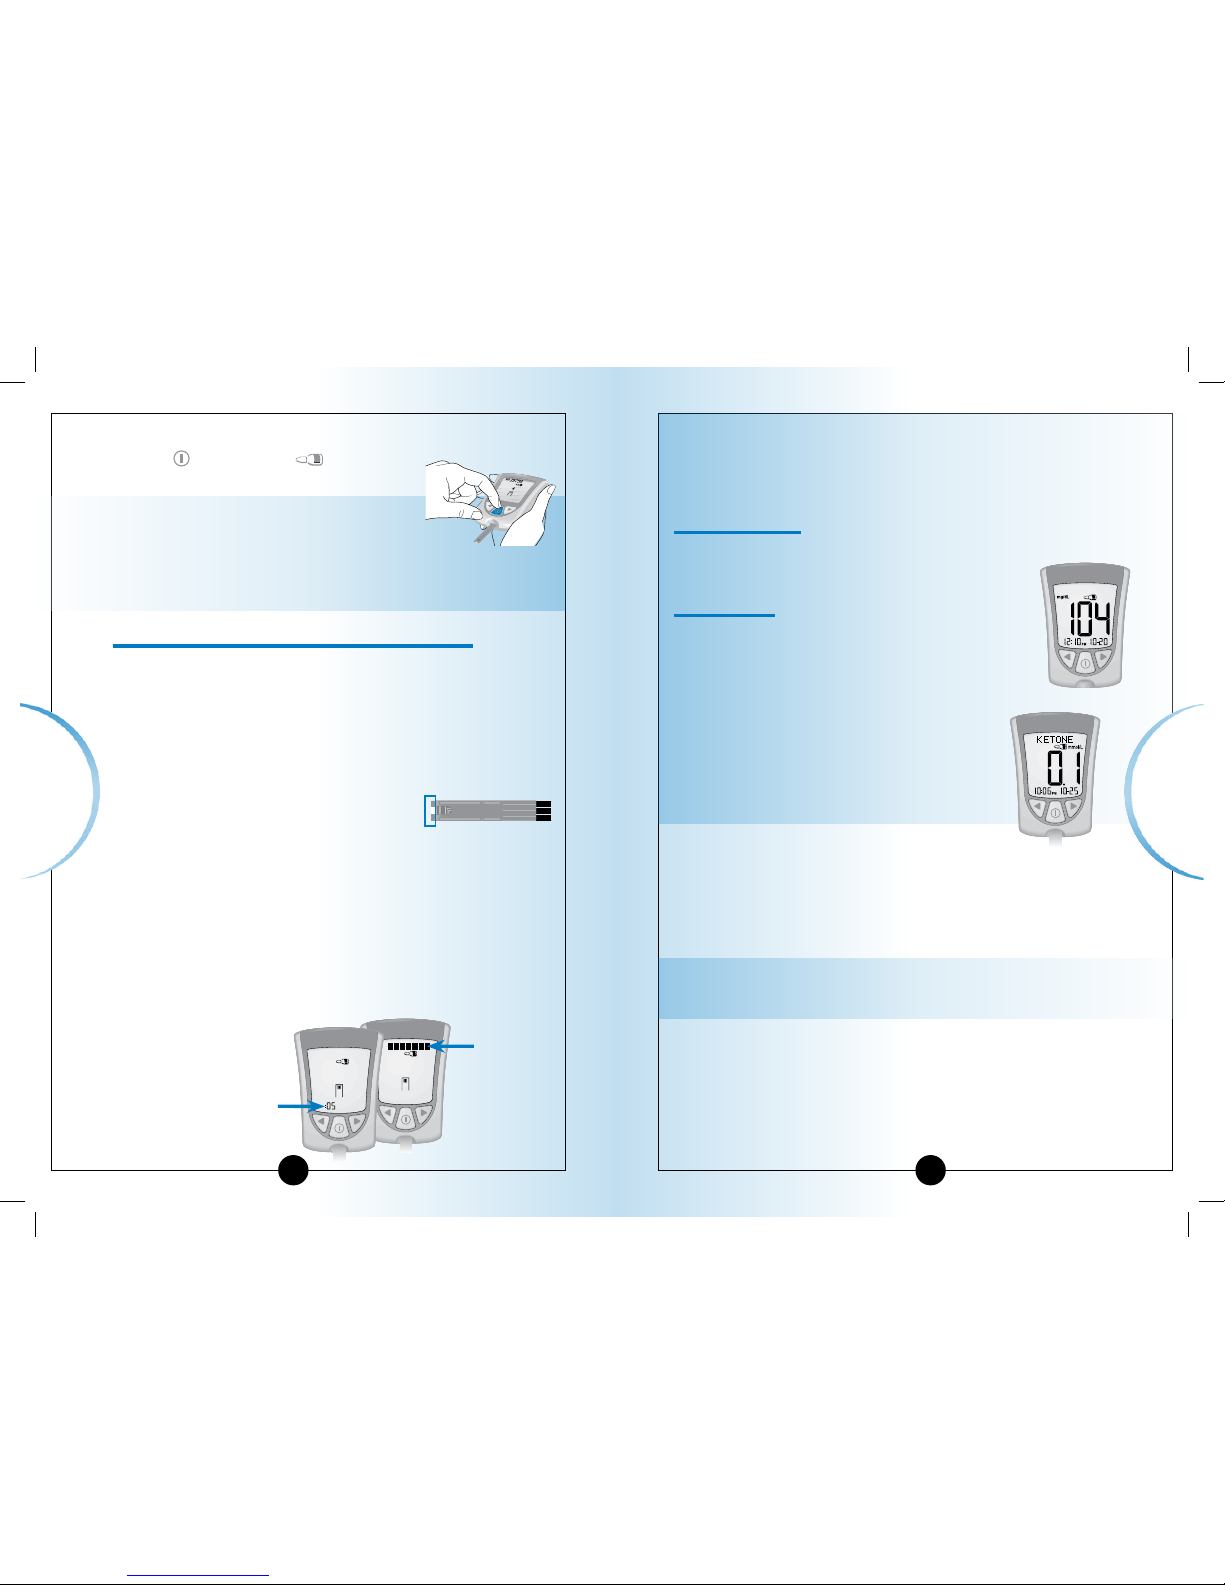
Insert the three black lines at the end of
the test strip into the strip port.
4
Push the test strip in until it stops.
The meter turns on automatically.
These items show on the display
window, one after the other:
• Display Check – Remember to make
sure that all items in the picture here
show on the display window. (See
Chapter 1 for more information about the
Display Check.)
• Time, month, and day (if set)
If date and time are not set, dashes will
show instead of numbers.
• LOT number for the box of test strips
you are using.
• Apply Sample message, which tells you
that the meter is ready for you to apply
control solution to the test strip.
Note: If you are a doing a β-Ketone control solution
test,
KETONE will show on the meter’s display
window with the β-Ketone Apply Sample message.
Control
Solution Testing
• The results obtained from control testing do not reflect
your personal blood glucose or blood β-Ketone levels in
any way.
• Do not swallow the control solution.
• Do not inject the control solution or use the control
solution as eye drops.
What You Will Need
• Optium Xceed meter calibrated to match the LOT
number of the test strip you are using
• Blood glucose or blood β-Ketone test strip and its
instructions for use
• MediSense Control Solutions and instructions for use
How to Do Control Solution Testing
Getting Started
1
Wash your hands using warm soapy water and dry
them completely.
2
Remove the test strip from its foil packet.
Note: For pictures that show how to open the blood
glucose test strip foil packet, please see the information
card in the box of blood glucose test strips.
▼▼
ART10825-Rev-A-Man.indd 40-41 11/10/06 1:10:20 PM
Page 22
Control Solution
Testing
Control
Solution Testing
Control
Solution Testing
39
5
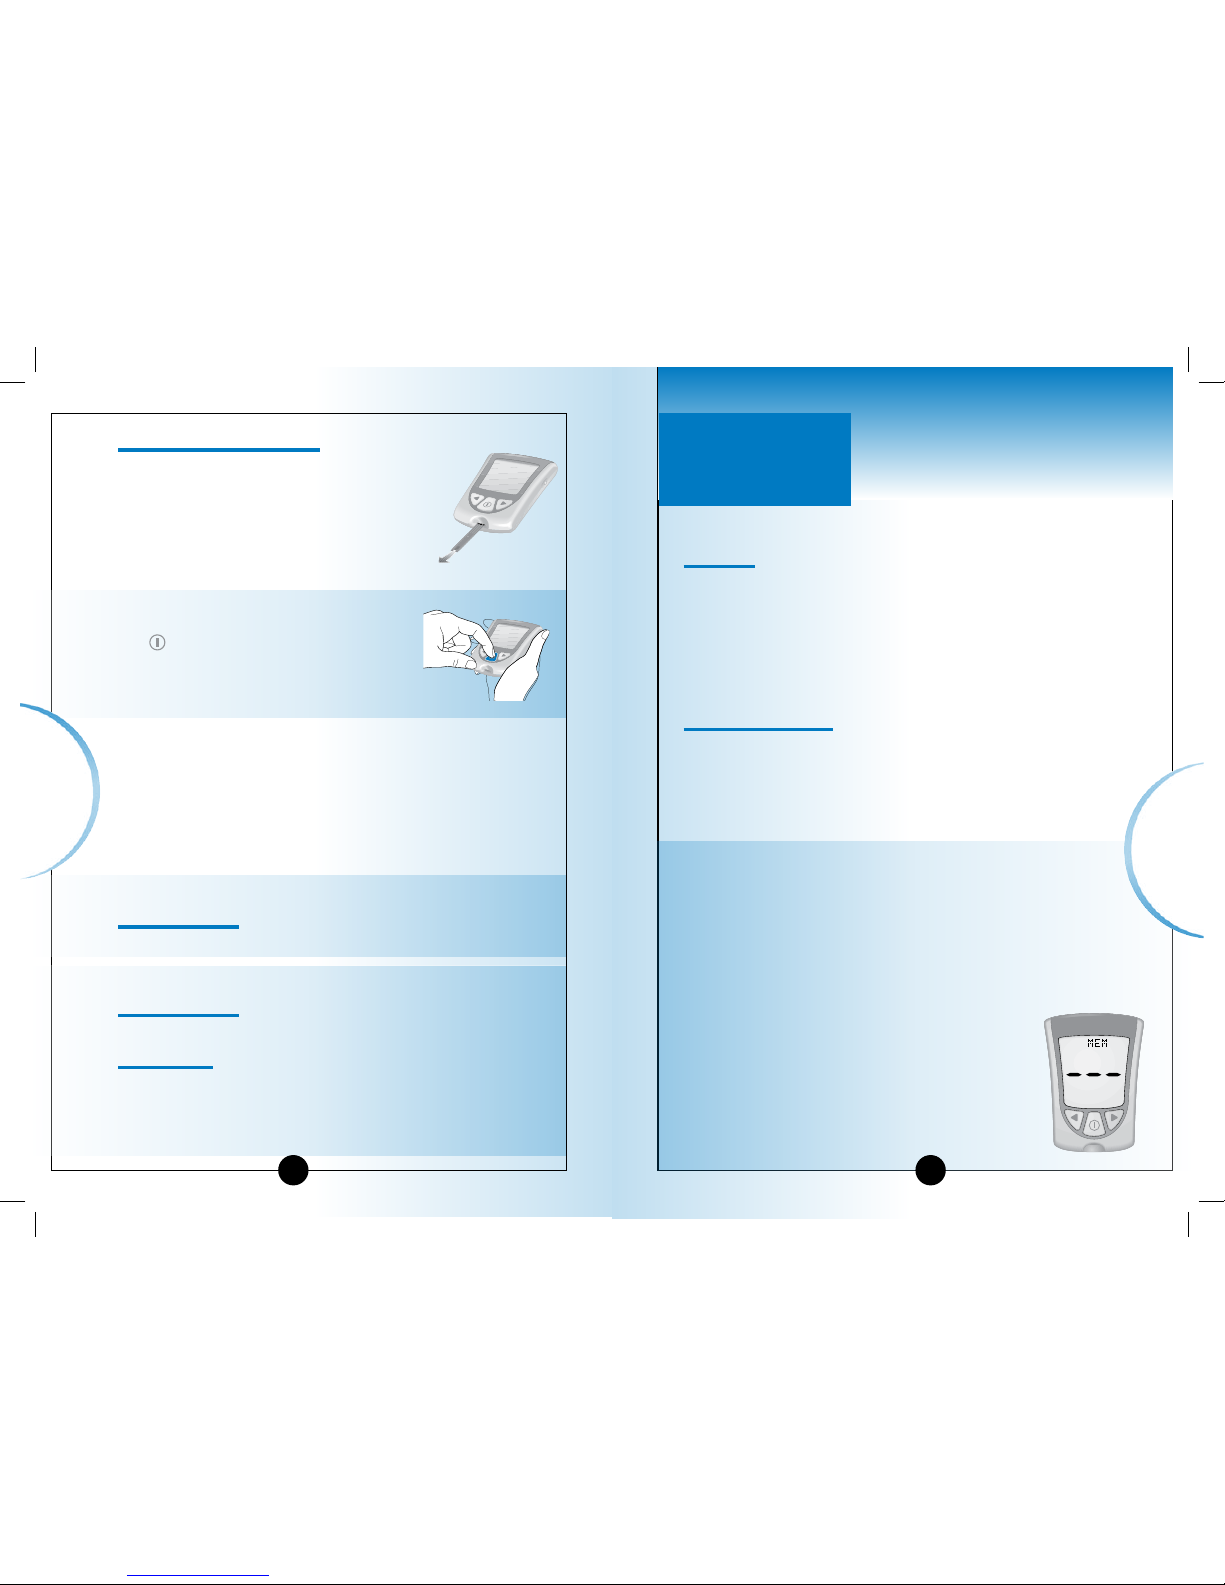
To mark the test as a control test, Press and Release
the
button once. shows on
the display window.
IMPORTANT: If you do not mark the test
as a control test, it will be saved in your
meter’s memory as one of your personal
blood glucose or blood β-Ketone results.
This could affect your blood glucose averages.
Applying Control Solution to the Test Strip
1
Turn the control solution bottle upside down three to
four times to mix the solution.
2
Remove the cap.
3
Apply a drop of control solution
to the test strip in the area shown
here. The control solution is drawn
into the test strip.
4
Continue to touch the control solution to the test strip
until the meter begins the test.
The meter begins the test when:
• You hear the beeper, if the beeper is ON.
• The display window shows the status bar.
• Then the display window shows the countdown.
40
Status bar
Countdown
Note: Do not remove the test strip from the meter or disturb it
during the countdown.
IMPORTANT: If the countdown does not start:
What It Means:
You might not have applied enough control
solution to the test strip.
What to Do:
• Apply a second drop of control solution to the
test strip. Refer to your test strip instructions
for use for the number of seconds you have to
apply a second drop.
• If the countdown still does not start, or
if the number of seconds you have to
apply a second drop have passed, discard
the test strip, turn off your meter, and try
again with a new test strip.
5
At the end of the countdown:
• If the beeper is ON, listen for the beeper.
• The control result shows on the display window.
Note: If you are doing a β-Ketone control solution test,
KETONE will also show with the result.
• The result is stored in your meter’s memory as a control
result. In your logbook, record the result as a control result.
Glucose
β-Ketone
ART10825-Rev-A-Man.indd 42-43 11/10/06 1:10:26 PM
Page 23
Control Solution
Testing
41
Shutting Off Your Meter
1
Removing the test strip from the strip
port turns off the meter. You can use
the opened foil packet to remove and
discard your used test strip.
2
Discard the test strip properly.
Note: You may also turn the meter
off by Pressing and Holding the
button. If you do not turn your
meter off or pull the test strip out,
the meter shuts off automatically
after 60 seconds.
Understanding Your Result
Compare the control result to the "Expected Results for
Use with MediSense Control Solutions" range printed on:
• The blood glucose test strip instructions for use, for
glucose control solution testing.
• The blood β-Ketone test strip instructions for use and foil
packet, for β-Ketone control solution testing.
If the control result falls within the range:
What It Means
Your meter and test strips are working correctly.
If the control result does not fall within the range:
What It Means
Your meter and test strips may not be working correctly.
What to Do
Repeat the test with a new test strip and ensure the
control solution testing instructions are followed
completely. If the result is still not within the printed
range, contact Customer Support.
▼
42
CHAPTER 7
Reviewing Results
What Can Your Meter Show You?
Memory
Your Optium Xceed meter has a memory that stores up to
450 events. This is a combination of control results, your
personal blood glucose and blood β-Ketone results, and
other meter information.
You can review up to 450 of your most recent events on
your meter’s display window.
Glucose Averages
You can view the average of all your blood glucose
results from the last 7, 14, or 30 days. If you marked your
control solution tests, the averages do not include control
solution results. (For more information on marking control
solution tests, see Chapter 6.)
IMPORTANT:
• To review blood glucose averages, you must set the
date and time before monitoring.
• If you do not mark control solution tests, this may affect
your glucose averages.
• Blood glucose averages do not include blood β-Ketone
results, glucose control results, β-Ketone control results,
or results that do not show the time, month,
and day.
• When there are no previous results or blood
glucose averages to review, the display
window shows three dashes.
▼
Questions? Call
Customer Support:
See page 57.
Reviewing & Using Your Results
➡
CHAPTER 7
ART10825-Rev-A-Man.indd 44-45 11/10/06 1:10:30 PM
Page 24
43 44
Reviewing Results
Reviewing Results
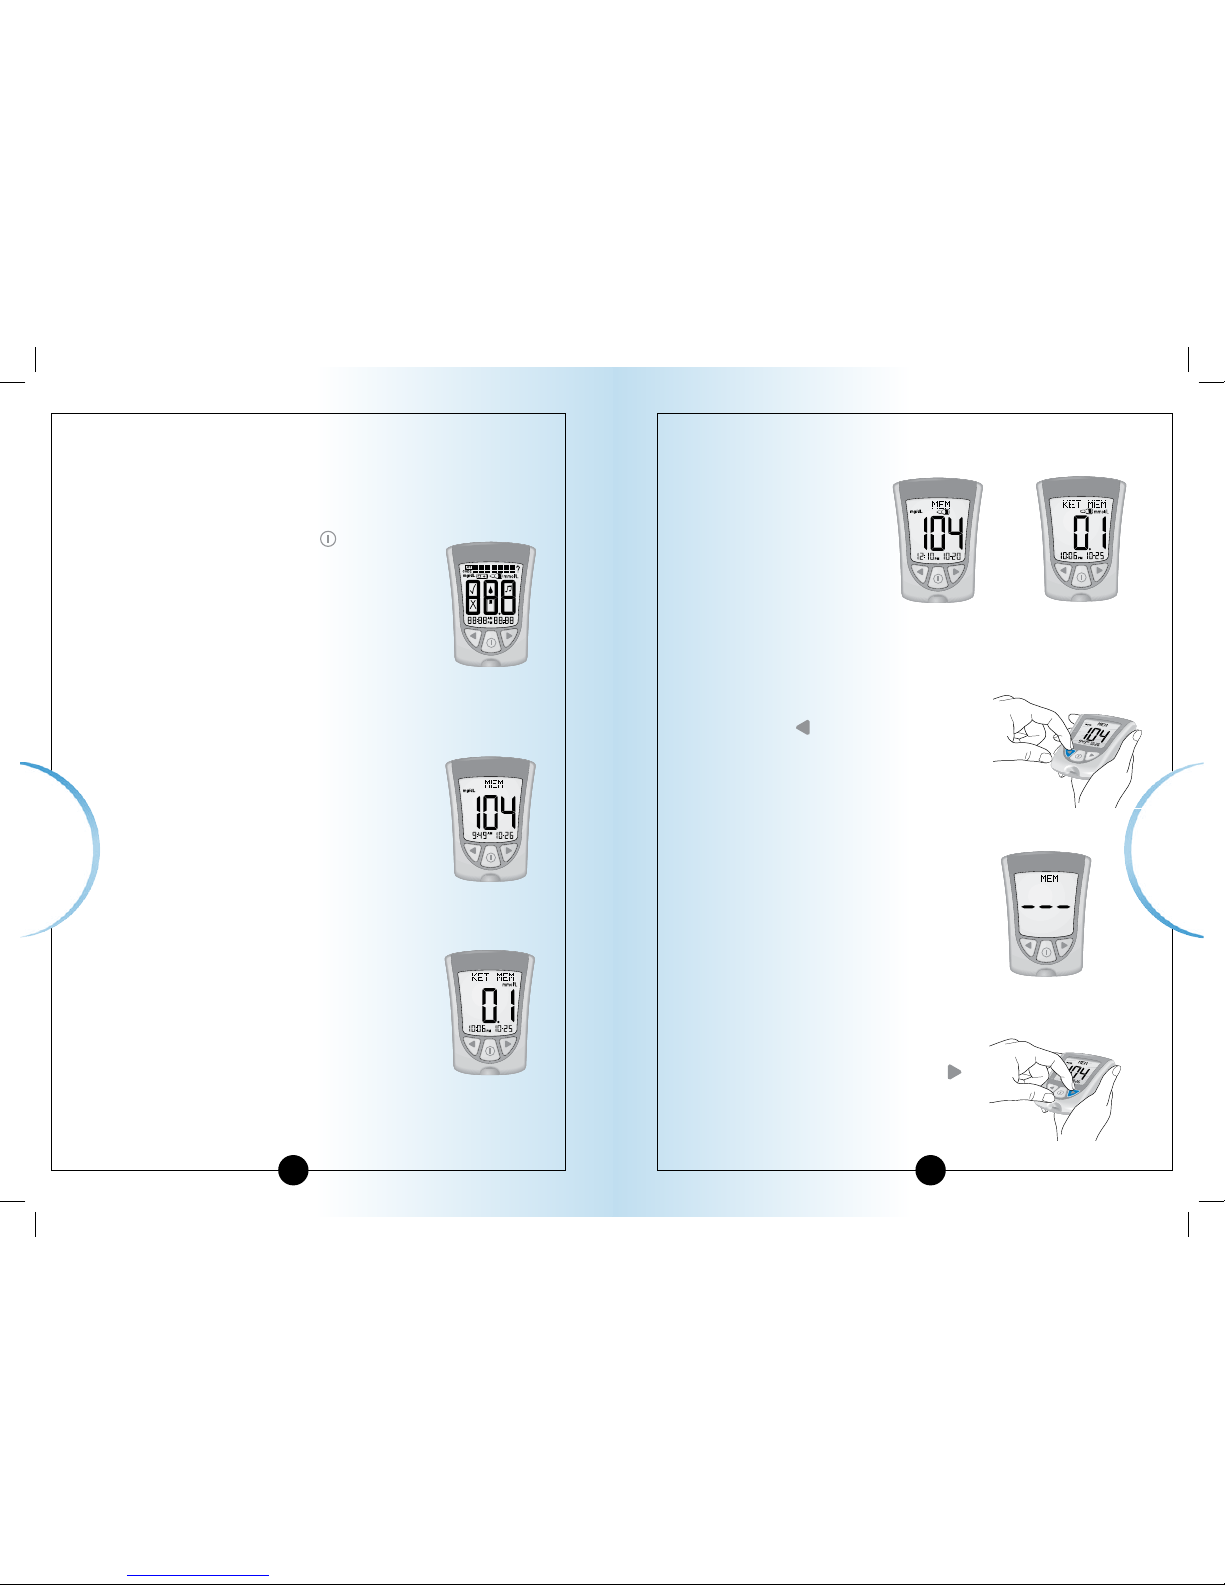
How to See Results in Memory
1
Begin with your meter turned off. Make sure there is
nothing in the strip port.
2
Press and Release the button.
• The Display Check shows on the
display window.
• Then your most recent result shows
with its units on the meter’s display
window, along with the time,
month, and day that you got the
result. (To set the correct date and
time, follow the steps in Chapter 2.)
A blood glucose result in Memory will
show with the letters
MEM.
A blood β-Ketone result in Memory
will show with the letters
KET MEM.
▼
Blood β-Ketone
result in Memory
Blood Glucose
result in Memory
A control solution result in Memory shows with a control
bottle, as long as you marked the test as a control
solution test.
3
To review previous results, Press and
Release the
button once per result.
4
When you reach the last result in
Memory, the display window shows
three dashes.
5
To return to a result you previously
reviewed, Press and Release the
button once per result.
Glucose control
solution result
in Memory
β-Ketone control
solution result
in Memory
ART10825-Rev-A-Man.indd 46-47 11/10/06 1:10:36 PM
Page 25
Reviewing Results
Reviewing Results
4645
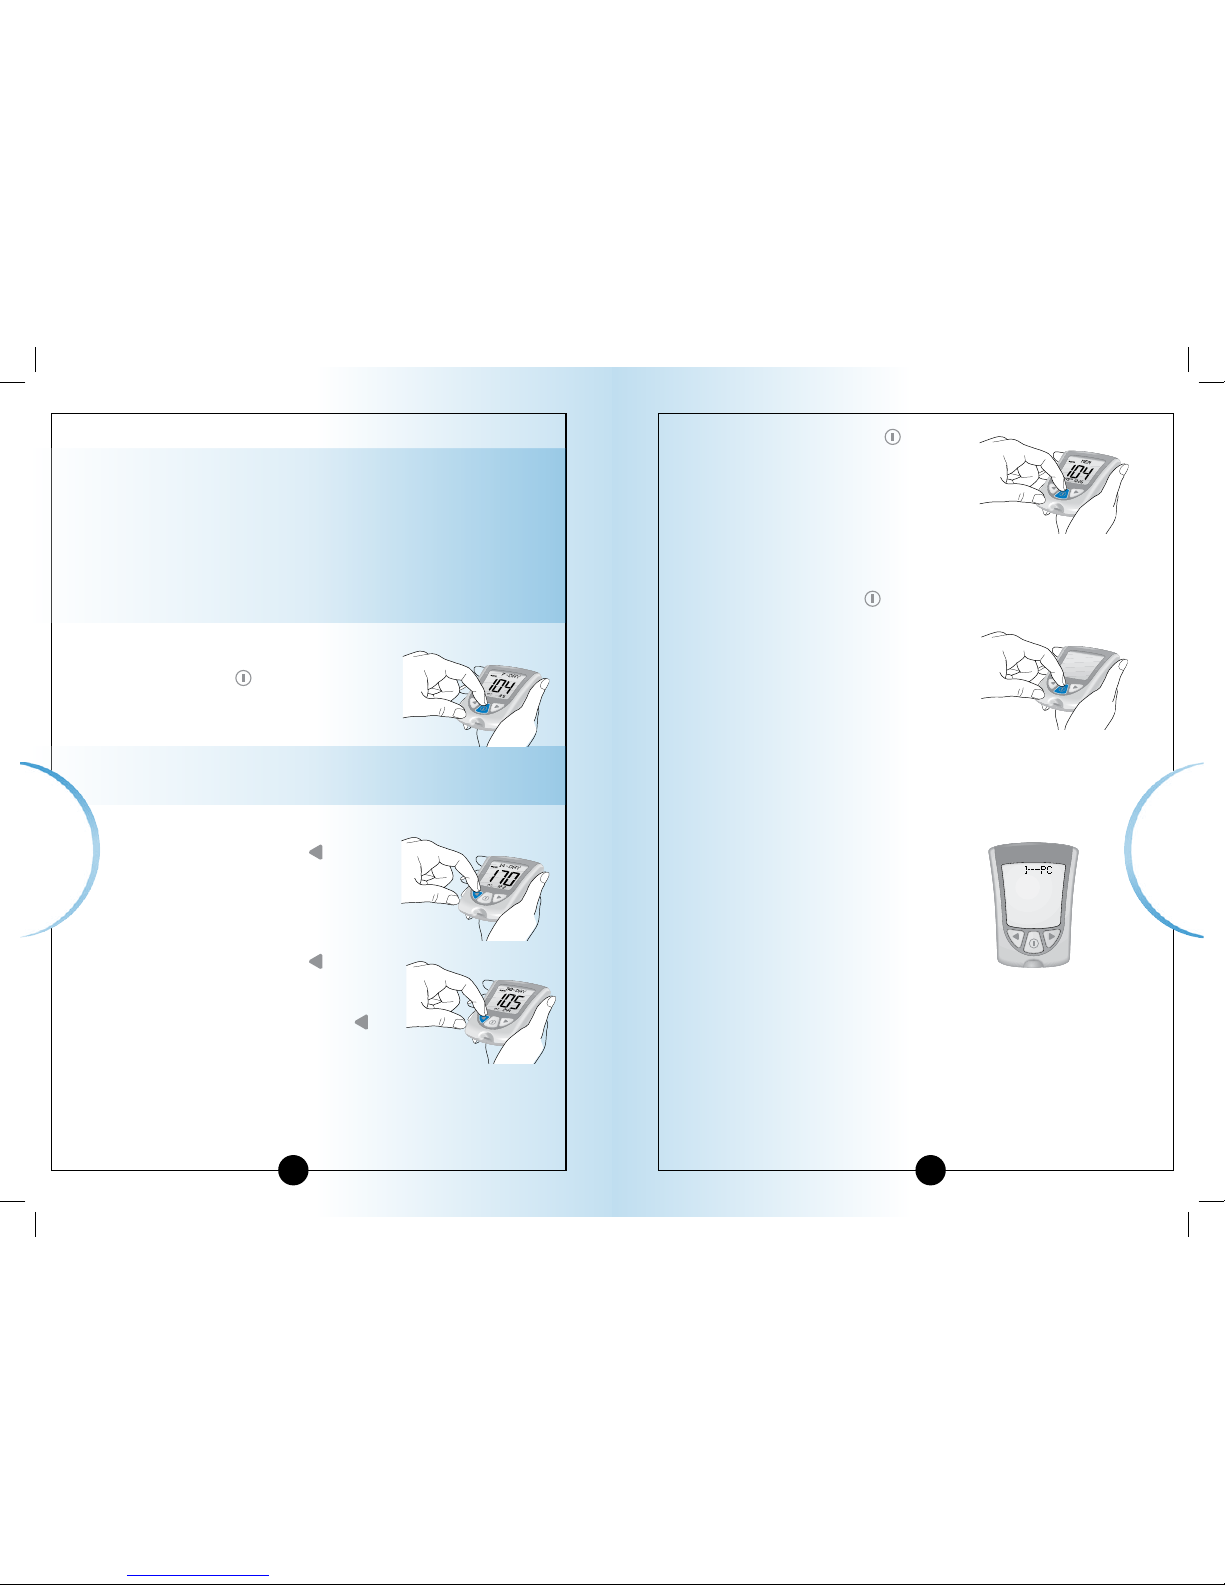
How to See Averages
IMPORTANT:
• Results that show as LO during blood glucose
monitoring are included as 20 mg/dL (1.1 mmol/L)
in blood glucose averages.
• Results that show as HI during blood glucose
monitoring are included as 500 mg/dL (27.8 mmol/L)
in blood glucose averages.
▼
1
While in Memory, Press and
Release the
button at any
time to see the 7-Day average of
your blood glucose results.
Note: n means how many tests were performed
within the 7-, 14-, or 30-Day average period.
2
Press and Release the button
once to see the 14-Day average
of your blood glucose results.
3
Press and Release the button
again to see the 30-Day average
of your blood glucose results.
If you Press and Release the
button again, the display window
shows the 7-Day average.
4
Press and Release the button
at any time to return to Memory.
5
Press and Hold the button to turn off your meter.
Otherwise, the meter turns off
after 30 seconds.
Transferring Your Results to a Computer
The results in your Optium Xceed meter's memory, along with
the time and date of the reading, can be transferred to
a computer with the use of
the Precision Link
®
Direct Software
Version 2.5 and a Precision Link
communications cable. For information
on how to purchase the software and
cable, contact Customer Support. To
install the software, please follow
the instructions provided in
the Precision Link User's Guide.
▼
ART10825-Rev-A-Man.indd 48-49 11/10/06 1:10:42 PM
Page 26
Error Messages
CHAPTER 8
Understanding &
Troubleshooting
Error Messages
There are times when error messages may show on your
meter’s display window.
In the next few pages, we describe the error messages
that may show on your meter’s display window, what
they mean, and what you need to do.
Questions? Call
Customer Support:
See page 57.
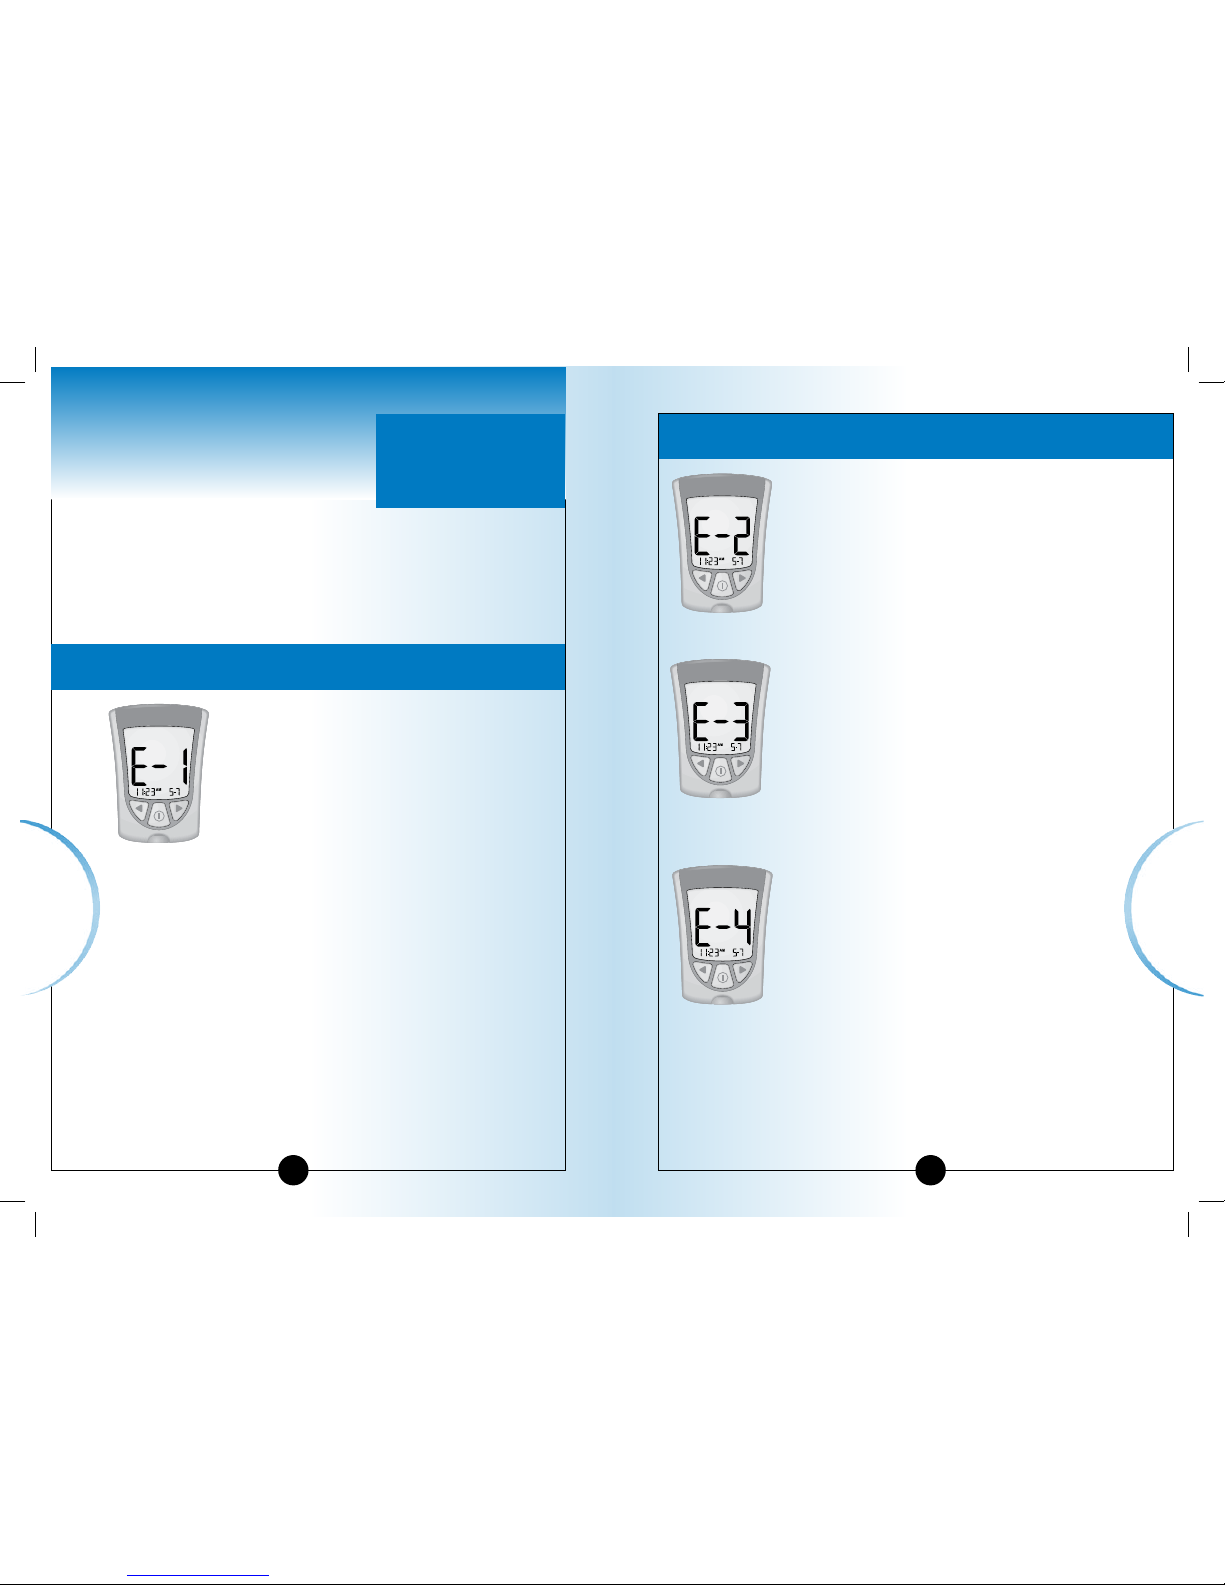
Temperature is too
hot or too cold for
the system to work
properly.
• Move your meter
and test strips to
a location where
the temperature
is appropriate and
monitor again with
a new test strip. You
may have to wait
for your meter to
adjust to the new
temperature. Refer
to your test strip
instructions for use
for the appropriate
operating range.
• If the error message
appears again, contact
Customer Support.
Message
What It What You
Means Need to Do
Message
What It What You
Means Need to Do
Meter error.
There may be a
problem with the
test strip.
Blood glucose
result may be too
high to be read by
the system.
OR
There may be a
problem with the
blood glucose or
blood β-Ketone test
strip.
• Turn the meter off,
then repeat previous
monitoring steps.
• If the error message
appears again, contact
Customer Support.
• Review the monitoring
instructions.
• Monitor again with a
new test strip.
• If the error message
appears again, contact
Customer Support.
• Monitor again with
a new test strip.
• If the error
message appears
again, contact
your healthcare
professional
immediately.
Error Messages
4847
ART10825-Rev-A-Man.indd 50-51 11/10/06 1:10:46 PM
Page 27
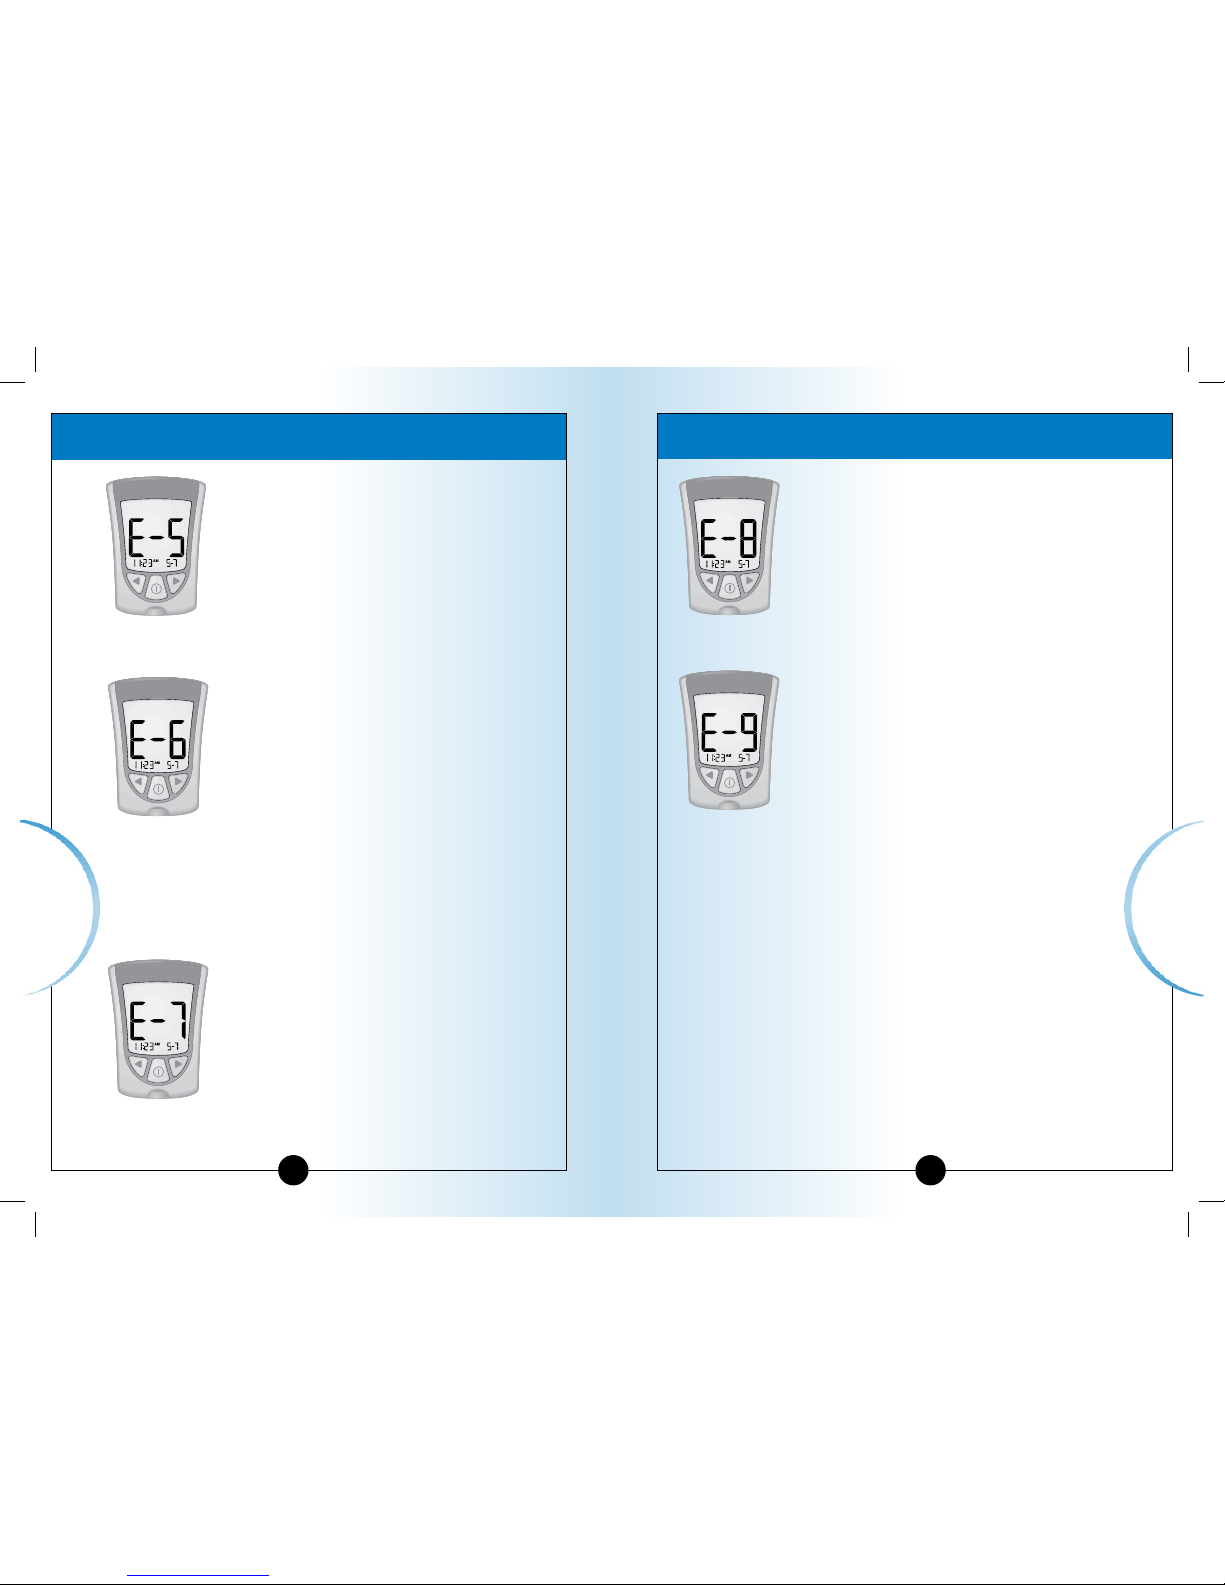
Blood applied to
test strip too soon.
Calibration/Test
strip error.
Test strip error.
Test strip is
damaged, used, or
the meter does not
recognize it.
• Review the monitoring
instructions.
• Monitor again with a
new test strip.
• If the error message
appears again, contact
Customer Support.
• Repeat the calibration
using the calibrator
bar that came with
the test strip you are
using.
• Check the date setting
on your meter.
• Check the expiration
date on the test strip
foil packet.
• If the error message
appears again, contact
Customer Support.
• Monitor again using
a test strip designed
for use with Optium
Xceed.
• If the error message
appears again, contact
Customer Support.
Message
What It What You
Means Need to Do
Message
What It What You
Means Need to Do
Meter error.
Meter err
or.
• Remove test strip, turn
meter off, and try to
monitor again.
• If the error message
appears again, contact
Customer Support.
• Remove test strip, turn
meter off, and try to
monitor again.
• If the error message
appears again, contact
Customer Support.
49
Error Messages
50
Error Messages
ART10825-Rev-A-Man.indd 52-53 11/10/06 1:10:49 PM
Page 28
CHAPTER 9
Questions? Call
Customer Support:
See page 57.
Specifications
& Limitations
Specifications
& Limitations
Your Meter’s
Specifications
& Limitations
5251
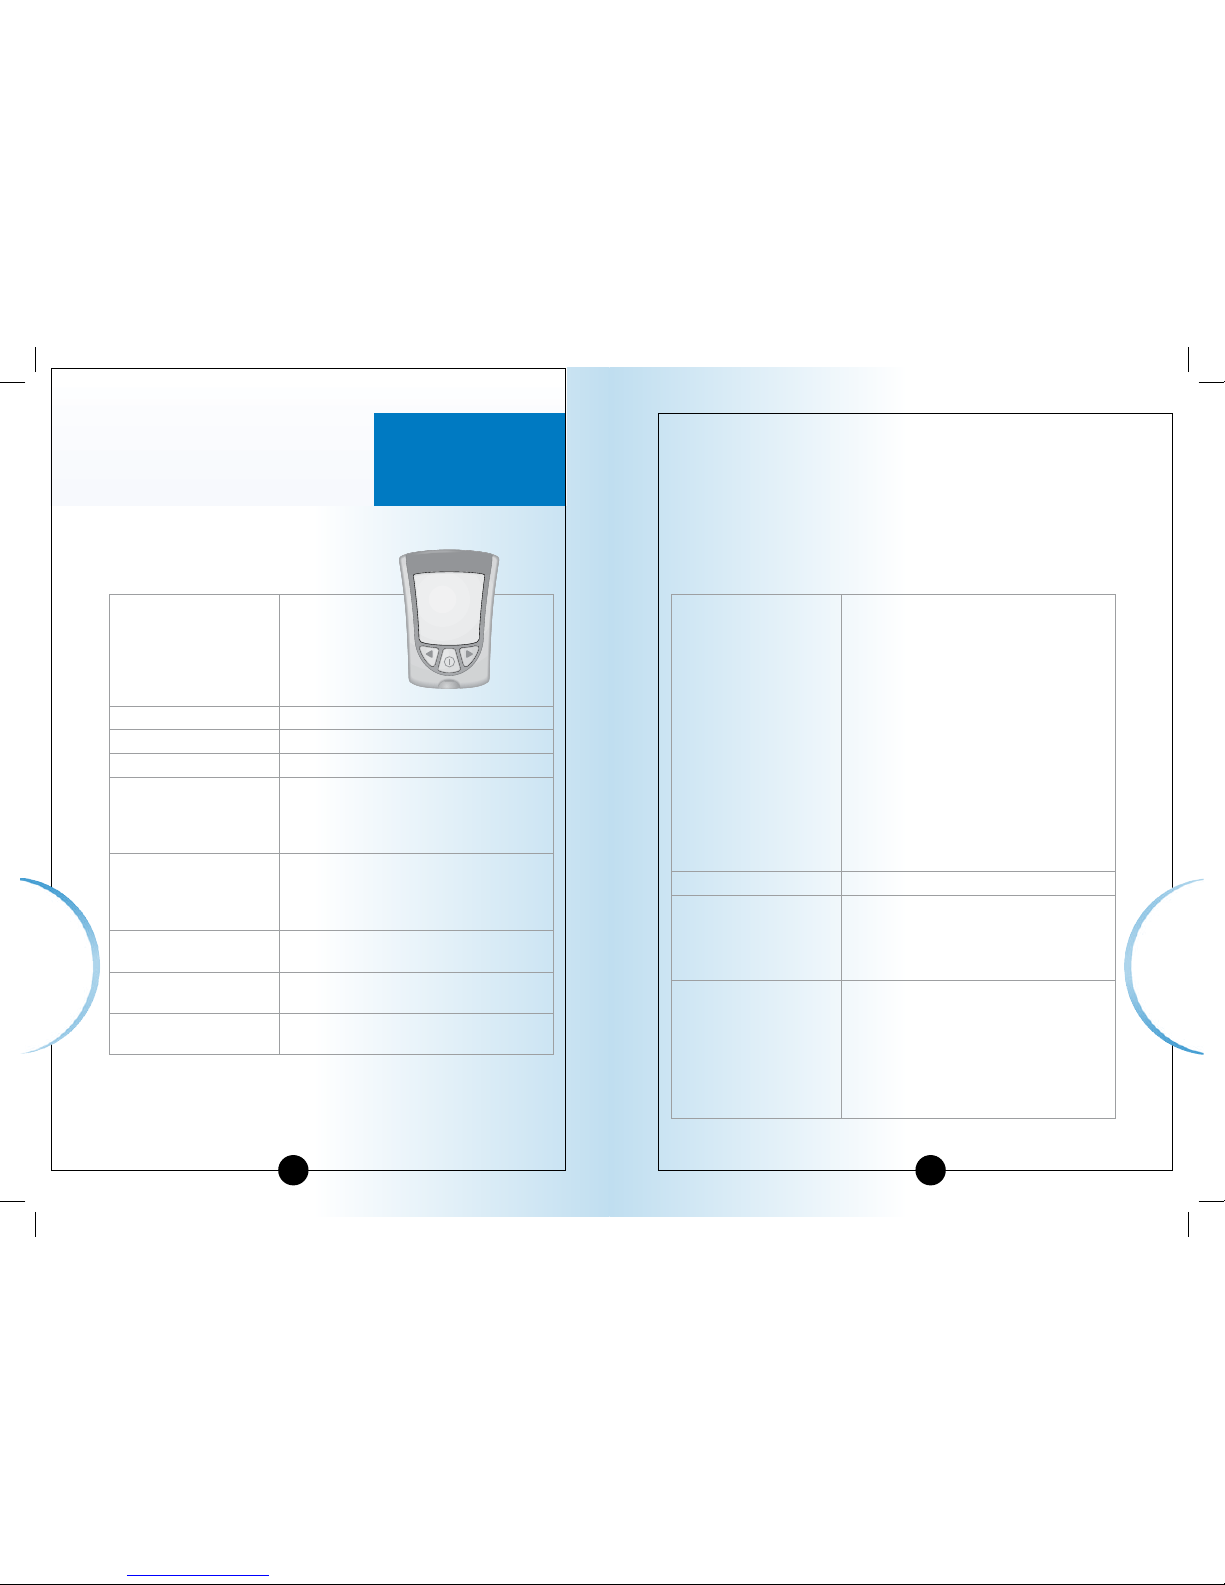
Size
Length:
Width:
Thickness:
7.47 cm
5.33 cm (Top)
4.32 cm (Bottom)
1.63 cm
Weight 42 grams
Power Source One CR 2032 Lithium (coin cell) battery
Battery Life Approximately 1,000 tests
Memory Up to 450 events including control
results, personal blood glucose and
blood β-Ketone results, and other meter
information
Storage Temperature
Meter:
Test Strips:
Control Solution:
–25º to 55ºC
See test strip instructions for use
See control solution instructions for use
Blood Glucose
Assay Range
See blood glucose test strip
instructions for use
Blood β-Ketone
Assay Range
See blood β-Ketone test strip
instructions for use
Control Solution
Range
See blood glucose or blood β-Ketone
test strip instructions for use
Functions - Blood glucose monitoring
- Blood β-Ketone monitoring
- Memory 450 events
- Glucose averaging: 7-Day, 14-Day, and
30-Day Averages
- Control solution marking and testing
- Backlight: If ON – Stays ON during
countdown; turns OFF 30 seconds after
result is displayed. If OFF – Stays OFF
during countdown; stays OFF during
data upload
- Beeper: If ON – Beeps when calibrator
is fully inserted and when countdown
starts and finishes
Data port Yes
Meter Operating
Range
Temperature:
Relative Humidity:
10º to 50ºC
10% to 90%, non-condensing
System Operating
Range
Temperature:
Relative Humidity:
The system operating range is the
operating range of the test strip you
are using. See “Limitations of Procedure”
section in test strip instructions for use
10% to 90%, non-condensing
ART10825-Rev-A-Man.indd 54-55 11/10/06 1:10:51 PM
Page 29
CHAPTER 10
53
Specifications
& Limitations
54
Caring For Your Meter
Caring for
Your Meter
Questions? Call
Customer Support:
See page 57.
▼
Important Information about Using Blood
Samples from the Forearm, Upper Arm, or Base
of the Thumb:
• Contact your healthcare professional before you
begin using any one of these alternative sites to test
your blood glucose.
• Sampling from any one of these alternative sites may
cause minor bruising and may leave marks that go
away in a short time.
• There may be times when alternative site results are
different from fingertip results. This happens when
blood glucose levels change rapidly (for example,
after you eat a meal, after you take insulin, or during
or after exercise).
• Use alternative sites to monitor your blood glucose
before, or more than two hours after, you eat a meal,
take insulin, or exercise.
• Do not use blood samples from alternative sites
when:
1. You think your blood glucose is low or is
changing rapidly,
2. You have been diagnosed with hypoglycemic
unawareness,
3. The results from alternative sites do not match
the way you feel,
4. It is within two hours of eating a meal, taking
insulin, or exercising, or
5. You monitor your blood β-Ketone.
▼
Cleaning Your Meter
Store your meter in its carrying case.
If the surface of your meter gets dirty, you may clean it.
Use a damp cloth and mild soap.
Healthcare professionals: Acceptable cleaning solutions
include 10% Bleach, 70% Alcohol, or 10% Ammonia.
IMPORTANT:
Do not try to clean the strip port.
Do not pour liquid into the strip port or buttons.
Do not place your meter in water or any other bath.
Replacing Your Meter’s Battery
When your meter needs its batteries replaced, the display
window shows one of two things:
This means the battery is low. You
may still use your meter and the results
will be accurate. However, the backlight
is not useable. It is recommended that
you replace the battery at this time.
This means the battery must be
replaced. The meter is not useable.
The meter turns off automatically.
IMPORTANT:
Do not remove the old battery until
you have a new battery to install. It may be necessary to
reset the time and date once you install a new battery.
➡
▼
➡
ART10825-Rev-A-Man.indd 56-57 11/10/06 1:10:53 PM
Page 30
56
Caring for Your
Meter
Caring for Your
Meter
Caring for
Your Meter
55
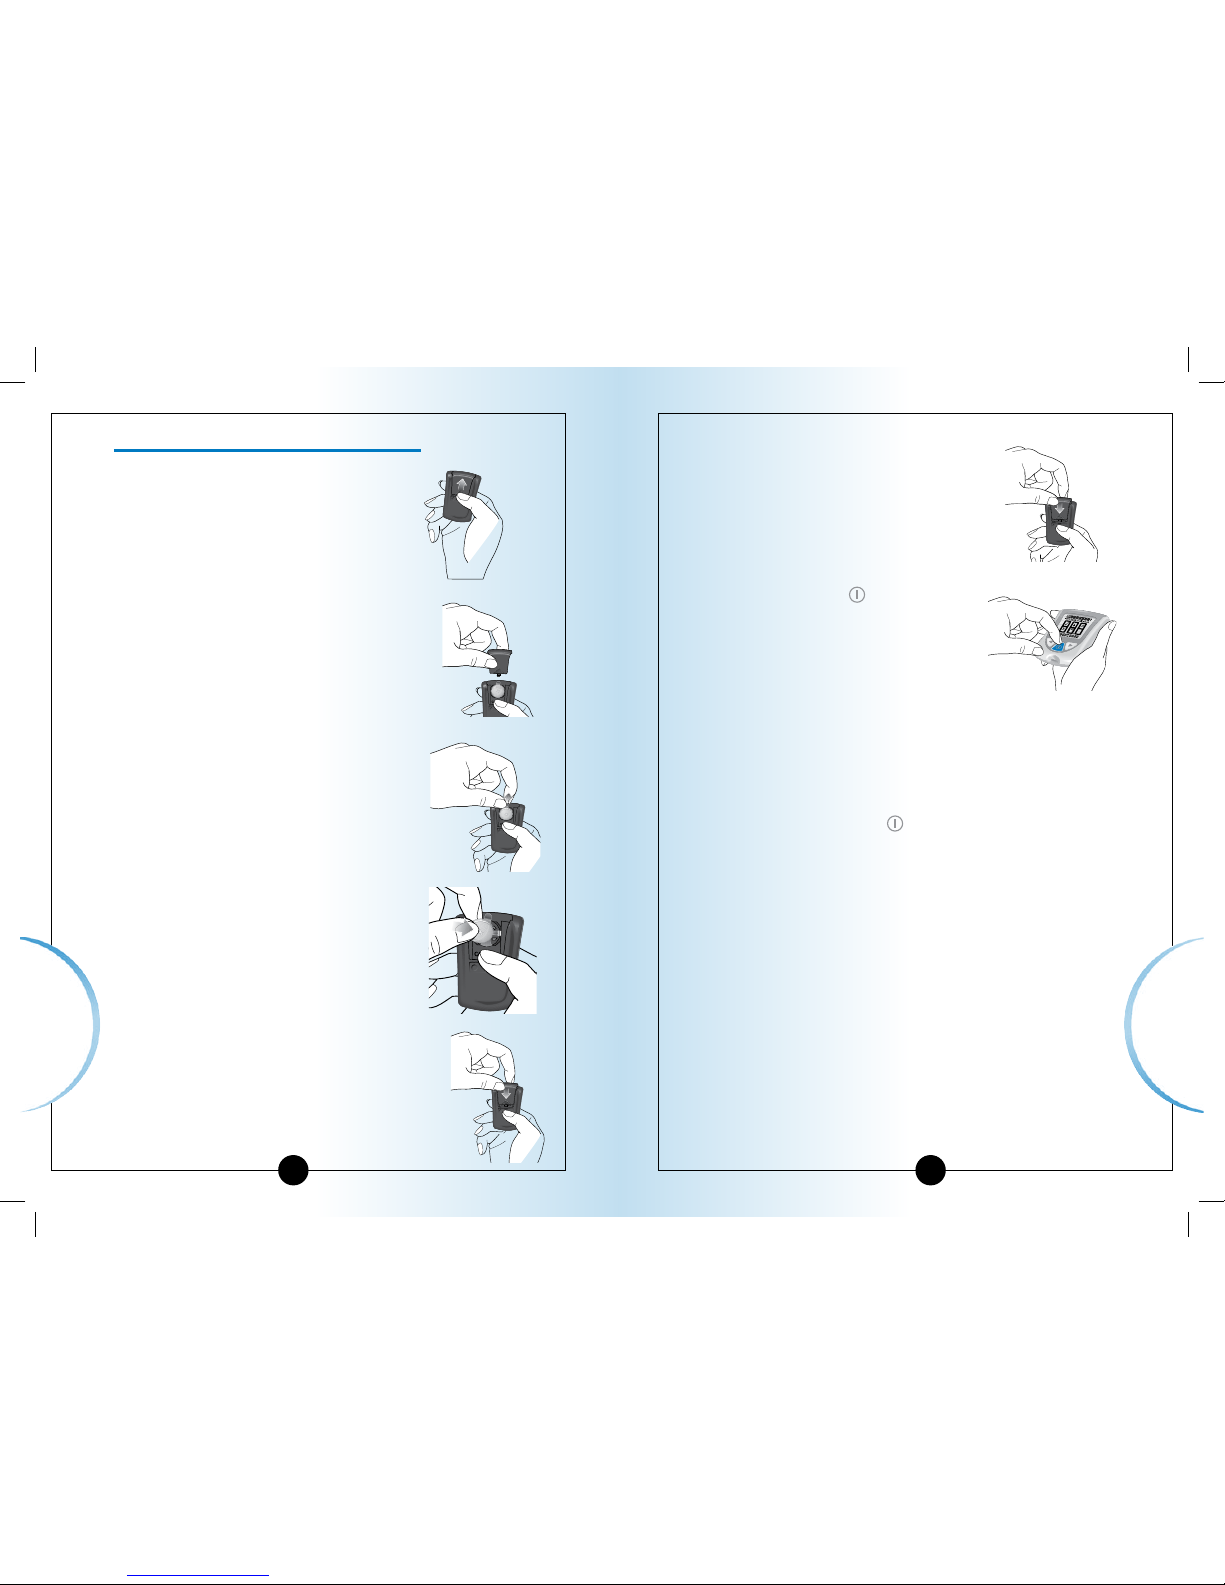
How to Replace Your Meter’s Battery
1
Gently push the battery cover in and
up with your thumb.
2
Lift the battery cover out of the meter.
3
Pull on the plastic tab sticking out of
the meter to remove the old battery.
4
Insert a new CR 2032 Lithium (coin
cell) battery with the plus sign (+)
facing up.
5
Place the notches on the battery cover
into the appropriate molded areas.
6
Gently push the battery cover in and
down until you hear a click.
7
Press and Hold the button to
turn your meter on. If your meter
does not turn on, review the battery
installation steps and reinstall the
battery.
8
Check the date and time on your
meter. You may automatically be
prompted to reset the time and date
when you first press the button to
turn your meter on. (See Chapter 2,
Setting Up Your System).
9
Be sure to discard the old battery
in compliance with your local
government’s regulations.
ART10825-Rev-A-Man.indd 58-59 11/10/06 1:10:59 PM
Page 31
58
Support
CHAPTER 11
57
Support
Questions? Call
Customer Support.
Abbott Laboratorios Uruguay SA
Abbott Diabetes Care
HELPLINE: 000-405-4342
Abbott Laboratorios Guatemala
Abbott Diabetes Care
HELPLINE: 597-4109
Abbott Laboratorios C.A.
Abbott Diabetes Care
HELPLINE: 0-800-372-3300
Abbott Laboratorios Peru
Abbott Diabetes Care
HELPLINE: 0-800-1-1215
Abbott Laboratorios Mexico
Abbott Diabetes Care
HELPLINES: Mexico City (DF) 55-24-4175
Outside Mexico City (DF) 01-800-711-2208
Support & Guarantee
Support
Abbott Laboratories is
committed to providing you
with support. Call us with any
questions you may have about
your Optium Xceed meter:
Abbott Laboratorios Argentina SA
Abbott Diabetes Care
HELPLINE: 0-800-8006334
EMAIL: [email protected]
Abbott Laboratorios do Brasil Ltda.
Abbott Diabetes Care
HELPLINE: 0800 703-0128
URL: www.abbottbrasil.com.br
Abbott Laboratorios de Chile Ltda.
Abbott Diabetes Care
HELPLINE: 800-802-226
Abbott Laboratorios de Colombia SA
Abbott Diabetes Care
HELPLINE: 01-8000-522-268
Abbott Laboratorios Republica Dominacana
Abbott Diabetes Care
HELPLINE: 809-566-7181 (ext 263)
ART10825-Rev-A-Man.indd 60-61 11/10/06 1:11:01 PM
Page 32
Guarantee
59 60
References
References
1. Schade DS, Eaton RP. Metabolic and clinical significance of ketosis. Special
Topics in Endocrinology and Metabolism 1982; 4:1–27.
2. Wiggam MI, O’Kane MJ, Harper R, Atkinson AB, Hadden DR, Trimble ER,
Bell PM. Treatment of diabetic ketoacidosis using normalization of blood 3hydroxybutyrate concentration as the endpoint of emergency management.
Diabetes Care 1997;
20:1347–52.
3. Harano Y, Kosugi K, Hyosu T, Suzuki M, Hidaka H, Kashiwagi A, Uno S, Shigeta
Y. Ketone bodies as markers for Type 1 (insulin-dependent) diabetes and their
value in the monitoring of diabetes control. Diabetologia 1984; 26:343–8.
4. Ubukata E. Diurnal variation of blood ketone bodies in
insulin-dependent diabetes mellitus and non-insulin-dependent diabetes
mellitus patients: The relationship to serum C-peptide immunoreactivity and
free insulin.
Ann Nutr Metab 1990; 34:333–42.
5. Luzi L, Barrett EJ, Groop LC, Ferrannini E, DeFronzo RA. Metabolic effects
of low-dose insulin therapy on glucose metabolism in diabetic ketoacidosis.
Diabetes 1988; 37:1470–77.
6. Hale PJ, Crase J, Nattrass M. Metabolic effects of bicarbonate in the
treatment of diabetic ketoacidosis.
Br Med J 1984; 289; 1035–8.
Guarantee
Abbott Laboratories (Abbott) guarantees that the Optium Xceed Meter
shall be free from defects in material and workmanship for a period
of two (2) years (24 months) from the date of purchase. Abbott’s sole
obligation shall be limited to replacing the defective meter with a new or
reconditioned unit. The guarantee extends only to the original purchaser
and is not assignable or transferable, and shall not apply to auxiliary
equipment or disposable accessories.
Abbott guarantees that the equipment is fit for the purpose and
indications described in the labeling when used in accordance with the
directions for use. Unless the equipment is used in accordance with such
instructions, this guarantee is void and of no effect. Abbott guarantees
the performance of the Optium Xceed Meter if it is used as directed and
provided that the failure to perform or misperformance of the Optium
Xceed Meter has not been caused in whole or in part by the use of test
strips that are not MediSense Optium test strips manufactured by Abbott
Laboratories. In the unlikely even that your Optium Xceed Meter should
fail, it will be replaced free of charge. Contact Customer Support or your
local Abbott Laboratories office or distributor.
▼
ART10825-Rev-A-Man.indd 62-63 11/10/06 1:11:01 PM
Page 33

61
ART10825-Rev-A-Man.indd 64 11/10/06 1:11:02 PM
 Loading...