

Page 1

Installation, Operation & Maintenance Manual
Reduce Particulate, Chlorine, Taste, Odor & Scale
For ScaleX2® Models: SX2-21, SX2-22
DO NOT DISCARD - GIVE THIS MANUAL TO THE OWNER AFTER INSTALLATION
DO NOT DISCARD THIS MANUAL AFTER INSTALLATION. THIS MANUAL CONTAINS
IMPORTANT OPERATION, MAINTENANCE AND PRECAUTIONARY INFORMATION.
PLEASE PRESENT THIS MANUAL TO USER/OPERATOR/OWNER AFTER INSTALLATION.
IT IS STRONGLY ENCOURAGED THAT YOU READ THIS MANUAL BEFORE INSTALLING
SYSTEM TO ENSURE THE BEST POSSIBLE INSTALLATION.
INSTALLATION MUST CONFORM TO ALL LOCAL AND STATE PLUMBING CODES AND
REGULATIONS.
CONNECT SYSTEM TO COLD WATER SUPPLY ONLY. WATER TEMP. CAN NOT EXCEED
100°F/38°C.
SYSTEM MUST BE INSTALLED IN A VERTICAL AND UPRIGHT POSITION.
SCALEX2® SYSTEMS MUST NOT BE USED IN CONJUNCTION WITH POLYPHOSPHATE OR
ANY OTHER SCALE INHIBITOR.
DO NOT INSTALL FILTERS DOWNLINE FROM THE SCALEX2® SYSTEM. SCALEX2® MUST
BE THE LAST FILTER SYSTEM BEFORE THE EQUIPMENT.
DO NOT USE WITH WATER THAT IS MICROBIOLOGICALLY UNSAFE OR OF UNKNOWN
QUALITY WITHOUT ADEQUATE DISINFECTION BEFORE OR AFTER THE SYSTEM.
FAILURE TO CHANGE CARTRIDGES PER RECOMMENDED INTERVALS WITH OPTIPURE
REPLACEMENT CARTRIDGES MAY LEAD TO SYSTEM FAILURE AND PROPERTY DAMAGE.
Introduction
Your new OptiPure ScaleX2® FoodService Filtration System will cleanse and condition the
tap water, providing optimum water characteristics for specied applications. Results include reduced equipment-maintenance requirements, longer equipment life and improved
quality and consistency of your products. Proper system installation and routine lter
changes ensure years of trouble-free operation and performance.
The OptiPure System is built with the nest and most advanced materials. Each system
is quality inspected and pressure-tested prior to shipment. With proper installation and
routine maintenance, you should have years of trouble-free operation.
Please refer to this manual when performing routine lter changes. The instructions make
periodic maintenance quick and easy, and ensure that you should receive maximum benet
from your system.
System Specications
Maximum Pressure: 125 psi/8.6 bar Maximum Temperature: 100°F/38°C, Min.: 35°F/2°C
Capacity: Change the CTO (pre-filter) cartridge at gallon rating, or at least every 6 months or
when pressure gauge needle enters the red zone on the outlet gauge while water is flowing
through the filter system under normal operating conditions. The SCLX2 cartridge does not
have a grain removal capacity; however, naturally occurring organics present in the water
will gradually degrade the effectiveness of this cartridge. Change the SCLX2 cartridge at
least once a year.
Installation Precautions
• Do NOT install system on line pressure above 125 psi.
• Do NOT install the system backwards with the feed water line connected to the outlet.
• Do NOT use liquid pipe compounds for tting connections. USE two to three wraps of
teon tape.
• Do NOT solder plumbing connections attached to lter housing or inlet valve. Inlet
valve and lter housing will be damaged by high temperature.
•
Do NOT allow system to freeze. Turn o water supply to housing and drain housing if
temperature falls below 32°F.
• Do NOT install system in direct sunlight or where system is exposed to harsh
chemicals, or where it may be subjected to being struck by moving equipment, carts,
mops or any other item that may cause damage.
Page 2
Model SX2-21
Capacity: 15,000 gals/56,800 L
Service Flow Rate: 1.5 gpm/5.7 lpm
Inlet/Outlet: 1/2” FNPT
Model SX2-22
Capacity: 30,000 gals/113,600 L
Service Flow Rate: 3 gpm/11.3 lpm
Inlet/Outlet: 1/2” FNPT
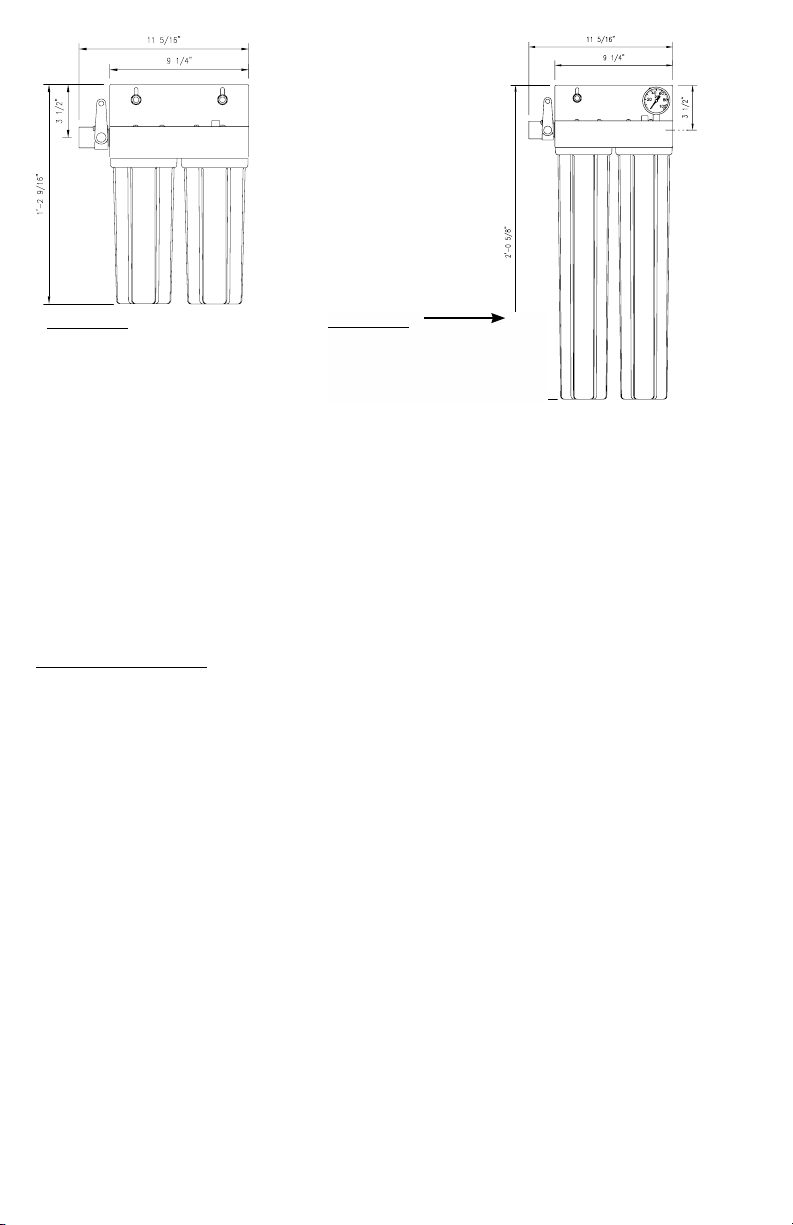
• ALLOW a minimum of 3” under the housing to allow for lter replacement.
• IF water hammer is evident, install water hammer arrestors before OptiPure unit.
• Do NOT overtighten tting connections into inlet valve our housing outlet.
• Always back-up valves and ttings with a wrench when installing a tting to avoid
turning the valve.
• Do NOT install the unit behind equipment where it may be dicult to access the
system for lter replacement.
Position the OptiPure unit in a suitable location. The direction of ow through the OptiPure
unit is always left to right; keep this in mind when determining installation location. Do NOT
mount the OptiPure system near any source of heat. Also, do not mount the system above
any device or area that would be adversely aected by water.
Installation Procedure
1. Turn o all equipment to be fed by the OptiPure System. Locate water supply cut-o
valve and turn o.
2. Determine if water line has an existing water treatment system. If so, examine system
for use of polyphospate or other scale inhibitors. ScaleX2
®
will not be eective if used in
conjunction with other scale inhibitors. Remove the scale inhibitors from the water line
or discontinue installation.
3. Install a 1/2” full-ow ball valve on the water supply side that will feed the water system.
4. Anchor the OptiPure System on a wall stud or suitable mounting material spanning wall
studs. System must be vertical and upright.
5. Run a suitable line from the 1/2” full-ow ball valve at the tap water source to the inlet
ball valve on the left side of the ScaleX2
®
system. Use 2-3 wraps of teon tape and
brace the inlet ball valve on the system with a wrench when connecting the feed water
line. NOTE: DO NOT OVERTIGHTEN CONNECTION FITTING INTO BALL VALVE.
6. Select the appropriate size tubing for the equipment being fed and connect it to the
outlet of the ScaleX2
®
System. NOTE: DO NOT connect the tubing to the equipment
at this time. Prior to making connection to the equipment this line will be used to
facilitate ushing the system. As an option, a drain valve in a tee on the outlet side of
the OptiPure system could be provided in the line to facilitate ushing when changing
lters.
7. With System inlet valve closed, slowly open the 1/2” full-ow ball valve at the tap water
source. Check for leaks.
8. If a drain valve was not installed on the outlet side of the system, hold the tubing that
will connect to equipment in a clean bucket or over sink or drain. Open the system inlet
feed valve and allow water to ush through system for ten (10) minutes at the specied
system ow rate to allow air and any carbon nes to escape. NOTE: NO ACTIVATION IS
2
Page 3

REQUIRED FOR THE OPTIPURE SYSTEM TO PERFORM PROPERLY. FLUSHING IS RECOMMENDED TO ALLOW AIR TO ESCAPE THE SYSTEM AND REMOVE ANY CARBON FINES
PRIOR TO CONNECTING TO EQUIPMENT.
9. Make certain that the end of the tubing to be connected to the equipment is clean and
sanitized.
10. Connect tubing to equipment. Open all water supply valves and check for leaks.
11. If there are no leaks, turn on equipment and check for normal operation.
12. Attach the Service Log to the Installed OptiPure System and ll in install date.
Operation
With adequate pressure, normal operation of the ScaleX2® System is completely automatic.
Dependable operation involves only monitoring of outlet pressure, periodic lter changes
and service documentation.
Pressure Gauge Monitoring
Periodically monitor the pressure gauge on the ScaleX2® unit. If the needle on the gauge
ever enters the red zone, it may be an indication that the lters have become clogged with
sediment. Ideally, the pressure should never drop into the red zone.
Maintenance
The only routine maintenance your ScaleX2® System should ever
require is periodic lter cartridge changes or replacement sump
O-rings. Filter changes are necessary for optimum performance of
your foodservice equipment. If the system sizing recommendations
have been followed, the ScaleX2® System is designed to provide a
six (6) month lter- replacement interval on most tap water for the
CTO-20 cartridge, and the ScaleX2® Cartridge should last one (1)
year.
3.
2.
Filter Change Frequency
Several situations will mandate lter changes. Complete lter
sets should be changed when any of the following apply:
• Six (6) to twelve (12) Months have passed since unit installation or previous lter change.
• Reduced water ow.
• Pressure gauge needle enters the red zone or drops below
pressure required for equipment operation.
If lter change frequency is less than 6 months due to pres-
sure drop, it may be necessary to add additional preltra-
tion or evaluate system sizing recommendations.
Filter Cartridge Replacement Procedure
IMPORTANT: Determine whether all equipment connected to
the ScaleX2® System must be turned o prior to shutting o
water supply from lters.
1. If required, turn o equipment.
2. Turn OFF water to ScaleX2® System by closing Inlet Ball
Valve.
3. Press the red button to release pressure.
4. Remove housing(s) - use lter wrench if necessary.
5. Clean inside of housing sumps with warm water. If de-
sired, disinfect housings using a teaspoon of household
bleach in a lter bowl of water. Let stand 5 minutes, and
then discard.
6. Insert new cartridges into lter housings. Match cartridge model numbers to model numbers on bracket.
7. Make certain the O-ring is properly positioned and reinstall lter housings (hand tighten only). Check O-ring for
damage and replace if damaged or distorted.
3
6.
8.
4.
7.
Page 4

8. Slightly open the inlet ball valve;
push the red pressure relief button to release trapped air until
a small amount of water comes
out - release the red button and
fully open the ball valve.
9. Open the ush valve downline from the lter housing (if
equipped) and ush the new
cartridges to drain or bucket for
ten (10) minutes or until water
runs clear. If no ush valve is
present, disconnect line from
equipment to ush to drain.
10. VERY IMPORTANT: With water
supply inlet valve OPEN and
water ow conrmed, turn on
connected equipment. Failure
to supply water to equipment
may cause serious damage.
11. Record lter change.
Replacement Parts for:
SX2-21, SX2-22
Part # Description
600-10050 Sump, 10”
600-10060 Sump, 20”
600-99003 O-Ring -Std
520-00206 Valve, Inlet Ball 1/2”
530-20019 Gauge, Pressure 0-160 psi
600-99007 Wrench, Std.
600-99205 Pressure Relief Button Kit
160-52910 (Optional) Flush Valve Kit 1/2”
Replacement Filter Cartridges
OptiPure Filter Systems are designed,
tested, and certied with OptiPure lter
cartridges with proven performance,
size and operating capacities. Use of
replacement cartridges other than
those specied will void warranties and
certications, and may compromise
equipment protection, water quality
and cartridge life.
System Tested and Certied by NSF International
against NSF/ANSI Standard 42 Aesthetic Effects
- Particulate Reduction (Class I) and the reduction
of Chlorine, Taste and Odor.
NOTE: Testing was performed under standard laboratory conditions, actual performance may vary. It is recommended that you
have your water supply tested to determine your actual water
conditions.
For further information regarding OptiPure Certied
systems visit the NSF website at www.NSF.org
Replacement Cartridges
System Cartridge Qty
SX2-21 CTO-10
SCLX2-1
SX2-22 CTO-20
SCLX2-2
OptiPure warrants the quality of workmanship of their system
components and assembly, except for replacement cartridges
and membranes, for a period of 60 months. OptiPure Systems
are designed, tested and certied with OptiPure cartridges. Use
of replacement cartridges or parts other than those specied will
void warranties and certications, and may compromise equip-
ment protection, water quality and cartridge life.
1
1
1
1
OptiPure, a division of AQUION
2605 Technology Dr., Bldg 300 Plano, TX 75074
p: 972.881.9797; f: 972.422.6262
e: info@optipure.net www.optipurewater.com
©2018 Aquion, Inc. SX2-21,-22 02/20/18
4
 Loading...