

Page 1

Installation, Operation and Maintenance Instructions
Water Softener Cartridge System Model FXWS-12B
FilterXpress div. of Procam Controls, Inc.
2605 Technology Dr., Bldg. 300 Plano, TX 75074 Ph: 972.881.9797 Fax: 972.422.6262
Attn: Installer, Important Safety Precautions: Read before attempting installation!!!! Do not
discard these instructions, they contain important operating instructions. Please give to user
upon completion of installation!
Do not expose fittings and valves to excessive heat when connecting water supplies. Seals and gaskets could be damaged by high heat
due to soldering with a torch.
It is recommended that water hammer arrestors are used when plumbing system experiences water hammer.
MAXIMUM WATER PRESSURE FOR THE SYSTEM IS 100 PSI.
MAXIMUM WATER TEMPERATURE IS 90° F.
Do not expose filter cartridge to solvents, harsh cleaning agents or chemicals other than water and a mild dishwashing detergent. The
plastic will weaken and crack as a result.
DO NOT USE WRENCH TO TIGHTEN FILTER CARTRIDGE AFTER FILTER CHANGE. IF LEAK OCCURS REPLACE O-RING.
WRENCH TIGHTENING CARTRIDGE MAY CAUSE HEAD TO STRESS CRACK.
DO NOT INSTALL FILTER SYSTEMS ABOVE ELECTRICAL EQUIPMENT.
DO NOT INSTALL THE FXWS-12B WHERE FILTERS ARE NOT ACCESSIBLE OR EXPOSED TO HEAT.
DO NOT OVERTIGHTEN FITTINGS INTO PLASTIC HOUSINGS, FITTINGS OR MANIFOLDS.
For use on potable water supplies only! The FXWS-12B is not intended for use on water that is microbiologically
unsafe.
Specifications:
Inlet/Outlet Connections: 3/4" female NPT.
Rated Capacity: 4500 grains.
Overall Dimensions: 14.25" wide x 23" high (allow +3" for removing sump for changes) x 8" deep.
This system is ideal for removing hardness from water for use in Espresso Machines, Steam Cabinets or Tables and
other equipment where hardness scaling is a problem.
Before Installation:
1. Flush water supply lines to avoid plugging filters with installation debris and resin from solder joints.
2. Check water pressure for requirements of equipment that uses water.
3. Determine site of installation, space required, and mounting hardware required. Wall must be structurally sound for mounting water
system. Mount into studs whenever possible. Allow enough clearance below filter housings for changing. FXWS-12B requires at
least 3 inches.
4. Use 2 wraps of Teflon tape for sealing pipe joints. Do not overtighten fittings, this may cause cracking.
5. Read through instructions before installing water system.
6. Obtain appropriate adapters to go from 3/4" fpt to supply and equipment.
7. Use hardness test strips included with the FXWS-12B to test the hardness of the water before and after the FXWS-12B and document
below.
Installation Date:_____________________________
Installed By:_______________________________
Feed Water Hardness:___________________________ Treated Water Hardness:__________________
url:www.filterxpress.com
1 WS12Biom.doc
Page 2
Installation, Operation and Maintenance Instructions
Water Softener Cartridge System Model FXWS-12B
FilterXpress div. of Procam Controls, Inc.
2605 Technology Dr., Bldg. 300 Plano, TX 75074 Ph: 972.881.9797 Fax: 972.422.6262
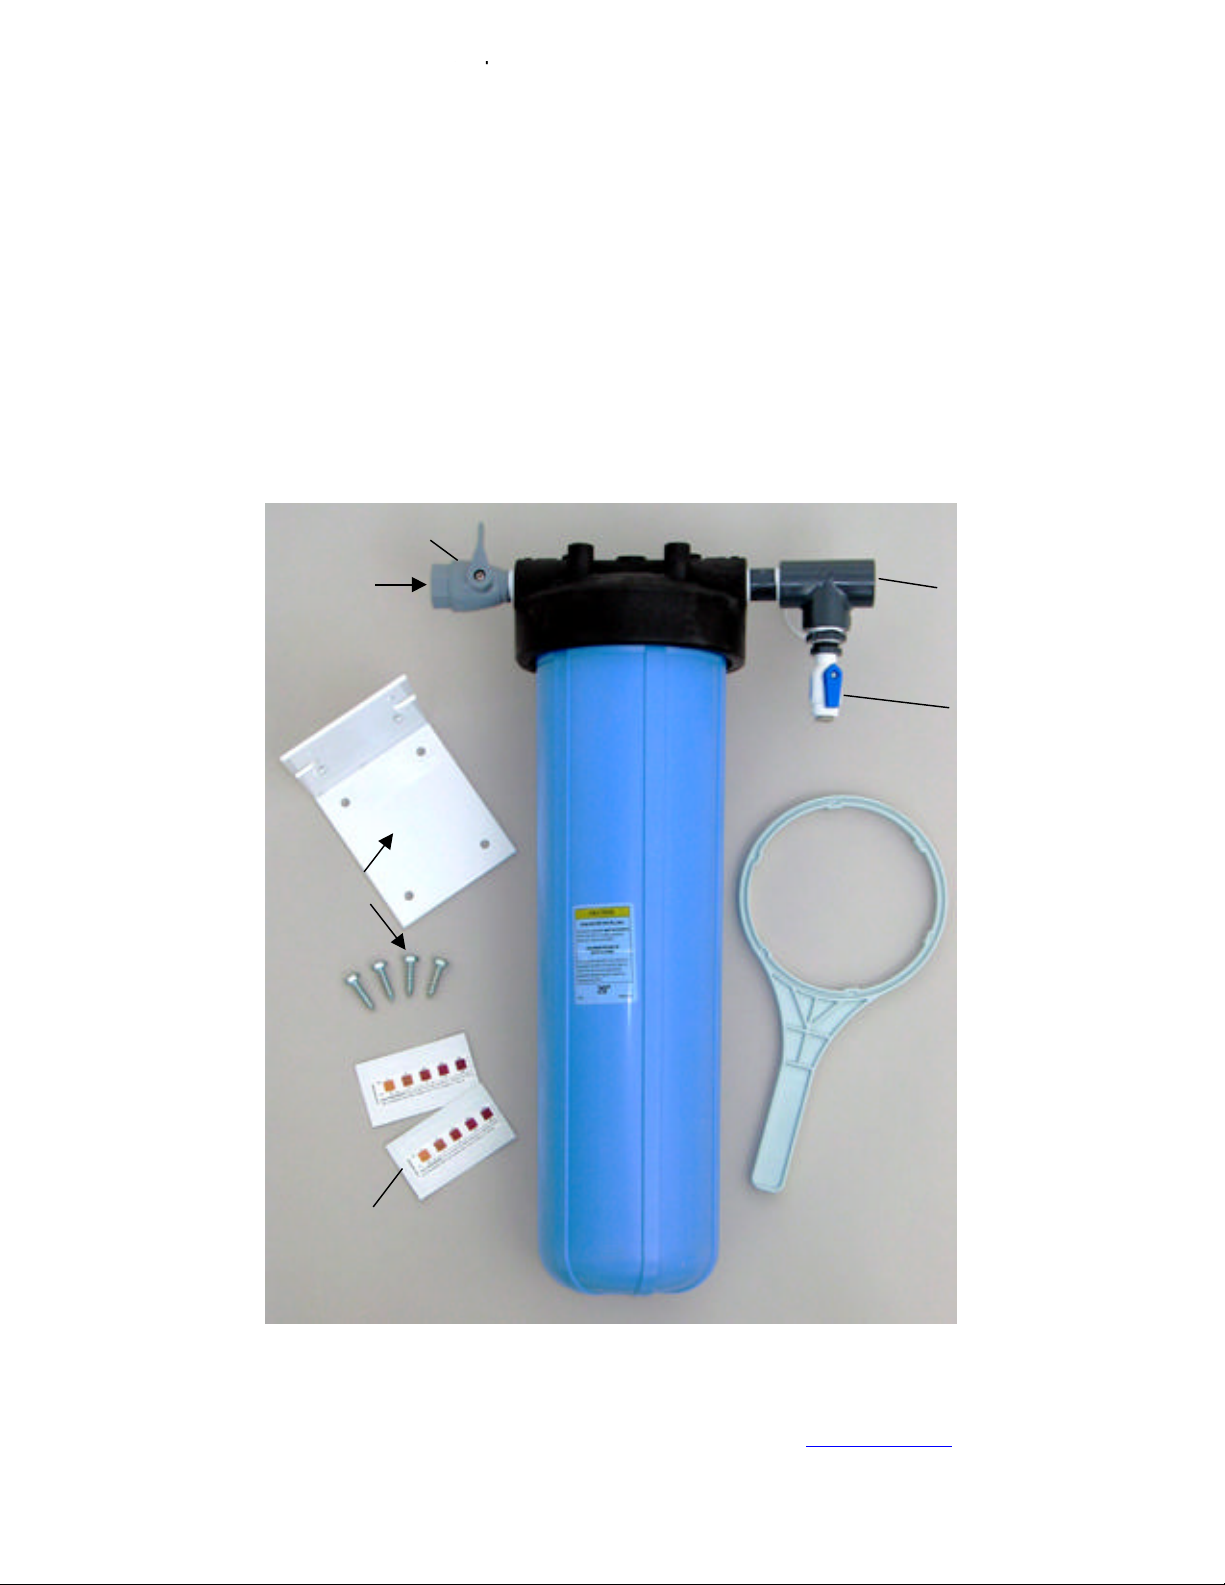
Connect to
Water Supply
3/4" fnpt
Water Supply
Shut-Off Valve
Flush
Valve - Can
be used to
test water
hardness
3/4" Female
Pipe Thread
Outlet -
Connect to
equipment.
Wall Mount
Bracket
& Lag Bolts
for attaching
Housing to
bracket.
Replacement
Cartridge #:
PC-WSBB-20
Test
Strips
Filter Housing
Wrench
Projected Filter Change Date:_________________________
Hardness conversion: 1 grain per gallon equals 17.1 ppm or mg/l. e.g. 10 grains of hardness is equal to 171 mg/l of hardness.
The formula to determine cartridge life span is:
Grains capacity of filter/grains per gallon = gallons softened
An Example:
If the FXWS-12B was installed in a system with feedwater that contains 10 grains of hardness, the expected life span would be: 4500
grains /10 grains = 450 gallons of softened water. The higher the grains per gallon the lower the capacity of the cartridge.
Caution: If used on a espresso machine that has an automatic cleaning cycle the amount of water used daily must be subtracted from the
total gallon throughput. In addition, these figures are the calculated capacity. In cases where the water has above normal sediment or
chlorine, the rated capacity of the cartridge may be reduced. To achieve the maximum protection for the equipment it is recommended
that the hardness be monitored until a standard can be established.
Hardness
2 WS12Biom.doc
url:www.filterxpress.com
Page 3

Installation, Operation and Maintenance Instructions
Water Softener Cartridge System Model FXWS-12B
FilterXpress div. of Procam Controls, Inc.
2605 Technology Dr., Bldg. 300 Plano, TX 75074 Ph: 972.881.9797 Fax: 972.422.6262
Installation Instructions:
1. Unpack the water system and determine the appropriate location as close to the equipment as possible.
2. Secure the manifold to the wall utilizing the appropriate anchors.
3. Utilizing unions or quick-disconnect fittings; e.g. flare, compression or push-in tubing fittings, connect water supply to 3/4" female
pipe thread on inlet ball valve. When installing fittings into inlet ball valve, use a back-up wrench to avoid turning the ball valve
when tightening the adapter fitting. Close inlet ball valve.
CAUTION: DO NOT SWEAT COPPER INTO ADAPTER ATTACHED TO BALL VALVE, THE HEAT WILL DESTROY THE SEATS & SEALS IN THE
VALVE. NOTE: BEFORE HARD PLUMBING OUTLET LINE TO EQUIPMENT IT IS NECESSARY TO FLUSH THE FILTER (See step 6).
4. Utilizing unions or quick-disconnect fittings, connect to 3/4" fpt outlet on right side of manifold. Do not overtighten or cross-thread.
5. Connect the outlet line to the equipment. (Do not start equipment or open inlet valve at this time, flush filters first.)
6. All filter systems need to be flushed before use. A small amount of fines are rubbed off during shipping and handling, and the first
water out of the system will be tinted black or brown. This is normal and will not last longer than a couple of gallons of water
throughput. ALWAYS FLUSH THE FILTERS AFTER INSTALLATION AND DISCARD WATER INTO DRAIN OR BUCKET. Flushing may be
accomplished by routing a line from the flush valve outlet to a drain or bucket and opening the inlet ball valve and the flush valve
simultaneously, allowing several gallons of water to flow through the filters. Close flush valve after water runs clear.
7. Inspect filter system and connections for leaks with inlet ball valve open.
8. Initiate equipment and purge air from system. Check for leaks in the entire line and check water pressure.
9. Document installation date; check water hardness of water supply and filtered water. Calculate projected filter cartridge change date
and document.
Filter Cartridge Changing Procedure:
Important Notes: When changing cartridges it is recommended that hands are washed and/or gloves are used to prevent contamination of
new cartridges. Never leave replacement cartridges unsealed. DO NOT use petroleum jelly to lubricate o-rings, this practice would invite
bacterial contamination. Never re-use filter cartridges that have been previously used in a FXWS-12B. Hand-Tighten sumps only, never use
a tool to tighten. If leaks persist, o-ring replacement may be necessary.
1. Shut off power to equipment fed by the filter system.
2. Shut off "Water Supply Shut-Off Valve" on the inlet to the FXWS-12B. Open flush valve to relieve pressure.
3. Unscrew the housing sump by turning to the left until free. Pull housing downward and away from the head. Wash out the sump
with mild soap and water. Disinfect if desired with a cap full of bleach.
4. Replace the cartridge with a new cartridge marked PC-WSBB-20. Insert cartridge into the sump. Replace sump on head and turn to
the right until rotation stops. Hand-Tighten Only.
5. With "Flush Valve" fully open, open "Water Supply Shut-Off Valve". Flush cartridges by running water into bucket or drain until water
runs clear. Close "Flush Valve".
6. Turn on power to equipment.
7. Purge air from system and check for leaks.
Hardness Testing:
For your convenience we have included two hardness test strips in this installation kit for determining the hardness of your feedwater.
Due to the fact that tap water varies dramatically even within the same city we strongly recommend that you test the hardness and
calculate the capacity of the system. This will provide you with the maximum protection for your equipment. The test procedure is very
simple and will only take a few seconds to complete.
Test Procedure:
1. Flush water from the supply line that you will be using to supply the FXWS-12B for several minutes.
2. Fill a clean cup with the water from the line after flushing.
3. Dip the test strip into the water sample for one (1) second, remove and immediately match with the closest color on the strip package
for total hardness (TH) as parts per million (ppm) or grains per gallon (gpg). Color is stable for one (1) minute.
4. After installation of the FXWS-12B and the unit has been flushed, check the hardness of the treated water using the same procedure
in steps 1-3. It should read zero.
Doing this test will confirm that the FXWS-12B is performing and will provide you with the peace of mind that your equipment is protected
from hardness scale.
url:www.filterxpress.com
3 WS12Biom.doc
 Loading...