

Page 1

GlobeSurfer® X●1 User Guide
High speed Wi-Fi router for Wireless USB modems
Easy-to-use networking for shared connectivity
Page 2

GlobeSurfer
®
X.1 User Guide
Version: v003ext Page: 2 of 30
OVERVIEW AND PURPOSE
This document provides customers with information to help them use their GlobeSurfer
®
X.1 on a day to day basis.
NOTICE
The information in this User Guide is subject to change without notice. The contents herein are provided "as is".
Except as required by applicable law, no warranties of any kind, either express or implied, including, but not limited
to, the implied warranties of merchantability and fitness for a particular purpose, are made in relation to the
accuracy, reliability or contents of this document.
COPYRIGHT
Reproduction, transfer, distribution or storage of part or all of the contents of this User Guide in any form is
prohibited without the prior written permission of Option
®
nv.
TRADEMARK
Copyright 2009©. Option nv. All rights reserved. Option, GlobeTrotter, Zero-CD and the Option logo are registered
trademarks of Option. All third-party trademarks are the property of their respective owners.
Page 3

GlobeSurfer
®
X.1 User Guide
Version: v003ext Page: 3 of 30
CONTENTS
1
WELCOME 4
WARNING 5
2 FEATURES 7
3 SYSTEM REQUIREMENTS 8
4 GLOBESURFER® X.1 PACKAGE CONTENT 8
5 GETTING STARTED 9
5.1 GUIDELINES FOR SAFE AND EFFICIENT USE 9
5.2 POSITIONING THE GLOBESURFER® X.1 9
5.3 FIRST TIME USE 9
5.3.1 Step 1: Connect the power adapter 10
5.3.2 Step 2: Connect the USB Modem Stick 10
5.3.3 Step 3: Connect your computer 10
5.3.4 Step 4: Log in to GlobeSurfer® X.1 10
5.3.5 Step 5: Use the ‘Installation Wizard’. 11
5.3.6 Step 6: Connect to the Internet. 11
5.4 CONFIGURE YOUR COMPUTERS 11
5.4.1 Using Ethernet LAN 11
5.4.2 WLAN connection 11
6 USING YOUR GLOBESURFER X.1 13
6.1 STAYING CONNECTED 13
6.1.1 The ‘Connection Status’ page is displayed 13
6.1.2 Using the Graphical User Interface 13
6.2 CHANGING YOUR USER NAME AND PASSWORD 14
6.2.1 Restoring the factory default settings 14
6.2.2 Firmware Upgrade 14
6.2.3 Upgrading From a Local Computer 15
6.2.4 Managing SMS text messages 15
6.3 ADMINISTRATION BASICS 16
6.3.1 Wireless Encryption 16
7 SHARED PRINTERS 17
7.1 INSTALL THE PRINTER DRIVERS 17
7.2 CONNECTING THE PRINTER 17
7.3 ADD A NETWORK PRINTER 17
7.3.1 For Windows® XP 17
7.3.1.1 Printing a test page after installation 17
7.3.2 For Windows Vista
®
18
8 FILE SERVER (ATTACHED STORAGE) 19
9 DETAILED TECHNICAL SPECIFICATIONS 22
10 GLOSSARY 24
11 PRODUCT SUPPORT AND ADDITIONAL HELP 25
11.1 Technical Support 25
APPENDIX A: LIMITED WARRANTY 26
APPENDIX B: HEALTH, SAFETY AND CERTIFICATION INFO 27
Page 4
GlobeSurfer
®
X.1 User Guide
Version: v003ext Page: 4 of 30
1 WELCOME
The GlobeSurfer
®
X.1 is a high performance 300MBs Wi-Fi device that enables you to connect workgroups of
individuals to the internet (Wide Area Network) or your private LAN (Local Area Network) using a single USB Modem.
GlobeSurfer
®
X.1 is compatible with all primary USB Modems, and allows users to share GSM and 3G mobile
networks that support GPRS, EDGE, UMTS, HSDPA, CDMA and EVDO technologies.
Simple set-up
GlobeSurfer
®
X.1 provides you with a quick installation and set-up that gets you easily and quickly connected to the
Internet. You can use an Internet browser (e.g. Microsoft
®
Internet Explorer, Firefox®, Safari, Chrome or Opera) and
most personal computers, including Windows
®
, Macintosh® and Linux®. The ‘Wizard’ installation introduces you to
the basic settings that need to be configured for use with the mobile network, many of these may have already been
set during the device customisation process before being purchased. Once you have configured, you can review and
enable customised wireless security settings.
Instant protection
Your GlobeSurfer
®
X.1 supports Network Address Translation (NAT). This network service hides the computers in
your network so they cannot be found or directly accessed from outside your network. A firewall is also included
which, by default, blocks incoming traffic and allows outgoing traffic.
Additional security
GlobeSurfer
®
X.1 supports both Wired Equivalent Privacy (WEP) and Wi-Fi Protected Access (WPA and WPA2) to
protect your network data. Security logs keep you aware of potential security risks and intrusion attempts. You can
view logs online or via email.
Stay in touch
You can use GlobeSurfer
®
X.1 to send and receive SMS text messages via the USB Modem stick. The GUI (Graphical
User Interface) lets you know when a new SMS arrives.
Important note
To protect your network from unauthorised access, and to make it more difficult for hackers to analyse your data,
please configure the WLAN security settings and enable WEP, WPA or WPA2 encryption on your GlobeSurfer
®
X.1 (if
this has not already been preconfigured for you).
Setup
Connecting your computer or home network to the gateway is a simple procedure, varying slightly depending on your
operating system. This chapter will help you to seamlessly integrate GlobeSurfer
®
X.1 with your computer or home
network.
The Windows default network settings dictate that in most cases the setup procedure described below will be
unnecessary. For example, the default DHCP setting in Windows XP is ’client’, requiring no further modification.
Page 5
GlobeSurfer
®
X.1 User Guide
Version: v003ext Page: 5 of 30
However, it is advised to follow the setup procedure described below to verify that all communication parameters are
valid and that the physical cable connections are correct.
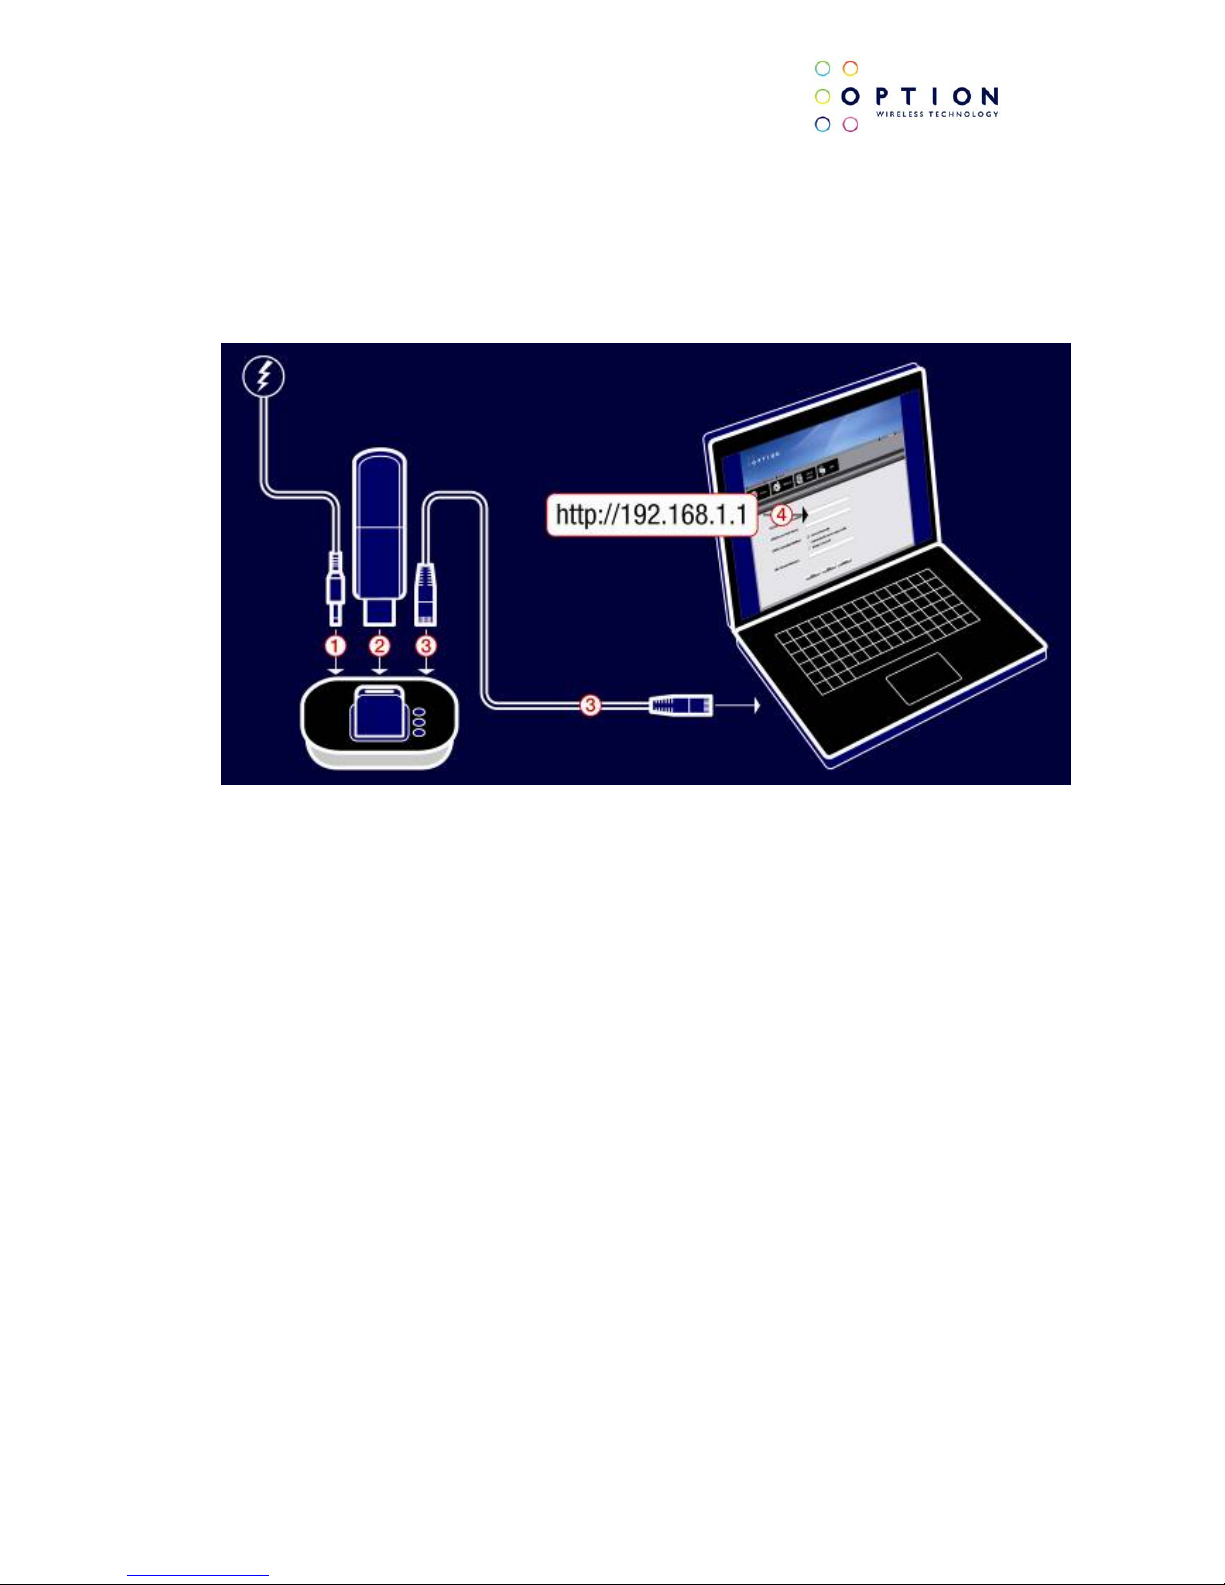
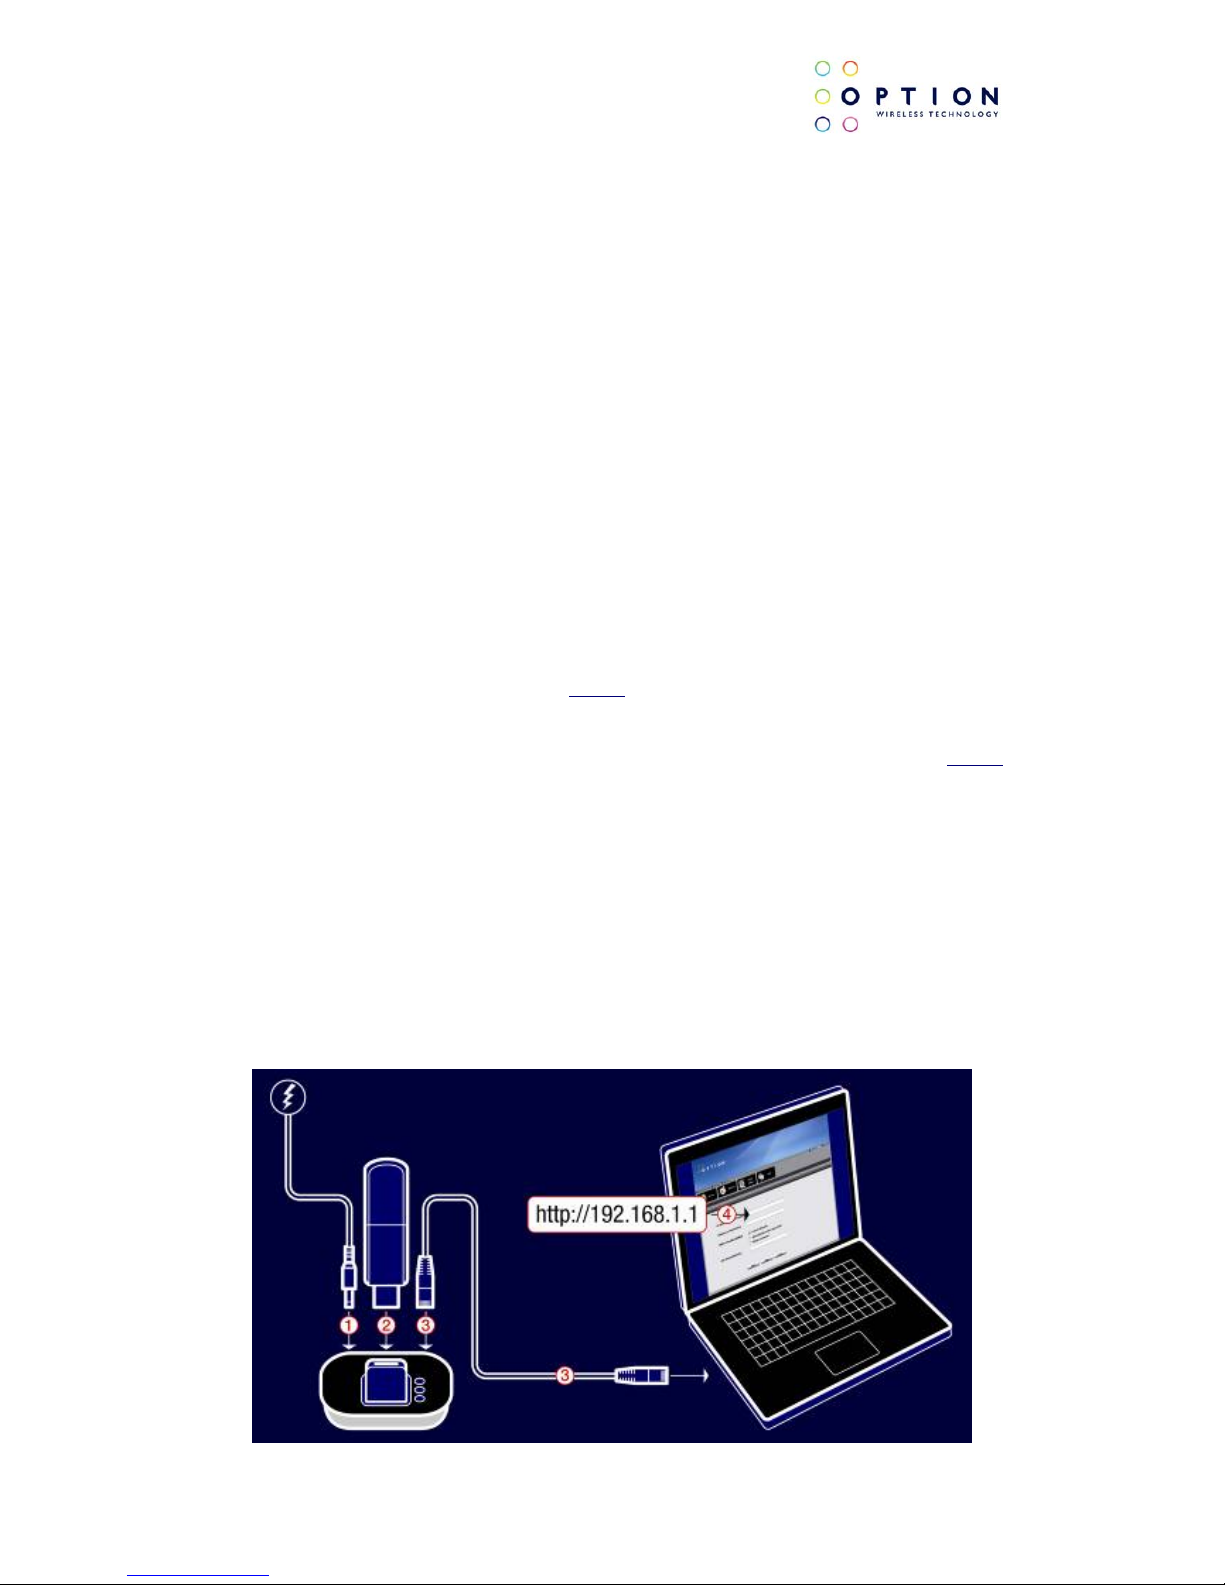
The setup procedure consists of three consecutive stages:
1. Connecting the X1 Power Supply
2. Connecting the USB Modem device
3. Connecting to the PC via Ethernet or Wi-Fi
Figure 1: Hardware Configuration
Setting up WAN and LAN connections
• WAN Connection: Setting up the WAN connection requires that a USB Modem is inserted correctly into the USB
port of the GlobeSurfer
®
X.1. With the USB Modem in place you configure the WAN connection through the Wizard
Setup of GlobeSurfer
®
X.1. The first time you login to GlobeSurfer® X.1 you will have to enter a user name and
password, these are printed on the manufacturing label at the base of the GlobeSurfer
®
X.1, unless pre-configured
for you prior to purchase.
• LAN Connection: Your computer can connect to the gateway in two ways, either through Ethernet or through the
use of Wireless. The most common type of connection is Ethernet. Use an Ethernet cable to connect between an
Ethernet port on your gateway and your computer.
WARNING
• The GlobeSurfer
®
X.1 is intended for use only when powered by the external power supply shipped
together with the equipment or via the USB “Y-Cable” power accessory (sold separately), available from
your operator. The use of any other power supply may invalidate regulatory approval of this equipment.
Refer to the table below for applicable power supplies.
• GlobeSurfer
®
X.1 is intended for indoor use only and its interconnection points shall not be connected
outside of any premises (i.e. outside of any buildings). Refer to the table below for each interconnection
point found in this user instruction.
• GlobeSurfer
®
X.1 is regarded a class III equipment where protection against electric shock is provided by
means of power supplied from SELV circuit i.e. external power supply and does not generate hazardous
voltages within itself.
Page 6
GlobeSurfer
®
X.1 User Guide
Version: v003ext Page: 6 of 30
Applicable power supplies
Power supply Manufacturer Model
GS2 AC/DC adapter PHIHONG PSA15R-050P
Equipment interconnection points
Interconnection Category Type
DC input connector SELV 5.5/1.2mm DC jack
LAN connector SELV RJ45
Rated Input Voltage
Maximum Input Voltage 5 VDC
Page 7
GlobeSurfer
®
X.1 User Guide
Version: v003ext Page: 7 of 30
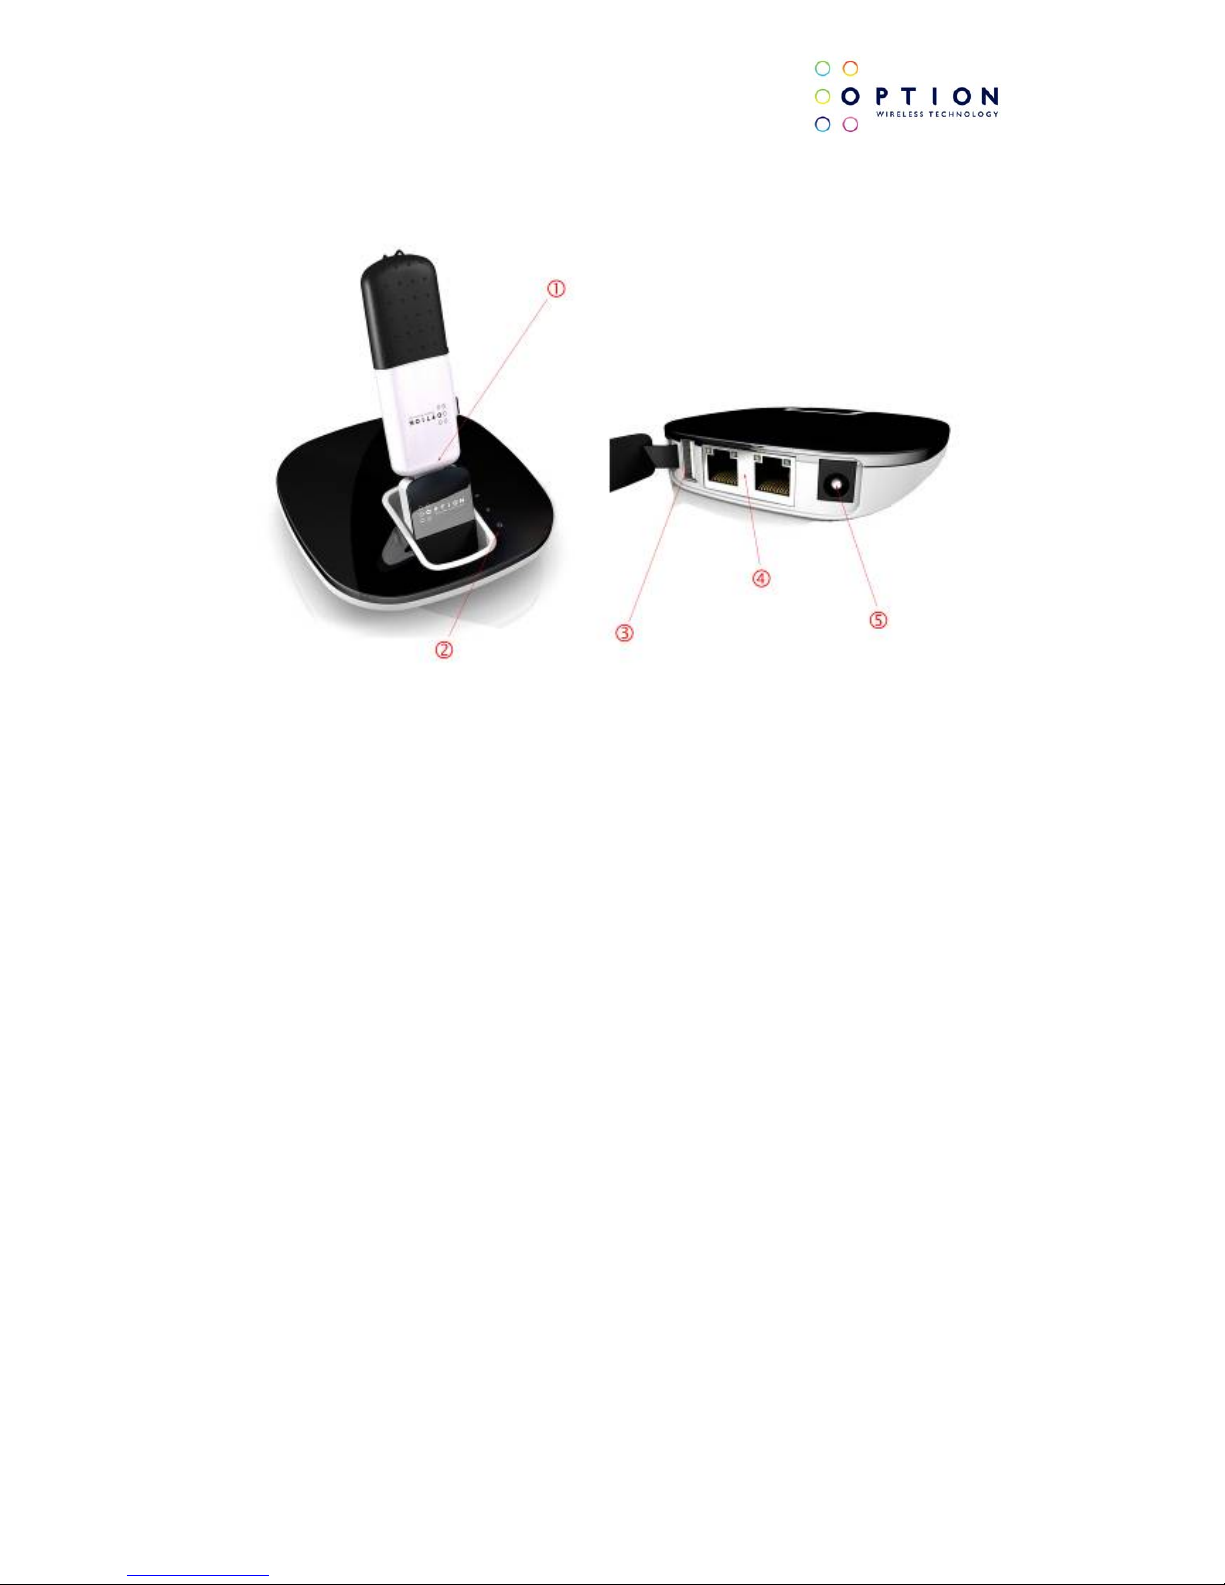
2 FEATURES
1. USB Modem Port
Connect your USB Modem into the flip up port on your cradle in order to establish the WAN access to the
internet for group/collaborative access via the single gateway USB device.
2. LED’s
Invisible LED’s that only illuminate when acitivty occurs – thereby keeping a unique and balanced look and
feel to the device when not in use. The four LED’s represent:
a. Power
b. Wi-Fi transmit/receive
c. Internet connection established
d. Ethernet connection(s) established
3. Secondary USB Port
Connecting an external hard disk drive (File Server) or USB printer (Printer Server) to this port extends the
functionality of the GlobeSurfer
®
X.1.
Please note: This port is only configured for File Server and Print Server functionality – any other
USB device connected to the GlobeSurfer
®
X.1 may not work, and is not supported. Please also
note, any external hard disk drive must be formatted in FAT32 or FAT16 file format for read and
write access – NTFS file format is only supported in ‘read only’ mode.
4. Ethernet Ports
Local Area Network (LAN) and Wide Area Network (WAN) Ports for Ethernet cables to be connected directly
into the unit. The LAN and WAN ports can support direct connections to the GlobeSurfer
®
X.1, thereby
negating the need for the Wi-Fi (ideal for older PC’s that do not support Wi-Fi). The ports can also be used
to connect an ADSL Modem that has fixed line internet access – the GlobeSurfer
®
X.1 then being the high
speed LAN Wi-Fi gateway (with Wi-Fi speeds of up to 300Mbps).
5. DC 5V Input socket:
Plug in the power adapter DC cable provided, or use the “Y-Cable” power accessory (sold separately) in
order to power the device directly from the USB ports of the PC.
Page 8

GlobeSurfer
®
X.1 User Guide
Version: v003ext Page: 8 of 30
3 SYSTEM REQUIREMENTS
Windows Vista
®
, Windows® XP, Windows® XP Pro, Windows® XP Home Edition, Window® 2000 SP4 or Mac OS®
10.4, 10.5
4 GLOBESURFER
®
X.1 PACKAGE CONTENT
• GlobeSurfer
®
X.1 device
• Quick Start Guide
• Power Supply Unit
• International Power Adaptor
• RJ45 Ethernet Cable
Page 9
GlobeSurfer
®
X.1 User Guide
Version: v003ext Page: 9 of 30
5 GETTING STARTED
5.1 GUIDELINES FOR SAFE AND EFFICIENT USE
GlobeSurfer
®
X.1 contains sensitive electronic components as used in wireless routers. For safe and efficient use,
please follow these guidelines:
• Handle the unit carefully and store it in a clean and dust-free place.
• Do not expose the unit to liquid, moisture or humidity.
• Do not expose the unit to extreme temperatures, either high or low.
• Do not expose the unit to open flames or lit tobacco products.
• Do not drop, throw or try to open the unit.
• Do not paint or place stickers on the unit.
• Do not operate the unit near medical equipment without prior permission.
• Do not use the unit in areas where radio equipment or mobile phones are prohibited.
5.2 POSITIONING THE GLOBESURFER
®
X.1
Position GlobeSurfer
®
X.1 to ensure the following:
• A good mobile signal (when USB Modem stick has been inserted): you may find that placing the unit near a
window provides the best reception, however DO NOT
place (or leave) the GlobeSurfer® X.1 in direct sunlight
as the heat build up due to the sun will damage the device.
• A good wireless signal: centrally located and quite high up, or close to a window to optimise wireless
connections to computers in both horizontal and vertical directions, allowing wider coverage. Again, DO NOT
place (or leave) the GlobeSurfer
®
X.1 in direct sunlight as the heat build up due to the sun will damage the
device
• A power outlet is within easy reach.
• Keep the GlobeSurfer
®
X.1 out of direct sunlight and away from heat sources, power lines, fluorescent lighting
fixtures, and electrical noise such as radios, transmitters and broadband amplifiers.
• Water or moisture must not enter the case of the unit.
5.3 FIRST TIME USE
You need a compatible USB Modem stick from your mobile operator to use GlobeSurfer
®
X.1.
Page 10

GlobeSurfer
®
X.1 User Guide
Version: v003ext Page: 10 of 30
5.3.1 Step 1: Connect the power adapter
Caution: Use the power adapter supplied with the GlobeSurfer
®
X.1. Using a different power adapter can damage
the GlobeSurfer
®
X.1
Plug the power adapter into the 230 Volt AC mains and plug the DC cable firmly into the 5V DC input of the
GlobeSurfer
®
X.1
5.3.2 Step 2: Connect the USB Modem Stick
A full list of compatible modem sticks can be sourced from your Operator, or by visiting http://www.option.com
5.3.3 Step 3: Connect your computer
Connect your computer to GlobeSurfer
®
X.1 using the supplied RJ45 Ethernet based LAN cable.
Note: If you want to use a wireless (WLAN) connection to perform the initial set-up, WLAN must be installed and
activated on your computer.
5.3.4 Step 4: Log in to GlobeSurfer
®
X.1
Start your web browser.
Enable cookies or allow them for this address.
Type:
http://192.168.1.1 into your browser internet address bar, and press ‘Enter’ or click ‘Go’:
The GlobeSurfer
®
X.1 Management Console opens up with the Login page.
Page 11

GlobeSurfer
®
X.1 User Guide
Version: v003ext Page: 11 of 30
Tip: Save the link (URL) to this page as a bookmark in your Browser (follow the instructions in your web browser).
Then you can easily access the GlobeSurfer
®
X.1 Management Console in future by using the bookmark.
The ‘User name’ for the default account is ‘admin’, the Password for the default account is also ‘admin’.
Click ‘OK’ to proceed to the Installation Wizard (if connecting to the GlobeSurfer
®
X.1 for the very first time) or to
the GUI layout page if the GlobeSurfer
®
X.1 has been preconfigured.
5.3.5 Step 5: Use the ‘Installation Wizard’.
The ‘Installation Wizard’ guides you through the main settings for your GlobeSurfer
®
X.1 and, most importantly,
gets you connected straight away.
Read the instructions on each page and fill in the requested details and click ‘Next’ to carry on.
When you get to the ‘Finish’ page, read the summary of the settings you have chosen.
Click ‘Finish’ to accept settings and confirm with ‘OK’.
5.3.6 Step 6: Connect to the Internet.
From the Browser “Basic Mode” screen, click ‘Connect’.
The status shows ‘Connecting’ and then ‘Connected’.
Open a new browser window and go to a page on the Internet.
5.4 CONFIGURE YOUR COMPUTERS
5.4.1 Using Ethernet LAN
Once GlobeSurfer
®
X.1 is configured as above, it is ready to be used. If you are only using the Ethernet LAN
connection with GlobeSurfer
®
X.1, no further configuration is needed. Simply open a new browser window and use
your computer to ‘surf’ the Internet with GlobeSurfer
®
X.1.
If you want to use the wireless connection (WLAN), additional settings are required on each computer that is
connected to GlobeSurfer
®
X.1 via the WLAN.
5.4.2 WLAN connection
Your computer must have a WLAN adapter that supports IEEE 802.11 b/g/n to set up a wireless connection. If
encryption is used, make sure that each computer uses the same type of encryption as configured in the ‘Wizard’.
For other operating systems, or if your specific WLAN adapter uses any other connection alternatives, refer to the
documentation from the WLAN adapter manufacturer.
Page 12

GlobeSurfer
®
X.1 User Guide
Version: v003ext Page: 12 of 30
Use the following instructions to connect your computer to GlobeSurfer® X.1 if you are using Windows® XP.
1. Turn on your computer and enable the WLAN adapter, if necessary.
2. From the Windows
®
‘Start’ menu, select ‘Control Panel’.
3. Click ‘Network Connections’.
4. Click ‘Wireless Network Connection’ and then ‘Show Wireless Networks’. A list of available wireless networks
is displayed.
5. Select the device with the SSID that you entered in the ‘Installation Wizard’, and click ‘Connect’.
If encryption is set on your GlobeSurfer
®
X.1 a dialog box is displayed that requests a ‘Network key’. Type in
the same password or encryption key that was entered in the ‘Installation Wizard’.
6. Enter the password or encryption key in both fields and click ‘Connect’. After short time the message
‘Connected’ is displayed in the dialog box and an icon is displayed in the Windows
®
XP notification area.
In future, your computer will automatically connect to the wireless network
Page 13

GlobeSurfer
®
X.1 User Guide
Version: v003ext Page: 13 of 30
6 USING YOUR GLOBESURFER X.1
6.1 STAYING CONNECTED
You can use GlobeSurfer
®
X.1 to surf the Internet and use e-mail just as if your computer is always connected.
There is no need to login to the GlobeSurfer
®
X.1 Graphical User Interface (within the Web Browser) to use those
features. If you want to change settings or use SMS then you have to login. See ‘Using the Graphical User
Interface’, on page 13.
If it does not connect automatically, then use the checklist below to connect your GlobeSurfer
®
X.1 to the Internet.
Step 1: Make sure that the power adapter is connected, GlobeSurfer
®
X.1 is on and the USB Modem stick is
inserted correctly.
Step 2: Open an Internet browser on your computer and click the bookmark to GlobeSurfer
®
X.1, or type
http://192.168.1.1 in the address bar.
Note: If this does not work, make sure that your computer is connected to GlobeSurfer
®
X.1 using either
LAN or WLAN. If you are uncertain, check the ‘Network Connections’ in ‘My Network Places’ or in the
Windows
®
Control Panel.
Step 3: Enter the USB Modem PIN code, if requested, and click ‘OK’.
6.1.1 The ‘Connection Status’ page is displayed
Click ‘Connect’, or press the connect button on the top of your GlobeSurfer
®
X.1, to connect to the Internet.
When the connection is established ‘Connected’ shows on the GlobeSurfer
®
X.1 in the Graphical User Interface.
You are now connected to the Internet and you can open a new browser window and start surfing on the Internet.
6.1.2 Using the Graphical User Interface
To access the GlobeSurfer
®
X.1 Graphical User Interface:
1. Open an Internet browser on your computer and click the bookmark link to GlobeSurfer
®
X.1, or type
http://192.168.1.1 in the address bar.
2. The ‘Basic Mode’ page is displayed, showing the ‘Connection Status’ and other basic information.
Tip: If the GlobeSurfer
®
X.1 has been configured “Auto Connect”, then you do not need to login to use the
internet, you simply need to insert the USB Modem stick and wait for the connection to be automatically
established.
Page 14

GlobeSurfer
®
X.1 User Guide
Version: v003ext Page: 14 of 30
6.2 CHANGING YOUR USER NAME AND PASSWORD
The password is your security code for the GlobeSurfer
®
X.1 Graphical User Interface. When logging in to the
Graphical User Interface for the first time you have to use the default user name and password of “admin” and
“admin”.
If you want to change the user name or password, you can do as follows:
1. Login to the GlobeSurfer
®
X.1 Graphical User Interface, if you have not done so already.
2. Click ‘Advanced Mode’ in the header area.
3. Click the ‘System’ icon on the menu tabs.
4. Click on “Password” from the submenu.
5. Enter the new details in the ‘User name’ and ‘Password’ fields.
6. Click ‘Apply’ to save the changes.
Cannot remember your username or password?
You can login to change usernames and passwords, but if you have only one user with administrative permissions
and you cannot remember that login name or password, you will have to restore GlobeSurfer
®
X.1 to the factory
default settings. This allows you to accept the default user name and provide a new password in the ‘Welcome
page’.
6.2.1 Restoring the factory default settings
You can restore the factory default configuration for GlobeSurfer® X1 when you want to build a new network from
scratch, or when changes to the network have become unclear.
Note: All web-based management settings and parameters, not only those in the Advanced section, will
be restored to their default values. This includes the administrator password: the user-specified password
will no longer be valid.
All personal configuration settings are deleted.
You can restore the factory settings as follows:
Insert a paperclip into the little recess hole that lies between the Ethernet port and the USB port to the
rear of the X1 device.
6.2.2 Firmware Upgrade
GlobeSurfer
®
X.1 firmware can be upgraded, but your personal settings may be lost during the upgrade process.
The firmware is upgraded by downloading a software image file and installing on GlobeSurfer
®
X.1.
Page 15

GlobeSurfer
®
X.1 User Guide
Version: v003ext Page: 15 of 30
6.2.3 Upgrading From a Local Computer
To upgrade GlobeSurfer
®
X.1 using a locally stored file:
1. Login to the GlobeSurfer
®
X.1 Graphical User Interface, if you have not done so already.
2. Enter the “Advanced mode”
3. Select the ‘System’ icon.
4. Click ‘Firmware’, and then select the button allowing you to Browse for the latest image file that you
previously downloaded or were sent.
Note: You can only use files with a .img extension to perform the firmware upgrade.
5. Click ‘Upgrade to confirm. The upgrade process should take between one to five minutes depending on the
size and scope of the firmware changes.
WARNING: DO NOT TURN OFF THE POWER OR DISCONNECT THE GLOBESURFER
®
X.1 DURING THE
FIRMWARE UPGRADE PROCESS, OR YOU MAY RISK UNRECOVERABLE DAMAGE TO THE DEVICE
GlobeSurfer
®
X.1 will automatically reboot and the new firmware version will run.
6.2.4 Managing SMS text messages
The SMS feature works in much the same way as on a mobile phone, with the added convenience of the PC screen
and keyboard. Note that the SMS messages require the presence of a valid USB Modem stick with SMS
functionality enabled (i.e., a valid date/tariff agreement).
To access the SMS feature click the ‘SMS’ icon on the menu bar.
Page 16

GlobeSurfer
®
X.1 User Guide
Version: v003ext Page: 16 of 30
6.3 ADMINISTRATION BASICS
The basic configuration of GlobeSurfer
®
X.1 is done in the ‘Quick Setup’. There may be other configuration settings
required in everyday use. These are accessed using the web-based Graphical User Interface as described below.
6.3.1 Wireless Encryption
Configure the encryption of the GlobeSurfer
®
X.1 wireless network. The ‘None’ option should only be used during
installation of your network to simplify the set-up procedure.
Add encryption to your wireless network to prevent unauthorised traffic monitoring and access, as soon as your
local wireless network has been set up. Configure your wireless PC clients to use the same encryption type and
keys, otherwise the devices will not understand each other.
Select from the drop-down list:
• No encryption: not recommended except during installation of your network.
• WEP: Wireless Equivalent Privacy is a 64 bit or 128-bit encryption method with user configurable fixed keys.
128-bit provides higher security.
• WPA: Wi-Fi Protected Access is a 256-bit encryption method with keys that change automatically over time.
• WPA2: A more secure version of WPA with implementation of the 802.11i standard.
• WPA and WPA2: A combination of both security protocols listed above.
Note: WPA/WPA2 is recommended as it provides a higher level of security due to the longer key that changes
automatically.
Page 17

GlobeSurfer
®
X.1 User Guide
Version: v003ext Page: 17 of 30
7 SHARED PRINTERS
GlobeSurfer
®
X.1 includes a print server that allows printers attached to the device via the USB connection to be
shared by all computers on the LAN.
Steps on How to use GlobeSurfer
®
X.1’s Print Server
To use the print server on the Option
®
GlobeSurfer® X.1, you need to accomplish the following tasks:
1. Install the printer drivers on the computer
2. Connect the Printer to your Option
®
GlobeSurfer® X.1
3. Add a network printer
7.1 INSTALL THE PRINTER DRIVERS
Printers using the USB port come with a software installation CD for installing the printer drivers and applications. The
drivers for the printers must be installed on the computer first to prepare it to use the printer when it’s connected to
the GlobeSurfer
®
X.1. Refer to the printer’s documentation on how to install the drivers.
7.2 CONNECTING THE PRINTER
1. Turn OFF the Option
®
GlobeSurfer® X.1
2. Connect the Printer on the USB port and switch ON the router and printer
7.3 ADD A NETWORK PRINTER
7.3.1 For Windows
®
XP
Before you continue, ensure that you’ve installed the printer drivers on this computer and the printer is attached to
the GlobeSurfer
®
X.1.
1. Click on the Start Button > Control Panel > Printers and Other Hardware > Printers and Faxes.
2. Click on the File Menu > Add Printer.
3. Click on Next on the Add Printer Wizard page.
4. Choose Local Printer attached to this computer and click Next, on the Local or Network Printer page.
5. Choose Create a new port and on the drop down box choose Standard TCP/IP Port then click Next.
6. Click Next button on Welcome to the Add Standard TCP/IP Printer Port Wizard.
7. Enter your GlobeSurfer
®
X.1’s Default Gateway IP address 192.168.1.1 then click Next.
8. Under Additional Port Information Required choose Custom then click Next
9. Once the computer detects the printer on the Print Server, it will ask for the printer manufacturer and
model, a list of printers will be shown, select the your printer from the list and click OK.
10. Choose Keep existing driver (recommended) then click Next until you reach Completing the Add Printer
Wizard.
11. Click Finish to complete the installation.
7.3.1.1 Printing a test page after installation
1. Open the Printers and Faxes page from Control Panel.
2. Right click on the new printer and click on Properties.
3. Click on the Print Test Page button on the Printer properties page, the test page will be printed on the
network printer.
Page 18

GlobeSurfer
®
X.1 User Guide
Version: v003ext Page: 18 of 30
7.3.2 For Windows Vista
®
1. Click on the Start Button> Control Panel.
2. Click Printer under the Hardware and Sound category.
3. Click on Add a Printer.
4. Click on Add a local printer then click Next.
5. Select Create a new port, on the drop down box choose Standard TCP/IP port then click Next.
6. Enter the Default Gateway IP address of your GlobeSurfer
®
X.1 192.168.1.1 then click Next.
7. Under Additional Port Information Required window, select Custom then click Next.
8. Once the computer detects the printer on the Print Server, it will ask for the printer manufacturer and
model, a list of printers will be shown, select the your printer from the list and click OK.
9. Select Use the driver that is currently installed then click Next.
10. To print a test page click on Print a test page on the confirmation screen, click Finish to complete the
installation.
11. If Printing was unsuccessful right click on the Printer’s icon then select Properties.
12. Under printer’s Properties click Port Tab and tick the IP address (192.198.1.1) that was set on previous
settings then click Apply.
Page 19

GlobeSurfer
®
X.1 User Guide
Version: v003ext Page: 19 of 30
8 FILE SERVER (ATTACHED STORAGE)
GlobeSurfer
®
X.1 includes a file server function that allows external hard disk drives to be attached to the device via
the secondary USB port. Once the external disk drive is connected, it can be shared by all computers on the LAN.
Please note that the external hard disk drives must be formatted as “FAT” (File Allocation Table) format in
order to read and write to the disk. NTFS (New Technology File System) format is supported for ‘read’ only,
and will not enable you to write to the disk. It is possible to re-format your external hard drive in FAT32
format through the GlobeSurfer
®
X.1 device if you require read/write functionality.
Please note: External Hard drives that require power over their USB cable (i.e., are not independently
powered) should be connected to the GlobeSurfer
®
X.1 while it is turned off, or there is a risk the sudden
power surge required to start the external hard drive may cause the GlobeSurfer
®
X.1 to ‘hang’. USB
‘memory stick’ storage devices can be connected to the GlobeSurfer
®
X.1 at any point (i.e., while the
GlobeSurfer
®
X.1 is turned on or off).
Please note: Ideally the power supply unit provided with the GlobeSurfer
®
X.1 should be used when
external drives are connected. The “Y-Cable” power accessory should not be used to power the
GlobeSurfer
®
X.1 if an external hard drive is being used – unless the external hard drive has its own source
of power.
To add an external hard disk drive to the GlobeSurfer
®
X.1 device, and use it over the LAN, follow the steps below.
1. Power off the GlobeSurfer
®
X.1 if the external hard drive is powered via the USB cable
2. Connect the external hard disk drive, and then turn on the GlobeSurfer
®
X.1.
3. Log in to the browser Graphical User Interface.
Once you insert your external hard drive to the USB port on the GlobeSurfer
®
X.1, the browser will refresh to show
the presence of the Storage device.
1. Select the ‘Share’ tick box in order to publish your external hard disk drive on the LAN, and select Read,
Write or Read/Write to enable privileges for connected users.
2. Select “Apply” to publish the storage device onto the LAN.
Page 20

GlobeSurfer
®
X.1 User Guide
Version: v003ext Page: 20 of 30
In order to view the contents of the storage device over the LAN, follow the steps below:
1. Expand “My Network Places” > “Entire Network” > “Microsoft Windows Network” and you will notice a
workgroup entitled ‘Wgcradle’
2. Open ‘Wgcradle’ and the contents of the attached storage device will be present.
Please note: by ‘right clicking’ over the primary storage folder and selecting “Mount Network Drive”, you will then be
able to assign a drive label (eg., E:, F:, G: etc) to the storage device, so it will mount automatically next time it is
inserted (see image below).
Page 21

GlobeSurfer
®
X.1 User Guide
Version: v003ext Page: 21 of 30
Please note that external hard disk drives must be formatted as “FAT” (File Allocation Table) format in order to read
and write to the disk. NTFS (New Technology File System) format is supported for ‘read’ only, and will not enable you
to write to the disk.
It is possible to re-format your external hard drive in FAT32 format through the GlobeSurfer
®
X.1 device if you require
read/write functionality.
Please note: It is highly recommended that external hard drives be separately powered. For external hard drives that
require power over their USB cable, it is highly recommended that the hard drive be connected to the
GlobeSurfer
®
X.1 device while the GlobeSurfer® X.1 is turned off. In the event an external hard drive is connected to
the GlobeSurfer
®
X.1 while it is turned on, the sudden power drain on the GlobeSurfer® X.1 device while the external
hard drive initially powers up, may cause the GlobeSurfer
®
X.1 to hang.
Page 22

GlobeSurfer
®
X.1 User Guide
Version: v003ext Page: 22 of 30
9 DETAILED TECHNICAL SPECIFICATIONS
General features
• Fully compliant IEE 802.11b/g standards and IEE802.11n draft (MIMO) router
• Compatible with all commercially available USB style 3.5G cellular modems
• Works on HSDPA, HSUPA and GPRS networks
• Integrated WIFI Antenna’s
• 150Mbps Receive PHY Rate and 150Mbps Transmit PHY Rate
• 2 LED Shielded RJ45 Ethernet Ports for 10/100Mbs Base T support (switchable as WAN or LAN)
• 2 USB ports.
o 1 located on the top of the device
o 1 located at the back of the device
• Browser based GUI interface for LAN/WAN and SMS functionality
Functional details
• Networking compliance with IEEE 802.11 b/g standards and IEEE 802.11 n draft.
• 10/100Mbs LAN/WAN (switchable) Ethernet Ports
• Compatible with USB-style Cellular Modems
o Operating on HSDPA, HSUPA and GPRS cellular networks.
• Firewall
o Network Address Translation (NAT)
o Stateful Packet Inspection (SPI) protects against DoS attacks
• Access Control to prevent unauthorized usage
• UPnP (Universal Plug & Play) and ALGs support for Internet applications such as Email, FTP, Gaming, Remote
Desktop, Net Meeting, Telnet, and more
• Provides additional security of Enable/Disable SSID, Internet Access Control (Services, URL and MAC Filtering)
• Supports multiple and concurrent IPSec, L2TP and PPTP VPN pass-through sessions
• Flash memory for firmware upgrade, save/restore settings
• Easy Management via Web Browser (HTTP) and Remote Management
• Supports 64/128-bit WEP, WPA, WPA2
• Compliant with Windows 98SE/NT/2000/XP/2003 Server, Linux and Mac OS
• DMZ support
• PPP always on with configurable timeout
Wireless support
• Modulation Support
o IEEE802.11b (DSSS)
DBPSK : 1 Mbps
DQPSK : 2 Mbps
CCK : 5.5/11 Mbps
o IEEE802.11g (OFDM/DSSS)
BPSK : 6/9 Mbps
QPSK : 12/18 Mbps
QAM-16 : 24/36 Mbps
QAM-64 : 48/54 Mbps
o IEEE802.11n (OFDM/DSSS)
BPSK
QPSK
QAM-16
QAM-64
o Frequency Band
North America (FCC) : 2.412GHz~2.462GHz (Ch1 – 11)
Europe (ETSI) : 2.412GHz~2.472GHz (Ch1 – 13)
Japan (MKK) : 2.412GHz~2.472GHz (Ch1 – 14)
Page 23

GlobeSurfer
®
X.1 User Guide
Version: v003ext Page: 23 of 30
o Wireless Security Support
WEP (64/128 bit)
WPA-PSK Personal / WPA2-PSK Personal
TKIP, AES
Stealth AP (Hidden ESSID, Deny any Access)
MAC Address Filtering
Hardware
• Power Requirement
o Input Power : 5V @ 2A
o Power Consumption : 10 Watt (max)
o Power Adaptor : 5V @ 3A DC (Phihong PSA15R-050P)
• Wireless Transmit Power
o 802.11b (1 antenna) : 18 +/- 1 dBm
o 802.11g (1 antenna) : 17 +/- 1 dBm
o 802.11gn (2 antenna) : 17 +/- 1 dBm
Device specifications
• LED Indicators
o 1 x Power LED
o 1 x LAN/WAN Link/ACT Status LED
o 1 x Wireless LAN Link Status LED
o 1 x 3.5G Link/ACT Status LED
o 2 x LAN/WAN Link Status LED (Integrated in RJ45)
o 2 x LAN/WAN ACT Status LED (Integrated in RJ45)
• External Connectors
o 1 x DC Jack for Power Input
o 1 x RJ45 for LAN port
o 1 x RJ45 for WAN port
o 2 x USB type A
-1 USB Port for USB Modem
-1 USB Port for extending functionality (Printer/Hard Drive)
• Physical Dimension
o 95 mm x 97 mm x 28 mm
Certifications
• FCC*, CE (CE1313)
*The GlobeSurfer
®
X.1 has been FCC certified with the iCON® 431 and iCON® 451 USB products. It is also compatible with many other USB
devices, but these may not comply with the FCC rules. In case of questions, please contact the manufacturer before purchase.
Page 24

GlobeSurfer
®
X.1 User Guide
Version: v003ext Page: 24 of 30
GLOSSARY
802.11b WLAN standard. Provides a transmission speed of up to 11Mbps in the 2.4GHz band.
802.11g WLAN standard. Provides transmission speeds of up to 54Mbps (typically 22Mbps) in the
2.4GHz band.
802.11n WLAN standard. Provides transmission speeds of up to 300Mbps (typically 160Mbps) in the
2.4GHz band. Is considered a successor of, and is compatible with, 802.11b/g. Enables highspeed data access from up to 100 meters distance from the base station.
EDGE Enhanced Data rates for Global Evolution. An enhancement to GSM that increases data
throughput.
Ethernet The most widely used local area network (LAN) access method defined by the IEEE as the
802.3 standard. Originally developed by Xerox to link minicomputers in the Palo Alto Research
Centre.
Firewall Technology in the form of hardware or software that controls the flow of data between a
private and an unprotected network (LAN and Internet, respectively) or protects an internal
network from attacks from the Internet.
Firmware Pre-installed software to operate GlobeSurfer
®
X.1.
GPRS General Packet Radio Service. An enhancement to the GSM mobile communications system
that supports data packets. GPRS enables continuous flows of IP data packets over the
system for such applications as Web browsing and file transfer.
GSM Global System for Mobile Communications. A digital cellular phone technology that is the
predominant system in Europe, but is also used around the world. Operating in the 900MHz
and 1.8GHz bands in Europe and the 1.9GHz PCS band in the US.
HTTP Hypertext Transfer Protocol is a service protocol to transmit documents between servers or
from a server to a client. Is mainly used on the Internet, or the World Wide Web.
IP address The IP address identifies every device connected to the Internet through an address that is
unique.
LAN Local Area Network. Local computer connection that has few or no connections to the outside
world.
Pass-phrase A pass-phrase is used as an encryption password and is generally longer than an ordinary
password and may contain letters and numbers.
Port Describes an interface between the operating system, applications and the Internet.
SSID Service Set Identifier; network name in WLAN which allows stations in the WLAN to find the
correct access point.
UMTS Universal Mobile Telecommunication System. A global standard for third generation (3G)
mobile technology. UMTS in its initial phase offers bit rates of up to 384Kbps, both up-link
and down-link.
URL Uniform Resource Locator is an Internet address, such as www.google.com.
WAN Wide Area Network is a network mainly working across great distances.
WEP Wired Equivalent Privacy; describes a 64 or 128 bit encryption process used for wireless
LANs.
WLAN Wireless Local Area Network is a remote technology for wireless networking.
WPA Wi-Fi Protected Access is a 256-bit encryption method for a WLAN.
WPA2 A more secure version of WPA with implementation of the 802.11i standard.
Page 25

GlobeSurfer
®
X.1 User Guide
Version: v003ext Page: 25 of 30
10 PRODUCT SUPPORT AND ADDITIONAL HELP
GlobeSurfer
®
X.1 updates will be made available on the Option® support website. Here you will also find the latest
firmware releases, and the User Guide, complete with information about compatible USB Modems from both
Option
®
and competitive manufacturers.
10.1 Technical Support
Questions and answers regarding GlobeSurfer
®
X.1 can be found on the Option® support website.
Page 26

GlobeSurfer
®
X.1 User Guide
Version: v003ext Page: 26 of 30
APPENDIX A: LIMITED WARRANTY
HARDWARE: Option
®
warrants its products to be free from defects in workmanship and materials, under normal
use and service, for one year. If a product does not operate as warranted during the applicable warranty period,
Option
®
shall, at its option and expense, repair the defective product or part, deliver to Customer an equivalent
product or part to replace the defective item. All products replaced will become property of Option
®
. Replacement
products may be new or reconditioned. Option
®
shall not be responsible for any software, firmware, information or
memory data of Customer contained in, stored on, or integrated with any products returned to Option
®
pursuant to
any warranty.
SOFTWARE: Option
®
warrants that the software programs licensed from it will perform in substantial conformance
to the program specifications therefore for a period of ninety (90) days from the date of purchase from Option
®
or
its Authorized Reseller. Option
®
warrants the magnetic media containing software against failure during the
warranty period. No updates are provided. Option
®
’s sole responsibility hereunder shall be (at Option®’s discretion)
to replace any defective media with software, which substantially conforms to Option
®
’s applicable published
specifications. Customer assumes responsibility for the selection of the appropriate applications program and
associated reference materials. Option
®
makes no warranty that its products will work in combination with any
hardware or applications software products provided by third parties, that the operation of the software products
will be uninterrupted or error-free, or that all defects in the products will be corrected. For any third-party products
listed in the Option
®
software product documentation or specifications as being compatible, Option® will make
reasonable efforts to provide compatibility, except where the non-compatibility is caused by a “bug” or defect in
the third party’s product.
STANDARD WARRANTY SERVICE:
Standard warranty service for hardware products may be obtained by delivering
the defective product, accompanied by a copy of the dated proof a purchase, to Option
®
’s Corporate Service
Center or to an Authorized Option
®
Reseller during the applicable warranty period. Standard warranty service for
software products may be obtained by calling Option
®
’s Corporate Service Center or an Authorized Reseller, within
the warranty period. Products returned to Option
®
’s Corporate Service Center must be pre-authorized by Option®
with a Return Material Authorization (RMA) number marked on the outside of the package, and sent prepared,
insured, and packaged appropriately for safe shipment. The repaired or replaced item will be shipped to Customer,
at his own expense, not later than thirty (30) days after receipt by Option
®
.
WARRANTIES EXCLUSIVE:
If an Option
®
product does not operate as warranted above, customer’s sole remedy
shall be repair or replacement, at Option
®
’s option. The foregoing warranties and remedies are exclusive and are
in lieu of all other warranties, express or implied, either in fact or by operation of law, statutory or otherwise,
including warranties of merchantability and fitness for a particular purpose, Option
®
neither assumes nor
authorizes any person to assume for it any other liability in connection with the sale, installation, maintenance or
use of its products. Option
®
shall not be liable under this warranty if its testing and examination disclose that the
alleged defect in the product does not exist or was caused by Customer’s or any third person’s misuse, neglect,
improper installation or testing, unauthorized attempts to repair, or any other cause beyond the range of intended
use, or by accident, fire or other hazard.
LIMITATION OF LIABILITY: In no event, whether based in contract or tort (including negligence) shall Option® be
liable for incidental, consequential, indirect, special or punitive damages of any kind, or for loss of revenue, loss of
business, or other financial loss arising out of or in connection with the sale, installation, maintenance, use,
performance, failure, or interruption of its products, even if Option® or its Authorized Reseller has been advised of
the possibility of such damages.
Page 27

GlobeSurfer
®
X.1 User Guide
Version: v003ext Page: 27 of 30
APPENDIX B: HEALTH, SAFETY AND CERTIFICATION INFO
CE number: 1313
FCC-ID: NCMOGS1001
The GlobeSurfer
®
X.1 has been FCC certified with the iCON® 431 and iCON® 451 USB products. It is also compatible
with many other USB devices, but these may not comply with the FCC rules. In case of questions, please contact the
manufacturer before purchase.
Your GlobeSurfer
®
X.1, coupled with a USB Modem uses the same technology as a mobile phone. It is important that
you always obey all safety regulations related to mobile phone use. If you have any doubt about the safe operation of
your GlobeSurfer
®
X.1 you should seek advice from authorized personnel.
1. Safety Measurements
Please read the following guidelines carefully. Not following these guidelines can cause harm to the GlobeSurfer
®
X.1, yourself or other persons.
1.1 General recommendations for use
• Always treat your product with care and keep in a clean and dust-free place. Do not expose your product to
open flames or lit tobacco products.
• Do not expose to liquid, moisture or humidity. Do not expose the GlobeSurfer
®
X.1 to rain or other liquids.
• Do not drop, throw or try to bend your product.
• Do not paint your product.
• Do not attempt to disassemble your product. Doing so may be dangerous and it will void the warranty.
1.2 Traveling: Handle the GlobeSurfer
®
X.1 with care while traveling. It is recommended to remove any USB stick
from the device when travelling.
1.3 Ambient temperatures: Do not expose the GlobeSurfer
®
X.1 to ambient temperatures beyond the range of -10
and +55 degrees Celsius.
1.4 Explosive atmosphere: Turn off your PC in any area with a potentially explosive atmosphere. It is rare, but your PC
could generate sparks, which could cause an explosion or fire. Areas with a potentially explosive atmosphere are not
always clearly marked. They include fuelling areas (petrol filling stations), below deck on boats, fuel or chemical
transfer or storage facilities, and areas where the air contains chemicals or particles, such as grain, dust, or metal
powders. Do not transport or store your PC and accessories in the compartment of a vehicle which contains
flammable gas, liquid or explosives.
1.5 Blasting areas – construction sites: Turn off your PC when in a blasting area in order to avoid interfering with
two-way radios used in blasting operations.
1.6 Do not use on aircraft: Using a wireless devices on aircraft can cause interference and is illegal. Remove your
GlobeSurfer
®
X.1 if you intend to use your PC whilst in an aircraft. Do not use it when the plane is on the ground
without permission from the aircraft crew.
1.7 Do not use in hospitals: Please ensure you follow any local regulations or rules. People are often asked to switch
off all electronic devices in some areas of a hospital. This is a recommendation that Option
®
fully supports. Using the
GlobeSurfer
®
X.1 close to sensitive electronic devices could possibly result in interference. If you intend to use your
PC in such areas, you must disconnect the GlobeSurfer
®
X.1.
1.8 Interference from radio signals: Option
®
relies on advice from health authorities and relevant expert bodies about
potentially undesirable reactions to radio emissions from the GlobeSurfer
®
X.1
1.9 Immunity to interference: Electromagnetic interference is the disturbance of the normal operation of a device due
to its response to radio signals from an external source. Occasionally, in some situations you may hear short sounds
coming from audio equipment such as radio or multimedia PC. However, these audible signals do not interfere with
the operation of the equipment.
Page 28

GlobeSurfer
®
X.1 User Guide
Version: v003ext Page: 28 of 30
The Directive from the European Commission (2004/108/EC) governing all forms of electronic equipment concerns
interference that such equipment produces, and its immunity to interference from outside. Any equipment compliant
with that directive is unlikely to suffer interference. All wireless devices may get interference which could affect
performance.
1.10 Cardiac pacemakers, implanted defibrillators and other medical implant devices
It is possible that the GlobeSurfer
®
X.1 may interfere with some types of pacemakers or implanted defibrillators when
operated close to the implanted device. You should seek advice from your doctor that is specific to the implant before
using the GlobeSurfer
®
X.1. Health authorities in many countries have set up advisory services for medical devices
and implants including providing advice about maintaining separation distance between the mobile device or other
radio frequency equipment and the implant. Option
®
operating companies reflect the advice given by their relevant
health authority or national advisory service, and as a minimum recommend a separation distance of at least 20cm
between the GlobeSurfer
®
X.1 or other radio frequency terminal equipment and the embedded device.
1.11 Hearing devices: People with hearing aids or other cochlear implants may experience interfering noises when
using mobile devices or when one is nearby. The level of interference will depend on the type of mobile device, the
type of hearing device and the distance between the two. Increasing the distance between the GlobeSurfer
®
X.1 and
hearing device may reduce interference.
1.12 Children: Do not allow children to play with your GlobeSurfer
®
X.1. They could hurt themselves or others, or
could accidentally damage the GlobeSurfer
®
X.1. Your GlobeSurfer® X.1 contains small parts with sharp edges that
may cause an injury or which could become detached and create a choking hazard.
1.13 Driving: Do NOT use the GlobeSurfer
®
X.1 while driving. Park the vehicle first.
1.14 SIM cards: To protect against damage from electrostatic discharge (ESD) do not touch the SIM card connectors.
As a precaution, always make sure that the GlobeSurfer
®
X.1 is already in your hand before you insert or remove the
SIM card.
1.15 Accessories: Only use Option
®
approved accessories. Do not connect with incompatible products. When used
with accessories, Option
®
can only guarantee safe and correct operation of our products if the accessories are tested
and approved by us.
1.16 Safe distance: The GlobeSurfer
®
X.1 has been thoroughly tested to comply with SAR requirements. These tests
simulate the absorption by the human body of radiation from the GlobeSurfer
®
X.1.
This device complies with the SAR regulation as stated by the FCC.
The measurements were made according to the Supplement C to OET Bulletin 65 of the Federal Communications
Commission (FCC) Guidelines [OET 65] for evaluating compliance of mobile and portable devices with FCC limits for
human exposure (general population) to radiofrequency emissions. The device was tested in all applicable USB
orientations with a separation of 5mm to the flat phantom. The FCC guidelines define a limit of 1.2W/kg averaged
over a mass of 1g for single platform devices, in this case a notebook platform.
This device complies with the SAR regulation as stated by the European Council Recommendation.
The SAR limit as defined by the European Council Recommendation is 2.0W/kg for a mass of 10g (European Council
Recommendation 1999 519 EC), based upon ICNIRP guidelines. Details are available upon request.
For day-to-day use we would advise the user to keep a minimum distance from the antenna of 20cm.
Users concerned with the risk of Radio Frequency exposure may wish to limit the duration of their calls and to
position the antenna as far away from the body as is practical.
Page 29

GlobeSurfer
®
X.1 User Guide
Version: v003ext Page: 29 of 30
2. Certification requirements
2.1 Federal communications commission notice
This equipment has been tested and found to comply with the limits for a Class B digital device, pursuant to Part
15,22 and 24 of the FCC Rules. These limits are designed to provide reasonable protection against harmful
interference in a residential installation. This equipment generates, uses, and can radiate radio frequency energy and,
if not installed and used in accordance with the instructions, may cause harmful interference to radio
communications. However, there is no guarantee that interference will not occur in a particular installation. If this
equipment does cause harmful interference to radio or television reception, which can be determined by turning the
equipment off and on, the user is encouraged to try to correct the interference by one or more of the following
measures:
Reorient or relocate the receiving antenna.
Increase the separation between the equipment and receiver.
Connect the equipment into an outlet on a circuit different from that to which the receiver is connected.
Consult the dealer or an experienced radio or television technician for help.
2.2 Modifications
The FCC requires the user to be notified that any changes or modifications made to this device that are not expressly
approved by Option could void the user's authority to operate the equipment.
2.3 This device complies with Part 15 of the FCC rules
This device complies with Part 15 of the FCC rules. Operation is subject to the following two conditions:
(1) this device may not cause harmful interference, and
(2) this device must accept any interference received, including interference that may cause undesired operation.
2.4 Exposure Information to Radio Frequency Energy
This equipment complies with FCC radiation exposure limits set forth for an uncontrolled environment. This
equipment should be installed and operated with minimum distance of 20 cm between the radiator and your body.
This transmitter must not be co-located or operating in conjunction with any other antenna or transmitter.
2.5 Manufacturer’s Disclaimer Statement
The information in this document is subject to change without notice and does not represent a commitment on the
part of the vendor. No warranty or representation, either expressed or implied, is made with respect to the quality,
accuracy, or fitness for any particular purpose of this document. The manufacturer reserves the right to make
changes to the content of this document and/or the products associated with it at any time without obligation to notify
any person or organization of such changes. In no event will the manufacturer be liable for direct, indirect, special,
incidental, or consequential damages arising out of the use or inability to use this product or documentation, even if
advised of the possibility of such damages.
2.6 System Requirements
Must be supplied by a SELV (Safety Extra Low Voltage) circuit with limited power.
For questions regarding your product or FCC declaration, contact:
Option | Gaston Geenslaan 14 | 3001 Leuven | Belgium | www.option.com
To identify this product we refer to the Part, Series, or Model number found on the product.
Page 30

GlobeSurfer
®
X.1 User Guide
Version: v003ext Page: 30 of 30
Option nv – Gaston Geenslaan 14 – 3001 Leuven Belgium – T +32 16 317 411 – F +32 16 207 164
www.option.com
 Loading...