

GlobeSurfer ® II 1.8 - 7.2 - 7.2 S
User Guide

2
TABLE OF CONTENTS
1. WELCOME TO GLOBESURFER® II 3
2. COPYRIGHT 4
3. YOUR GLOBESURFER
3.1 Buttons and connections 5
3.2 The front panel display 6
3.3 Guidelines for safe and efficient use 8
4. GETTING STARTED 11
4.1 Positioning GlobeSurfer
4.2 Connect your phone 11
4.3 First time use 12
4.4 Configure your computers 16
5. EVERYDAY USE 18
5.1 Staying connected 18
5.2 Making phone calls 20
5.3 Using the management console 20
5.4 Managing SMS text messages 27
5.5 Administration Basics 32
5.6 Quick Setup 32
6. SECURITY BASICS 36
6.1 Review the basics 36
6.2 Network Address Translation 36
6.3 Determine the wireless exposure 36
6.4 Firewall 37
6.5 Control the traffic 37
6.6 IP- Hostname (url) Filtering 38
6.7 Mac Filtering 41
7. GLOSSARY 42
8. SPECIFICATIONS 45
®
II 5
®
II 11

GlobeSurfer ® II 1.8 - 7.2 - 7.2 S USER GUIDE
1. WELCOME TO GLOBESURFER® II
Within minutes, you can connect to your mobile network and use a wireless
connection to the Internet through the mobile network.
GlobeSurfer® II is compatible with GSM and 3G mobile networks and supports
GPRS, EDGE, UMTS and HSDPA technologies.
Tip: To achieve the best possible reception, check the signal strength on the
display of the unit (the more bars the better the reception). You may find that
placing the unit near a window provides the best reception.
Simple set-up
GlobeSurfer® II provides you with a quick installation and set-up that gets you
easily and quickly connected to the Internet. You can use an Internet browser
(e.g. Internet Explorer 6.0 or Firefox 1.5) and most personal computers, including
Windows®, Macintosh® and Linux®. The ‘Quick Setup Wizard’ introduces you to
the basic settings that need to be configured for use with the mobile network.
Once you have configured, you can review and enable customised wireless
security settings.
3
Instant protection
Your GlobeSurfer® II supports Network Address Translation (NAT). This network
service hides the computers in your network so they cannot be found or directly
accessed from outside your network. A firewall is also included which, by default,
blocks incoming traffic and allows outgoing traffic.
Additional security
GlobeSurfer® II supports both Wireless Equivalent Privacy (WEP) and Wi-Fi
Protected Access (WPA and WPA2) to protect your network data. Security logs
keep you aware of potential security risks and intrusion attempts. You can view
logs online or via e-mail.

4
Stay in touch
You can use GlobeSurfer® II to send and receive SMS text messages. The display
on the front of the unit lets you know when a new SMS arrives.
You can use GlobeSurfer
®
II to make mobile phone calls. When you get a phone
call the display shows the caller’s number and indicates missed calls.
Important note
To protect your network from unauthorised access, and to make it more difficult
for hackers to analyse your data, please configure the WLAN security settings and
enable WEP, WPA or WPA2 encryption on your GlobeSurfer
®
II.
2. COPYRIGHT
Copyright © 2007, Option
Version 1.1
Information about Option GlobeSurfer® II may change without prior notice.
Information published in this user guide is accurate at the time of publication.
Although all security precautions were taken during the creation of this user guide
Option is not liable toward persons or organisations for losses or damages caused
either directly or indirectly due to instructions contained in this user guide.
All brands and registered brands are property of their respective owners. Services
may be changed, added or deleted. For the newest firmware version for your
GlobeSurfer® II, visit http://www.option.com
Information about Option GlobeSurfer® II may change without prior notice. The
content of this user guide was accurate at the time of publication. Although all
security precautions are taken during the creation of this user guide Option is not
liable toward persons or organisations for losses or damage caused either directly
or indirectly due to instructions contained in this user guide.
GlobeSurfer ® II 1.8 - 7.2 - 7.2 S USER GUIDE
3. YOUR GLOBESURFER® II
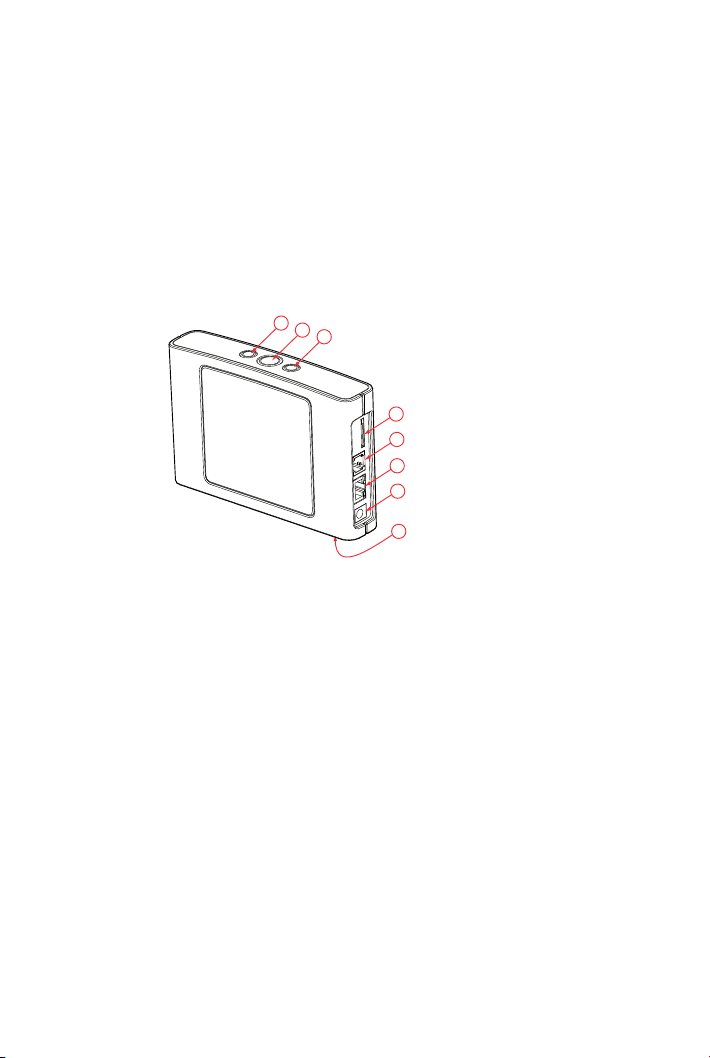
3.1 Buttons and connections
1. Display. Toggles between main screen and missed calls.
2. On / Off. Press to turn the unit on and off.
3. Connect. Press to connect or disconnect your local network to or from
the mobile network.
Tip: Can also be configured to automatically connect or disconnect as
required. See ‘Quick Setup’ on page 32.
4. SIM card slot. Insert or remove the SIM card: press carefully until it
snaps in or releases.
5. Telephone. Plug your home telephone into the unit.
6. LAN. Plug the LAN Ethernet cable into the unit.
The LAN connection handles 10/100 Mbit/s.
7. DC 5V Input socket: plug in the power adapter DC cable.
8. Restore defaults. This button is hidden underneath the unit. Press it with
a pointed object, like a paper clip, to restore the unit to its factory default
settings. This may be required when you want to build a new network
from scratch, or when changes to network have become unclear or
when the admin password has been lost.
5
6
Note: All web-based management settings and parameters, not only
those in the Advanced section, are re-stored to their default values. The
administrator password is no longer valid. All other user names are deleted.
All personal configuration settings are deleted, including all SMS messages
in the GlobeSurfer
®
II memory. Messages on the SIM card are not effected.
Tip: Leave the unit on so that you can connect to the Internet at the push
of a button, or automatically if that option is selected. The unit is connected
when “Connected” shows on the main screen of the GlobeSurfer
panel display.
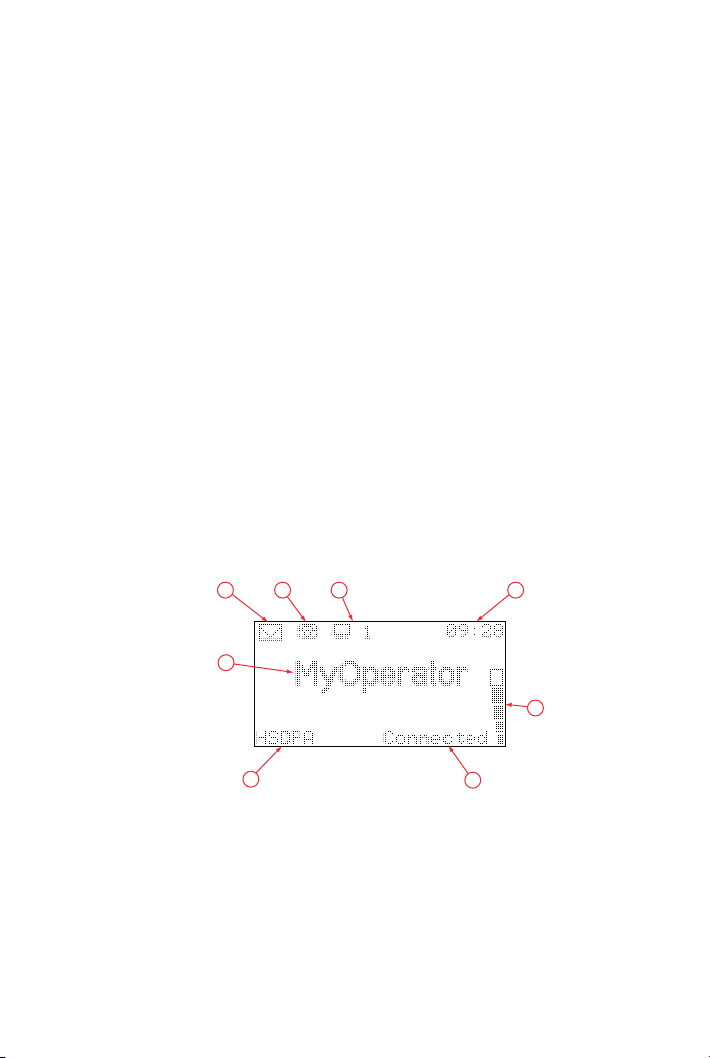
3.2 The front panel display
3.2.1 The main screen
®
II front
1. New SMS received. If blinking, the SMS memory is full.
Tip: delete a few messages to leave space to receive more.
2. Phone icon indicates a missed call. It disappears after you have
viewed every missed call.
3. Computer icon and number of computers associated with
GlobeSurfer® II via the WLAN.

GlobeSurfer ® II 1.8 - 7.2 - 7.2 S USER GUIDE
4. Current time. Displayed when the clock is synchronised.
5. The five bars indicate the mobile signal strength.
6. Connection status.
7. Mobile connection type: GPRS, EDGE, UMTS or HSDPA.
8. The name (or identifier) of your Mobile operator.
3.2.2 Incoming calls
When you get an incoming call the phone number is displayed:
See ‘Making Phone calls’ on page 20.
3.2.3 Missed calls
When you press the ‘Display’ button missed calls are displayed. See
‘Buttons and connections’ on page 5.
7
1. Missed Calls
2. Current time. Displayed when the clock is synchronised with
the network.
3. Call sequence number and total number of missed calls.
4. Phone number of missed call.
8
5. Date and time of last missed call from that phone number.
Press the ‘Display’ button repeatedly to step through all missed calls
until you return to the main screen.
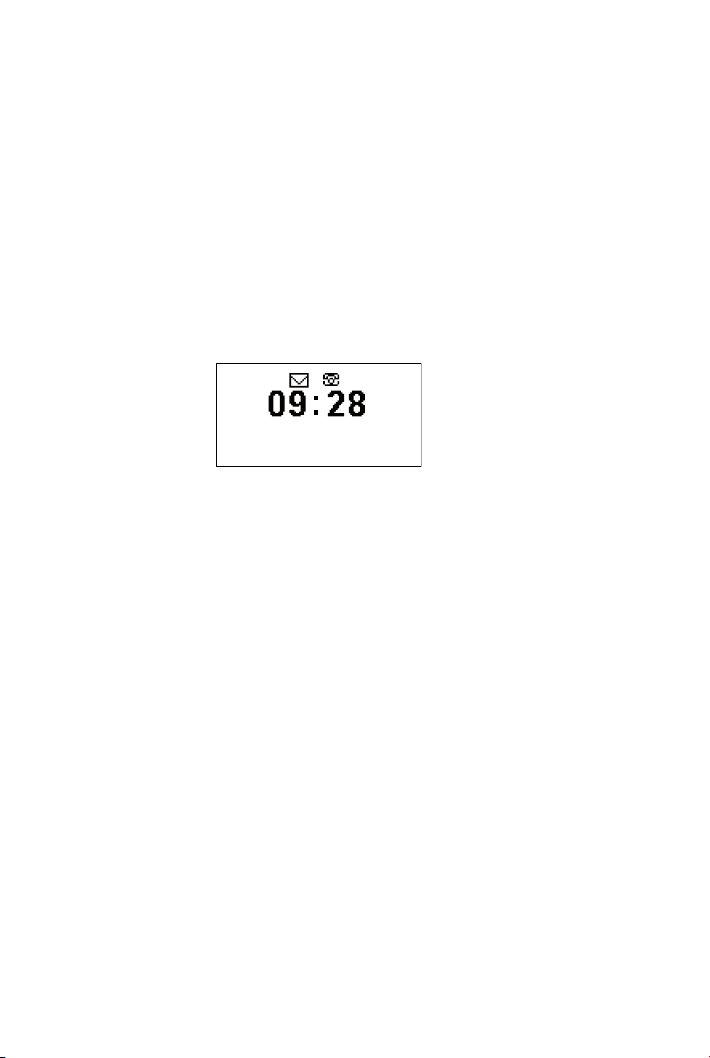
3.2.4 The display screen saver
A screen saver feature is included to preserve the quality of the
display on the unit. When the display is inactive for a short time, the
screen saver activates showing a moving image of the current time.

GlobeSurfer ® II 1.8 - 7.2 - 7.2 S USER GUIDE
3.3 Guidelines for safe and efficient use
GlobeSurfer® II contains sensitive electronic components as used in mobile
phones and wireless routers. For safe and efficient use, please follow these
guidelines:
•
The GlobeSurfer II is intended for use only when powered by external
power supply shipped together with equipment or other available from
Option. The use of any other power supplies may invalidate regulatory
approval of this product. For servicing, contact your vendor or OPTION for
a suitable power supply!
•
Do not connect the POTS (phone) line to telecommunication network
socket outlets! The equipment could be damaged! There is a risk of
electrical shock!
•
Use the GlobeSurfer II only indoor and in dry location. Do not use this
product near water for example, near a bathtub, wash bowl, kitchen sink,
or laundry tub, in a wet basement, or near a swimming pool, and the like.
Refer to table for each interconnection point found in this user instruction.
•
This device is suitable for use on TN power systems and IT-power
systems connection of Norway (max 2430Vphase-phase). If you are not
sure of the type of power system to your home, consult your appliance
dealer or local power company.
•
Do not install this product in direct sunlight. Slots and openings in the
enclosure are provided for ventilation and to ensure reliable operation of
the device and to protect it from overheating these openings must not be
blocked or covered. The openings should never be blocked by placing the
product on a bed, sofa, rug, or other similar surface. This product should
never be placed near or over a radiator or heat register. This product
should not be placed in a built-in installation such as a bookcase or rack
unless proper ventilation is provided or the manufacturer’s instructions
have been followed.
•
Unplug the product from the wall outlet before cleaning. Do not use liquid
9

10
cleaners or aerosol cleaners. Never spill liquid of any kind on the product.
Use a damp cloth for cleaning.
CAUTION! There is risk of fire and electrical shock!
Equipment interconnection points
Interconnection Category Type
DC input connector
SIM card connector
External antenna
connector
LAN connector
Telephone connector TNV2
SELV 5.5 / 1.2mm DC jack
SELV SIM type ( ISO7816 )
SELV MC-CARD type
SELV RJ45
RJ11
Rated Input Voltage
Maximum Input Voltage 5 VDC
SELV interconnections must only be connected to other equipment that
complies with requirements of SELV-circuits as defined in EN60950-1:2001
directive.
TNV2 interconnections must only be connected to other equipment that
complies with requirements of TNV2-circuits as defined in EN609501:2001 directive.

GlobeSurfer ® II 1.8 - 7.2 - 7.2 S USER GUIDE
4. GETTING STARTED
11
4.1 Positioning GlobeSurfer
®
II
Position GlobeSurfer® II to ensure the following:
•
A good mobile signal: you may find that placing the unit near a window
provides the best reception.
•
A good wireless signal: centrally located and quite high up, or close to a
window to optimise wireless connections to computers in both horizontal
and vertical directions, allowing wider coverage.
•
The computer or network hub that will be connected to the LAN port
is nearby.
•
A power outlet is within easy reach.
•
The GlobeSurfer® II display is in sight, and the buttons and connectors are
within easy reach.
•
At least 20 cm away from your person.
•
Out of direct sunlight and away from heat sources, power lines,
fluorescent lighting fixtures, and electrical noise such as radios,
transmitters and broadband amplifiers.
•
Water or moisture cannot enter the case of the unit.
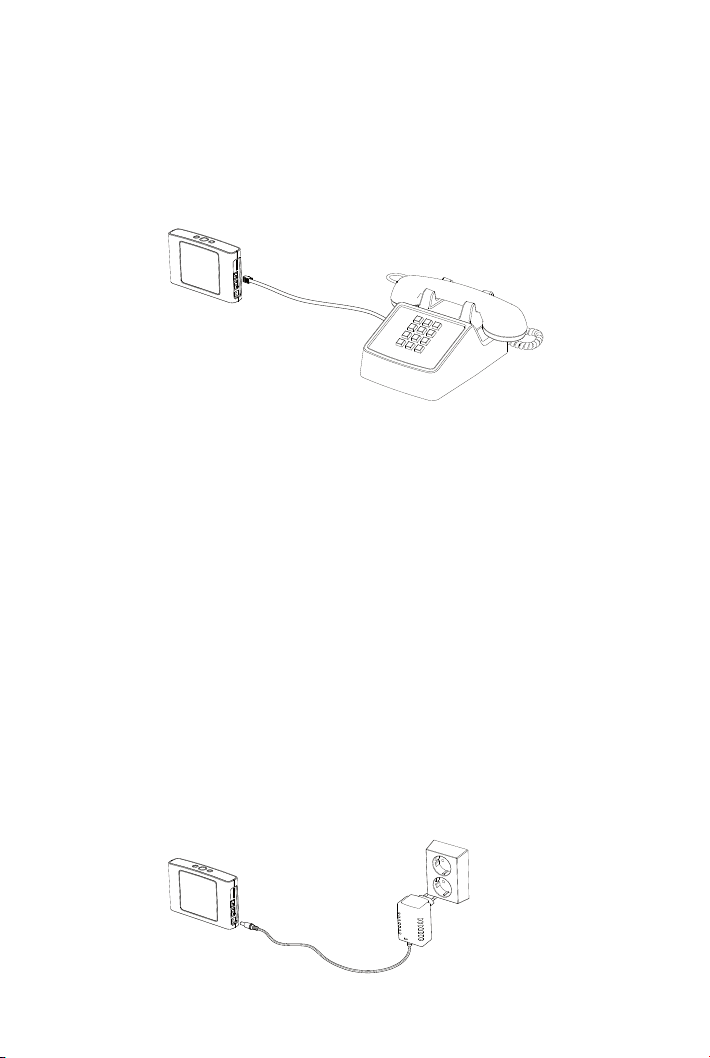
4.2 Connect your phone
You can use a typical corded or cordless home telephone.
Plug your phone into the phone socket on GlobeSurfer
to make calls through the mobile network.
To connect a DECT or wireless telephone you must plug the base unit into
GlobeSurfer® II. You can connect the first telephone outlet into GlobeSurfer® II
and thus connect all home telephones through GlobeSurfer
network.
®
II and you are ready
®
II to your mobile
12
Note: You can not connect a mobile phone to GlobeSurfer® II.
4.3 First time use
You need a SIM card from your mobile operator to use GlobeSurfer® II.
Please insert the SIM card before you plug in the power adapter.
Step 1: Insert the SIM card.
Insert the SIM card into the slot on the right-hand side of GlobeSurfer
®
II.
Press carefully until it snaps into place.
Tip: The orientation notch must face downward to the left with the gold
plated contacts facing away from you.
Step 2: Connect the power adapter.
Caution: Use the power adapter supplied with GlobeSurfer
different power adapter can damage GlobeSurfer
®
®
II. Using a
II.
Plug the power adapter into the AC mains and plug the DC cable firmly into
the 5V DC input of GlobeSurfer
®
II.

GlobeSurfer ® II 1.8 - 7.2 - 7.2 S USER GUIDE
The unit powers-up within about 30 seconds.
Step 3: Connect your computer
Note: DO NOT enter the PIN code now! Enter it during ‘Step 6’.
When the message ‘Enter PIN’ is displayed, connect your computer to
GlobeSurfer® II using a LAN cable or a WLAN network.
Note: If you want to use a wireless (WLAN) connection to perform the
initial set-up, WLAN must be installed and activated on your computer. For
information on how to set up WLAN on your computer, please see ‘WLAN
connection’ on page 17.
13
Step 4: Log in to GlobeSurfer® II.
Start your web browser.
Enable cookies or allow them for this address.
Type http://192.168.1.1 in the browser address bar, and press ‘Enter’ or
click ‘Go’:
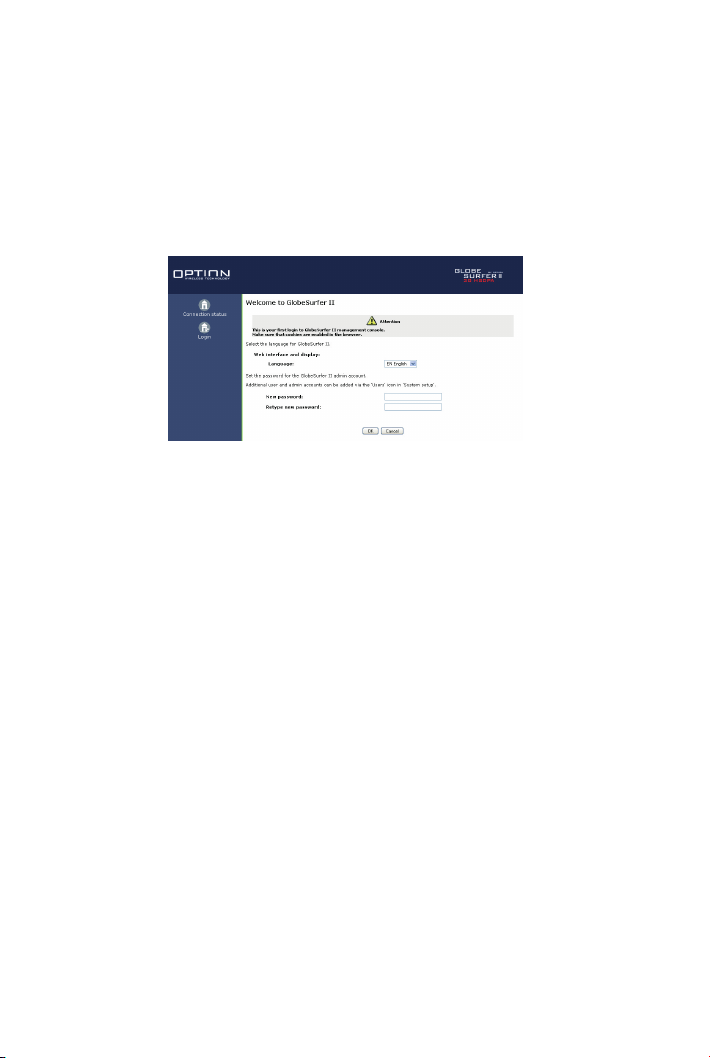
14
The GlobeSurfer® II Management Console opens up with the Welcome page.
Tip: Save the link (URL) to this page as a bookmark in your Browser (follow
the instructions in your web browser).Then you can easily access the
GlobeSurfer® II Management Console in future by using the bookmark.
Select the language you want to use.
Enter a password for the default ‘admin’ account in the ‘New password’
field and again in the ‘Retype password’ field.
Tip: The ‘User name’ for the default account is ‘admin’. Use this together
with your password next time you are asked to login.
Click ‘OK’ to save the new password.
The ‘Quick Setup Wizard’ opens.
Step 5: Use the ‘Quick Setup Wizard’.
The ‘Quick Setup Wizard’ guides you through the main settings for your
GlobeSurfer® II and, most importantly, gets you connected straight away.
Read the instructions on each page and fill in the requested details and
click ‘Next’ to carry on.
When you get to the ‘Finish’ page, read the summary of the settings you
have chosen.
Click ‘Finish’ to accept settings and confirm with ‘OK’.
Note: Finish the ‘Quick Setup Wizard’ before going on to ‘Step 6’.
GlobeSurfer ® II 1.8 - 7.2 - 7.2 S USER GUIDE
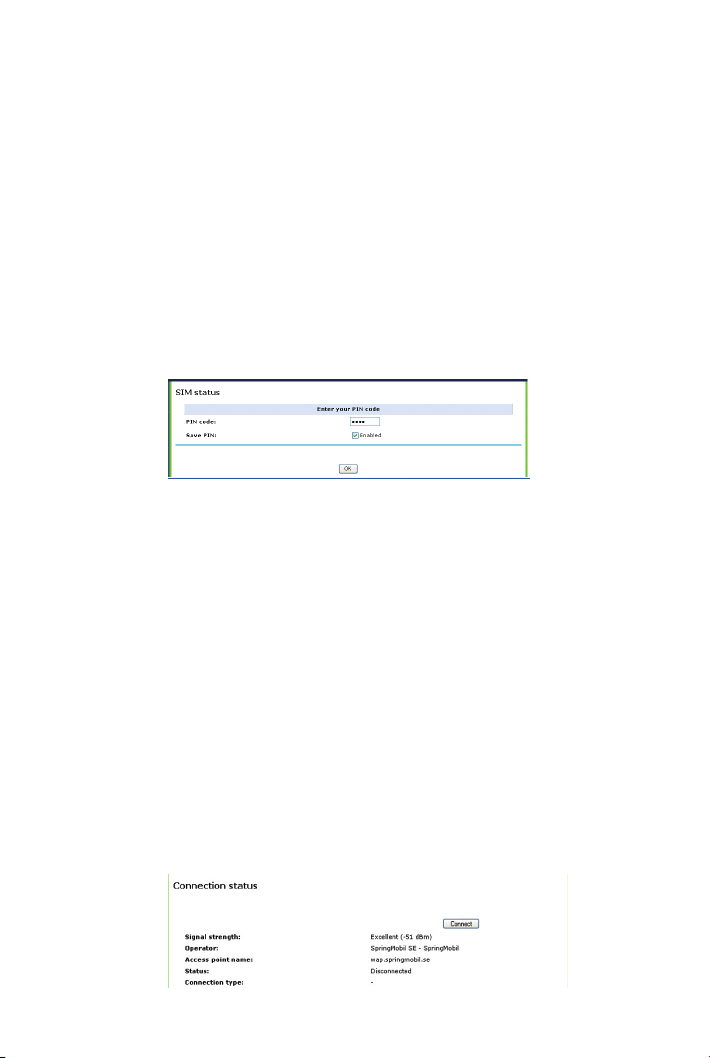
Step 6: Enter the PIN code.
The PIN code is specific to your SIM card.
You are now asked to key-in the PIN code:
Enter the PIN code.
Tick the ‘Save PIN’ checkbox: then you will not be asked to enter the PIN again.
Click ‘OK’.
When you get the ‘PIN OK’ response then click ‘OK’.
The Connection page is displayed.
15
Step 7: Making your first call.
As soon as the operator name shows on the GlobeSurfer
®
II display, you can
make your first call from your home telephone using the mobile network.
Tip: You can adjust the position of the GlobeSurfer
®
II to achieve the best
possible reception by checking the signal strength on the display of the unit:
the more bars the better the reception.
Note: If your phone supports caller ID and you do not see any numbers
displayed when people are calling you. Please visit the ‘Quick setup’ pages
of GlobeSurfer
®
II again and select the correct caller ID standard for your
phone/country.
Step 8: Connect to the Internet.
Click ‘Connect’.

16
Tip: Press the Connect button on GlobeSurfer® II as an alternative.
The status shows ‘Connecting’ and then ‘Connected’.
Open a new browser window and go to a page on the Internet.
Step 9: Set the Date and time.
To set the date and time:
1. Select the ‘System setup’ icon in the GlobeSurfer
®
II management
console.
2. Click the ‘Date and time’ icon.
3. Select your time zone from the pull-down menu.
4. 12/24 hour mode: Select 12 or 24 hours.
5. Select daylight saving time, if applicable in your time zone.
6. Click ‘Apply’ or ‘OK’ to save these settings to GlobeSurfer
Note: GlobeSurfer
®
II is configured to synchronise the time automatically
®
II.
using the Network Time Protocol (NTP) and will do so as soon as it connects
to the Internet.
See the On-line help if you want to know about more ‘Date and time’
settings.
4.4 Configure your computers
4.4.1 Using Ethernet LAN
Once GlobeSurfer® II is configured as above, it is ready to be
used. If you are only using the Ethernet LAN connection with
GlobeSurfer® II, no further configuration is needed. Simply open a
new browser window and use your computer to ‘surf’ the Internet

GlobeSurfer ® II 1.8 - 7.2 - 7.2 S USER GUIDE
with GlobeSurfer® II.
If you want to use the wireless connection (WLAN), additional
settings are required on each computer that is connected to
GlobeSurfer® II via the WLAN.
4.4.2 WLAN connection
Your computer must have a WLAN adapter that supports IEEE
802.11 b/g to set up a wireless connection. If encryption is used,
make sure that each computer uses the same type of encryption as
configured in the ‘Quick Setup Wizard’.
For other operating systems, or if your specific WLAN adapter uses
any other connection alternatives, refer to the documentation from
the WLAN adapter manufacturer.
Use the following instructions to connect your computer to
GlobeSurfer® II if you are using Windows® XP.
17
1. Turn on your computer and enable the WLAN adapter, if
necessary.
2. From the Windows
®
‘Start’ menu, select ‘Control Panel’.
3. Click ‘Network Connections’.
4. Click ‘Wireless Network Connection’ and then ‘Show Wireless
Networks’. A list of available wireless networks is displayed.
5. Select the device with the SSID that you entered in the ‘Quick

18
Setup Wizard’, or the default SSID, and click ‘Connect’. If
encryption is set on your GlobeSurfer
that requests a ‘Network key’. Type in the same pre-shared key
that was entered in the ‘Quick Setup Wizard’.
6. Enter the pre-shared key in both fields and click ‘Connect’.
After about a minute the message ‘Connected’ is displayed
in the dialog box and an icon is displayed in the Windows
notification area.
In future, your computer will automatically connect to GlobeSurfer® II.
5. EVERYDAY USE
5.1 Staying connected
You can use GlobeSurfer® II to make phone calls, surf the Internet and use
e-mail just as if your computer is always connected. There is no need to
login to the GlobeSurfer
you want to change settings or use SMS then you have to login. See ‘Using
the management console’ on page 20.
If does not connect automatically, then use the checklist below to connect
your GlobeSurfer
®
II, a dialog box is displayed
®
II management console to use those features. If
®
II to the Internet.
®
XP

GlobeSurfer ® II 1.8 - 7.2 - 7.2 S USER GUIDE
Step 1: Make sure that the power adapter is connected, GlobeSurfer® II is
on and the SIM card is inserted correctly.
19
Step 2: Open an Internet browser on your computer and click the bookmark
to GlobeSurfer
®
II, or type http://192.168.1.1 in the address bar.
Note: If this does not work, make sure that your computer is connected to
GlobeSurfer® II using either LAN or WLAN. If you are uncertain, check the
‘Network Connections’ in ‘My Network Places’ or in the Windows
®
Control
Panel.
Step 3: Enter the PIN code, if requested, and click ‘OK’.
The ‘Connection Status’ page is displayed.
Click ‘Connect’, or press the connect button on the top of your GlobeSurfer® II,
to connect to the Internet.
When the connection is established ‘Connected’ shows on the GlobeSurfer® II
display and on the ‘Connection Status’ page in the management console.
You are now connected to the Internet and you can open a new browser
window and start surfing on the Internet.

20
5.2 Making phone calls
Tip: Do not login if you just want to make phone calls.
Just pick up the phone and dial. As long as your phone is plugged in to the
unit and your mobile operator name is shown on the display then you can
make and receive calls. You can see Incoming call details and missed calls
on the front panel display.
Tip: Login if you want to change settings or read the list of incoming,
outgoing and missed calls. See ‘Changing telephone settings’ on page 22.
5.3 Using the management console
To access the GlobeSurfer® II management console:
1. Open an Internet browser on your computer and click the bookmark link
to GlobeSurfer
®
II, or type http://192.168.1.1 in the address bar.
2. The ‘Connection Status’ page is displayed, and the left sidebar shows
the ‘Connection Status’ and ‘Login’ icons.
Tip: Do not login if you just want use the Internet, email or make phone calls.
5.3.1 Checking the connection status
This page is always displayed when first accessing GlobeSurfer® II.

GlobeSurfer ® II 1.8 - 7.2 - 7.2 S USER GUIDE
•
Click ‘Connect’ or ‘Disconnect’ to manually connect or
disconnect to or from the UMTS network.
Note: The ‘Connection status’ page is refreshed at regular intervals
in order to update the information displayed. You can disable
the automatic refresh by clicking ‘Automatic refresh off’ on the
‘Connection status’ page but if you do that you will have to click
‘‘Refresh’ whenever you want to see the current status.
Note: The connection time and the number of sent and received
bytes shown here may differ from that shown on your bill.
5.3.2 Login to the management console
If you want to change settings or use SMS then you have to login to
GlobeSurfer® II.
1. From the ‘Connection Status’ page click ‘Login’ in the left
sidebar.
21
2. Enter your user name and password to login to the
GlobeSurfer® II management console.

22
3. Click ‘OK’. The ‘Connection Status’ page is displayed, and the
left sidebar shows the options available.
Connection
status
Quick
Setup
SMS
Connection
Settings
System
Setup
Advanced
Logout
Display the status of the Internet
connection. See page 20.
Quick access to basic configuration
settings. See page 32.
Manage your SMS messages. See
page 27.
Create and configure network
connections. See the ‘Reference
Manual’.
You can access ‘Telephone’, ‘Data and
Time’, ‘SIM’ settings and ‘Firmware
upgrade’ and more. Please refer to
the ‘Reference Manual’.
This section is intended for more
advanced users. Changes to these
settings could adversely affect the
operation of your network. Please
refer to the ‘Reference Manual’.
Log out from the management
console.
5.3.3 Changing telephone settings
To change telephone settings from the GlobeSurfer® II management
console:

GlobeSurfer ® II 1.8 - 7.2 - 7.2 S USER GUIDE
Click on ‘System setup’, ‘Telephone’ and you can access the
telephone settings and see lists of missed, incoming and outgoing
calls.
•
Caller ID: this shows the setting made in the ‘Quick setup
Wizard’. You can change this from the drop-down list if required.
•
Dialling timeout: type in the number of seconds to set the delay
between pressing a dial-key on phone and when the call is placed.
•
Use # to end dialling: this allows you to press the #-key instead
of waiting for the timeout.
•
Call log: keeps a log of incoming, outgoing and missed calls.
23
5.3.4 Changing your user name and password
The password is your security code for the GlobeSurfer® II
management console. When logging in to the management console
for the first time you have to set a password.
If you want to change the user name or password, you can do as
follows:
1. Login to the GlobeSurfer
®
II management console, if you have
not done so already.
2. Click ‘System setup’ in the left sidebar.
3. Click the ‘Users’ icon in the ‘System setup’ page.
4. Click on the user that you want to change. The default user is
‘Administrator’ with ‘admin’ as the login user name.
5. Enter the new details in the ‘Full name’, ‘User name’, ‘New
password’ and ‘Retype password’ fields.

24
6. Click ‘OK’ to save the changes.
See the ‘Online help’ or the ‘Reference Manual’ for information on
how to change the permissions and set email notification.
Cannot remember your username or password?
You can login to change usernames and passwords, but if you
have only one user with administrative permissions and you cannot
remember that login name or password, you will have to restore
GlobeSurfer® II to the factory default settings. This allows you to
accept the default user name and provide a new password in the
‘Welcome page’.
5.3.5 Restoring the factory default settings
You can restore the factory default configuration for GlobeSurfer®
II when you want to build a new network from scratch, or when
changes to the network have become unclear.
Note: All web-based management settings and parameters, not
only those in the Advanced section, will be restored to their default
values. This includes the administrator password: the user-specified
password will no longer be valid.
All personal configuration settings are deleted, including all SMS
messages in the unit. Messages on the SIM card are not effected.
You can restore the factory settings as follows:
•
On the unit: press the Restore defaults button underneath using
a pointed object.
•
From the GlobeSurfer® II management console:
1. Select the ‘System setup’ icon and ‘Restore Defaults’
2. Read the warning and Click ‘OK’.

GlobeSurfer ® II 1.8 - 7.2 - 7.2 S USER GUIDE
Then you will need to redo the Set-up as described from ‘Step 3:
Connect your computer’ on page 13.
5.3.6 Adding a new user
You do not need a user account to be able to make and receive
phone calls or to surf on the Internet. However, you do need to
login with a user account to be able to send and receive SMS text
messages or use the telephone log.
To add a new user:
1. Login to the GlobeSurfer
done so already.
2. Click ‘System setup’ in the left sidebar.
3. Click ‘Users’ in the ‘System setup’ page.
®
II management console, if you have not
25
4. Click ‘New user’ in the User settings page.

26
5. Enter a new ‘Full name’, ‘User name’, and password.
Re-type the new password to verify it.
6. Tick the ‘Administrator permissions’ checkbox.
7. Click ‘OK’ to save the changes.
See the ‘Online help’ or the ‘Reference Manual’ for information on
how to change the permissions and set email notification.
5.3.7 Firmware Upgrade
GlobeSurfer® II firmware can be upgraded without losing any of
your configurations and settings. The firmware is upgraded by
downloading a software image file from the Internet and installing on
GlobeSurfer® II.
5.3.8 Upgrading From a Local Computer
To upgrade GlobeSurfer® II using a locally stored file:
1. Login to the GlobeSurfer
done so already.
2. Select the ‘System setup’ icon.
3. Click ‘Firmware upgrade’.
4. Enter the path of the software image file, or click ‘Browse’ to
browse for the file on your PC and click ‘OK’ when ready: the file
will load into GlobeSurfer
®
II management console, if you have not
®
Note: You can only use files with a .rmt extension to perform the

GlobeSurfer ® II 1.8 - 7.2 - 7.2 S USER GUIDE
firmware upgrade.
5. When completed, a confirmation dialog will ask if you want to
upgrade to the new version.
6. Click ‘OK’ to confirm. The upgrade process should take less
than a minute.
GlobeSurfer® II will automatically reboot and the new firmware
version will run, maintaining your custom configurations and settings.
27
5.4 Managing SMS text messages
The SMS feature works in much the same way as on a mobile phone, with
the added convenience of the PC screen and keyboard.
To access the SMS feature click the ‘SMS’ icon in the left sidebar.
5.4.1 Reading a message
GlobeSurfer® II displays an envelope symbol when a new SMS is
received.

28
1. Select the ‘Inbox’ tab to display the messages, with unread
message in bold.
2. Click the SMS that you want to read. The message text is shown.
3. When you have read the SMS you can click on:
•
‘Reply’: the message text is displayed in the ‘SMS create’ tab
with the phone number of the sender already filled in.
•
‘Delete’: the SMS is deleted without confirmation and is not
possible to restore.
•
‘Save to archive’: the SMS is moved to the ‘Archive’ tab.
•
‘Forward’: the message text is displayed in the ‘SMS create’ tab
ready for you to enter a phone number.
To delete an SMS from the list of messages in the ‘Inbox’ tab:
1. Select the ‘Inbox’ tab.
2. Click the ‘Remove’ icon for the message that you want to delete;
the SMS is deleted without confirmation and is not possible to
restore.
5.4.2 Writing and sending a text message
To write a text message

GlobeSurfer ® II 1.8 - 7.2 - 7.2 S USER GUIDE
1. Select the ‘SMS create’ tab.
2. Type your message text in the ‘SMS message’ field. The
Characters left field shows how much space is left.
3. Enter the mobile number of the person you want to contact in the
‘Phone numbers’ field. Use the standard mobile number format:
+491761234567 for international, and 01761234567 for national
numbers.
Tip: You can enter several numbers separated by commas (no
spaces allowed), up to a maximum of ten phone numbers.
4. You can select the ‘Flash SMS’ - ‘Enabled’ checkbox if you
want the message text displayed immediately when received (not
supported by all phones).
5. Click ‘Send SMS’ when ready to send.
Alternatively you can:
•
Click ‘Save as draft’ to save in the Drafts folder for completion later.
•
Click ‘Save as template’ to save the message as a template for
future use.
Tip: GlobeSurfer® II supports concatenated SMS, which works as
follows; if you want to send a longer than standard SMS of 160
characters you can type the almost the equivalent of 4 standard
messages (up to 609 characters). When you send the message it
will counted as separate messages.
29
Note: When you send an SMS, you may incur a charge depending
on the subscription you have with your mobile operator.
5.4.3 Sent SMS text messages
The ‘Sent’ tab shows the status of sent messages.

30
The sent SMS is first put in the outbox folder and moved to the sent
folder when successfully sent.
Tip: Select the ‘Sent’ tab to check that the message has been sent.
If the message is still in the Outbox there is probably something
wrong with the connection.
5.4.4 Saving a message
The ‘Archive’ tab is for messages that you want to save.
1. Select the ‘Inbox’, or ‘Sent’ tab, and select the SMS that you want
to save.
2. Click ‘Save to archive’. The message is moved to the ‘Archive’ tab.
3. Select the ‘Archive’ tab if you want to see that the message has
been moved. See ‘Text Messages on the SIM card’ on page 30.
Note: A maximum of 100 messages can be held in the
GlobeSurfer® II memory: i.e. totally in the ‘Inbox’, ‘Sent’, ‘Archive’,
‘Templates’ and ‘Drafts’ tabs.
5.4.5 SMS Templates
Templates can be used when you write messages with similar
contents. Then create an SMS with the standard text and save it as
a template.
To create a new template:
1. Select the ‘SMS Create’ tab to create a new message to use as a
template.
2. Click ‘Save as template’ when ready.
To use an existing template:
1. Select the ‘Templates’ tab, and then click the message that you want
to use. You are then moved to the ‘SMS Create’ tab to change the
text and to enter the phone number of the receiver, as required.
2. Click ‘Send’ when ready.

GlobeSurfer ® II 1.8 - 7.2 - 7.2 S USER GUIDE
5.4.6 SMS Setting
The ‘Settings’ tab shows the number to the Short Message Service
Centre (SMSC number) which is usually pre-configured on the SIM
card by the Internet Service Provider.
If required, enter a new number and click ‘OK’.
5.4.7 Text Messages on the SIM Card
To read an SMS:
1. Select the ‘SIM card’ tab.
2. Select the message that you want to read.
31
To reply to, or forward an SMS:
1. Select the ‘SIM card’ tab.
2. Select the message that you want to edit.
3. Click ‘Reply’ or ‘Forward’: the message text is displayed in the
‘SMS Create’ tab where you can edit and send the SMS.
4. Click ‘Send’ when ready.
To save an SMS:
1. Select the ‘SIM card’ tab.

32
2. Select a message.
3. Click ‘Save to archive’, to save a copy of the SMS to the Archive tab.
To delete an SMS:
1. Select the ‘SIM card’ tab.
2. Click the ‘Remove’ icon, for the message that you want to delete.
The SMS is deleted without confirmation and is not possible to
restore.
To delete an open SMS:
1. Select the ‘SIM card’ tab.
2. Select a message to read it.
3. Click ‘Delete’: the SMS is deleted without confirmation and is not
possible to restore.
5.5 Administration Basics
The basic configuration of GlobeSurfer® II is done in the ‘Quick Setup’.
There may be other configuration settings required in everyday use. These
are accessed using the web-based management console as described below.
For advanced users and network administrators there are many other
settings and parameters that you can change. For example: to set up Virtual
Private Networks (VPN), to enable corporate grade security settings, system
monitoring and diagnostics. These settings are described in the ‘Reference
Manual’.
Some information is also available in the ‘Online help’. Click ‘Help’ in the
upper right-hand corner of each page to open a new browser window
containing help instructions.
5.6 Quick Setup
You can use the ‘Quick Setup’ to change the main settings needed to use
GlobeSurfer® II.

GlobeSurfer ® II 1.8 - 7.2 - 7.2 S USER GUIDE
The following settings can be changed:
5.6.1 Language
Select the language for GlobeSurfer® II.
Note: The current language setting will be restored if you do not
apply the settings.
33
5.6.2 Telephony
Select the caller ID standard for the telephone handset interface.
5.6.3 UMTS Setup
Access point name: as provided by your mobile operator.
UMTS Connect Method:
•
Connect Manually: connect to the Internet by clicking Connect on
the Connection Status page in the management console or press
the Connect button on GlobeSurfer
•
Automatically connect upon traffic: GlobeSurfer® II will
automatically connect when you attempt to send data via the
Internet.
®
II.

34
In case of inactivity, disconnect after (minutes): The default is zero
(0) minutes, meaning GlobeSurfer
you actively disconnect. If you want GlobeSurfer
®
II will stay connected until
®
II to disconnect
automatically set a time interval (in minutes). The maximum is 1440
minutes (24 hours).
Note: Incoming traffic is treated as inactivity.
5.6.4 Wireless Setup
The following settings are the most important for the local Wireless LAN:
•
SSID: The Service Set Identifier: enter a name for your local
wireless network (WLAN) (maximum 32 characters).
•
SSID broadcast: If you set the ‘Enabled’ checkbox to broadcast
then other devices can detect and connect to your WLAN. You can
install the WLAN with this feature enabled and then disable it once
you have set up GlobeSurfer
®
II and its associated wireless clients.
Tip: You can clear this checkbox later to disable broadcasting and
hide the name of your network; this provides minimal security, as
other devices have to know the SSID to connect.
5.6.5 Wireless Encryption
Configure the encryption of the GlobeSurfer® II wireless network.
The ‘No encryption’ option should only be used during installation of
your network to simplify the set-up procedure.
Add encryption to your wireless network to prevent unauthorised
traffic monitoring and access, as soon as your local wireless network
has been set up. Configure your wireless PC clients to use the same
encryption type and keys, otherwise the devices will not understand
each other.
Select from the drop-down list:

GlobeSurfer ® II 1.8 - 7.2 - 7.2 S USER GUIDE
•
No encryption: not recommended except during installation of your
network.
•
WEP: Wireless Equivalent Privacy is a 64 bit or 128-bit encryption
method with user configurable fixed keys. 128-bit provides higher
security.
•
WPA: Wi-Fi Protected Access is a 256-bit encryption method with
keys that change automatically over time.
•
WPA2: A more secure version of WPA with implementation of the
802.11i standard.
•
Keep current (radius based) scheme: this option is only available if
advanced encryption settings have previously been configured.
Note: Not all wireless client equipment supports ASC II-text format.
If you are experiencing problems, use the hexadecimal key format
since most vendors support it.
Note: WPA/WPA2 is recommended as it provides a higher level of
security due to the longer key that changes automatically.
35
Configuring WEP:
•
Key Type: Select the encryption level from the drop-down list.
•
Pre-shared key: Type in the hexadecimal 26 characters, or a plain
text (ASC II) pass-phrase of 5 or 13 characters.
Configuring WPA or WPA2 encryption:
•
Key Type: Select the encryption level from the drop-down list.
•
Pre-shared key: Type in the hexadecimal 64 characters, or a plain
text (ASC II) pass-phrase of at least 8 characters.
Note: Advanced options for encryption configuration are available
via the icons ‘Connection Settings’, ‘Network Connections’. Wireless
encryption has no security effect on wired (Ethernet) connections.

36
5.6.6 Firewall Setup
The GlobeSurfer® II firewall has three pre-defined levels of security.
The default, ‘typical security’, blocks traffic initiated by an external
(Internet) source, and allows traffic initiated from the local network.
For advanced configuration of your firewall security parameters,
please refer to the ‘Reference Manual’.
5.6.7 Save the Setup configuration
Save the new configuration by clicking ‘OK’ or ‘Apply’ and then
‘OK’ to confirm. If using the ‘Quick Setup Wizard’ save the new
configuration by clicking ‘Finish’ and then ‘OK’ to confirm.
Note: Browser reload: You may need to reconfigure connected
computers and reload the GlobeSurfer
6. SECURITY BASICS
6.1 Review the basics
Just connecting your computer to GlobeSurfer® II provides a basic level of
protection because it supports Network Address Translation (NAT).
6.2 Network Address Translation
Your GlobeSurfer® II supports NAT. This network service makes it possible
for all of the computers in your network to share a single IP address.
This IP address is assigned to your GlobeSurfer
that is visible to the outside world. The private addresses that DHCP assigns
to computers in your network remain private and cannot be reached from
the Internet.
6.3 Determine the wireless exposure
If you live in a rural area far away from your neighbour, the likelihood that
®
II management console page.
®
II and is the only address

GlobeSurfer ® II 1.8 - 7.2 - 7.2 S USER GUIDE
someone will break into your wireless network is very low. On the other hand,
if you live in a densely populated area in the city next to an office building,
there is a potential danger that a third party may try to access your WLAN.
Based on your own security needs, decide which security settings you want
to implement:
•
Change SSID
•
Disable SSID broadcast
•
Enable WEP, WPA, or WPA2 encryption
These settings are available from the ‘Quick Setup’ page of your
GlobeSurfer® II. Each computer to be connected to your WLAN must use the
same settings.
Furthermore, you can enable MAC filtering on GlobeSurfer® II. MAC filtering
can be used to grant or deny WLAN computers in your network access to
GlobeSurfer® II based on the MAC address of the computer. For further
information see ‘MAC Filtering’, on page 41.
37
6.4 Firewall
Your GlobeSurfer® II has a true firewall that uses rules to control the
incoming and outgoing data traffic. The firewall has three pre-defined
levels of security. The default, ‘typical security’, blocks traffic initiated by an
external (Internet) source, and allows traffic initiated from the local network.
6.5 Control the traffic
A firewall blocks uninvited Internet traffic that might cause damage to
the computers in your network. Before traffic is allowed in or out of your
network, it has to pass through the firewall. Incoming traffic is examined
to see whether it meets the conditions of incoming rules. If the conditions
are met, the traffic is allowed in. Outgoing traffic is also examined and
compared to outgoing rules before it is allowed out. Rules are based on

38
Internet services, such as FTP, Telnet and NetMeeting.
Is it necessary to change the default firewall rules or add new rules?
For private use, you should not have to add new rules or change the default
rules.
By default, all incoming traffic is blocked and all outgoing traffic is allowed.
If you set up a virtual server, an additional incoming rule is automatically
added to enable access to the server from the Internet.
An example of an attack that your GlobeSurfer
®
II will automatically block is
a Denial of Service (DoS) attack. This is an attack where a hacker chooses
to flood your network with more requests than it can handle. While this type
of attack would not harm computers in the network, it could slow or even
stop network operations. You do not need to set up a firewall rule for this.
More information about the firewall and applying corporate grade security is
provided in the ‘Reference Manual’.`
6.6 IP- Hostname (url) Filtering
You may configure GlobeSurfer® II to block specific Internet sites so that
they cannot be accessed from computers in the local network. Moreover,
restrictions can be applied to a comprehensive, automatically updated, table
of sites to which access is not recommended.
To view the table of Web sites currently being blocked:
•
Click the ‘IP/Hostname Filtering’ tab located under Security.

GlobeSurfer ® II 1.8 - 7.2 - 7.2 S USER GUIDE
6.6.1 Adding a new Web site
1. Click ‘New Entry’. The ‘Restricted IP Address or Hostname’ dialog
will appear.
2. Enter the web site address (IP address or URL) that you would
like to make inaccessible from your local network (all web pages
within the site will also be blocked). If the web site address has
multiple IP addresses,GlobeSurfer
addresses and automatically add them to the restrictions table.
3. You can also select the group of computers to which you would
like to apply the filtering rule. You can either select from a
predefined table of groups by selecting one from the ‘Applied to’
combo box, or create a new group by clicking the ‘New’ link. To
learn how to create groups, to which you can apply rules, see the
‘Reference Manual’.
4. You can define (this is optional, not compulsory) the period during
which the rule will take effect. You can either select from a
predefined table of schedules by selecting one from the Schedule
combo box, or create a new schedule by clicking the ‘New’. To
learn how to create a new time schedule, see the ‘Reference
Manual’.
5. Click ‘OK’ to add the web site to the table. You will be returned
to the previous screen while GlobeSurfer
site. ‘Resolving...’ will appear in the Status column while the site
is being located (the URL is being ‘resolved’ into one or more IP
addresses).
6. If the site is successfully located then ‘Resolved’ will appear
®
II will resolve all additional
®
II attempts to find the
39

40
in the status column; otherwise, ‘Hostname Resolution Failed’
will appear. Click ‘Refresh’ to update the status if necessary. If
GlobeSurfer® II fails to ‘locate’ the web site, do the following:
Use a Web browser to verify that the Web site is available. If it is,
then you probably entered the Web site address incorrectly. See
‘Modifying a Web site address currently in the table’ on page 40.
7. If the Web site is not available return to the ‘Restrictions list’
screen at a later time and click ‘Resolve now’ to verify that the
Web site can be found and blocked by GlobeSurfer
6.6.2 Modify a Web site address currently in the table
1. Click the ‘Edit’ icon that appears in the ‘Action’ column. The
Restricted IP Address or Hostname screen will appear.
2. Modify the Web site address, group and schedule as necessary.
If it is long or complicated, you may want to use your browser’s
Copy and Paste functions to copy the address from the address
bar to the management console. Be sure to omit the “http://” at
the beginning and the “/” at the end of the address.
3. Click ‘OK’ to save the changes.
®
II.
6.6.3 Ensuring that all IP addresses to Web-sites in the table
are blocked
1. Click ‘Resolve now’. GlobeSurfer® II will check each of the Website addresses in the table and ensure that all IP addresses at
which this Web site can be found are included in the IP addresses
column.
You may disable a restriction and make the Web site available again
without removing the site from the ‘Restrictions list’. This may be
useful if you wish to make the Web site available only temporarily
and expect that you will want to block it again in the future.
2. To temporarily disable a restriction: Clear the checkbox next to the
restricted URL.

GlobeSurfer ® II 1.8 - 7.2 - 7.2 S USER GUIDE
3. To re-instate the restriction later, tick the checkbox next to the URL.
4. To remove a restriction: Click ‘Remove’. The restriction will be
removed from the Restrictions list.
6.7 Mac Filtering
A common method of restricting WLAN network access is to specify the
Media Access Control (MAC) address. Every WLAN network adapter is
identified by its MAC address. Specifying which computers can connect to
your network can limit network access to trusted computers. GlobeSurfer
II supports MAC filtering based on either a list of denied or allowed
computers. MAC filtering mode ‘Allow’ specifies that the list of MAC
addresses is granted access to GlobeSurfer
specifies that all computers except those in the list of MAC addresses are
granted access to GlobeSurfer
Before you set up your list of trusted MAC addresses, you have to know
what they are. A device’s MAC address is usually found on a sticker on the
bottom of the device. For internal wireless PCI cards, refer to your operating
system documentation for instructions.
You can also type ‘ipconfig /all’ in the ‘Command Prompt’ in Windows
to locate the MAC address. The MAC address displays as the physical
address.
Adding wireless computers to MAC filtering
1. Click ‘Network connections’ in the left sidebar.
2. Click ‘Settings’ located under ‘LAN Wireless’.
3. Scroll down and click ‘New MAC address’.
41
®
®
II. MAC filtering mode ‘Deny’
®
II.

42
4. Enter the MAC address of the WLAN computer and click ‘OK’.
5. Select ‘MAC filtering mode’: Click ‘Allow’ or ‘Deny’.
Select ‘Disable’ if you want to disable MAC filtering.
6. Click ‘OK’ at the bottom of ‘Configure LAN Wireless’ to apply your settings.
7. GLOSSARY
802.11b WLAN standard. Provides a transmission speed of up to 11
Mbps in the 2.4 GHz band.
802.11g WLAN standard. Provides transmission speeds of up to 54
Mbps (typically 22 Mbps) in the 2.4 GHz band. Is considered a
successor of, and is compatible with, 802.11b. Enables highspeed data access from up to 100 meters distance from the
base station.
DHCP Dynamic Host Configuration Protocol. The Dynamic Host
Configuration Protocol is used to configure IP addresses
and applicable information dynamically. Instead of a fixed IP
address, DHCP clients receive their IP address from a central
DHCP server.

GlobeSurfer ® II 1.8 - 7.2 - 7.2 S USER GUIDE
DNS Domain Name System. Internet service that is used to assign
IP addresses to the corresponding readable domain name and
vice versa.
Dynamic DNS Dynamic Domain Name System. Provides assignment of
dynamic IP addresses to fixed domain names.
EDGE Enhanced Data rates for Global Evolution. An enhancement to
GSM that increases data throughput.
Ethernet The most widely used local area network (LAN) access
method defined by the IEEE as the 802.3 standard. Originally
developed by Xerox to link minicomputers in the Palo Alto
Research Centre.
Firewall Technology in the form of hardware or software that controls
the flow of data between a private and an unprotected network
(LAN and Internet, respectively) or protects an internal network
from attacks from the Internet.
Firmware Pre-installed software to operate GlobeSurfer
FTP File Transfer Protocol (FTP) regulates file transfers on the
Internet.
GPRS General Packet Radio Service. An enhancement to the GSM
mobile communications system that supports data packets.
GPRS enables continuous flows of IP data packets over the
system for such applications as Web browsing and file transfer.
GSM Global System for Mobile Communications. A digital cellular
phone technology that is the predominant system in Europe, but
is also used around the world. Operating in the 900MHz and
1.8GHz bands in Europe and the 1.9GHz PCS band in the US.
HSDPA High Speed Down-link Packet Access. An enhancement to 3G
technology that increases the down-link speed.
HTTP Hypertext Transfer Protocol is a service protocol to transmit
documents between servers or from a server to a client. Is
43
®
II.

44
mainly used on the Internet, or the World Wide Web.
IP address The IP address identifies every device connected to the Internet
through an address that is unique.
Pass-phrase A pass-phrase is used as an encryption password and is
generally longer than an ordinary password and may contain
letters and numbers.
LAN Local Area Network. Local computer connection that has few
or no connections to the outside world.
MAC address Media Access Control (MAC) address. A 48-bit identification
number of a network card that generally cannot be changed.
Shown as a hexadecimal number.
NAT Network Address Translation (NAT). Method to convert (mostly
private) IP addresses of a network to other (mostly public) IP
addresses of another network.
Network adapter Another word for Network card. The network card is the device
that establishes the connection between the network (wireless
or wired) and the computer
Network name See ‘SSID’, below.
Port Describes an interface between the operating system,
applications and the Internet.
SMTP Simple Mail Transfer Protocol. E-mail programs use SMTP to
transmit data to the mail server. It then forwards the e-mail via
intermediate stations to the recipient’s mail server.
SSID Service Set Identifier; network name in WLAN which allows
stations in the WLAN to find the correct access point.
TCP/IP Transmission Control Protocol / Internet Protocol; this is the
transport protocol on which the data transmission on the
Internet is based.
UMTS Universal Mobile Telecommunication System. A global standard

GlobeSurfer ® II 1.8 - 7.2 - 7.2 S USER GUIDE
for third generation (3G) mobile technology. UMTS in its initial
phase offers bit rates of up to 384 kbps, both up-link and
down-link.
URL Uniform Resource Locator is an Internet address, such as
www.google.com.
WAN Wide Area Network is a network mainly working across great
distances.
WEP Wired Equivalent Privacy; describes a 64 or 128 bit encryption
process used for wireless LANs.
WLAN Wireless Local Area Network is a remote technology for
wireless networking.
WPA Wi-Fi Protected Access is a 256-bit encryption method for a
WLAN.
WPA2 A more secure version of WPA with implementation of the
802.11i standard.
45
8. SPECIFICATIONS
UMTS FDD UMTS, 850 / 1900 / 2100 MHz, HSDPA speeds up
to 1.8 / 3.6 / 7.2 Mbps (Depending on product variant)
LAN Ethernet 10BaseT / 100BaseT, Auto MDIX
WLAN IEEE 802.11 b/g WLAN
Security 64 bit and 128 bit WEP Encryption
WPA/WPA2 Encryption
Port and URL Filter
DMZ Support
Firewall, three predefined levels
VPN tunnelling, PPTP, Ipsec, L2TP

46
Display Monochrome 128 x 64 Pixel OLED display
Status information
New SMS Received
Missed / Incoming calls
Current time (hours:minutes), clock synchronisation
over the Internet (NTP)
Signal strength
Number of WLAN connections
Screen saver
Buttons On / Off
Connect/disconnect UMTS
Display information
Restore factory defaults
Connectors Power connector
RJ-45 Ethernet
RJ-11 POTS telephone
SIM card holder
External antenna connector (GSM/UMTS)
User Interface Device configuration with local web browser
(no software installation required)
Power adapter Input 110-240V, 50-60Hz
Output 5V DC, 2.4A
Dimensions 150 x 100 x 32 (W x H x D in mm)
Weight 255g, excluding power adapter
Operating Environment Indoors 0 °C – 60 °C
Humidity 5% – 95%

GlobeSurfer ® II 1.8 - 7.2 - 7.2 S USER GUIDE
Lic en se d by QUALCO MM Incorpor at ed at least und er one or more of the fol lo wing Un it ed States
Pat en ts a nd / or t heir coun te rp arts. In other natio ns : 4 ,9 01 ,307; 5,4 90 ,1 65; 5,056 ,1 09 ; 5,504,7 73 ;
5,1 01 ,5 01; 5 ,5 06 ,865; 5 ,1 09 ,390; 5 ,5 11,073; 5 ,228,05 4; 5 ,535,23 9; 5,267, 26 1; 5,544, 19 6;
5,2 67 ,2 62; 5 ,5 68 ,483; 5 ,3 37 ,338; 5 ,6 00,754; 5 ,414,79 6; 5 ,657,42 0; 5,416, 79 7; 5,659, 56 9;
5,7 10 ,7 84; 5,778,3 38
GlobeSurfer® II Questions and answers can be found on our Support web-site:
http://support.option.com/support/faq.php
To register please go to:
http://support.option.com/support/register.php
To post technical questions after you have registered please use the online
support at:
http://support.option.com/support/newticket.php
47
Copyright Option nv © 2007 all rights reserved. No parts may be reproduced without written permission.
The Apple logo, Mac and Mac OS are trademarks of Apple Computer, Inc.
Option nv, Gaston Geenslaan 14, 3001 Leuven, Belgium.
www.option.com

Gaston Geenslaan 14 - 3001 Leuven Belgium - T +32 16 317 411 - F +32 16 207 164
www.option.com
 Loading...