


USER GUIDE

WELCOME
2

About This User Guide
This User Guide describes the QuantumVu Interactive Program
Guide, Video On Demand, On-Screen Caller ID, Parental
Control, Set-top Boxes (STBs), remote controls, and Multi-Room
DVR service. Additional information about your remote control
can be found in the instruction manual that came with it.
Contacting Customer Service
As always, OptiNet’s friendly staff of local customer care
professionals are ready to answer any questions you may have
about your QuantumVu service. If you need any assistance, call
us toll-free at 866-835-1288 or visit www.bvu-optinet.com
Thank you for choosing QuantumVu from OptiNet. QuantumVu will open a whole new world of entertainment for you and your
family. This user guide will help you learn more about all the great new features QuantumVu has to offer. Please keep it in a safe
place for future reference.
Dear OptiNet Customer
3
User Equipment. . . . . . . . . . . . . . . . . . . . . . . . . . . . . . . . . . . . . 6
Set-Top Box Safety Information. . . . . . . . . . . . . . . . . . . . . . . . . . . . . . . 7
Residential Gateway Unit (RGU). . . . . . . . . . . . . . . . . . . . . . . . . . . . . . 1
Set-Top Box Front Panel Features. . . . . . . . . . . . . . . . . . . . . . . . . . . . 12
Set-Top Box Back Panel Features. . . . . . . . . . . . . . . . . . . . . . . . . . . . 14
Universal Remote Control.. . . . . . . . . . . . . . . . . . . . . . . . . . . . . . . . . . . . 16
Using the Menu Screen. . . . . . . . . . . . . . . . . . . . . . . . . . . . . 18
Menu Navigation Tips. . . . . . . . . . . . . . . . . . . . . . . . . . . . . . . . . . . . . . . . . 2
Main Menu Screens. . . . . . . . . . . . . . . . . . . . . . . . . . . . . . . . . . . . . . . . . . . . 21
Using the Interactive Program Guide (IPG). . . . . . . . . . . . . . 22
Find and Watch a Program. . . . . . . . . . . . . . . . . . . . . . . . . . . . . . . . . . . . 23
Browse While Watching Programming. . . . . . . . . . . . . . . . . . . . . . . . 24
Program Info Screen. . . . . . . . . . . . . . . . . . . . . . . . . . . . . . . . . . . . . . . . . . . 25
Search for Programs. . . . . . . . . . . . . . . . . . . . . . . . . . . . . . . . . . . . . . . . . . . 26
Narrowing Your Search by Title, People, or VOD. . . . . . . . . . . . . 27
Digital Video Recorder (DVR). . . . . . . . . . . . . . . . . . . . . . 28
Control Live Programming. . . . . . . . . . . . . . . . . . . . . . . . . . . . 2
Record Programs. . . . . . . . . . . . . . . . . . . . . . . . . . . . . . . . . . . . . . . . 3
View a List of Scheduled Recordings. . . . . . . . . . . . . . . . . . . . . . . . . . 33
View a List of All Recorded Programs. . . . . . . . . . . . . . . . . . . . . . . . . . 34
Watch a Recorded Program. . . . . . . . . . . . . . . . . . . . . . . . . . . . . . . . . . . . 35
Delete Existing Recordings. . . . . . . . . . . . . . . . . . . . . . . . . . . . . . . . . . . . 36
Manage Your DVR from a Computer. . . . . . . . . . . . . . . . . . . . . . . . . . 37
Video On Demand. . . . . . . . . . . . . . . . . . . . . . . . . . . . . . . . . . 3
Access the Video On Demand screen. . . . . . . . . . . . . . . . . . . . . . . 4
Rent Video On Demand Content. . . . . . . . . . . . . . . . . . . . . . . . . . . . . . 41
Play Your Current Rentals . . . . . . . . . . . . . . . . . . . . . . . . . . . . . . . . . . . . . . 42
Subscription & Premium Video On Demand. . . . . . . . . . . . . . . . . 43
Table of Contents
4
Favorite Channels. . . . . . . . . . . . . . . . . . . . . . . . . . . . . . . . . . . 44
Set Up or Revise a List of Favorites. . . . . . . . . . . . . . . . . . . . . . . . . . . . 45
Use a Favorite Channels Screen . . . . . . . . . . . . . . . . . . . . . . . . . . . . . 46
Hide and Show Channels in the Guide. . . . . . . . . . . . . . . . . . . . . . . 47
Parental Control. . . . . . . . . . . . . . . . . . . . . . . . . . . . . . . . . . . . . 48
Create a PIN. . . . . . . . . . . . . . . . . . . . . . . . . . . . . . . . . . . . . . . . . . . . . . . . . . . . 4
Lock Specic Channels. . . . . . . . . . . . . . . . . . . . . . . . . . . . . . . . . . . . . . . . . 5
Lock Programs Based on Ratings. . . . . . . . . . . . . . . . . . . . . . . . . . . . . 51
Lock Adult Content. . . . . . . . . . . . . . . . . . . . . . . . . . . . . . . . . . . . . . . . . . . . 52
Lock Video On Demand rentals. . . . . . . . . . . . . . . . . . . . . . . . . . . . . . 53
Watch a Locked Program. . . . . . . . . . . . . . . . . . . . . . . . . . . . . . . . . . . . . . 54
Settings. . . . . . . . . . . . . . . . . . . . . . . . . . . . . . . . . . . . . . . . . . . . . . . 55
Change the Aspect Ratio for Widescreen or HDTV. . . . . . . . . . 56
Set Language Preferences. . . . . . . . . . . . . . . . . . . . . . . . . . . . . . . . . . . . . 56
Turn Sound Effects On/Off. . . . . . . . . . . . . . . . . . . . . . . . . . . . . . . . . . . 57
Change the Digital Audio Output. . . . . . . . . . . . . . . . . . . . . . . . . . . . . . 57
Applications. . . . . . . . . . . . . . . . . . . . . . . . . . . . . . . . . . . . . . . . . . 58
TV Caller ID. . . . . . . . . . . . . . . . . . . . . . . . . . . . . . . . . . . . . . . . . . 60
Incoming Calls. . . . . . . . . . . . . . . . . . . . . . . . . . . . . . . . . . . . . . . . . . . . . . . . . . 61
View your On-Screen Caller ID History. . . . . . . . . . . . . . . . . . . . . . . . . 61
Snooze the On-Screen Caller ID feature. . . . . . . . . . . . . . . . . . . . . 62
Disable the On-Screen Caller ID feature. . . . . . . . . . . . . . . . . . . . . 62
Frequently Asked Questions. . . . . . . . . . . . . . . . . . . . . . . 63
Troubleshooting. . . . . . . . . . . . . . . . . . . . . . . . . . . . . . . . . . . . . 64
5
The equipment provided by OptiNet
delivers QuantumVu service to your
home or business and connects to most
entertainment devices.
USER EQUIPMENT
Set Top Box Safety Information.. . . . . . . . . . . . . . . . . . . . . . . .7
Residential Gateway Unit (RGU).. . . . . . . . . . . . . . . . . . . . . . .1
Set-Top Box Front Panel Features.. . . . . . . . . . . . . . . . . . . .12
Set-Top Box Back Panel Features.. . . . . . . . . . . . . . . . . . . . .14
Universal Remote Control. . . . . . . . . . . . . . . . . . . . . . . . . . . . . .16
6
Refer all servicing to qualied service personnel. Servicing is
required when the equipment has been damaged in any
way, such as a powersupply cord or plug is damaged, liquid
has been spilled or objects have fallen into the equipment,
the equipment has been exposed to rain or moisture, does not
operate normally, or has been dropped.
Power Source Warning
A label on this product indicates the correct power source for
this product. Operate this product only from an electrical outlet
with the voltage and frequency indicated on the product label.
If you are uncertain of the type of power supply to your home or
business, consult your local power company.
The AC inlet on the unit must remain accessible and operable
at all times.
Ground the Product
WARNING: Avoid electric shock and re hazard! If this
product connects to cable wiring, be sure the wiring
is grounded (earthed). Grounding provides some
protection against voltage surges and built-up static charges.
Protect the Equipment from Lightning
In addition to disconnecting the AC power from the wall outlet,
disconnect the signal inputs.
Verify the Power Source from the On/Off Power Light
When the on/off power light is not illuminated, the equipment
may still be connected to the power source. The light may go
out when the equipment is turned off, regardless of whether it is
still plugged into an AC power source.
Set Top Box Safety Info.
7
Eliminate AC Mains Overloads
WARNING: Avoid electric shock and re hazard!
Do not overload AC mains, outlets, extension cords, or
integral convenience receptacles. For products that
requires battery power or other power sources to operate them,
refer to the operating instructions for those products.
Provide Ventilation and Select a Location
• Remove all packaging material before applying power to
the equipment.
• Do not place this equipment on a bed, sofa, rug, or similar
surface.
• Do not install this equipment in an enclosure, such as a
bookcase or rack, unless the installation provides proper
ventilation.
• Do not place entertainment devices (such as VCRs or DVDs),
lamps, books, vases with liquid, or other objects on top of this
equipment.
• Do not block ventilation openings.
Protect from Exposure to Moisture and Foreign Objects
WARNING: Avoid electric shock and re hazard!
Do not expose this equipment to dripping or splashing
liquids, rain or moisture. Objects lled with liquids, such
as vases, should not be placed on this equipment.
WARNING: Avoid electric shock and re hazard!
Unplug this equipment before cleaning. Do not use
a liquid cleaner or an aerosol cleaner. Do not use a
magnetic/static cleaning device (dust remover) to clean this
product.
WARNING: Avoid electric shock and re hazard! Never
push objects through the openings in this equipment.
Foreign objects can cause electrical shorts that can
result in electric shock or re.
8
WARNING: Avoid electric shock and re hazard! Do
not open the cover of the equipment. Opening or
removing the cover may expose you to dangerous
voltages. If you open the cover, your warranty will be voided.
This equipment contains no user-serviceable parts. Refer all
servicing to qualied service personnel. Servicing is required
when the equipment has been damaged in any way, such as a
power-supply cord or plug is damaged, liquid has been spilled
or objects have fallen into the equipment, the equipment has
been exposed to rain or moisture, does not operate normally, or
has been dropped.
Check Equipment Safety
Upon completion of any service or repairs to this equipment,
the service technician must perform safety checks to determine
that this equipment is in proper operating condition.
Protect the Equipment When Moving It
Always disconnect the power source when moving the product
or connecting or disconnecting cables.
Note: This illustration may vary from the actual product.
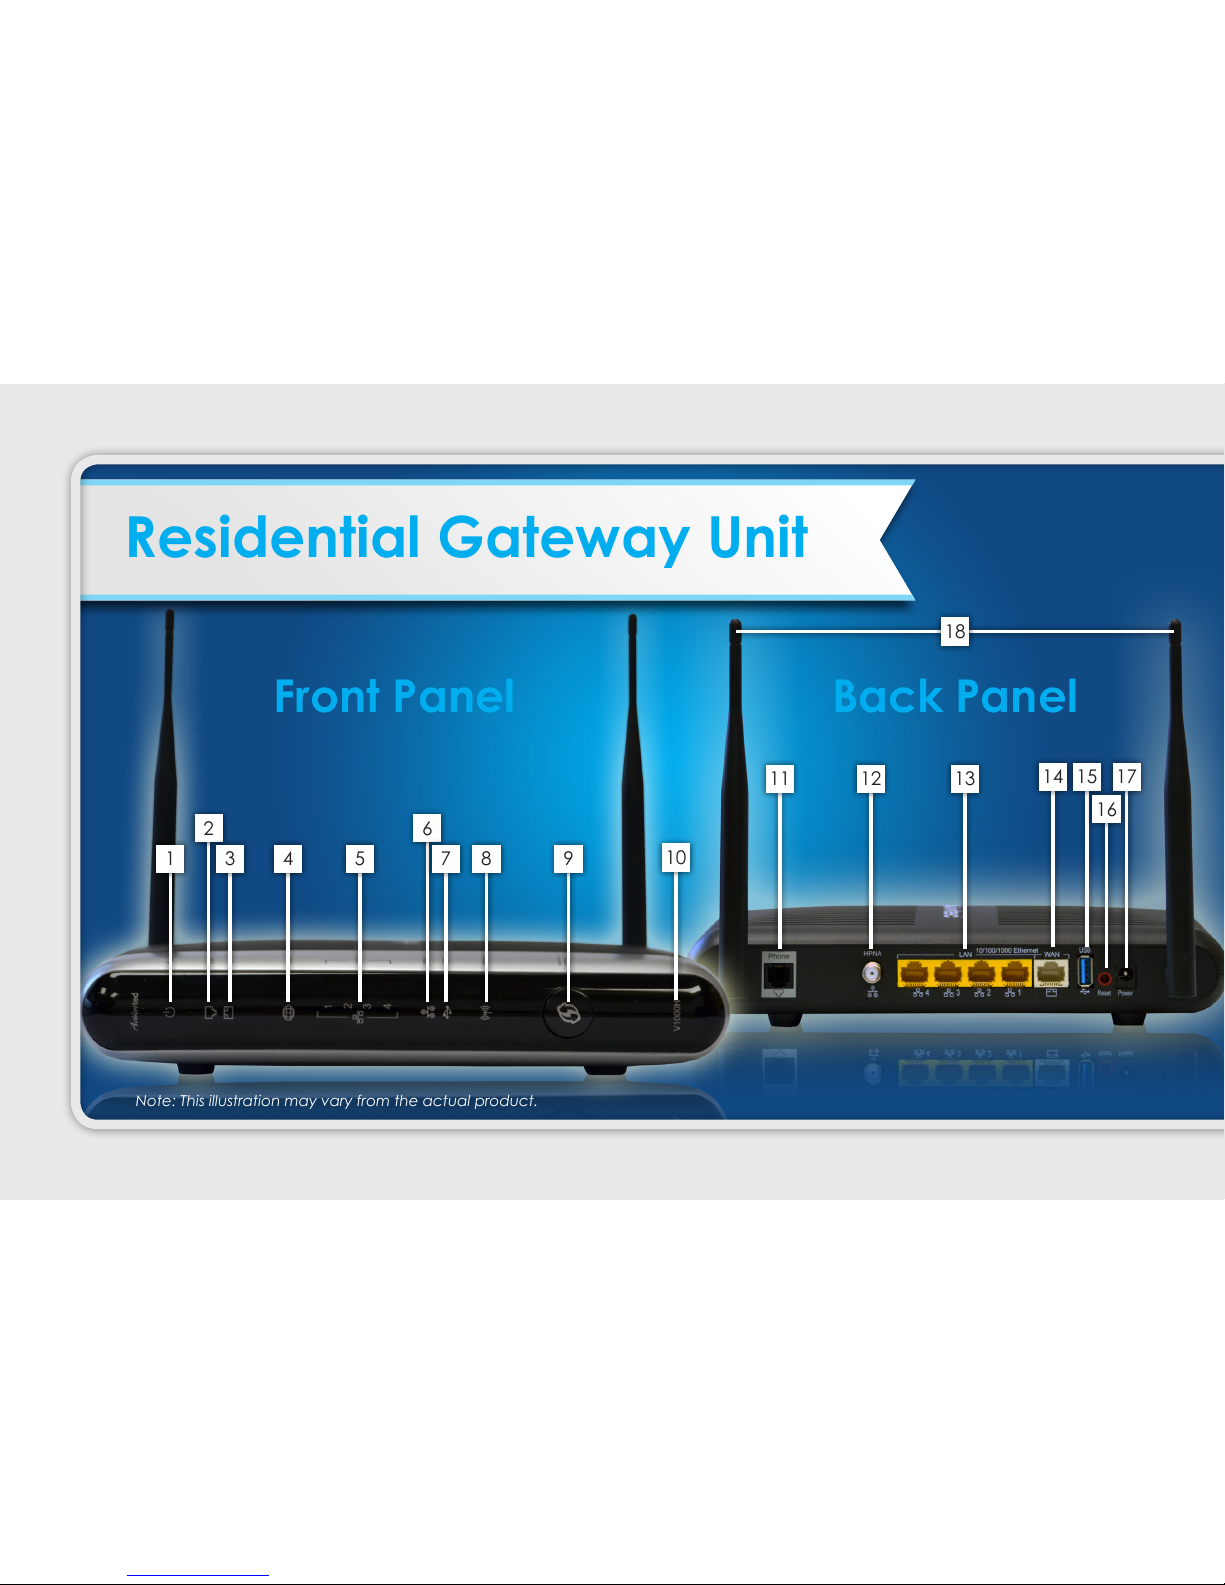
2
13
1 4 5
11
14 17
3
6
12
7 8
1
15
16
18
Front Panel Back Panel
Residential Gateway Unit
1
11
FRONT PANEL
1. Power - The Power LED displays the Residential Gateway’s
(RG) current status. If the Power LED glows steadily green,
the RG is receiving power and fully operational. When the
Power LED is rapidly ashing, the RG is initializing. If the Power
LED is glowing red when the Power cord is plugged in, the
RG has suffered a critical error and technical support should
be contacted. If the Power LED is ashing red, the RG is
performing a rmware update.
2. DSL - Not used
3. WAN Ethernet - When the WAN Ethernet LED glows steadily,
the RG is connected to an Ethernet WAN. When it ashes, it
signies that data trafc is traveling across the connection.
4. Internet - When the Internet LED glows steadily, the RG is
connected to the provider. When it ashes, data trafc is
passing across the RG.
5. LAN Ethernet - The LAN Ethernet LEDs illuminate when the
RG is connected to another device via one of its LAN Ethernet
ports. When one of the LAN Ethernet LEDs ashes, data trafc
is passing across the corresponding connection.
6. HPNA - The HPNA LED illuminates when the RG is connected
to another device via its HPNA port. When it ashes, data
trafc is passing across the connection.
7. USB - Not used.
8. Wireless - Not used.
. WPS Button - Not used.
10. Model Number
BACK PANEL
11. Line Port - Not used.
12. HPNA Port - The HPNA port is used to connect the RG to Set
Top Box(es).
13. LAN Ethernet Ports (4) - The LAN Ethernet ports are used
to connect computers to the RG via Ethernet cable. The
Ethernet ports are 1/1/1 Mbps auto-sensing ports, and
either a straight-through or crossover Ethernet cable can be
used when connecting to the ports.
14. WAN Ethernet Port - The WAN Ethernet port is used to
connect the RG to a BVU’s network.
15. 15. USB Port - Not used.
16. Reset Switch - Not used. (Please do not press)
17. Power Port - The Power port is used to connect the Power
cord to the RG.
WARNING! Do not unplug the Power cord from the RG
during the reset process. Doing so may result in permanent
damage to the Modem Router.
18. Antennas
!
1 2 3 4 5 6 7 8
Note: This illustration may vary from the actual product.
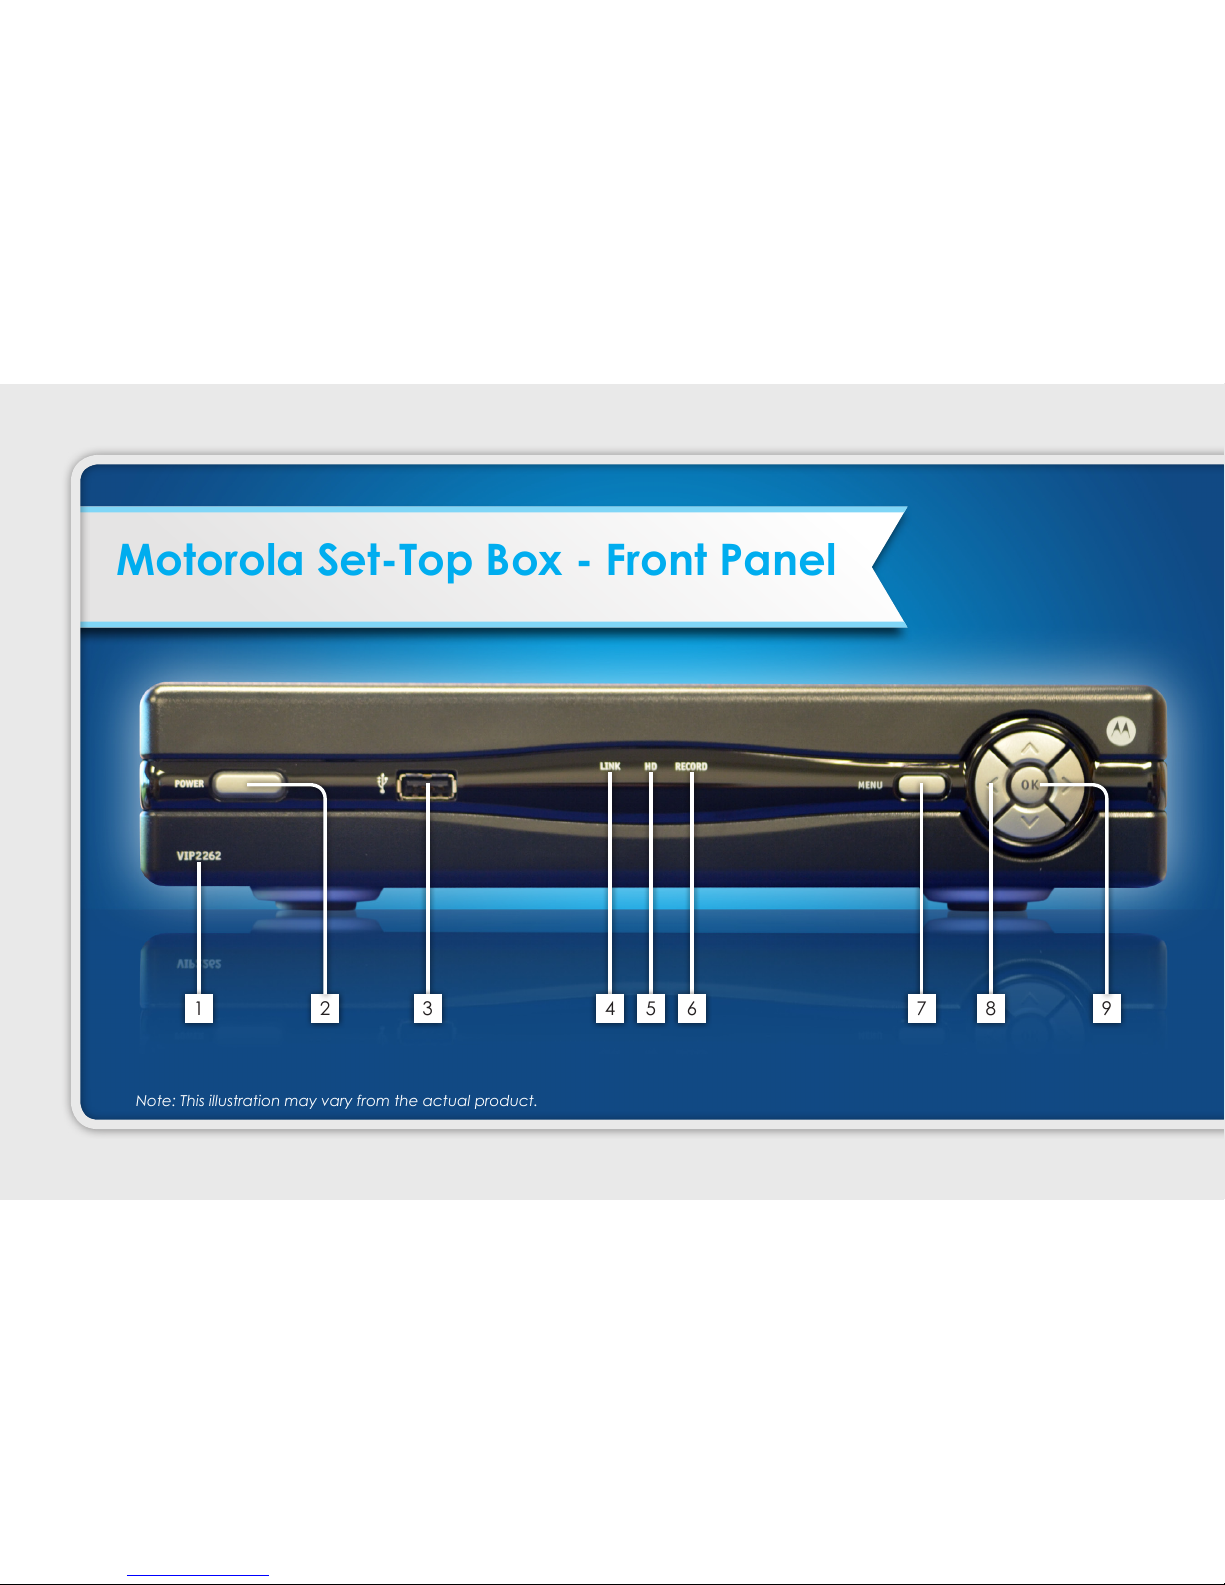
Motorola Set-Top Box - Front Panel
12
1. Model Number – Identies the model number of your
set-top box.
2. Power – Turns the set-top on or places it in standby. To
restart the set-top, press and hold the POWER button for
1 seconds. The LED is green.
3. USB Port – USB connector. (optional)
4. Link – Indicates network link status. The LED is green.
5. HD – Indicates the set-top is set to a resolution of 72p or
18i. The LED is blue.
6. Record – Indicates that a recording is in progress. The LED
is red.
7. Menu – Accesses the on-screen menu.
8. Arrow Keys – Accesses on-screen services (such as the
on-screen guide, Video On Demand, or Pay Per View)
and navigates menus.
. OK – Selects the current item.
CAUTION:
Your set-top may be equipped with a hard disk drive
to store programs that you record and to allow you to rewind
and pause live Programming. Any time the set-top is powered
on (power LED is illuminated) or a recording is in progress (the
record LED is illuminated) the hard disk drive is in use.
If you need to move the set-top, complete the following steps
to allow the hard disk drive to shut down properly. First, make
sure that no recording is in progress (record LED is off). Then,
turn off power by pressing the Power key. Finally, unplug the
unit and wait 1 seconds for the hard disk drive to spin down
(stop). At this point the unit can be moved safely.
You should handle this product with the same level of care
you would use when handling other electronics containing a
hard disk drive, such as a laptop computer or other hard disk
drive-equipped devices.
13

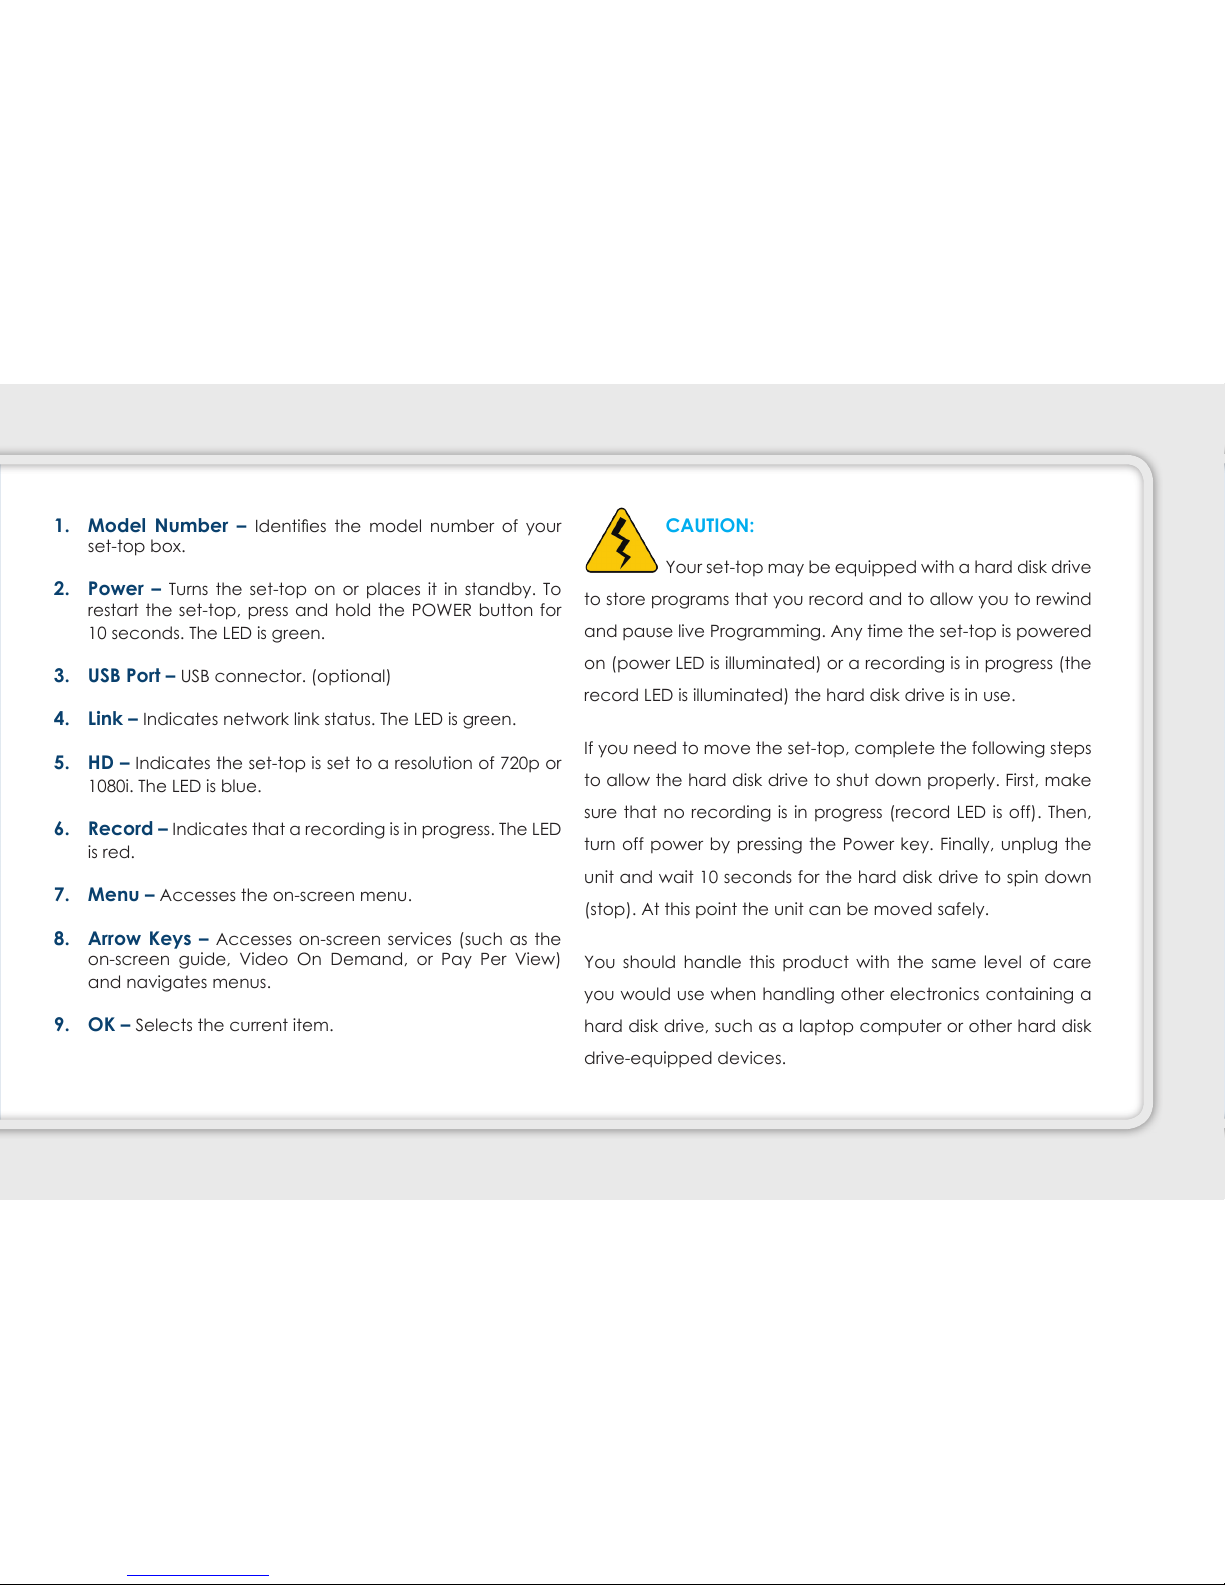
1 2 3 4 6 7 8 1 11 12
Note: This illustration may vary from the actual product.
Motorola Set-Top Box - Back Panel
14
5
1. To Wall (Video In) or WPS (not shown) – Connects the
set-top to in-house coaxial wiring, if applicable.
2. Network – Connects to the Ethernet (CAT-5) network at
your home, if applicable.
3. eSATA Port – eSATA connector. (optional)
4. S-Video – Connects an S-Video cable to send an S-Video
signal to your television set, VCR, or DVD recorder. This
signal is standard denition but higher quality than other
standard-denition connections.
5. Optical – Connects an optical cable to send a digital
audio signal to a surround-sound set-top or other digital
audio device.
6. YPbPr – Connects the set-top to the component video
input (YPbPr) on the HDTV.
7. Video Out – Connects to composite input on your HDTV
or SDTV. Note: Two video output connectors are provided.
Typically, one output is connected to the television set,
and the other output is used to connect to a home theater
system, DVD recorder, or VCR.
8. Audio Out (L/R) – Connects RCA-type cables to Audio
Out to send analog audio signals (left and right) to a
television set with stereo inputs or to a stereo amplier.
Note: Two sets of audio out connectors are provided.
Typically, one set of outputs is connected to the television
set, and the other set is used to connect to a home theater
system, DVD recorder, or VCR.
. To TV (Video Out) – Connects to the television.
10. HDMI – Connects an HDTV HDMI™ (High-Denition
Multimedia Interface) cable from the HDTV to the HDMI
port. HDMI supports both digital audio and video.
11. USB Port – Connects to external USB equipment approved
by OptiNet.
12. Power – Connects the DC output of the AC power
adapter (provided) to deliver power to the set-top. Use
only the AC power adapter provided with the set-top.
15
1 2 3 4 5 6 7 8
Note: This illustration may vary from the actual product.
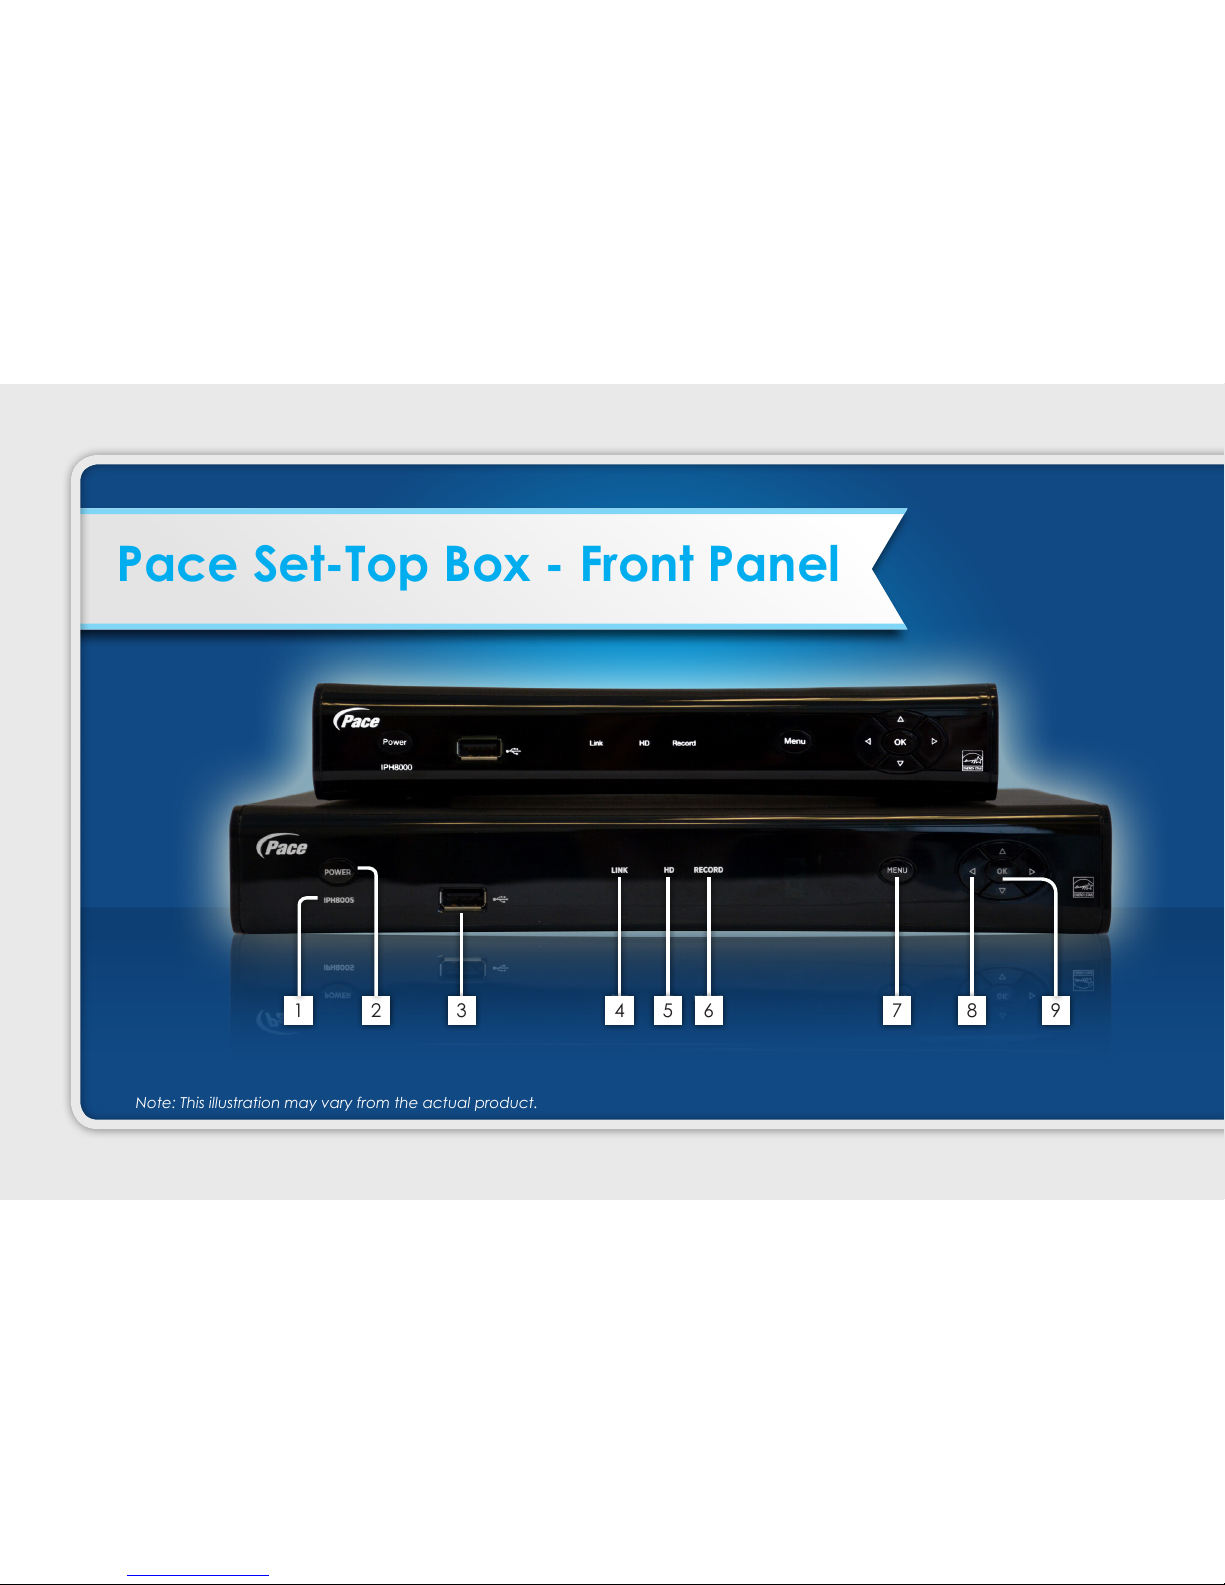
Pace Set-Top Box - Front Panel
16

1. Model Number – Identies the model number of your
set-top box.
2. Power – Turns the set-top on or places it in standby. To
restart the set-top, press and hold the POWER button for
1 seconds. The LED is green.
3. USB Port – USB connector. (optional)
4. Link – Indicates network link status. The LED is green.
5. HD – Indicates the set-top is set to a resolution of 72p or
18i. The LED is blue.
6. Record – Indicates that a recording is in progress. The LED
is red.
7. Menu – Accesses the on-screen menu.
8. Arrow Keys – Accesses on-screen services (such as the
on-screen guide, Video On Demand, or Pay Per View)
and navigates menus.
. OK – Selects the current item.
CAUTION:
Your set-top may be equipped with a hard disk drive
to store programs that you record and to allow you to rewind
and pause live Programming. Any time the set-top is powered
on (power LED is illuminated) or a recording is in progress (the
record LED is illuminated) the hard disk drive is in use.
If you need to move the set-top, complete the following steps
to allow the hard disk drive to shut down properly. First, make
sure that no recording is in progress (record LED is off). Then,
turn off power by pressing the Power key. Finally, unplug the
unit and wait 1 seconds for the hard disk drive to spin down
(stop). At this point the unit can be moved safely.
You should handle this product with the same level of care
you would use when handling other electronics containing a
hard disk drive, such as a laptop computer or other hard disk
drive-equipped devices.
17
1 2 3 5 6 7 8
Note: This illustration may vary from the actual product.
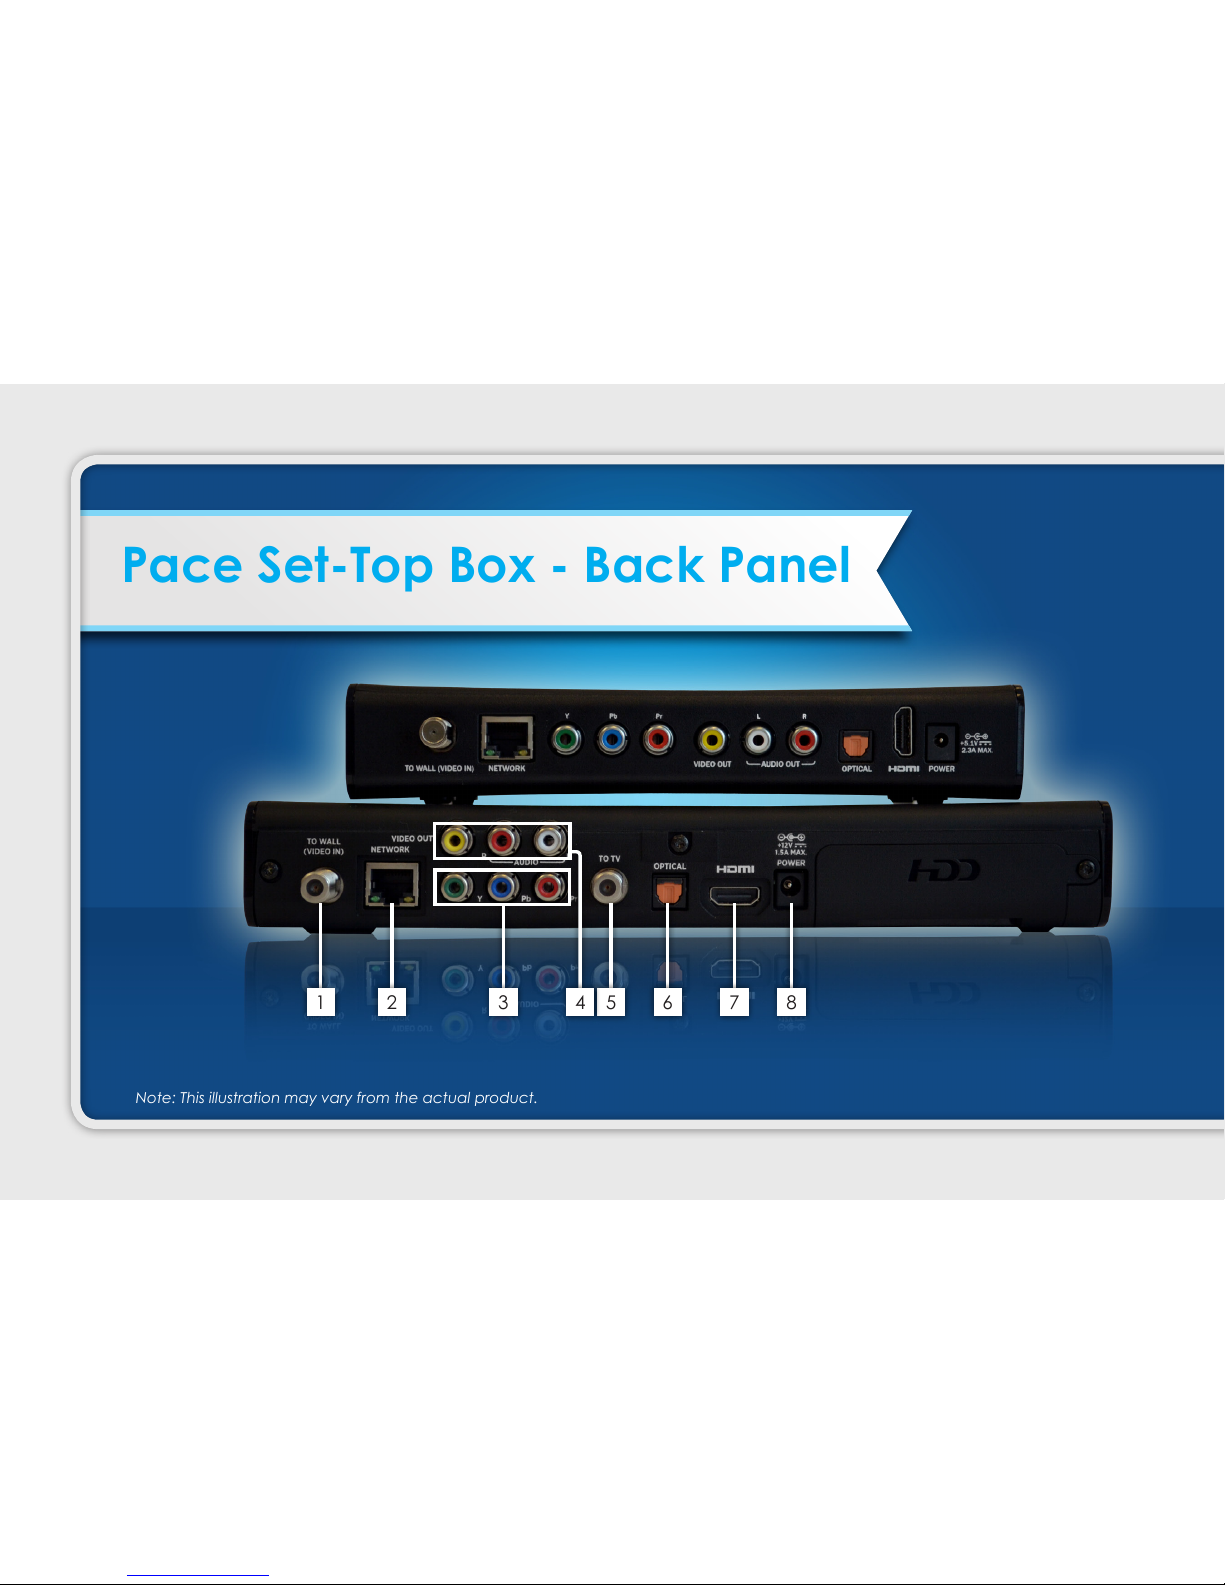
Pace Set-Top Box - Back Panel
4
18
1. To Wall (Video In) or WPS (not shown) – Connects the
set-top to in-house coaxial wiring, if applicable.
2. Network – Connects to the Ethernet (CAT-5) network at
your home, if applicable.
3. YPbPr – Connects the set-top to the component video
input (YPbPr) on the HDTV.
4. Video & Audio Out (L/R)– Connects to composite input
on your HDTV or SDTV. Note: Two video output connectors
are provided. Typically, one output is connected to the
television set, and the other output is used to connect to a
home theater system, DVD recorder, or VCR.
Connects RCA-type cables to Audio Out to send analog
audio signals (left and right) to a television set with stereo
inputs or to a stereo amplier. Note: Two sets of audio out
connectors are provided. Typically, one set of outputs is
connected to the television set, and the other set is used
to connect to a home theater system, DVD recorder, or
VCR.
5. To TV (Video Out) – Connects to the television.
6. Optical – Connects an optical cable to send a digital
audio signal to a surround-sound set-top or other digital
audio device.
7. HDMI – Connects an HDTV HDMI™ (High-Denition
Multimedia Interface) cable from the HDTV to the HDMI
port. HDMI supports both digital audio and video.
8. Power – Connects the DC output of the AC power
adapter (provided) to deliver power to the set-top. Use
only the AC power adapter provided with the set-top.
1
Note: This illustration may vary from the actual product.
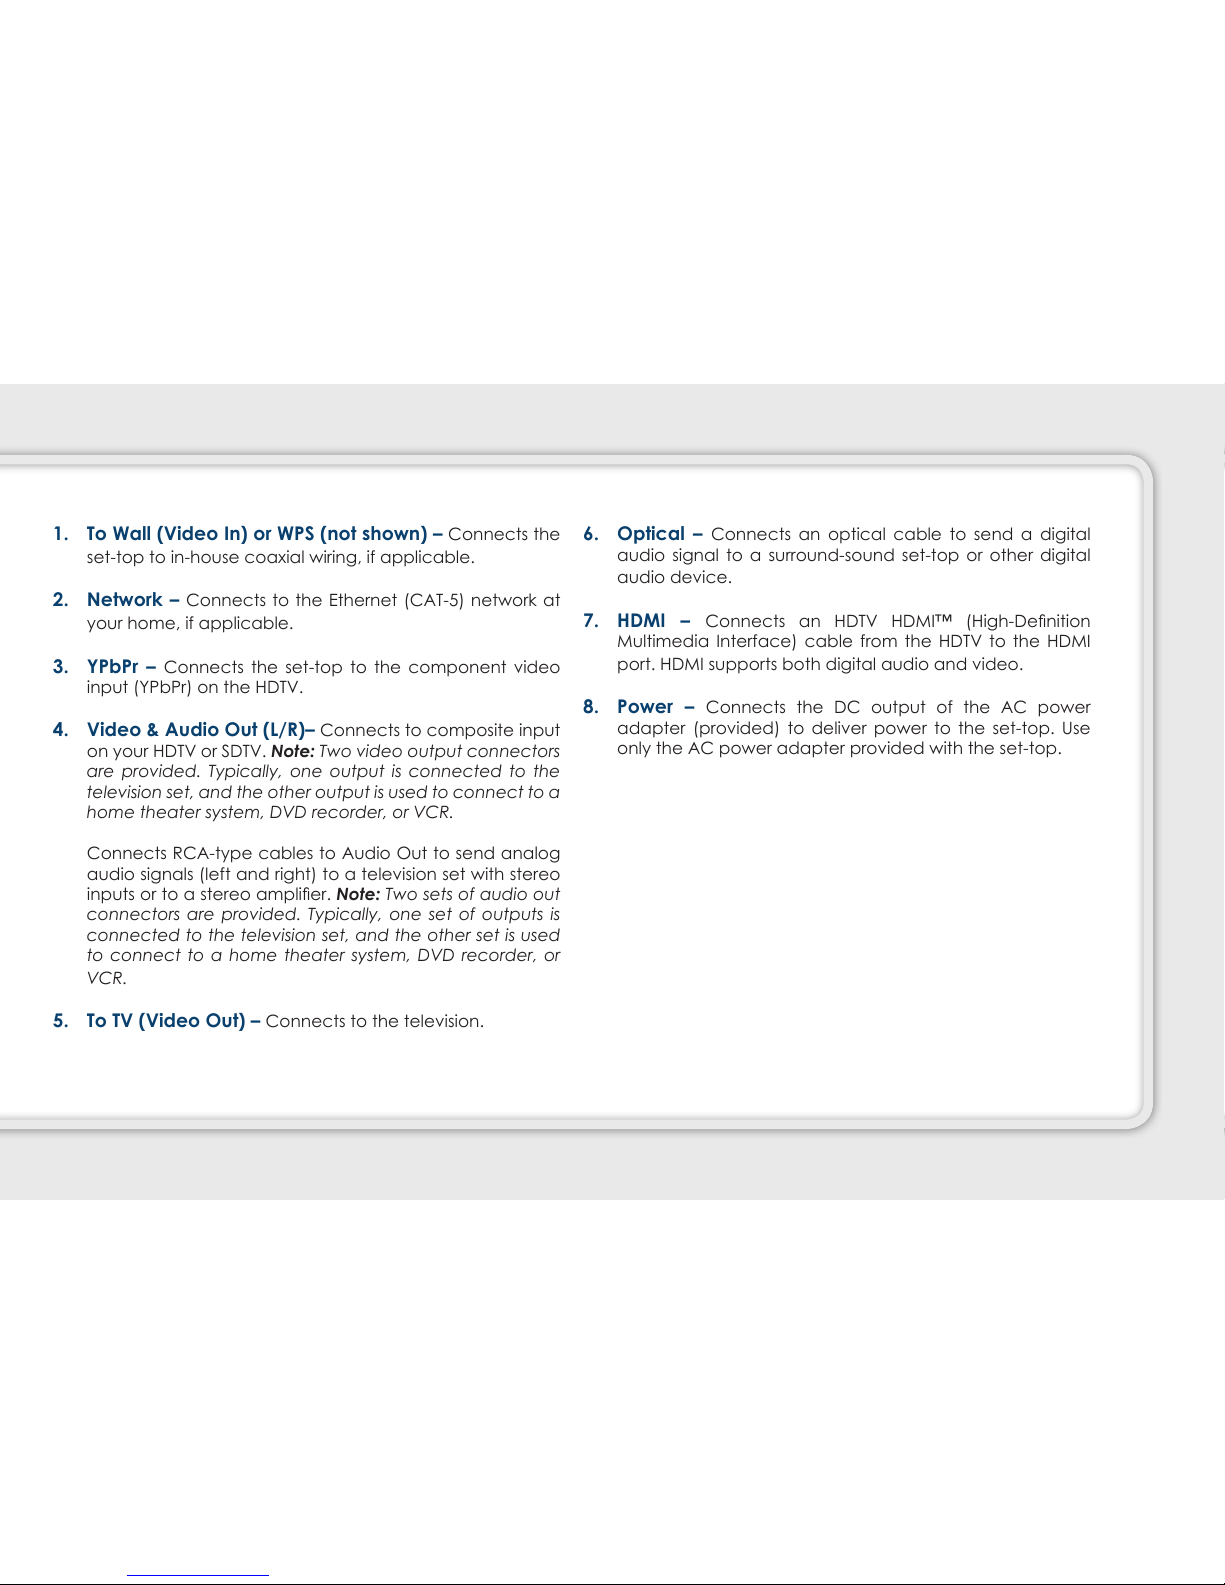
TV
DVD
AUX
STB
TV VIDEO
SET UP
POWER
C
B
A
STOP
PLAY
PAUSE
REPLAY
FWD
REW
FF
RECORD
ON DEMAND
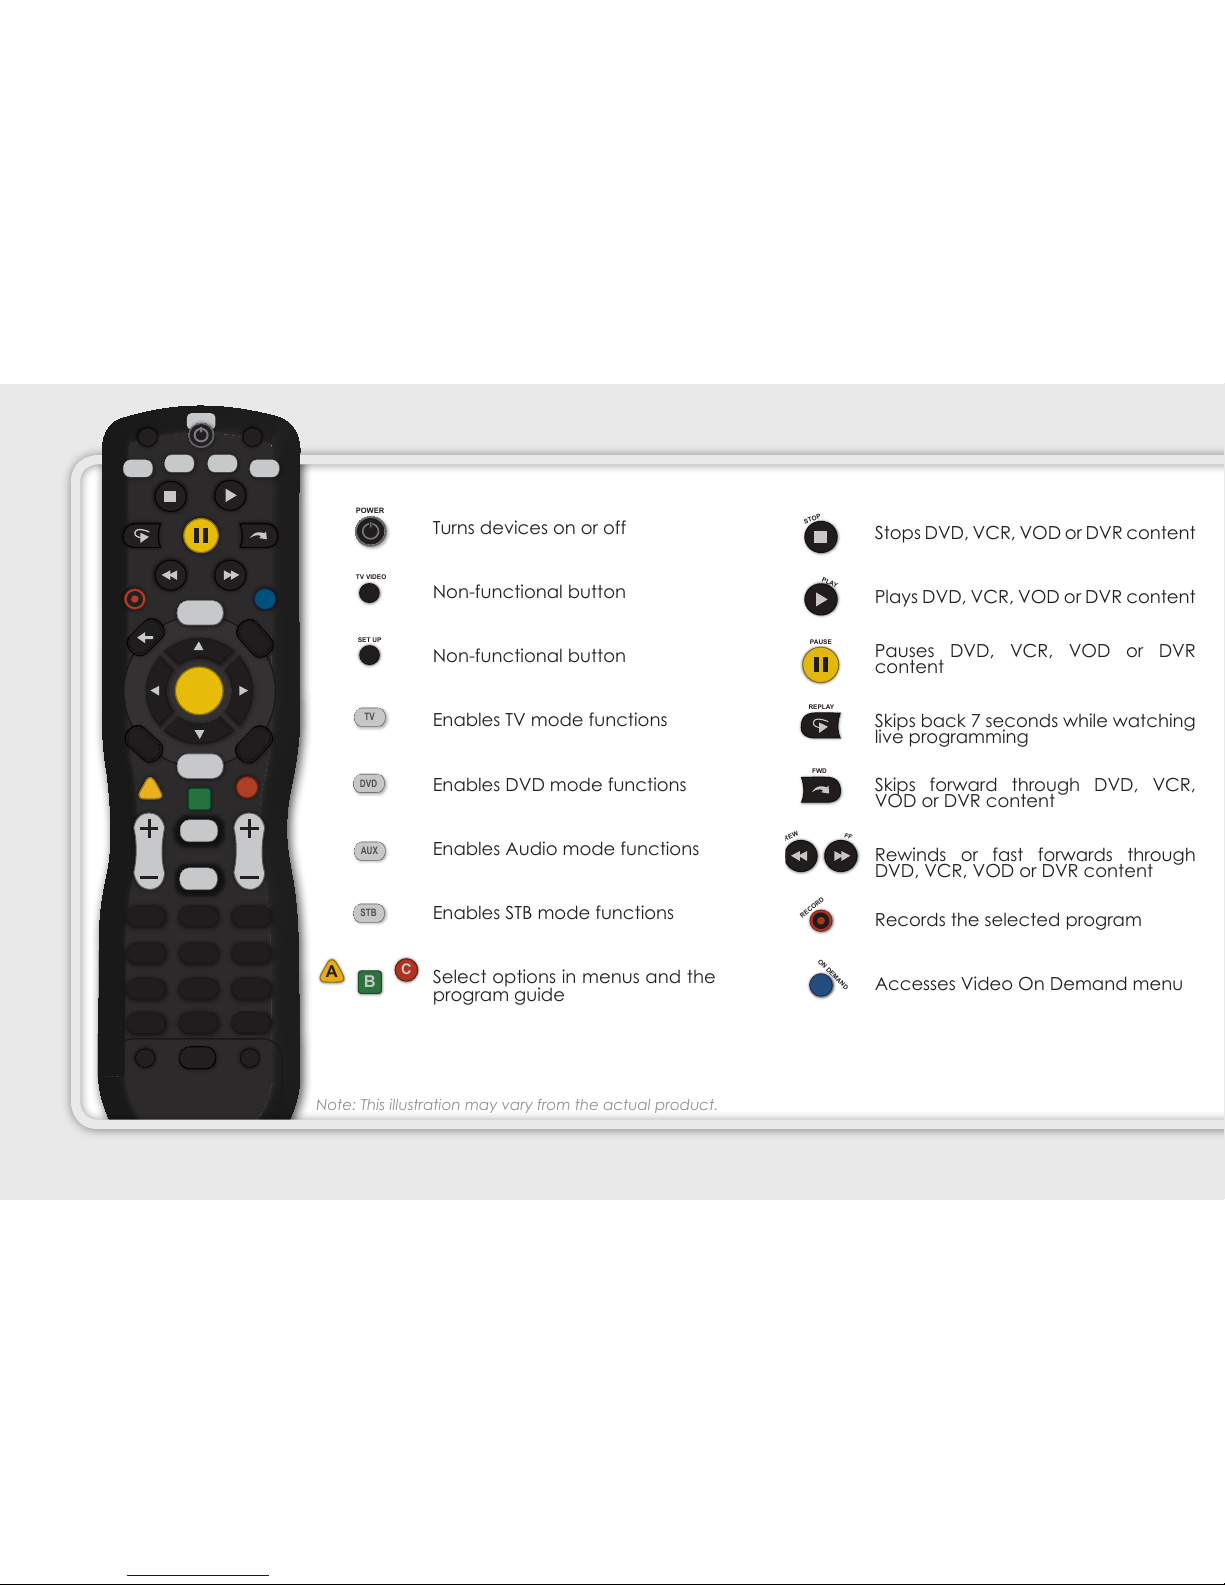
MENU
BACK
DVR
RECORDINGS
OK
EXIT
INFO
GUIDE
VOL
CH
LAST
MUTE
DELETE
ENTER
0
8
5
2
7
4
1
9
6
3
abc def
ghi jkl mno
pqrs tuv wxyz
SPACE ZOOM
STOP
PLAY
PAUSE
REPLAY
FWD
REW
FF
RECORD
ON DEMAND
MENU
BACK
DVR
RECORDINGS
OK
EXIT
INFO
GUIDE
VOL
CH
LAST
MUTE
DELETE
ENTER
0
8
5
2
7
4
1
9
6
3
abc def
ghi jkl mno
pqrs tuv wxyz
SPACE ZOOM
Turns devices on or off
Non-functional button
Non-functional button
Enables TV mode functions
Enables DVD mode functions
Enables Audio mode functions
Enables STB mode functions
Select options in menus and the
program guide
Stops DVD, VCR, VOD or DVR content
Plays DVD, VCR, VOD or DVR content
Pauses DVD, VCR, VOD or DVR
content
Skips back 7 seconds while watching
live programming
Skips forward through DVD, VCR,
VOD or DVR content
Rewinds or fast forwards through
DVD, VCR, VOD or DVR content
Records the selected program
Accesses Video On Demand menu
TV
DVD
AUX
STB
MENU
GUIDE
C
B
A
DVR
EXIT
INFO
LAST
MUTE
DELETE
ENTER
0
8
5
2
7
4
1
9
6
3
abc def
ghi jkl mno
pqrs tuv wxyz
SPACE ZOOM
OK
i
VOL
CH
TV VIDEO
SET UP
POWER
STOP
PLAY
REPLAY
PAUSE
FWD
REW
FF
RECORD
ON DEMAND
BACK
RECORDINGS
INTERACTIVE
OPTIONS
LIVE TV
2
TV
DVD
AUX
STB
MENU
GUIDE
C
B
A
DVR
EXIT
INFO
LAST
MUTE
DELETE
ENTER
0
8
5
2
7
4
1
9
6
3
abc def
ghi jkl mno
pqrs tuv wxyz
SPACE ZOOM
OK
i
VOL
CH
TV VIDEO
SET UP
POWER
STOP
PLAY
REPLAY
PAUSE
FWD
REW
FF
RECORD
ON DEMAND
BACK
RECORDINGS
INTERACTIVE
OPTIONS
LIVE TV
MENU
BACK
DVR
RECORDINGS
OK
EXIT
INFO
GUIDE
VOL
CH
LAST
MUTE
DELETE
ENTER
0
8
5
2
7
4
1
9
6
3
abc def
ghi jkl mno
pqrs tuv wxyz
SPACE ZOOM
VOL
CH
LAST
MUTE
DELETE
ENTER
0
8
5
2
7
4
1
9
6
3
abc def
ghi jkl mno
pqrs tuv wxyz
SPACE ZOOM
INTERACTIVE
OPTIONS LIVE TV
Accesses the Menu Screen
Return to previous screen
Accesses the DVR list of recordings
Selects and deselects screen items
Moves through selections
Returns from menu screen and to
viewing TV or video
Displays text information for current
selected channel
Displays text information about the
selected programs or closes the IPG
Adjusts volume up
Adjusts volume down
Returns to last channel viewed
Mutes sound
Selects next channel up
Selects next channel down
Enters channel numbers, text, and remote codes.
Also use to enter your parental control PIN.
DELETE: Clears text and numbers in text elds.
ENTER: Enters and saves (stores) and entry. Sizes the
picture for some high-denition television (HDTV)
models.
OPTIONS: Non-functional button
INTERACTIVE: Access On-Screen Apps
LIVE TV: Returns to current live programming
21
The Menu Screen provides access
to the features of your QuantumVu
service.
USING THE MENU SCREEN
Using the Menu Screen.. . . . . . . . . . . . . . . . . . . . . . . . . . . . . . . 1
Menu Navigation Tips.. . . . . . . . . . . . . . . . . . . . . . . . . . . . . . . . . 2
Main Menu Screens.. . . . . . . . . . . . . . . . . . . . . . . . . . . . . . . . . . . . 21
USING THE MENU SCREEN
22
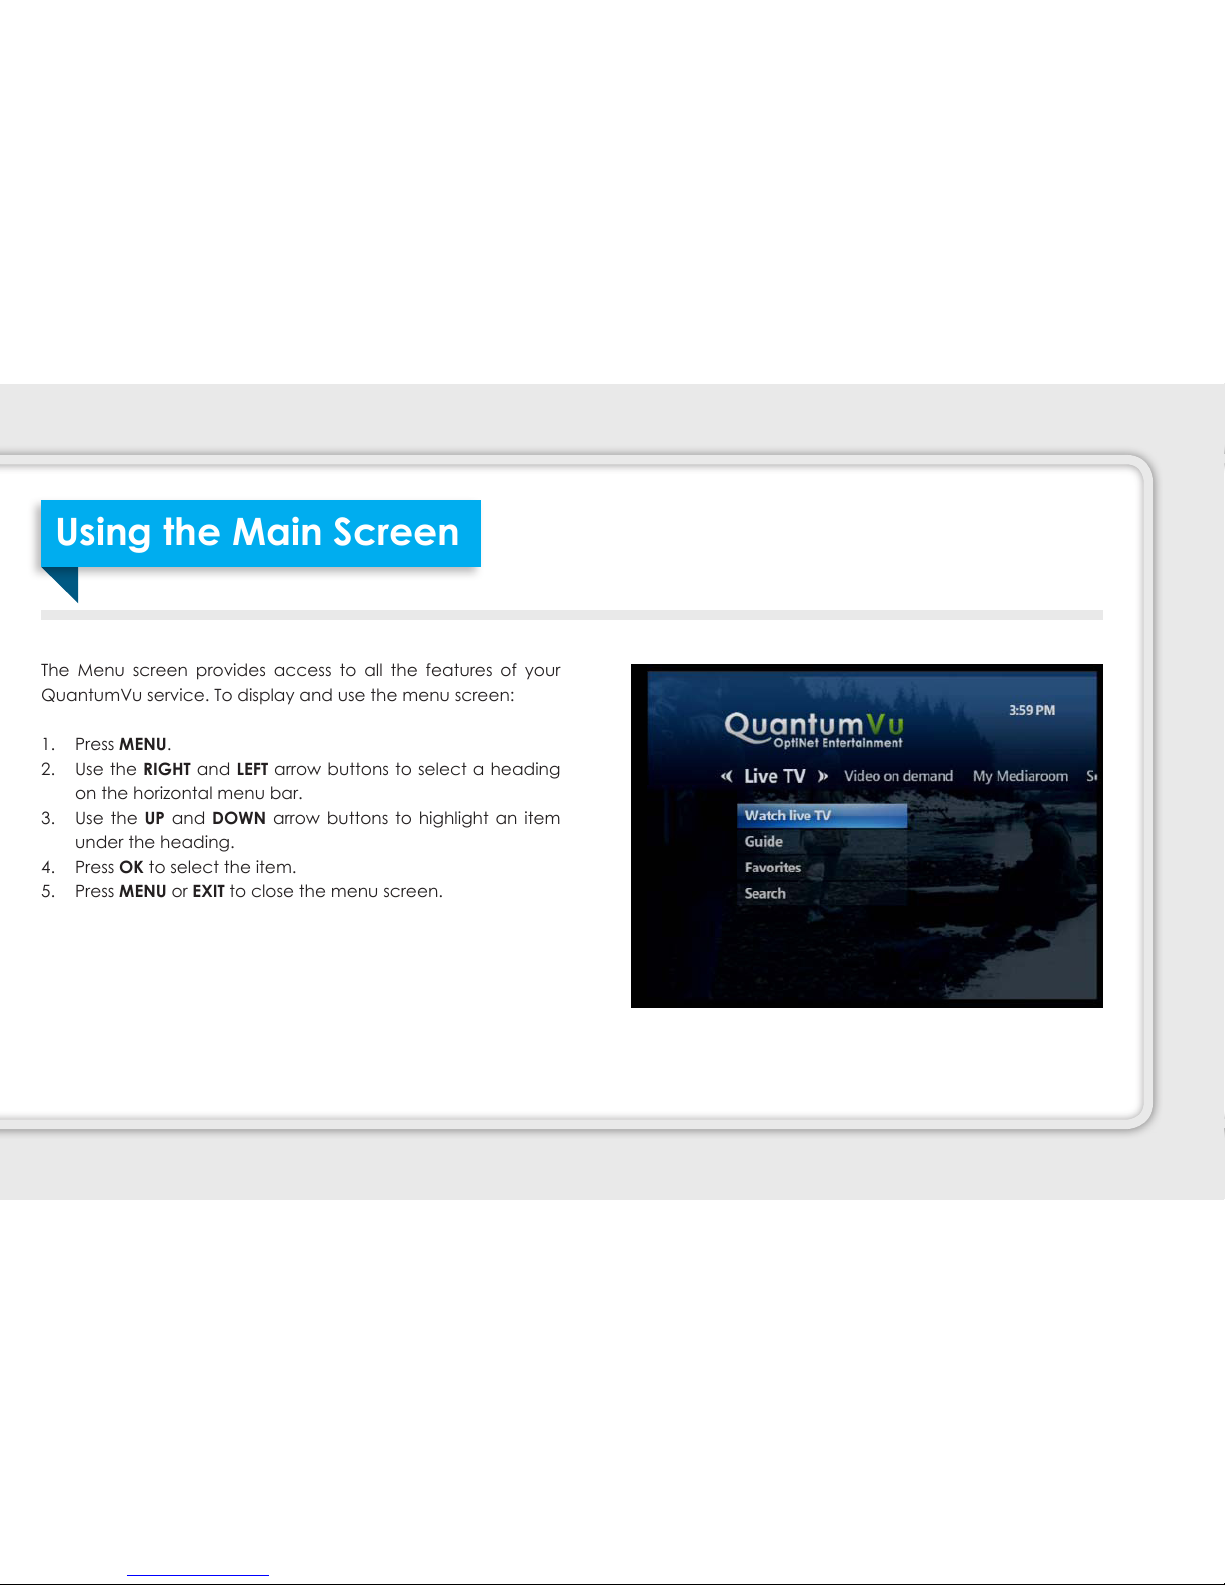
The Menu screen provides access to all the features of your
QuantumVu service. To display and use the menu screen:
1. Press MENU.
2. Use the RIGHT and LEFT arrow buttons to select a heading
on the horizontal menu bar.
3. Use the UP and DOWN arrow buttons to highlight an item
under the heading.
4. Press OK to select the item.
5. Press MENU or EXIT to close the menu screen.
Using the Main Screen
23
Before accessing your on-screen menus, it’s helpful to know how to choose, select and exit from the menu screens.
• Use the RIGHT and LEFT arrow buttons to select items in the horizontal menu that appears at the top of any screen.
• Use the UP and DOWN arrow buttons to select items in vertical menus that appear when you highlight an item in the top menu
bar
• Press OK to activate your selected item.
• Press BACK to return to the last menu screen that you were viewing.
• Use EXIT TO TV to dismiss the screen and return to your program.
Menu Navigation Tips
24
• Select Live TV to access the Guide, your favorite channel listings, or the program search feature. (See p. 2 for more information.)
• Select Recorded TV to view a list of all the programs you have recorded on your DVR. (See p. 26 for more information.)
• Select Video On Demand (VOD) to access the video library or watch a program you’ve already rented. (See p. 37 for more
information.)
• Select Settings to customize your menu and guide settings, manage parental locks, and more. (See p. 52 for more information.)
Main Menu Screens
25

Use the Interactive Program Guide to
nd and select programs, recorded
shows and Video On Demand content.
Find and Watch a Program. . . . . . . . . . . . . . . . . . . . . . . . . . . . . . . . . . . . . . . 23
Browse While Watching Programming. . . . . . . . . . . . . . . . . . . . . . . . . . . . 24
Program Info Screen. . . . . . . . . . . . . . . . . . . . . . . . . . . . . . . . . . . . . . . . . 25
Search for Programs. . . . . . . . . . . . . . . . . . . . . . . . . . . . . . . . . . . . . . . . . . . 26
Narrowing Your Search by Title, People, or VOD. . . . . . . . . . . . . . . . . . . 27
USING THE IPG
26

1. Press GUIDE.
2. Use the CH +- button and the UP and DOWN arrow buttons
to scroll vertically through the program guide.
3. Use the RIGHT and LEFT arrow buttons to scroll horizontally
through the program guide hourly.
4. Use the REW and FF buttons to scroll through the program
guide at day intervals.
5. Press OK to watch the selected program. If it is not currently
on, a Program Info screen will appear.
• Press INFO for viewing options and more information,
like cast and crew.
• Press RECORD to record the program. Learn more about
recording on p. 28.
• Press GUIDE to simply exit the guide and return to the
program you were watching
Tip: You can swap the guide view so that the
channels are on the top bar. Use the LEFT arrow
button to select a channel and press OK.
Find and Watch a Program
27
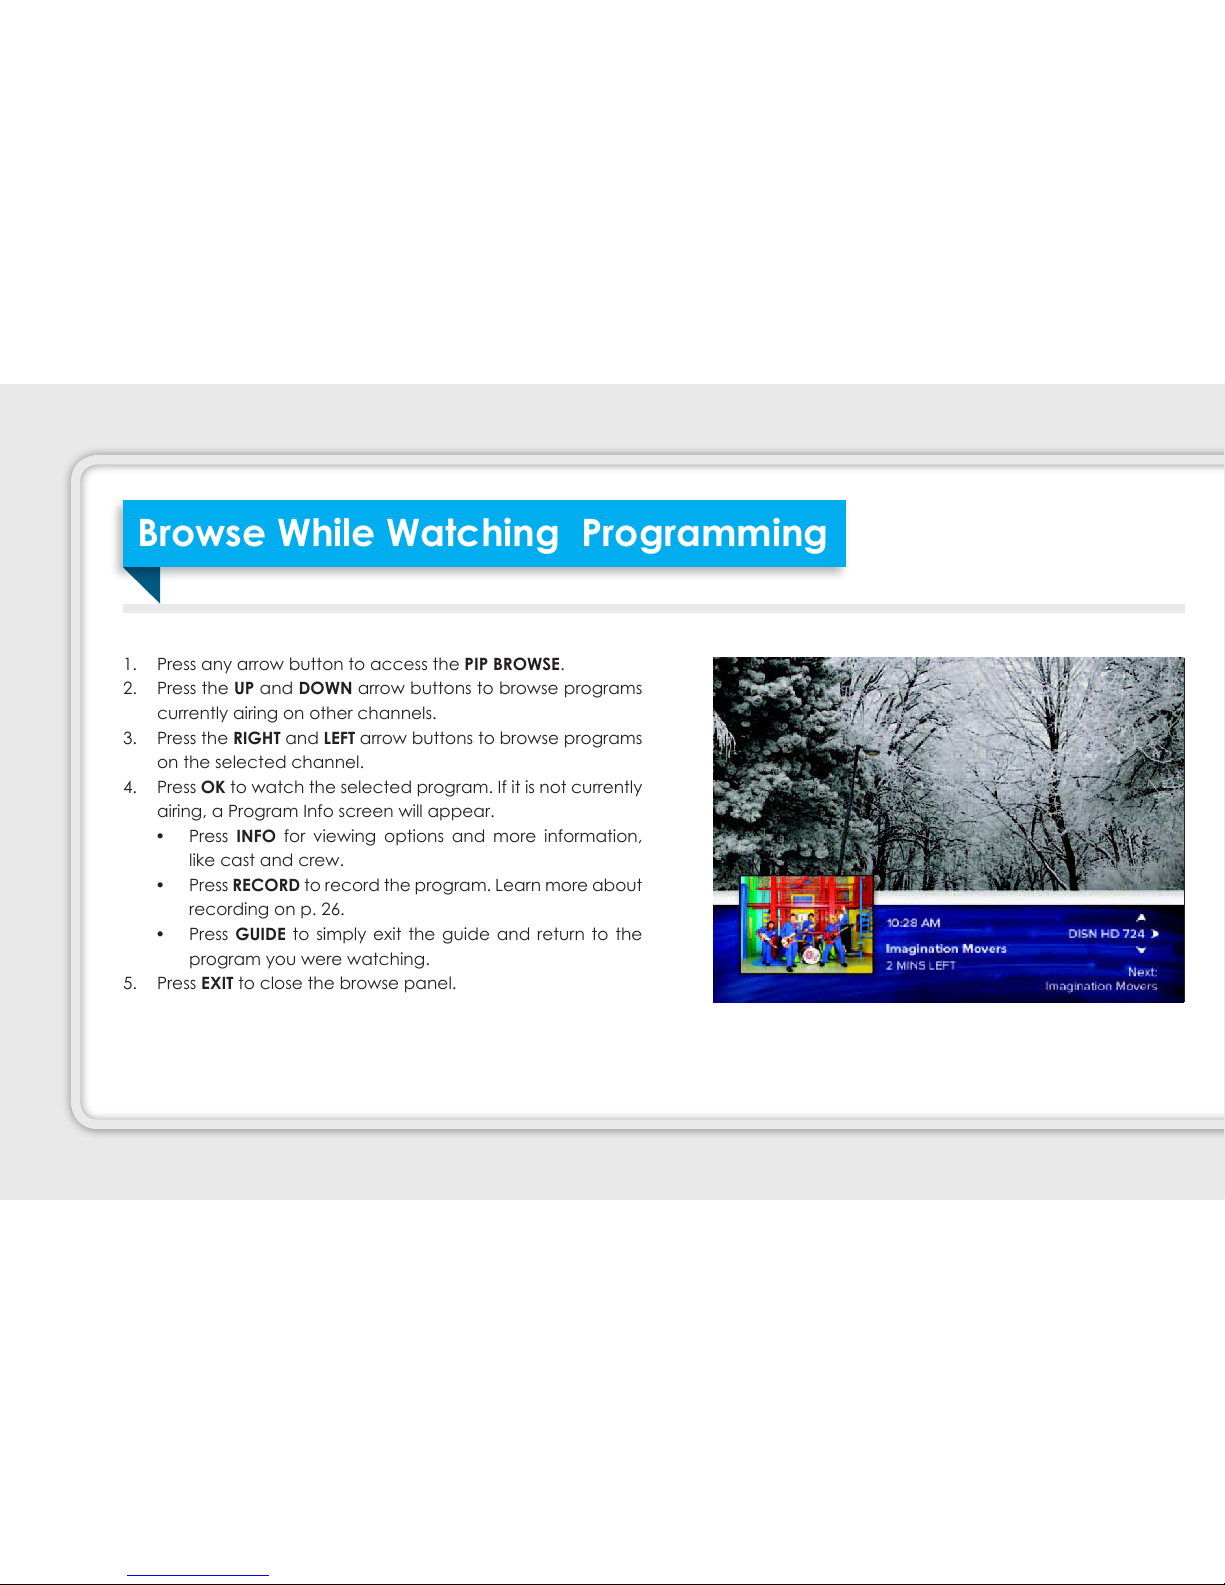
1. Press any arrow button to access the PIP BROWSE.
2. Press the UP and DOWN arrow buttons to browse programs
currently airing on other channels.
3. Press the RIGHT and LEFT arrow buttons to browse programs
on the selected channel.
4. Press OK to watch the selected program. If it is not currently
airing, a Program Info screen will appear.
• Press INFO for viewing options and more information,
like cast and crew.
• Press RECORD to record the program. Learn more about
recording on p. 26.
• Press GUIDE to simply exit the guide and return to the
program you were watching.
5. Press EXIT to close the browse panel.
Browse While Watching Programming
28

The program info screen displays information about a selected
program and enables you to perform various actions such as
recording or watching the program.
Get information about the program you are watching:
1. Press INFO. The program info screen appears with a short
description of the program, including running time.
2. Use the RIGHT arrow to view information about the cast and
crew.
3. To record the program, or set up a series recording, use the
DOWN arrow and press OK to select the desired action. See
p. 26 for more information about recording programs.
4. Select EXIT to return to the program you were watching.
Tip: You can get info for any program in the Guide by
pressing GUIDE and following the same instructions
to the left.
Program Info Sheet
2
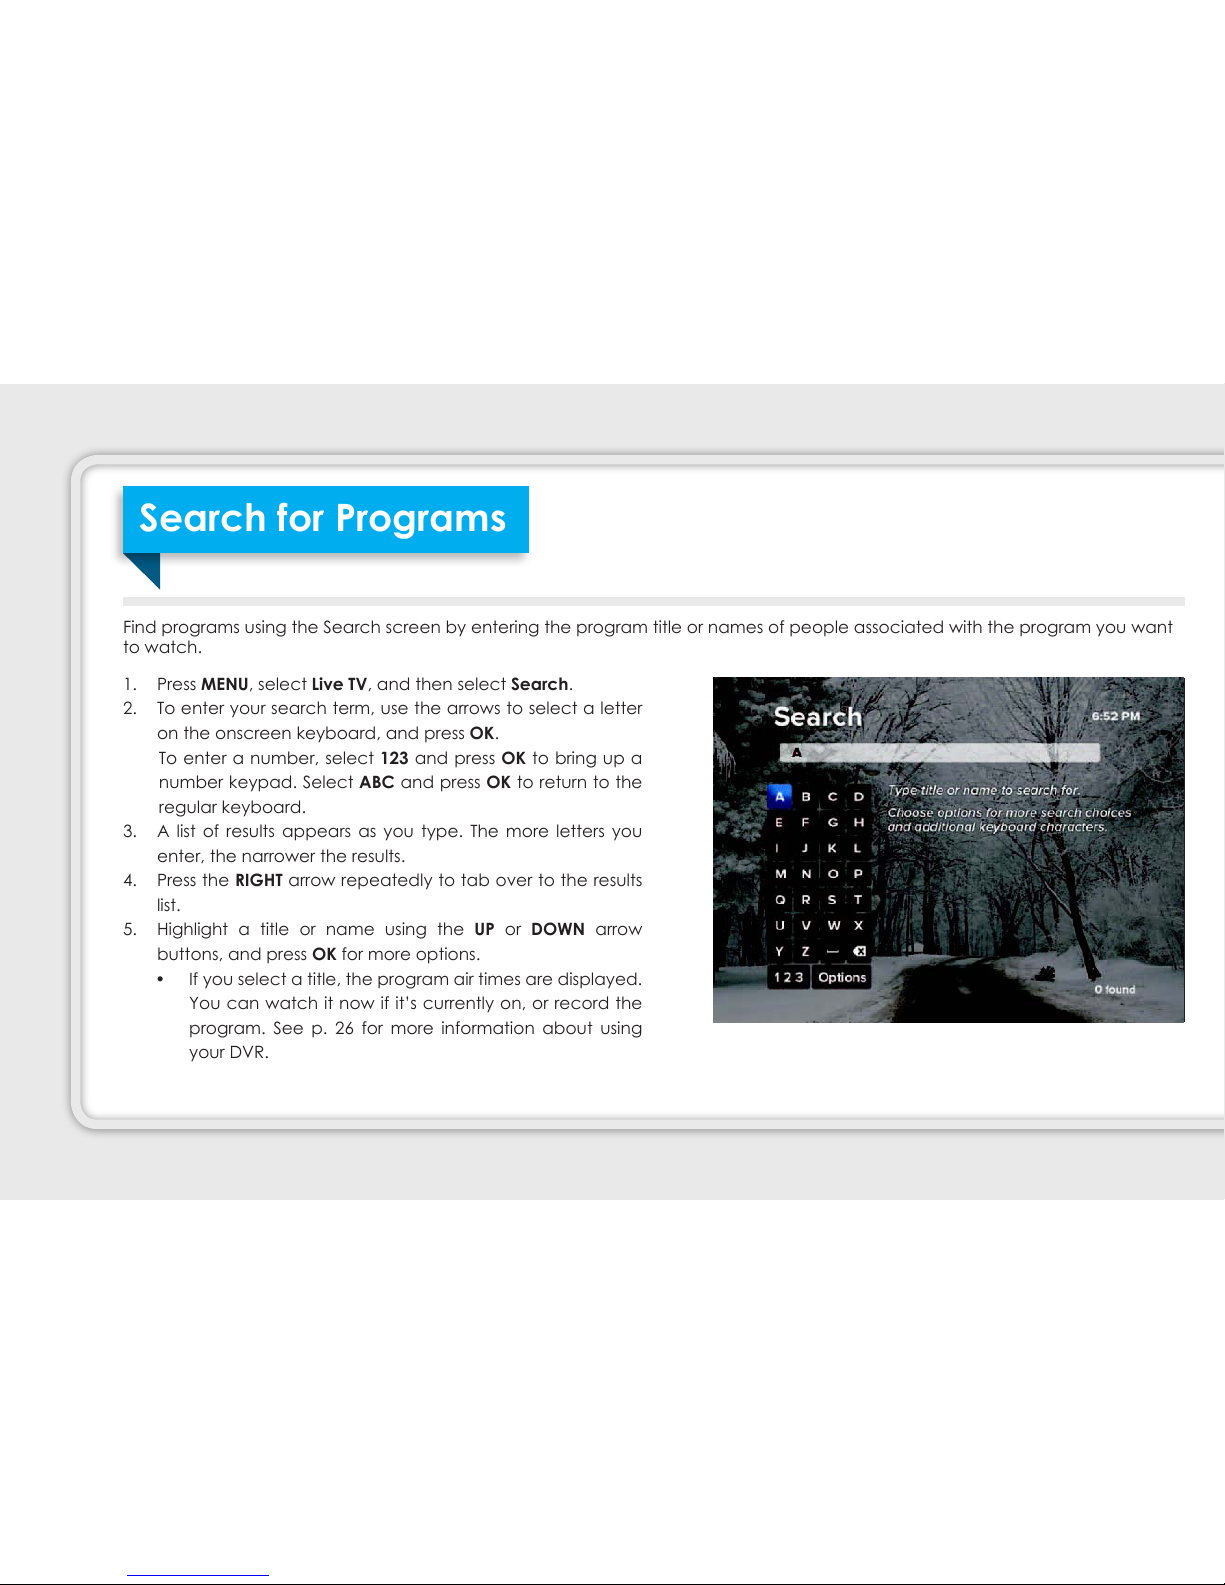
1. Press MENU, select Live TV, and then select Search.
2. To enter your search term, use the arrows to select a letter
on the onscreen keyboard, and press OK.
To enter a number, select 123 and press OK to bring up a
number keypad. Select ABC and press OK to return to the
regular keyboard.
3. A list of results appears as you type. The more letters you
enter, the narrower the results.
4. Press the RIGHT arrow repeatedly to tab over to the results
list.
5. Highlight a title or name using the UP or DOWN arrow
buttons, and press OK for more options.
• If you select a title, the program air times are displayed.
You can watch it now if it’s currently on, or record the
program. See p. 26 for more information about using
your DVR.
Find programs using the Search screen by entering the program title or names of people associated with the program you want
to watch.
Search for Programs
3

• If you select a name, a list of programs with that actor or
director is displayed. Select a title to view details. Press OK
to watch or record the program.
• If “More…” appears next to the title, a list of all programs
with that title appears. Select a title from the list. Press OK to
watch or record the program.
• If “On Demand” appears next to the title, the program is
available on Video On Demand. You can watch a preview
or rent the program.
1. From the Search screen, use the arrow buttons to select
Options on the onscreen keyboard. Press OK.
2. From Filter Results, choose Titles, Video On Demand (VOD),
or People depending on what you are searching for. Press
OK.
3. Enter your search term and select a program as described
on p. 24.
Narrowing Your Search
31

With DVR service, you can pause, rewind
and restart live programming, record current
shows, record an individual show or a series
of episodes, schedule future shows to record,
and watch recorded shows at any time.
You can also:
• Record up to 4 shows at once
• With optional Whole-Home DVR service,
watch recorded programs from any room
in your house.
• Record up to 5 times more than your
current DVR.
• Manage your recordings from any
computer 24/7.
Control Live Programming.. . . . . . . . . . . . . . . . . . . . . . . . . . . . . . . . . . . . . . . . . . . . . . 2
Record Programs.. . . . . . . . . . . . . . . . . . . . . . . . . . . . . . . . . . . . . . . 3
View a List of Scheduled Recordings.. . . . . . . . . . . . . . . . . . . . . . . . . 33
View a List of All Recorded Programs.. . . . . . . . . . . . . . . . . . . . . . . . . . 34
Watch a Recorded Program.. . . . . . . . . . . . . . . . . . . . . . . . . . . . . . . . . . . . . . 35
Delete Existing Recordings.. . . . . . . . . . . . . . . . . . . . . . . . . . . . . . . . . . . . . . . 36
Manage Your DVR From a Computer. . . . . . . . . . . . . . . . . . . . . . . .37
DIGITAL VIDEO RECORDER
32
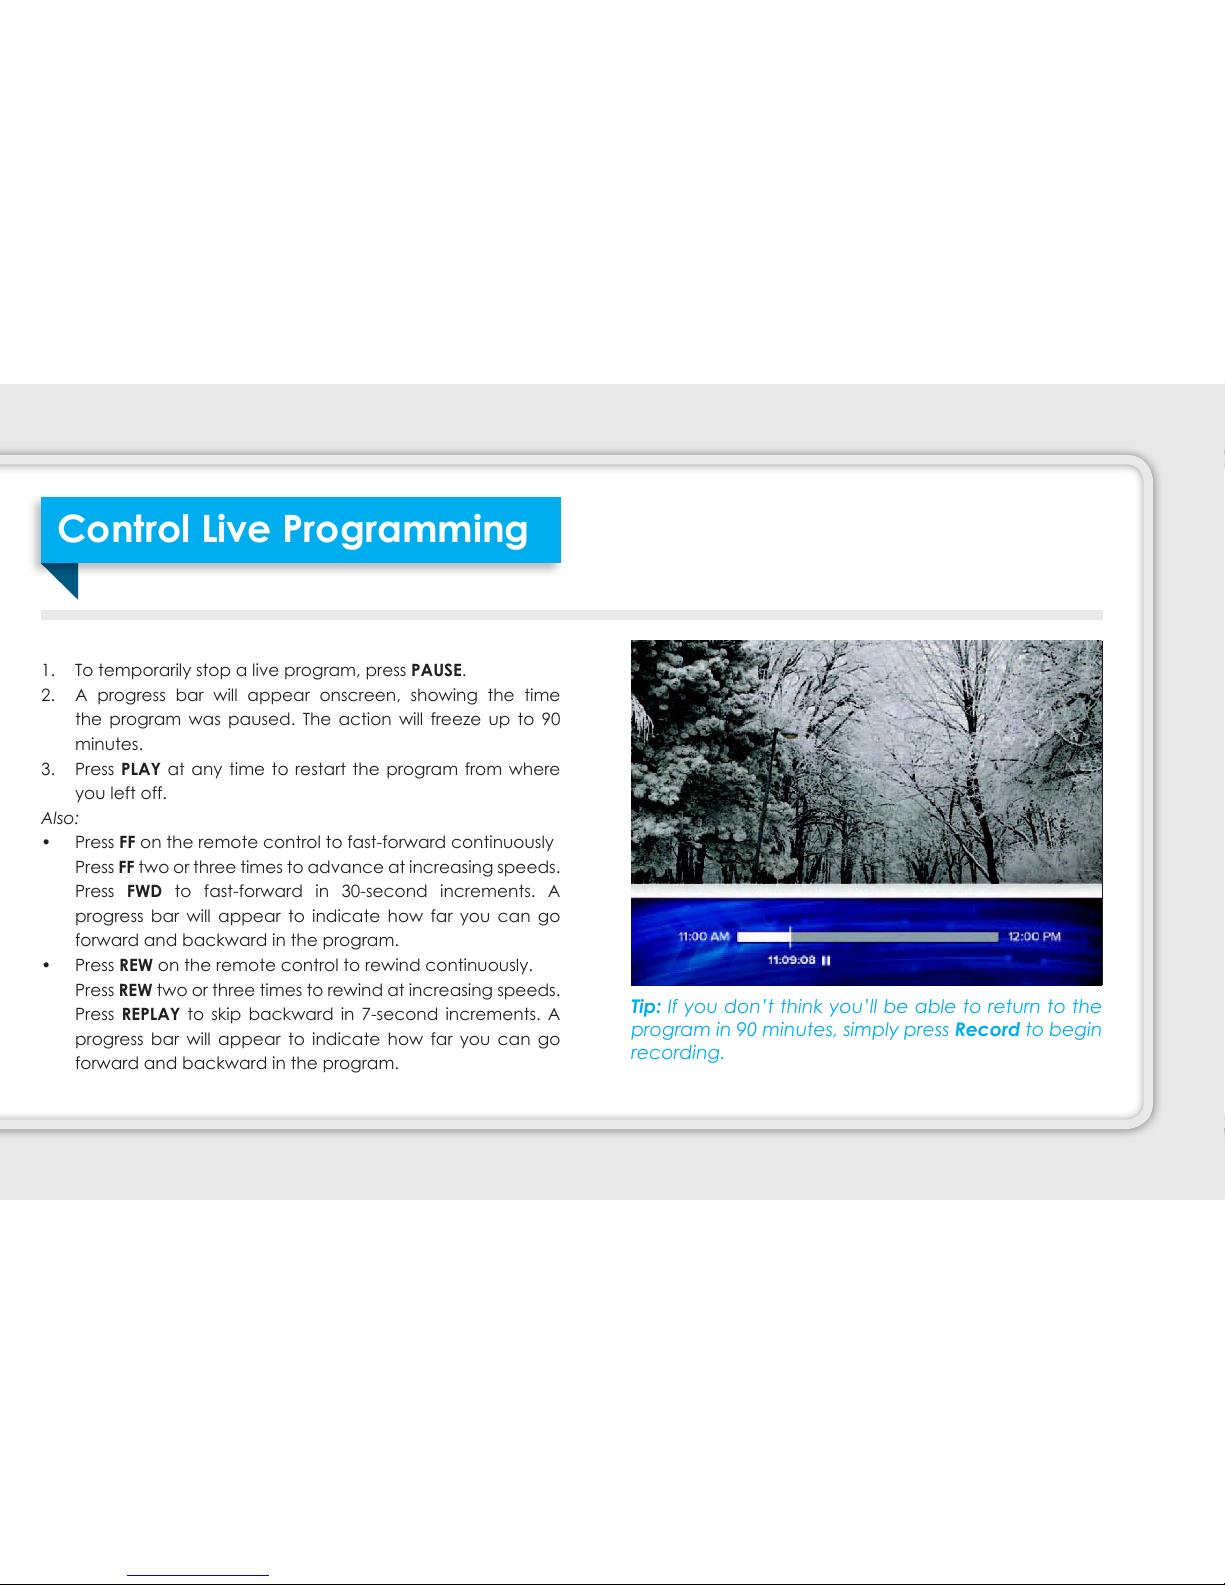
1. To temporarily stop a live program, press PAUSE.
2. A progress bar will appear onscreen, showing the time
the program was paused. The action will freeze up to
minutes.
3. Press PLAY at any time to restart the program from where
you left off.
Also:
• Press FF on the remote control to fast-forward continuously
Press FF two or three times to advance at increasing speeds.
Press FWD to fast-forward in 3-second increments. A
progress bar will appear to indicate how far you can go
forward and backward in the program.
• Press REW on the remote control to rewind continuously.
Press REW two or three times to rewind at increasing speeds.
Press REPLAY to skip backward in 7-second increments. A
progress bar will appear to indicate how far you can go
forward and backward in the program.
Tip: If you don’t think you’ll be able to return to the
program in 90 minutes, simply press Record to begin
recording.
Control Live Programming
33
Record the program you are watching:
1. Press RECORD to begin immediately recording the program
you’re watching.
2. The message “Recording” will appear onscreen. The
RECORDING light on your set-top box will turn red and
remain on while the program is recording.
3. Recording will stop at the program’s scheduled end time.
Press STOP to end the recording at any time. Press OK to
conrm.
4. The recording will be saved under its program title. See View
a List of All Recorded Programs on p. 32 for information on
how to play recorded shows.
NOTE: The Recording feature is not available with Video On
Demand (VOD) or Pay Per View.
What can you watch while recording?
You can record up to four programs on different television sets
at the same time. So you can record up to four programs and
watch a fth live program, or watch one of the four programs
you are recording.
Recorded Programming
34

Record a single program or series from the Guide:
1. Press GUIDE. Use the arrow buttons on your remote to scroll
through and highlight a program.
2. Press RECORD. A red dot appears next to the program title
to indicate that a recording is scheduled.
3. Press RECORD twice to schedule a series recording. Three
red dots will appear next to the program title.
4. Press RECORD a third time to cancel the recording. The red
dots will disappear.
5. Select EXIT to return to your last viewed channel.
Record a single program from the Program Info screen:
1. Access the program info screen:
• Press INFO when tuned to a program you want to
record, OR
• Press GUIDE. Use the arrow buttons to highlight a
program you want to record and press INFO.
2. Select Record Episode and press OK.
3. To add time in case the program runs long, highlight Don’t
Record. Press OK. Select a time and press OK.
4. Select Record, then press OK.
35

Record a series from the Program Info screen:
1. Access the program info screen:
• Press INFO when tuned to a program you want to
record, OR
• Press GUIDE. Use the arrow buttons to highlight a
program you want to record and press INFO.
2. Select Record Series and press OK.
3. Use the arrow buttons to select Time. Press OK.
4. You can limit the recordings to:
• Any day (at the scheduled time)
• Any day/anytime
• Any day/anytime/once per day
5. Select Show Type if you want to limit it to rst run only.
Otherwise, your DVR will record every episode.
6. To add time in case the program runs long, select Stop
Recording. Press OK. Select a time and press OK.
7. Select Record, then press OK.
36

You can view the list of Scheduled Recordings from any
television set in your home with a set-top box.
1. Press MENU, then select RECORDED TV and press OK. Or,
press the RECORDED TV button on your remote as a shortcut.
2. Use the RIGHT arrow to select Scheduled. Press OK. The
recorded TV screen lists upcoming recordings in the order
in which they will be recorded.
3. Use the arrow buttons or CH +- to scroll through the listings.
4. To view only the scheduled series, use the RIGHT arrow to
select Series.
View a List of Scheduled Recordings
37

You can view the list of Recorded Programs from any television
set in your home with a set-top box.
1. Press MENU, then select RECORDED TV. Or, press the
RECORDED TV button on your remote as a shortcut.
2. The recorded TV screen lists your available recordings by
date, starting with the most recent.
3. To view the list by title, use the RIGHT arrow to select By Title.
4. Use the arrow buttons to scroll through the list.
View a List of All Recorded Programs
38

You can watch a recorded program from any television set in
your home with a set-top box.
1. Press MENU, then select RECORDED TV and press OK. Or,
press the RECORDED TV button on your remote as a shortcut.
2. Use the arrow buttons to select the program you’d like to
watch. Press OK.
• Select Play and press OK to watch the program.
• Select Resume Play to continue watching the program
where you left off.
• Press Stop at any time. The stopped screen appears.
1. When a recording is nished playing, the nished screen
appears.
• Select Start Over to watch the program again from the
beginning.
• Select Erase to delete the program permanently.
• Select Recorded TV to return to the recorded programs
list.
• Select Watch Live TV to return to live programming.
Watch a Recorded Program
3

Manually deleting unwanted recordings from your DVR ensures
that you keep what you want. Otherwise, older programs are
erased automatically to make room for new recordings when
the DVR storage limit is reached.
You can delete an existing recording from any television set in
your home with a set-top box.
1. Press MENU, then select RECORDED TV and press OK. Or,
press the RECORDED TV button on your remote as a shortcut.
2. Highlight the program to erase, then press OK.
3. Select Erase, then press OK.
4. Repeat to conrm.
1. Press MENU, then select RECORDED TV and press OK. Or,
press the RECORDED TV button on your remote as a shortcut.
2. Highlight the recording you would like to protect and press
OK.
3. Highlight Keep Until, then select Keep until space needed
or Keep until I erase.
4. Press OK.
Delete Existing Recordings
Protect a Recording from
Being Automatic Deleted
4

Schedule Recordings
1. After login, the interactive program guide will appear:
• Use the up, down, left or right arrows to scroll through
the listings.
• Choose a date from the Date drop-down menu to jump
to a specic day.
• Chose a time from the Time drop-down menu to jump
to a specic time.
• Type a channel number into the Channel Box and click
Go to jump to a specic channel.
• Click Search to search for a program by its title.
2. Click a program’s title to open the Program Details screen
for more details or to record the program.
3. Set your recording options and click Record. A red
“recording” icon will appear in the program guide. The
scheduled recording will also appear in your Scheduled
Shows list and in the Recorded TV > Scheduled menu on your
set-top box.
Manage Your DVR from a Computer
Visit bvu-optinet.com or our BVU MOBILE APP and login to
the Remote DVR section using your Remote DVR username
and password that you established when you signed up
for QuantumVu DVR service.
If you have not obtained a username, please contact
Customer Service at 276.821.6100
41
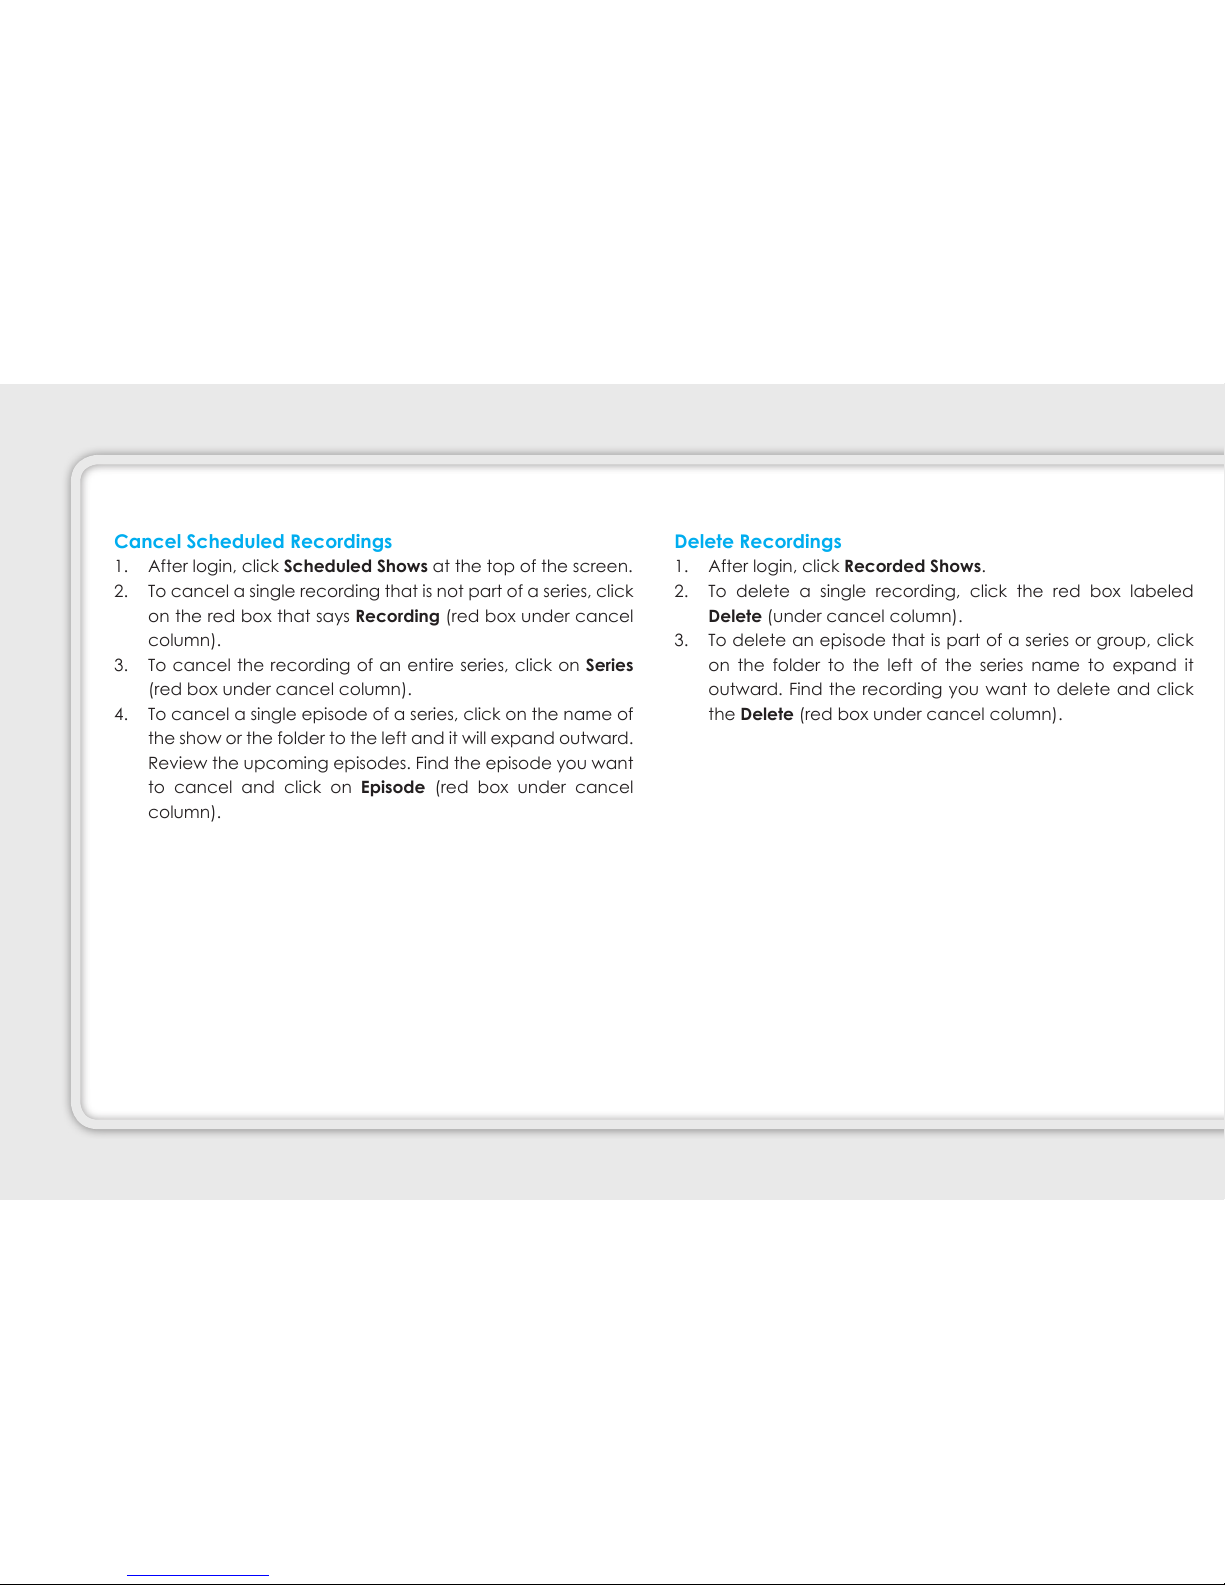
Cancel Scheduled Recordings
1. After login, click Scheduled Shows at the top of the screen.
2. To cancel a single recording that is not part of a series, click
on the red box that says Recording (red box under cancel
column).
3. To cancel the recording of an entire series, click on Series
(red box under cancel column).
4. To cancel a single episode of a series, click on the name of
the show or the folder to the left and it will expand outward.
Review the upcoming episodes. Find the episode you want
to cancel and click on Episode (red box under cancel
column).
Delete Recordings
1. After login, click Recorded Shows.
2. To delete a single recording, click the red box labeled
Delete (under cancel column).
3. To delete an episode that is part of a series or group, click
on the folder to the left of the series name to expand it
outward. Find the recording you want to delete and click
the Delete (red box under cancel column).
42

Video On Demand (VOD) gives you
access to a library of hundreds of
hours of movies, events, programs and
special features. Just like a DVD, you
can also pause, rewind, fast forward
and watch the programming as many
times as you like within the rental
period.
Access the Video On Demand Screen.. . . . . . . . . . . . . . . . . . . . . . . . 4
Rent Video On Demand Content.. . . . . . . . . . . . . . . . . . . . . . . . . . . . . . . 41
Play Your Current Rentals.. . . . . . . . . . . . . . . . . . . . . . . . . . . . . . . . . . . . . . . . 42
Subscription & Premium Video On Demand.. . . . . . . . . . . . . . . . . 43
VIDEO ON DEMAND
43

• Press On Demand on your remote control, OR
• Press MENU and select Video On Demand then Video On Demand again followed by your desired category choice.
Access the Video On Demand Screen
44

1. Access the Video On Demand screen by pressing the red On Demand button on the remote control.
2. Use the UP and DOWN arrows to go to a video category.
3. Use the RIGHT and LEFT, UP and DOWN arrows to select a video or subcategory.
4. Select the program you want to rent and press OK on your remote. A Program Info screen appears and enables you to watch
a preview, rent the program or add to Saved Videos, by arrowing over to the heart icon and pressing OK on remote.
5. Select Rent ($) and press OK. Press OK again to conrm.
Looking for something specic? Select from the Video On Demand menu then press OK. Or to browse categories like New
Releases: select Movies, press OK and use the arrow buttons to select a category.
Rent Video On Demand Titles
45
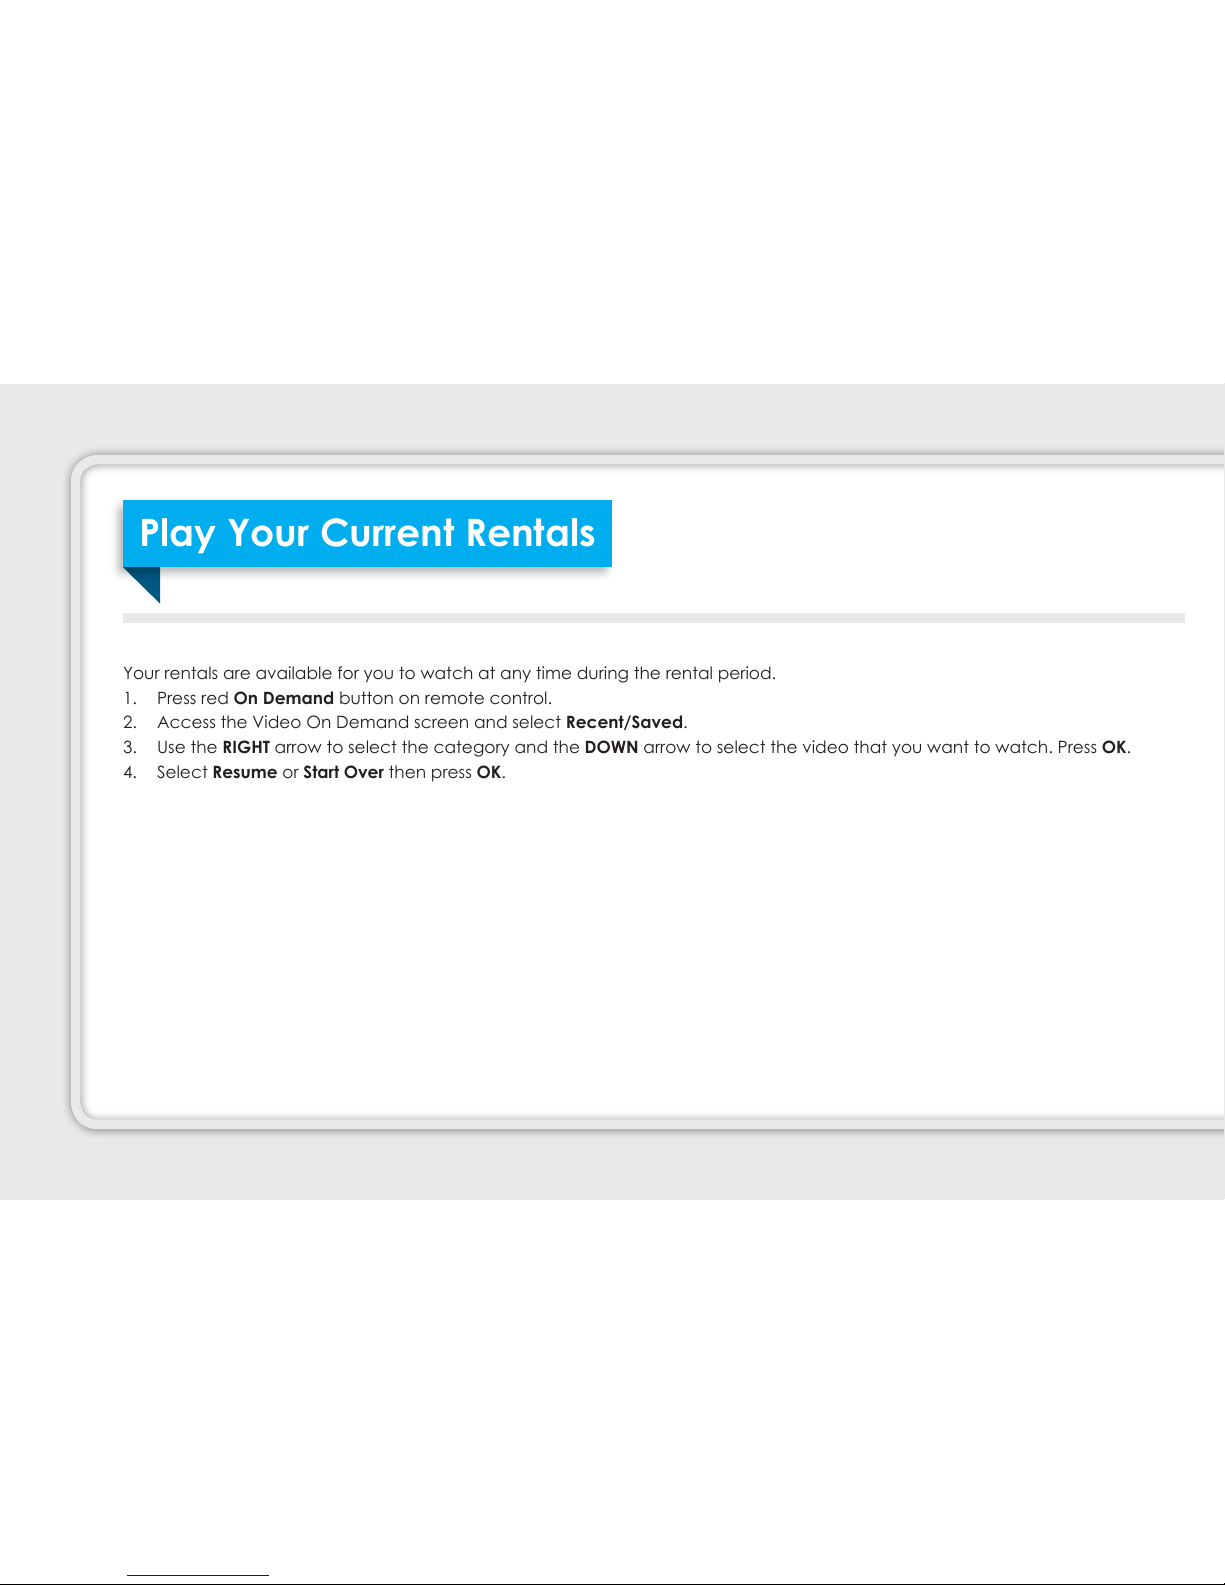
Play Your Current Rentals
Your rentals are available for you to watch at any time during the rental period.
1. Press red On Demand button on remote control.
2. Access the Video On Demand screen and select Recent/Saved.
3. Use the RIGHT arrow to select the category and the DOWN arrow to select the video that you want to watch. Press OK.
4. Select Resume or Start Over then press OK.
Play Your Current Rentals
46

You have access to additional VOD programming when you subscribe to a subscription VOD package or a premium movie
channel suite (such as HBO®).
1. Press red On Demand button on remote control.
2. Select Premium VOD.
3. A list of premium channels will appear. Use the LEFT and RIGHT arrows to select the category and program you want to watch.
Press OK.
Subscription & Premium Video On Demand
47

The Favorites screen is a customized
program guide that contains only the
channels and programs you have
chosen. When you do not want to look
through the full IPG for a program, you
can use the Favorites screen instead.
FAVORITE CHANNELS
Set-up or Revise a List of Favorites.. . . . . . . . . . . . . . . . . . . . . . . .45
Use a Favorite Channels Screen . . . . . . . . . . . . . . . . . . . . . . . . . . .46
Hide and Show Channels in the Guide.. . . . . . . . . . . . . . . . . . .47
FAVORITE CHANNES
48
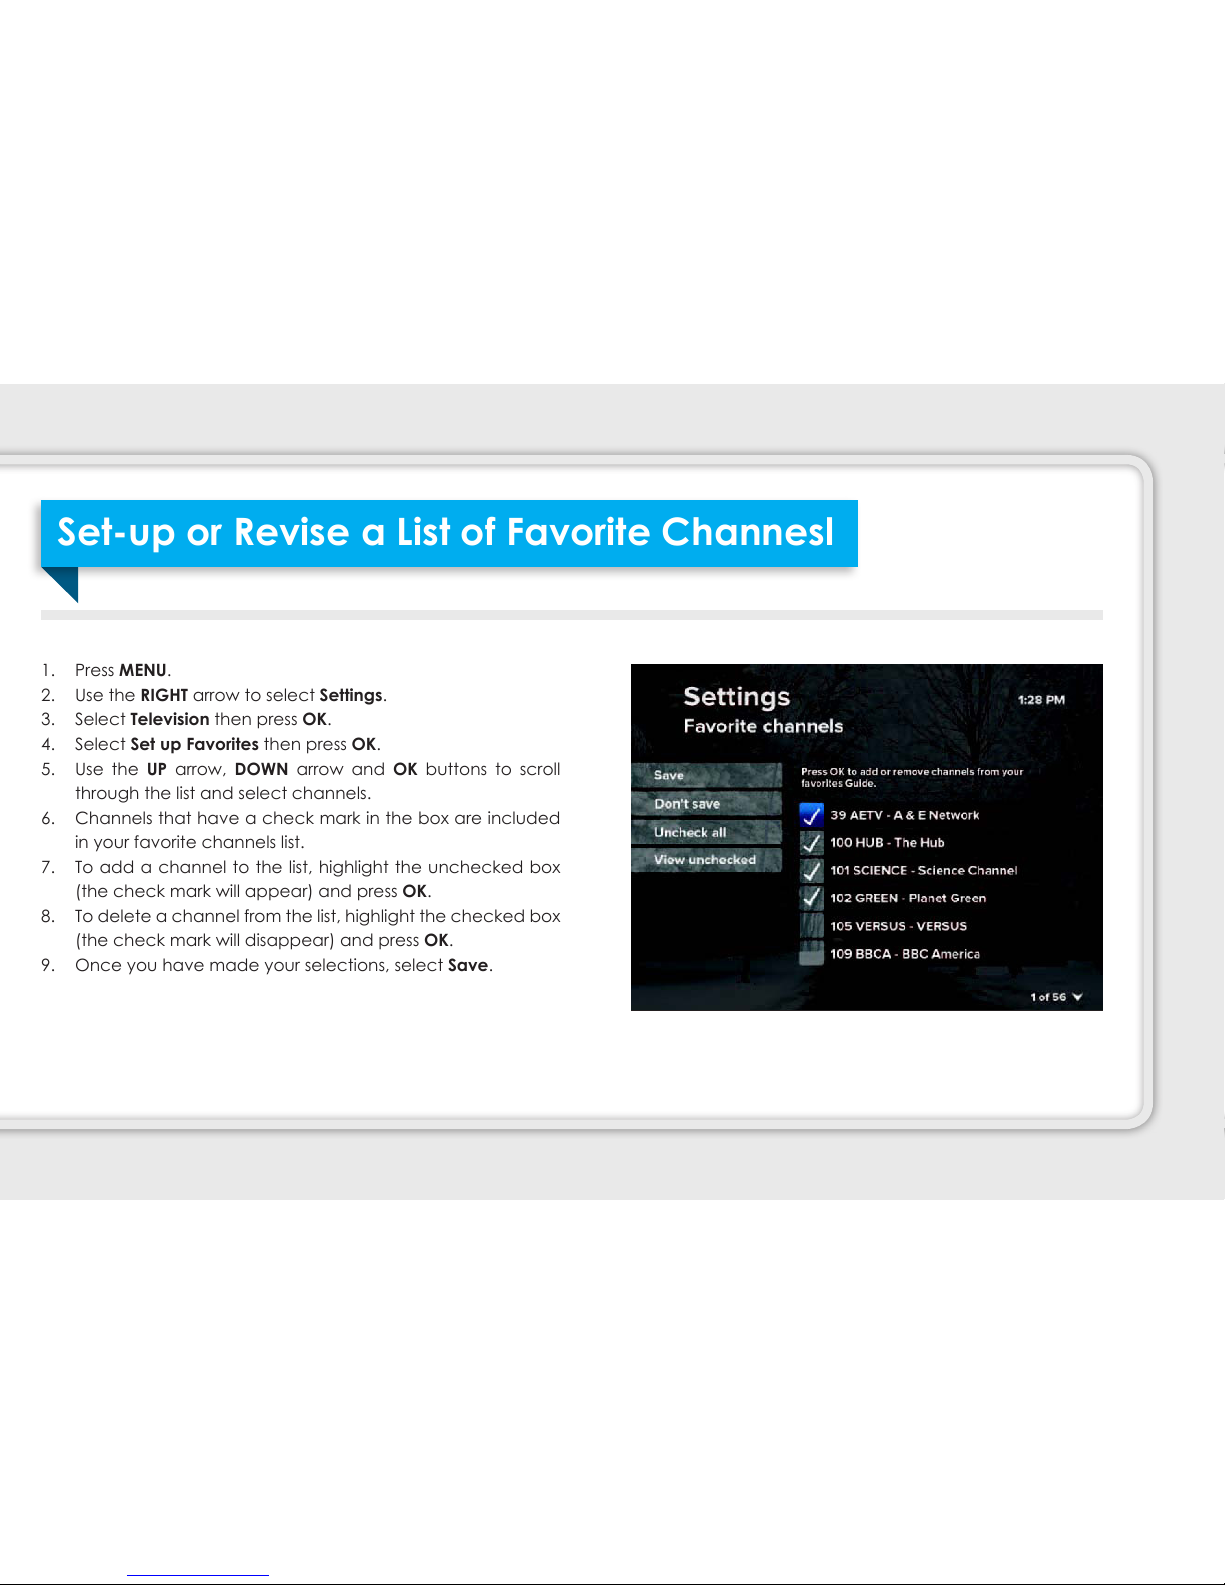
1. Press MENU.
2. Use the RIGHT arrow to select Settings.
3. Select Television then press OK.
4. Select Set up Favorites then press OK.
5. Use the UP arrow, DOWN arrow and OK buttons to scroll
through the list and select channels.
6. Channels that have a check mark in the box are included
in your favorite channels list.
7. To add a channel to the list, highlight the unchecked box
(the check mark will appear) and press OK.
8. To delete a channel from the list, highlight the checked box
(the check mark will disappear) and press OK.
. Once you have made your selections, select Save.
Set-up or Revise a List of Favorite Channesl
4

1. Press MENU.
2. Under Live TV, use the DOWN arrow to select Favorites then
press OK.
3. The Favorites screen appears. Use it as you would the
regular guide.
Use the Favorite Channels Screen
5

You can select which channels you want to appear in the
interactive program guide (IPG).
1. Press MENU.
2. Use the RIGHT arrow to select Settings.
3. Select Television then press OK.
4. Select Customize Channel Guide and then press OK.
5. Channels that have a check mark in the box are currently
displayed in the guide.
• To hide a channel, highlight the checked box (the
check mark will disappear) and press OK.
• To make a hidden channel reappear, highlight the
unchecked box (the check mark will appear) and press
OK.
6. Select Save and press OK.
Hide and Show Channels in the Guide
51

Parental Controls allow you to lock programs
that may be unsuitable for younger viewers.
Activating the Parental Controls feature
involves creating a locking PIN (a 4-digit
number) and enabling lock settings. Once
Parental Controls have been activated,
locked programs can only be viewed by
entering the PIN.
PARENTAL CONTROL
Create a PIN.. . . . . . . . . . . . . . . . . . . . . . . . . . . . . . . . . . . . . . . . . . . . . . . . . . . . .4
Lock Specic Channels.. . . . . . . . . . . . . . . . . . . . . . . . . . . . . . . . . . . . . . . .5
Lock Programs Based on Ratings.. . . . . . . . . . . . . . . . . . . . . . . . . . . . . .51
Lock Adult Content.. . . . . . . . . . . . . . . . . . . . . . . . . . . . . . . . . . . . . . . . . . . . .52
Lock Video On Demand Rentals.. . . . . . . . . . . . . . . . . . . . . . . . . . . .53
Watch a Locked Program.. . . . . . . . . . . . . . . . . . . . . . . . . . . . . . . . . . . . .54
PARENTAL CONTROL
52

1. Press MENU.
2. Use the RIGHT arrow to select Settings.
3. Select Parental Controls.
• A lock appears next to Parental Locking.
• No lock means that no PIN has been set.
4. Select Parental Locking and press OK.
5. Enter the default PIN - 1234
6. Re-enter the PIN to conrm. The Parental Locking Settings
screen appears with all of your locking options.
7. Use the RIGHT arrow to select Change PIN.
8. Enter a new 4-digit PIN. Re-enter the PIN to conrm.
Create a PIN
53
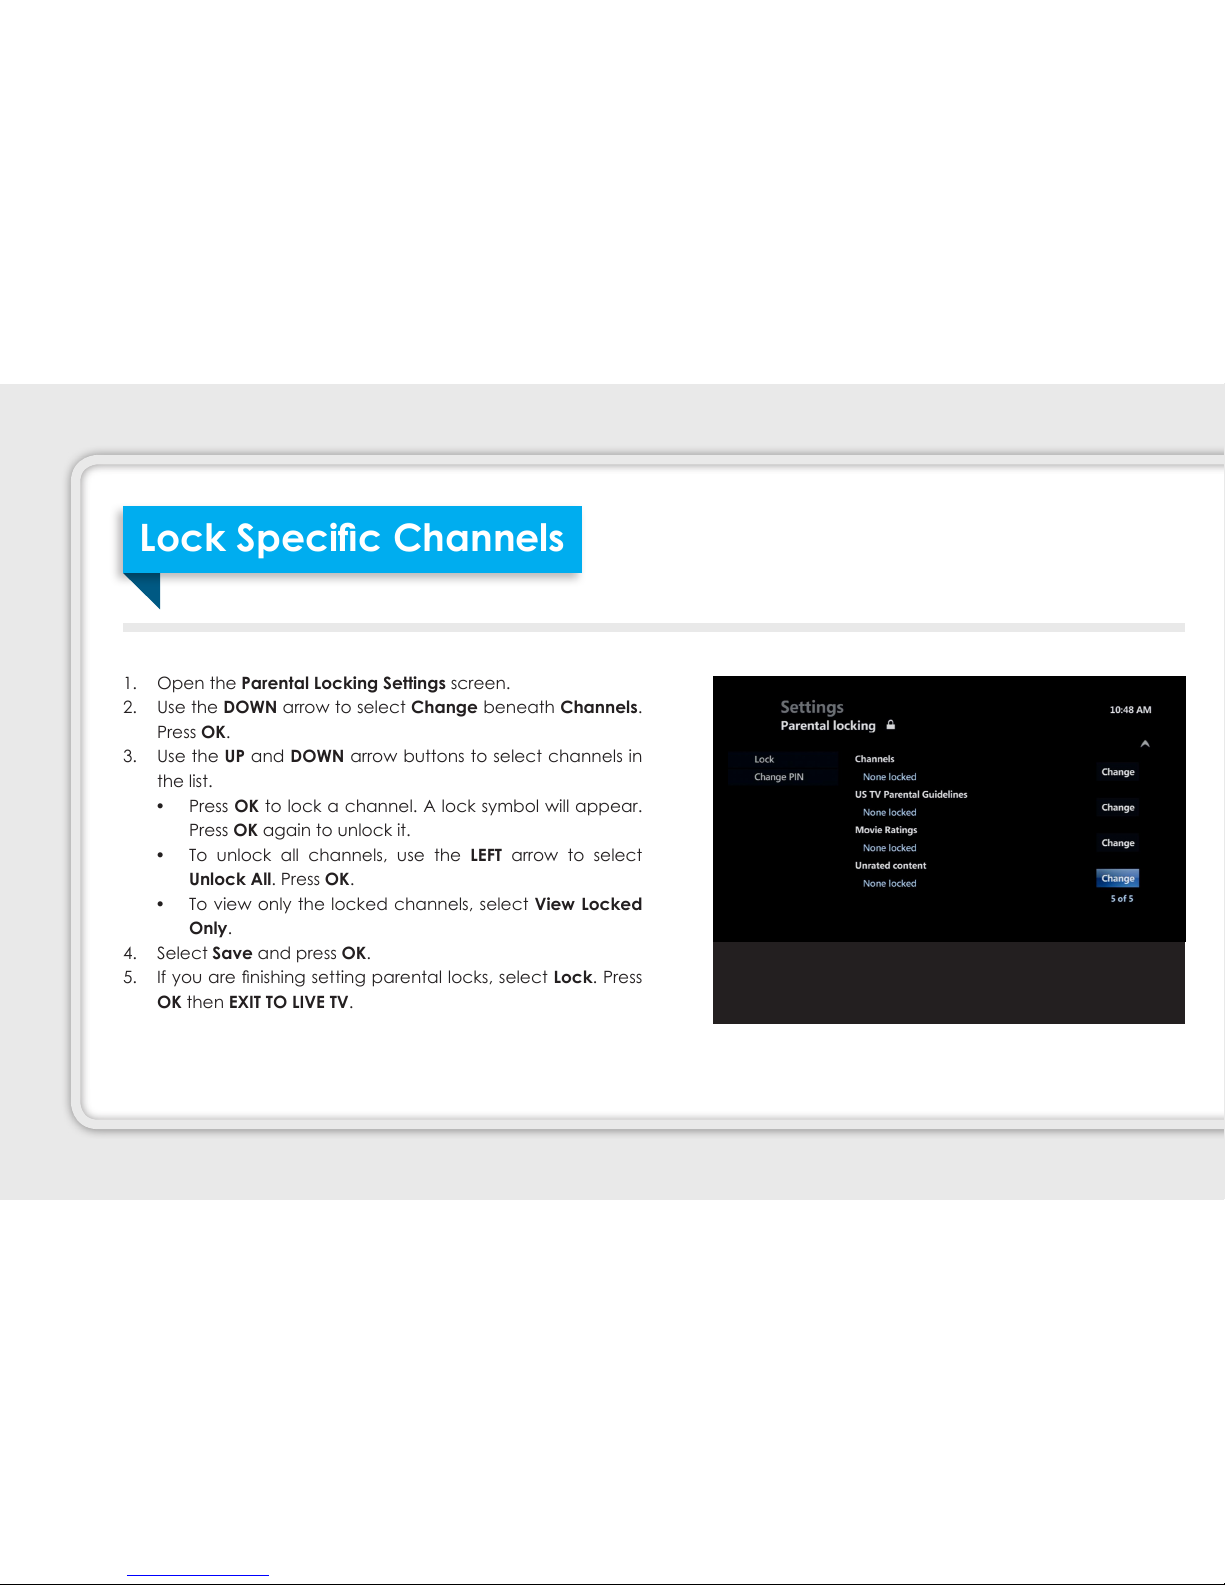
1. Open the Parental Locking Settings screen.
2. Use the DOWN arrow to select Change beneath Channels.
Press OK.
3. Use the UP and DOWN arrow buttons to select channels in
the list.
• Press OK to lock a channel. A lock symbol will appear.
Press OK again to unlock it.
• To unlock all channels, use the LEFT arrow to select
Unlock All. Press OK.
• To view only the locked channels, select View Locked
Only.
4. Select Save and press OK.
5. If you are nishing setting parental locks, select Lock. Press
OK then EXIT TO LIVE TV.
Lock Specic Channels
54

1. Open the Parental Locking Settings screen.
2. Use the DOWN arrow to select Change beneath, Movie
Ratings. Press OK.
3. Select the lowest rating you want to lock.
• Press OK to lock programs with that rating and higher.
• To unlock all ratings, use the LEFT arrow to select Unlock
All. Press OK.
4. Select Save and press OK.
5. If you are nished setting parental locks, select Lock. Press
OK then EXIT TO LIVE TV.
Lock Programs Based on Ratings
55
1. Press Menu on remote control.
2. Select Settings then press OK on remote.
3. Select Parental Controls then press OK.
4. Select Adult Locking then press OK.
5. Press OK. The lock symbol will appear.
6. Select Save and press OK.
7. If you are nished setting parental locks, select Lock. Press OK then EXIT TO LIVE TV.
Lock Adult Content
56

1. Press Menu on remote control.
2. Select Settings then press OK on remote.
3. Select Parental Controls then press OK.
4. Select Parental Locking then press OK.
5. Use the arrows to select Change beneath Rentals. Press OK.
6. Use the RIGHT arrow to select Lock Renting and press OK.
A lock symbol appears. (Press OK again to clear the lock.)
7. Use the LEFT arrow to select Save. Press OK.
8. If you are nished setting parental locks, select Lock. Press
OK then EXIT TO LIVE TV.
NOTE: When VOD rentals are locked, you will be required to
enter your Parental Locking PIN to rent a video.
Lock Video On Demand Rentals
57

1. When a locked program screen appears, press OK.
2. Enter your 4-digit PIN at the prompt.
3. Use the UP and DOWN arrow buttons to select the unlocking
option and press OK.
NOTE: If you have set up Video On Demand locking, you must
still enter the PIN to rent VOD programs.
Locked program screen.
Watch a Locked Program
58

Use the Settings to view and customize
features of your QuantumVu service.
Change the Aspect Ratio for Widescreen or HDTV.. . . . . . . . . . 56
Set Language Preferences.. . . . . . . . . . . . . . . . . . . . . . . . . . . . . . . . . . . . 56
Turn Sound Effects On or Off. . . . . . . . . . . . . . . . . . . . . . . . . . . . . . . . . . . . . . 57
Change the Digital Audio Output.. . . . . . . . . . . . . . . . . . . . . . . . . . . . . . 57
SETTINGS
5
1. Press MENU.
2. Select Settings then select Television. Press OK.
3. Select Aspect Ratio and High Denition. Press OK.
4. Use the UP or DOWN arrows to choose from
• 4:3 standard denition
• Widescreen standard denition
• 72p High Denition or 18i High Denition, depending
on your TV.
5. Press OK. Select Continue and press OK again.
Change the language you hear
Some TV programs have an optional Spanish-language audio
track. You can set programs to automatically switch to Spanish
when available (this feature does not work if you are watching
a recorded program).
1. Press MENU.
2. Select Settings then select Audio. Press OK.
3. Select Secondary Audio. Press OK.
4. Select Use Secondary Audio if Available. Press OK.
5. Select Save and press OK.
Change the on-screen menu language
1. Press MENU.
2. Select Settings then select General. Press OK.
3. Select On-Screen language. Press OK.
4. Highlight the language you want to use and press OK.
5. Select Save and press OK.
Change the Aspect Ratio for Widescreen or HDTV
Set Language Preferences
6
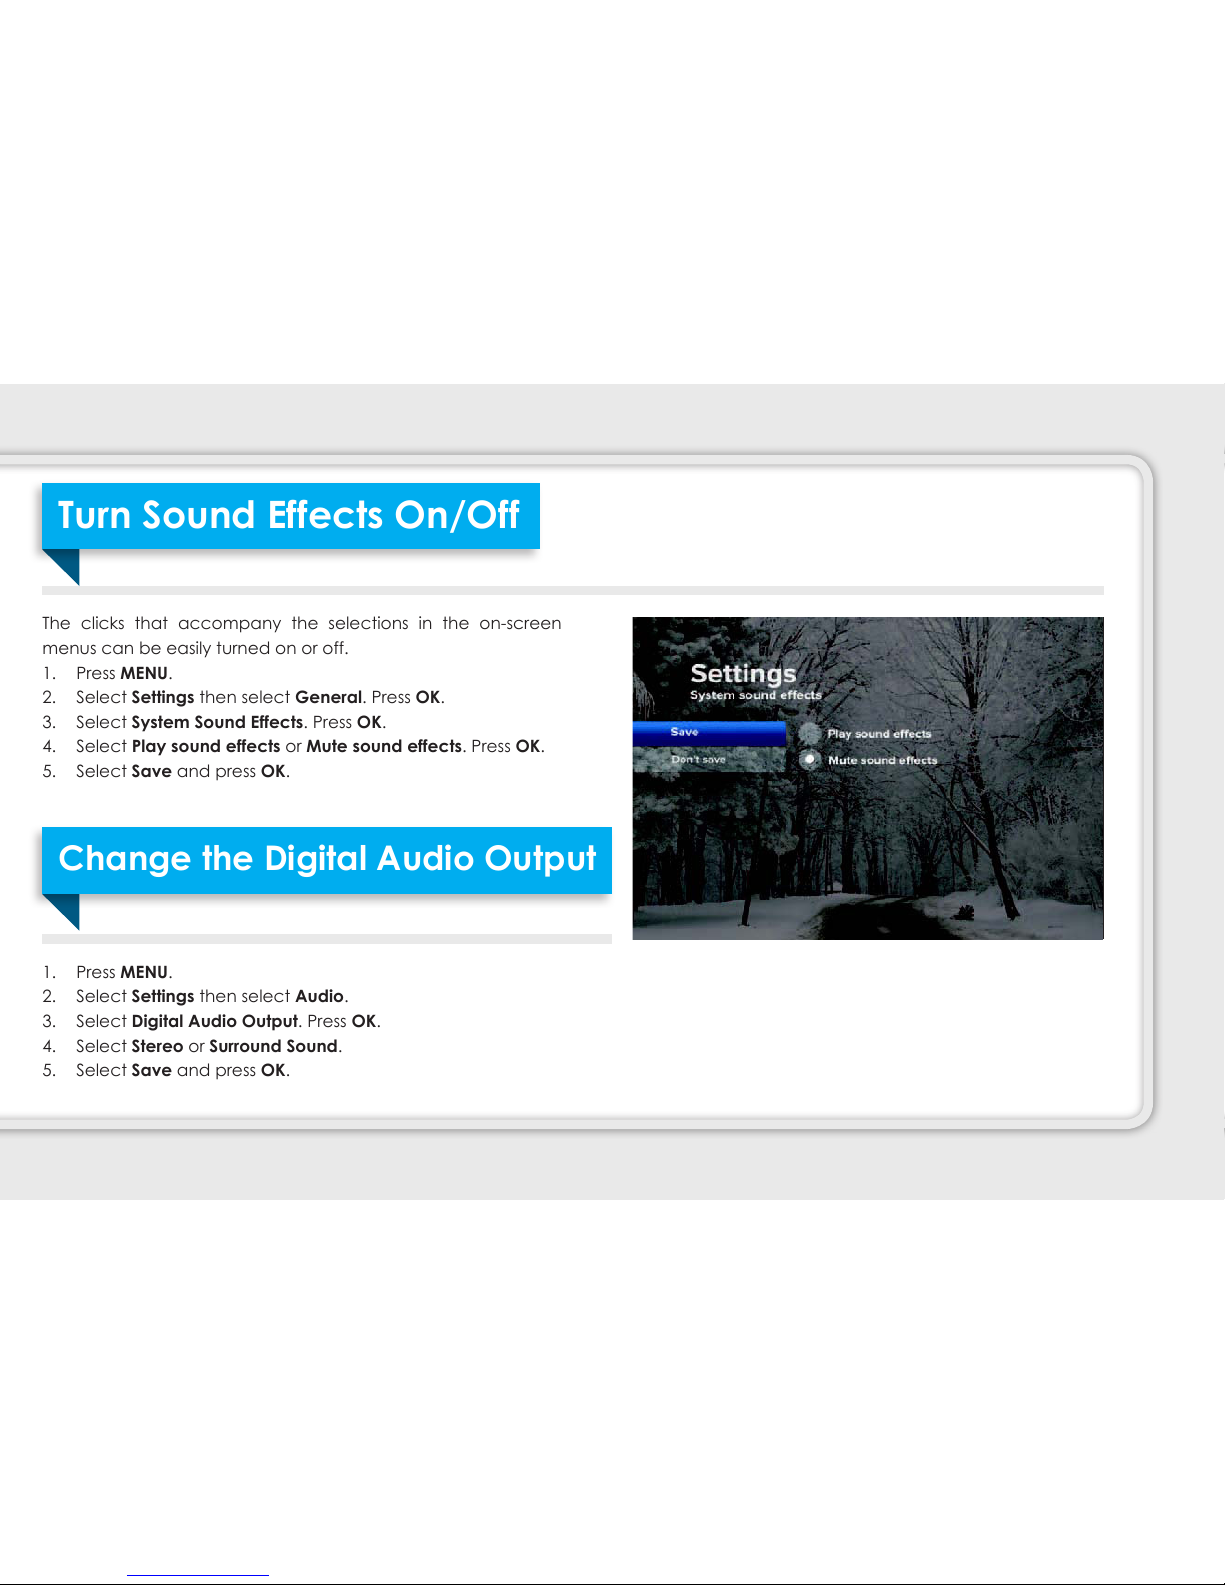
The clicks that accompany the selections in the on-screen
menus can be easily turned on or off.
1. Press MENU.
2. Select Settings then select General. Press OK.
3. Select System Sound Effects. Press OK.
4. Select Play sound effects or Mute sound effects. Press OK.
5. Select Save and press OK.
1. Press MENU.
2. Select Settings then select Audio.
3. Select Digital Audio Output. Press OK.
4. Select Stereo or Surround Sound.
5. Select Save and press OK.
Turn Sound Effects On/Off
Change the Digital Audio Output
61

The Applications menu provides access to interactive applications that are free or available for purchase.
APPLICATIONS
APPLICATIONS
62

1. Press MENU.
2. Select Apps.
3. Choose the application you wish to access. Press OK.
4. Each application will display automatically or provide on-
screen instructions once accessed.
Using Applications
63

On-Screen Caller ID lets you view
Caller ID information on your TV screen.
On-Screen Caller ID is automatically
activated for every customer with
OptiNet phone service and QuantumVu.
ON-SCREEN CALLER ID
Incoming Calls. . . . . . . . . . . . . . . . . . . . . . . . . . . . . . . . . . . . . . . . . . . . . . . . . . . 61
View your On-Screen Caller ID History. . . . . . . . . . . . . . . . . . . . . 61
Snooze the On-Screen Caller ID Feature. . . . . . . . . . . . . . . . . . . . . 62
Disable the On-Screen Caller ID Feature. . . . . . . . . . . . . . . . . . . . . 62
ON-SCREEN CALLER ID
64

Incoming calls will appear on your TV screen for approximately
15 seconds.
1. Press MENU.
2. Select Apps then press OK.
3. Select My Phone then press OK.
4. Select Caller ID History then press OK.
5. Use the UP or DOWN arrow buttons to browse your call
history.
Incoming Calls
View On-Screen Caller ID History
65

1. Press MENU.
2. Select Apps then press OK.
3. Select My Phone then press OK.
4. Select On-Screen Message then press OK.
5. Select Snooze and press OK.
6. Select Caller ID Settings. Press OK.
1. Press MENU.
2. Select Apps then press OK.
3. Select My Phone then press OK.
4. Select Caller-ID Settings then press OK.
5. Select On-Screen Message. Press OK.
6. Select Caller ID then Disable. Press OK.
7. Use the arrow buttons to select the Disable option. Press OK.
8. On-Screen Caller ID will be disabled until you choose to enable it. To enable On-Screen Caller ID, repeat steps 1-3; press OK
when the Enable option is selected.
Snooze the On-Screen Caller ID Feature
Disable the On-Screen Caller ID Feature
66

Will the DVR record on more than one TV in my home?
Yes; with the multi-room DVR feature, any television set with a
STB can record and watch programs on the DVR.
Can you record with the DVR and watch another channel?
Yes; while recording 3 or fewer programs simultaneously, you
can watch any other channel to which you subscribe. If you
would like to record 4 programs at the same time, you can still
watch a previously recorded program from your DVR.
Can parental locking be used with Video On Demand
(VOD)?
Yes; once you set up a PIN, parental controls can be used for
Video On Demand (VOD). All rentals will require the use of a
PIN. Please remember to keep your PIN in a safe place because
the PIN-reset process is not immediate, and parental control
functionality will experience downtime.
If a program is locked do I need a PIN to record it?
You do not have to enter a PIN to schedule recordings for
programs locked by the parental locking feature, but viewers
do have to enter a PIN to watch the program while it’s recording
or to view it at any time thereafter.
Whom should I contact if there is a disruption in my
QuantumVu service?
You should call 276-821-616 to report connection problems.
Frequently Asked Questions (FAQs)
67

The STB won’t turn on.
Check that the STB is plugged in. If it is, try plugging another
device into the socket to make sure power is owing to it. If
the power is working, there may be something wrong with your
remote control.
The remote won’t control the STB.
Press the STB button on the top left of the remote control to
manage the QuantumVu STB.
There is video but no sound.
First, check to see if the volume is muted by pressing MUTE or
+ on the VOL button. Try changing the channel to see if the
problem is only with one channel. If your system uses standard
video or S-video connectors, be sure that you have connected
the audio-out jacks on the receiver to the audio-in jacks on your
TV or audio receiver.
Sound is good but picture is poor.
Check the connections of your video cables to make sure
they are properly seated in their jacks. Also, try changing the
channel to be sure that the problem is not just on one channel.
If you have no connection after ve minutes, make sure all the
connections to your STB are secure.
The STB will not respond.
The green LED surrounding the STB’s power button should ash
each time a remote button is pressed. If this happens, but the STB
does not respond to your commands, you may need to restart
the STB. To do this, press and hold the POWER button for ve
seconds. If you are still experiencing problems, call technical
support at 276-821-616,
The remote is not working.
Point the remote directly at the STB. Make sure there is nothing
between the remote and the remote sensor on the STB. If these
steps don’t resolve the problem try replacing the batteries in
your remote.
If you’re still experiencing problems after reading through these
suggestions, call customer support at 866-835-1288.
Troubleshooting
68

THANKS FOR CHOOSING
6
Additional Notes
7

Additional Notes
71

v. 06.2014
Contact Us
Bristol...................................276.821.6100
Abingdon..............................276.698.3210
Area-Wide.............................866.835.1288
Website...........................bvu-optinet.com
Email.........customerservice@bvua.com
Address......15022 Lee Hwy. Bristol, VA
 Loading...