

Page 1

g
13-127 7.fm Page 1 We dnesday, July 14, 1999 4:11 PM
Mini Stereo Component System
AM/FM Stereo Tuner with 24 Presets
Cat. No. 13-1277
OWNER’S MANUAL
Please read before using this equipment.
SYSTEM 730
with 7-Disc Elevator CD Changer
50-Track Memory and Random Play
Dual Cassettes with CD Synchro
and Hi-Speed Dubbin
5-Inch Speakers
Extended Bass
3 Preset Equalizer Settings
Clock
Wake Timer
Sleep Timer
and Remote Control
R
Page 2

y
g
y
g
j
g
y
g
y
y
13-127 7.fm Page 2 We dnesday, July 14, 1999 4:11 PM
FEATURES
Your Optimus System 73 0 Mini Stereo Component System offers, in
one attractive package, all of the features you need for excellent stereo
sound and entertainment. The System 730 includes a 7-disc elevator
CD changer, AM/FM stereo tuner,
dual hi-speed cassette deck, speakers, and a remote control, as well as
three preset graphic equalizer controls and several other special features.
CD CHANGER FEATURES
7-Disc Elevator CD Chan
er
— lets
you load up to seven CDs and aut omatically play them one after another.
Automatic Search Music S
(ASMS)
— lets you quickly locate
stem
and play any track on a CD.
Audible Search
— helps you locate
a particular section of a CD by rapidly
playing it in either direction.
Pro
rammable Play
— lets you program and play up to 50 trac ks in any
order.
CASSETTE DECK FEATURES
Conse cutive Pla
— lets you au tomatically play two cassette tapes,
one after the other.
Multiple Source Reco rdin
— lets
you record onto a cassette tape from
the CD changer, radio, an other cassette tape, or from an external microphone (not supplied).
CD S
nchro Du bbing
— simplifies
recording from the CD player to a
cassette tape.
Automatic Level Contro l (ALC)
—
automatically adjusts the recording
level.
Hi-Speed Dubbin
— lets you set
the System 730 to record cassette
tapes at one and a half times the normal speed.
Auto-Stop
— automatically stops
the cassette tape when it finishes
playing, recording, rewinding, or fastforwarding to protect the tape and
tape-handling parts.
Random Pla
— lets you set the
System 730 to automatically play the
tracks on all CDs in random order.
Repeat Pla
— lets you automatical-
Soft Cassette T ape E
opens the cassette compartment
door when you press the eject button, so the tape does not pop out.
ect
— slowly
ly repeat the tracks on all C Ds or a
series of programmed tracks.
© 1995 Tandy Corporation.
Radio Shack and Optimus are regist ered trademarks used by Tandy Corporation.
All Rights Reserved.
2
Page 3
CAUTION
13-127 7.fm Page 3 We dnesday, July 14, 1999 4:11 PM
OTHER SPECIAL FEATURES
Remote Control — lets you cont rol
most of the Sy stem 730’s fun ctions
from a distance.
Dual Backlit LCD Displays — clearly displays your system’s indicators
for easy viewing i n almost any lighting condition.
Three Preset Graphic Equalizer
Settings — provide common sound
settings for enhancing rock, pop, or
classical music at the p ress o f a button.
Digital Clock — gives you a digital
time display even when the System
730 is turned off.
Memory Tuning — lets you store
and easily recall up to 24 of your favorite AM and FM radio stations.
Wake Timer — lets you set the System 730 to automatically turn itself on
and play the last selected radio station, CD, or cassette tape.
Sleep Timer — lets you set your system to auto matical ly turn itself off after up to 90 minutes.
Auxiliary Input Jacks — let you
connect an additional audio source,
such as a TV, VCR, turntable, or an
external CD changer or cassette
deck, to your system.
Note: The remote control requires
two AAA batteries (no t supplied) for
power.
Read this manual carefully. It will
help you get the most enjoyment
from your System 730.
For your records, we urge you to
record the serial number of your System 730 in the space below. T he serial number is located on the back of
the system.
Serial Number
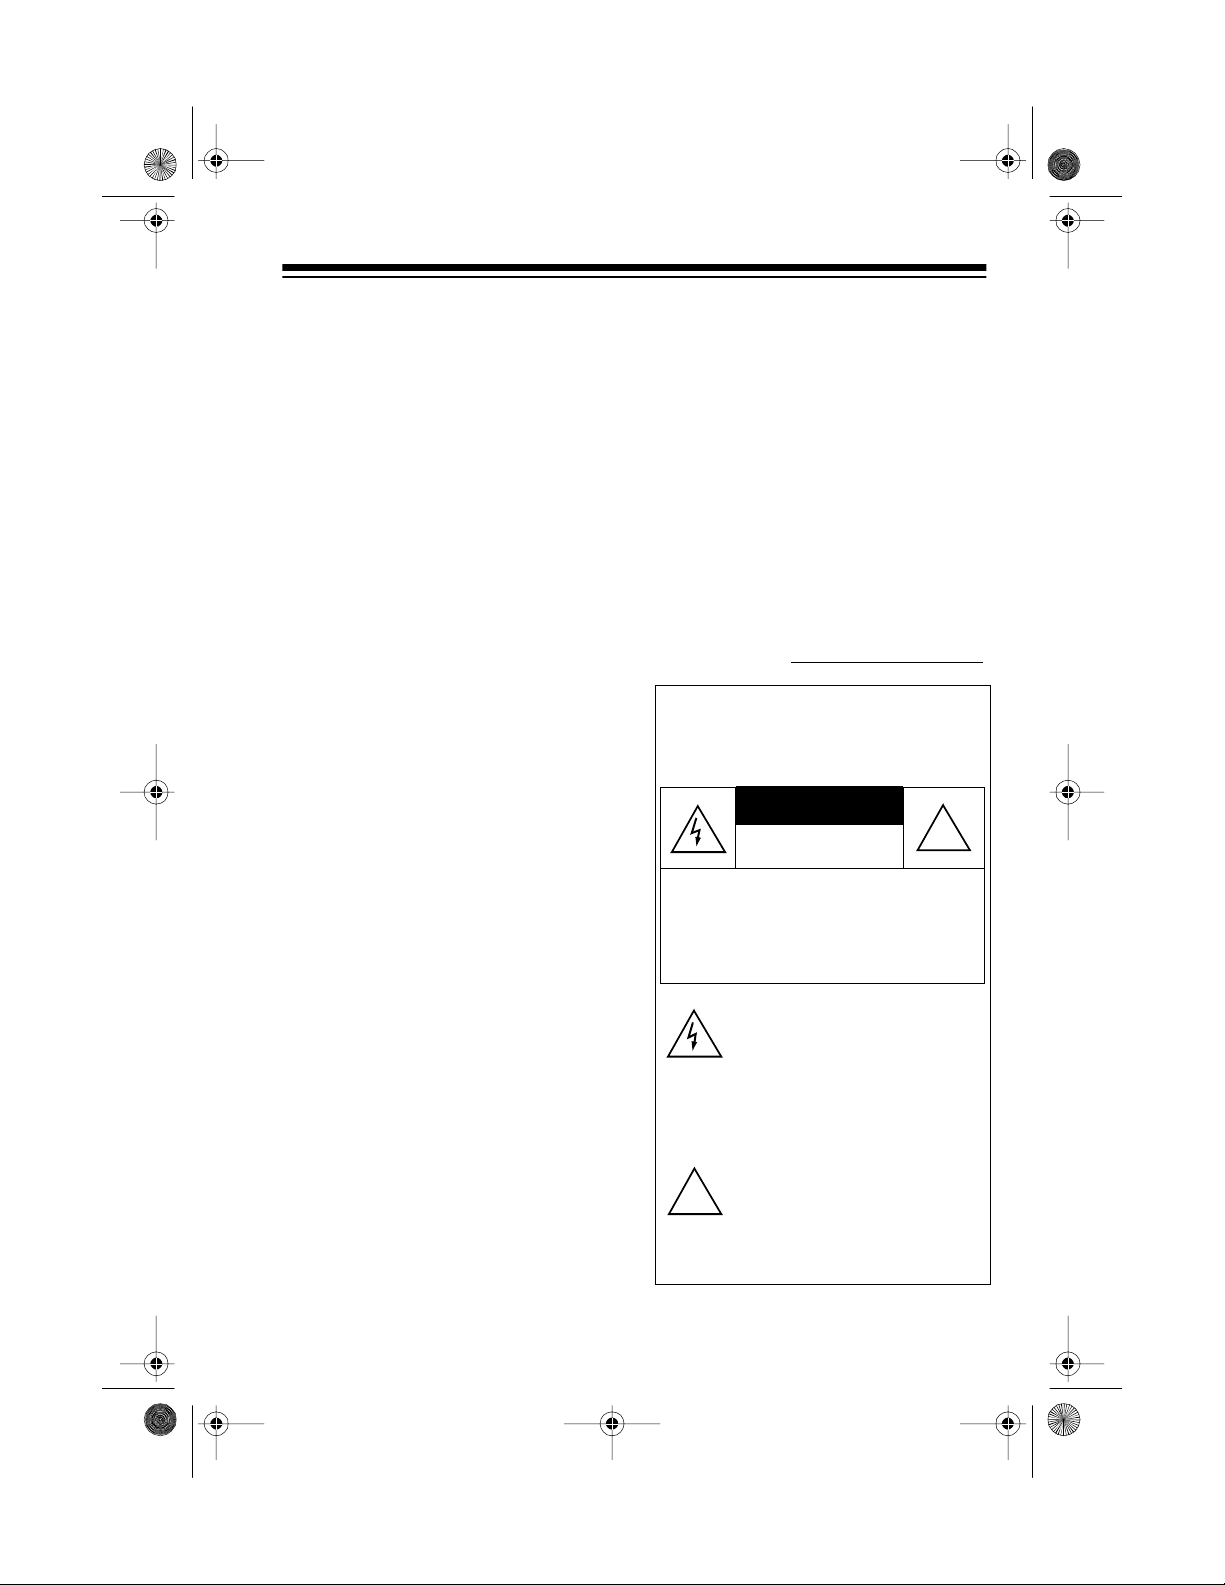
Warning: To prevent fire or shock
hazard, do not expose this product to
rain or moist u re .
RISK OF ELECTRIC SHOCK.
DO NOT OPEN.
CAUTION: TO REDUCE THE RISK OF
ELECTRIC SHOCK, DO NOT REMOVE
COVER OR BACK. NO USER -SERVICEABLE PARTS INSIDE. REFER SERVICING TO QUALIFIED PERSONNEL.
This symbol is intended to alert
you to the presence of uninsulated dangerous voltage within the
product’s enclosure that might be
of suf ficient m agnitu de to co nstitute a r isk of el ectri c shock . Do not
open the product’s case.
This symbo l is in tended to info rm
you that important operating and
!
maintenance instructions are included in the litera ture accom panying this product.
!
3
Page 4

13-127 7.fm Page 4 We dnesday, July 14, 1999 4:11 PM
Most CDs that c an be played on t his
changer have this mark on them:
Warning: This CD chang er employs
a laser light beam. Only a qualified
service person should remove the
cover or attempt to service this device, due to possible eye injury.
Note: Most material on compact
discs and prerecorded tapes is copyrighted. Unauthorized duplication of
copyrighted material is a violation of
the copyright laws of mos t countries
and such duplication may result in
fines and/or imprisonment. Note,
however, that in the United States, it
is not a violation of U.S. copyright
laws for a consume r t o use an audio
recording device to duplicate musical
recordings for noncommercial (personal) use.
4
Page 5

g
13-127 7.fm Page 5 We dnesday, July 14, 1999 4:11 PM
TABLE OF CONTENTS
Preparation ..................................................................................................... 7
Connecting the Speakers .......................................................................... 7
Speaker Placement ............................................................................. 7
Connecting the FM Antenna ...................................................................... 8
Connecting an Additional Audio Source .................................................... 8
Connecting Power ..................................................................................... 8
Setting the Current Time ............................................................................ 9
Installin g Batterie s in the Re mote Contr ol ......... .. . .... . .. .... . .. .... . .... . .. .... . .. .... 9
Connecting Headphones ......................................................................... 10
Listening Safely ................................................................................. 10
Basic Operation ............................................................................................ 11
Using the Demonstration Feature ............................................................ 11
Using the Remote Control ....................................................................... 11
Turning On/Off the System ...................................................................... 11
Setting the Sound .................................................................................... 12
Adjusting the Volume ......................................................................... 12
Adjusting the Balance ........................................................................ 12
Using Extended Bass (X-BASS) ....................................................... 12
Changing the Preset Graphic Equalizer Settings .............................. 13
Radio Operation ........................................................................................... 14
Listening to the Radio .............................................................................. 14
Using Memory Tuning .............................................................................. 15
Storing a Station in Memory .............................................................. 15
Recalling a Stored Station ................................................................. 16
CD Chan
Loading and Playing a CD ....................................................................... 17
Special CD Changer Features ................................................................. 19
Programmed Play .................................................................................... 21
CD and CD Changer Care Tips . .............................................................. 23
er Operation ................................................................................. 17
Automatic Search Music System (ASMS) ......................................... 19
Audible Search .................................................................................. 19
Random Play ..................................................................................... 19
Repeat Play ....................................................................................... 20
Cue .................................................................................................... 20
Storing/Playing a Programmed Sequenc e ........................................ 21
Reviewing a Programmed Sequence . ............................................... 22
Erasing a Programmed Sequen ce .................................................... 23
5
Page 6

13-127 7.fm Page 6 We dnesday, July 14, 1999 4:11 PM
Cassette Deck Operation ............................................................................ 25
Loading a Tape ........................................................................................ 25
Playing a Tape ......................................................................................... 26
Consecutive Play .............................................................................. 26
Recording onto a Cassette Tape ............................................................. 27
Recording from a CD ........................................................................ 27
Copying Cassette Tapes ................................................................... 29
Recording from the Radio ................................................................. 30
Recording from an External Microphone .......................................... 31
Tape Tips ................................................................................................. 32
Erasing a Cassette Tape ................................................................... 32
Preventing Accidental Erasure .......................................................... 32
Restoring Tape Tension and Sound Quality ...................................... 32
Using an Additional Audio Source ............................................................. 33
Listening to an Additional Audio Source .................................................. 33
Recording from an Additional Audio Source ............................................ 33
Special Features .......................................................................................... 34
Setting a Wake Up Time .......................................................................... 34
Setting the Sleep Timer ........................................................................... 35
Using an External Microphone ................................................................ 36
Maintenance ................................................................................................. 37
The FCC Wants You to Know .................................................................. 38
Cleaning the T ape-Handling Parts........................ .. ..... .. ..... ..... .. ..... .. ..... ....38
Specifications ............................................................................................... 39
6
Page 7

13-127 7.fm Page 7 We dnesday, July 14, 1999 4:11 PM
PREPARATION
Important
nections to the System 730 before
you connect it to power.
: Complete all other con-
CONNECTING THE
SPEAKERS
1. Press open the pair of terminal
tabs marked
R –
on the back of the System
730, then insert the right
speaker’s red wire into the red
(+) terminal and its black wire
into the black (–) terminal. Then
release the tabs.
MAIN SP EAK E RS/
: You can u se the set of termi-
Note
nals marked
to connect surround sound speakers
(not supplied) to your System 730.
Your local Radio Shack sells a wi de
selection of surround sound speakers.
+
Speaker Placement
For the best stereo effect, place the
speakers so the distance between
them is the same as the distance between the listening area and the point
halfway between the speakers. You
might want to experiment with several locations to find the best one.
:
Notes
• If the you place the speakers far
apart, you can improve the stereo effect by angling the speakers toward you.
SURROUND SPEAKER
Caution
your system and speakers,
never let the speaker wire’s bare
ends touch each other.
2. Repeat Step 1 to connect the left
speaker’s wires to the terminals
marked
: To avoid damaging
MAIN SPEAKERS/ + L –
• To increase the bass sound,
place the speakers in the corner
of the room, against the wall or
directly on the floor .
• To decrease the bass sound,
move the speakers slightly away
from the corner, increase the
distance between them, and/or
.
raise them 6 to 8 inches off the
floor. You can purchase speaker
stands at your local Radio
Shack store.
7
Page 8

13-127 7.fm Page 8 We dnesday, July 14, 1999 4:11 PM
CONNECTING THE FM
ANTENNA
To connect the supplied FM antenna,
loosen the screw caps on the terminals marked
the back of the System 730, slip the
antenna’s spade lugs onto the terminals, then tighten the screw caps.
Note
: You can use the set of screw
caps on the terminals marked
TENNA
tenna (not supplied) to your Sy stem
730.
/
FM ANTENNA/300
75
Ω to connect a 75Ω FM an-
Ω on
FM AN-
Notes
:
• See “Using an Additional Audio
Source” to operate an external
audio source with the System
730.
• If you conn ect a turntable to the
System 730, the turntable must
have a built-in equalizer amplifier.
CONNECTING POWER
To connect power after making all
other connections, plug your system’s AC cord into a standard AC
outlet. STAND-BY/MUTE turns on
12:00
and
flashes on the display.
CONNECTING AN
ADDITIONAL AUDIO
SOURCE
To connect an additional audio
source to your System 730, such as
a TV, VCR, CD changer or cassette
deck, plug the audio source’s left and
right line level audio wires into
VIDEO L
8
(left) and R (right).
INPUT
Caution
cord has a polarized plug (one blade
is wider than the other). If you have
difficulty inserting the plug into the
outlet, do not force it. Turn the plug
over and try again.
: Your system’s AC power
Page 9

13-127 7.fm Page 9 We dnesday, July 14, 1999 4:11 PM
SETTING THE
CURRENT TIME
TIME
•If
finish setting the hour and
minute, start again from Step 1.
disappears before you
1. Press
System 730, then press
PLAY
set time appear on the display.
2. Within 5 seconds, press
to change the hour setting or
MINUTE
setting.
POWER
once.
to change the minute
to turn on the
TIME
and the last-
DIS-
HOUR
• When power is disconnected or
interrupted, then restored, the
last known time flashes on the
display . If t his happens, reset the
time.
INSTALLING
BATTERIES IN THE
REMOTE CONTROL
The remote control requires two AAA
batteries (not supplied) for power.
For the best performance and longest life, we recommend alkaline batteries, such as Radio Shack Cat. No.
23-555.
Caution
of the required size and type.
1. To open the battery compart-
: Always use fresh batteries
ment cover, slide it in the direction of the arrow.
Notes
:
• When changing the hour, be
sure to set it the correct AM or
PM hour.
• To rapidly advance the hour or
minute setting, press and hold
HOUR
or
MINUTE
.
9
Page 10

13-127 7.fm Page 10 Wednesday, July 14, 1999 4:11 PM
2. Insert the batteries into the compartment as indicated by the
polarity symbols (+ and –)
marked inside.
3. Replace the cover.
Notes:
• If you will not be using the
remote control for a month or
more, remove the batteries.
• You can use the remote control
up to a distance of about 20 feet
(6.1 meters) in front o f the Sy stem 730. If it does not operate
properly within this distance,
replace the batteries.
Warning: Always dispos e of old batteries promptly and properly.
CONNECTING
HEADPHONES
To listen without disturbing others,
you can connect a pair of stereo
headphones with a
supplied) to the System 730. Your local Radio Shack store sells a wide
selection of stereo headphones.
1
/8-inch plug (not
To connect headphones, plug the
headphone’s
PHONES
1
/8-inch plug into the
jack on the front of the Sys-
tem 730.
Note: Connecting headphone s a utomatically disconnects the System
730’s speakers.
Listening Safely
To protect your hearing, follow these
guidelines when you use headphones.
• Set the volume to the lowest setting before you begin listening.
After you begin listening, adjust
the volume to a comfortable
level.
• Do not listen at extremely high
volume levels. Extended highvolume listening can lead to permanent hearing loss.
• Once you set the volume, do not
increase it. Over time, your ears
adapt to the vol ume level, so a
volume level that does not
cause discomfort might still
damage your hearing.
10
Page 11

13-127 7.fm Page 11 Wednesday, July 14, 1999 4:11 PM
BASIC OPERATION
USING THE
DEMONSTRATION
FEATURE
To showcase the features of your
System 730 and its dual display,
DEMO
press
PLAY
for about 2 seconds. The system repeatedly runs a preset
program on both displays.
Press
demonstration.
USING THE REMOTE
CONTROL
, or press and hold
DEMO
or
DISPLAY
to stop the
DIS-
: The buttons on the remote
Note
control and the system’s front panel
operate several of the same functions, although they might be labeled
differently. You can use either of
these controls to operate the System
730.
Caution
trol or
strong lights, such as a spotlight, will
reduce the remote control’s operating distance and can make it inoperative.
: Exposing the remote con-
SENSOR
to direct sunlight or
TURNING ON/OFF THE
SYSTEM
POWER
Press
730. STAND-BY/MUTE turns off and
the system’s last selected settings
appear on the displays.
to turn on the System
The remote control communicates
with your system through the remote
sensor located on the front of the
system. To use the remote control,
be sure that the front end of it is
pointing with a clear path toward
SENSOR
ton(s).
, then press the desired but-
To turn off the system, press
again. STAND-BY/MUTE turns on.
POWER
11
Page 12

13-127 7.fm Page 12 Wednesday, July 14, 1999 4:11 PM
SETTING THE SOUND
Adjusting the Volume
To increase the system’s volume,
VOLUME
turn
VOLUME +
decrease the volume, turn
towa rd
the remo t e control.
Important
age, set the volume to its minimum
level before playing the radio, a CD,
or a cassette tape.
toward
on the remote control. To
MIN
, or press
: To prevent h earing dam -
MAX
, or press
VOLUME
VOLUME –
on
Adjusting the Balance
To change the sound balance between the left and right speakers, ro-
BALANCE
tate
(right).
toward L (left) or
Using Extended Bass
(X-Bass)
To enhance the System 730’s bass
sound, press
Bass).
display. To return to normal bass
sound, press it aga in.
appears from the display.
X-BASS
X-BASS
appears on the lef t
(Extended
X-BASS
dis-
R
Note
: To turn off the sou nd temporarily, press
control. STAND-BY/MUTE flashes.
To resume listening, press
again. STAND-BY/MUTE turns off.
12
MUTE
on the remote
MUTE
Page 13

13-127 7.fm Page 13 Wednesday, July 14, 1999 4:11 PM
Changing the Preset
Graphic Equalizer Settings
The sound produced by your System
730 is delivered over five different
sound frequencies — 70 Hz, 300 Hz,
1 KHz, 3.5 KHz, and 10 KHz. You
can set the balance of these frequencies using your system’s three preset
graphic equalizer settings. These
settings are designed to give you the
best sound for rock, pop, and classical music.
Each time you turn it on, the System
730 automatically uses the last selected graphic equalizer setting. To
change the setting, press
POP
CLASSIC
CLASSIC
, or
appears on the display.
ROCK, POP
.
ROCK
, or
At all times during radio, CD, and
cassette play and/or recording, light
bars rise and fall on the system’s left
display to show the current sound
level for each of the five frequencies.
In addition, a light bar ma rked
EL
shows the average level of all
combined frequencies.
,
LEV-
13
Page 14

13-127 7.fm Page 14 Wednesday, July 14, 1999 4:11 PM
RADIO OPERAT ION
LISTENING TO THE
RADIO
FM1
FM1
or
TUNER
or
DOWN
1. Repeatedly press
select the desired band. Select
AM
for AM stations, or
FM2
for FM stations. As you
TUNER
press
and the last selected station
appear on the display.
: You can tune to any FM
Note
station when either
is selected, and you can also
store and recall stations in memory in the two FM groups (see
“Using Memory Tuning”).
2. Press
TUNING
trol, to tune to the desired station. As you press the button,
the frequency number changes
on the display.
, AM,
TUNING UP
s or t on the remote con-
FM1
or
to
or
FM2
FM2
, or
To rapidly scan for a station,
press
AUTO
AUTO
Then press and hold
or
the remote control, for about 1
second. When you release it,
the tuner automatically stops at
the next strong station.
To resume manual tuning, p ress
AUTO/MANUAL
the remote control, so
appears.
Notes
• Each time you press
AUTO/MANUAL
on the remote control, so
appears on the display.
DOWN
, or
TUNING
, or
, or
TUNING UP
s or t on
O/AUTO
AUTO
:
TUNING
or
730 automatically sets
REO/MODE
broadcast is being received in
stereo,
the display.
or t, the System
s
STEREO
to
STEREO
appears on
O/
on
dis-
TUNER
STE-
. If t he
14
Page 15

13-127 7.fm Page 15 Wednesday, July 14, 1999 4:11 PM
• To improve reception for weak
FM stereo stations, press
STEREO/MODE
(monaural) appears on the
display. The sound is no
longer in stereo, but reception
should improve. To return to
stereo sound, press
MODE
.
• For the best FM reception,
fully extend the FM antenna.
• The AM an tenna is built-in. To
improve AM reception, move
or re-position the System 730.
3. Set
VOLUME
+
or – on the remote control) to
the desired level, an d select the
desired
equalizer settings.
X-BASS
so
(or press
and graphic
USING MEMORY
TUNING
MONO
STEREO/
VOLUME
3. Press
appears on the display.
4. Within 3 seconds, press a number (1-8) for the memory location where you want to store t he
station.
and
memory number, and
appear on the display. For
example, if you select memory
number 8,
appears.
MEMORY
MEMORY
P
(program), the selected
P8 STATION
MEMORY
.
disappears,
STATION
You can store and easil y re call up to
24 of your favorite AM and FM radio
stations (8 AM and 16 FM) in the
System 730’s memory.
Storing a Station in Memory
DOWN
FM1
, or
1. Press
2. Press
TUNER
FM2
or
TUNING
trol, to tune to the desired station.
to select AM,
.
TUNING UP
s or t on the remote con-
or
MEMORY
: If
Note
before you press the desired
memory number, repeat Steps 3
and 4 then try again.
5. Repeat Steps 2-4 t o store up to
,
eight stations each in
FM2
and
Notes
• You cannot clear a station from
memory, but you can store a
new one in its place.
.
:
disappears
AM, FM1
15
,
Page 16

13-127 7.fm Page 16 Wednesday, July 14, 1999 4:11 PM
• When power is disconn ected or
interrupted for 50 hours or more,
the System 730 loses all of its
memory s ett in gs .
Recalling a Stored Station
1. Press
desired band.
2. Press the desired station’s
memory number (1-8).
memory number,
and the frequency number
appear on the display.
TUNER
to select the
P
, the
STATION
,
16
Page 17

13-127 7.fm Page 17 Wednesday, July 14, 1999 4:11 PM
CD CHANGER OPERATION
The System 730 lets you load up to
seven CDs at once and gives you
many options to control the way it
plays them.
: You can play a 3-inch CD in
Note
your System 730, bu t you m ust load
it in CD tray position 1 (see “Loading
and Playing a CD”).
LOADING AND
PLAYING A CD
1. Press CD. CD, the last selected
CD number, and
appear on the display.
2. To select a CD tray position (1-
7), press the corresponding disc
number, or press
desired disc number on the
remote control.
position number, and
appear on the display.
TRACK 1
DISC
then the
CD
, the se lect ed
TRACK 1
3. Press
changer drawer opens.
4. Carefully place a CD in the
drawer with the label facing up.
5. To load more CDs (up to seven),
simply press the next
BER
changer moves to the selected
position, then the drawer automatically opens again so you
can load the next CD.
After you have loaded all the
CDs, press
The drawer automatically
closes.
OPEN/LOAD
. The CD drawer closes, the
OPEN/LOAD
. The CD
DISC NUM-
again.
: A box ( ) appears
Note
around the disc number on the
display when the position is full.
17
Page 18

13-127 7.fm Page 18 Wednesday, July 14, 1999 4:11 PM
6. To play the last CD you loaded,
press
PLAY
, or
CD
on the
remote control.
To play a different CD, press the
desired disc number, or press
DISC
then the disc number on
the re mote contr ol, to s elect the
CD. Then press
CD
press
PLAY
on the remote con-
t
, or
t
trol to begin play.
appears, then the selected
CD begins to play, and its
elapsed play time appears.
:
Notes
• To skip over , search, or repeat
tracks, see “Special CD
Changer Features.”
7. Set
+
or
VOLUME
–
(or press
on the remote control) to
VOLUME
the desired level, an d select the
desired
X-BASS
and graphic
equalizer settings.
8. The System 730 automatically
stops play at the end of the highest numbered CD l oaded in the
system. For example, if you
have four CDs loaded, play
stops automatically at t he end of
the fo urth C D.
To stop the CD changer at any
time during play, press
, or press
CD
STOP
on the
remote control. and the CD’s
elapsed play time disappear
from the display.
• To briefly stop play, press
PAUSE
on the main system. appears on the display.
To resume play, press
CD
or
on the rem ote cont rol.
t
PLAY
disappears.
18
: To display the total playing
Note
time of a selected CD, press
TIME
on
the remote control before or during
play. The total playing tim e appears
on the display for about 5 seconds.
,
t
Page 19

13-127 7.fm Page 19 Wednesday, July 14, 1999 4:11 PM
SPECIAL CD CHANGER
FEA TURES
Automatic Search Music
System (ASMS)
The automatic search music system
lets you skip forward or backward
through the tracks on all loaded CDs.
• To skip to the beginning of the
next track, press and release
>>
control.
• To return to the beginning of the
current track, press and release
<<
control.
, or
, or
CD
>> on the remote
<<
CD
on the remote
control. The CD rapidly advances
and you hear the music at a high
speed and low volume.
Release the button to resume normal
play.
Random Play
The System 730 lets you set the CD
changer to play the tracks on all CDs
in random order.
1. With at least one CD in the CD
changer and no CD playing,
RANDOM
press
RANDOM
tem.
randomly selected disc and
track number appear o n the display. Then the track begins to
play, and its elapsed play time
appears.
on the main sys-
., , and the first
• To skip backward or forward
through additional tracks,
repeatedly press and release
<<
or >>, or
the remote control, until the
desired track number appears
on the display.
CD
<<
or >> on
Audible Search
To search backward or forward during play, press and hold down
>>
, or
CD
<<
or >> on the remote
<<
or
Notes
:
• To skip to the next randomly
selected track, press
DOM
again.
• You can search forward or
backward on the current disc
or repeat all tracks during random play.
RAN-
19
Page 20

13-127 7.fm Page 20 Wednesday, July 14, 1999 4:11 PM
2. To briefly stop random play,
press
PAUSE
on the main
system. appears on the display. To resume play, press
PLAY
, or
CD
on the
remote control. disappears.
3. The System 730 automatically
stops random play after it has
played all tracks on all loaded
CDs. To stop the CD changer at
any time during random play,
STOP
press
, or
the remote control.
CD
RANDOM
on
,
, and the CD’s elapsed play
time disappear from the display.
To continuously repeat an entire programmed sequence, first program
the tracks you want to play (see “Programmed Play”), then press
before or during play so
REPEAT
REPEAT
ap-
pears on the display along with
MEMORY
.
Repeat Play
The System 730 lets you continuously repeat all tracks on all loaded CDs
or an entire programmed sequence.
To continuously repeat the t racks o n
all loaded CDs, press
or during play so
on the display.
20
REPEA T
REPEAT
before
appears
To cancel repeat play before, during,
or after play, press
PEAT
disappears from the display. If
REPEAT
so
RE-
repeat is cancelled during play, the
CD changer resumes normal play.
Cue
To select a track before you begin
play or after pressing
the main system, press
<<
CD
or >> on the remote control,
until the desired track number appears on the display. Then press
PLAY
, or
CD
control, to play the track.
PAUSE
on
<<
or >> or
on the remote
Page 21

13-127 7.fm Page 21 Wednesday, July 14, 1999 4:11 PM
PROGRAMMED PLAY
You can program the CD changer to
play up to 50 tracks in any order you
choose, and you can program the
same CD and/or track to play more
than once.
Stori ng/Playing a
Progra mm e d Seq u e nc e
1. With at least one CD i n the CD
changer and no CD playing,
select a CD by pressing the corresponding disc number (1-7), or
press
number on the remote control.
CD
and
display.
DISC
then the desired
, the selected CD number,
TRACK 1
appear on the
3. To store the selected track,
press
control.
about 4 seconds, then lights
steadily, and
position number) appears for
about 10 seconds.
MEMORY
MEMORY
P-01
on the remote
flashes for
(the program
2. Track 1 of the current CD is
automatically selected. To select
a different track, press
>>
on the main s ystem, or
<<
or >> or the desired track
number on the remote control.
As you press it, the track number changes on the display.
<<
or
CD
Note
: If you press ed the desired
track number on the remote control, the track number flashes on
the display and you must press
MEMORY
track number stops flashing
before you press
repeat Step 2 then try again.
4. Repeat Steps 1-4 t o store up to
50 tracks.
Note
than 50 tracks,
on the display.
within 4 seconds. If the
MEMORY
: If you try to store more
FULL
appears
21
,
Page 22

13-127 7.fm Page 22 Wednesday, July 14, 1999 4:11 PM
5. Press
PLAY
, or
CD
on the
remote control, to play the programmed sequence . ,
P-01
and the first programmed CD
and track number appear. Then
the CD’s elapsed play time
appears, and the first track
begins to play.
: To briefly stop pro-
Note
grammed play, press
PAUSE
on the main system. appears
on the display. To resume programmed play, press
CD
or
on the remote control.
PLAY
disappears.
6. Programmed play automatically
stops at the end of the last programmed track. To stop the CD
changer at any time during programmed play, press and
release
STOP
, or press
CD
on the remote control.
and the CD’s elapsed play time
disappear from the display.
:
Notes
,
• Press
PLAY
remote control, to play the pro-
, or
grammed sequence again.
• To replace a programmed track,
press
RECALL
on the remote
control until the mem ory num ber
of the track you want to replace
appears on the display. Then
repeat Steps 1-3 to store a new
track.
• To resume regular or random
play after storing a programmed
sequence, you must first erase
the programmed sequence (see
“Erasing a Programmed Sequence”).
,
Reviewing a Programmed
Sequence
To review a programmed sequenc e,
while play is stopped, repeatedly
RECALL
press
As you press it, the CD, track number, and memory position of each
stored track appears.
on the remote control.
CD
on the
22
Page 23

13-127 7.fm Page 23 Wednesday, July 14, 1999 4:11 PM
Erasing a Programm ed
Sequence
To erase an entire programmed sequence, while play is stopped, press
and hold
remote control, for at least 2 seconds.
display.
Notes
• If you remove a CD, the CD
• When p ower is disconnected or
STOP
, or
MEMORY
:
changer automatically sk ips that
disc’s tracks in the sequence.
interrupted for 50 hours or more,
any programmed sequence is
entirely erased.
disappears from the
CD
on the
CD AND CD CHANGER
CARE TIPS
Although a CD is very durable, you
should handle it with care. We recommend the following precautions.
• Keep the CD in its protective
case or sleeve when you are not
playing it.
• Keep the CD clean. Your local
Radio Shack store sells a suitable CD cleaner kit.
• Keep the CD dry. A drop of
moisture can act as a lens and
affect the laser beam’s focus. If
it gets wet, wipe the CD with a
soft, dry cloth before playing it.
• Do not write on either side of a
CD, especially the non-label
side.
• Handle the CD by its edges to
avoid fingerprints and surface
scratches, which can prevent
the laser from accurately reading the CD. If the CD gets
scratched, use Scratch ‘n’ Fix
(Radio Shack Cat. No. 42-127)
to keep the CD from skipping
during play.
• Do not store CDs in high-temperature, high-humidity locations.
23
Page 24

13-127 7.fm Page 24 Wednesday, July 14, 1999 4:11 PM
If the System 730 is subjecte d to a
sudden shock or jolt during play, the
CD’s rotation speed might suddenly
change, and the music might be
briefly int errupted . This is no t a malfunct ion .
Cautions:
• To avoid damaging the CD
changer, do not place anything
but a CD in the CD drawer.
• Remove any loaded CDs from
the CD changer before moving
the System 730 to prevent dam aging the CDs.
• Moving the CD changer suddenly from a cold place to a
warmer one can cause moisture
to form on the pickup lens and
disrupt operation. If this happens, wait about 2 hours before
playing a CD.
24
Page 25

13-127 7.fm Page 25 Wednesday, July 14, 1999 4:11 PM
CASSETTE DECK OPERATION
The System 730 has a dual casset te
deck system which lets you automatically play two cassette tapes consecutively, record from the CD
changer, record one cassette tape
onto another, and more.
:
Notes
• The remote control does not
operate the System 730’s cassette deck.
• The System 730’s Automatic
Level Control (ALC) feature
automatically adjusts the recording level. The settings of
X-BASS
UME
,
CLASSIC
or
the recording.
• Tape quality greatly affects the
quality of the recording. We recommend regular length (60- or
90-minute) cassette tapes. We
do not recommend long-play
cassette tapes, su ch as C -120s,
because they are thin and can
easily tangle in the cassette
mechanism. For low-noise,
wide-range recordings, u se normal-bias tape.
have no effect on
, and
ROCK, POP
VOL-
• Before recording, be sure the
cassette tape’s erase-protection
tabs are in place. See “Preventing Accidental Erasure.”
LOADING A TAPE
1. Press
desired tape deck (TAPE 1 or
TAPE 2) to open the cassette
compartment door.
,
: TAPE 1 only plays prere-
Note
corded cassette tapes. TAPE 2
both plays back and records.
2. Insert the ca ssette tape into the
tape guides with the exposed
tape edge facing down, the side
you want to play facing you, and
the full reel to the left.
STOP/EJECT
on the
• Before you load a cas sette tape
for recording, turn the cassette’s
hub with your finger or a pencil
to take u p any slack and move
the tape past its leader. (Avoid
touching the tape with your fingers.)
3. Close the door.
25
Page 26

13-127 7.fm Page 26 Wednesday, July 14, 1999 4:11 PM
PLAYING A TAPE
1. Press
TAPE
the display.
2. Press
PLAY
play.
Note
: To briefly stop the tape
during playback, press
The button locks and the tape
stops. Press
continue playback.
TAPE
.
appears on
. The tape begins t o
PAUSE
again to
PAUSE
4. The System 730 automatically
stops the tape when it reaches
the end. To stop the tape at any
time during playback, press
STOP/EJECT
.
Consecutive Play
You can set the System 730 to automatically play the first side of the cassett e t a pe i n ea c h d e ck , on e a fter th e
other.
1. Load the first cassette tape you
want to play into TAPE 1, and
the other into TAPE 2. Be sure
.
the side of each tape you want
to play is facing out.
3. Set
VOLUME
+
or – on the remote control) to
(or press
the desired listening level, and
select the desired
X-BASS
graphic equalizer settings.
26
VOLUME
and
2. Press
PLAY
on TAPE 1. The
tape in TAPE 1 begins to play.
3. Press
P AUSE
, then
TA PE 2. Both buttons lock.
PLAY
on
Page 27

13-127 7.fm Page 27 Wednesday, July 14, 1999 4:11 PM
When the tape in TAPE 1
reaches the end, the tape in
TAPE 2 automatically begins to
play.
Note: To bri efly s top the tape in
either deck during playback,
press
PAUSE
on the desired
deck. The button locks and the
tape stops. Press
PAUSE
again
to continue playback.
4. At the end of the tape in TAPE 2,
the system automatically stops
the tape. To stop playback on
either deck at any time, press
STOP/EJECT
on that deck.
PLAY
releases.
Notes:
• If you press
STOP/EJECT
on
TAPE 1 during consecutive play,
the tape in TAPE 2 automatically
begins to play.
• To rapidly fast-forward or rewind
a cassette tape in either deck
while the tape is stopped, press
FAS T-F
or
REWIND
. The button
locks and the tape fast-forwards
or rewinds.
RECORDING ONTO A
CASSETTE TAPE
The System 730 lets you record onto
a cassette tape from the CD changer,
radio, another cassette tape, or from
an external microphone (not supplied).
Note: You can also record from an
additional audio source (see “Recording from an Additional Audio
Source”).
Caution: Never try to force down
RECORD
protection tab from a cassette tape
(see “Preventing Accidental Erasure”). You might damage the tape
mechanism.
Recording from a CD
Follow these steps to record from a
CD onto a cassette tape.
1. Press
after you remove an erase-
CD
. CD, the last selected
CD number, and
TRACK 1
appear on the display.
The System 730 automatically
stops the tape when it reaches
the end. To stop the tape at any
time during fast-forwarding or
rewinding, press
STOP/EJECT
.
2. Load the CD(s) you want to
record into the CD changer.
27
Page 28

13-127 7.fm Page 28 Wednesday, July 14, 1999 4:11 PM
3. Load a blank cassette tape, or
one you want to record over, into
TAPE 2.
4. To record the tracks from all
loaded CDs in order, press the
disc number of the first CD you
want to begin recording, or
DISC
press
then the number o n
the remo t e control.
To record only selected tracks or
change the sequence of the
tracks, you must first program
the desired sequence.
5. To automatically start the CD
and begin recording at the s am e
time (synchronously), press
RECORD
on TAPE 2.
PLAY
auto-
matically locks down with
RECORD
, and appears.
Then the first selected CD or
programmed track begins to
play, its elapsed play time
appears, and the tape begins
recording.
To briefly stop the CD while
recording, press
PAUSE
on
the main system. appears
on the display. To resume play,
press
PLAY
, or press
CD
on the remote control. disappears.
6. To listen to the CD during
recording, adjust
press
VOLUME + or –
VOLUME
(or
on the
remote control) to the desired
listening level, and select the
desired
X-BASS
and graphic
equalizer settings.
7. The System 730 automatically
stops the tape when it reaches
the end. To stop the tape at any
time during recording, press
STOP/EJECT
on TAPE 2.
To stop the CD during or after
STOP
recording, press
CD changer, or press
on th e
CD
on
the remote control.
: The System 730 automati-
Note
cally stops the CD changer
when it reaches the end of all
loaded CDs or the programmed
sequence. If the tape is still
recording, press
STOP/EJECT
on
TAPE 2 to stop the tape.
: To briefly stop the tape
Note
while recording, press
PAUSE
TAPE 2. The button locks and
the tape stops. Press
again to resume recording.
28
on
PAUSE
Page 29

13-127 7.fm Page 29 Wednesday, July 14, 1999 4:11 PM
Copyi ng Cas sette Tapes
The System 730 lets you dub (copy)
one cassette tape to another, one
side at a time, using its dual cassette
decks (TAPE 1 and TAPE 2).
1. Load a blank cassette tape, or
one you want to record over, into
TAPE 2.
2. Load the tape you want to
record from into TAPE 1.
3. Press
PAUSE
TAPE 2.
PLAY
locks down with
PAUSE
.
4. To record at one and a half times
the normal speed, press
SPEED
HI-SPEED
.
the display. To set i t back to normal speed, press
HI-SPEED
again.
RECORD
, then
automatically
RECORD
appears on
HI-SPEED
disappears.
on
and
HI-
PLAY
5. Press
on TAPE 1. The
tape in TAPE 1 begins to play,
PAUSE
automatically releases
on TAPE 2, and TAPE 2 begins
to record.
6. To listen to the t ape in TAPE 1
during recording, adjust
UME
(or press
VOLUME + or –
VOL-
on
the remote control) to the
desired listening level, and
select the desired
X-BASS
and
graphic equalizer settings.
: If you use
Note
HI-SPEED
during recording, you hear the
sound at one and a half times
the normal speed.
7. To briefly stop the tape in either
deck while recording, press
PAUSE
on that deck. The but ton
locks and the tape stops. Press
PAUSE
again to resum e record-
ing.
8. The System 730 automatically
stops the tape in each deck
when the tape reaches the e nd
of the side.
To stop the tape in either deck at
any time during recording, press
STOP/EJECT
on that deck.
29
Page 30

13-127 7.fm Page 30 Wednesday, July 14, 1999 4:11 PM
Notes:
• If you press
TAPE 1,
PLAY
STOP/EJECT
releases on
on
that deck, but recording on
TAPE 2 continues.
• If you press
TAPE 2,
PLAY
STOP/EJECT
and
on
RECORD
release, and recording stops.
Recording from the Radio
The System 730 lets you record onto
a cassette tape from any A M or FM
radio station. You can also se t it to
automatically turn on at a preset time
and begin recording from the radio.
1. Repeatedly press
select the desired band, then
select the desired station.
2. Load a blank cassette tape, or
one you want to record over, into
TAPE 2.
3. Press
TAPE 2.
PAUSE
PLAY
locks down with
PAUSE
.
TUNER
RECORD
then
automatically
RECORD
to
on
and
Note: To briefly stop the tape
while recording, press
PAUSE
on
TAPE 2. The button locks and
the tape stops. Press
PAUSE
again to resume recording.
5. To listen to the radio during
recording, adjust
press
VOLUME + or –
VOLUME
(or
on the
remote control) to the desired
listening level, and select the
desired
X-BASS
and graphic
equalizer settings.
6. The System 730 automatically
stops the tape when it reaches
the end. To stop the tape at any
time during recording, press
STOP/EJECT
RECORD
on TAPE 2.
PLAY
and
release, and
recording stops.
To set your System 730 to automa tically begin recording from the radio
at a preset time, first set and turn on
the wake-up timer (see “Setting a
Wake Time”).
4. Release
begin recording.
30
PAUSE
on TAPE 2 to
Then follow Steps 1-3 above, p ress
POWER
release
to turn off the system, then
PAUSE
on TAPE 2. At the
preset wake up t ime, your system automati cally turns it self o n a nd imme-
Page 31

13-127 7.fm Page 31 Wednesday, July 14, 1999 4:11 PM
diately begins recording from the radio.
31
Page 32

13-127 7.fm Page 32 Wednesday, July 14, 1999 4:11 PM
Recording from an External
Microphone
The System 730 lets you record onto
a cassette tape using an external microphone with a
supplied), such as Radio Shac k Cat.
No. 33-2001.
: The system al s o l ets you hear
Note
sound from an external microphone
combined with sound from the radio,
a prerecorded CD or cass ette, or an
additional audio source (see “Using
an External Microphone”).
1. Plug the microphone’s
plug into
System 730.
1
/8-inch plug (not
MIC
on the front of the
1
/8-inch
5. Press
PAUSE
on TAPE 2 to
begin recording. Any sound captured by the external microphone is recorded on the tape.
:
Notes
• Follow any instructions pro-
vided with the external microphone for placement of the
microphone to achieve the
best record i ng re sult s.
• To briefly stop the tape while
recording, press
PAUSE
TAPE 2. The but ton locks and
the tape stops. Press
again to resume recording.
on
PAUSE
2. Press
TAPE
TAPE
.
appears on
the display.
3. Load a blank cassette tape, or
one you want to record over, into
TAPE 2.
4. Press
PAUSE
TAPE 2.
locks down with
PAUSE
.
PLAY
RECORD
then
automatically
RECORD
and
32
on
6. To increase the volume of the
microphone’s sound input, turn
MIXING
toward
decrease it, turn it toward
MAX
. To
MIN
.
7. To hear the sound being
recorded, adjust
press
VOLUME + or –
VOLUME
on the
, or
Page 33

13-127 7.fm Page 33 Wednesday, July 14, 1999 4:11 PM
remote control, to the desired level.
33
Page 34

13-127 7.fm Page 34 Wednesday, July 14, 1999 4:11 PM
8. The System 730 automatically
stops the tape when it reaches
the end. To stop the tape at any
time during recording, press
STOP/EJECT
RECORD
recording stops.
on TAPE 2.
PLAY
and
release, and
TAPE TIPS
Erasing a Cassette Tape
To record over a cassette tape, simply record over the previous recording.
: The tape you are recording
Note
over must be a normal bias-type
tape.
To quickly erase a tape, you might
prefer to use a bulk tape eraser, such
as Radio Shack Cat. No. 44-232.
Preventing Accidental
Erasure
Cassette tapes have two erase-protection tabs — one for each side.
To protect a recording from being accidentally recorded over or erased,
break off that side’s plastic tab with a
screwdriver.
If you break off a tab and decide later
that you want to record on that side of
the tape, caref ully cove r onl y t he t ab
hole for that side of the cassette with
a piece of adhesive tape.
Caution
tection tab does not prevent a bulk
eraser from erasing a cassette tape.
: Removing the erase-pro-
Restoring Tape Tension and
Sound Quality
After you play a cassette tape several times, the tape might become
tightly wound on the reel s. This can
cause playback sound quality to deteriorate.
To restore the sound quality, fast-forward the tape from the beginning to
the end of one side, then completely
rewind it. Then loosen the tape reels
by gently tapping each side of the
cassette’s outer shell on a flat surface.
Caution
the cassette when tapping it. Do not
touch the exposed tape o r allow any
sharp objects near the cassette.
: Be careful not to damage
34
Page 35

13-127 7.fm Page 35 Wednesday, July 14, 1999 4:11 PM
USING AN ADDITIONAL AUDIO SOURCE
If you connected a n additional a udio
source, such as a TV, VCR, turntable, or an external CD changer or
cassette deck, you can use your System 730 to listen to or record from
that source.
LISTENING TO AN
ADDITIONAL AUDIO
SOURCE
1. Set
2. Press
VOLUME
–
on the remote control), to its
lowest setting, and be sure that
the audio sou rce’s volume control (if any) is also set to its lowest level.
the remote control.
appears on the display.
(or press
VIDEO AUX
, or
VOLUME
VIDEO
VIDEO
on
RECORDING FROM AN
ADDITIONAL AUDIO
SOURCE
To record onto a cassette t ape from
an additional audio source, follow the
steps in “Recording from the Radio,”
with the following changes:
• In Step 1, press
VIDEO
on the remote control, so
VIDEO
• Begin play on the additional
audio source as instructed in its
owner’s manual after you
release
ing.
appears on the display.
PAUSE
VIDEO AUX
to begin record-
, or
3. Operate the audio source
according to its owner’s manual.
4. Set
VOLUME
+
or – on the remote control) and
the audio sou rce’s volume control (if any) to the de sired listening level.
(or press
VOLUME
35
Page 36

13-127 7.fm Page 36 Wednesday, July 14, 1999 4:11 PM
SPECIAL FEATURES
SETTING A WAKE UP
TIME
Like an alarm clock, you can set your
system to automat ically turn itsel f on
and play the last selected radio station, CD, or cassette tape.
1. Press
TIME
time appear, and
flashes on the display.
2. Within 5 seconds, press
to change the hour setting or
MINUTE
setting.
DISPLAY
and the last-set wa ke-up
three times.
WAKE-UP
HOUR
to change the minute
3. To turn on the wake-up timer,
within 5 seconds, press
REO/MODE
steadily on the display.
: If
Note
before you press
MODE
, repeat Steps 1 and 3
again.
4. Select the desired radio station,
CD, or cassette tape you want
the System 730 to play when it
turns itself on.
: If you selected a cassette
Note
tape, be sure to press
PAUSE
on the approp riate deck
(TA PE 1 or 2).
WAKE-UP
.
TIME
disappears
STE-
lights
STEREO/
PLAY
and
:
Notes
• When changing the hour, be
sure to set it to the correct AM
or PM hour.
TIME
•If
you finish setting the hour and
minute, start again from Step
1.
36
disappears before
5. Set
6. Press
VOLUME
+
–
or
the desired listening level, and
select the desired
graphic equalizer settings.
System 730. STAND-BY/MUTE
turns on, then the current time
WAKE-UP
and
on the display.
(or press
on the remote control) to
POWER
to turn off the
appear dimly lit
VOLUME
X-BASS
and
Page 37

13-127 7.fm Page 37 Wednesday, July 14, 1999 4:11 PM
Notes:
• If you selected a cassette tape, be sure to release
deck after you turn off the system.
• To turn off the wake-up timer, repeat Steps 1 and 3.
disappears from the display to indicate that the timer is turned off.
• Until you turn off the wake-up timer, the System 730 automatically turns
itself on every day at t he preset wake-up time and pl ays the last selected
radio station or CD. If no CD is loaded in the last selected CD position, the
system automatically selects the next CD.
PAUSE
WAKE-UP
on the selected
flashes then
SETTING THE SLEEP TIMER
You can set the System 730 to automatically turn itself off up to 90 minutes from
the time you set it.
1. Press
play.
DISPLAY
twice.
TIME
and 00 appear, and
SLEEP
flashes on the dis-
2. Within 5 seconds, repeatedly press
time is displayed.
The first time you press
appears, indicating the System 730 is set to turn itself off in 90 minutes.
STEREO/MODE
STEREO/MODE
SLEEP
,
until the desired sle ep
lights steadily and
90
37
Page 38

13-127 7.fm Page 38 Wednesday, July 14, 1999 4:11 PM
Each additional time you press
10 minutes.
Note
: If
disappears from
TIME
the display before you finish set ting the sleep time, repeat St eps
1-2 again.
3. The System 730 remains on for
the length of sleep time
selected, then automatically
turns itself off.
To turn off the system before the
sleep time has elapsed on the
dis play, pres s
POWER
.
STEREO/MODE
, the sleep time decreases by
To turn off the sleep timer and
continue using the System 730,
repeat Steps 1 and 2 and
choose a sleep time of 00 in
Step 2.
38
Page 39

13-127 7.fm Page 39 Wednesday, July 14, 1999 4:11 PM
USING AN EXTERNAL MICROPHONE
The System 730 lets you c onnect and hea r soun d from an ex ternal m icrophone
combined with sound from the radio, a prerecorded CD or cassette, or an additional audio source.
1
1. Plug the microphone’s
/8-inch plug into
2. Start play on the audio source you want to accompany the microphone.
MIC
on the front of the System 730.
3. Set
VOLUME
(or press
level, and select the desired
VOLUME + or –
X-BASS
on the remote control) to the desired
and graphic equalizer settings.
4. Speak or sing into the microphone to hear your voice combined with the
sound from the selected audio source.
39
Page 40

13-127 7.fm Page 40 Wednesday, July 14, 1999 4:11 PM
5. To increase the volume of the microphone’s sound input, turn
toward
MAX
. To decrease it, turn it toward
MIN
.
MIXING
40
Page 41

13-127 7.fm Page 41 Wednesday, July 14, 1999 4:11 PM
MAINTENANCE
Your Optimus Syst em 730 Mini Stereo Component System is an example of superior design and
craftsmanship. The following suggestions will help you care for your
System 730 so you c an enjoy it for
CLEANER
years.
Keep the System 730
dry. If it gets wet, wipe
it dry immediately.
Liquids might contain
minerals that can co rrode the electronic circuits.
Handle the System
730 gently and carefully. Dropping it can
damage circuit boards
and cases and can
cause the System 730
to work improperly.
parts.
Wipe the System 730
with a damp cloth occasionally to keep it
looking new. Do not
use harsh chemicals,
cleaning solvents, or
strong detergents to
clean the System 730.
Modifying or tampering with the System 730’s internal components can
cause a malfunction, might invalidate
its warranty, and void your FCC authorization to use it. If your System
730 s not performing as it should,
take it to your local Radio Shack
store for assistance.
Use and store the
System 730 only in
normal temperature
environments. Temperature extremes
can shorten the life of
electronic devices
and distort or melt
plastic parts.
Keep the System 730
away from dust and
dirt, which can cause
premature wear of
41
Page 42

13-127 7.fm Page 42 Wednesday, July 14, 1999 4:11 PM
THE FCC WA NTS YOU
TO KNOW
This stereo system complie s with the
limits for a Class B digital device as
specified in Part 15 of
These limits provide reasonable protection against radio and TV interference in a residential area. However,
your stereo system might cause TV
or radio interference even when it is
operating properly. To eliminate interference, you can t ry one or more
of the following corrective measures:
• Reorient or relocate the receiving antenna
• Increase the distance between
the stereo system and the radio
or TV
• Use outlets on different electrical
circuits for the stereo system
and the radio or TV
Consult your local Radio Shack store
if the problem still exists.
FCC Rules
CLEANING THE TAPEHANDLING PARTS
Dirt, dust or particles of a cassette
tape’s coating can accumulate on the
cassette deck tape heads, and other
.
parts that the tape touches. This can
greatly reduce the performance of
the cassette decks. Use the following
cleaning procedure for each deck after every 20 hours of tape player operation.
1. Be sure the system is off, then
disconnect power.
2. Open the cassette com partment
door on each deck.
3. Press
4. Use a cotton swab dipped in
PLAY
to expose the tape-
handling parts.
denatured alcohol or tape head
cleaning solution to clean each
deck’s record or play head,
pinch roller, capstan and erase
head.
You must use shielded interface c ables with this stereo system.
42
5. When you finish cleaning, close
each deck’s cassette compartment door and reconnect power.
Your local Radio Shack store sells a
complete line of cassette deck cleaning supplies.
Page 43

13-127 7.fm Page 43 Wednesday, July 14, 1999 4:11 PM
SPECIFICATIONS
Cassette Deck
Tape Speed 17/8 ips
Wow and Flutter 0.35% WRMS
Frequency Response (at -3 dB) 100
Hz–8 kHz
Recording System AC Bias
Erase System AC
CD Changer
Number of Programmable Tracks
50 Tracks
Frequency Response (at – 3 dB) 50
Hz–20 kHz
Dynamic Range 82 dB
Signal-to-Noise (JIS-A) 60 dB
Harmonic Distortion (at 1 kHz) .1%
Separation (at 1 kHz) 40 dB
Sampling Frequency 44.1 kHz
Quantization Number . 16-Bit Linear/
Channel
Oversampling 4 Times
Pick-Up System 3 Beam
Optical Source Semiconductor
Laser
Wavelength 760–820 nm
43
Page 44

13-127 7.fm Page 44 Wednesday, July 14, 1999 4:11 PM
General
Power Supply120V AC 60 Hz, 90W
Tuning RangeAM: 530–1710 kHz
FM: 88–108 MHz
1
Speaker Size 5
Impedance of Microphone Jack 600
Ω
Impedance of (Stereo) Headphones
Jack 16–32 Ω
Power Output 10 Watts per Channel
Remote Control Power 2 AAA Bat-
teries (Cat. No. 23-555)
Dimensions of Unit 13
1
11
/16 Inches (HWD)
(354 × 278 × 281 mm)
Dimensions of Speakers . 13
13
7
/16 x 69/16 Inches (HWD)
(354 × 198 × 167 mm)
Weight 24
/4 Inches
1
/4 lbs (11 Kg)
15
/16 x 1015/16 x
15
/16 x
Included Accessories.Remote Control
FM Antenna (300 Ω)
Specifications are typical; individual
units might vary. Specifications are
subject to change an d improvement
without notice.
44
Page 45

13-127 7.fm Page 45 Wednesday, July 14, 1999 4:11 PM
NOTES
45
Page 46

13-127 7.fm Page 46 Wednesday, July 14, 1999 4:11 PM
46
Page 47

13-127 7.fm Page 47 Wednesday, July 14, 1999 4:11 PM
47
Page 48

g
g
13-127 7.fm Page 48 Wednesday, July 14, 1999 4:11 PM
RADIO SHACK LIMITED WARRANTY
This product is warranted against defects for 90 days from date of purchase from Radio Shack company-owned stores and authorized Radio
Shack franchisees and dealers. Within this period, we will repair it without char
slip
not cover transportation costs. Nor does it cover a product subjected to
misuse or accident al dama
EXCEPT AS PROVIDED HEREIN, RADIO SHACK MAKES NO
EXPRESS WARRANTIES AND ANY IMPLIED WARRANTIES ARE LIMITED IN DURATION TO THE DURATION OF THE WRITTEN LIMITED
WARRANTIES CONTAINED HEREIN. Some states do not permit limitation or exclusion of implied warranties; therefore, the aforesaid limitation(s) or exclusion(s) may not apply to the purchaser.
This warranty gives you specifi c legal rights and you may also have o ther r ights which vary
from state to state.
e for parts and labor. Simply
as proof of purchase date to any Radio Shack store. Warranty does
e.
We Service Wh at W e Sell
bring your Radio Shack sales
9/94
RADIO SHACK
A Division of Tandy Corporation
Fort Worth, Texas 76102
6A5 Printed in Hong Kong
 Loading...