

Optimus Multiband PLL Radio, 12-808 Owner's Manual

Cat. No. 12-808
OWNER’S MANUAL
Please read before using this equipment.
Multiband PLL Radio
with Direct Key Entry
12-808.fm Page 1 Wednesday, November 3, 1999 9:56 AM

2
FEATURES
Your Optimus Multiband PLL Radio is designed for your active lifestyle. Its portable,
lightweight design lets you listen to music,
sports, or news almost anywhere you go.
The radio tunes the AM, FM, SW (short
wave), TV sound, and weather bands. The
radio’s alarm clock and sleep timer features
make it convenient for daily use.
Your radio's features include:
50 Station Memory
—
lets you store ten stations in each band into memory for easy access.
Five Band Selection
— lets you listen to
AM, FM, SW, TV sound, and weather stations.
Direct Entry for AM/FM/SW
—
lets you en-
ter a station’s frequency to easily tune it.
Backlit Liquid-Crystal Digital Display
—
clearly shows the time and the curr ently selected station.
Dual Time
—
lets you keep track of the time
in a different time zone.
Alarm Clock
—
turns on the radio automati-
cally at a time you set.
Sleep Timer
—
plays the radio for up to 90
minutes then automatically turns it off.
Built-in 3" Speaker
—
provides quality
sound that you can share with others.
Earphone Jack
—
lets you connect earphones or headphones (not supplied) to the
radio.
Three Power Sources
—
lets you power
your radio from intern al batteri es, your ve hicle's cigarette-lighter socket (using an optional DC adapter), or AC power (using an
optional AC adapter).
PLL Tuning
—
the radio’s digital phaselocked loop synthesizer provides drift-free
frequency tuning with the highest degree of
accuracy and stability.
Lock Switch
—
prevents you from acciden-
tally changing the tuned frequency.
DX/LOC (Sensitivity) Switch
—
lets you set
the radio for the best reception of distant or
local stations.
©
1999 Tandy Corporation.
All Rights Reserved.
Optimus, Adaptaplug, and RadioShack are registered trademarks used by Tandy Corporation.
12-808.fm Page 2 Wednesday, November 3, 1999 9:56 AM
3
PREPARATION
CONNECTING POWER
Your radio requires four AA batteries (not
supplied) for power and two AAA batteries
(not supplied) for clock and memory backup.
For the best performance and longest life,
we recommend RadioShack alkaline batteries.
Cautions:
• Use only fresh batteries of the required
size and recommended type.
• Do not mix old and new batteries, different types of batteries (standard, alkaline, or rechargeable), or rechargeable
batteries of different capacities.
You can also use optional nickel-cadmium
(Ni-Cd) batteries to power your radio. Before
you use Ni-Cd batteries, you must charge
them with a separate battery charger (available at your local RadioShack store).
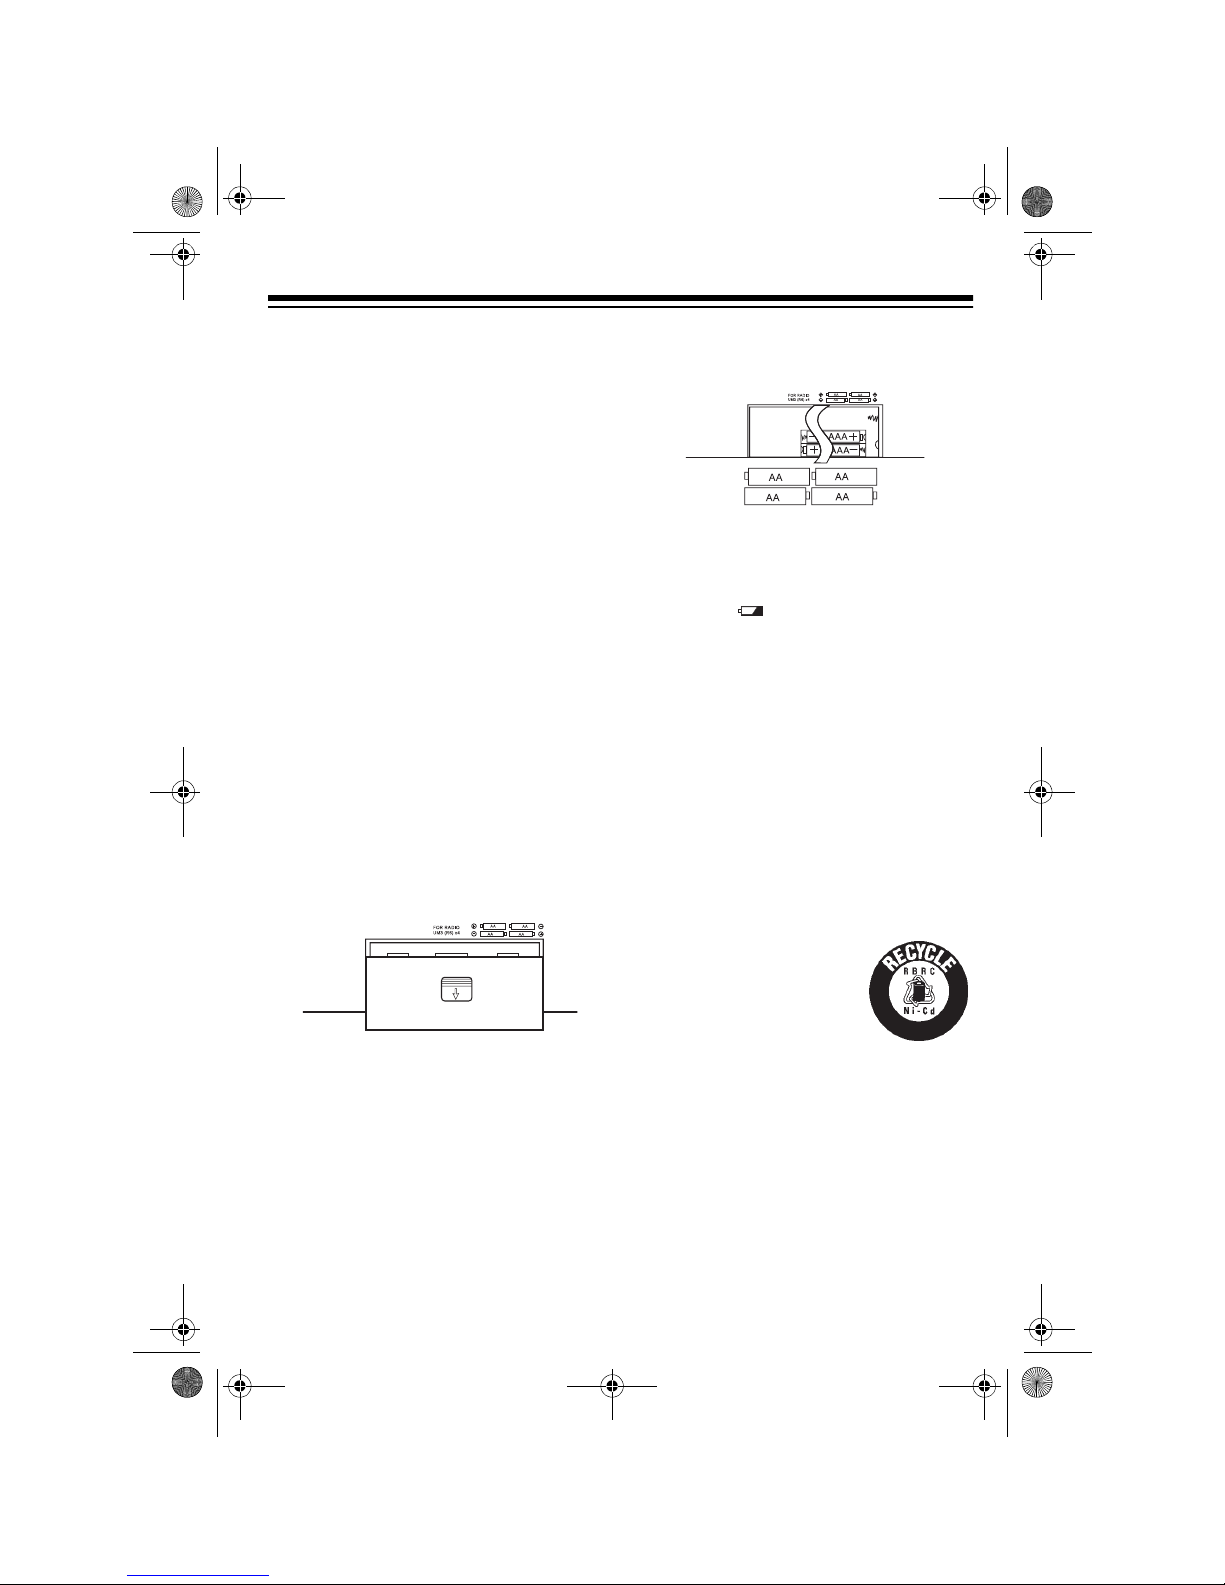
Follow these steps to install batteries.
1. Slide the battery compartment cover in
the direction of the arrow to remove it.
2. Place two AAA batteries in the compartment and on top of the attached ribbon,
as indicated by the polarity symbols (+
and –) marked above the compartment.
3. Place four AA batteries in the compartment as indicated by the polarity sym-
bols (+ and –) marked outside and
above the compartment.
4. Replace the cover.
When the radio does not receive usually
strong FM stations or if it stops operating
properly and flashes, replace the AA b atteries. Replace the AAA batteries about every
six months.
Note:
To prevent los ing the stati on memor y,
and alarm settings, replace the AAA batteries
within 30 seconds.
Warning:
Dispose of ol d batteries prompt ly
and properly. Do not burn or bury them.
Caution:
If you do not plan to use the radio
for several months, remove the batteries.
Batteries can leak chemicals that can destroy electronic parts.
Important:
This radio can
use nickel-cadmium rechargeable batteries. At the
end of a nickel- cadmium
battery's useful life, it must
be recycled or disposed of
properly. Contact your local, county, or state hazardous waste management authorities for information on
recycling or disposal programs in your area
or call 1-800-843-7422. Some options that
might be available are: municipal curbside
collection, drop-off boxes at retailers such as
your local RadioShack store, recycling collection centers, and mail-back programs.
1
-
8
0
0
-
8
4
3
-
7
4
2
2
12-808.fm Page 3 Wednesday, November 3, 1999 9:56 AM

4
Connecting an AC Adapter
You can power the radio usin g a 6V, 30 0-m A
AC adapter and a size M Adaptaplug
®
adapter (neither supplied). Both are available at
your local RadioShack store.
Cautions:
You must use a Class 2 power
source that supplies 6V DC
and delivers at least 300 mA.
Its center tip must be set to positive and
its plug must fit the radio's
DC 6V
jack.
Using an adapter that does not meet
these specifications could damage the
radio or the adapter.
• Always connect the AC adapter to the
radio before you connect it to AC power.
When you finish, disconnect the adapter
from AC powe r before you dis connect it
from the radio.
Connect the Adaptaplug adapter to the AC
adapter, plug the adapter into your radio’s
DC 6V
jack, then plug the other end of the
adapter into a standard AC outlet.
Connecting a DC Adapter
You can power the radio from a vehicle’s
12V cigarette -lighter sock et or similar po wer
source using a 6V, 300-mA DC adapter and
a size M Adaptaplug adapter (neither supplied). Both are available at your local RadioShack store.
Cautions:
You must use a power source
that supplies 6V DC and deliv-
ers at least 300 mA. Its center
tip must be set to positive and its plug
must fit the radio's
DC 6V
jack. Using an
adapter that does not meet these speci-
fications could damage the radio or the
adapter.
• Always connect the DC adapter to the
radio before you connect it to the power
source. Wh en y ou fi nis h, d isc onnec t t he
adapter from the power source before
you disconnect it from the radio.
Set the adapter’s voltage switch to 6V, connect the Adaptaplug adapter to the DC
adapter, plug the adapter into your radio’s
DC 6V
jack, then plug the other end of the
adapter into your ve hic le ’s 12V power source
socket.
Note:
If the radio does not charge properly,
unplug the adapter from the cigarette-lighter
socket and clean the so cket to remov e ashe s
and debris.
USING EARPHONES OR
HEADPHONES
The radio has a built-in speaker to listen to
but you can use stereo earphones or headphones (not supplied) with a
1
/8-inch (3.5-
mm) plug to listen privately.
Insert the earphones’ plug into the radio's
earphone jack.
Note:
The built-in speaker disconnects when
you connect an earphone or headphones.
Listening Safely
To protect your hearing, follow these guidelines when you use earphones or headphones.
• Set the volume to the lowest setting
before you begin listening. After you
begin listening, adjust the volume to a
comfortable level.
!
!
12-808.fm Page 4 Wednesday, November 3, 1999 9:56 AM
 Loading...