

Page 1
OPTIMUS
HIKER+
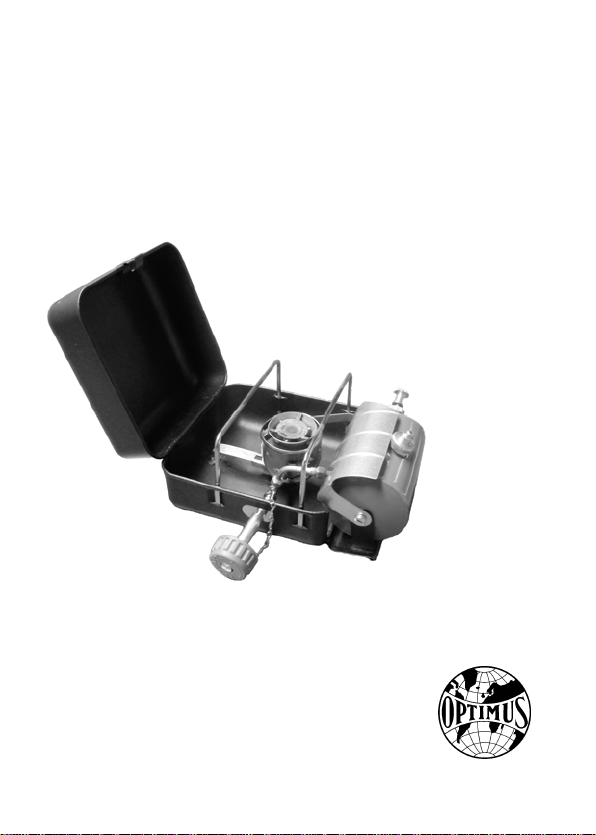
PARTS OF THE STOVE
1
4
9 3
5
7 8 2
6
1. Stove lid
2. Tank
3. Tank lid
4. Pump
5. Heat shield
6. Control knob
7. Fuel Control
valve
8. Fuel Pipe
9. Burner
Page 2

PEACE AND QUIET
Congratulations, you’re the proud new owner of one of the world’s most robust and
dependable stoves. That must mean you’re on your way to exciting and demanding
adventures. We know that you’ve made a smart choice with this stove and when you
use it, you’ll know too. Get ready for great outdoor cooking, thanks to over a century of
success at Optimus.
Being the outdoor enthusiasts we are, we understand that you’re probably curious
about your new stove and anxious to try it out as soon as possible. But even if you
have plenty of experience with similar products, please read the manual so you
become familiar with the specifics relating to this stove.
All of us at Optimus hope that you will take the time to sit down and enjoy the peace
and quiet unique to food preparation in the Great Outdoors.
Good luck, and bon appétit!
SAFETY FIRST
When you use your Optimus Hiker+, you’ll be handling highly flammable fuels. If used
incorrectly, you will be putting yourself and everything around you in danger. Make sure
that you’ve understood everything in this manual before using the stove. Try it out and
get to know it properly before you head out for adventure.
Check that no fuel is leaking before you light the stove. If you have spilled any fuel, the
safest thing is to move the stove. If you discover fuel leaking from any part of the stove,
the leak must be taken care of before the stove is used. Never use a stove that is
leaking fuel.
The Optimus Hiker+ is designed for outdoor use only. A lit stove consumes oxygen and
gives off carbon monoxide. If you use the stove indoors in an unventilated area or in a
tent, you run the risk of falling victim to carbon monoxide poisoning.
Make sure that you never hold your face or any other part of your body over the stove.
Also make sure you keep your clothes away from the stove. Many materials used for
outdoor clothing, sleeping bags, etc. are highly flammable.
Be very careful when lighting a stove that has just been used. A hot burner can
vaporize the fuel. The fuel may ignite explosively. Allow the stove to cool properly
before lighting it again.
Never leave the stove without supervision. Never leave children unattended near the
stove.
Use Optimus Hiker+ only for cooking food and boiling water.
Page 3

HOW YOUR STOVE WORKS
The Optimus Hiker+ is a multifuel stove. This means that you can use a number of
different liquid fuels, such as gasoline, diesel and kerosene. Unlike propane gas, these
are often easier to get hold of even in the most remote corners of the globe. They also
make your stove considerably more powerful when used during winter trips.
Preparing food on a multifuel stove using liquid fuel is slightly more complicated than
using a gas stove. First off, the fuel has to be pressurized in order to make the stove as
hot as possible. The gas in a gas tank is already pressurized when you buy it from the
shop, but the liquid fuel you put in your fuel tank is not. Therefore, you have to pump up
the pressure in the tank yourself.
You also need to prime the stove for a short time using a squirt of fuel. Priming involves
heating up the burner to such an extent that the fuel is vaporized when it passes
through the burner’s nozzle. Vaporized fuel burns efficiently with a blue flame and a
hissing sound.
FUELS
The Optimus Hiker+ has a burner designed to use petroleum-based fuels. Therefore,
you cannot use alcohol-based fuel. We recommend that y ou use chemically pure
gasoline or high-quality kerosene. Under no circumstances should you handle fuel near
a lit stove or in your tent. Use a funnel with a filter when filling the tank so as to avoid dirt
and foreign bodies getting into the fuel. Never mix different kinds of fuel. Empty the tank
entirely before putting in a different fuel.
Expect to use 100 – 150 ml (3.3 – 5.0 fl. oz.) fuel per person per day. In the winter, you
will use more fuel for melting snow, priming for longer, et c. In this instance, expect to
use twice as much fuel. To keep your fuel consumption down, it is important to adjust
the flame so that the stove burns as efficiently as possible.
TECHNICAL SPECIFICATION
Fuel:
Optimus Arctic Fuel, White Gas,
Gasoline/Petrol, Kerosene, Diesel,
Jet Fuel, and others
Weight:
1560 grams (55 oz)
Measurements folded:
180x180x110 mm
(7x7x4 inches)
Rating:
2850 W
Burn time:
Up to 1.5 hours at maximum
output (using 350 ml / 12 fl. oz.
fuel)
Boil time:
As little as 3.5 minutes
depending on climate, altitude,
etc.
Page 4

Follow these step-by-step instructions on how to use the stove
1 Open the lid of the stove’s box and slide out the tank.
2 Cleaning the nozzle in the burner.
All fuels may contain impurities that can block the nozzle in the burner. The Optimus
Hiker+ has a built-in cleaning needle that is used to clean the nozzle with ease. Slide
the tank in and out a few times. The magnets underneath the burner force the needle
to move, thereby cleaning the nozzle.
Get into the habit of cleaning the nozzle of the stove before you start preparing food.
This will reduce the risk of the nozzle in the burner getting blocked. See the section
entitled “Maintenance” if the stove functions poorly even though it has been cleared
by sliding the tank in and out.
3 Fill the tank 2/3 full with fuel and screw on the tank lid.
Do not fill the fuel tank completely. It should only be filled approximately 2/3 full
(350 ml / 12 fl. oz.). You have to leave some space for the air that will be compressed
when you pump up the pressure.
Read more about fuels on the previous page.
WARNING! Make sure that you stay well away from a lit stove or naked flame
when you are filling the tank with fuel.
4 Attach the stove’s control knob to the burner and turn it off (-).
The stove’s control knob is used to adjust the fuel control valve on the burner. Make
sure that you turn the control knob in it’s off position all the way to the right (-) before
pumping pressure into the tank.
It gets very hot under the stove, so remember to place the stove on a firm base which
cannot catch fire.
Do not use a pan that covers the tank lid. Covering the tank lid may expose the tank
lid to excessive heat that can melt the tank lids o-rings resulting in fuel leakage. The
weight of the pan plus food should not exceed 6 kg (13 lbs).
WARNING! Do not place the stove on or near flammable materials. Do not remove the tanks heat shield. Do not use a pan that covers the tank lid.
5 Pump up pressure in the fuel tank 10-20 times
The fuel in the tank is normally not left pressurized between use, so you have to pump
up pressure before the stove can be lit and used.
If the fuel tank is full (2/3 is full), you will need to pump approximately 10 times. Pump
about 20 times if the tank is half full or less. There must be firm resistance in the pump
when you reach the stove’s working pressure.
The air pressure in the fuel tank is crucial to the heat of the stove. When preparing
food, you may have to do some more pumping in order to maintain maximum heat.
If you pump up too high a pressure however, the fue l flow will be too great resulting
in a yellow flame.
WARNING! Make sure that no fuel is leaking out before you light the stove. Never
light a stove that is leaking fuel.
6 Release a small amount of fuel for priming.
The stove’s burner has to be hot to allow the liquid fuel to vaporize at the nozzle and
burn efficiently. Therefore, you have to prime the burner before you can start
preparing food. This is done by first releasing a squirt of fuel and allowing it to burn
for a short time, heating up the nozzle in the burner.
The priming time varies depending on what type of fuel you are using. For example,
gasoline is vaporized more readily than kerosene and requires less priming.
Priming takes longer when it is cold and if the stove is not protected from the wind.
Start by turning the stove’s control knob to the left (+) for two seconds. It is difficult to
see how much fuel has run out onto the wick, but as you get used to your stove you will
get a feel for this. Proceed with caution as you become familiar with your stove.
WARNING! Check for fuel leaks at the tank, pump, and burner before lighting the
stove.
7 Light the fuel and wait until the flame has almost burned out.
Light the fuel at th e wick using a match or lighter. The wick is the white pad located
under the burner inside the cup. This is accessed via one of the holes in the cup.
Of course, it is important to make sure that you never hold your face or any other part
of your body directly over the stove when you light it. The fuel may ignite explosively.
If the stove cannot be lit, you might not have released enough fuel. If this is the case,
repeat step 6.
The fuel will burn with a yellow, flaring flame and heat the burner. Wait a short time
until the fuel has almost burned out and the flame has become small.
WARNING. Keep children away from the stove and never leave it without
supervision.
8 Open the control knob (+) again and adjust the flame.
Once the priming flames are almost out, open the control knob (+) again by about
a quarter turn. If the burner is hot enough, the fuel will vaporize and be ignited by the
priming flame. The flame should then turn bluish and hiss gently after a short time.
If the vaporized fuel does not ignite, light it carefully with a match.
A yellow, flaring flame means that the burner is not hot enough or that you have
opened the control knob too far. Start off by turning down (-) the control knob a little.
If the flame does not turn blue after 10-15 seconds, the burner is not hot enough and
you have to prime the stove a little longer. When this happens there is often to much
fuel on the wick. Turn down the control knob one more time, wait until the flames are
almost out and then open the control knob again.
When the stove is burning as it should, you can gradually open the control knob and
increase the stoves heat. Maximum heat is attained when the control knob has been
opened by about two turns. If you open it by more than two turns, you will use up more
fuel without making the stove any hotter. If the flame flares up and turns yellow, turn
down the control knob slightly and wait until the flame has turned blue again.
The burner is designed to burn best and give maxi mum heat with a pan in place.
Once the stove has been burning for a while, it may be a good idea to pump a couple
of times in order to maintain pressure in the tank. Too little pressure in the tank will
result in poor performance. Too much pressure will also lead to poor performance and
a yellow, flaring flame. With a little practice, you will learn how often and how much to
pump in order to maintain an effective flame.
WARNING! Never move a hot stove or a stove that is in use.
9 Shut off the stove by turning the control knob all the way to the left (-).
If the stove is not to be used for a while or packed away, air pressure should be
released from the tank. Turn off the stove and let it cool off properly before slowly
opening the tank lid letting the air pressure escape. Remember to tighten the tank
lid when pressure has been released.
WARNING! Be very careful when lighting a stove that has just been used. A hot
burner can vaporize the fuel. Vaporized fuel is very difficult to see. There is a risk
that the fuel will ignite explosively and you get burned.
10 Let the stove cool down.
Allow the stove to cool properly before packing it. Alw ays close the control knob and
the tank lid properly when you have shut off the stove.
MAINTENANCE – ROUTINE MEASURES
CLEANING THE NOZZLE
You should clean the nozzle in the burner every time you use the stove. This is done
by moving the burner back and forth a few times in the box to pass the magnets beneath the burner’s base nut. The patented Optimus cleaning needle will then be activated.
CHECKING THE O-RINGS
It is important to ensure that the spindle O-rings are complete and undamaged in order
to avoid fuel leakage. Get into the habit of occasionally checking the two O-rings by
unscrewing the control valve and spindle. Replace the O-rings if you suspect that they
are cracked or otherwise damaged.
If you are out in winter, you must pay particular attention to all rubber O-rings and
seals. These may become hard and brittle in severe cold, and possibly crack. To be on
the safe side, replace the old ones and take a few spares with you.
LUBRICATING THE PUMP LEATHER
You should lubricate the pump leather using Optimus lubricant so the pump will
function perfectly. It is particularly important to check this if the stove has not been
used for a long time. The pump leather is located at the far end of the pump rod. This is
accessed by unscrewing the pump rod and pulling out the pump rod entirely from the
pipe. Lubricate the leather using a small amount of lubricant or petroleum based oil
(butter can be used in an emergency). Be careful when replacing the pump rod.
MORE ADVANCED MAINTENANCE AND SERVICE
CLEANING THE NOZZLE AND CLEANING NEEDLE
If the stove is not functioning satisfactorily and the routine measures above do not help,
the nozzle and cleaning needle may need to be cleaned. Remove the burner plate, use
a screwdriver or similar tool to unscrew the nozzle. Remove the cleaning needle from
the burner. Wipe clean the cleaning needle body and the inside of the nozzle. Clean
the nozzle hole by carefully pushing the cleaning needle through the nozzle.
CLEANING THE SPINDLE’S FUEL GROOVES
If the stove is still not getting hot enough even though you have cleaned the nozzle
and cleaning needle, the spindle’s fuel grooves may need to be cleaned. Unscrew the
control valve (+) as far as it will go. Use a wrench or similar tool to unscrew the spindle
nut. Unscrew the control valve fully and then pull it out together with the spindle. Clean
carefully the three grooves running longitudinally, with the spindle on the tip, using a
fingernail, for example. Take care not to damage the spindle threads.
REPLACING THE FUEL FILTER
If you are still having problems with the stove, the fuel filter may need to be replaced.
The fuel filter is located inside the screw connector between burner and fuel pipe.
Unscrew the mounting nut and pry the filter out using a pointed object. Make sure the
filter holder is clean before inserting the new filter. If you have problems with the fuel
filter, you can use the stove without one for a brief period. However, the burner nozzle
may clog from impurities in the fuel. Some fuels also tend to flare more if no filter is
fitted. Replace the filter when you get home.
Page 5

SPARE PARTS
Set 1
Set 1 Art. No. 8017988
Set 2 Art No. 8017989
8017883
8017882
Set 2
Set 1
Set 1
SPARE PARTS
We recommend that you perform regular maintenance in order to enhance the life and
reliability of the stove. For this purpose, Optimus provides a Hiker Extensive Repair
Kit ITEM NO. 8017988. Also, if you are going off on longer trips, we recommend that
you take along this repair kit for your Optimus Hiker+ stove.
WARRANTY
Optimus provides a 2-year warranty against manufacturing defects. Proof of purchase
showing the date the product was purchased and where is required for this warranty to
be valid. The warranty is valid for the origi nal purchaser only. This warranty does not
cover damage due to accident, improper use or modifications carried out by the user.
If you have any problems with your Optimus Hiker+, return it to your dealer or contact
Optimus. Clear food and dirt from the stove before handing it over.
For more information, contact your dealer or Optimus. If you need this manual in another language please visit our website www. optimusstoves.com.
Print Nr. 8017990/0
 Loading...