

Page 1

QUALITYYOUCANTRUST
USER’SMANUAL
FOODDEHYDRATOR
Page 2

CONTENTS WELCOME TO YOUR NEW KITCHEN ASSISTANT
WELCOMETOYOURNEWKITCHENASSISTANT 1
SAFETYFIRST 2
GETTINGTOKNOWYOURDEHYDRATOR 4
USINGYOURDEHYDRATOR 5
INGREDIENTPREPARATION 6
FOODSTORAGEANDREHYDRATION 8
FOODDRYINGGUIDE:VEGETABLES 10
FOODDRYINGGUIDE:FRUITS 11
FOODDRYINGGUIDE:MEATS 11
Congratulations on your purchase of the natural health food assistant, the Optimum Stainless Steel
Food Dehydrator. Dehydration is one of the oldest and most eective forms of food preservation.
The North American Indians preserved meat by sun-drying, the Japanese dried fish and rice and
the Chinese have been drying eggs for centuries. Dehydration allows you to preserve many types
of food for indefinite periods by removing the moisture in meats, fruits and vegetables, enabling
them to last for months instead of days without refrigeration. There are numerous health benefits
associated with dehydrated foods, including concentrated taste, retention of valuable vitamins and
minerals and no added preservatives, additives or chemicals.
With your new Dehydrator, you will be able to create natural, healthy snacks and robustly
flavoured meals brimming with goodness for you and your family.
Foods are considered RAW with the majority of phytonutrients, vitamins and minerals intact when
it is unheated and remains under 40-48°C (105-118°F) for an extended period of time. Dehydration is a
popular gourmet food preparation method which creates a natural crisp and crunchy texture.
Many variables can aect the results of food dehydration such as room temperature, humidity and
the moisture levels in the food you are drying. To master the various dehydration techniques, it will
be necessary to experiment with your drying processes. Too much heat may harden your food, whilst
too little heat may increase the time taken to achieve your desired results. Just about anything can
be dehydrated, so start experimenting to discover a whole new world of healthy food possibilities.
TO ENSURE YOUR SAFETY AND TO GET THE BEST PERFORMANCE FROM
YOUR DEHYDRATOR, PLEASE READ THESE INSTRUCTIONS CAREFULLY.
CLEANINGANDMAINTENANCE 12
SPECIFICATIONS 13
WARRANTYTERMSANDCONDITIONS 14
CONTACTUS 15
1
Page 3

SAFETY FIRST
READ THIS USER MANUAL CAREFULLY BEFORE YOU USE THE
APPLIANCE AND KEEP THE MANUAL FOR FUTURE REFERENCE.
WHEN USINGTHEAPPLIANCE,BASICSAFETYPRECAUTIONS
SHOULDBEFOLLOWEDATALLTIMES,INCLUDINGTHEFOLLOWING:
1. CHECK FOR DAMAGED PARTS. Before using the appliance, check that all parts are operating
properly and perform their intended functions. Check for any conditions that may aect the
appliance’s operation. DO NOT use if the power cord is damaged or frayed.
2. To avoid starting the appliance unintentionally, ensure the power switch is in the “OFF” position
before connecting the appliance to the power outlet.
3. ALWAYS DISCONNECT the appliance from the power outlet before servicing, changing
accessories, disassembling or cleaning the appliance. Unplug the appliance when not in use.
4. KEEP CHILDREN AWAY. NEVER LEAVE THE APPLIANCE UNATTENDED. Always monitor the
appliance while in use.
5. The Manufacturer is relieved of any responsibility in case of improper use of the appliance.
Improper use of the appliance will void warranty.
6. Electrical repair must be conducted by the authorised Service Centre. Use only original factory
parts and accessories. Modification of the appliance voids warranty. NEVER open the rear panel
of the appliance. NEVER remove the back screen from the appliance.
7. DO NOT pull the power cord to unplug the appliance. You are strongly advised to NOT use
extension cords with the appliance. If an extension cord is used, ensure the marked electrical
rating is at least as great as the electrical rating of this appliance.
8. Ensure the appliance is stable during use. All four rubber feet of the appliance are placed
securely on a level surface. The appliance should not move when in use.
9. DO NOT use the appliance outdoors or near any flammable or combustible material. The
appliance is for INDOOR USE ONLY. NOT FOR COMMERCIAL USE.
10. USE IN A WELL VENTILATED LOCATION.
11. DO NOT block air vents on the door or at the rear of the appliance. Keep the appliance at least
12” (30.5 cm) away from any wall to allow for proper air circulation.
12. DO NOT operate the appliance on flammable surfaces, such as carpeting, etc.
13. To prevent electric shock, DO NOT IMMERSE THE APPLIANCE AND CONTROL PANEL IN
WATER OR OTHER LIQUIDS. This could result in serious injury from electric shock. DO NOT use
appliance with wet hands or bare feet. DO NOT operate the appliance near running water.
14. Disconnect the appliance from the power outlet before cleaning components. READ ALL
INSTRUCTIONS before cleaning the appliance.
15. After cleaning, ensure the appliance is completely dry before reconnecting to the power outlet
to prevent ELECTRIC SHOCK.
16. DO NOT place or use the appliance or any parts on or near hot gas, electric burner, in a heated
oven, or on a stove top. DO NOT let the power cord hang over the edge of a table, counter or
touch any hot surfaces.
17. BEWARE! Surfaces on the appliance may become HOT during use! Serious burns and injury may
result! Use handles or knobs only.
18. Do not use the appliance for other than its intended use.
19. If the appliance malfunctions during use, shut down the appliance IMMEDIATELY and discontinue
use. DO NOT attempt to open the Control Panel. This product has no user-serviceable parts.
Always contact the authorised Service Centre if the appliance malfunctions or for servicing.
DO NOT use or replace with any unauthorised parts not intended for this unit. All parts for this
appliance must be used according to this Instruction Manual. ONLY use manufacturer approved
parts from the authorised Service Center. Any other parts or accessories not intended for use
with this appliance is strictly prohibited and will void warranty.
20. The use of accessory attachments not recommended by the Manufacturer is forbidden and may
cause injuries.
2 3
Page 4
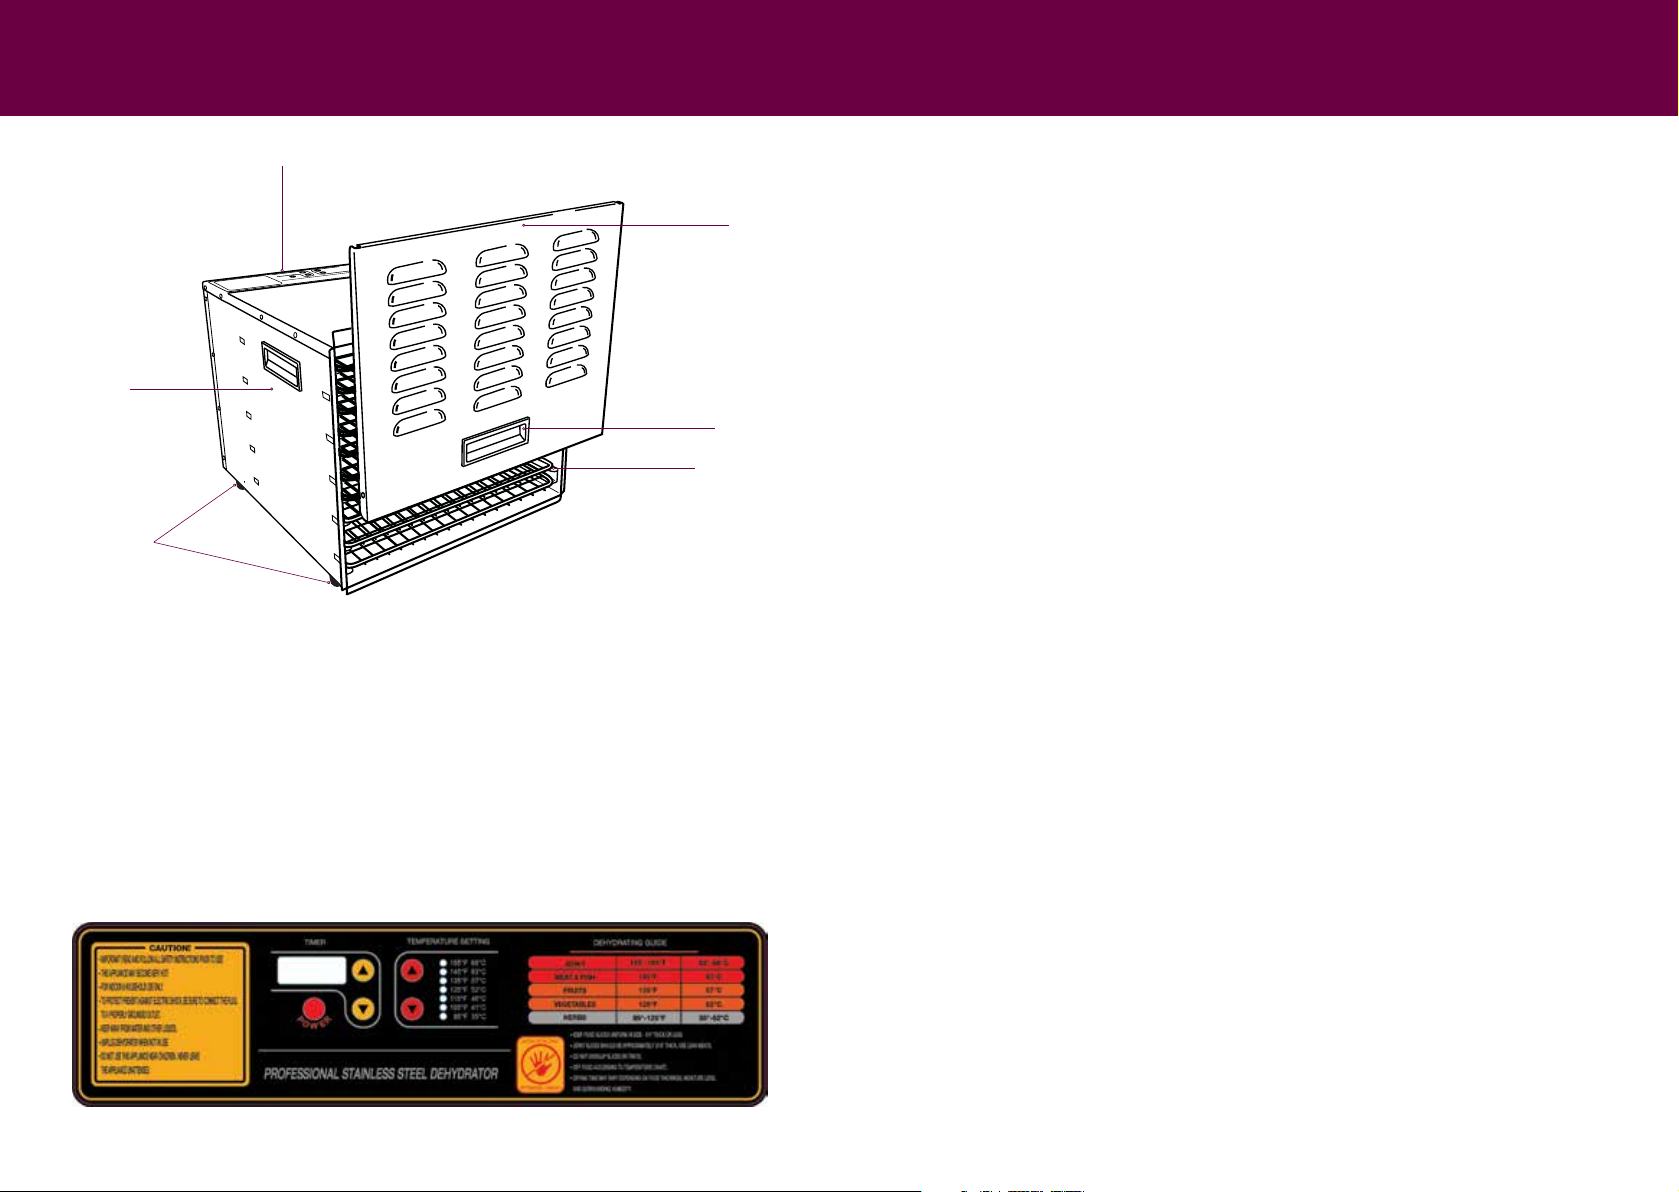
USING YOUR DEHYDRATORGETTING TO KNOW YOUR DEHYDRATOR
Control panel
Dehydrator
cabinet
Removable
drying trays
Rubber feet
INCLUSIONS
Tray insert
5 x Small hole trays, ideal when drying smaller ingredients.
5 x Large hole trays, ideal when drying larger ingredients.
2 x Mesh inserts, reusable and ideal for placing on top or underneath ingredients being dried.
Door
Handle
For your safety and the best results, read all operating instructions before using the appliance.
1. Operate the appliance on a clean, dry surface.
2. Plug the appliance into a standard 230V, 50Hz power outlet.
3. Position the appliance at least 12” (30.5cm) from any wall during operation to allow for proper air
circulation. DO NOT block air vents at the rear or on the door of the appliance.
4. Remove Racks from the appliance. Load removable food trays with food to be dried. Position
pieces so they do not overlap or touch each other. Allow ample space between pieces of food
for proper air circulation. Remove any excess water from food by patting it with a paper towel.
Excess moisture may cause the temperature of the appliance to drop.
5. Press the ‘up’ or ‘down’ button under the Temperature Setting of the Control Panel to adjust
the temperature to your desired setting. It is recommended to place an oven thermometer (not
included) into the appliance to monitor the temperature.
6. Press the ‘up’ or ‘down’ button under the Timer of the Control Panel to adjust the time to your
desired setting of up to 15 hours.
7. Press ‘Power’ to start drying process.
8. Preheat the appliance for 5-10 minutes before loading the trays into the appliance.
9. Install the Door onto the Dehydrator Cabinet by attaching the door onto the lip on top of the
Cabinet and sliding the door downwards. Ensure the sides of the Door are attached securely
against the Cabinet. CAUTION: SHARP EDGES.
10. Water droplets may form on the surface of the food while dehydrating. Excess humidity can be
removed by blotting food with a paper towel. CAUTION: the appliance can become hot!
NOTE: Drying time may vary depending on several factors, including relative humidity, air
temperature, product thickness and fat content. Actual temperature in the appliance is based on
room temperature of 70°F (21°C). If the appliance is not used in room temperature setting of 70°F
(21°C), temperature indicated on Temperature Setting may not be achieved or may be exceeded.
Control panel
4 5
Page 5

INGREDIENT PREPARATION
TOOLS YOU NEED TO GET STARTED
• Paring knife (Stainless Steel Blade)
• Cutting board
• Storage containers
ADDITIONAL TOOLS TO SPEED UP THE PROCESS:
• A food processor or other similar appliance for faster and consistent slicing
• A steamer and basket, or kettle and collapsible steamer for blanching
• Blender for making fruit puree for fruit leather
• A small notebook to keep track of the length of time and recipes which work and do not work
foryou.
BASIC FOOD PREPARATION TIPS
• Fruit and vegetable peels often contain most of the food’s nutritional value. Therefore, it is better
not to peel if the dried food is to be eaten as snack or used in cookies. On the other hand,
you will want to peel apples intended for a pie or tomatoes intended for soup. Generally, if you
usually peel the food for a specific recipe, then peel the food before it is to be dehydrated.
• One of the most important factors in successful dehydration is how the food is sliced. When
drying fruits, it helps to ensure all the slices have the same thickness so they dry evenly. Also,
keep in mind that thick slices dry more slowly than thin slices.
• During dehydration, moisture escapes best from a cut or broken surface absent of the skin.
Therefore, the larger the cut area, the faster and better the food will dehydrate.
• For example, thin stalked vegetables, such as green beans, asparagus and rhubarb should be
cut lengthwise, or with an extreme diagonal cut to expose as much of its flesh as possible.
• Fruits should be sliced across the core and not down through the core. Try to always make thin,
flatcuts.
• Broccoli stems should be halved or quartered depending on its diameter. Small fruits, such as
strawberries, can be halved. Even smaller berries should either be halved or blanched slightly to
break the skin.
FILLING THE DRYING TRAYS
• When loading food on the trays, you can make use of all of the tray’s surface, while allowing
some airflow to be maintained. Place food in a single layer whenever possible to ensure
uniformdehydration.
• Dehydration removes moisture and will cause food to shrink as it dries. This allows you to
store the same amount of food in a smaller space. Chopped food should not be spread thicker
than1cm.
• It may be necessary to stir the finely chopped food once or twice during dehydration to ensure
even drying of all the pieces. To do so, turn the machine o, unplug it, remove the trays, stir, then
reassemble and restart the machine according to the instructions on page 5.
PREVENTING DRIPPING
• Some foods such as very ripe tomatoes and citrus or sugared fruits may drip juices. Dripping
can change the flavour of dierent foods on lower trays. To lessen dripping, tap the tray firmly
downward on a towel laid on the counter top repeatedly for a few times to remove excess
moisture before inserting the tray into the appliance.
6 7
Page 6

FOOD STORAGE AND REHYDRATION
FOOD STORAGE
Dried foods should be allowed to cool before being sealed in an airtight container. This will prevent
the formation of condensation and ensure your produce has the longest possible shelf life.
When properly used, vacuum-sealed bags provide ideal storage. The lesser the air present, the
less conducive it is for bacteria and micro-organisms. Stored foods should be checked monthly
for bacteria, insects and mould. If any mould is detected, it is best to dispose of the produce and
revisit your dehydration process. Use a clean, dry container in the future to prevent facing the
sameproblem.
REHYDRATION
Rehydration is the replacement of moisture to bring the food back to its natural state. Although some
dried foods, such as fruits, are excellent in their dehydrated state, you will often want to reconstitute
other dried foods before eating them. Here are some tips on rehydration:
Adding Water
• For chopped or shredded vegetables, and for fruits to be used in cookies, no rehydration is
usually needed. If the pieces are quite crisp and dry, you can try sprinkling with 1 tbs. water per
cup of driedfood.
• For vegetables and fruits to be used in soues, pies, quick breads, doughs or batter, use 2 parts
water to 3 parts (by volume) dried food.
• For vegetables and fruits which will be cooked in a liquid such as vegetable side dishes, fruit
toppings and compotes, use 1 to 1½ parts water to 1 part dried food. Extra liquid may be required
during cooking.
Duration
• Chopped and shredded foods reconstitute quickly. Generally, 15 to 30 minutes is sucient.
• Larger vegetables, fruit slices or meat cubes can be reconstituted overnight in water, left in
the refrigerator. Alternately, you can also chose to place the food in boiling water, remove from
stove, and let it stand for 2 to 3 hours.
• Whole pieces of fruit take the longest to reconstitute, and are best left to soak overnight.
Other Tips
• If you drain reconstituted foods, save the liquid. This liquid has great nutritional value. Freeze this
liquid for later use in soups, leathers, pies or compotes.
• There is no need to reconstitute ahead of time when making soups. Dried vegetables can be
added directly to the soup about one hour before serving.
• Do not add spices, salt, bouillon cubes or tomato products until vegetables are reconstituted and
cooked. These items hinder rehydration considerably.
• Some foods take longer to reconstitute than others. Carrots and beans require more time than
green peas or potatoes. A rule of thumb: Food which take the longest to dehydrate will take the
longest to reconstitute.
• Try not to use more liquid than necessary for rehydrating as nutrients will be drained away with
the excess water. Place dehydrated food in a container and use just enough water to cover the
food. Add more water later as needed to replace what the food absorbs.
8 9
Page 7

FOOD DRYING GUIDE
VEGETABLES : SET TEMPERATURE TO 52°C (125°F)
FOOD PREPARATION CONSISTENCY TIME
Artichokes Cut into ⅓” strips. Boil about 10 minutes. Brittle 6-14 hours
Asparagus Cut into 1” pieces. Tips yield better result. Brittle 6-14 hours
Beans Cut and steam blanch until translucent. Brittle 8-26 hours
Beets Blanch, cool, remove tops and roots. Slice. Brittle 8-26 hours
Brussel Sprouts Cut sprouts from stalk. Halve, lengthwise. Crispy 8-30 hours
Broccoli Trim and cut. Steam until tender, about 3 - 5 minutes. Brittle 6-20 hours
Cabbages Trim and cut into ⅛” strips. Cut core into ¼” strips. Leathery 6-14 hours
Carrots Steam until tender. Shred or cut into slices. Leathery 6-12 hours
Cauliflower Steam blanch until tender. Trim and cut. Leathery 6-16 hours
Celery Cut stalks into ¼” slices. Brittle 6-14 hours
Chives Chop. Brittle 6-10 hours
Cucumbers Pare and cut into ½” slices. Leathery 6-18 hours
Eggplant/
Squash
Garlic Remove skin from clove and slice. Brittle 6-16 hours
Hot Peppers Dry whole. Leathery 6-14 hours
Trim and slice into ¼” – ½” slices. Brittle 6-18 hours
FRUITS : SET TEMPERATURE TO 57°C (135°F)
FOOD PREPARATION CONSISTENCY TIME
Apples Pare, core and cut into slices or rings. Pliable 5-6 hours
Apricots Clean, cut in halves or in slices. Pliable
Bananas Peel and cut into ⅛” slices. Crisp 8-38 hours
Berries
Cherries Pitting is optional, or pit when 50% dry. Leathery 8-34 hours
Cranberries Chop or leave whole. Pliable 6-26 hours
Dates Pit and slice. Leathery 6-26 hours
Figs Slice. Leathery 6-26 hours
Grapes Leave whole. Pliable 8-38 hours
Nectarines
Orange Peels Peel in long strips. Brittle 8-16 hours
Peaches Pit when 50% dry. Halve or quarter with cut side up. Pliable
Pears Peel and slice. Pliable 8-30 hours
Cut strawberries into ⅜” slices.
Other berries, leave whole.
Cut in half, dry with skin side down.
Pit when 50%dry.
Pliable 8-26 hours
Pliable 8-26 hours
12-38
hours
10-34
hours
Mushrooms Slice, chop or dry whole. Leathery 6-14 hours
Onions Slice thinly or chop. Brittle 8-14 hours
Peas Shell and blanch for 3 - 5 minutes. Brittle 8-14 hours
Peppers Cut into ¼” strips or rings. Remove seeds. Brittle 4-14 hours
Potatoes Slice, dice or cut. Steam blanch for 8 - 10 minutes. Brittle 6-18 hours
Rhubarb Remove outer skin and cut into ⅛” lengths. No moisture 6-38 hours
Spinach, Kale,
etc.
Tomatoes Remove skin. Cut in halves or slices. Leathery 8-24 hours
Zucchini Slice into ¼” slices. Brittle 6-18 hours
Steam blanch until wilted, but not soggy. Brittle 6-16 hours
10 11
MEATS : SET TEMPERATURE TO 63-68°C (145-155°F)
FOOD PREPARATION CONSISTENCY TIME
Beef Jerkies
Lean flank or round steak slices about 1” to
1½” thick.
Slightly chewy,
but not brittle
6-15 hours
Page 8

CLEANING AND MAINTENANCE SPECIFICATIONS
CLEANING
After each use, clean the drying trays and dehydrator door with warm soapy water. Do not wash
trays, door or base in dishwasher. Stubborn particles may be removed by soaking and/or using a
plastic scrubber. Do not use abrasive materials or solvents to clean stainless steel! To clean the
dehydrator’s base (the bottom part with the motor and heating element), unplug and wipe clean
with a damp sponge or cloth. NEVER immerse the base in water or allow liquid to flow into the area
containing the electrical parts.
STORAGE
After the appliance is cleaned, dry all parts, stack drying trays on the base, and store in a clean and
dry place.
Product Food Dehydrator
Model P300
Power 1000 WATTS
Voltage 220-240V
Product weight 15 kg
Dimensions 435 x 515 x 355mm
Only for EU countries. Do not dispose of electric appliances together with household
waste material! In observance of European Directive 2002/96/EC on waste electrical
and electronic equipment and its implantation in accordance with national law, electric
appliances that have reached the end of their life must be collected separately and
returned to an environmentally compatible recycling facility.
12 13
Page 9

WARRANTY TERMS & CONDITIONS (INTERNATIONAL)
CONTACT US
This warranty as outlined below solely covers distributors of the Optimum range of appliances. Please contact your
distributor for full product warranty.
Eective as of 1st January 2014
1. Optimum® warrants this appliance to be free from defects in materials and workmanship and to perform
satisfactorily in household use for a period of 2 years and in commercial use for a period of 12 months from
the date of purchase when used in accordance with the accompanying instruction book.
2. Any warranties exceeding this standard period are oered as extended terms by the selling distributor and
claimable only though that provider.
3. Defects that occur within this manufacturers warranty period, under normal use and care will be repaired or
replaced at our discretion only if the selling distributor is unable to do so. This is done solely at our option
with no charge for parts. This warranty does not extend to accessories included or purchased separately.
Replacements can be oered for major faults as determined by your distributor and at their own discretion.
4. In the event that the goods requiring repair are under warranty, and this distributor is unable to provide the
repairs, the customer is responsible for the cost of the return of the product to Optimum® (or their approved
service provider) and also the cost of return to the customer.
5. Whilst in transit, the goods are at the owner’s risk and any further damage during this transportation is not
covered under warranty.
6. Customers should ensure that the product being returned is properly packaged so as to ensure that no
damage occurs to the product during transit. To be able to process the warranty claim, ensure you have
included an explanation of any problem; Optimum® will not fault-find and will only repair described faults as
covered under warranty.
7. This full warranty is void if this appliance has been subjected to abuse, negligence, accident, alteration, failure
to follow operating instructions, or the product has been exposed to abnormal or extreme conditions.
8. Cosmetic changes that do not aect performance, such as discolouration of parts of the product in the hands
of the user or the eects of the use of abrasive cleaners will not be warranted or considered defects. The
cleaning or removal of food products along with any damage caused by allowing them to build up is not
covered by this full warranty.
9. This warranty does not cover normal wear and tear of the product or parts.
10. This warranty does not cover any defect caused by an accident, misuse, abuse, improper installation or
operation, lack of reasonable care, unauthorised modification, loss of parts, tampering or attempted repair by
a person not authorised by Optimum®.
11. The warranty will not apply if damage, malfunction or failure resulting from alterations, accident, misuse,
abuse, fire, liquid spillage, maladjustment of customer controls, use on an incorrect voltage, power surges
and dips, thunderstorm activity, acts of God, voltage supply problems, tampering or unauthorised repairs by
any persons, use of defective or incompatible accessories, exposure to abnormally corrosive conditions or
entry by any insect, vermin or foreign object in the product.
12. Warranty does not cover damage done to any product by using the machine with an alternate power source
(solar, inverter, generator, etc.) and the use of these devices to power your appliance is not recommended.
13. You must keep your purchase docket/receipt as proof of purchase and as proof of the date on which
the purchase was made. The purchase docket or receipt must be presented when making a claim under
thiswarranty.
14. In the event the receipt of purchase is not presented, then this warranty is invalid. Consumer Law allows us to
request reasonable proof of purchase to service a warranty claim.
15. This warranty does not imply, intend to or detract any consumer rights listed in and able to be enforced
from Regulated Consumer Law, any condition which is found to be in breach of the consumer law, the single
condition shall be void only and all other conditions remain in place.
Please contact the distributor located in the Country where you made your original purchase for
all Support, Servicing and Warranty.
14 15
Page 10

16 17
Page 11

P300 Dehydrator Manual v6
 Loading...