

Page 1
Page 2

Optimal Tracking Icare User Manual
page 1
CONTENTS
1 IMPORTANT SAFETY INSTRUCTIONS….….………..... 2
2 DECLARATION OF CONFORMITY & GUARANTEE.... 4
3 PRESENTATION….……...…….…………………….…...… 6
4 THE VARIOUS USES OF ICARE….………………...……. 7
5 OPERATING PRINCIPLE…….……….. .…………………. 9
6 TIPS AND TRICKS FOR USES……………………………. 11
7 USING THE RECEIVER………..……………………..…… 15
8 USING THE TRANSMITTER………………..……………..40
9 CONNECTING TO A COMPUTER…...…………………... 45
10 APPENDICES………………………...………….… ………... 52
11 DETAILED SUMMARY………………...…...……………... 54
Page 3
Optimal Tracking Icare User Manual
page 2
1 IMPORTANT SAFETY INSTRUCTIONS
Before using Icare, please read the following safety instructions:
The Icare system is no substitute for common sense and personal responsibility.
Its purpose is also not to be a substitute for the vigilance of parents and/or caretakers.
Consequently, even when using the Icare system, you should continue to:
visually supervise your children.
stay next to them if there is a body of water nearby.
Optimal Tracking accepts no liability for any direct or indirect harm, injury, drowning,
kidnapping, disappearance, or death of any individual, animal, or object.
Do not modify the strap closure system for the child version transmitter.
The strap closure system is designed to prevent strangulation if the transmitter wearer
becomes suspended by the strap. Any significant tension on the strap will cause the closure to
open.
Do not handle the Icare system while driving.
Park your vehicle before using the system.
Turn Icare off while on airplanes.
Icare can create interference for the airplanes electronic systems.
Turn Icare off when near any electronic medical equipment.
Electronic medical equipment is sensitive to radio waves.
Specific regulations
Comply with all specific regulations in effect wherever you are located. Make sure that the
use of Icare there is not prohibited.
Water-resistance
Only the Icare transmitter is water-resistant (splash-proof and resistant to short term surface
immersion in water). Keep the receiver dry.
Charging the batteries
Use only the supplied charger Ref. No. GFP051T-0510 equipped with the Icare connector
to recharge the transmitter and receiver batteries. Follow the connection instructions supplied
(see pages 15 and 40
)
Opening the product
The Icare receiver and transmitter should not be opened, because any improper handling
could cause the battery to explode or any other hazard. Consequently, only an approved
technician may open the transmitter or receiver.
Page 4

Optimal Tracking Icare User Manual
page 3
Do not incinerate the device or use it in areas presenting risks of explosion.
The battery could explode.
Do not dispose of the device just anywhere.
If you wish to dispose of the device, you must:
return it to your retailer, or
drop it off at a waste-collection site, or
return it to Optimal Tracking
Page 5

Optimal Tracking Icare User Manual
page 4
2 DECLARATION OF CONFORMITY AND GUARANTEE
Declaration of conformity
We, Optimal Tracking, hereby declare under our sole responsibility that the Icare product conforms to the
following European standards:
Radio: EN 300 220-2 (V2.1.2)
Radio: EN 300 440-2 (V1.2.2)
E.M.C.: EN 301 489-3 (V1.4.1)
Electrical safety: EN 60950-1 (2006)
Health: EN 50371 (2002)
The radio receiver falls under Class 2 according to the EN 300 220-2 standard.
Conformity tests and reports were made by the following organization:
EMITECH
ZI Angers Beaucouzé
15 rue de la claie
49070 BEAUCOUZE - FRANCE
Tel. : +33 (0) 2 41 73 26 27
www.emitech.fr
Guarantee
The term, “Product,” refers to all products made by Optimal Tracking described in this document.
Optimal Tracking guarantees the Product against any material or construction defects under normal operating
conditions, for a period of 1 year starting from the date of purchase. The original purchase invoice or register
receipt, indicating the Product purchase date, constitutes proof of purchase date. All software supplied with the
Product, including firmware, are supplied “as-is.” Optimal Tracking does not guarantee that the function of these
software programs will be uninterrupted or free from errors, or that these software programs will meet your
needs.
If you make a claim under this Guarantee, Optimal Tracking may, at its discretion, repair or replace all or part of
the defective Product covered by the Guarantee with new or refurbished products or parts. If Optimal Tracking
decides to use refurbished parts or products, these will have the same characteristics or performance as new
products.
All parts removed or products replaced under the Guarantee become the property of Optimal Tracking.
This Guarantee does not apply:
if the Product was damaged or rendered defective following a use of the Product not compliant with the
use for which it was designed, particularly including use not compliant with the user manual supplied
with the Product, or any other misuse or negligence by the Product user.
if the Product was modified, notably through the use of products not manufactured or sold by Optimal
Tracking
if the Product was repaired by someone not affiliated with Optimal Tracking, or a service provider
approved by Optimal Tracking.
in the event an inappropriate shipping method or packaging is used when returning the Product to
Optimal Tracking or to a service provider approved by Optimal Tracking.
Page 6

Optimal Tracking Icare User Manual
page 5
to lost or damaged software, data, or removable storage media. Optimal Tracking may decide to replace
the Product sent in under the guarantee with a refurbished product of the same quality, resulting in your
inability to access the data stored in your original Product.
OPTIMAL TRACKING EXCLUDES ANY OTHER GUARANTEE, EXPRESS OR IMPLICIT, AND
NOTABLY ANY IMPLICIT GUARANTEE OF MERCHANTABILITY OR SUITABILITY FOR A
PARTICULAR USE. IN NO CASE MAY OPTIMAL TRACKING BE HELD LIABLE FOR PARTICULAR
OR INDIRECT ANCILLARY DAMAGES, NOTABLY LOSS OF INCOME, PROFIT, OR DATA, OR
PERIODS OF IMMOBILIZATION, REGARDLESS OF WHETHER THE REQUEST FOR LIABILITY IS
CONTRACTUAL, CRIMINAL, OR FOUNDED ON A GUARANTEE, IF IT IS FOUNDED ON THE USE OF
FUNCTION OF THE PRODUCT OR ANY SOFTWARE SUPPLIED BY OPTIMAL TRACKING WITH THE
PRODUCT, EVEN IF OPTIMAL TRACKING HAS BEEN INFORMED OF THE POSSIBILITY OF SUCH
DAMAGES.
By making a claim under this Guarantee, you acknowledge that the distribution and, depending on availability,
the replacement of the Product in accordance with and within the limits of this Guarantee, constitute your sole
and unique recourse with regard to Optimal Tracking under this Guarantee in the event of a defect of the Product
covered by this Guarantee.
Optimal Tracking
360 chemin de Pauli
13760 Saint Cannat - France
Tel: +33 (0) 4 42 38 05 32
www.optimaltracking.com
The information contained in this document is subject to change without notice. Optimal Tracking reserves the
right to change or improve its products and to make modifications to this content without prior warning. To get
the latest updates of this document, please refer to www.optimaltracking.com.
The brand names mentioned in this manual are the property of their owners.
Manual version V1.00 ENG. June 2011
Page 7
Optimal Tracking Icare User Manual
page 6
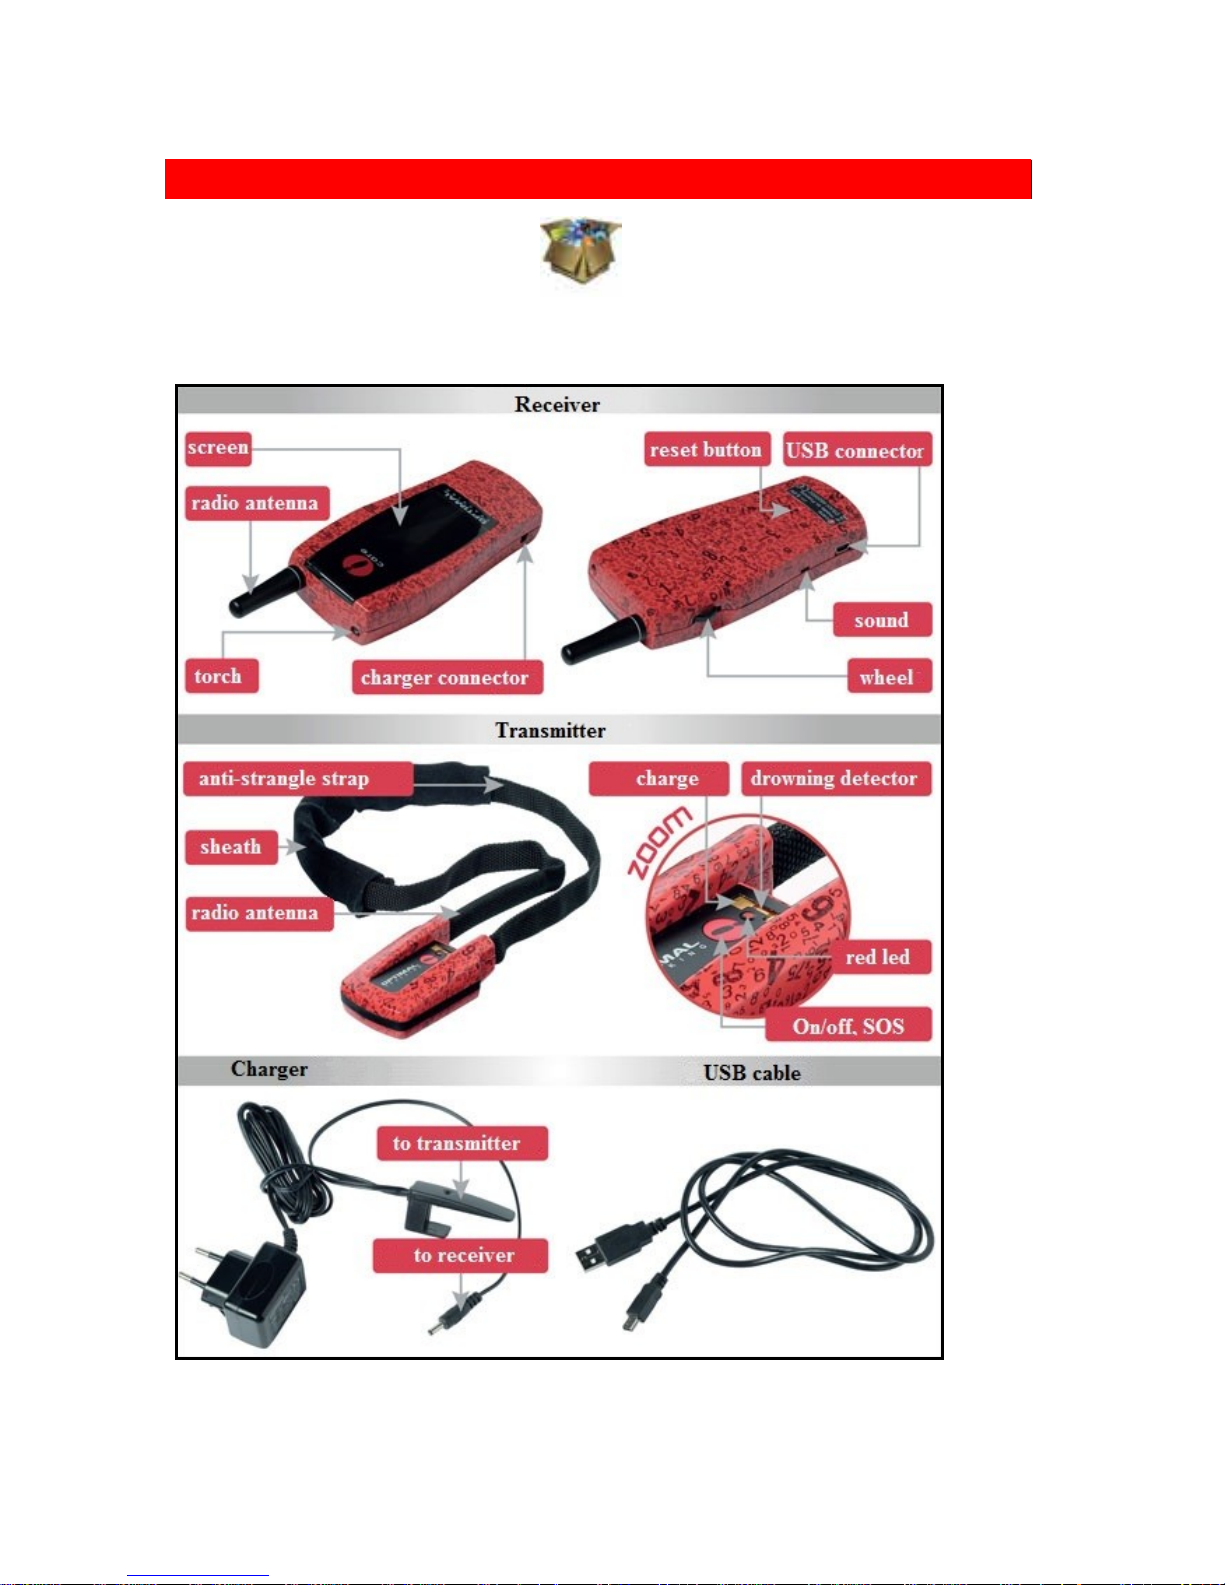
3 PRESENTATION
Page 8

Optimal Tracking Icare User Manual
page 7
4 THE VARIOUS USES OF ICARE
Monitor or find your children, animals, etc.
Icare enables you at any time to find out the geographic location of your child or animal and
display it on the receiver screen. Thanks to the direction and distance indicator, you can
immediately find the person or animal wearing the transmitter.
You can quickly set up one or more alarms, informing you:
that the child or animal is too far from you.
that they are in an off-limits area.
that they are close to a hazard.
If the child feels in danger, they can send you a distress message, just by pressing the single
button on the transmitter.
The receiver can simultaneously track up to 100 transmitters.
Monitoring around a body of water
In the event the transmitter is immersed in water, a “drowning” message is sent to the receiver.
Therefore, you can immediately go to the rescue of the drowning person.
Prepare your trips on your computer
You can prepare your trips on your computer and load them into Icare. Once out in the field,
you can follow the trajectories loaded and find your way easily.
You can view the profile of your trip and have access to all sorts of statistics as you move
around.
To go back, you can follow your old path that has been recorded, by retracing your steps in
the opposite direction.
View your trajectories in 3-D at the end of the day
Throughout the day, the receiver records its trajectory as well as the transmitters’ trajectories.
At the end of the day, you can use Google Earth to view in 3-D your trajectory, whether on
foot, cycling, skiing, boating, ultralighting etc. Throughout the trajectory, everything is
indicated, altitude, speeds, time, etc.
Page 9
Optimal Tracking Icare User Manual
page 8
Track model aircraft, paragliders, hot-air balloons, etc.
At any time, you can locate your model aircraft or friend in a paraglider, hot-air balloon, etc.
in real time. Their 3-D trajectory is recorded and you can find them instantaneously. Due to a
lack of obstacles between the transmitter and receiver during flight, the transmitter range is
greater than 10 kilometers.
Track the location of canoes, sailboats, etc.
You can track the position of a group of canoes, sailboats, pedal boats, etc. and make sure
they do not go too far.
Direct tracking on Google Earth
Connect the receiver to your computer and you can track the movement of all your
transmitters direct on Google Earth.
Alert in the event of the theft of a car, boat, etc.
Place a transmitter in your vehicle and trigger an alarm if the vehicle is moved. In this case,
you will receive an alarm message on the receiver.
And many more uses…
Finding your car in a parking lot by recording its position, etc.
Page 10
Optimal Tracking Icare User Manual
page 9
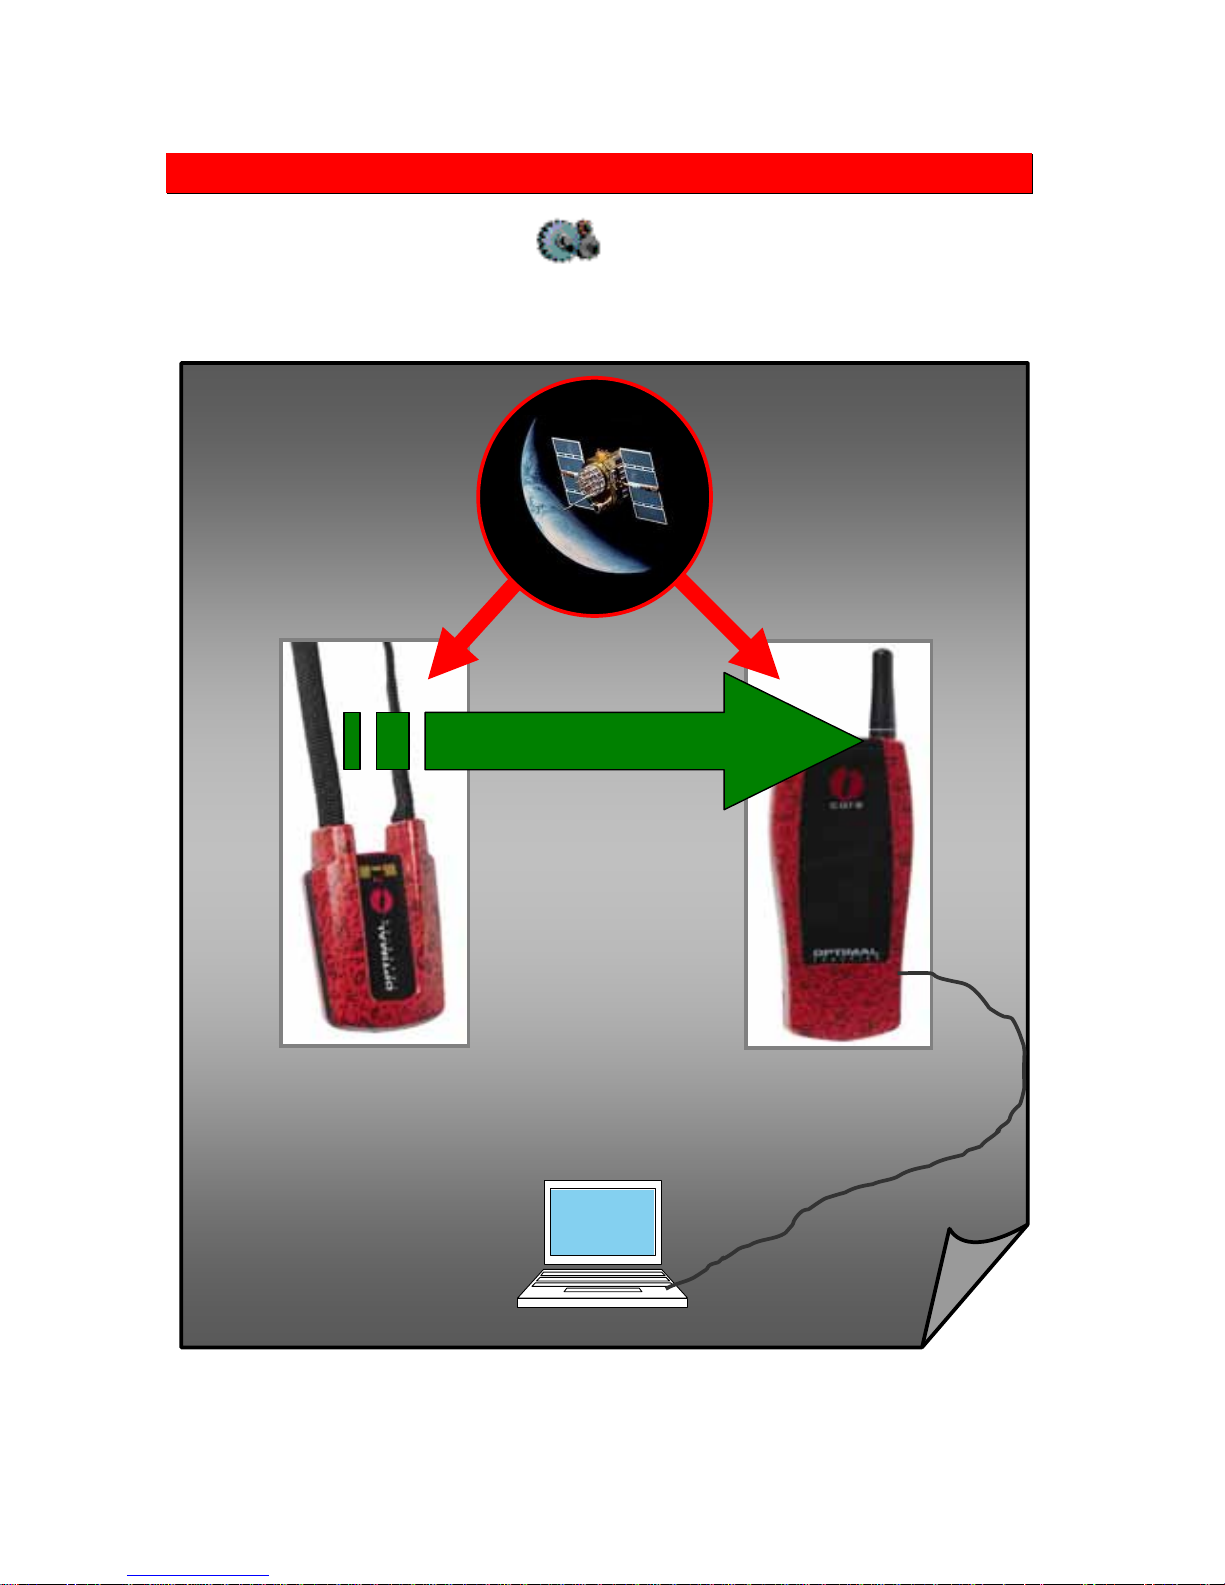
5 OPERATING PRINCIPLE
Regular position
updates
SOS
Drowning alert
Etc.
Transmitter position
display
Alerts
Etc.
View on
GoogleEarth
Loading maps
Receiver
Transmitter
position
sent by
radio
optional
USB cable
Operating Diagram
GPS signals
GPS satellites
Page 11

Optimal Tracking Icare User Manual
page 10
The receiver and transmitter each have a GPS receiver which enables them to
determine their geographic position.
Approximately every 30 seconds, the transmitter sends a radio message to the receiver.
This message contains the transmitter’s geographic position.
The receiver displays the positions of every transmitter.
Various alarms enable optimal transmitter monitoring (SOS, drowning, off-limits,
etc.).
The receiver can be connected to a computer in order to display real-time transmitter
positions and movements on Google Earth on the computer screen.
Icare’s main features
Viewing the geographic position of transmitters, on the receiver display screen.
Viewing the distance and direction of a transmitter from the receiver.
Viewing over 100 transmitters simultaneously.
On unobstructed terrain, the receiver can locate all transmitters within a 3 kilometer
radius. Various obstructions (buildings, houses, hills, etc.) can reduce this radius.
Orientation of display based on orientation of the receiver with regard to North.
Highly-sensitive GPS capable of operating in difficult environments (forest, city,
inside some buildings, etc.).
6 different operating modes.
Map display.
Creating points, lines, or polygons by moving about over the land.
Creating points, lines, or polygons on Google Earth or other software.
Real-time viewing of receiver and transmitters on Google Earth, in addition to their
trajectories.
Creating off-limits areas and activating alarms if the transmitter enters them.
Recording receiver and transmitter trajectories.
Transmitter drowning detection.
Sending SOS messages from the transmitter.
Nighttime flashlight.
Route tracking.
Reaching a saved point.
“See and go” feature for aiming at a point and moving in its direction.
Detailed transmitter tracking (battery, altitude, speed, etc.).
Display of all receiver parameters (altitude, speed, trajectory, altitude changes,
trajectory profile, etc.).
Language selection.
Unit of measurement system selection.
Backing up maps and trajectories to a computer.
Adjustable transmitter strap with anti-strangle system.
Page 12
Optimal Tracking Icare User Manual
page 11
6 TIPS AND TRICKS FOR USE
Starting both units
After starting both units, it is necessary to wait until they receive information from the GPS
satellites and calculate their position. This takes 1-3 minutes, depending on the view of the
sky the units have. Ideally, they should be laid flat, outside, for 3 minutes, with a clear view
of the sky.
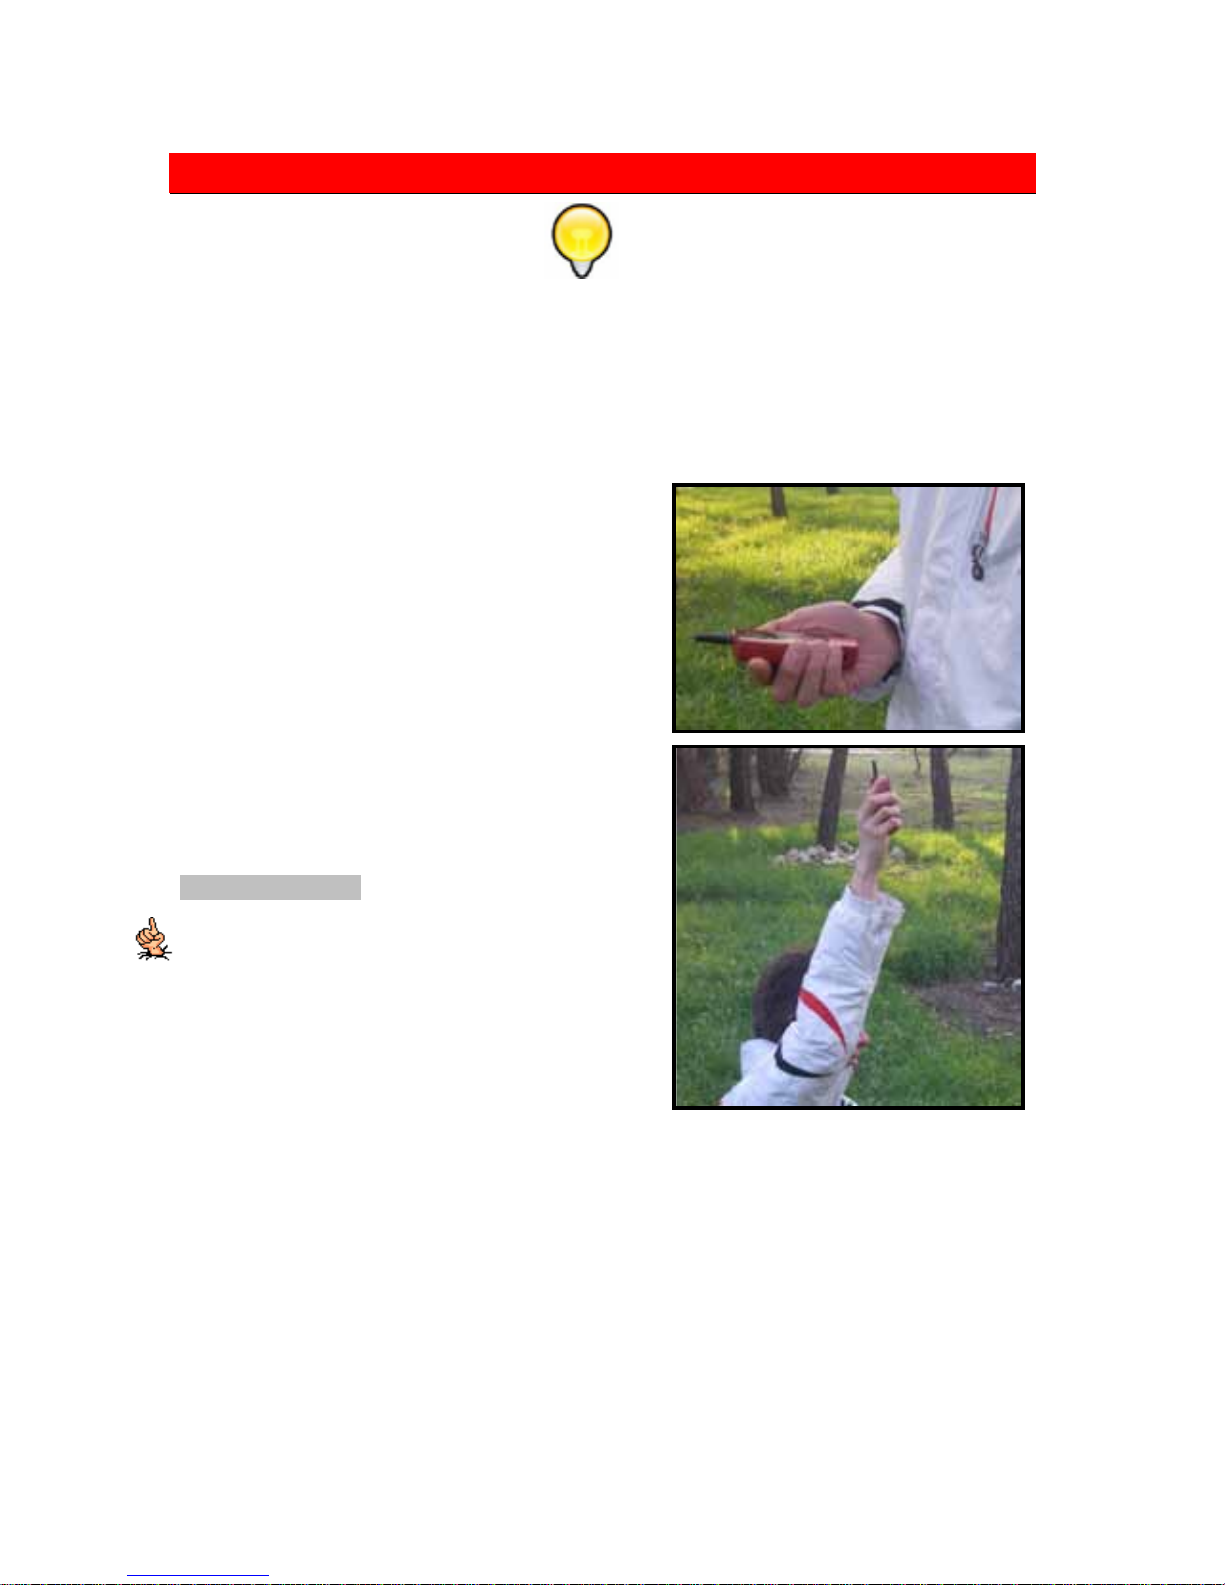
How to hold the receiver
During all navigation operations, the receiver
must be held horizontally so that the compass
can precisely orient the receiver with regard to
North.
But, if the transmitter is far away or obstructed
(buildings, hills, etc.), it is recommended to hold
the receiver as high as possible with the antenna
vertical until you receive a position message
from the transmitter (signaled by a short beep
on the receiver). This improves reception.
Also in the case of a distant transmitter, in
search transmitter mode, two seconds before
receiving a message from the transmitter, the
receiver vibrates and an icon tells the user to
maintain hold the device up high, with the
antenna vertical, for 5 seconds. After 5 seconds,
you can return to a normal position.
Page 13
Optimal Tracking Icare User Manual
page 12
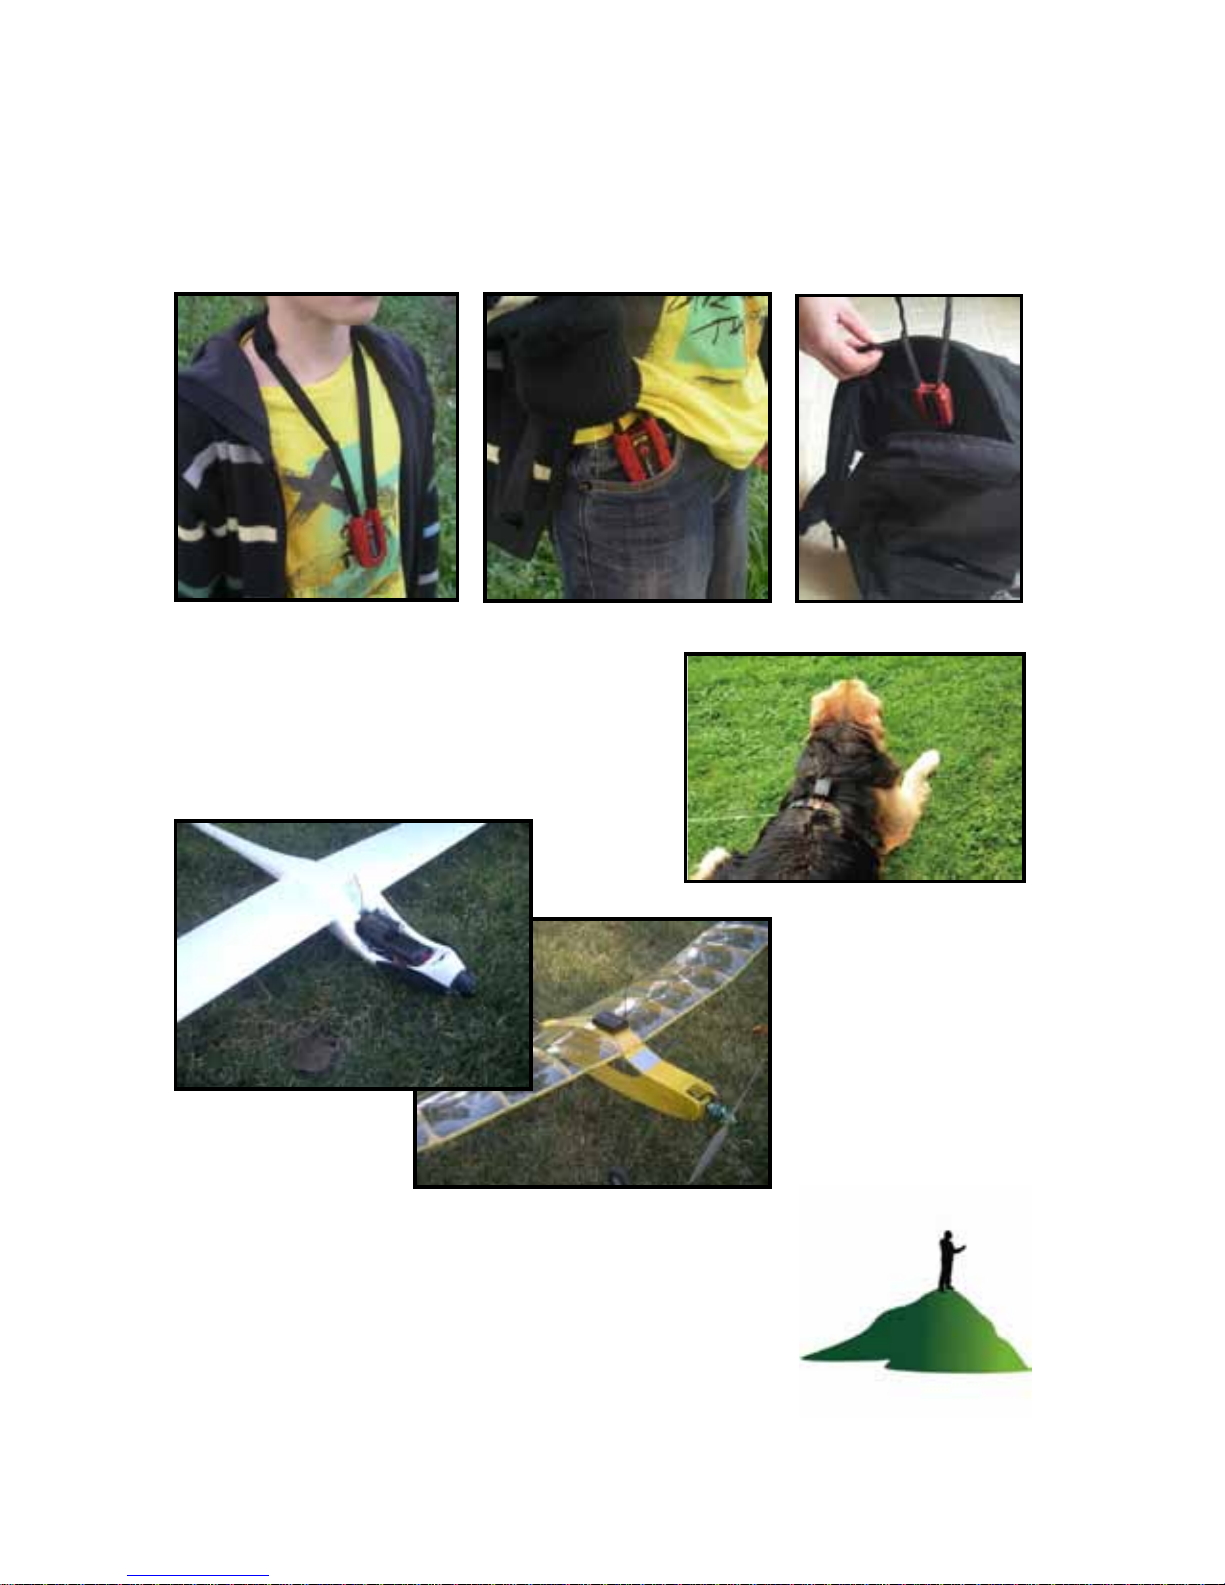
Where to place the transmitter
For children, the transmitter was designed to be worn around the neck, with the front side
(containing the activation button) away from the body. Clothing over the transmitter will not
interfere with operation. The transmitter can also be placed in a pocket, as long as the front
side is not facing the body. It can also be placed in a bag.
For dogs, the transmitter is attached to a
harness in order to remain on the dog’s back
and enable proper GPS and radio operation.
Gg
Increasing system range
When the transmitter is far away or there are obstructions between
the transmitter and receiver, it is recommended to move to a high,
unobstructed location in order to better receive the position
message from the transmitter.
For aeromodelling, just
avoid to cover the
transmitter with a metal
or carbon part.
Page 14

Optimal Tracking Icare User Manual
page 13
Position precision
The precision of positions calculated by GPS is generally between 10 and 20 meters (it can be
degraded in difficult environments such as forests, cities, inside buildings, etc.).
Consequently, when you are around twenty meters from the transmitter, continue the search
by looking around you.
Using multiple transmitters simultaneously
Each transmitter has a transmission channel. There are 111 possible channels. Each
transmitter is factory configured to a channel based on its serial number. Multiple transmitters
can operate simultaneously without interference as long as they are on different channels. If
not, the channel can be changed (see page 44
).
Monitoring a child near a body of water
When a child falls in the water, a “drowning” message is sent to the receiver. But if the child
sinks quickly, the transmitter's range is severely reduced, since water muffles radio waves.
Therefore it is recommended to set a no news for 30 seconds alarm. This way, if no message
is received for 30 seconds, the alarm is sent because the child may have fallen in the water.
The combination of a “drowning” alarm and a no news for…alarm enhances system safety
and makes it possible to intervene quickly.
Recalibrating the compass
The earth’s magnetic field varies depending on the location and environment. Therefore, it is
recommended to recalibrate the compass from time to time. A message is sent when
recalibration is desirable. To recalibrate, see page 36
.
Compass behavior depending on speed
At low speeds (under 10 km/h), for all display modes using the compass, the onscreen display
depends on the receiver orientation. The top of the screen corresponds to what is in front of
the receiver, the compass heading icon is .
Beyond this speed, the display is oriented depending on the direction you are moving. The top
of the screen corresponds to where you are heading, the compass heading icon is .
At low speeds, if the receiver is not horizontal, the
icon replaces the heading indication in
the lower icon bar in order to alarm you to keep the receiver horizontal.
Deactivating the “drowning” detector.
If the transmitter wearer is in no risk of going into water, it is possible to deactivate the
drowning detection on their transmitter (see page 44).
Page 15

Optimal Tracking Icare User Manual
page 14
Retracing your steps on a trip
To retrace your steps in the opposite direction:
Save your trajectory in a map (see page 35
).
Activate follow a route mode and select the trajectory saved in the opposite direction.
Follow the broken arrow indicating the direction to take and the course deviation (see
page 20).
Finding your vehicle in a parking lot
To be sure of finding your vehicle in a parking lot:
Before you leave your vehicle, save your position on a map (see page 29
).
Activate reach a point mode and select the saved point.
Page 16
Optimal Tracking Icare User Manual
page 15
7 USING THE RECEIVER
First use
Fully charge the receiver (see page 15) before using it for the first time.
Start the receiver (press the thumb wheel for 1 second).
Select the menu language (see page 17
).
Initializing position, compass, and time.
o Place the receiver outside for a few minutes, with a clear view of the sky, so
the receiver can determine its GPS position.
o Once the position is determined, the compass calibration menu displays.
o Keep the receiver horizontal, click, and then turn around for about 4 rotations
over 20 seconds while keeping the device horizontal. The compass is now
calibrated (see page 36
).
o Set the time in settings/UTC time diff. by defining the time difference with
regard to UTC (time difference defined in hours.hundredths of hours) (see
page 37).
Recharging the battery
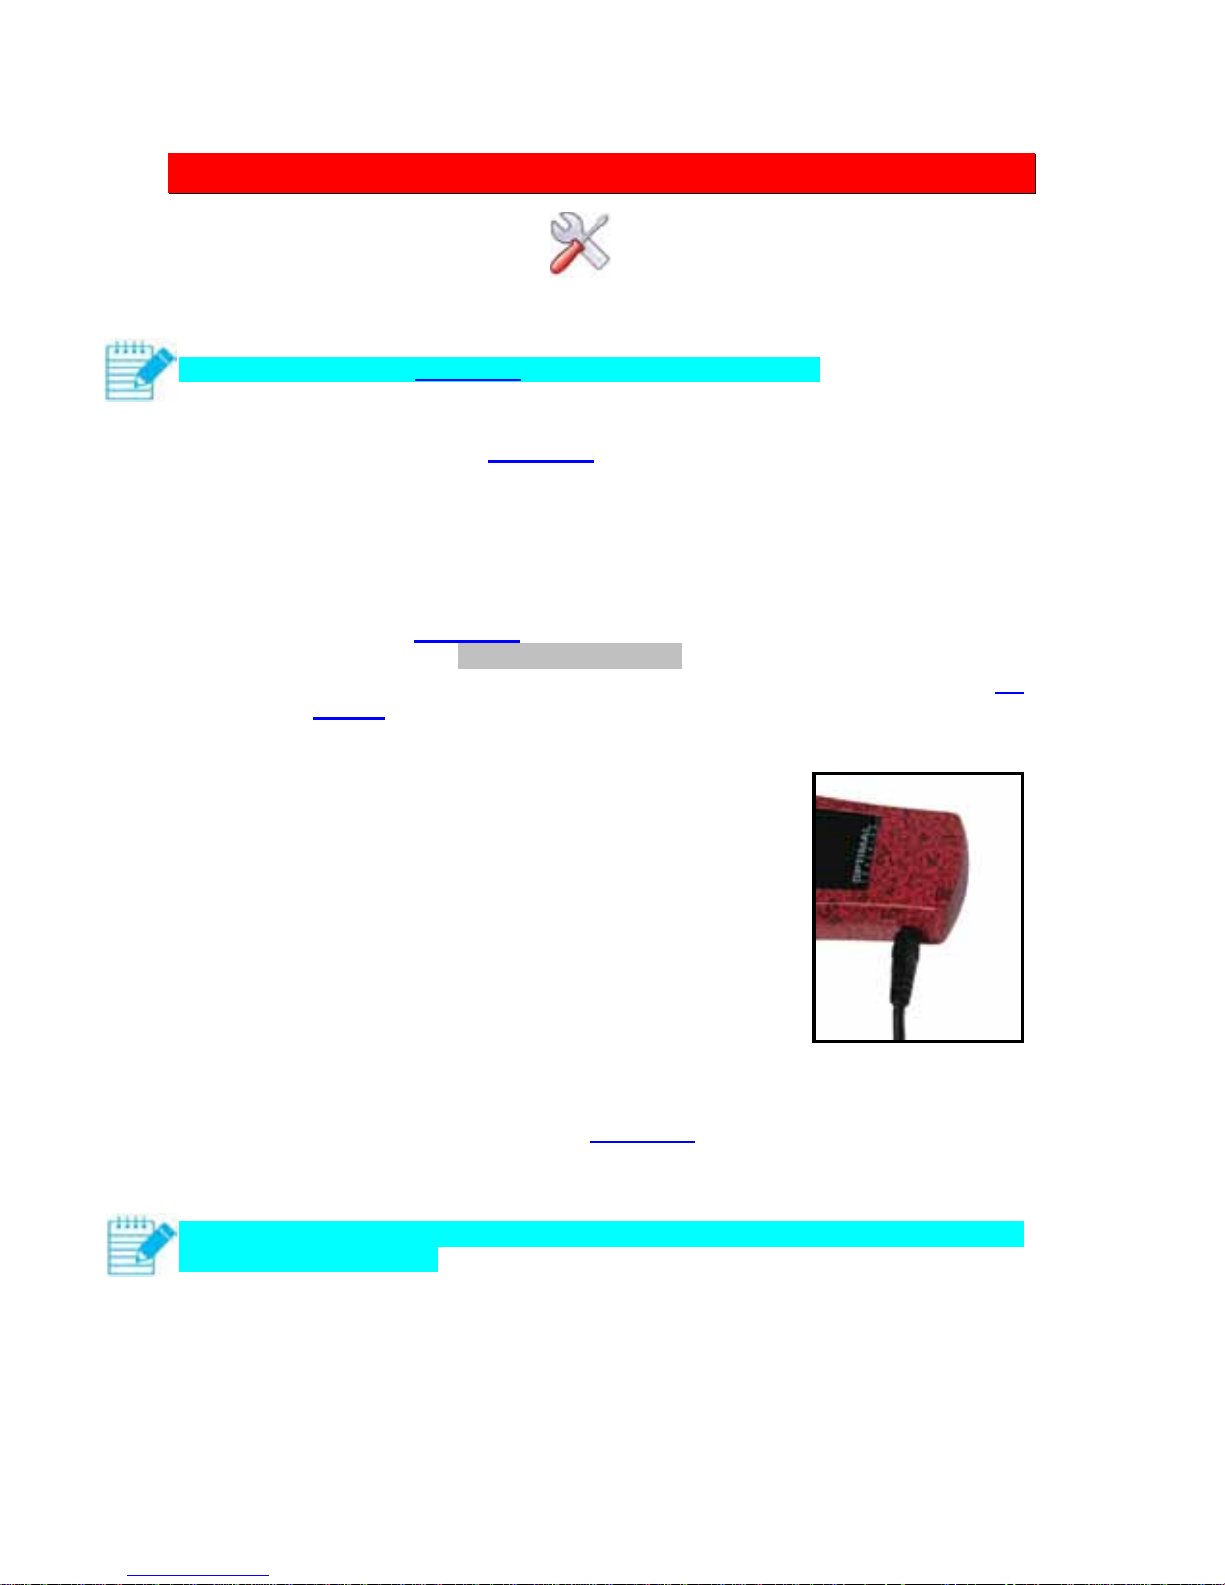
Connect the charger to a 110 or 220 volt outlet (50/60 Hz)
Connect the charger jack as indicated in the photo to the
right. You can charge the transmitter and receiver at the
same time.
Receiver in standby mode
maximum charge time: around 3 hours.
charging: the LED flashes every 2 seconds.
charged: the LED flashes 2 times a second.
Receiver in active mode
slower charging.
charge indicated by an onscreen icon (see page 23
).
Battery life for a fully-charged receiver is around 14 hours (at 20°C) .
Due to the magnetic field created by the charger, the heading calculated by the compass may
be distorted during charging.
Page 17
Optimal Tracking Icare User Manual
page 16
Startup and shutoff
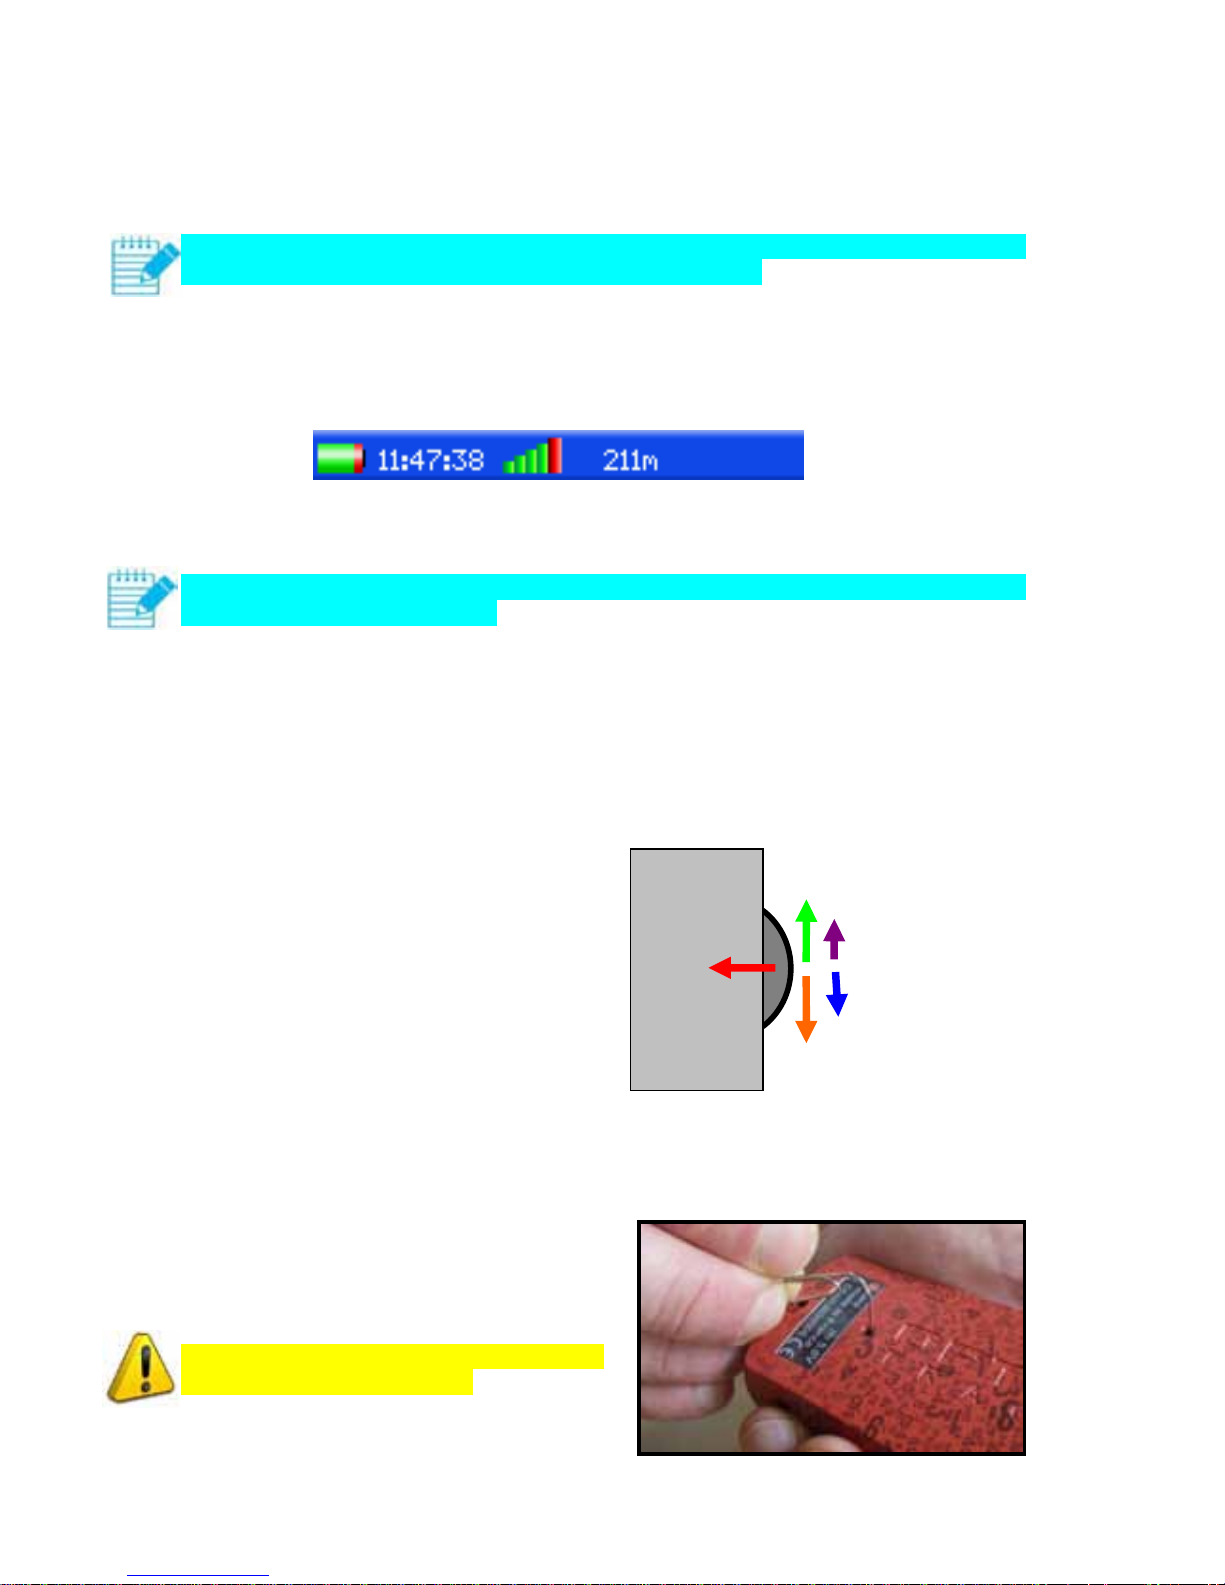
To start the receiver, press the thumb wheel for 1 second.
Before using the receiver in navigation mode, place it outside, horizontally, with a clear view
of the sky for 1-3 minutes so that it can determine its position. At least 3 green bars means
that the GPS position has been determined.
blue bars: number of satellites being acquired, position unknown.
green bars: number of satellites used to calculate position.
3 green bars: 3 satellites used, 2-D position, altitude is unknown.
4 or 5 green bars: at least 4 satellites used to calculate position.
The receiver can be used without GPS reception. In this case, the last known position is used.
Certain features are then inactive.
To search for a transmitter or point or follow a trajectory, it is necessary to have GPS
reception, i.e., at least 3 green bars.
To place the receiver on stand-by, press the thumb wheel for 3 seconds.
Using the thumb wheel
There are 5 possible actions on the thumb wheel:
click:
confirms the choice under the cursor.
displays the main menu.
up all the way:
fast zoom in.
moves cursor upward quickly.
partially-upward:
slow zoom in.
moves cursor upward slowly.
down all the way:
fast zoom out.
moves cursor downward quickly.
partially-downward:
slow zoom out.
moves cursor downward slowly.
Rebooting the receiver
If the receiver is no longer responding, press
on the reset button with a fine point to reboot
the receiver.
Note, rebooting erases the entire memory
(maps, alarms, trajectories, etc.).
down all the way
partially upward
partially dowward
up all the way
click
thumb
wheel
Page 18
Optimal Tracking Icare User Manual
page 17
Language selection
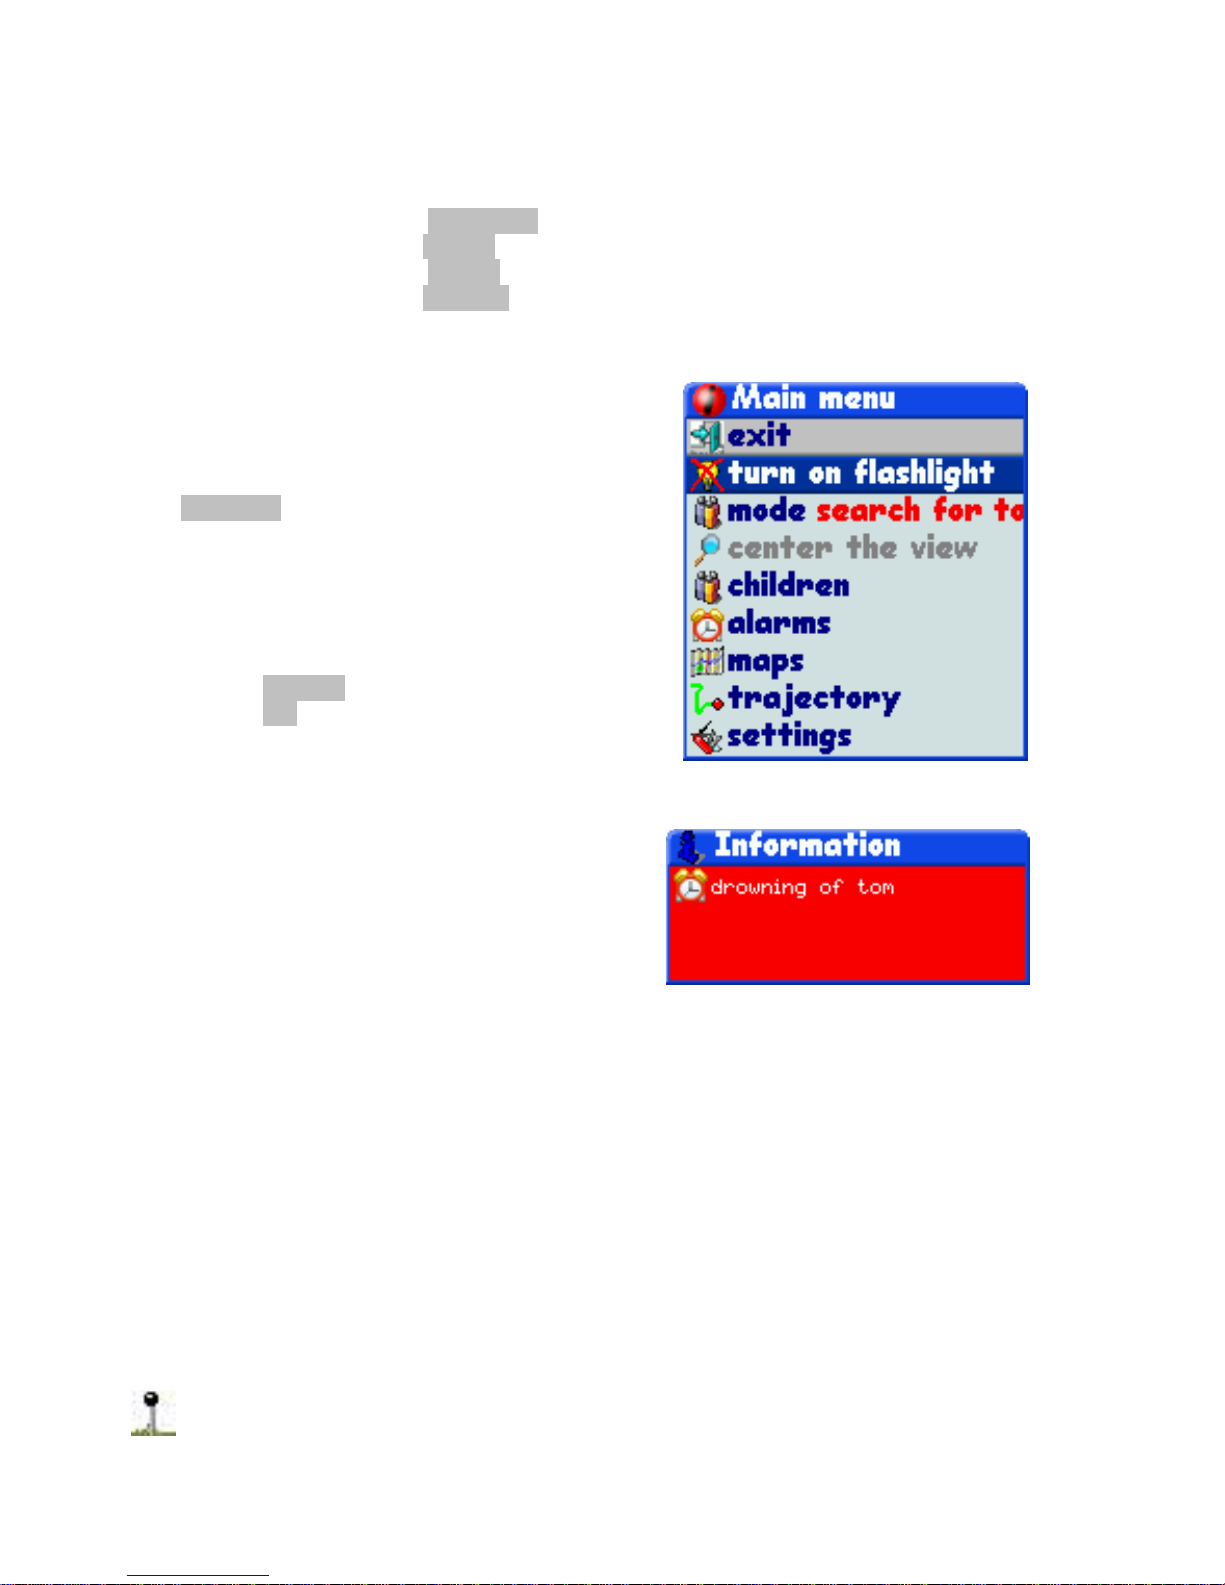
The receiver is factory-configured in English. To change the language:
Click to display the Main menu in English.
Move the cursor to settings.
Click to display the settings menu.
Move the cursor to language.
Click as many times as necessary to display the desired language.
Manipulations
Displaying the main menu
If the menu is not displayed, click to display the
main menu.
Browsing menus
Move the thumbwheel upward or downward in
order to move the cursor more or less quickly.
Click on previous to return to the previous menu.
Click on exit to close all menus.
Erasing information messages
Information messages display in small
information windows:
Click to erase the oldest of all the messages.
Erasing all messages erases the information
window.
Stopping sound messages
Click to stop all sound messages.
Zoom
If there are no menus displayed, the thumb wheel can be used to zoom on the display:
Thumb wheel upward: zoom in on the zone displayed.
Thumb wheel downward: zoom out on the zone displayed.
Receiving a message from a transmitter
Each time a position message is received from a transmitter, a brief sound is emitted by the
receiver.
The reception icon blinks for a few seconds and indicates reception quality (from 0 to 5).
Page 19
Optimal Tracking Icare User Manual
page 18
The 6 operating modes
The mode menu lets you select one of 6 operating modes.
1-Search transmitter mode
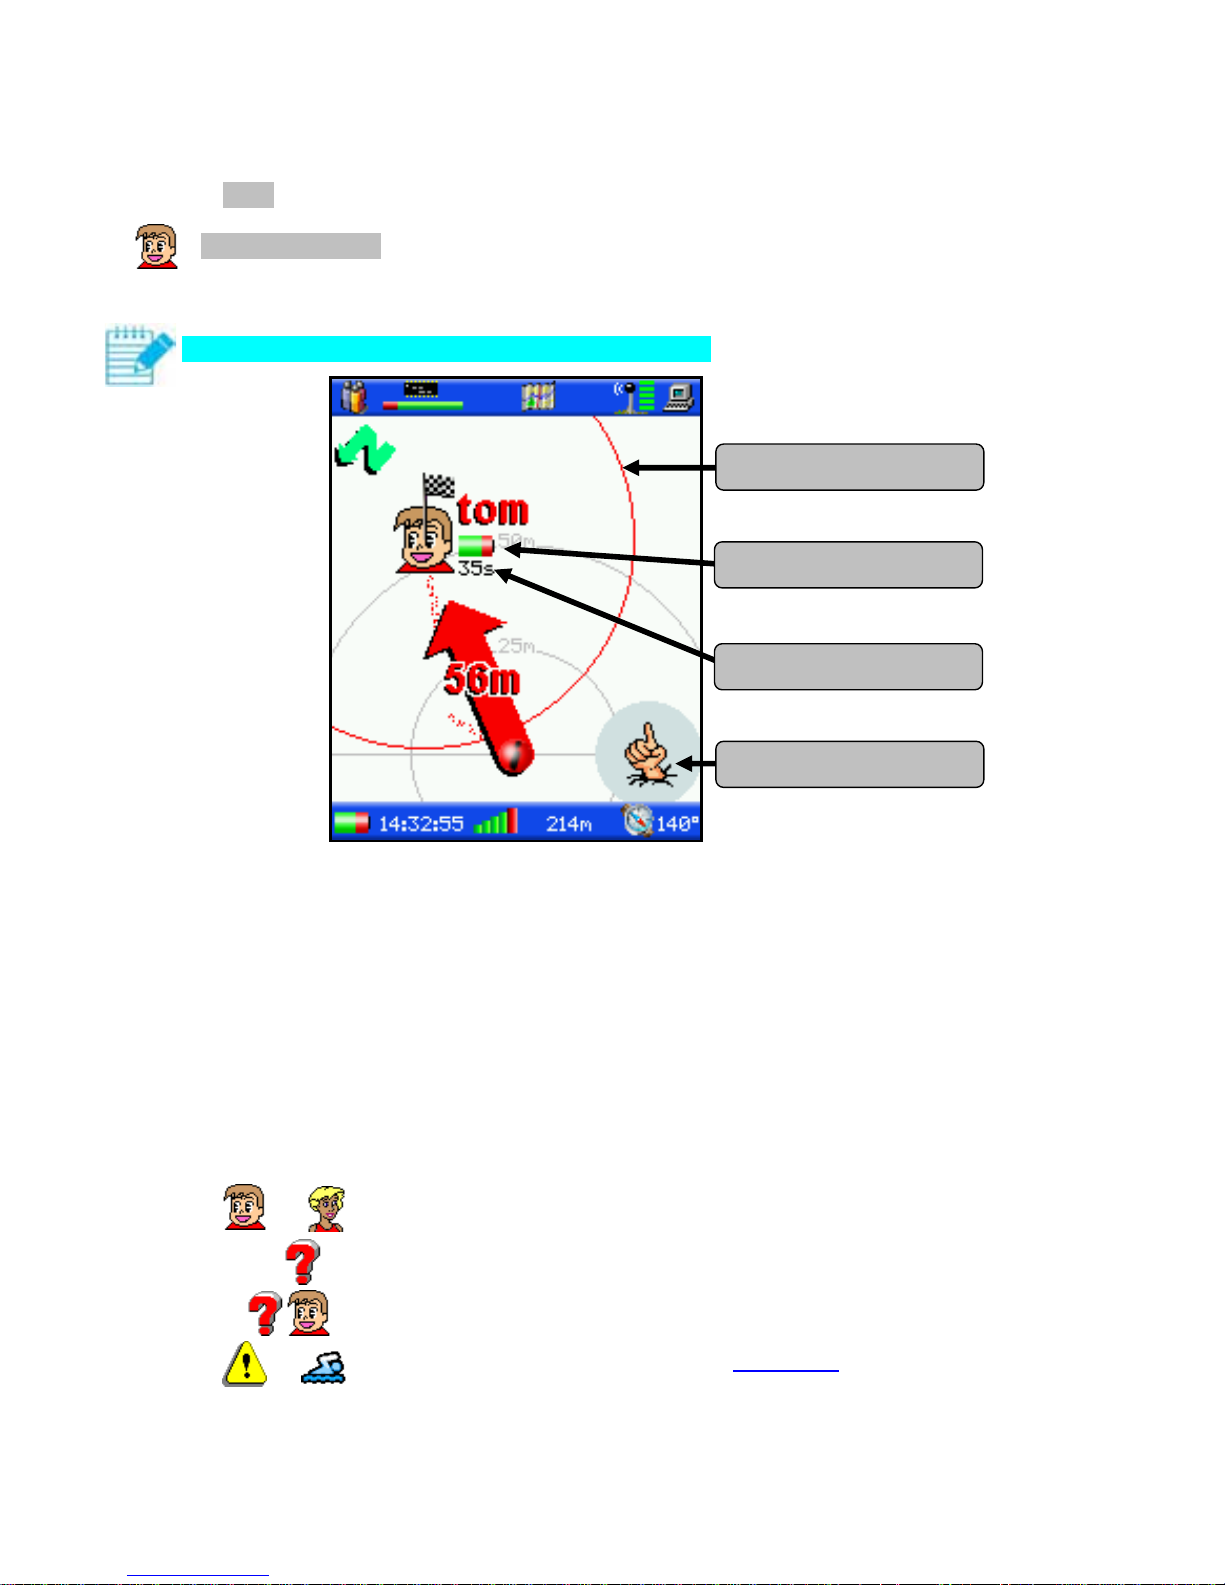
Select the transmitter to search for. The search screen displays.
Hold the device horizontally for proper compass operation.
Arrow and distance: indicate the transmitter distance and direction from you, which
lets you find the transmitter wearer instantaneously.
Position age: indicates how much time has elapsed since the transmitter was in this
position. The transmitter sends a position message approximately every 30 seconds.
The position displayed corresponds to the last position message received containing a
valid GPS position.
Remaining power: indicates the transmitter’s remaining battery life.
Uncertainty circle: limit of the probable location zone for the transmitter at the time
the position message is received. The weaker the GPS signal, the greater the
uncertainty zone.
Checkered flag: points to the transmitter you are searching for.
Icon representing the transmitter:
o fixed: means the transmitter position is precise.
o fixed: transmitter position unknown, insufficient GPS reception.
o flashing alternately: transmitter position known but not very precise.
o flashing: alarms from the transmitter (see page 32
).
…
…
ancienneté de la position
uncertainty circle
remaining power
position age
message imminent
Page 20
Optimal Tracking Icare User Manual
page 19
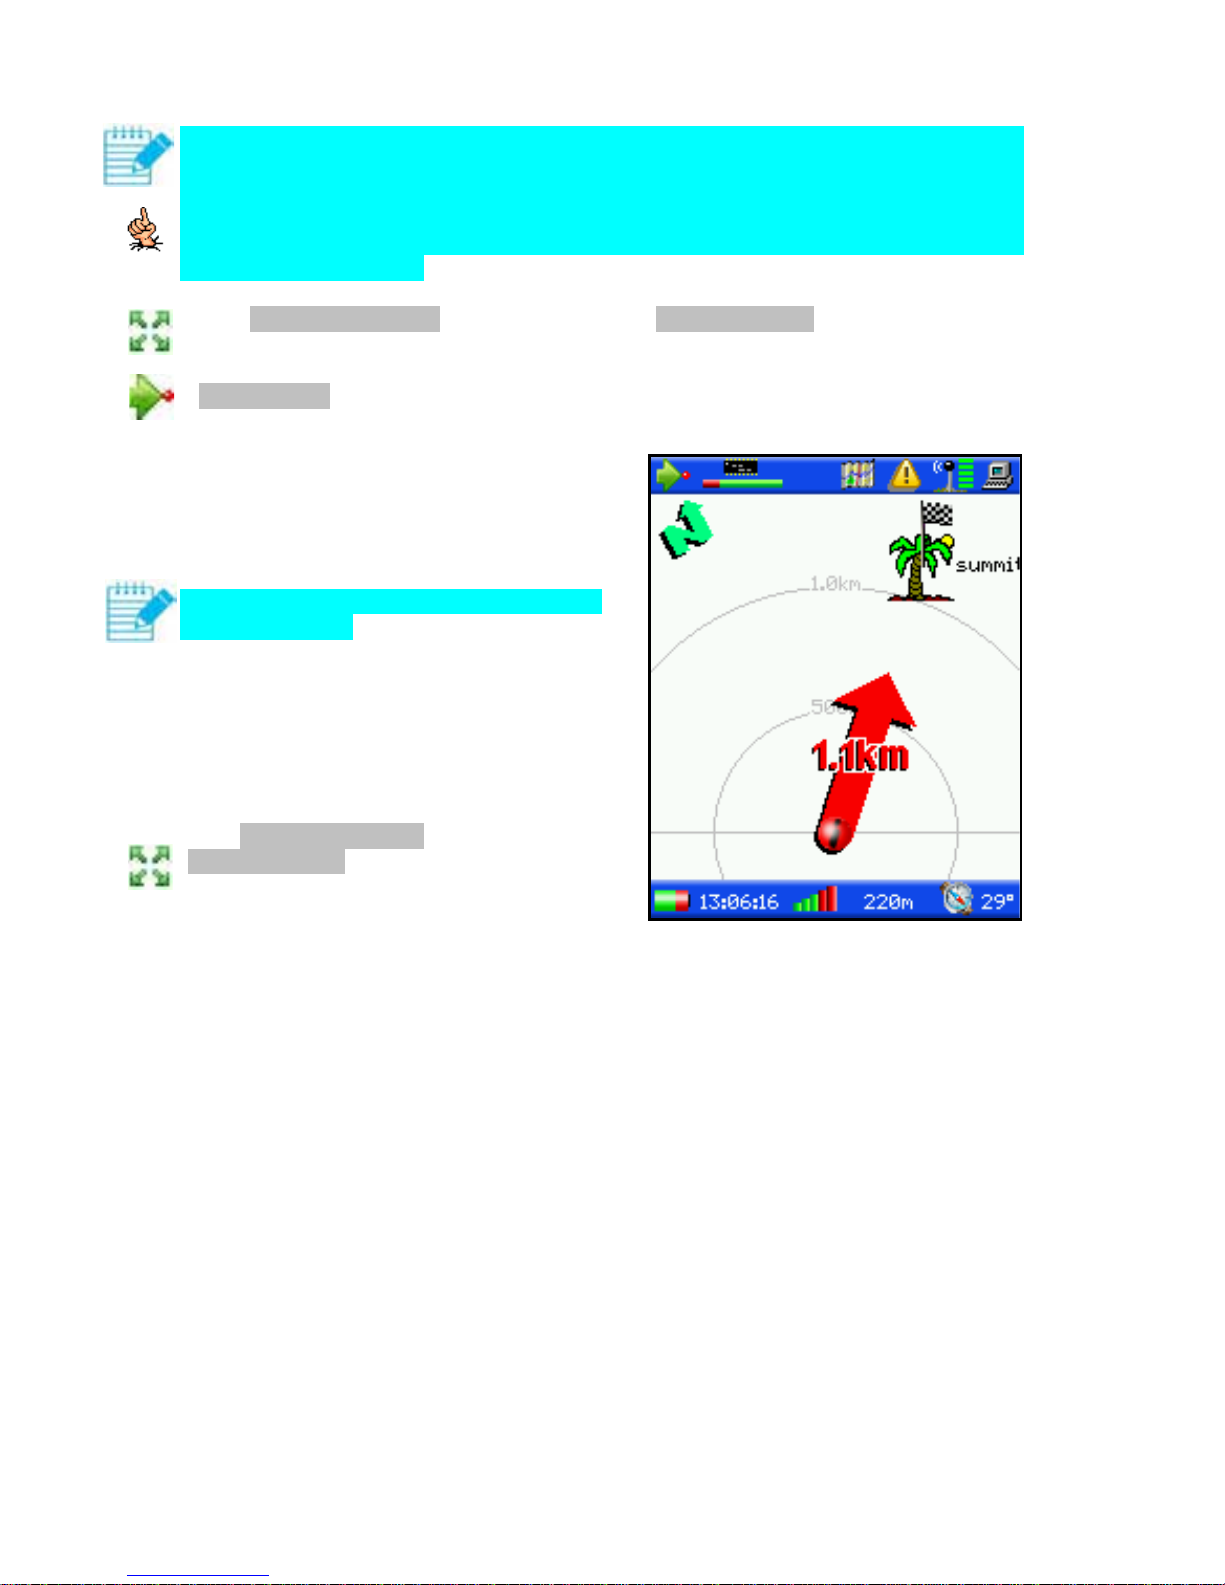
If the transmitter is far off, or if the surrounding terrain is somewhat obstructed (buildings,
hills, etc.), it is recommended to hold the receiver high up and vertical when sending the
transmitter position message, in order to increase system range. Two seconds before receiving
a message from the transmitter, the receiver vibrates and an icon tells the user to maintain
hold the device up high, with the antenna vertical, for 5 seconds. After 5 seconds, you can
return to a normal position.
If the automatic centring option is activated (settings/centring menu), the zoom is
constantly adjusted so the transmitter can appear onscreen. This option can be deactivated.
2-Reach a point mode
Select the map where the point to reach is
saved.
Select the point to be reached.
The search screen displays.
Hold the device horizontally for proper
compass operation.
Arrow and distance: indicate the
direction and distance of the point to be
reached from you.
Checkered flag: points to the point to
be reached.
If the automatic centring option is activated
(settings/centring menu), the zoom is
constantly adjusted so the point to be reached
can appear onscreen. This option can be
deactivated.
Page 21
Optimal Tracking Icare User Manual
page 20
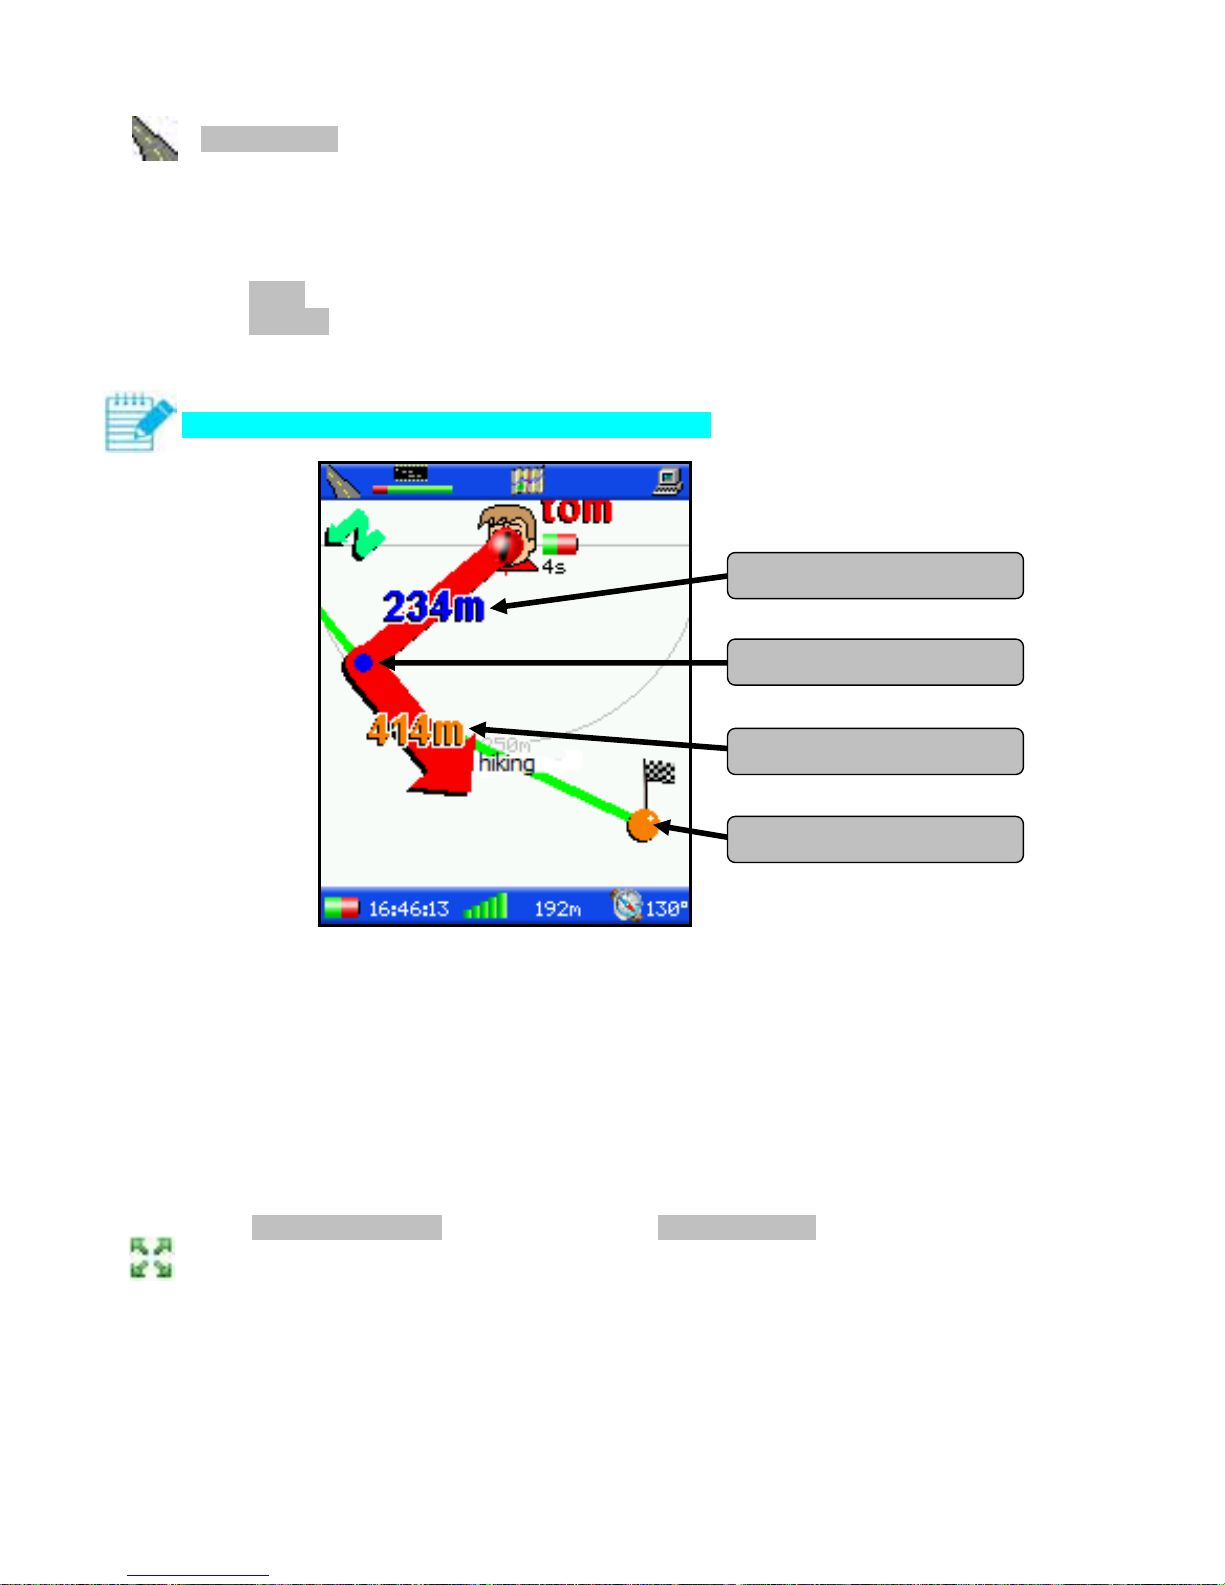
3-Follow a route mode
Select the map where the route to be followed is saved.
Select the line to be followed.
An image of the line appears. Then select which direction you want to follow the line:
direct or
opposite
The tracking screen appears.
Hold the device horizontally for proper compass operation.
Arrow: indicates your deviation from the route as well as the direction to head in once
on the route.
Course deviation: indicates the distance to the closest point on the route.
Distance remaining: alternates between:
o distance remaining on the route until the end of the route.
o distance remaining on the route until the next point on the route.
Ball topped with a checkered flag: indicates alternatively:
o the end of the route.
o the next point on the route.
If the automatic centring option is activated (settings/centring menu), the zoom is
constantly adjusted so the nearest point on the route can appear onscreen. This option can be
deactivated.
course deviation
distance remaining
nearest point on the route
destination
Page 22
Optimal Tracking Icare User Manual
page 21
4-See and go mode
This mode is used:
to aim at a distant point and reach it.
to define a course heading and not deviate from it.
You must define:
The use:
hiking: only the heading and distance are requested.
free flight: in addition to heading and distance, wind speed is required in order to
graduate the line of sight direction based on the flight time of the model aircraft.
the type of entry:
keyboard: the heading value must be entered.
aiming: the heading value is defined by the internal compass by orienting the
device in the aiming direction.
distance: distance to the point to be reached. If you are not looking to reach a
particular point, enter a large distance value. The course to be followed will be this
distance in length.
wind speed: only when using free flight. This is used to graduate the course to be
followed based on the flight time of the model aircraft. This way, if you have aimed
for the model's landing point and its flight time is three minutes, you just have to move
to the graduation 3 minutes of the course to be able to find the model.
If you have entered the heading by aim, point the
antenna in the direction chosen and click on validate.
Otherwise, enter the heading manually, then validate it.
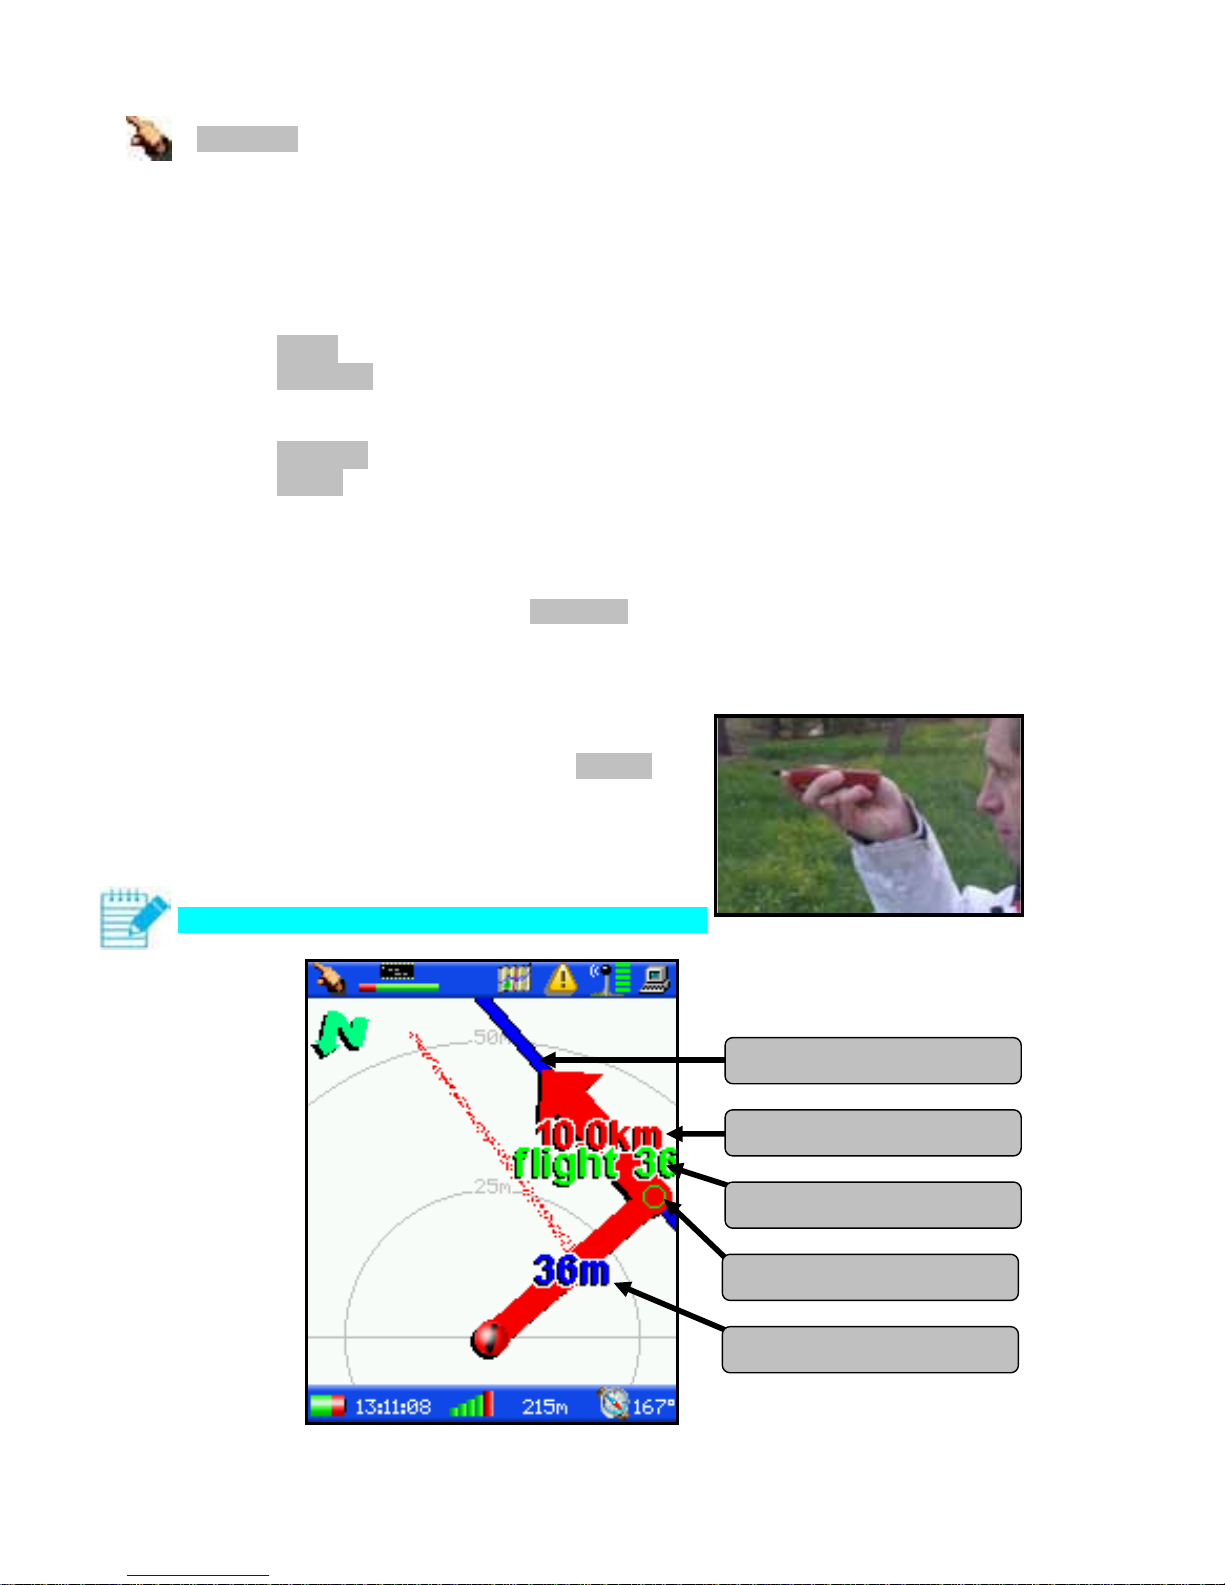
After validation, the tracking screen appears.
Hold the device horizontally for proper compass operation.
course to follow
distance to travel
flight time and distance
nearest point on the course
course deviation
Page 23
Optimal Tracking Icare User Manual
page 22
Arrow: indicates your deviation from the course as well as the course direction.
Course deviation: indicates the distance to the closest point on the course.
Distance remaining: distance remaining on the course until the end of the course.
Checkered flag: indicates the end of the course.
Flight time and distance: in free-flight use, indicate the flight time and distance
covered by the model, if it has landed on the nearest course point to you.
If you want to change modes, then return to see and go mode, while keeping the same course,
select last “see and go” mode.
Also, if you want to change the settings of the see and go menu, (wind speed, etc.) while
keeping the same course, go to the settings/settings “see and go” menu.
If the automatic centring option is activated (settings/centring menu), the zoom is
constantly adjusted so the nearest point on the course can appear to you onscreen. This option
can be deactivated.
5-Global fixed North mode
In this mode, the compass no longer has an effect. The view displayed is oriented to North at
the top.
The view can be moved by the thumb wheel or centered on any geographic entity.
To do this, go to the center the view menu:
full centring: centering the view so that everything is displayed (trajectories, maps,
transmitters, etc.).
horizontal move: the view is displaced to the left or right by rotating the thumb wheel.
vertical move: the view is displaced upward or downward by rotating the thumb
wheel.
focus on…: centers the view on the entity chosen.
6-Global compass mode
The view displayed is centered on you. The compass is used to orient the display.
Page 24
Optimal Tracking Icare User Manual
page 23
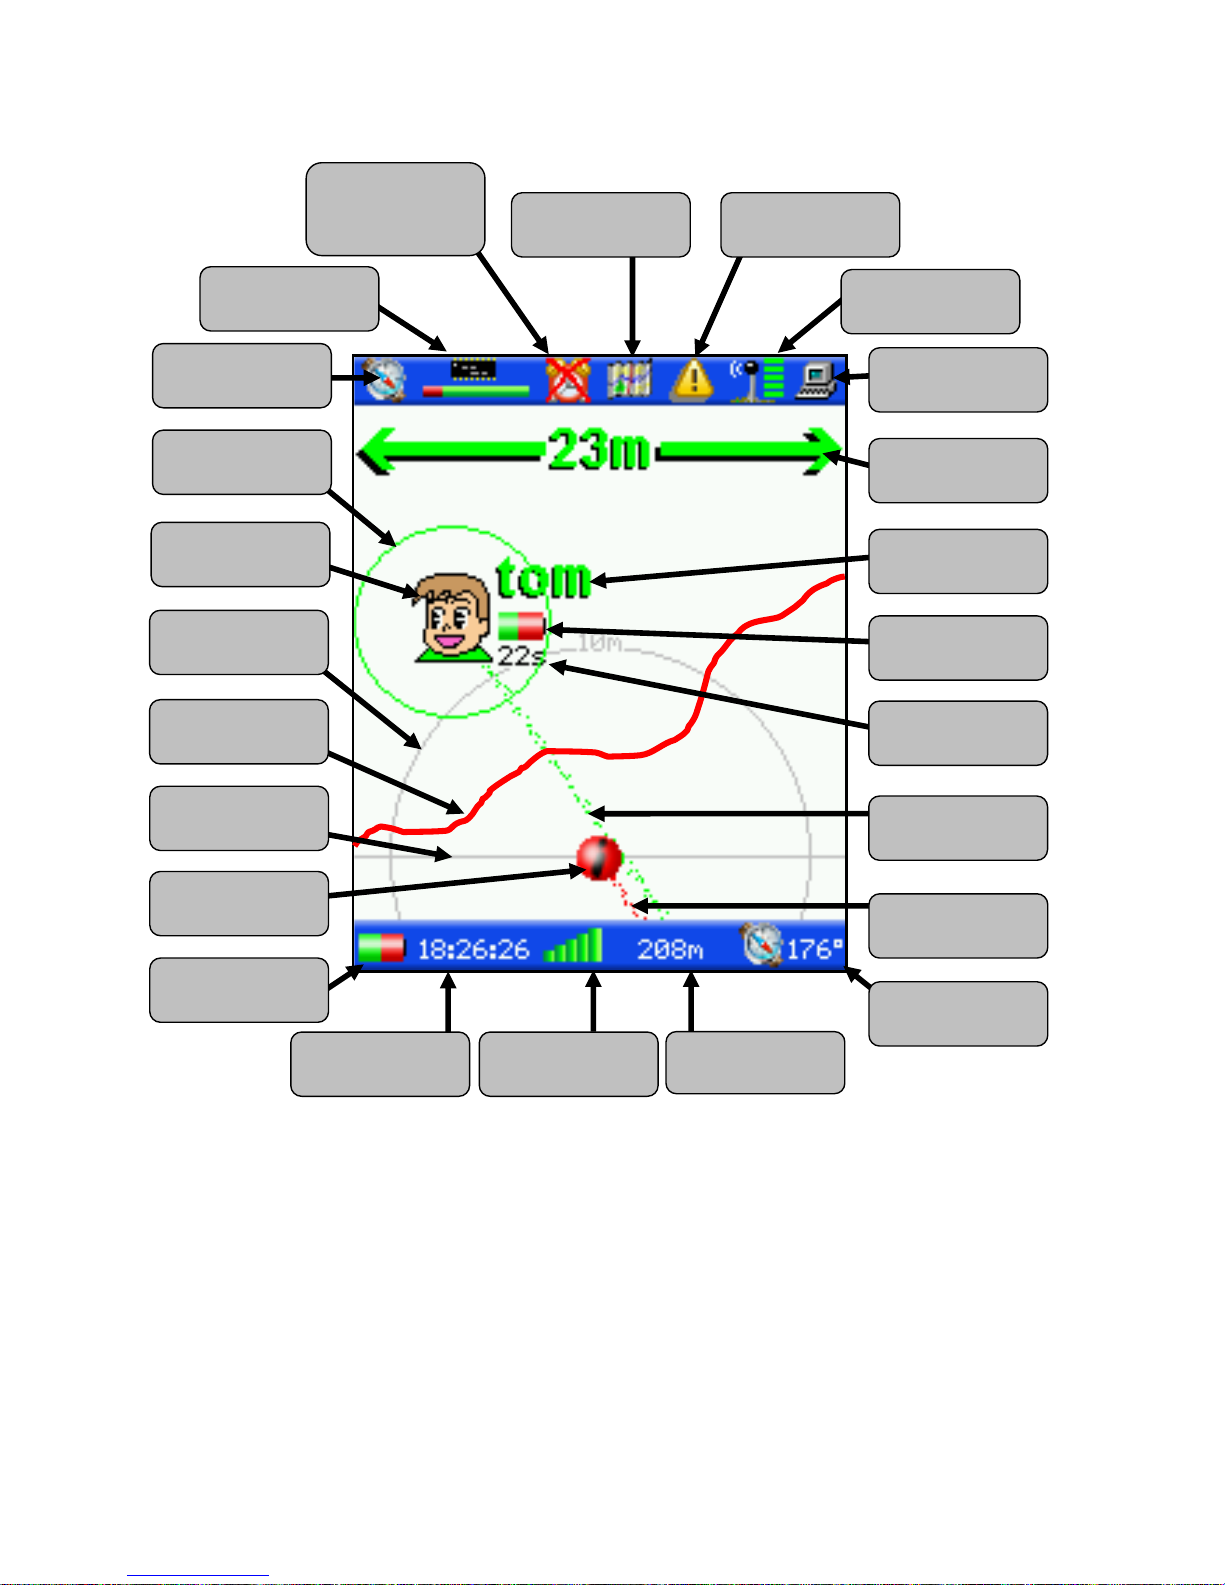
Display description
Upper icon bar
operating mode: indicates which mode the receiver is in
available memory: indicates in green the free memory space.
deactivations: successively displays deactivations, including sound, vibrator, and
luminous alarm.
displaying a map: indicates if a map is active.
transmitter alarms: indicates that a transmitter has sent an alarm (SOS, drowning,
off-limits, no news).
transmitter reception quality: indicates (between 0 and 5) the reception quality of
the most recent message from a transmitter. One bar or no bars indicates that the
signal is weak and that the transmitter may soon be out of range.
transmitter
trajectory
operating mode
available
memory
deactivations
(sound, vibrator,
etc.)
displaying a
map
transmitters
alerts
computer
connection
transmitter
reception quality
uncertainty
circle
scale changing
name of
transmitter
transmitter
position
scale
circle
battery status
or charge
your position
your trajectory
time GPS reception
your altitude
compass
heading
reference
position
transmitter
battery life
transmitter
position age
active map
entity
Page 25
Optimal Tracking Icare User Manual
page 24
computer connection: indicates that the receiver is connected to the USB port of a
computer.
Lower icon bar
battery status or charge: indicates remaining battery life. While charging, the “plug”
icon is displayed.
time: indicates the time based on UTC and the time difference from UTC defined by
the user.
GPS reception quality: the blue bars indicate the number of satellites being acquired,
the green bars indicate the number of satellites used for calculating position. Good
precision requires at least 4 green bars (4 satellites used to calculate position).
altitude: indicates altitude above sea level.
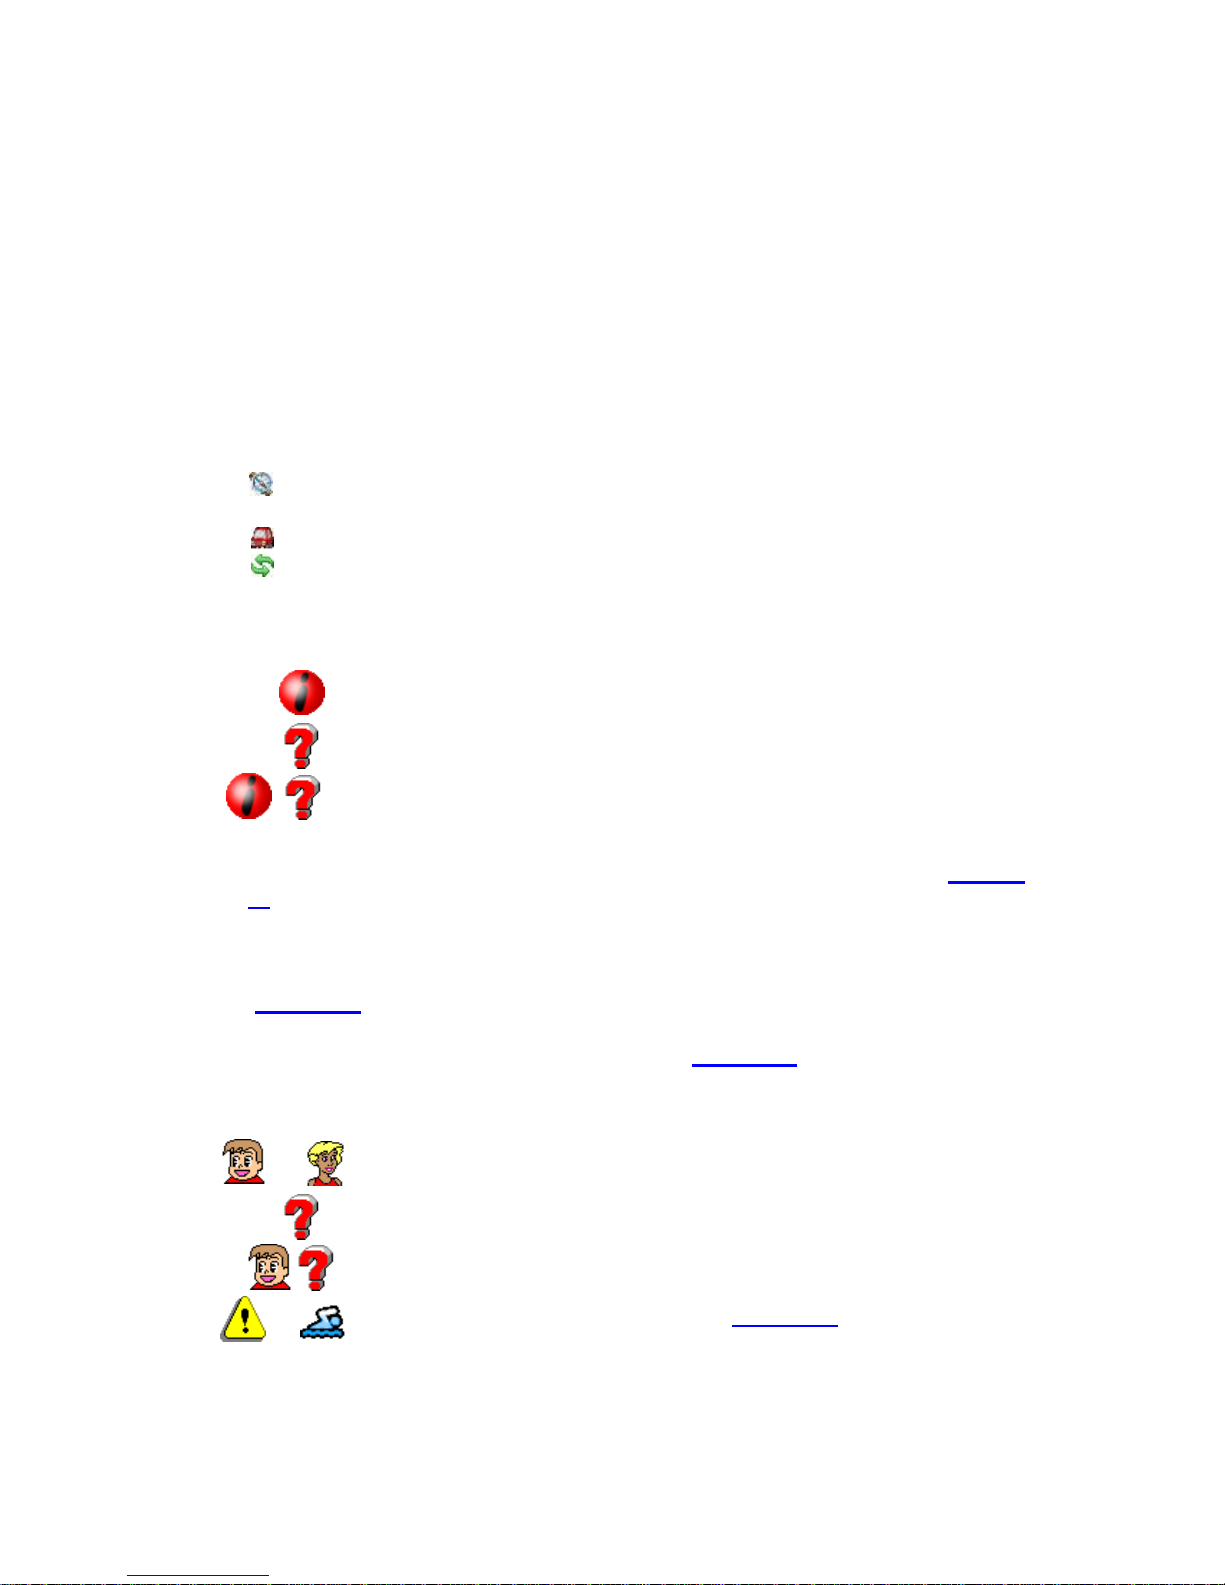
compass heading:
o under 10 km/h and receiver horizontal. Indicates the heading pointed to by the
antenna.
o over 10 km/h. Indicates the heading you are going in.
o under 10 km/h and receiver not horizontal.
Central area
your position:
o fixed: your position is accurate.
o fixed: your position unknown, insufficient GPS reception.
o alternately flashing: your position is known but without much
precision.
your trajectory: this is constantly being saved. It is possible to change its
characteristics (color, thickness, distance between points, save frequency, etc. see page
38).
reference point position: depending on the operating mode, the reference can be in
the middle, top, or bottom of the screen. For example, for all search methods, it floats
in order to expand the search area. It is possible to deactivate reference point floating
(see page 37
).
active map entities: all points, lines, and polygons from the active map are displayed.
It is possible to deactivate displaying their name (see page 38
).
circles of uncertainty: they outline the probable location area of each transmitter.
transmitter position:
o fixed: means the transmitter position is accurate.
o fixed: transmitter position unknown, insufficient GPS reception.
o flashing alternately: transmitter position known but not very accurate.
o flashing: alarms from the transmitter (see page 32
).
transmitter name: each transmitter has a name that you can set. By default, this name
is “sn” followed by the last 5 digits of the transmitter’s serial number.
…
…
Page 26
Optimal Tracking Icare User Manual
page 25
transmitter battery life: this display lets you monitor the transmitter’s remaining
battery life.
Transmitter position age: indicates how much time has elapsed since the transmitter
was in this position. The transmitter sends a position message approximately every 30
seconds. The position displayed corresponds to the last position message received
containing a valid GPS position.
transmitter trajectory: this is constantly being saved. It is possible to change its
characteristics (color, thickness, distance between its points, etc. see page 38
).
scale changing: while zooming, this indicates the size of the zone displayed.
When the transmitter is moving, the position indicated onscreen is not the current transmitter
position, it is the position the transmitter was it N seconds ago, N being the position age
(displayed to the right of the symbol representing the transmitter).
Generally, this age is no longer than thirty seconds (interval between two transmitter
messages). But, in a few cases, this age can be greater:
the transmitter has no GPS reception (transmitter in a building, basement, etc.)
The transmitter has been shut off.
The transmitter is out of range.
etc.…
Therefore it is important to always look at this age because the position may be quite old.
Automatic centring
If the automatic centring option is activated (settings/centring menu), the zoom is
constantly adjusted in search or tracking modes (see page 37
).
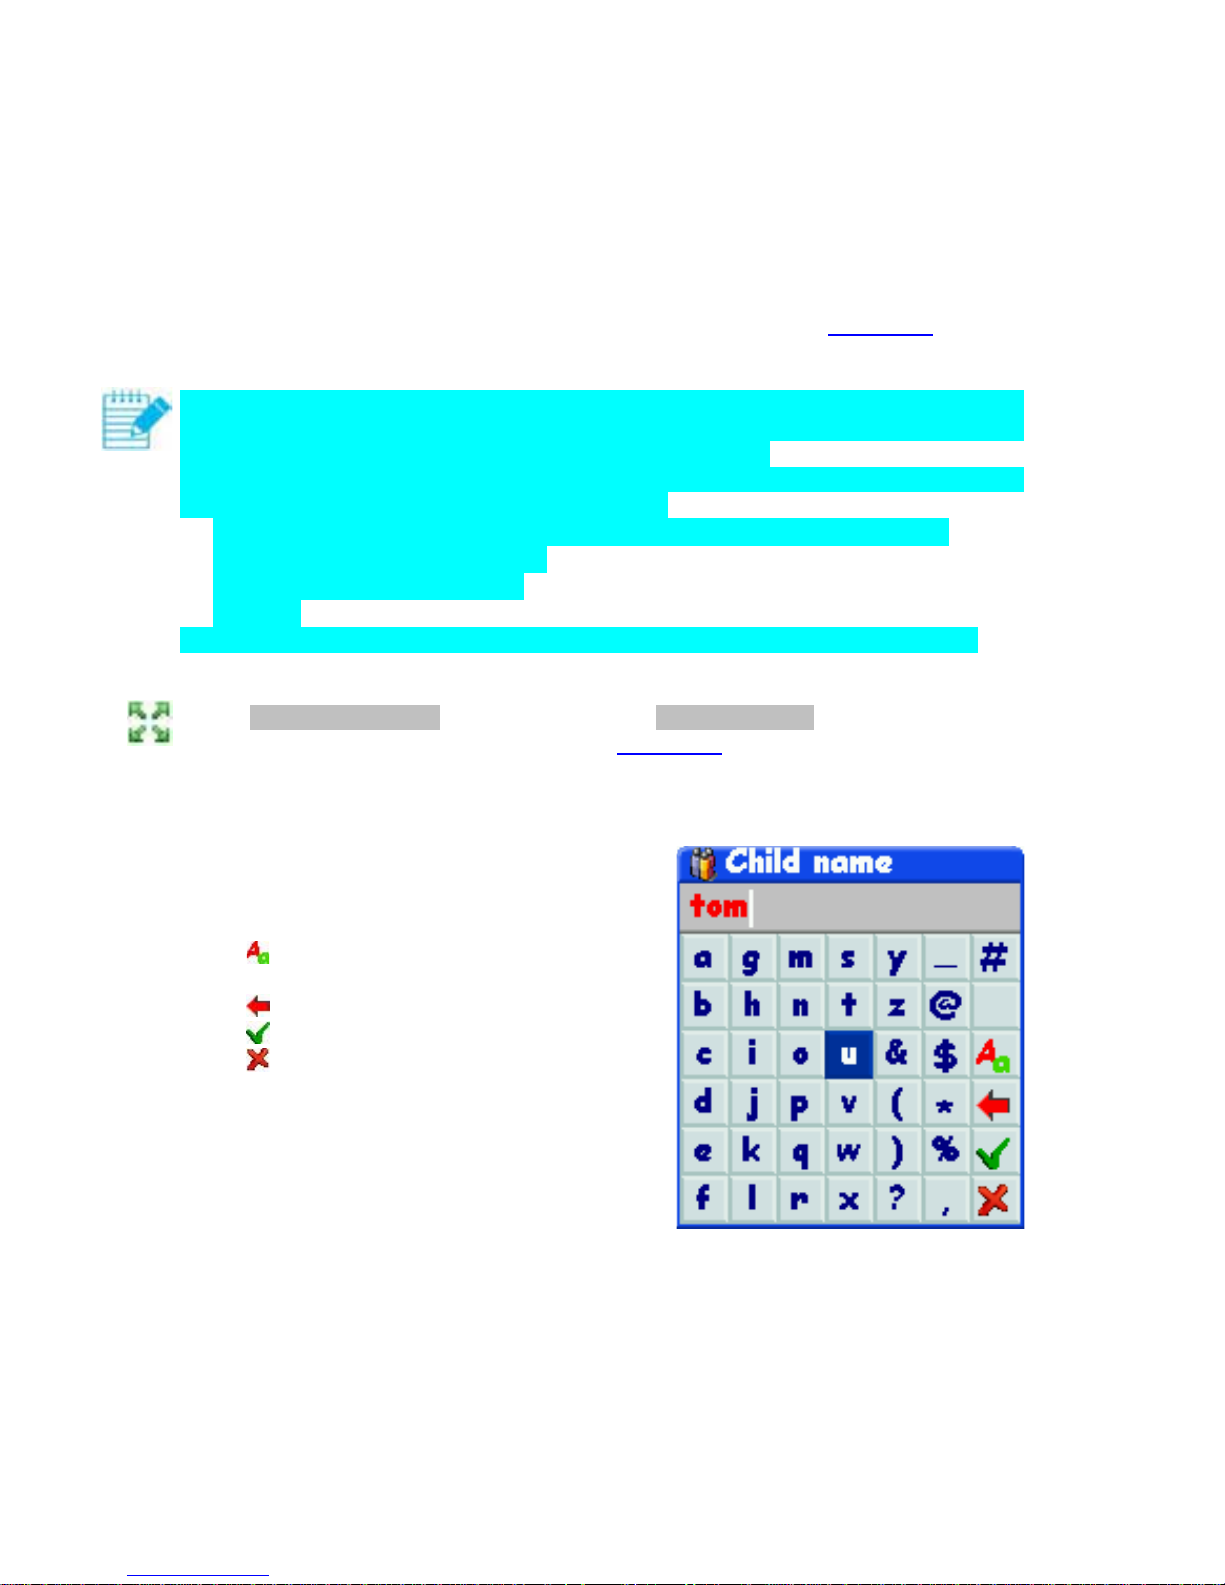
Keyboard
For entry, a simulated keyboard is displayed.
The thumb wheel lets you move around
through the keys.
alternates between lowercase and
uppercase letters.
erases the last character.
confirms the entry.
cancels the entry.
.
Page 27
Optimal Tracking Icare User Manual
page 26
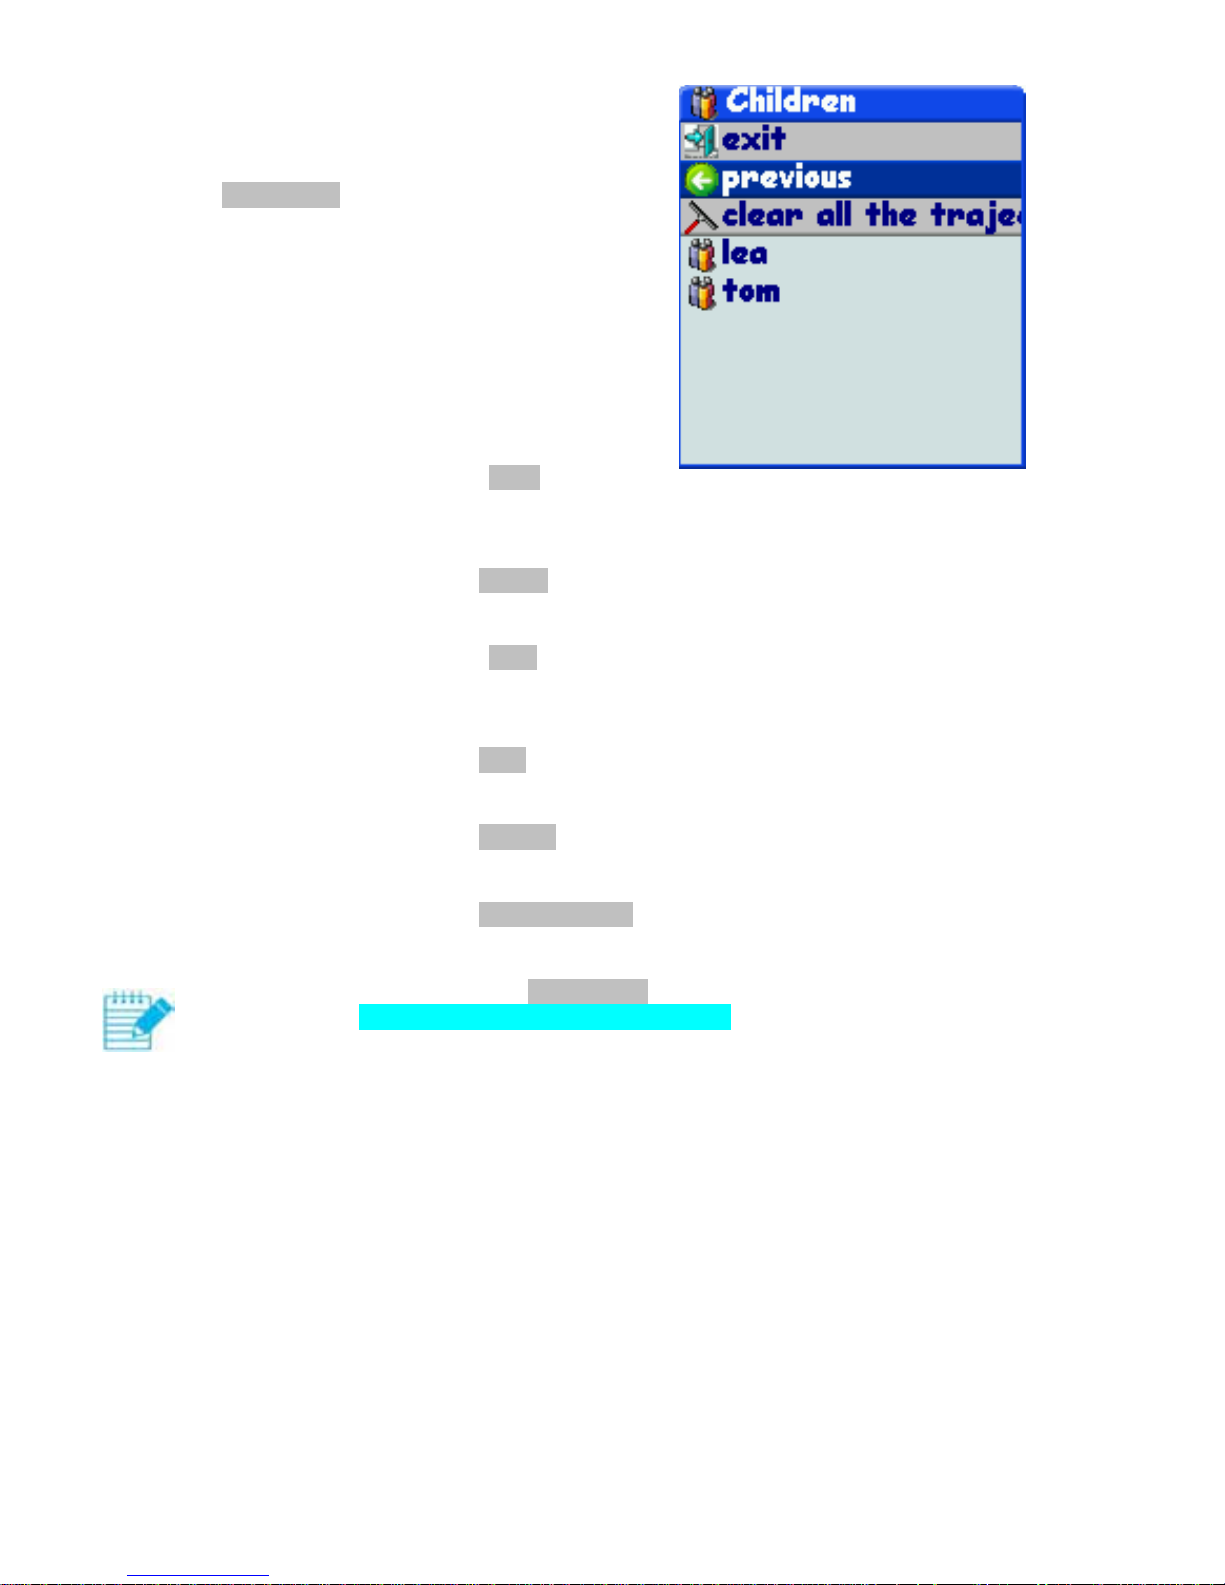
Transmitters
The transmitters menu lets you change all the
transmitter display settings, erase their
trajectories, and display the information for
each transmitter.
The list of all transmitters that have already
sent a message to the receiver is displayed.
Click on one of these transmitters to display or
change its settings.
Renaming the transmitter
On the transmitter page, click on name and enter a new name. By default, the name of each
transmitter is “sn” followed by the last 5 digits of the transmitter’s serial number.
Changing the symbol representing the transmitter
On the transmitter page, click on symbol to scroll through all the options.
Changing the transmitter color
On the transmitter page, click on color to scroll through all the options. Some symbols have
fixed colors. The transmitter trajectory uses the color set by the user.
Saving changes in name, symbol, or color
On the transmitter page, click on save.
Deleting a transmitter from the list
On the transmitter page, click on remove.
Emptying the transmitter trajectory
On the transmitter page, click on clear trajectory.
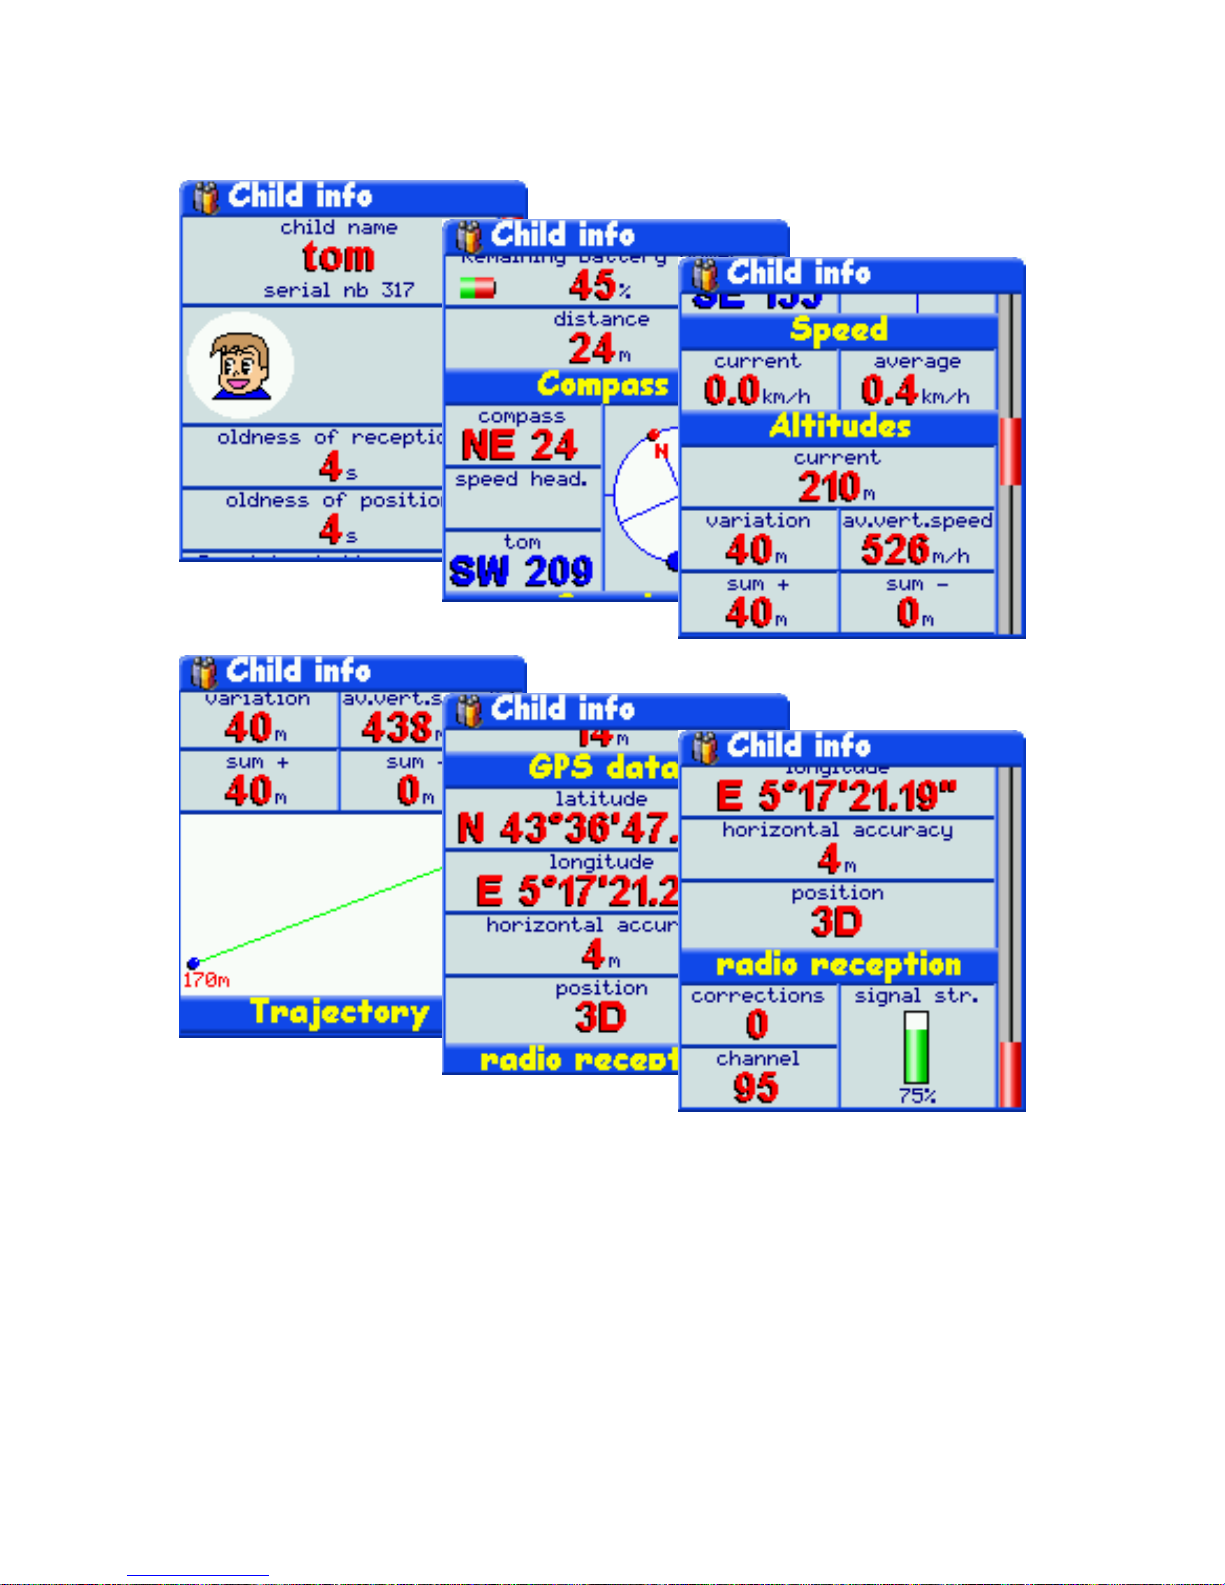
Displaying all information on the transmitter
On the transmitter page, click on information. Use the thumb wheel to browse the
information table. Click to return to the previous menu. The following information is
displayed:
emergencies.
reception and position age.
battery life.
distance from receiver.
heading.
speeds.
altitude (current, variation, graph, sums, etc.).
trajectory duration and length.
GPS position and information.
radio signal quality information.
radio channel.
Page 28
Optimal Tracking Icare User Manual
page 27
Page 29
Optimal Tracking Icare User Manual
page 28
Maps
The maps menu lets you create, add to, or change maps.
A map is a set of points, lines, and polygons intended to be displayed simultaneously. Several
maps may be created, but only one can be displayed at a time. This map is called the active
map.
The points, lines, and polygons of maps can be used:
simply to be displayed and find your bearings better.
to define alarm zones (see page 31
)
for navigating (point to reach or trajectory to follow).
There are two ways to create a map:
by moving around in the field and saving geographic entities. The advantage of this
method is that it does not require any other equipment, with the drawback being the
time it takes to move around.
by entering onscreen, on Google Earth or another program, all map entities and then
loading them into the receiver. This fast and easy method requires using a computer,
however (see page 50
).
Creating a new map
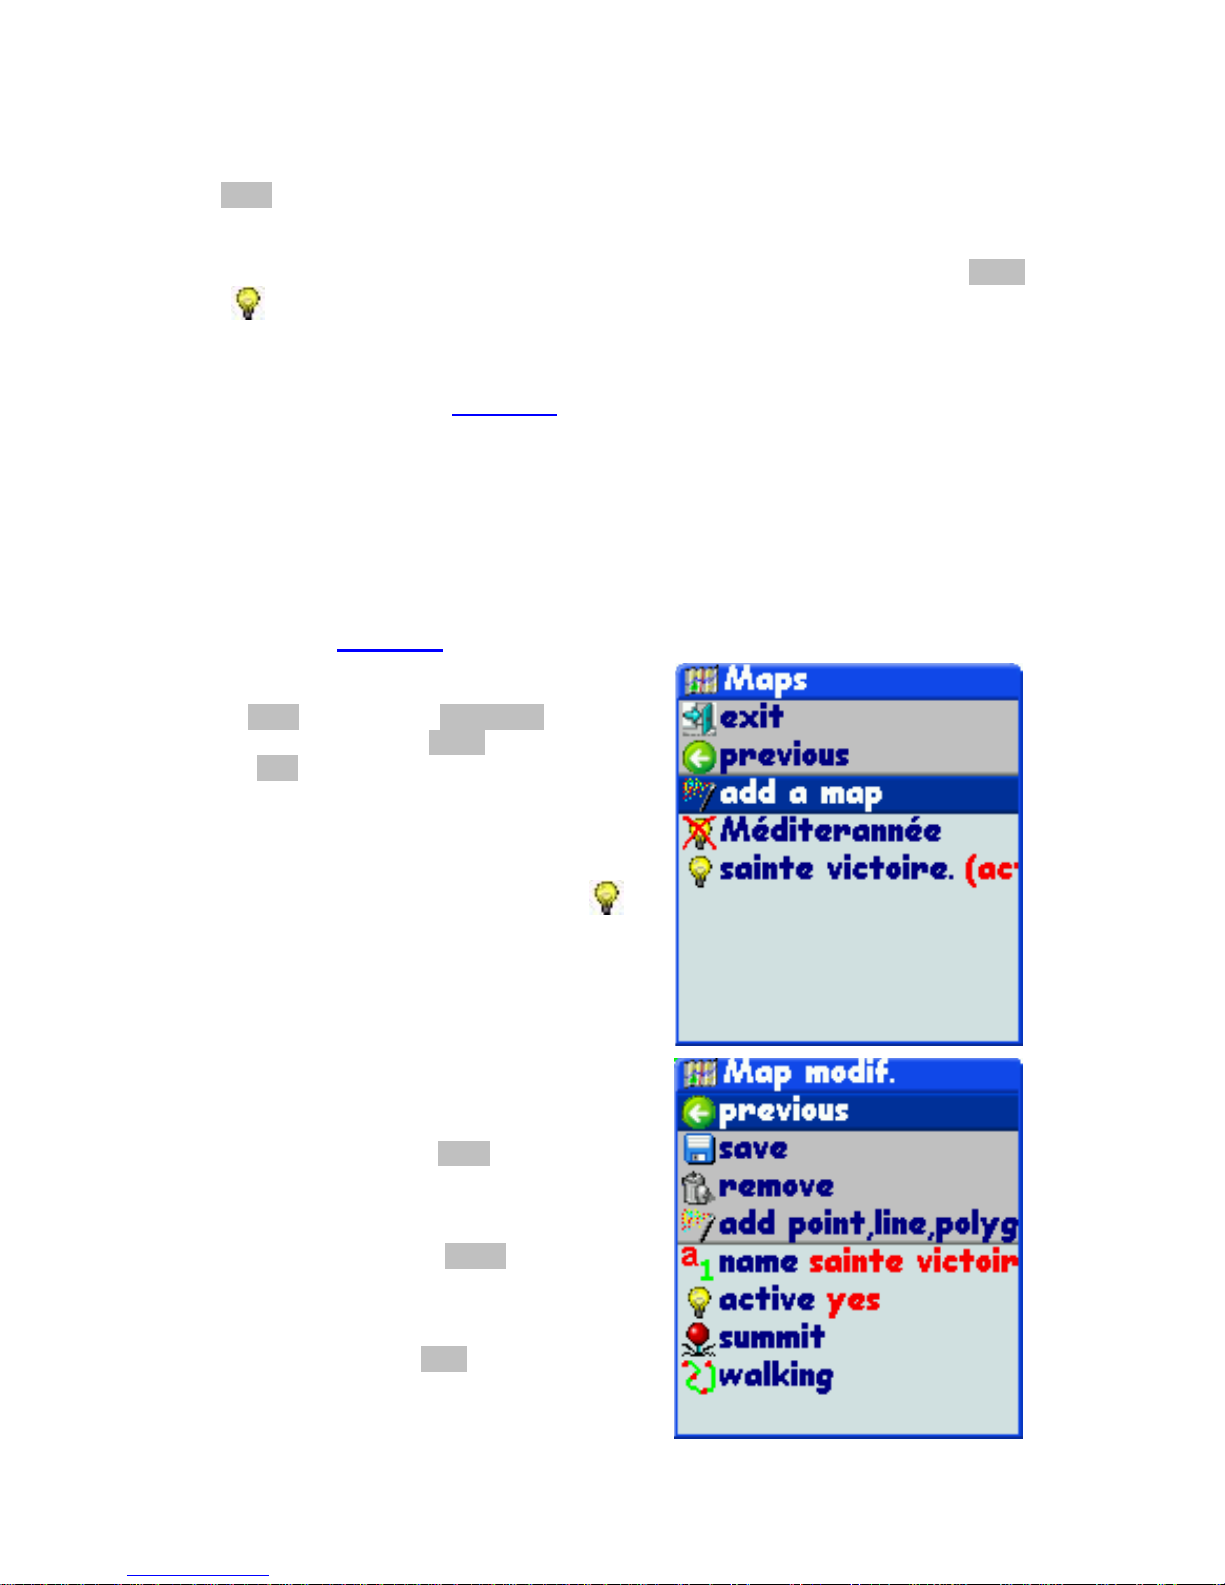
On the maps page, click on add a map. Then
enter its name and if it is active or not, then
click on save. The map created is empty.
Selecting a map
The list of all maps saved in the receiver is
displayed. Only one of these maps can be
active; it is preceded by the symbol:
Click on one of these maps to display or
change its contents.
Renaming the map
On the map page, click on name and enter a
new name.
Changing map visibility
On the map page, click on active. Only one
map can be active, i.e. displayed onscreen.
Saving name or visibility changes
On the map page, click on save.
Page 30
Optimal Tracking Icare User Manual
page 29
Deleting the map
On the map page, click on remove.
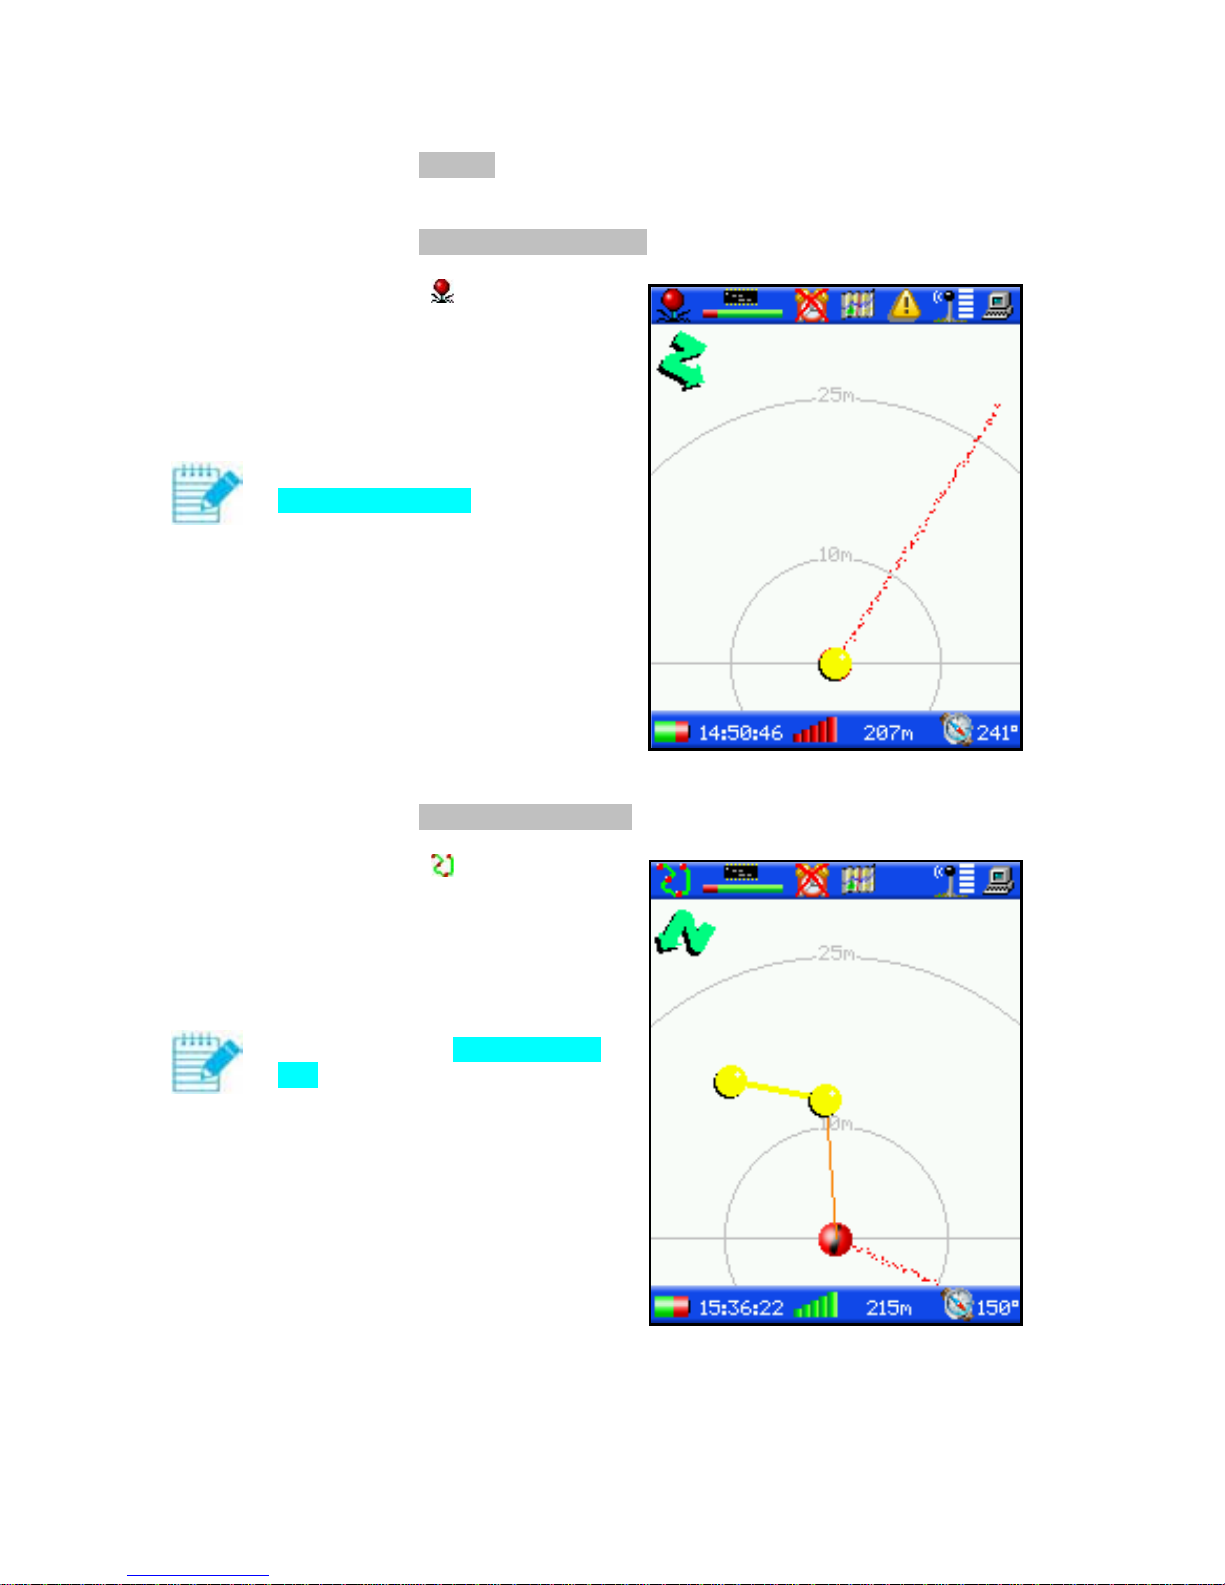
Adding a point corresponding to your position on the map
On the map page, click on add point.../add a point.
The mode icon becomes
and the entry
screen displays.
click when you are located at the
point to be entered. The point
entered appears in yellow.
if you click again, the new position
erases the previous one.
when you are sure of your entry,
double click to save the point and
its characteristics:
map to store the point on
name
symbol
color (some symbols have
fixed colors)
size (some symbols have a
fixed size)
Adding a line to the map, by moving about in the field
On the map page, click on add point.../add a line.
The mode icon becomes
and the entry
screen displays.
click each time you are located at a
point on the line to be entered. The
point entered appears in yellow as
well as the temporary line.
when you have entered the last
point on the line, double click to
save the line and its characteristics:
map to store the line on
name
type of trajectory
color
thickness
line closed or not
Page 31
Optimal Tracking Icare User Manual
page 30
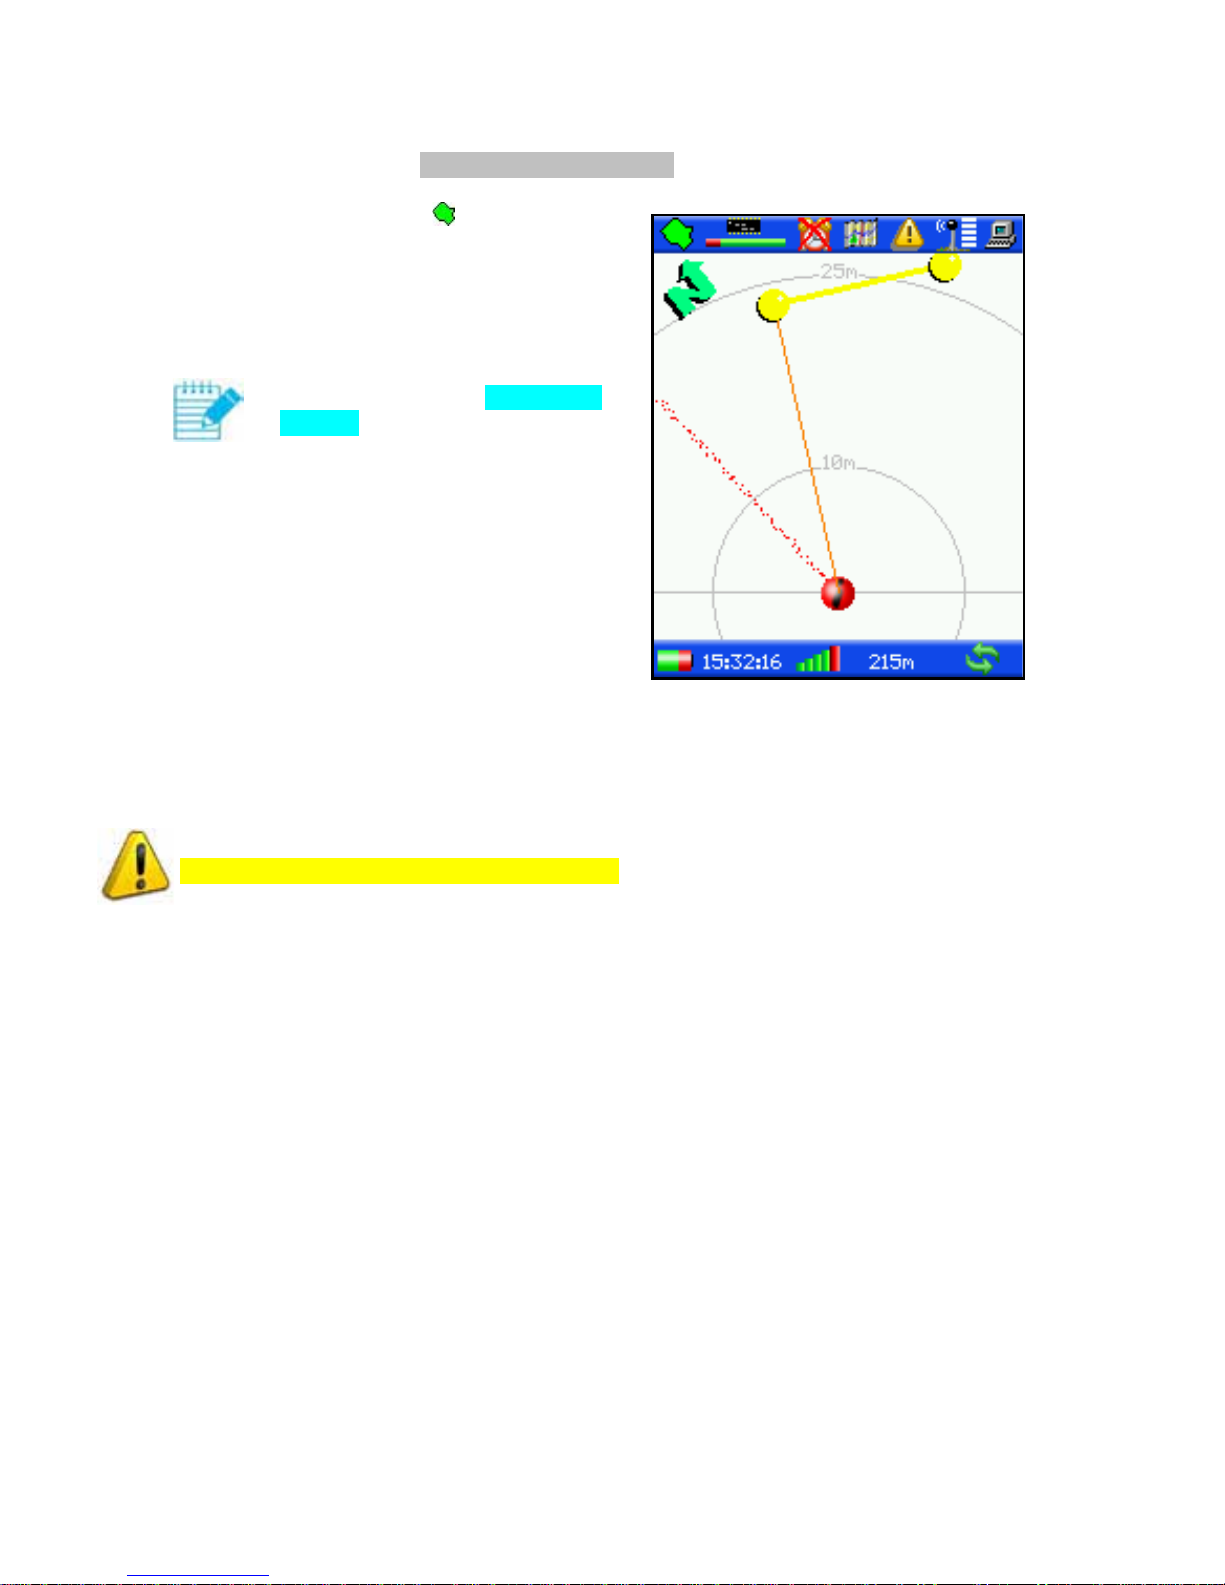
Adding a polygon to the map, by moving about in the field
On the map page, click on add point.../add a polygon.
The mode icon becomes
and the entry
screen displays.
click each time you are located at a
corner on the polygon to be entered.
The point entered appears in yellow
as well as the temporary polygon.
when you have entered the last
point on the polygon, double click
to save the polygon and its
characteristics:
map to store the polygon on
name
color
display level from 0 to 8
(low level polygons are
displayed first)
Changing or deleting a map entity
On the map page, click on the entity to be changed or deleted. The page that opens lets you:
change the entity’s characteristics.
move the entity to another map.
delete the entity.
Note, the position of entities cannot be changed.
Page 32

Optimal Tracking Icare User Manual
page 31
Alarms
The alarms menu lets you create or change alarms.
An alarm lets you detect abnormal behavior from one or more transmitters.
There are 10 types of alarms the user can set:
no news from a transmitter for a certain period.
transmitter too far from receiver.
transmitter outside a polygon.
transmitter within a polygon.
transmitter too close to a point.
transmitter too far from a point.
transmitter too close to a line.
transmitter too far from a line.
transmitter too close to a polygon.
transmitter too far from a polygon.
In addition to these alarms are two permanent alarms:
SOS activated by pushing the transmitter button.
drowning detection by immersing the transmitter in water (this alarm can be
deactivated, see page 44).
Settable alarms can be created for one transmitter or all transmitters.
The combination of all these alarms allows for effective monitoring of children or animals
moving around the area:
detecting if transmitter is too far (risk of danger, but also a risk of going out of range).
detecting transmitters out of range (no news).
detecting a transmitter leaving a mandatory area.
detecting entry into an off-limits area.
detecting a transmitter near a hazard.
drowning detector.
SOS sent by the child.
etc.…
Page 33
Optimal Tracking Icare User Manual
page 32
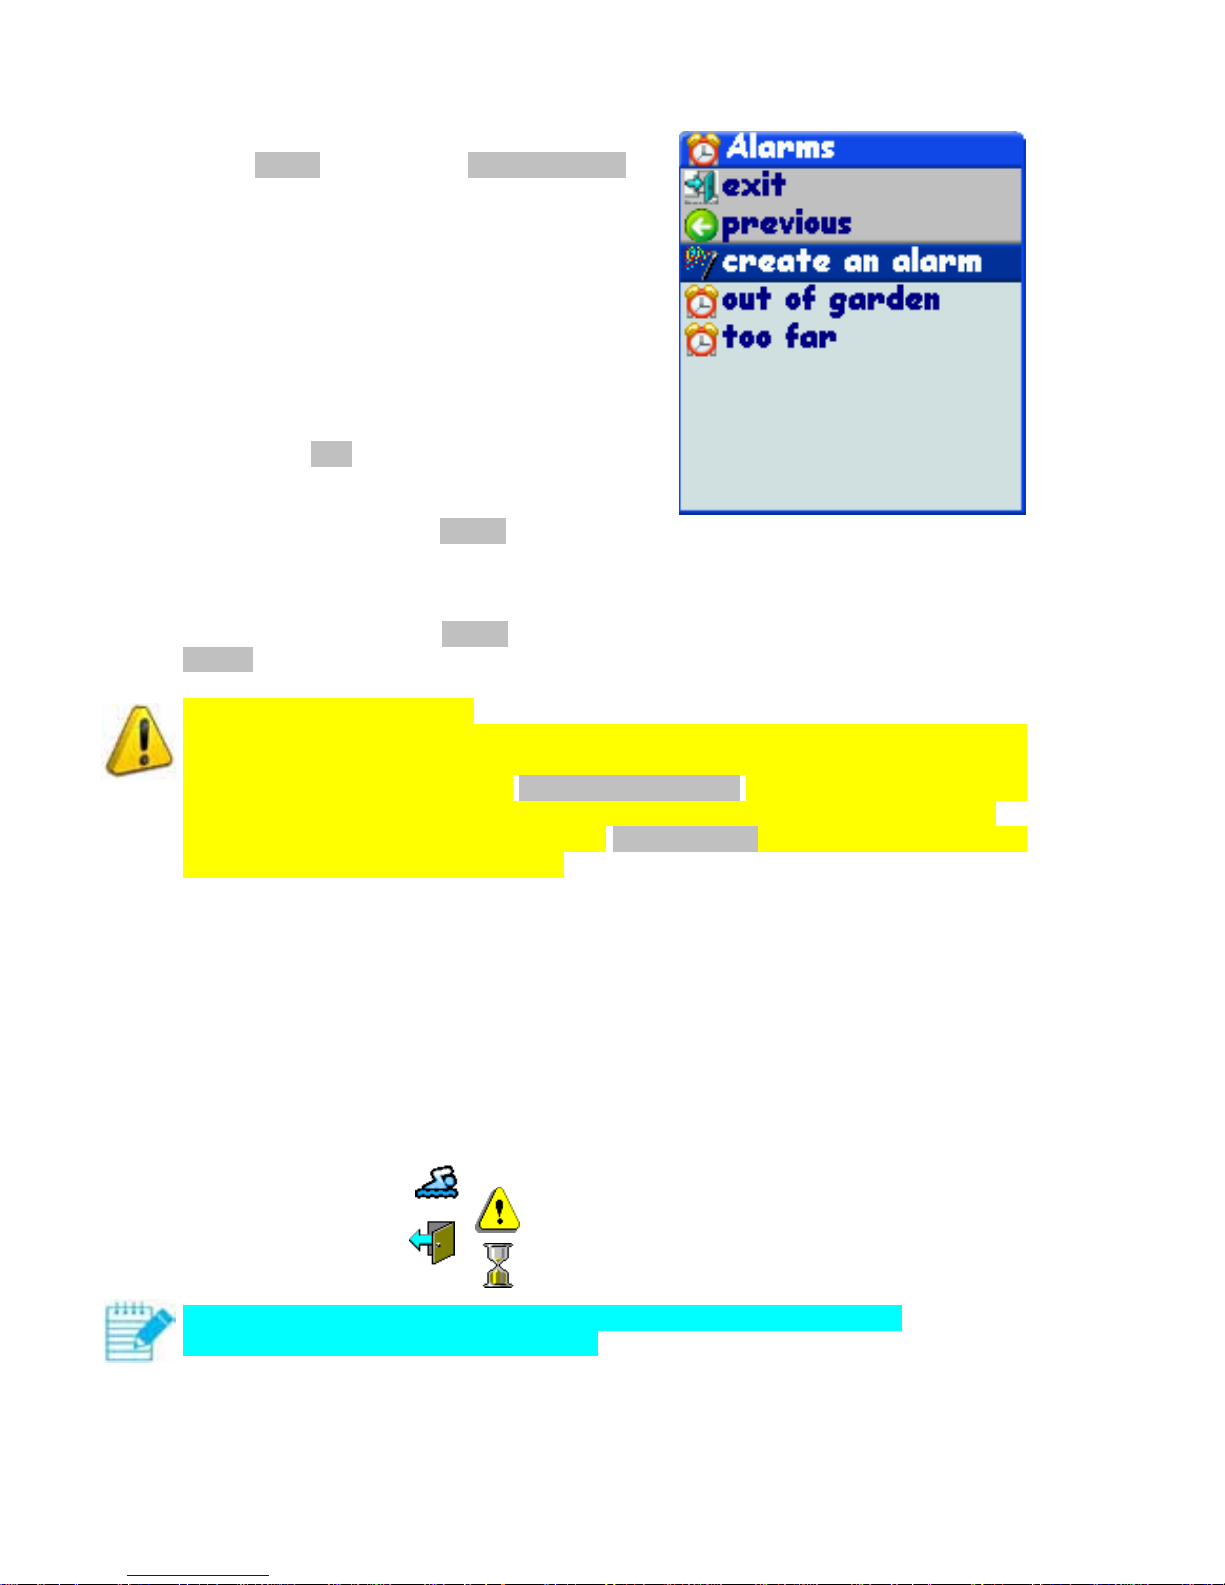
Creating a new alarm
On the alarms page, click on create an alarm.
Then enter:
its name.
The transmitter the alarm will apply to or
if it applies to all transmitters.
the alarm type.
depending on the alarm type:
o maximum or minimum distances.
o maximum time without news.
o the geographic entity as well as the
map it is on.
Then click on save.
Changing an alarm
In the list of alarms on the alarms page, click on the alarm you want to change. The page
which opens is the same one as to create a new alarm. You can change all the alarm settings.
Deleting an alarm
In the list of alarms on the alarms page, click on the alarm you want to delete, then click
remove.
To properly detect a drowning
When a child falls in the water, a “drowning” message is sent to the receiver. But if the child
sinks quickly, the transmitter's range is severely reduced, since water muffles radio waves.
Therefore it is recommended to set a no news for 30 seconds alarm. This way, if no message
is received for 30 seconds, the alarm is sent because the child may have fallen in the water.
The combination of a “drowning” alarm and a no news for …alarm enhances system safety
and makes it possible to intervene quickly.
Receiving an alarm
Each time an alarm is triggered:
a sound alarm goes off for 20 seconds.
the receiver vibrates for 20 seconds.
the LED flashes for 20 seconds.
an information message displays to explain the alarm.
a symbol describing the alarm type flashes on the upper icon bar.
a symbol describing the alarm flashes on the transmitter position.
The symbols are:
drowning:
SOS:
zone alarm:
no news:
To stop the sound alarm, vibration, and flashing, click once on the thumb wheel.
To erase the information message, click again.
Page 34

Optimal Tracking Icare User Manual
page 33
If the receiver is connected to the USB port of a computer and real-time monitoring in Google
Earth is activated, a sound alarm is triggered by the computer and an alarm signal appears in
Google Earth at the transmitter's position.
Sound alarm, vibration, and LED flashing can be deactivated (see page 38
).
Page 35
Optimal Tracking Icare User Manual
page 34
Trajectory analysis
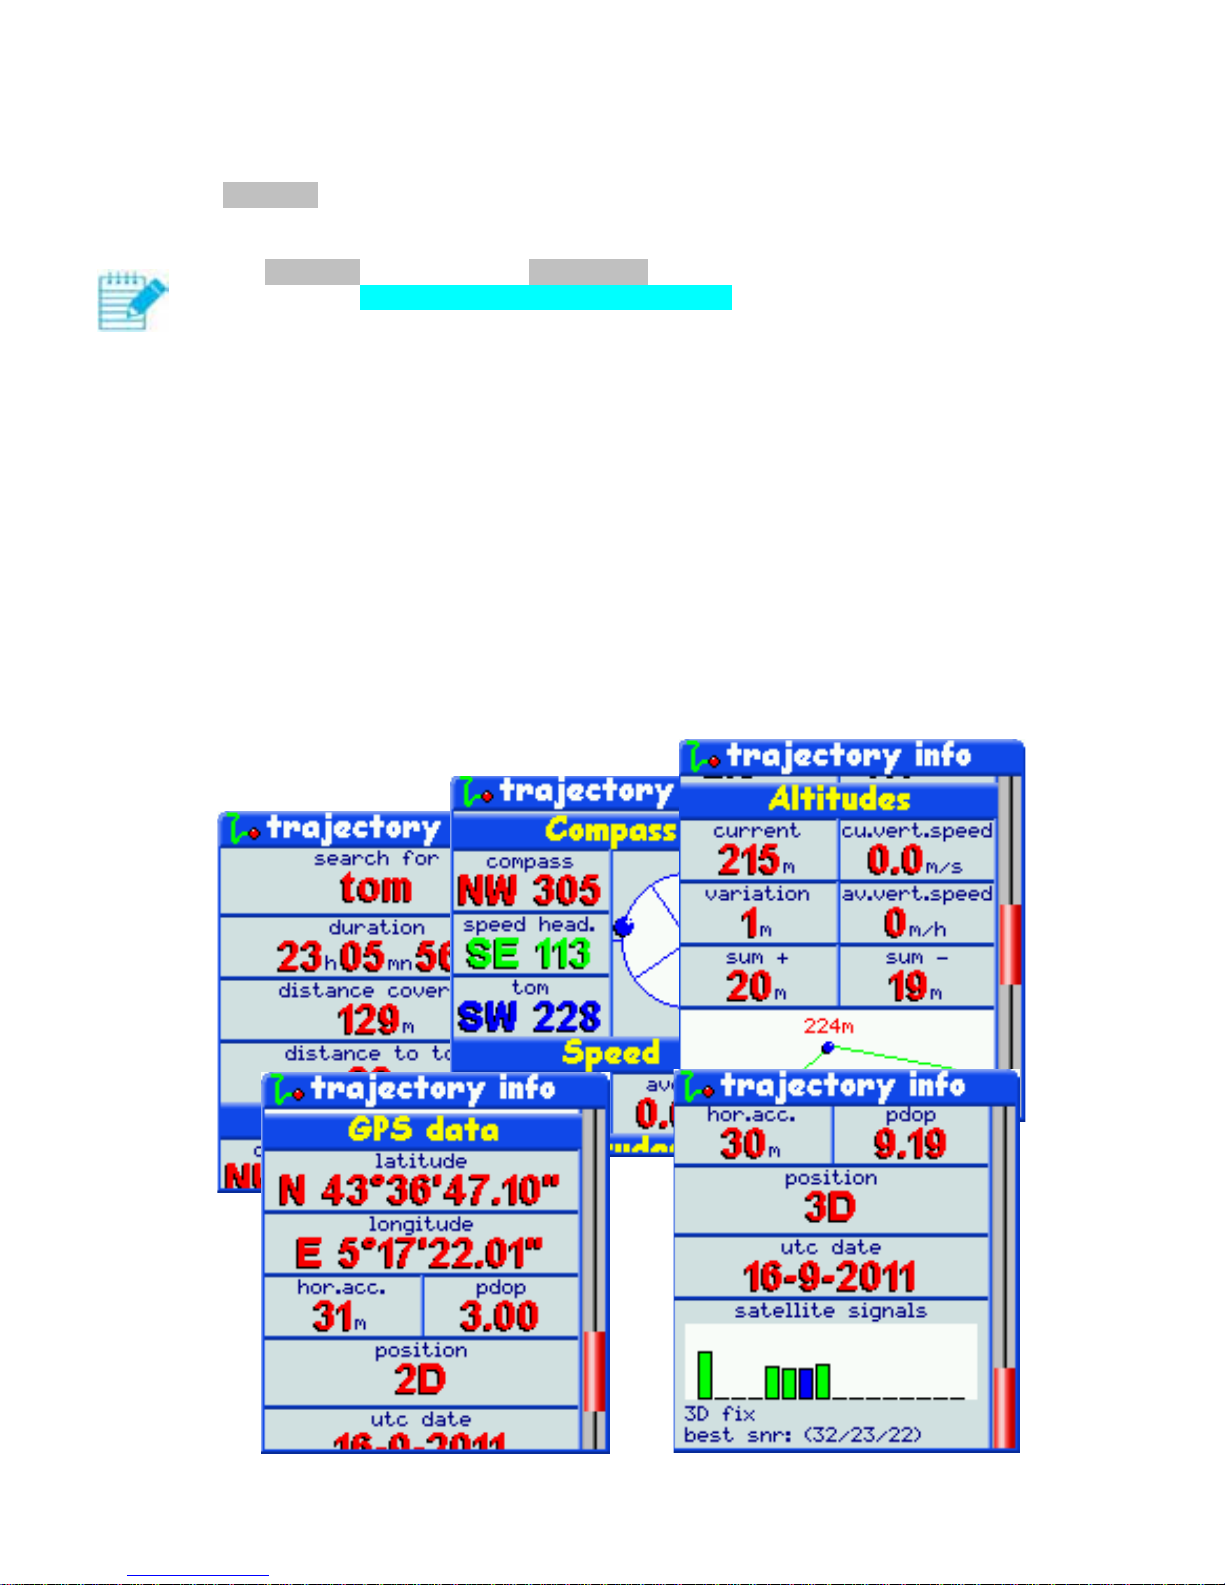
The trajectory menu lets you display all the information related to your trip.
Displaying all information regarding your trip
On the trajectory page, click on information. Use the thumb wheel to browse the
information table. Click to return to the previous menu. The following information is
displayed:
trip duration.
distance traveled.
distance to the transmitter searched for (if the corresponding mode is active).
distance to the point to be reached (if the corresponding mode is active).
distance to travel on the trajectory to be followed (if the corresponding mode is active).
distance to travel on the course to be followed (if the corresponding mode is active).
compass.
superimposing quick search or tracking symbols on the compass.
current and average speeds.
altitude.
current and average vertical speeds.
altitude changes.
altitude gain/loss totals.
altitude graph.
GPS data.
UTC date.
Page 36

Optimal Tracking Icare User Manual
page 35
Resetting the trajectory
On the trajectory page, click on clear trajectory. All trajectory measurements are then reset
(durations, distances traveled, averages, altitude changes, totals, etc.).
Saving the trajectory on a map
It is useful to save your trajectory on a map in several cases:
before resetting the trajectory in order to make a backup.
to backtrack (see page 14
).
to automatically create a zone for alarms.
Click on save in a map, select the map as well as the display characteristics, then click on
save.
Flashlight
The flashlight lets you see in front of you, which could be useful when looking for a child or
animal at night. It consumes little battery power and stays lit for a long time.
Turning on the flashlight
On the main menu page, click on turn on flashlight.
Turning off the flashlight
On the main menu page, click on turn off flashlight.
Page 37
Optimal Tracking Icare User Manual
page 36
Settings
The settings menu lets you:
select the language.
select display settings.
calibrate the compass.
enter magnetic declination.
set the time.
select the units of measure used.
deactivate alarms.
enter the receiver name.
view the memory contents.
access advanced settings.
Language selection
Click on language until the desired language is displayed.
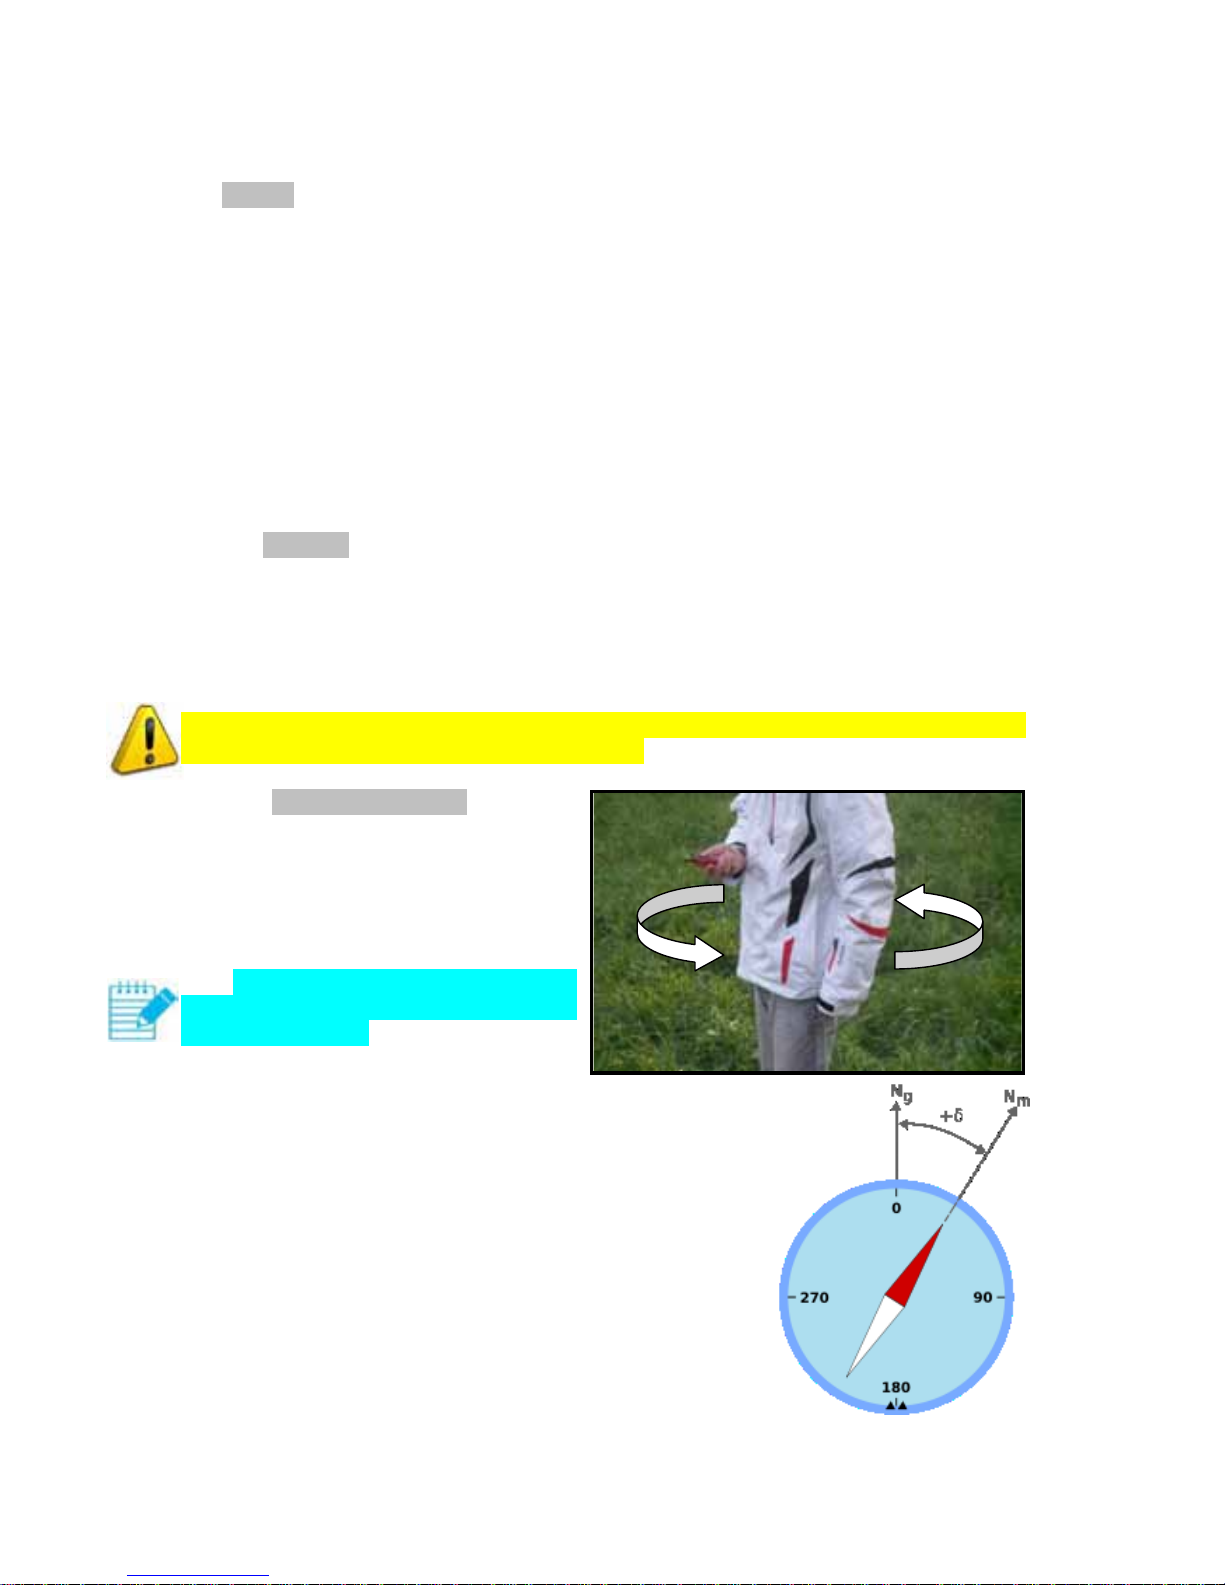
Calibrating the compass
The compass must be recalibrated regularly (once a week) or with every major movement
(over 1000 km). A message is sent when recalibration is necessary. However, if you think the
compass is giving incorrect information, recalibrate it.
Do not forget that magnetic declination, i.e. the difference between true North and magnetic
North must be entered for proper compass function.
Click on compass calibration and follow
the instructions displayed. Hold the device
horizontally, and turn around approximately
4 rotations over 20 seconds while holding
the device horizontally.
For proper calibration, it is important to
keep away from objects which generate a
magnetic field (vehicles, etc.) and to keep
the device horizontal.
Magnetic declination
Magnetic declination is, at a given point on the earth’s surface,
the angle formed between the direction to the geographic North
Pole and the magnetic North Pole. This angle is counted
positively to the east and negatively to the west.
The earth’s rotational axis defines the geographic poles, and the
axis of the earth’s magnetic field defines the magnetic poles.
These two axes do not coincide and the magnetic North Pole is
different from the geographic North Pole. This is why magnetic
declination varies from one point to another on the earth’s
surface.
Page 38

Optimal Tracking Icare User Manual
page 37
It also varies over time because the axis of the earth’s magnetic field changes over time due
to movements in the earth’s core.
Click on magn.declin. and enter the declination value, positive to the east and negative to the
west. The value can be found online for each point on the globe.
Time difference
GPS reception allows the receiver to
very precisely know the
coordinated universal time (UTC).
Coordinated universal time is a time
standard adopted as the basis for
international civil time by most
countries on the planet.
Therefore it is necessary to enter
your time difference from this
universal time.
Click on UTC time diff. and enter
the difference expressed in hours
and hundredths of hours
(1.50 means 1 hour and 30 min).
Automatic centring
When centring is automatic, the zoom is constantly adjusted in order to keep certain entities
visible:
in transmitter search mode, the transmitter is always visible.
in reach a point mode, the point is always visible.
in follow a route mode, the point on the route nearest to you is always visible.
in see and go mode, the point on the course nearest to you is always visible.
In manual centring, the zoom is only changed by the user.
To change the centring, click on centring.
Floating or fixed reference point
In all modes, except global fixed North and global compass, the reference point moves from
top to bottom in order to increase the area of most interest to you. The reference point is said
to be floating. Reference-point floating can be deactivated, and the reference point is then
fixed.
To change the reference-point behavior, click on reference.
Brightness
Click on backlight to adjust screen brightness from 1 to 9. Decreasing brightness helps to
increase battery life.
Backlight duration
If the thumb wheel is not turned or clicked for a certain period, the screen dims to very low
brightness in order to decrease power consumption.
To set this timer, click on backlight duration until you reach the desired time.
Page 39

Optimal Tracking Icare User Manual
page 38
Displays all transmitters in search mode
In search mode, if too many transmitters are in the area, the movement on the screen can be
very slow. In this case, tou can select to display only the transmitter searched.
Displaying help messages
Help messages can be displayed to better guide you in the use of your Icare. By default, they
are deactivated. Click on help display to activate or deactivate them.
Displaying information messages
Information messages can be displayed to better inform you on the function of your Icare. By
default, they are deactivated. Click on info display to activate or deactivate them.
Selecting units of measure
Three measurement systems are available:
the metric system.
the English terrestrial system.
the nautical system.
Click on units until you get to the measurement system desired.
Changing the receiver’s trajectory
Click on receiver trajectory to change the receiver’s trajectory.
You can then change:
maximum points: the maximum number of points making up the trajectory.
length of segments: the distance between two consecutive points on the trajectory.
periodicity: the time between two consecutive trajectory backups.
type: the type of line used to trace the trajectory.
color: the color of the trajectory.
thickness: the thickness of the trajectory.
Changing transmitter trajectories
Click on transmitter trajectories to change the transmitters’ trajectories.
You can then change:
maximum points: the maximum number of points making up the trajectory.
Length of segments: the distance between two consecutive points on the trajectory.
type: the type of line used to trace the trajectory.
thickness: the thickness of the trajectory.
The color of a transmitter’s trajectory is the color set in the transmitters menu.
Displaying the name of map entities
It is possible to deactivate the display of map entity names in order to clarify the display. For
this, click on displays the name of map entities.
Deactivating sounds, sound alarms, vibration, and light alarms
Sounds generated upon startup, shutoff, clicking, etc. can be deactivated by clicking on
sounds.
Sound alarms can be deactivated by clicking on sound alarm.
Vibration can be deactivated by clicking on vibrator.
The luminous alarm (flashing LED) can be deactivated by clicking on flashlight alarm.
These deactivations are displayed on the upper icon bar.
Page 40

Optimal Tracking Icare User Manual
page 39
Changing see and go mode settings
By clicking on settings “see and go”, it is possible, while maintaining the tracking course, to
change some see and go mode settings (see page 21):
use.
distance.
wind speed.
This makes it possible, for example, to correct wind speed after entering the tracking course.
Setting the receiver name
It is possible to assign a name to the receiver. By default, this name is “sn” followed by the
last 5 digits of the receiver’s serial number. To change the name, click on receiver name and
enter the name desired.
Viewing memory use
By clicking on memory used, you can access:
memory used by the system.
memory used by data from transmitters.
memory used by your trajectory.
memory used by maps.
free memory.
the number of transmitters, maps, points, lines, polygons, and alarms.
the receiver name.
This page gives good visibility of memory use.
To leave the page, click.
Viewing advanced settings
By clicking on advanced, you can access:
the age and distance of the most recent compass calibration.
other settings useful only for technical support.
To leave the page, click.
Page 41
Optimal Tracking Icare User Manual
page 40
8 USING THE TRANSMITTER
Recharging the battery
Fully charge the transmitter before first use.
Connect the charger to a 110 or 220 volt outlet
(50/60 Hz)
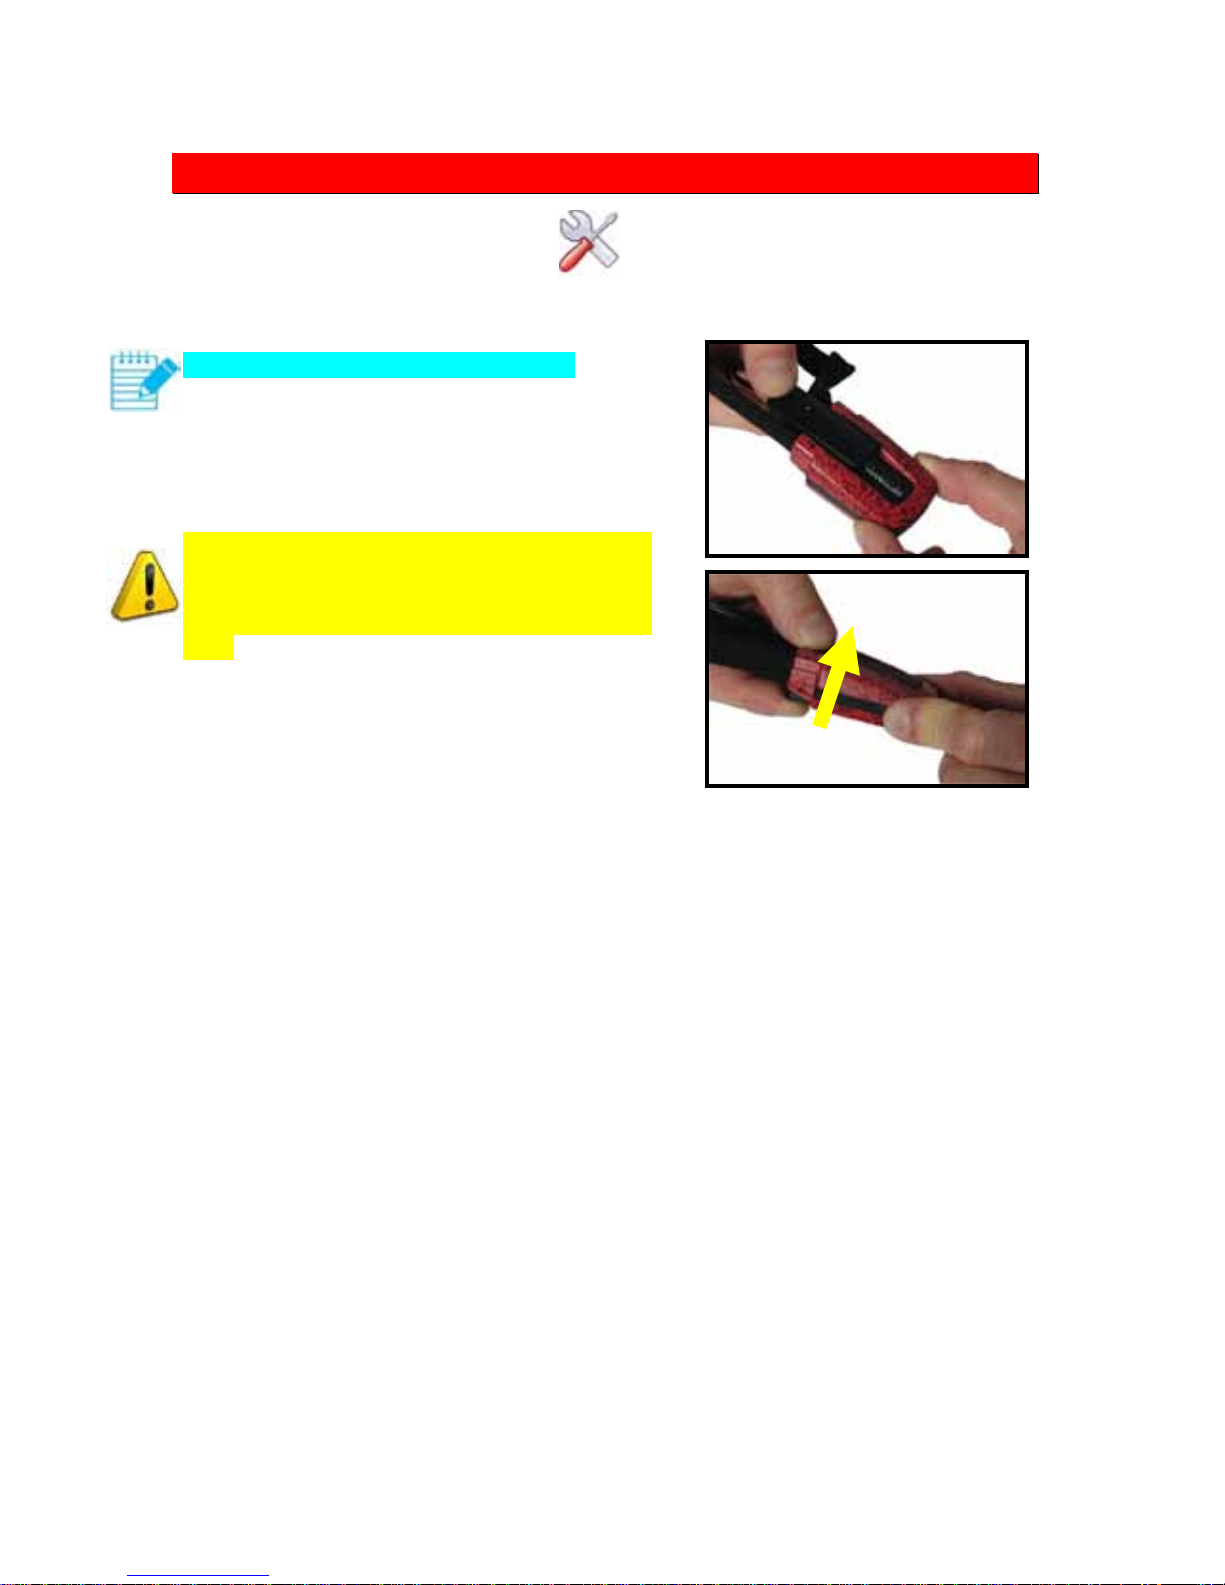
Connect the transmitter clip to the charger as shown
in the photo. The red LED flashes slowly.
When charging is completed (the LED flashes
quickly), do not pull on the cord to disconnect the
clip. Lightly lift on the clip, and remove it (see
photo opposite). The clip is then removed without
force.
The transmitter and receiver can be charged at the
same time.
Transmitter in standby mode
maximum charge time: around 1 hour, 15 minutes.
charging: LED flashes every 2 seconds.
charged: LED flashes 2 times a second.
Once the clip is disconnected, the transmitter stays on standby.
Transmitter in active mode
maximum charge time: around 1 hour, 15 minutes.
charging: LED flashes every 2 seconds.
charged: LED flashes 2 times a second.
Once the clip is disconnected, the transmitter stays active.
Battery life for a fully-charged transmitter is 13 hours (at 20°C).
Page 42
Optimal Tracking Icare User Manual
page 41
Startup and shutoff
To start the transmitter, press the
button for 1 second. The red LED flashes 3 times slowly
to signal the transmitter is starting up. Afterward, the LED flashes once every thirty seconds.
Place the transmitter outside, horizontally, with a clear view of the sky for 1-3 minutes so that
it can determine its position.
To find out if the transmitter position has been determined, look at its icon on the receiver
screen:
o fixed: means the transmitter position is known and precise.
o fixed: transmitter position unknown.
o flashing alternately: transmitter position known but not very precise.
To verify that the transmitter is working properly:
see if a message is sent approximately every thirty seconds.
o the red LED flashes.
o The receiver beeps.
press briefly on the button and verify that an SOS message is sent.
o the red LED flashes.
o The receiver displays an SOS message.
To put the transmitter in standby mode, press the
button for 10 seconds. After 10 seconds,
the red LED flashes quickly to indicate the transmitter is shut off. The procedure to put a
transmitter on standby is intentionally long in order to prevent a child from shutting off the
transmitter unintentionally.
If the battery is drained when starting the transmitter, the LED flashes three times quickly and
the transmitter goes to standby mode. In this case, you must recharge the battery.
Using and adjusting the strap
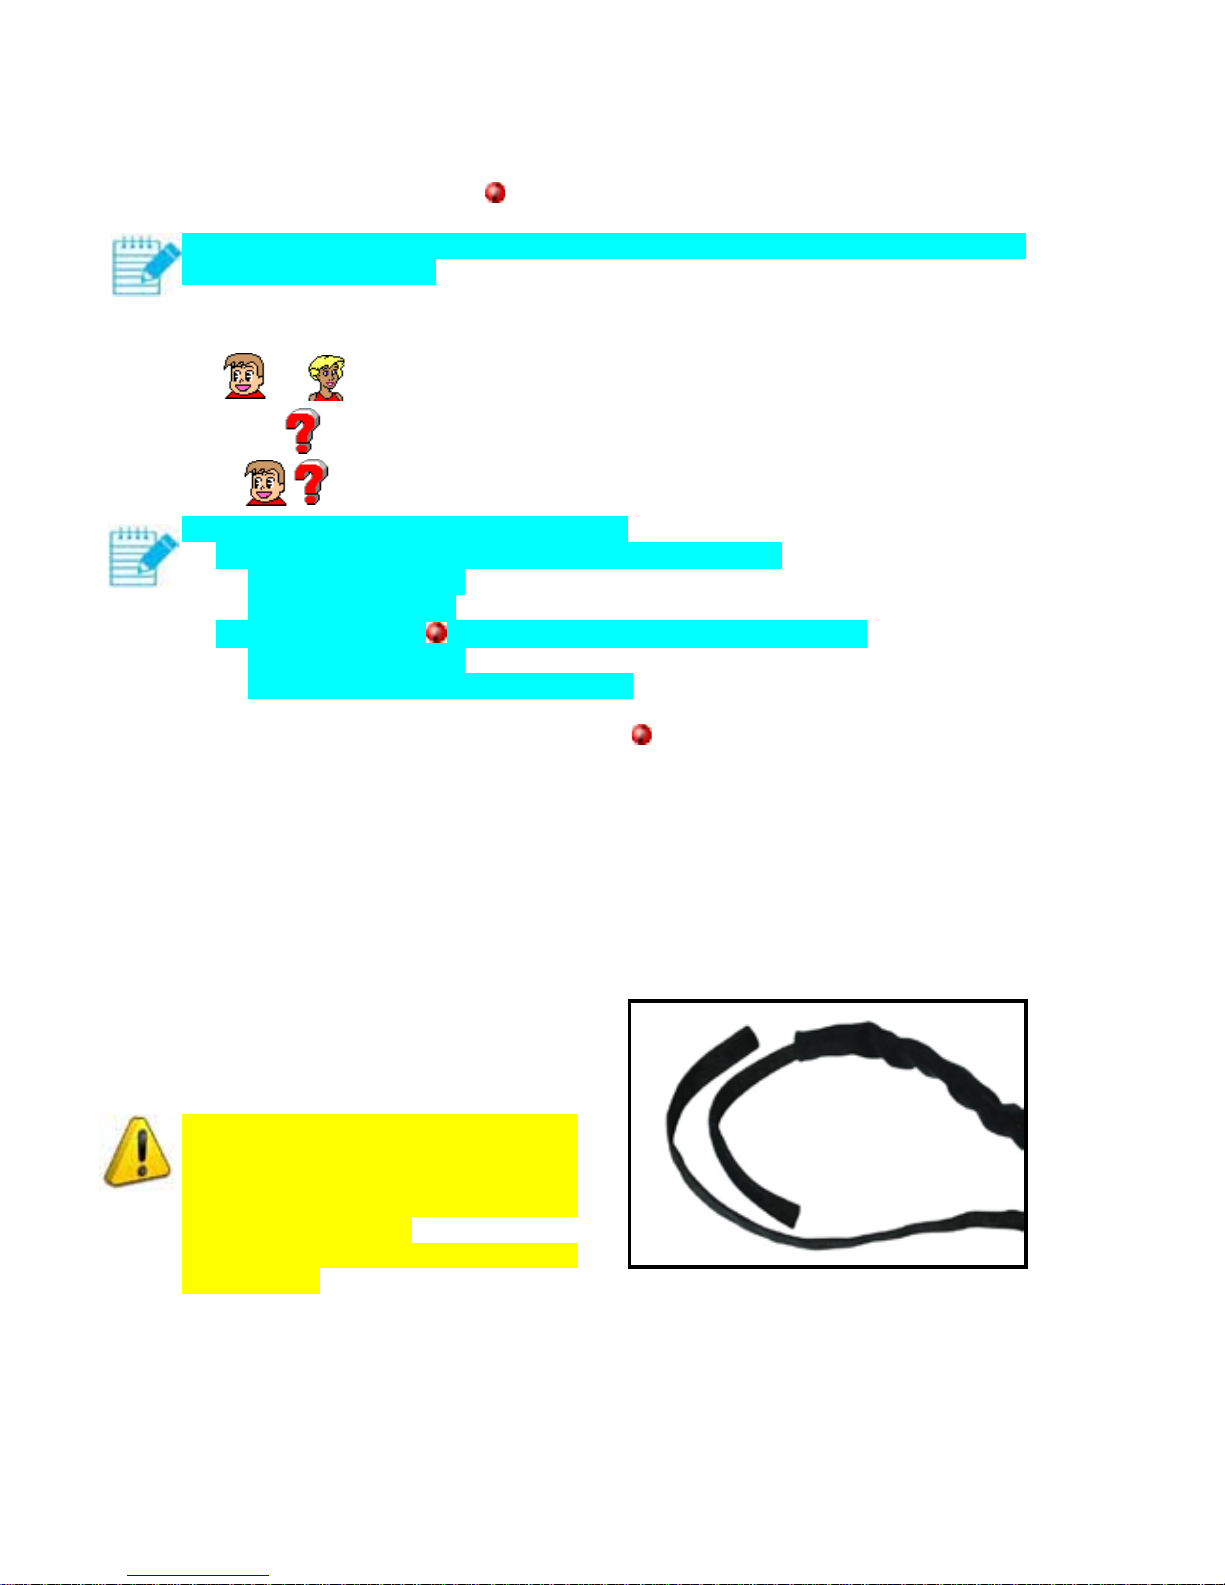
The length of the strap can be adjusted. To
do this, slide the sheath along the strap and
adjust the Velcro to the desired length. Put
the sheath back on the middle of the strap.
The strap closure system is designed to
prevent strangulation if the transmitter
wearer becomes suspended by the strap.
Any significant tension on the strap will
cause the closure to open.
Consequently, do not modify the strap
closure system.
…
Page 43
Optimal Tracking Icare User Manual
page 42
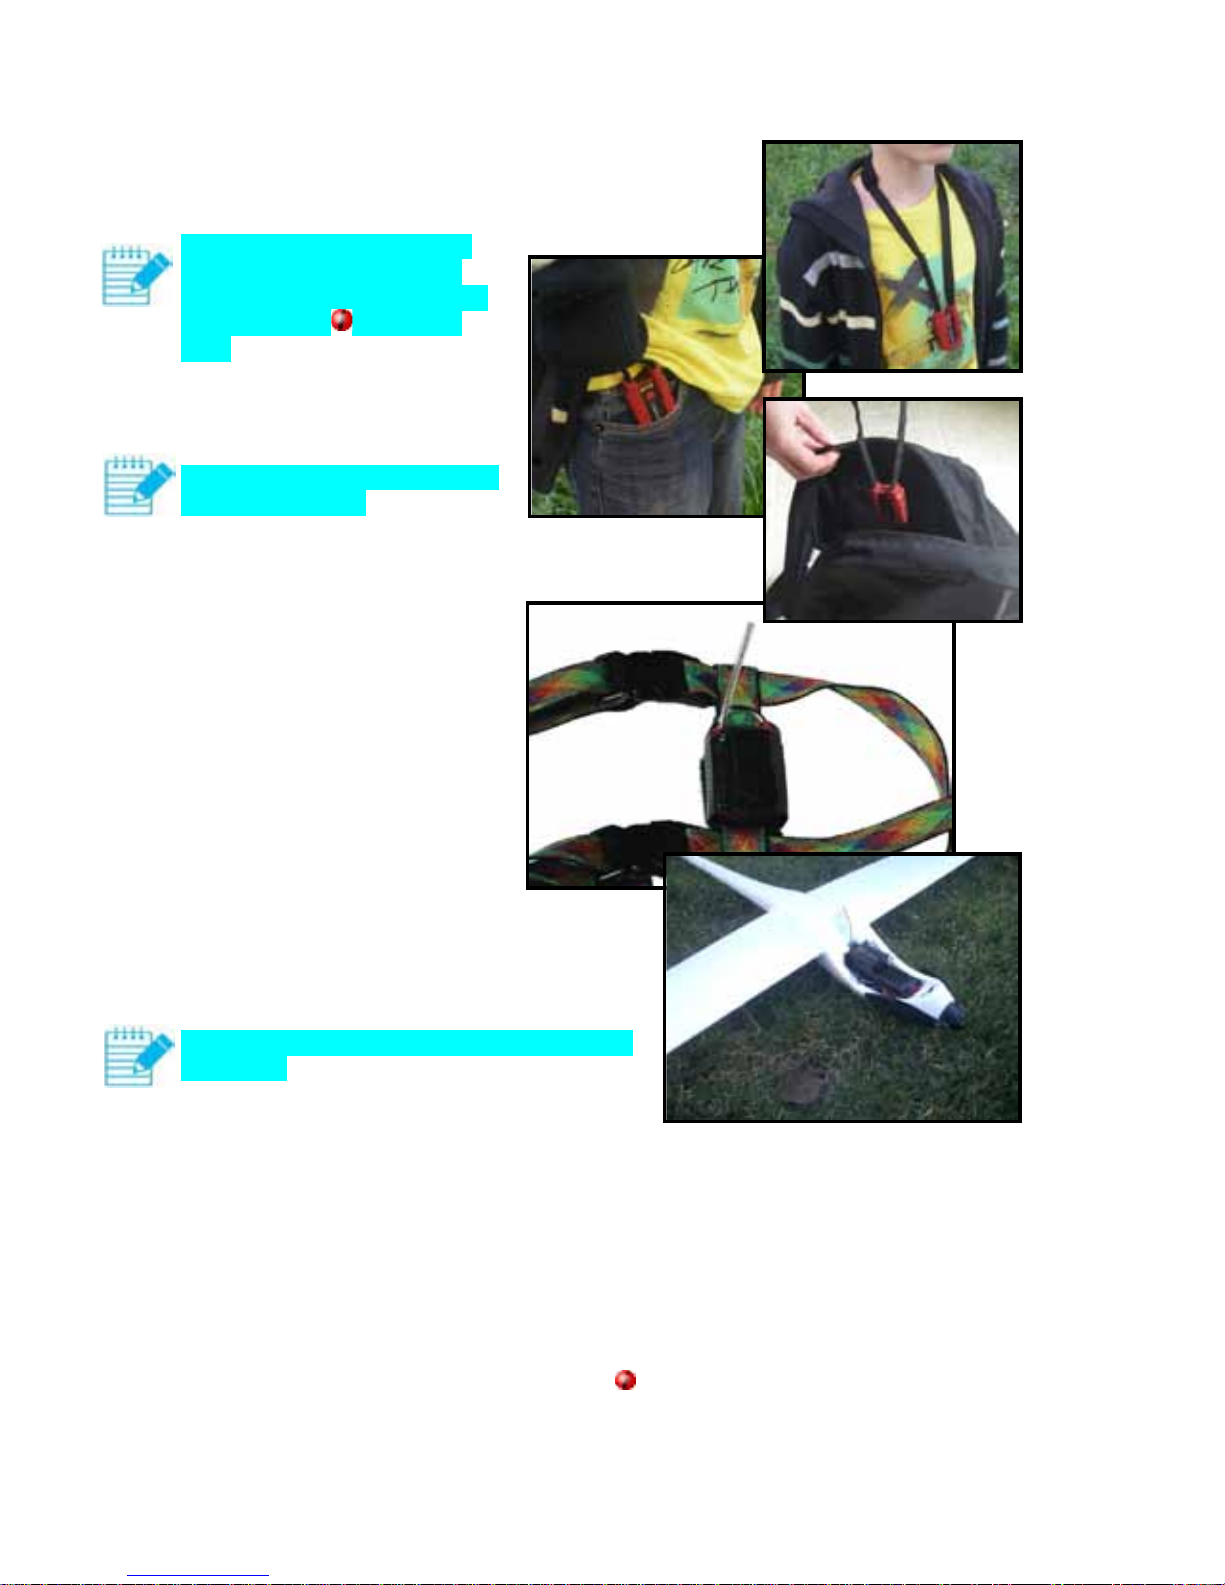
How to place the transmitter
Around the neck
For children, the transmitter was
designed to be worn around the
neck, face forward (containing the
activation button ) against the
body. Clothing over the transmitter
will not interfere with operation.
In a pocket
Make sure the front side is facing
away from the body.
In a bag
On a dog harness
In a plane for the aeromodelling version
Avoid to cover the transmitter with a metal or
carbon part.
Sending messages to the receiver
Approximately every 30 seconds, the transmitter sends out a position message. All receivers
can receive it, there is no unit pairing.
When the receiver receives a message containing the transmitter position, it makes a brief
sound.
In addition to regular transmissions, the transmitter sends a message:
if an SOS is triggered by pressing on the
button.
if immersed in water.
Page 44

Optimal Tracking Icare User Manual
page 43
Sending an SOS
If the child wearing the transmitter feels in danger, they just have to press on the
button.
An SOS message is then immediately sent to the receiver. In order to increase safety of the
child, the SOS is repeated in the next 5 message transmissions. Thus, any time the
button is
pressed, an SOS message is sent for 3 minutes.
Drowning detector
When the transmitter falls in the water, a “drowning” message is sent to the receiver.
To increase child safety even more near a body of water:
If the transmitter sinks quickly, the transmitter's range is severely reduced, since water
muffles radio waves.
Therefore it is recommended to set a no news for 30 seconds alarm on the receiver. This way,
if no message is received for 30 seconds, the receiver alarm is triggered because the child may
have fallen in the water.
The combination of a “drowning” alarm and a “no news for…” alarm enhances system safety
and makes it possible to intervene quickly.
The drowning detector can be deactivated (see page 44).
Water-resistance
The transmitter is splash-proof and resistant to short term surface immersion in water.
Wash the front side of the transmitter slowly with fresh water after any immersion.
Channels
Each transmitter has a transmission channel. There are 111 possible channels. Each
transmitter is factory configured to a channel based on its serial number. Multiple transmitters
can operate simultaneously without interference as long as they are on different channels. If
not, the channel can be changed (see page 44
).
Page 45
Optimal Tracking Icare User Manual
page 44
Transmitter setup
Some transmitter settings can be changed. In order to make setup more user-friendly, settings
are displayed on the receiver.
To set up the transmitter:
start up the receiver.
make sure the transmitter to be set up is in standby mode. If it is not, put it in standby
mode.
start up the transmitter and press the
button 5 times in the 5 seconds following
the three startup flashes of the red LED.
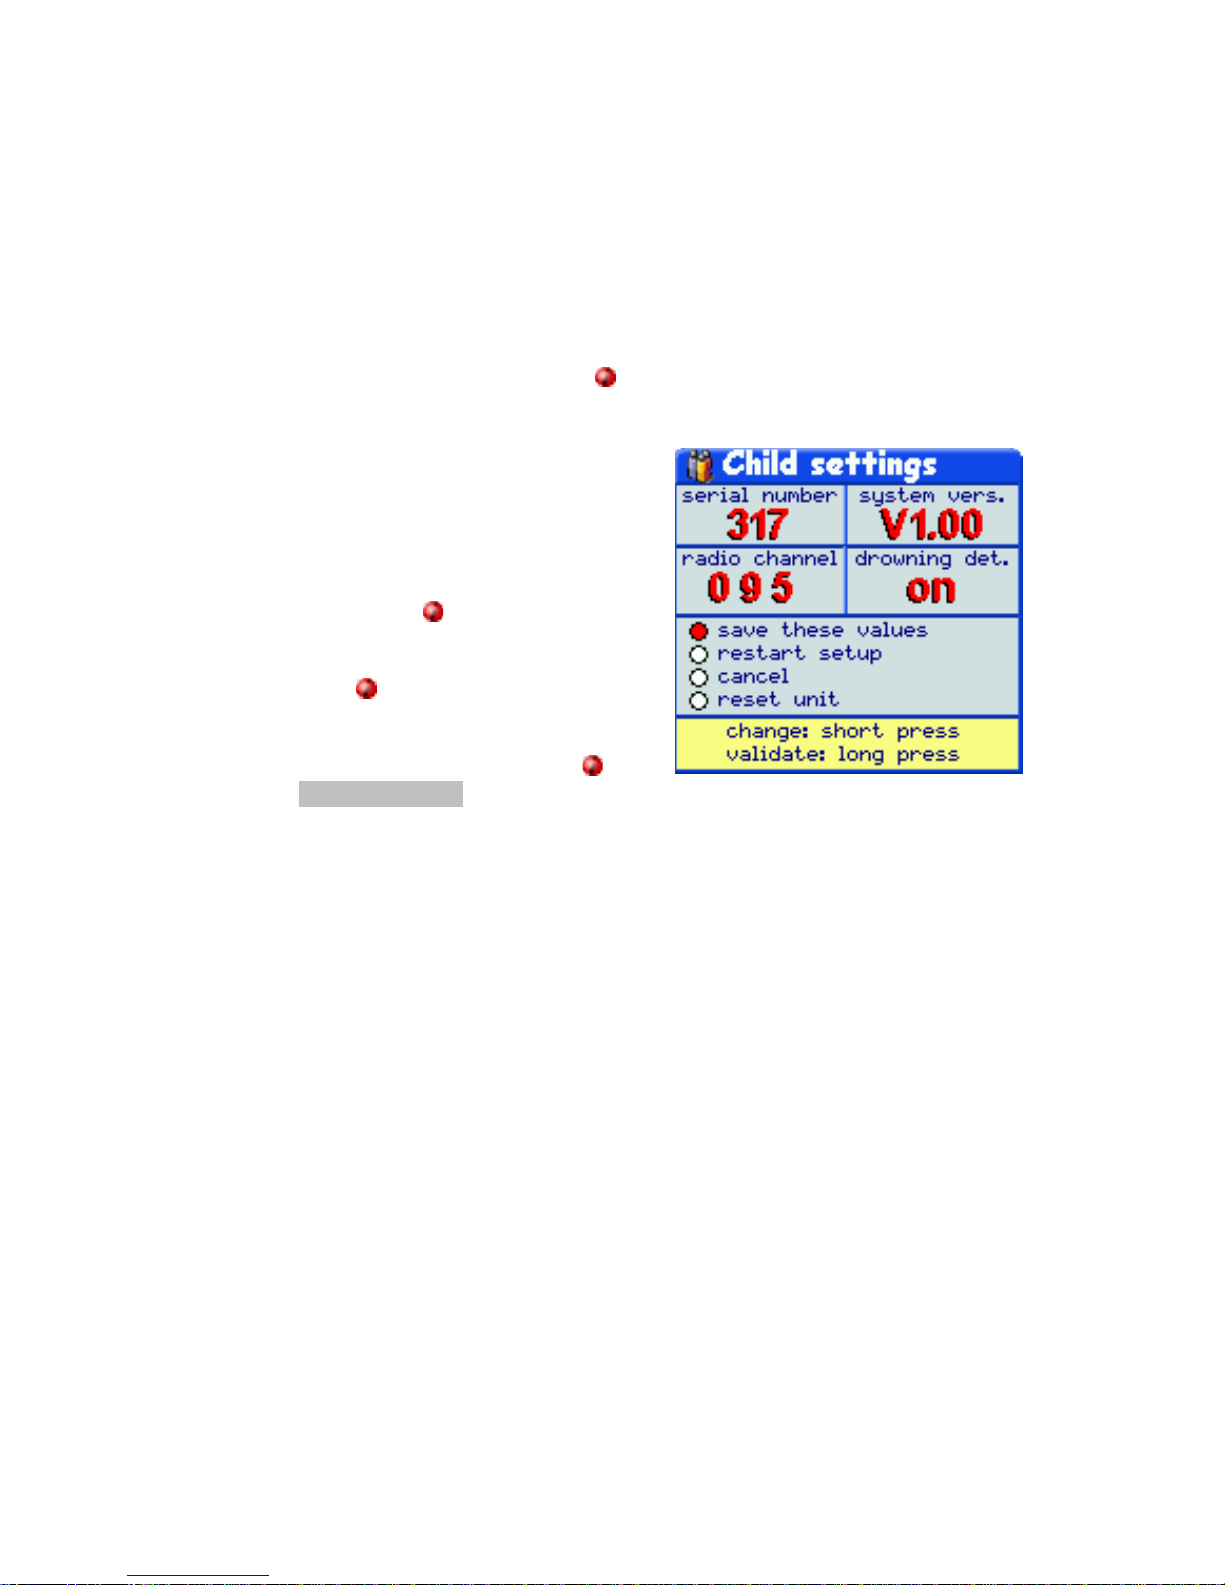
The setup screen displays on the receiver.
Two settings can be changed:
the transmission channel.
the drowning detector.
A short press of the
button on the
transmitter changes the field blinking in
yellow onscreen.
A long press of the
button on the transmitter
validates the field blinking in yellow.
To save your changes, hold down on the
button when save these values is selected and
flashing in yellow.
Once setup is finished, the transmitter stays active.
For informational purposes, the last 5 digits of the transmitter’s serial number as well as the
firmware version are displayed on the setup screen.
A simple click on the receiver makes the setup window go away.
Page 46

Optimal Tracking Icare User Manual
page 45
9 CONNECTING TO A COMPUTER
Connecting to a computer via the USB port requires the installation of Icare Manager. Icare
Manager is a free software program that makes it possible to:
track in real-time on Google Earth:
o transmitter positions, trajectories, and alarms
o the receiver’s position and trajectory
load a map into the receiver.
save receiver contents onto the computer.
Icare Manager operates under Windows 98, 2000, NT, ME, XP, Vista, and Windows 7.
In addition to Icare Manager, you can also install at no charge:
Google Earth for real-time tracking and map creation.
GPSBabel for converting any GPS format to or from Google Earth.
Installing Icare Manager
The computer must be connected to the Internet.
Step 1: Downloading Icare Manager (necessary)
go to www.optimaltracking.com
.
go to the downloads section.
click on “download Icare Manager.”
save the compressed “Icare Manager” folder to your computer.
extract the “Icare Manager” folder using WinZip (if you do not have WinZip, you
can download it online).
go to the Icare Manager folder, and right-click on the
IcareManager file and
select “copy.”
go to your desktop, right-click, and select “paste link.” Now you will have a link on
your desktop for launching Icare Manager.
Step 2: Installing the USB driver (necessary)
Windows 7 operating system:
connect the receiver to the computer using the USB cable supplied.
The USB driver installs automatically.
Page 47
Optimal Tracking Icare User Manual
page 46
Windows Vista operating system:
connect the receiver to the computer using the USB cable supplied.
a “New hardware detected” window pops up.
select “Search for and install software driver.”
click on “Continue” if Windows asks you for authorization to install the driver.
the driver is automatically searched for by “Windows Update,” which can take a few
minutes.
again, a “New hardware detected” window pops up.
select “Search for and install software driver.”
click on “Continue” if Windows asks you for authorization to install the driver.
the driver is again automatically searched for by “Windows Update,” which can take
a few minutes.
the message “The device driver was installed correctly” pops up. Driver installation
is finished.
Windows XP, 2000, NT, 98, ME operating systems:
download the USB driver for your operating system at
http://www.ftdichip.com/Drivers/VCP.htm.
extract the downloaded folder using WinZip (if you do not have WinZip, you can
download it online).
connect the receiver to the computer using the USB cable supplied.
follow the instructions by requesting a manual installation and indicating that the USB
driver is in the downloaded folder.
Step 3: Installing the free Google Earth program (recommended)
go to www.earth.google.com
.
click on “download Google Earth.”
follow the directions provided by the site and execute the installation program.
Step 4: Installing the free GPSBabel program (optional)
go to www.gpsbabel.org/download.html
.
download the latest version of GPSBabel
follow the directions provided by the site and execute the installation program.
Page 48

Optimal Tracking Icare User Manual
page 47
Step 5: Setting up Icare Manager (necessary)
Upon startup, Icare Manager reads the config_icare_manager.txt setup file.
This file can be modified using “Notepad.”
the first line is for selecting the language:
french: French
english: English
the second line is for the full name of the GPSBabel launch command. For example,
“C:\Program Files\GPSBabel\gpsbabelfe.exe” if GpsBabel is installed in C:\Program
Files\GPSBabel and if the program is named gpsbabelfe.exe.
third line for the Google Earth real-time tracking refresh period (2 seconds by
default).
fourth line for the period separating receiver readings under real-time tracking (1
second by default).
fifth line for the period separating the launch of real-time tracking and display of data
in Google Earth (15 seconds by default).
For slower computers, it may be useful to increase the refresh period as well as the period
between readings. Set the values to around 3 to 5 seconds.
Step 6: Setting up Google Earth (necessary)
In Google Earth, click on “Tools/Options/General, and make sure that under “KML
error handling” that the option “Silently accept all unrecognized data” is checked.
If not, check the option and click on “Apply.”
Page 49
Optimal Tracking Icare User Manual
page 48
Using Icare Manager
Connecting the receiver
Connect the receiver to a USB port on your computer using the USB cable supplied.
If the receiver is shut off, start it up.
Launch
IcareManager.
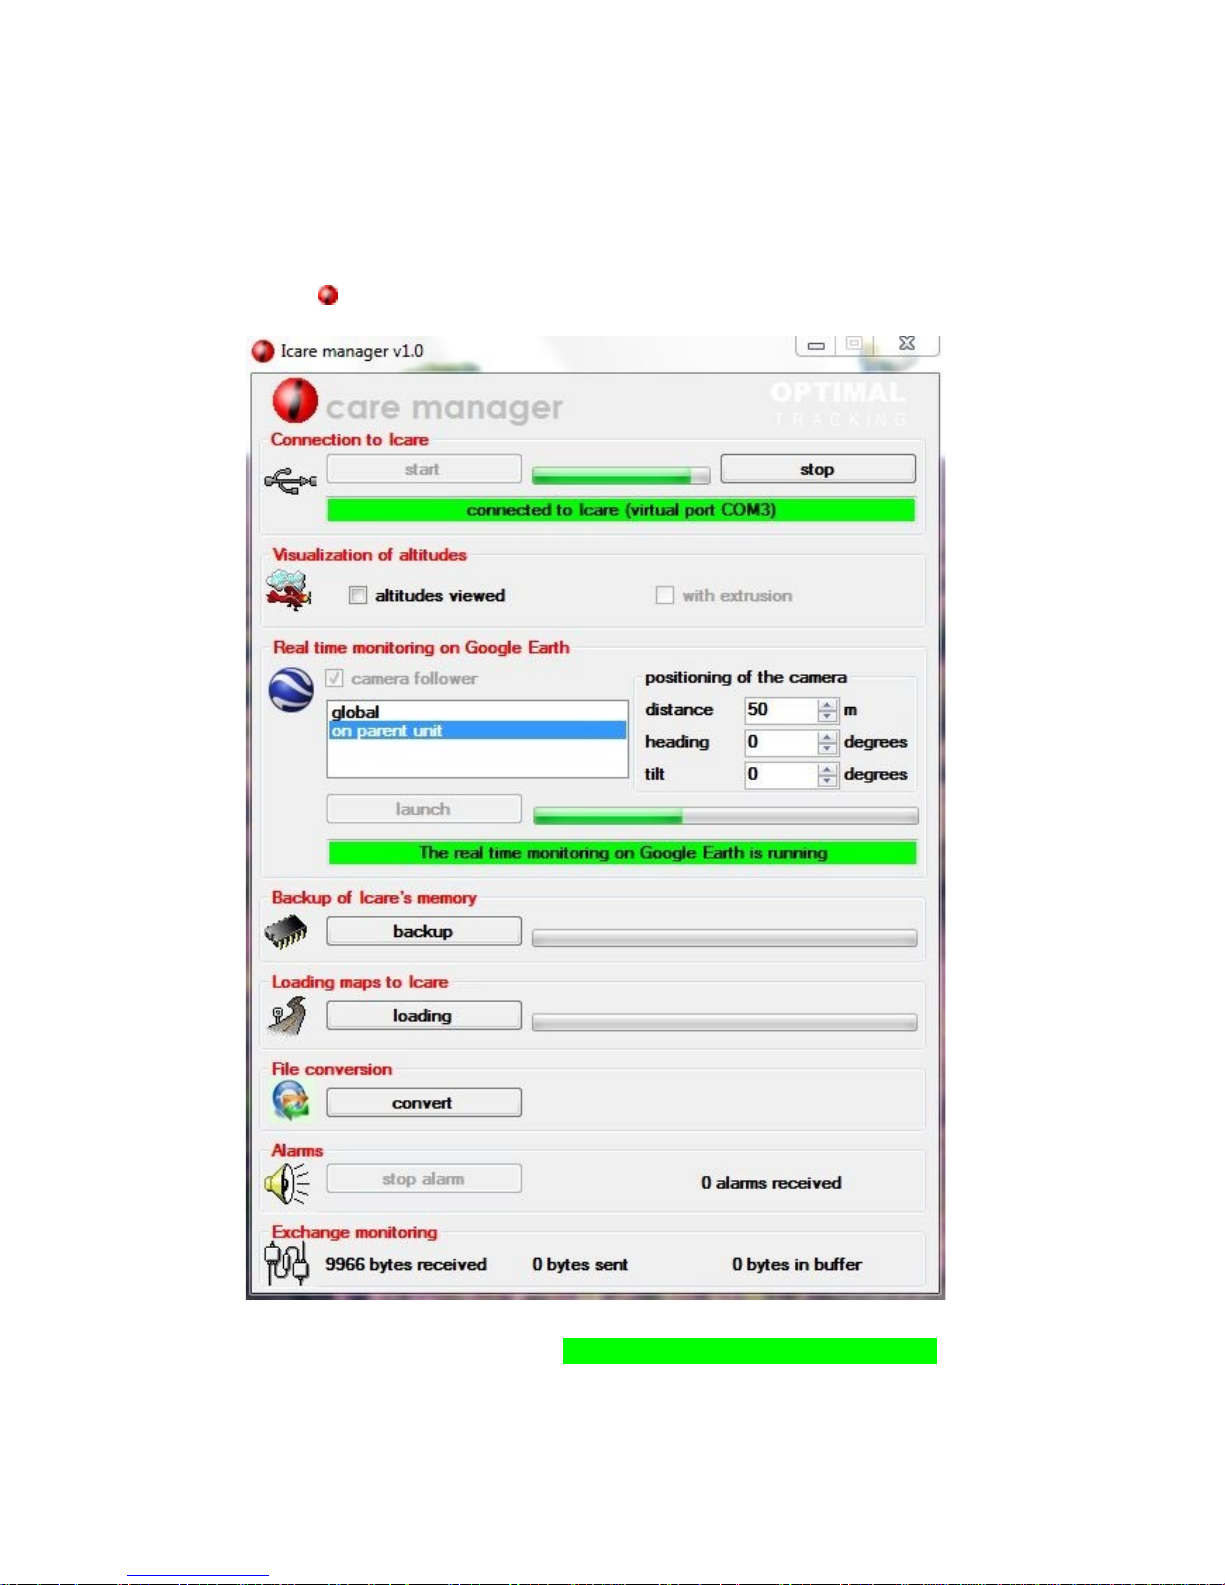
Icare Manager connects to the receiver automatically. If not, disconnect and reconnect the
USB cable, then click on “startup.” A “connected to Icare (virtual port…)” message
displays.
If you want to end the connection, click on “stop.”
Page 50
Optimal Tracking Icare User Manual
page 49
Do not disconnect the receiver without first ending the connection because this could interfere
with any new connection. In this case, it is preferable to re-launch Icare Manager.
Viewing altitudes
If you are interested in trips by air (hot air balloons, model aircraft, etc.), click on “altitudes
viewed.” All trajectories and positions are then in 3-D. Otherwise, trajectories and positions
are projected at ground level.
Click on “with extrusion” to view altitudes as well as ground projections at the same time.
Each 3-D trajectory is then linked to the ground to better view its altitude.
Real-time tracking on Google Earth
Before launching real-time tracking, you must decide if you want to use a “camera follower.”
This lets you constantly track a transmitter or set of entities displayed by keeping them in the
center of the screen.
If you opt for a camera follower, click on “camera follower” before launching real-time
tracking. Then, it will be possible for you at any time during real-time tracking to:
select the entity to track (transmitter, receiver, overall tracking).
select the distance and orientation of the camera (distance, heading, and angle).
Click on “launch” to launch real-time tracking on Google Earth.
Page 51

Optimal Tracking Icare User Manual
page 50
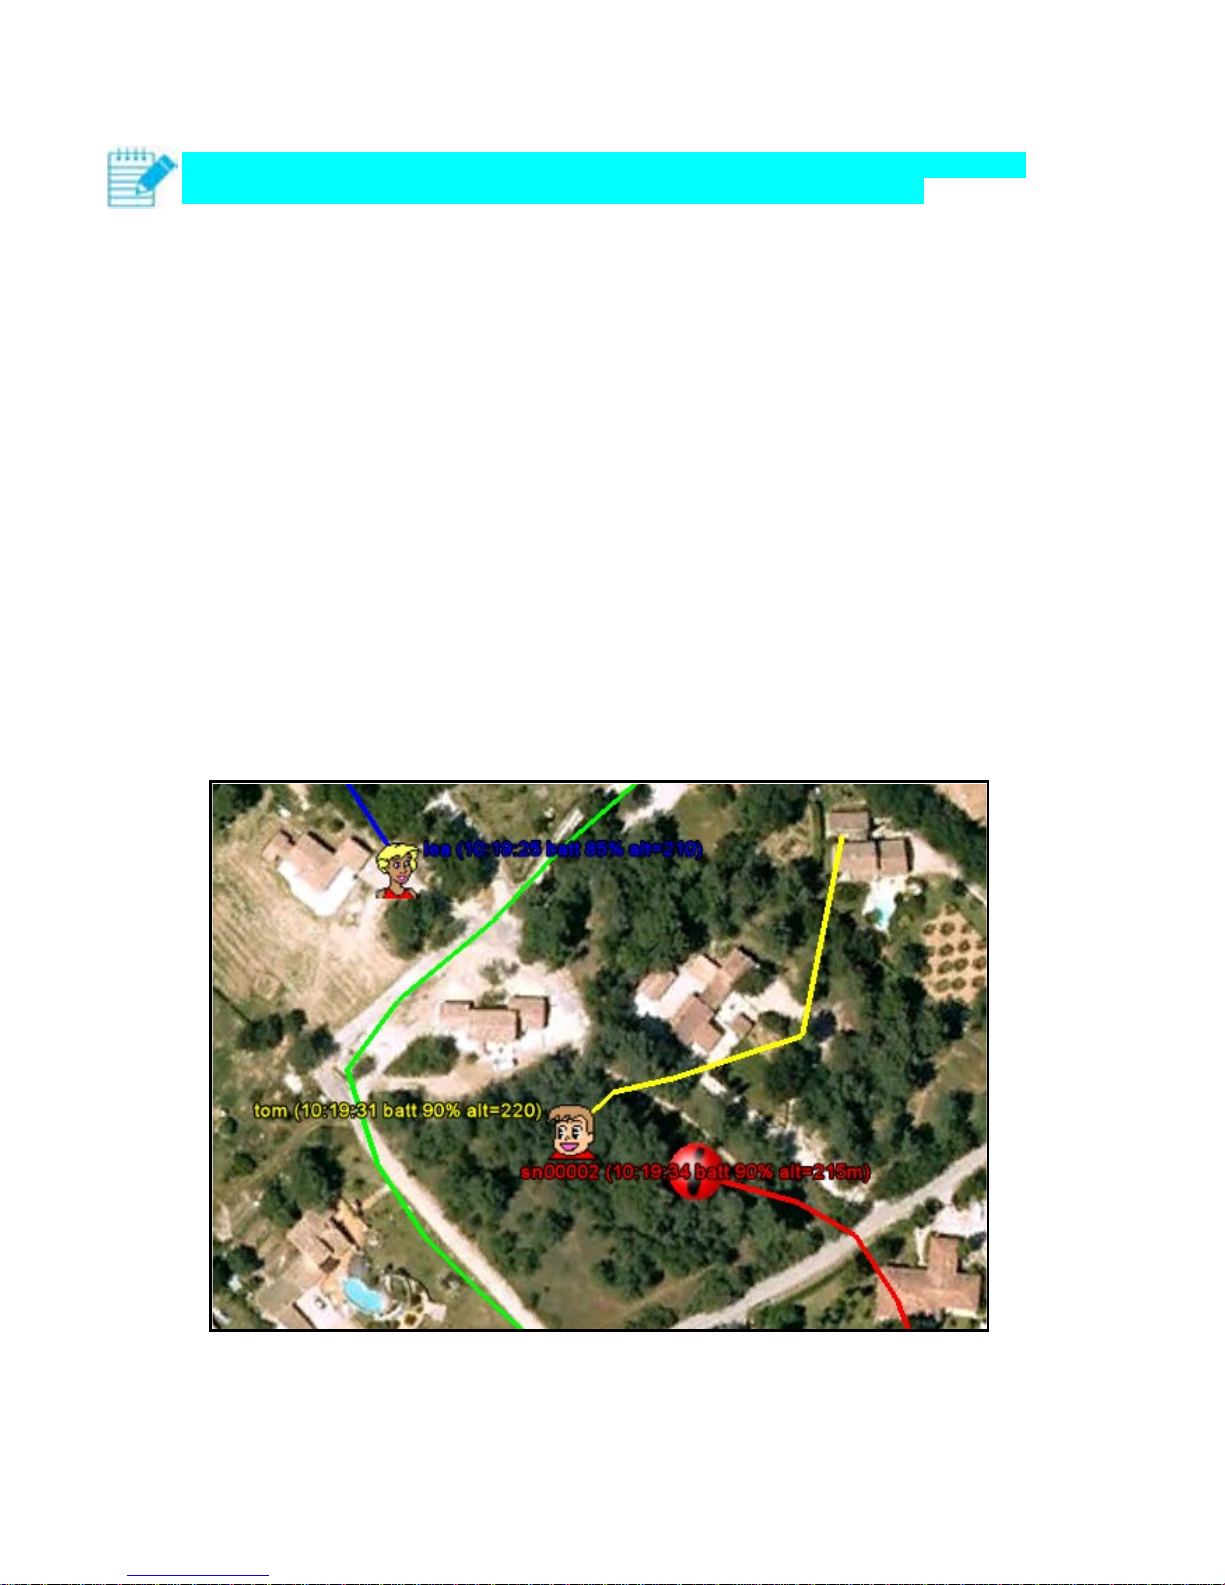
Google Earth launches and displays in real time:
positions and trajectories of active transmitters.
the receiver’s position and trajectory.
active map entities.
time, altitude, and speed of all trajectory points.
battery status of the various units.
transmitter alarm symbols
If an alarm is triggered, a symbol appears on the position of the transmitter triggering the
alarm. Simultaneously, a chime is triggered by Icare Manager. To stop this, click on “stop
alarm”.
During real-time tracking, you can change the viewing settings with Icare Manager.
To end real-time tracking, close Google Earth.
Backing up receiver contents
click on “backup.”
select a folder to save the backup in.
click on “OK.”
The receiver gives off a series of beeps, then a file named “Icare save (date and time)” is
created in the folder chosen.
Icare Manager then asks if you want to view the contents of the backup on Google Earth.
The backup file is in KML format (the Google Earth format) and contains:
the trajectories of all transmitters.
the receiver’s trajectory.
all maps stored in the receiver.
Loading maps
Gather in a KML file (the Google Earth format) all points, lines, and polygons that you want
to load into the receiver. For this, you can:
construct these entities in Google Earth quickly using the mouse:
create a folder in Google Earth (right-click on “temporary places”).
move into this folder (click on the folder).
create points (reference points), lines (trips), and polygons.
save this folder in a KML file (right-click on the folder and select “save place
as”).
specify that you want the KML format and not KMZ format.
import maps from other software or another device and convert them using GPSBabel.
Page 52

Optimal Tracking Icare User Manual
page 51
When the KML file containing the entities to be transferred is ready:
click on “loading.”
select the KML file.
click on “open.”
The receiver gives off a series of beeps, then a new map is created in the receiver. It bears the
name of the document contained in the KML file (i.e. the name of the KML file if the file was
saved by Google Earth).
Conversion
In order to be able to communicate with almost all GPS software and devices, Icare Manager
gives you access to GPSBabel.
click on “convert.”
GPSBabel launches.
you can then select for input and output:
the GPS device or file format.
multiple options.
GPSBabel gives you access to most hiking software and most GPS devices on the market.
Alerts
Icare Manager displays the number of alarms received from transmitters. With each alarm, a
sound alarm goes off. This can be stopped by clicking on “stop alarm”.
Page 53

Optimal Tracking Icare User Manual
page 52
10 APPENDICES
Specifications
General
Radio range (unobstructed terrain)
3 kilometers (more than 10 in the air)
Operating temperature range
-10°C to 55°C
Charging temperature range
0°C to 45°C
Receiver
Dimensions excluding antenna
115 x 56 x 22 mm
Weight
113 grams
Power supply
Lithium Polymer Batt. - 1250 mAh 3.7 Volts
Battery life (at 20°C)
14 hours
Charge time (at
3 hours
GPS
Very high sensitivity
Electronic compass resolution
±1 degree
Electronic compass precision
±5 degrees
Screen size
32 x 40 mm
Screen resolution
176 x 220 pixels
Screen type
Transmissive TFT, 65,000 colors
Computer interface
USB 2.0
Memory for maps
512 Kb
Sound
Magnetic transducer
Vibrate
Yes
Flashlight
High luminosity LED
Radio receiver sensitivity
-116 dBm
Water-resistance
none
Transmitter
Dimensions excluding antenna and strap
66 x 42 x 24 mm (48x35x14 aeromodelling)
Weight
61 grams (32 aeromodelling)
Power supply
Lithium Polymer Batt. - 1250 mAh 3.7 Volts
Battery life (at 20°C)
13 hours
Charge time (at
1 hour and 15 minutes
GPS
Very high sensitivity
Water-resistance
Short duration surface immersion
Radio broadcast frequency
869.525 MHz
Radio broadcast power
500 mW
Strap
Adjustable and anti-strangle
Radio band occupancy
0.9% of the time
Page 54

Optimal Tracking Icare User Manual
page 53
Charger
Reference
GFP051T-0510
Input
100V/240V 50/60Hz
Output
DC 5V 1A
Precautions
Do not short-circuit the blades of the transmitter charge connector.
Do not clean the screen with anything other than a soft cloth.
Upkeep
Clean the screen with a soft cloth or lens cloth. Any other method may scratch the
screen.
Delicately clean the 3 gold contacts on the transmitter’s front side with a cloth and a
bit of alcohol.
Page 55

Optimal Tracking Icare User Manual
page 54
11 DETAILED SUMMARY
USING THE RECEIVER 15
First use 15
Recharging the battery 15
Startup and shutoff 16
Using the thumb wheel 16
Rebooting the receiver 16
Language selection 17
Manipulations 17
Displaying the main menu 17
Browsing menus 17
Erasing information messages 17
Stopping sound messages 17
Zoom 17
Receiving a message from a transmitter 17
The 6 operating modes 18
Search transmitter mode 18
Reach a point mode 19
Follow a route mode 20
See and go mode 21
Global fixed North mode 22
Global compass mode 22
Display description 23
Upper icon bar 23
Lower icon bar 24
Central area 24
Automatic centring 25
Keyboard 25
Transmitters 26
Renaming the transmitter 26
Changing the symbol representing the transmitter 26
Changing the transmitter color 26
Saving changes in name, symbol, or color 26
Deleting the transmitter from the list 26
Emptying the transmitter trajectory 26
Displaying all information on the transmitter 26
Maps 28
Creating a new map 28
Selecting a map 28
Renaming a map 28
Changing map visibility 28
Saving name or visibility changes 28
Deleting the map 29
Adding a point corresponding to your position on the map 29
Adding a line to the map, by moving about in the field 29
Adding a polygon to the map, by moving about in the field 30
Changing or deleting a map entity 30
Alarms 31
Creating a new alarm 32
Changing an alarm 32
Deleting an alarm 32
Receiving an alarm 32
Trajectory analysis 34
Displaying all information regarding your trip 34
Resetting the trajectory 35
Saving the trajectory on a map 35
Flashlight 35
Settings 36
Page 56

Optimal Tracking Icare User Manual
page 55
Language selection 36
Calibrating the compass 36
Magnetic declination 36
Time difference 37
Automatic centring 37
Floating or fixed reference point 37
Brightness 37
Backlight duration 37
Displaying all transmitters in search mode 38
Displaying help messages 38
Displaying information messages 38
Selecting units of measure 38
Changing the receiver’s trajectory 38
Changing transmitter trajectories 38
Displaying the name of map entities 38
Deactivating sounds, sound alarms, etc. 38
Changing See and Go mode settings 39
Setting the receiver name 39
Viewing memory use 39
Viewing advanced settings 39
USING THE TRANSMITTER 40
Recharging the battery 40
Startup and shutoff 41
Using and adjusting the strap 41
How to place the transmitter 42
Sending messages to the receiver 42
Sending an SOS 43
Drowning detector 43
Water-resistance 43
Channels 43
Transmitter setup 44
CONNECTING TO A COMPUTER 45
Installing Icare Manager 45
Using Icare Manager 48
Connecting the receiver 48
Viewing altitudes 49
Real-time tracking on Google Earth 49
Backing up receiver contents 50
Loading maps 50
Conversion 51
Alerts 51
APPENDICES 52
Specifications 52
Precautions 53
Upkeep 53
Page 57

Notes
..............................................................................................................................
..............................................................................................................................
..............................................................................................................................
..............................................................................................................................
..............................................................................................................................
..............................................................................................................................
..............................................................................................................................
..............................................................................................................................
..............................................................................................................................
..............................................................................................................................
..............................................................................................................................
..............................................................................................................................
..............................................................................................................................
..............................................................................................................................
..............................................................................................................................
..............................................................................................................................
..............................................................................................................................
..............................................................................................................................
..............................................................................................................................
..............................................................................................................................
..............................................................................................................................
..............................................................................................................................
Page 58

Notes
..............................................................................................................................
..............................................................................................................................
..............................................................................................................................
..............................................................................................................................
..............................................................................................................................
..............................................................................................................................
..............................................................................................................................
..............................................................................................................................
..............................................................................................................................
..............................................................................................................................
..............................................................................................................................
..............................................................................................................................
..............................................................................................................................
..............................................................................................................................
..............................................................................................................................
..............................................................................................................................
..............................................................................................................................
..............................................................................................................................
..............................................................................................................................
..............................................................................................................................
..............................................................................................................................
..............................................................................................................................
Page 59

OPTIMAL TRACKING
360 chemin de Pauli 13760 SAINT CANNAT - FRANCE
Téléphone : +33 (0)4 42 38 05 32
www.optimaltracking.com
 Loading...