

Page 1

ADVANCED PATIO HEATER
User Manual
English
Page 2

--- WARRANTY ---
All our Patio Heaters come with a 2-year full manufacturer’s ‘collect and return’
warranty (from the date of purchase). Proof of purchase will be required to qualify
for the warranty. The warranty can’t be transferred to a second owner.
As part of our warranty agreement we take liability for collecting faulty items, as
well as liability for any replacements and repairs. We’ll also be liable for the cost of
returning the items to you. Please note that we’re not liable for any costs that are
incurred by third party companies, including: builders or electricians.
If the product has been tampered with or modied it will void the warranty.
CONTENTS
Safety .......................................................................................................................... 3
Introduction ............................................................................................................... 4
Installation ................................................................................................................. 5
Operation ................................................................................................................... 6
Specications ............................................................................................................. 7
2 3
SAFETY FIRST
WARNING - When using electrical appliances, basic safety precautions should always be
followed. Failure to comply with these instructions may cause a re, electrical shock or other
injury to persons or property.
1. Some parts of this product can become very hot and cause burns. Particular attention has to be given
where children and vulnerable people are present. Children of less than 3 years should be kept away unless
continuously supervised.
2. Children between 3 and 8 years old should only be allowed to switch the appliance on/o, provided that it has
been correctly installed in its intended operating position and they have been given supervision or instruction
concerning the safe use of the appliance and understand the hazards involved. They should not plug in,
regulate, perform maintenance or clean the appliance.
3. Do not use this heater with a programmer, timer or any other device that switches the heater on automatically,
since a re risk exists if the heater is covered or positioned incorrectly.
4. Do not use this heater in the immediate surroundings of a bath, a shower or a swimming pool.
5. Do not place the unit close to curtains and/or other ammable objects.
6. Do not cover the unit with anything during operation or before the unit has cooled down following shut down.
7. Do not wrap the power supply cord round the unit.
8. Do not use this unit in a place with poor air quality, i.e. dust, steam, gas, etc.
9. Do not use this unit as a clothes drier or towel drier.
10. Do not use this unit as a sauna heater.
11. Do not use this unit as a room heater.
12. Do not use this unit for animal heating or incubation.
13. Do not immerse the unit into water for cleaning.
14. The unit is at high temperature during operation. It keeps hot for a period after shut down. Potential danger
would occur when touching it during this period.
15. The unit must be handled with care, and avoid of vibration or hitting.
16. The unit must be securely grounded during operation.
17. If damaged, the unit must be repaired by the manufacturer.
18. If the supply cord is damaged, it must be replaced by the manufacturer, its service agent or similarly qualied
persons in order to avoid a hazard.
19. When assembling, keep clear from any board or ammable material.
20. This appliance is not intended for use by persons (including children) with reduced physical, sensory or mental
capabilities, or lack of experience and knowledge, unless they have been given supervision or instruction
concerning use of the appliance by a person responsible for their safety.
21. Do not use on building sites, greenhouses, barns or stables or any environment where ammable dust may be
present.
22. The head of the unit reaches high temperatures during operation. Always unplug the unit and wait until it is
cool before cleaning.
23. The unit should be plugged in a socket, which is easily visible and reachable.
Page 3
INTRODUCTION INSTALLATION
Features
WARNING
Don’t let the cold ruin the fun. With the Advanced patio heater, you and your guests can sit
down and enjoy the evening in comfort. The heater has a 1500W carbon bre heating element
and will easily provide up to 9m
2
of warmth. It will consume less energy than traditional gas
patio heaters.
Suitable for both home and commercial use, the Advanced heater is a feature-packed but
compact infrared heater, suitable for use in outdoor spaces. It comes with both wall-mount and
ceiling-mount brackets for exible, quick and simple installation.
The Advanced is also equipped with two ‘warm-white’ LED lights to illuminate your outside space
with a soft white glow. The included remote control lets you control the lights and the heating
from your seat.
Don’t worry about rain or bad weather. The product has IP24 certication and is rainproof. You
will be able to keep the heater outside during the whole year.
• Innovative electric heating technology produces 1500W of infrared heat
• Low glare carbon bre heating element – built to withstand over 5000 hours of use
• Heat distribution area up to 9m
2
• Waterproof rating of IP24 making it suitable for outdoor use
• Comes complete with both wall and ceiling mount brackets for exible, easy installation
• Head can be tilted to the correct angle for optimal heat projection
• Comes equipped with two integrated ‘warm-white’ LED lights
• Control the heating and lighting functions using the control panel or remote control
• Elegant, slim-line stainless steel construction with brushed metal nish
4 5
This heater is not equipped with a device to control the room
temperature. Do not use this heater in small rooms when they are
occupied by persons not capable of leaving the room on their own,
unless constant supervision is provided.
CAUTION:
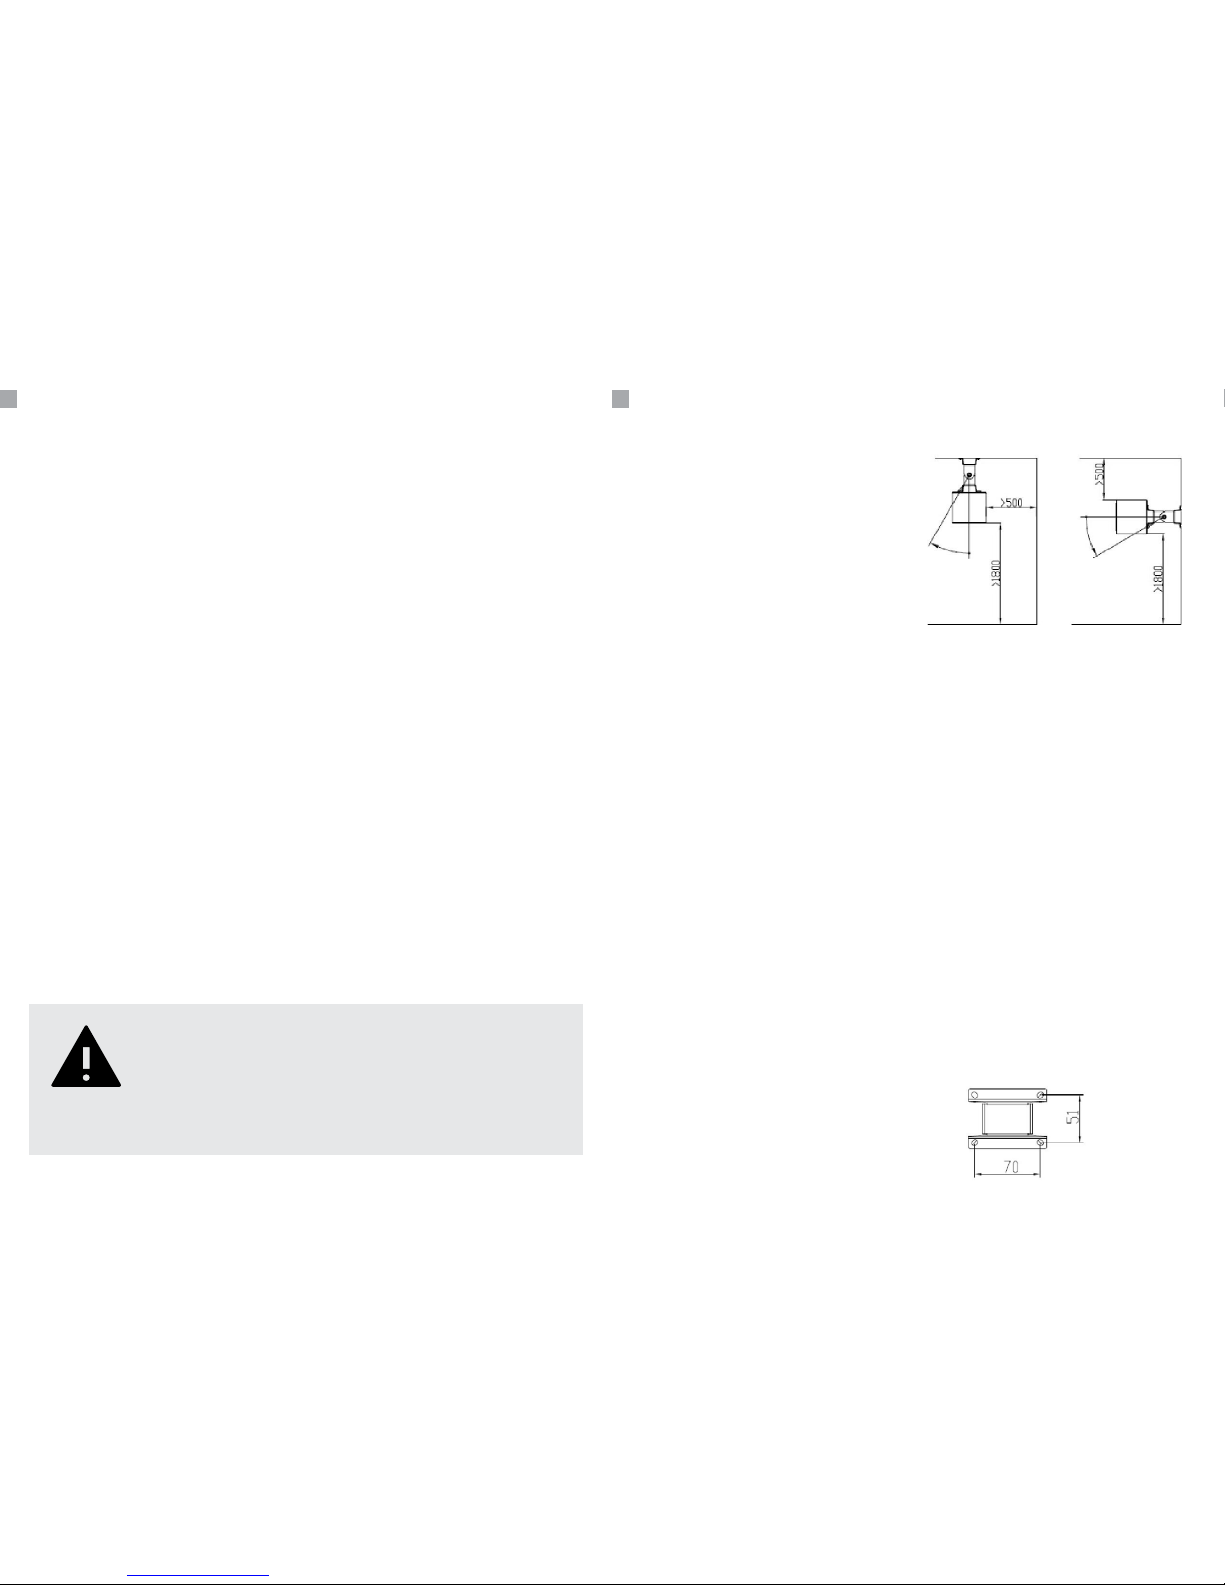
1. This appliance should be installed at least
1800mm from the oor.
2. Make sure there is at least 500mm distance
from every wall around the product, apart from
on the wall of installation.
3. For ceiling/ wall-mounted installation, make
sure the heater’s adjustable angle is always
facing away from the nearest wall/surface.
WARNING
This heater is not equipped with a device to control the room
temperature. Do not use this heater in small rooms when they are
occupied by persons not capable of leaving the room on their own,
unless constant supervision is provided.
Hanging Installation:
1. Mark and drill 2 holes on the ceiling as per
diagram.
2. Insert plastic plugs (#1 x2pcs) into the holes.
3. Screws (#3 x2pcs) go through the mounting
pole (#2 x1pc) and fasten on the ceiling.
4. Insert the hanging lines (#4 x2pcs) into the line
holes (#A) of mounting pole (#2). Length can
be manually adjusted by pushing the switch of
hole (#A).
5. Clip the power cord on the cable clip (#B) of
mounting pole (#2).
Wall/Ceiling Mounted Installation:
1. Mark and drill 4 holes on the wall or ceiling as
per diagram.
2. Insert plastic plugs (#1 x4pcs) into the holes.
3. Screws (#3 x4pcs) go through the mounting
bracket (#2 x1pc) and fasten on the wall or
ceiling.
4. Parallel insert the bracket (#2) into the slot
(#4) –-on the top of the heater and fasten with
screw (#5 x1pc).
5. Fasten the screw (#A) of the bracket (#2) after
adjusting the suitable angle for using the
heater.
Page 4

OPERATION SPECIFICATIONS
6 7
Please follow the below instructions to operate your heater safely.
NB - Install unit as per page 5 prior to operation.
Operating instructions
Connect the unit to the power supply
Plug in the power plug to switch on the power supply. Turn on the Power Switch, a buzzer will
sound, after which the heater will be in stand-by mode - “HEAT” Indicator blinks.
The buzzer sounds every time the control panel button or remote control is used.
Operation by Control Panel
1. Press ON/OFF button for 1st time - heating mode starts. “HEAT” Indicator illuminates;
2. Press ON/OFF button by 2nd time - heating & lighting modes are on at the same time;
3. Press ON/OFF button by 3rd time - heating mode stops while lighting mode will remain on.
4. Press ON/OFF button by 4th time, all functions stop and unit returns to Stand-by mode.
“HEAT” Indicator blinks.
Operation by Remote Control
1. Press “HEAT” button for 1st time - heating mode starts. “HEAT”Indicator illuminates;
2. Press “HEAT” button by 2nd time - heating mode stops. Stand-by mode activated.
3. Press “LIGHT” button for 1st time - lighting mode starts.
4. Press “LIGHT” button by 2nd time - lighting mode stops. Stand-by mode activated.
5. Press “OFF” button - all functions stop and return to Stand-by mode.
Heating Power: 1500W
Product Dimensions: 900mm (W) x 100mm (H) x 90mm (D)
Product Weight: 4.3kg
Heating Element: Carbon Fibre Tube
Element Life: More than 5000 Hours
Heat Distribution Area: Up to 9m
2
Heating Angle: 120°
Heating Distance: 2.5m
Lighting Element: 2 x 3.5w LED Lights
LED Light Colour: Warm White (2900~3100k)
Power Supply: 220-240v, 50/60Hz
Power Cable Length: 180cm
Power Connection: British Standard (BS) Plug
Control Method: Control Panel, Remote Control
Control Function: Heating On/O, Lighting On/O
Casing: Stainless Steel (304 Grade) Construction with Brushed Metal Finish
Installation: Wall or Ceiling Mounted
Tilt Angle Range (Wall-Mount): 30°
Chain Length (Ceiling-Mount): Adjustable up to 50cm
Waterproof Rating: IP24
Insulation: Class 1
Certications: CE, GS, IP24
Warranty: 2 Years
Page 5

 Loading...