


ECOVISION Series
INSTRUCTION MANUAL
Model
B-20R
B-20CR
B-50
B-50B
M-100FX
M-100FLed
v 1.1 2017

Page 2

Warning
This microscope is a scientic precision instrument designed to last for many years with a minimum of maintenance. It is built to high optical and mechanical standards and to withstand daily use. We remind you that this
manual contains important information on safety and maintenance, and that it must therefore be made accessible to the instrument users. We decline any responsibility deriving from incorrect instrument use that does not
comply with this manual.
Symbols and conventions
The following chart is an illustrated glossary of the symbols that are used in this manual.
CAUTION
This symbol indicates a potential risk and alerts you to proceed with caution.
ELECTRICAL SHOCK
This symbol indicates a risk of electrical shock.
Safety Information
Avoiding Electrical Shock
Before plugging in the power supply, make sure that the supplying voltage of your region matches with the operation voltage of the equipment and that the lamp switch is in “OFF” position. Users should observe all safety
regulations of the region. The equipment has acquired the CE safety label. However, users have full responsibility to use this equipment safely. Please follow the guidelines below, and read this manual in its entirety to ensure
safe operation of the unit.
Intended use
For teaching use only. Not intended for any animal or human therapeutic or diagnostic use.
Page 3
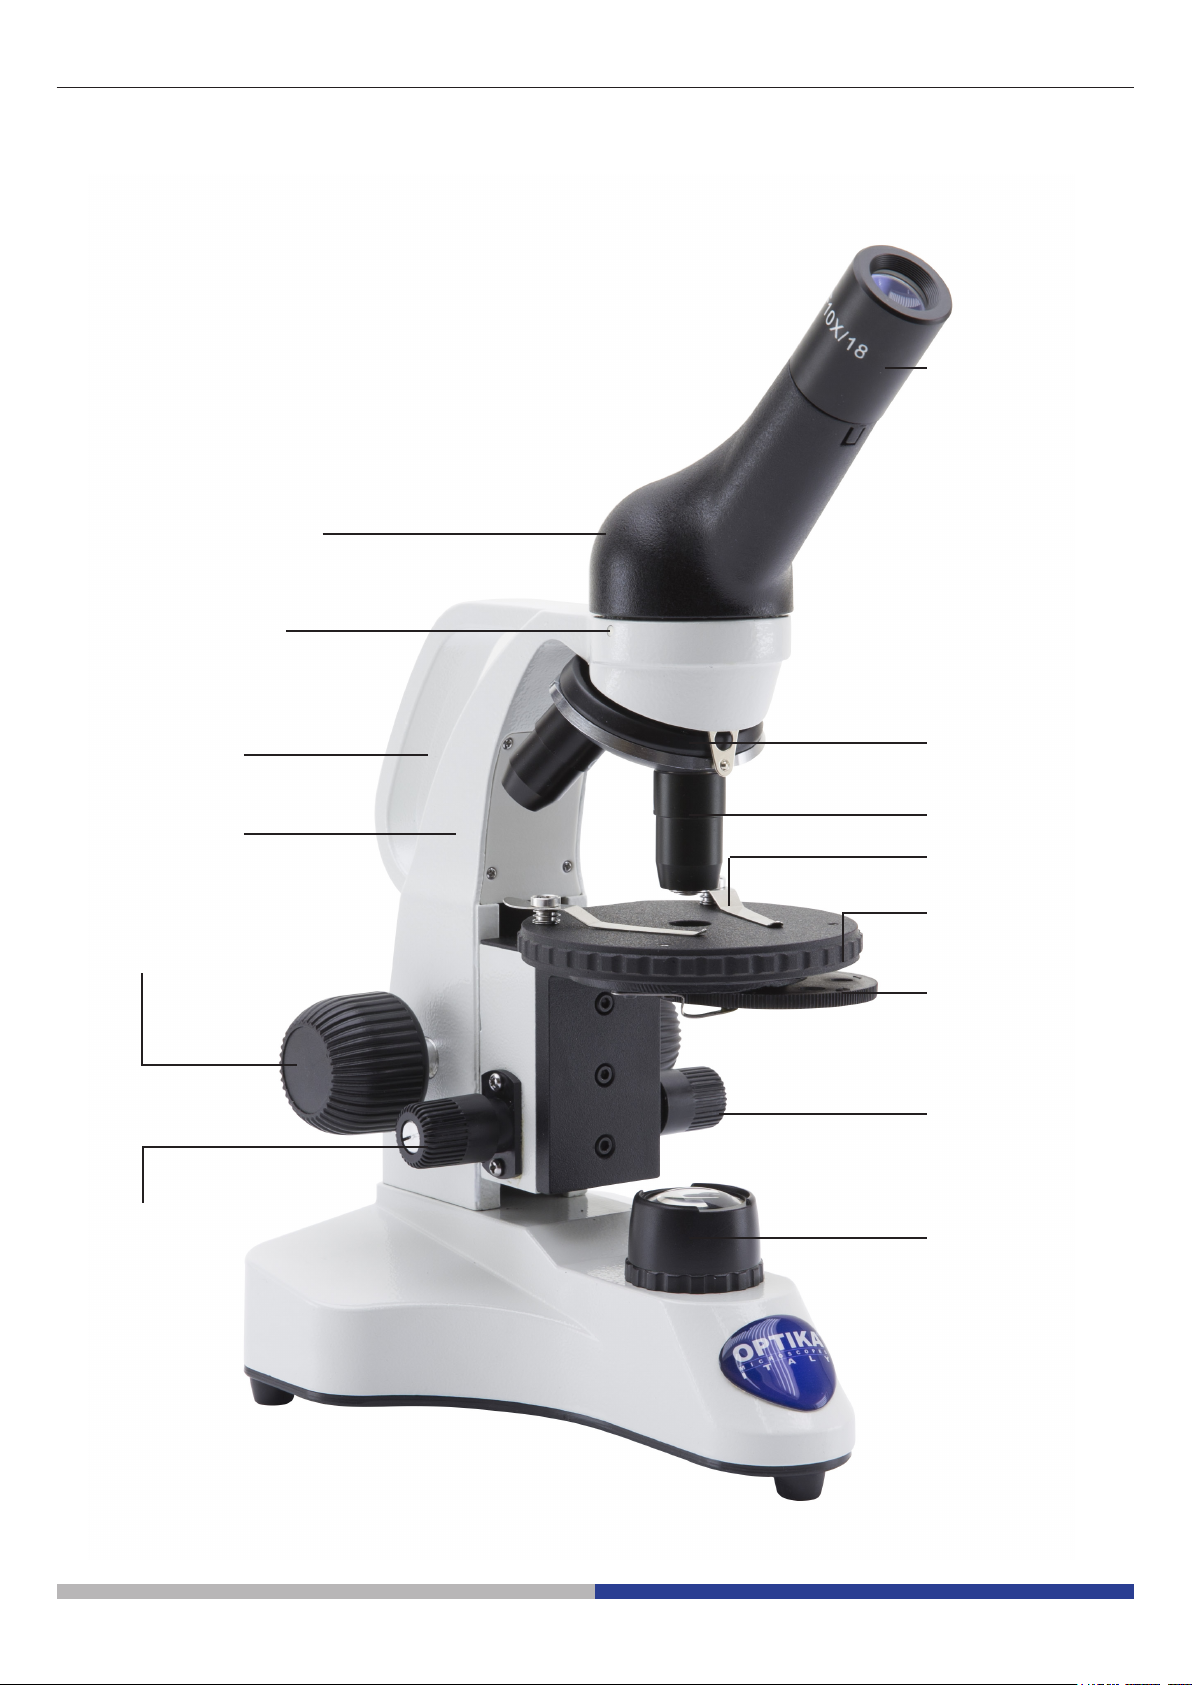
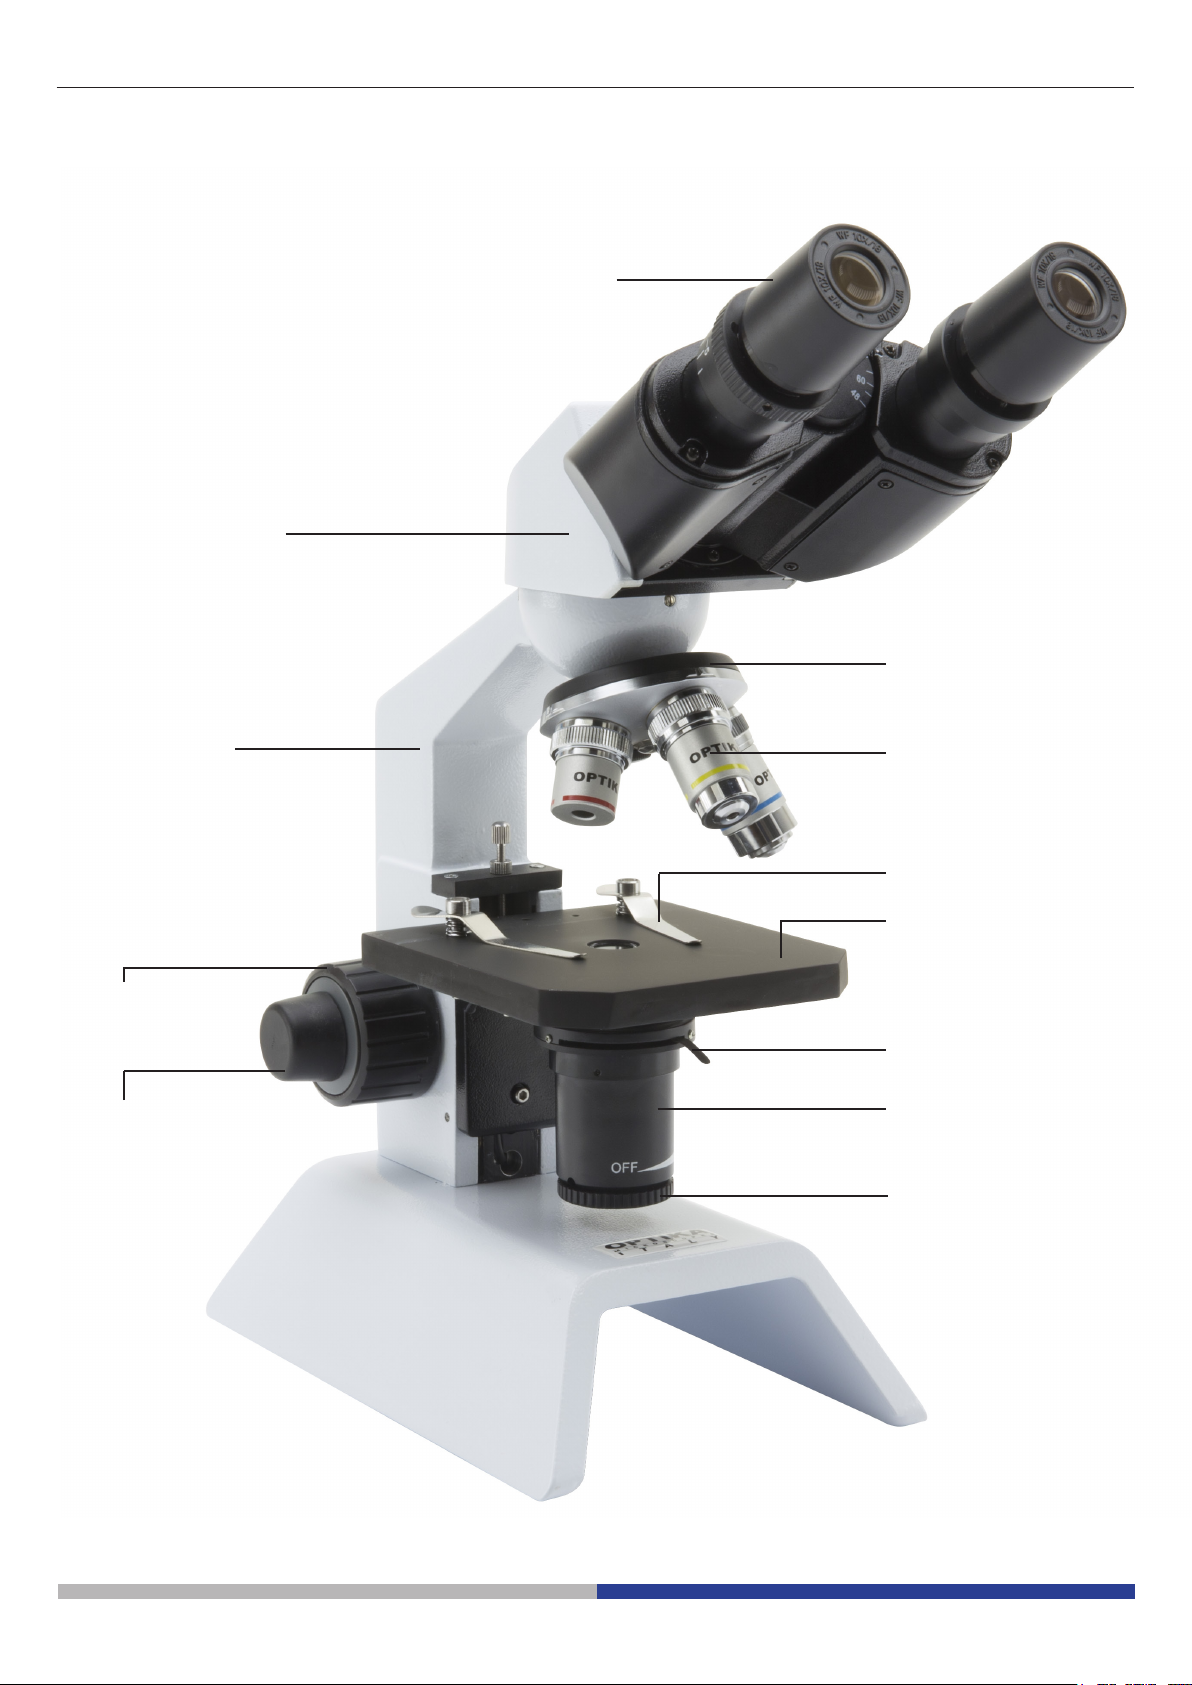
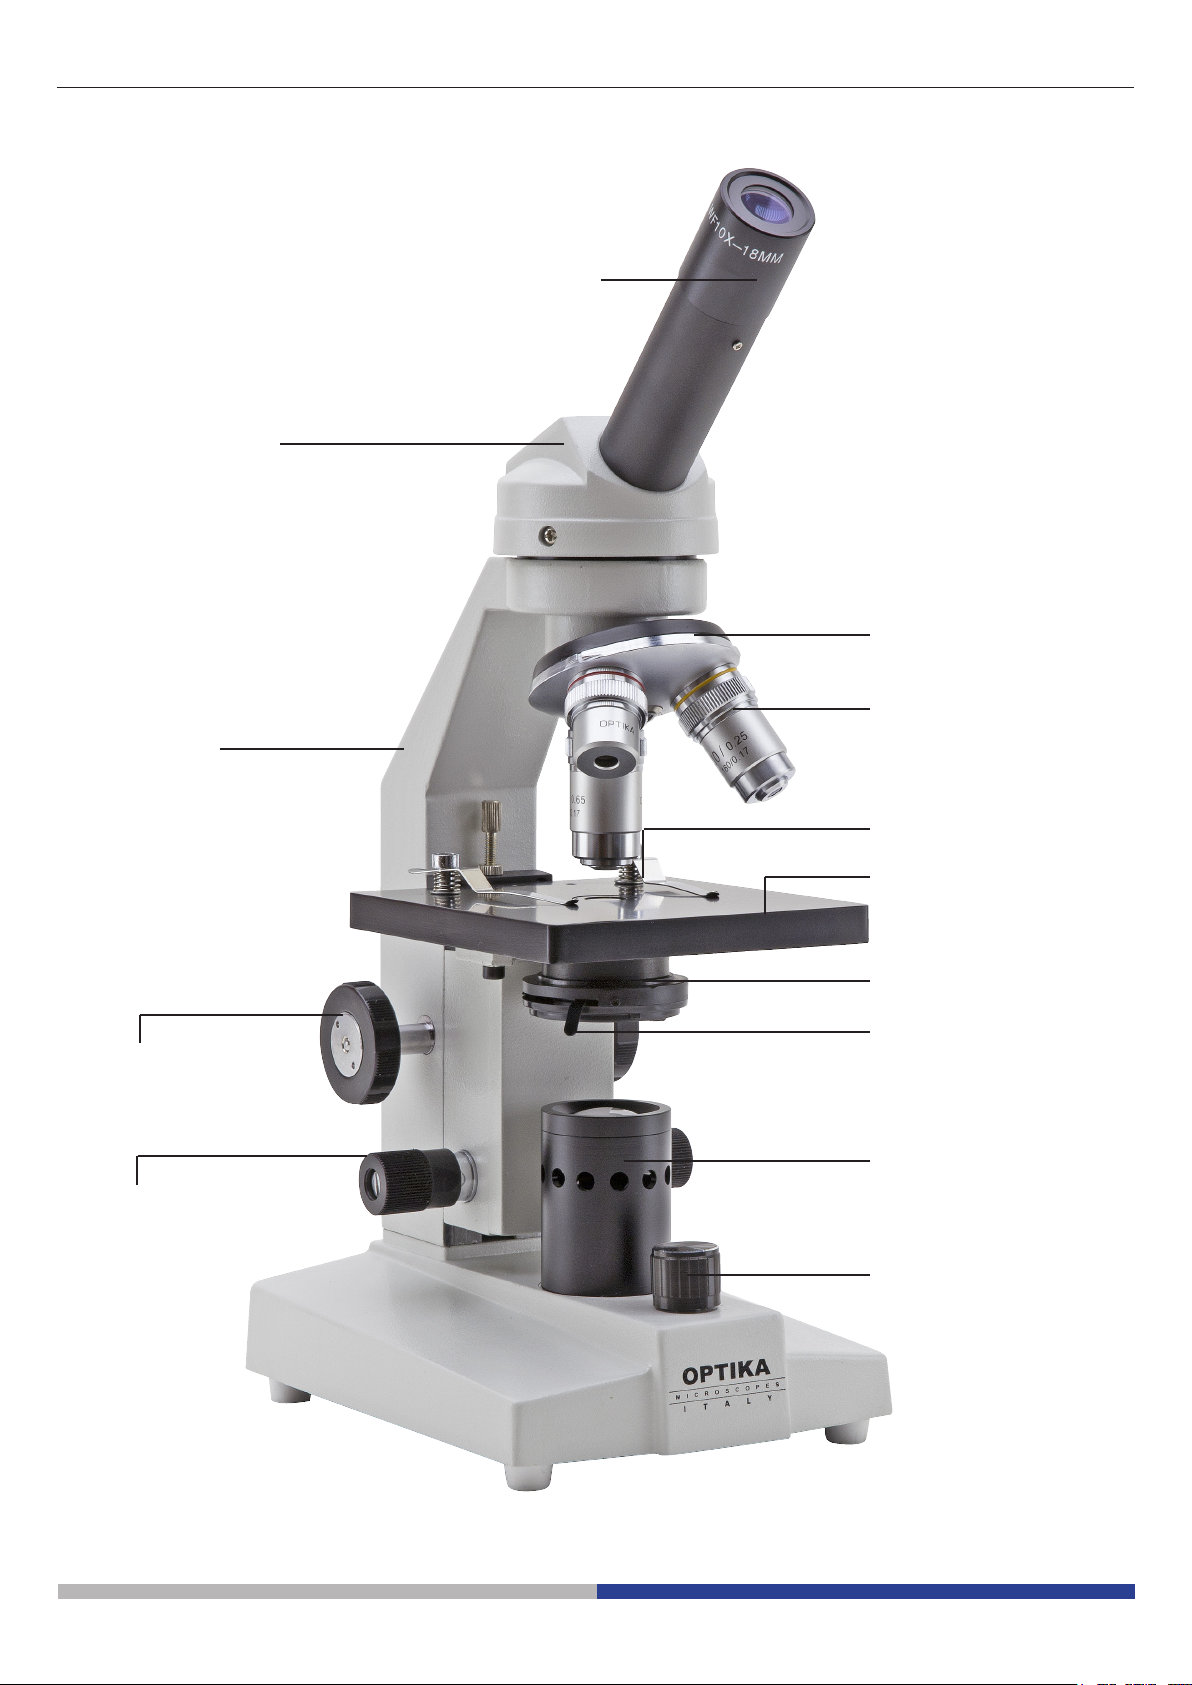
Overview B-20R
OBSERVATION
HEAD
LOCK SCREW
EYEPIECE
CARRYING HANDLE
MAIN BODY
COARSE FOCUSING
KNOB
FINE FOCUSING KNOB
NOSEPIECE
OBJECTIVE
SLIDE CLAMP
STAGE
CONDENSER
FINE FOCUSING KNOB
LED LIGHT
ILLUMINATOR
Page 4
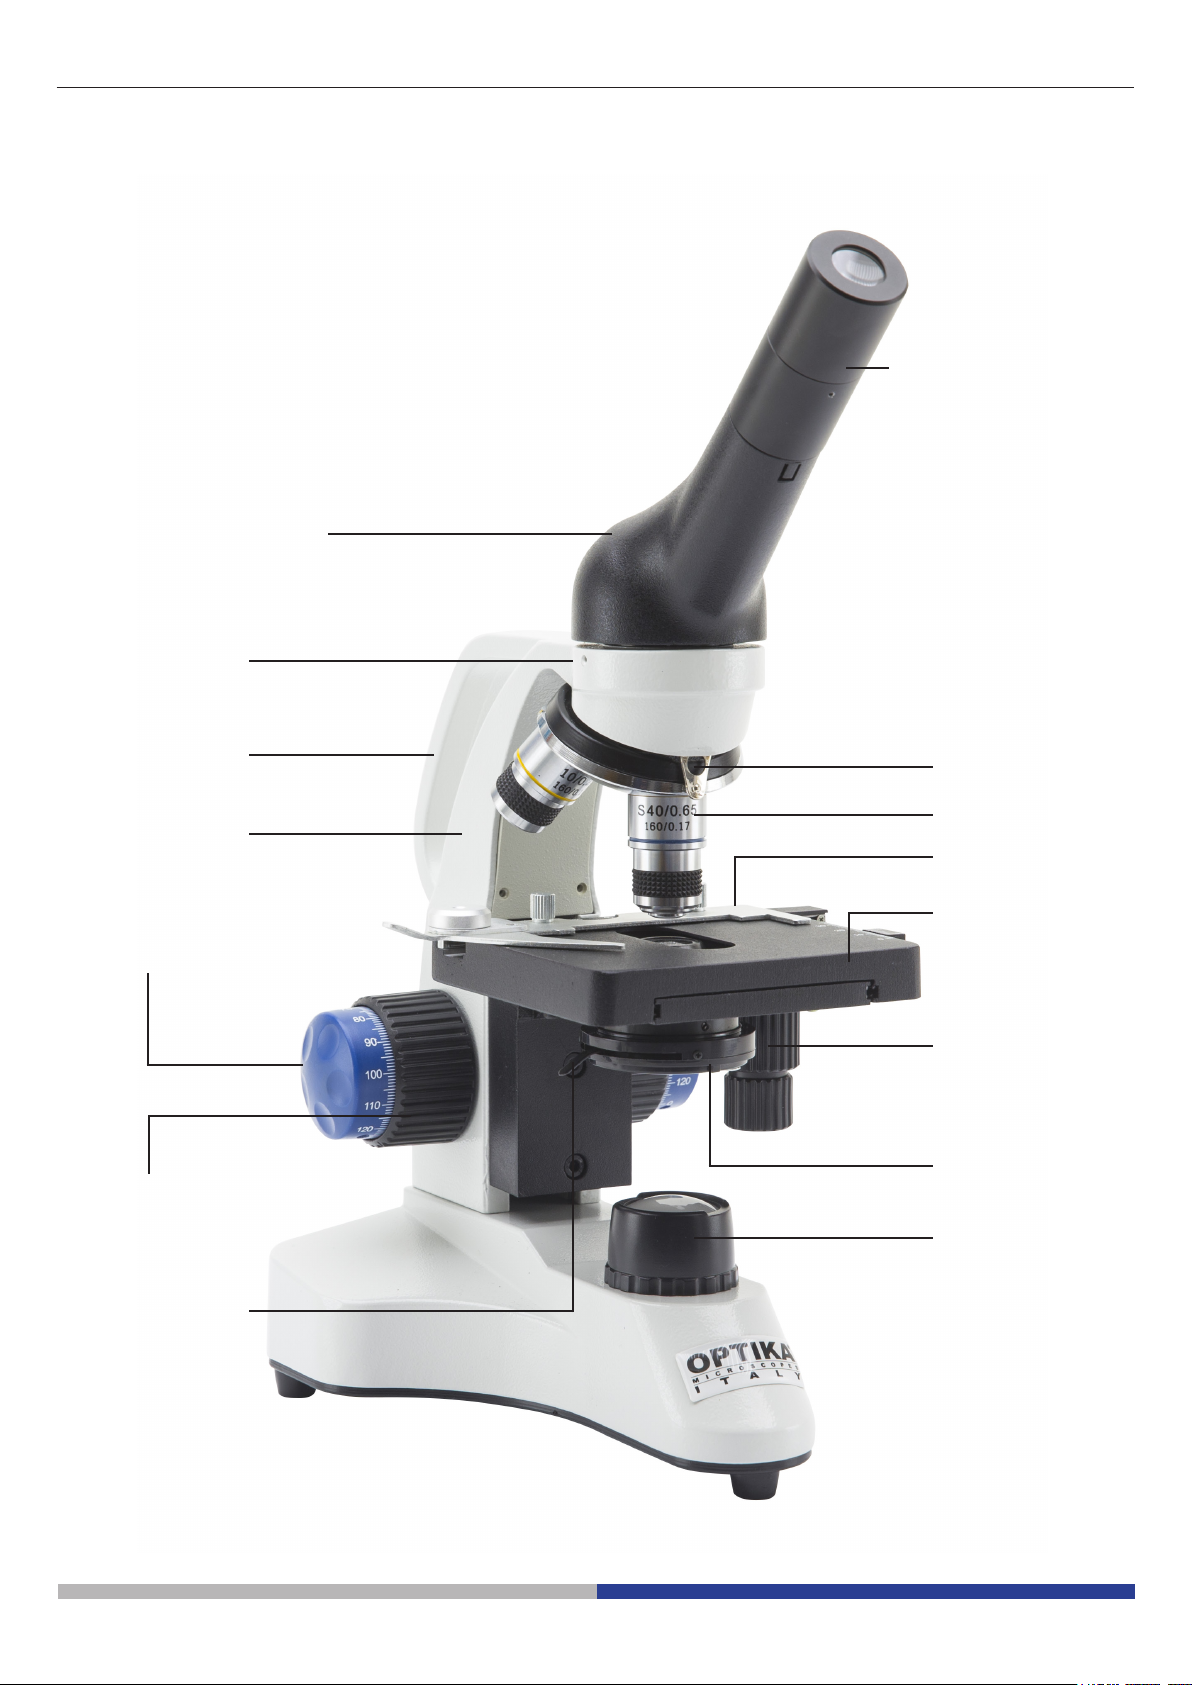
Overview B-20CR
OBSERVATION
HEAD
LOCK SCREW
EYEPIECE
CARRYING HANDLE
MAIN BODY
FINE FOCUSING KNOB
COARSE FOCUSING
KNOB
IRIS DIAPHRAGM
NOSEPIECE
OBJECTIVE
SLIDE CLAMP
STAGE
TRANSLATING
KNOBS
CONDENSER
LED LIGHT
ILLUMINATOR
Page 5
Overview B-50
OBSERVATION
HEAD
EYEPIECE
NOSEPIECE
MAIN BODY
COARSE
FOCUSING KNOB
FINE FOCUSING
KNOB
OBJECTIVE
SLIDE CLAMP
STAGE
CONDENSER
BRIGHTNESS ADJUSTMENT
ON/OFF KNOB
Page 6

Overview B-50B
OBSERVATION
HEAD
EYEPIECES
NOSEPIECE
MAIN BODY
COARSE
FOCUSING KNOB
FINE FOCUSING
KNOB
OBJECTIVE
SLIDE CLAMP
STAGE
IRIS DIAPHRAGM
CONDENSER
BRIGHTNESS ADJUSTMENT
ON/OFF KNOB
Page 7

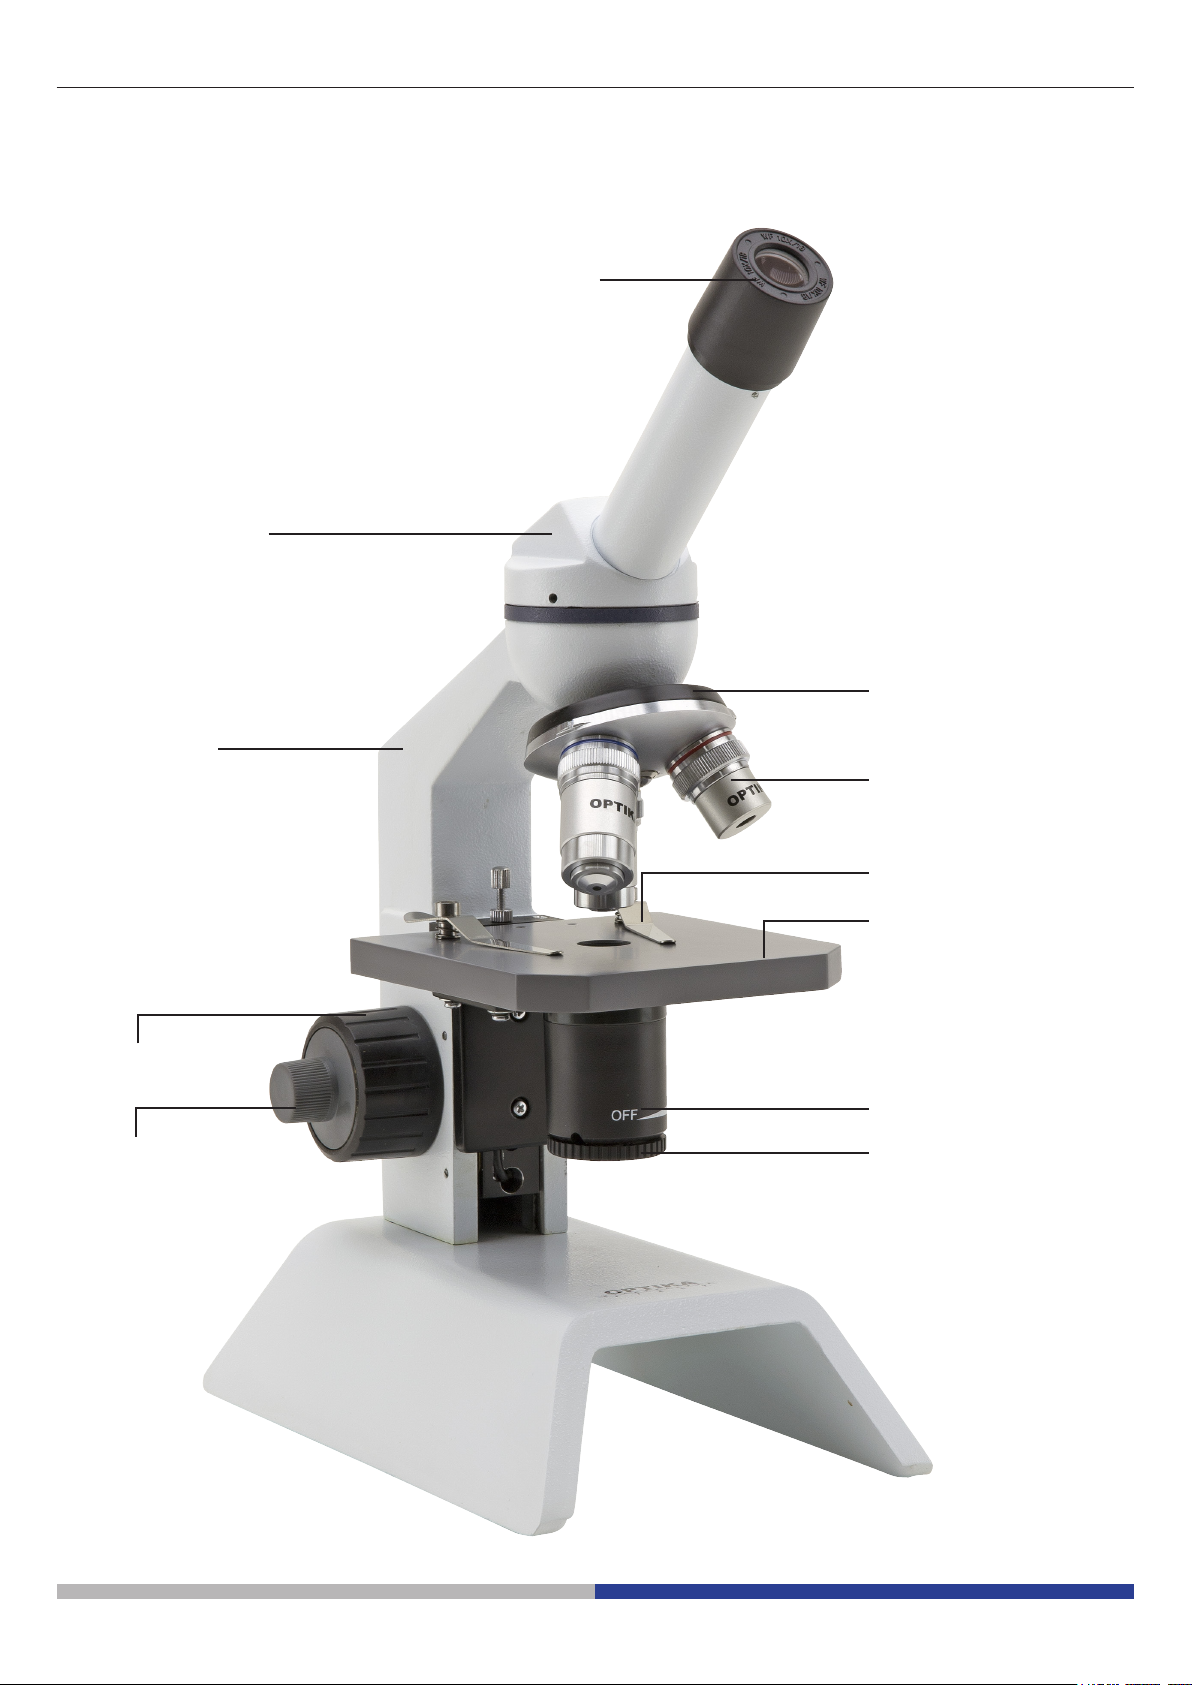
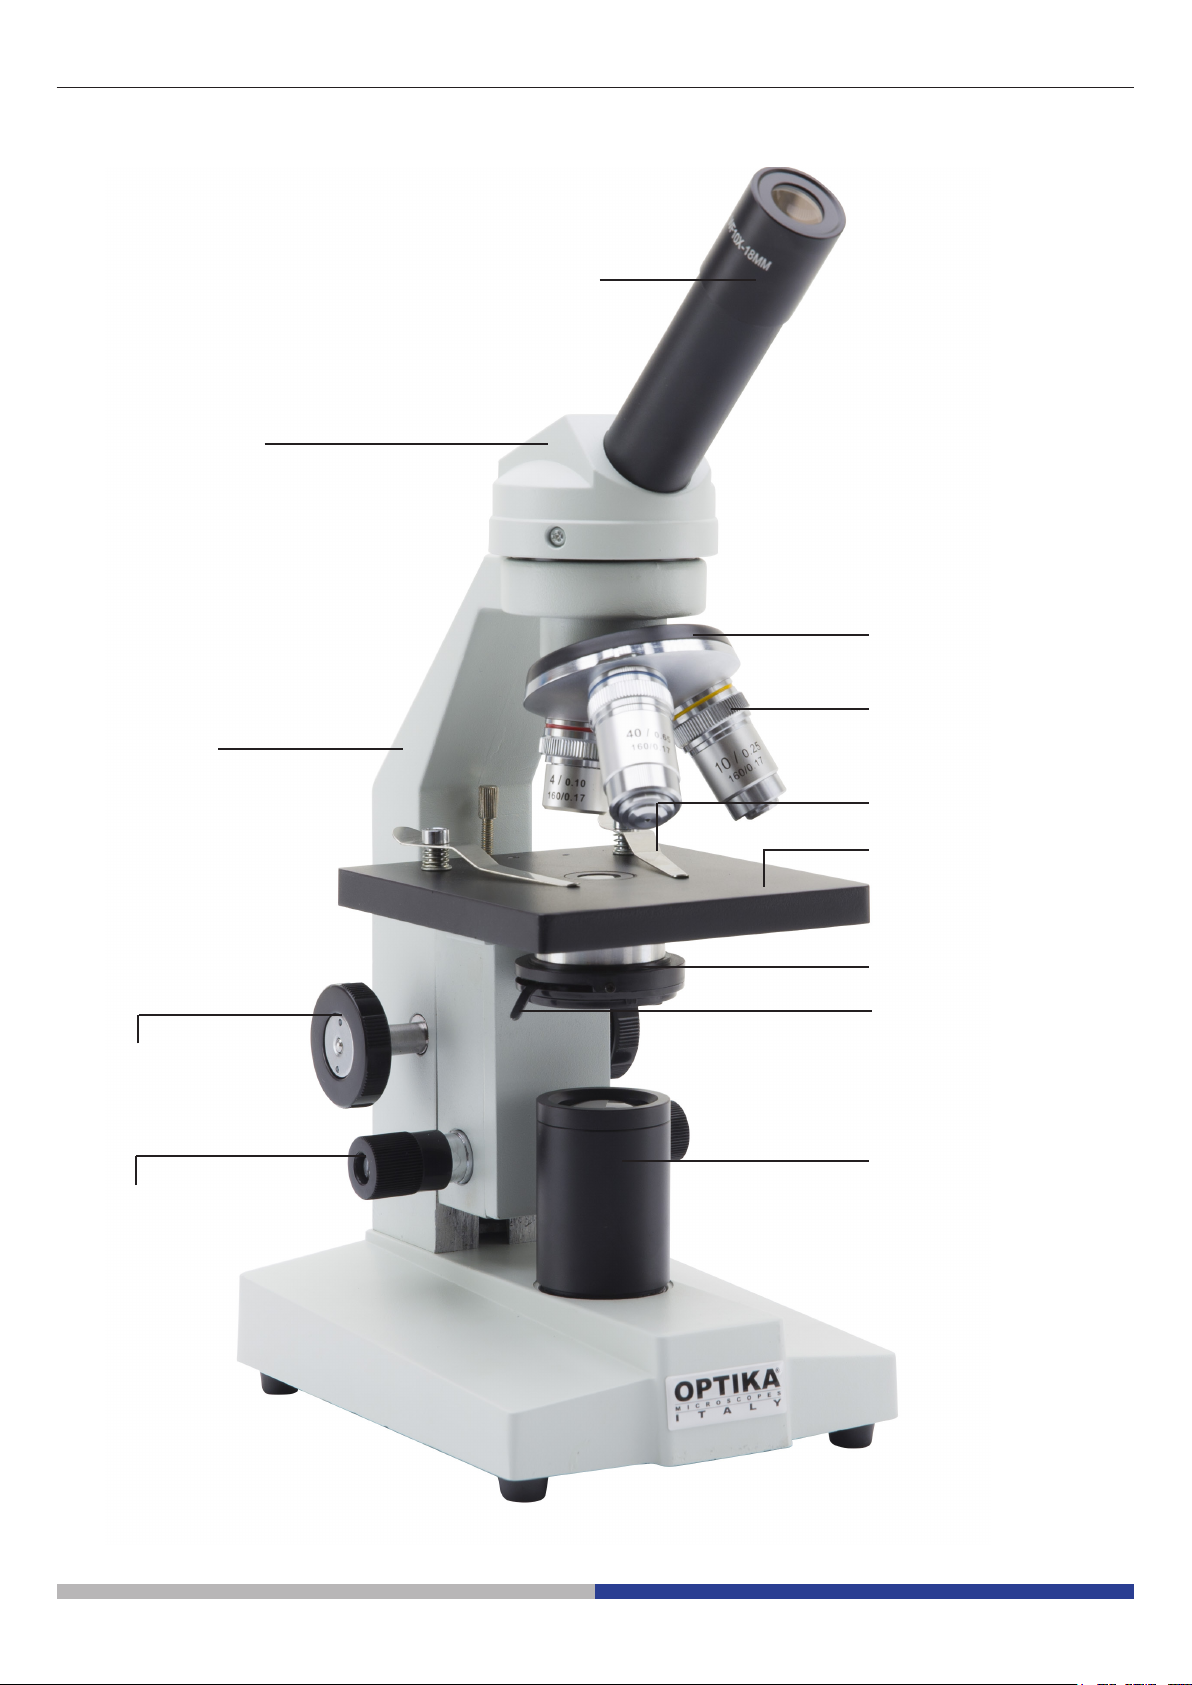
Overview M-100FX
OBSERVATION
HEAD
EYEPIECE
NOSEPIECE
MAIN BODY
COARSE
FOCUSING KNOB
FINE FOCUSING
KNOB
OBJECTIVE
SLIDE CLAMP
STAGE
CONDENSER
IRIS DIAPHRAGM
ILLUMINATOR
Page 8

Overview M-100FLed
OBSERVATION
HEAD
EYEPIECE
NOSEPIECE
MAIN BODY
COARSE
FOCUSING KNOB
FINE FOCUSING
KNOB
OBJECTIVE
SLIDE CLAMP
STAGE
CONDENSER
IRIS DIAPHRAGM
ILLUMINATOR
BRIGHTNESS
ADJUSTMENT
KNOB
Page 9

Unpacking
The microscope is housed in a moulded Styrofoam container. Remove the tape from the edge of the container
and lift the top half of the container. Take some care to avoid that the optical items (objectives and eyepieces)
fall out and get damaged. Using both hands (one around the arm and one around the base), lift the microscope
from the container and put it on a stable desk.
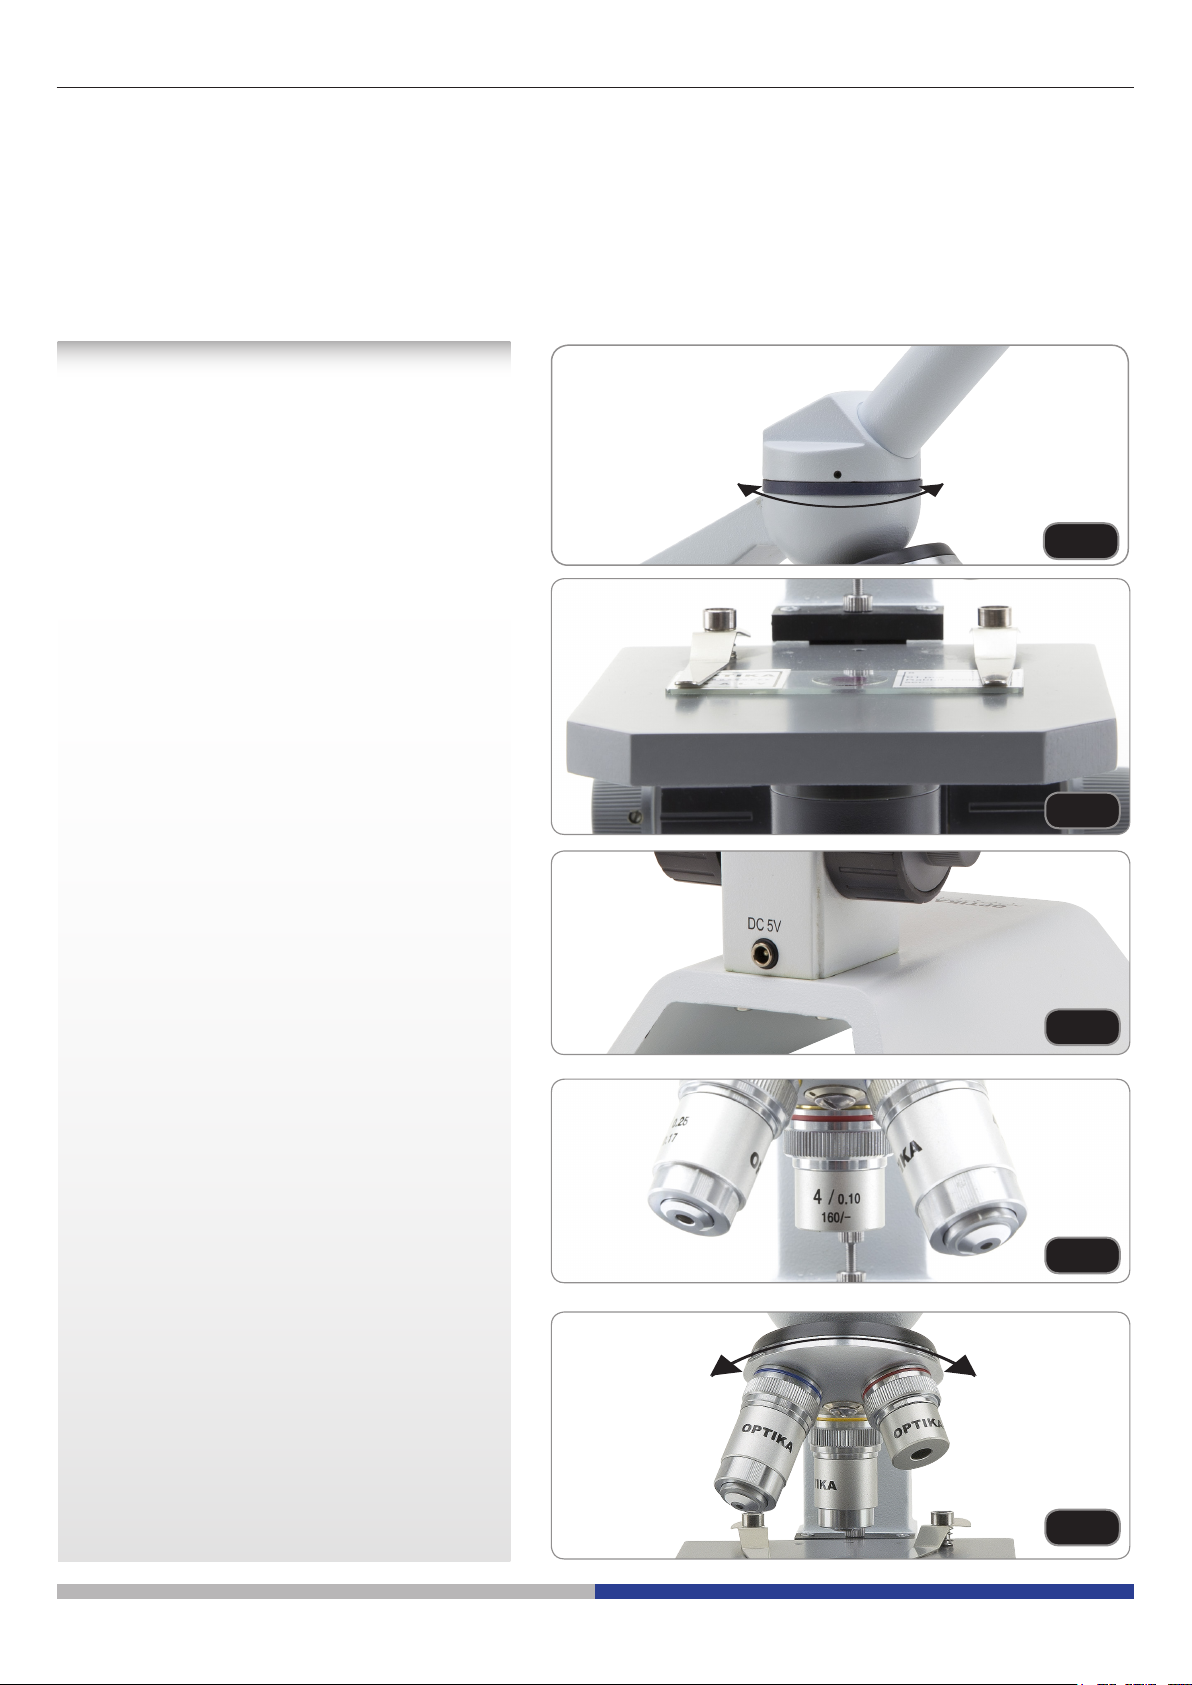
Using the microscope
1. Turn the observation head to a comfortable
position for observation.
Fig.1
2. Ensure that the specimen is centred over
the stage opening. Lock the specimen
slide on the mechanical stage using the
two slide clamps.
3. The microscope comes with an electrical
illuminator. Insert the plug of the external
power supply into the power socket on the
back of the microscope and turn on the light
by using the main switch on the microscope.
On B-50 and B-50B, turn the light control
knob located under the condenser.
4. Rotate the coarse focusing knob to bring
the slide into focus with the 4x objective.
Adjust the ne focusing knob (when
included) to get the image sharp and clear.
5. Turn the nosepiece to choose the objective
you need.
Fig.2
Fig.3
Fig.4
Page 10
Fig.5
Maintenance
Microscopy environment
This microscope is recommended to be used in a clean, dry and shock free environment with a temperature of
5°-40°C and a maximum relative humidity of 75 % (non condensing). Use a dehumidier if needed.
To think about when and after using the microscope
• The microscope should always be kept vertically when moving it and be careful so that no
moving parts, such as the eyepieces, fall out.
• Never mishandle or impose unnecessary force on the microscope.
• Never attempt to service the microscope yourself.
• After use, turn “OFF” the light immediately, cover the microscope with the included
dust-cover, and keep it in a dry and clean place.
Electrical safety precautions
• Before plugging in the power supply, make sure that the supplying voltage of your region
matches with the operation voltage of the equipment and that the lamp switch is in “OFF”-
position.
•
Users should observe all safety regulations of the region. The equipment has acquired
the CE safety label. However, users do have full responsibility to use this equipment safely.
Cleaning the optics
• If the optical parts need to be cleaned try rst to: use compressed air.
• If that is not sufcient: use a soft lint-free piece of cloth with water and a mild detergent.
• And as a nal option: use the piece of cloth moistened with a 3:7 mixture of ethanol and ether.
Note: ethanol and ether are highly ammable liquids. Do not use them near a heat source, near sparks or
near electric equipment. Use these chemicals in a well ventilated room.
• Remember to never wipe the surface of any optical items with your hands. Fingerprints can damage the
optics.
• Do not disassemble objectives or eyepieces in attempt to clean them.
For the best results, use the OPTIKA cleaning kit (see catalogue).
If you need to send the microscope to Optika for maintenance, please use the original packaging.
Page 11
Equipment disposal
Art.13 Dlsg 25 july 2005 N°151. “According to directives 2002/95/EC, 2002/96/EC and 2003/108/EC relating
to the reduction in the use of hazardous substances in electrical and electronic equipment and waste disposal.”
The basket symbol on equipment or on its box indicates that the product at the end of its useful life should be
collected separately from other waste.
The separate collection of this equipment at the end of its lifetime is organized and managed by the producer.
The user will have to contact the manufacturer and follow the rules that he adopted for end-of-life equipment
collection.
The collection of the equipment for recycling, treatment and environmentally compatible disposal, helps to prevent
possible adverse effects on the environment and health and promotes reuse and/or recycling of materials of the
equipment.
Improper disposal of the product involves the application of administrative penalties as provided by the laws in force.
Page 12

Serie ECOVISION
MANUALE D’ISTRUZIONI
Modello
B-20R
B-20CR
B-50
B-50B
M-100FX
M-100FLed
v 1.1 2017

Pagina 14
Avvertenza
Questo microscopio è uno strumento scientico di alta precisione, progettato per durare a lungo con una
minima manutenzione; è costruito su elevati standard ottici e meccanici e per resistere all’utilizzo quotidiano. Vi
ricordiamo che questo manuale contiene informazioni importanti per la sicurezza e per la manutenzione dello
strumento, e deve quindi essere messo a disposizione di coloro che lo utilizzeranno.
Decliniamo ogni responsabilità derivante da un utilizzo dello strumento non indicato nel presente manuale.
Simboli
La seguente tabella riporta i simboli utilizzati in questo manuale.
PERICOLO
Questo simbolo indica un rischio potenziale ed avverte di procedere con cautela.
SHOCK ELETTRICO
Questo simbolo indica un rischio di shock elettrico.
Informazioni sulla sicurezza
Per evitare shock elettrici
Prima di collegare il cavo di alimentazione alla presa elettrica, assicurarsi che il voltaggio della rete locale
coincida con il voltaggio dello strumento e che l’interruttore dell’illuminazione sia nella posizione “OFF”.
Gli utenti dovranno seguire tutte le norme di sicurezza locali. Lo strumento è certicato CE. In ogni caso, gli
utilizzatori sono gli unici responsabili per un utilizzo sicuro dello strumento. Per l’utilizzo in sicurezza dello
strumento è importante attenersi alle seguenti istruzioni e leggere il manuale in tutte le sue parti.
Utilizzo previsto
Solo per ricerca. Non è previsto alcun utilizzo di questo strumento per uso diagnostico.
Pagina 15

Descrizione dello strumento B-20R
TESTA
VITE PER IL FISSAGGIO
OCULARE
MANIGLIA DI
TRASPORTO
CORPO
PRINCIPALE
MANOPOLA PER LA
MESSA A FUOCO
MACROMETRICA
MANOPOLA PER LA
MESSA A FUOCO
MICROMETRICA
REVOLVER
OBBIETTIVI
PINZETTE FERMA
VETRINI
TAVOLINO
CONDENSATORE
MANOPOLA PER LA
MESSA A FUOCO
MICROMETRICA
ILLUMINATORE A LED
Pagina 16

Descrizione dello strumento B-20CR
TESTA
VITE PER IL FISSAGGIO
OCULARE
MANIGLIA DI
TRASPORTO
CORPO
PRINCIPALE
MANOPOLA PER LA
MESSA A FUOCO
MICROMETRICA
MANOPOLA PER LA
MESSA A FUOCO
MACROMETRICA
DIAFRAMMA
DI APERTURA
REVOLVER
OBBIETTIVI
PINZETTE FERMA
VETRINI
TAVOLINO
MANOPOLE DI
TRANSLAZIONE
CONDENSATORE
ILLUMINATORE A LED
Pagina 17

Descrizione dello strumento B-50
OCULARE
TESTA
CORPO
PRINCIPALE
REVOLVER
OBBIETTIVI
MANOPOLA PER LA
MESSA A FUOCO
MACROMETRICA
MANOPOLA PER LA
MESSA A FUOCO
MICROMETRICA
PINZETTE FERMA
VETRINI
TAVOLINO
CONDENSATORE
MANOPOLA DI REGOLAZIONE
LUMINOSITÀ E ON/OFF
Pagina 18
Descrizione dello strumento B-50B
OCULARI
TESTA
REVOLVER
CORPO
PRINCIPALE
MANOPOLA PER LA
MESSA A FUOCO
MACROMETRICA
MANOPOLA PER LA
MESSA A FUOCO
MICROMETRICA
OBBIETTIVI
PINZETTE FERMA
VETRINI
TAVOLINO
DIAFRAMMA
DI APERTURA
CONDENSATORE
MANOPOLA DI
REGOLAZIONE
LUMINOSITÀ E ON/OFF
Pagina 19
Descrizione dello strumento M-100FX
OCULARE
TESTA
REVOLVER
CORPO
PRINCIPALE
MANOPOLA PER LA
MESSA A FUOCO
MACROMETRICA
MANOPOLA PER LA
MESSA A FUOCO
MICROMETRICA
OBBIETTIVI
PINZETTE FERMA
VETRINI
TAVOLINO
CONDENSATORE
DIAFRAMMA
DI APERTURA
ILLUMINATORE
Pagina 20
Descrizione dello strumento M-100FLed
OCULARE
TESTA
REVOLVER
CORPO
PRINCIPALE
MANOPOLA PER LA
MESSA A FUOCO
MACROMETRICA
MANOPOLA PER LA
MESSA A FUOCO
MICROMETRICA
OBBIETTIVI
PINZETTE FERMA
VETRINI
TAVOLINO
CONDENSATORE
DIAFRAMMA
DI APERTURA
ILLUMINATORE
MANOPOLA
REGOLAZIONE
INTENSITÀ
LUMINOSA
Pagina 21
Disimballagio
Il microscopio è riposto in un imballo di polistirolo espanso. Rimuovere il nastro adesivo dal collo ed aprire la
parte superiore dell’imballo. Fare attenzione a non far cadere le parti ottiche (obiettivi e oculari) nell’estrarre il
microscopio dalla scatola per evitare che vengano danneggiati. Utilizzare entrambe le mani (una intorno allo
stativo e una alla base), slare il microscopio dal contenitore e appoggiarlo su un piano stabile.
Utilizzo del microscopio
1. Ruotare la testa di osservazione in una
posizione comoda per l’osservazione.
Fig.1
2. Assicurarsi che il campione sia centrato
sopra l’apertura del tavolino. Fissare il
vetrino sul tavolino utilizzando le pinzette.
3. Il microscopio è dotato di illuminatore.
Inserire la spina dell’alimentatore esterno
nella presa sul retro del microscopio
e accendere l’illuminatore ruotando
l’apposita manopola (se inclusa).
Su B-50 e B-50B, ruotare la manopola
di regolazione luce posta sotto il
condensatore.
4. Ruotare la manopola di messa a fuoco
macrometrica per portare il campione a
fuoco con l’obiettivo 4x. Regolare il fuoco
micrometrico (se incluso) per ottenere
un’immagine nitida.
Fig.2
Fig.3
Fig.4
5. Ruotare il revolver per scegliere l’obiettivo
desiderato.
Fig.5
Pagina 22

Manutenzione
Ambiente di lavoro
Si consiglia di utilizzare il microscopio in un ambiente pulito e secco, privo di urti, ad una temperatura fra 0°C
e 40°C e con una umidità relativa massima dell’85% (in assenza di condensazione). Si consiglia l’uso di un
deumidicatore se necessario.
Prima e dopo l’utilizzo del microscopio
• Tenere il microscopio sempre in posizione verticale quando lo si sposta.
• Assicurarsi inoltre che le parti mobili, ad esempio gli oculari, non cadano.
• Non maneggiare senza precauzioni e non adoperare inutile forza sul microscopio.
• Non cercare di provvedere da soli alla riparazione.
• Dopo l’uso spegnere immediatamente la lampada, coprire il microscopio con l’apposita
custodia antipolvere in dotazione e tenerlo in un luogo asciutto e pulito.
Precauzioni per un utilizzo sicuro
• Prima di collegare l’alimentatore alla rete elettrica assicurarsi che il voltaggio locale sia
idoneo a quello dell’apparecchio e che l’interruttore della lampada sia posizionato su
“OFF”.
• Attenersi a tutte le precauzioni di sicurezza della zona in cui ci si trova ad operare.
• L’apparecchio è omologato secondo le norme di sicurezza CE. Gli utenti hanno comunque piena responsabilità nell’utilizzo sicuro del microscopio.
Pulizia delle ottiche
• Qualora le ottiche necessitino di essere pulite, utilizzare prima di tutto aria compressa.
• Se questo non fosse sufciente usare un panno non slacciato, inumidito con acqua e un detergente
delicato.
• Come ultima opzione è possibile usare un panno inumidito con una soluzione 3:7 di alcol etilico ed etere.
• Attenzione: l’alcol etilico e l’etanolo sono sostanze altamente inammabili. Non usarle vicino ad una fonte di calore, a scintille o presso apparecchiature elettriche. Le sostanze devono essere adoperate in un
luogo ben ventilato.
• Non stronare la supercie di nessun componente ottico con le mani. Le impronte digitali possono danneggiare le ottiche.
• Non smontare gli obiettivi o gli oculari per cercare di pulirli.
Per un migliore risultato, utilizzare il kit di pulizia OPTIKA (vedi catalogo).
Se si necessita di spedire il microscopio al produttore per la manutenzione, si prega di utilizzare l’imballo originale.
Pagina 23

Smaltimento
Ai sensi dell’articolo 13 del decreto legislativo 25 luglio 2005 n°151. “Attuazione delle direttive 2002/95/CE,
2002/96/CE e 2003/108/CE, relative alla riduzione dell’uso di sostanze pericolose nelle apparecchiature
elettriche ed elettroniche, nonché allo smaltimento dei rifiuti”.
Il simbolo del cassonetto riportato sulla apparecchiatura o sulla sua confezione indica che il prodotto alla fine della
propria vita utile deve essere raccolto separatamente degli altri rifiuti. La raccolta differenziata della presente
apparecchiatura giunta a fine vita è organizzata e gestita dal produttore.
L’utente che vorrà disfarsi della presente apparecchiatura dovrà quindi contattare il produttore e seguire il
sistema che questo ha adottato per consentire la raccolta separata dell’apparecchiatura giunta a fine vita.
L’adeguata raccolta differenziata per l’avvio successivo della apparecchiatura dismessa al riciclaggio, al
trattamento e allo smaltimento ambientalmente compatibile contribuisce ad evitare possibili effetti negativi
sull’ambiente e sulla salute e favorisce il reimpiego e/o riciclo dei materiali di cui è composta l’apparecchiatura.
Lo smaltimento abusivo del prodotto da parte del detentore comporta l’applicazione delle sanzioni amministrative
previste dalla normativa vigente.
Pagina 24

Serie ECOVISION
MANUAL DE INSTRUCCIONES
Modelo
B-20R
B-20CR
B-50
B-50B
M-100FX
M-100FLed
v 1.1 2017

Página 26

Advertencia
Este microscopio es un instrumento cientíco de precisión. Su utilización está pensada para una larga duración
con un mínimo nivel de mantenimiento. Para su fabricación se han utilizado elementos ópticos y mecánicos de
elevada calidad que lo convierten en el instrumento ideal para la utilización diaria en las aulas y el laboratorio.
Informamos que esta guía contiene importantes informaciones sobre la seguridad y el mantenimiento del producto y por lo tanto debe ser accesible a todos aquellos que utilizan dicho instrumento.
Símbolos
A continuación le mostramos una lista de los símbolos que encontrará a lo largo de éste manual.
PRECAUCIÓN
Éste símbolo indica riesgo alto y le advierte de proceder con precaución.
DESCARGA ELECTRICA
Éste simbolo indica riesgo de descarga eléctrica.
Información de seguridad
Evitar una descarga eléctrica
Antes de conectar el microscopio a la toma de corriente, asegurarse que la tensión de entrada del lugar donde
se usa coincide con la tensión de utilización del microscopio y que el interruptor del iluminador esté en posición
“OFF”. El usuario debe consultar las normas de seguridad de su país. El instrumento está dotado de una etiqueta de seguridad CE. No obstante estas pautas, el usuario debería utilizar el microscopio en función de sus
necesidades pero con un mínimo de responsabilidad y seguridad. Por favor, siga las siguientes instrucciones y
lea éste manual en su totalidad para asegurar la operación segura del equipo.
Utilización
Solo para investigación. No utilizar para uso terapéutico o de diagnosis humano o animal.
Página 27

Vista General B-20R
CABEZAL
TORNILLO DE BLOQUEO
OCULAR
AGARRADERA
ESTATIVO
MANDO DE ENFOQUE
MACRO
MANDO DE ENFOQUE
MICROMETRICO
REVOLVER
OBJETIVO
PINZA
SUJETA-MUESTRAS
PLATINA
CONDENSADOR
MANDO DE ENFOQUE
MICROMETRICO
ILUMINADOR LED
Página 28

Vista General B-20CR
CABEZAL
TORNILLO DE BLOQUEO
OCULAR
AGARRADERA
ESTATIVO
FINE FOCUSING KNOB
MANDO DE ENFOQUE
MICROMETRICO
DIAFRAGMA IRIS
REVOLVER
OBJETIVO
PINZA
SUJETA-MUESTRAS
PLATINA
MANDOS DE
TRASLACIÓN X -Y
CONDENSADOR
ILUMINADOR LED
Página 29

Vista General B-50
CABEZAL
OCULAR
REVOLVER
ESTATIVO
MANDO DE ENFOQUE
MACROMETRICO
MANDO DE
ENFOQUE
MICROMETRICO
OBJETIVOS
PINZA
SUJETA-MUESTRAS
PLATINA
CONDENSADOR
ANILLO DE ENCENDIDO Y
REGULACIÓN DE LA
ILUMINACIÓN
Página 30

Vista General B-50B
CABEZAL
OCULAR
REVOLVER
ESTATIVO
MANDO DE ENFOQUE
MACROMETRICO
MANDO DE
ENFOQUE
MICROMETRICO
OBJETIVOS
PINZA
SUJETA-MUESTRAS
PLATINA
DIAFRAGMA DE
APERTURA
CONDENSADOR
ANILLO DE ENCENDIDO Y
REGULACIÓN DE LA
ILUMINACIÓN
Página 31

Vista General M-100FX
CABEZAL
OCULAR
REVOLVER
CUERPO
PRINCIPAL
MANDO DE ENFOQUE
MACROMETRICO
MANDO DE ENFOQUE
MICROMETRICO
OBJETIVO
PINZA
SUJETA-MUESTRAS
PLATINA
CONDENSADOR
DIAFRAGMA DE
APERTURA
ILUMINADOR
Página 32

Vista General M-100FLed
CABEZAL
OCULAR
REVOLVER
CUERPO
PRINCIPAL
MANDO DE ENFOQUE
MACROMETRICO
MANDO DE ENFOQUE
MICROMETRICO
OBJETIVO
PINZA
SUJETA-MUESTRAS
PLATINA
CONDENSADOR
DIAFRAGMA DE
APERTURA
ILUMINADOR
BOTON AJUSTE
INTENSIDAD LUZ
Página 33

Desembalaje
El microscopio se entrega con un embalaje de poliestireno. Después de abrir el embalaje, abrir la parte superior
del mismo. Prestar atención para evitar dañar los componentes ópticos (objetivos y oculares) y para evitar que
el instrumento se caiga. Extraer el microscopio de su embalaje con ambas manos (con una mano sostener el
brazo y con la otra la base) y apoyarlo en un plano estable.
Utilización del microscopio
1. Gire el cabezal de observación a una
posición que le sea cómoda para trabajar.
Fig.1
2. Asegúrese que la muestra está centrada
sobre la abertura de la platina. Sujetar la
muestra con ambas pinzas de la platina.
3. El microscopio viene dotado con un
iluminador. Introduzca el enchufe en la
toma de corriente de la parte posterior del
microscopio y encienda la luz utilizando
el interruptor principal del microscopio.
En B-50 y B-50B, gire el control de luz
situado bajo la platina y condensador
respectivamente.
4. Gire el mando de enfoque macrometrico
para enfocar la muestra con el objetivo 4x.
Ajuste el botón de enfoque micrometrico
para obtener una imagen nítida y clara.
5. Girar el revolver para posicionar en el
centro el objetivo con el que trabajará.
Fig.2
Fig.3
Fig.4
Página 34
Fig.5

Mantenimiento
Ambiente de trabajo
Se aconseja utilizar este microscopio en un ambiente limpio y seco; también se deben evitar los impactos. La
temperatura de trabajo recomendada es de 0-40°C y la humedad relativa máxima es de 85 % (en ausencia
de condensación). Si es necesario, utilizar un deshumidicador.
Consejos antes y después de la utilización del microscopio
• Durante los desplazamientos, mantener el microscopio en posición vertical y prestar
mucha atención para evitar que se caigan los accesorios móviles, por ejemplo, los oculares.
• Manejar con cuidado el microscopio evitando usar una fuerza mayor de la necesaria.
• Evitar reparar el microscopio por su cuenta.
• Apagar la luz inmediatamente después de haber utilizado el microscopio, cubrirlo con su
correspondiente funda antipolvo y mantenerlo en un ambiente limpio y seco.
Precauciones de seguridad relativas al sistema eléctrico
• Antes de conectar el microscopio a la toma de corriente, asegurarse que la tensión de
entrada del lugar donde se usa coincide con la tensión de utilización del microscopio y
que el interruptor del iluminador esté en la posición “OFF”.
• El usuario debe consultar las normas de seguridad de su país.
• El instrumento está dotado de una etiqueta de seguridad CE. No obstante estas pautas,
el usuario debería utilizar el microscopio en función de sus necesidades pero con un
mínimo de responsabilidad y seguridad.
Limpieza de la ópticas
• Si es necesario limpiar los componentes ópticos utilizar, en primer lugar, aire comprimido.
• Si no es suciente, limpiar las ópticas con un paño, que no esté deshilachado, humedecido en agua y
detergente neutro.
• Si todavía no es suciente, humedecer un paño con una mezcla de 3 partes de etanol y 7 partes de éter.
• Importante: el etanol y el éter son líquidos altamente inamables. No se deben utilizar cercanos a una
fuente de calor, chispas o instrumentación eléctrica. Utilizar en un ambiente bien aireado.
• No frotar la supercie de ningún componente óptico con la manos. Las huellas digitales pueden dañar las
ópticas.
• No desmontar los objetivos o los oculares para intentar limpiarlos.
Para obtener mejores resultados, utilice el kit de limpieza OPTIKA (véase el catálogo).
Si fuera necesario, enviar el microscopio a la empresa Optika para su mantenimiento se ruega utilizar el embalaje
original.
Página 35

Eliminación de residuos
En conformidad con el Art. 13 del D.L. de 25 julio 2005 n°151. Actuación de las Directivas 2002/95/CE, 2002/96/
CE y 2003/108/CE, relativas a la reducción del uso de sustancias peligrosas en la instrumentación eléctrica y
electrónica y a la eliminación de residuos.
El símbolo del contenedor que se muestra en la instrumentación o en su embalaje indica que el producto
cuando alcanzará el final de su vida útil se deberá recoger de forma separada del resto de residuos.
La gestión de la recogida selectiva de la presente instrumentación será llevada a cabo por el fabricante.
Por lo tanto, el usuario que desee eliminar la presente instrumentación tendrá que ponerse en contacto con el
fabricante y seguir el sistema que éste ha adoptado para permitir la recogida selectiva de la instrumentación.
La correcta recogida selectiva de la instrumentación para su posterior reciclaje, tratamiento y eliminación
compatible con el ambiente contribuye a evitar posibles efectos negativos al ambiente y a la salud y favorece
su reutilización y/o reciclado de los componentes de la instrumentación.
La eliminación del producto de forma abusiva por parte del usuario implicaría la aplicación de las sanciones
administrativas previstas en la normativa vigente.
Página 36

ECOVISON Series
MANUEL D’UTILISATION
Modèle
B-20R
B-20CR
B-50
B-50B
M-100FX
M-100FLed
v 1.1 2017

Page 38

Avertissement
Ce microscope est un appareil scientique prévu pour durer plusieurs années. Son niveau d’entretien est mininum. Les meilleurs composants optiques et mécaniques ont été utilisés pour sa conception ce qui font de cet
appareil un instrument idéal pour une utilisation journalière.
Ce guide contient des informations importantes sur la sécurité et l’entretien du produit; Par conséquent il doit
être accessible à tous ceux qui utilisent cet insrument.
Nous déclinons toute responsabilité quant à une utilisation de l’instrument non conforme à ce manuel.
Symboles
Le tableau suivant est un glossaire illustré des symboles qui sont utilisés dans ce manuel.
ATTENTION
Ce symbole indique un risque potentiel et vous avertit de procéder avec prudence.
CHOC ÉLECTRIQUE
Ce symbole indique un risque de choc électrique.
Précautions
Éviter choc électrique
Avant de connecter le câble d’alimentation au réseau électrique s’assurer que la tension d’entrée soit compatible
avec celle de l’appareil et que l’interrupteur de l’éclairage soit en position d’arrêt. L’utilisateur devra consulter les
normes de sécurités de son pays et est responsable de l’utilisation de l’appareil. L’appareil est livré avec une
étiquette de sécurité C.E. Prière de suivre les directives ci-dessous et lire ce manuel dans son intégralité pour
le bon fonctionnement de l’instrument.
Usage
Uniquement pour la recherche. Non destiné à usage thérapeutique ou diagnostique sur animaux ou êtres
humains.
Page 39

Description de l’instrument B-20R
TÊTE
VIS DE FIXATION
OCULAIRE
POIGNÉE DE
TRANSPORT
STATIF
COMMANDE
MACROMÉTRIQUE
COMMANDE
MICROMÉTRIQUE
TOURELLE PORTE
OBJECTIFS
OBJECTIFS
CLIPS DE FIXATION DE
LA PRÉPARATION
PLATINE
CONDENSEUR
ÉCLAIRAGE LED
Page 40

Description de l’instrument B-20CR
TÊTE
VIS DE FIXATION
OCULARE
POIGNÉE DE
TRANSPORT
STATIF
COMMANDE
MICROMÉTRIQUE
COMMANDE
MACROMÉTRIQUE
DIAPHRAGME
D’OUVERTURE
TOURELLE PORTE
OBJECTIFS
OBJECTIFS
CLIPS DE FIXATION DE
LA PRÉPARATION
PLATINE
COMMANDES DE
TRANSLATION
CONDENSEUR
ÉCLAIRAGE LED
Page 41

Description de l’instrument B-50
TÊTE
OCULAIRE
TOURELLE PORTE
OBJECTIFS
STATIF
COMMANDE
MACROMÉTRIQUE
COMMANDE
MICROMÉTRIQUE
OBJECTIFS
CLIPS DE FIXATION DE
LA PRÉPARATION
PLATINE
CONDENSEUR
REGLAGE DE
L’INTENSITÉ
LUMINEUSE ET ON/OFF
Page 42

Description de l’instrument B-50B
TÊTE
OCULAIRE
TOURELLE PORTE
OBJECTIFS
STATIF
COMMANDE
MACROMÉTRIQUE
COMMANDE
MICROMÉTRIQUE
OBJECTIFS
CLIPS DE FIXATION DE
LA PRÉPARATION
PLATINE
DIAPHRAGME
D’OUVERTURE
CONDENSEUR
REGLAGE DE
L’INTENSITÉ
LUMINEUSE ET
ON/OFF
Page 43

Description de l’instrument M-100FX
OCULAIRE
TÊTE
TOURELLE PORTE
OBJECTIFS
STATIF
COMMANDE
MACROMÉTRIQUE
COMMANDE
MICROMÉTRIQUE
OBJECTIFS
CLIPS DE FIXATION DE
LA PRÉPARATION
PLATINE
CONDENSEUR
DIAPHRAGME
D’OUVERTURE
ÉCLAIRAGE
Page 44

Description de l’instrument M-100FLed
OCULAIRE
TÊTE
TOURELLE PORTE
OBJECTIFS
STATIF
COMMANDE
MACROMÉTRIQUE
COMMANDE
MICROMÉTRIQUE
OBJECTIFS
CLIPS DE FIXATION DE
LA PRÉPARATION
PLATINE
CONDENSEUR
DIAPHRAGME
D’OUVERTURE
ÉCLAIRAGE
REGLAGE DE
L’INTENSITÉ
LUMINEUSE ET
ON/OFF
Page 45

Déballage
Le microscope est livré dans un emballage en polystyrène.
Après avoir retiré l’emballage en polystyrène du carton, enlever la partie supérieure de l’emballage après avoir
retiré la bande adhésive qui se trouve tout au tour. Faire bien attention de ne pas endommager les composants
optiques (objectifs et oculaires). Sortir le microscope de son emballage avec les deux mains (avec une main
soutenez le bras du microscope et avec l’autre la base) puis l’appuyer sur une table stable.
Utilisation du microscope
1. Tourner la tête d’observation jusqu’à obtenir
une position confortable pour l’observation.
Fig.1
2. S’assurer que la préparation soit au
centre sur l’ouverture de la platine. Fixer
la préparation sur la platine en utilisant les
clips de xation.
3. Le microscope est équipé d’un éclairage.
Brancher l’alimentation à l’arrière du
microscope et allumer l’éclairage en
agissant sur la commande dediée (si
incluse). Pour le modèles B-50 et B-50B,
agir sur la commande (anneau) de règlage
située sous le condenseur.
4. Agir sur la commande de mise au point
macrométrique pour la mise au point de
l’échantillon avec l’objectif grossissement
4x. Agir sur la commande de mise au point
micrométrique (si prévue) pour afner le
règlage.
Fig.2
Fig.3
Fig.4
5. Agir sur la tourelle porte objectifs pour
cahnger de grossissement.
Fig.5
Page 46

Réparation et entretien
Environnement de travail
Il est conseillé d’utiliser le microscope dans un environnement propre et sec, protégé des impactes, à une
température comprise entre 0°C y 40°C et avec une humidité relative maximale de 85% (en absence de
condensation). Il est conseillé d’utiliser un déshumidicateur si nécessaire.
Conseils avant et après l’utilisation du microscope
• Maintenir le microscope toujours en position verticale lorsque vous le déplacez.
• Assurez vous que les pièces mobiles (oculaires) ne tombent pas.
• Manipulez avec attention le microscope en évitant de le forcer.
• Ne réparez pas le microscope vous même.
• Éteindre immédiatement la lumière après avoir utilisé le microscope, couvrez le avec la
housse prévue à cet effet et conservez le dans un endroit propre et sec.
Précaution de sécurité sur le système électrique
• Avant de connecter le câble d’alimentation sur le réseau électrique assurez vous que la
tension d’entrée soit compatible avec celle de l’appareil et que l’interrupteur de l’éclai-
rage soit en position arrêt.
• L’utilisateur devra consulter les normes de sécurités de son pays.
• L’appareil inclût une étiquette de sécurité C.E. Dans tous les cas, l’utilisateur assume
toute responsabilité relative à l’utilisation sûre de l’appareil.
Nettoyage des optiques
• Si vous souhaitez nettoyer les optiques, utilisez dans un premier temps de l’air comprimé.
• Si cela n’est pas sufsant, utilisez alors un chiffon non efloché, humidié avec un peu d’eau et avec un
détergent délicat.
• Comme dernière option, il est possible d’utiliser un chiffon humide avec une solution de 3:7 d’éthanol et
d’éther.
• Attention: l’éthanol et l’éther sont des substances hautement inammables. Ne les utilisez pas près d’une
source de chaleur, d’étincelles ou d’appareils électriques. Les substances chimiques doivent être utilisées
dans un environnement aéré.
• Ne pas frotter la supercie d’aucun des composants optiques avec les mains.
• Les empreintes digitales peuvent endommager les parties optiques.
Pour les meilleurs résultats, utiliser le kit de nettoyage OPTIKA (voir le catalogue).
Conserver l’emballage d’origine dans le cas où il serait nécessaire de retourner le microscope au fournisseur pour
un entretien ou une réparation.
Page 47

Ramassage
Conformément à l’Article 13 du D.L du 25 Juillet 2005 nº151
Action des Directives 2002/95/CE, 2002/96/CE et 2003/108/CE, relatives à la réduction de l’utilisation de
substances dangereuses dans l’appareil électrique et électronique et à l’élimination des résidus.
Le Symbole du conteneur qui figure sur l’appareil électrique ou sur son emballage indique que le produit devra
être, à la fin de sa vie utile, séparé du reste des résidus. La gestion du ramassage sélectif du présent instrument
sera effectuée par le fabricant. Par conséquent, l’utilisateur qui souhaite éliminer l’appareil devra se mettre en
contact avec le fabricant et suivre le système que celui-ci a adopté pour permettre le ramassage sélectif de
l’appareil. Le ramassage sélectif correct de l’appareil pour son recyclage, traitement et élimination compatible
avec l’environnement contribue à éviter d’éventuels effets négatifs sur l’environnement et la santé et favorise
sa réutilisation et/ou recyclage des composants de l’appareil. L’élimination du produit de manière abusive de la
part de l’utilisateur entraînera l’application de sanctions administratives sur la norme en vigueur.
Page 48

ECOVISION Series
BEDIENUNGSANLEITUNG
Model
B-20R
B-20CR
B-50
B-50B
M-100FX
M-100FLed
v 1.1 2017

Pagina 50

Warnung
Dieses Mikroskop ist ein wissenschaftliches Präzisionsgerät, es wurde entwickelt für eine jahrelange Verwendung bei einer minimalen Wartung. Dieses Gerät wurde nach den höchsten optischen und mechanischen
Standards und zum täglichen Gebrauch hergestellt. Diese Bedienungsanleitung enthält wichtige Informationen
zur korrekten und sicheren Benutzung des Geräts. Diese Anleitung soll allen Benutzern zur Verfügung stehen.
Wir lehnen jede Verantwortung für eine fehlerhafte, in dieser Bedienungsanleitung nicht gezeigten Verwendung Ihrer Produkte ab.
Zeichen
Die folgende Tabelle zeigt die Symbole, die in dieser Anleitung verwendet werden.
ACHTUNG
Dieses Symbol zeigt eine potentielle Gefahr und warnt, mit Vorsicht zu verfahren.
STROMSCHLAG
Dieses Symbol weist auf eine Gefahr von Stromschlägen.
Sicherheitshinweise
Elektrische Vorsichtsmaßnahmen
Bevor Sie das Netzkabel anstecken, vergewissern Sie sich, dass die Spannung für das Mikroskop geeignet ist
und dass der Beleuchtungsschalter sich in Position “OFF” bendet.
Beachten Sie alle Sicherheitsvorschriften des Arbeitsplatzes, an dem Sie mit dem Mikroskop arbeiten. Das
Gerät entspricht den CE-Normen. Die Benutzer tragen während der Nutzung des Geräts die volle Verantwortung
dafür.
Verwendungsempfehlungen
Nur für Forschung. Nicht für therapeutische Verwendung.
Pagina 51

Beschreibung des instruments B-20R
KOPF
BEFESTIGUNGSSCHRAUBE
OKULAR
HANDGRIFF
STATIV
GROBTRIEBSKNOPF
FEINTRIEBSKNOPF
REVOLVER
OBJEKTIVE
PRÄPARATEKLEMMEN
TISCH
KONDENSOR
FEINTRIEBSKNOPF
HELLIGKEITSVERSTELLUNG
Pagina 52

Beschreibung des instruments B-20CR
KOPF
BEFESTIGUNGSSCHRAUBE
OKULAR
HANDGRIFF
STATIV
FEINTRIEBSKNOPF
GROBTRIEBSKNOPF
APERTURBLENDE
REVOLVER
OBJEKTIVE
PRÄPARATEKLEMMEN
TISCH
VERLEGUNGSKNÖPFE
KONDENSOR
HELLIGKEITSVERSTELLUNG
Pagina 53

Beschreibung des instruments B-50
OKULAR
KOPF
REVOLVER
STATIV
GROBTRIEBSKNOPF
FEINTRIEBSKNOPF
OBJEKTIVE
PRÄPARATEKLEMMEN
TISCH
KONDENSOR
ON/OFF
HELLIGKEITSVERSTELLUNG
Pagina 54

Beschreibung des instruments B-50B
OKULARE
KOPF
REVOLVER
STATIV
GROBTRIEBSKNOPF
FEINTRIEBSKNOPF
OBJEKTIVE
PRÄPARATEKLEMMEN
TISCH
APERTURBLENDE
KONDENSOR
ON/OFF
HELLIGKEITSVERSTELLUNG
Pagina 55

Beschreibung des instruments M-100FX
OKULAR
KOPF
REVOLVER
STATIV
GROBTRIEBSKNOPF
FEINTRIEBSKNOPF
OBJEKTIVE
PRÄPARATEKLEMMEN
TISCH
KONDENSOR
APERTURBLENDE
LEUCHTE
Pagina 56

Beschreibung des instruments M-100FLed
OKULAR
KOPF
REVOLVER
STATIV
GROBTRIEBSKNOPF
FEINTRIEBSKNOPF
OBJEKTIVE
PRÄPARATEKLEMMEN
TISCH
KONDENSOR
APERTURBLENDE
LEUCHTE
ON/OFF
HELLIGKEITSVERSTELLUNG
Pagina 57

Öffnung der Verpackung
Das Mikroskop ist in einem geformten Schaumpolystyrol Verpackung verpackt. Entfernen Sie das Klebeband
von der Verpackung und ziehen Sie die obere Hälfte der Verpackung hoch. Beachten Sie bitte, die optischen Bestandteile (Objektive und Okulare) nicht fallen zu lassen oder nicht zu beschädigen. Ziehen Sie das Mikroskop
aus der Verpackung mit beiden Händen (eine um den Arm und eine um die Basis) heraus und legen Sie es auf
eine stabile Oberäche.
Mikroskops
1. Drehen sie den kopf, um eine bequeme
position zu erreichen.
Fig.1
2. Vergewissern sie sich , dass die probe auf
der tischöffnung zentriert ist. Befestigen
sie den objektträger auf dem tisch mit hilfe
der präparateklemmen.
3. Das mikroskop ist mit beleuchtung
ausgestattet. Schalten sie den stecker
vom aussennetzteil in die steckdose
auf der rückseite vom mikroskop ein
und schalten sie die leuchte an, indem
sie den knopf ( wenn einbegriffen)
drehen. Mit b-50 und b-50b , drehen sie
den lichteinstellungsknopf unter dem
kondensor.
4. Drehen sie den grobtriebsknopf , um die
probe mit dem 4x objektiv zu fokussieren.
Regulieren sie den feintriebsknopf ( wenn
einbegriffen ) , um ein klaren bild zu
erreichen.
Fig.2
Fig.3
Fig.4
5. Drehen sie den revolver , um den
gewünschten objektiv zu wählen.
Fig.5
Pagina 58

Wartung
Arbeitsumfeld
Es wird empfohlen, das Mikroskop an einem sauberen, trockenen und stoßsicheren Ort zu verwenden,
bei einer Temperatur zwischen 0° und 40° und einer Feuchtigkeit nicht über 85% (ohne Kondensation).
Wenn nötig wird die Verwendung eines Luftentfeuchters empfohlen.
Vor und nach der Verwendung
• Bei Bewegungen muss das Gerät immer aufrecht gehalten werden.
• Stellen Sie sicher, dass die mobilen Teile (z.B. die Okulare) nicht fallen.
• Führen Sie selbst keine Reparaturen durch.
• Nach der Verwendung schalten Sie sofort die Beleuchtung aus, decken das Gerät mit
der
• Staubabdeckung und halten es in einem sauberen und trockenen Platz.
Elektrische Vorsichtsmaßnahmeno
• Bevor Sie das Netzkabel verbinden, versichern Sie sich, dass die Spannung für das Mikroskop geeignet ist und, dass der Beleuchtungsschalter in Position “OFF” steht.
• Beachten Sie alle Sicherheitsvorschriften des Arbeitsplatzes, an dem Sie mit dem Mikroskop arbeiten.
• Das Gerät entspricht den CE-Normen. Der Benutzer trägt bei Gebrauch die volle Verantwortung.
Reinigung der optischen Teile
• Falls die optischen Teile gereinigt werden sollen, so verwenden Sie dazu zuerst Druckluft.
• Falls dies nicht genügen sollte, so verwenden Sie einen fusselfreien, mit Wasser und einem Reinigungsmittel
• befeuchtet Tuch.
• Schließlich kann man ein feuchtes Tuch mit einer 3:7 Lösung von Äthylalkohol und Äther verwenden.
• Achtung: Äthylalkohol und Äther sind leicht ammbar. Sie dürfen in der Nähe von Wärmequellen, Funken
• oder elektrischen Geräten nicht verwendet werden. Sie sollten an einem belüfteten Ort verwendet werden.
• Scheuern Sie keine Oberäche der optischen Komponenten mit den Händen. Die Fingerabdrücke
• können die Optik beschädigen.
• Die Objektive oder die Okulare sollen bei der Reinigung nicht abgenommen werden.
Für gute Ergebnisse verwenden Sie das OPTIKA Reinigungskit (siehe Katalog).
Falls das Mikroskop zurück an uns für Wartung geschickt werden muss, verwenden Sie bitte die ursprüngliche
Verpackung.
Pagina 59

Wiederverwertung
Gemäß dem Artikel 13 vom Dekret Nr. 151 vom 25.07.2005
“Umsetzung der Richtlinien 2002/95/EG, 2002/96/EG und 2003/108/EG in Bezug auf die Verwendung
gefährlicher Stoffe in elektrischen und elektronischen Geräten sowie die Abfallentsorgung”
Das Symbol vom Müllcontainer erscheint auf dem Gerät oder der Verpackung und weist darauf hin, dass das
Produkt Ende des Lebens separat von anderen Abfällen entsorgt werden muss. Die getrennte Sammlung von
Geräten, die am Ende Ihrer Lebensdauer sind, wird vom Hersteller organisiert. Der Benutzer, der dieses Gerät
entsorgen möchtet, muss dann Kontakt mit dem Hersteller aufnehmen und der Vorgehensweise folgen, die
zur separaten Entsorgung eingeführt geworden ist. Die korrekte Sammlung von Geräten um die nachfolgende
Behandlung, Entsorgung und umweltfreundliche Wiederverwendung zu ermöglichen ist ein Beitrag um
negative Auswirkungen auf der Umwelt und der Gesundheit zu vermeiden und die Wiederverwendung der
Gerätkomponenten zu begünstigen. Die Illegale Entsorgung des Produkts vom Benutzer wird gemäß den
geltenden Bestimmungen bestraft.
Pagina 60

Série ECOVISION
MANUAL DE INSTRUÇÕES
Modello
B-20R
B-20CR
B-50
B-50B
M-100FX
M-100FLed
v 1.1 2017

Página 62

Advertência
Este microscópio é um instrumento cientíco de alta precisão, projetado para durar um longo tempo com
manutenção mínima; a sua realização respeita os melhores padrões óticos e mecânicos, para que possa ser
utilizado diariamente. Recordamos que este manual contém informações importantes para a segurança e a
manutenção do instrumento, portanto deve ser colocado à disposição daqueles que o irão utilizar. O fabricante
exime-se de qualquer responsabilidade em caso de utilização do instrumento não indicada neste manual.
Símbolos
A tabela seguinte apresenta os símbolos utilizados neste manual.
PERIGO
Este símbolo indica um risco potencial e adverte que é preciso proceder com cuidado.
CHOQUE ELÉTRICO
Este símbolo indica um risco de choque elétrico.
Informações sobre a segurança
Para evitar choques elétricos
Antes de ligar o cabo de alimentação com a tomada elétrica, certicar-se de que a tensão da rede local
coincida com a tensão do instrumento e que o interruptor da iluminação esteja na posição “OFF”.
Os utilizadores deverão seguir todas as normas de segurança locais. O instrumento tem certicação CE. Em
todo o caso, os utilizadores são os únicos responsáveis pela utilização segura do instrumento. Para a utilização
com segurança do instrumento, é importante respeitar as seguintes instruções e ler completamente o manual.
Utilização prevista
Apenas para pesquisa. Não é prevista qualquer utilização deste instrumento para nalidades diagnósticas.
Página 63

Visão geral B-20R
CABEÇA DE
OBSERVAÇÃO
PARAFUSO DO
FECHAMENTO
OCULAR
ASA DE
TRANSPORTE
CORPO
PRINCIPAL
BOTÃO DE FOCALIZAÇÃO
GROSSEIRO
BOTÃO DE
FOCALIZAÇÃO FINO
REVOLVER
OBJETIVO
BRAÇADEIRA DE
CORREDIÇA
PLATINA
CONDENSATORE
BOTÃO DE
FOCALIZAÇÃO FINO
ILUMINADOR DE LUZ
LED
Página 64

Visão geral B-20CR
CABEÇA DE
OBSERVAÇÃO
PARAFUSO DO
FECHAMENTO
OCULAR
ASA DE
TRANSPORTE
CORPO
PRINCIPAL
BOTÃO DE
FOCALIZAÇÃO FINO
BOTÃO DE FOCALIZAÇÃO
GROSSEIRO
DIAFRAGMA DA
ÍRIS
REVOLVER
OBJETIVO
BRAÇADEIRA DE
CORREDIÇA
PLATINA
TRANSLATING
BOTÃO
CONDENSADOR
ILUMINADOR DE LUZ
LED
Página 65

Visão geral B-50
CABEÇA DE
OBSERVAÇÃO
CORPO
PRINCIPAL
OCULAR
REVOLVER
OBJETIVO
BOTÃO DE
FOCALIZAÇÃO
GROSSEIRO
BOTÃO DE
FOCALIZAÇÃO
FINO
BRAÇADEIRA DE
CORREDIÇA
PLATINA
CONDENSADOR
BOTÃO DE AJUSTE DE
BRILHO ON/OFF
Página 66

Visão geral B-50B
CABEÇA DE
OBSERVAÇÃO
OCULAR
REVOLVER
CORPO
PRINCIPAL
BOTÃO DE
FOCALIZAÇÃO
GROSSEIRO
BOTÃO DE
FOCALIZAÇÃO
FINO
OBJETIVO
BRAÇADEIRA DE
CORREDIÇA
PLATINA
DIAFRAGMA DA
IRIS
CONDENSADOR
BOTÃO DE AJUSTE DE
BRILHO ON/OFF
Página 67

Visão geral M-100FX
CABEÇA DE
OBSERVAÇÃO
OCULAR
REVOLVER
CORPO
PRINCIPAL
BOTÃO DE
FOCALIZAÇÃO
GROSSEIRO
BOTÃO DE
FOCALIZAÇÃO
FINO
OBJETIVO
BRAÇADEIRA DE
CORREDIÇA
PLATINA
CONDENSADOR
DIAFRAGMA DA
IRIS
ILUMINADOR
Página 68

Visão geral M-100FLed
CABEÇA DE
OBSERVAÇÃO
OCULAR
REVOLVER
CORPO
PRINCIPAL
BOTÃO DE
FOCALIZAÇÃO
GROSSEIRO
BOTÃO DE
FOCALIZAÇÃO
FINO
OBJETIVO
BRAÇADEIRA DE
CORREDIÇA
PLATINA
CONDENSADOR
DIAFRAGMA DA
IRIS
ILUMINADOR
BOTÂO DE AJUSTE
DO BRILHO
Página 69

Desembalando
O microscópio é alojado em um recipiente de isopor moldado. Remova a ta da borda do recipiente e levante a
metade superior do recipiente. Tome algum cuidado para evitar que os itens ópticos (objetivos e oculares) cair
e car danicado. Usando ambas as mãos (uma ao redor do braço e outra ao redor da base), levante o microscópio do recipiente e coloque-o em uma mesa estável.
Usando o microscópio
1. Gire a cabeça da observação a uma
posição confortável distante observação.
Fig.1
2. Certique-se de que o espécime está
centrado sobre a abertura do palco.
Trave a corrediça da amostra no estágio
mecânico usando as duas braçadeiras de
corrediça.
3. O microscópio vem com um iluminador
elétrico. Insira o plugue da fonte de
alimentação externa na tomada de
corrente na parte de trás do microscópio e
acenda a luz usando o interruptor principal
no microscópio. Na B-50 e B-50B, rode
o manípulo de luz contrai localizado o
condensador.
4. Gire o botão de focalização grossa para
colocar o slide em foco com o objetivo 4x.
Ajuste o botão de focalização no (quando
incluído) para obter a imagem nítida e
clara.
Fig.2
Fig.3
Fig.4
5. Gire o revolver para escolher o objetivo
que você precisa.
Fig.5
Página 70

Manutenção
Ambiente de trabalho
Recomenda-se de utilizar o microscópio em um ambiente limpo e seco, sem o risco de colisões, a uma temperatura entre 0°C e 40°C e com uma humidade relativa máxima de 85% (em ausência de condensação).
Recomenda-se o uso de um desumidicador, se necessário
Antes e depois da utilização do microscópio
• Manter o microscópio sempre em posição vertical quando se o desloca.
• Certicar-se além disso que as partes móveis, por exemplo os oculares, não caiam.
• Não manusear sem precauções e não usar força inútil no microscópio.
• Não tentar fazer qualquer reparação por si próprio.
• Depois do uso desligar imediatamente a lâmpada, cobrir o microscópio com a sua proteção anti-pó fornecida e mantê-lo em um lugar seco e limpo
Precauções para um uso seguro
• Antes de ligar a fonte de alimentação à rede elétrica certicar-se que a tensão local seja
adequada à do aparelho e que o interruptor da lâmpada esteja posicionado no “OFF”.
• Seguir todas as precauções de segurança da zona na qual se trabalha.
• O aparelho é aprovado segundo as normas de segurança CE. Os utilizadores têm, de
qualquer modo plena responsabilidade sobre a utilização em segurança do microscópio.
Limpeza das lentes
• Caso as lentes necessitem de ser limpas, utilizar em primeiro lugar ar comprimido.
• Se não for suciente usar um pano que não deixe apos, húmido com água e um detergente
• delicado.
• Em último caso é possível usar um pano humedecido com uma solução 3:7 de álcool etílico e éter.
• Atenção: o álcool etílico e o etanol são substâncias altamente inamáveis. Não usar junto a uma fonte
• de calor, faíscas ou junto a aparelhos elétricos. As substâncias devem ser manuseadas em um lugar
• bem ventilado.
• Não esfregar as superfícies de nenhuma lente com as mãos. As impressões digitais poderão
• danicar as lentes.
• Não desmontar as objetivas ou os oculares para tentar limpá-los.
Para um melhor resultado utilizar o kit de limpeza OPTIKA (ver catálogo).
Se for necessário enviar o microscópio ao fabricante para a sua manutenção, pede-se que seja utilizada a embalagem original.
Página 71

OPTIKA S.r.l.
Via Rigla, 30 - 24010 Ponteranica (BG) - ITALIA Tel.: +39 035.571.392 - Fax: +39 035.571.435
info@optikamicroscopes.com - www.optikamicroscopes.com
OPTIKA Spain
spain@optikamicroscopes.com
OPTIKA USA
usa@optikamicroscopes.com
OPTIKA China
china@optikamicroscopes.com
OPTIKA Hungary
hungary@optikamicroscopes.com
OPTIKA India
india@optikamicroscopes.com
 Loading...