

Page 1
OPTIKA MICROSCOPES - ITALY
www.optikamicroscopes.com - info@optikamicroscopes.com
Ver. 4.0.0
DM-5UP
OPERATION MANUAL
GUIDA UTENTE
MANUAL DE INSTRUCCIONES
MANUEL D’INSTRUCTIONS
Page 2

Page 2
INDEX
1.0 DESCRIPTION page 4
2.0 INTRODUCTION page 6
3.0 CONTENTS OF THE BOX page 6
4.0 UNPACKING AND ASSEMBLY page 6
5.0 USING THE MICROSCOPE page 7
6.0 USING THE VIDEO CAMERA page 7
7.0 MAINTENANCE page 8
8.0 TECHNICAL SPECIFICATIONS page 9
9.0 RECYCLING AND RECOVERY page 10
Page 3
Page 3
This microscope is a scientific precision instrument designed to last for many years with a minimum of maintenance. It is built to high optical and mechanical standards and to withstand daily use.
Optika reminds you that this manual contains important information on safety and maintenance, and that it
must therefore be made accessible to the instrument users.
Optika declines any responsibility deriving from instrument uses that do not comply with this ma-nual.
Safety guidelines
This manual contains important information and warnings regarding safety about installation, use and
maintenance of the microscope. Please read this manual carefully before using the equipment. To
ensure safe use, the user must read and follow all instructions in this manual. OPTIKA products are
designed for safe use in normal operating conditions. The equipment and accessories described in
the manual are manufactured and tested according to industry standards for safety instrumentation
laboratory. Misuse can cause personal injury or damage to the instrument. Keep this manual at hand
close to the instrument, for an easy consultation.
Electrical safety
Before connecting the power cord to wall outlet, ensure that your mains voltage for your region corresponds to the voltage supply of the instrument, and that the illuminator’s switch is in position OFF. The
user must observe the safety regulations in force in his region. The instrument is equipped with CE safety marking, in any case the user has full responsibility concerning the safe use of that instrument.
Warning/Caution symbols used in this manual
The user should be aware of safety aspects when using the instrument. Warning or hazard symbols
are shown below. These symbols are used in this manual.
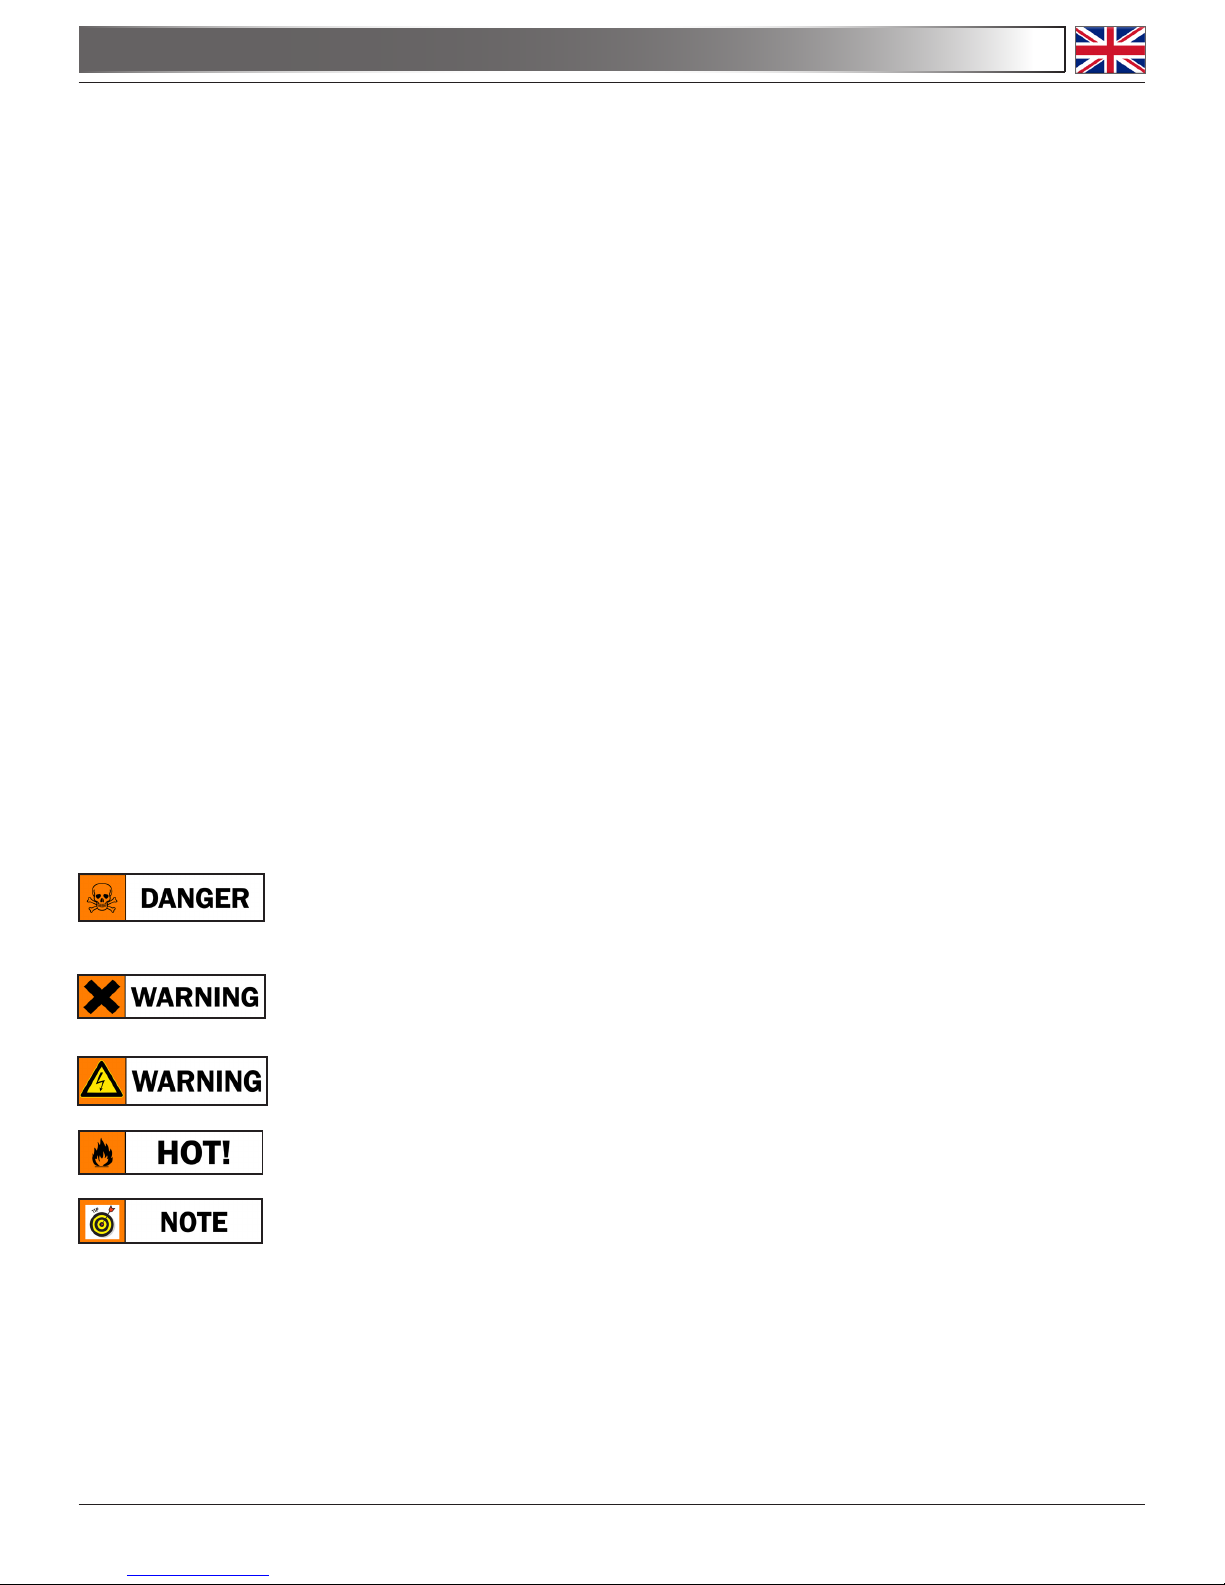
The instructions on this symbol to avoid possible severe personal injuries.
Warning of use; the incorrect operation on the instrument can cause damages
to the person or instrument.
Possibility of electric shock.
Attention: high temperature surfaces. Avoid direct contact.
Technical notes or usage tips.
SAFETY GUIDELINES
Page 4
Page 4
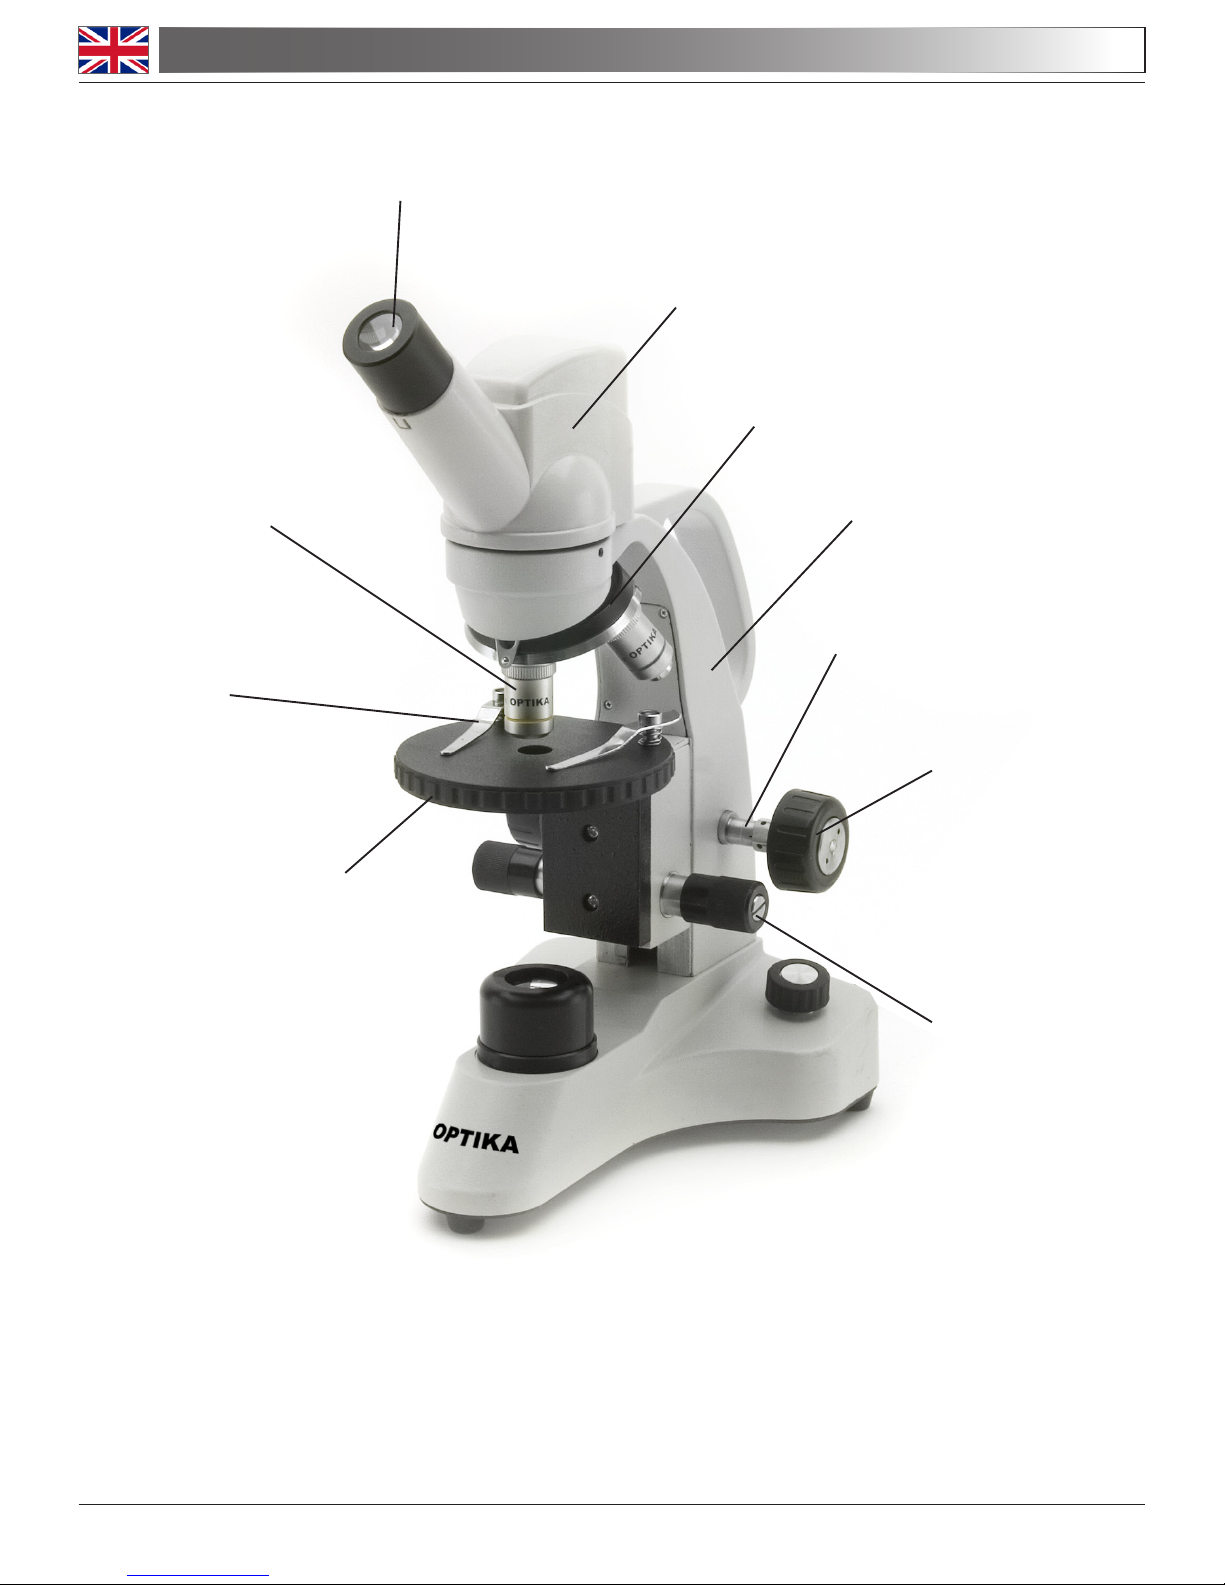
1.0 DESCRIPTION
EYEPIECE
OBSERVATION HEAD
WITH INTEGRATED
VIDEO CAMERA
NOSEPIECE
MAIN BODY
TENSION REGULATION
COARSE FOCUSING
KNOB
FINE FOCUSING
KNOB
MOVEABLE STAGE
SLIDE CLIP
OBJECTIVE
DM-5UP: FRONT VIEW
Page 5
Page 5
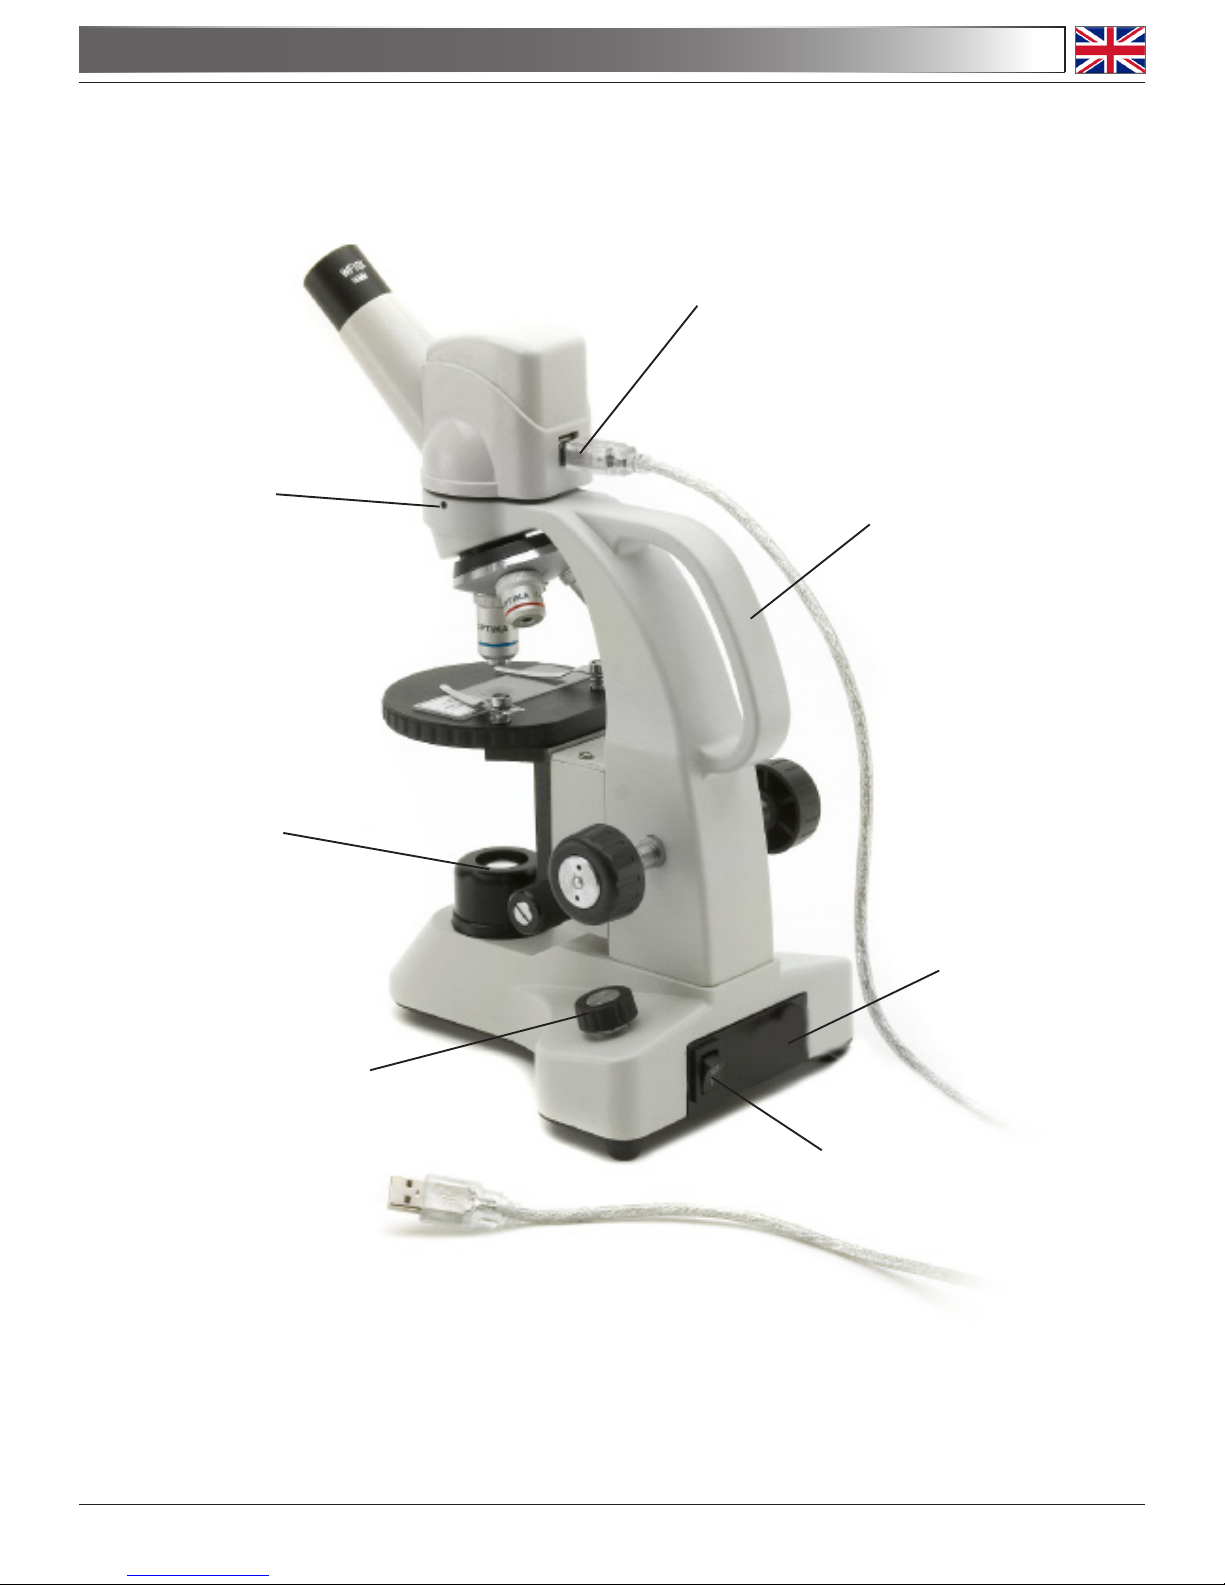
1.0 DESCRIPTION
DM-5UP: REAR VIEW
USB-CABLE ATTACHMENT AND
POWER SUPPLY (4,8V DC)
CARRYING HANDLE
ON-OFF SWITCH
BRIGHTNESS
ADJUSTMENT
KNOB
LED LIGHT ILLUMINATOR
LOCK SCREW
POWER SUPPLY
(4,8V DC)
Page 6
Page 6
2.0 INTRODUCTION
This microscope is a scientific precision instrument designed to last for many years with a minimum of maintenance. It is built to high optical and mechanical standards and to withstand daily use.
Optika reminds you that this manual contains important information on safety and maintenance, and that it
must therefore be made accessible to the instrument users.
Optika declines any responsibility deriving from instrument uses that do not comply with this manual.
Connect the mains plug into the socket at the base
Make sure, before you turn the illumination on, that the voltage selector is set to the mains voltage for
your region.
The power cord should be used only on network sockets equipped with adequate grounding.
Contact a technician to check the state of your electrical system. If there is no need to install additional
accessories, the instrument is now ready for use. Once positioned and installed with the necessary
components, the microscope is ready to be used. Your microscope is a laboratory instrument designed to last. Handle it always carefully and avoid abrupt vibrations or shocks. Always disconnect the
power cable from the microscope when not in use for long time, while you clean it or when you perform
any maintenance.
AVOID DISASSEMBLING THE INSTRUMENT
Do not disassemble the instrument. This entails the cancellation of the warranty and may cause
malfunction
• Microscope body with triple revolver (4,10,40x already mounted), monocular head with
digital output and mains cable already mounted
• CD OPMIAS
• USB software protection key
• USB cable
• Small screwdriver
• Wrench for regulation of focus tension
4.1 The microscope is housed in a moulded Styrofoam container. Remove the tape from the edge of the
container and lift the top half of the container. Take some care to avoid that the optical items (objectives and eyepieces) fall out and get damaged. Lift the microscope from the container and put it on a
stable desk.
4.2 Insert the eyepiece into the eye tube.
3.0 CONTENTS OF THE BOX
4.0 UNPACKING AND ASSEMBLY
Page 7

Page 7
5.0 USING THE MICROSCOPE
5.1 Adjust the observation head
Loosen the lock-screw, turn the observation head to a comfortable position for observation, and then
lock the lock-screw.
5.2 Place the specimen on the stage
Lock the specimen slide on the mechanical stage using the slide clip. Ensure that the specimen is
centred over the stage opening by adjusting the coaxial knobs of the stage.
5.3 Lamp settings
The microscope is fitted with white LED illuminator. Before turning on the light, read the section 7.3
about electrical safety precautions. Insert the plug of the cable into the power socket and turn on the
switch on the back of the main body. Turn the brightness adjustment knob to a brightness suitable for
observation.
5.4 Focus adjustment
Rotate the coarse focusing knob to bring the slide into focus using an objective with a low magnifica-
tion. Adjust the fine focusing knob to get the image sharp and clear. Turn the tension regulation using
the wrench to get a suitable tension for the focus system. When the image is in focus, turn the nosepiece to choose the objective you need.
6.0 USING THE VIDEO CAMERA
6.1 Installing the camera CD with the imaging software and drivers
The microscope is equipped with a digital camera incorporated in the head. To install the camera,
please follow these instructions:
1) Verify that your computer fulfils the system requirements (see Technical Specifications).
2) Insert the OPMIAS CD in your PC.
3) Open the CD and execute the file \opmias en vers 2.0 \ setup.exe.
4) Follow the instructions on the screen.
5) Insert the provided USB cable on the back of the microscope head and plug the other end of the cable
in a USB 2.0 port.
6) The camera will now be automatically identified and Windows hardware installation guide will start
automatically.
7) Repeat this process for the USB Software Dog that protects the software. Thus, plug in the USB Dog
in a free USB port.
8) The USB Dog will be automatically identified.
9) The camera can now be tested. Leave both the camera and the USB Dog connected to the PC (the
CD can be removed at this point) and run the shortcut that has been placed on the desktop.
10) Go to the “Help” menu and click on “Local Register”. “Register success!” will appear on the screen and
the software can now be used completely.
11) Press the video camera icon “Capture” for video capture mode.
12) Read the “Help” inside the software for further instructions.
Page 8

Page 8
7.1 Microscopy environment
This microscope is recommended to be used in a clean, dry and shock free environment with a tem-
perature of 0-40°C and a maximum relative humidity of 85 % (non condensing). Use a dehumidifier if
needed.
7.2 To think about when and after using the microscope
- The microscope should always be kept vertically when moving it and be careful so that no moving
parts, such as the eyepieces, fall out.
- Never mishandle or impose unnecessary force on the microscope.
- Never attempt to service the microscope yourself.
- After use, turn off the light immediately, cover the microscope with the included dust-cover, and keep
it in a dry and clean place.
7.3 Electrical safety precautions
- Before plugging in the power cord with the supply, make sure that the supplying voltage of your region matches with the operation voltage of the equipment and that the lamp switch is in off-position.
- Do not turn the power on and off, off and on immediately as this will shorten the life span of the bulb
and may cause damage to the electrical system.
- Users should observe all safety regulations of the region. The equipment has acquired the CE safety
label. However, users do have full responsibility to use this equipment safely.
7.4 Cleaning the optics
- If the optical parts need to be cleaned try first to: use compressed air.
- If that is not sufficient: use a soft lint-free piece of cloth with water and a mild detergent.
- And as a final option: use the piece of cloth moistened with a 3:7 mixture of ethanol and ether.
Note: ethanol and ether are highly flammable liquids. Do not use them near a heat source, near
sparks or near electric equipment. Use these chemicals in a well ventilated room.
- Remember to never wipe the surface of any optical items with your hands. Fingerprints can damage
the optics.
- Do not disassemble objectives or eyepieces in attempt to clean them.
7.5 If you need to send the microscope to Optika for maintenance, please use the original packaging.
7.0 MAINTENANCE
Page 9

Page 9
Head: Digital, monocular, 360° rotating, 45° inclined
Eyepieces: Wf10x/16mm
Nosepiece: Triple, reversed
Objectives: Achromatic 4x, 10x, 40x
Working stage: Rotating round stage, diameter: 90 mm, moving range 5 mm,
slide clips
Focusing system: Coarse and fine with different axis, with focus tension adjustment
Illumination: White led, non-rechargeable, with brightness control
Mains power: 4,8V DC
RESOLUTION: 640 x 480 pixels (480 kilo pixels)
Sensor: ¼”CMOS
Sensor imaging area: 4.12 mm x 3.07 mm
Data output:
(uncompressed video)
8 bit
Pixel size: 7.9 mm x 7.9 mm
Resolution & frame rate: 640 x 480
25 frames/second
Sensitivity: 2.3 V/Lux-sec
(550 nm)
Electronic shutter: 1/16-1/1600
White balance: Auto / Manual
S/n ratio: ≥52 dB
Dynamic range: ≥60 dB
Digital port: USB1.1 or USB2.0
Imaging software: OPMIAS (OPTIKA Micro Image Analysis Software), available in English
and Italian
System requirements: RAM: 256 MB (512 MB recommended)
Video card: Separate card (64 MB or higher)
Operating system: Windows XP, Windows Vista and Windows Seven 32
and 64bit.
8.1 Microscope
8.2 Video camera
8.0 TECHNICAL SPECIFICATIONS
Page 10
Page 10
9.0 RECOVERY AND RECYCLING
Art.13 Dlsg 25 july 2005 N°151. “According to directives 2002/95/EC, 2002/96/EC and 2003/108/EC relating
to the reduction in the use of hazardous substances in electrical and electronic equipment and waste disposal.”
The basket symbol on equipment or on its box indicates that the product at the end of its useful life should be
collected separately from other waste.
The separate collection of this equipment at the end of its lifetime is organized and managed by
the producer. The user will have to contact the manufacturer and follow the rules that he adopted for end-of-life equipment collection. The collection of the equipment for recycling, treatment
and environmentally compatible disposal, helps to prevent possible adverse effects on the environment and health and promotes reuse and/or recycling of materials of the equipment. Improper disposal of the product involves the application of administrative penalties as provided by the laws in force.
Page 11

Page 12

Pagina 12
INDICE
1.0 DESCRIZIONE pag. 14
2.0 INTRODUZIONE pag. 16
3.0 CONTENUTO pag. 16
4.0 DISIMBALLAGGIO E MONTAGGIO pag. 16
5.0 UTILIZZO DEL MICROSCOPIO pag. 17
6.0 UTILIZZO DELLA VIDEOCAMERA pag. 17
7.0 MANUTENZIONE pag. 18
8.0 SPECIFICHE TECNICHE pag. 19
9.0 MISURE ECOLOGICHE pag. 20
Page 13

Pagina 13
Il presente microscopio è uno strumento scientifico di precisione studiato per durare molti anni con una manutenzione minima, essendo costruito secondo i migliori standard ottici e meccanici e progettato per un utilizzo
quotidiano.
Optika ricorda che il presente manuale contiene informazioni importanti per un uso sicuro e una corretta manutenzione dello strumento. Esso deve quindi essere accessibile a chiunque lo utilizzi.
Optika declina ogni responsabilità derivante da un uso improprio dei suoi strumenti non indicato dalla presente guida.
Avvertenze di sicurezza
Questo manuale contiene importanti informazioni e avvertenze riguardanti la sicurezza riguardo l’installazione, l’utilizzo e la manutenzione del microscopio. Si raccomanda di leggere attentamente il
manuale prima di qualsiasi utilizzo dello strumento. Per assicurare un utilizzo sicuro l’utente deve
leggere e seguire tutte le istruzioni poste nel presente manuale.
I prodotti OPTIKA sono studiati per un utilizzo sicuro in condizioni operative normali. Lo strumento e
gli accessori descritti nel manuale sono realizzati e testati secondo standard industriali di sicurezza
per strumentazione da laboratorio.
L’utilizzo non corretto può causare lesioni alla persona o danni allo strumento.
Mantenere questo manuale a portata di mano vicino allo strumento, per una facile consultazione.
Precauzioni di sicurezza elettrica
Prima di collegare il cavo di alimentazione alla presa di rete, assicurarsi che la tensione di rete della
vostra regione corrisponda alla tensione di alimentazione dello strumento, e che l’interruttore dell’illuminatore sia in posizione spenta.
L’utente deve osservare la regolamentazione riguardante la sicurezza in vigore nel proprio Stato. Lo
strumento è dotato di marcatura di sicurezza CE, in ogni caso l’utente ha piena responsabilità riguardo all’utilizzo sicuro dello strumento stesso.
Simboli di avvertenza/pericolo usati nel manuale
L’utente deve essere a conoscenza degli aspetti legati alla sicurezza nel momento in cui utilizza lo
strumento. I simboli di avvertenza o pericolo sono indicati sotto. Tali simboli sono utilizzati in questo
manuale di istruzioni.
Seguire le istruzioni contrassegnate da questo simbolo per evitare possibili gravi danni alle persone.
Avvertimento di utilizzo; la non corretta operazione sullo strumento può causare
danni alla persona o allo strumento.
Possibilità di shock elettrico.
Attenzione: superfici ad elevata temperatura. Evitare il contatto diretto.
Note tecniche o consigli di utilizzo.
INDICAZIONI PER LA SICUREZZA
Page 14

Pagina 14
1.0 DESCRIZIONE
OCULARE
TESTATA D’OSSERVAZIONE CON
VIDEO CAMERA INTEGRATA
REVOLVER
STATIVO
REGOLAZIONE DELLA
TENSIONE
MANOPOLA DI
MESSA A FUOCO
MANOPOLA DI
MESSA A FUOCO
MICROMETRICA
PIANO PORTAPREPARATI
MOBILE
PINZA DEL
VETRINO
OBIETTIVO
DM-5UP: VISTA FRONTALE
Page 15

Pagina 15
1.0 DESCRIZIONE
DM-5UP: RETRO
PORTA USB E ALIMENTAZIONE
ESTERNA
MANIGLIA
INTERRUTTORE
MANOPOLA DI REGOLAZIONE
DELLA LUMINOSITÀ
ILLUMINATORE
LED
VITE DI FISSAGGIO
TRASFORMATORE
DA 4,8V DC
Page 16

Pagina 16
2.0 INTRODUZIONE
Il presente microscopio è uno strumento scientifico di precisione studiato per durare a lungo con una manutenzione minima, essendo costruito secondo i migliori standard ottici e meccanici e progettato per un utilizzo
quotidiano.
Optika ricorda che il presente manuale contiene informazioni importanti per un utilizzo sicuro ed una corretta
manutenzione dello strumento; deve quindi essere accessibile a chiunque lo utilizzi.
Optika declina ogni responsabilità derivante da un uso improprio dei suoi strumenti, non indicato dalla presente guida.
Connettere il cavo di alimentazione nella presa posta nella base dello stativo.
Assicurarsi, prima dell’accensione, che il selettore del voltaggio sia impostato sulla tensione di rete
della vostra regione.
Il cavo di alimentazione deve essere utilizzato solo su prese di rete dotate di adeguata messa a ter-
ra.
Contattare un vostro tecnico per assicurarsi sullo stato dell’impianto elettrico. Se non vi è necessità di
installare altri accessori, lo strumento è ora pronto per l’utilizzo. Una volta posizionato e installato con
i necessari componenti, il microscopio è pronto per l’utilizzo. Il vostro microscopio è uno strumento da
laboratorio progettato per durare a lungo. Maneggiatelo sempre con cura ed abitate brusche vibrazioni o colpi.Scollegare sempre il cavo di alimentazione dal microscopio quando non viene utilizzato per
lunghi tempi, mentre lo si pulisce o quando si esegue una qualsiasi manutenzione.
EVITARE DI SMONTARE LO STRUMENTO
Non disassemblare lo strumento. Questo comporta l’annullamento della garanzia e potrebbe causare
malfunzionamenti.
• Stativo del microscopio con revolver quadruplo (4x, 10x, 40x, 100x),
testa monoculare con uscita digitale e cavi principali già montati.
• CD OPMIAS
• Chiave USB di protezione del software
• Cavetto USB
• Cacciavite piccolo
• Manopola per la regolazione della tensione della messa a fuoco
4.1 Il microscopio si trova in un imballaggio di polistirolo espanso stampato. Dopo aver tolto il nastro ade-
sivo da tutti gli imballi, sollevare la metà superiore dell’imballaggio. Fare attenzione a non far cadere
o danneggiare le componenti ottiche (obiettivi ed oculari). Estrarre il microscopio dal suo imballaggio
ed appoggiarlo su di un piano stabile.
4.2 Inserire gli oculari nei tubi porta-oculari.
3.0 CONTENUTO
4.0 DISIMBALLAGGIO E MONTAGGIO
Page 17

Pagina 17
5.0 UTILIZZO DEL MICROSCOPIO
5.1 Regolazione della testata di osservazione
Allentare la vite di serraggio, ruotare la testata fino a trovare una posizione comoda per l’osservazione
e quindi avvitarla nuovamente.
5.2 Posizionamento del vetrino sul tavolo portapreparati
Fissare il vetrino con preparato al piano meccanico mediante l’apposita pinzetta per il sostegno dei
campioni. Regolando le manopole coassiali del piano portaoggetti, assicurarsi che il vetrino si trovi al
centro del campo di osservazione.
5.3 Impostazioni della lampada
Il microscopio è dotato di un illuminatore bianco LED. Prima di accendere la lampada, leggere attenta-
mente la sezione 7.3 riguardo alle precauzioni per un utilizzo sicuro. Inserire lo spinotto del cavo nella
presa di alimentazione e premere il pulsante di accensione posto sulla parte posteriore dello stativo.
Ruotando la manopola di regolazione della luminosità, cercare la luce ideale per l’osservazione.
5.4 Regolazione della messa a fuoco
Ruotare la manopola di messa a fuoco macrometrica per focalizzare il vetrino con un obiettivo con
basso potere di ingrandimento. Regolare la manopola di regolazione diottrica micrometrica fino ad
ottenere un’immagine chiara e definita. Ruotare la manopola di regolazione della tensione fino ad
ottenere la tensione ideale per il sistema di messa a fuoco. Quando l’immagine appare a fuoco, scegliere l’obiettivo necessario con l’apposito revolver.
6.0 UTILIZZO DELLA VIDEOCAMERA
6.1 Il microscopio è dotato di una videocamera digitale incorporata nella testata.
Per installare la videocamera seguire le seguenti istruzioni:
1) Verificare che i requisiti di sistema siano idonei (vedere la sezione Specifiche tecniche).
2) Inserire il CD OPMIAS nel computer.
3) Aprire la cartella dal CD ed eseguire il file \opmias it 2.0\ setup.exe
4) Seguire le istruzioni che compaiono sullo schermo.
5) Inserire il cavetto USB fornito sul retro della testata del microscopio e connettere l’altro capo con la
porta USB 2.0.
6) La videocamera sarà riconosciuta e l’installazione guidata di Windows si avvierà automaticamente.
7) Ripetere l’operazione per la chiave USB che protegge il software. A questo punto inserire la chiavetta
USB in una porta USB libera.
8) Windows riconoscerà la chiave USB automaticamente.
9) Ora è possibile utilizzare la videocamera. Lasciare sia la videocamera che la chiave USB connesse
al computer (è possibile estrarre il CD). Cliccare sulla rispettiva icona posizionata sul desktop per
avviare OPMIAS.
10) Dal menù “Assistenza” cliccare “Registro locale”. Lo schermo visualizzerà il messaggio “Registrazione effettuata con successo”. E’ ora possibile usare il programma OPMIAS.
11) Cliccare sull’icona “Cattura” video per i singoli fotogrammi in modalità video.
12) Per ulteriori informazioni leggere la guida “Assistenza” che si trova all’interno del software.
Page 18

Pagina 18
7.0 MANUTENZIONE
7.1 Ambiente di lavoro
Si consiglia di utilizzare il microscopio in un ambiente pulito e secco, dove non ci siano urti, ad una
temperatura fra 0°C e 40°C e con un’umidità relativa massima dell’85% (in assenza di condensazione). Si consiglia l’uso di un deumidificatore se necessario.
7.2 Da ricordare prima e dopo l’utilizzo del microscopio
•Tenere il microscopio sempre in posizione verticale quando lo si sposta. Assicurarsi inoltre che le
parti mobili, ad esempio gli oculari, non cadano.
• Maneggiare sempre con cura e non adoperare inutilmente forza sul microscopio.
• Non cercare di provvedere da soli alla riparazione.
• Dopo l’uso spegnere immediatamente la lampada, coprire il microscopio con l’apposita custodia
antipolvere in dotazione e tenerlo in un luogo asciutto e pulito.
7.3 Precauzioni per un uso sicuro
• Prima di collegare il cavo di alimentazione alla rete elettrica assicurarsi che il voltaggio locale sia
idoneo a quello dell’apparecchio e che l’interruttore della lampada sia posizionato su off.
• Non accendere e spegnere l’interruttore ripetutamente a brevissima distanza. Questo riduce sensibilmente la durata della lampadina e potrebbe causare danni al sistema elettrico.
• Attenersi a tutte le precauzioni di sicurezza della zona. L’apparecchio è omologato secondo le norme
di sicurezza CE. Gli utenti hanno comunque piena responsabilità durante l’utilizzo del microscopio.
7.4 Pulizia delle ottiche
• Qualora le ottiche necessitino di essere pulite, utilizzare prima di tutto aria compressa.
• Se questo non fosse sufficiente usare un panno non sfilacciato, inumidito con acqua e un detergente delicato.
• Come ultima opzione è possibile usare un panno inumidito con una soluzione 3:7 di alcol etilico ed
etere. Attenzione: l’alcol etilico e l’etanolo sono sostanze altamente infiammabili. Non usarle vicino
ad una fonte di calore, a scintille o presso apparecchiature elettriche. Le sostanze chimiche devono
essere adoperate in un luogo ben ventilato.
• Non strofinare la superficie di nessun componente ottico con le mani. Le impronte digitali possono
danneggiare le ottiche.
• Non smontare gli obiettivi o gli oculari per cercare di pulirli.
7.5 Si prega di utilizzare l’imballaggio originale nel caso in cui fosse necessario rispedire il microscopio
ad Optika per la manutenzione.
Page 19

Pagina 19
Testata: Digitale, monoculare, rotazione a 360°, inclinazione di 45°
Oculare: WF10X/16mm
Revolver: Triplo, invertito
Obiettivi: Acromatici 4x, 10x, 40x
Piano di lavoro: Girevole, diametro: 90 mm; movimento xy: 5 mm; pinzette portavetrini
Sistema di messa a fuoco: macro e micro metrico coassiale con regolazione di tensione.
Illuminazione: LED bianco, non ricaricabile con controllo luminosità.
Alimentazione di rete: 4,8V DC
RISOLUZIONE: 640 × 480 pixel (480 kilo pixel)
Sensore: ¼”CMOS
Sensore area immagine: 4.12 mm x 3.07 mm
Dati in uscita: (video non
compresso)
8 bit
Dimensioni pixel: 7.9 mm x 7.9 mm
Risoluzione e frequenza dei
fotogrammi:
800 x 600
25 fot. al secondo
Sensibilità: 2.3 V/Lux-sec
(550 nm)
Chiusura elettronica: 1/16-1/1600
Bilanciamento del bianco: Auto / Manual
Rapporto segnale/rumore ≥52 dB
Range dinamico: ≥60 dB
Porta digitale: USB1.1 or USB2.0
Software di modifica immagini:
OPMIAS (OPTIKA Micro Image Analysis Software), disponibile in inglese
ed italiano.
Requisiti di sistema: RAM: 256 MB (512 MB consigliato)
Scheda video: scheda separata (64MB o maggiore)
Sistema operativo: Windows XP, Windows Vista, Windows Seven 32 e
64bit
8.1 Microscopio
8.2 Videocamera
8.0 SPECIFICHE TECNICHE
Page 20

Pagina 20
9.0 MISURE ECOLOGICHE
Ai sensi dell’articolo 13 del decreto legislativo 25 luglio 2005 n°151. “Attuazione delle direttive 2002/95/CE,
2002/96/CE e 2003/108/CE, relative alla riduzione dell’uso di sostanze pericolose nelle apparecchiature elettriche ed elettroniche, nonché allo smaltimento dei rifiuti”.
Il simbolo del cassonetto riportato sulla apparecchiatura o sulla sua confezione indica che il prodotto alla
fine della propria vita utile deve essere raccolto separatamente degli altri rifiuti. La raccolta differenziata della
presente apparecchiatura giunta a fine vita è organizzata e gestita dal produttore.
L’utente che vorrà disfarsi della presente apparecchiatura dovrà quindi contattare il produttore e seguire il
sistema che questo ha adottato per consentire la raccolta separata dell’apparecchiatura giunta a fine vita.
L’adeguata raccolta differenziata per l’avvio successivo della apparecchiatura dismessa al riciclaggio, al trattamento e allo smaltimento ambientalmente compatibile contribuisce ad evitare possibili effetti negativi sull’ambiente e sulla salute e favorisce il reimpiego e/o riciclo dei materiali di cui è composta l’apparecchiatura.
Lo smaltimento abusivo del prodotto da parte del detentore comporta l’applicazione delle sanzioni amministrative previste dalla normativa vigente.
Page 21

Page 22

Página 22
INDICE
1.0 DESCRIPCIÓN pag. 24
2.0 INTRODUCCIÓN pag. 26
3.0 CONTENIDO pag. 26
4.0 DESEMBALAJE Y MONTAJE DEL MICROSCOPIO pag. 26
5.0 UTILIZACIÓN DEL MICROSCOPIO pag. 27
6.0 UTILIZACIÓN DE LA VIDEOCÁMARA pag. 27
7.0 MANTENIMIENTO pag. 28
8.0 ESPECIFICACIONES TECNICAS pag. 29
9.0 MEDIDAS ECOLÓGICAS pag. 30
Page 23

Página 23
El presente microscopio es un instrumento científico de precisión proyectado para durar muchos años con
un mínimo nivel de mantenimiento. Para su construcción se han utilizado elementos ópticos y mecánicos
de elevada calidad que lo convierten en el instrumento ideal para ser utilizado a diario en las aulas y en el
laboratorio.
Optika avisa que esta guía contiene importante información sobre la seguridad y el mantenimiento del producto y por lo tanto debe ser accesible a todos aquellos que utilizan dicho instrumento.
Optika declina cualquier responsabilidad derivada de un uso inapropiado del presente instrumento no contemplado en la presente guía.
Advertencias de seguridad
Este manual incluye importante información y normas sobre la seguridad de instalación, utilización y
mantenimiento del microscopio. Se ruega leer atentamente el manual antes de utilizar el instrumento. Para una utilización segura, el usuario debe leer y seguir atentamente todas la instrucciones del
manual.
Los productos OPTIKA han sido diseñados para ser utilizados en condiciones normales de trabajo. El
instrumento y los accesorios descritos en el manual han sido realizados y testados según las normas
industriales de seguridad para instrumentación de laboratorio.
Una utilización inadecuada podría dañar el instrumento o provocar lesiones al usuario.
Mantener el presente manual cerca del instrumento para facilitar su consulta.
Normas de seguridad sobre el sistema eléctrico
Antes de conectar el microscopio a la toma de corriente, asegurarse que la tensión de entrada del
lugar donde se usa coincide con la tensión de utilización del microscopio y que el interruptor del iluminador esté en la posición off.
El usuario debe consultar las normas de seguridad de su país. El instrumento incluye
una etiqueta de seguridad CE. No obstante estas pautas, el usuario debería utilizar el microscopio en
función de sus necesidades pero con un mínimo de responsabilidad y seguridad.
Símbolos de advertencia/peligro utilizados en el presente manual
El usuario debe conocer las indicaciones relacionadas con la seguridad cuando utiliza el microscopio.
A continuación se indican los símbolos de advertencia o peligro. Dichos símbolos se han utilizado en
este manual de instrucciones.
Seguir las instrucciones indicadas para evitar posibles daños severos al
usuario.
Advertencia de utilización; la utilización inadecuada del instrumento podría
dañar el instrumento o provocar daños al usuario.
Posibilidad de descarga eléctrica.
Atención: superficie de elevada temperatura. Evitar el contacto directo.
Notas técnicas o consejos de utilización.
NORMAS DE SEGURIDAD
Page 24

Página 24
1.0 DESCRIPCIÓN
OCULAR
CABEZAL DE OBSERVACIÓN CON VIDEO
CÁMARA INTEGRADA
REVOLVER
SOPORTE
REGULACIÓN DE LA
TENSIÓN
MANDO DEL ENFOQUE
MACROMÉTRICO
MANDO DEL
ENFOQUE
MICROMÉTRICO
PLATINA PORTAPREPARADOS
PINZAS DE SUJECIÓN
DE MUESTRAS
OBJETIVO
VISTA ANTERIOR
Page 25

Página 25
1.0 DESCRIPCIÓN
VISTA POSTERIOR
PUERTO USB Y ALIMENTACIÓN
EXTERNA
MANGO
INTERRUPTOR ON/OFF
TORNILLO DE FIJACIÓN
ILUMINADOR LED
MANDO DE REGULACIÓN DE
LA LUMINOSIDAD
TRANSFORMADOR
DE 4,8V DC
Page 26

Página 26
2.0 INTRODUCCIÓN
El presente microscopio es un instrumento científico de precisión creado para durar muchos años con un
nivel mínimo de mantenimiento.
Para su construcción se han utilizado elementos ópticos y mecánicos de elevada calidad que lo convierten
en el instrumento ideal para la utilización diaria.
Optika avisa que esta guía contiene importante información sobre la seguridad y el mantenimiento del producto y por lo tanto debe ser accesible a todos aquellos que utilizan dicho instrumento.
Optika declina cualquier responsabilidad derivada del uso inapropiado del presente instrumento no contemplado en la presente guía.
Introducir el cable de alimentación en la toma situada en la base del microscopio.
Antes de encender el microscopio, asegurarse que el selector del voltaje se sitúe en la tensión de red
correspondiente a su país.
El cable de alimentación se debe utilizar solamente en tomas eléctricas con toma a tierra. Consultar
un técnico para asegurarse del estado de la red eléctrica. Después de haber situado e instalado el
microscopio con los componentes necesarios, estará listo para su utilización. El microscopio es un
instrumento de laboratorio proyectado para durar mucho tiempo. Manejarlo siempre con mucha precaución, evitando las vibraciones bruscas y los golpes. Desconectar siempre el cable de alimentación
del microscopio cuando no se utiliza durante un largo periodo de tiempo, mientras se limpia o cuando
se realiza cualquier trabajo de mantenimiento.
NO DESMONTAR EL MICROSCOPIO
No desmontar el microscopio para evitar anular la garantía y provocar el funcionamiento incorrecto
• Soporte del microscopio con revolver cuádruple (4x, 10x, 40x, 100x),
cabezal monocular con conexión USB y cables principales ya montados.
• CD OPMIAS
• Llave USB con el software de protección
• Cable USB
• Destornillador pequeño
• Mando de regulación de la tensión del enfoque
4.1 El microscopio se entrega con un embalaje de poliestireno. Después de haber extraído la cinta adhesiva del embalaje, elevar la parte superior del embalaje. Prestar atención para evitar que los componentes ópticos (objetivos y oculares) se caigan o se dañen. Extraer el microscopio de su embalaje y
apoyarlo sobre un superficie estable.
4.2 Introducir los oculares en los tubos portaoculares.
3.0 CONTENIDO
4.0 DESEMBALAJE Y MONTAJE DEL MICROSCOPIO
Page 27

Página 27
5.0 UTILIZACION DEL MICROSCOPIO
5.1 Regulación del cabezal de observación
Aflojar los tornillos de ajuste, girar el cabezal hasta obtener una posición cómoda para la observación
y fijar de nuevo los tornillos.
5.2 Colocación de la muestra en la platina portapreparados
Fijar la muestra en la platina utilizando las correspondientes pinzas de sujeción de muestras. Regu-
lando los mandos coaxiales de la platina portapreparados, asegurarse que la muestra se sitúe en el
centro del campo de observación.
5.3 Selección de la luz
El microscopio incluye un iluminador LED blanco. Antes de encender la lámpara, leer atentamente
el capítulo 7.3 sobre las precauciones para una utilización segura. Introducir el enchufe en la toma
de alimentación y pulsar el interruptor de puesta en marcha situado en la parte posterior del soporte.
Girando el mando de regulación de la luminosidad, buscar la luz ideal para la observación.
5.4 Regulación del enfoque
Girar el mando de enfoque macrométrico para enfocar el preparado con un objetivo de bajo poder
de aumentos. Regular el mando de enfoque micrométrico para obtener una imagen clara y definida.
Girar el mando de regulación de la tensión hasta encontrar la tensión adaptada al enfoque. Cuando
la imagen esté enfocada, seleccionar el objetivo deseado en el revólver portaobjetivos.
6.1 El microscopio incluye una videocámara digital incorporada en el cabezal.
Para instalar la videocámara seguir las siguientes instrucciones:
1) Verificar que los requisitos del sistema sean los idóneos (ver capítulo especificaciones
técnicas).
2) Introducir el CD OPMIAS en el ordenador.
3) Abrir la carpeta del CD y ejecutar el archivo \ opmias it 2.0 \ setup.exe
4) Seguir las instrucciones que aparecerán sobre la pantalla.
5) Introducir el cable USB suministrado en su correspondiente espacio situado en la parte posterior del
cabezal del microscopio y conectar el otro extremo al puerto USB 2.0.
6) La videocámara será reconocida y la instalación guiada de Windows se pondrá en marcha automáticamente.
7) Repetir la operación con la llave USB que protege el software. Introducir la llave USB en un puerto
USB libre.
8) Windows reconocerá la llave USB y la instalación guiada se pondrá en marcha automáticamente.
Seguir las instrucciones que aparecerán en la pantalla. Los drivers se instalarán automáticamente.
9) Ahora es posible utilizar la videocámara. Dejar la videocámara y la llave USB conectada al ordenador
(es posible extraer el CD).
10) Windows reconocerá la llave USB automáticamente.
11) Pulsar el icono “Cattura video” para capturar los fotogramas en modo video.
12) Para mayor información leer la guía “Assistenza” situada en el interior del software.
6.0 UTILIZACIÓN DE LA VIDEOCÁMARA
Page 28

Página 28
7.1 Ambiente de trabajo
Se aconseja utilizar el microscopio en un ambiente limpio y seco, protegido de impactos, a una tem-
peratura comprendida entre 0°C y 40°C y con una humedad relativa máxima de 85% (en ausencia de
condensación). Se aconseja el uso de un deshumidificador si fuera necesario.
7.2 Recordar antes y después de la utilización del microscopio
• Mantener el microscopio siempre en posición vertical cuando se desplaza. Asegurarse que las piezas móviles (oculares) no se caigan.
• Manejar con cuidado el microscopio evitando usar una fuerza mayor de la necesaria.
• No reparar el microscopio por su cuenta.
• Después de haber utilizado el microscopio, cubrirlo con su correspondiente funda antipolvo y mantenerlo en un ambiente limpio y seco.
7.3 Precauciones para un uso seguro
• Antes de conectar el cable de alimentación a la red eléctrica asegurarse que el voltaje sea compatible con el del aparato y que el interruptor de la lámpara esté situado en la posición off.
• No encender ni apagar el interruptor repetidamente en breve distancia de tiempo. Podría reducirse
sensiblemente la duración de la lámpara y puede provocar daños al sistema eléctrico.
• Respetar todas las precauciones de seguridad de la zona. El aparato está homologado según las
normas de seguridad CE. Los usuarios poseen toda la responsabilidad durante la utilización del microscopio.
7.4 Limpieza de las ópticas
• Si se desean limpiar las ópticas, utilizar en primer lugar aire comprimido.
• Si no es suficiente, usar un paño que no este deshilachado, humedecido con agua y un detergente
delicado.
• Como última opción es posible usar un paño humedecido con una solución 3:7 de alcohol etílico y
éter. Atención: el alcohol etílico y el etanol son sustancias altamente inflamables. No utilizarlas cerca
de fuentes de calor, chispas o aparatos eléctricos. Las sustancias químicas se deben usar en ambientes aireados.
• No frotar la superficie de ningún componente óptico con las manos. Las huellas digitales pueden
perjudicar las ópticas.
• No desmontar los objetivos o los oculares para intentar limpiarlos.
7.5 Se ruega utilizar el embalaje original si fuera necesario enviar el microscopio a la empresa Optika
para el mantenimiento.
7.0 MANTENIMIENTO
Page 29

Página 29
Cabezal: Digital, monocular, giratorio 360°, inclinación 45°
Ocular: Wf10x/16mm
Revólver: Triple, invertido
Objetivos: Acromáticos 4x, 10x, 40x
Platina: Rotating round stage, diameter: 90 mm, moving range 5 mm,
slide clips
Sistema de enfoque: Macro y micrométrico coaxial con regulación de la tensión.
Iluminación: Led blanco, non recargable con regulación de la luminosidad.
Alimentación: 4,8V DC
Resolución: 640 x 480 pixels (480 kilo pixel)
Sensor: ¼”CMOS
Sensor área imagen: 4.12 mm x 3.07 mm
Datos en salida:
(video no incluido)
8 bit
Dimensiones pixel: 7.9 mm x 7.9 mm
Resolución y frecuencia de
los fotogramas:
640 x 480
25 fot. al segundo
Sensibilidad: 2.3 V/Lux-segundo
(550 nm)
Cierre electrónico: 1/16-1/1600
Balance de blancos: Automático / Manual
Relación señal/ruidos: ≥52 dB
Rango dinámico: ≥60 dB
Tipo de conexión: USB1.1 or USB2.0
Software de modificación
de imágenes:
OPMIAS (OPTIKA Micro Image Analysis Software), disponible en ingles
e italiano.
Requisitos del sistema: RAM: 256 MB (se aconseja 512 MB)
Tarjeta gráfica: tarjeta separada (64MB o superior)
Sistema operativo: Windows XP, Windows Vista, Windows Seven 32 y
64bit
8.1 Microscopio
8.2 Videocámara
8.0 ESPECIFICACIONES TÉCNICAS
Page 30

Página 30
9.0 MEDIDAS ECOLÓGICAS
En conformidad con el Art. 13 del D.L. de 25 julio 2005 n°151.Actuación de las Directivas 2002/95/CE,
2002/96/CE y 2003/108/CE, relativas a la reducción del uso de sustancias peligrosas en la instrumentación
eléctrica y electrónica y a la eliminación de residuos.
El símbolo del contenedor que se muestra en la instrumentación o en su embalaje indica que el producto
cuando alcanzará el final de su vida útil se deberá recoger de forma separada del resto de residuos. La
gestión de la recogida selectiva de la presente instrumentación será llevada a cabo por el fabricante.Por lo
tanto, el usuario que desee eliminar la presente instrumentación tendrá que ponerse en contacto con el fabricante y seguir el sistema que éste ha adoptado para permitir la recogida selectiva de la instrumentación.
La correcta recogida selectiva de la instrumentación para su posterior reciclaje, tratamiento y eliminación
compatible con el ambiente contribuye a evitar posibles efectos negativos al ambiente y a la salud y favorece
su reutilización y/o reciclado de los componentes de la instrumentación.
La eliminación del producto de forma abusiva por parte del usuario implicaría la aplicación de las sanciones
administrativas previstas en la normativa vigente.
Page 31

Page 31
SOMMAIRE
1.0 DESCRIPTION pag. 33
2.0 INTRODUCTION pag. 35
3.0 CONTENU pag. 35
4.0 DÉBALLAGE ET MONTAGE DU MICROSCOPE pag. 35
5.0 UTILISATION DU MICROSCOPES pag. 36
6.0 UTILISATION DE LA CAMÉRA VIDÉO pag. 36
7.0 ENTRETIEN pag. 37
8.0 DESCRIPTION TECHNIQUE pag. 38
9.0 NORMES ÉCOLOGIQUES pag. 39
Page 32

Page 32
Ce microscope est un appareil scientifique de précision pensé pour durer de nombreuses années avec un entretient minimum. Pour son élaboration il a été utilisé des éléments optiques et mécaniques de grande qui le
convertisse en un appareil idéal pour une utilisation journalière dans les salles de classes et les laboratoires.
Optika informe que ce manuel contient d’importantes informations concernant la sécurité et l’entretient de ce
produit et par conséquent il doit être accessible à toutes personnes susceptibles d’utiliser cet appareil.
Optika décline toute responsabilité dérivant d’une utilisation inappropriée de cet appareil non contemplée
dans ce mode d’emploi.
Sécurité
Ce manuel contient d’importantes infomations concernant les normes de sécurité à suivre durant
l’installaton, ainsi que sur l’utilisation et l’entretien du microscope. Si raccomanda di leggere attentamente il manuale prima di qualsiasi utilizzo dello strumento. Il est donc important de lire ce manuel et
de suivre les normes de sécurité.
Les produits OPTIKA peuvent être utilisés en toute sécurité dans des conditions de travail normales.
L’instrument et les accéssoires décrits dans ce manuel ont été realisés et testés selon des standard
industriels de sécurité pour l’instrumentation scientifique.
Une utilisation inapropriée risquerait de provoquer des blessures à l’utilisateur et au microscope.
Garder ce manuel à portée de main durnat l’utilisation du microscope.
Précautions de sécurité électrique
Avant de brancher le cable d’alimentation à la prise, s’assurer que la tension dans votre région corresponde à la tension de l’instrument et que l’interrupteur de l’éclairage soit éteint.
L’utilisateur se doit de suivre les normes de sécurité de son propre pays.
L’instrument a un marquage de sécurité CE, l’utilisateur est responsable de l’utilisation appropriée de
l’instrument.
Symboles d’avertissement / risque utilisés dans le manuel
Avant d’utiliser l’instrument, l’utilisateur doit connaitre toutes les précautions liées à la sécurité.
Les symboles d’avertissement ou de danger sont indiqués ci-dessous.
Suivez les instructions marquées de ce symbole afin d’éviter d’éventuelles blessures.
Avvertissement concernant l’utilisation; l’utilisation inapproprièe du microscope
riquerait de provoquer des blessures à l’utilisateur et d’abimer l’instrument.
Risque de choc életrique.
Attention: surfaces à haute température. Eviter le contact direct.
Notes techniques et conseils pour l’utilisation.
PRÉCAUTIONS DE SÉCURITÉ
Page 33

Page 33
1.0 DESCRIPTION
OCULAIRE
TÊTE D’OBSERVATION AVEC
CAMÉRA VIDÉO INTEGRÉE
REVOLVER
STATIF
RÉGLAGE DE LA
TENSION
COMMANDE DE MISE
AU POINT
MACROMÉTRIQUE
COMMANDE DE MISE
AU POINT
MICROMÉTRIQUE
PLATINE MOBILE
PINCE DE MAINTIEN DE
LA PRÉPARATION
OBJECTIF
VUE DE FACE
Page 34

Page 34
1.0 DESCRIPTION
VUE DE DOS
PORTE USB
POIGNÉE
INTÉRRUPTEUR ON/OFF
VIS DE FIXATION
ECLAIRAGE LED
COMMANDE DE RÉGLAGE DE
L’ÉCLAIRAGE
TRANSFORMATEUR
DE 4,8V DC
Page 35

Page 35
2.0 INTRODUCTION
Ce microscope est un instrument scientifique de précision prévu pour durer longtemps et qui ne requiert pas
trop d’entretien. En effet il a été construit selon les meilleurs critères optiques et mécaniques qui en font un
appareil idéal à utiliser quotidiennement.
Optika informe que ce manuel contient d’importantes informations concernant la sécurité et l’entretien de ce
produit, par conséquent il doit être accessible à toute personne susceptible d’utiliser cet appareil.
Optika décline toute responsabilité dérivant d’une utilisation inappropriée de cet appareil non contemplée
dans ce mode d’emploi.
Avant d’allumer, vérifier que le sélecteur de tension soit régler selon la tension de votre pays.
Le câble d’alimentation doit être utiliser uniquement dans des prises avec mise à la terre appro-
priée.
Contacter votre téchnicien pour vérifier l’état de votre circuit électrique.
Si vous ne devez installer aucun autre accessoire, le microscope est prêt à l’utilisation
Votre microscope est un instrument de laboratoire conçu por durer longtemps. Traitez le avec soin
et évitez de le soumettre à chocs et vibrations. Débranchez toujours le câble d’alimentation quand le
microscope n’est pas utiliser pendant longtemps, lors du nettoyage ou lorsque que vous en effectuez
l’entretien.
NE PAS DEMONTER LINSTRUMENT
Ne pas démonter l’instrument. Ceci annulerait la validité de la garantie et risquerait de provoquer des
dysfonctionnements.
• Statif du microscope avec quadruple révolver (4x, 10x, 40x, 100x),
tête monoculaire avec porte digitale et cables principaux déjà montées.
• CD OPMIAS
• Clé USB de protéction du programme
• Petit tournevis
• Commande de la tension de la mise au point
4.1 Le microscope se trouve dans un moule en polystyrène.
Après avoir ouvert l’emballage, soulever la partie supérieure du moule. Faire attention à ne pas faire
tomber les pièces optiques (objectifs et oculaires). Sortir le microscope de son emballage et l’appuyer
sur une surface stable.
4.2 Enfiler les oculaires dans les tubes porte-oculaires.
3.0 CONTENU
4.0 DÉBALLAGE ET MONTAGE DU MICROSCOPE
Page 36

Page 36
5.0 UTILISATION DU MICROSCOPE
5.1 Réglage de la tête d’observation
Desserer la vis de fermeture, tourner la tête d’observation jusqu’à trouver une position adéquate pour
l’observation et resserer la vis.
5.2 Positionnement de la préparation sur la platine
Fixer la lame de la préparation de la platine à l’aide de la pincette prévue pour soutenir les échantillo-
ns. En réglant les commandes coaxiales de la platine, vérifier que l’échantillon se trouve au centre du
champ visuel.
5.3 Réglage de la lampe
Le microscope est dôté d’un éclairage à LED blanc. Avant d’allumer la lampe lire attentivement les pré-
cautions de la séction 7.3. Enfiler la prise de courant et presser sur l’intérrupteur pour la mise en marche. En tournat la poignée de réglage de l’éclairage, chercher la lumière idéale pour l’observation.
5.4 Réglage de la mise au point
Tourner la poignée de mise au point macrométrique à fien de focaliser la préparation avec un objectif
à faible grossissement. Ajuster la poignée de réglage dioptrique micrométrique jusqu’à obtenir une
immage bien définie. Tourner la poignée de réglage de la tension jusqu’à obtenir la tension idéale
pour le système de mise au point. Quand l’image est au point, choisir l’objectif nécessaire à l’aide du
révolver.
6.0 UTILISATION DE LA CAMÉRA VIDÉO
5.1 Le microscope est dôté d’une caméra vidéo digitale incorporée dans la tête d’observation.
Pour installer la caméra vidéo suivre les instructions suivantes:
1) Verifier que le système soit aproprié (séction Description Technique)
2) Insérer le cd OPMIAS dans l’ordinateur
3) Ouvrez le dossier du CD et exécutez le fichier \opmias it 2.0\setup.exe
4) Suivre les instructions qui s’affichent sur votre écran.
5) Enfiler le cable USB fournit à l’arrière de la tête d’observation du microscope et connecter l’autre extremité à la sortie USB 2.0.
6) La caméra est reconnut et le programme d’installation guidée de Windows démarre automatiquement.
7) Répeter l’operation avec la clé USB qui protège le programme et puis l’inserer dans une sortie USB
libre.
8) Windows reconnait la clé USB automatiquement.
9) Il est à présent possible d’utiliser la caméra vidéo. Laisser la caméra et la clé USB enclanchées à l’ordinateur (extraire le cd). Cliquer sur l’icône sur la fenêtre principale pour faire démarrer le programme
OPMIAS.
10) Dans le menu “Help” cliquer sur “Local Register”. Le message “Register success!” apparaitra sur
l’écran. Il est à présent possible d’utiliser le programme OPMIAS.
11) Cliquez sur “Capture vidéo” pour capturer les images en mode vidéo.
12) Pour d’autres informations lire le guide “Help” du programme.
Page 37

Page 37
7.0 ENTRETIEN
7.1 Lieu de travail
Il est conseiller d’utiliser le microscope dans un environnement propre et sec. Eviter les chocs. Tem-
pérature conseillée entre 0°C et 40°C et teneur maximale d’humidité de 85% (en absence de condensation). Si celà est nécessaire, utiliser un déumidificateur.
7.2 Avant et après l’utilisation du microscope
- Lors des déplacements du microscope, le maintenir toujours en position verticale. S’assurer que les
pièces mobiles, par example les oculaires, ne tombent pas.
- Manipuler soigneusement et ne pas exercer de force inutile sur le microscope
- Evitez d’improviser la réparation soi-même
- Après l’utilisation, éteindre immédiatement la lumière, couvrir avec la housse antipoussière et ranger
dans unlieu sec et propre.
7.3 Normes de sécurité
- Avant de brancher le cable d’alimentation dans la prise de courant, s’assurer que la tension corresponde à celle du microscope et que l’intérrupteur de l’éclairage soit sur la position”off”.
- Eviter d’allumer et d’éteindre continuellemnet le microscope. Celà risquerait de réduire la durée de
fonctionnement de l’ampoule et d’abimer le système électrique
- L’instrument est omologué selon les normes de sécurité CE mais durant l’utilisations les utilisateurs
sont pleinement responsables.
7.4 Nettoyage des pièces optiques
Quand les optiques doivent être nettoyées, utiliser de l’air comprimé.
Si celà n’est pas suffisant utiliser un chiffon doux, imbibé d’eau et d’ub détergent neutre.
Si cela n’est pas encore suffisant, humidifiez un chiffon avec un mélange de 3:7 d’éthanol et d’éther.
Important: L’éthanol et l’éther sont des liquides hautement inflammables. Ils ne doivent en aucun cas
être utilisés près d’une source de chaleur, d’étincelle ou d’appareils électriques. Utiliser dans un environnement bien ventilé.
Ne pas frottez la surfaces des pièces optiques avec les mains. Les empreintes digitales peuvent abi-
mer les optiques
Ne pas démonter les objectifs et les oculaires pour essayer de les nettoyer.
Si il est nécessaire de renvoyer le microscope à OPTIKA pour la réparationou l’entretien, utiliser l’em-
ballage original
7.5 Si il est nécessaire de renvoyer le microscope à OPTIKA pour la réparationou l’entretien, utiliser l’em-
ballage original.
Page 38

Page 38
Tête d’observation: Digitale, monoculaire, rotation à 360°, incliné de 45°
Oculaire: Wf10x/16mm
Révolver: Triple, inversé
Objectifs: Achromatiques 4x, 10x, 40x
Platine: Tournante, diamètre: 90 mm, mouvement xy 5 mm,
pinces de soutien de l’échantillon
Système de mise au point: Macro et micrométrique coaxial avec réglage de la tension
éclairage: Led blanc non rechargeable avec contrôle de la luminosité
Alimentation: 4,8V DC
8.1 Microscope
8.2 Caméra Vidéo
8.0 DESCRIPTION TECHNIQUE
Résolution: 640 × 480 pixel (480 kilo pixel)
Senseur: ¼”CMOS
Senseur d’image: 4.12 mm x 3.07 mm
Données de sortie:
(video non-comprimé)
8 bit
Dimensions pixel: 7.9 mm x 7.9 mm
Résolution et fréquence
des photogrammes:
640 x 480
25 fot. al second
Sensibilité: 2.3 V/Lux-sec
(550 nm)
Fermeture électronique: 1/16-1/1600
Compensation du blanc: Auto / Manuel
Rapport signal/bruit ≥52 dB
Range dynamique: ≥60 dB
Sortie digitale: USB1.1 or USB2.0
Programme de retouche
des images:
OPMIAS (OPTIKA Micro Image Analysis Software), disponible en anglais et en italien.
Critères du système: RAM: 256 MB (512 MB conseilles)
Fiche vidéo: fiche á part (64MB o ou plus)
Système operatif: Windows XP, Windows Vista, Windows Seven 32 or
64bit
Page 39

Page 39
9.0 NORMES ÉCOLOGIQUES
Conformément à l’Article 13 du D.L du 25 Juillet 2005 nº151
Action des Directives 2002/95/CE, 2002/96/CE et 2003/108/CE, relatives à la réduction de l’utilisation de
substances dangereuses dans l’appareil électrique et électronique et à l’élimination des résidus.
Le Symbole du conteneur qui figure sur l’appareil électrique ou sur son emballage indique que le produit
devra être, à la fin de sa vie utile, séparé du reste des résidus. La gestion du ramassage sélectif du présent
instrument sera effectuée par le fabricant. Par conséquent, l’utilisateur qui souhaite éliminer l’appareil devra
se mettre en contact avec le fabricant et suivre le système que celui-ci a adopté pour permettre le ramassage
sélectif de l’appareil. Le ramassage sélectif correct de l’appareil pour son recyclage, traitement et élimination compatible avec l’environnement contribue à éviter d’éventuels effets négatifs sur l’environnement et
la santé et favorise sa réutilisation et/ou recyclage des composants de l’appareil. L’élimination du produit de
manière abusive de la part de l’utilisateur entraînera l’application de sanctions administratives sur la norme
en vigueur.
Page 40

OPTIKA MICROSCOPES - ITALY
www.optikamicroscopes.com - info@optikamicroscopes.com
www.optikamicroscopes.com info@optikamicroscopes.com
OPTIKA S.R.L.
Via Rigla 30, Ponteranica (BG) - ITALY
Tel.: ++39 035 571392 (6 linee) Telefax: ++ 39 035 571435
MAD Iberica Aparatos Cientificos
c/. Puig i Pidemunt, nº 28 1º 2ª - (Pol. Ind. Plà d’en Boet) 08302 MATARO
(Barcelona) España Tel: +34 937.586.245 Fax: +34 937.414.529
Alpha Optika Microscopes Hungary
2030 ÉRD, Kaktusz u. 22.- HUNGARY
Tel.: +36 23 520 077 Fax: +36 23 374 965
 Loading...