

Optika B-290 Operation Manual
OPTIKA MICROSCOPES - ITALY
www.optikamicroscopes.com - info@optikamicroscopes.com
Ver. 1.0.0
B-290
OPERATION MANUAL
GUIDA UTENTE
MANUAL DE INSTRUCCIONES
MANUEL D’INSTRUCTIONS
BEDIENUNGSANLEITUNG

Page 2
INDEX
1.0 DESCRIPTION page 4
2.0 INTRODUCTION page 6
3.0 UNPACKING AND ASSEMBLY page 6
4.0 USING THE MICROSCOPE page 7
5.0 MAINTENANCE page 8
6.0 TECHNICAL SPECIFICATIONS page 9
7.0 RECOVERY AND RECYCLING page 9
Page 3
This microscope is a scientic precision instrument designed to last for many years with a minimum of maintenance. It is built to high optical and mechanical standards and to withstand daily use.
Optika reminds you that this manual contains important information on safety and maintenance, and that it
must therefore be made accessible to the instrument users.
Optika declines any responsibility deriving from instrument uses that do not comply with this manual.
Safety guidelines
This manual contains important information and warnings regarding safety about installation, use and
maintenance of the microscope. Please read this manual carefully before using the equipment. To
ensure safe use, the user must read and follow all instructions in this manual. OPTIKA products are
designed for safe use in normal operating conditions. The equipment and accessories described in
the manual are manufactured and tested according to industry standards for safety instrumentation
laboratory. Misuse can cause personal injury or damage to the instrument. Keep this manual at hand
close to the instrument, for an easy consultation.
Electrical safety
Before connecting the power cord to wall outlet, ensure that your mains voltage for your region corresponds to the voltage supply of the instrument, and that the illuminator’s switch is in position OFF. The
user must observe the safety regulations in force in his region. The instrument is equipped with CE
safety marking, in any case the user has full responsibility concerning the safe use of that instrument.
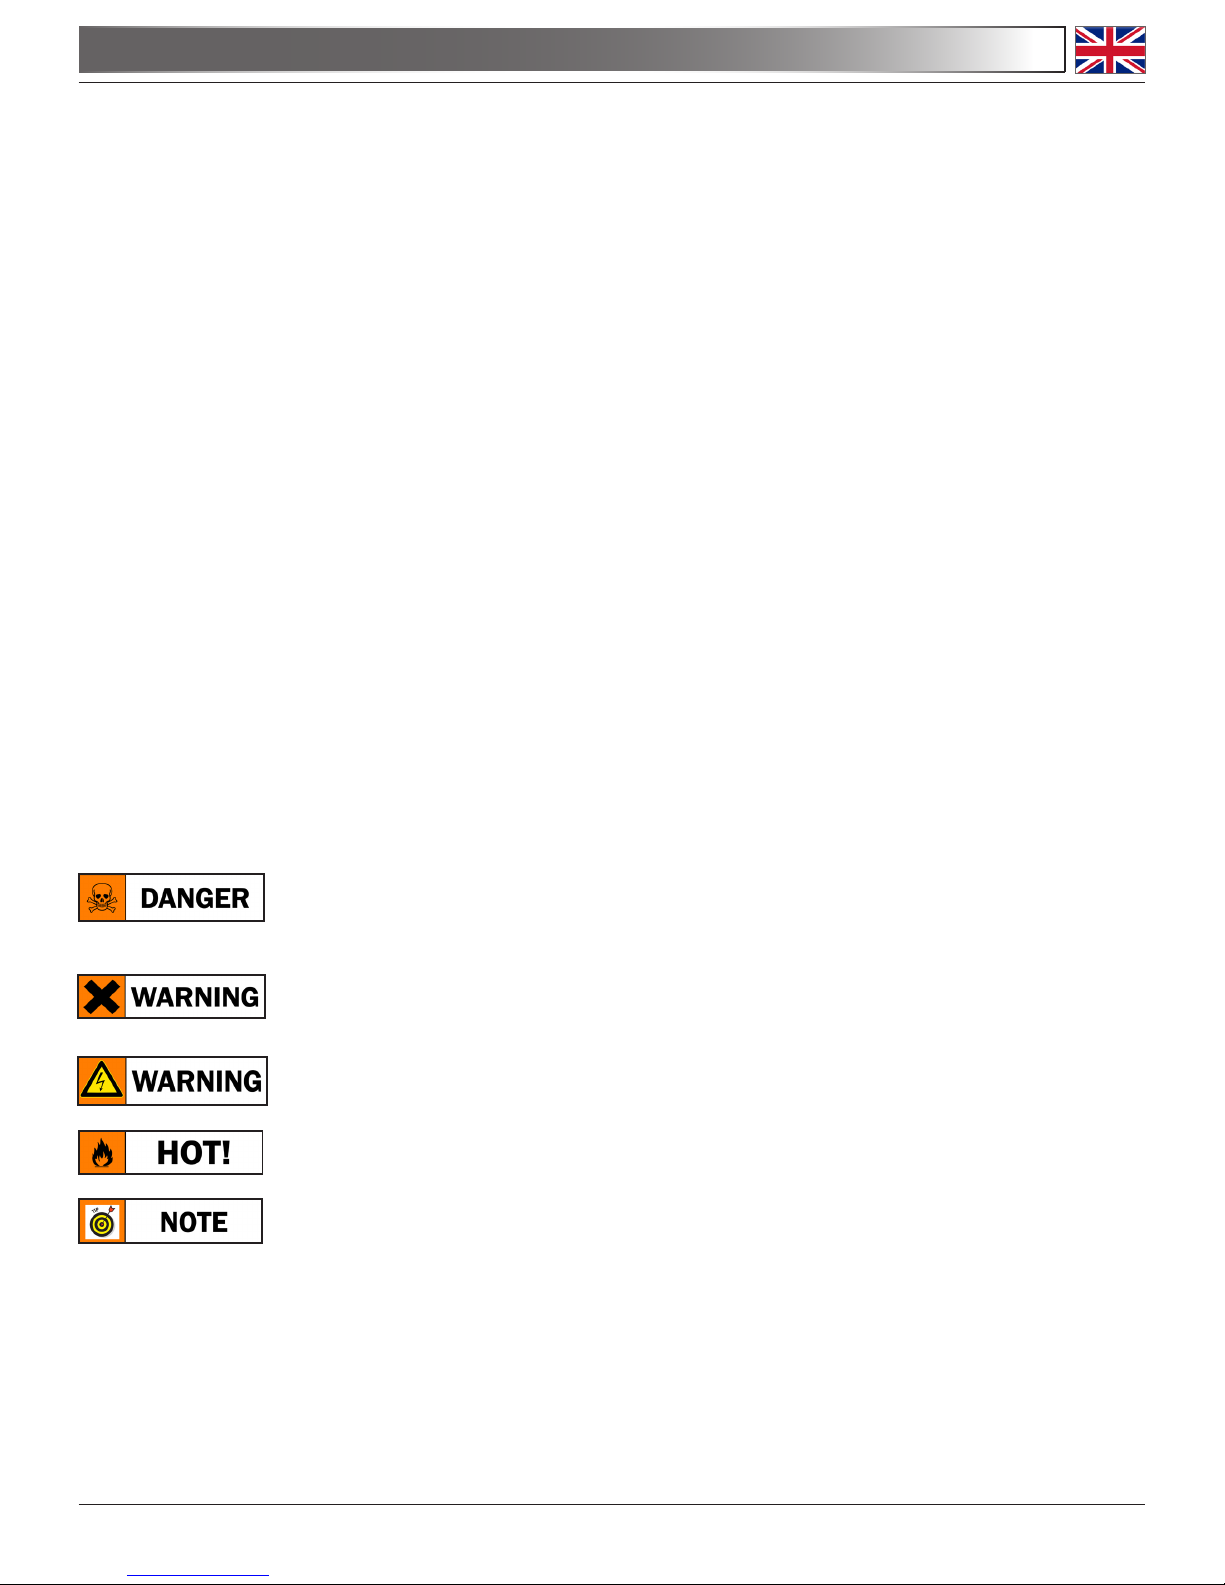
Warning/Caution symbols used in this manual
The user should be aware of safety aspects when using the instrument. Warning or hazard symbols
are shown below. These symbols are used in this manual.
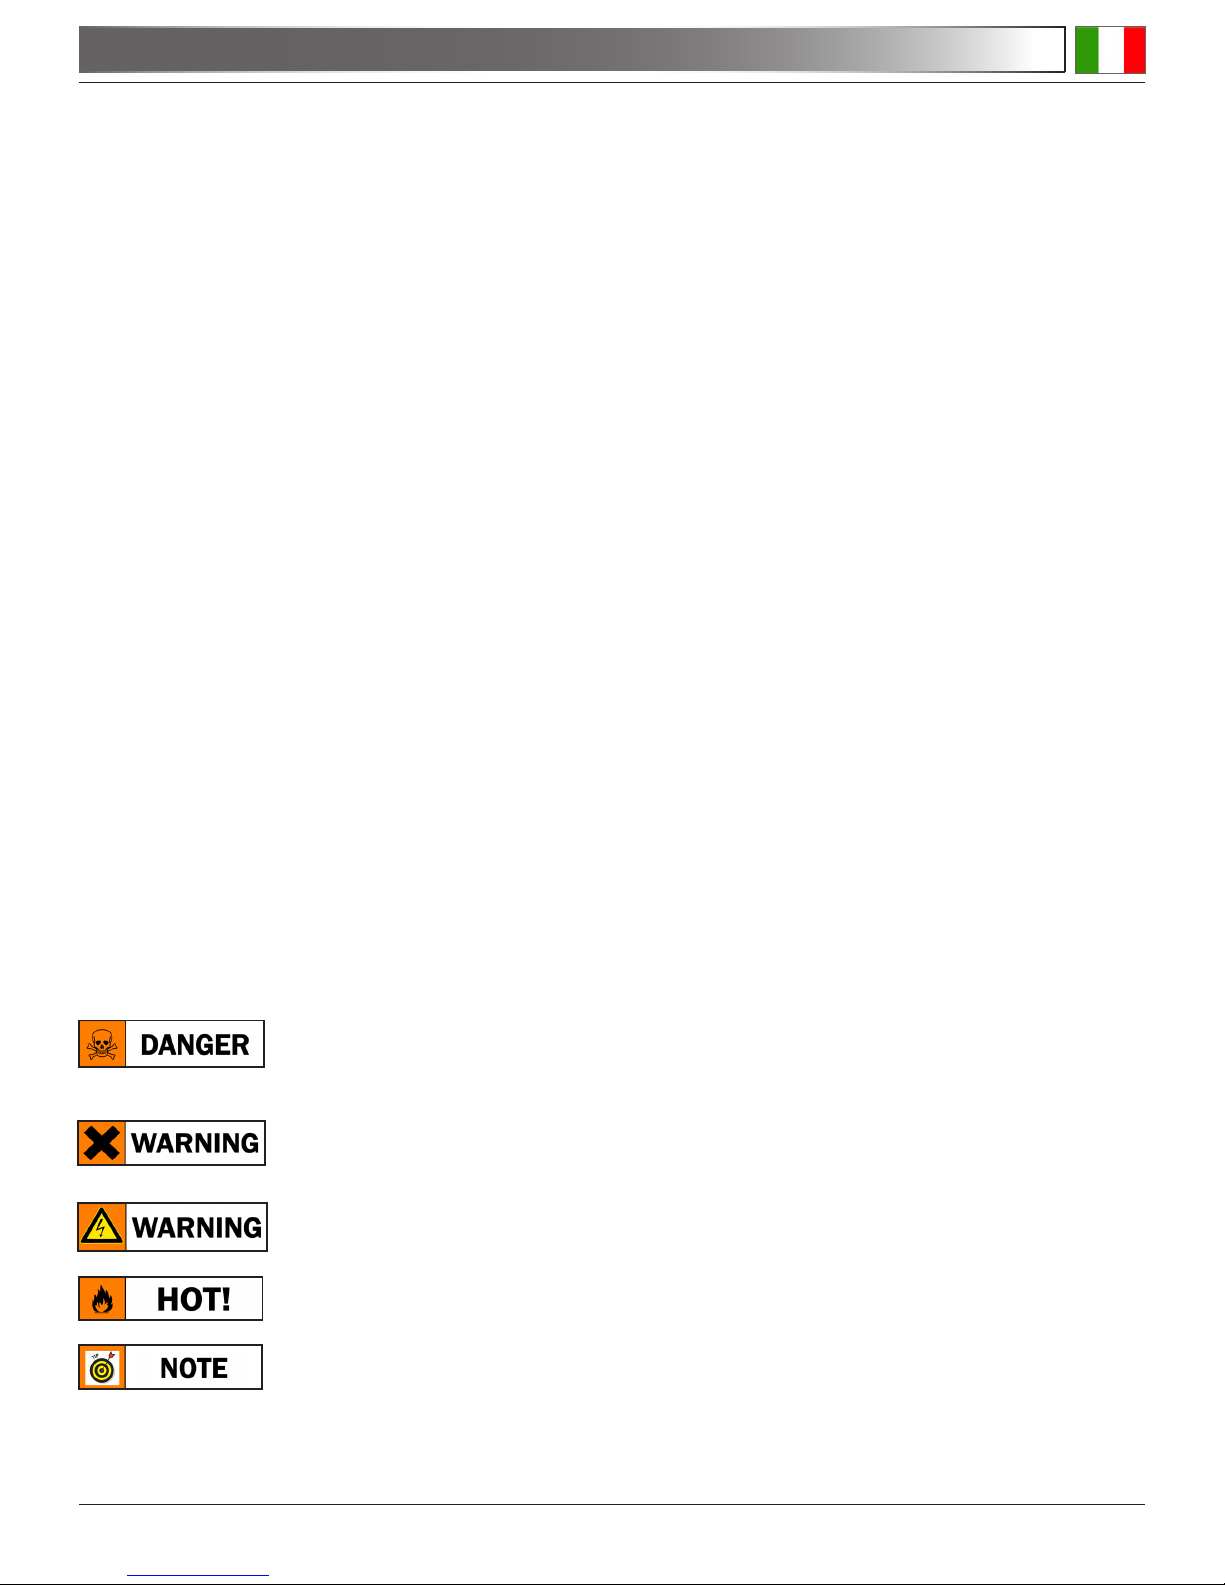
The instructions on this symbol to avoid possible severe personal injuries.
Warning of use; the incorrect operation on the instrument can cause damages
to the person or instrument.
Possibility of electric shock.
Attention: high temperature surfaces. Avoid direct contact.
Technical notes or usage tips.
SAFETY GUIDELINES
Page 4
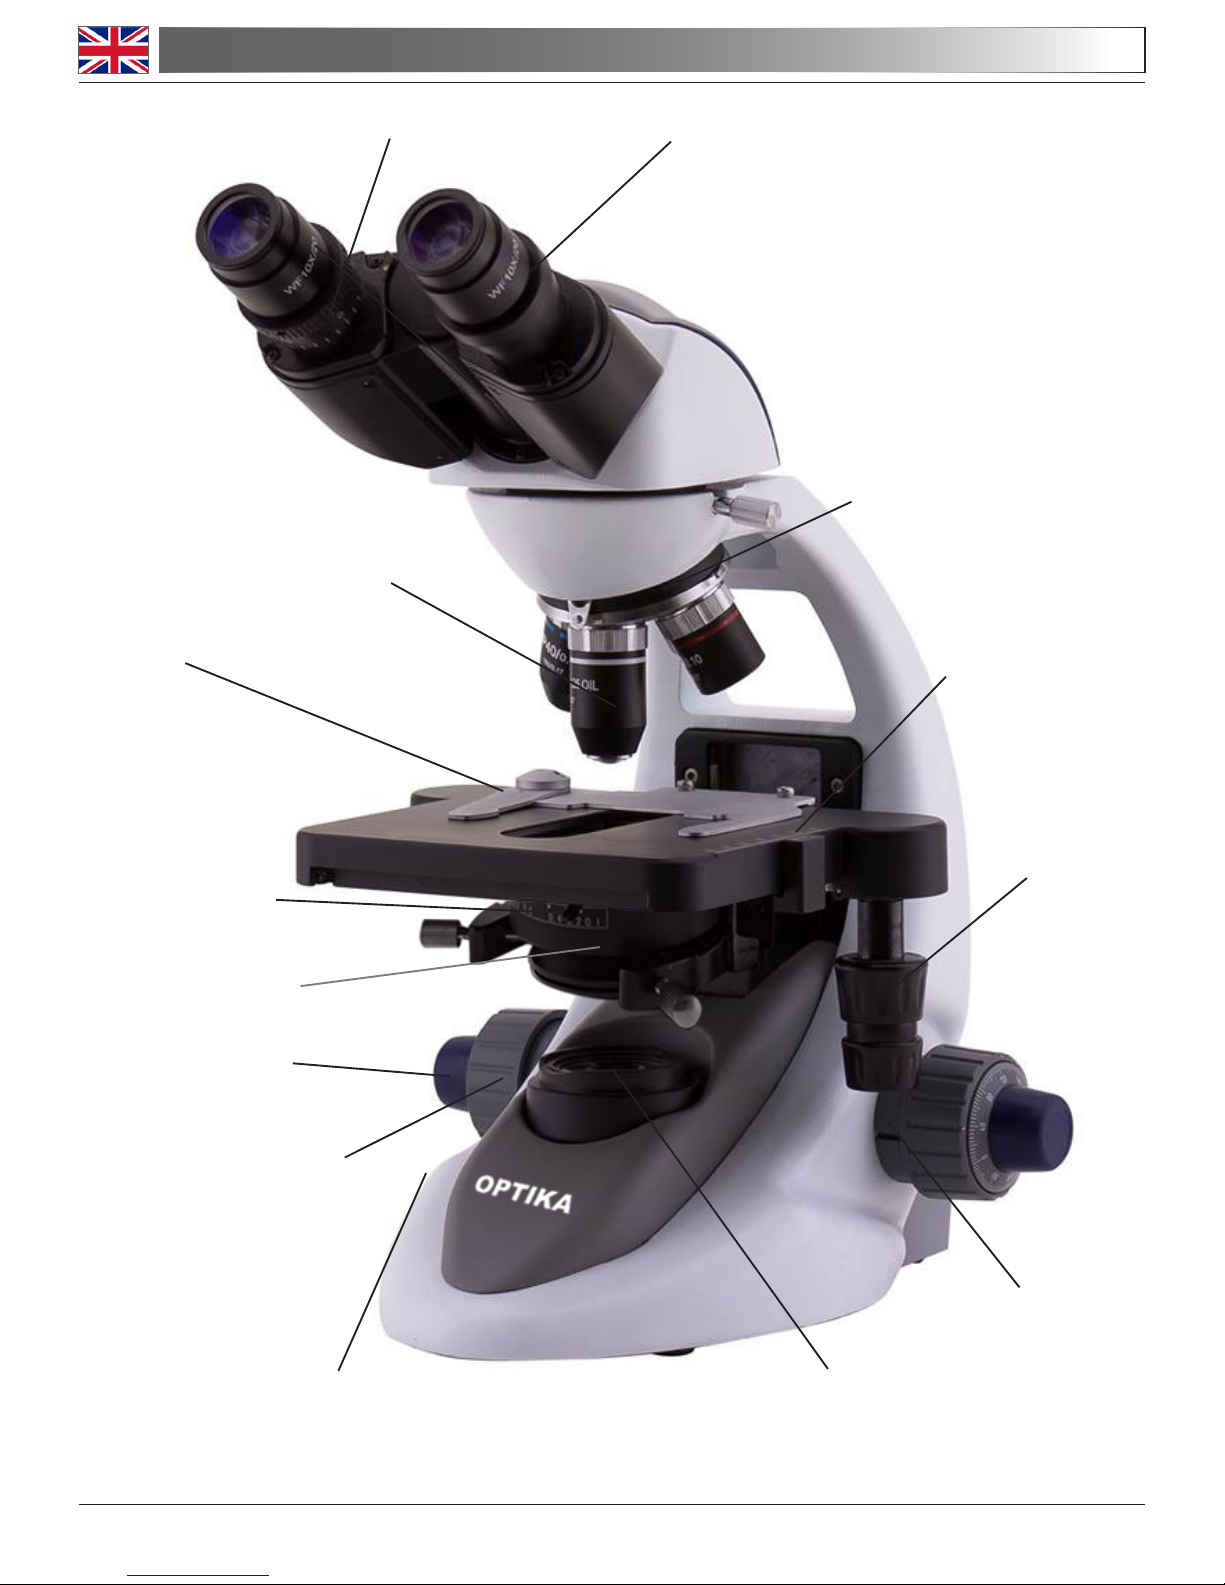
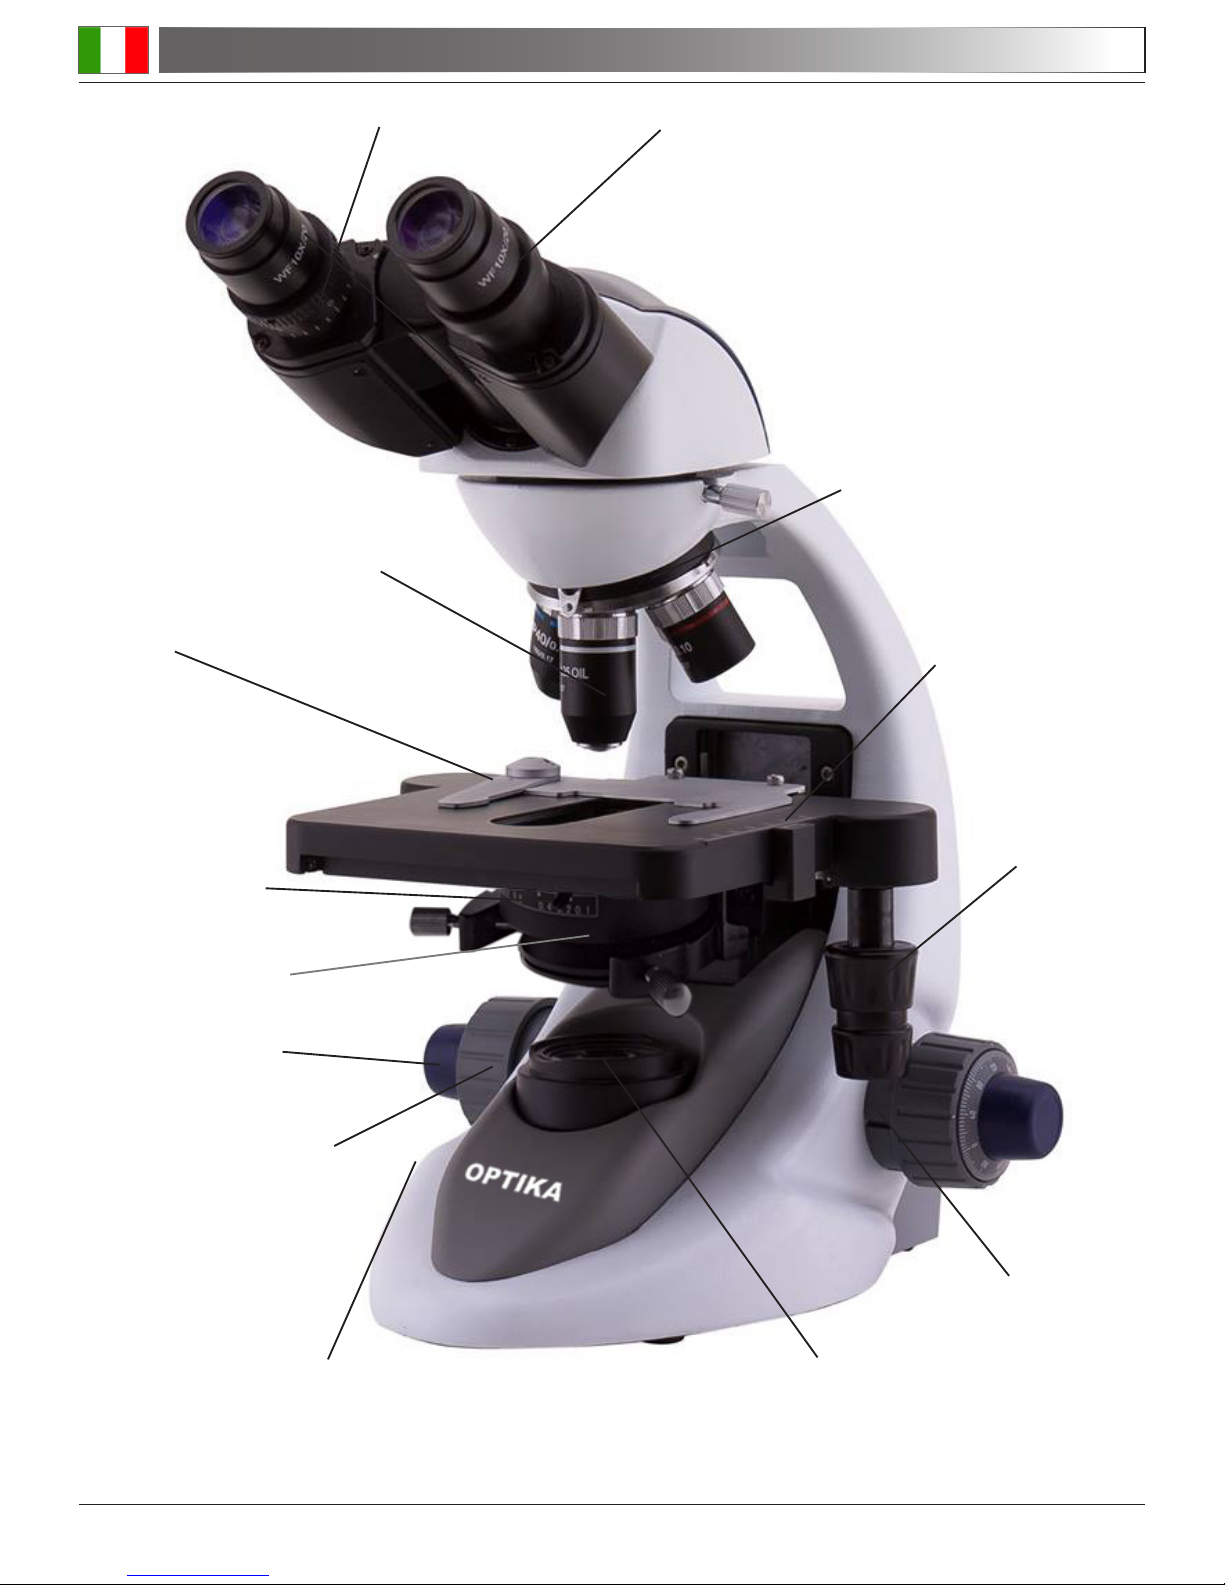
1.0 DESCRIPTION
EYEPIECE
DIOPTRIC ADJUSTMENT
RING
BINOCULAR
OBSERVATION HEAD
[B-292]
OBJECTIVE
SLIDE CLAMP
COARSE FOCUSING
KNOB
FINE FOCUSING
KNOB
BRIGHTNESS ADJUSTMENT
KNOB (ON LEFT SIDE)
LED
ILLUMINATOR
TENSION ADJUSTMENT
KNOB
IRIS DIAPHRAGM
TRANSLATION
KNOBS
CONDENSER
STAGE
NOSEPIECE
Page 5
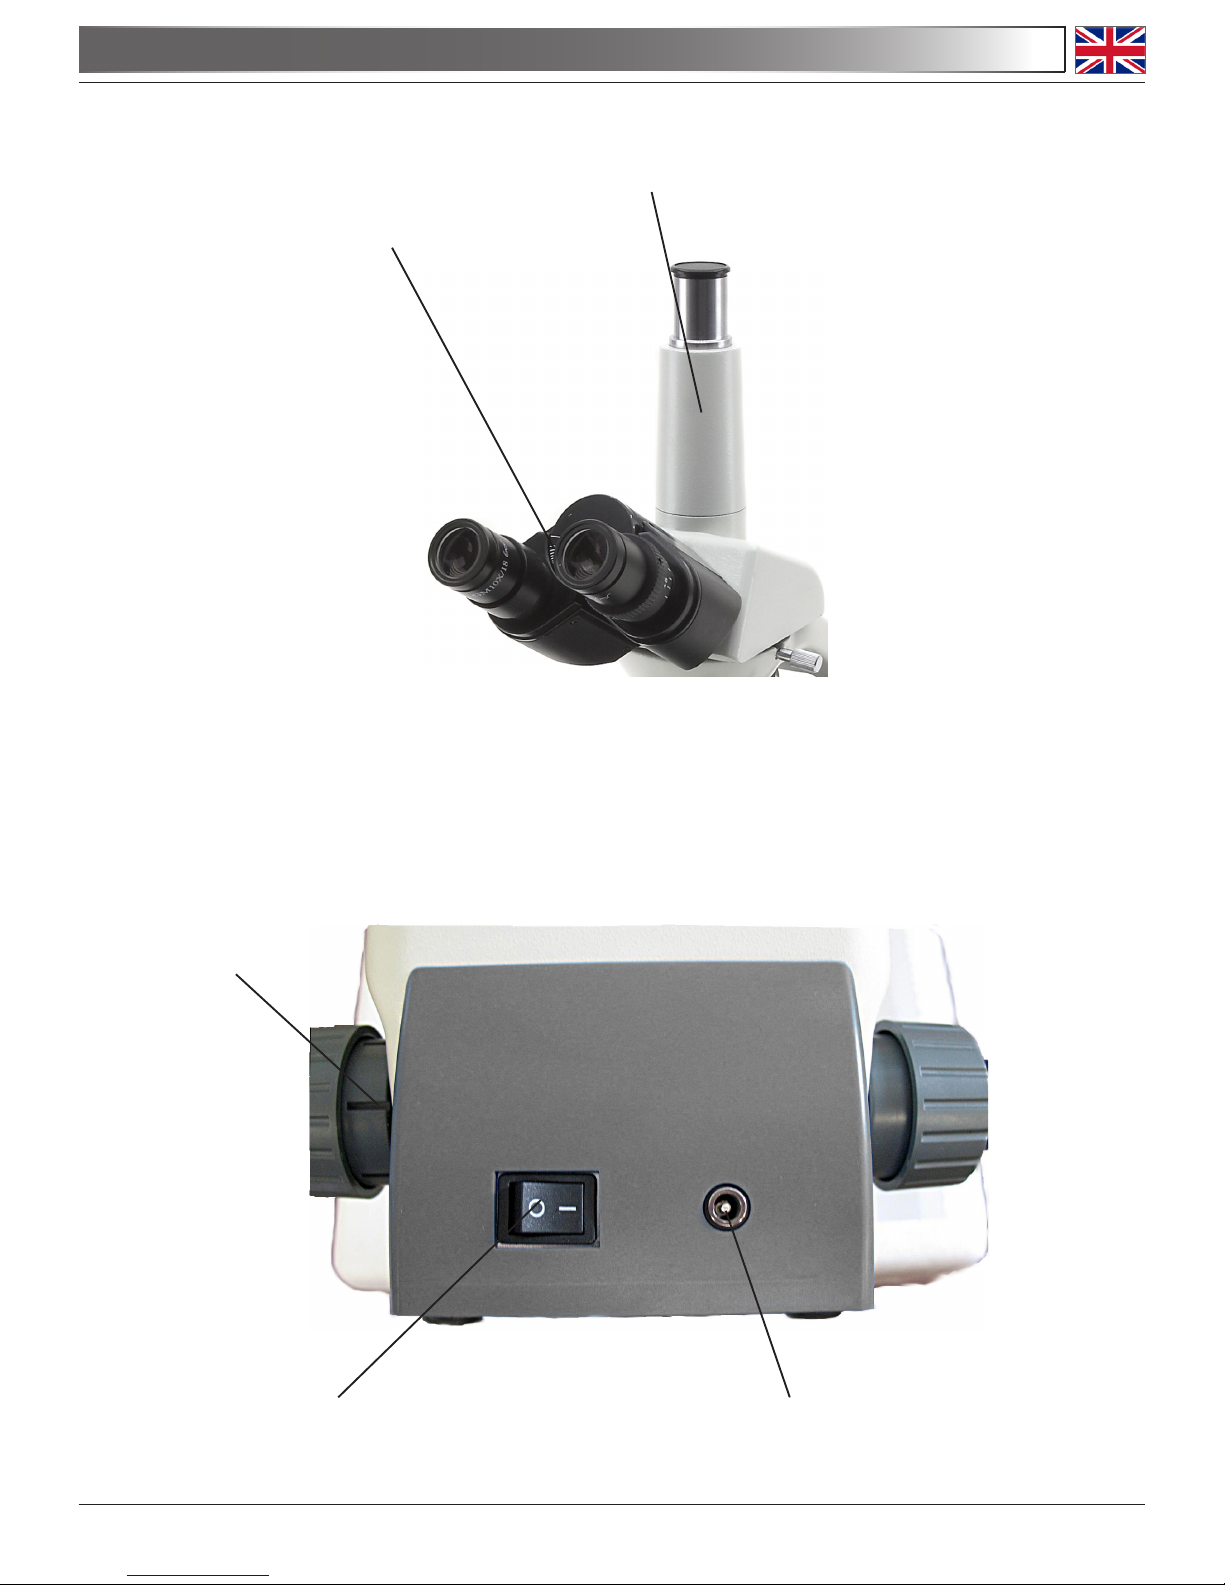
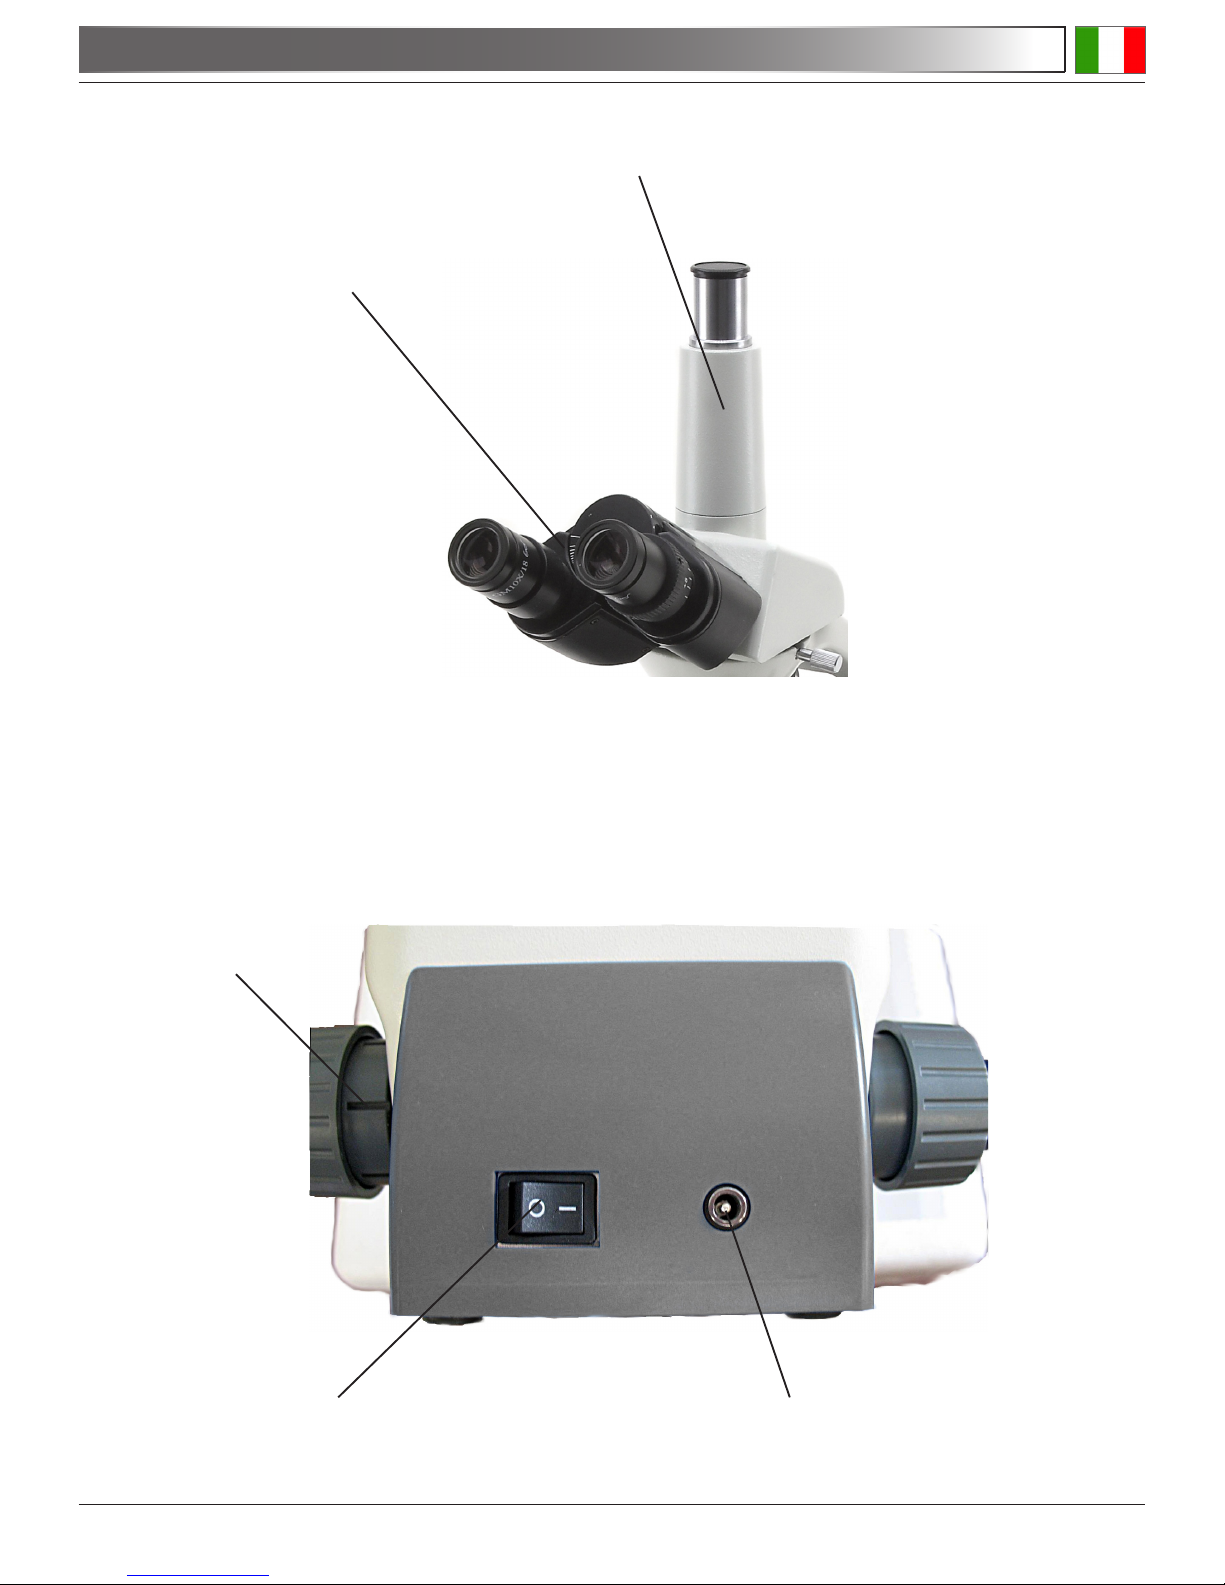
1.0 DESCRIPTION
TENSION
ADJUSTMENT KNOB
ON/OFF SWITCH
POWER SUPPLY
INPUT JACK
REAR:
TRINOCULAR
OBSERVATION
HEAD [B-293]
PHOTO PORT

Page 6
2.0 INTRODUCTION
This microscope is a scientic precision instrument designed to last for many years with a minimum of main-
tenance. It is built to high optical and mechanical standards and to withstand daily use.
Optika reminds you that this manual contains important information on safety and maintenance, and that it
must therefore be made accessible to the instrument users.
Optika declines any responsibility deriving from instrument uses that do not comply with this manual.
3.1 The microscope is housed in a moulded Styrofoam container. Remove the tape from the edge of
the container and lift the top half of the container. Take some care to avoid that the optical items (objectives and eyepieces) fall out and get damaged. Using both hands (one around the arm and one
around the base), lift the microscope from the container and put it on a stable desk.
3.2 Place the observation head onto the top of the arm and tighten the lock-screw. Insert the eyepieces
into the eye tubes.
3.3 Connect the provided 6Vdc power supply to the power supply input jack on the rear of the microscope.
3.0 UNPACKING AND ASSEMBLY
The power cord should be used only on network sockets equipped with adequate grounding.
Contact a technician to check the state of your electrical system. If there is no need to install additional
accessories, the instrument is now ready for use. Once positioned and installed with the necessary
components, the microscope is ready to be used. Your microscope is a laboratory instrument designed to last. Handle it always carefully and avoid abrupt vibrations or shocks. Always disconnect the
power cable from the microscope when not in use for long time, while you clean it or when you perform
any maintenance.
AVOID DISASSEMBLING THE INSTRUMENT
Do not disassemble the instrument. This entails the cancellation of the warranty and may cause
malfunction.

Page 7
4.0 USING THE MICROSCOPE
4.1 Adjust the observation head
Loosen the lock-screw, turn the observation head to a comfortable position for observation, and then
lock the lock-screw.
4.2 Place the specimen on the stage
Lock the specimen slide on the mechanical stage using the slide clamp. Ensure that the specimen is
centred over the stage opening by adjusting the coaxial knobs of the stage.
4.3 Lamp settings
The microscope is tted with power white LED illuminator. Before turning on the light, read the section
5.3 about electrical safety precautions. Insert the plug of the 6Vdc power supply into the jack on the
rear and turn on the ON/OFF switch. Turn the brightness adjustment knob to a brightness suitable for
observation.
4.4 Adjust interpupillary distance
Hold the right and left parts of the observation head by both hands and adjust the interpupillary dis-
tance by turning the two parts until one circle of light can be seen.
4.5 Focus and diopter adjustment
Rotate the coarse focusing knob to bring the slide into focus using an objective with a low magnication. Adjust the ne focusing knob to get the image sharp and clear while observing with your right
eye, then turn the dioptric adjustment ring on the left eyepiece until a sharp and clear image can be
observed also with the other eye. Turn the tension-adjust-knob to get a suitable tension for the focus
system. When the image is in focus, turn the nosepiece to choose the objective you need.
4.6 Condenser adjustment
Raise or lower the condenser through the knob to obtain a clear and uniform illumination of the sam
ple. To center the condenser: completely close the iris diaphragm. Using the condenser centering
screws, move the diaphragm in the center of the eld of view. Then gradually expand the diaphragm
until it is tangent to the edges of the eld of view. If necessary, you can perform an additional adjust
ment.
The condenser is centered when the edges of iris diaphragm are tangent to the eld of view.
4.7 Set the numerical aperture
Adjust the aperture of the iris diaphragm to set the numerical aperture of the illuminator, thus control-
ling image contrast and resolution.
4.8 Photo and video capture
To use a camera, for photo or video capturing, connect it to the trinocular tube using the proper
adaptor. Please refer to the camera manuals for further details.

Page 8
5.1 Microscopy environment
This microscope is recommended to be used in a clean, dry and shock free environment with a
temperature of 0-40°C and a maximum relative humidity of 85 % (non condensing). Use a dehumidier
if needed.
5.2 To think about when and after using the microscope
• The microscope should always be kept vertically when moving it and be careful so that no moving
parts, such as the eyepieces, fall out.
• Never mishandle or impose unnecessary force on the microscope.
• Never attempt to service the microscope yourself.
• After use, turn off the light immediately, cover the microscope with the included dust-cover, and keep
it in a dry and clean place.
5.3 Electrical safety precautions
• Before plugging in the power supply, make sure that the supplying voltage of your region matches with
the operation voltage of the equipment and that the lamp switch is in off-position.
• Users should observe all safety regulations of the region. The equipment has acquired the CE safety
label. However, users do have full responsibility to use this equipment safely.
5.4 Cleaning the optics
• If the optical parts need to be cleaned try rst to: use compressed air.
• If that is not sufcient: use a soft lint-free piece of cloth with water and a mild detergent.
• And as a nal option: use the piece of cloth moistened with a 3:7 mixture of ethanol and ether.
Note: ethanol and ether are highly ammable liquids. Do not use them near a heat source, near
sparks or near electric equipment. Use these chemicals in a well ventilated room.
• Remember to never wipe the surface of any optical items with your hands. Fingerprints can damage
the optics.
• Do not disassemble objectives or eyepieces in attempt to clean them.
5.5 If you need to send the microscope to Optika for maintenance, please use the original packaging.
5.0 MAINTENANCE
Page 9
HEAD: B-292: binocular, 360° rotating, 30° inclined
B-293: trinocular, 360° rotating, 30° inclined. Light split 50/50
EYEPIECES: WF 10X/ 20mm
NOSEPIECE: Quadruple, reversed
OBJECTIVES: E-PLAN 4x, 10x, 40x and 100x (oil immersion)
WORKING STAGE: Double layer with mechanical sliding stage, 150x133mm, moving range
75x50mm . Belt-drive in X direction.
CONDENSER: 1.25 N.A. Abbe type, with iris diaphragm
FOCUSING SYSTEM: Coaxial coarse and ne focusing system, with tension adjustment mechanism
ILLUMINATION: X-LED3, 3.6W, with brightness control.
POWER SUPPLY: Input Voltage of the power supply:
100-240Vac / 50-60Hz
6.0 TECHNICAL SPECIFICATIONS
7.0 RECOVERY AND RECYCLING
Art.13 Dlsg 25 july 2005 N°151. “According to directives 2002/95/EC, 2002/96/EC and 2003/108/EC relating
to the reduction in the use of hazardous substances in electrical and electronic equipment and waste disposal.”
The basket symbol on equipment or on its box indicates that the product at the end of its useful life should be
collected separately from other waste.
The separate collection of this equipment at the end of its lifetime is organized and managed by
the producer. The user will have to contact the manufacturer and follow the rules that he adopted for end-of-life equipment collection. The collection of the equipment for recycling, treatment
and environmentally compatible disposal, helps to prevent possible adverse effects on the environment and health and promotes reuse and/or recycling of materials of the equipment. Improper disposal of the product involves the application of administrative penalties as provided by the laws in force.

Pagina 10
INDICE
1.0 DESCRIZIONE pag. 12
2.0 INTRODUZIONE pag. 14
3.0 DISIMBALLAGGIO E MONTAGGIO pag. 14
4.0 UTILIZZO DEL MICROSCOPIO pag. 15
5.0 MANUTENZIONE pag. 16
6.0 SPECIFICHE TECNICHE pag. 17
7.0 MISURE ECOLOGICHE pag. 17
Pagina 11
Il presente microscopio è uno strumento scientico di precisione studiato per durare molti anni con una manutenzione minima, essendo costruito secondo i migliori standard ottici e meccanici e progettato per un utilizzo
quotidiano.
Optika ricorda che il presente manuale contiene informazioni importanti per un uso sicuro e una corretta manutenzione dello strumento. Esso deve quindi essere accessibile a chiunque lo utilizzi.
Optika declina ogni responsabilità derivante da un uso improprio dei suoi strumenti non indicato dalla presente guida.
Avvertenze di sicurezza
Questo manuale contiene importanti informazioni e avvertenze riguardanti la sicurezza riguardo l’installazione, l’utilizzo e la manutenzione del microscopio. Si raccomanda di leggere attentamente il
manuale prima di qualsiasi utilizzo dello strumento. Per assicurare un utilizzo sicuro l’utente deve
leggere e seguire tutte le istruzioni poste nel presente manuale.
I prodotti OPTIKA sono studiati per un utilizzo sicuro in condizioni operative normali. Lo strumento e
gli accessori descritti nel manuale sono realizzati e testati secondo standard industriali di sicurezza
per strumentazione da laboratorio.
L’utilizzo non corretto può causare lesioni alla persona o danni allo strumento.
Mantenere questo manuale a portata di mano vicino allo strumento, per una facile consultazione.
Precauzioni di sicurezza elettrica
Prima di collegare il cavo di alimentazione alla presa di rete, assicurarsi che la tensione di rete della
vostra regione corrisponda alla tensione di alimentazione dello strumento, e che l’interruttore dell’illuminatore sia in posizione spenta.
L’utente deve osservare la regolamentazione riguardante la sicurezza in vigore nel proprio Stato. Lo
strumento è dotato di marcatura di sicurezza CE, in ogni caso l’utente ha piena responsabilità riguardo all’utilizzo sicuro dello strumento stesso.
Simboli di avvertenza/pericolo usati nel manuale
L’utente deve essere a conoscenza degli aspetti legati alla sicurezza nel momento in cui utilizza lo
strumento. I simboli di avvertenza o pericolo sono indicati sotto. Tali simboli sono utilizzati in questo
manuale di istruzioni.
Seguire le istruzioni contrassegnate da questo simbolo per evitare possibili gravi danni alle persone.
Avvertimento di utilizzo; la non corretta operazione sullo strumento può causare
danni alla persona o allo strumento.
Possibilità di shock elettrico.
Attenzione: superci ad elevata temperatura. Evitare il contatto diretto.
Note tecniche o consigli di utilizzo.
INDICAZIONE PER LA SICUREZZA
Pagina 12
1.0 DESCRIZIONE
OCULARE
ANELLO DI COMPENSAZIONE
DIOTTRICA
TESTATA BINOCULARE
[B-292]
OBIETTIVO
PINZA DI
SOSTEGNO
MANOPOLA FOCUS
MACROMETRICO
MANOPOLA FOCUS
MICROMETRICO
REGOLAZIONE INTENSITÀ
LUMINOSA (SUL LATO SINISTRO)
ILLUMINATORE
LED
MANOPOLA REGOLAZIONE
TENSIONE DI FOCUS
DIAFRAMMA DI
APERTURA
MANOPOLE
COASSIALI DI
TRASLAZIONE
CONDENSATORE
TAVOLO
REVOLVER
Pagina 13
1.0 DESCRIZIONE
MANOPOLA REGOLAZIONE TENSIONE
DI FOCUS
INTERRUTTORE ON/OFF
JACK INGRESSO
ALIMENTATORE
RETRO:
TESTATA TRINOCULARE
[B-293]
USCITA VIDEO
 Loading...