

Page 1

OPTIKA MICROSCOPES - ITALY
www.optikamicroscopes.com - info@optikamicroscopes.com
Ver. 2.0.0
B-150POL - B-150POLR
OPERATION MANUAL
GUIDA UTENTE
MANUAL DE INSTRUCCIONES
Page 2

Page 2
INDEX
1.0 DESCRIPTION page 4
2.0 INTRODUCTION page 6
3.0 UNPACKING AND ASSEMBLY page 6
4.0 USING THE MICROSCOPE page 7
5.0 RECHARGEABLE BATTERY (B-150POLR MODELS) page 8
6.0 MAINTENANCE page 9
7.0 TECHNICAL SPECIFICATIONS page 9
8.0 RECOVERY AND RECYCLING page 10
Page 3

Page 3
This microscope is a scientic precision instrument designed to last for many years with a minimum of maintenance. It is built to high optical and mechanical standards and to withstand daily use.
Optika reminds you that this manual contains important information on safety and maintenance, and that it
must therefore be made accessible to the instrument users.
Optika declines any responsibility deriving from instrument uses that do not comply with this ma-nual.
Safety guidelines
This manual contains important information and warnings regarding safety about installation, use and
maintenance of the microscope. Please read this manual carefully before using the equipment. To
ensure safe use, the user must read and follow all instructions in this manual. OPTIKA products are
designed for safe use in normal operating conditions. The equipment and accessories described in
the manual are manufactured and tested according to industry standards for safety instrumentation
laboratory. Misuse can cause personal injury or damage to the instrument. Keep this manual at hand
close to the instrument, for an easy consultation.
Electrical safety
Before connecting the power cord to wall outlet, ensure that your mains voltage for your region corresponds to the voltage supply of the instrument, and that the illuminator’s switch is in position OFF. The
user must observe the safety regulations in force in his region. The instrument is equipped with CE safety marking, in any case the user has full responsibility concerning the safe use of that instrument.
Warning/Caution symbols used in this manual
The user should be aware of safety aspects when using the instrument. Warning or hazard symbols
are shown below. These symbols are used in this manual.
The instructions on this symbol to avoid possible severe personal injuries.
Warning of use; the incorrect operation on the instrument can cause damages to the
person or instrument.
Possibility of electric shock.
Attention: high temperature surfaces. Avoid direct contact.
Technical notes or usage tips.
SAFETY GUIDELINES
Page 4
Page 4
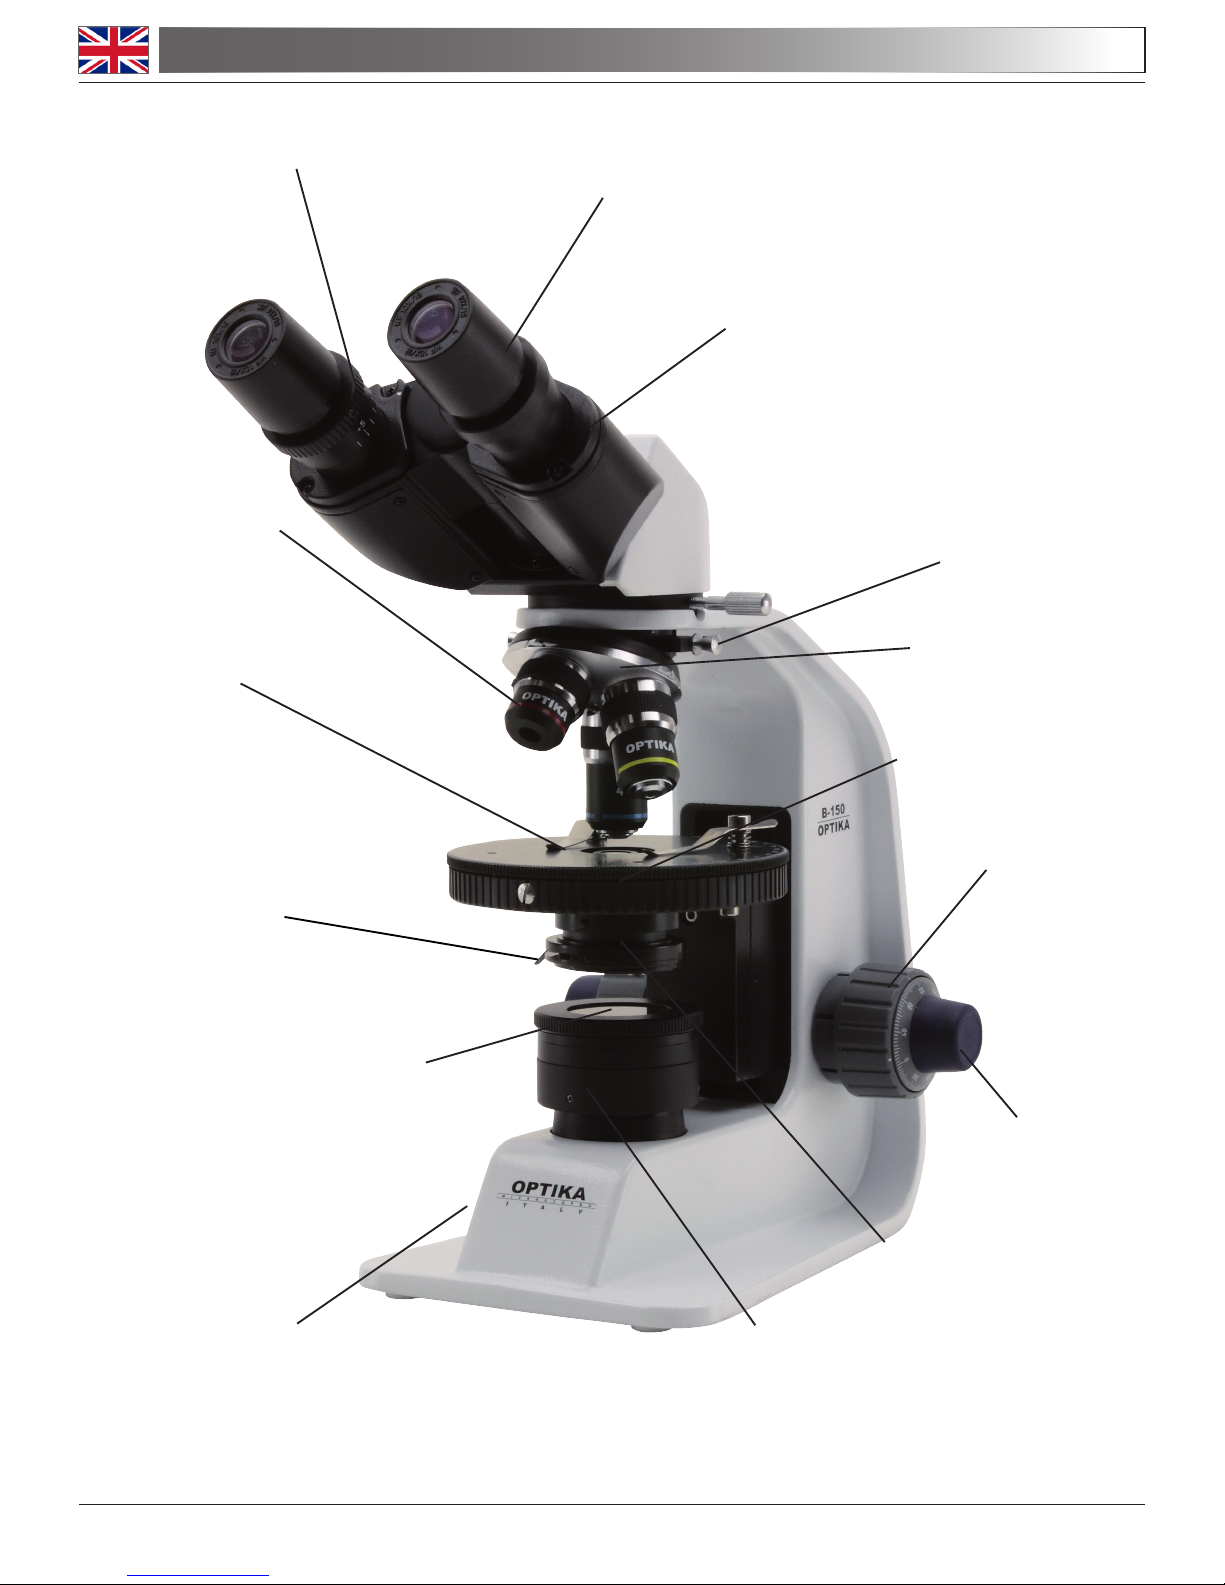
1.0 DESCRIPTION
EYEPIECE
DIOPTRIC ADJUSTMENT
RING
BINOCULAR OBSERVATION
HEAD
OBJECTIVE
SPECIMEN CLAMPS
COARSE FOCUSING
KNOB
FINE FOCUSING
KNOB
BRIGHTNESS ADJUSTMENT
ON/OFF KNOB (ON LEFT SIDE)
LED
ILLUMINATOR
IRIS DIAPHRAGM
CONDENSER
STAGE
NOSEPIECE
POLARIZER FILTER
ANALYZER FILTER
Page 5

Page 5
1.0 DESCRIPTION
MONOCULAR
OBSERVATION
HEAD
TENSION
ADJUSTMENT KNOB
POWER SUPPLY
INPUT JACK
REAR:
Page 6

Page 6
2.0 INTRODUCTION
This microscope is a scientic precision instrument designed to last for many years with a minimum of main-
tenance. It is built to high optical and mechanical standards and to withstand daily use.
Optika reminds you that this manual contains important information on safety and maintenance, and that it
must therefore be made accessible to the instrument users.
Optika declines any responsibility deriving from instrument uses that do not comply with this manual.
3.1 The microscope is housed in a moulded Styrofoam container. Remove the tape from the edge of the
container and lift the top half of the container. Take some care to avoid that the optical items (objectives and eyepieces) fall out and get damaged. Using both hands (one around the arm and one around
the base), lift the microscope from the container and put it on a stable desk.
3.2 Place the observation head onto the top of the arm and tighten the lock-screw. Insert the eyepieces
into the eye tubes.
3.3 Connect the provided power supply to the power supply input jack on the rear of the microscope.
3.0 UNPACKING AND ASSEMBLY
Connect the mains plug into the socket at the base
Make sure, before you turn the illumination on, that the voltage selector is set to the mains voltage for
your region.
The power cord should be used only on network sockets equipped with adequate grounding.
Contact a technician to check the state of your electrical system. If there is no need to install additional
accessories, the instrument is now ready for use. Once positioned and installed with the necessary
components, the microscope is ready to be used. Your microscope is a laboratory instrument designed to last. Handle it always carefully and avoid abrupt vibrations or shocks. Always disconnect the
power cable from the microscope when not in use for long time, while you clean it or when you perform
any maintenance.
AVOID DISASSEMBLING THE INSTRUMENT
Do not disassemble the instrument. This entails the cancellation of the warranty and may cause
malfunction.
Page 7
Page 7
4.0 USING THE MICROSCOPE
4.1 Adjust the observation head
Loosen the lock-screw, turn the observation head to a comfortable position for observation, and then
lock the lock-screw.
4.2 Place the specimen on the stage
Lock the specimen slide on the mechanical stage using the clamps. Ensure that the specimen is cen-
tred over the stage opening.
4.3 Lamp settings
The microscope is tted with power white LED illuminator. Before turning on the light, read the section
6.3 about electrical safety precautions. Insert the plug of the power supply into the jack on the rear.
Turn the brightness adjustment knob in order to switch the light on and to reach a brightness suitable
for observation.
4.4 Adjust interpupillary distance
Hold the right and left parts of the observation head by both hands and adjust the interpupillary distan-
ce by turning the two parts until one circle of light can be seen.
4.5 Focus and diopter adjustment
Rotate the coarse focusing knob to bring the slide into focus using an objective with a low magnication. Adjust the ne focusing knob to get the image sharp and clear while observing with your right
eye, then turn the dioptric adjustment ring on the left eyepiece until a sharp and clear image can be
observed also with the other eye. Turn the tension-adjust-knob to get a suitable tension for the focus
system. When the image is in focus, turn the nosepiece to choose the objective you need.
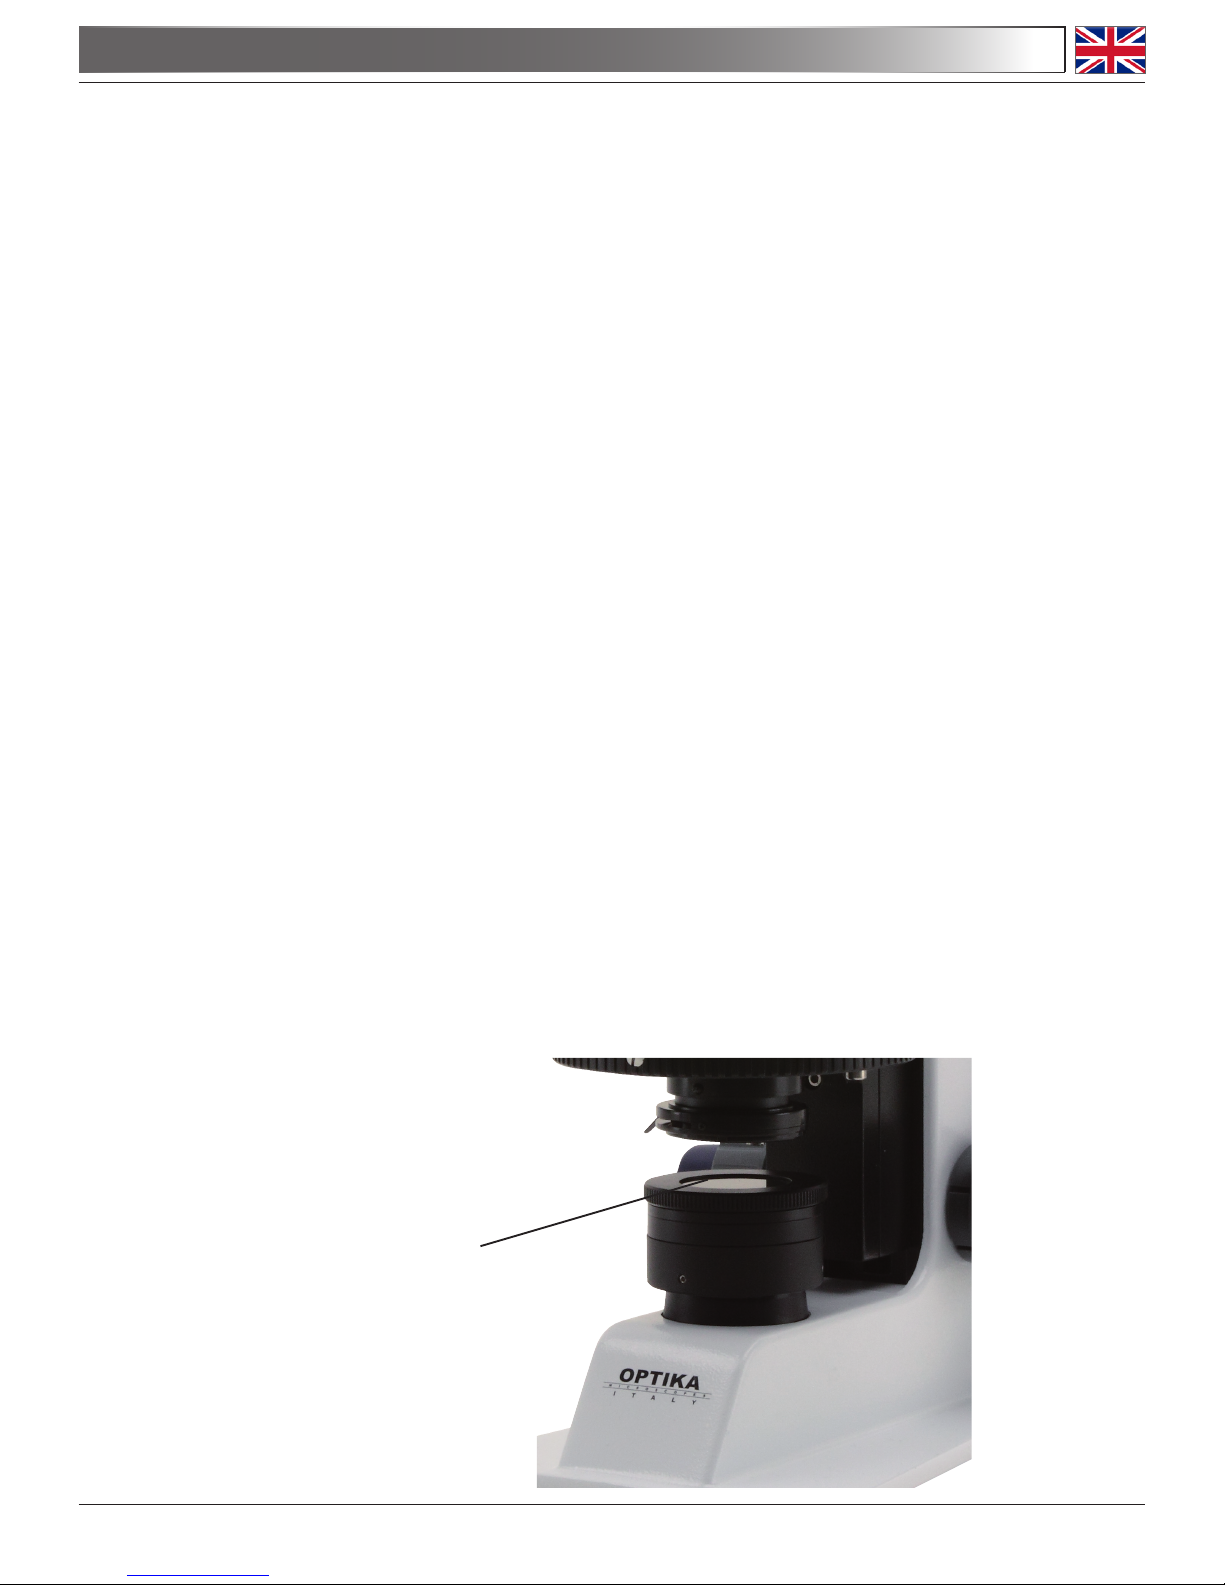
4.6 Make a polarization analysis
Insert both the swing-out polarizer lter and the analyzer lter (which is placed under the observation
head). Rotate now the polarizer lter until you have a dark background (“extinction condition”). By rotating the stage it’s possible now to observe the polarization effects of your sample. You can lock the
position of the rotating stage through the screw on the back of the stage.
4.7 Set the numerical aperture
Adjust the aperture of the iris diaphragm to set the numerical aperture of the illuminator, thus control-
ling image contrast and resolution.
INSERT THE POLARIZER
FILTER
Page 8
Page 8
B-150POLR models are equipped with a built-in rechargeable battery.
The battery can be recharged simply by connecting the microscope to the provided external power supply,
using the jack connector on the rear.
During the charging process, you can use the microscope as usual.
In order to speed up the charging of the battery, it’s suggested to turn the
LED off when you connect the external power supply.
For a full charge, it’s suggested to keep the external power supply connected
to the microscope for at least 8 hours.
Always unplug the external power supply from the microscope, when
not in use.
5.0 RECHARGEABLE BATTERY (B-150POLR MODELS)
Page 9

Page 9
6.1 Microscopy environment
This microscope is recommended to be used in a clean, dry and shock free environment with a
temperature of 0-40°C and a maximum relative humidity of 85 % (non condensing). Use a dehumidier
if needed.
6.2 To think about when and after using the microscope
• The microscope should always be kept vertically when moving it and be careful so that no moving
parts, such as the eyepieces, fall out.
• Never mishandle or impose unnecessary force on the microscope.
• Never attempt to service the microscope yourself.
• After use, turn off the light immediately, cover the microscope with the included dust-cover, and keep
it in a dry and clean place.
6.3 Electrical safety precautions
• Before plugging in the power supply, make sure that the supplying voltage of your region matches with
the operation voltage of the equipment and that the lamp switch is in off-position.
• Users should observe all safety regulations of the region. The equipment has acquired the CE safety
label. However, users do have full responsibility to use this equipment safely.
6.4 Cleaning the optics
• If the optical parts need to be cleaned try rst to: use compressed air.
• If that is not sufcient: use a soft lint-free piece of cloth with water and a mild detergent.
• And as a nal option: use the piece of cloth moistened with a 3:7 mixture of ethanol and ether.
Note: ethanol and ether are highly ammable liquids. Do not use them near a heat source, near
sparks or near electric equipment. Use these chemicals in a well ventilated room.
• Remember to never wipe the surface of any optical items with your hands. Fingerprints can damage
the optics.
• Do not disassemble objectives or eyepieces in attempt to clean them.
6.5 If you need to send the microscope to Optika for maintenance, please use the original packaging.
6.0 MAINTENANCE
MODELS: B-150POL-M: monocular; objectives 4x, 10x, 40x
B-150POL-B: binocular; objectives 4x, 10x, 40x
EYEPIECES: WF 10X/ 18mm
NOSEPIECE: Quadruple
OBJECTIVES: Achromatic type
WORKING STAGE: Pre-centered 120mm rotating stage with locking screw.
CONDENSER: Abbe condenser, N.A. 1.2 pre-centered
FOCUSING SYSTEM: Coaxial coarse and ne focusing system, with tension adjustment mechanism
ILLUMINATION: 1W White LED, 6300K, with brightness control.
FILTERS: Rotatable swing in/out polarizer, slide in/out analyser
POWER SUPPLY: Input Voltage: 100-240Vac / 50-60Hz
Output: 5Vdc 500mA (B-150R model: 6Vdc 2,5A)
Internal NiMH rechargeable battery (B-150POLR models only)
7.0 TECHNICAL SPECIFICATIONS
Page 10
Page 10
8.0 RECOVERY AND RECYCLING
Art.13 Dlsg 25 july 2005 N°151. “According to directives 2002/95/EC, 2002/96/EC and 2003/108/EC relating
to the reduction in the use of hazardous substances in electrical and electronic equipment and waste disposal.”
The basket symbol on equipment or on its box indicates that the product at the end of its useful life should be
collected separately from other waste.
The separate collection of this equipment at the end of its lifetime is organized and managed by
the producer. The user will have to contact the manufacturer and follow the rules that he adopted for end-of-life equipment collection. The collection of the equipment for recycling, treatment
and environmentally compatible disposal, helps to prevent possible adverse effects on the environment and health and promotes reuse and/or recycling of materials of the equipment. Improper disposal of the product involves the application of administrative penalties as provided by the laws in force.
Page 11

Page 12

Pagina 12
INDICE
1.0 DESCRIZIONE pag. 14
2.0 INTRODUZIONE pag. 16
3.0 DISIMBALLAGGIO E MONTAGGIO pag. 16
4.0 UTILIZZO DEL MICROSCOPIO pag. 17
5.0 BATTERIA RICARICABILE (modelli B-150POLR) pag. 18
6.0 MANUTENZIONE pag. 19
7.0 SPECIFICHE TECNICHE pag. 19
8.0 MISURE ECOLOGICHE pag. 20
Page 13

Pagina 13
Il presente microscopio è uno strumento scientico di precisione studiato per durare molti anni con una manutenzione minima, essendo costruito secondo i migliori standard ottici e meccanici e progettato per un utilizzo
quotidiano.
Optika ricorda che il presente manuale contiene informazioni importanti per un uso sicuro e una corretta manutenzione dello strumento. Esso deve quindi essere accessibile a chiunque lo utilizzi.
Optika declina ogni responsabilità derivante da un uso improprio dei suoi strumenti non indicato dalla presente guida.
Avvertenze di sicurezza
Questo manuale contiene importanti informazioni e avvertenze riguardanti la sicurezza riguardo l’installazione, l’utilizzo e la manutenzione del microscopio. Si raccomanda di leggere attentamente il
manuale prima di qualsiasi utilizzo dello strumento. Per assicurare un utilizzo sicuro l’utente deve
leggere e seguire tutte le istruzioni poste nel presente manuale.
I prodotti OPTIKA sono studiati per un utilizzo sicuro in condizioni operative normali. Lo strumento e
gli accessori descritti nel manuale sono realizzati e testati secondo standard industriali di sicurezza
per strumentazione da laboratorio.
L’utilizzo non corretto può causare lesioni alla persona o danni allo strumento.
Mantenere questo manuale a portata di mano vicino allo strumento, per una facile consultazione.
Precauzioni di sicurezza elettrica
Prima di collegare il cavo di alimentazione alla presa di rete, assicurarsi che la tensione di rete della
vostra regione corrisponda alla tensione di alimentazione dello strumento, e che l’interruttore dell’illuminatore sia in posizione spenta.
L’utente deve osservare la regolamentazione riguardante la sicurezza in vigore nel proprio Stato. Lo
strumento è dotato di marcatura di sicurezza CE, in ogni caso l’utente ha piena responsabilità riguardo all’utilizzo sicuro dello strumento stesso.
Simboli di avvertenza/pericolo usati nel manuale
L’utente deve essere a conoscenza degli aspetti legati alla sicurezza nel momento in cui utilizza lo
strumento. I simboli di avvertenza o pericolo sono indicati sotto. Tali simboli sono utilizzati in questo
manuale di istruzioni.
Seguire le istruzioni contrassegnate da questo simbolo per evitare possibili gravi danni
alle persone.
Avvertimento di utilizzo; la non corretta operazione sullo strumento può causare danni
alla persona o allo strumento.
Possibilità di shock elettrico.
Attenzione: superci ad elevata temperatura. Evitare il contatto diretto.
Note tecniche o consigli di utilizzo.
INDICAZIONI PER LA SICUREZZA
Page 14

Pagina 14
1.0 DESCRIZIONE
OCULARE
COMPENSAZIONE
DIOTTRICA
TESTATA DI OSSERVAZIONE
BINOCULARE
OBIETTIVI
PINZETTE
MANOPOLA FUOCO
MACROMETRICA
MANOPOLA FUOCO
MICROMETRICA
REGOLAZIONE INTENSITA’ E ON/
OFF (SUL LATO SINISTRO)
ILLUMINATORE LED
DIAFRAMMA
AD IRIDE
CONDENSATORE
TAVOLINO
REVOLVER
FILTRO
POLARIZZATORE
FILTRO
ANALIZZATORE
Page 15

Pagina 15
1.0 DESCRIZIONE
TESTATA DI OSSERVAZIONE
MONOCULARE
MANOPOLA DI REGOLAZIONE
DELLA TENSIONE
JACK INGRESSO
ALIMENTATORE
RETRO:
Page 16

Pagina 16
2.0 INTRODUZIONE
Il presente microscopio è uno strumento scientico di precisione studiato per durare molti anni con una manu-
tenzione minima, essendo costruito secondo i migliori standard ottici e meccanici e progettato per un utilizzo
quotidiano.
Optika ricorda che il presente manuale contiene informazioni importanti per un uso sicuro e una corretta ma-
nutenzione dello strumento. Esso deve quindi essere accessibile a chiunque lo utilizzi.
Optika declina ogni responsabilità derivante da un uso improprio dei suoi strumenti non indicato dalla pre-
sente guida.
3.1 Il microscopio si trova in un imballaggio di polistirolo espanso stampato. Dopo aver tolto il nastro ade-
sivo da tutti gli imballi, sollevare la metà superiore dell’imballaggio. Fare attenzione a non far cadere
o danneggiare i componenti ottici (obiettivi e oculari). Estrarre il microscopio dal suo imballaggio con
entrambe le mani (una intorno al braccio e una intorno alla base) e appoggiarlo su un piano stabile.
3.2 Fissare la testata di osservazione sulla parte superiore del braccio mediante l’apposita vite di serrag-
gio. Inserire gli oculari nei tubi porta-oculari.
3.3 Connettere l’alimentatore (fornito nella confezione) al jack di ingresso posto sul retro.
3.0 DISIMBALLAGGIO E MONTAGGIO
Connettere il cavo di alimentazione nella presa posta nella base dello stativo.
Assicurarsi, prima dell’accensione, che il selettore del voltaggio sia impostato sulla tensione di rete
della vostra regione.
Il cavo di alimentazione deve essere utilizzato solo su prese di rete dotate di adeguata messa a terra.
Contattare un vostro tecnico per assicurarsi sullo stato dell’impianto elettrico. Se non vi è necessità di
installare altri accessori, lo strumento è ora pronto per l’utilizzo. Una volta posizionato e installato con
i necessari componenti, il microscopio è pronto per l’utilizzo. Il vostro microscopio è uno strumento da
laboratorio progettato per durare a lungo. Maneggiatelo sempre con cura ed abitate brusche vibrazioni o colpi.Scollegare sempre il cavo di alimentazione dal microscopio quando non viene utilizzato per
lunghi tempi, mentre lo si pulisce o quando si esegue una qualsiasi manutenzione.
EVITARE DI SMONTARE LO STRUMENTO
Non disassemblare lo strumento. Questo comporta l’annullamento della garanzia e potrebbe causare
malfunzionamenti.
Page 17

Pagina 17
4.1 Regolazione della testata di osservazione
Allentare la vite di serraggio, ruotare la testata no a trovare una posizione comoda per l’osservazione
e quindi avvitarla nuovamente.
4.2 Posizionamento del vetrino sul tavolo portapreparati
Fissare il vetrino con preparato al piano meccanico mediante le apposite pinzette per il sostegno dei
campioni. Assicurarsi che il vetrino si trovi al centro del campo di osservazione.
4.3 Impostazioni del sistema di illuminazione
Il microscopio è dotato di un illuminatore bianco LED di potenza. Prima di accendere l’illuminazione,
leggere attentamente la sezione 6.3 sulle precauzioni per un utilizzo sicuro. Inserire lo spinotto dell’alimentatore nel jack posto sul retro. Ruotare la manopola di regolazione della luminosità per accendere
l’illuminatore e impostare la luce ideale per l’osservazione.
4.4 Regolazione della distanza interpupillare
Regolare la distanza interpupillare dei portaoculari sulla testata no ad ottenere la visione di un unico
campo luminoso circolare afferrando le parti destra e sinistra della testata di osservazione con entrambe le mani.
4.5 Regolazione della messa a fuoco e compensazione diottrica
Ruotare la manopola di messa a fuoco macrometrica per focalizzare il vetrino con un obiettivo con
basso potere di ingrandimento. Regolare la manopola di messa a fuoco micrometrica no ad ottenere
un’immagine chiara e denita osservando con l’occhio destro, quindi ruotare l’anello di compensazione diottrica posto sull’oculare sinistro no ad ottenere un’immagine denita anche nell’occhio sinistro.
Con la manopola di regolazione della tensione impostare la tensione migliore per la messa a fuoco.
Quando l’immagine appare a fuoco, scegliere l’obiettivo necessario con l’apposito revolver.
4.6 Eseguire un’analisi di polarizzazione
Inserire sia il ltro polarizzatore estraibile sia il ltro analizzatore (che si trova sotto la testata
di osservazione). Ruotare ora il ltro polarizzatore no ad ottenere un fondo nero (condizione di
“estinzione”). Tramite la rotazione del tavolino girevole è possibile ora osservare gli effetti di polariz
zazione del campione. Potete bloccare la posizione del tavolino tramite l’apposita vite posta sul
retro del tavolino.
4.7 Impostazione dell’apertura numerica
Per impostare l’apertura numerica dell’illuminatore, regolare l’apertura del diaframma a iride posto
sotto il condensatore. In questo modo si controllano contrasto e risoluzione dell’immagine.
4.0 UTILIZZO DEL MICROSCOPIO
INSERIRE IL FILTRO
POLARIZZATORE
Page 18

Pagina 18
I modelli B-150POLR sono dotati di batteria ricaricabile interna.
La batteria può essere ricaricata semplicemente collegando il microscopio all’alimentatore esterno fornito in
dotazione, usando il jack nella parte posteriore.
Durante il processo di carica, potete utilizzare il microscopio normalmente.
Per velocizzare la ricarica della batteria, è consigliato spegnere completamente il
LED quando collegate l’alimentatore esterno.
Per ottenere una ricarica completa, è consigliato mantenere il microscopio
connesso all’alimentatore per almeno 8 ore.
Scollegare sempre l’alimentatore dal microscopio, quando questo non
viene utilizzato.
5.0 BATTERIA RICARICABILE (MODELLI B-150POLR)
Page 19

Pagina 19
6.1 Ambiente di lavoro
Si consiglia di utilizzare il microscopio in un ambiente pulito e secco, privo di urti, ad una temperatura fra
0°C e 40°C e con una umidità relativa massima dell’85% (in assenza di condensazione). Si consiglia
l’uso di un deumidicatore se necessario.
6.2 Prima e dopo l’utilizzo del microscopio
• Tenere il microscopio sempre in posizione verticale quando lo si sposta. Assicurarsi inoltre che le parti
mobili, ad esempio gli oculari, non cadano.
• Non maneggiare senza precauzioni e non adoperare inutile forza sul microscopio.
• Non cercare di provvedere da soli alla riparazione.
• Dopo l’uso spegnere immediatamente la lampada, coprire il microscopio con l’apposita custodia
antipolvere in dotazione e tenerlo in un luogo asciutto e pulito.
6.3 Precauzioni per un utilizzo sicuro
• Prima di collegare il cavo di alimentazione alla rete elettrica assicurarsi che il voltaggio locale sia
idoneo a quello dell’apparecchio e che l’interruttore della lampada sia posizionato su OFF.
• Attenersi a tutte le precauzioni di sicurezza della zona in cui ci si trova ad operare. L’apparecchio
è omologato secondo le norme di sicurezza CE. Gli utenti hanno comunque piena responsabilità
nell’utilizzo sicuro del microscopio.
6.4 Pulizia delle ottiche
• Qualora le ottiche necessitino di essere pulite, utilizzare prima di tutto aria compressa.
• Se questo non fosse sufciente usare un panno non slacciato, inumidito con acqua e un detergente
delicato.
• Come ultima opzione è possibile usare un panno inumidito con una soluzione 3:7 di alcol etilico ed
etere.
Attenzione: l’alcol etilico e l’etanolo sono sostanze altamente inammabili. Non usarle vicino ad una
fonte di calore, a scintille o presso apparecchiature elettriche. Le sostanze devono essere adoperate
in un luogo ben ventilato.
• Non stronare la supercie di nessun componente ottico con le mani. Le impronte digitali possono
danneggiare le ottiche.
• Non smontare gli obiettivi o gli oculari per cercare di pulirli.
6.5 Si prega di utilizzare l’imballaggio originale nel caso in cui fosse necessario rispedire il microscopio ad
Optika per la manutenzione.
6.0 MANUTENZIONE
MODELLI: B-150POL-M: monoculare; obiettivi 4x, 10x, 40x
B-150POL-B: binoculare; obiettivi 4x, 10x, 40x
OCULARI: WF 10X/ 18mm
REVOLVER: Quadruplo
OBIETTIVI: Acromatici
PIANO DI LAVORO: Tavolino rotante 120mm pre-centrato con vite di bloccaggio.
CONDENSATORE: Condensatore di Abbe, A.N. 1.2 precentrato.
7.0 SPECIFICHE TECNICHE
Page 20

Pagina 20
7.0 SPECIFICHE TECNICHE
MESSA A FUOCO: Sistema di messa a fuoco macrometrica e micrometrica coassiale,
con regolazione della tensione.
ILLUMINAZIONE: LED bianco 1W, 6300K, con controllo luminosità.
FILTRI: Polarizzatore estraibile e ruotabile; analizzatore estraibile
ALIMENTATORE : Tensione di ingresso: 100-240Vac / 50-60Hz
Uscita: 5Vdc 500mA (modelli B-150R: 6Vdc 2,5A)
batteria interna ricaricabile NiMH (solo modelli B-150POLR)
8.0 MISURE ECOLOGICHE
Ai sensi dell’articolo 13 del decreto legislativo 25 luglio 2005 n°151. “Attuazione delle direttive 2002/95/CE,
2002/96/CE e 2003/108/CE, relative alla riduzione dell’uso di sostanze pericolose nelle apparecchiature elettriche ed elettroniche, nonché allo smaltimento dei riuti”.
Il simbolo del cassonetto riportato sulla apparecchiatura o sulla sua confezione indica che il prodotto alla
ne della propria vita utile deve essere raccolto separatamente degli altri riuti. La raccolta differenziata della
presente apparecchiatura giunta a ne vita è organizzata e gestita dal produttore.
L’utente che vorrà disfarsi della presente apparecchiatura dovrà quindi contattare il produttore e seguire il
sistema che questo ha adottato per consentire la raccolta separata dell’apparecchiatura giunta a ne vita.
L’adeguata raccolta differenziata per l’avvio successivo della apparecchiatura dismessa al riciclaggio, al trattamento e allo smaltimento ambientalmente compatibile contribuisce ad evitare possibili effetti negativi sull’ambiente e sulla salute e favorisce il reimpiego e/o riciclo dei materiali di cui è composta l’apparecchiatura.
Lo smaltimento abusivo del prodotto da parte del detentore comporta l’applicazione delle sanzioni amministrative previste dalla normativa vigente.
Page 21

Page 22

Página 22
INDICE
1.0 DESCRIPCIÓN pag. 24
2.0 INTRODUCCIÓN pag. 26
3.0 DESEMBALAJE Y MONTAJE pag. 26
4.0 UTILIZACIÓN DEL MICROSCOPIO pag. 27
5.0 BATERIA RECARCABLE (modelos B-150POLR) pag. 28
6.0 MANTENIMIENTO pag. 29
7.0 ESPECIFICACIONES TÉCNICAS pag. 29
8.0 MEDIDAS ECOLÓGICAS pag. 30
Page 23

Página 23
El presente microscopio es un instrumento cientíco de precisión proyectado para durar muchos años con
un mínimo nivel de mantenimiento. Para su construcción se han utilizado los mejores modelos ópticos y
mecánicos, que lo convierten en el instrumento ideal para ser utilizado a diario.
Optika avisa que el presente manual contiene información importante para un uso seguro y el correcto mantenimiento del instrumento. Por lo tanto debe ser accesible a todos aquellos que lo utilizan.
Optika declina cualquier responsabilidad debida al uso inapropiado del instrumento no con templado en la
presente guía.
Advertencias de seguridad
Este manual incluye importante información y advertencias sobre la seguridad de instalación, utilización y mantenimiento del microscopio. Se ruega leer atentamente el manual antes de utilizar el
instrumen to. Para una utilización segura, el usuario deberá leer y seguir atentamente todas la instrucciones indicadas en el manual.
Los productos OPTIKA han sido diseñados para ser utilizados en condiciones normales de trabajo. El
instrumento y los accesorios descritos en el manual han sido realizados y testados según las normas
industriales de seguridad de instrumentación de laboratorio.
Una utilización inadecuada podría dañar el instrumento o provocar lesiones al usuario. Mantener el
presente manual cerca del instrumento para facilitar su consulta.
Precauciones de seguridad sobre el sistema eléctrico
Antes de conectar el cable de alimentación a la corriente eléctrica, asegurarse que la tensión de entrada del lugar donde se usa el instrumento coincide con la tensión de utilización del microscopio, y
que el interruptor del ilu minador esté en la posición off.
El usuario debe consultar las normas de seguridad de su país. El instrumento incluye
una etiqueta de seguridad CE. En cualquier caso, el usuario se asume cualquier responsabilidad
relativa al uso seguro del instrumento.
Símbolos de advertencia o peligro utilizados en el manual
El usuario debe conocer las indicaciones relacionadas con la seguridad cuando utiliza el microscopio.
A continuación se indican los símbolos de advertencia o peligro que se han utilizado en éste manual
de instrucciones.
Seguir las instrucciones indicadas para evitar posibles daños severos al usuario.
Advertencia de utilización; la utilización inadecuada del instrumento podría dañar el
instrumento o provocar daños al usuario.
Posibilidad de descarga eléctrica.
Atención: supercie de elevada temperatura. Evitar el contacto directo.
Notas técnicas o consejos de utilización.
NORMAS DE SEGURIDAD
Page 24

Página 24
1.0 DESCRIPCIÓN
OCULAR
COMPENSACIÓN
DIÓPTRICA
CABEZAL BINOCULAR
OBJETIVOS
PINZA DE SUJECIÓN
DE MUESTRAS
MANDO DE ENFOQUE
MACROMÉTRICO
MANDO DE ENFOQUE
MICROMÉTRICO
REGULACIÓN DE LA INTENSIDAD E INTERRUPTOR
ON/OFF (EN EL LATERAL IZQUIEDO)
ILUMINADOR LED
DIAFRAGMA IRIS
CONDENSADOR
PLATINA
PORTAPREPARADOS
REVÓLVER PORTAOBJETIVOS
FILTRO
POLARIZADOR
FILTRO ANALIZADOR
COLOCACIÓN DE LA
MUESTRA
Page 25

Página 25
1.0 DESCRIPCIÓN
CABEZAL MONOCULAR
MANDO DE REGULACIÓN DE LA
TENSIÓN
CONECTOR JACK DE
ALIMENTACIÓN
REVERSO:
Page 26

Página 26
2.0 INTRODUCCIÓN
El presente microscopio es un instrumento cientíco de precisión proyectado para durar muchos años con
un mínimo nivel de mantenimiento. Para su construcción se han utilizado los mejores modelos ópticos y
mecánicos, que lo convierten en el instrumento ideal para ser utilizado a diario.
Optika avisa que el presente manual contiene información importante para un uso seguro y el correcto man-
tenimiento del instrumento. Por lo tanto debe ser accesible a todos aquellos que lo utilizan.
Optika declina cualquier responsabilidad debida al uso inapropiado del instrumento no con templado en la
presente guía.
3.1 El microscopio se entrega con un embalaje de poliestireno. Después de abrir el embalaje, abrir la
parte superior del mismo. Prestar atención para evitar dañar los componentes ópticos (objetivos y
oculares) y para evitar que el instrumento se caiga. Extraer el microscopio de su embalaje con ambas
manos (con una mano sostener el brazo y con la otra la base) y apoyarlo en una supercie estable.
3.2 Fijar el cabezal de observación en la parte superior del soporte utilizando el correspondiente tornillo
de jación. Introducir los oculares en los tubos portaoculares.
3.3 Conectar el alimentador (suministrado con el microscopio) al conector jack situado en la parte poste-
rior del microscopio.
3.0 DESEMBALAJE Y MONTAJE
Introducir el cable de alimentación en la toma situada en la base del microscopio.
Antes de encender el microscopio, asegurarse que el selector del voltaje se sitúe en la tensión de red
correspondiente a su país.
El cable de alimentación se debe utilizar solamente en tomas eléctricas con toma de tierra.
Consultar un técnico para asegurarse del estado de la red eléctrica. Si no fuera necesario in-
stallar otros accesorios y, después de haber situado e instalado en el microscopio los componentes necesarios, estará listo para su utilización. El presente microscopio es un instrumento de
laboratorio proyectado para durar mucho tiempo. Manejarlo siempre con mucha pre caución, evitando vibraciones bruscas y golpes. Si no se utiliza durante un largo periodo de tiempo, desconectar siempre el cable de alimentación cuando se limpia o se realiza el mantenimiento.
NO DESMONTAR EL MICROSCOPIO
No desmontar el microscopio para evitar anular la garantía y provocar un posible funcionamiento
incorrecto.
Page 27

Página 27
4.1 Regulación del cabezal de observación
Aojar el tornillo de ajuste, girar el cabezal hasta obtener una posición cómoda para la observación y
jar de nuevo el tornillo.
4.2 Colocación de la muestra en la platina portapreparados
Fijar la preparación en la platina utilizando las correspondientes pinzas de sujeción. Asegurarse que
la preparación se sitúe en el centro del campo de observación.
4.3 Regulación de la luminosidad
El microscopio incluye un iluminador LED blanco. Antes de poner en marcha el iluminador, leer aten-
tamente la sección 6.3. sobre las precauciones de seguridad eléctrica. Introducir el enchufe de alimentación en el conector jack situado en la parte posterior. Girar el mando de regulación de la luminosidad para encender el iluminador y seleccionar la luminosidad correcta para la observación.
4.4 Regulación de la distancia interpupilar
Mantener con las dos manos la parte izquierda y la derecha del cabezal de observación y regular la
distancia interpupilar de los portaoculares situados en el cabezal girando las dos partes hasta que no
se observe un único anillo de luz.
4.5 Regulación del enfoque y compensación dióptrica
Utilizando un objetivo con bajo poder de aumentos, girar el mando de enfoque macrométrico para
enfocar la muestra. Observando con el ojo derecho, regular el mando de enfoque micrométrico hasta
obtener una imagen clara y denida; girar el anillo de compensación dióptrica situado en el ocular
izquierdo hasta obtener una imagen denida también en el ojo izquierdo. Con el mando de regulación
de la tensión seleccionar la tensión correcta de enfoque. Cuando la imagen esté enfocada, seleccionar el objetivo necesario.
4.6 Realización de un análisis de polarización
Introducir el ltro polarizador extraíble y el ltro analizador (situado debajo del cabezal de observa-
ción). A continuación, girar el ltro polarizador hasta obtener un fondo negro (condición de “extinción”.
Moviendo la platina giratoria, será posible observar los efectos de polarización de la muestra. Es posible bloquear la posición de la platina a través del correspondiente tornillo situado en la parte posterior
de la platina.
4.7 Selección de la apertura numérica
Regular la apertura del diafragma iris situado en la parte inferior del condensador para seleccionar
la apertura numérica del iluminador. De esta manera se controlará el contraste y la resolución de la
imagen.
4.0 UTILIZACIÓN DEL MICROSCOPIO
SUJETAR LA PALANCA
DEL CONDENSADOR Y
GIRAR
Page 28

Página 28
Los modelos B-150POLR están dotados de batería recargable interna.
La batería se puede recargar conectando el microscopio al alimentador externo suministrado, a través del
jack situado en la parte posterior.
Es posible utilizar el microscopio durante el procedimiento de recarga.
Para aligerar la recarga de la batería, se aconseja apagar completamente el LED.
Para realizar una recarga completa, se aconseja mantener el microscopio conectado
al alimentador durante al menos 8 horas.
Cuando no se utiliza el microscopio, desconectarlo siempre el alimentador.
5.0 BATERIA RECARCABLE (MODELOS B-150POLR)
Page 29

Página 29
MODELLOS: B-150POL-M: monocular; objetivos: 4x, 10x, 40x
B-150POL-B: binocular; objetivos: 4x, 10x, 40x
OCULARES: WF 10X/ 18mm
REVÓLVER: Cuádruplo
OBJETIVOS: Acromáticos
PLATINA
PORTAPREPARADOS: Platina giratoria, diámetro: 120mm pre-centrada con tornillos de bloqueo.
7.0 ESPECIFICACIONES TÉCNICAS
6.1 Ambiente de trabajo
Se aconseja utilizar este microscopio en un ambiente limpio y seco; también se deben evitar los
impactos. La temperatura de trabajo recomendada es de 0-40°C y la humedad relativa máxima es de
85% (en ausencia de condensación). Si fuera necesario, utilizar un deshumidicador.
6.2 Consejos antes y después de la utilización del microscopio
• Durante los desplazamientos, mantener el microscopio en posición vertical y prestar mucha atención
para evitar que se caigan los accesorios móviles, por ejemplo, los oculares.
• Manejar con cuidado el microscopio evitando usar una fuerza mayor de la necesaria.
• Evitar reparar el microscopio por su cuenta.
• Apagar la luz inmediatamente después de haber utilizado el microscopio, cubrirlo con su
correspondiente funda antipolvo y mantenerlo en un ambiente limpio y seco.
6.3 Precauciones de seguridad relativas al sistema eléctrico
• Antes de conectar el microscopio a la corriente, asegurarse que la tensión de entrada del lugar donde
se usa coincide con la tensión de utilización del microscopio y que el interruptor del iluminador esté
en la posición OFF.
• El usuario debe consultar las normas de seguridad de su país. El instrumento incluye una etiqueta de
seguridad CE. No obstante estas pautas, el usuario debería utilizar el microscopio en función de sus
necesidades pero con un mínimo de responsabilidad y seguridad.
6.4 Limpieza de la ópticas
• Si fuera necesario limpiar los componentes ópticos utilizar, en primer lugar, aire comprimido.
• Si no fuera suciente, limpiar las ópticas con un paño, que no esté deshilachado, humedecido en
agua y detergente neutro.
• Si todavía no fuera suciente, humedecer un paño con una mezcla de 3 partes de etanol y 7 partes
de éter.
Importante: el etanol y el éter son líquidos altamente inamables. No se deben utilizar cerca de
fuentes de calor, chispas o instrumentación eléctrica. Utilizar en un ambiente bien aireado.
• No frotar con la manos la supercie de ningún componente óptico. Las huellas digitales podrían dañar
las ópticas.
• No desmontar los objetivos o los oculares para intentar limpiarlos.
6.5 Si fuera necesario enviar el microscopio a la empresa Optika para su mantenimiento, se ruega utilizar
el embalaje original.
6.0 MANTENIMIENTO
Page 30

Página 30
7.0 ESPECIFICACIONES TÉCNICAS
CONDENSADOR: Condensador de Abbe, A.N. 1.2 precentrado..
ENFOQUE: Sistema de enfoque macrométrico y micrométrico coaxial,
con regulación de la tensión.
ILUMINACIÓN: LED blanco 1W, 6300K, con regulación de la luminosidad
FILTROS: Polarizador extraíble y giratorio; analizador extraíble
ALIMENTACIÓN : Tensión de entrada: 100-240 Vac/50-60 Hz
Salida: 5Vdc 500mA (modelos B-150R: 6Vdc 2,5A)
Batería recargable interna NiMH (sólo en los modelos B-150POLR)
En conformidad con el Art. 13 del D.L. de 25 julio 2005 n°151.Actuación de las Directivas 2002/95/CE,
2002/96/CE y 2003/108/CE, relativas a la reducción del uso de sustancias peligrosas en la instrumentación
eléctrica y electrónica y a la eliminación de residuos.
El símbolo del contenedor que se muestra en la instrumentación o en su embalaje indica que el producto
cuando alcanzará el nal de su vida útil se deberá recoger de forma separada del resto de residuos. La
gestión de la recogida selectiva de la presente instrumentación será llevada a cabo por el fabricante.Por lo
tanto, el usuario que desee eliminar la presente instrumentación tendrá que ponerse en contacto con el fabricante y seguir el sistema que éste ha adoptado para permitir la recogida selectiva de la instrumentación.
La correcta recogida selectiva de la instrumentación para su posterior reciclaje, tratamiento y eliminación
compatible con el ambiente contribuye a evitar posibles efectos negativos al ambiente y a la salud y favorece
su reutilización y/o reciclado de los componentes de la instrumentación.
La eliminación del producto de forma abusiva por parte del usuario implicaría la aplicación de las sanciones
administrativas previstas en la normativa vigente.
8.0 MEDIDAS ECOLÓGICAS
Page 31

Page 32

www.optikamicroscopes.com
info@optikamicroscopes.com
OPTIKA
Tel.: ++39 035 571392 (6 linee) Telefax: ++ 39 035
Via Rigla 30, Ponteranica (BG) -
S.R.L.
ITALY
571435
MAD Iberica Aparatos
c/. Puig i Pidemunt, nº 28 1º 2ª - (Pol. Ind. Plà d’en Boet) 08302 MATARO
(Barcelona) España Tel: +34 937.586.245 +34 937.414.529
Cientificos
New York Microscope Company Inc
100 Lauman Lane, Suite A, Hicksville, New York 11801, USA
Tel.: 877.877.7274 - Fax: 516.801.2046
www.microscopeinternational.com -
OPTIKA MICROSCOPES -
www.optikamicroscopes.com -
info@nyscopes.com
ITALY
info@optikamicroscopes.com
 Loading...