

Page 1
OPTIKA MICROSCOPES - ITALY
www.optikamicroscopes.com - info@optikamicroscopes.com
Ver. 7.0.0
B-150 - B-150R - B-150ALC
OPERATION MANUAL
GUIDA UTENTE
MANUAL DE INSTRUCCIONES
MANUEL D’INSTRUCTIONS
BEDIENUNGSANLEITUNG
Page 2

Page 2
INDEX
1.0 DESCRIPTION page 4
2.0 INTRODUCTION page 6
3.0 UNPACKING AND ASSEMBLY page 6
4.0 USING THE MICROSCOPE page 7
5.0 RECHARGEABLE BATTERY (B-150R MODELS) page 8
6.0 AUTOMATIC LIGHT CONTROL (B-150ALC MODELS) page 9
7.0 MAINTENANCE page 10
8.0 TECHNICAL SPECIFICATIONS page 10
9.0 RECOVERY AND RECYCLING page 11
Page 3

Page 3
This microscope is a scientic precision instrument designed to last for many years with a minimum of maintenance. It is built to high optical and mechanical standards and to withstand daily use.
Optika reminds you that this manual contains important information on safety and maintenance, and that it
must therefore be made accessible to the instrument users.
Optika declines any responsibility deriving from instrument uses that do not comply with this ma-nual.
Safety guidelines
This manual contains important information and warnings regarding safety about installation, use and
maintenance of the microscope. Please read this manual carefully before using the equipment. To
ensure safe use, the user must read and follow all instructions in this manual. OPTIKA products are
designed for safe use in normal operating conditions. The equipment and accessories described in
the manual are manufactured and tested according to industry standards for safety instrumentation
laboratory. Misuse can cause personal injury or damage to the instrument. Keep this manual at hand
close to the instrument, for an easy consultation.
Electrical safety
Before connecting the power cord to wall outlet, ensure that your mains voltage for your region corresponds to the voltage supply of the instrument, and that the illuminator’s switch is in position OFF. The
user must observe the safety regulations in force in his region. The instrument is equipped with CE
safety marking, in any case the user has full responsibility concerning the safe use of that instrument.
Warning/Caution symbols used in this manual
The user should be aware of safety aspects when using the instrument. Warning or hazard symbols
are shown below. These symbols are used in this manual.
The instructions on this symbol to avoid possible severe personal injuries.
Warning of use; the incorrect operation on the instrument can cause damages to the
person or instrument.
Possibility of electric shock.
Attention: high temperature surfaces. Avoid direct contact.
Technical notes or usage tips.
SAFETY GUIDELINES
Page 4
Page 4
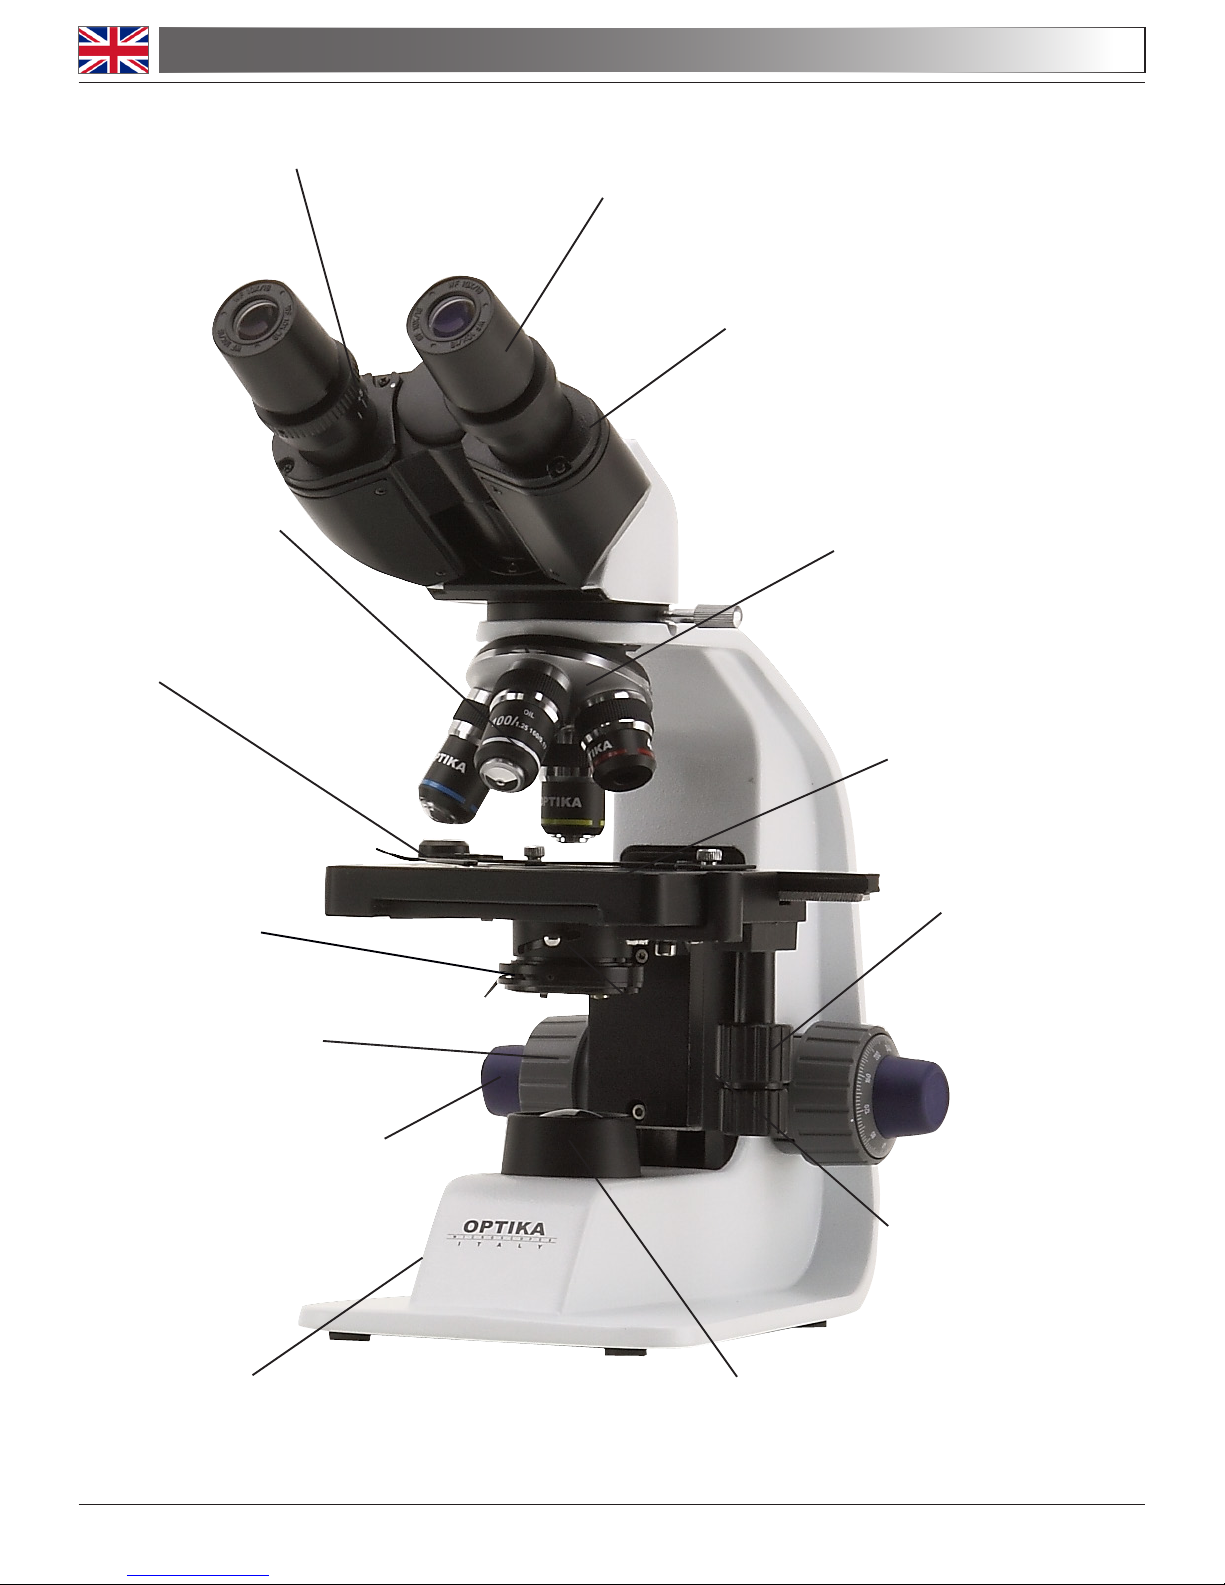
1.0 DESCRIPTION
EYEPIECE
DIOPTRIC ADJUSTMENT RING
BINOCULAR
OBSERVATION HEAD
OBJECTIVE
SLIDE CLAMP
COARSE FOCUSING
KNOB
FINE FOCUSING
KNOB
BRIGHTNESS ADJUSTMENT
ON/OFF KNOB (ON LEFT SIDE)
LED
ILLUMINATOR
IRIS DIAPHRAGM
TRANSLATION
KNOBS
CONDENSER
STAGE
NOSEPIECE
Page 5
Page 5
1.0 DESCRIPTION
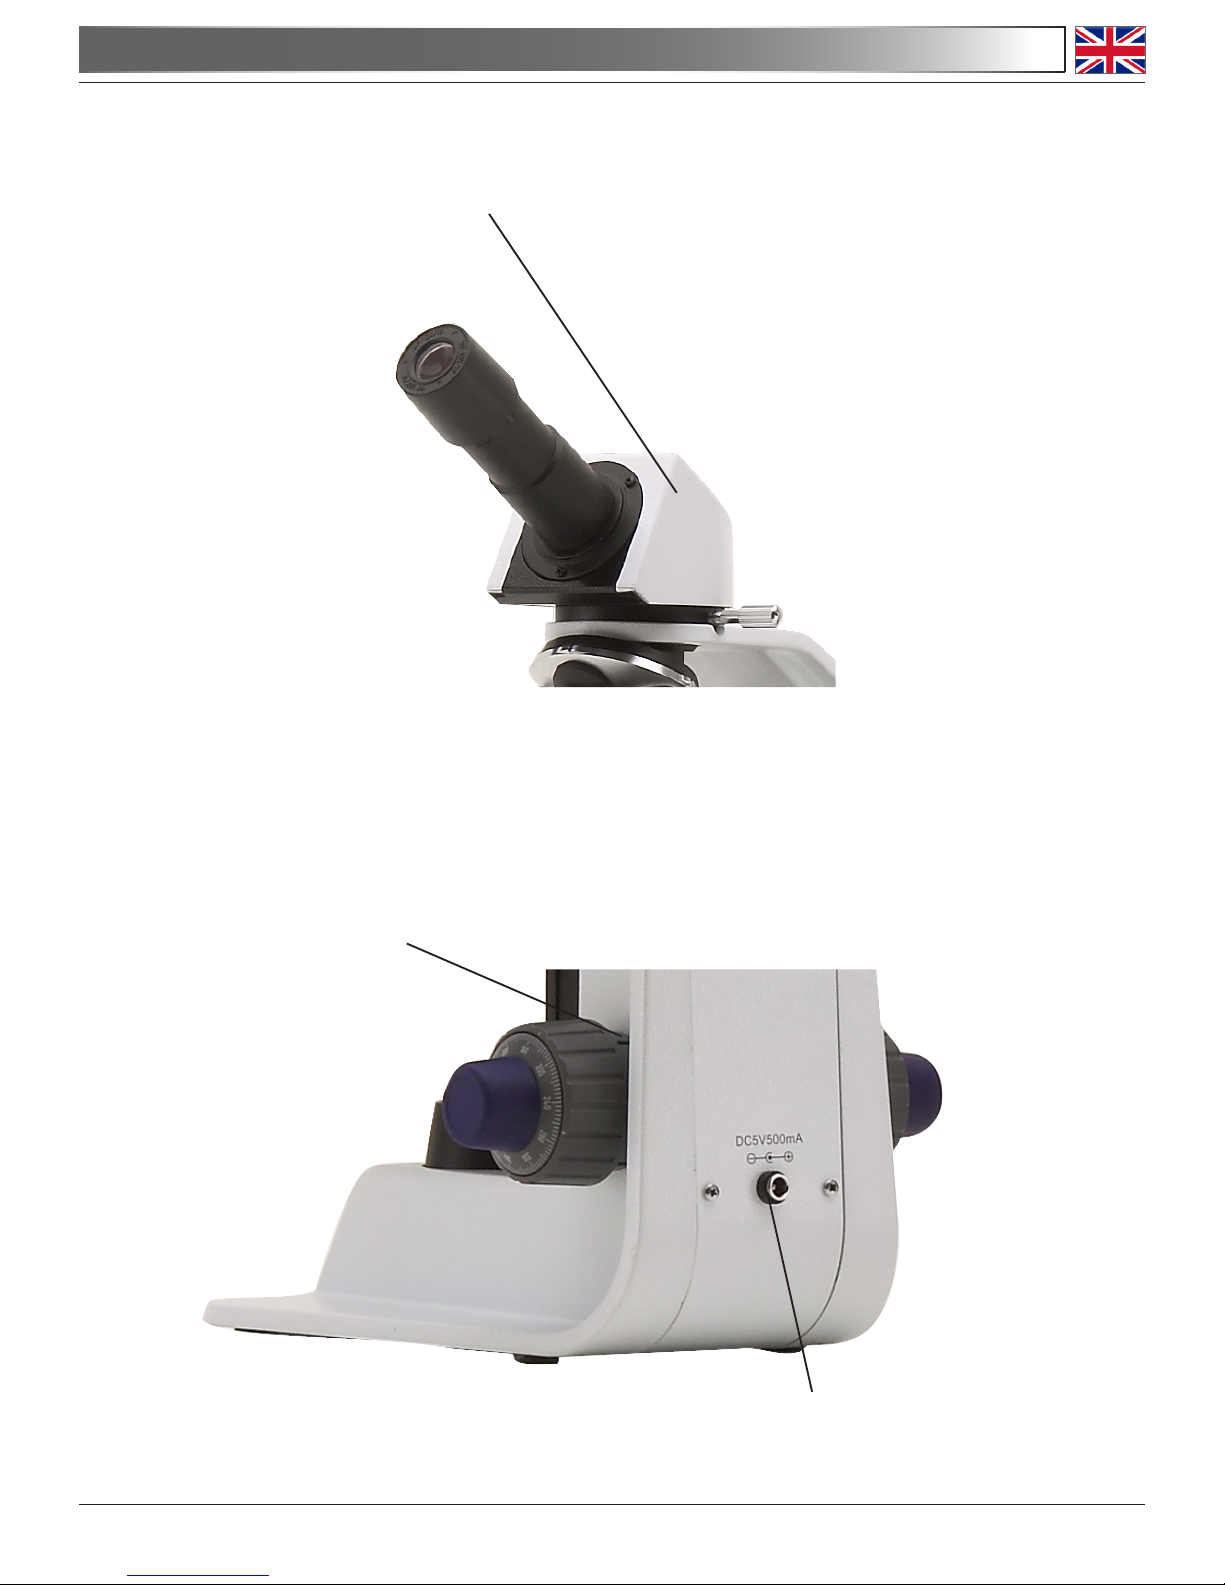
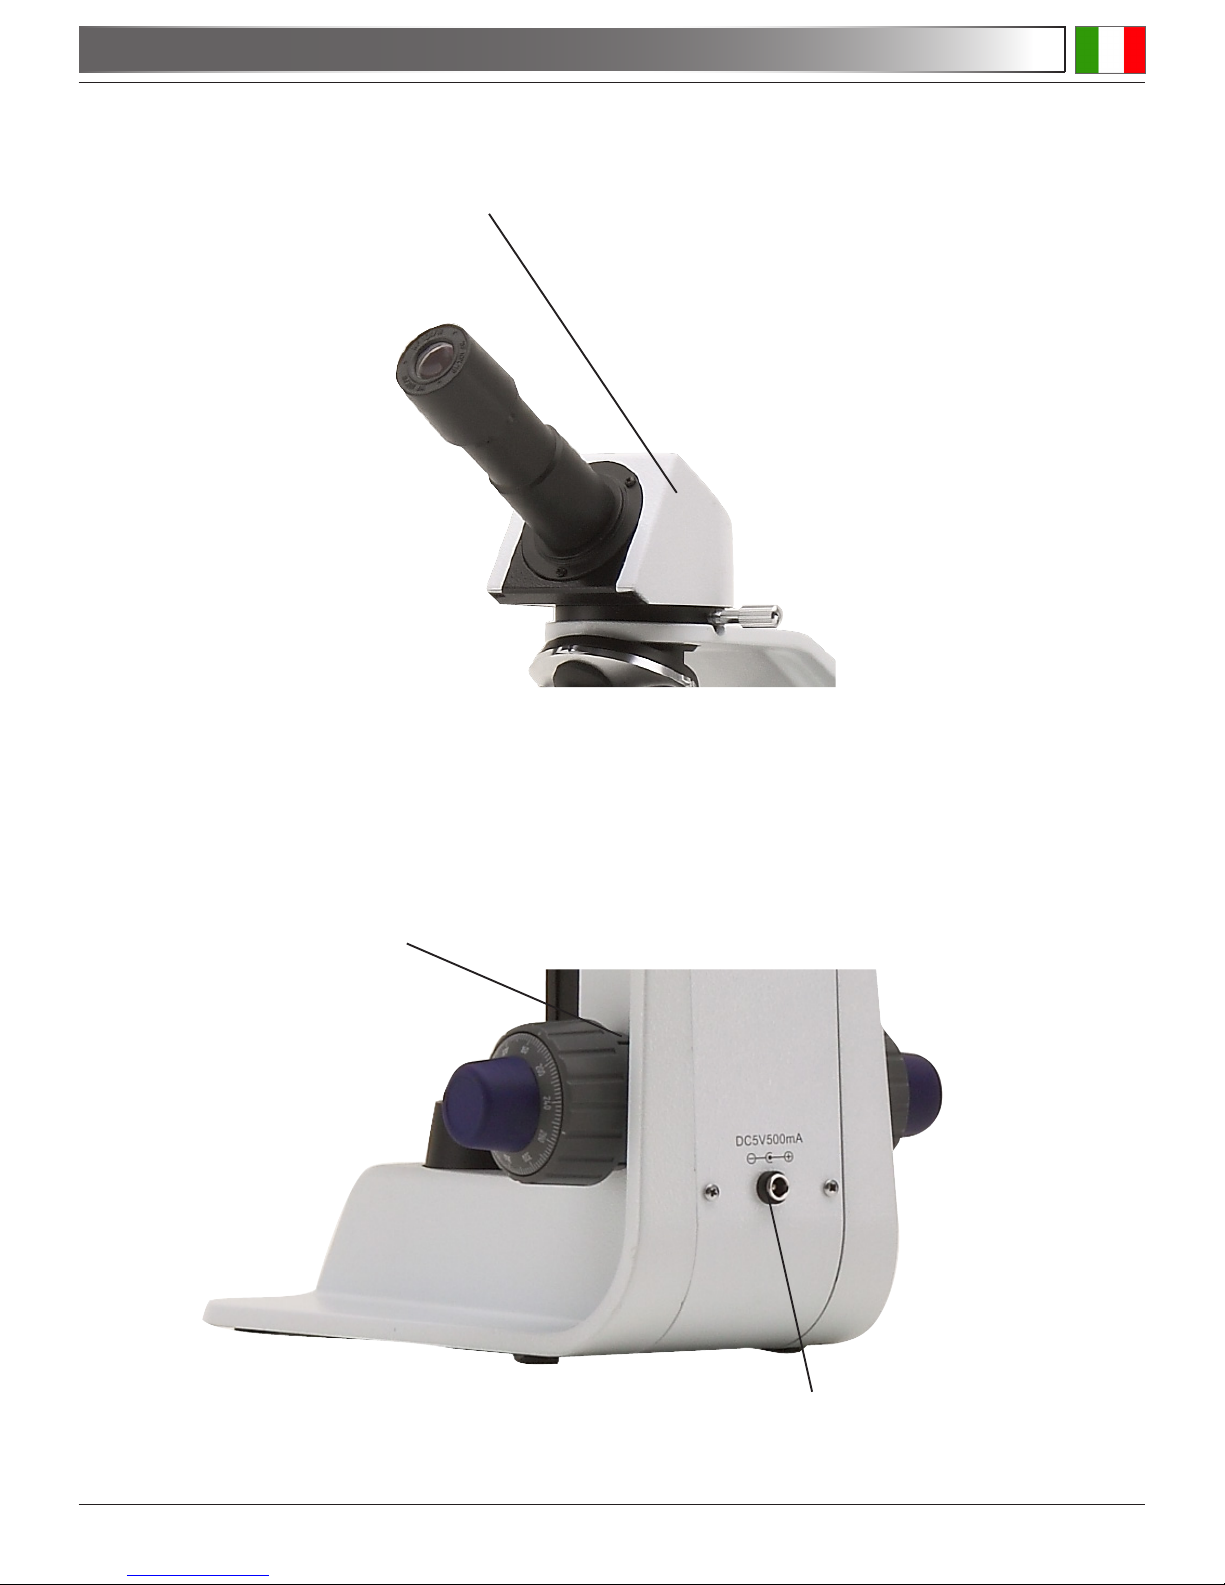
MONOCULAR
OBSERVATION
HEAD
TENSION
ADJUSTMENT KNOB
POWER SUPPLY
INPUT JACK
REAR:
Page 6

Page 6
2.0 INTRODUCTION
This microscope is a scientic precision instrument designed to last for many years with a minimum of main-
tenance. It is built to high optical and mechanical standards and to withstand daily use.
Optika reminds you that this manual contains important information on safety and maintenance, and that it
must therefore be made accessible to the instrument users.
Optika declines any responsibility deriving from instrument uses that do not comply with this manual.
3.1 The microscope is housed in a moulded Styrofoam container. Remove the tape from the edge of
the container and lift the top half of the container. Take some care to avoid that the optical items (objectives and eyepieces) fall out and get damaged. Using both hands (one around the arm and one
around the base), lift the microscope from the container and put it on a stable desk.
3.2 Place the observation head onto the top of the arm and tighten the lock-screw. Insert the eyepieces
into the eye tubes.
3.3 Connect the provided power supply to the power supply input jack on the rear of the microscope.
3.0 UNPACKING AND ASSEMBLY
Connect the mains plug into the socket at the base
Make sure, before you turn the illumination on, that the voltage selector is set to the mains voltage for
your region.
The power cord should be used only on network sockets equipped with adequate grounding.
Contact a technician to check the state of your electrical system. If there is no need to install additional
accessories, the instrument is now ready for use. Once positioned and installed with the necessary
components, the microscope is ready to be used. Your microscope is a laboratory instrument designed to last. Handle it always carefully and avoid abrupt vibrations or shocks. Always disconnect the
power cable from the microscope when not in use for long time, while you clean it or when you perform
any maintenance.
AVOID DISASSEMBLING THE INSTRUMENT
Do not disassemble the instrument. This entails the cancellation of the warranty and may cause
malfunction.
Page 7
Page 7
4.0 USING THE MICROSCOPE
4.1 Adjust the observation head
Loosen the lock-screw, turn the observation head to a comfortable position for observation, and then
lock the lock-screw.
4.2 Place the specimen on the stage
Lock the specimen slide on the mechanical stage using the slide clamp. Ensure that the specimen is
centred over the stage opening by adjusting the coaxial knobs of the stage.
4.3 Lamp settings
The microscope is tted with power white LED illuminator. Before turning on the light, read the section
6.3 about electrical safety precautions. Insert the plug of the power supply into the jack on the rear.
Turn the brightness adjustment knob in order to switch the light on and to reach a brightness suitable
for observation.
4.4 Adjust interpupillary distance
Hold the right and left parts of the observation head by both hands and adjust the interpupillary dis-
tance by turning the two parts until one circle of light can be seen.
4.5 Focus and diopter adjustment
Rotate the coarse focusing knob to bring the slide into focus using an objective with a low magnication. Adjust the ne focusing knob to get the image sharp and clear while observing with your right
eye, then turn the dioptric adjustment ring on the left eyepiece until a sharp and clear image can be
observed also with the other eye. Turn the tension-adjust-knob to get a suitable tension for the focus
system. When the image is in focus, turn the nosepiece to choose the objective you need.
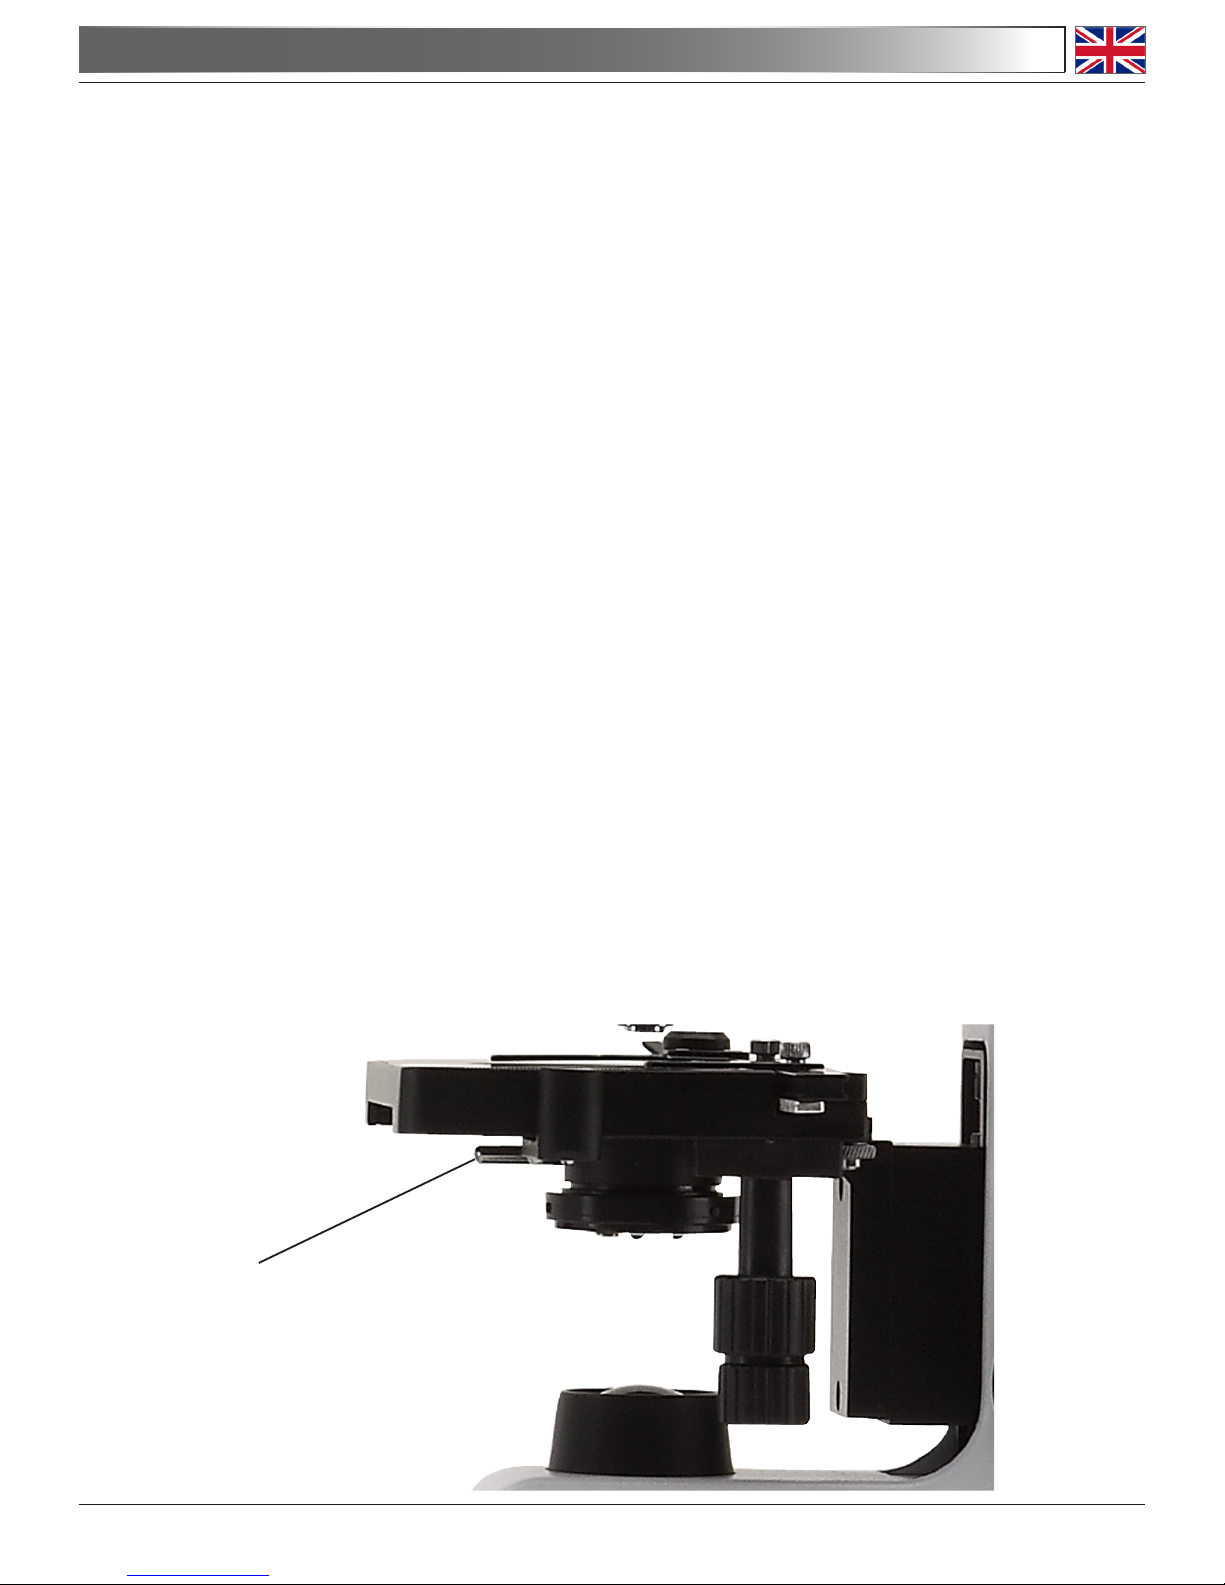
4.6 Condenser adjustment
Hold the lever of the condenser and rotate it up or down until you reach a clear and uniform sample
illumination.
4.7 Set the numerical aperture
Adjust the aperture of the iris diaphragm to set the numerical aperture of the illuminator, thus control-
ling image contrast and resolution.
HOLD THIS
LEVER AND
ROTATE IT
Page 8
Page 8
B-150R models are equipped with a built-in rechargeable battery.
The battery can be recharged simply by connecting the microscope to the provided external power supply,
using the jack connector on the rear.
During the charging process, you can use the microscope as usual.
In order to speed up the charging of the battery, it’s suggested to turn the
LED off when you connect the external power supply.
For a full charge, it’s suggested to keep the external power supply connected
to the microscope for at least 8 hours.
Always unplug the external power supply from the microscope, when
not in use.
5.0 RECHARGEABLE BATTERY (B-150R MODELS)
Page 9

Page 9
B-150ALC models have a special function called “Automatic Light Control”.
The level of light is adjusted by the microscope in order to maintain the same level as the one the user has
chosen, no matter if the aperture of the diaphgram changes, another objective is inserted, opacity of the
sample changes, etc.
Model B-151ALC
1) Set the focus on the sample as described in the previous chapters, using the objective of your choice.
2) Rotate the brightness adjustment knob in order to get a comfortable level of illumination.
3) Press the ALC button on the side of the microscope.
Now the ALC system is working: if you open or close the aperture diaphragm or change objective, the system
will try to maintain the same level of illumination as the one you stored when you pressed the button.
4) Press the ALC button again to return to a manual control of illumination.
6.0 AUTOMATIC LIGHT CONTROL (B-150ALC MODELS)
BRIGHTNESS
ADJUSTMENT
KNOB
ALC BUTTON
Page 10

Page 10
7.1 Microscopy environment
This microscope is recommended to be used in a clean, dry and shock free environment with a
temperature of 0-40°C and a maximum relative humidity of 85 % (non condensing). Use a dehumidier
if needed.
7.2 To think about when and after using the microscope
• The microscope should always be kept vertically when moving it and be careful so that no moving
parts, such as the eyepieces, fall out.
• Never mishandle or impose unnecessary force on the microscope.
• Never attempt to service the microscope yourself.
• After use, turn off the light immediately, cover the microscope with the included dust-cover, and keep
it in a dry and clean place.
7.3 Electrical safety precautions
• Before plugging in the power supply, make sure that the supplying voltage of your region matches with
the operation voltage of the equipment and that the lamp switch is in off-position.
• Users should observe all safety regulations of the region. The equipment has acquired the CE safety
label. However, users do have full responsibility to use this equipment safely.
7.4 Cleaning the optics
• If the optical parts need to be cleaned try rst to: use compressed air.
• If that is not sufcient: use a soft lint-free piece of cloth with water and a mild detergent.
• And as a nal option: use the piece of cloth moistened with a 3:7 mixture of ethanol and ether.
Note: ethanol and ether are highly ammable liquids. Do not use them near a heat source, near
sparks or near electric equipment. Use these chemicals in a well ventilated room.
• Remember to never wipe the surface of any optical items with your hands. Fingerprints can damage
the optics.
• Do not disassemble objectives or eyepieces in attempt to clean them.
7.5 If you need to send the microscope to Optika for maintenance, please use the original packaging.
MODELS: B-151: monocular with xed table; objectives 4x, 10x, 40x
B-153: monocular with double layer stage; objectives 4x, 10x, 40x, 60x
B-155: monocular with double layer stage; objectives 4x, 10x, 40x, 100x
B-157: binocular with double layer stage; objectives 4x, 10x, 40x, 60x
B-159: binocular with double layer stage; objectives 4x, 10x, 40x, 100x
EYEPIECES: WF 10X/ 18mm
NOSEPIECE: Quadruple
OBJECTIVES: Achromatic type
WORKING STAGE: Double layer with mechanical sliding stage, size 125x116mm, X-Y
movement range 76x30.
Only for B-151: plain stage 125X120mm.
CONDENSER: Abbe condenser, N.A. 1.2 precentered
Only for B-151: Abbe condenser N.A. 0.65 precentered
FOCUSING SYSTEM: Coaxial coarse and ne focusing system, with tension adjustment mechanism
8.0 TECHNICAL SPECIFICATIONS
7.0 MAINTENANCE
Page 11
Page 11
ILLUMINATION: 1W White LED, 6300K, with brightness control.
POWER SUPPLY: Input Voltage: 100-240Vac / 50-60Hz
Output: 5Vdc 500mA (B-150R model: 6Vdc 2,5A)
Internal NiMH rechargeable battery (B-150R models only)
8.0 TECHNICAL SPECIFICATIONS
9.0 RECOVERY AND RECYCLING
Art.13 Dlsg 25 july 2005 N°151. “According to directives 2002/95/EC, 2002/96/EC and 2003/108/EC relating to the reduction in the use of hazardous substances in electrical and electronic equipment and waste
disposal.”
The basket symbol on equipment or on its box indicates that the product at the end of its useful life should be
collected separately from other waste.
The separate collection of this equipment at the end of its lifetime is organized and managed by
the producer. The user will have to contact the manufacturer and follow the rules that he adopted for end-of-life equipment collection. The collection of the equipment for recycling, treatment
and environmentally compatible disposal, helps to prevent possible adverse effects on the environment and health and promotes reuse and/or recycling of materials of the equipment. Improper
disposal of the product involves the application of administrative penalties as provided by the laws in force.
Page 12

Pagina 12
INDICE
1.0 DESCRIZIONE pag. 14
2.0 INTRODUZIONE pag. 16
3.0 DISIMBALLAGGIO E MONTAGGIO pag. 16
4.0 UTILIZZO DEL MICROSCOPIO pag. 17
5.0 BATTERIA RICARICABILE (MODELLI B-150R) pag. 18
6.0 CONTROLLO AUTOMATICO DELLA LUCE (MODELLI B-150ALC) pag. 19
7.0 MANUTENZIONE pag. 20
8.0 SPECIFICHE TECNICHE pag. 20
9.0 MISURE ECOLOGICHE pag. 21
Page 13
Pagina 13
Il presente microscopio è uno strumento scientico di precisione studiato per durare molti anni con una manutenzione minima, essendo costruito secondo i migliori standard ottici e meccanici e progettato per un utilizzo
quotidiano.
Optika ricorda che il presente manuale contiene informazioni importanti per un uso sicuro e una corretta manutenzione dello strumento. Esso deve quindi essere accessibile a chiunque lo utilizzi.
Optika declina ogni responsabilità derivante da un uso improprio dei suoi strumenti non indicato dalla presente guida.
Avvertenze di sicurezza
Questo manuale contiene importanti informazioni e avvertenze riguardanti la sicurezza riguardo l’installazione, l’utilizzo e la manutenzione del microscopio. Si raccomanda di leggere attentamente il
manuale prima di qualsiasi utilizzo dello strumento. Per assicurare un utilizzo sicuro l’utente deve
leggere e seguire tutte le istruzioni poste nel presente manuale.
I prodotti OPTIKA sono studiati per un utilizzo sicuro in condizioni operative normali. Lo strumento e
gli accessori descritti nel manuale sono realizzati e testati secondo standard industriali di sicurezza
per strumentazione da laboratorio.
L’utilizzo non corretto può causare lesioni alla persona o danni allo strumento.
Mantenere questo manuale a portata di mano vicino allo strumento, per una facile consultazione.
Precauzioni di sicurezza elettrica
Prima di collegare il cavo di alimentazione alla presa di rete, assicurarsi che la tensione di rete della
vostra regione corrisponda alla tensione di alimentazione dello strumento, e che l’interruttore dell’illuminatore sia in posizione spenta.
L’utente deve osservare la regolamentazione riguardante la sicurezza in vigore nel proprio Stato. Lo
strumento è dotato di marcatura di sicurezza CE, in ogni caso l’utente ha piena responsabilità riguardo all’utilizzo sicuro dello strumento stesso.
Simboli di avvertenza/pericolo usati nel manuale
L’utente deve essere a conoscenza degli aspetti legati alla sicurezza nel momento in cui utilizza lo
strumento. I simboli di avvertenza o pericolo sono indicati sotto. Tali simboli sono utilizzati in questo
manuale di istruzioni.
Seguire le istruzioni contrassegnate da questo simbolo per evitare possibili gravi danni
alle persone.
Avvertimento di utilizzo; la non corretta operazione sullo strumento può causare danni
alla persona o allo strumento.
Possibilità di shock elettrico.
Attenzione: superci ad elevata temperatura. Evitare il contatto diretto.
Note tecniche o consigli di utilizzo.
INDICAZIONI PER LA SICUREZZA
Page 14
Pagina 14
1.0 DESCRIZIONE
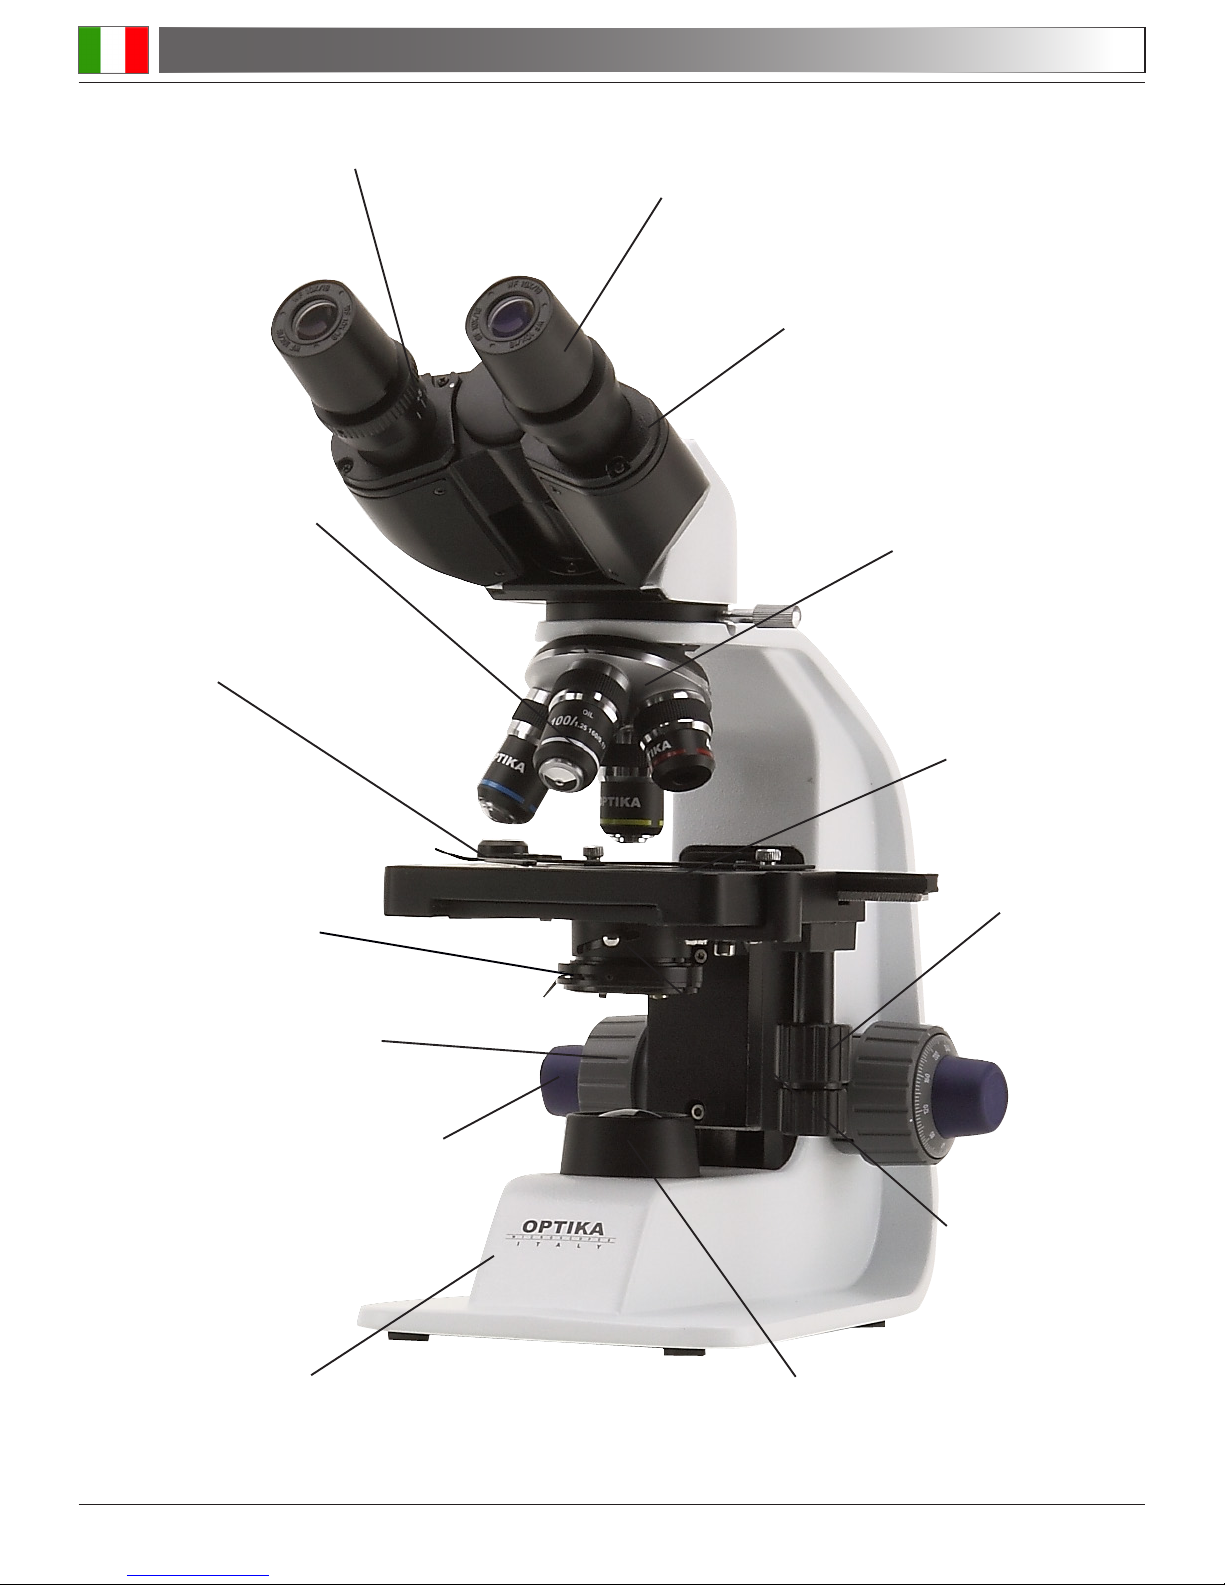
OCULARE
COMPENSAZIONE
DIOTTRICA
TESTATA DI OSSERVAZIONE
BINOCULARE
OBIETTIVI
PINZETTA
MANOPOLA FUOCO
MACROMETRICA
MANOPOLA FUOCO
MICROMETRICA
REGOLAZIONE INTENSITA’ E ON/
OFF (SUL LATO SINISTRO)
ILLUMINATORE LED
DIAFRAMMA
AD IRIDE
MANOPOLA DI
TRASLAZIONE
CONDENSATORE
TAVOLINO
REVOLVER
Page 15
Pagina 15
1.0 DESCRIZIONE
TESTATA DI OSSERVAZIONE
MONOCULARE
MANOPOLA DI REGOLAZIONE
DELLA TENSIONE
JACK INGRESSO
ALIMENTATORE
RETRO:
Page 16
Pagina 16
2.0 INTRODUZIONE
Il presente microscopio è uno strumento scientico di precisione studiato per durare molti anni con una manu-
tenzione minima, essendo costruito secondo i migliori standard ottici e meccanici e progettato per un utilizzo
quotidiano.
Optika ricorda che il presente manuale contiene informazioni importanti per un uso sicuro e una corretta ma-
nutenzione dello strumento. Esso deve quindi essere accessibile a chiunque lo utilizzi.
Optika declina ogni responsabilità derivante da un uso improprio dei suoi strumenti non indicato dalla pre-
sente guida
3.1 Il microscopio si trova in un imballaggio di polistirolo espanso stampato. Dopo aver tolto il nastro adesivo da tutti gli imballi, sollevare la metà superiore dell’imballaggio. Fare attenzione a non far cadere
o danneggiare i componenti ottici (obiettivi e oculari). Estrarre il microscopio dal suo imballaggio con
entrambe le mani (una intorno al braccio e una intorno alla base) e appoggiarlo su un piano stabile.
3.2 Fissare la testata di osservazione sulla parte superiore del braccio mediante l’apposita vite di serrag-
gio. Inserire gli oculari nei tubi porta-oculari.
3.3 Connettere l’alimentatore (fornito nella confezione) al jack di ingresso posto sul retro.
3.0 DISIMBALLAGGIO E MONTAGGIO
Connettere il cavo di alimentazione nella presa posta nella base dello stativo.
Assicurarsi, prima dell’accensione, che il selettore del voltaggio sia impostato sulla tensione di rete
della vostra regione.
Il cavo di alimentazione deve essere utilizzato solo su prese di rete dotate di adeguata messa a terra.
Contattare un vostro tecnico per assicurarsi sullo stato dell’impianto elettrico. Se non vi è necessità di
installare altri accessori, lo strumento è ora pronto per l’utilizzo. Una volta posizionato e installato con
i necessari componenti, il microscopio è pronto per l’utilizzo. Il vostro microscopio è uno strumento da
laboratorio progettato per durare a lungo. Maneggiatelo sempre con cura ed abitate brusche vibrazioni o colpi.Scollegare sempre il cavo di alimentazione dal microscopio quando non viene utilizzato per
lunghi tempi, mentre lo si pulisce o quando si esegue una qualsiasi manutenzione.
EVITARE DI SMONTARE LO STRUMENTO
Non disassemblare lo strumento. Questo comporta l’annullamento della garanzia e potrebbe causare
malfunzionamenti.
Page 17

Pagina 17
AFFERRARE LA LEVETTA
DEL
CONDENSATORE E RUOTARE
4.1 Regolazione della testata di osservazione
Allentare la vite di serraggio, ruotare la testata no a trovare una posizione comoda per l’osservazione
e quindi avvitarla nuovamente.
4.2 Posizionamento del vetrino sul tavolo portapreparati
Fissare il vetrino con preparato al piano meccanico mediante l’apposita pinzetta per il sostegno dei
campioni. Regolando le manopole coassiali del piano portaoggetti, assicurarsi che il vetrino si trovi al
centro del campo di osservazione.
4.3 Impostazioni del sistema di illuminazione
Il microscopio è dotato di un illuminatore bianco LED di potenza. Prima di accendere l’illuminazione,
leggere attentamente la sezione 6.3 sulle precauzioni per un utilizzo sicuro. Inserire lo spinotto dell’alimentatore nel jack posto sul retro. Ruotare la manopola di regolazione della luminosità per accendere
l’illuminatore e impostare la luce ideale per l’osservazione.
4.4 Regolazione della distanza interpupillare
Regolare la distanza interpupillare dei portaoculari sulla testata no ad ottenere la visione di un unico
campo luminoso circolare afferrando le parti destra e sinistra della testata di osservazione con entrambe le mani.
4.5 Regolazione della messa a fuoco e compensazione diottrica
Ruotare la manopola di messa a fuoco macrometrica per focalizzare il vetrino con un obiettivo con
basso potere di ingrandimento. Regolare la manopola di messa a fuoco micrometrica no ad ottenere
un’immagine chiara e denita osservando con l’occhio destro, quindi ruotare l’anello di compensazione diottrica posto sull’oculare sinistro no ad ottenere un’immagine denita anche nell’occhio sinistro.
Con la manopola di regolazione della tensione impostare la tensione migliore per la messa a fuoco.
Quando l’immagine appare a fuoco, scegliere l’obiettivo necessario con l’apposito revolver.
4.6 Regolazione del condensatore
Afferrare la levetta del condensatore e ruotare verso l’alto o verso il basso no ad ottenere un’illuminazione chiara e uniforme del campione.
4.7 Impostazione dell’apertura numerica
Per impostare l’apertura numerica dell’illuminatore, regolare l’apertura del diaframma a iride posto
sotto il condensatore. In questo modo si controllano contrasto e risoluzione dell’immagine.
4.0 UTILIZZO DEL MICROSCOPIO
Page 18

Pagina 18
I modelli B-150R sono dotati di batteria ricaricabile interna.
La batteria può essere ricaricata semplicemente collegando il microscopio all’alimentatore esterno fornito in
dotazione, usando il jack nella parte posteriore.
Durante il processo di carica, potete utilizzare il microscopio normalmente.
Per velocizzare la ricarica della batteria, è consigliato spegnere completamente il
LED quando collegate l’alimentatore esterno.
Per ottenere una ricarica completa, è consigliato mantenere il microscopio
connesso all’alimentatore per almeno 8 ore.
Scollegare sempre l’alimentatore dal microscopio, quando questo non
viene utilizzato.
5.0 BATTERIA RICARICABILE (MODELLI B-150R)
Page 19

Pagina 19
I modelli B-150ALC sono dotati di una speciale funzione chiamata “Automatic Light Control” (Controllo automatico della luce).
Il livello della luce è regolato dal microscopio in modo da mantenere il livello prescelto dall’utente, indipendentemente dalla variazione del diaframma di apertura, dall’inserimento di un obiettivo diverso, dal cambiamento
dell’opacità del campione, ecc.
Modello B-151ALC
1) Mettere a fuoco il campione come descritto nei capitoli precedenti, usando l’obiettivo desiderato.
2) Agire sulla manopola di regolazione dell’intensità in modo da ottenere un livello confortevole di illumi
nazione.
3) Premere il pulsante ALC sul anco del microscopio.
Ora il sistema ALC è in funzione: se aprite o chiudete il diaframma di apertura oppure cambiate obiettivo, il
sistema cercherà di mantenere il livello di luce corrispondente a quello memorizzato premendo il pulsante
ALC.
4) Premere di nuovo il pulsante ALC per tornare al controllo manuale dell’illuminazione.
6.0 CONTROLLO AUTOMATICO DELLA LUCE (MODELLI B-150ALC)
MANOPOLA
REGOLAZIONE
INTENSITÀ
PULSANTE ALC
Page 20

Pagina 20
7.1 Ambiente di lavoro
Si consiglia di utilizzare il microscopio in un ambiente pulito e secco, privo di urti, ad una temperatura
fra 0°C e 40°C e con una umidità relativa massima dell’85% (in assenza di condensazione). Si
consiglia l’uso di un deumidicatore se necessario.
7.2 Prima e dopo l’utilizzo del microscopio
• Tenere il microscopio sempre in posizione verticale quando lo si sposta. Assicurarsi inoltre che le parti
mobili, ad esempio gli oculari, non cadano.
• Non maneggiare senza precauzioni e non adoperare inutile forza sul microscopio.
• Non cercare di provvedere da soli alla riparazione.
• Dopo l’uso spegnere immediatamente la lampada, coprire il microscopio con l’apposita custodia
antipolvere in dotazione e tenerlo in un luogo asciutto e pulito.
7.3 Precauzioni per un utilizzo sicuro
• Prima di collegare il cavo di alimentazione alla rete elettrica assicurarsi che il voltaggio locale sia
idoneo a quello dell’apparecchio e che l’interruttore della lampada sia posizionato su OFF.
• Attenersi a tutte le precauzioni di sicurezza della zona in cui ci si trova ad operare. L’apparecchio
è omologato secondo le norme di sicurezza CE. Gli utenti hanno comunque piena responsabilità
nell’utilizzo sicuro del microscopio.
7.4 Pulizia delle ottiche
• Qualora le ottiche necessitino di essere pulite, utilizzare prima di tutto aria compressa.
• Se questo non fosse sufciente usare un panno non slacciato, inumidito con acqua e un detergente
delicato.
• Come ultima opzione è possibile usare un panno inumidito con una soluzione 3:7 di alcol etilico ed
etere.
Attenzione: l’alcol etilico e l’etanolo sono sostanze altamente inammabili. Non usarle vicino ad una
fonte di calore, a scintille o presso apparecchiature elettriche. Le sostanze devono essere adoperate
in un luogo ben ventilato.
• Non stronare la supercie di nessun componente ottico con le mani. Le impronte digitali possono
danneggiare le ottiche.
• Non smontare gli obiettivi o gli oculari per cercare di pulirli.
7.5 Si prega di utilizzare l’imballaggio originale nel caso in cui fosse necessario rispedire il microscopio ad
Optika per la manutenzione.
7.0 MANUTENZIONE
MODELLI: B-151: monoculare con tavolino sso; obiettivi 4x, 10x, 40x
B-153: monoculare con tavolino doppio strato; obiettivi 4x, 10x, 40x, 60x
B-155: monoculare con tavolino doppio strato; obiettivi 4x, 10x, 40x, 100x
B-157: binoculare con tavolino doppio strato; obiettivi 4x, 10x, 40x, 60x
B-159: binoculare con tavolino doppio strato; obiettivi 4x, 10x, 40x, 100x
OCULARI: WF 10X/ 18mm
REVOLVER: Quadruplo
OBIETTIVI: Acromatici
PIANO DI LAVORO: Tavolino traslatore a doppio strato con traslatore scorrevole, dimensioni
8.0 SPECIFICHE TECNICHE
Page 21

Pagina 21
125x116mm, range di traslazione 76x30.
Solo per B-151: tavolino sso 125x120mm.
CONDENSATORE: Condensatore di Abbe, A.N. 1.2 precentrato.
Solo per B-151: Condensatore di Abbe, A.N. 0.65 precentrato
MESSA A FUOCO: Sistema di messa a fuoco macrometrica e micrometrica coassiale,
con regolazione della tensione.
ILLUMINAZIONE: LED bianco 1W, 6300K, con controllo luminosità.
ALIMENTATORE : Tensione di ingresso: 100-240Vac / 50-60Hz
Uscita: 5Vdc 500mA (modelli B-150R: 6Vdc 2,5A)
batteria interna ricaricabile NiMH (solo modelli B-150R)
8.0 SPECIFICHE TECNICHE
Ai sensi dell’articolo 13 del decreto legislativo 25 luglio 2005 n°151. “Attuazione delle direttive 2002/95/CE,
2002/96/CE e 2003/108/CE, relative alla riduzione dell’uso di sostanze pericolose nelle apparecchiature elettriche ed elettroniche, nonché allo smaltimento dei riuti”.
Il simbolo del cassonetto riportato sulla apparecchiatura o sulla sua confezione indica che il prodotto alla
ne della propria vita utile deve essere raccolto separatamente degli altri riuti. La raccolta differenziata della
presente apparecchiatura giunta a ne vita è organizzata e gestita dal produttore.
L’utente che vorrà disfarsi della presente apparecchiatura dovrà quindi contattare il produttore e seguire il
sistema che questo ha adottato per consentire la raccolta separata dell’apparecchiatura giunta a ne vita.
L’adeguata raccolta differenziata per l’avvio successivo della apparecchiatura dismessa al riciclaggio, al trattamento e allo smaltimento ambientalmente compatibile contribuisce ad evitare possibili effetti negativi sull’ambiente e sulla salute e favorisce il reimpiego e/o riciclo dei materiali di cui è composta l’apparecchiatura.
Lo smaltimento abusivo del prodotto da parte del detentore comporta l’applicazione delle sanzioni amministrative previste dalla normativa vigente.
9.0 MISURE ECOLOGICHE
Page 22

Página 22
INDICE
1.0 DESCRIPCIÓN pag. 24
2.0 INTRODUCCIÓN pag. 26
3.0 DESEMBALAJE Y MONTAJE pag. 26
4.0 UTILIZACIÓN DEL MICROSCOPIO pag. 27
5.0 BATERIA RECARCABLE (MODELOS B-150R) pag. 28
6.0 CONTROL AUTOMÁTICO DE LUZ – ALC -(MODELOS B-150ALC) pag. 29
7.0 MANTENIMIENTO pag. 30
8.0 ESPECIFICACIONES TÉCNICAS pag. 30
9.0 MEDIDAS ECOLÓGICAS pag. 31
Page 23

Página 23
El presente microscopio es un instrumento cientíco de precisión proyectado para durar muchos años con
un mínimo nivel de mantenimiento. Para su construcción se han utilizado los mejores modelos ópticos y
mecánicos, que lo convierten en el instrumento ideal para ser utilizado a diario.
Optika avisa que el presente manual contiene información importante para un uso seguro y el correcto mantenimiento del instrumento. Por lo tanto debe ser accesible a todos aquellos que lo utilizan.
Optika declina cualquier responsabilidad debida al uso inapropiado del instrumento no con templado en la
presente guía.
Advertencias de seguridad
Este manual incluye importante información y advertencias sobre la seguridad de instalación, utilización y mantenimiento del microscopio. Se ruega leer atentamente el manual antes de utilizar el
instrumen to. Para una utilización segura, el usuario deberá leer y seguir atentamente todas la instrucciones indicadas en el manual.
Los productos OPTIKA han sido diseñados para ser utilizados en condiciones normales de trabajo. El
instrumento y los accesorios descritos en el manual han sido realizados y testados según las normas
industriales de seguridad de instrumentación de laboratorio.
Una utilización inadecuada podría dañar el instrumento o provocar lesiones al usuario. Mantener el
presente manual cerca del instrumento para facilitar su consulta.
Precauciones de seguridad sobre el sistema eléctrico
Antes de conectar el cable de alimentación a la corriente eléctrica, asegurarse que la tensión de entrada del lugar donde se usa el instrumento coincide con la tensión de utilización del microscopio, y
que el interruptor del ilu minador esté en la posición off.
El usuario debe consultar las normas de seguridad de su país. El instrumento incluye
una etiqueta de seguridad CE. En cualquier caso, el usuario se asume cualquier responsabilidad
relativa al uso seguro del instrumento.
Símbolos de advertencia o peligro utilizados en el manual
El usuario debe conocer las indicaciones relacionadas con la seguridad cuando utiliza el microscopio.
A continuación se indican los símbolos de advertencia o peligro que se han utilizado en éste manual
de instrucciones.
Seguir las instrucciones indicadas para evitar posibles daños severos al usuario.
Advertencia de utilización; la utilización inadecuada del instrumento podría dañar el
instrumento o provocar daños al usuario.
Posibilidad de descarga eléctrica.
Atención: supercie de elevada temperatura. Evitar el contacto directo.
Notas técnicas o consejos de utilización.
NORMAS DE SEGURIDAD
Page 24

Página 24
1.0 DESCRIPCIÓN
OCULAR
COMPENSACIÓN DIÓPTRICA
CABEZAL BINOCULAR
OBJETIVOS
PINZA DE SUJECIÓN DE
MUESTRAS
MANDO DE ENFOQUE
MACROMÉTRICO
MANDO DE ENFOQUE
MICROMÉTRICO
REGULACIÓN DE LA INTENSIDAD E INTERRUPTOR
ON/OFF (EN EL LATERAL IZQUIEDO)
ILUMINADOR LED
DIAFRAGMA IRIS
MANDO COAXIAL
DE TRASLACIÓN
CONDENSADOR
PLATINA PORTAPREPARADOS
REVÓLVER PORTAOBJETIVOS
Page 25

Página 25
1.0 DESCRIPCIÓN
CABEZAL MONOCULAR
MANDO DE REGULACIÓN DE LA
TENSIÓN
CONECTOR JACK DE
ALIMENTACIÓN
REVERSO:
Page 26

Página 26
2.0 INTRODUCCIÓN
El presente microscopio es un instrumento cientíco de precisión proyectado para durar muchos años con
un mínimo nivel de mantenimiento. Para su construcción se han utilizado los mejores modelos ópticos y
mecánicos, que lo convierten en el instrumento ideal para ser utilizado a diario.
Optika avisa que el presente manual contiene información importante para un uso seguro y el correcto mantenimiento del instrumento. Por lo tanto debe ser accesible a todos aquellos que lo utilizan.
Optika declina cualquier responsabilidad debida al uso inapropiado del instrumento no con templado en la
presente guía.
3.1 El microscopio se entrega con un embalaje de poliestireno. Después de abrir el embalaje, abrir la
parte superior del mismo. Prestar atención para evitar dañar los componentes ópticos (objetivos y
oculares) y para evitar que el instrumento se caiga. Extraer el microscopio de su embalaje con ambas
manos (con una mano sostener el brazo y con la otra la base) y apoyarlo en una supercie estable.
3.2 Fijar el cabezal de observación en la parte superior del soporte utilizando el correspondiente tornillo
de jación. Introducir los oculares en los tubos portaoculares.
3.3 Conectar el alimentador (suministrado con el microscopio) al conector jack situado en la parte posterior del microscopio.
3.0 DESEMBALAJE Y MONTAJE
Introducir el cable de alimentación en la toma situada en la base del microscopio.
Antes de encender el microscopio, asegurarse que el selector del voltaje se sitúe en la tensión de red
correspondiente a su país.
El cable de alimentación se debe utilizar solamente en tomas eléctricas con toma de tierra.
Consultar un técnico para asegurarse del estado de la red eléctrica. Si no fuera necesario installar
otros accesorios y, después de haber situado e instalado en el microscopio los componentes necesarios, estará listo para su utilización. El presente microscopio es un instrumento de laboratorio
proyectado para durar mucho tiempo. Manejarlo siempre con mucha pre caución, evitando vibraciones bruscas y golpes. Si no se utiliza durante un largo periodo de tiempo, desconectar siempre el
cable de alimentación cuando se limpia o se realiza el mantenimiento.
NO DESMONTAR EL MICROSCOPIO
No desmontar el microscopio para evitar anular la garantía y provocar un posible funcionamiento
incorrecto.
Page 27

Página 27
SUJETAR LA PALANCA
DEL CONDENSADOR Y GIRAR
4.1 Regulación del cabezal de observación
Aojar el tornillo de ajuste, girar el cabezal hasta obtener una posición cómoda para la observación y
jar de nuevo el tornillo.
4.2 Colocación de la muestra en la platina portapreparados
Fijar la muestra en la platina utilizando la correspondiente pinza de sujeción. Regular los mandos
coaxiales para asegurarse que la muestra se sitúe en el centro del campo de observación.
4.3 Regulación de la luminosidad
El microscopio incluye un iluminador LED blanco. Antes de poner en marcha el iluminador, leer aten-
tamente la sección 6.3. sobre las precauciones de seguridad eléctrica. Introducir el enchufe de alimentación en el conector jack situado en la parte posterior. Girar el mando de regulación de la luminosidad para encender el iluminador y seleccionar la luminosidad correcta para la observación.
4.4 Regulación de la distancia interpupilar
Mantener con las dos manos la parte izquierda y la derecha del cabezal de observación y regular la
distancia interpupilar de los portaoculares situados en el cabezal girando las dos partes hasta que no
se observe un único anillo de luz.
4.5 Regulación del enfoque y compensación dióptrica
Utilizando un objetivo con bajo poder de aumentos, girar el mando de enfoque macrométrico para
enfocar la muestra. Observando con el ojo derecho, regular el mando de enfoque micrométrico hasta
obtener una imagen clara y denida; girar el anillo de compensación dióptrica situado en el ocular
izquierdo hasta obtener una imagen denida también en el ojo izquierdo. Con el mando de regulación
de la tensión seleccionar la tensión correcta de enfoque. Cuando la imagen esté enfocada, seleccionar el objetivo necesario.
4.6 Regulación del condensador
Sujetar la palanca del condensador y girar hacia arriba o hacia abajo hasta obtener una iluminación
clara y uniforme de la muestra.
4.7 Selección de la apertura numérica
Regular la apertura del diafragma iris situado en la parte inferior del condensador para seleccionar
la apertura numérica del iluminador. De esta manera se controlará el contraste y la resolución de la
imagen.
4.0 UTILIZACIÓN DE L MICROSCOPIO
Page 28

Página 28
Los modelos B-150R están dotados de batería recargable interna.
La batería se puede recargar conectando el microscopio al alimentador externo suministrado, a través del
jack situado en la parte posterior.
Es posible utilizar el microscopio durante el procedimiento de recarga.
Para aligerar la recarga de la batería, se aconseja apagar completamente el LED.
Para realizar una recarga completa, se aconseja mantener el microscopio conectado
al alimentador durante al menos 8 horas.
Cuando no se utiliza el microscopio, desconectarlo siempre el alimentador.
5.0 BATERIA RECARCABLE (MODELOS B-150R)
Page 29

Página 29
Los modelos de la serie B-150 con ALC tienen una función especial en el sistema de iluminación denominado
Control Automático de luz (en Inglés Automatic Light Control)
La intensidad de luz se ajusta automáticamente en el microscopio para mantener el mismo nivel de iluminación seleccionado por el usuario, aunque éste haga cambios en la apertura del diafragam, en el objetivo con
el que trabaje, o varie la opacidad de las muestras, etc.
Modelo B-151ALC
1) Enfocar la muestra con el objetivo que el usuario haya seleccionado, tal y come se describe en el
capítulo anterior.
2) Girar el mando de ajuste de intensidad de luz hasta conseguir el nivel óptimo para la observación.
3) Presionar el botón ALC ubicado a la izquierda de la base del microscopio.
En estos momentos el sistema ALC (control automático de luz) está funcionando, si abre o cierra la apertura
del diafragma, o cambia de objetivo, el sistema mantendra el mismo nivel de intensidad de luz que haya almacenado en la memoria al presionar el botón ALC.
4) Para cancelar el control automático de luz, presione de nuevo el botón ALC y volverá al sistema ma-
nual.
6.0 CONTROL AUTOMÁTICO DE LUZ – ALC -(MODELOS B-150ALC)
MANDO DE AJUSTE
DE INTENSIDAD DE
LUZ
PU BOTÓN ALC (CONTROL
AUTOMÁTICO DE LUZ)
Page 30

Página 30
7.1 Ambiente de trabajo
Se aconseja utilizar este microscopio en un ambiente limpio y seco; también se deben evitar los
impactos. La temperatura de trabajo recomendada es de 0-40°C y la humedad relativa máxima es de
85% (en ausencia de condensación). Si fuera necesario, utilizar un deshumidicador.
7.2 Consejos antes y después de la utilización del microscopio
• Durante los desplazamientos, mantener el microscopio en posición vertical y prestar mucha atención
para evitar que se caigan los accesorios móviles, por ejemplo, los oculares.
• Manejar con cuidado el microscopio evitando usar una fuerza mayor de la necesaria.
• Evitar reparar el microscopio por su cuenta.
• Apagar la luz inmediatamente después de haber utilizado el microscopio, cubrirlo con su
correspondiente funda antipolvo y mantenerlo en un ambiente limpio y seco.
7.3 Precauciones de seguridad relativas al sistema eléctrico
• Antes de conectar el microscopio a la corriente, asegurarse que la tensión de entrada del lugar donde
se usa coincide con la tensión de utilización del microscopio y que el interruptor del iluminador esté
en la posición OFF.
• El usuario debe consultar las normas de seguridad de su país. El instrumento incluye una etiqueta de
seguridad CE. No obstante estas pautas, el usuario debería utilizar el microscopio en función de sus
necesidades pero con un mínimo de responsabilidad y seguridad.
7.4 Limpieza de la ópticas
• Si fuera necesario limpiar los componentes ópticos utilizar, en primer lugar, aire comprimido.
• Si no fuera suciente, limpiar las ópticas con un paño, que no esté deshilachado, humedecido en
agua y detergente neutro.
• Si todavía no fuera suciente, humedecer un paño con una mezcla de 3 partes de etanol y 7 partes
de éter.
Importante: el etanol y el éter son líquidos altamente inamables. No se deben utilizar cerca de
fuentes de calor, chispas o instrumentación eléctrica. Utilizar en un ambiente bien aireado.
• No frotar con la manos la supercie de ningún componente óptico. Las huellas digitales podrían dañar
las ópticas.
• No desmontar los objetivos o los oculares para intentar limpiarlos.
7.5 Si fuera necesario enviar el microscopio a la empresa Optika para su mantenimiento, se ruega utilizar
el embalaje original.
7.0 MANTENIMIENTO
MODELLOS: B-151: monocular con platina ja; objetivos: 4x, 10x, 40x, 60x
B-153: monocular con platina de doble nonio; objetivos: 4x, 10x, 40x, 60x
B-155: monocular con platina de doble nonio; objetivos: 4x, 10x, 40x, 100x
B-157: binocular con platina de doble nonio; objetivos: 4x, 10x, 40x, 60x
B-159: binocular con platina de doble nonio; objetivos: 4x, 10x, 40x, 100x
OCULARES: WF 10X/ 18mm
REVÓLVER: Cuádruplo
OBJETIVOS: Acromáticos
8.0 ESPECIFICACIONES TÉCNICAS
Page 31

Página 31
PLATINA
PORTAPREPARADOS: Platina con mecanismo de traslación de doble nonio; dimensiones:
125x116 mm.; recorrido: 76x30.
Modelo B-151: platina ja; dimensiones: 125x120 mm;
CONDENSADOR: 1.2 A.N Abbe con precentrado
Modelo B-151: Condensador de Abbe, A.N 0.65 precentrado
ENFOQUE: Sistema de enfoque macrométrico y micrométrico coaxial, con regulación de la tensión.
ILUMINACIÓN: LED blanco 1W, 6300K, con regulación de la luminosidad
ALIMENTACIÓN : Tensión de entrada: 100-240 Vac/50-60 Hz
Salida: 5Vdc 500mA (modelos B-150R: 6Vdc 2,5A)
Batería recargable interna NiMH (sólo en los modelos B-150R)
8.0 ESPECIFICACIONES TÉCNICAS
En conformidad con el Art. 13 del D.L. de 25 julio 2005 n°151.Actuación de las Directivas 2002/95/CE,
2002/96/CE y 2003/108/CE, relativas a la reducción del uso de sustancias peligrosas en la instrumentación
eléctrica y electrónica y a la eliminación de residuos.
El símbolo del contenedor que se muestra en la instrumentación o en su embalaje indica que el producto
cuando alcanzará el nal de su vida útil se deberá recoger de forma separada del resto de residuos. La gestión de la recogida selectiva de la presente instrumentación será llevada a cabo por el fabricante.Por lo tanto,
el usuario que desee eliminar la presente instrumentación tendrá que ponerse en contacto con el fabricante y
seguir el sistema que éste ha adoptado para permitir la recogida selectiva de la instrumentación. La correcta
recogida selectiva de la instrumentación para su posterior reciclaje, tratamiento y eliminación compatible con
el ambiente contribuye a evitar posibles efectos negativos al ambiente y a la salud y favorece su reutilización
y/o reciclado de los componentes de la instrumentación.
La eliminación del producto de forma abusiva por parte del usuario implicaría la aplicación de las sanciones
administrativas previstas en la normativa vigente.
9.0 MEDIDAS ECOLÓGICAS
Page 32

Page 32
SOMMAIRE
1.0 DESCRIPTION pag. 34
2.0 INTRODUCTION pag. 36
3.0 DEBALLAGE ET MONTAGE pag. 36
4.0 UTILISATION DU MICROSCOPE pag. 37
5.0 BATTERIE RECHARGEABLE (MODÈLES B-150R) pag. 38
6.0 CONTRÔLE AUTOMATIQUE DE L’ÉCLAIRAGE (MODÈLES B-150ALC) pag. 39
7.0 ENTRETIENT pag. 40
8.0 CARACTÉRISTIQUES TECHNIQUES pag. 40
9.0 ENTRETIENT DU MICROSCOPE pag. 41
Page 33

Page 33
Le présent microscope est un appareil scientique de précision créé pour offrir une durrée de vie de plusieurs
années avec un niveau d’entretient mininum. Les meilleurs composants optiques et mécaniques ont été utilisés pour sa conception ce qui fond de lui un appareil idéal pour une utilisation journalière.
Optika averti que ce guide contient des informations importantes sur la sécurité et l’entretient du produit et
que par conséquent il doit être accessible à tous ceux qui untilisent cet insrument.
Optika décline toute responsabilité dérivant d’une utilisation inappropriée du présent instrument non contemplée dans ce guide d’utilisation.
Précaution de sécurité
Ce manuel inclu d’importantes informations concernant la sécurité de l’installation, de l’utilisation et
de l’entretient du microscope. Il est important de lire attentivement le manuel avant d’utiliser l’appareil. Pour une utilisation sûre, l’utilisateur devra lire et suivre attentivement tous les indications de ce
manuel.
Les produits OPTIKA ont été créés pour être utilisés dans des conditions normales d’utilisation. L’appareil et les accessoires décrits dans le manuel ont été réalisés et testés selon les normes industrielles de sécurité des appareils de laboratoire.
Une utilisation innapropriée pourrait emdommager l’appareil et provoquer des lésions à l’utilisateur.
Garder ce présent manuel près de l’appareil pour faciliter sa consultation.
Précaution de sécurité sur le système électrique
Avant de connecter le câble d’alimentation sur le réseau électrique assurez vous que la tension d’entrée soit compatible avec celle de l’appareil et que l’interrupteur de l’éclairage soit en position arrêt.
L’utilisateur devra consulter les normes de sécurités de son pays. L’appareil inclu une étiquette de
sécurité C.E. Dans tous les cas, l’utilisateur assume toute responsabilité relative à l’utilisation sûre de
l’appareil.
Symboles des avertissements et dangers utilisés dans le manuel
L’utilisateur doit connaître les indications reliées à la sécurité lorsqu’il utilise le microscope.
Ci-dessous sont indiqués les symboles d’avertissements et de dangers qui sont utilisés dans ce
manuel.
Suivre les indications pour éviter de possibles dommages sévères sur l’appareil.
Avertissement d’utilisation; l’utilisation innapropriée de l’appareil pourrait endommager
l’appareil et provoquer des lesions à l’utilisateur.
Posibilité de décharge électrique.
Atention: suppercie de elevation de température. Evitez le contact direct.
Notes techniques ou conseils d’utilisation.
NORMES DE SÉCURITÉS
Page 34

Page 34
1.0 DESCRIPTION
OCULAIRE
COMPENSATION
DIOPTRIQUE
TÊTE BINOCULAIRE
OBJECTIFS
VALETS DE FIXATIONS DE
PREPARATIONS
COMMANDE DE MISE AU
POINT MACROMETRIQUE
COMMANDE DE MISE AU
POINT MICROMETRIQUE
REGLAGE DE L’INTENSITÉ ET
INTERRUPTEUR ON/OFF (SUR LE
CÔTÉ GAUCHE)
ECLAIRAGE LED
DIAPHRAGME A
IRIS
COMMANDE
COAXIALE
CONDENSEUR
PLATINE PORTE PRÉPARATIONS
REVOLVER PORTE OBJETICTIFS
Page 35

Page 35
1.0 DESCRIPTION
TÊTE MONOCULAIRE
COMMANDE DE RÉGLAGE DE LA TENSION
DOUILLE D’ALIMENTATION JACK
DERRIÈRE:
Page 36

Page 36
2.0 INTRODUCTION
Ce microscope est un insrtument scientique de précision créé pour durer de longues années avec un niveau
d’entretient minimum. Pour son élaboration, les éléments optiques et mécaniques qui ont été utilisés son de
grande qualité et le convertissent en un instrument idéal pour une utilisation journalière.
Optika averti que ce guide contient des informations importantes sur la sécurité et l’entretient du produit et
que par conséquent il doit être accessible à tous ceux qui untilisent cet insrument.
Optika décline toute responsabilité dérivant d’une utilisation inappropriée du présent instrument non contem-
plée dans ce guide d’utilisation.
3.1 Le microscope est livré dans un emballage en polystyrène. Après avoir enlevé le papier adhésif de
l’emballage, enlevez la partie supérieure de l’emballage. Faites attention à ce que les composants
optiques (objectifs et oculaires) ne tombent pas ou ne s’endommagent pas. Sortez le microscope de
son emballage et posez le sur une supercie stable et plate.
3.2 Fixez la tête d’observation sur la partie supérieure du corps du microscope en utilisant les vis de xa-
tion correspondantes. Introduisez l’oculaire dans le porte oculaire
3.3 Connectez l’alimentation (fournie avec le microscope) à la douille Jack située sur partie postérieure
du microscope.
3.0 DEBALLAGE ET MONTAGE
Avant d’allumer le microscope, assurez vous que le bouton sélecteur de voltage soit sur la bonne
position (la tension doit correspondre à celle de votre pays).
Le câble d’alimentation doit être utilisé seulement sur des prises électriques avec prise de terre.
Consultez un technicien pour vous assurer de l’état de votre réseau électrique. Si cela n’est pas
nécessaire installez d’autres accessoires et aprés avoir situé et installé sur le microscope les composants nécessaires, celui-ci sera prêt à l’emploi. Le présent microscope est un appareil de laboratoire
pensé pour durer de nombreuses années. Mannipulez le avec précaution en évitant les vibrations
brusques et les coups. Si vous ne l’utilisez pas pendant une longue période, débranchez toujours le
câble d’alimentation lorsque vous le nettoyez ou réalisez l’entretient de celui-ci.
NE PAS DÉMONTER LE MICROSCOPE
Ne démontez pas le microscope pour éviter d’annuler la garatnie et de provoque un possible problème de fonctionnement.
Page 37

Page 37
TENEZ LA TIRETTE
DU CONDENSEUR ET
TOURNEZ
4.1 Réglage de la tête d’observation
Dévissez la vis de xation, tournez la tête du microscope jusqu’à obtenir une position confortable pour
l’observation et xez à nouveau la vis.
4.2 Positionnement de la préparation sur la platine porte préparation
Fixez la préparation sur la platine en utilisant les valets correspondants. Réglez les commandes
coaxiales pour vous assurer que la préparation se situe bien au centre du champ de vision.
4.3 Réglage de la luminosité
Le microscope inclus un éclairage LED blanc. Avant de mettre en marche l’éclairage, lisez attentive-
ment la section 6,3, concernant les précautions de sécurité électrique. Branchez la prise d’alimentation sur la douille Jack située à l’arrière du microscope. Tournez le bouton de réglage de la lumière et
sélectionnez l’intensité lumineuse correcte pour l’observation.
4.4 Réglage de la distance inter-pupillaire
Tenez avec les deux mains les parties gauche et droite de la tête d’observation et réglez la distance
inter-pupillaire des tubes porte oculaires situés sur la tête en tournant les deux parties jusqu’à l’observation d’un seul et unique cercle lumineux.
4.5 Réglage de la mise au point et compensation dioptrique
En utilisant un objectif de un faible grossissement, tournez la commande de mise au point macrométrique pour faire la mise au point de la préparation. En observant avec l’œil droite, réglez la mise au
point micrométrique jusqu’à obtenir une image claire et dénie; tournez l’anneau de compensation
dioptrique situé sur l’oculaire de gauche jusqu’à obtenir une image dénie aussi sur l’œil gauche.
Avec la commande de réglage de la tension, sélectionnez la tension correcte pour la mise point.
Lorsque vous avez la mise au point de l’image, sélectionnez l’objectif nécessaire.
4.6 Réglage du condenseur
Tenez la tirette du condenseur et tournez vers le haut ou vers le bas jusqu’à obtenir une illumination
claire et uniforme de la préparation.
4.7 Sélection de l’ouverture numérique
Réglez l’ouverture du diaphragme à iris située sur la partie inférieure du condenseur pour sélectionner l’ouverture numérique de l’éclairage. De cette manière vous contrôlerez le contraste et la résolution de l’image.
4.0 UTILISATION DU MICROSCOPE
Page 38

Page 38
Les modèles B-150R sont équipés de batterie interne rechargeable.
La batterie peut être rechargée simplement en connectant le microscope de l’alimentateur externe fournie,
en utilisant le Jack dans le dos.
Pendant le processus de charge, vous pouvez utiliser le microscope normalement.
Pour accélérer la charge de la batterie, il est recommandé de désactiver complètement
le LED
Pour obtenir une charge complète, il est recommandé de garder le microscope con
necté à l’alimentation électrique pendant au moins 8 heures.
Toujours déconnecter l’alimentation du microscope lorsqu’il n’est pas utilisé.
5.0 BATTERIE RECHARGEABLE (MODÈLES B-150R)
Page 39

Page 39
Les modèles B-150ALC sont équipés d’une fonction spéciale appelée “Automatic Light Control” (Contrôle
automatique de l’éclairage).
Le niveau de la lumière est réglé par le microscope de manière à maintenir le niveau sélectionné par l’utilisateur, indépendamment de la variation du diaphragme d’ouverture, de l’insertion d’un objectif différent, de
l’opacité de l’échantillon, etc.
Modèle B-151ALC
1) Mettre au point l’échantillon (comme décrit dans les précédents chapitres), en utilisant l’objectif choisi.
2) Tourner la commande de réglage de l’intensité de manière à obtenir le niveau désiré de l’éclairage
3) Appuyer la commande ALC sur le côté du microscope
Maintenant, le système ALC fonctionne: si vous ouvrez ou fermez le diaphragme ou vous changez l’ objectif,
le système maintient le niveau de lumière correspondant à celui enregistrée en appuyant la commade ALC.
4) Appuyez à nouveau la commande ALC pour retourner aux contrôle manuel de l’éclairage.
6.0 CONTRÔLE AUTOMATIQUE DE L’ÉCLAIRAGE (MODÈLES B-150ALC)
COMMANDE DE
RÉGLAGE DE
L’INTENSITÉ
COMMANDE POUR ALC
Page 40

Page 40
7.1 Environnement de travail
Il est conseillé d’utiliser le microscope dans un environnement propre et sec, protégé des impactes,
à une température comprise entre 0°C y 40°C et avec une humidité relative maximale de 85% (en
absence de condensation). Il est conseillé d’utiliser un déshumidicateur si nécessaire.
7.2 Conseils avant et après l’utilisation du microscope.
• Maintenir le microscope toujours en position verticale lorsque vous le déplacez. Assurez vous que les
pièces mobiles (oculaires) ne tombent pas.
• Manipulez avec attention le microscope en évitant de le forcer.
• Ne réparez pas le microscope vous même.
• Éteindre immédiatement la lumière après avoir utilisé le microscope, couvrez le avec la housse prévue
à cet effet et conservez le dans un endroit propre et sec.
7.3 Precauciones de seguridad relativas al sistema eléctrico
• Avant de connecter le câble d’alimentation sur le réseau électrique assurez vous que le voltage soit
compatible avec l’appareil et que l’interrupteur de l’éclairage soit en position arrêt (OFF).
• L’utilisateur doit consulter les normes de sécurité de son pays. L’appareil inclus une étiquette de
sécurité C.E. Mais malgrés cela, l’utilisateur devrait utiliser le microscope en fonction de ses besoins
et avec un minimum de responsabilité et sécurité.
7.4 Nettoyage des optiques
• Si vous souhaitez nettoyer les optiques, utilisez dans un premier temps de l’air comprimé.
• Si cela n’est pas sufsant, utilisez alors un chiffon non efloché, humidié avec un peut d’eau et avec
un détergent délicat.
• Comme dernière option, il est possible d’utiliser un chiffon humide avec une solution de
3:7 de alcool éthylique et de l’éther.
Attention: l’alcool éthylique et l’éthanol sont des substances hautement inammables. Ne les utilisez
pas près d’une source de chaleur, d’étincelles ou d’appareils électriques. Les substances chimiques
doivent être utilisées dans un environnement aéré
• Ne pas frotter la supercie d’aucun des composants optiques avec les mains. Les empreintes digitales
peuvent porter préjudice aux optiques.
• Ne démontez pas les objectifs ou les oculaires pour essayer de les nettoyer.
7.5 Il est important d’utiliser l’emballage d’origine dans le cas où il serait nécessaire de retourner le
microscope à l’entreprise Optika pour un entretient.
7.0 ENTRETIENT
MODÈLES: B-151: monoculaire avec platine xe, objectifs : 4x, 1x, 40x, 60x
B-153: monoculaire avec platine et surplatine ; objectifs: 4x, 10x, 40x, 60x
B-155: monoculaire avec platine et surplatine ; objectifs: 4x, 10x, 40x, 100x
B-157: binoculaire avec platine et surplatine ; objectifs: 4x, 10x, 40x, 60x
B-159: binoculaire avec platine et surplatine ; objectifs: 4x, 10x, 40x, 100x
OCULAIRES: WF 10X/ 18mm
REVOLVER: Quadruple
OBJECTIFS: Achromatiques
8.0 CARACTERISTIQUES TECHNIQUES
Page 41

Page 41
PLATINE PORTE
PREPARATIONS: Platine avec méchanisme de mouvement à double échelle ;
dimensions: 125x116 mm ; rang de mouvement: 76x30.
Modèle B-151: platine xe; dimensions: 125x120 mm
CONDENSEUR: O.N 1.2 de type Abbe, pré-centré
Modèle B-151: Condenseur d’ Abbe, O.N 0.65 pré-centré
MISE AU POINT: Système de mise au point macrométrique et micrométrique coaxial,
avec réglage de la tension. .
ILLUMINATION: LED blanc 1W, 6300K, avec réglge d’intensité.
ALIMENTATION: Tension à l’entrée: 100-240 Vac/50-60 Hz
En sortie: 5Vdc 500mA (modèles B-150R: 6VDC 2.5A)
batterie rechargeable NiMH (modèles B-150R)
8.0 CARACTERISTIQUES TECHNIQUES
Conformément à l’Article 13 du D.L du 25 Juillet 2005 nº151
Action des Directives 2002/95/CE, 2002/96/CE et 2003/108/CE, relatives à la réduction de l’utilisation
de substances dangereuses dans l’appareil électrique et électronique et à l’élimination des
résidus.
Le Symbole du conteneur qui gure sur l’appareil électrique ou sur son emballage indique que le produit
devra être, à la n de sa vie utile, séparé du reste des résidus. La gestion du ramassage sélectif du
présent instrument sera effectuée par le fabricant. Par conséquent, l’utilisateur qui souhaite éliminer
l’appareil devra se mettre en contact avec le fabricant et suivre le système que celui-ci a adopté pour
permettre le ramassage sélectif de l’appareil. Le ramassage sélectif correct de l’appareil pour son recyclage,
traitement et élimination compatible avec l’environnement contribue à éviter d’éventuels effets
négatifs sur l’environnement et la santé et favorise sa réutilisation et/ou recyclage des composants de
l’appareil. L’élimination du produit de manière abusive de la part de l’utilisateur entraînera l’application
de sanctions administratives sur la norme en vigueur.
9.0 ENTRETIENT DU MICROSCOPE
Page 42

Seite 42
INHALT
1.0 BESCHREIBUNG Seite 44
2.0 EINLEITUNG Seite 46
3.0 AUSPACKEN UND MONTAGE Seite 46
4.0 VERWENDUNG DES MIKROSKOPS Seite 47
5.0 AKKU (MODELLE B-150R) Seite 48
6.0
AUTOMATISCHE STEUERUNG DER BELEUCHTUNG (MODELLE B-150ALC)
Seite 49
7.0 WARTUNG Seite 50
8.0 TECHNISCHE DATEN Seite 50
9.0 WIEDERVERWERTUNG Seite 51
Page 43

Seite 43
Dieses Mikroskop ist ein wissenschaftliches Präzisionsgerät, es wurde entwickelt für eine jahrelange Verwendung bei einer minimalen Wartung. Dieses Gerät wurde nach den höchsten optischen und mechanischen
Standards und zum täglichen Gebrauch hergestellt.
Diese Bedienungsanleitung enthält wichtige Informationen zur korrekten und sicheren Benutzung des Geräts. Diese Anleitung soll allen Benutzern zur Verfügung stehen.
Optika lehnt jede Verantwortung für eine fehlerhafte, in dieser Bedienungsanleitung nicht gezeigten Verwendung Ihrer Produkte ab.
Sicherheitshinweise
Diese Bedienungsanleitung enthält wichtige Sicherheitsinformationen bezüglich auf die Installation,
Verwendung und Wartung des Mikroskops. Wir empfehlen, die Bedienungsanleitung sorgfältig zu
lesen vor der Verwendung. Um das Gerät sicher zu verwenden muss der Benutzer den angegebenen
Anleitungen folgen. Die OPTIKA Produkte sind für eine sichere Verwendung bei normalen Arbeitsbedingungen entwickelt worden. Das Gerät und die in dieser Bedienungsanleitung beschriebenen
Zubehörteile sind gemäß industriellen Sicherheitsrichtlinien für Laborinstrumente hergestellt und getestet worden. Eine falsche Verwendung kann Verletzungen verursachen und das Gerät beschädigen.
Diese Bedienungsanleitung muss immer in der Nähe des Geräts sein, um eine schnelle Beratung zu
ermöglichen.
Elektrische Vorsichtsmaßnahmen
Bevor Sie das Netzkabel anstecken, vergewissern Sie sich, dass die Spannung für das Mikroskop
geeignet ist und dass der Beleuchtungsschalter sich in Position OFF bendet.
Beachten Sie alle Sicherheitsvorschriften des Arbeitsplatzes, an dem Sie mit dem Mikroskop
arbeiten. Das Gerät entspricht den CE-Normen. Die Benutzer tragen während der Nutzung
des Geräts die volle Verantwortung dafür.
Wartung- und Gefahrzeichen
Der Benutzer muss alle Sicherheitsaspekte wissen als er das Gerät verwendet. Wartung- und Gefahrzeichen werden unten angegeben und in dieser Bedienungsanleitung verwendet.
Beachten Sie die Hinweise um mögliche schwere Verletzungen zu vermeiden.
Verwendungsermahnung; eine falsche Verwendung des Geräts kann Verletzungen
oder Beschädigungen verursachen.
Elektrischer Schlag möglich.
Achtung: Oberäche mit hoher Temperatur. Vermeiden Sie einen direkten Kontakt.
Technische Hinweise und Verwendungsempfehlungen.
VORSICHTSMASSNAHMEN
Page 44

Seite 44
1.0 BESCHREIBUNG
OKULAR
DIOPTRIENVERSTELLUNG
BINOKULARER KOPF
OBJEKTIVE
KLEMME
GROBTRIEB
FEINTRIEB
LICHTEINSTELLUNG
LED BELEUCHTUNG
IRISBLENDE
KREUZTISCHBEWEGUNGSKNOPF
KONDENSOR
KREUZTISCH
REVOLVER
Page 45

Seite 45
1.0 BESCHREIBUNG
MONOKULARER KOPF
SPANNUNGSEINSTELLUNG
NETZTEIL-STECKDOSE
BLICK VON HINTEN:
Page 46

Seite 46
2.0 EINLEITUNG
Dieses Mikroskop ist ein wissenschaftliches Präzisionsgerät, es wurde entwickelt für eine jahrelange Verwen-
dung bei einer minimalen Wartung. Dieses Gerät wurde nach den höchsten optischen und mechanischen
Standards und zum täglichen Gebrauch hergestellt.
Diese Bedienungsanleitung enthält wichtige Informationen zur korrekten und sicheren Benutzung
des Geräts. Diese Anleitung soll allen Benutzern zur Verfügung stehen.
Optika lehnt jede Verantwortung für eine fehlerhafte, in dieser Bedienungsanleitung nicht gezeigten Verwen-
dung Ihrer Produkte ab.
3.1 Das Mikroskop bendet sich in einer Polystyrolverpackung. Nehmen Sie das Klebeband von der
Verpackung ab und heben Sie dann den oberen Teil der Verpackung. Bitte beachten Sie dabei, dass
die optischen Komponenten (Objektive, Okulare) nicht beschädigt werden oder fallen. Halten Sie das
Mikroskop mit beiden Händen (eine rund um das Stativ und eine um den Fuß), ziehen Sie es aus der
Verpackung raus und stellen sie es auf eine ache, stabile Oberäche.
3.2 Befestigen Sie den Kopf auf dem Stativ mit Hilfe der Spannschraube. Setzen Sie die Okulare in den
Tuben ein.
3.3 Verbinden Sie das Netzteil zur Steckdose auf der Rückseite des Mikroskops.
3.0 AUSPACKEN UND MONTAGE
Stecken Sie das Netzkabel in die Steckdose auf dem Stativ.
Bevor Sie das Netzkabel anstecken, vergewissern Sie sich, dass die Spannung für das Mikroskop
geeignet ist
Das Netzkabel muss nur zu Steckdosen verbunden werden, die über eine geeignete Erdung verfü-
gen.
Lassen Sie das elektrische System von einem Techniker prüfen. Falls keine weitere Zubehörteile ins-
talliert werden muss, ist das Gerät Verwendungsbereit.
Dieses Mikroskop wurde für eine lange Verwendung entwickelt. Behandeln Sie es mit Vorsicht und
gebrauchen Sie nicht zu viel Kraft. Entfernen Sie immer das Netzkabel vom Mikroskop als es für eine
lange Zeit nicht verwendet wird, bei der Reinigung und der Wartung.
MONTIEREN SIE NICHT DAS GERÄT AB.
Betriebsstörungen können entstehen und die Garantie wird ungültig.
Page 47

Seite 47
HALTEN SIE DEN RING AM
KONDENSORFUSS FEST UND DREHEN
4.1 Kopfeinstellung
Lockern Sie die Spannschraube, dann drehen Sie den Kopf solange bis eine komfortable Position für
die Betrachtung erreicht ist. Befestigen Sie nochmals die Schraube.
4.2 Objektträger auf dem Tisch legen
Befestigen Sie den Objektträger auf dem Kreuztisch mit Hilfe der dafür vorgesehenen Klemmen.
Benutzen Sie hierfür die koaxialen Knöpfe des Kreuztisches, damit der Objektträger in der Mitte des
Betrachtungsfeldes positioniert werden kann.
4.3 Beleuchtungseinstellung
Das Mikroskop ist mit einer LED ausgerüstet. Bitte lesen Sie sorgfältig Abschnitt 6.3 vor dem Ein-
schalten der Lampe durch. Stecken Sie das Netzkabel in die Steckdose ein, dann drehen Sie den
Knopf für Helligkeitseinstellung um das beste Licht für die Betrachtung zu nden.
4.4 Einstellung des Augenabstandes
Stellen Sie den Augenabstand der Okulare ein bis ein einzelnes rundes Hellfeld gefunden wird, halten
Sie dabei beide Seiten des Kopfes mit beiden Händen fest.
4.5 Fokus- und Dioptrienverstellung
Drehen Sie den Grobtriebknopf und suchen Sie den Fokus mit einem Objektiv mit niedriger Vergrößerung. Bei Betrachtung mit dem rechten Auge stellen Sie das Bild scharf mit Hilfe des Feintriebknopfes,
dann drehen Sie den Dioptrienverstellungsring auf dem linken Okular solange bis das Bild auch mit
dem anderen Auge scharf ist. Dank dem Spannungseinstellungsknopf suchen Sie eine geeignete
Spannung für den Fokus. Als das Bild scharf ist, drehen Sie den Revolver um das Objektiv auszuwählen. .
4.6 Einstellung des Kondensors
Halten Sie den Ring am Kondensorfuss fest und drehen ihn auf oder ab bis eine klare und gleiche
Beleuchtung geschaffen wird.
4.7 Einstellung der numerischen Apertur
Um die numerische Apertur der Leuchte einzustellen muss zuerst die Apertur der Irisblende einge-
stellt werden. Auf diese Weise werden Kontrast und Auösung des Bildes beobachtet.
4.0 VERWENDUNG DES MIKROSKOPS
Page 48

Seite 48
Die B-150R Mikroskope sind mit einem internen Akku ausgestattet.
Der Akku kann einfach durch die Verbindung des Mikroskops mit dem Außennetzteil aufgeladen werden.
Während der Ladung kann das Mikroskop normalerweise verwendet werden.
Um die Ladung zu beschleunigen empehlt man, die LED völlig auszuschalten.
Um den Akku völlig aufzuladen, lassen Sie das Mikroskop mindestens 8 Stunden mit
dem Außennetzteil verbunden.
Schalten Sie immer das Netzteil vom Mikroskop ab, als das nicht verwendet wird.
5.0 AKKU (MODELLE B-150R)
Page 49

Seite 49
6.0 AUTOMATISCHE STEUERUNG DER BELEUCHTUNG (MODELLE B-150ALC)
Die Modelle B-150ALC sind mit einer speziellen Funktion ausgestattet, die «Automatic Light Control»
gnannt wird (automatische Steuerung der Beleuchtung).
Das Beleuchtungsniveau wird vom Mikroskop so reguliert, dass das vom Benutzer gewählte Niveau unabhängig von der Änderung der Aperturblende, der Montage eines anderen Objektivs, der Änderung der Mattheit der Probe, etc. beibehalten wird.
Modell B-151ALC
1) Die Probe scharf einstellen, wie es in den vorherigen Abschnitten beschrieben wurde, dazu das
gewünschte Objektiv verwenden.
2) Den Knopf zum Einstellen der Intensität betätigen, um ein angenehmes Beleuchtungsniveau zu
erreichen.
3) Die Drucktaste ALC auf der Seite des Mikroskops drücken.
Jetzt ist das System ALC in Betrieb: wenn Sie die Aperturblende öffnen oder schließen oder das Objektiv
auswechseln, versucht das System das Beleuchtungsniveau beizubehalten, das dem durch Druck auf die
Taste ALC gespeicherten entspricht.
4) Erneut die Taste ALC drücken, um auf die manuelle Einstellung der Beleuchtung zurückzugehen.
KNOPF ZUM
EINSTELLEN DER
INTENSITÄT
DRUCKTASTE ALC
Page 50

Seite 50
7.1 Arbeitsumfeld
Es wird empfohlen, das Mikroskop an einem sauberen, trockenen und stoßsicheren Ort zu verwenden,
bei einer Temperatur zwischen 0° und 40° und einer Feuchtigkeit nicht über 85% (ohne Kondensation).
Wenn nötig wird die Verwendung eines Luftentfeuchters empfohlen.
7.2 Vor und nach der Verwendung
• Bei Bewegungen muss das Gerät immer aufrecht gehalten werden. Stellen Sie sicher, dass die
mobilen Teile (z.B. die Okulare) nicht fallen.
• Behandeln Sie das Mikroskop mit Vorsicht und verwenden Sie nicht zu viel Kraft.
• Führen Sie selbst keine Reparaturen durch.
• Nach der Verwendung schalten Sie sofort die Beleuchtung aus, decken das Gerät mit der
Staubabdeckung und halten es in einem sauberen und trockenen Platz.
7.3 Elektrische Vorsichtsmaßnahmen
• Bevor Sie das Netzkabel verbinden, versichern Sie sich, dass die Spannung für das Mikroskop
geeignet ist und, dass der Beleuchtungsschalter in Position OFF steht.
• Beachten Sie alle Sicherheitsvorschriften des Arbeitsplatzes, an dem Sie mit dem Mikroskop arbeiten.
Das Gerät entspricht den CE-Normen. Der Benutzer trägt bei Gebrauch die volle Verantwortung.
7.4 Reinigung der optischen Teile
• Falls die optischen Teile gereinigt werden sollen, so verwenden Sie dazu zuerst Druckluft.
• Falls dies nicht genügen sollte, so verwenden Sie einen fusselfreien, mit Wasser und einem
Reinigungsmittel befeuchtet Tuch.
• Schließlich kann man ein feuchtes Tuch mit einer 3:7 Lösung von Äthylalkohol und Äther
verwenden.
Achtung: Äthylalkohol und Äther sind leicht ammbar. Sie dürfen in der Nähe von Wärmequellen,
Funken oder elektrischen Geräten nicht verwendet werden. Sie sollten an einem belüfteten Ort
verwendet werden.
• Scheuern Sie keine Oberäche der optischen Komponenten mit den Händen. Die Fingerabdrücke
können die Optik beschädigen.
• Die Objektive oder die Okulare sollen bei der Reinigung nicht abgenommen werden.
7.5 Falls das Mikroskop zurück an Optika für Wartung geschickt werden muss, verwenden Sie bitte die
ursprüngliche Verpackung.
7.0 WARTUNG
MODELLE: B-151: monokular mit Tisch, 4x, 10x, 40x Objektive
B-153: monokular mit Kreuztisch, 4x, 10x, 40x, 60x Objektive
B-155: monokular mit Kreuztisch, 4x, 10x, 40x, 100x Objektive
B-157: binokular mit Kreuztisch, 4x, 10x, 40x, 60x Objektive
B-159: binokular mit Kreuztisch, 4x, 10x, 40x, 100x Objektive
OKULARE: WF 10X/ 18mm
REVOLVER: 4-fach
OBJEKTIVE: Achromatische
8.0 TECHNISCHE DATEN
Page 51

Seite 51
TISCH: Kreuztisch 125x116mm, 76x30 X/Y-Bewegung
Nur B-151: fester Tisch 125x120mm
KONDENSOR: 1.25 N.A. Abbe vorzentriert
Nur B-151: 0.65 N.A. Abbe vorzentriert
FOKUS: Koaxiale Grob- und Feintrieb mit Spannungseinstellung.
BELEUCHTUNG: Weiße LED 1W, 6300K, Helligkeitseinstellung
STROM: 100-240 Vac/50-60 Hz –
Audgang: 5Vdc 500mA (Modelle B-150R: 6 V DC 2,5 A)
NiMH-Akku (Modelle B-150R)
8.0 TECHNISCHE DATEN
Gemäß dem Artikel 13 vom Dekret Nr. 151 vom 25.07.2005
“Umsetzung der Richtlinien 2002/95/EG, 2002/96/EG und 2003/108/EG in Bezug auf die Verwendung gefährlicher Stoffe in elektrischen und elektronischen Geräten sowie die Abfallentsorgung”
Das Symbol vom Müllcontainer erscheint auf dem Gerät oder der Verpackung und weist darauf hin, dass das
Produkt Ende des Lebens separat von anderen Abfällen entsorgt werden muss. Die getrennte Sammlung von
Geräten, die am Ende Ihrer Lebensdauer sind, wird vom Hersteller organisiert. Der Benutzer, der dieses Gerät entsorgen möchtet, muss dann Kontakt mit dem Hersteller aufnehmen und der Vorgehensweise folgen,
die zur separaten Entsorgung eingeführt geworden ist. Die korrekte Sammlung von Geräten um die nachfolgende Behandlung, Entsorgung und umweltfreundliche Wiederverwendung zu ermöglichen ist ein Beitrag
um negative Auswirkungen auf der Umwelt und der Gesundheit zu vermeiden und die Wiederverwendung
der Gerätkomponenten zu begünstigen. Die Illegale Entsorgung des Produkts vom Benutzer wird gemäß den
geltenden Bestimmungen bestraft.
9.0 WIEDERVERWERTUNG
Page 52

www.optikamicroscopes.com
info@optikamicroscopes.com
OPTIKA
Tel.: ++39 035 571392 (6 linee) Telefax: ++ 39 035
Via Rigla 30, Ponteranica (BG) -
S.R.L.
ITALY
571435
MAD Iberica Aparatos
c/. Puig i Pidemunt, nº 28 1º 2ª - (Pol. Ind. Plà d’en Boet) 08302 MATARO
(Barcelona) España Tel: +34 937.586.245 +34 937.414.529
Cientificos
New York Microscope Company Inc
100 Lauman Lane, Suite A, Hicksville, New York 11801, USA
Tel.: 877.877.7274 - Fax: 51 6.801.2046
www.microscopeinternational.com -
OPTIKA MICROSCOPES -
www.opt ikamicroscopes.com -
info@nyscopes.com
ITALY
info@optikamicroscopes.com
 Loading...