

Optika 4083.4 Instruction Manual
Multimedia cameras - EDUCAM USB 64 BIT VERSION
INSTRUCTION MANUAL
Model
4083.4
Version: 1
Issued: 18, 08, 2014

Description
The EDUCAM MULTIMEDIA USB video camera is especially designed to meet the various requirements in the
educational eld.
It can be connected to a professional monitor, a TV set, or a PC through USB link. It can be used in the following
ways:
- as an episcope, for the reproduction of texts, documents, photographs, etc.
- as an enlarger, to enlarge small objects, insects, minerals, etc.
- for video-microscopy, connectable both to biological or stereo microscopes using the adapters included.
- as a overhead projector, for the projection of tracings
- as a camera for teleconferences, that can be connected to a computer and to the Internet
- as a camera for video-conferences, used in conferences, assemblies, meetings, etc.
- as a camera for lming, with the help of a video recorder.
This video camera enables you to record clearly even when there is little light available, thanks to its extremely
sensitive electronic circuits. The special lens enables you to focus from 0,76 mm, up to an innite distance.
At the camera base, there is an extremely sensitive microphone that, via the TV itself, or via a separate amplifying system, enables you to reproduce for example the teacher’s voice during the lesson, or to record sounds and
noises from the surrounding area.
The special exible arm and the heavy weight of the base, gives the EDUCAM its versatile, sturdy and stabile
characteristics. The micro-video camera placed on the end of the exible arm can be placed in any position,
even projecting from the base, without jeopardising the system’s stability. A special joint allows the head to rotate
avoiding connector breakages inside the exible arm.
Page 2

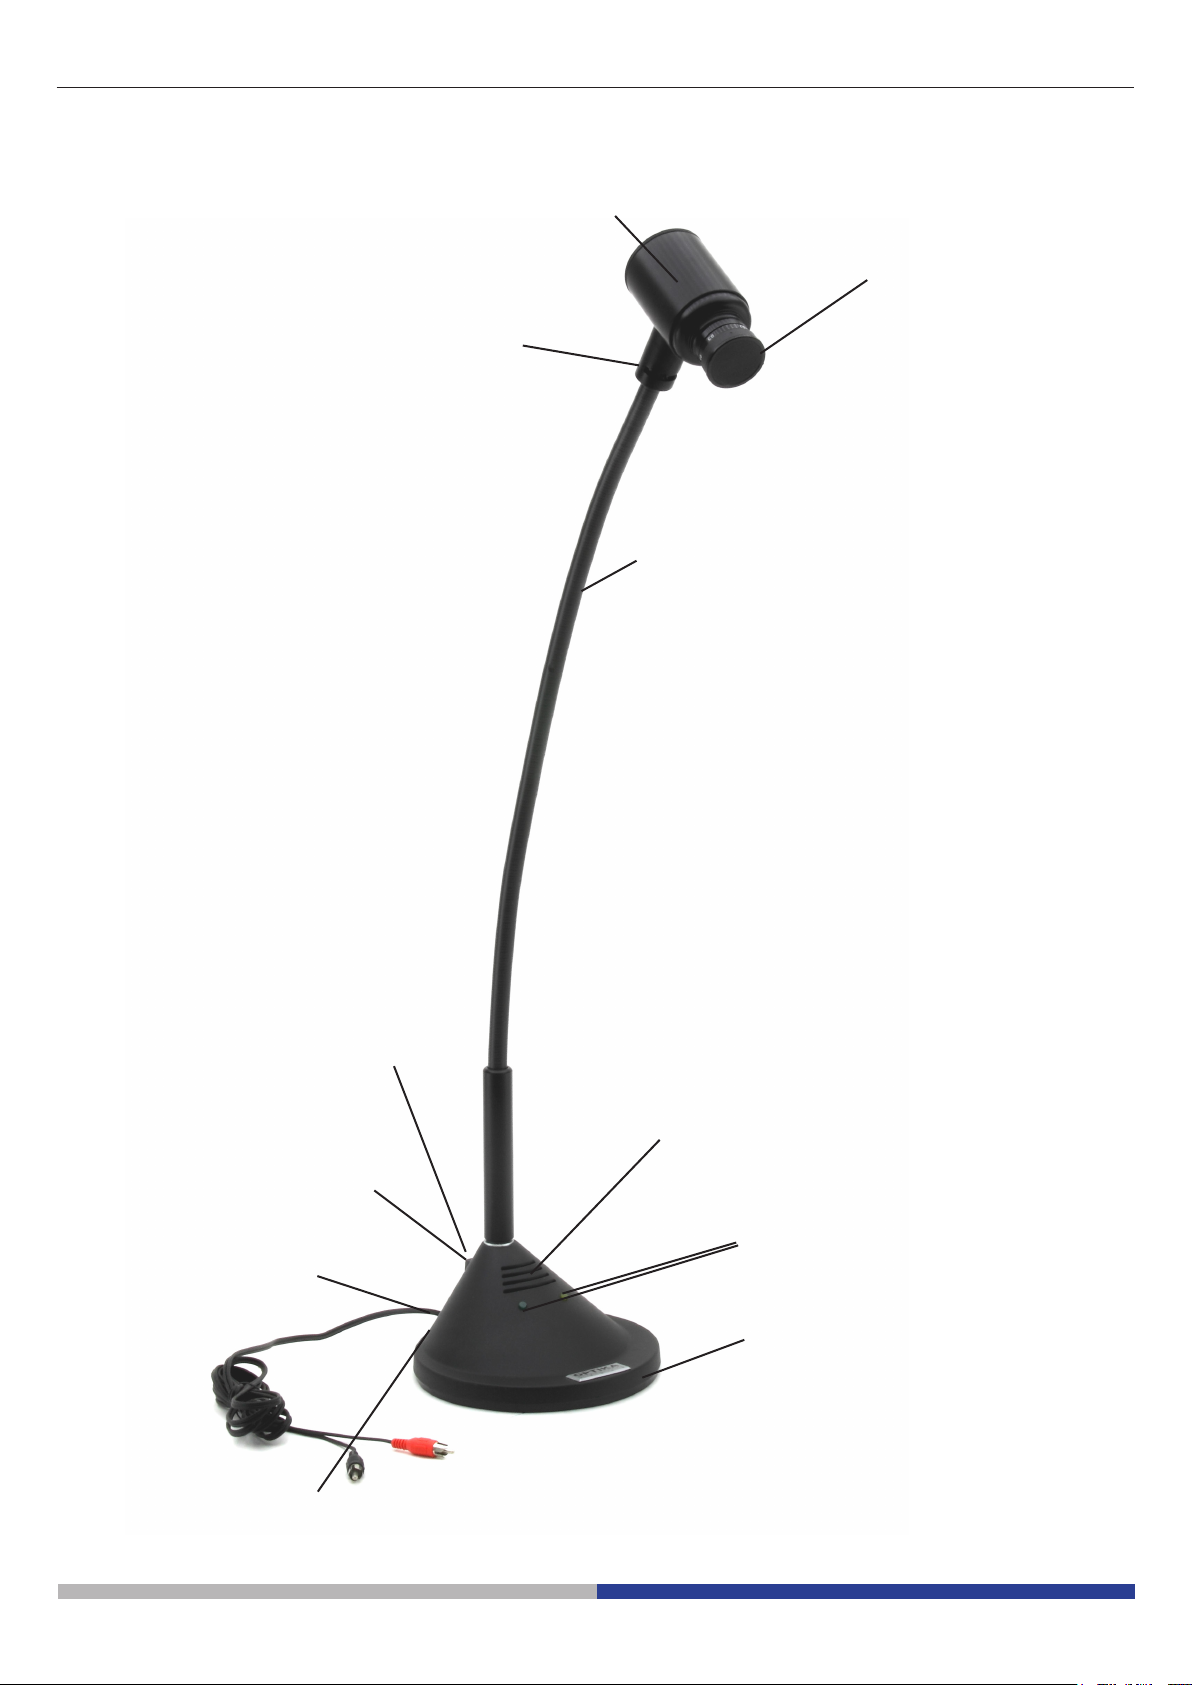
Overview
HEAD
OBJECTIVE
HEAD ROTATION SYSTEM
FLEXIBLE ARM
VIDEO/ AUDIO SWITCH
POWER SOCKET
VIDEO/AUDIO AV SIGNAL CABLE
VIDEO USB SIGNAL CABLE
MICROPHONE
VIDEO/AUDIO LED
BASE
Page 3

Product specications
Sensor 1/3” interline transfer colour CCD element
Horizontal resolution 420 TV lines
Digital resolution 640x480
Total resolution 307k pixel
Objective 8 mm, F:1.2
Sensitivity min. 0,08 lux at F:1.2
Picture controls electronic shutter
Gain control automatic
White balance automatic
Video signal PAL compatible - VHS
Working distance from 0,76 mm to innite
Magnications 90x at 0,76 mm (with 21” monitor)
Microphone built-in high sensivity microphone
Audio signal analogic
Power supply 15 V DC, 400 mA, with external power adapter
Switching on via 3-position switch
PC link standard USB 2.0
Length of exible arm 65cm
Base diameter 17 cm
Weight 3.4 Kg
Assembly
Power supply
The Educam Multimedia video camera requires 15 V DC working voltage and comes with an external power pack. This
power pack needs to be plugged directly into a 220 V mains sockets and its output cable should then be plugged directly into
the video camera power supply socket.
Video and audio signals
The analog video signal from the Educam video camera is transmitted to a TV monitor and the audio signal to an amplifier or
an amplified monitor. The small video/audio output signal cable, that can be found on the back of the camera base, should
be connected as follows:
Red plug (video signal):
into the video input of your monitor/colour TV directly or via the SCART adapter provided (in the yellow video
socket).
Black plug (audio signal):
into the audio input of your amplier system or into the audio input of your monitor/colour TV or via the SCART
adapter provided (in the white audio mono socket).
Using the SCART adapter, it has to be inserted into the SCART socket at the back of the TV set. See the TV
manufacturer’s instruction manual for details of how to switch on the TV and use its SCART circuit.
Connect the USB cable that can be found on the back of the camera base, to the PC in order to view the digital
USB video signal (follow the instructions on next section to install the camera on your PC).
Page 4
Switching on the video camera
The Educam video camera has a 3-position switch at the rear of its base. Each position corresponds to a specic function:
Central position “0” -> TV camera off.
Position “I” -> the yellow LED is lit and the Educam is operating with video signal only.
Position “II” -> both the yellow and green LEDs are lit and the Educam is operating with both video and audio
signals.
Operation
Using the video camera
Position the camera head with the lens and the electronic sensor directly in front of the object that you wish
to observe using its exible arm. The lens provided with the camera has a manual focusing and must therefore be adjusted every time the distance between the object and the camera is changed. This can be done by
simply turning the lens on the camera head. The object must be at least 0.76 mm away from the lens. There
are no limits to the maximum distance. To use the microphone to capture audio, put the camera base with the
microscope close to the audio source. It could happen that you hear a whistling noise while using the microphone. This whistle is not a defect of the Educam camera, but a normal audio effect (“Larsen effect”) that occurs when the microscope is to close to the loudspeakers and the microphone is receiving the audio from the
loudspeakers. The intensity also depends on the dimension and size of the room.
The best solution to avoid this effect is to place the Educam video camera far from the loudspeakers, to use a
separated amplier system and place it in a room without reverb. The “Larsen effect” will decrease in a room
with many people and many pieces of furniture.
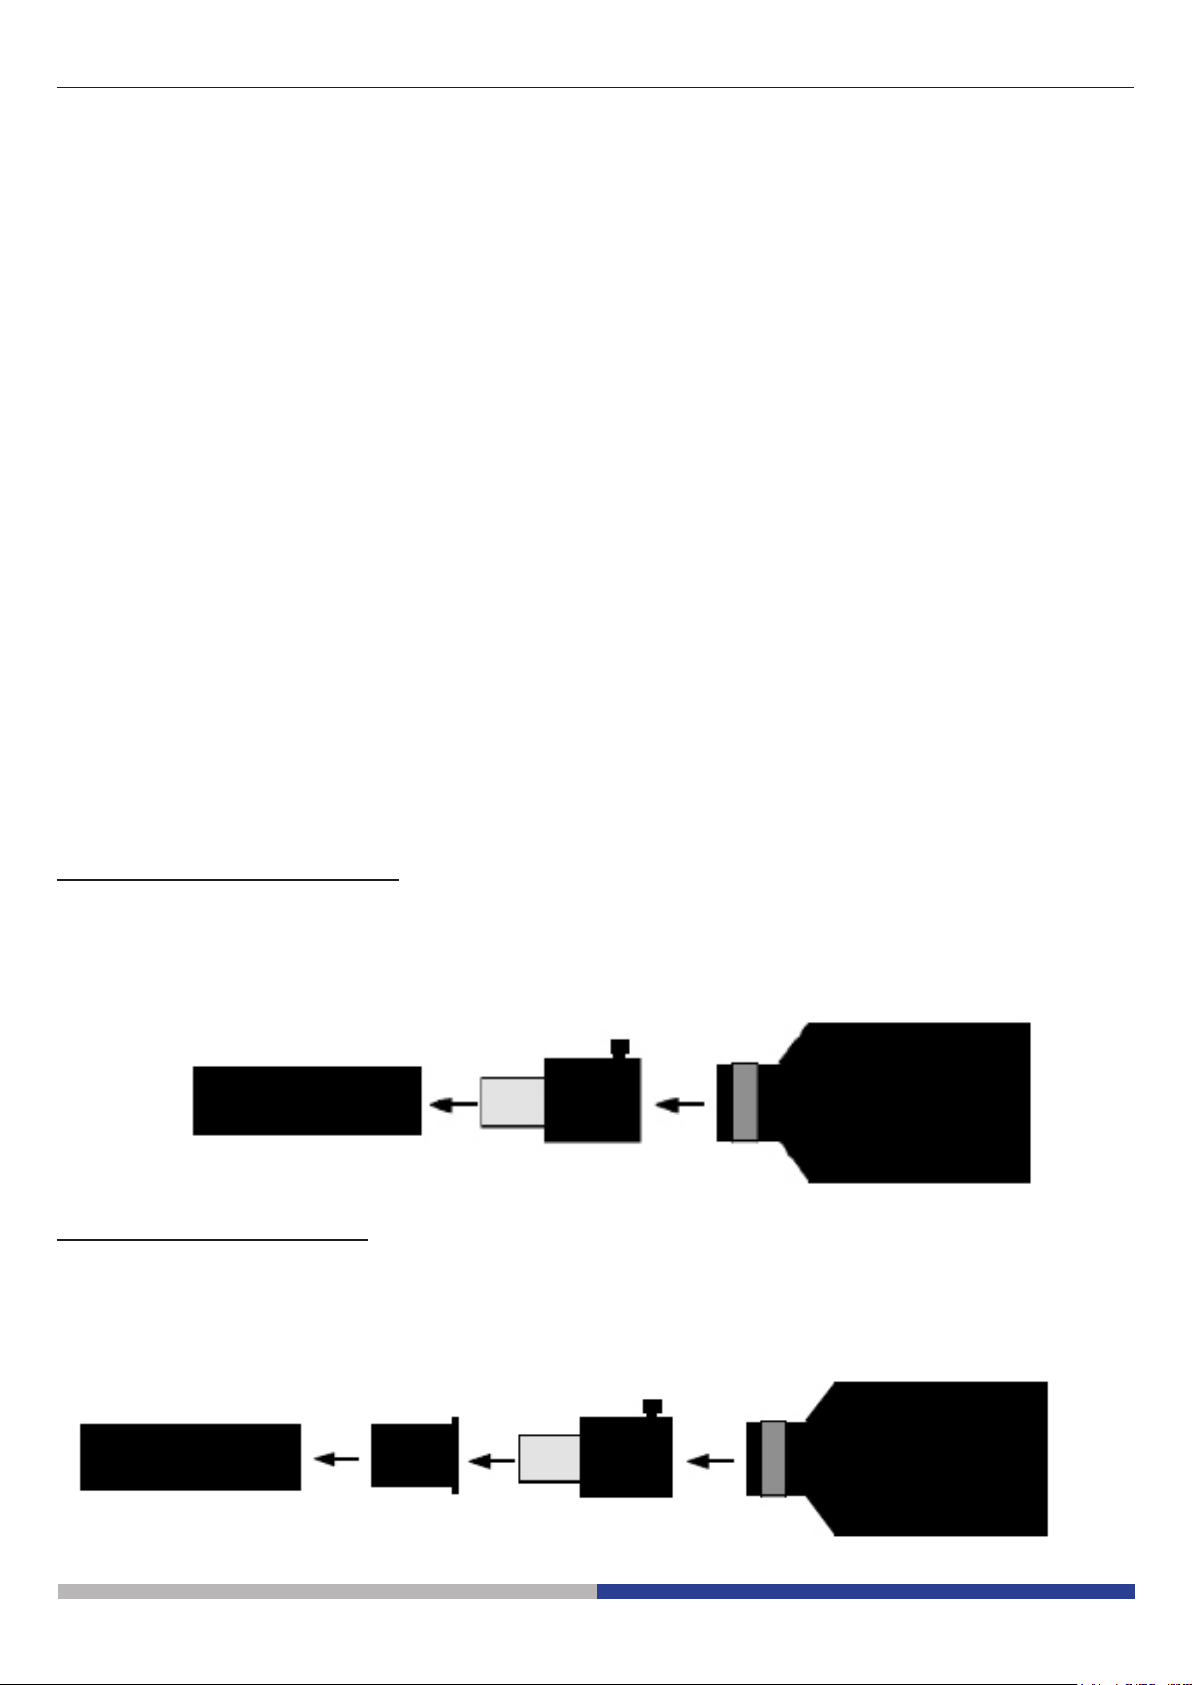
Capturing video from a microscope
The Educam video camera has been designed for effective use with microscopes.
The following special adapters (provided) are required for this application:
Adapter for biological microscopes: To be used directly in the optical tube of the microscope after having extracted the eyepiece. This adapter contains a WF10x eyepiece that needs to be replaced with the one belonging to the microscope.
MICROSCOPE
EYEPIECE TUBE
Adapter for stereo microscopes: To be used directly on one of the optical cylinders on a stereo microscope after having extracted the eyepiece. The biological microscope adapter needs to be inserted inside this adapter.
MICROSCOPE
EYEPIECE TUBE
STEREO MICROSCOPE
ADAPTER
BIOLOGICAL
MICROSCOPE ADAPTER
BIOLOGICAL
MICROSCOPE ADAPTER
VIDEO CAMERA HEAD
VIDEO CAMERA HEAD
Page 5
Installation of the camera’s drivers and pc
Drivers and Software Installation
Before connecting the camera to the PC, insert the CD for installation, choose the folder \ driver \ and run setup.
exe.
When the Driver installation is completed choose the folder \ powerdirector8 \ and run setup.exe, wait for the
software installation. The software’s serial number can be found in the le CD \ SN.txt.
Connect the power supply and turn on the camera. Connect the USB cable to the PC. The camera will be recognized and the drivers installed.
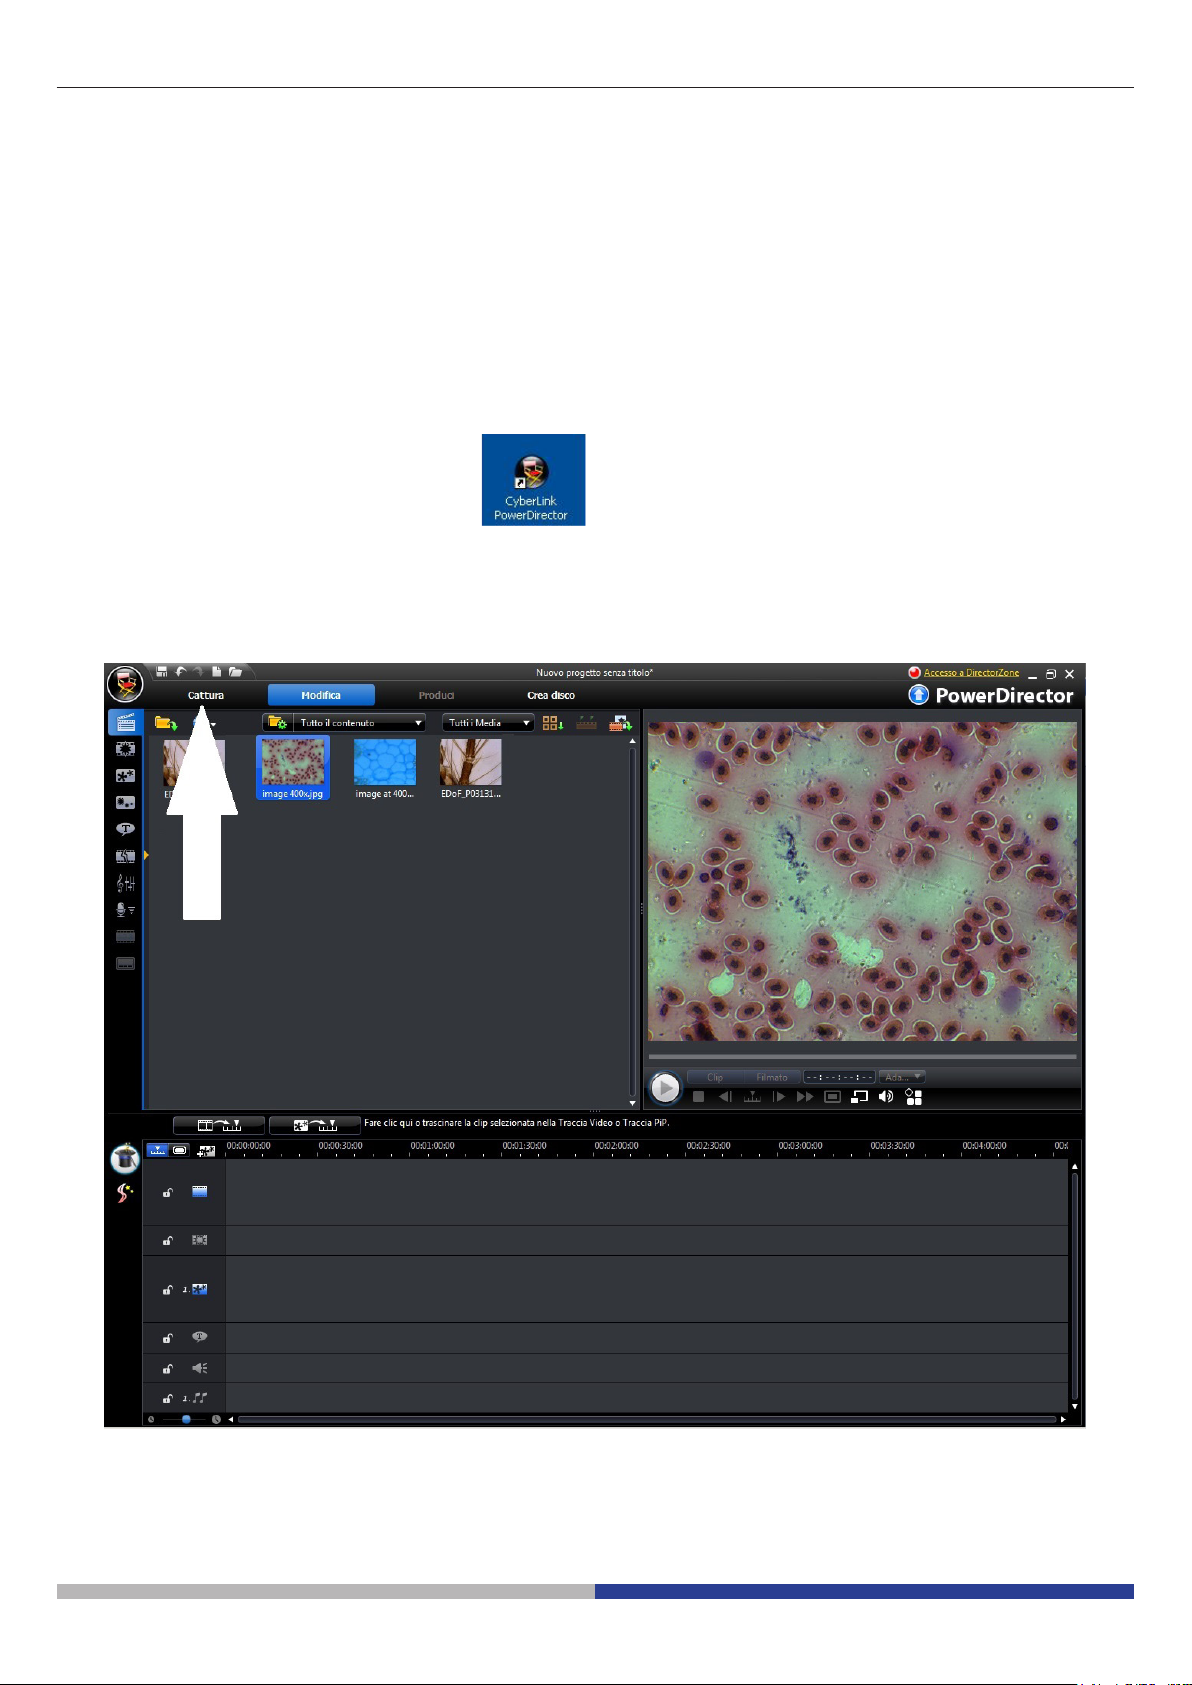
Image and Video Recording:
Start the software by clicking on the icon:
Select “Power director”.
Select “Capture”.
Page 6
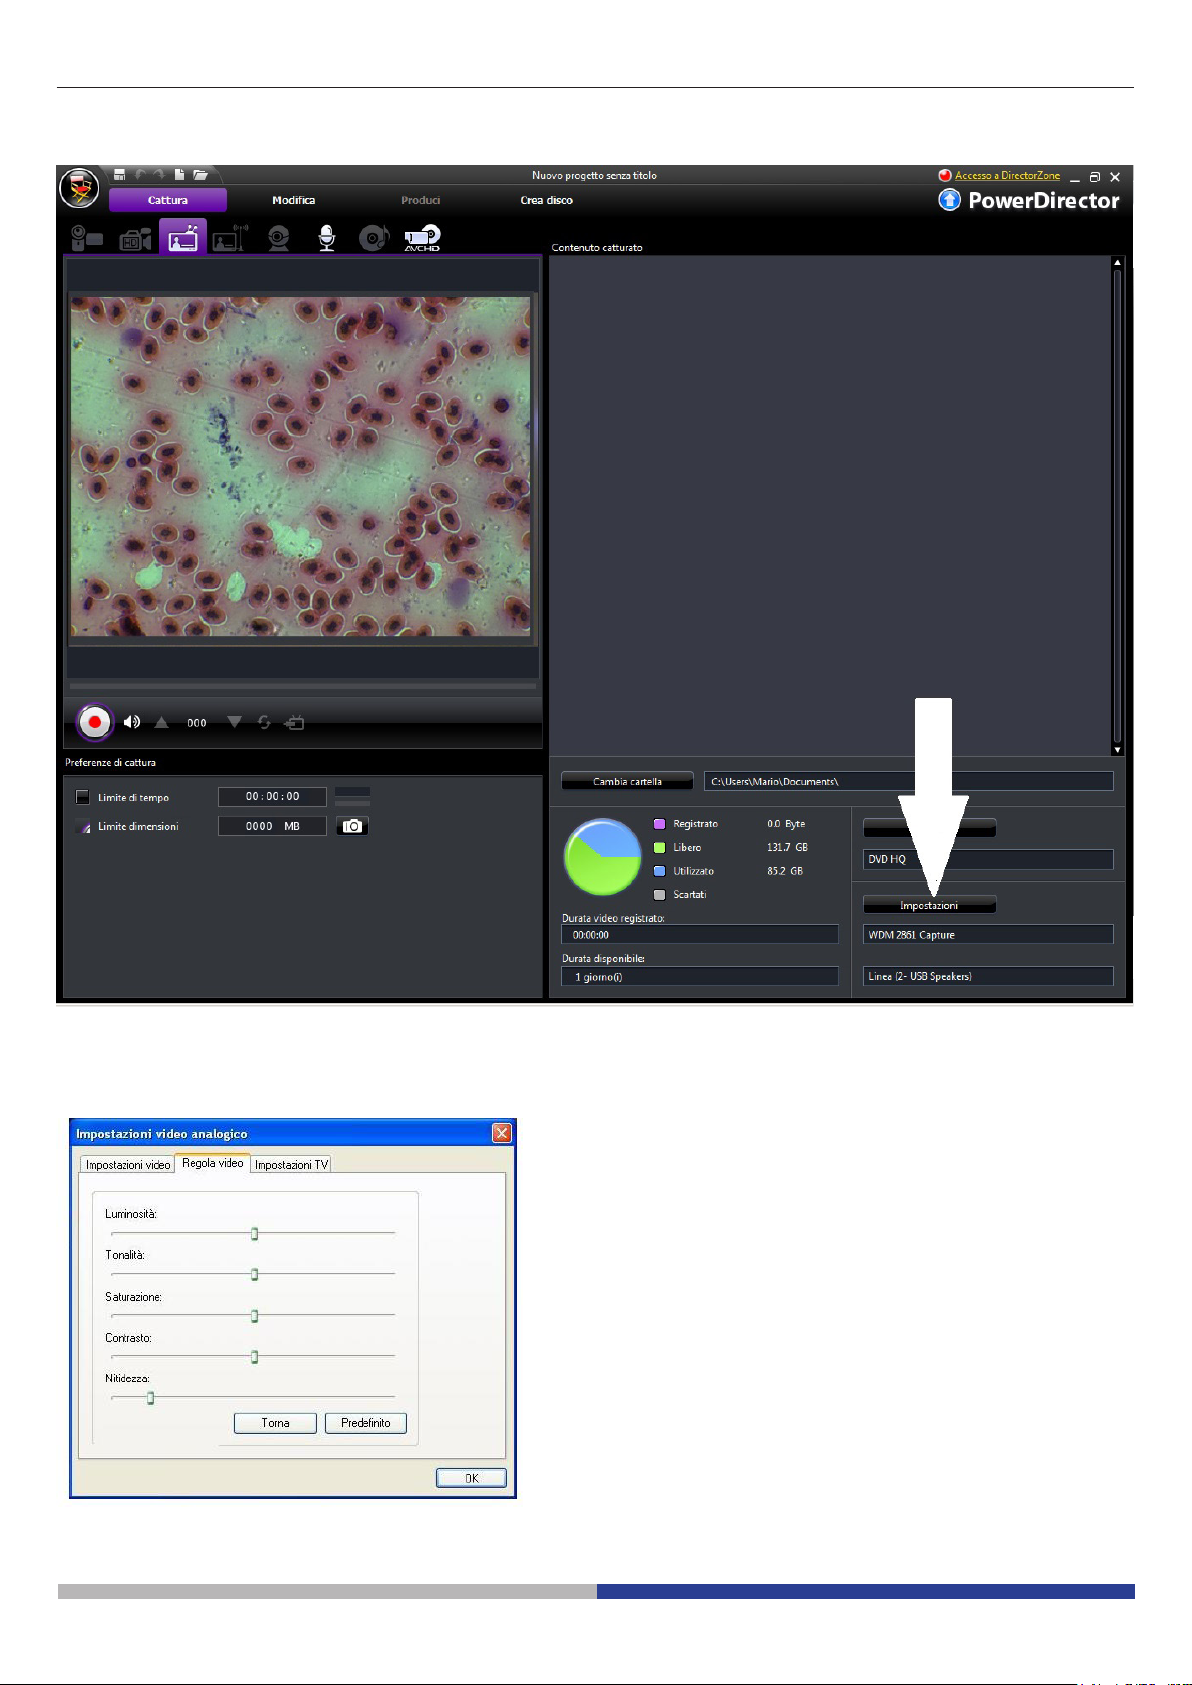
In order to adjust the image properties (colour, resolution) click on “Settings”.
Modify the colour and the properties according to your requirements, then click on OK.
Page 7
Use the camera with Optika Vision Lite
Optika Vision Lite allows you to have a full screen view, to save images step by step, to save video, and to make
line measurements on the captured image.
1. Please insert your CD and run \Optika Vision Lite 2.11\Software\setup.exe
2. Now Optika Vision Lite icon appears on your desktop.
3. Please install the additional Driver from the folder \Optika Vision Lite 2.11\Additional Driver\
4. Now you can run Optika Vision Lite and select the camera Driver USB2861Device from the list that appears
when you select the microscope-shaped icon.
Equipment disposal
Art.13 Dlsg 25 july 2005 N°151. “According to directives 2002/95/EC, 2002/96/EC and 2003/108/EC relating
to the reduction in the use of hazardous substances in electrical and electronic equipment and waste disposal.”
The basket symbol on equipment or on its box indicates that the product at the end of its useful life should be
collected separately from other waste.
The separate collection of this equipment at the end of its lifetime is organized and managed by the producer.
The user will have to contact the manufacturer and follow the rules that he adopted for end-of-life equipment
collection.
The collection of the equipment for recycling, treatment and environmentally compatible disposal, helps to prevent
possible adverse effects on the environment and health and promotes reuse and/or recycling of materials of the
equipment.
Improper disposal of the product involves the application of administrative penalties as provided by the laws in force.
Page 8

Telecamere multimediali - EDUCAM USB VERSIONE 64 BIT
MANUALE D’ISTRUZIONI
Modello
4083.4
Versione: 1
Emesso il: 18, 08, 2014

Descrizione
La telecamera EDUCAM USB è uno strumento espressamente progettato per soddisfare molteplici esigenze in
ambito didattico.
Può essere connessa a monitor, schermi TV o al PC tramite porta USB. Essa può essere utilizzata per le seguenti applicazioni:
- come episcopio, per la riproduzione di testi, documenti, fotograe, ecc.;
- come ingranditore, per l’ingrandimento di piccoli oggetti, insetti, minerali, ecc.;
- come sistema di video-microscopia, collegabile sia a microscopi biologici che a stereomicroscopi
grazie agli adattatori forniti in dotazione;
- come lavagna luminosa, per la proiezione di lucidi;
- come telecamera per teleconferenze, per collegamento a computer e a internet;
- come telecamera per videoconferenze, per conferenze, assemblee, congressi, ecc.;
- come telecamera per la creazione di lmati, con l’ausilio di un videoregistratore.
Questa telecamera consente riprese nitide anche in condizioni di scarsa illuminazione, grazie all’elevata sensi-
bilità dei suoi circuiti elettronici. Lo speciale obiettivo consente una messa a fuoco a partire da 0,76 mm no a
distanza innita.
Alla base è posto un microfono ad alta sensibilità che, attraverso il televisore stesso o un apposito impianto di
amplicazione, permette di riprodurre la voce dell’insegnante durante la lezione oppure di registrare i suoni e i
rumori dell’ambiente circostante.
Lo speciale braccio essibile e il notevole peso della base conferiscono a EDUCAM caratteristiche di versatilità,
robustezza e stabilità. La micro-telecamera posta all’estremità del braccio essibile può essere ruotata in qual-
siasi posizione, anche a sbalzo rispetto alla base, senza compromettere la stabilità del sistema. Uno speciale
snodo permette la rotazione della testata evitando rotture dei connettori posti all’interno del braccio essibile.
Pagina 10
Descrizione dello strumento
SISTEMA DI ROTAZIONE DELLA
TES TATA
TES TATA
OBIETTIVO
BRACCIO FLESSIBILE
INTERRUTTORE AUDIO/VIDEO
PRESA DI
ALIMENTAZIONE
CAVO SEGNALE AUDIO/VIDEO AV
CAVO SEGNALE VIDEO
USB
MICROFONO
INDICATORE LED
VIDEO/AUDIO
BASE
Pagina 11
 Loading...