

Optika 4083.13H Instruction Manual

Version: 1
Issued: 25, 01, 2016
Model
4083.13H - OPTIKAM HDMI
USB and HDMI (1080p) camera
INSTRUCTION MANUAL

Page 2
Table of Contents
Package Contents.
Installation of camera drivers and software.
Some notes.
How to test your Camera.
Select the right driver.
Getting started with Optika Vision Lite, a very easy measuring and documentation software.
Getting started with optika IsView, a complete software for measuring, adjusting, capturing images and
video clip.
HDMI user guide.
Equipment disposal.
Page 3
Package Contents
DESCRIPTION QUANTITY
HDMI Camera 1
12V 2000mA power supply 1
SD card 1
USB cable 1
HDMI cable 1
Calibration slide 1
CD 1
Mouse 1

Page 4
Installation of camera drivers and software
1. Operating system requirements: all the Windows O.S.
2. Please insert your CD and run:
\optika vision lite\ setup.exe
3. Now the Optika Vision Lite icon appears on your desktop.
4. Please Run
\optika IsView\ setup.exe
5. Now the Optika IsView icon appear on your desktop
6. You don’t need to install any driver.
7. PlugtheCamerainyourPC:thecamerawillbeidentiedautomatically.
Some notes
Often a PC has some ports on the front and some on the back: the ports on the back are usually faster. We suggest to use these ones.
If you connect the camera into another USB port, Windows needs to recognize its Driver again even if it has
alredy done this operation for the first USB port.
It may happen sometimes that Windows doesn’t recognize a Camera using one of your PC USB ports, while
gives no problem using another port.
How to test your Camera
In order to check if your Camera works correctly, it’s not necessary to put it into the microscope: it’s enough to
connect it into the USB port, run Vision Lite using the icon on your desktop, select the right driver and check
whether the shown image is not totally black.
Select the right driver
Please select: USB CAMERA.
With Optika Vision Lite you have to tell the Software which is the Driver by selecting the microscope-shaped
icon. With Optika IsView the live image coming from your camera will automatically appear.

Page 5
Getting started with Optika Vision Lite, a very easy measuring and documentation
software.
Run Optika Vision Lite by clicking on its icon on your desktop.
Select the right Driver for capturing the image. Note that after choosing the driver and before capturing the image you can set the brightness, saturation, gamma ecc..
Then you can capture the image.
The image is now ready for being manipulated using Optika Vision Lite.
Getting started with optika IsView, a complete software for measuring, adjusting,
capturing images and video clip.
Run Optika IsView by clicking on your desktop.
The live image with easy buttons for set your camera live view will automatically appear.

Page 6
HDMI user guide
1. USB interface.
A: Connect a mouse to the USB port. Use the mouse to control the camera directly.
B: Connect the USB port to PC to make the camera work as a Driver-Free camera.
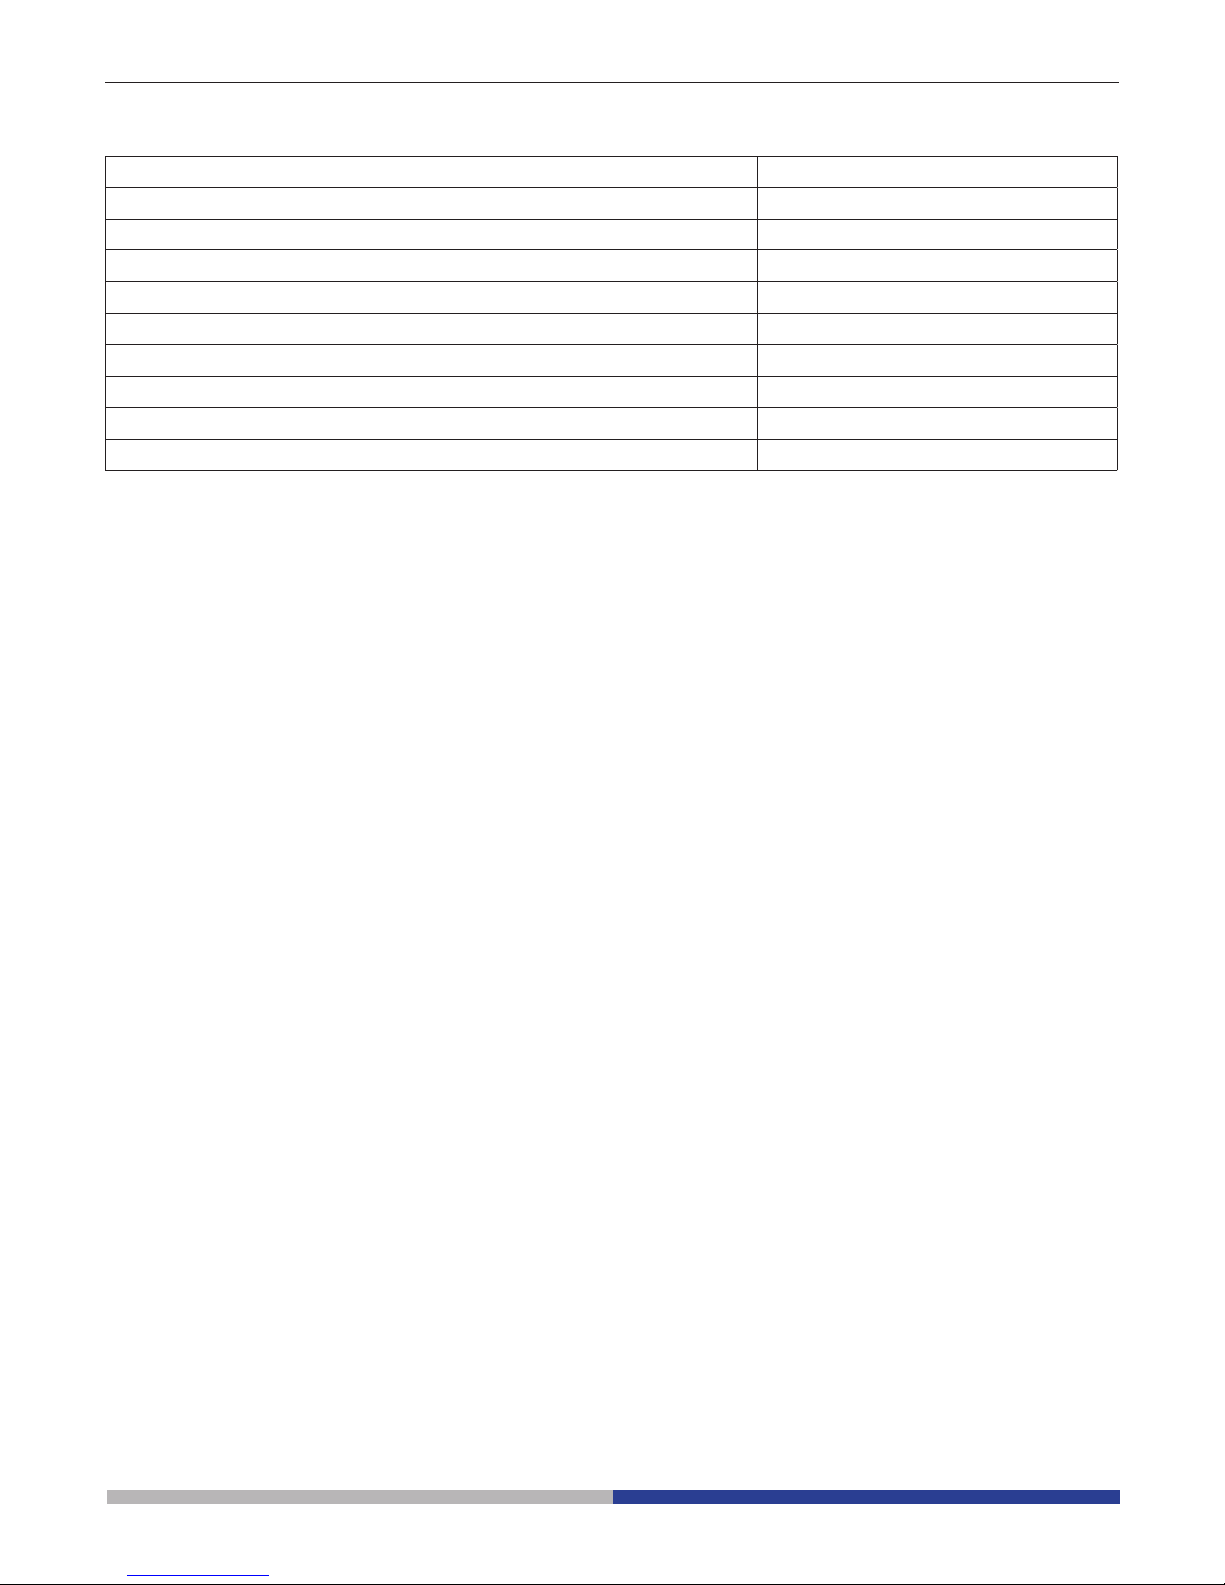
2. HDMI interface.
Use the HDMI cable to connect the camera to the HDMI monitor.
3. Power interface.
Please use the provided 12V2A power supply. When power is plugged in the red light is on. When switch on the
camera blue light is on.
4. ON/OFF KEY
Press and hold the ON/OFF key until the blue light is ON, press the ON/OFF key again to turn the camera off.
5. SD CARD
To get faster and more stable data transfer recommend to use “Class10” SD card we supply a 8 giga SD card.
6. C MOUNT
Standard C-mount optical port.
POWER LIGHT WORKING LIGHT
POWER
TURN ON/OFF
HDMI
USB
SD CARD
Page 7
HDMI Operation
Step 1. Connect the camera.
1. Plug in the 12V2A power supply. Use HDMI cable to connect the camera to the monitor. Press and hold
ON/OFF key until blue light is on.
2. Connect the mouse to the USB port. Move the cursor to get the settings on the screen.
3. Insert the SD card.
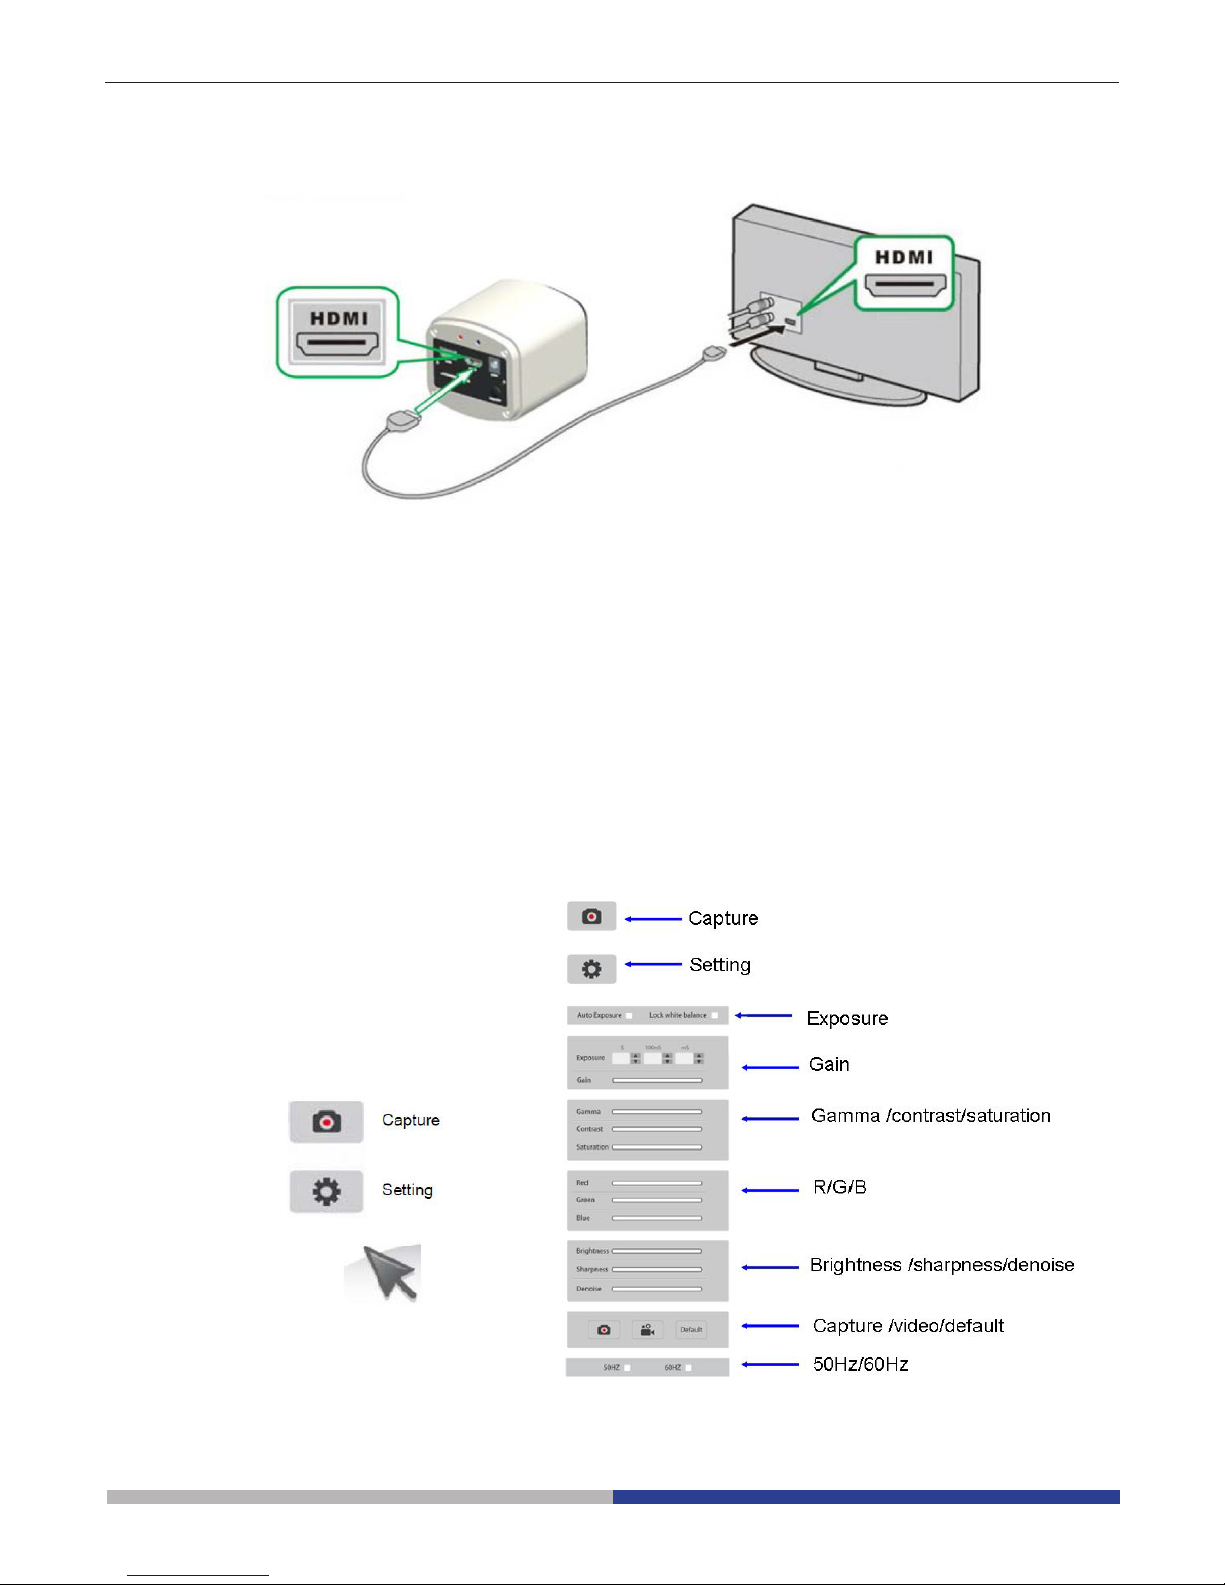
Step 2. Move the cursor to the left of the screen.
When move the cursor to the left of the screen, ‘Capture’ and ‘Setting’ icons will appear (See image on the left
side). Click ‘Setting’ to get parameter setting menu (See image on the right side).

Page 8
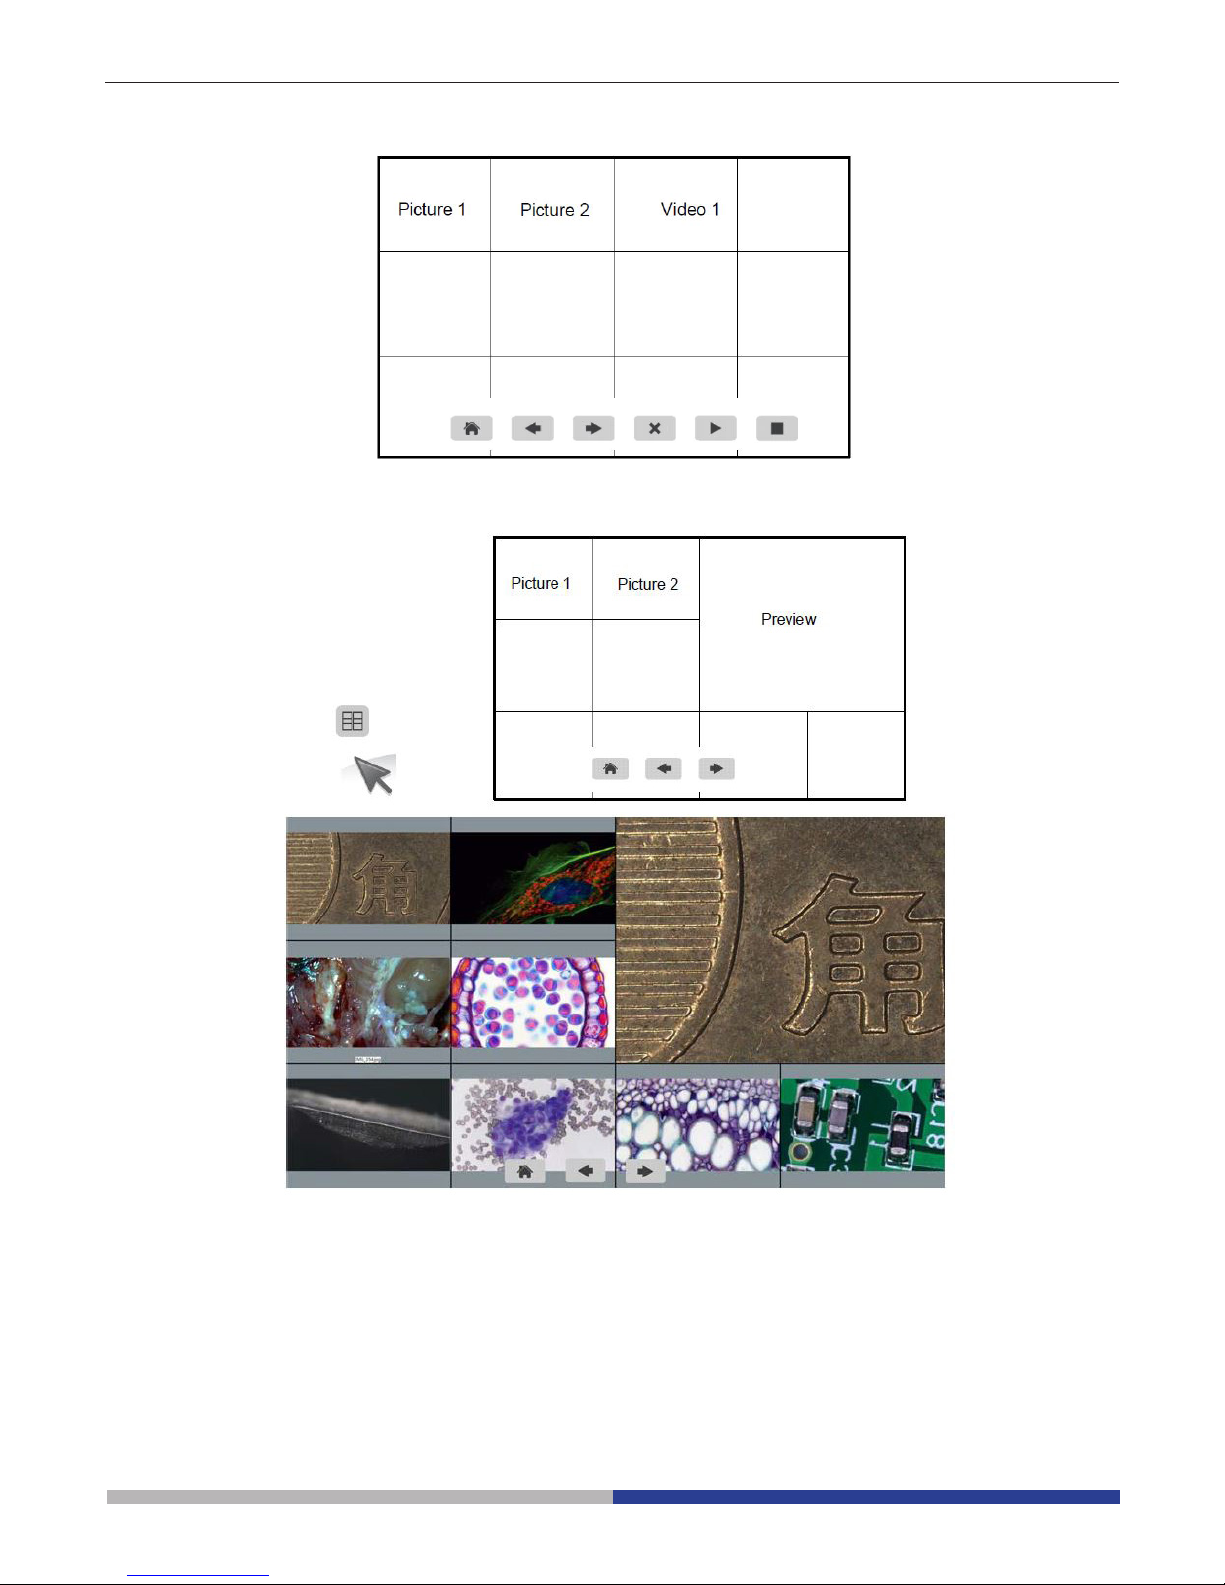
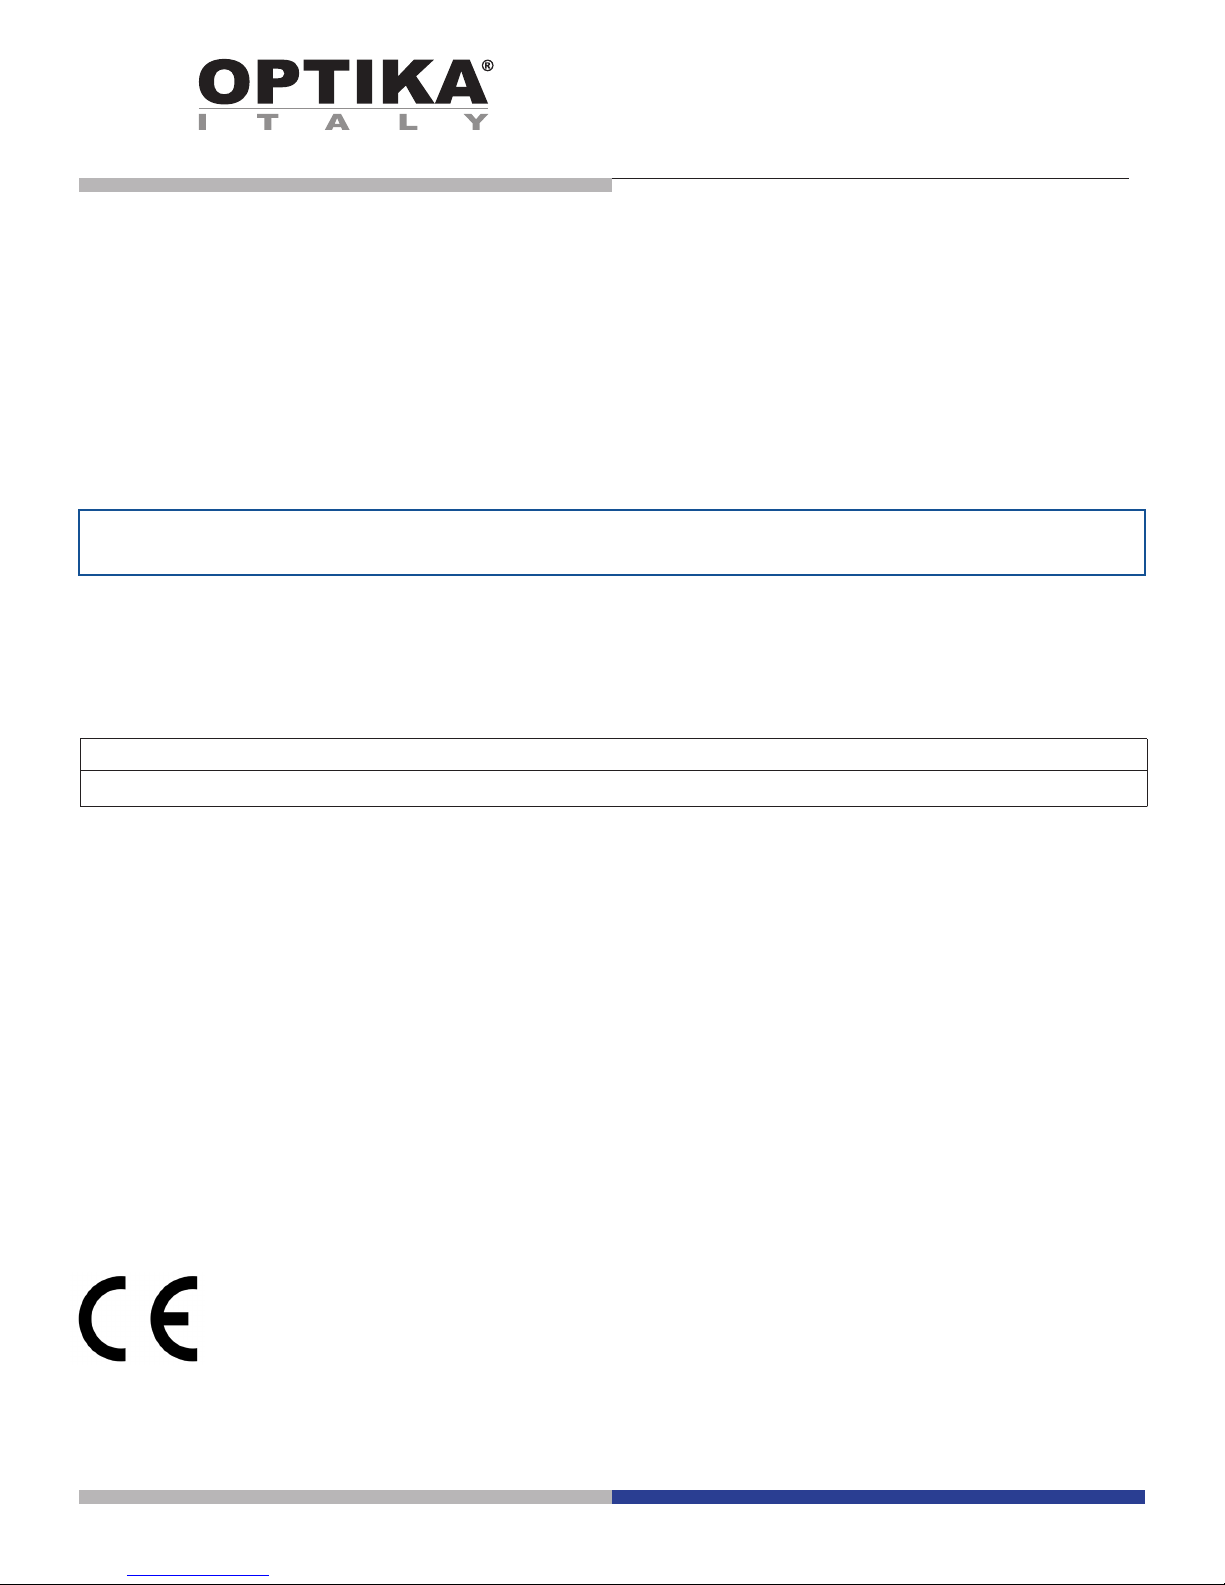
Step 3. Move the cursor to the right of the screen.
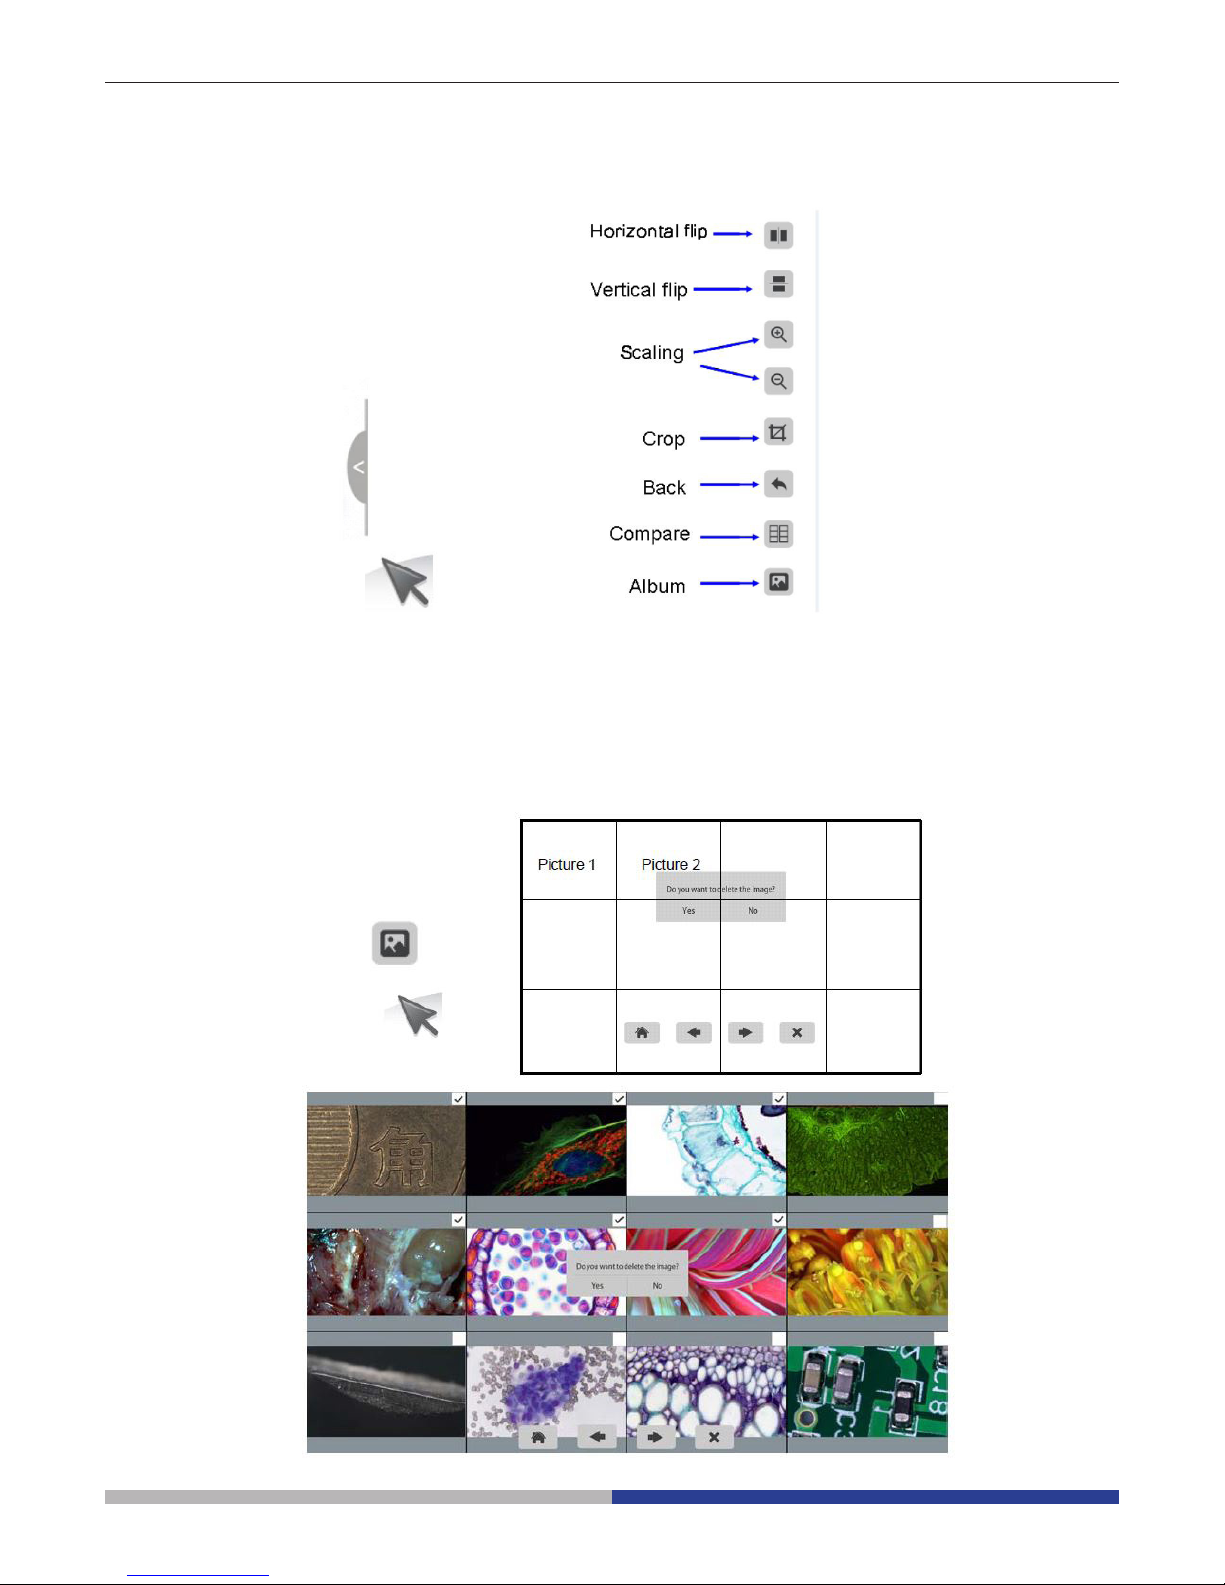
Step 4. Check the images and videos you have captured on the SD card.
1. Check the album and delete the images.
Page 9
2. Check the video and delete the video. To delete the video successfully, be sure this video is not in use.
Step 5. Compare preview with the captured images.
Connect the camera to the PC
1. Use the special USB cable for connecting the camera to the PC.
2. Plug in the 12V 2A Power Supply.
3. Press and hold the on/off key until the blu light is on.
4. Run the Optika IsView software, please open the on-line help to discover all the software features.
Page 10
Equipment disposal
Art.13 Dlsg 25 july 2005 N°151. “According to directives 2002/95/EC, 2002/96/EC and 2003/108/EC relating
to the reduction in the use of hazardous substances in electrical and electronic equipment and waste disposal.”
The basket symbol on equipment or on its box indicates that the product at the end of its useful life should be
collected separately from other waste.
The separate collection of this equipment at the end of its lifetime is organized and managed by the producer.
The user will have to contact the manufacturer and follow the rules that he adopted for end-of-life equipment
collection.
The collection of the equipment for recycling, treatment and environmentally compatible disposal, helps to prevent
possible adverse effects on the environment and health and promotes reuse and/or recycling of materials of the
equipment.
Improper disposal of the product involves the application of administrative penalties as provided by the laws in force.
Modello
4083.13H - OPTIKAM HDMI
Telecamera USB e HDMI (1080p)
MANUALE D’ISTRUZIONI
Versione: 1
Emesso il: 25, 01, 2016

Pagina 12
Indice
Contenuto della confezione.
Installazione dei drivers e del software.
Alcune note.
Come vericare la telecamera.
Selezionare il driver corretto.
Optika vision lite, un programma completo per eseguire misurazioni e per documentare le vostre im-
magini.
Iniziare a utilizzare Optika IsView, un software completo per la misura, regolazione e cattura di imma-
gini e video.
Guida HDMI.
Smaltimento.

Pagina 13
Contenuto della confezione
DESCRIZIONE QUANTITÀ
Camera HDMI 1
Alimentazione 12V 2000mA 1
SD card 1
Cavo USB 1
Cavo HDMI 1
Vetrino di calibrazione 1
CD 1
Mouse 1

Pagina 14
Installazione dei drivers e del software
1. Requisiti del sistema operativo: compatibile con tutti i sistemi operativi Windows.
2. Inserire il CD e avviare il programma:
\ optika vision lite \ setup.exe
3. Ora l’icona Optika Vision Lite apparirà sul vostro desktop.
4. Avviare il programma
\ optika IsView\ setup.exe
5. Ora l’icona Optika IsView apparirà sul vostro desktop.
6. Non è necessario installare alcun driver.
7. Aquestopuntoinserirelatelecamera:lafotocameraverràidenticataautomaticamente.
Alcune note
Consigliamo di utilizzare le porte USB poste sul retro del PC, poiché garantiscono in generale una migliore comunicazione.
Se utilizzate una periferica su una porta USB e la collegate poi in una seconda porta, Windows avrà bisogno di
riconoscerla ed installare il Driver anche per questa porta.
È possibile che Windows non riconosca la periferica su una porta USB, si consiglia di provare il collegamento
su di un altra porta USB.
Come vericare la telecamera
Per verificare il funzionamento non è necessario inserire fisicamente la telecamera nel microscopio, basta collegarla alla porta USB ed eseguire Vision Lite usando l’icona sul vostro Desktop, selezionare quindi il Driver
corretto e controllare di non avere un’immagine completamente nera.
Selezionare il driver corretto
Seleziona: USB CAMERA.
Con Optika Vision Lite dovete indicare al software il driver da utilizzare selezionando l’icona a forma di microscopio.
Con Optika IsView l’immagine live proveniente dalla telecamera apparirà automaticamente.

Pagina 15
Optika vision lite, un programma completo per eseguire misurazioni e per documentare le vostre immagini
Lanciate Optika Vision Lite selezionando l’apposita icona sul desktop.
Selezionate il Driver corretto e catturate l’immagine. Notate che prima di catturare l’immagine potete regolare
alcuni importanti fattori quali: sensibilità del CCD, saturazione, contrasto, gamma, ecc..
Quindi catturate l’immagine. L’immagine è ora pronta per essere elaborata con Optika Vision Lite.
Iniziare a utilizzare Optika IsView, un software completo per la misura, regolazione e cattura di immagini e video
Avviare Optika IsView cliccando sull’icona sul desktop.
L’immagine live della telecamera apparirà automaticamente, con semplici pulsanti di controllo.

Pagina 16
Guida HDMI
1. Interfaccia USB.
A: Collegare un mouse all’uscita USB. Usare il mouse per controllare direttamente la telecamera.
B: Collegare un PC all’uscita USB per utilizzare la telecamera come una Driver-Free camera.
2. Interfaccia HDMI.
Usare il cavo HDMI per collegare la camera a un monitor HDMI.
3. Alimentazione.
Utilizzare l’alimentatore 12V2A fornito in dotazione. Quando l’alimentazione è attiva la luce rossa è accesa.
Quando la telecamera è in uso la luce blu è accesa.
4. ON/OFF
Tener premuto il pulsante ON/OFF finchè la luce blu sia accesa, premere di nuovo il pulsante ON/OFF per
spegnare la telecamera.
5. SD CARD
Per rendere più rapido e stabile il trasferimento dati, si raccomanda di utilizzare la SD CARD Class10 SD da
noi fornita da 8 GB.
6. C MOUNT
Uscita con attacco standard C-MOUNT.
POWER LIGHT WORKING LIGHT
POWER
TURN ON/OFF
HDMI
USB
SD CARD

Pagina 17
Operazioni HDMI
Step 1. Collegare la camera.
1. Accendere l’alimentatore 12V2A fornito. Usare il cavo HDMI per collegare la camera al monitor.
Tener premutoilpulsanteON/OFFnchèsiaccendalaluceblu.
2. Collegare il mouse all’uscita USB. Muovere il cursore per impostare la schermata.
3. Inserire la SD card.
Step 2. Muovere il cursore sulla parte sinistra dello schermo.
Portando il cursore nella parte sinistra dello schermo, appariranno le icone ‘Capture’ e ‘Setting’ (vedi immagine
a sinistra). Cliccare su ‘Setting’ per entrare nel menu dei parametri (vedi immagine a destra).
Pagina 18
Step 3. Spostare il cursore a destra dello schermo.
Step 4. Controllare immagini e video salvate su SD card.
1. Controllare la galleria e cancellare le immagini.
 Loading...