

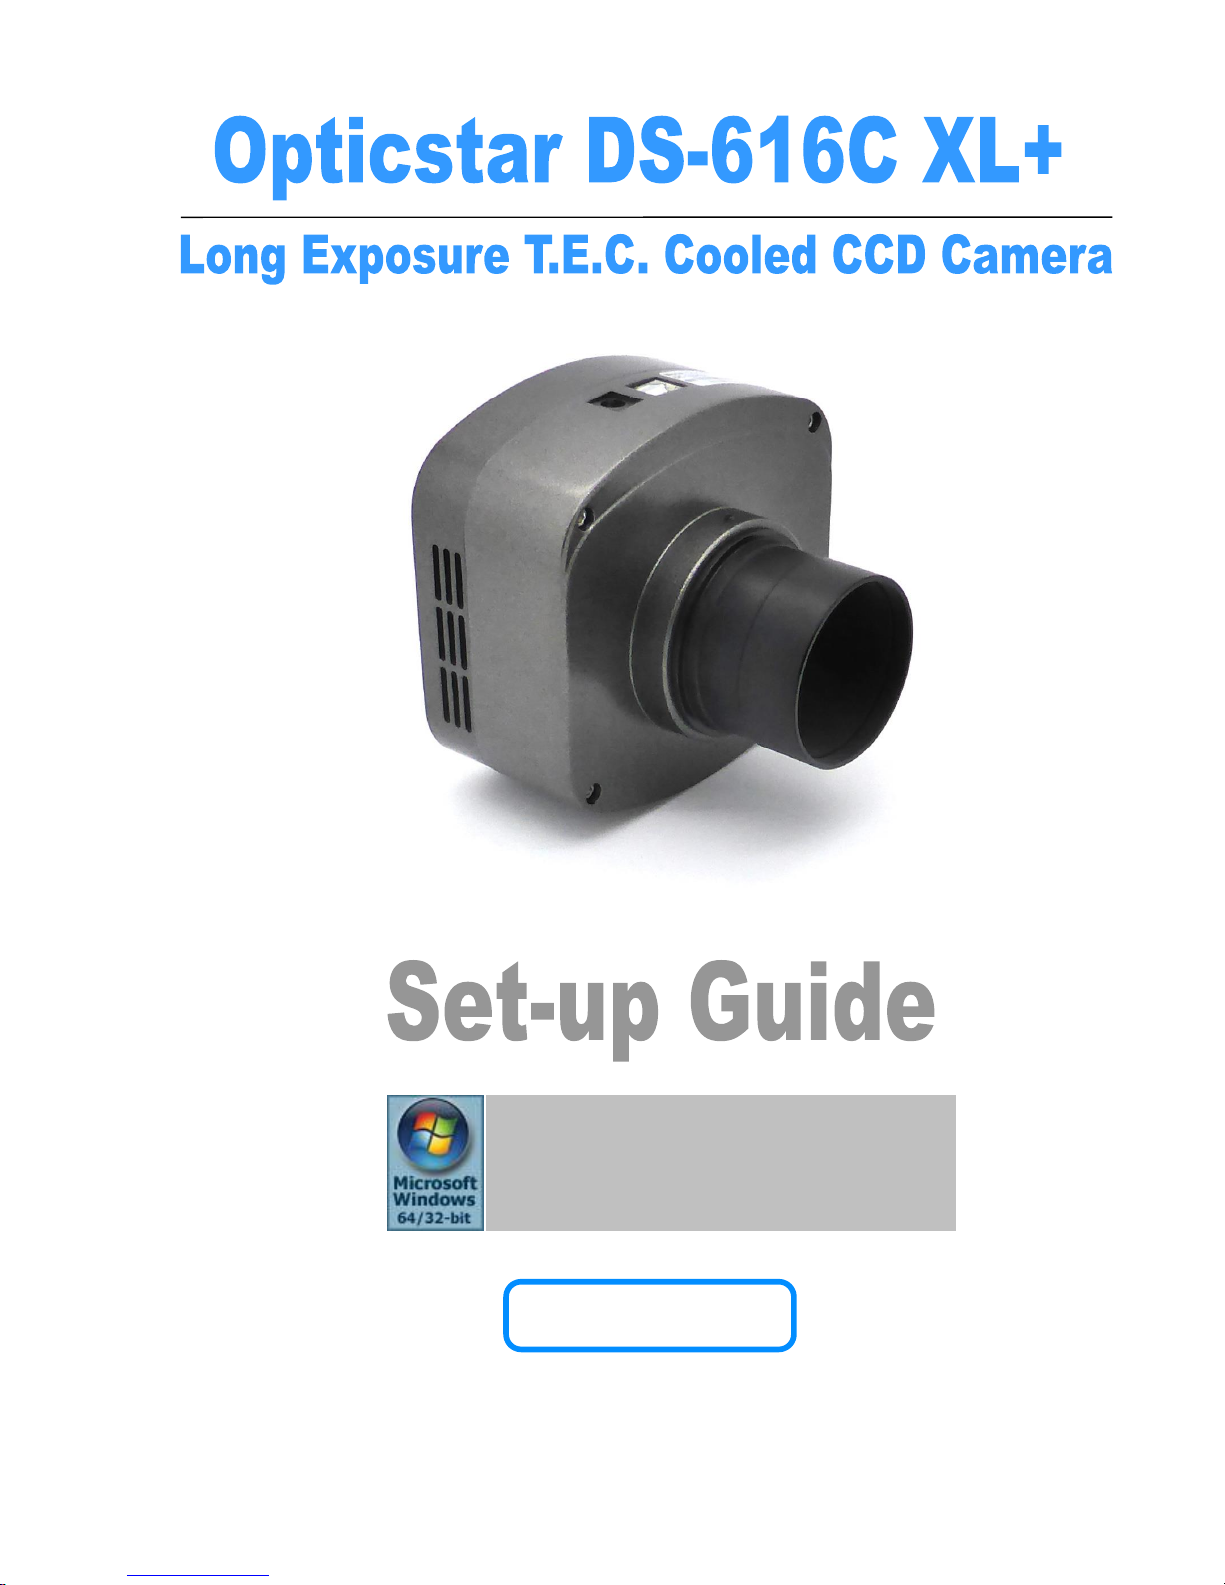
Opticstar DS-616C XL+ Setup Manual
OPTICSTAR
Microsoft Windows
(64-bit & 32-bit)
XP/Vista/7/8/10
DS-616C XL Setup Guide
24/10/2017
© Opticstar Ltd
1
1. The DS camera is sealed to protect the sensor and electronics, do not
open your camera, this will make the camera susceptible to moisture
and dust.
2. Do not drop your camera as this can result in serious damage.
3. Only use the supplied power supply unit (12VDC 2A regulated).
4. Do not point the camera to a bright light source like the Sun without the
appropriate filters.
5. Do not over-tighten adaptors attached to the camera.
6. Treat the camera glass window with the same care as you would of a
photographic lens.
CAUTION
!
Manufacturer’s Warranty
This product has a 1 year back to base warranty. For after sales
support please contact Opticstar at: info@opticstar.com

DS-616C XL Setup Guide
24/10/2017
© Opticstar Ltd
2
Contents
CONTENTS ..........................................................................................................................................................................2
INTRODUCTION ................................................................................................................................................................4
PACKAGE CONTENTS .....................................................................................................................................................4
SYSTEM REQUIREMENTS ..............................................................................................................................................4
CONNECTING THE DS-616C XL+ TO THE COMPUTER ..........................................................................................5
INSTALLING THE SOFTWARE DRIVERS ...................................................................................................................6
SOFTWARE APPLICATIONS ..........................................................................................................................................9
NEBULOSITY .......................................................................................................................................................................9
ASTROART .........................................................................................................................................................................9
MAXIM DL .........................................................................................................................................................................9
INSTALLING NEBULOSITY V2 AND THE DS-616C XL PLUGIN .......................................................................... 10
RUNNING NEBULOSITY V2 ................................................................................................................................................ 10
MAIN PANEL..................................................................................................................................................................... 11
Advanced Sub Panel.................................................................................................................................................... 11
VIDEO MODE .................................................................................................................................................................... 12
SUPPORT ........................................................................................................................................................................... 12
INSTALLING THE DS-616C XL PLUGIN FOR ASTROART .................................................................................... 13
BINNING MODES ............................................................................................................................................................... 14
HIGHER IMAGE QUALITY .................................................................................................................................................. 14
HIGHER SPEED .................................................................................................................................................................. 14
STARVIEW ........................................................................................................................................................................ 15
CAPTURE SETTINGS .......................................................................................................................................................... 15
COLOUR SYNTHESIS ......................................................................................................................................................... 16
SUPPORT ........................................................................................................................................................................... 16
INSTALLING THE DS-616C XL PLUGIN FOR MAXIM DL V4/V5 ......................................................................... 17
BINNING MODES ............................................................................................................................................................... 18
HIGHER IMAGE QUALITY .................................................................................................................................................. 18
HIGHER SPEED .................................................................................................................................................................. 18
STARVIEW ................................................................................................................................................................ ........ 19
CAPTURE SETTINGS .......................................................................................................................................................... 19
COLOUR SYNTHESIS ......................................................................................................................................................... 20
SUPPORT ........................................................................................................................................................................... 20
TROUBLESHOOTING ..................................................................................................................................................... 21
SYSTEM REQUIREMENTS .................................................................................................................................................. 21
INSTALLATION ISSUES ...................................................................................................................................................... 21
Windows does not Recognise the Camera ................................................................................................................... 21
Camera Driver Check ................................................................................................................................................. 22
Camera Driver Removal ............................................................................................................................................. 22
Re-installing the Camera and Drivers ........................................................................................................................ 23
CAMERA PERFORMANCE .................................................................................................................................................. 23
USB BUS SPEED ............................................................................................................................................................... 23
USB EXTENSIONS ............................................................................................................................................................. 24
USB PORT ISSUES ............................................................................................................................................................ 24
COMPUTER LATENCY .................................................................................................................................................. 25
GOOD PRACTICES .......................................................................................................................................................... 25
CAMERA CLEANING ......................................................................................................................................................... 25
CAMERA POWER REQUIREMENTS ..................................................................................................................................... 25
OVEREXPOSING THE CAMERA TO STRONG LIGHT ............................................................................................................. 25
SUPPORT ........................................................................................................................................................................... 25
DS-616C XL Setup Guide
24/10/2017
© Opticstar Ltd
3
OTHER SOFTWARE ....................................................................................................................................................... 25
CAMERA SPECIFICATION ........................................................................................................................................... 26
If you have any queries regarding the camera or you require after
sales support, please email us at: info@opticstar.com Please
include your camera’s serial number as displayed on the camera’s
case.
The camera does not incorporate any optics and therefore it cannot
reach focus by itself. A T-threaded (M42 x 0.75) mounted lens
must be used with the camera or it must be attached to a telescope
with the nosepiece adapter that is included with the camera.
The camera requires a computer running Microsoft Windows
XP/Vista/7/8/10 with a fully specified USB 2.0 port. If your
computer’s USB 2.0 ports do not meet the full specification of the
USB 2.0 standard, you may need to use a USB 2.0 Repeater cable
between the computer and the camera. Please refer to the
Troubleshooting section of this guide under USB Extensions for
more details.
DS-616C XL Setup Guide
24/10/2017
© Opticstar Ltd
4
Introduction
Your Opticstar DS-616C XL+ single shot camera will enable you to capture
images of deep sky objects, the planets and their satellites as well as images of
the Moon and Sun with the use of an appropriate filter. The camera incorporates
thermo-electric cooling (TEC) reducing the levels of noise dramatically during
longer exposures.
The DS-616C XL+ is the latest in the XL range of high performance scientific
CCD cameras with the following features:
• Sony 1.8” colour CCD with 6.1-megapixel resolution.
• Higher frame rate for focus and preview modes.
• High light sensitivity due to Gain function in hardware.
• Colour binning modes at 1x1, 2x2 and 4x4.
Package Contents
Please insure that you check that no parts are missing. In the event of a part
missing please inform your local supplier immediately. Your camera should
include the following:
1. Camera.
2. USB cable.
3. USB 2.0 repeater cable (may be required for some computers).
4. T-mount to 2” Nosepiece (for 2” telescope drawtubes).
5. Printed setup guide (this document).
6. CD with software, drivers and Nebulosity user manual.
7. Mains Power Supply Unit for powering the camera.
System Requirements
You will first need to install the camera and drivers before installing the
Nebulosity software. Please follow the instructions closely for a successful
installation. You will require a PC running Microsoft Windows (64-bit or 32-bit)
XP/Vista/7/8/10 with a free USB 2.0 port.
If you experience any difficulty during or following installation please refer to the
Troubleshooting section in this guide.
If you have installed the camera drivers in the past and you wish to replace the
drivers to a different version you must first remove the original drivers. Please
refer to the Troubleshooting section on how to remove the currently installed
drivers.
The 2” nosepiece can be secured on the camera using a screw
driver. Remove the cap from the camera, screw the nosepiece in its
place and secure it by tightening the three screws on the side of
the camera’s optical window.

DS-616C XL Setup Guide
24/10/2017
© Opticstar Ltd
5
Connecting the DS-616C XL+ to the Computer
Before installing the software drivers and applications, follow the instructions
below to connect the DS-616C XL+ to your computer.
1. Remove the protective cap at the front of the camera exposing the camera’s
female T-tread. Screw the 2” Nosepiece in its place which is bundled with the
camera. This will enable the camera to be attached to a telescope with a 2”
draw tube.
2. Connect the power supply unit to the mains.
3. Insert the power lead into the camera’s 12VDC socket.
4. Plug the mains power supply to a mains socket.
5. Attach one end of the USB cable to the side of the camera. Additionally, you
may have to attach the USB 2.0 Repeater cable too on some computers.
6. Attach the other end of the USB cable to your computer. Windows will
identify the camera as a new device. Please, follow the instructions in the
next section to install the software.
DS-616C XL Setup Guide
24/10/2017
© Opticstar Ltd
6
Installing the Software Drivers
Follow the instructions below closely ensuring that you make the right
selections.
1. Un-install any previous versions of the software.
2. Insert the supplied CD in the CD/DVD drive.
3. Plug the camera to a USB2.0 port
(ideally to one attached directly
on the motherboard of your
computer).
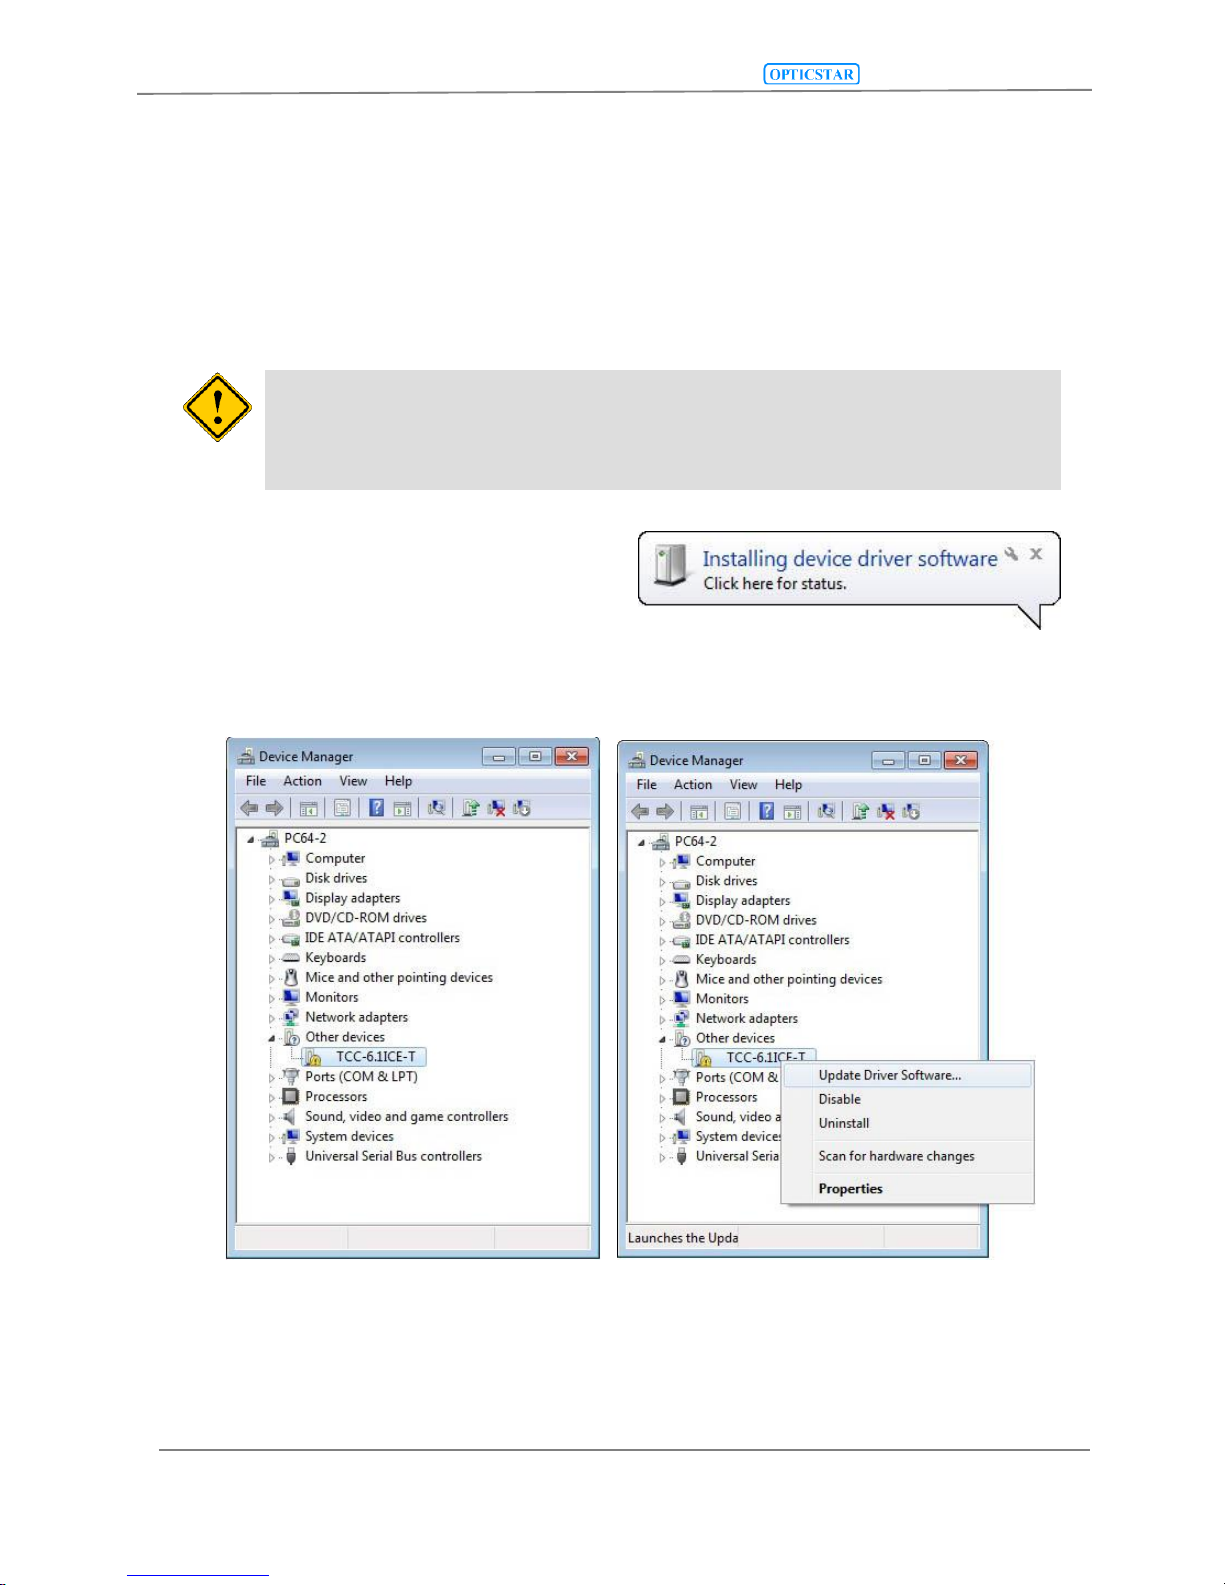
4. The Windows Device Manager will list the camera as TCC-6.1ICE-T as
shown below.
Once connected to the computer, the
Device Manager will show the camera.
During installation do not allow Windows to automatically select the
best drivers. If you allow Windows to automatically select the
drivers, installation will fail.
The software drivers can also be installed
by the user from the Device Manager.
DS-616C XL Setup Guide
24/10/2017
© Opticstar Ltd
7
5. The Windows Found New Hardware Wizard will come into view. If the
wizard does not appear, you can install the drivers by right-clicking on the
camera entry in Device Manager and select Update Driver Software.
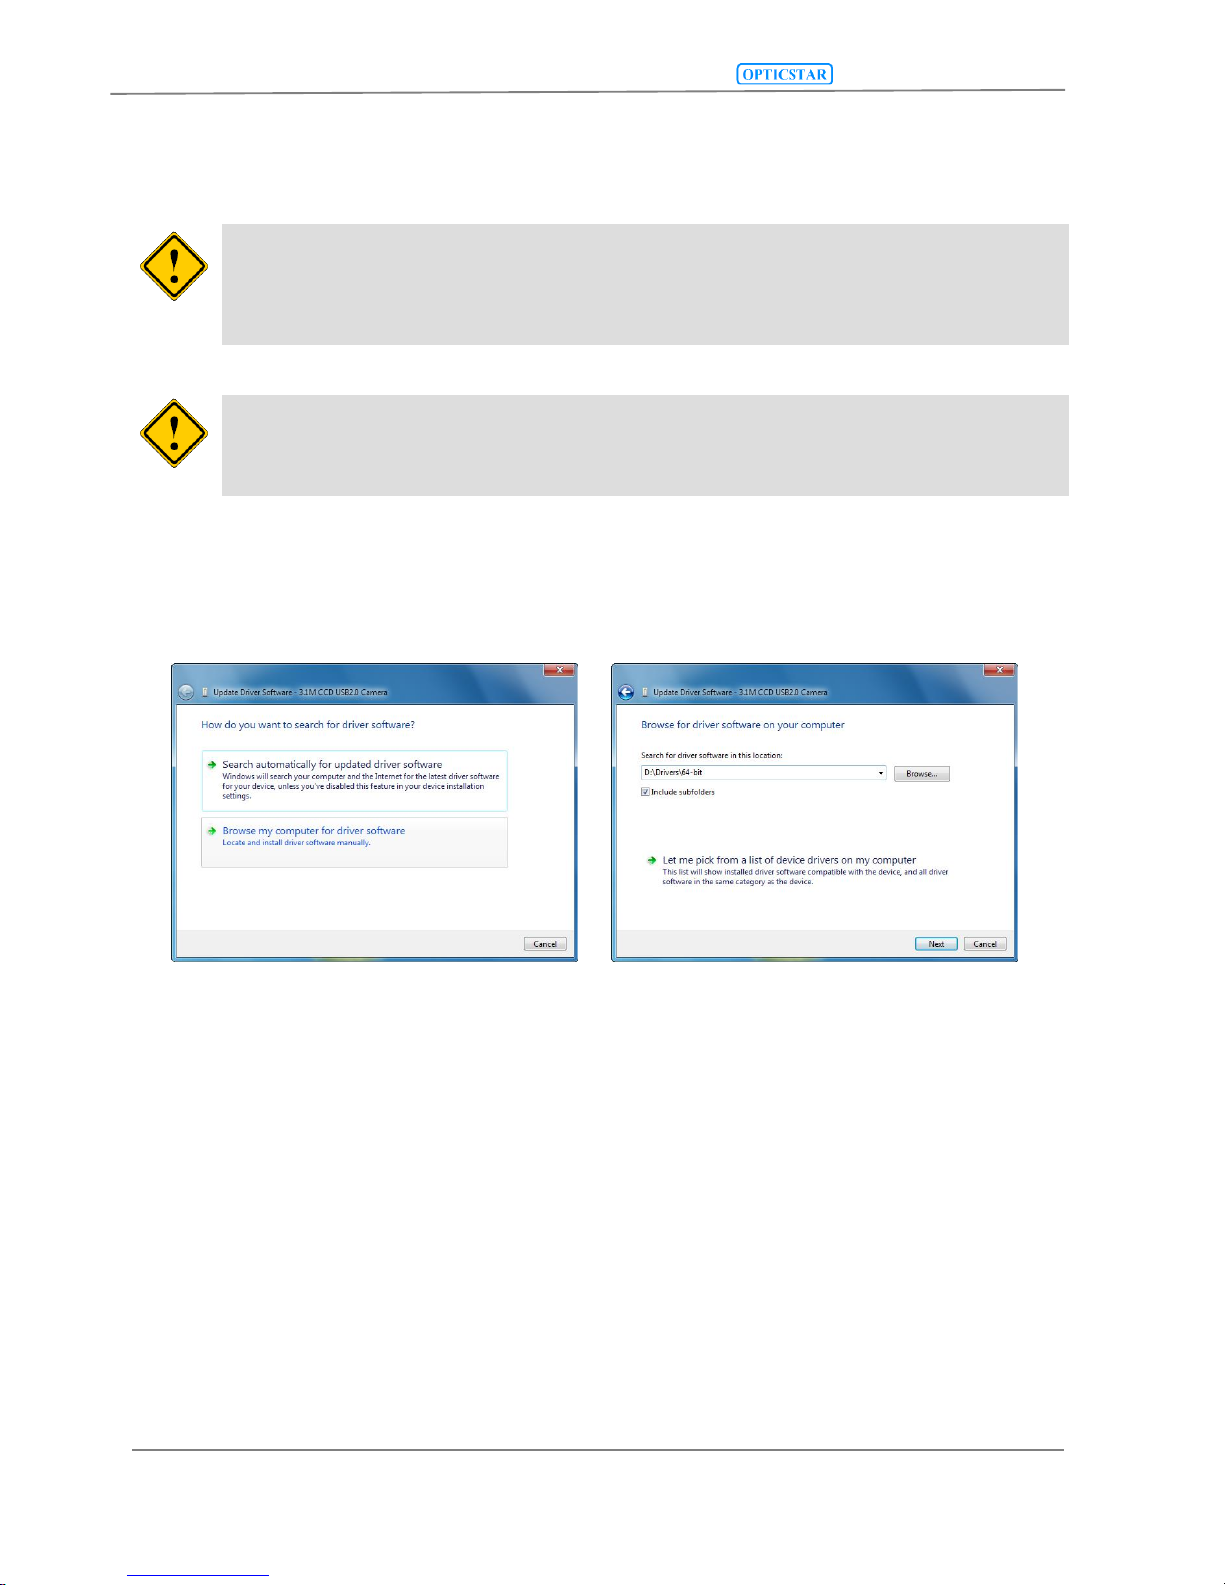
6. Do not allow Windows to search automatically for the driver software.
Instead, select the Browse my computer for driver software option.
7. The drivers are situated on the CD inside the Drivers folder. These
software drivers will operate on 64-bit and 32-bit Microsoft Windows
XP\Vista\7\8\10 operating systems. The 64-bit drivers are situated in the
\Drivers\64-bit folder and the 32-bit drivers are situated inside the
\Drivers\32-bit folder.
Anti-virus software may attempt to block the installation. In such cases
the anti-virus software should be temporarily disabled. Alternatively,
when prompted, add the installation files to the trusted list.
Select the software drivers manually.
The software drivers are situated on the
CD inside the Drivers folder.
Windows may demand the user to have Administrator access rights in
order to install the software. Otherwise the installation will be
terminated by Windows.
DS-616C XL Setup Guide
24/10/2017
© Opticstar Ltd
8
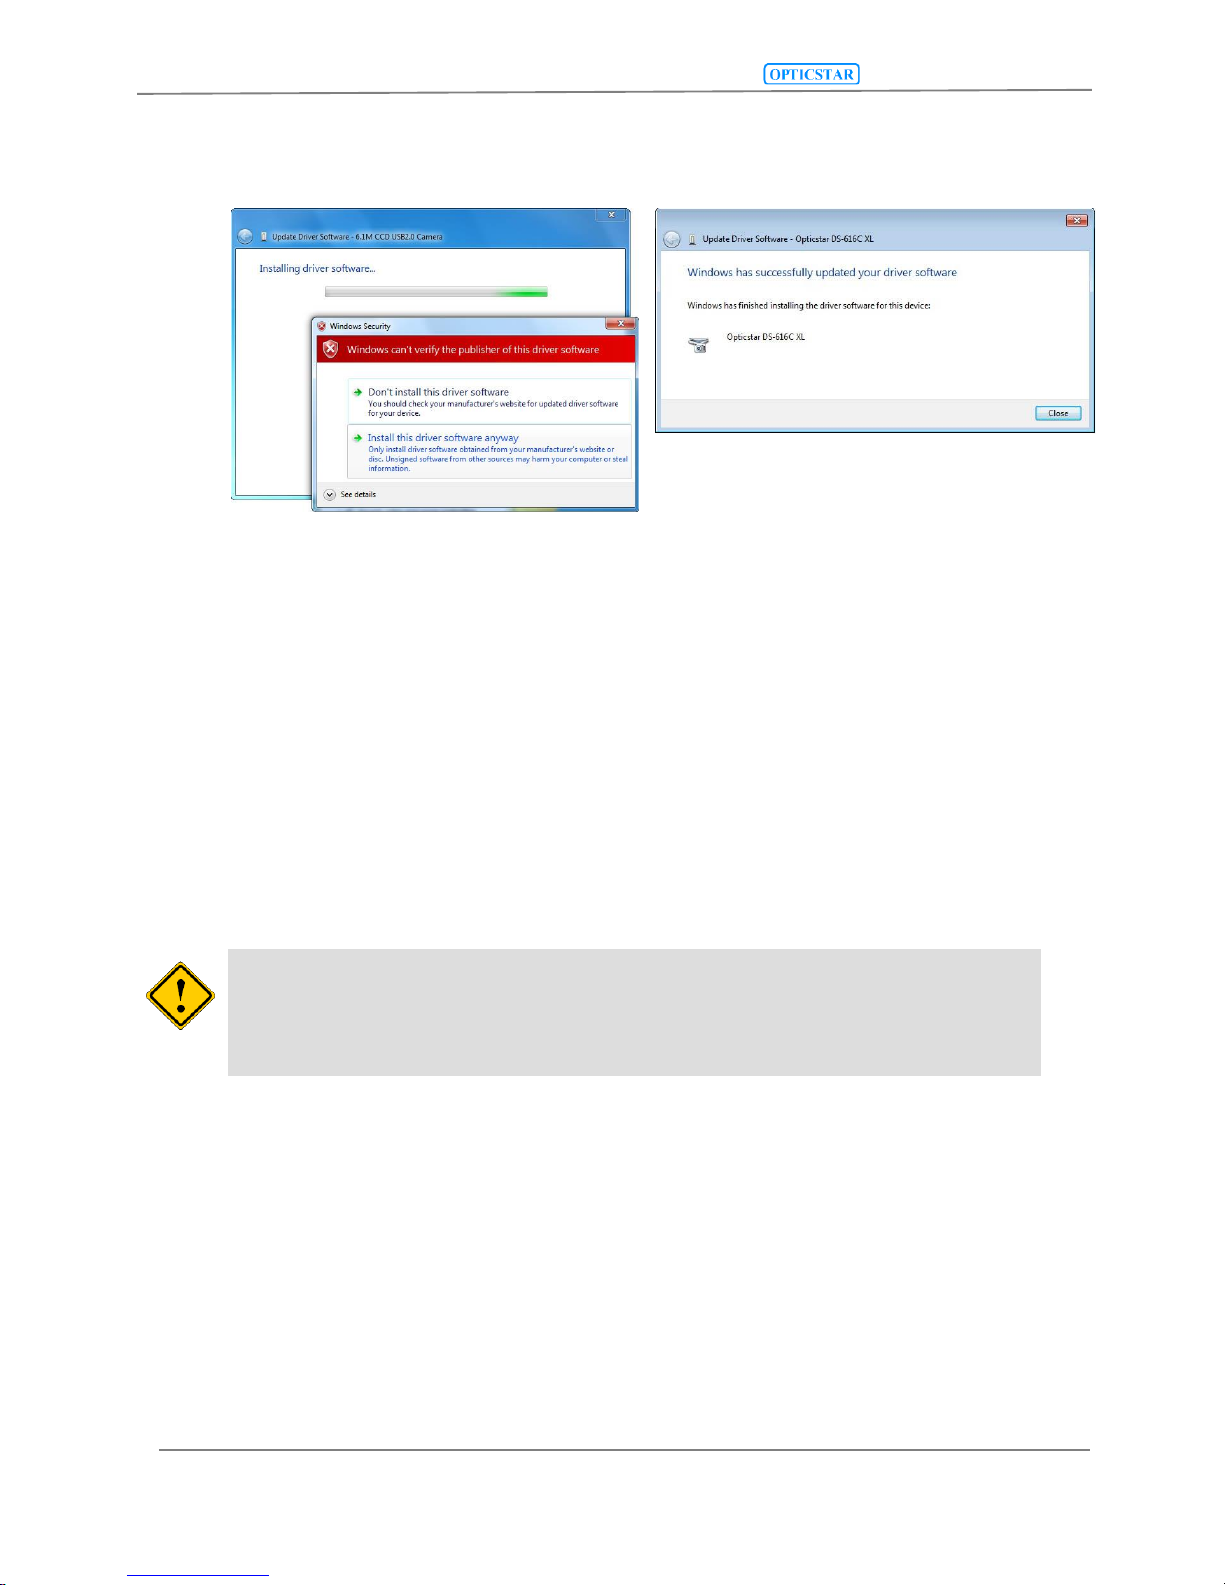
8. Windows may display a warning prior to installing the driver software.
Ignore the message and select Install the driver software anyway.
9. Once the drivers have been installed, Windows will identify the camera as
Opticstar DS-616C XL.
10. If Windows asks you to restart the computer before proceeding, please do
so.
11. Your camera and drivers are now installed. Please refer to the
Troubleshooting section in this guide if the camera and driver installation
failed to complete successfully.
Ignore the Windows warning.
The drivers installed successfully.
Note that if later you remove the camera from your computer and
re-connect it to a different USB 2.0 port Windows may ask for the
drivers again. Repeat the above procedure to re-install the drivers
for the newly selected USB 2.0 port.
 Loading...