

Page 1

IP Installer User's Manual
O1401-00
1
Opticom Technologies Inc.
IP Installer User's Manual
Version 3.0.1
January 21, 2014
Opticom Technologies Inc.
O1401-00
Page 2

IP Installer User's Manual
O1401-00
2
Opticom Technologies Inc.
IP Installer User’s Manual
Document Part Number: O1401-00
Document Version: 3.0.1
Revised: January 21, 2014
About This Document
This document is prepared for users of netwrok video products supplied by Opticom. It is assumed that the users are
familiar with Microsoft Windows operating systems and Web browsers such as Internet Explorer. It is also assumed
that the users are well aware of how to install and use the network equipment such as LAN, Hub, router, and having
basic knowledge of network terminologies. If you have any questions regarding network installations, please contact
your network equipment vendor or network administrator or Internet service providers.
For updated contents, detailed features and other applications from Opticom, please refer to the user’s manual in
CD-ROM provided with the product you purchased, or visit Opticom's Internet homepage at
http://www.opticomtech.com/.
Disclaimer
Opticom makes no representations or warranties with respect to the contents hereof. In addition, information
contained herein is subject to change without notice. Every precaution has been taken in the preparation of this
manual, nevertheless, Opticom assumes no responsibility for errors or omissions or any damages resulting from
the use of the information contained in this document.
Trademarks
Windows and Internet Explorer are a trademark of Microsoft Corporation.
All other trademarks belong to their respective owners.
Technical Support
For technical support call or visit our web site.
Telephone: 855-569-3240
Web site: http://www.opticomtech.com
Page 3

O1401-00
3
Opticom Technologies Inc.
IP Installer User's Manual
Table of Contents
1.
About IP Installer ........................................................................................................................................... 4
2.
Installing and Uninstalling ............................................................................................................................... 4
2.1.
Installing IP Installer ............................................................................................................................ 4
2.2.
Uninstalling IP Installer ......................................................................................................................... 7
3.
Using IP Installer ......................................................................................................................................... 10
3.1.
Starting the Program .......................................................................................................................... 10
3.2.
Search Product ................................................................................................................................... 12
3.3.
Manual Network Setup ........................................................................................................................ 13
3.3.1.
3.3.2.
3.4.
3.5.
3.6.
3.7.
3.8.
3.9.
When one IP device is selected ................................................................................................. 14
When two or more IP devices are selected ................................................................................. 15
Automatic Network Setup ................................................................................................................... 17
Using DHCP Server ............................................................................................................................. 19
Using PPPoE ....................................................................................................................................... 20
Updating Firmware ............................................................................................................................. 21
Filter Configuration ............................................................................................................................. 23
Live View ........................................................................................................................................... 25
Page 4
O1401-00
4
Opticom Technologies Inc.
IP Installer User's Manual
1. About IP Installer
IP Installer is a proprietary utility program for network video products supplied by Opticom Technologies Inc.. It
enables users of Opticom products to search their network for any Opticom network camera, video server, or
network device no matter what IP address it has. By using IP Installer, users will be able to facilitate network setup
process for Opticom products deployment.
Runs on Microsoft Windows operating system (XP, Vista, 7)
Searching for Network Cameras, Video Servers, and Network Video Recorders
Capable of firmware updating for Opticom products
Support automatic and manual IP setup
2. Installing and Uninstalling
2.1. Installing IP Installer
If the program is started from the CD supplied with Opticom products, insert the CD to the ODD tray and check
the installation file. If it is download or copied from the Internet or any other media, locate the file from the PC’s
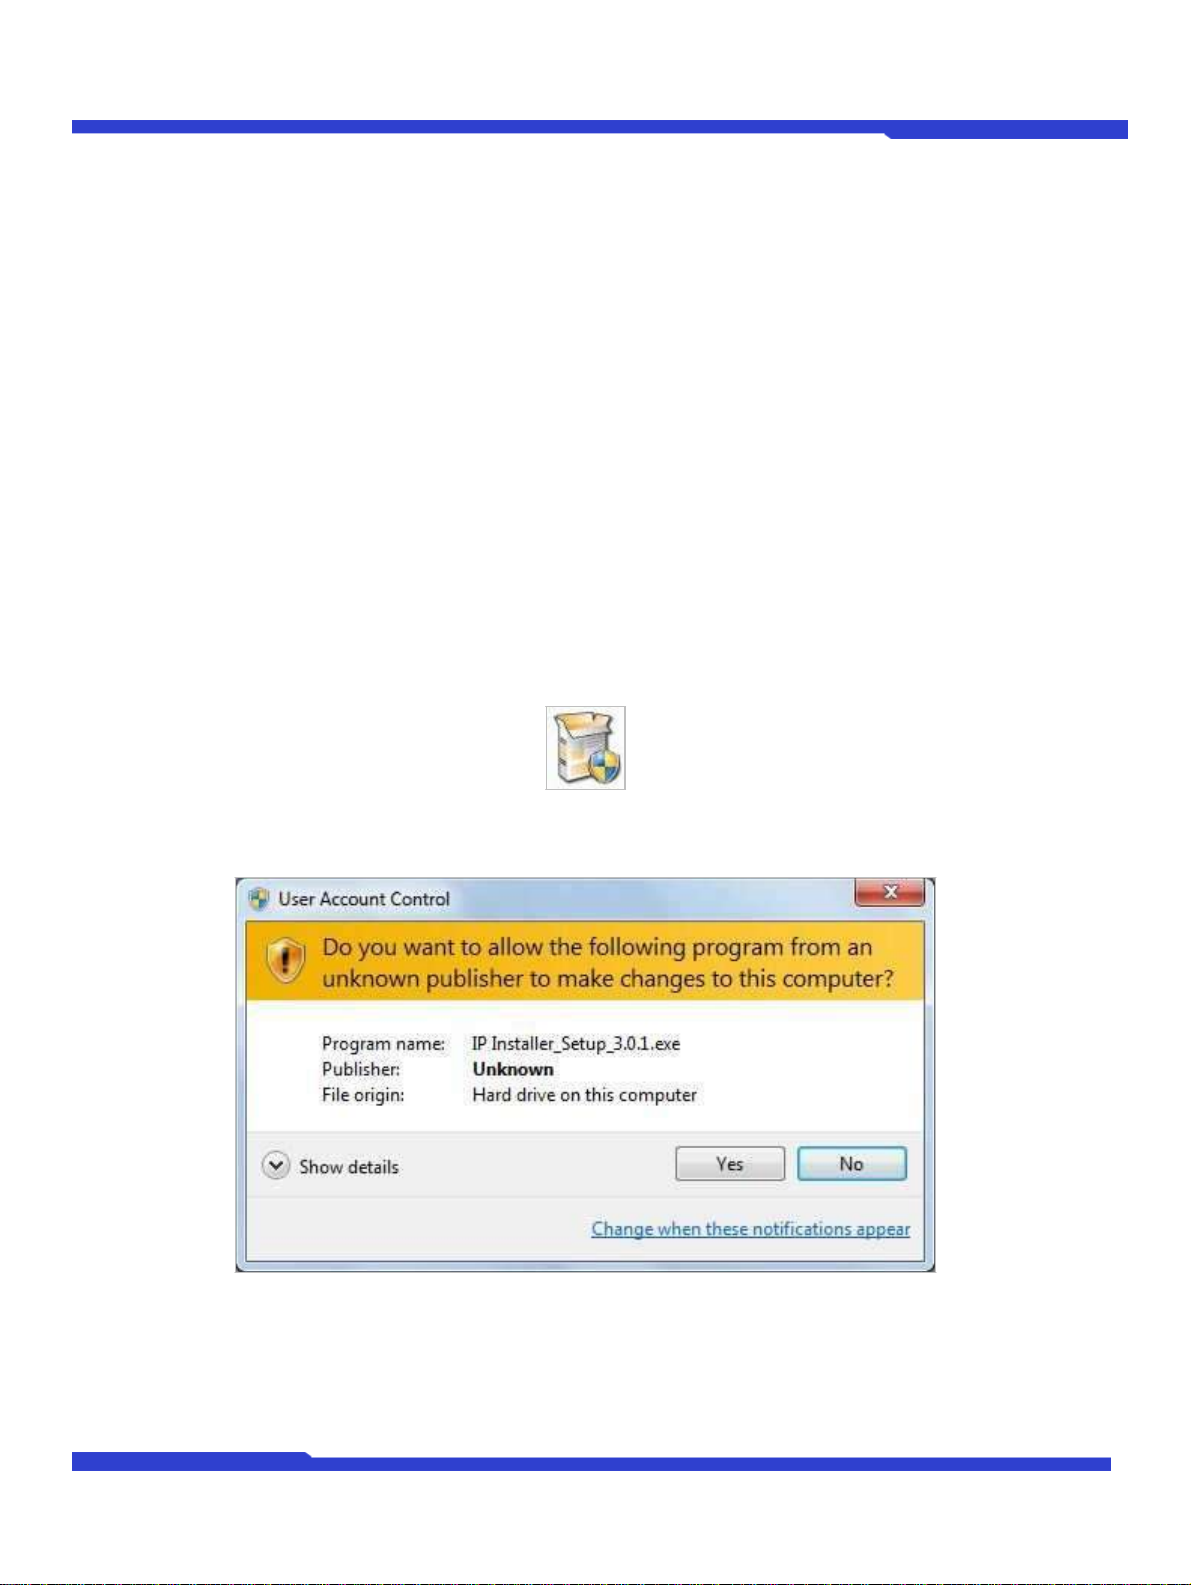
hard drive. You will see the icon as shown with the file name IP Installer_Setup_3.0.1.exe. The actual file
name in your case may vary as the version changes. Double click the icon to star installation.
You may see a consent prompt for running this install program, which is an User Account Control of the
Windows as shown below.
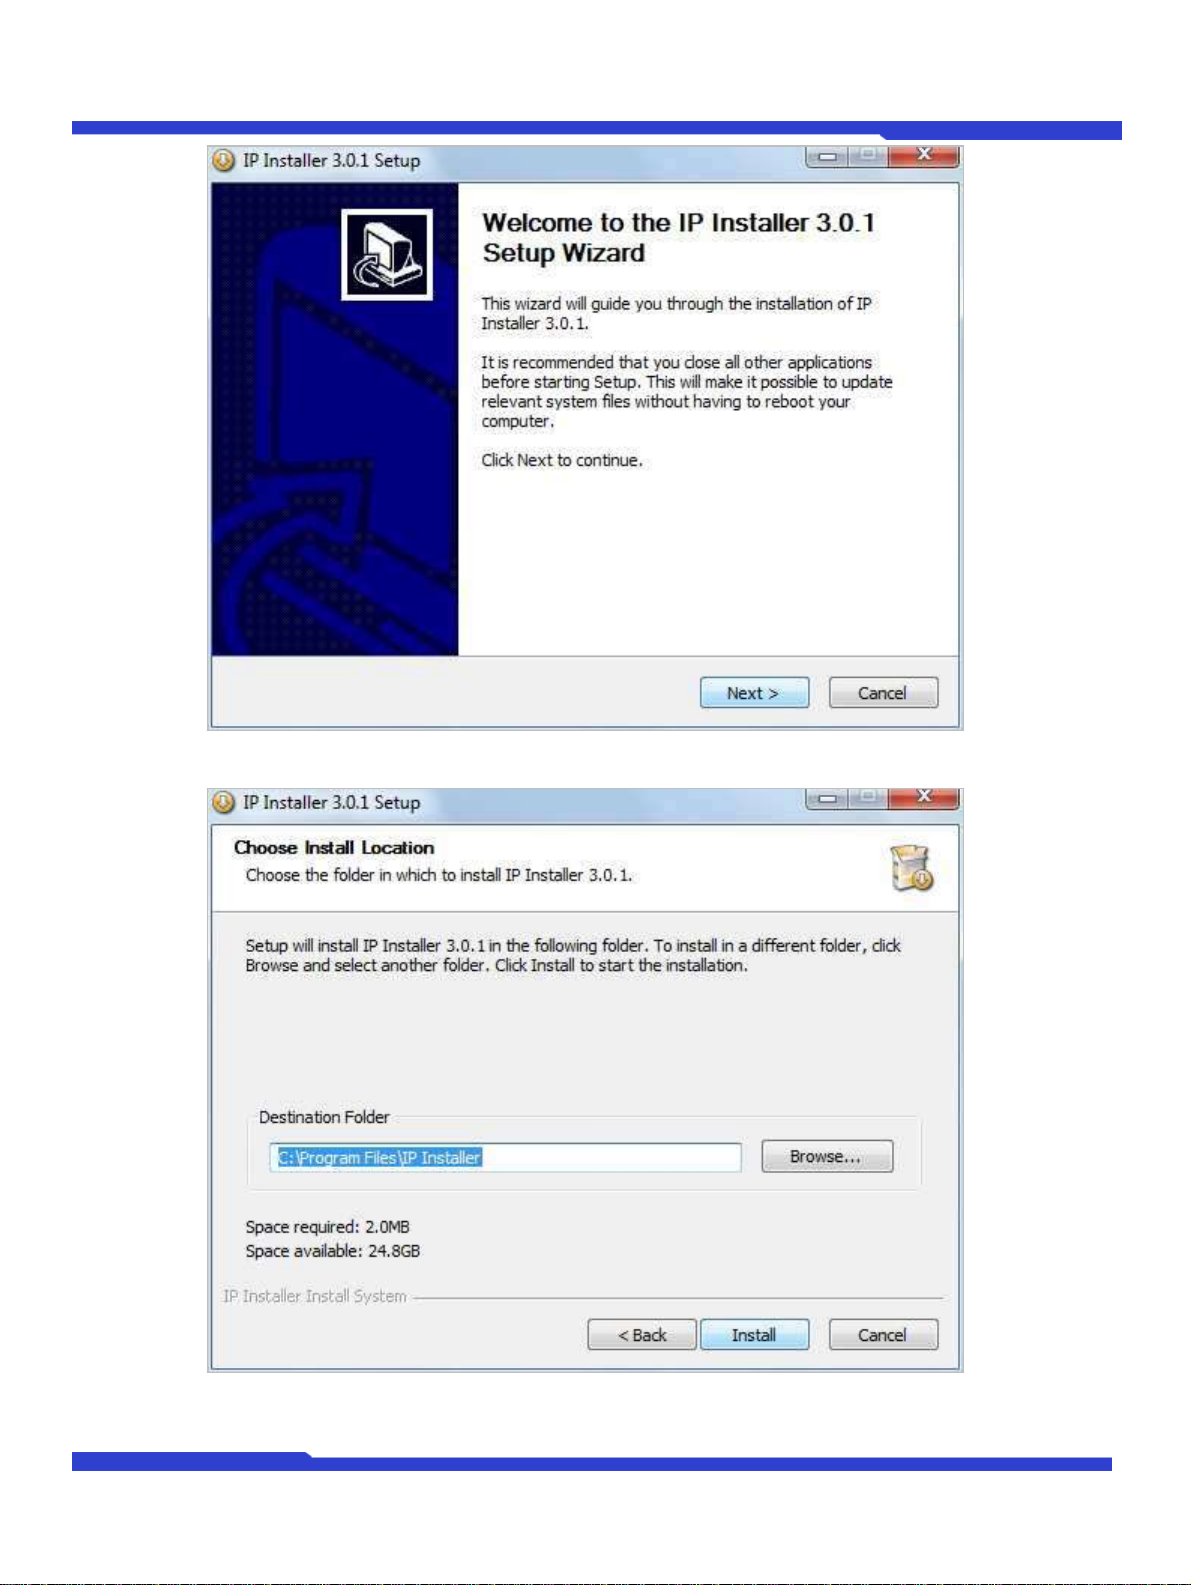
Click Yes button, then the following window will be shown on the screen.
Page 5
O1401-00
5
Opticom Technologies Inc.
IP Installer User's Manual
To precede the installation, click Next button. The following window will be displayed for location to install.
The default location for installation is C: \Program Files\IP Installer. It is recommended to install on this folder, but
Page 6
O1401-00
6
Opticom Technologies Inc.
IP Installer User's Manual
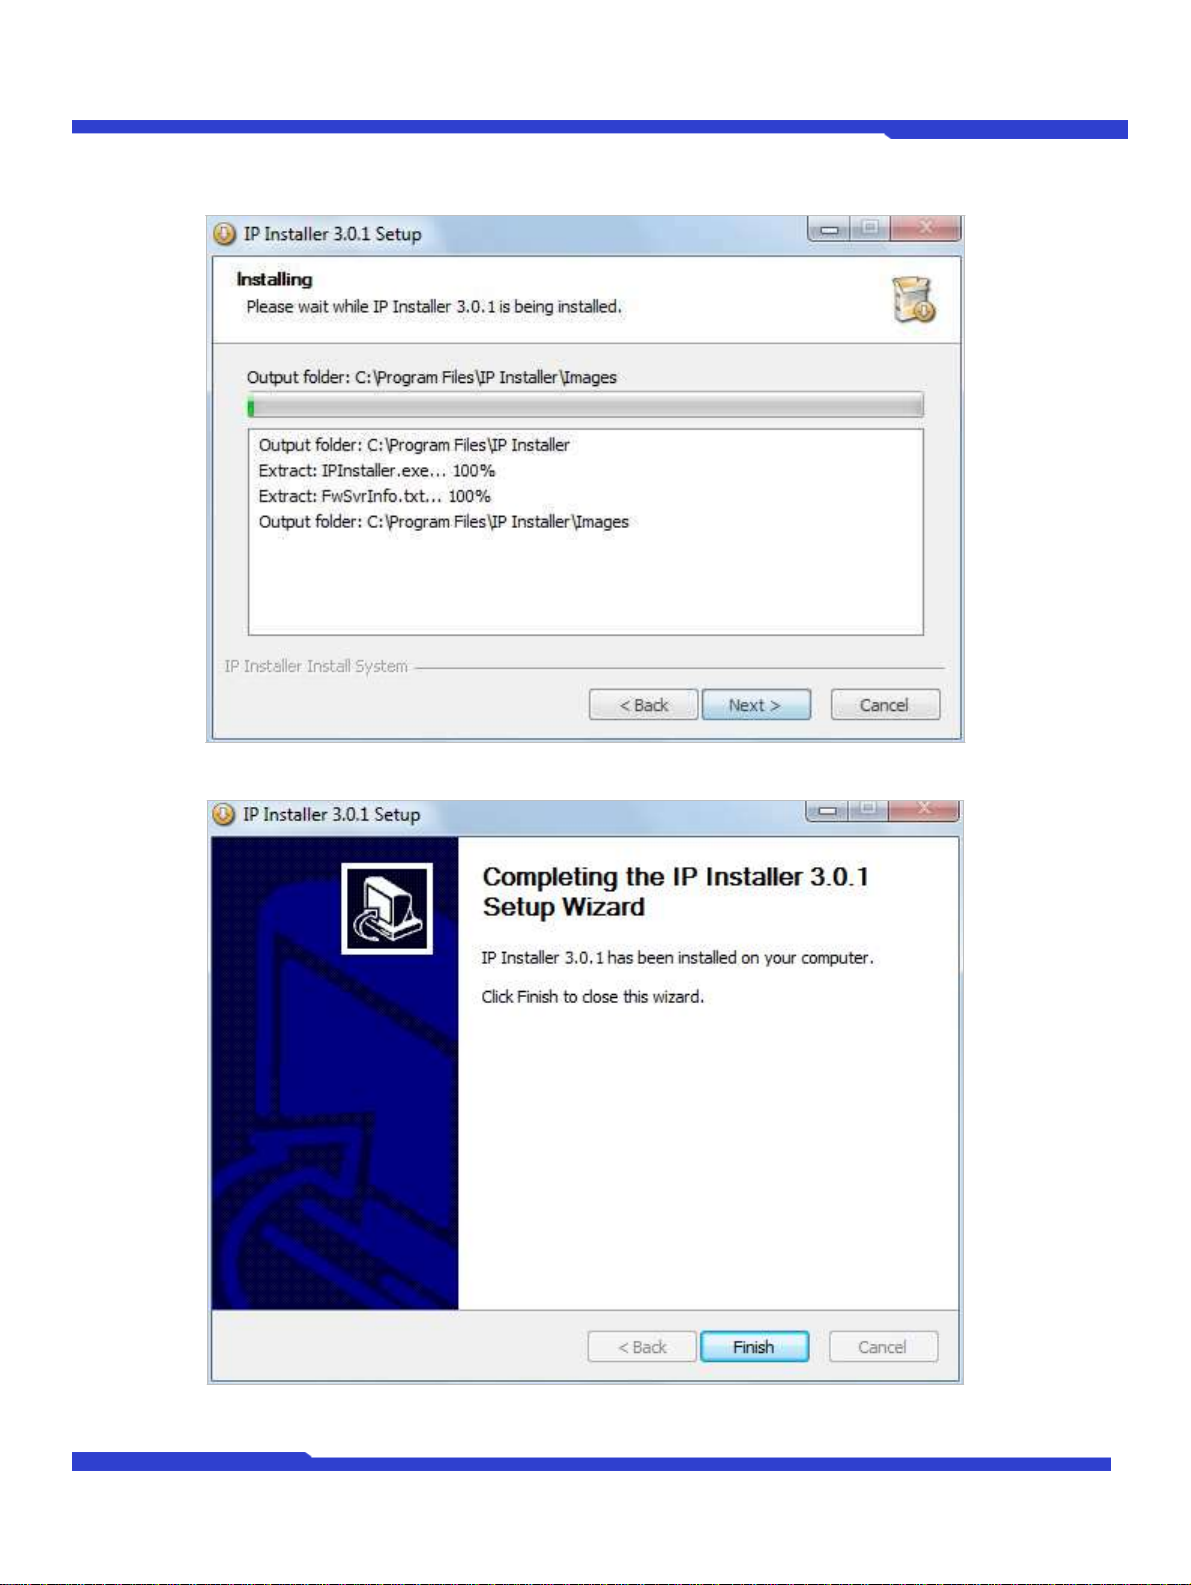
if you want to change it to other location, click Browse button to choose a proper path as you’d like. Now click
Install button. You will see the progress of copying install files to the hard drive as shown below.
When the file copying is done, the following windows will be shown. Click Finish button to finish the installation.
Page 7
IP Installer User's Manual
O1401-00
7
Opticom Technologies Inc.
2.2. Uninstalling IP Installer
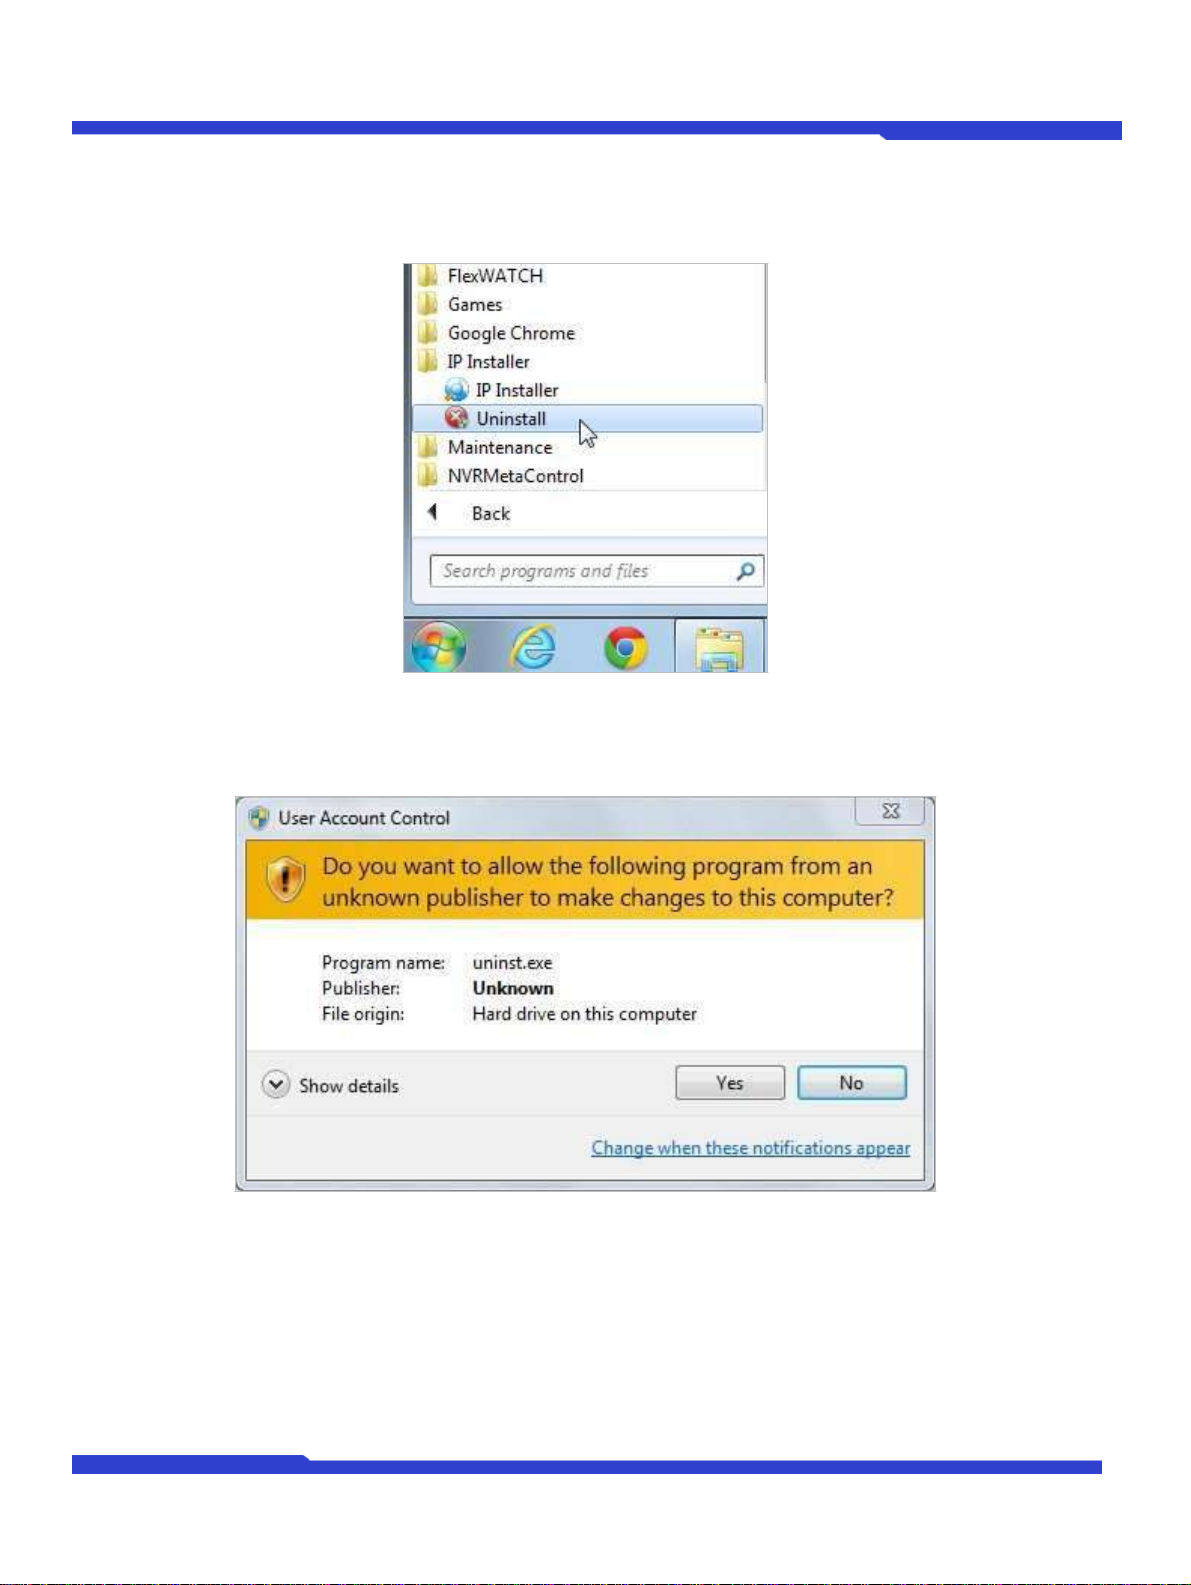
If you want to remove the IP Installer program from your PC, click Start > All Programs > IP Installer >
Uninstall.
You may see a consent prompt for running this install program, which is an User Account Control of the
Windows as shown below.
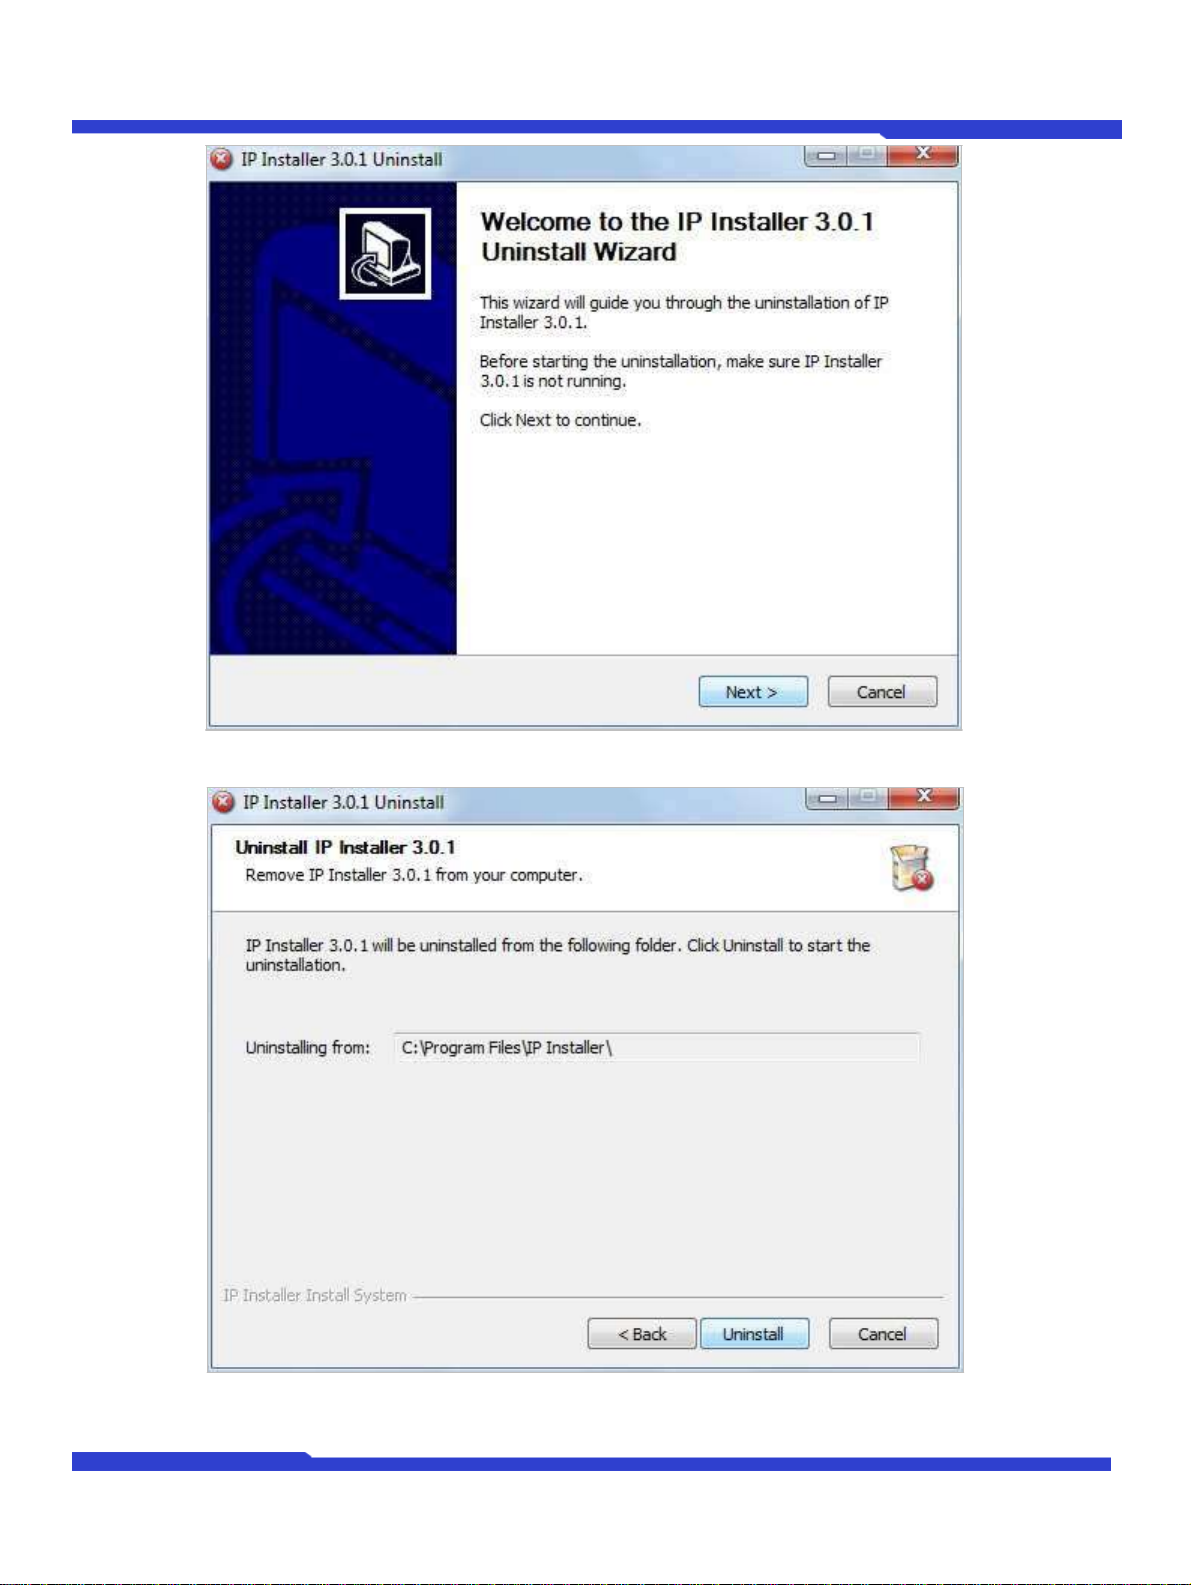
Click Yes button, then the following window will be shown on the screen.
Page 8
IP Installer User's Manual
O1401-00
8
Opticom Technologies Inc.
Click Next button and you will see the following window.
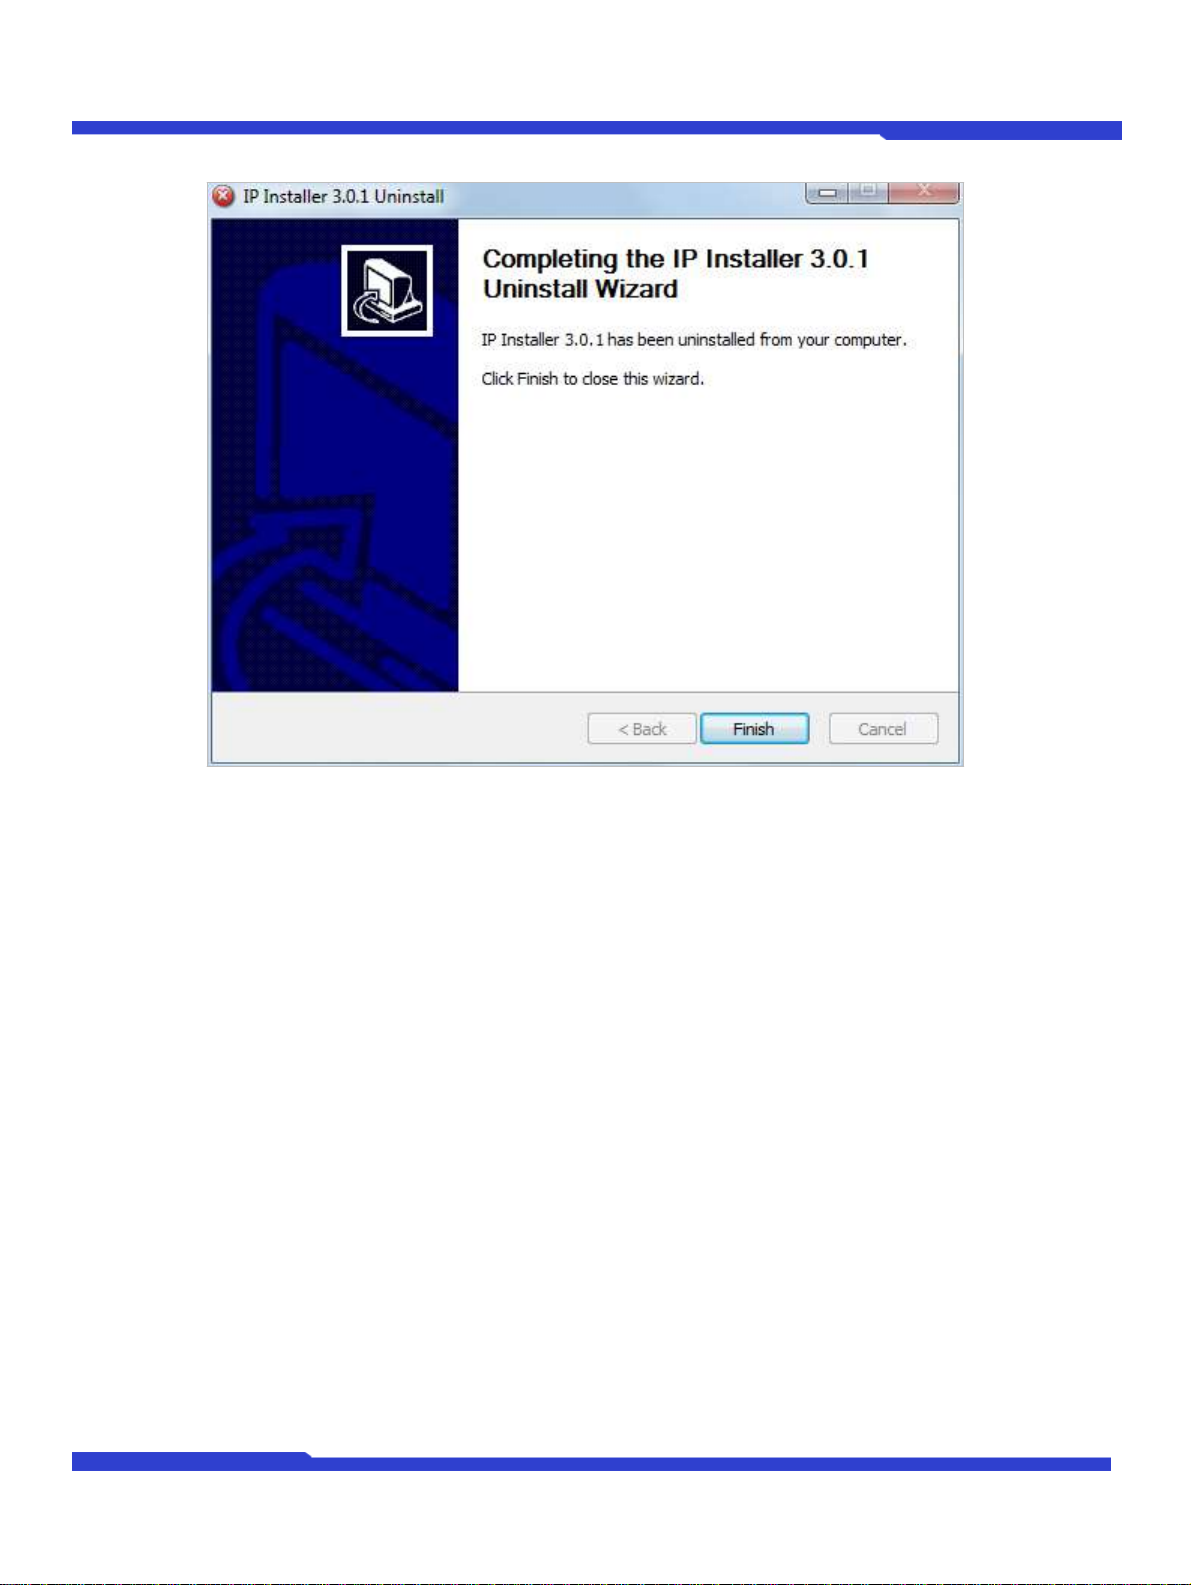
Click Uninstall button to start removing the IP Installer program from your computer. The following window will
be displayed. Click Finish button to close the window.
Page 9
IP Installer User's Manual
O1401-00
9
Opticom Technologies Inc.
Page 10
O1401-00
10
Opticom Technologies Inc.
IP Installer User's Manual
3. Using IP Installer
3.1. Starting the Program
Once IP Installer program has been installed on your computer, a shortcut icon should be
created on the desktop of you computer. You can start IP Installer by double clicking the icon.
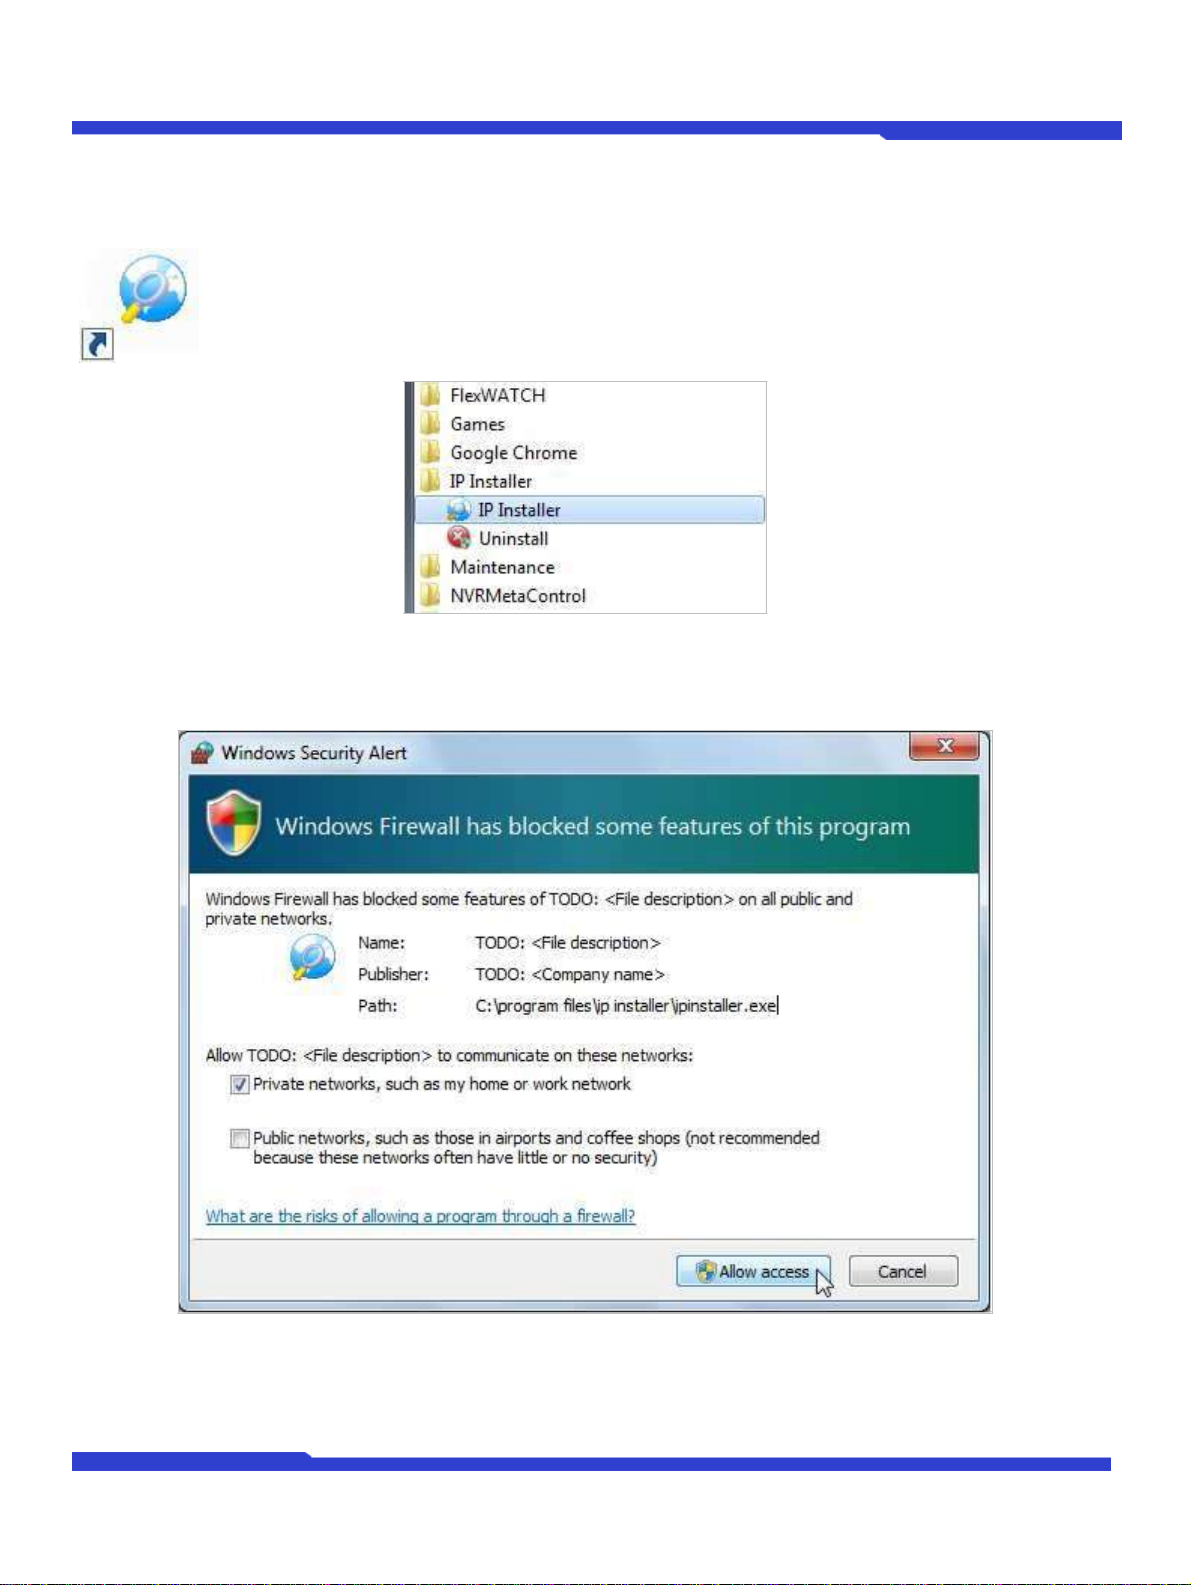
Or you can also start the program by clicking Start > All Programs > IP Installer > IP
Installer as shown below.
If this is the first time ever you installed and run this version of IP Installer program on your computer, you may
see the following Windows Security Alert window. If so, click Allow access button, then the IP Installer
program window will start normally.
Page 11
IP Installer User's Manual
O1401-00
11
Opticom Technologies Inc.
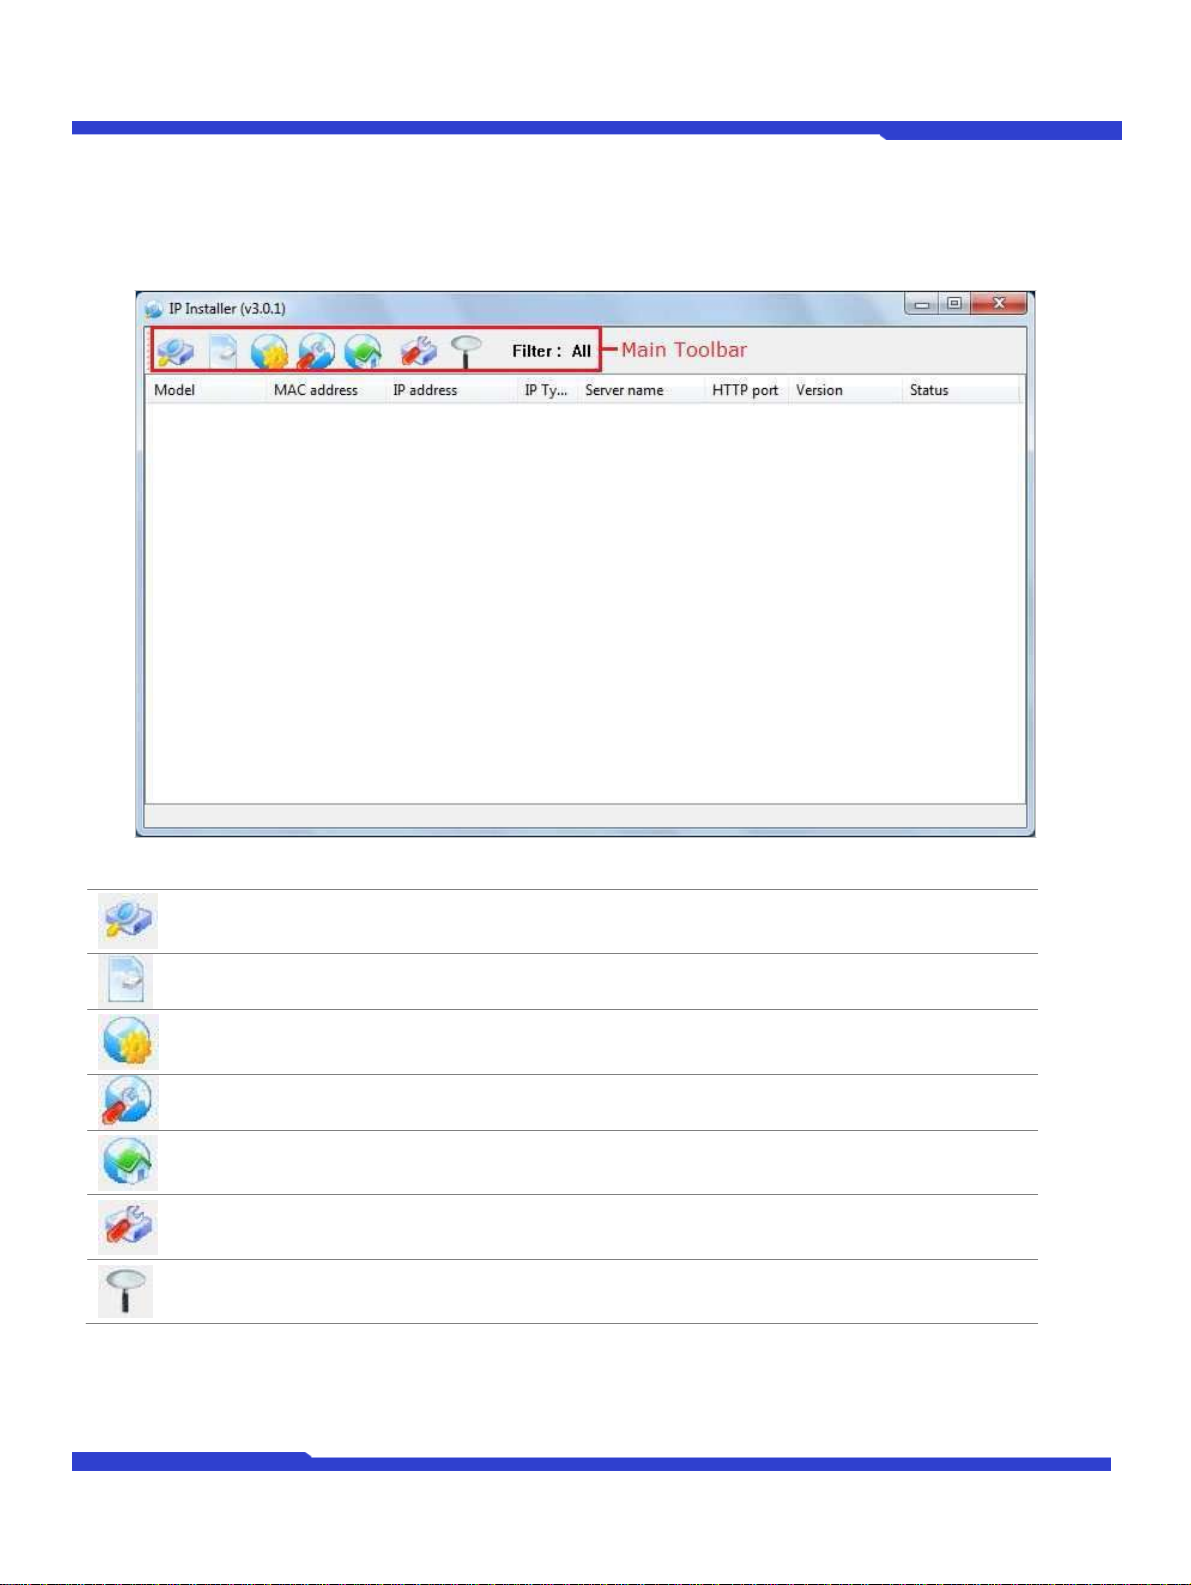
Search Product
Scan the network and show the list of all the Opticom products that
IP Installer program found.
Clear Product List
Clear the Opticom products list created by searching the network.
Automatic IP Setup Configure the network setting of selected IP device in Automatic mode.
Manual IP Setup
Configure the network setting of selected IP device in Manual mode.
Connect Product
Homepage
Connect to the server homepage of the selected IP device.
Update Firmware
Update the firmware of the selected IP device.
Filter Configuration Define the range of MAC and IP addresses to search.
After the program is started, the main window of IP Installer program will be appear on the screen as shown
below. There is no network device shown since it is the first time to run the program and nothing has been
registered.
Page 12
IP Installer User's Manual
O1401-00
12
Opticom Technologies Inc.
3.2. Search Product
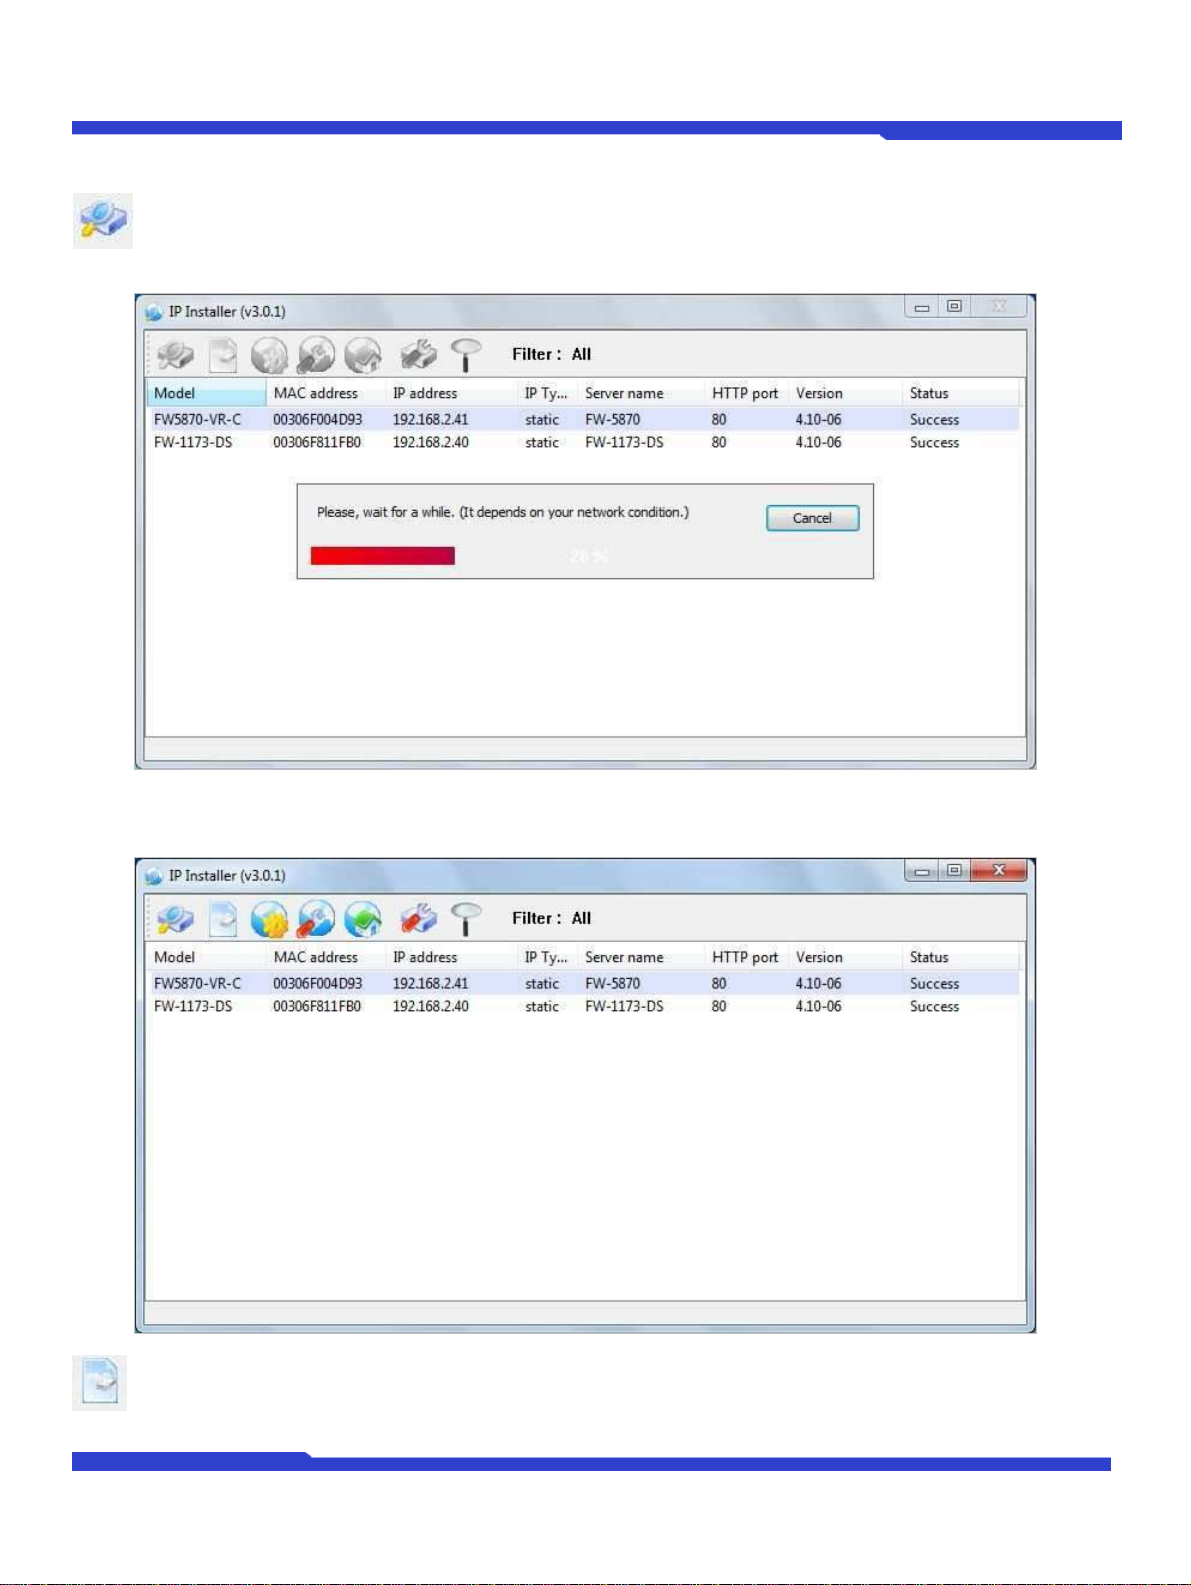
Make sure that your Opticom products are connected to the network, and click the Search Product
button. A status window will pop up to show the progress of the searching. Wait until it reaches 100%, or
you may press Cancel button if you will go ahead with the result made until the moment.
After searching is finished, IP Installer program will display the notification window of completion of searching.
Click OK button to clear the window.
If you want to clear the list of the IP Devices from the window, click Clear Product List button from the
Main Toolbar.
Page 13
O1401-00
13
Opticom Technologies Inc.
IP Installer User's Manual
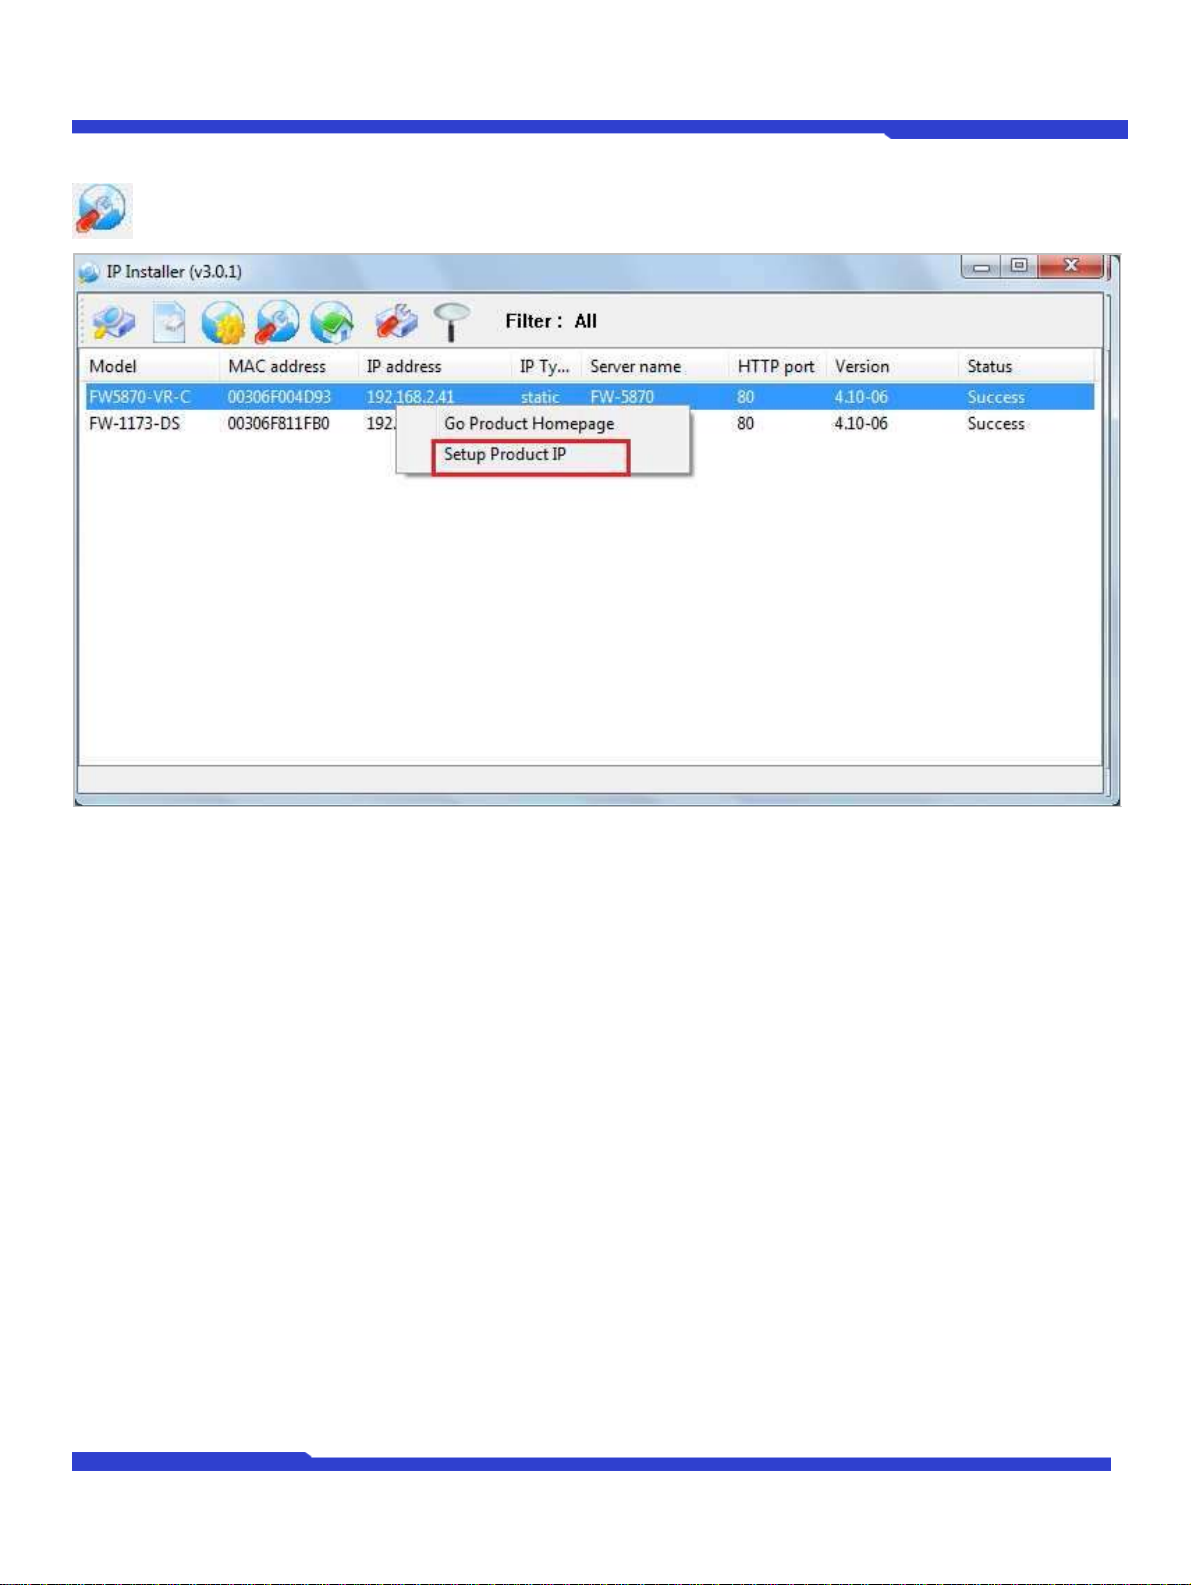
3.3. Manual Network Setup
Configuring the network parameters of the devices in the list can be started either by clicking right mouse
button or by clicking Manual IP Setup icon on the main Toolbar.
Before starting the setup, you first need to choose the one to be configured. You may choose only one device by
clicking it, or you can choose two or more devices by clicking one after another while you keep pressing CTRL key
of your keyboard.
Page 14
O1401-00
14
Opticom Technologies Inc.
IP Installer User's Manual
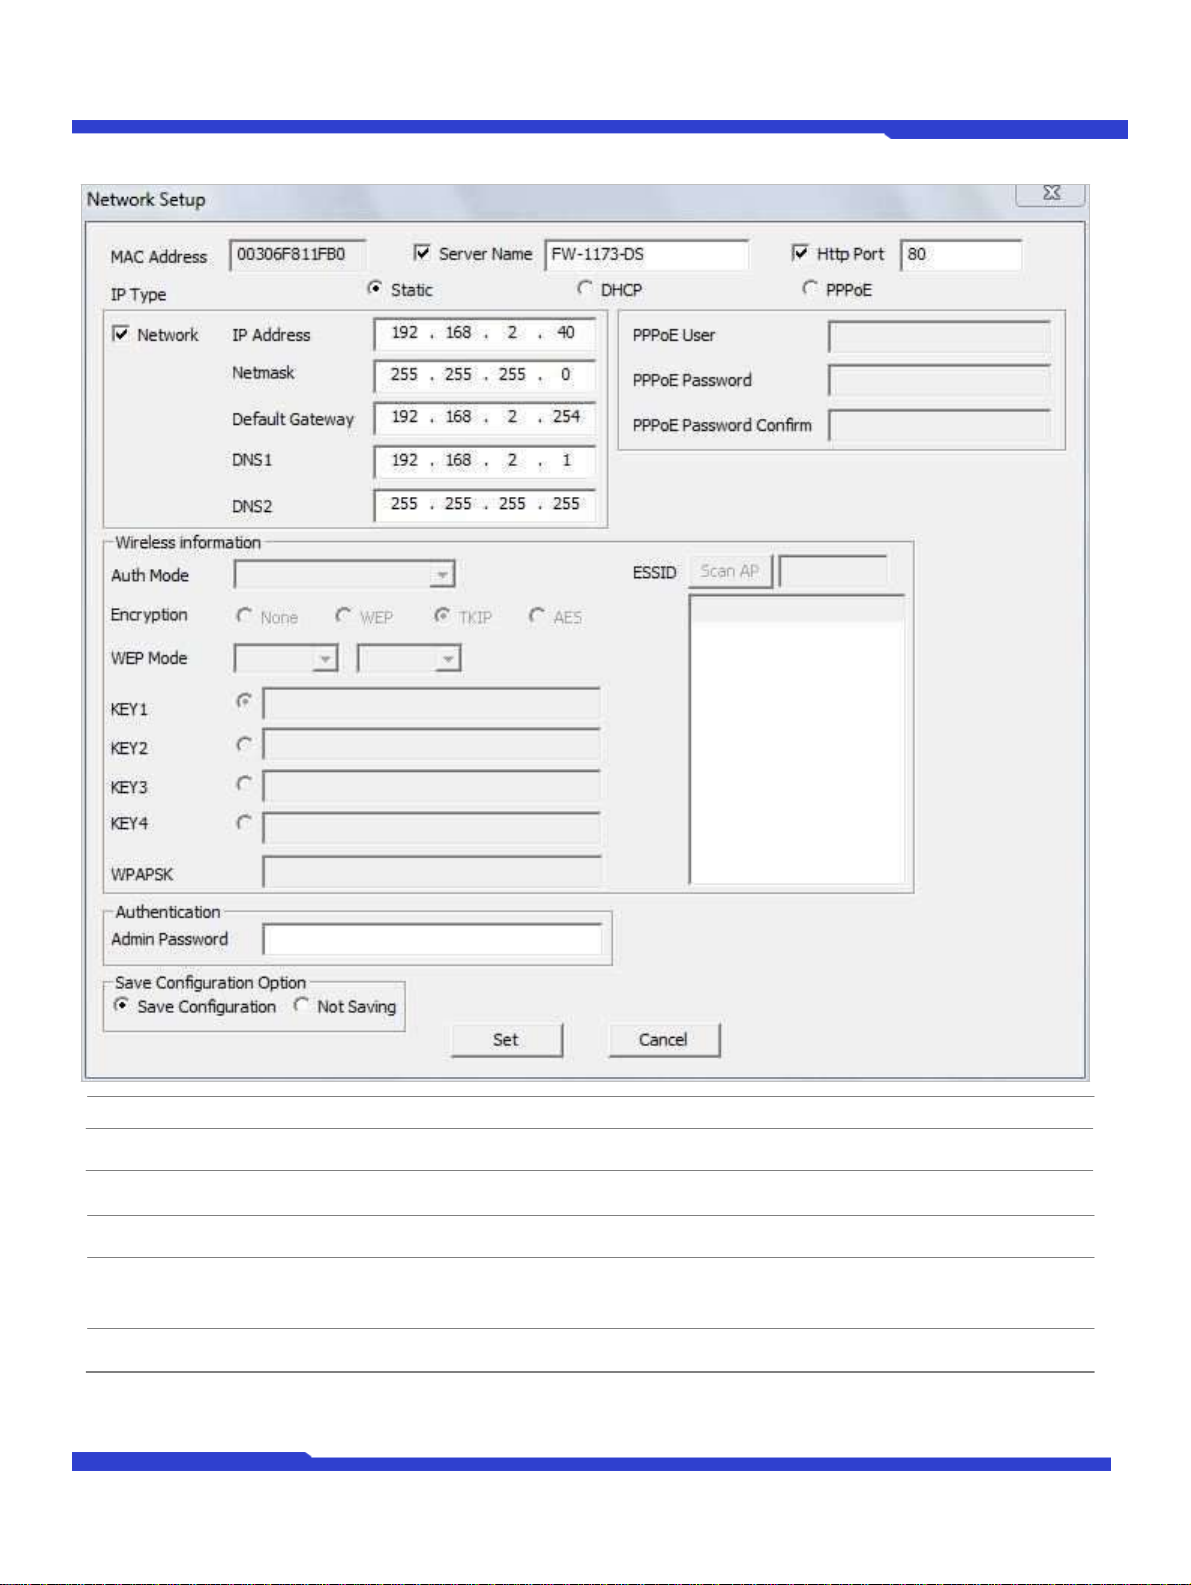
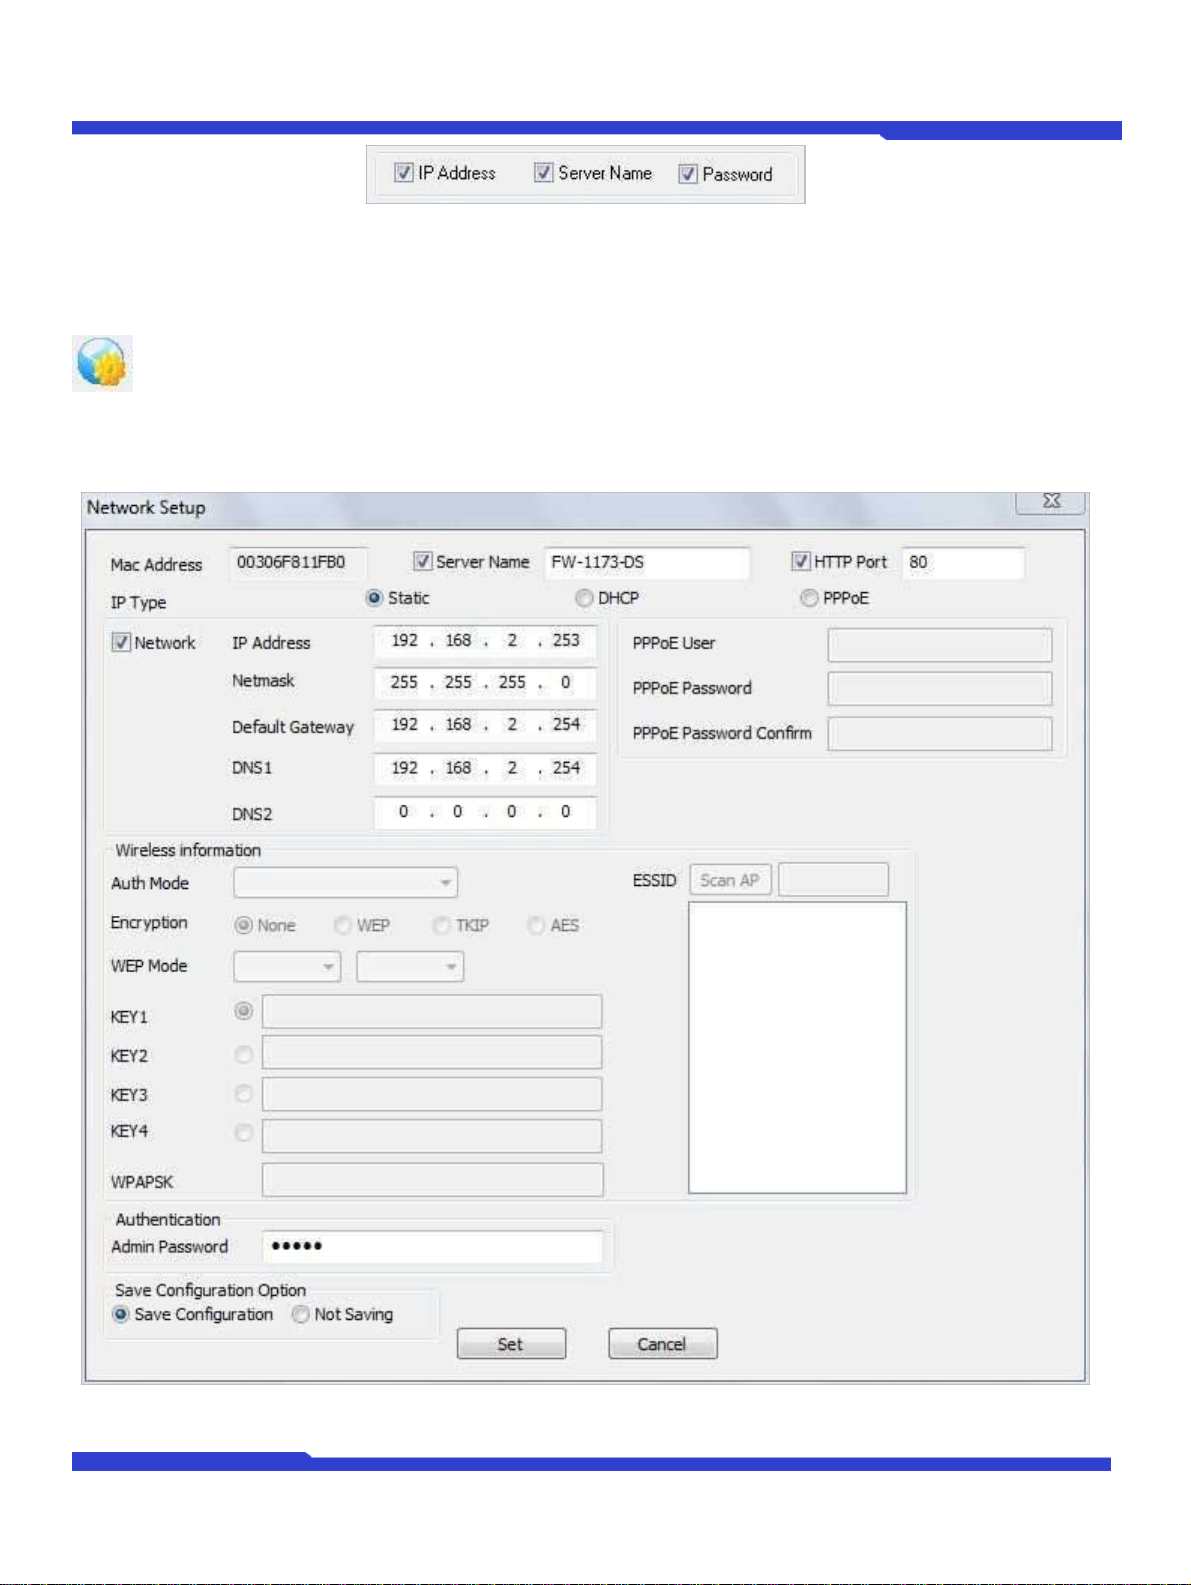
3.3.1. When one IP device is selected..
MAC Address MAC address of the selected device is shown.
Server Name Name of the selected IP device.
HTTP Port HTTP port number of the IP device for web access to homepage.
IP Type How to assign IP address to the device (Select Static here for Manual IP Setup)
Network
PPPoE
General network parameters are required in this part. Please contact your network
administrator for detail. (IP Address, Netmask, Default Gateway, DNS1, DNS2)
(This is not used in Manual IP Setup)
Page 15
O1401-00
15
Opticom Technologies Inc.
IP Installer User's Manual
Authentication Mode
Supported Encryption
Open, Shared
N/A or WEP
WPAPSK, WPA2PSK
TKIP, AES
Enter the values for connecting to wireless network. Contact your network administrator
for details. (Only available for devices with Wireless option)
Auth Mode: Choose from Open System, Shared Key, WPAPSK, WPA2PSK.
ESSID: Enter the name of the Access Point to connect to.
Encryption: Choose from None, WEP, TKIP, AES. The selections are dependent on
which Authentication mode as below.
Wireless
Information
WEP Mode: Select either 64-bit or 128-bit modes, or either HEX or ASCII.
KEY1 – 4: Enter WEP Keys accordingly to Key numbers.
WPAPSK: If you chose to use WPASK or WPA2PSK mode in Auth mode, enter here
the appropriate TKIP or AES value. The maximum length is 63 ASCII characters.
Authentication
(Admin Password)
Save Configuration
Option
Click Set button to apply the changed values to IP device. If you don’t want it, click Cancel button.
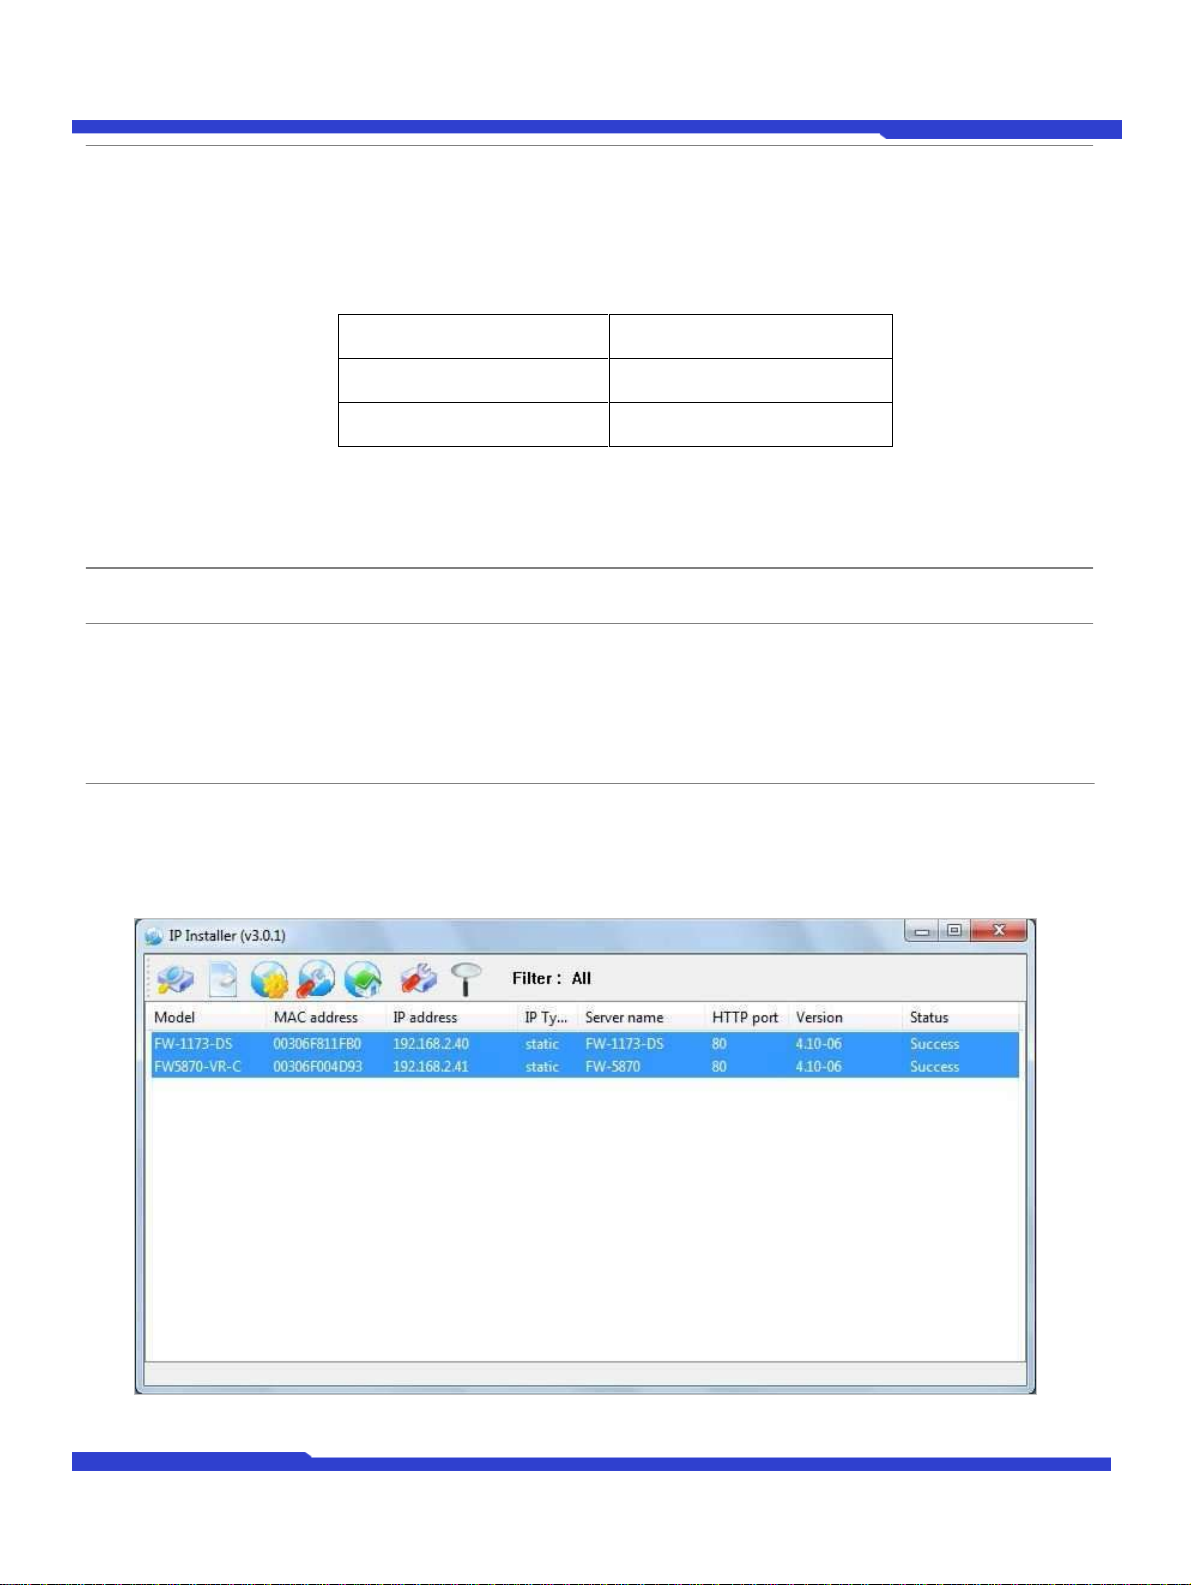
3.3.2. When two or more IP devices are selected..
You can select two or more IP devices at the same time by click one after another while CTRL key is pressed. The
result is shown as below.
Password for the IP device.
(Default password for Opticom products is “root” unless already changed) Select
whether the configured contents is to be saved in the Flash memory or not.
Save Configuration: Changed values will be saved in the Flash memory of the
device, which means the changes are permanent.
Not Saving: Changed values will not be saved in the Flash memory, which means
if the IP device is turned off the changes are lost and the previous setting will be
applied back.
To configure the network parameters of those devices, click the right mouse button or click Manual IP Setup icon
Page 16
O1401-00
16
Opticom Technologies Inc.
IP Installer User's Manual
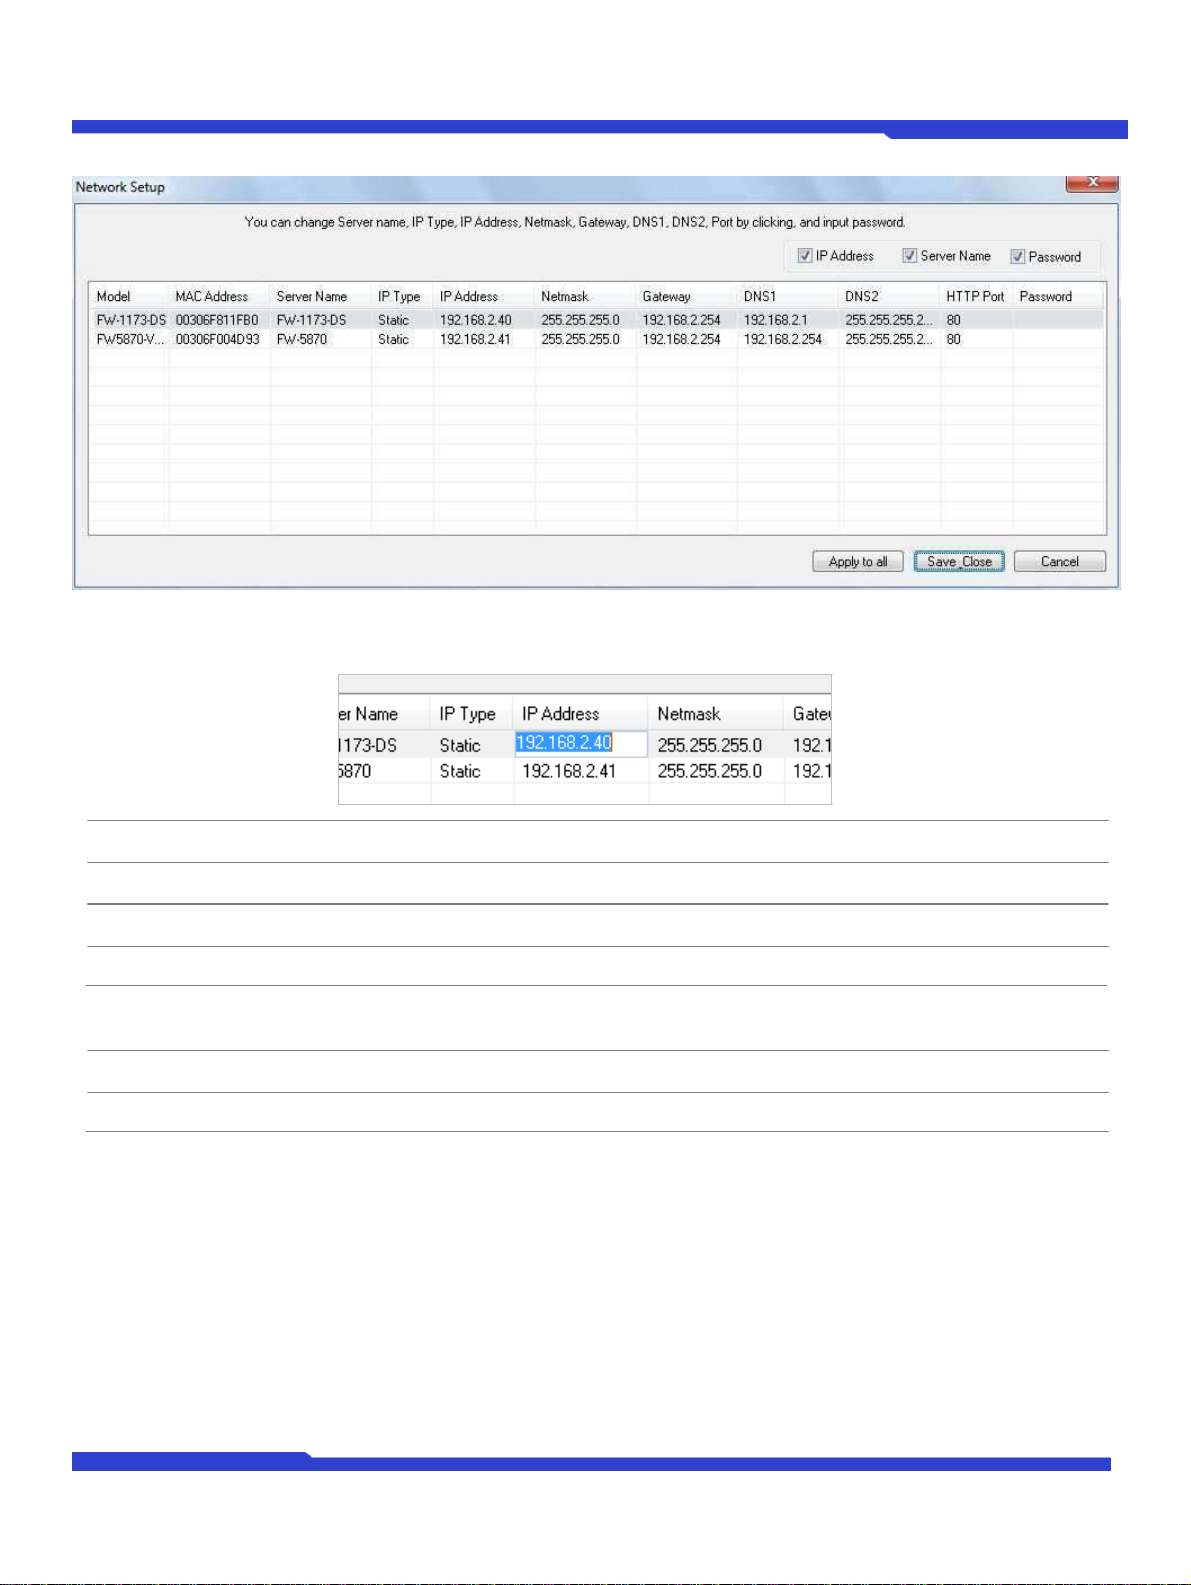
on the main Toolbar with multiple IP devices selected as shown above. Then the following window will show up.
You can modify the value of each changeable field by clicking it. The following shows an example of entering a new
value to a field.
Model
MAC Address MAC address of the selected device is shown.
Server Name Name of the selected IP device.
Model Numbers of the IP devices that you selected.
IP Type How to assign IP address to the device (Select Static here for Manual IP Setup)
IP address, Netmask,
Gateway, DNS1, DNS2
HTTP Port HTTP port number of the IP device for web access to homepage.
Password
General network parameters are required in this part. Please contact your network
administrator for detail.
Password for the IP device. (Default password for Opticom products is “root”)
If you click Apply to all button after change just a field of one IP device, the remaining IP devices will have the
same value for that parameter. In this case, each device’s Server name and IP Address field will have +1
incremented value added to the original value. For example, if the first IP device has been given the server name
of NetCam and Apply to all button is pressed, it will be automatically changed to NetCam1 and the next IP
device will have NetCam2 and so on. The same applies to the IP address field.
For Password field, the entered information doesn’t incremented but will use the same data.
In using Apply to all, you can choose which field is affected. Put check marks only on the devices you want to use
this automatic action as below.
Page 17
O1401-00
17
Opticom Technologies Inc.
IP Installer User's Manual
Click Save & Close button to save the changed values in the Flash memory of all the IP devices and close the
Network setup window.
3.4. Automatic Network Setup
Configuring the network parameters of the devices in the list can be started either by clicking right mouse
button or by clicking Automatic IP Setup icon on the main Toolbar. Before starting the setup, you first
need to choose the one to be configured. In this setup mode, IP Installer program checks your local
network and assigns available IP addresses to the IP devices. You have a choice of using those automatically
assigned IP addresses, or you can just enter other IP addresses as you desire.
Page 18
O1401-00
18
Opticom Technologies Inc.
IP Installer User's Manual
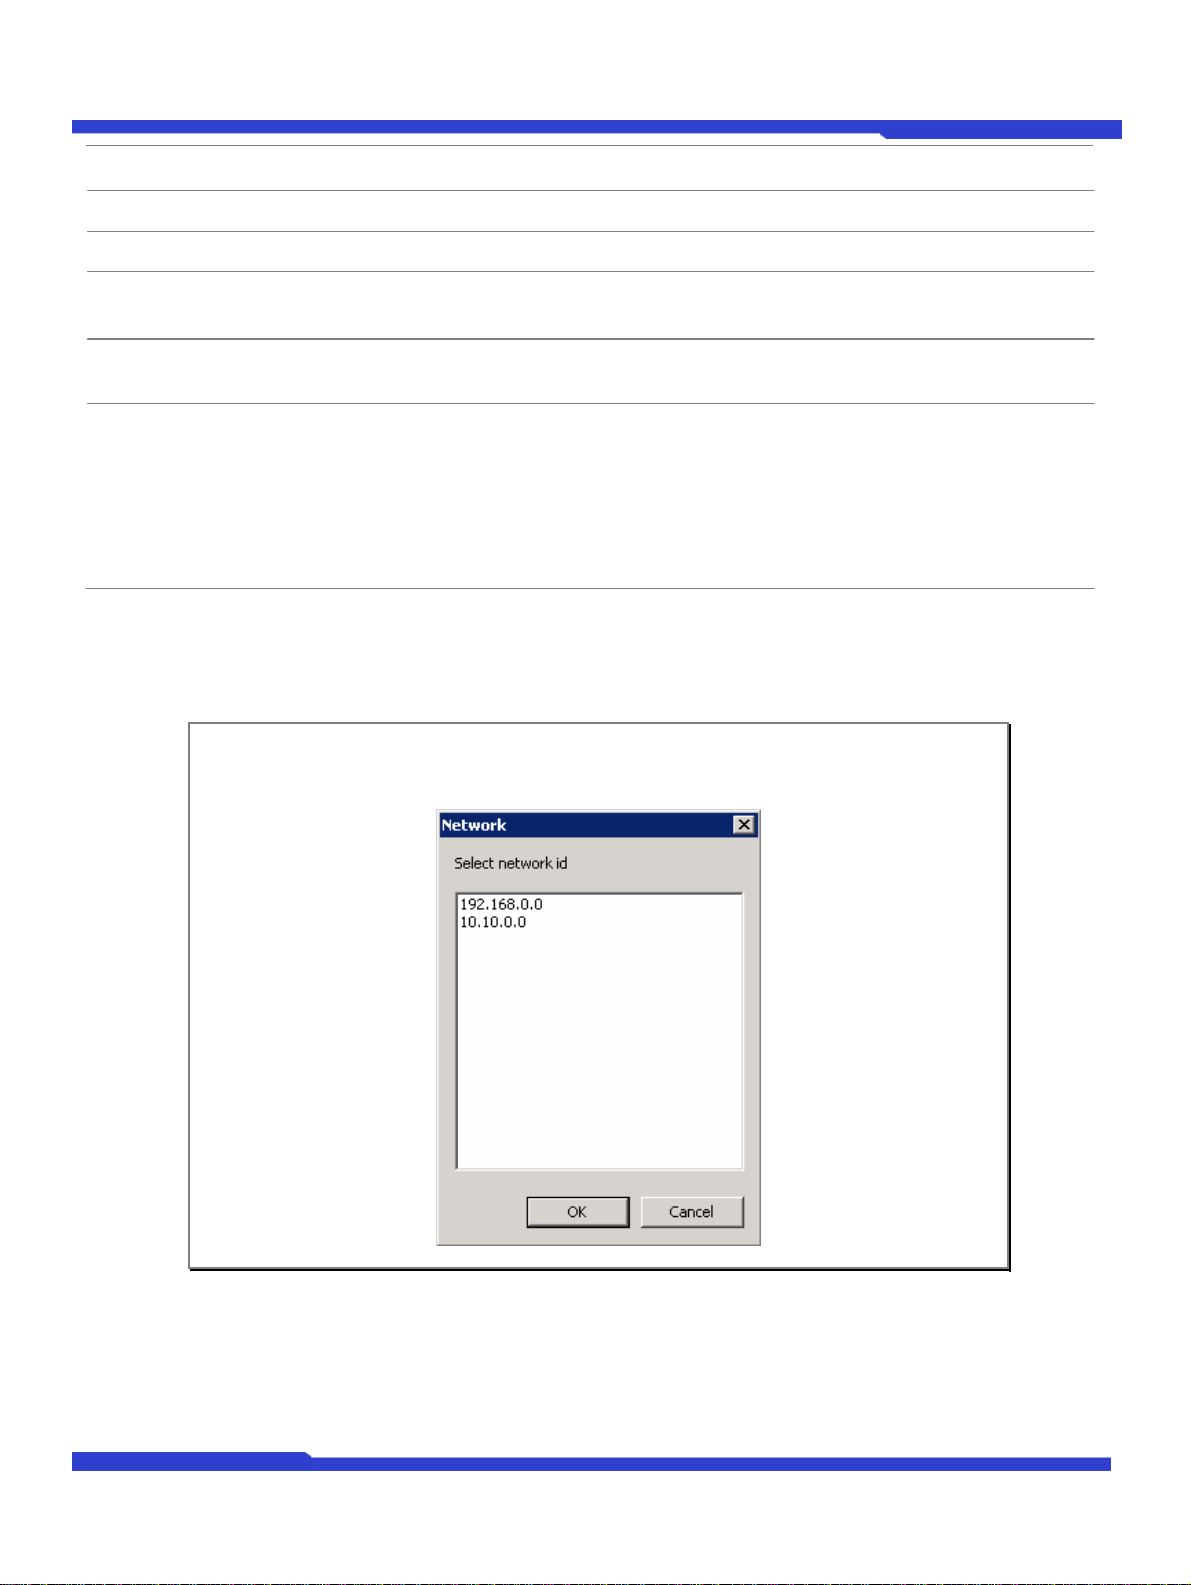
Note: If your network has more than one IP address classes at the same time, the
confirmation window will be displayed as below. You need to choose the one you
are going to use for your IP devices.
Server Name Name of the selected IP device.
HTTP Port HTTP port number of the IP device for web access to homepage.
IP Type How to assign IP address to the device (Select Static here for Manual IP Setup)
Network
General network parameters are required in this part. Please contact your network
administrator for detail. (IP Address, Netmask, Default Gateway, DNS1, DNS2)
Authentication
(Admin Password)
Save Configuration
Option
Password for the IP device. (Default password for Opticom products is “root”)
Select whether the configured contents is to be saved in the Flash memory or not.
Save Configuration: Changed values will be saved in the Flash memory of the
device, which means the changes are permanent.
Not Saving: Changed values will not be saved in the Flash memory, which means
if the IP device is turned off the changes are lost and the previous setting will be
applied back.
Click Set button to apply the changed values to IP device. If you don’t want it, click Cancel button to restore the
previous values.
Page 19
O1401-00
19
Opticom Technologies Inc.
IP Installer User's Manual
3.5. Using DHCP Server
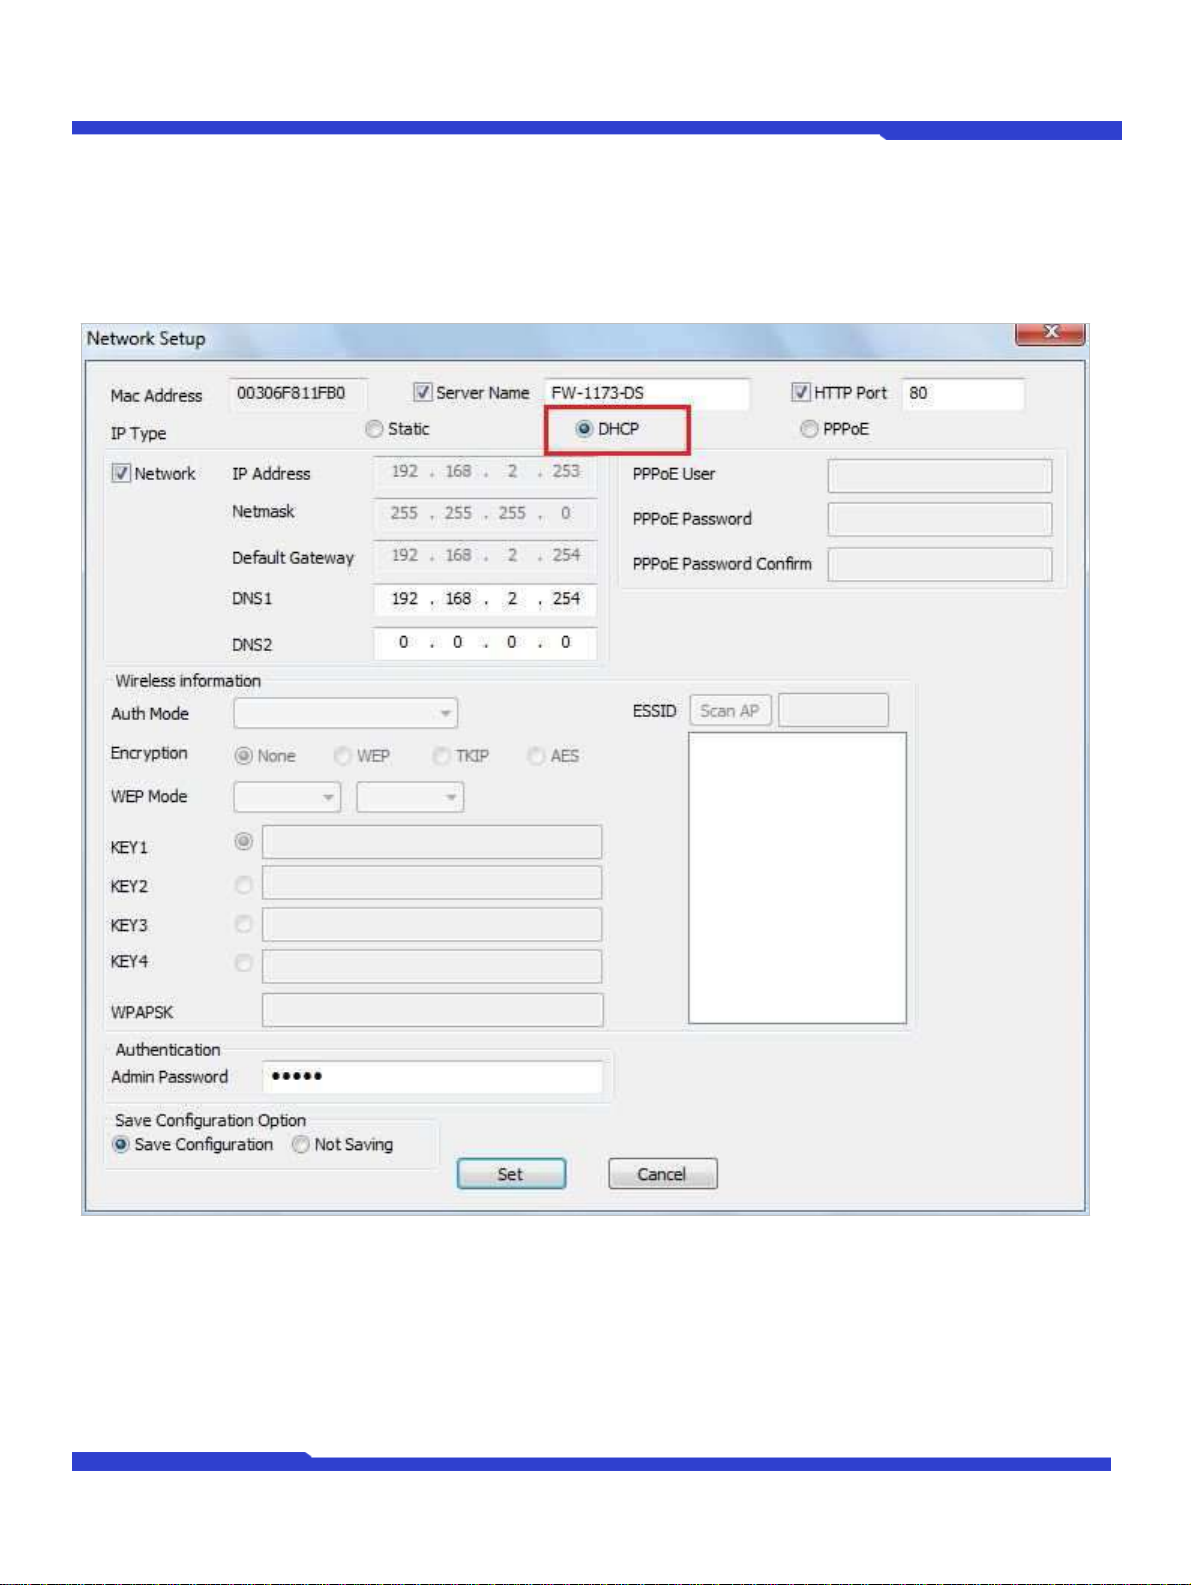
If your network has a DHCP server running for assigning IP addresses, you may choose to let it assign IP addresses
to the IP devices on the list. To do that, first open the Network Setup window either by Manual IP Setup or
Automatic IP Setup procedure. Choose DHCP in IP Type selection, then IP Address, Netmask, Default
Gateway field in Network setup area on the window will be disabled to input as shown below.
For setting up other fields on the setup window, refer to 3.3 Manual Network Setup. After filling up the fields
with appropriate values, click Set button to apply the changed values to IP device. If you don’t want it, click
Cancel button to restore the previous values.
Page 20
IP Installer User's Manual
O1401-00
20
Opticom Technologies Inc.
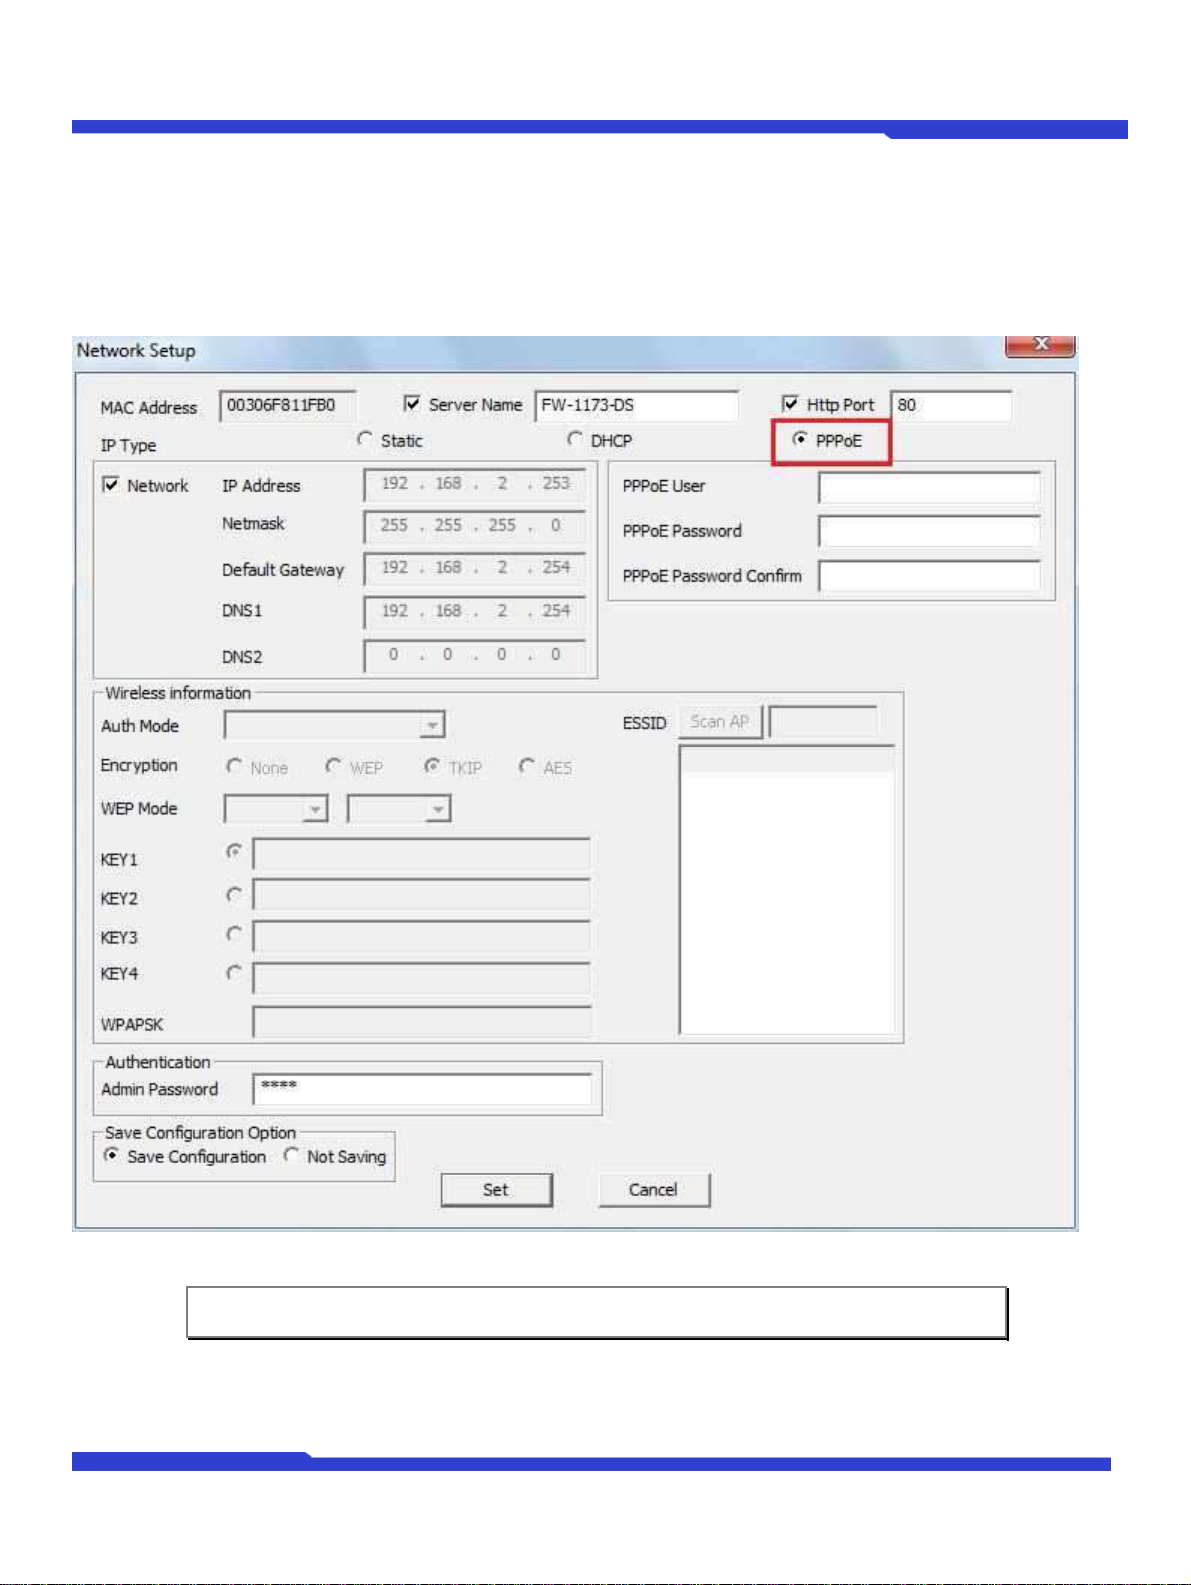
Note: In PPPoE mode, Wireless configuration is not available.
3.6. Using PPPoE
If your network environment is based on PPPoE connection, you’ll need to choose PPPoE on IP Type selection.
First open the Network Setup window either by Manual IP Setup or Automatic IP Setup procedure. Choose
PPPoE in IP Type selection, then all the fields in Network setup area on the window will be disabled. The network
settings such as IP Address, Netmask, Default Gateway, DNS are no longer available to enter. You only need to
enter the Server Name, HTTP Port number, and login authentication for your PPPoE connection.
Page 21
IP Installer User's Manual
O1401-00
21
Opticom Technologies Inc.
Note: After setting up the network for the IP devices, make sure the IP devices are
accessible on the network from your computer. It can be done by running Live
View function of the homepage of the IP device’s built-in server. Refer to 3.9 Live
View section for how to do it.
MAC Address MAC address of the selected device is shown.
Server Name Name of the selected IP device.
HTTP Port HTTP port number of the IP device for web access to homepage.
IP Type How to assign IP address to the device (Select PPPoE in this mode)
User Authentication for PPPoE Connection.
PPPoE User: Enter User ID.
PPPoE
Authentication
(Admin Password)
Save Configuration
Option
PPPoE Password: Enter Password for the User ID.
PPPoE Password Confirm: Enter the same Password again.
Password for the IP device.
(Default password for Opticom products is “root” unless already changed)
Select whether the configured contents is to be saved in the Flash memory or not.
Save Configuration: Changed values will be saved in the Flash memory of the
device, which means the changes are permanent.
Not Saving: Changed values will not be saved in the Flash memory, which means
if the IP device is turned off the changes are lost and the previous setting will be
applied back.
3.7. Updating Firmware
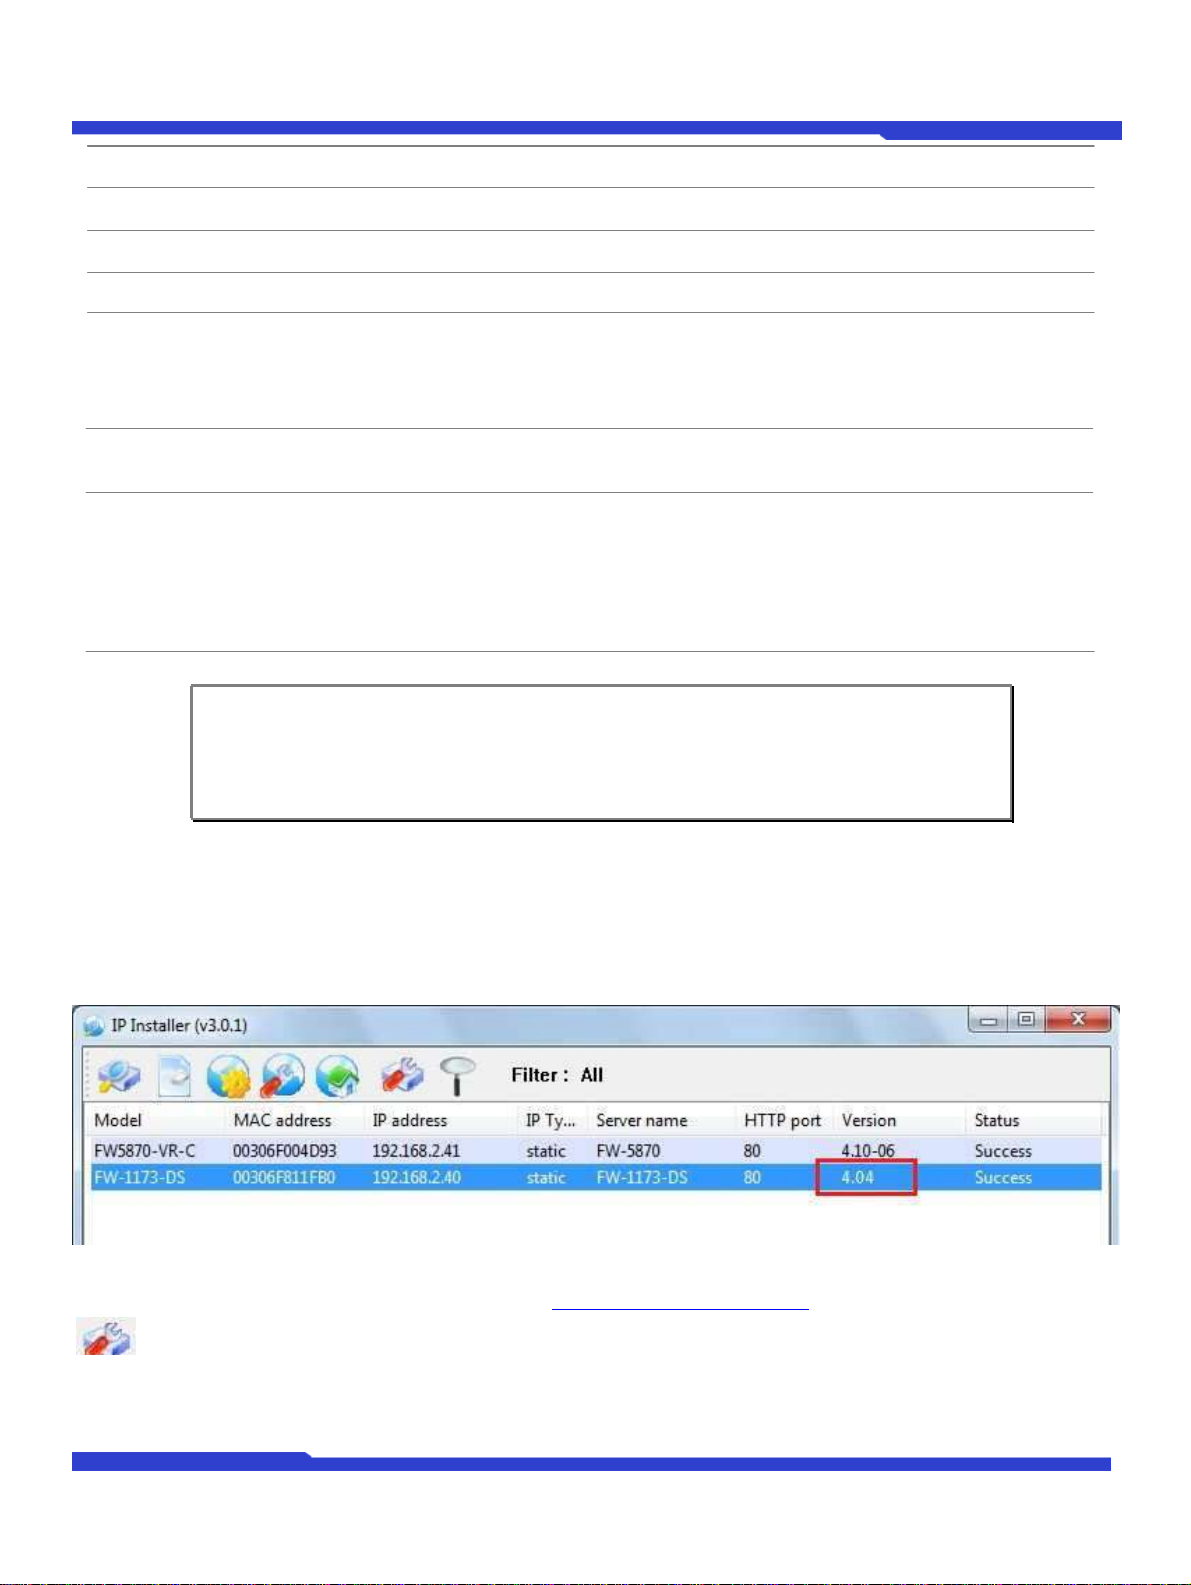
Once IP devices are searched and shown on the screen as functioning successfully, you can update the firmware of
them in IP Installer program. To do that, first check the firmware version of the device, which you can find on the
IP Installer window.
In the above picture, the firmware version of this product is 4.04 while the latest firmware version available is 4.10-
06 as you could see at Opticom’s homepage (http://www.opticomtech.com). If you decide to update the
firmware, first download the latest firmware into the hard drive of your computer. Unzip the file if it is
compressed.
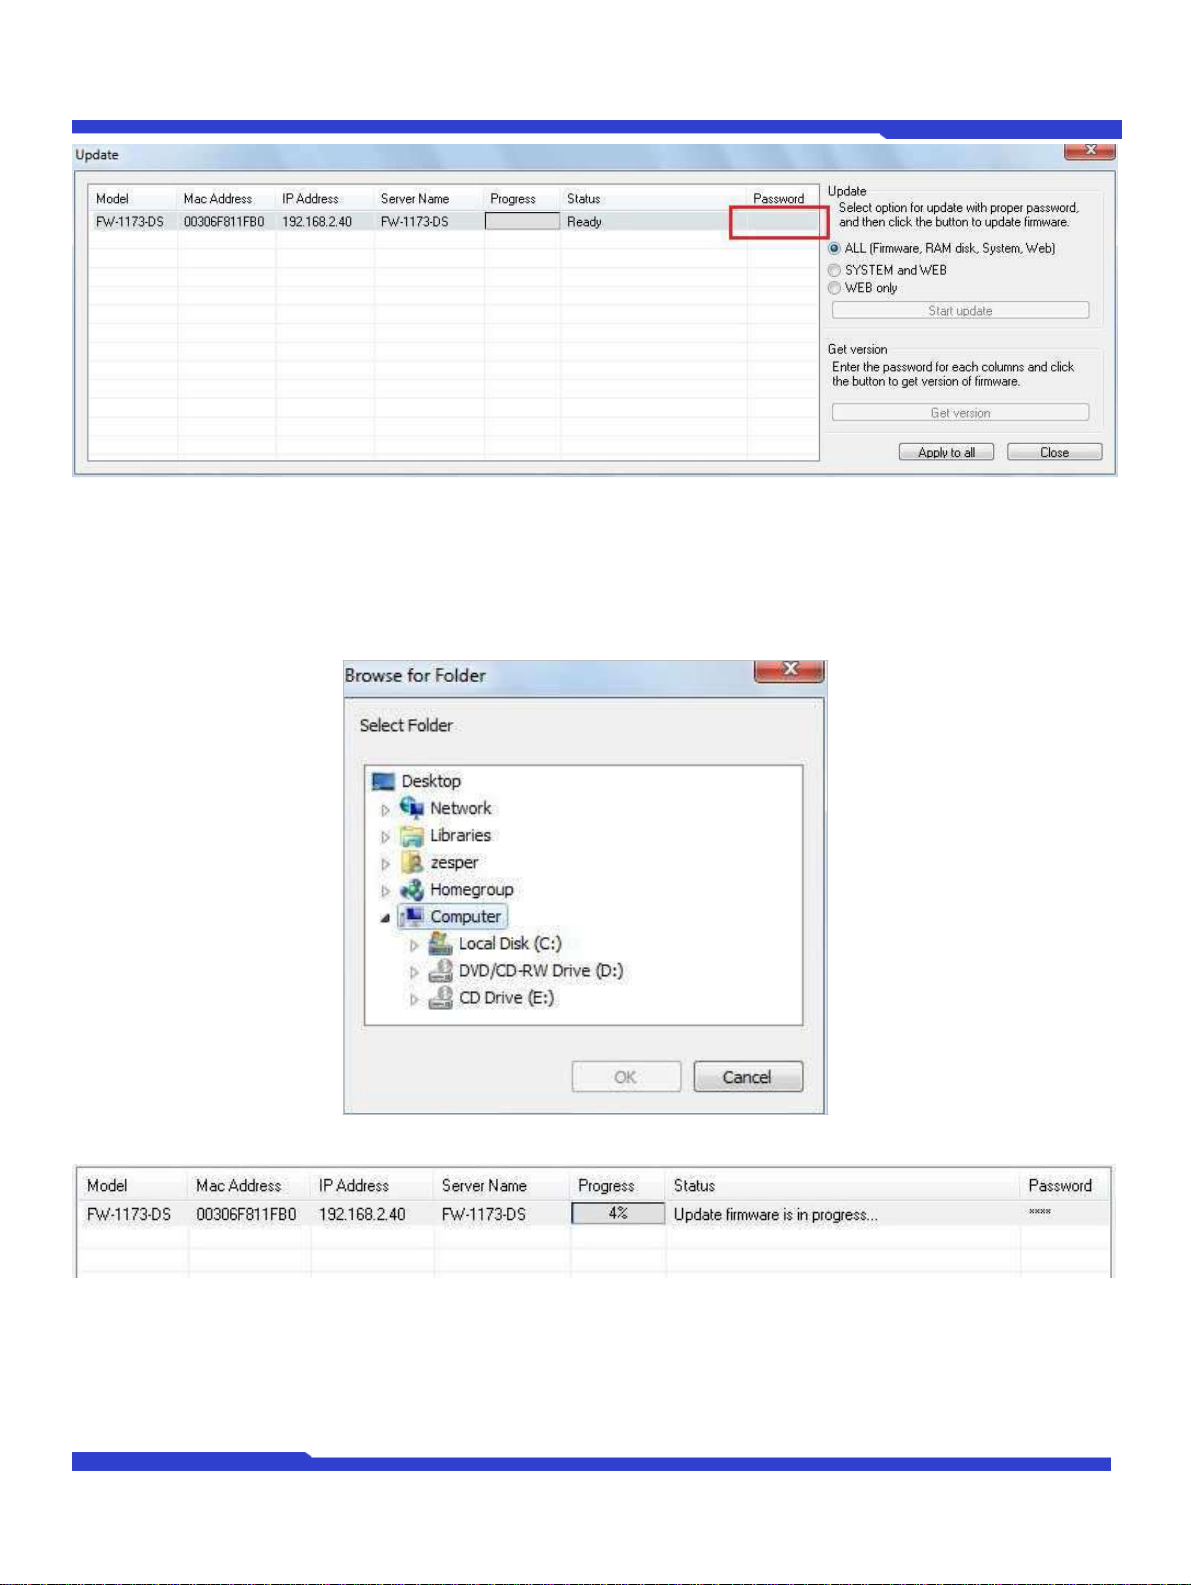
Then select the IP device to be updated on IP Installer window, then click Update Firmware button from the
toolbar. The following window will be displayed.
Page 22
IP Installer User's Manual
O1401-00
22
Opticom Technologies Inc.
You may find the Password field is empty on the window shown above. If so, click the Password field of the IP
device and enter the proper password for the device. You are not allowed to update the firmware if the correct
password is not provided.
After the password is entered, the Start Update button will be enabled now. Click the button to see the following
window for selecting the firmware files.
Locate the firmware files on the hard drive and click OK button. The firmware updating will start.
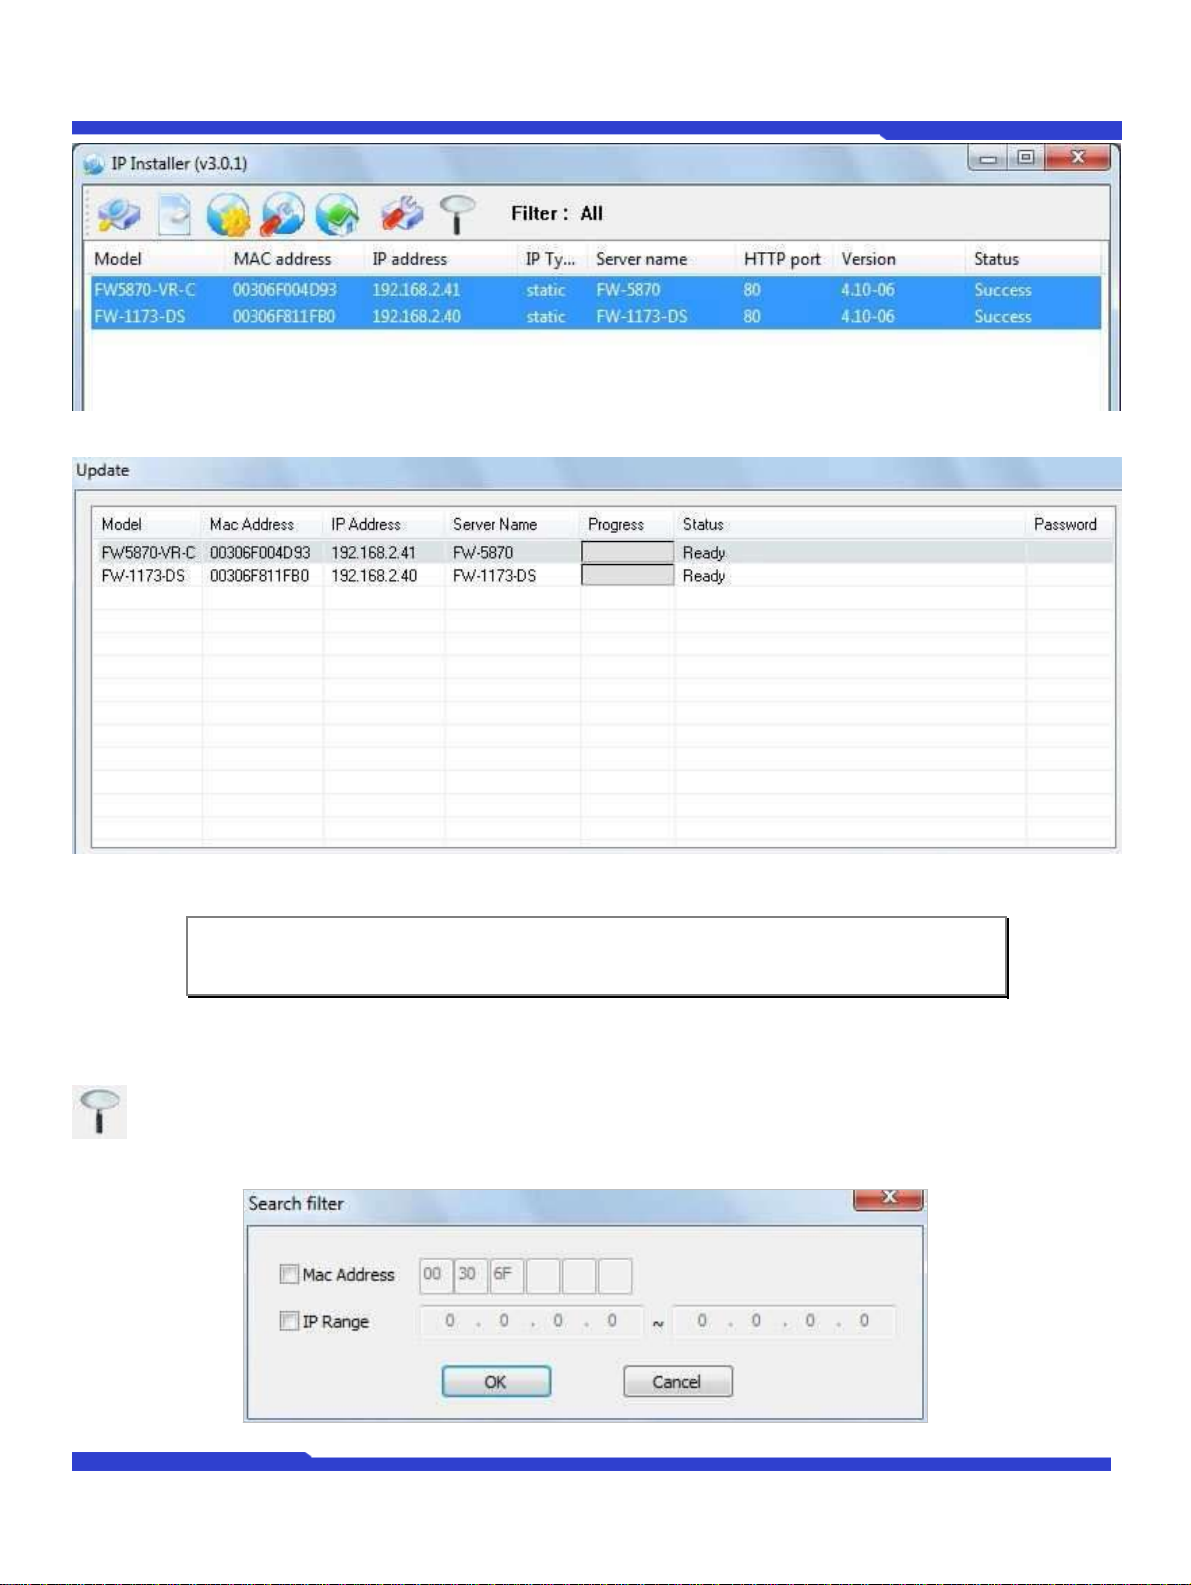
You can also select multiple IP devices at the same time, and have them start firmware updating in a single step.
Select the files to update by using CTRL key as below.
Page 23
IP Installer User's Manual
O1401-00
23
Opticom Technologies Inc.
Note: The detailed information of firmware files and the procedure can be found in
Opticom User’s Manual.
Click Start Update button. You will see the update window brought up with multiple IP devices listed.
The rest of the procedure is the same as in the firmware update case for a single IP device.
3.8. Filter Configuration
When you need to search only for the IP device having a specific range of MAC or IP addresses, you can do
it by using this feature. To set the search condition, click Filter Configuration button on the Toolbar,
then the following window will show up on the screen.
Page 24
IP Installer User's Manual
O1401-00
24
Opticom Technologies Inc.
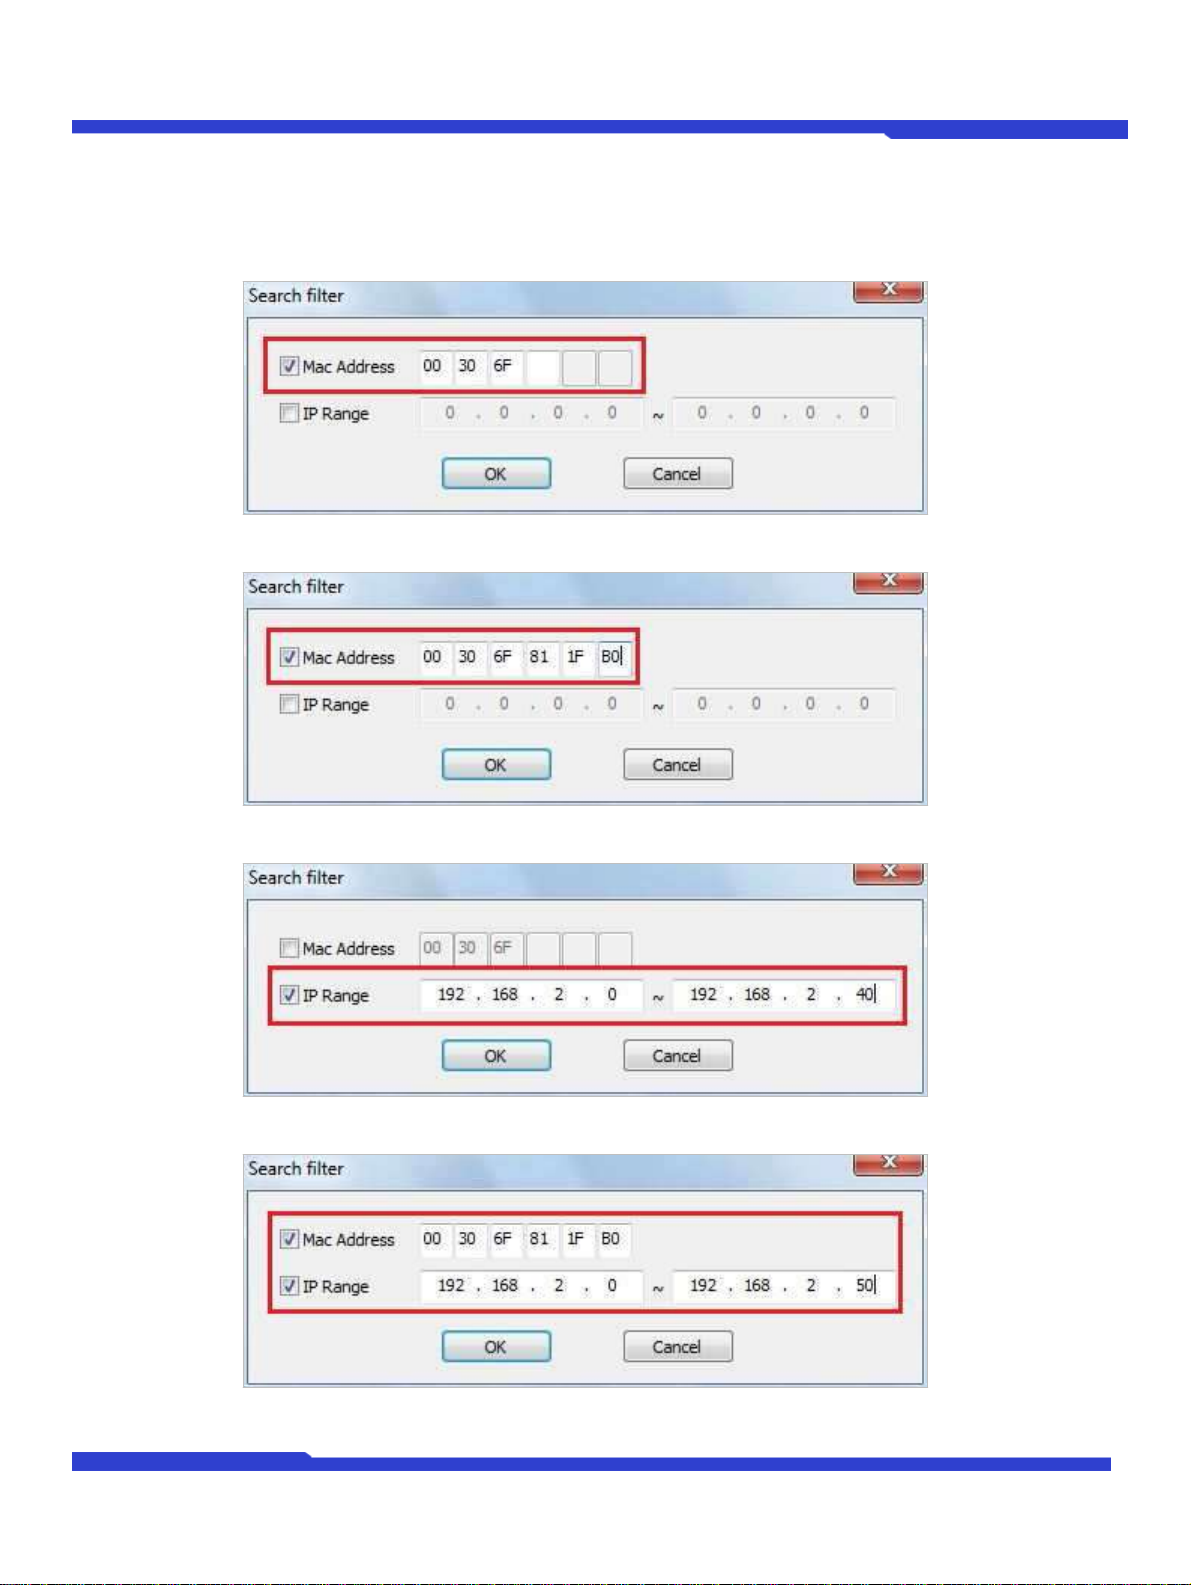
The first six HEX characters are already filled with 00:30:6F, which is MAC prefix for our products. Put a
checkmark MAC Address or IP Range to set the range for searching.
You can set the range of IP addresses to scan as shown below. In this example, all the IP devices having MAC
address starting with 00:30:6F will be listed on the result window after scanning.
Or you can look for a single IP device having a specific IP address as below.
IP Address range for searching can be entered as follows.
You may even set both MAC Address and IP Range together at the same time.
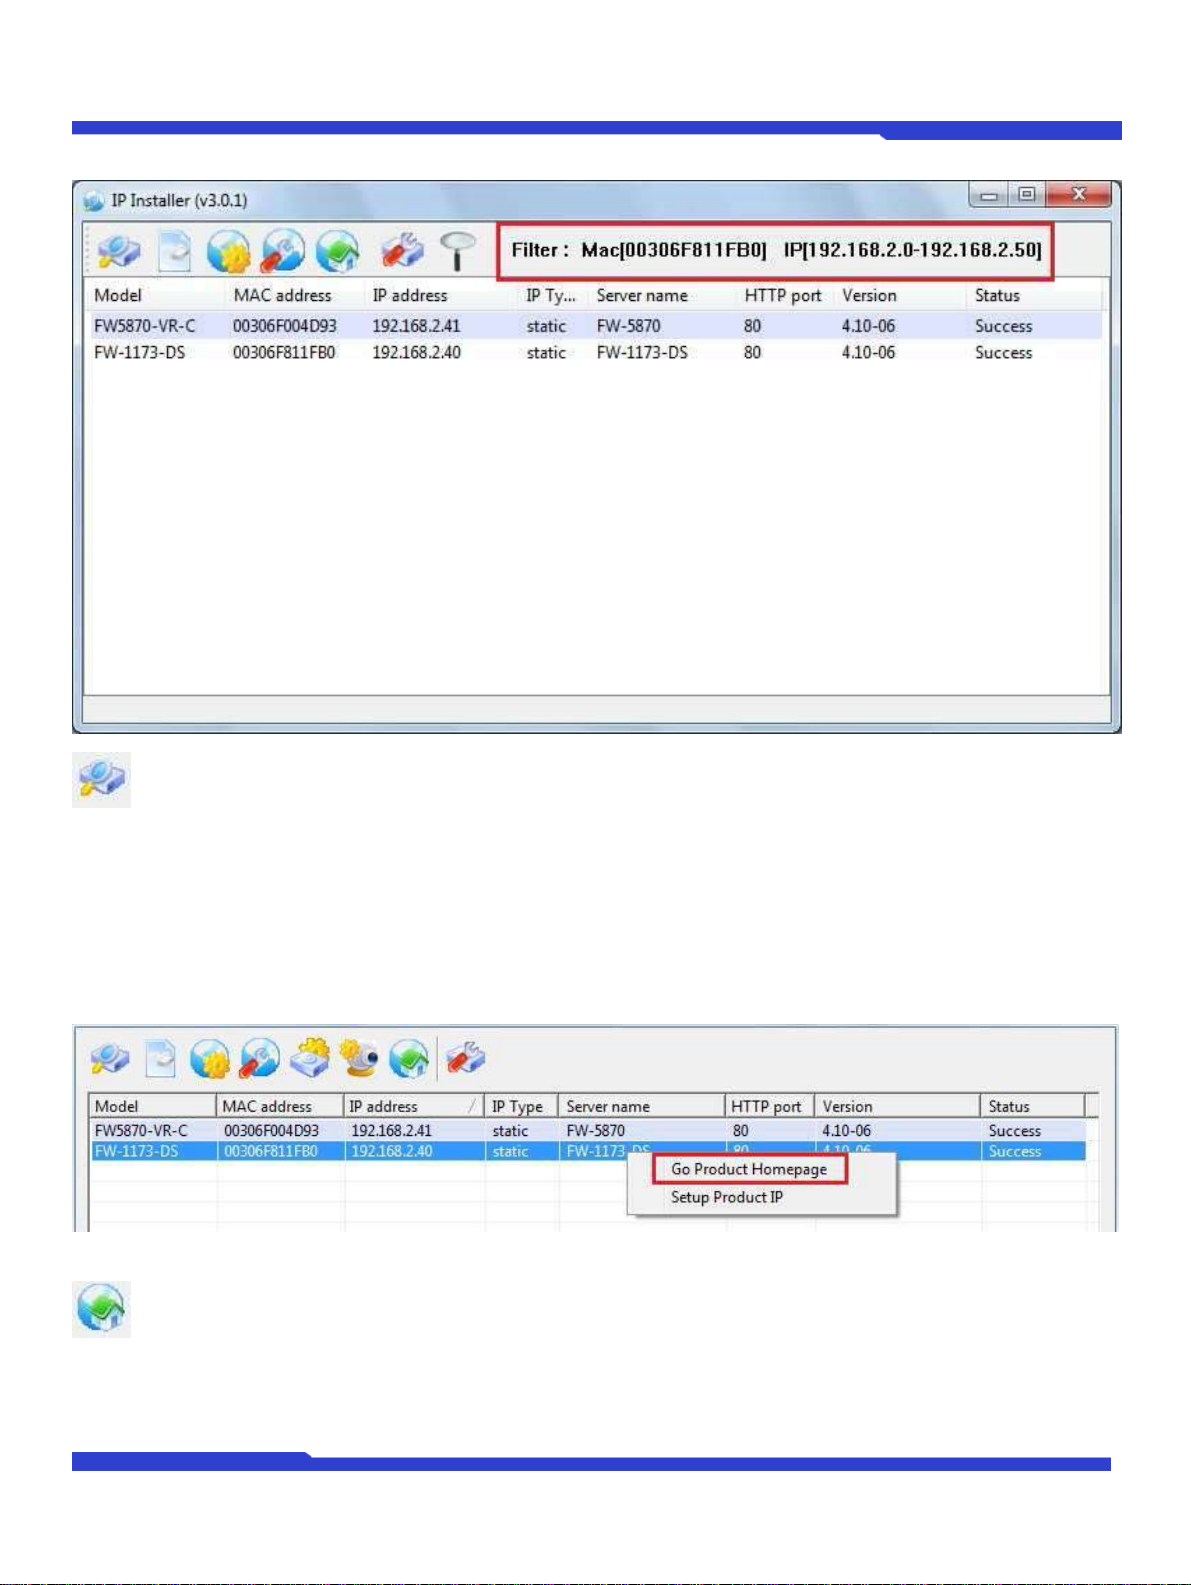
After setting the searching range as explained above, click OK button. Then IP Installer program window will show
Page 25
IP Installer User's Manual
O1401-00
25
Opticom Technologies Inc.
the searching range on the top right portion of the window as shown below.
To start searching with this condition now, click Search Product button on the toolbar. The program will
start searching and show the result after a moment.
3.9. Live View
Once searching and configuration on IP devices are done, you should make sure that the IP devices are accessible
with the new settings. The best way to do it is by connecting the homepage of each IP device’s built-in server, and
starting Live View feature.
Select Go Product Homepage when you click the mouse right button on the IP device to test.
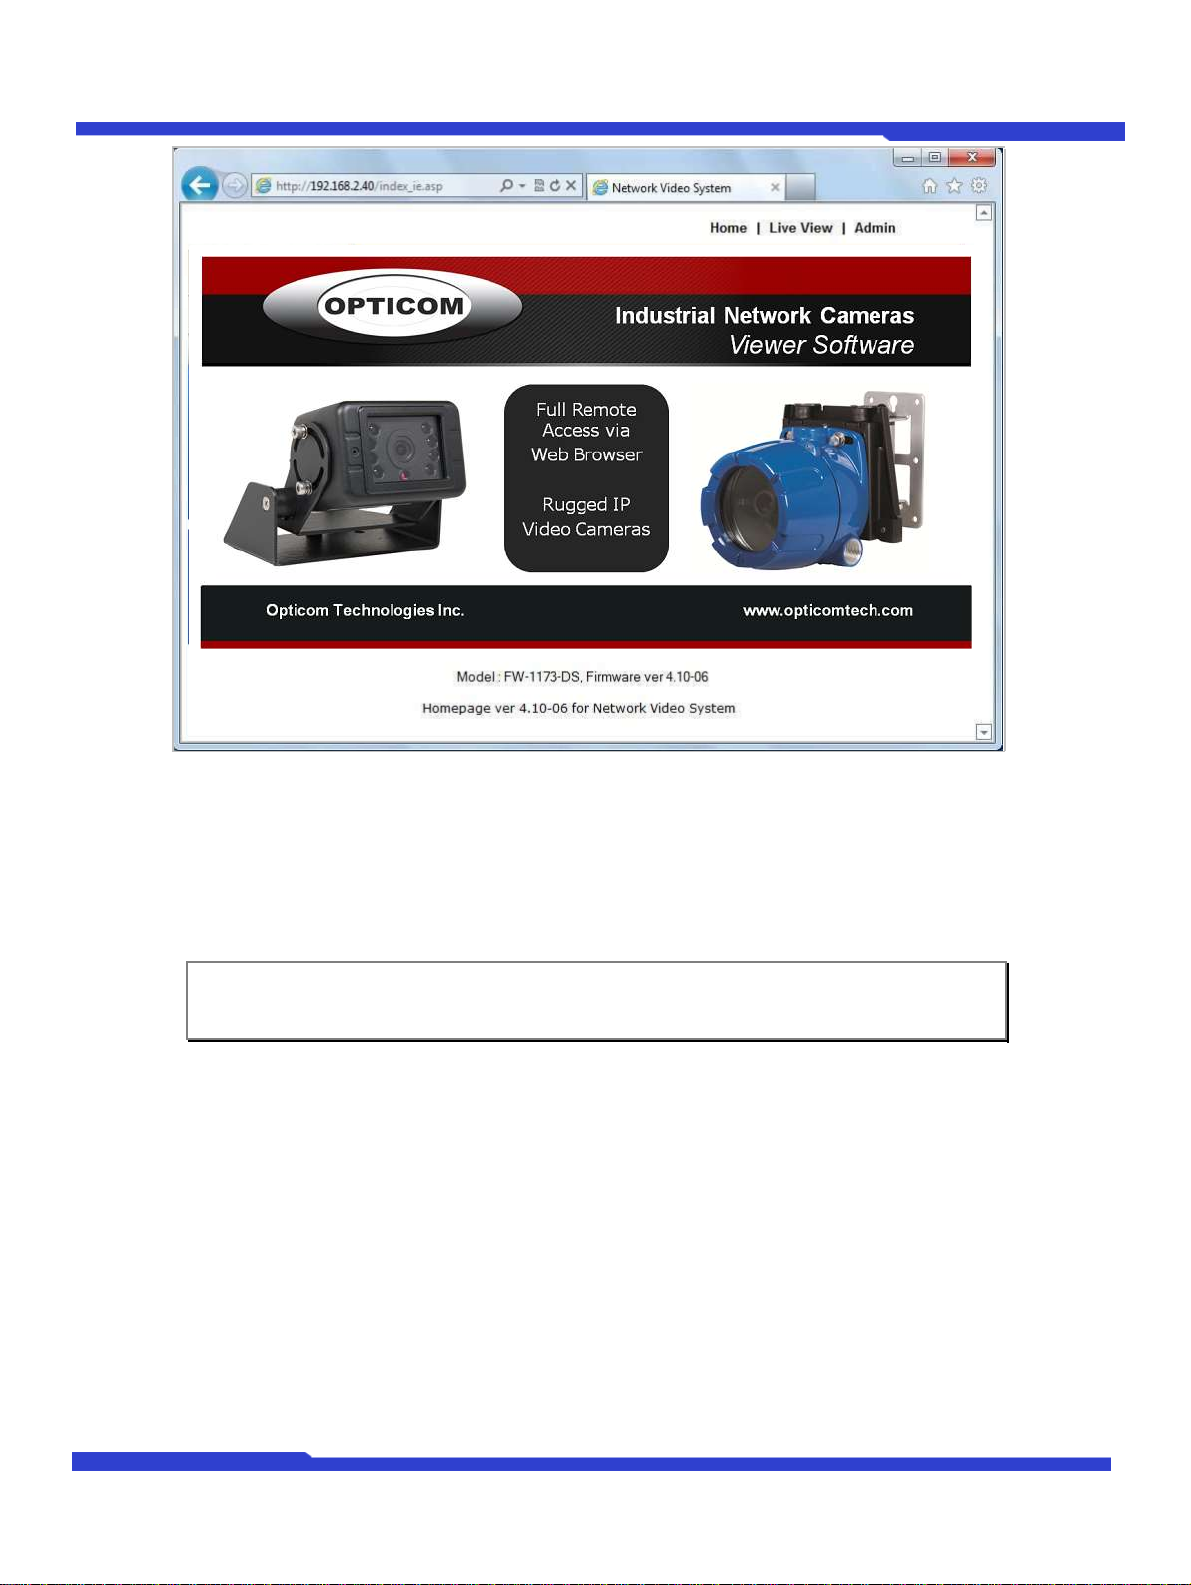
If you select Go Product Homepage, the homepage of that device’s built-in server will be opened on a
new Web browser window as shown below. This is the same result when you click Connect Product
Homepage button from the Main Toolbar.
Page 26
IP Installer User's Manual
O1401-00
26
Opticom Technologies Inc.
Note: Refer to SmartViewer User’s Manual for detailed information on SmartViewer
ActiveX program.
Click Live View on the top right of the window, then SmartViewer ActiveX program will be started. If you have not
installed the SmartViewer program before, it will ask a confirmation to install it. Allow it and you will be able to find
out whether the configuration by IP Installer program is properly done.
 Loading...