

Page 1

and Serial I/O Extender
www.opticis.com
Digital Video/Audio
User’s Manual
for the M5-2C2
© 2008 Opticis. All Rights Reserved
Revision 1.0
Opticis Locations
Opticis Co., Ltd. Opticis North America Ltd.
#304 Byucksan Technopia 330 Richmond street, Suite 100
434-6 Sangdaewon-Dong, Chungwon-Ku Chatham, Ontario
Sungnam City, Kyungki-Do Canada N7M 1P7
462-120, South Korea
Tel: +82 (31) 737-8033 Tel: (519) 355-0819
Fax: +82 (31) 737-8079 Fax: (519) 355-0520
For order support, please contact your Distributor or Reseller.
For technical support, check with the Opticis web site www.opticis.com
contact [email protected]
or
Page 2
Manual Contents
__________________________________________
Figure 3 – Connection of Audio Cable to Uplink Module 1-3
Figure 5 – Connection of Downlink Module 1-4
Figure 8 – Connection of AC/DC Power Adaptor 1-5
Manual Contents 1-0
Welcome!, Product Description 1-1
System Requirements for Setup 1-2
Installation 1-3
Booster and EQ Mode Setting 1-7
Troubleshooting, Maintenance, Technical Support 1-8
Product Specifications 1-9
Warranty Information 1-10
Regulatory Statements 1-11
Pictorials
Figure 1 – Overall Digital Video/Audio and Serial I/O
Extender 1-1
Figure 2 – Connection of DVI and RS232 Cable
to Uplink Module 1-3
Figure 4 – Selection of Audio Input 1-4
Figure 6 – Connection of Two(2) CAT5 Cables 1-5
Figure 7 – Wiring Diagram of CAT5 Cable (Direct Type) 1-5
Welcome!
Congratulations on your purchase of the M5-2C2, Digital Video/Audio and Serial
I/O extender. This manual contains information that will assist you in installing
and operating the product.
Product Description
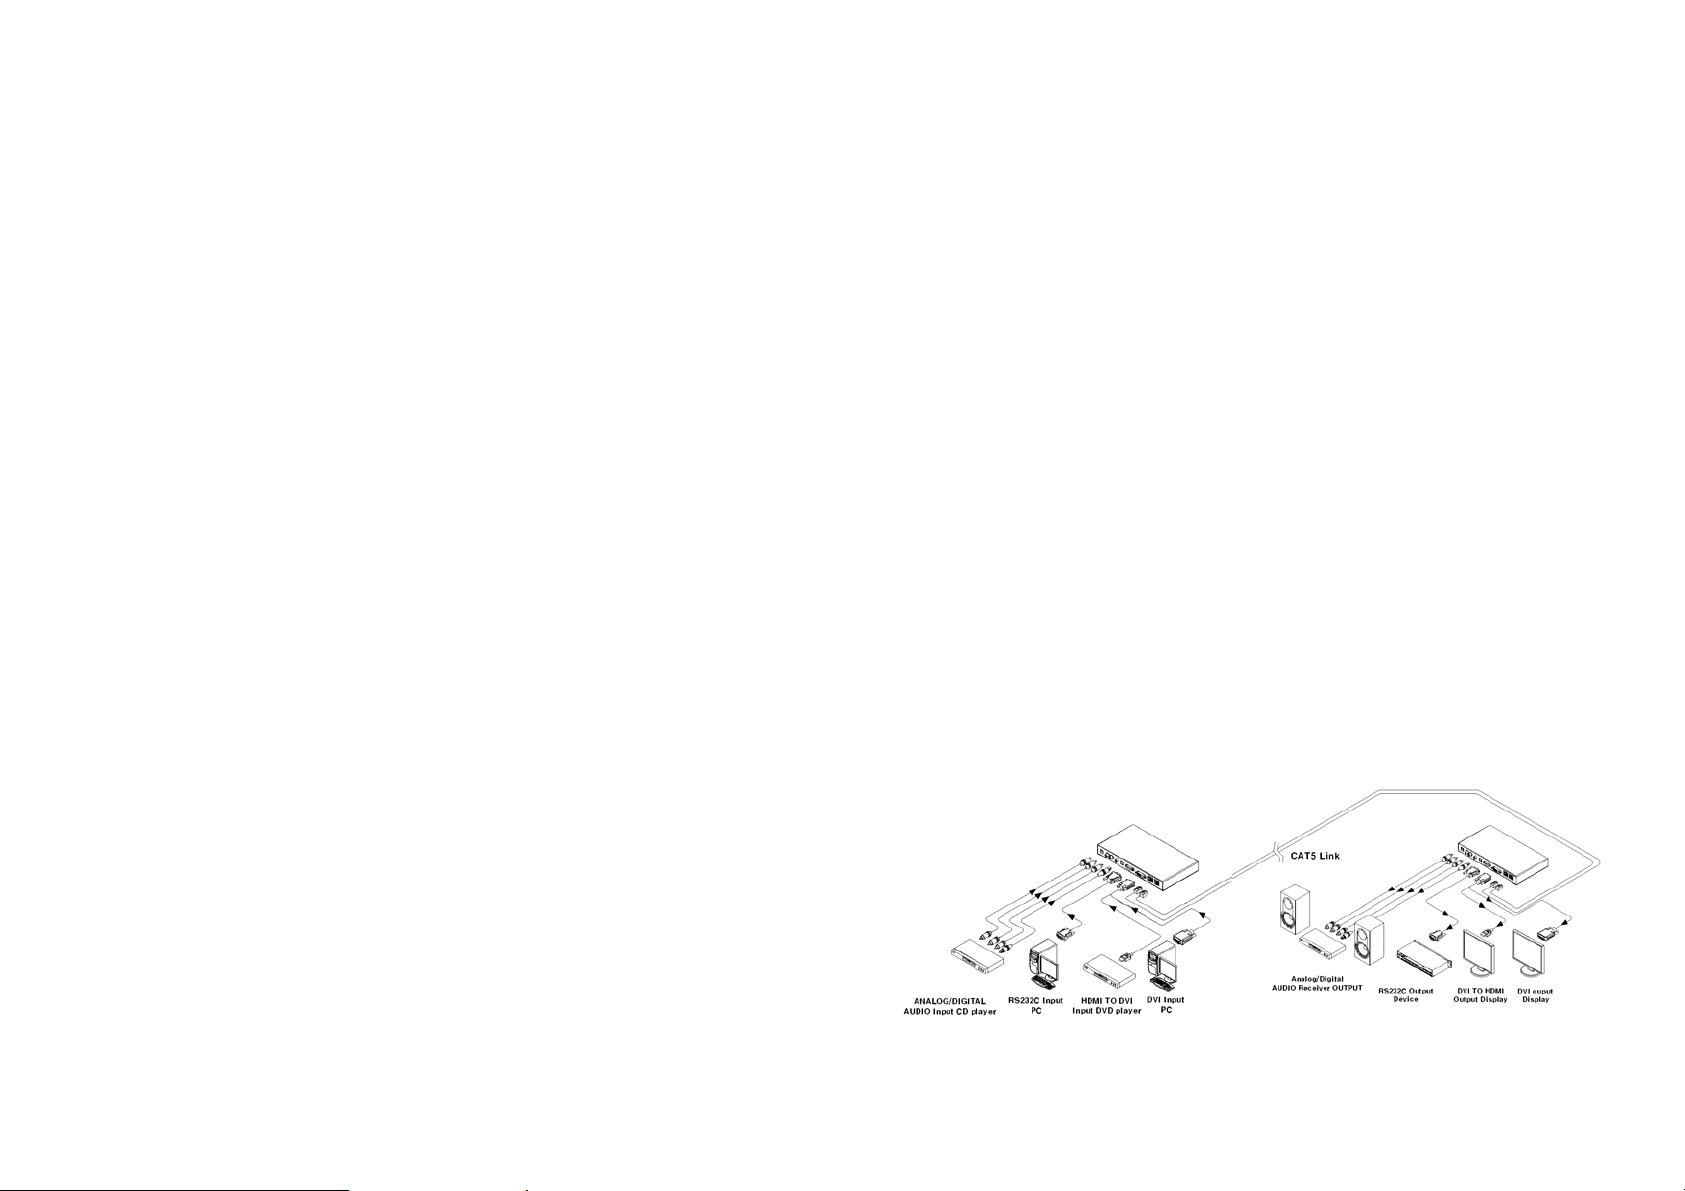
M5-2C2-TR offers integrated extension of digital video, audio and RS-232
interface up to 50m (160ft) for HDMI/DVI. It maintains HD video signals up to
WUXGA (1920x1200) at 60Hz refresh rate for PC and 1080p for HDTV. It is
compatible with full DDC2B and HDCP. It supports connecting one of 3 different
audio types in the transmitter; RCA, PDIF (Optic) or SPDIF (Coaxial) and
outputting all 3 audio types. RS232 serial interface offers device-to-device and
device-to-controller connections to build up control system for A/V integration.
It is designed to multiplex and de-multiplex the DVI/HDMI video, digital/analog
audio, Display Data Channel (DDC) command interface, High Definition Copy
Protection (HDCP) and serial protocol so as to be linked over two CAT5 cables.
It gives benefits of easy plug-and-go installation and offers you a cost effective
solution for pro A/V system.
Shipping Group of M5-2C2 Digital Video/Audio and RS232 Extender
Tx and Rx boxes: One Uplink module & One Downlink module.
AC/DC power adapter: One +12V/3A unit (including AC cord).
User’s Manual
Option: DVI to HDMI cable, DVI cable, Dsub cable, Audio cable
Figure 1 – Overall Digital Video/Audio and Serial I/O Extender
1-1 Welcome, Product Description
Page 3
System Requirements for Setup
Hardware requirements
You have a graphic controller card with a DVI port in your
Windows/Mac (Mac is option), or SUN system. It should support
the maximum graphic resolution feature of the display to be
connected.
In case of using a computer, no special memory size, CPU
speed and chipsets are required.
Proper initial trial of the entire platform with its application using
a short length copper cable is recommended prior to install with
the optical link.
Software requirements
No special needs, if the DVI graphic controller and display
peripheral are operational with the platform’s OS and
application.
AC/DC Power Adapter Technical Advisory
The power of M5-2C2 is designed to supply to either Uplink or
Downlink module by plugging the power plug.
1-2 System Requirements for Setup
Installation
Important: Please use the installation procedure below. Improper, or no
operation may result if the start-up sequence is not correctly followed.
Step 1
Carefully unpack the contents of the shipping group.
Step 2
With system power turned off
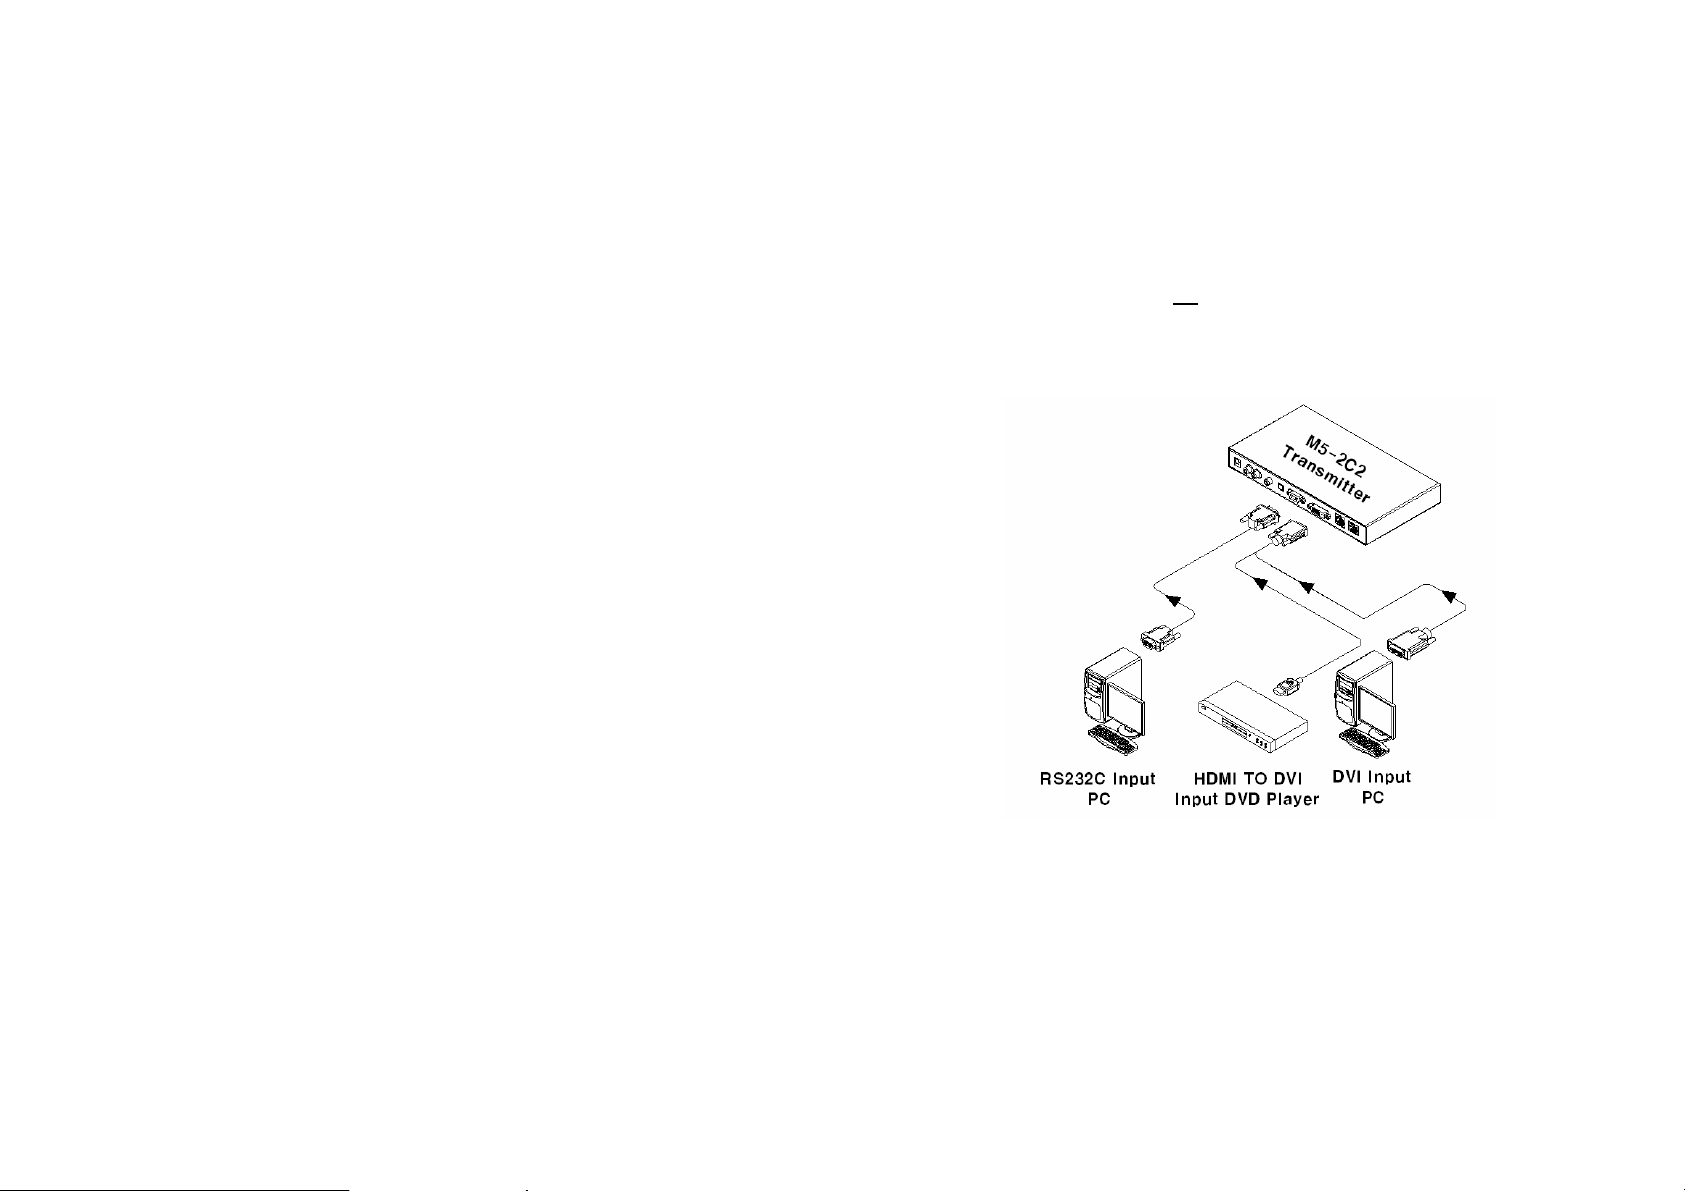
receptacle of PC or other video source equipment by a DVI copper cable or a
HDMI to DVI cable. If necessary, connect the RS232 cable plugs to each Dsub 9-pin connector on PC and Uplink module.
Figure 2 – Connection of DVI and RS232 Cable to Uplink Module
Step 3
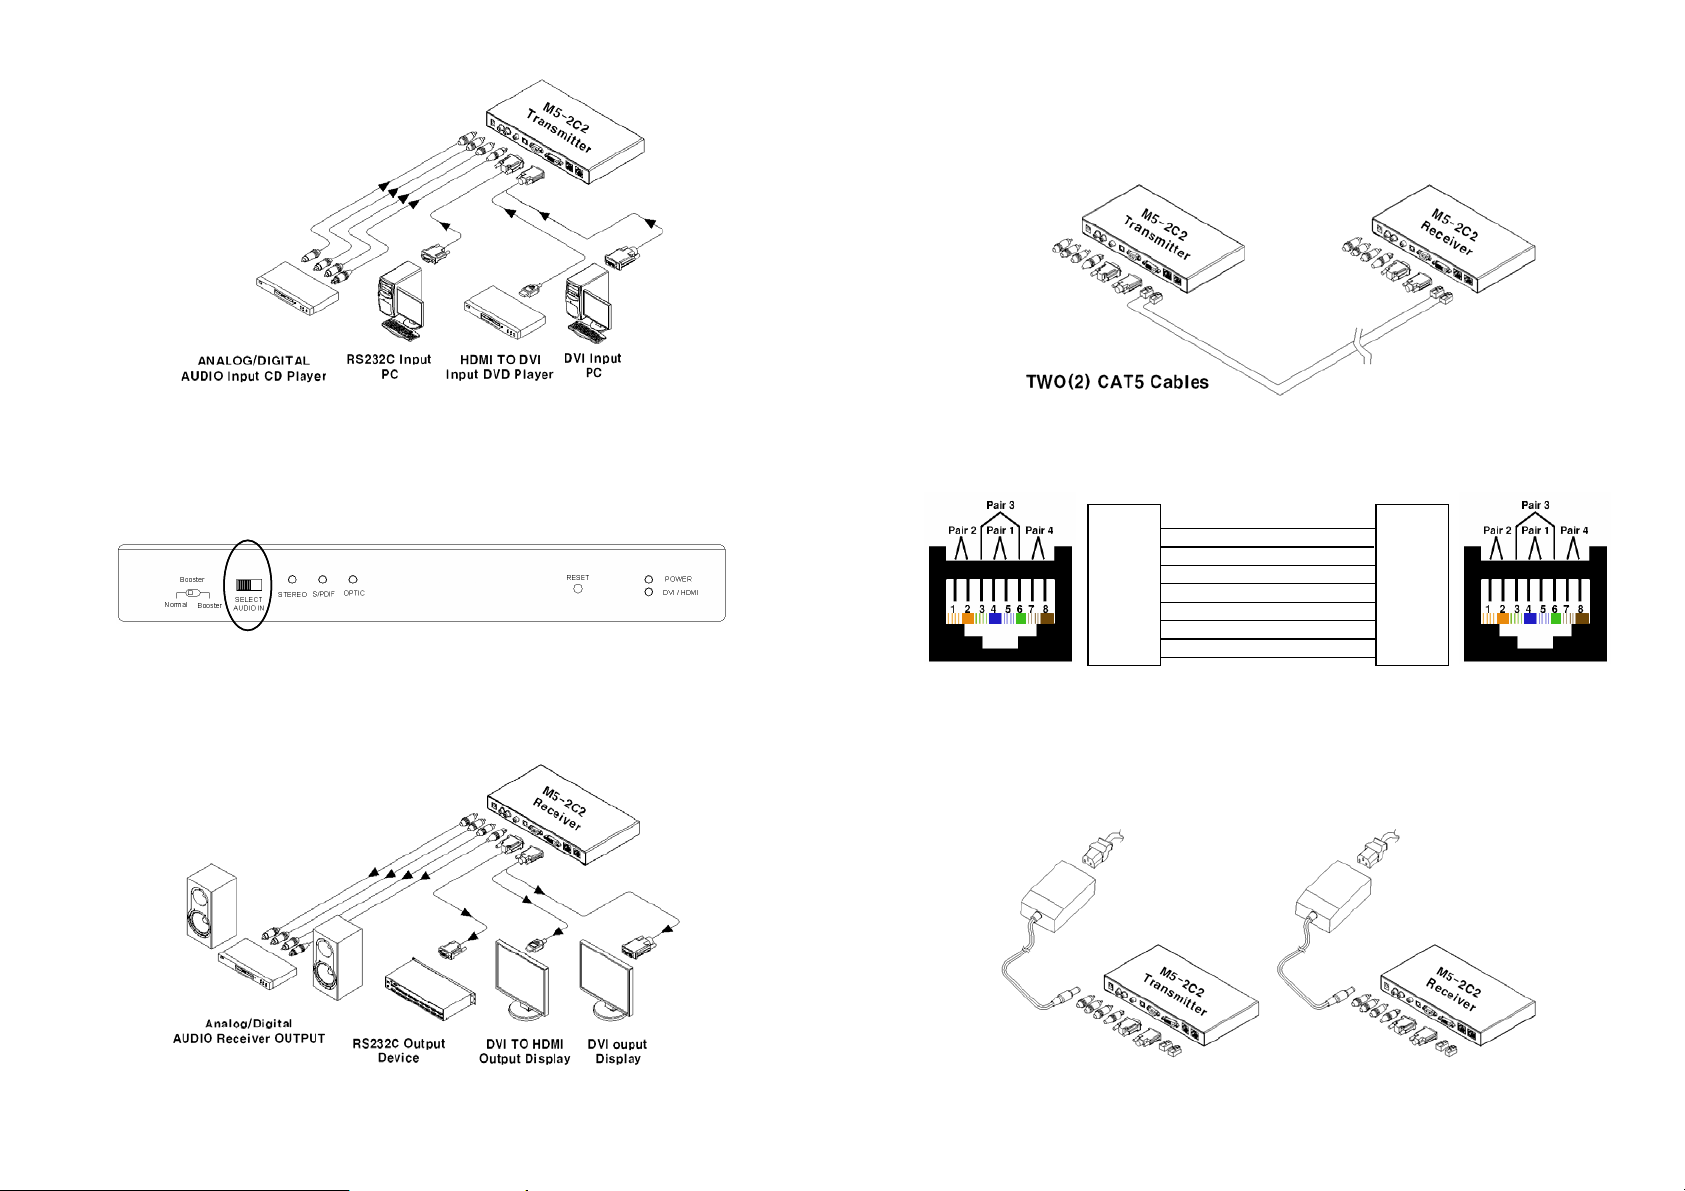
Connect the Uplink module to the audio source equipment by audio cables
such as RCA, S/PDIF coaxial cable and S/PDIF optical fiber.
1-3 Installation
, connect the Uplink module to the DVI
Page 4
)
(
)
r
You can select one of different 3 audio inputs - RCA, S/PDIF(coaxial) and
S/PDIF(optical) - using the switch of front panel. Audio input is changed by
the audio selection switch.
Figure 3 – Connection of Audio Cable to Uplink Module
Step 4
In the same way as above, connect the Downlink module to the display by
DVI copper cable and to the audio output equipments such as media receiver
or speaker by audio cable. The RS232 devices near the display can be
connected by RS232 copper cables also.
Figure 4 – Selection of Audio Input
1-4 Installation (continued
Figure 5 – Connection of Downlink Module
Step 5
Connect two(2) CAT5 or CAT6 cables to RJ45 receptacles of the Uplink and
Downlink modules, as shown in Fig. 7. Opticis recommend solid shielded
CAT6 cables. Carefully check the wiring sequence of CAT5 or CAT6 cable as
Fig. 8 and ensure each RJ45 connector is fully engaged.
Figure 6 – Connection of Two(2) CAT5 Cables
White/Orange
1
Orange
2
White/Green
3
Blue
4
White/Blue
5
Green
6
White/Brown
7
Brown
8
.
1
.
2
.
3
.
4
.
5
.
6
.
7
.
8
Figure 7 – Wiring Diagram of CAT5 Cable (Direct Type)
Step 6
Connect an AC/DC power adapter to either Uplink or Downlink module as
your availability of AC outlet. You can find power indication LED lit on in the
both modules.
o
Figure 8 – Connection of AC/DC Power Adapter
1-5 Installation
continued
Page 5
Step 7
Power ON the PC and display or connected RS-232 devices. Ensure
“DVI/HDMI” and “LINK” indication LEDs lit ON, representing secure
connection of all kinds of cables. Confirm LED of the selected audio input lit
ON.
Tip 1: If any status LED is not ON normally after all installation as guided in
the above, we recommend you to push “RESET” button while all connections
are set and the Uplink and Downlink modules are powered in. “Reset”
function is designed for HPD(Hot Plug Detection) check.
Tip 2: Avoid “hot plugging” the Uplink as this is not recommended practice
with live digital voltages.
1-6 Installation
Booster and EQ Mode Setting
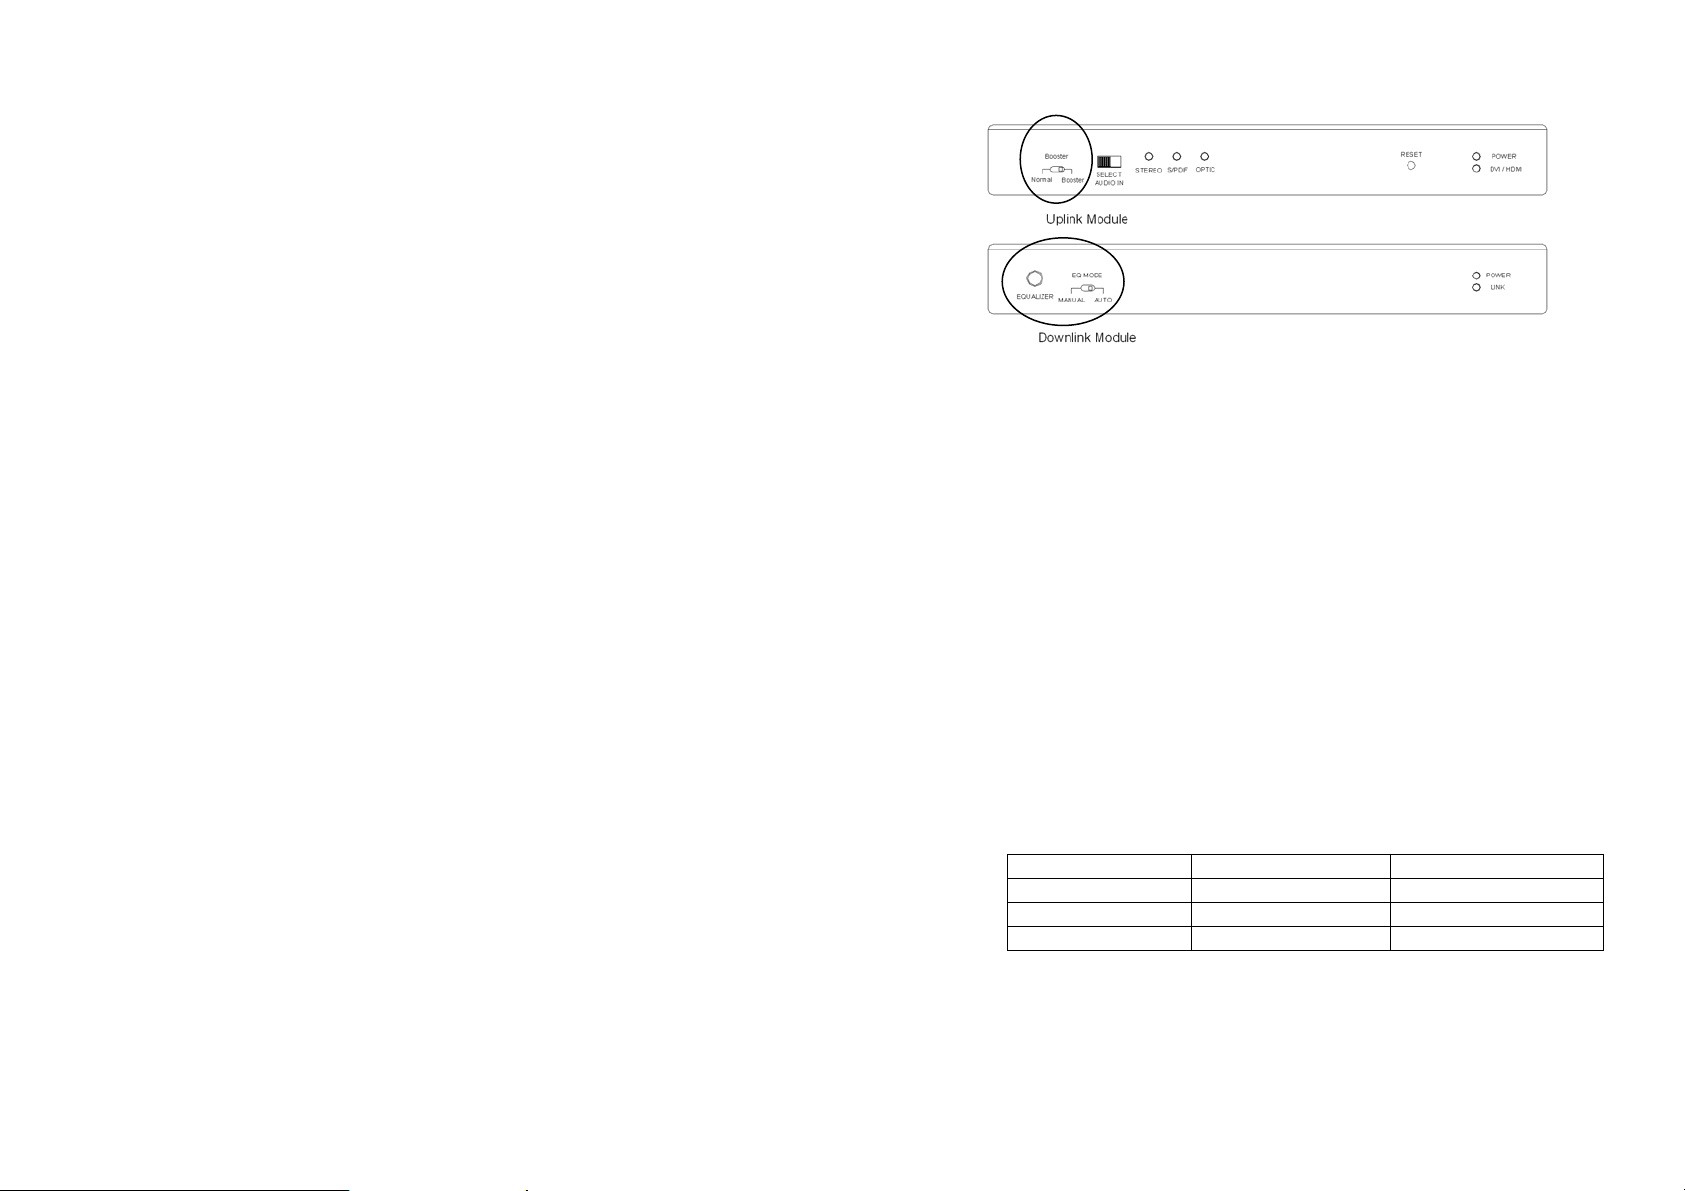
Booster and EQ Mode is used extensions over 10 m (33 feet). By default, M52C2 transmitter and receiver are set to “BOOSTER” and “AUTO” respectively.
Under the default setting, M5-2C2 is optimized for the length from 10m
(33feet) to 40m (130feet). If you don’t get a picture still or have noise, Booster
and EQ Mode Setting are required like the followings.
1. Start by having the source equipments connected by cables and
playing with your display on.
2. Set the transmitter to “BOOSTER” by “BOOSTER” switch on the front
side of Uplink module. Check if the display is displayed normally.
3. If you don’t get a picture still or have noise, set the receiver to
“MANUAL” using “EQ MODE” switch of Downlink module.
4. Start with the “EQUALIZER” knob all the way counter clockwise and
slowly turn the knob clockwise until the display is shown normally.
1-7 Booster and EQ Mode Setting
Table - Recommended Setting with the Length
Tx – Booster Rx – EQ Mode Acceptable Length
Normal Auto 1~10m
Booster Auto 10~40m
Booster Manual 40~50m
Page 6

p
Troubleshooting
The display displays only black screen.
• Check that all AC and DC plugs and jacks used by external power
Screen is distorted or displays noises.
Maintenance
No special maintenance is required for this product. Ensure that this product
is stored or used in a benign environment free from liquid or dirt
contamination.
There are no user serviceable parts. Refer all service and repair issues to
Opticis or its authorized distributor.
Technical Support and Service
For commercial or general product support, contact your reseller. For
technical service, contact Opticis by email [email protected]
website at www.opticis.com.
1-8 Troubleshooting, Maintenance, Technical Support
supplies (both Opticis and others) are firmly connected.
• Ensure that power LED lit ON.
• Ensure that the Uplink and Downlink modules connected correctly to
the PC and display, respectively.
• Check if the PC and display are powered on and properly booted.
• Reset the M5-2C2-TR using Reset button on Uplink and Downlink
modules.
• Test to make sure the modules are working normally with short CAT5
or CAT6 cable 5~10m. If you get the good video at the short length,
you have to set the correct booster and EQ mode as guided on page
1-6.
• Reset the M5-2C2 using Reset button on Uplink and Downlink
modules.
• Reset the system.
• Test to make sure the modules are working normally with short CAT5
or CAT6 cable 5~10m. If you get the good video at the short length,
you have to set the correct booster and EQ mode as guided on page
1-6.
or visit its
Product Specifications
M5-2C2 Digital Vide/Audio and Serial I/O Optical Extender
Compliance with DVI standard: supports DVI 1.0 of DDWG, using
fiber-optic communication links and DDC2B.
Compliance with HDCP : supports HDCP
Extension limit:
50m (160feet) at WUGA (1,900x1,200) 24bit color at 60Hz refresh
rate for PC and 1080p for HDTV.
Audio: Input - Selectable RCA, S/PDIF(coaxial) or S/PDIF(optic)
Output - RCA, S/PDIF(coaxial) and S/PDIF(optic)
RS232C: supports D-sub 9 Pin connectors for RS232C.
Cable Connection: The transmitter and receiver boxes of M5-2C2
have two(2) RJ45 receptacles connected to two(2) CAT5 or CAT6
cables.
Mechanical specifications of Uplink and Downlink boxes
Dimensions: 240mm / 130mm / 31mm (W/H/D)
Weight: 440 ± 10 gram for each of Uplink and Downlink
module.
Environmental Specifications
Operating temperature: 0°C to 50°C
Storage temperature: - 10°C to 70°C
AC/DC Power Adapter
Power Input: Universal AC 85-264V, 50/60Hz, AC power cord with
power jack.
Power Output: +12 V, 3.0 A SMPS DC-power Adapter
Cord DC Jack & length: Core is 12 V and outer cylinder is GND.
Length is 18.5 cm
AC Cord length: 1.8m
Certification: PSE, UL, cUL, FCC, CE, TUV-GS
1-9 Product S
ecifications
Page 7

A
Warranty Information
1 (One) Year Warranty
Opticis warrants this Digital Video/Audio and Serial I/O Optical Extender to be
free from defects in workmanship and materials, under normal use and
service, for a period of one (1) year from the date of purchase from Opticis or
its authorized resellers.
If a product does not work as warranted during the applicable warranty period,
Opticis shall, at its option and expense, repair the defective product or part,
deliver to customer an equivalent product or part to replace the defective item,
or refund to customer the purchase price paid for the defective product.
All products that are replaced will become the property of Opticis.
Replacement products may be new or reconditioned.
ny replaced or repaired product or part has a ninety (90) day warranty or the
reminder of the initial warranty period, whichever is longer.
Opticis shall not be responsible for any software, firmware, information, or
memory data of customer contained in, stored on, or integrated with any
products returned to Opticis for repair under warranty or not.
Warranty Limitation and Exclusion
Opticis shall have no further obligation under the foregoing limited warranty if
the product has been damaged due to abuse, misuse, neglect, accident,
unusual physical or electrical stress, unauthorized modifications, tampering,
alterations, or service othe r than by Opticis or its authorized agents, causes
other than from ordinary use or failure to properly use the product in the
application for which said product is intended.
1-10 Warranty Information
FCC/CE Statement for Regulation of Electro-magnetic
Emission
This device complies with part 15 of FCC Rules. Operation is subject to the
following two conditions: (1) this device may not cause harmful interference, and
(2) this device must accept any interference received, including interference that
may cause undesired operation. This equipment has been tested and found to
comply with the limits for a Class B digital device, pursuant to part 15 and 2 of
FCC Rules, EN 55022/55024/61000-3 for CE certification. These limits are
designed to provide reasonable protection against harmful interference when
the equipment is operated in a residential installation. This equipment
generates, uses, and can radiate radio frequency energy and. if not installed
and used in accordance with the instruction guide, may cause harmful
interference to radio communications. However, there is no guarantee that
interference will not occur in a particular installation. If this equipment does
cause harmful interference to radio or television reception, which can be
determined by turning the equipment off and on, the user is encouraged to try to
correct the interference by one or more of the following measures:
• Re-orient or relocate the receiving antenna.
• Increase the separation between the equipment and the receiver.
• Connect the equipment into an outlet on a circuit different from that to which
the receiver is connected.
• Consult a service representative for help.
Properly shielded and grounded cables and connectors must be used in order
to comply with FCC/CE emission limits. Changes or modifications not expressly
approved by the party responsible for compliance could void the user s authority
to operate the equipment.
1-11 Regulatory Statements
 Loading...