

opticis IPKVM-350ED User Manual

- 1 -
IP KVM HDMI /DVI Extender, IPKVM-350ED
User’s Manual
※ The design can be chaned without notice
Doc No. : OIPKVM5-D150323/ Rev1.0
WWW.OPTICIS.COM
Ver. 1.0
Front
Back

- 2 -
Contents
Welcome .................................................................................................................................................. 3
Product Description .................................................................................................................................. 3
Main Features .......................................................................................................................................... 4
Network components ............................................................................................................................... 4
Shipping Group ........................................................................................................................................ 5
Supporting video resolutions for Input / Output........................................................................................ 5
Application ................................................................................................................................................ 6
System requirements for setup ................................................................................................................ 6
Installation ................................................................................................................................................ 7
Connection Ports ...................................................................................................................................... 8
Setting Local/Remote Authority.............................................................................................................. 10
LED Indication ........................................................................................................................................ 11
SW & Factory Reset ............................................................................................................................... 11
Configuration & Operation...................................................................................................................... 12
Remote Manager (PC Program) ............................................................................................................ 12
Getting Started ....................................................................................................................................... 23
Product Specifications ............................................................................................................................ 29
Externally Setting Local/Remote Authority ............................................................................................. 30
Troubleshooting ..................................................................................................................................... 31
Warranty Information ............................................................................................................................. 32

- 3 -
Welcome
Congratulations on your purchase of the IP KVM HDMI / DVI Extender, IPKVM-350-ED. This manual
contains information that will assist you in installing and operating the product.
Product Description
The OPTICIS HDMI / DVI IP KVM Extender, IPKVM-350-ED is designed for extending of HDMI,
keyboard / mouse and provides unicast (1 to 1) over IP network. But the key feature of Dual-display
mode inside IPKVM-350-ED enables user to extend two (2) displays with keyboard / mouse.
The transmitter, IPKVM-350-E (Encoder) connected to a HDMI source, encodes the HDMI by H.264
and transmits the video signal via Ethernet. The receiver, IPKVM-350-D (Decoder) connected to a
display, receives the H.264 encoded video signal via the Ethernet and decodes video signal into the
HDMI display.
The USB keyboard and mouse interface in the receiver, IPKVM-350-D also can be accessed to the
source via transmitter, IPKVM-350-E, if it is connected to the source by USB interface.
The IPKVM-350-ED supports the digital video data of full HD up to 1080p at 60Hz and stereo audio
and transmits the signal via Intra network. By using GUI interface and PC program, user can control
the transmitters for connecting in the receiver side.

- 4 -
Main Features
♦ Supports Dual-display mode: extend two (2) displays with keyboard / mouse.
♦ Provides unicast (1 to 1) over IP network
♦ LAN standard: 802.3 Ethernet 10/100/1000Mbps.
♦ Video Resolution: up to 1080p@60Hz
♦ H.264 CODEC
♦ OSD GUI
♦ Remote Manager: PC Program for User Setting and Control
♦ HDMI V1.3, DVI 1.0
♦ USB KVM via backchannel: USB HID mouse & keyboard on remote site(Rx).
♦ Provides optionally mounting bracket (OPSCB) complying with VESA 75,100.
♦ IPKVM-350-E(Transmitter,Tx): Power Jack, RJ45, HDMI Input /HDMI Output (Loop-through)
and mini USB port
♦ IPKVM-350-D (Receiver,Rx): Power Jack, RJ45, HDMI Output and Dual USB ports
♦ Certifications: CE / FCC
Network components
♦ Source: A video source connected to a transmitter (encoder), a source can be a media player,
personal computer, or camera.
♦ Transmitter (Encoder): An encoder is needed for each source and can broadcast to a single
transmitter (decoder) or to multiple receivers (decoders).
♦ Receiver (Decoder): A decoder is needed for each display output.
♦ RemoteManager(PC Program): Via a PC connected to the network, RemoteManager (PC
program) manages user accounts, configures IP addresses of IPKVM-350-EDs and
provides user information about each IPKVM connection.
When you set IP address or RX grouping for the first time and modify or add device
(IPKVM-350-EDs), you need to use this program.
♦ IP Network: An IP network what IP devices is connected via Switching hub.
e.g Ethernet switching hub, Optical-Ethernet switch

- 5 -
Shipping Group
♦ IPKVM-350-E: Transmitter (Tx, Encoder) or IPVKM-350-D: Receiver (Rx, Decoder)
♦ Power adaptor: One (1) unit of 5V, 2A
♦ One (1) HDMI male to male cables (1.2m)
♦ One (1) Mini-USB Cable for PC (Only IPKVM-350-E,Tx)
♦ Two (2) of Three (3) pin terminal block
♦ User’s manual
Option
♦ RS232 cable: DB9 male to Three (3) pin terminal block
♦ Switch (Tx): Console Switch & RJ11 male to Three (3) pin terminal block
♦ Mounting bracket (OPSCB) complying with VESA 75, 100.
Supporting Video Resolutions for Input / Output
♦ 480i60, 576i50
♦ 480p60, 576p50
♦ 720p50, 720p60
♦ 1080i30, 1080i50, 1080i60
♦ 1080p24, 1080p30, 1080p50, 1080p60
♦ 640x480p60
♦ 800x600p60
♦ 1024x768p60
♦ 1280x768p60
♦ 1280x960p60
♦ 1280x1024p60
♦ 1600x1200p60
♦ 1920x1080p60
Note: Some PC resolutions may not be displayed properly.

- 6 -
Application
♦ KVM
♦ Video Control room
♦ RCS/ROS
System Requirements for Setup
♦ Hardware requirements
▶ You must have a HDMI graphic controller or card having a HDMI or DVI port in your PC or
any other equipment being used.
▶ It should support the maximum graphic resolution feature of displays to be connected.
▶ No special requirements for memory size, CPU speed and chipsets, if you’ve already
properly installed your HDMI or DVI graphic controllers or cards.
♦ Software requirements
▶ You need to check OS version of your PC or any other equipment being used.
♦ Network requirements
▶ You may need Ethernet switch(L2 or L3) as a switching hub, Optical-Ethernet switch or
router for connecting multiple IPKVM-350-EDs in Local network. And also it is possible to
communicate directly between one pair of IPKVM-350-ED, point-to-point connection.
Network speed of each port of Ethernet switch requires 100/1000Mbps
♦ requirements for control PC to install RemoteManager
▶ We provides RemoteManager [PC program] for setting and control. The program
manages user accounts, setup of IP addresses of IPKVM-350-EDs.
▶ Requirements: Windows XP and Window7 (or above OS)
♦ AC/DC Power Adapter Technical Advisory
▶ The IPKVM-350-ED has a reverse voltage protection circuit and receiver (Rx) module also
has overcurrent protection circuit.
▶ The IPKVM-350-ED is designed to use mainly external +5V AC/DC power adaptor. The
internal power supplied through a HDMI pin (#18) from the graphic source is used to
identify normal connection between a source and transmitter, IPKVM-350-E.

- 7 -
Installation
Important: Please keep the installation procedure below. Improper or no operation may result if the
start-up sequence is not followed correctly.
Step 1
Carefully unpack the contents of the shipping group.
Step 2
Turn on the PC, display, and network server.
Step 3
Connect HDMI IN port in IPKVM-350-E (Tx) to the PC by supplied HDMI cable.
Step 4
Connect mini USB port in IPKVM-350-E (Tx) to USB port in PC with supplied USB cable.
Step 5
Connect Local Display port in IPKVM-350-E (Tx) to HDMI port in a display with HDMI cable. You may
skip Step 5 if you don’t need loop-through for local.
Step 6
Connect LAN port (RJ45) in IPKVM-350-E (Tx) to LAN port in Network server with LAN cable.
Step 7
Connect HDMI OUT port in IPKVM-350-D (Rx) to a display by supplied HDMI cable.Then, Attach
keyboard and mouse for remote control.
Step 8
Connect LAN port (RJ45) in IPKVM-350-D (Rx) to LAN port in Network server with LAN cable.
Step 9
Plug the +5V power adaptors to both IPKVM-350-E (Tx) and IPKVM-350-D (Rx).
Note: If you change an input source to another source, you have to reset the power of all TXs and
RXs by re-plugging of the +5V power adaptor.
Note: Before you power on your devices, firstly connect your encoder(transmitter) unit to your
source and to the network, secondly connect your decoder(receiver) unit to the network and
to your displays, and other devices to your decoder and encoder units (including connection
of mini-USB cable to the PC source, finally plug +5V power adaptor to your encoders and
decoders.

- 8 -
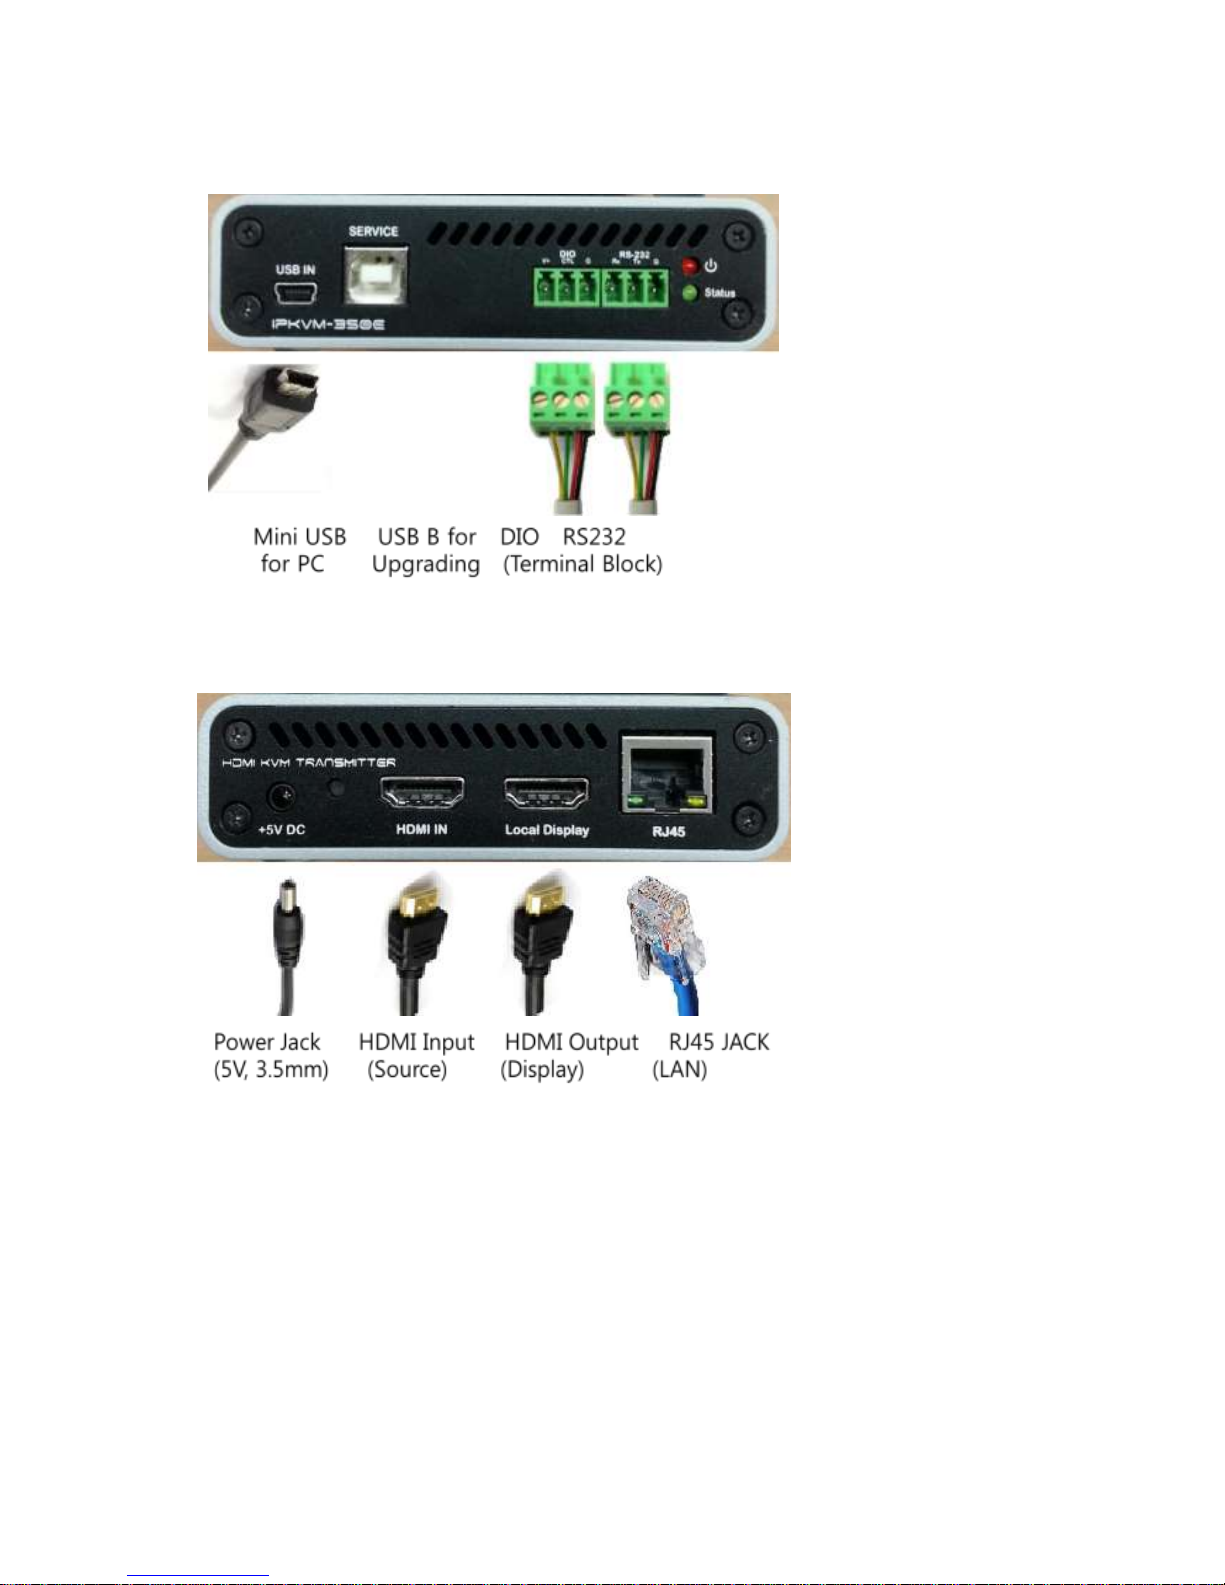
Connection Ports
♦ Connector descriptions
▶ 5V AC/DC Power (Transmitter & Receiver): Connect the 5V AC/DC Power Adaptor to the
connector of each device. When the 5V AC/DC Power Adaptor is connected to the
device, the power LED is turned on. For more information on LEDs, see “LED indication”
▶ HDMI IN (Transmitter): Connect your video source (such as a PC) to this connector. If
your video source doesn’t support HDMI output, use an HDMI/DVI cable or an HDMI
converter to connect it to your transmitter device. Note: To connect to this connector,
you need a shielded HDMI cable.
▶ HDMI Out (Receiver): Connect a digital display to this connector. If your digital display has
not an HDMI input, use an HDMI/DVI cable or an HDMI adaptor to connect it to your
receiver device. Note: To connect to this connector, you need a shielded HDMI cable.
▶ Local Display (Transmitter): Connect a digital display to the HDMI output connector. If your
digital display has not an HDMI input, use an HDMI/DVI cable or an HDMI converter to
connect it to your transmitter device. Note: To connect to this connector, you need a
shielded HDMI cable.
▶ RJ45 (Transmitter & Receiver): Connect a network cable (CAT5e/CAT6) to this connector.
▶ mini USB port (Transmitter): Connect a source PC to this connector for the purpose of
using HID mouse or Keyboard.
▶ Dual USB A Type (Receiver): Connect a mouse and/or a keyboard to this connector for
the purpose of using HID mouse or Keyboard.
▶ RS232 (Transmitter & Receiver)
Optional - Connect a RS232 cable to this terminal block for the purpose of using a knob
or controller (which controls an instrument).
▶ DIO (Transmitter & Receiver)
Optional - Connect a DIO cable to this terminal block for the purpose of using Knob
or controller (which receive some data from an instrument)
Note: If you change a source to another source such as PC, Camcorder, you have to reset
the power of all TXs and RXs by re-plugging of the +5V power adaptor.
- 9 -
♦ IPKVM-350-E Transmitter Front
♦ IPKVM-350-E Transmitter Back

- 10 -
♦ IPKVM-350-D Receiver front
♦ IPKVM-350-D Receiver back
Setting Local/Remote Authority
You can use KVM (including an HID mouse and/or a keyboard, or a knob (or controller) under user’s
authority. Only on the Local site, you can set user’s authority to Local or Remote using an external
console switch. But without the external console switch, you can access to the devices on both local
and remote site.

- 11 -
LED Indication
IPKVM-350-ED has two (2) LEDs for Power and Authority status located on the front
♦ Power status LED (Red)
When power is applied, the red LED will be turned on.
♦ Authority status LED (Green)
If green LED turns on the transmitter, IPKVM-350 doesn’t work HID Mouse/Keyboard and
others (Knob, etc.) on the Remote site. And also if green LED turns on the receiver, IPKVM-
350-D is ready to use HID Mouse/Keyboard and others (Knob, etc.) on the Remote site. You
can set the authority state to Local or Remote on the external console switch (TX). And you
can see same status via LEDs on the Console switch. Refer to the page 30, “Externally
Setting Local/Remote Authority”.
SW & Factory Reset
♦ SW Reset: Press the Reset switch on the back of devices shortly to reset devices.
♦ Factory Reset : To recover the Factory setting, press and hold the Reset switch on the
Back of devices until the LED turns off after blinking approx.10sec.
Configuration & Operation
Note: Please keep the installation procedure below. Improper or no operation may result if the
start-up sequence is not followed correctly.
Note: IPKVM-350-ED supports static fixed IP on the network. And a default IP is 192.168.0.100 on
the Txs and 192.168.0.200 on the RXs from shipping group ,that is, all Txs have 192.168.0.100
and all Rxs have 192.168.0.200 from shipping group. And also, Gateway is 192.168.0.1 and
Subnet Mask is 255.255.255.0 in both Txs and Rxs.
Important:
When you first set and modify devices for a system configuration, you need to use Remote
Manager (PC Program).
First, you should directly connect with PC and change the IP address of each Tx or Rx to another
one by using PC Program. It is because devices, which have same IP, are not operated on one
network. Refer to the page 12, “Remote Manager (PC Program).
Second, you need to set Tx IP grouping on the Rx for multi-screen viewing, directly with PC
or on one network by using PC Program.
 Loading...