

Page 1
ㅕ
Manual Contents
__________________________________________
Manual Contents
1-0
Welcome! Product Description
1-1
System Requirements for Setup, Shipping group
1-2
Installation; Connection with Copper cable
1-3
Connection with Copper cable and Optical
Extender (RX side)
1-4
Connection with Copper cable and Optical
Extender (TX side)
1-5
Troubleshooting
1-6
Maintenance, Technical Support, and Service
1-7
Product Specifications
1-8
Warranty Information
1-9
Pictorials
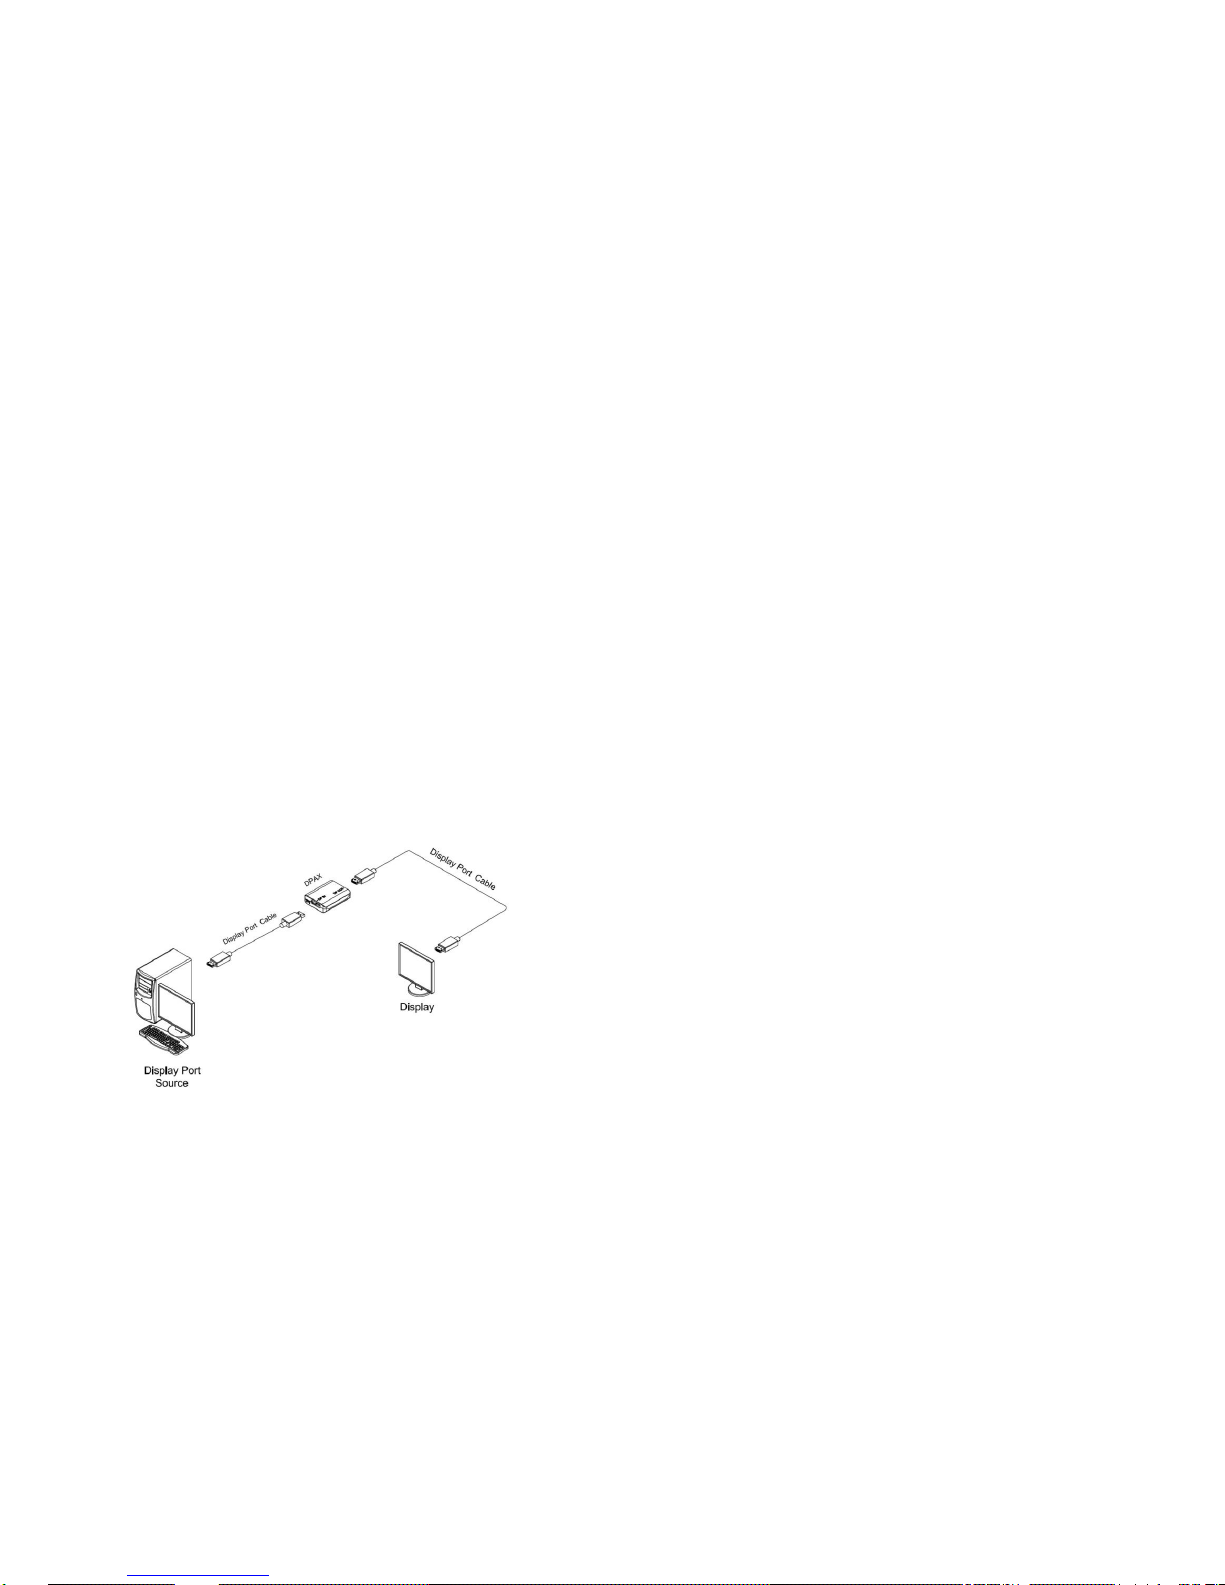
Figure 1 – Overall Connection of DPAX
1-1
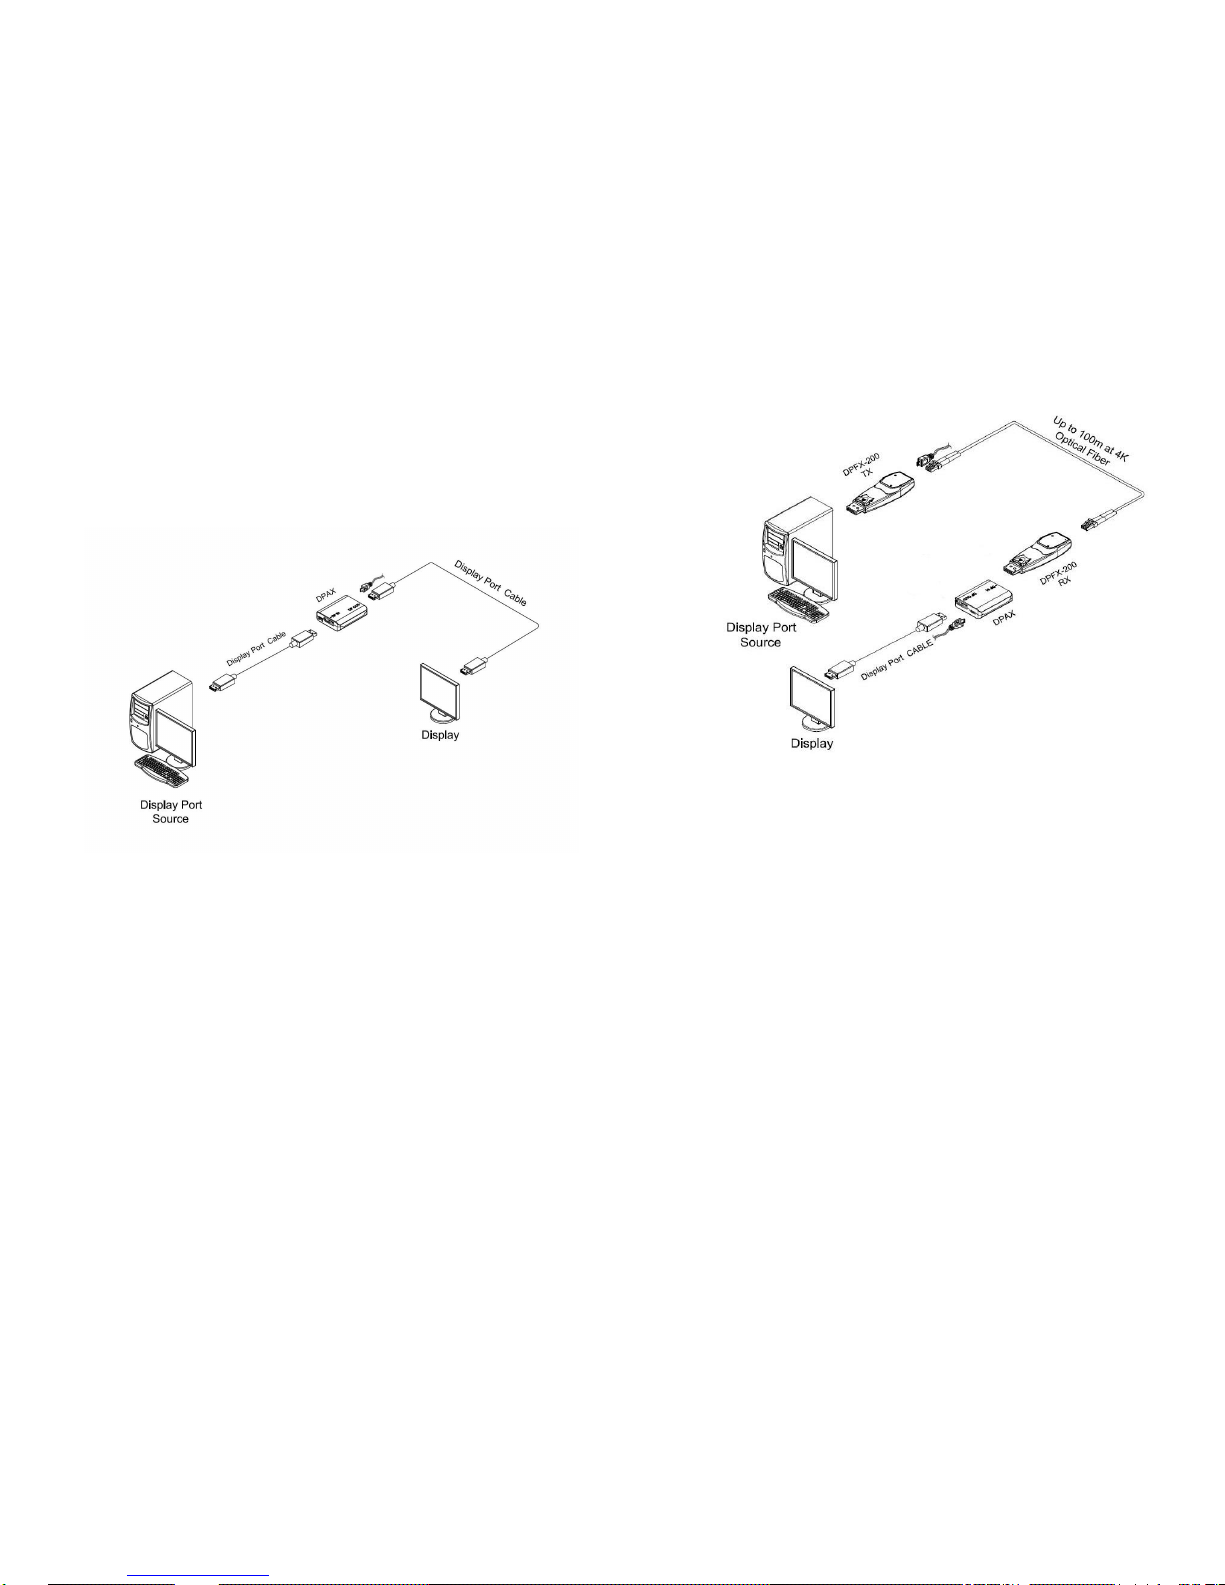
Figure 2 – Connection of DPAX with Copper cable
1-3
Figure 3 – Connection of DPAX with Copper cable
and Optical fiber (RX side)
1-4
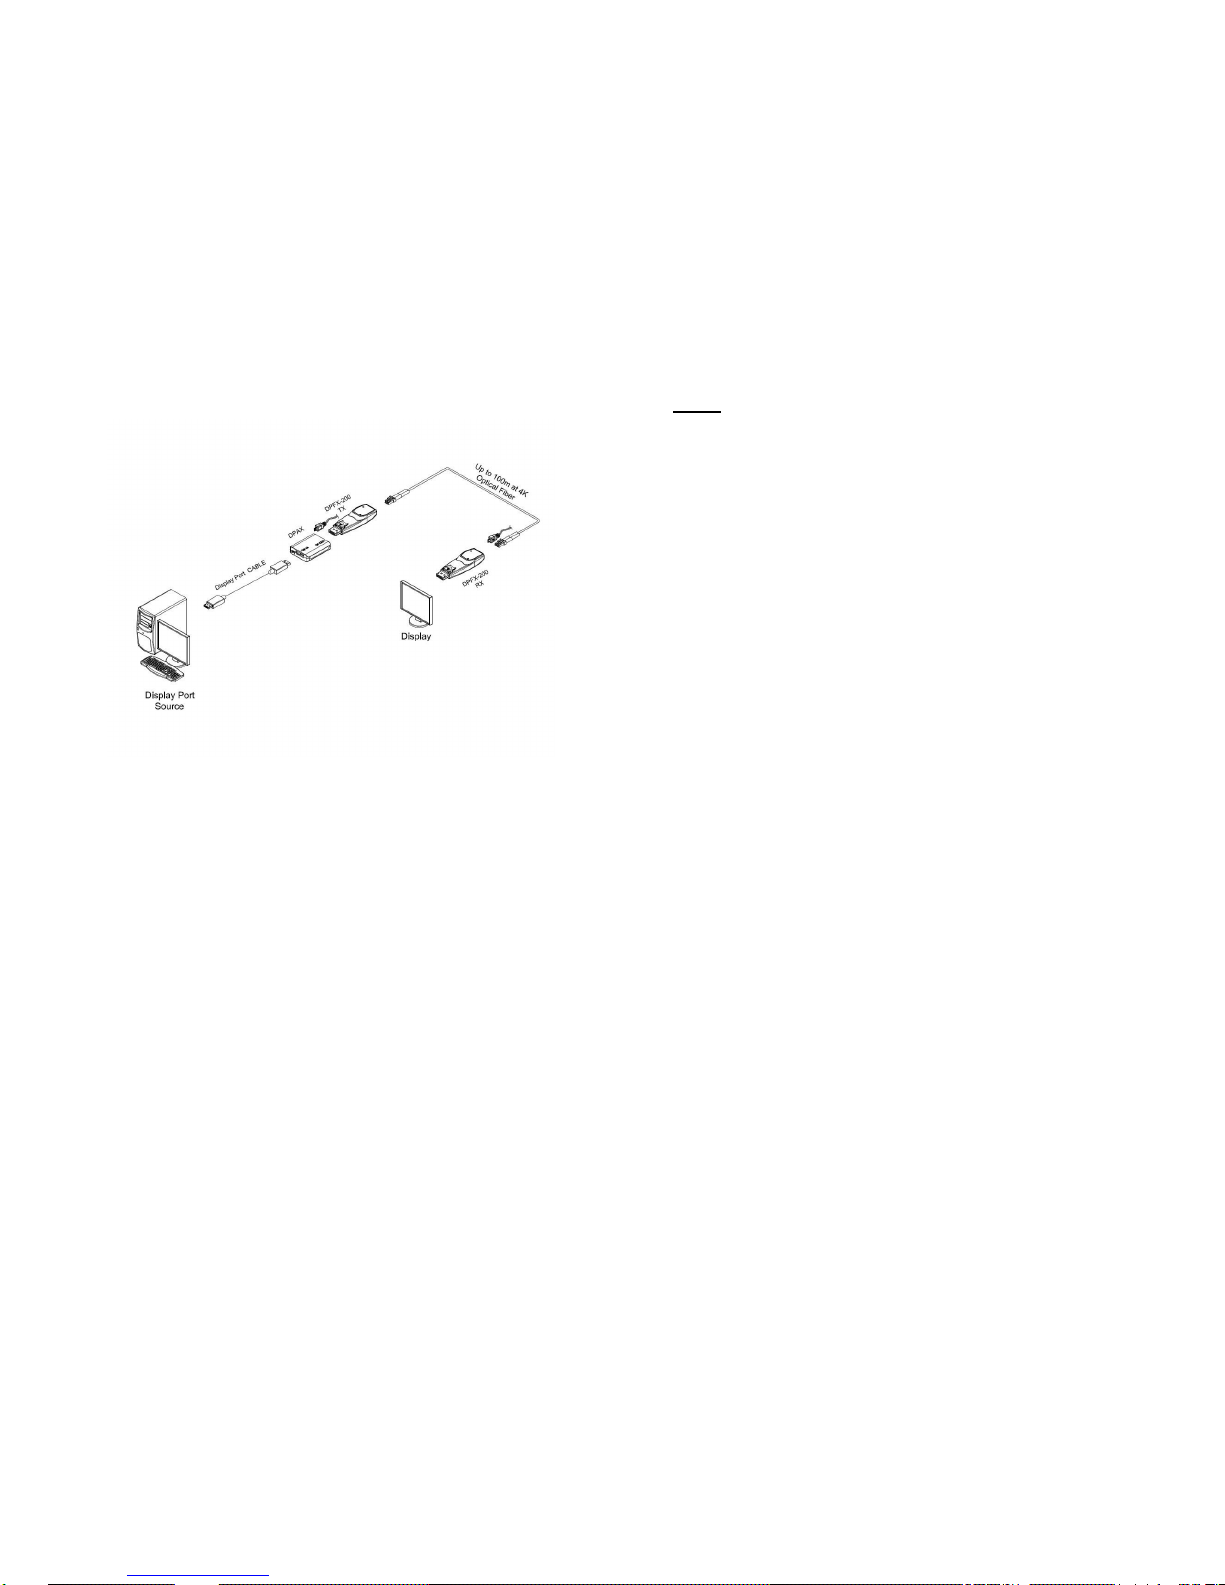
Figure 4 – Connection of DPAX with Copper cable
and Optical fiber (TX side)
1-5
1-0 Manual Contents
User’s Manual for the
DPAX
Doc No. : OE-H160602-00 / Rev1.0
DisplayPort 1.2
Data Recovery Repeater
25-0563
Page 2
Welcome!
Congratulations on your purchase of the DisplayPort 1.2 Data Recovery
Repeater, DPAX. This manual contains information that will assist you in
installing and operating the product.
Product Description
The new DisplayPort 1.2 Data Recovery Repeater, DPAX is an active repeater
for DisplayPort video signal to increase video transmission of a DisplayPort
signal up to combined length of 18m (59ft) over Premium grade DisplayPort
Cable.
3m (10ft) from the Source - 15m (49ft) to the Display at DP1.2
5m (16ft) from the Source - 20m (65ft) to the Display at DP1.1
DPAX complies with DisplayPort 1.2 standards, and supports Ultra High
Definition (up to 3840x2160) at 60Hz with auxiliary channel, MST function.
DPAX has been especially designed to work with Opticis fiber-optic
DisplayPort extenders, DPFX-100, DPFX-200 and M1-5000. So it can extend
transmission of DisplayPort signal even longer.
Figure 1 – Overall Connection of DPAX
1-1 Welcome, Product Description
System Requirements for Setup
□ Hardware requirements
▪ You have to have a DisplayPort source and Display. It should
support the maximum graphic resolution feature of displays to
be connected.
▪ No special requirement of memory size, CPU speed and
chipsets, if you’ve already installed graphic card that supports
DisplayPort system properly on your Display Source.
▪ For proper initial trial of the entire platform with its application,
using a short length copper cable is recommended prior to
install with the product.
□ Software requirements
▪ No special restrictions, if you’ve already properly installed your
DisplayPort system.
□ Connection Advisory
▪ It is highly recommend that both Display Source and Display are
capable of High-resolution transmission. For Optical fiber
transmission, DPAX is specially designed to couple with Opticis
DisplayPort Extender models. Connecting with other Optical
fiber products can result in showing inappropriate display or
having undesired resolution.
Shipping Group of DPAX;
One (1) DPAX
One (1) USB Power Cable
User’s Manual
Optional Products:
DC +5V, 1A power adapter
1-2 System Requirements for Setup, Shipping Group
Page 3
Installation
Important: Please keep the connection procedure below. Improper or no
operation may result if the start-up sequence is not correctly followed.
Connection with Copper cable
Figure 2 – Connection of DPAX with Copper cable
Step 1
Carefully unpack the contents in the shipping group.
Step 2
Connect a DisplayPort cable (maximum 3m) from the DisplayPort Source to
input port of DPAX, DP IN.
Step 3
Connect another DisplayPort cable (maximum 5m) from output port of DPAX,
DP OUT, to the Display.
Step 4
Power up DPAX by using USB power cable or DC power adapter(optional).
Step 5
Power up Display Source and Display and check if it works properly.
1-3 Installation
Connection with Copper cable and Optical Extender (RX side)
Figure 3 – Connection of DPAX with Copper cable and Optical fiber (RX side)
Step 1
Carefully unpack the contents in the shipping group.
Step 2
Connect a general DisplayPort cable from Display to the output port of DPAX,
DP OUT, which coupled with Receiver module of DP Extender. Make sure to
have DPAX switch on the RX side.
Step 3
Connect Optical fiber between Transmitter and the Receiver modules of DP
Extender by reference to its user manual.
Step 4
Power up DPAX by using DC power adapter (optional). Both transmitter and
receiver of DP Extender can be turned on by 3.3V from pin #20 of DisplayPort
interface, however, supplying DC power is recommended for the stable power
supply for DP Extender. Check LED ON at RX side below DPAX switch.
Step 5
Power on Display Source and Display and check if it works properly.
1-4 Installation
Page 4
Connection with Copper cable and Optical Extender (TX side)
Figure 4 – Connection of DPAX with Copper cable and Optical fiber (TX side)
Step 1
Carefully unpack the contents in the shipping group.
Step 2
Connect a customized DisplayPort cable from Display source to input port of DPAX,
DP IN, which coupled with Transmitter module of DP Extender. Make sure to have
DPAX switch on the TX side.
Step 3
Connect Optical fiber between Transmitter and the Receiver modules of DP
Extender by reference to its user manual.
Step 4
Power up DPAX by DC power adapter (optional). Both transmitter and receiver of
DPFX can be turned on by 3.3V from pin #20 of DisplayPort interface, however,
Supplying DC power is recommended for the stable power supply for DPFX. Check
LED ON at TX side below DPAX switch.
Step 5
Power on Display Source and Display and check if it works properly.
1-5 Installation
Note 1. Indicator Information of DPAX
LED below switch is the indicator to classify use of DPFX Extender.
If connected to Display with DPFX RX module, make sure to have switch on
‘RX’ and check LED On at RX side below the switch.
If connected to Display Source with DP TX module, make sure to have switch
on ‘TX’ and check LED ON at TX side below the switch.
Troubleshooting
The display shows only black screen.
- Ensure that all plugs and jacks used by provided power supplies are firmly
connected.
- Ensure that the DP ports are firmly plugged into the Display Source and
Display.
- Check if the DP source and Display are powered on and properly booted.
- Reset the system by de-plugging and re-plugging the DP cable, or by deplugging and re-plugging the USB to DC plug cables that are plugged to
DPAX module or transmitter and receiver module if connected with optical
fiber.
- Re-boot up the system while connecting the module.
Screen is distorted or displays noises.
- Check if the graphic resolution is properly set. Go to the display properties
and tap the settings. Ensure that the resolution sets less than 4K UHD
(3840x2160) at 60Hz (YCbCr 4:4:4) refresh ratio.
- Reset the system.
- Power down, disconnect and reconnect each of DisplayPort cable or DC
power adaptors, and power up.
1-6 Troubleshooting
Page 5

Maintenance
No special maintenance is required for the DPAX module and power supplies.
Ensure that the cables and DPAX module are stored or used in a benign
environment free from liquid or dirt contamination.
There are no user serviceable parts. Refer all service and repair issues to
Opticis or its authorized local distributor.
Technical Support and Service
For commercial or general product support, contact your reseller. For
technical service, contact Opticis by email [email protected] or visit our
website at www.opticis.com
1-7 Maintenance, Technical Support, and Service
Product Specifications
Complies with DisplayPort 1.2 standards
Supports Ultra High Definition (up to 3840x2160) at 60Hz
Offers data recovery function
Transmits DisplayPort 1.2 data up to 18m (59feet) over Premium
grade DisplayPort cable.
3m (10ft) from the Source / 15m (49ft) to the Display at DP1.2
5m (16ft) from the Source / 20m (65ft) to the Display at DP1.1
Offers total data rate 21.6Gbps (5.4Gbps per lane)
Supports auxiliary channel, MST function
Supports much longer extension through daisy-chain connection
Designed so that compatibility could go well especially with Opticis
DisplayPort extenders for optical transmission
Operated by USB power or DC power supplying adaptor
Dimensions (WDH): 39.5 x 50 x 13mm
1-8 Product Specifications
Page 6

Warranty Information
1 (One) Year Warranty
Opticis warrants this optical DP module to be free from defects in
workmanship and materials, under normal use and service, for a period of
one (1) year from the date of purchase from Opticis or its authorized resellers.
If a product does not work as warranted during the applicable warranty period,
Opticis shall, at its option and expense, repair the defective product or part,
deliver to customer an equivalent product or part to replace the defective item,
or refund to customer the purchase price paid for the defective product.
All products that are replaced will become the property of Opticis.
Replacement products may be new or reconditioned.
Any replaced or repaired product or part has a ninety (90) day warranty or the
reminder of the initial warranty period, whichever is longer.
Opticis shall not be responsible for any software, firmware, information, or
memory data of customer contained in, stored on, or integrated with any prod
ucts returned to Opticis for repair under warranty or not.
Warranty Limitation and Exclusion
Opticis shall have no further obligation under the foregoing limited warranty if
the product has been damaged due to abuse, misuse, neglect, accident,
unusual physical or electrical stress, unauthorized modifications, tampering,
alterations, or service other than by Opticis or its authorized agents, causes
other than from ordinary use or failure to properly use the product in the
application for which said product is intended.
Dispose of Old Electrical & Electronic Equipment
(Applicable in the European Union and other European countries with separate systems)
This symbol on the product or on its packaging indicates that this
product shall not be treated as household waste. Instead it shall be
handed over to the applicable collection point for the recycling of
electrical and electronic equipment. By ensuring this product is
disposed of correctly, you will help prevent potential negative
consequences for the environment and human health, which could
otherwise be caused by inappropriate waste handling of this product.
The recycling of materials will help to conserve natural resources. For more detailed
information about recycling of this product, please contact your local city office, your
household waste disposal service or the shop where you purchased the product.
1-9 Warranty Information
© 2016 Opticis Co., Ltd. All Rights Reserved
Revision 1.0 02-Jun-2016
Opticis Locations
OPTICIS HQ
Opticis Co., Ltd.
# 16Fl, Kins Tower,
8 Sungnam-daero, 331 beon-gil,
Bundang-gu ,
Sungnam-si, Gyunggi-do, 13558
Rep. of Korea
Te l: +82 (31) 719-8033
Fax: +82 (31) 719-8032
www.opticis.com
For order support, please contact our Distributor or Reseller.
For technical support, check with the Opticis web site www.opticis.com or
contact [email protected]
 Loading...