

Operating instructions
HH CD & DVD Writer
AD-7173
AD-7170
AD-5173
AD-5170
CB-1100
NR-9500
SlimLine DVD Writer
AD-7543
AD-7540
AD-5540
AD-7633
AD-7630
label burn
3
Instructions
2
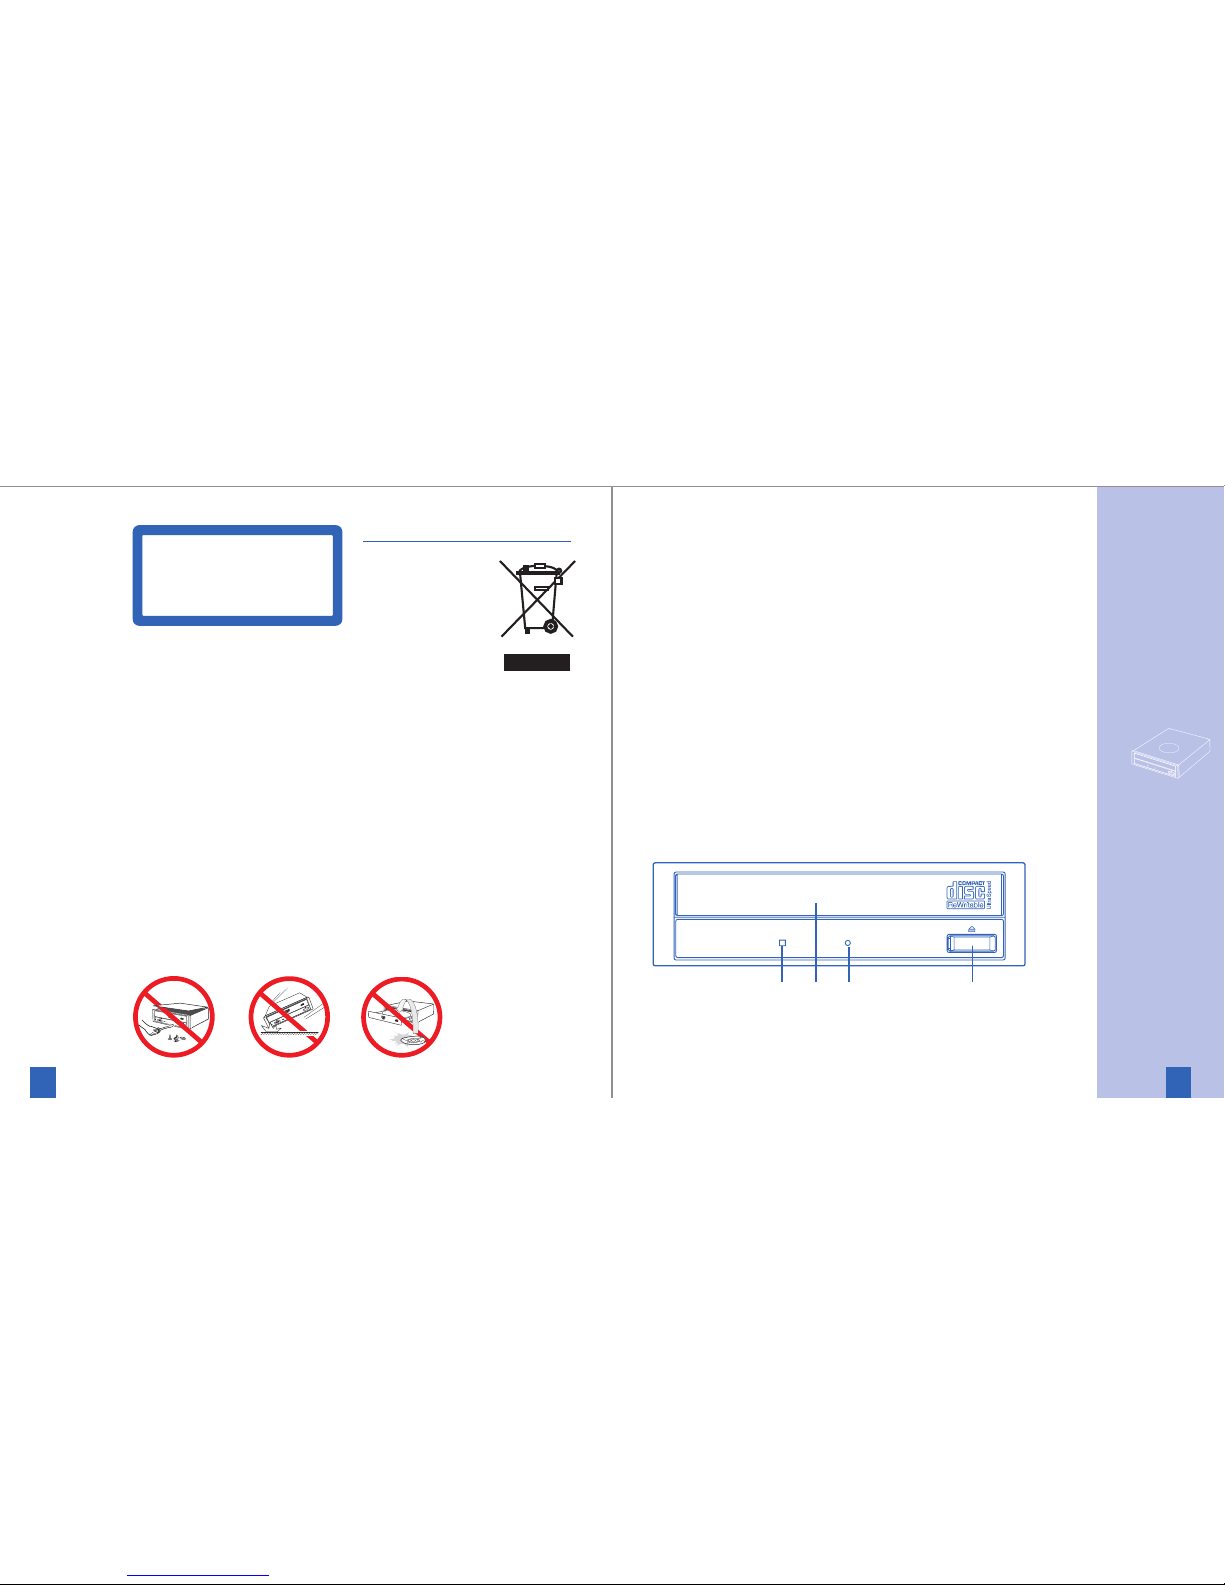
1 Busy Indicator
This indicator lights during
data read and write operation.
2 Tray Panel
This Panel prevents dust from
entering the Optiarc Writer
and opens automatically when
the Load/Eject button is pushed.
3 Emergency Eject Hole
Use to remove the disc from
the Optiarc Writer if the
electrical eject is disabled by
software or if power failure
occurs. (see „Emergency Eject“
for details)
4 Load/ Eject Button
This button is pressed to eject
or retract the disc tray when
the power is on.
Front View
1 2 3 4
Internal ATAPI Drive
Optiarc CD&DVD Writer
Names and Functions
English
CLASS 1 LASER PRODUCT
LASER KLASSE 1
LUOKAN 1 LASERLAITE
KLASS 1 LASERAPPARAT
Laser Safety Information
This drive employs a laser.
Do not remove the cover or attempt
to service this device when connected
due to
the possibility of eye damage.
CAUTION
Adjustment of control or following
procedures other than those specified
herein may result in hazardous
radiation exposure.
Laser Specification:
Semiconductor Laser: 300mW, 783nm;
300mW, 658nm
Disposing of your used NEC product
In the European Union
EU-wide legislation as
implemented in each
Member State requires
that used electrical
and electronic products
carrying the mark
must be disposed
of separately from normal household
waste. This includes Sony NEC Optiarc
DVD drives. When you dispose of such
products, please follow the guidance
of your local authority and/or ask the
shop where you purchased the
product.
The mark on the electrical and
electronic products only applies to
the current European Union Member
States.
Outside the European Union
If you wish to dispose of used
electrical and electronic products
outside the European Union, please
contact your local
authority and ask for
the correct method
of disposal.
5
Instructions
4
one for the hard disk and one for
a Optiarc Writer. If you prefer
to connect the Optiarc Writer to
the same port as your hard disc,
(as a secondary device) you have
to change jumper setting to
SLAVE mode.
Installing the Optiarc Writer
in a host PC
1. Turn off the computer, other
peripherals and unplug all the
cords and cables. Then remove
the computer cover, face plate,
mounting clips, and keeper
bracket. Refer to the Guide to
operations that came with your
computer for help with this step.
2. If necessary, slide other devices
above the installation outapproximately 50 ~70 mm (2 ~ 3 in.),
but do not disconnect the cables.
3. Slide the Optiarc Writer into
the computer until it is out
approximately 50 ~ 70 mm
(2 ~ 3 in.).
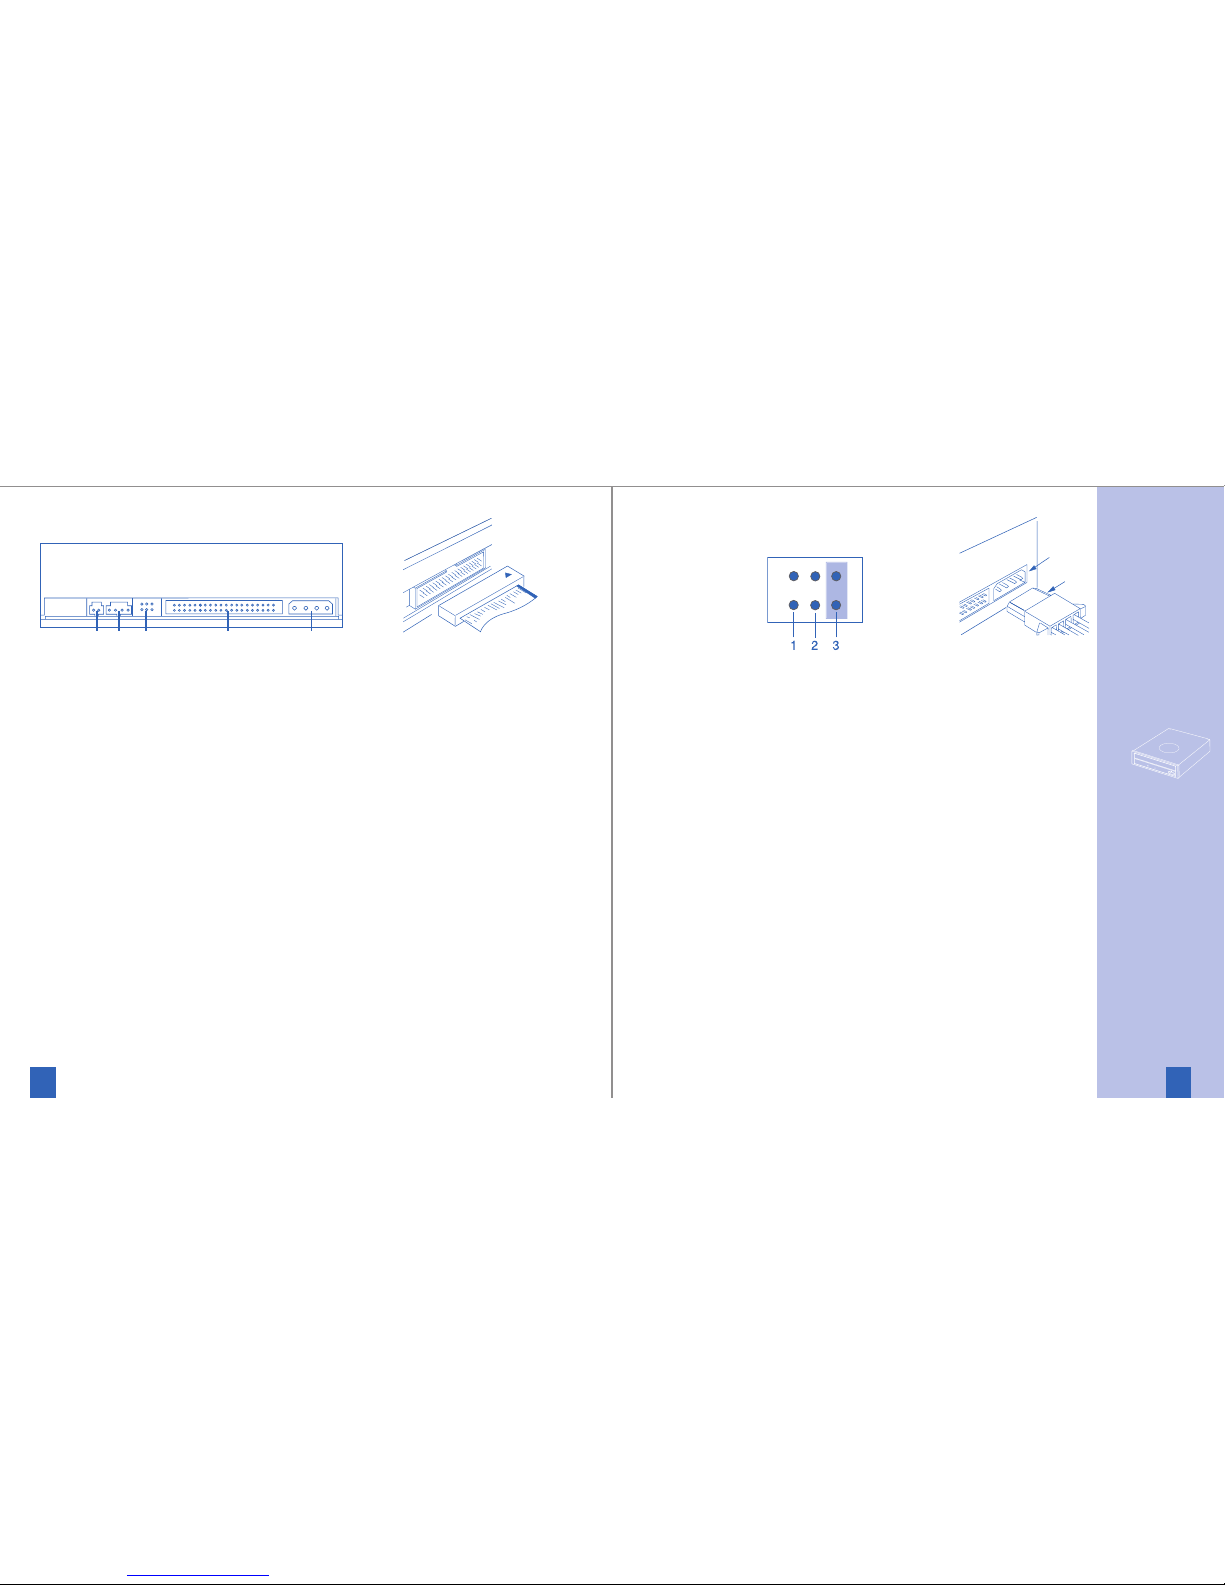
4. Locate a spare power cable in
your computer.
5. Connect that power cable to
the power connector on the
back of the Optiarc Writer.
6. Connect the I/O BUS connector
on the Optiarc Writer and the
IDE controller. Connect the
coloured stripe side of the
cable on the side marked with
the arrow (∇).
7. Slide the Optiarc Writer into
the computer and fix it in the
computer cabinet with 4 screws.
To avoid damage to the Optiarc
Writer take care, that the screws
do not reach more than 5 mm
into the Optiarc Writers cabinet.
Jumper Block
1 = CSEL
2 = SLAVE
3 = MASTER
5 DIGITAL OUT Connector
This connector is used to connect Digital Audio to an audio
board.
6 LINE OUT Connector
This connector is used to connect CD
-
Audio to an audio board.
7 JUMPER BLOCK
These blocks of jumper set the
configuration for the Optiarc
Writer (ref. chapter
‘Installation’-’Jumper Setting’
for details).
8 Power Connector
Use this to provide operating
power from the host computer.
9 I/O BUS Connector
This BUS connector is used to
control the Optiarc Writer and
data transmission. Use a flat
ribbon cable to connect your
computer to the Optiarc
Writer. Connect the coloured
side of the ribbon cable to the
side marked with the arrow.
Installation
Jumper Setting
A jumper consists out of a pair of
pins and a connector, which fits
over the pins. When the connector
is in place it establishes an electronic link between the pins, which
enables the function being controlled by the jumper. If the connector is removed, the electronic
link is disconnected and the
function is disabled. Jumpers are
used to set the Optiarc Writer
mode on the IDE interface. The
factory default setting is MASTER
for fitting to enhanced IDE controllers supporting two ports,
Rear View
5 7 9 86
7
Instructions
6
Instructions
Driver Installation
The software installation starts
with activating the reading function of the drive (CD-ROM).
If you are using the Optiarc Writer
with Windows 95/98/ME/NT/
200x/XP/Vista or IBM OS/2 Warp,
all necessary drivers will be
loaded automatically by the
operating system.
Drivers mentioned above are part
of the Operating Systems and not
available from NEC.
To use the IDE/ATAPI Optiarc
Writer
with MS-DOS and MS-
Windows
3.x,
you have to install
the attached driver software
before you can use the Optiarc
Writer for the first time.
Refer to the README.TXT file on
the driver disk for information
about installing this driver.
This drive* supports RPC according
to SFF8090v4 (RPC-2). The final
setting/definition of the video
region code is determined by the
fifth DVD video region code change.
For Windows 3.xx don’t use the
32 bit hard disk access, because
this mode is not supported for
DVD drives.
If the reading function is available the next is to achieve the
writing function provided by the
writing software. Please insert
Your writing software CD-ROM
into the Optiarc Writer and use
the information provided with
the software (if the installation
does not starting automatically
you have to activate the
installation software manually).
To disable or enable drive’s buffer
under run prevention technology
you need a writer S/W supporting
this function.
Support
For local support like hotline,
service or drivers see the file
„README.TXT“ on the software
CD-ROM or NEC´s Internet site
at http://www.neceurope.com
*) not for NR-9500
8. Replace the mounting clips,
keeper bracket, and computer
cover. Refer to the Guide to
Operations that came with the
computer for help with this step.
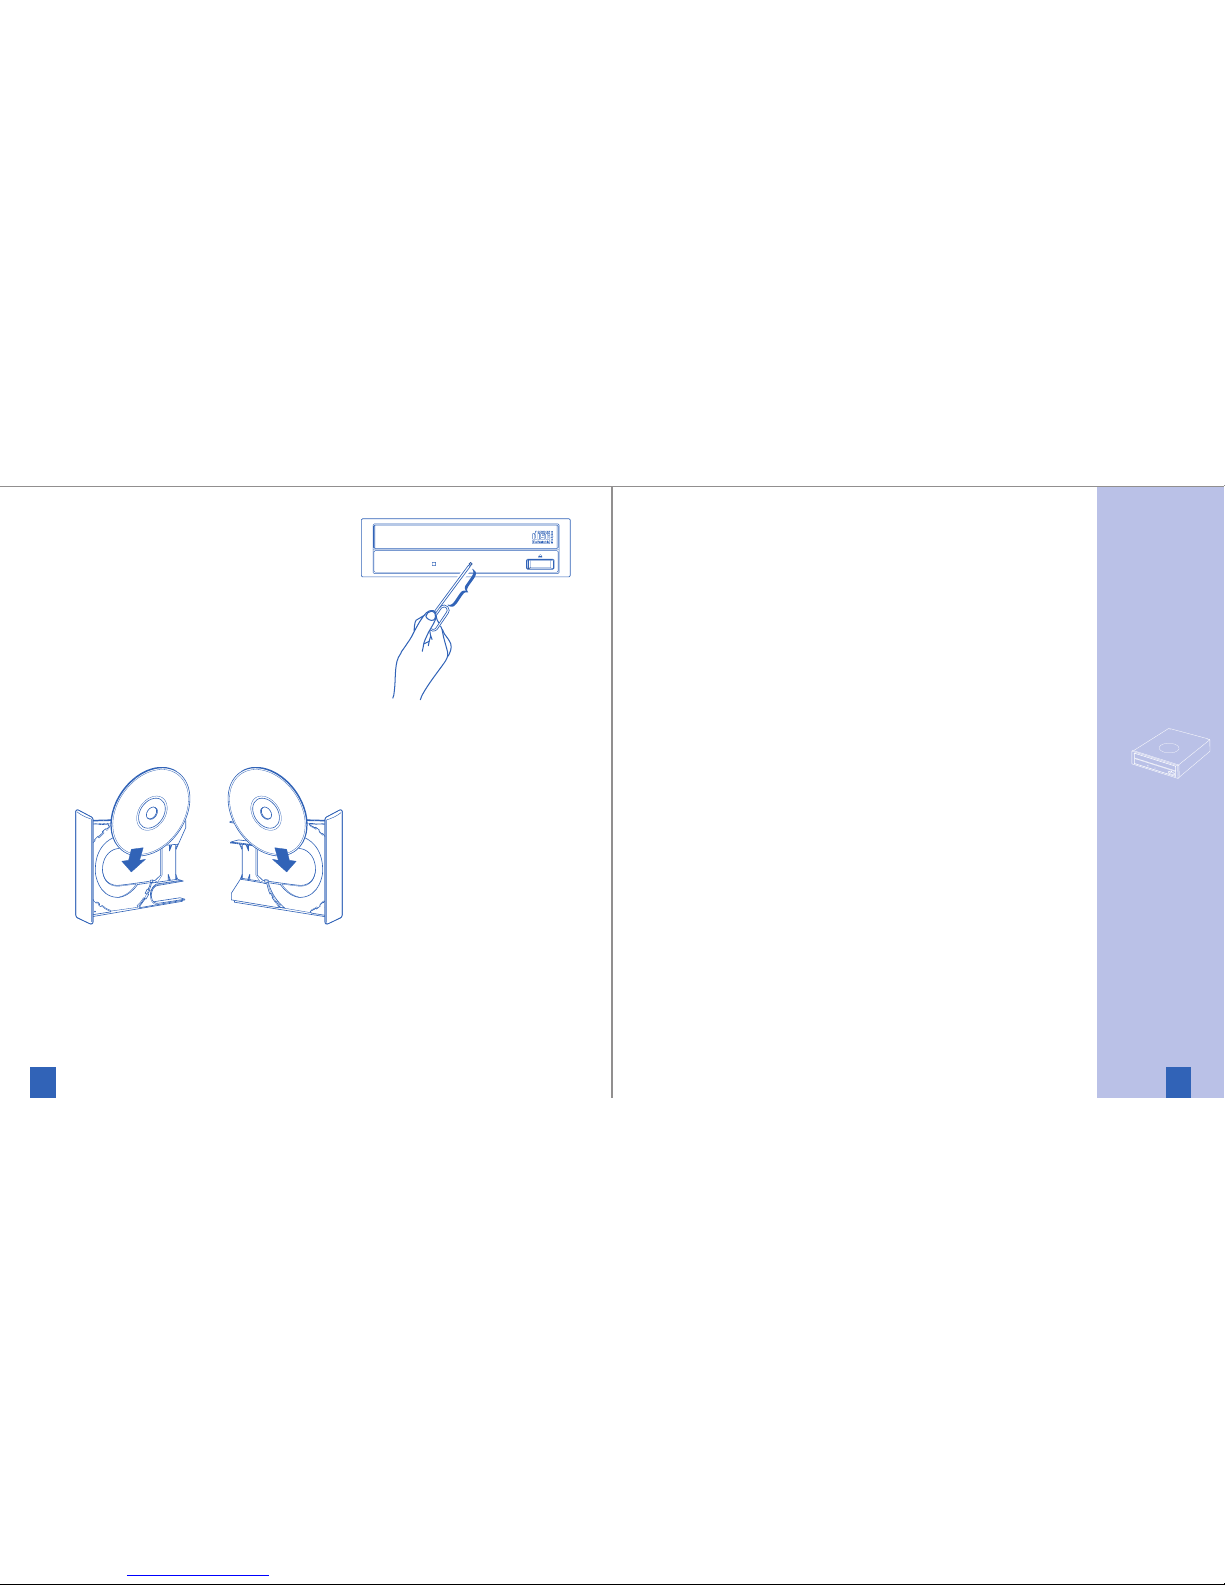
Vertical use
The Optiarc Writer can be used in
the vertical position. When using
the Optiarc Writer, in the vertical
position, load and unload discs as
shown on the diagram below.
Only 12 cm discs can be used
when the Optiarc Writer is installed
vertically. Do not place 8cm discs
in the tray when using the Optiarc
Writer installed in this way.
Emergency Eject
The procedure described below
can be used to open the tray of
the Optiarc Writer if the EJECT
button is disabled by software or a
power failure occurs.
1. Turn off the power to the
Optiarc Writer.
2. If a disc inside still spinning
wait until spin stoped certainly.
3. Insert a steel rod (about 1.3 mm
in diameter) into the emergency
eject hole and push firmly until
the cartridge is ejected. A stiff
paper clip may be used as steel
rod.
65 mm
(min. 45 mm)
Instructions

Audio
Sampling Frequency 44.1 kHz
Quantifying Bit Number 16-bit linear
Number of Channels 2
Frequency Response 20 Hz-20 kHz
+3 dB, -3 dB
Dynamic Range 75 dB
S/N Ratio >75 dB
Total Harmonic Distortion
0.15%
Wow & Flutter below measurable limits
Line out: 0.725 Volt
General
Power Consumption 26 VA
(5V 1.6A, 12V 1.6A)
Dimensions (WxHxD) 148 x 42 x 184 mm
(AD-517x:/-717x: 148 x 42 x 175 mm)
Weight 0.77 kg
(AD-517x:/-717x: 0.705 kg)
Noise ≤ 54 dB(A)
Storage temperature -25° to +60° C
Storage humidity 10 % to 90 % RH,
noncondensing
Operating temp. +5° to +45° C
Operating humidity 20 % to 70 % RH,
noncondensing
Above specifications are subject to change.
Photo CD is a trademark of Kodak
used under license.
*) AD-717x series support DVD-RAM up to 12x
**) AD-717x series available as well with SATA
interface (serial ATA
)
cnicos • Dati tecnici • Specifications • Technische Date
Data-Section
Transfer Rate NR-9500B CB-1100B AD-517x, AD-717x*
(x=3: Labelflash™)
read DVD-ROM ./. 7200 -21600 KByte/sec (5-16x) 9075 -22000 KByte/sec (6.6-16x)
DVD +/-R ./. 4500 -10800 KByte/sec (3.3-8x) 9075 -22000 KByte/sec (6.6-16x)
DVD +/-RW ./. 4500 -10800 KByte/sec (3.3-8x) 7300 -17500 KByte/sec (5-13x)
CD-ROM 3105 - 7800 KByte/sec (21-52x) 3105 - 7800 KByte/sec (21-52x) 3000 - 7200 KByte/sec (20-48x)
CD-R/RW 2400- 4800 KByes/sec (16-32x) 2805- 6000 KByes/sec (19-40x) 2550 - 6000 KByes/sec (17-40x)
CD-DA 3450 - 7200 KByes/sec (23-48x) 3450- 7200 KByes/sec (23-48x) 2550 - 6000 KByes/sec (17-40x)
write DVD-R ./. ./. 10300-24700KByte/sec (7.5-18x)
supported speeds 18x/16x/13x/12x/8x/6x/4x/2x
DVD-R DL ./. ./. 5500 -11000 kByte/sec (4-8x)
supported speeds 8x/4x/2x
DVD-RW ./. ./. 5500 - 8200 kByte/sec (4-6x)
supported speeds 6x/4x/2x/1x
DVD +R ./. ./. 10300-24700KByte/sec (7.5-18x)
supported speeds 18x/16x/13x/12x/8x/6x/4x/2.4x
DVD +R9 ./. ./. 5500 -11000 kByte/sec (4-8x)
supported speeds 8x/4x/2.4x
DVD +RW ./. ./. 5500 -11000 kByte/sec (4-8x)
supported speeds 8x/4x/2.4x
CD-R 3500 - 7800 KByte/sec (23-52x) 3500 - 7800 KByte/sec (23-52x) 3000 - 7200 KByte/sec (20-48x)
supported speeds 52x/48x/40x/32x/24x/16x/8x/4x 52x/48x/40x/32x/24x/16x/8x 48x/40x/32x/24x/16x/8x
CD-RW 3500 - 4800 KByte/sec (23-32x) 3200- 4800 KByte/sec (21-32x) 3000 - 4800 KByte/sec (20-32x)
supported speeds 32x/24x/16x/10x/4x 32x/24x/16x/10x/4x 32x/24x/16x/10x/4x
Write methods
DAO (disc at once), SAO (session at once), TAO (track at once) with zero gap, variable or fixed packet, multisession
Access Time
DVD-ROM
(1/
3
stroke read, average)
./. 150 msec 160 msec
CD-ROM (
1
/3 stroke read, average) 110 msec 130 msec 140 msec
Memory Buffer 2 MByte 2 MByte 2 MByte
Interface/max. Transfer Rate
IDE/ ATAPI SFF-8020 rev. 2.60, PIO Mode 4/ Ultra DMA33 mode 2 support
PIO Mode 4 / Ultra DMA66 mode 4**
Compatibility CD
High Sierra and ISO 9660, CD-ROM, CD-ROM XA, CD-DA, CD-TEXT, CD-I (FMV), Enhanced Music CD (CD+), PhotoCD, VideoCD
Compatibility DVD ./. DVD-ROM, DVD-Video, DVD-R, DVD +R, DVD-R DL,DVD +R9, DVD, DVD +RW, DVD-RW
In compliance with
MPC-3, MultiRead, PC-99, PC-2001 MPC-3, MultiRead, PC-99, PC-2001 MPC-3, MultiRead, PC-99, PC-2001

3
Instructions
2
1 Front Panel
This panel prevents dust from
entering the DVD Writer and
opens automatically only a
little when the Eject button is
pushed.
2 Busy Indicator
This indicator lights during
data read and write operation.
3 Eject Button
This button is pressed to open
the disc tray/eject the disc
when the power is on.
4 Emergency Eject Hole*
Use to remove the disc from
the DVD Writer if the
electrical eject is disabled by
software or if power failure
occurs. (see „Emergency Eject“
for details)
Front View AD-554x, AD-754x
Internal ATAPI Drive
Optiarc Slimline Writer
Names and Functions
1
2
3 4
English
CLASS 1 LASER PRODUCT
LASER KLASSE 1
LUOKAN 1 LASERLAITE
KLASS 1 LASERAPPARAT
Laser Safety Information
This drive employs a laser.
Do not remove the cover or attempt
to service this device when
connected due to
the possibility of eye damage.
CAUTION
Adjustment of control or following
procedures other than those specified
herein may result in hazardous
radiation exposure.
Laser Specification:
Semiconductor Laser: 330mW, 785nm;
280mW, 661nm
Disposing of your
used NEC product
In the European Union
EU-wide legislation as
implemented in each
Member State requires
that used electrical
and electronic products
carrying the mark must be disposed
of separately from normal household
waste. This includes Sony NEC Optiarc
DVD drives. When you dispose of such
products, please follow the guidance
of your local authority and/or ask the
shop where you purchased the
product.
The mark on the electrical and
electronic products only applies to
the current European Union Member
States.
Outside the European Union
If you wish to dispose of used
electrical and electronic products
outside the European Union, please
contact your local
authority and ask for
the correct method
of disposal.
Front View AD-763x (slot-in)
23

5
Instructions
4
3. Connect the intended plug
with the socket on the back
of the Slimline DVD Writer.
4. Slide the Slimline DVD Writer
into the computer and fix it
in the computer cabinet with
4 screws.
To avoid damage to the DVD
Writer take care, that the screws
do not reach more than 1.5 mm
into the Optiarc Writers cabinet.
5. Fasten possibly before removed
drives again in the computer
and close the housing cover.
Refer to the Guide to Operations that came with the
computer for help with this step.
Drive usage
Inserting a Disc
1. Press the Eject button. The disc
tray will be ejected by about
10mm.
2. Pull the disc tray all the way
open by hand.
3. Set the disc into the shaft in
the centre of the tray with
the label side facing up.
4. Press the disc tray into the
DVD Writer calmly by hand.
Removing a Disc
1. Press the Eject button. The disc
tray will be ejected by about
10mm.
2. Pull the disc tray all the way
open by hand.
3. Lift the edge of the disc
strongly, pressing the shaft in
the centre of the tray.
4. Press the disc tray into the
DVD Writer drive calmly
by hand.
Note: If an eject prohibit
command has been received
from the computer, the disc
tray will not be ejected even if
the Eject button is pressed.
5 Connector
This Connector includes Power
I/O BUS and Audio Line Out.
Installation
Configuration
The drive configures itself
independently over the connector.
Note: Not all computer hardware
supports the intended automatic
configuration. Usually this
causes that after the drive
assembled the computer any
longer booting. In such case
the drives firmware bust my
changed by qualified
personnel.
Installing in a host computer
With the installation of Slimline
drives you have to consider that
dimensions and connections for
this was developed for the usage
in portable computer and are
standardized. If the Slimline drive
is not target for a standard
Slimline system, additional
adapters must be procured from
an appropriate expert trader.
1. Turn off the computer, other
peripherals and unplug all the
cords and cables. Then remove
the computer cover, face plate,
mounting clips, and keeper
bracket. Refer to the Guide to
operations that came with your
computer for help with this step.
2. Slide the Slimline DVD Writer
into the computer in such way
that you are able to connect
the intended plug.
Rear View
5

7
Instructions
6
For Windows 3.xx don’t use the
32 bit hard disk access, because
this mode is not supported for
DVD drives.
If the reading function is available the next is to achieve the
writing function provided by the
writing software. Please insert
Your writing software CD-ROM
into the DVD Writer and use
the information provided with
the software (if the installation
does not starting automatically
you have to activate the
installation software manually).
Support
For local support like hotline,
service or drivers see the file
„README.TXT“ on the software
CD-ROM or NEC´s Internet site
at http://www.neceurope.com
*) the slot-in drives AD-7630
and AD-7633 do not have
a emergency eject hole
Emergency Eject*
The procedure described below
can be used to open the tray of
the Optiarc Writer if the EJECT
button is disabled by software or a
power failure occurs.
1. Turn off the power to the
Slimline DVD Writer.
2. If a disc inside still spinning
wait until spin stoped certainly.
3. Insert a steel rod (about 0.8 mm
in diameter) into the emergency
eject hole and push firmly until
the cartridge is ejected. A stiff
paper clip may be used as steel
rod.
Driver Installation
The software installation starts
with activating the reading function of the drive (CD-ROM).
If you are using the Slimline DVD
Writer with Windows 95/98/ME/
NT/2000/XP or IBM OS/2 Warp,
all necessary drivers will be
loaded automatically by the
operating system.
Drivers mentioned above are part
of the Operating Systems and not
available from NEC.
To use the IDE/ATAPI Slimline
DVD Writer with MS-DOS and
MS-Windows 3.x, you have to
install the attached driver software
before you can use the Optiarc
Writer for the first time.
Refer to the README.TXT file on
the driver disk for information
about installing this driver.
This drive supports RPC according
to SFF8090v4 (RPC-2). The final
setting/definition of the video
region code is determined by the
fifth DVD video region code change.
20 mm
Optiarc AD-5540A
Optiarc AD-7540A
Optiarc AD-7543A
Optiarc AD-7630A
Optiarc AD-7633A

Audio
Sampling Frequency 44.1 kHz
Quantifying Bit Number 16-bit linear
Number of Channels 2
Frequency Response 20 Hz-20 kHz
+3 dB, -3 dB
Dynamic Range 80 dB
S/N Ratio >80 dB
Total Harmonic Distortion
0.10%
Wow & Flutter below measurable limits
Line out: 0.75 Volt
General
Power Consumption (max.)
8 VA
(5V 1.6A)
Dimensions (WxHxD) 128 x 12.7 x 129 mm
Weight 0.18 kg
(AD-7630, AD-7633: 0.16 kg)
Noise ≤ 47.5 dB(A)
Storage temperature -40° to +65° C
Storage humidity 5% to 95 % RH,
noncondensing
Operating temp. +5° to +50° C
Operating humidity 20% to 80 % RH,
noncondensing
Laser Specification 330mW,
785nm (CD)
280mW, 661nm (DVD)
Above specifications are subject to change.
Photo CD is a trademark of Kodak
used under license.
cnicos • Dati tecnici • Specifications • Technische Date
Data-Section
Transfer Rate AD-5540 AD-7540, AD-7543 AD-7630, AD-7633
read DVD-ROM 4500 - 11000 KByte/sec (3.3-8x) 4500 -11000 KByte/sec (3.3-8x) 4500 - 11000 KByte/sec(3.3-8x)
DVD +/-R 4500 -11000 KByte/sec (3.3-8x) 4500 - 11000 KByte/sec (3.3-8x) 4500 - 11000 KByte/sec(3.3-8x)
DVD +/-RW 4500 - 11000 KByte/sec (3.3-8x) 4500 -11000 KByte/sec (3.3-8x) 4500 - 11000 KByte/sec(3.3-8x)
DVD-RAM ./. 4100 - 6900 KByte/sec (3-5x) 4100 - 6900 KByte/sec (3-5x)
CD-ROM, CD-R 1500 - 3600 KByte/sec (10-24x) 1500 - 3600 KByte/sec (10-24x) 1500 - 3600 KByte/sec(10-24x)
CD-RW, CD-DA 1200 - 3600 KByes/sec (10-24x) 1500 - 3600 KByte/sec (10-24x) 1500 - 3600 KByte/sec(10-24x)
CD-ROM XA 1050 - 2400 KByes/sec (7-16x) 1050 - 2400 KByes/sec (7-16x) 1050 - 2400 KByes/sec (7-16x
write DVD-R 4500 - 11000 KByte/sec (3.3-8x) 4500 - 11000 KByte/sec (3.3-8x) 4500 -11000 KByte/sec(3.3-8x)
supported speeds 8x/6x/4x/2x 8x/6x/4x/2x 8x/6x/4x/2x
DVD-R DL 2700 - 5500 KByte/sec (2-4x) 2700 - 5500 KByte/sec (2-4x) 2700 - 5500 KByte/sec (2-4x)
supported speeds 4x/2x 4x/2x 4x/2x
DVD-RW 2700 - 8200 KByte/sec (2-6x) 2700 - 8200 KByte/sec (2-6x) 2700 - 8200 KByte/sec (2-6x)
supported speeds 6x/4x/2x/1x 6x/4x/2x/1x 6x/4x/2x/1x
DVD-RAM ./. 4100 - 6900 KByte/sec (3-5x) 4100 - 6900 KByte/sec (3-5x)
supported speeds ./. 5x/3x/2x 5x/3x/2x
DVD +R 4500 -11000KByte/sec (3.3-8x) 4500 -11000 KByte/sec (3.3-8x) 4500 -11000 KByte/sec(3.3-8x)
supported speeds 8x/6x/4x/2.4x 8x/6x/4x/2.4x 8x/6x/4x/2.4x
DVD +R9 3300 - 5500 kByte/sec (2.4-4x) 3300 - 5500 KByte/sec (2.4-4x) 3300 - 5500 KByte/sec(2.4-4x)
supported speeds 4x/2.4x 4x/2.4x 4x/2.4x
DVD +RW 4500 -11000 KByte/sec (3.3-8x) 4500 -11000 KByte/sec (3.3-8x) 4500 - 11000 KByte/sec(3.3-8x)
supported speeds 8x/6x/4x/2.4x 8x/6x/4x/2.4x 8x/6x/4x/2.4x
CD-R 1500 - 3600 KByte/sec (10-24x) 1500 - 3600 KByte/sec (10-24x) 1500 - 3600 KByte/sec(10-24x)
supported speeds 24x/16x/8x 24x/16x/8x 24x/16x/8x
CD-RW 1200 - 3600 KByte/sec (8-24x) 1200 - 3600 KByte/sec (8-24x) 1200 - 2400 KByte/sec (8-16x)
supported speeds 24x/20x/10x/4x 24x/20x/10x/4x 16x/10x/4x
Write methods
DAO (disc at once), SAO (session at once), TAO (track at once) with zero gap,
variable or fixed packet, multisession
Access Time
DVD-ROM
(1/
3
stroke read, average)
180 msec 180 msec 190 msec
CD-ROM (
1
/3 stroke read, average) 150 msec 150 msec 190 msec
Memory Buffer 2 MByte 2 MByte 2 MByte
Interface/max. Transfer Rate
IDE/ ATAPI SFF-8020 rev. 2.60, PIO Mode 4 / Ultra DMA33 mode 2 support
Compatibility DVD-ROM, DVD-Video, DVD+R, DVD-R, DVD+RW, DVD-RW (Read only), High Sierra and ISO 9660, CD-ROM, CD-ROM XA,
CD-DA, CD-TEXT, CD-I (FMV), Enhanced Music CD (CD+), PhotoCD (SingleSession/MultiSession), VideoCD (WhiteBook)
In compliance with
MPC-3, MultiRead, PC-99, PC-2001 MPC-3, MultiRead, PC-99, PC-2001 MPC-3, MultiRead, PC-99, PC-2001

11
Instructions
10
This devices need to be installed
into IBM compatible computers
with min. 800 MHz CPU,
128Mbyte RAM and 600Mbyte
free space on the non removable
disk (or as external solution
connected via USB2 or IEEE1394
to such kind of PC).
Software
To proceed with Labelflash™ you
need the Software NeroExpress
version 6.6.1.3d (or a more recent
version), which is part of this bundle.
Regarding the system requirements
please refer to the NeroExpress
manual chapter 2.1.
Disc
For marking the label side special
Labelflash™ DVD-R/+R media is
required.
The data side can be inscribed on
any DVD-R and/or DVD +R media
– subject to following conditions:
1. only the outer area of a DVD
will be used for labelling –
otherwise it will not be possible
to burn in addition data to
this media.
2. the data area and the label area
do not overlap – otherwise the
affected data will no longer be
readable.
3. the larger the disc area
inscribed the less space there
will be available for data.
4. the readability of the inscription
depends on the production
process of the media (though
the contrast will not be as
great as that of the incription
on the label side Labelflash™
media).
Overview
With the new Labelflash™ DVD
Writer from Optiarc DVD-R and
DVD +R media can be labelled
inside the drive (no marker or
printer are necessary).
The labelling can be done post or
before burning. For the inscription
of the DVD label side special
Labelflash™ necessary. In addition
the unused area of the data side
of the media can be utilised for
inscription.
Caution!
If you inscribe the data side you
have to take care that the data
area and the label do
not overlap
- otherwise the data on the
media no longer be read.
Because the labelling surface is
covered by 0.6mm thick
transparent plastic the inscription
is very durable, robust against
mechanical damages and
extremely light stable.
The time it takes to burn a label
is governed by the user, and can
be completed in as little as
5 minutes. Should a higher
contrast by required the inscription
will take longer.
The inscription area can be
decided by user freely between
the inner radius of 25mm and the
outer radius of 58mm – but the
minimum area width is 5mm (on
the data side the most meaningful
way is to inscribe just the outer area).
System requirements
Hardware
In order to take advantage
of the Labelflash™ inscription
function requires one the
following DVD Writers:
HH: AD-7173, AD-5173,
ND-4571, ND-4551, ND-3551
Slimline:AD-7543, AD-7633, ND-7551

13
Instructions
12
Please consider when you
inscribe the data side:
As data burning starts at the
innermost area of the disc it is
recommended that you finish
data burning prior to inscription.
If there is then sufficient space
available for an inscription (outer
area) you can perform the marking.
Please find below a diagram
showing the relation on burned
data and outer radius of the data
area (single session):
Please keep in mind that the min.
width for an inscription is 5mm!
After the labelling is
completed
the tray of the drive opens
automatically and the inscribed
media can be removed.
By selecting „Cancel“ you will
go back to the NeroExpress start
menu.
Technical Data
Inner radius:
min. 25mm - max. 53mm
Outer radius:
min. 28mm - max. 58mm
Width of the label area:
min. 5mm - max. 33mm
Disc rotation speed:
7875rpm, 4500rpm, 2250rpm
(depends on the selected media)
Resolution/gradation:
1000dpi/256
Above specifications
are subject to change.
Labelflash™ is a trademark of
Yamaha used under license.
How to create a Label with Nero
To create a Labelflash™ inscription
you have to first start NeroExpress.
Then please click the left side
of the Window the button:
To start the Labelflash™ design
and burn application you have to
continue by selecting
.
The usage of this application is
the same as the „Nero CoverDesigner“
– please study its instructions if
you need more details.
Once the Labelflash™ media
(„PRINTING SIDE“ down), or a data
side of a DVD +/-R (data side down),
has been placed in the drive the
application will show the corresponding disc type – after which the
„burn“ button can be selected.

 Loading...