

Page 1

Master module
OA-EDGE T
5916332 FEB 2013
NM-0001-5
Model
Profile color
Mounting height
Detection area
Detection method
Depth angle
adjustment
Power supply *
Power consumption
LED indicator
Test input
Safety / Test output 1
Safety / Test output 2
: OA-EDGE T
: Silver / Black
: 1.5 (4'11") to 3.0m (9'10")
: See DETECTION AREA
: Triangulation
: 0° to +25°
: 12 to 24VAC ±10% (50 / 60 Hz)
12 to 30VDC ±10%
: < 1.3W (< 2VA at AC) at Min. configuration
< 3.5W (< 4.5VA at AC) at Max. configuration
: See chart below
: Opto coupler 10 to 30VDC
Current / 6mA Max.
Output hold time
Response time
Operating temperature
Operating humidity
IP rate
Performance level
: Approx. 0.5 sec.
: <75msec.
: -20 to +55°C (-4 to 131°F)
: <80%
: IP54
: d (EN ISO13849-1 : 2008)
The specifications herein are subject to change without prior notice due to improvements.
NOTE
WARNING
CAUTION
NOTE
Disregard of warning may cause improper operation causing death or serious injury of
a person.
Special attention is required to the section of this symbol.
Setting to meet the requirements by EN16005.
Disregard of caution may cause improper operation causing injury of a person or damage to
objects.
NOTE
LED indicator
The following conditions are not suitable for sensor installation :
- Fog or exhaust emission around the door.
- Wet floor.
- Moving objects or objects that emit light near the detection area.
- Highly reflecting floor or highly reflecting objects around the door.
NOTE
Solid Green
Slow Green blinking
Twice Green blinking
Blinking Red
Status
Stand-by
Opening side detection (output 1)
Closing side detection (output 2)
Incomplete Initialization
Learning
Incomplete learning
Saturation
Sensor failure
Sensor module
indicator
Communication error
Solid Red
Solid Orange
Red & Green blinking
Yellow & Red blinking
Slow Red blinking
Fast Red blinking
Twice Orange blinking
Blinking Yellow
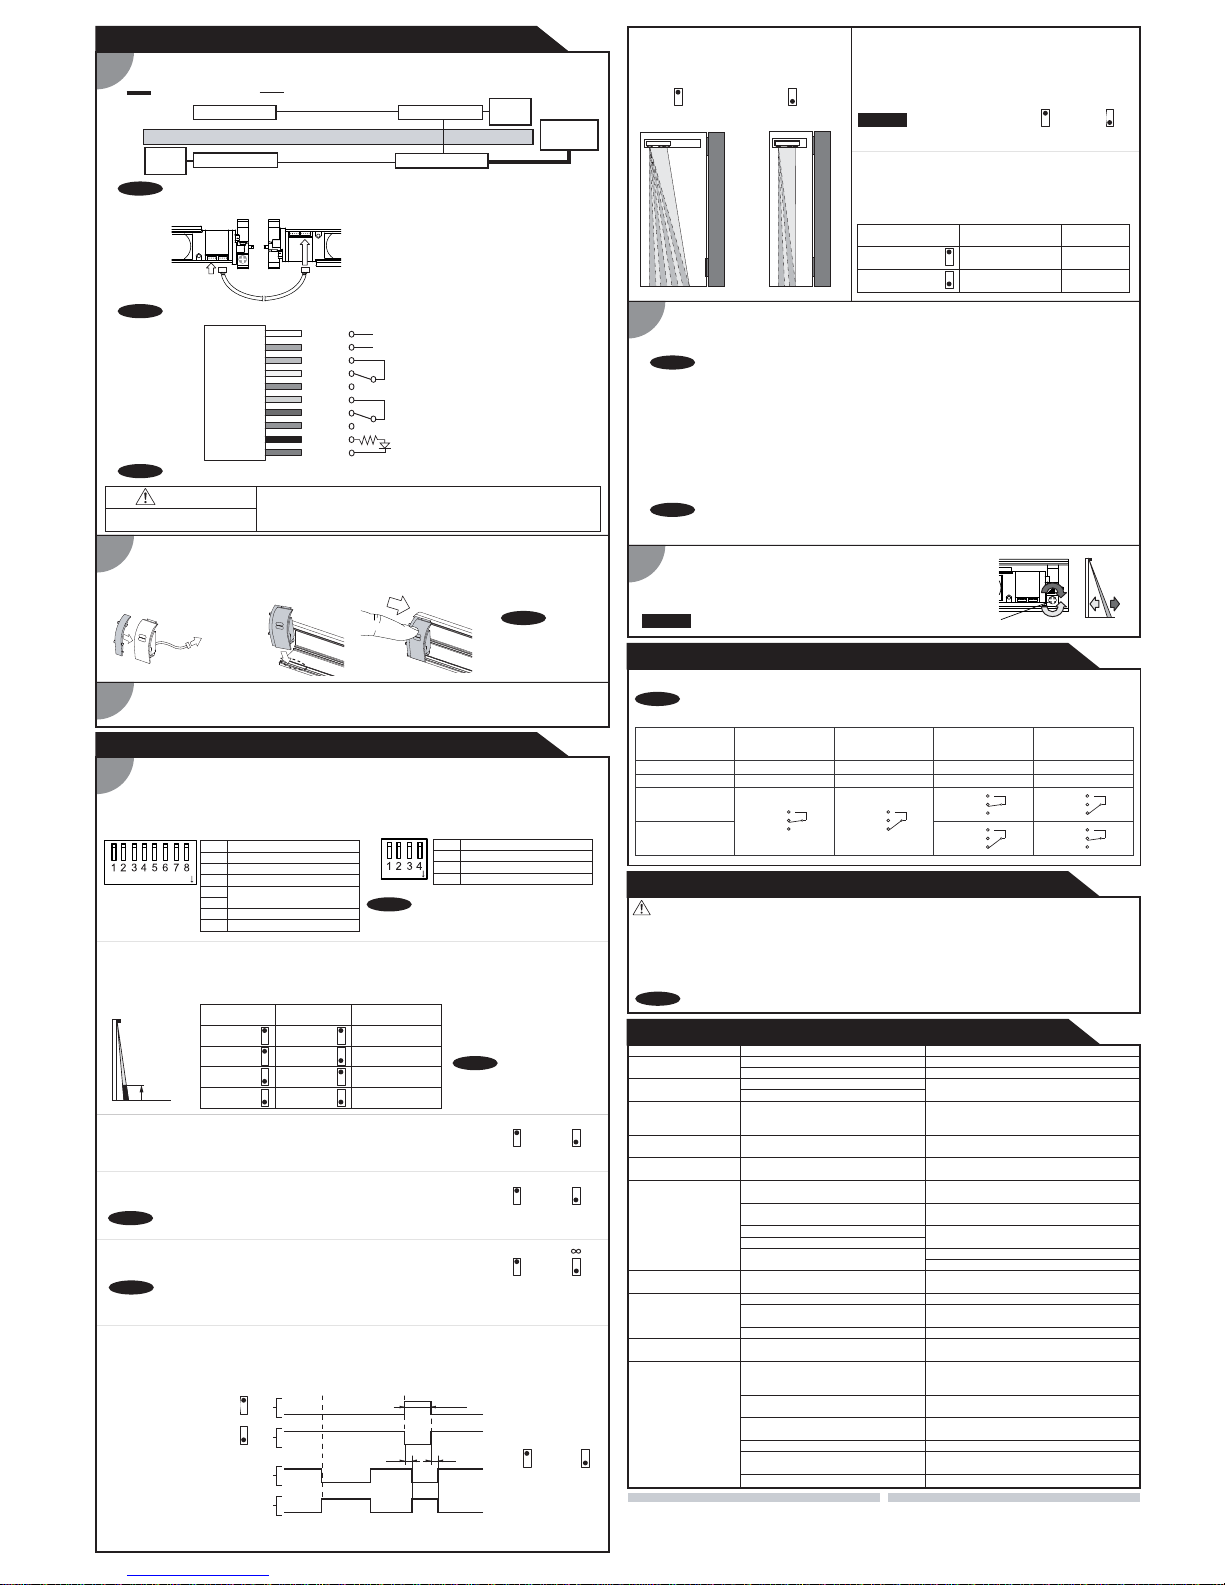
Profile
Front cover
Mounting clip
LED module
Spacer
Endcap
Power supply connector
Communication connector
LED indicator
Dipswitch A
Dipswitch B
Function switch
Angle adjustment screw
(1)
(2)
(3)
(4)
(5)
(6)
(7)
(8)
(9)
(10)
(11)
(12)
(13)
NOTE
Make sure to fix the sensor modules firmly by the mounting clips.
: Form C relay
Voltage / 42VDC
Current / 0.3A Max (Resistance load)
Output : see INSTALLATION
chapter 3. Wiring
* : The sensor has to be connected to a
door system is equipped with a SELV circuit.
The overcurrent protection of power supply
cable has to be less than 2A.
(7)
(8)
(10) (11) (12) (8)
(7)
The lens that is marked "Tx" must be positioned onto the corresponding door edge.
Refer to DETECTION AREA for the sensor module position. The sensor module can be inserted
in reverse as shown below. To do this,detach the mounting clip and rotate the sensor module by 180°
and reattach the mounting clips.
unit : mm (inch)
It is required to check the operation manual if this symbol is shown on the product.
Install the sensor at 1.8m (5'11")
to 2.5m (8'2").
WARNING
Do not wash, disassemble, rebuild or repair the sensor otherwise
it may cause electric shock or breakdown of the equipment.
Danger of electric shock
Read this operation manual carefully before use to ensure proper operation of this product.
Failure to read this operation manual may cause improper operation and may result in serious injury or death of a
person.The meanings of the symbols are as follows.Please study the following first and then read the contents of this
operation manual.
1. This sensor is a non-contact switch intended for door mounting and to use on automatic swing doors.
2. When setting the sensor's detection area, make sure that there is no traffic around the installation site.
3. Before turning the power ON, check the wiring to prevent damage or malfunction of equipment connected to
the sensor.
4. Only use the sensor as specified in the operation manual provided.
5. Be sure to install and adjust the sensor in accordance with the local laws and standards of the country in which
the sensor is installed.
6. Before leaving the installation site make sure that the sensor is operating properly and instruct the building
owner/operator on proper operation of the door and the sensor.
7. The sensor settings can only be changed by an installer or service engineer. When changed, the
changed settings and the date shall be registered in the maintenance logbook accompanying the door.
ENGLISH
ON
ON
Tx
Slave module
(8)
(11) (8)
123
Min. configuration : 1 master module +1 LED module
Max. configuration : 4 sensor modules +2 LED modules
(1)
(2)
(3)
(3)
(4)
(6)
(6)
(5)
(9)
(9)
Sensor module
MANUFACTURER'S STATEMENT
MANUFACTURER'S STATEMENT
SPECIFICATION
OUTER DIMENSIONS AND PART NAMES
INSTALLATION
2
Inserting the sensor module
1
Mounting the profile
Noise level
: <70dBA
(13)
(13)
ON
Tx
ON
ON
Tx
ON
ON
Tx
COMPLIED STANDARDS
Notified Body : TÜV NORD CERT GmbH Langemarckstr. 20 45141 Essen Germany
EC-type examination certificate No.
44 205 13 417493-002
EN16005
LED module indicator
ON : Solid Red
Original instructions
Category
: 2 (EN ISO13849-1 : 2008)
- Grating floor.
NOTE
1. Take the sensor modules out of the profile.
2. If the profile is longer than the door width, cut the profile. Make sure not to scratch the front cover.
3. Affix the profile on the intended mounting position leaving more than 20mm (13/16") from door edge to
attach the endcap.
4. If necessary, drill two mounting holes of ø3.4mm (ø1/8”) and fix the profile.
5. When mounting a sensor on each side of the door, it is necessary to drill a wiring hole of ø12mm (ø1/2”) to
connect the sensor modules. (See chapter 3. Wiring)
Make sure there is some space between the mounting clips and the mounting screws.
Min. 20mm
(13/16")
1
2
Make sure not to scratch the profile when making a hole.
Safety / Test output 1
OFF : Solid Green
ON : Solid Orange
Safety / Test output 2
OFF : Solid Green
The color depends on
the state of the output.
50.7 (2")
44.3 (1 3/4")
X =Minimum 340mm (13 3/8")
Black screw
(small)
Silver screw
Recommended installation position
Mounting height
Detection area width
Door width
W
h
d1
=
=
=
=
=
=
Distance from the leading edge to the sensor module
unit : mm (inch)
h d1
d3
W
900 (2'12")
1900
(6'3")
2000
(6'7")
2100
(6'11")
2200
(7'3")
2300
(7'7")
2400
(7'11")
2500
(8'2")
760
(2'6")
790
(2'7")
825
(2'9")
870
(2'10")
895
(2'11")
920
(3')
950
(3'1")
175
(6 7/8")
160
(6 3/8")
145
(5 6/8")
125
(5")
115
(4 1/2")
110
(4 1/2")
110
(4 3/8")
d2
n
2
2
2
2
2
2
2
d3
1100 (3'7")
375
(14 3/4")
355
(14")
345
(13 5/8")
320
(12 5/8")
315
(12 3/8")
310
(12 2/8)
300
(11 6/8")
n
2
2
2
2
2
2
2
d3
1200 (3'11")
420
(16 4/8")
415
(16 2/8")
410
(16 1/8")
400
(15 3/4")
n
2
2
2
2
2
2
2
Number of sensor modules
Distance between sensor modules
d3
d2
n
70
(2 3/4")
70
(2 3/4")
70
(2 3/4")
70
(2 3/4")
70
(2 3/4")
70
(2 3/4")
70
(2 3/4")
475
(18 5/8")
460
(18 1/8")
445
(17 1/2")
Test conditions required by EN 16005 Detection object : EN 16005 CA reference body
The actual detection area may become smaller depending on the ambient light, the color / material of
the object or the floor as well as the entry speed of the object.
NOTE
NOTE
DETECTION AREA
Detection area at 2200mm (7' 2 5/8") : Depth 140 (5 1/2") x Width 870 (2'10")
Emitting area at 2200mm (7' 2 5/8") : Depth 140 (5 1/2") X Width 440 (1' 5 1/2")
Leading edge
h
EN 16005 CA
reference body
d2
d3
d1
W
For instaltion heigths <1900mm the installation of an extra module will be mandatory in order to comply
with the regulations.
EN16005
EN 16005:2012 EN 12978:2003 +A1:2009 Machinery Directive 2006/42/EC
EMC Directive 2004/108/EC EN ISO 13849-1:2008 EN ISO 13849-2:2008
EN 61496-3:2001 clause 4. 3. 5 and 5. 4. 7. 3
Page 2
OPTEX CO.,LTD. OPTEX Technologies B.V.
Manufacturer European Subsidiary
5-8-12 Ogoto Otsu 520-0101, Japan
TEL.: +81(0)77 579 8700 FAX.: +81(0)77 579 7030
WEBSITE: www.optex.co.jp
Tiber 2, 2491 DH The Hague, The Netherlands
TEL.: +31(0)70 419 41 00 FAX.: +31(0)70 317 73 21
E-MAIL: info@optex.nl WEBSITE: www.optex.nl
Dipswitch A Dipswitch B
NOTE
Before starting the procedure, make sure that the power is turned OFF.
When passing the cable through the hole, do not tear the shield otherwise it may
cause electric shock or breakdown of the sensor.
WARNING
Danger of electric shock
ON
To the power supply
connector of
the master module
ON
NOTE
Only correctly initialising the sensor ensures
the correct functioning of the dipswitches
(see chapter 2. Function switch)
Set Dipswitch A3 to ON when the sensor operates by itself (ghosting).
NOTE
When Dipswitch A3 is set to ON ,the actual detection area may
become smaller than Immunity off.
A2
Setting1
OFF
A2
Setting2
ON
A3
Immunity on
ON
A3
Immunity off
OFF
1-3.Setting the immunity
1-2.Setting the frequency
When installing the sensors on a double swing door make sure that the frequency on
each sensor is set differently.
Each module has three communication connectors.
Use the most convenient connector for the
installation site.
Maximum of three sensor modules can be connected to one master module.
}
1.White
2.Brown
3.Green
4.Yellow
5.Grey
6.Pink
7.Blue
8.Red
9.Black
10.Violet
Power supply
12 to 24VAC ±10% , 12 to 30VDC ±10%
Safety / Test output 2
Form C relay
Reverse impulse (Closing side)
}
Test input
Opto coupler / Voltage: 10 to 30VDC
(+)
(-)
COM.
N.C.
N.O.
COM.
N.C.
N.O.
(+)
(-)
}
}
Safety / Test output 1
Form C relay
Stop impulse (Opening side)
NOTE
The value is a reference for
a mounting height of 1.8 to 2.5m
( 5' 11" to 8' 2" ).
Non detection
zone
Side view
B1 Non detection zone (B)
B2
B3
B4 Mounting side (Output select)
Area width
Self monitoring
A1
A4
A5
A6
A7
A8
Non detection zone (A)
Frequency
Immunity
Test input
Test input delay
For future use
A3
A2
Non detection zone
35cm
(13 3/4")
25cm
(9 13/16")
45cm
(17 11/16")
15cm
(5 7/8")
ON : "+10cm"
OFF : "+0cm"
Dipswitch A1
OFF : "15cm"
OFF : "15cm"
ON : "+10cm"
OFF : "+0cm"ON : "35cm"
ON : "35cm"
Dipswitch B1
INFORM BUILDING OWNER / OPERATOR OF THE FOLLOWING ITEMS
1. Always keep the front cover clean. If dirty, wipe it with a damp cloth. (Do not use any cleaner / solvent.)
2. Do not wash the sensor with water.
3. Do not disassemble, rebuild or repair the sensor yourself, otherwise electric shock may occur.
4. When LED indicator blinks Fast Red without any object in the detection area, contact your installer or service engineer.
5. Always contact your installer or service engineer when changing the settings.
6. Do not paint the front cover.
WARNING
1. After applying power, wait 10 seconds then walk test detection area to ensure proper operation.
2. Do not place any objects that move or emit light in the detection area. (e.g. Plant, illumination, etc.)
NOTE
ADJUSTMENTS
INSTALLATION
Connect the communication cable of the LED module to the master or slave module.
Attach the spacer on the endcap side. Insert the LED module to the profile as shown below.
The LED module can be inserted to both side of the profile.
4
Inserting LED module
After ADJUSTMENTS are completed, place the front cover and endcaps.
5
Placing the front cover
Each Master module is equipped with Dipswitch A and Dipswitch B and each Slave module is equipped with
only Dipswitch B. Only dipswitch A of the master module connected to the door controler is applicable and
will reflect the settings to all connected master and slave units automatically.
1
Dipswitch settings
The non detection zone is the height measured from the floor up to the position where the sensor starts to detect.
The zone can be set by a combination with Dipswitch A1 & B1.
[Non detection zone value] = [Dipswitch A1 value] + [Dipswitch B1 value]
1-1.Setting the non detection zone
NOTE
B2
4spots
OFF
2-1.Initialization
Do not enter the detection area when the sensor is performing a learning cycle.
When the initialization and the learning cycle is completed, the sensor will be in stand-by mode and
the LED will show solid green.
After the adjustment, check the detection area.
2-2.Learning
By selecting the sensor position the outputs & LED indicator will
function as shown below :
1-8.Setting the mounting side
(output select)
1-6.Setting the area width
2
Function switch
3
Area depth angle adjustment
When the door remains open or closed, please refer to the
TROUBLESHOOTING section. If the door still remains open or
closed, set dipswitch B3 to "Disable"
Set Dipswitch B3 to "Enable"..
1-7.Setting the self monitoring
B3
OFF
B3
ON
Disable Enable
B2
2spots
ON
The angle of each sensor module must be adjusted so that the door stops
before it comes into contact with an obstacle. After area angle adjustments,
start the learning as described in chapter 2.Function switch.
Adjustable angle : 0° to +25°
Angle adjustment screw
OFF :"Opening side
(output 1)"
Dipswitch B4 Output
Safety / Test output1
(stop impulse)
Solid Red
(detection)
ON :"Closing side
(output 2)"
Safety / Test output2
(reverse impulse)
Solid Orange
(detection)
LED
indicator
NOTE
Check the operation according to the chart below.
Outside of
detection area
COM.
N.C.
N.O.
CHECKING
COM.
N.C.
N.O.
The door movement might become unstable right after the learning. The movement becomes
stabilized after several openings and closings.
Always walk-test the detection area to ensure the proper operation.
Entry into
opening side
detection area
Entry into
closing side
detection area
Entry Power OFF
Status - Detection active Detection activeStand-by
LED indicator None Solid Red Solid OrangeSolid Green
Safety / Test output1
(Stop impulse)
Safety / Test output2
(Reverse impulse)
COM.
N.C.
N.O.
COM.
N.C.
N.O.
COM.
N.C.
N.O.
COM.
N.C.
N.O.
TROUBLESHOOTING
Problem Possible cause Possible countermeasures
The sensor has no function
Wrong power supply voltage Set to the stated voltage.
Wrong wiring or connection failure Check the wiring and connectors.
Incomplete initialization
(Red & Green blinking)
Initialization has not been conducted. Push the function switch for more than 2 sec. for
initialization.
Dipswitch setting is changed.
Initialization is not finished
(Red & Green blinking
continuous)
More than 2 master modules are connected
with power supply wire.
Connect the power supply cable to only one
master module.
Incomplete learning
(Yellow & Red blinking)
Initialization has not been conducted. Push the function switch for less than 2 sec. for
learning.
Learning does not start
(Twice Orange blinking)
Check the communication wires or change wires.Communication error
Sensor operates by itself.
(Ghosting) or
learning is not finished.
(Yellow & Red blinking
continuous)
The modules are affecting each other.
Change the module positions or adjust angles
or adjust the area width (Dipswitch B2).
Same frequency setting on double swing
door application.
Set the different frequencies. (Dipswitch A2)
Objects that move or emit light in the
detection area. (Ex.Plant, illumination, etc.)
Remove the objects.
The floor pattern is not plain or ‚
the door movement is irregular.
Set the immunity (Dipswitch A3) to "ON".
Extend the non detection zone.
Signal saturation.
Sensor operates by itself.
(Ghosting)
Waterdrops on the front cover Install in a place keeping the waterdrops off.
The module angle is changed. Check the module angles.The sensor functions
without the front cover
but not with it.
The front cover is dirty. Wipe the front cover with a damp cloth.
(Do not use any cleaner or solvent.)
The front cover is scratched Replace ‚the front cover.
Sensor operation is not
linked to door movement.
Connection error or
wrong mounting side setting.
Check the wiring or mounting side setting.
(Dipswitch B4)
Door remains open
or closed without any
object in the detection
area.
Presence timer set to infinity and sudden
change in the detection area.
Push the function switch for less than 2 sec. for
learning. Or change presence timer setting.
(Dipswitch A4)
Signal saturation. (Slow Red blinking)
The front cover on inner or outer side is dirty. Wipe the front cover with a damp cloth.
(Do not use any cleaner or solvent.)
Check the communication wires.Communication error. (Twice Orange blinking)
The sensor is affected by the floor color.
Push the function switch for less than 2 sec. for
learning. Or extend the non detection zone.
Sensor failure. (Fast Red blinking) Contact your installer or service engineer.
Change the module positions or adjust angles
or adjust the area width (Dipswitch B2).
Only the master module is equipped with a function switch. The function switch of the master module that is
connected to the door controller is only applicable to reflect settings to all sensor modules connected.
After a dipswitch setting change or when the power is supplied for the first time, the LED blinks red & green.
Push the function switch for more than 2 sec. and then the LED indicator on the master unit will switch off.
The LED indicator will start to blink green to indicate the number of connected sensor modules.
The LED indicator will start to blink yellow and red and the initialization is completed. The LED is now indicating
that you have to proceed a learning cycle.
Push the function switch for less than 2 sec. and then the LED indicator will start to blink yellow. The sensor will
learn the non detection zone.
To Master / Slave
module
For LED status see
SPECIFICATION
NOTE
Make sure to use the function switch when the door is in the fully closed position.
NOTE
NOTE
When a test input is not required, set the dipswitch A7 to OFF.
Slave module
Slave module
Slave module
Door
controller
Power supply cable Communication cable
Door
LED
module
LED
module
Master module *
* When more then 1 master module is installed on the door leaf, make sure that only one power
supply cable is connected to the operator otherwise initialization can not be completed.
All other master units will automatically function as a slave unit.
Wire the cable to the door controller as shown below.
3
Wiring
NOTE
1-4.Setting the presence timer
If an object remains in the detection area longer than the setting, LED
indicator may blink fast Red. In this case, it is not Sensor failure.
After an object is removed, LED indicator will show solid Green.
NOTE
A4
60sec.
OFF
A4
ON
Presence timer
The presence timer can be set by Dipswitch A4.
Set dipswitch B2 to "2 spots" when a narrow
detection area is required.
Test input
(from door controller)
Safety / test output
(to door controller)
High
Test inputDetection
* Test input delay time (=t2)
A7
Low
A7
N.O.
N.C.
Set dipswitches A7 & A8 according to the instructions from the door controller.
t1(>t2)
t2 t2
1-5.Setting the test input and test input delay time
open
close
open
close
A8A8
20msec.
10msec.
OFF
ON
* The test input delay time is the time period between the test input and Safety / Test output.
Test input and Safety / Test output timing chart
OFF
ON
EN16005
EN16005
 Loading...