

Optelec Traveller HD User Manual


Optelec Traveller HD
Index
1. Introduction ........................................................................................... 10
1.1. About this manual ...................................................................... 10
1.2. What’s in the box? ..................................................................... 11
1.3. Getting to know your Traveller HD ............................................. 11
2. Getting started ....................................................................................... 12
2.1. Using the Traveller HD ................................................................. 12
3. Operation ............................................................................................... 13
3.1. Slide and Read .......................................................................... 13
3.2. Buttons ....................................................................................... 13
3.2.1. Power On / Off ....................................................................... 13
3.2.2. Adjusting the magnification .................................................... 13
3.2.3. Choosing viewing modes ....................................................... 13
3.2.4. Object lighting on / off ............................................................ 14
3.2.5. Snapshot ................................................................................ 14
3.2.6. Menu ...................................................................................... 14
3.2.7. Reading line ........................................................................... 14
3.2.8. Positioning the reading line .................................................... 14
4. The Traveller HD Menu ......................................................................... 15
4.1. Activating the menu ...................................................................... 16
4.2. Navigating the menu .................................................................... 16
4.3. Exiting the menu .......................................................................... 16
Menu: Information ............................................................................ 16
Menu: Images .................................................................................. 17
Menu: Brightness ................................................................ ............. 18
Menu: Power.................................................................................... 18
Menu: Sound ................................................................................... 20
Menu: Light ...................................................................................... 20
Menu: Color ..................................................................................... 21
Menu: Reset .................................................................................... 21
5. Charging the battery ............................................................................. 22
5.1. Charging the Traveller HD ............................................................ 22
5.2. Standby and Auto Power Off ........................................................ 22
5.3. Battery warning ............................................................................ 22
Appendix A: Safety and Regulatory Notices ............................................ 23
Appendix B: Specifications ....................................................................... 26
Optelec offices worldwide ........................................................................ 114
Inhoudsopgave
1. Introductie .............................................................................................. 28
1.1. Over deze handleiding ...................................................................... 28
1.2. Wat zit er in de doos? ........................................................................ 29
1.3. Uw Traveller HD leren kennen .......................................................... 29
3

Optelec Traveller HD
2. Aan de slag ............................................................................................ 30
2.1. De Traveller HD gebruiken ........................................................... 30
3. Gebruik .................................................................................................. 31
3.1. Schuif en Lees ........................................................................... 31
3.2 Toetsen ......................................................................................... 31
3.2.1. Aan / uit .................................................................................. 31
3.2.2. Instellen van de vergroting ..................................................... 31
3.2.3. Kiezen weergave modes ........................................................ 31
3.2.4. Object verlichting aan / uit ...................................................... 32
3.2.5. Momentopname (Snapshot) .................................................. 32
3.2.6. Menu ...................................................................................... 32
3.2.7. Leeslijn................................................................................... 32
3.2.8. Positioneren van de Leeslijn .................................................. 32
4. Het Traveller HD Menu .......................................................................... 33
4.1. Activeren van het menu ............................................................... 34
4.2. Navigeren in het menu ................................................................ 34
4.3. Het verlaten van het menu .......................................................... 34
Menu: Informatie (Information) ............................................................ 34
Menu: Afbeeldingen (Images) ............................................................. 34
Menu: Helderheid (Brightness) ............................................................ 35
Menu: Energie (Power) ....................................................................... 36
Menu: Geluid (Sound) ......................................................................... 38
Menu: Objectverlichting (Light) ............................................................ 38
Menu: Kleur (Color) ............................................................................. 39
Menu: Fabrieksinstellingen (Reset) ..................................................... 39
5. Opladen van de batterij .......................................................................... 40
5.1. Het opladen van de Traveller HD ................................................ 40
5.2. Stand-by en Automatisch Uitschakelen ....................................... 40
5.3. Waarschuwing batterij ................................................................. 40
Bijlage A: Veiligheid en voorschriften ....................................................... 41
Bijlage B: Specificaties .............................................................................. 43
Optelec kantoren wereldwijd ................................................................... 114
Table des matières
1. Introduction ........................................................................................... 45
1.1. À propos du manuel ................................................................... 45
1.2. Le contenu de la boîte ................................................................ 46
1.3. Apprenez à connaître votre Traveller HD ................................... 46
2. Pour débuter ................................................................ .......................... 47
2.1. Utiliser le Traveller HD ................................................................. 47
3. Fonctionnement .................................................................................... 48
3.1. Glisser pour lire ................................................................................. 48
3.2. Les boutons ....................................................................................... 48
4

Optelec Traveller HD
3.2.1. Alimentation ........................................................................... 48
3.2.2. Ajuster le grossissement ........................................................ 48
3.2.3. Sélectionner les modes d’affichage ........................................ 48
3.2.4. Lumières d’objet Allumer / Éteindre ....................................... 49
3.2.5. Capture instantanée ............................................................... 49
3.2.6. Menu ...................................................................................... 49
3.2.7. Ligne de lecture ..................................................................... 49
3.2.8. Positionner la ligne de lecture ................................................ 49
4. Le Menu du Traveller HD ...................................................................... 50
4.1. Activer le menu ............................................................................ 51
4.2. Naviguer dans le menu ................................................................ 51
4.3. Quitter le menu ............................................................................. 51
Menu: Information ............................................................................ 51
Menu: Images .................................................................................. 52
Menu: Luminosité (Brightness) ........................................................ 53
Menu: Alimentation (Power) ............................................................. 53
Menu: Sons (Sound) ........................................................................ 56
Menu: Éclairage (Light) .................................................................... 56
Menu: Couleur (Color) ..................................................................... 56
Menu: Réinitialisation (Reset) .......................................................... 57
5. Charger la batterie ................................................................................. 58
5.1. Charger le Traveller HD ............................................................... 58
5.2. Mise en Veille et Mise Hors Tension Automatique........................ 58
5.3. Avertissement de batterie faible ................................................... 58
Annexe A: Avis de sécurité et de conformité ........................................... 59
Annexe B: Spécifications ........................................................................... 61
Optelec dans le monde ............................................................................ 114
Indice
1. Introduzione ........................................................................................... 63
1.1. A proposito di questo Manuale ................................................... 63
1.2. Contenuto della confezione ........................................................ 64
1.3. Pulsanti e componenti di Traveller HD ................................ ....... 64
2. Per iniziare ............................................................................................. 65
2.1. Utilizzare Traveller HD ................................................................. 65
3. Funzioni di Traveller HD ....................................................................... 66
3.1. Scorrimento e Lettura ................................................................. 66
3.2. Pulsanti ...................................................................................... 66
3.2.1. Accensione e Spegnimento ................................................... 66
3.2.2. Regolare l’ingrandimento ....................................................... 66
3.2.3. Scegliere la modalità di visualizzazione ................................. 66
3.2.4. Luce sull’oggetto on / off ................................ ........................ 67
5

Optelec Traveller HD
3.2.5. Foto ....................................................................................... 67
3.2.6. Menu ...................................................................................... 67
3.2.7. Riga per facilitare la lettura .................................................... 67
3.2.8. Posizionare la Riga di Lettura ................................................ 67
4. Menu di Traveller HD ............................................................................. 68
4.1. Attivare il Menu ............................................................................ 69
4.2. Navigare nel menu ....................................................................... 69
4.3. Uscire dal Menu ........................................................................... 69
Menu: Informazioni (Information) ..................................................... 69
Menu: Immagini (Images) ................................................................ 70
Menu: Luminosità (Brightness) ........................................................ 71
Menu: Alimentazione (Power) .......................................................... 71
Menu: Segnali Acustici (Sound) ....................................................... 73
Menu: Luce (Light) ........................................................................... 73
Menu: Colore (Color) ....................................................................... 74
Menu: Reset .................................................................................... 74
5. Caricare la batteria ................................................................................ 75
5.1. Come caricare il Traveller HD ...................................................... 75
5.2. Standby e Spegnimento automatico ............................................. 75
5.3. Messaggio per la batteria ............................................................. 75
Appendice A: Sicurezza, garanzia e direttive ........................................... 76
Appendice B: Specifiche tecniche ............................................................ 78
Sedi Optelec nel mondo ........................................................................... 114
Índice
1. Introducción .......................................................................................... 80
1.1. Acerca de este manual .............................................................. 80
1.2. ¿Qué contiene la caja? .............................................................. 81
1.3. Conocer su Traveller HD ............................................................ 81
2. Funcionamiento..................................................................................... 82
2.1. Uso del Traveller HD .................................................................... 82
3. Operación .............................................................................................. 83
3.1. Deslizar y leer ............................................................................ 83
3.2. Botones ...................................................................................... 83
3.2.1. Encender y apagar el Traveller HD ........................................ 83
3.2.2. Ajustar la amplificación .......................................................... 83
3.2.3. Seleccionar los modos de visualización ................................. 83
3.2.4. Encender y apagar la luz del objeto ....................................... 84
3.2.5. Foto instantánea .................................................................... 84
3.2.6. Menú ...................................................................................... 84
3.2.7. Línea de lectura ..................................................................... 84
3.2.8. Posicionar la línea de lectura ................................................. 84
6

Optelec Traveller HD
4. Menú del Traveller HD ........................................................................... 85
4.1. Activar el menú ............................................................................... 86
4.2. Navegar en el menú ..................................................................... 86
4.3. Salir del menú .............................................................................. 86
Menú: Información ........................................................................... 86
Menú: Imágenes .............................................................................. 87
Menú: Brillo ...................................................................................... 88
Menú: Alimentación ......................................................................... 88
Menú: Sonido................................................................................... 90
Menú: Iluminación ............................................................................ 90
Menú: Color ..................................................................................... 91
Menú: Restaurar .............................................................................. 91
5. Carga de la batería .................................................................................. 92
5.1. Cargar el Traveller HD ................................................................. 92
5.2. Reposo y apago automático ......................................................... 92
5.3. Aviso de la batería ....................................................................... 92
Apéndice A: Seguridad e avisos normativos ........................................... 93
Apéndice B: Especificaciones técnicas .................................................... 95
Optelec en el mundo ................................................................................ 114
Inhalt
1. Einführung ............................................................................................. 97
1.1. Über dieses Handbuch ............................................................... 97
1.2. Lieferumfang .............................................................................. 98
1.3. Kennenlernen des Traveller HD ................................................. 98
2. Erste Schritte ......................................................................................... 99
2.1. Benutzen des Traveller HD .......................................................... 99
3. Benutzung ............................................................................................ 100
3.1. Schieben und Lesen ................................................................ 100
3.2. Tastenbelegung ....................................................................... 100
3.2.1. Ein- / Ausschalten ................................................................ 100
3.2.2. Einstellen der Vergrößerung ................................................ 100
3.2.3. Auswahl des Darstellungsmodus ......................................... 100
3.2.4. Objektbeleuchtung Ein/Aus .................................................. 101
3.2.5. Schnappschuss.................................................................... 101
3.2.6. Menü .................................................................................... 101
3.2.7. Leselinie ............................................................................... 101
3.2.8. Ausrichten der Leselinie ....................................................... 101
4. Das Traveller HD Menü ....................................................................... 102
4.1. Das Menü aktivieren................................................................... 103
4.2. Navigieren im Menü ................................................................... 103
4.3. Verlassen des Menüs ................................................................. 103
Menü: Information .......................................................................... 103
7

Optelec Traveller HD
Menü: Images Bilder .................................................................. 104
Menü: Brightness Helligkeit ....................................................... 105
Menü: Power Ein-und Ausschalten ............................................ 105
Menü: Sound Signalton ............................................................. 107
Menü: Light Objektbeleuchtung ................................................. 107
Menü: Color Farbe ..................................................................... 108
Menü: Reset Zurücksetzen ........................................................ 108
5. Aufladen des Akkus ............................................................................ 109
5.1. Aufladen des Traveller HD ......................................................... 109
5.2. Standby und Auto Power Off ...................................................... 109
5.3. Akku Warnung ............................................................................ 109
Anhang A: Sicherheits- und Betriebsbestimmungen ............................ 110
Anhang B: Technische Informationen .................................................... 113
Optelec Weltweit ....................................................................................... 114
8

Optelec Traveller HD
User manual
Version 1.2
Copyright 2015 Optelec, the Netherlands
All rights reserved
Telephone: +31 (0)88 6783 444. Fax +31 (0)88 6783 400
Optelec
P.O. Box 399
2993 LT Barendrecht
The Netherlands
E-mail: info@optelec.nl
Website: www.optelec.com
English 9

Optelec Traveller HD
1. Introduction
Congratulations on choosing the Traveller HD, a light weight portable video
magnifier developed by Optelec. The Traveller HD enables you to read, view
photos, do work and so much more. The Traveller HD magnifies and
enhances text, objects and images and allows you to view them in your
preferred high contrast color combination, brightness and contrast settings. It
is easy to operate and can be used at home, work and school.
1.1. About this manual
At Optelec, we are constantly improving our products and their functionalities.
Therefore, it is possible that this manual is not the latest version. Please
download the most up-to-date manual on www.optelec.com at the Support
section.
This manual will help you to become familiar with the Traveller HD features
and operation. Please read this manual thoroughly before using your
Traveller HD.
If you have any questions or suggestions concerning the use of this product,
please contact your Optelec distributor or Optelec’s headquarters by
consulting the contact information page located at the end of this manual. We
greatly appreciate your feedback. We hope you enjoy working with your
Traveller HD.
10 English
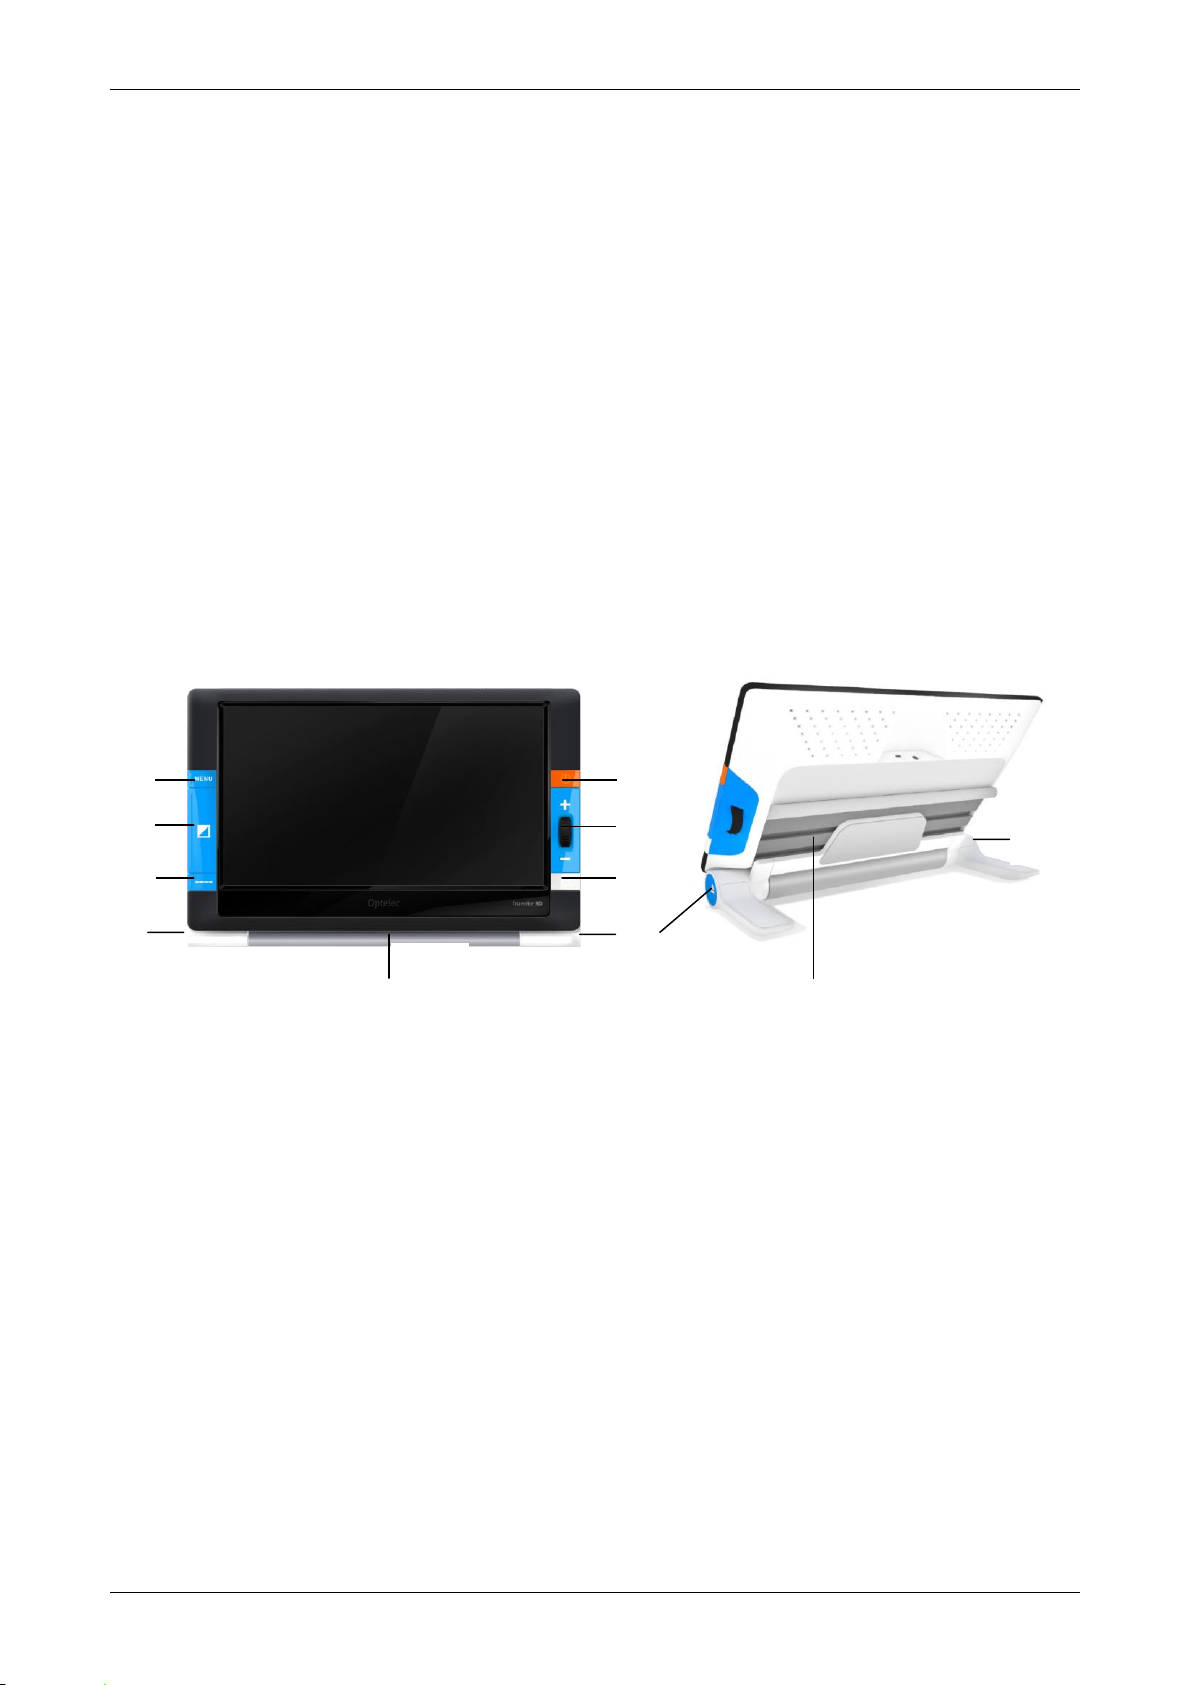
Optelec Traveller HD
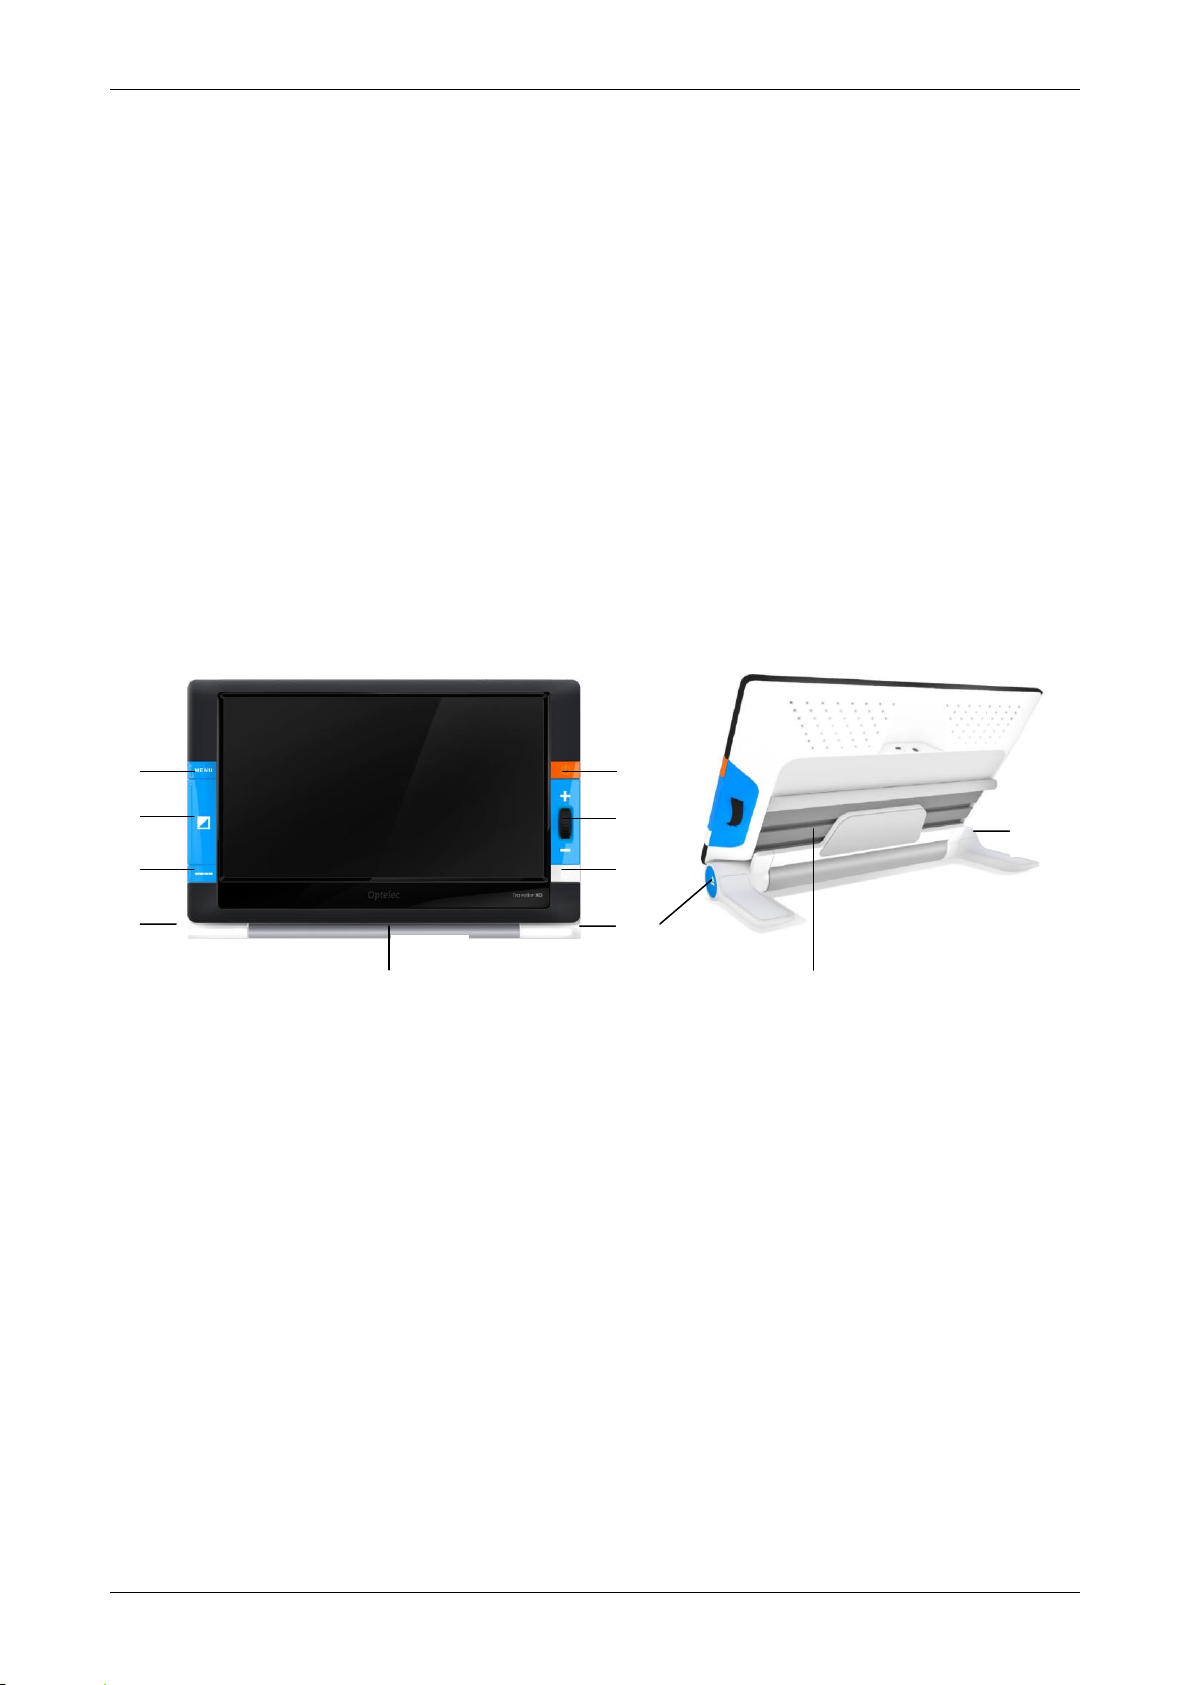
1. Release buttons
2. Menu button
3. Mode button
4. Reading Line button
5. On / Off button
6. Zoom wheel
7. Snapshot button
8. Roll
9. Slider
1 1 2
3
4
5 6 1 8 9
7
1.2. What’s in the box?
The Traveller HD packaging contains the following:
- The Traveller HD
- A protective carrying case
- A power supply
- A screen cleaning cloth
- This user manual
1.3. Getting to know your Traveller HD
The following figures show the Traveller HD’s main components.
English 11

Optelec Traveller HD
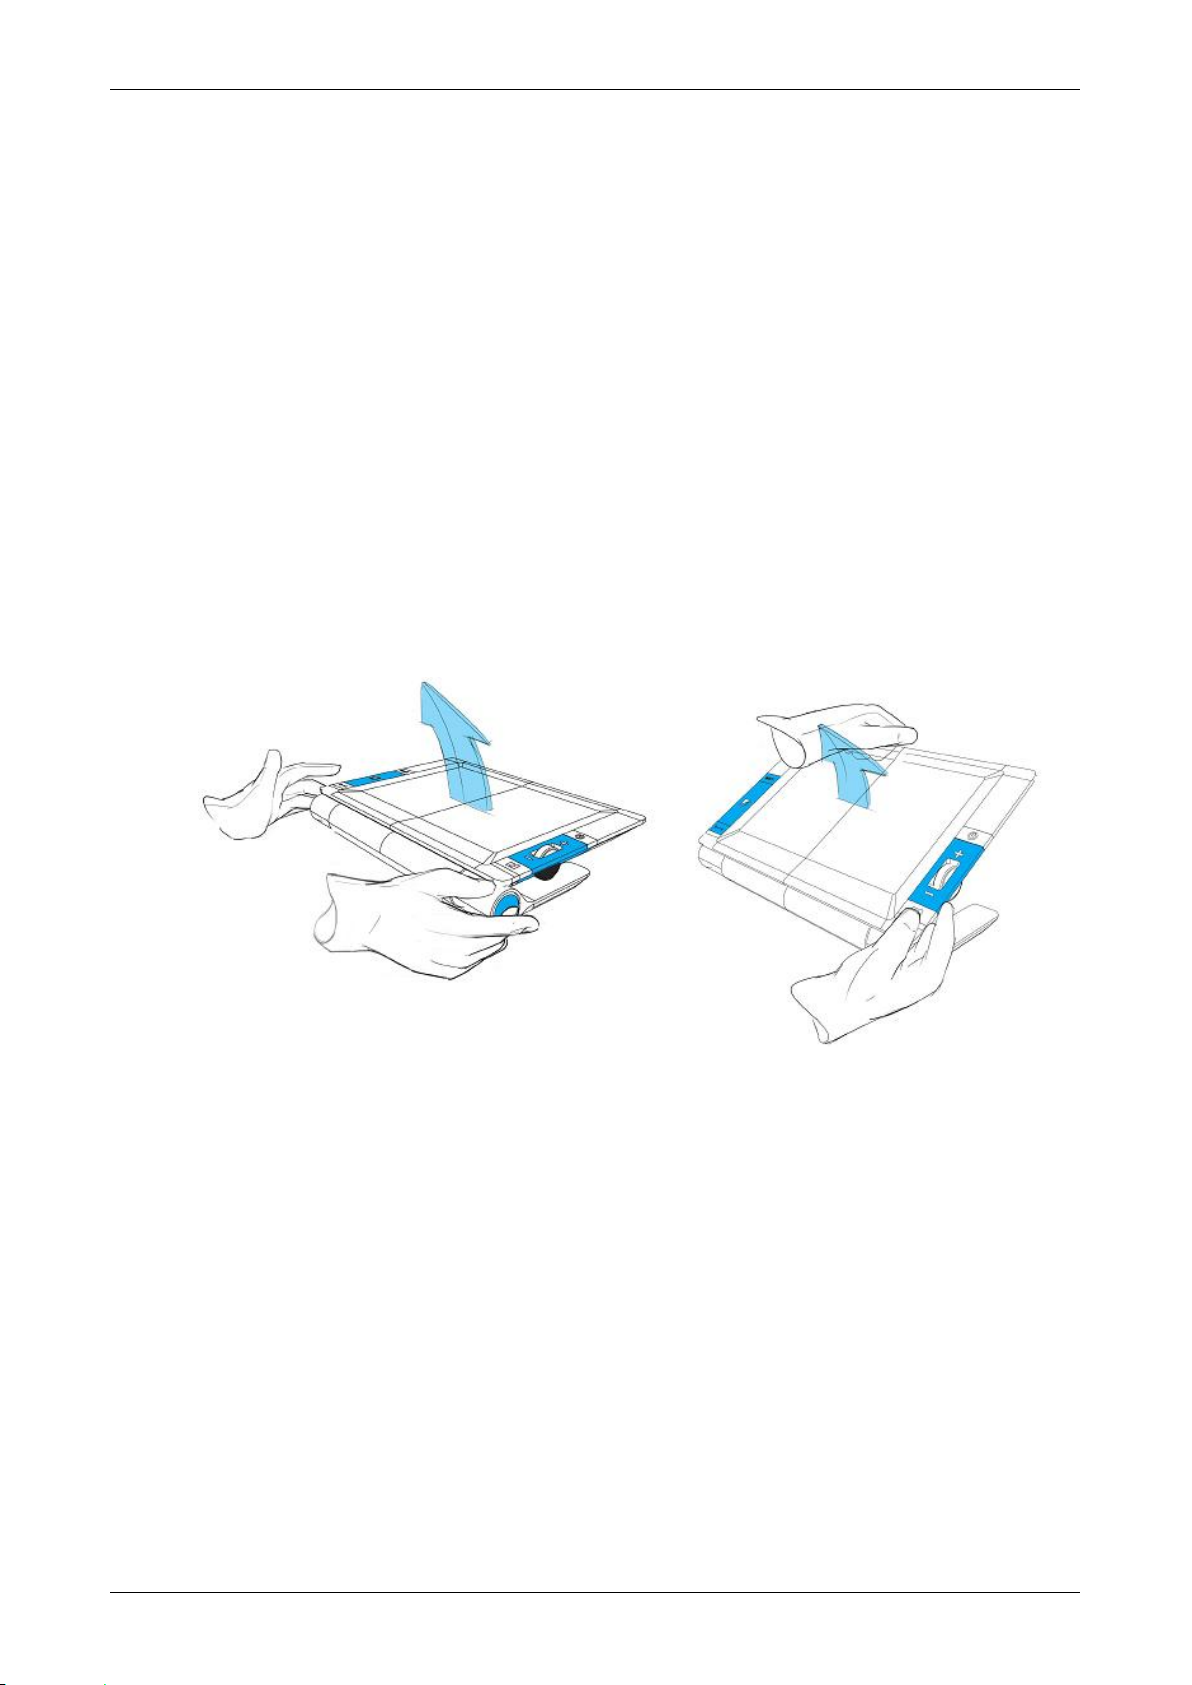
Press the two blue Release
buttons to unfold the Traveller
HD
Lift the screen until it locks in the
open position
2. Getting started
The Traveller HD is placed correctly in front of you when the screen is facing
up, and the Zoom wheel is located at the right side of the screen.
2.1. Using the Traveller HD
The Traveller HD can only be used in the open position. The screen will be
set at an ergonomic angle for an optimal reading position, while the camera
will point downward. The open position enables you to read long texts and
easily slide over documents.
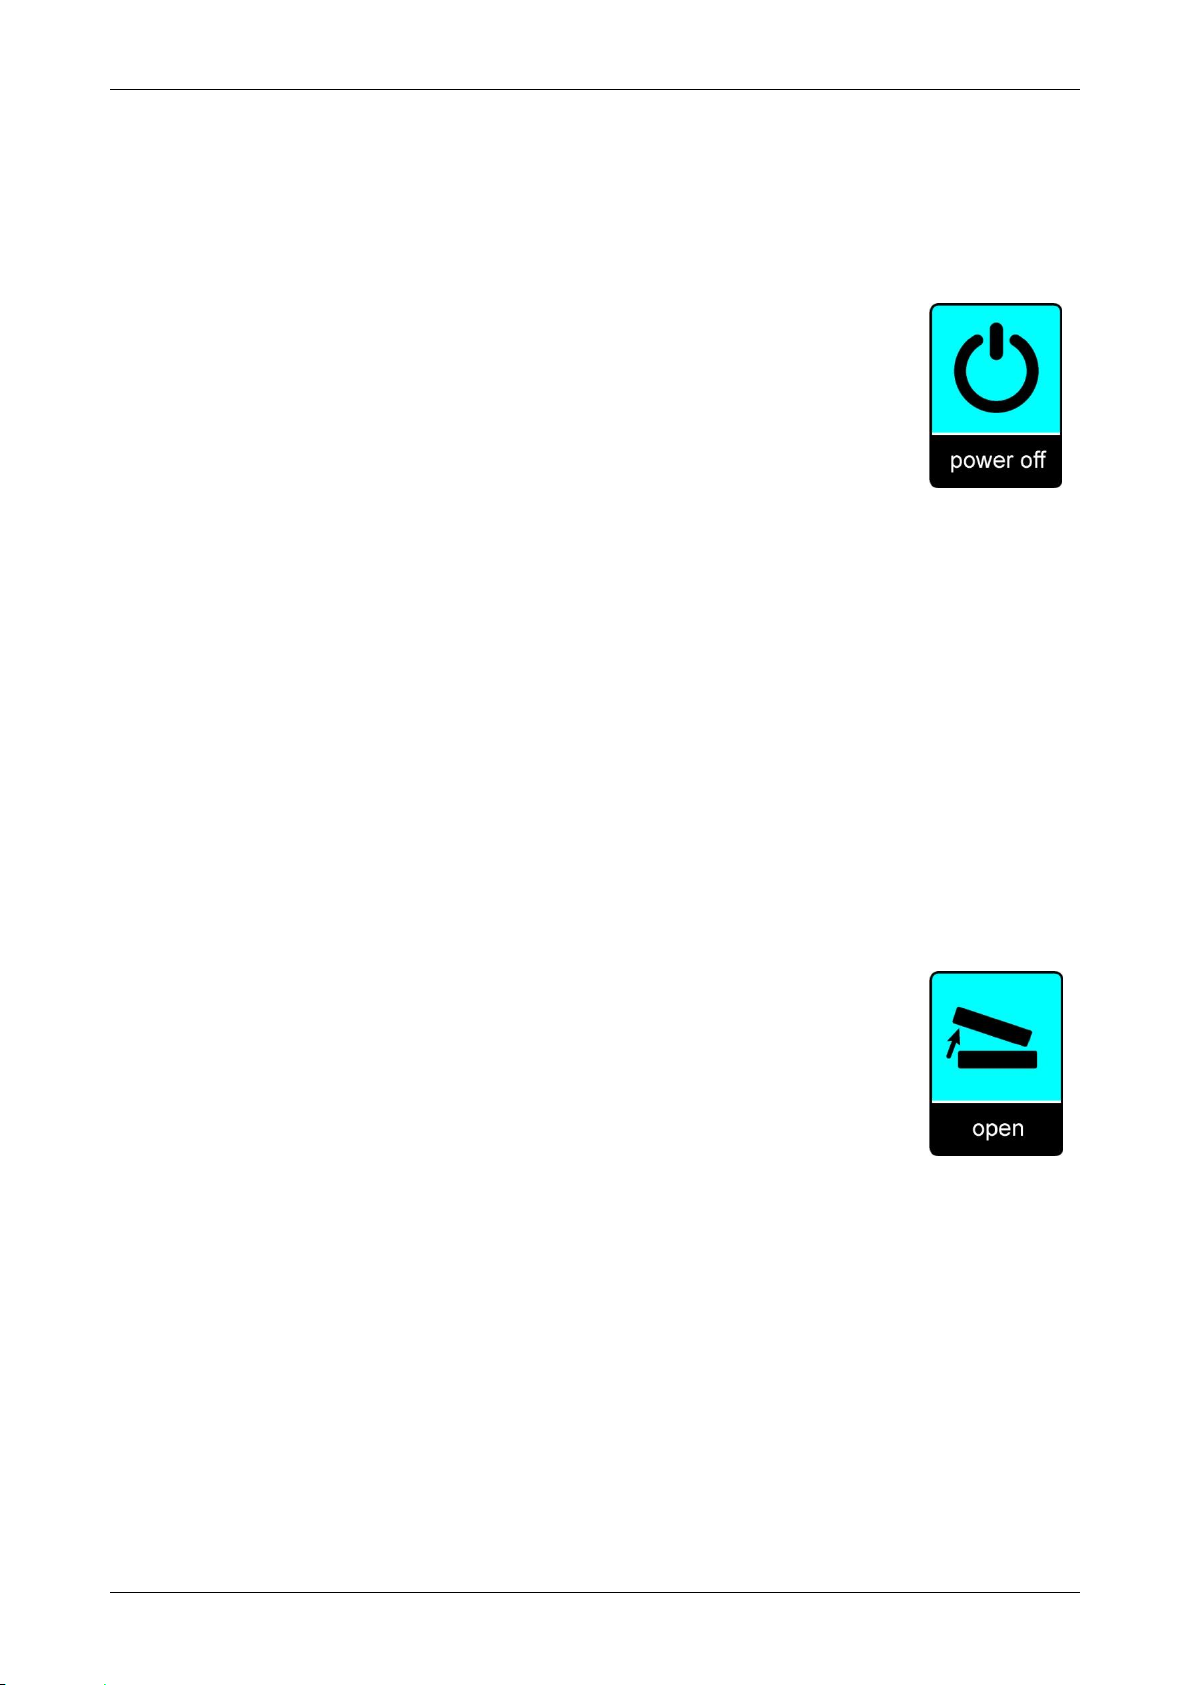
To open the unit, follow these steps:
1. Place the Traveller HD in front of you so that the screen is facing up,
and the Zoom wheel is at the right side of the screen.
2. Press the two blue Release buttons located at the outer sides of the
roller. The Traveller HD screen will unlock, move up and power on.
3. Lift the screen until the screen locks in the up position.
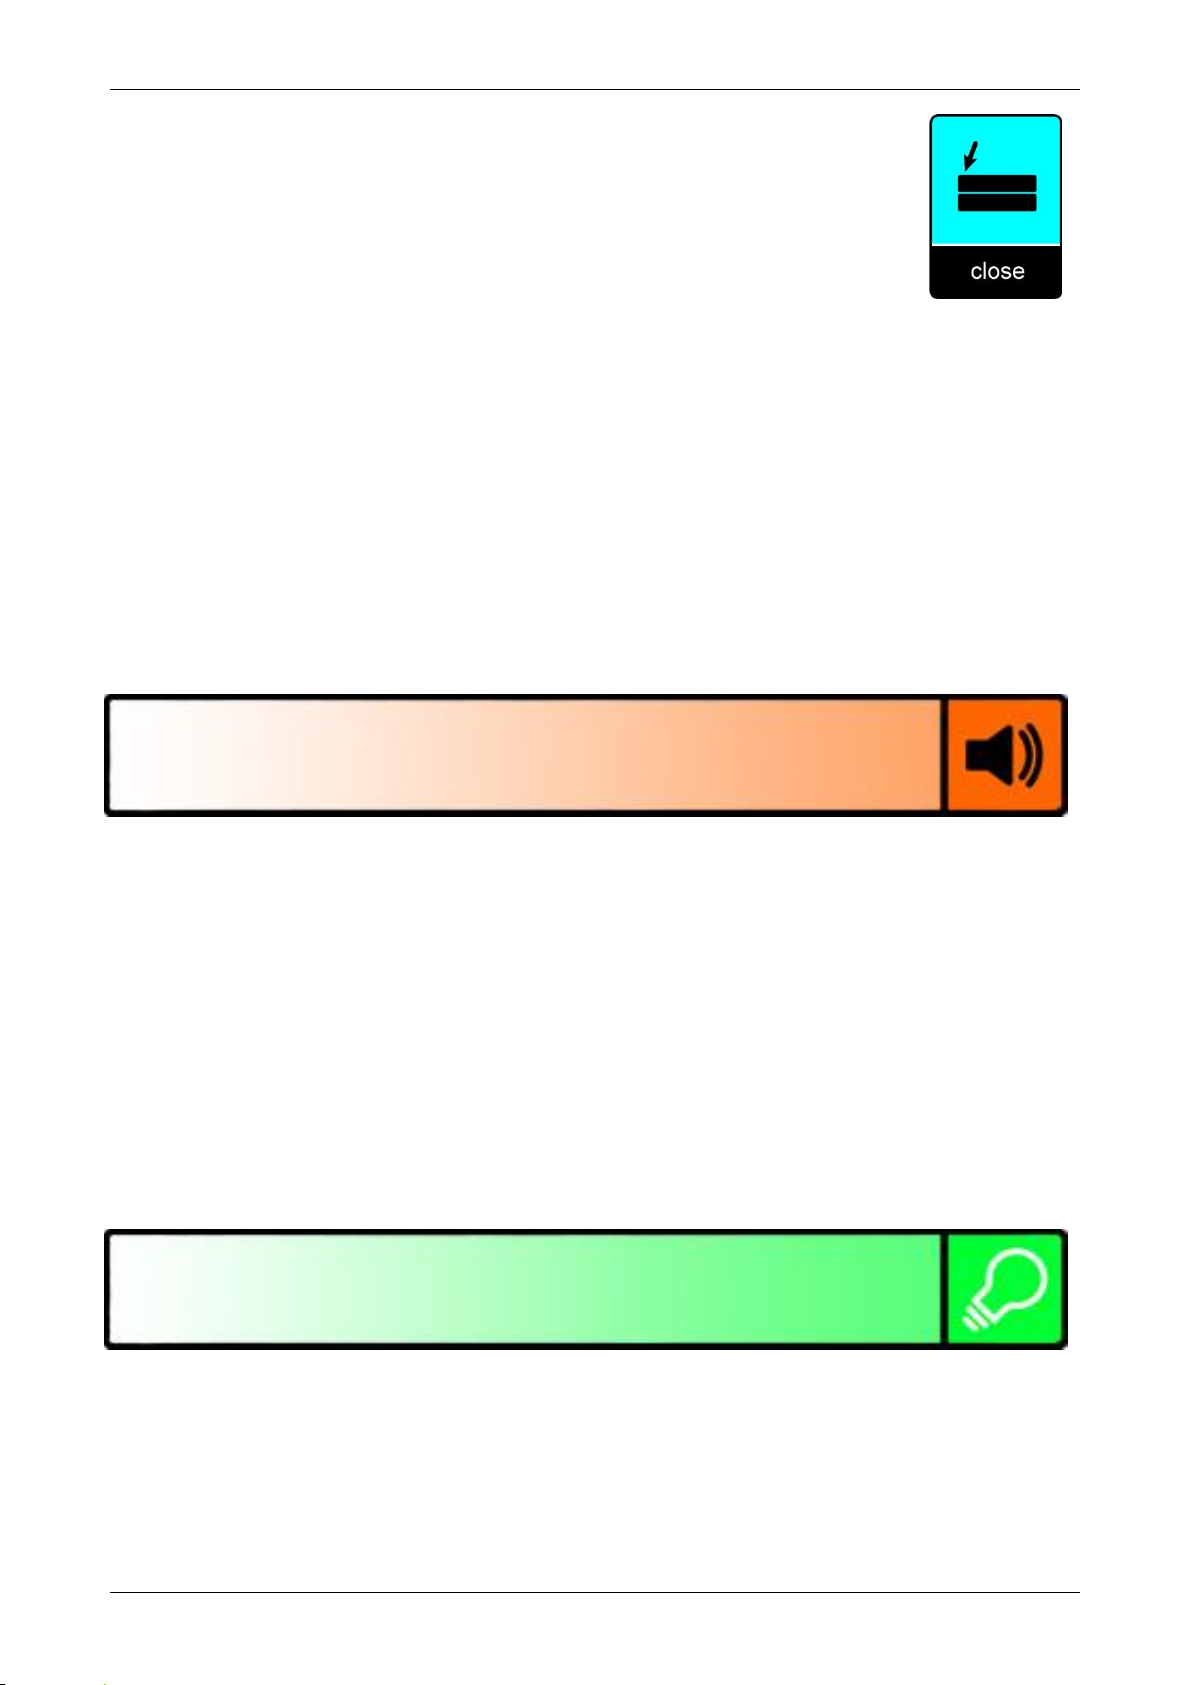
To close the unit, follow these steps:
1. Place the Traveller HD in front of you so that the screen is facing up
and in center position, and the Zoom wheel is at the right side of the
screen.
2. Press the two blue Release buttons located at the outer sides of the
roller.
3. Lower the screen until the screen locks into the closed position.
Important: Only use the blue Release buttons to unlock or collapse the
screen. Do not force the screen up or down.
12 English

Optelec Traveller HD
3. Operation
3.1. Slide and Read
Place the Traveller HD on the document you want to read. To navigate
vertically, use the roller and move the unit up and down over the document.
To read or to navigate horizontally, slide the screen and move it from left to
right, and from right to left to move back to the beginning of the line.
3.2. Buttons
3.2.1. Power On / Off
To power on the Traveller HD, press the orange On / Off button located
above the Zoom wheel on the right side of the unit for 2 seconds. The
Traveller HD will play the start up beeps and start up in the same viewing
mode as when it was powered off. Press the button for 2 seconds again to
power off the Traveller HD. Depending on the power settings in the Traveller
HD menu, the Traveller HD can power on when opening the unit, and power
off automatically when closing the Traveller HD.
3.2.2. Adjusting the magnification
To adjust the magnification, use the Zoom wheel at the right side of the
Traveller HD. Scroll up to zoom in and scroll down to zoom out.
3.2.3. Choosing viewing modes
Pressing the large blue Mode button between the Menu and Reading Line
button to the left of the screen allows you to select one of the 5 viewing
modes, depending on how the system is configured:
1. Full color photo mode: This mode displays the original colors of the
pictures and text.
2. Reading mode 1: This mode enhances the foreground / background
contrast. Pictures and text will be displayed in the configured high
contrast foreground and background color, by default black text on a
white background. The foreground and background colors can be
changed in the Traveller HD Menu.
3. Reading mode 2 (optional): This mode enhances the foreground /
background contrast. Pictures and text will be displayed in the
configured high contrast foreground and background color, by default
white text on a black background. The foreground and background color
can be changed or disabled in the Traveller HD Menu.
4. Reading mode 3 (optional): This mode enhances the foreground /
background contrast. Pictures and text will be displayed in the
configured high contrast foreground and background color. By default
English 13

Optelec Traveller HD
this mode is disabled. The foreground and background color can be
enabled and changed in the Traveller HD Menu.
5. Reading mode 4 (optional): This mode enhances the foreground /
background contrast. Pictures and text will be displayed in the
configured high contrast foreground and background color. By default
this mode is disabled. The foreground and background color can be
enabled and changed in the Traveller HD Menu.
3.2.4. Object lighting on / off
Pressing the Mode button for three seconds will turn off the object lighting.
Pressing this button for three seconds again will turn the object lighting back
on.
3.2.5. Snapshot
To make a snapshot, press the white Snapshot button located below the
Zoom wheel. It allows you to take a temporary picture of a text or image.
Pressing the Snapshot button again for 2 seconds will save the temporary
image. The Traveller HD can save up to 1000 images.
3.2.6. Menu
Press the blue Menu button located at the left side of the unit, marked with
the word “Menu” to activate the Traveller HD settings menu. For more
information about the Traveller HD menu, please refer to chapter 4.
3.2.7. Reading line
The Traveller HD can display a reading line to help you position the Traveller
straight on the document. To display the reading line, press the blue Reading
Line button below the Mode button at the left side of the unit for 2 seconds.
Push this button again to hide the reading line.
3.2.8. Positioning the reading line
When the reading line is activated, press the Reading Line button for 2
seconds again. The line blinks to indicate it can be moved. Press the Reading
Line button to move the line to one of its three positions, top half, middle or
bottom half of the screen. After 5 seconds, the reading line will stop blinking
and exits modification mode automatically.
14 English
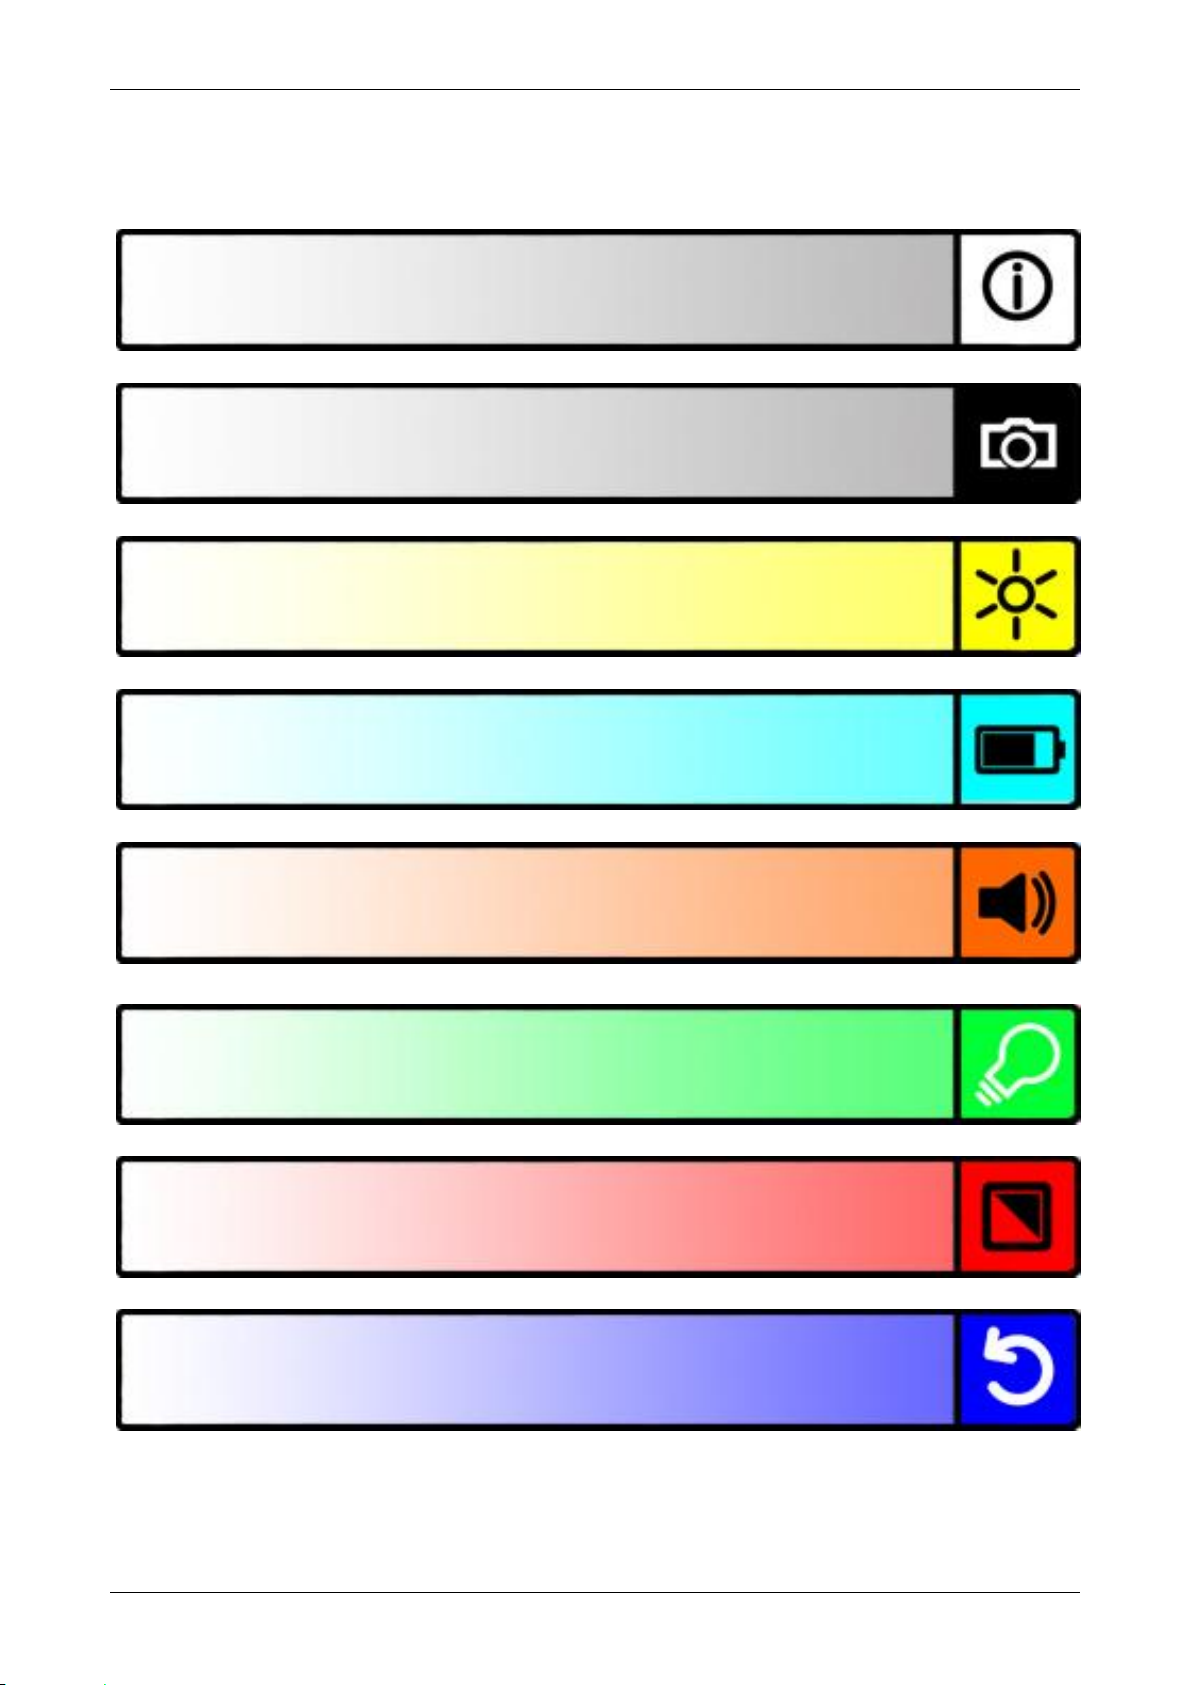
Optelec Traveller HD
Allows you to change the colors of the high contrast
modes
Shows the battery status and firmware version
Allows you to view or delete the saved snapshots
Allows you to adjust the screen brightness
Allows you to configure the power settings
Allows you to switch the sound on and off
Allows you to reset all factory settings to default
Allows you to switch the light on and off
4. The Traveller HD Menu
English 15
Optelec Traveller HD
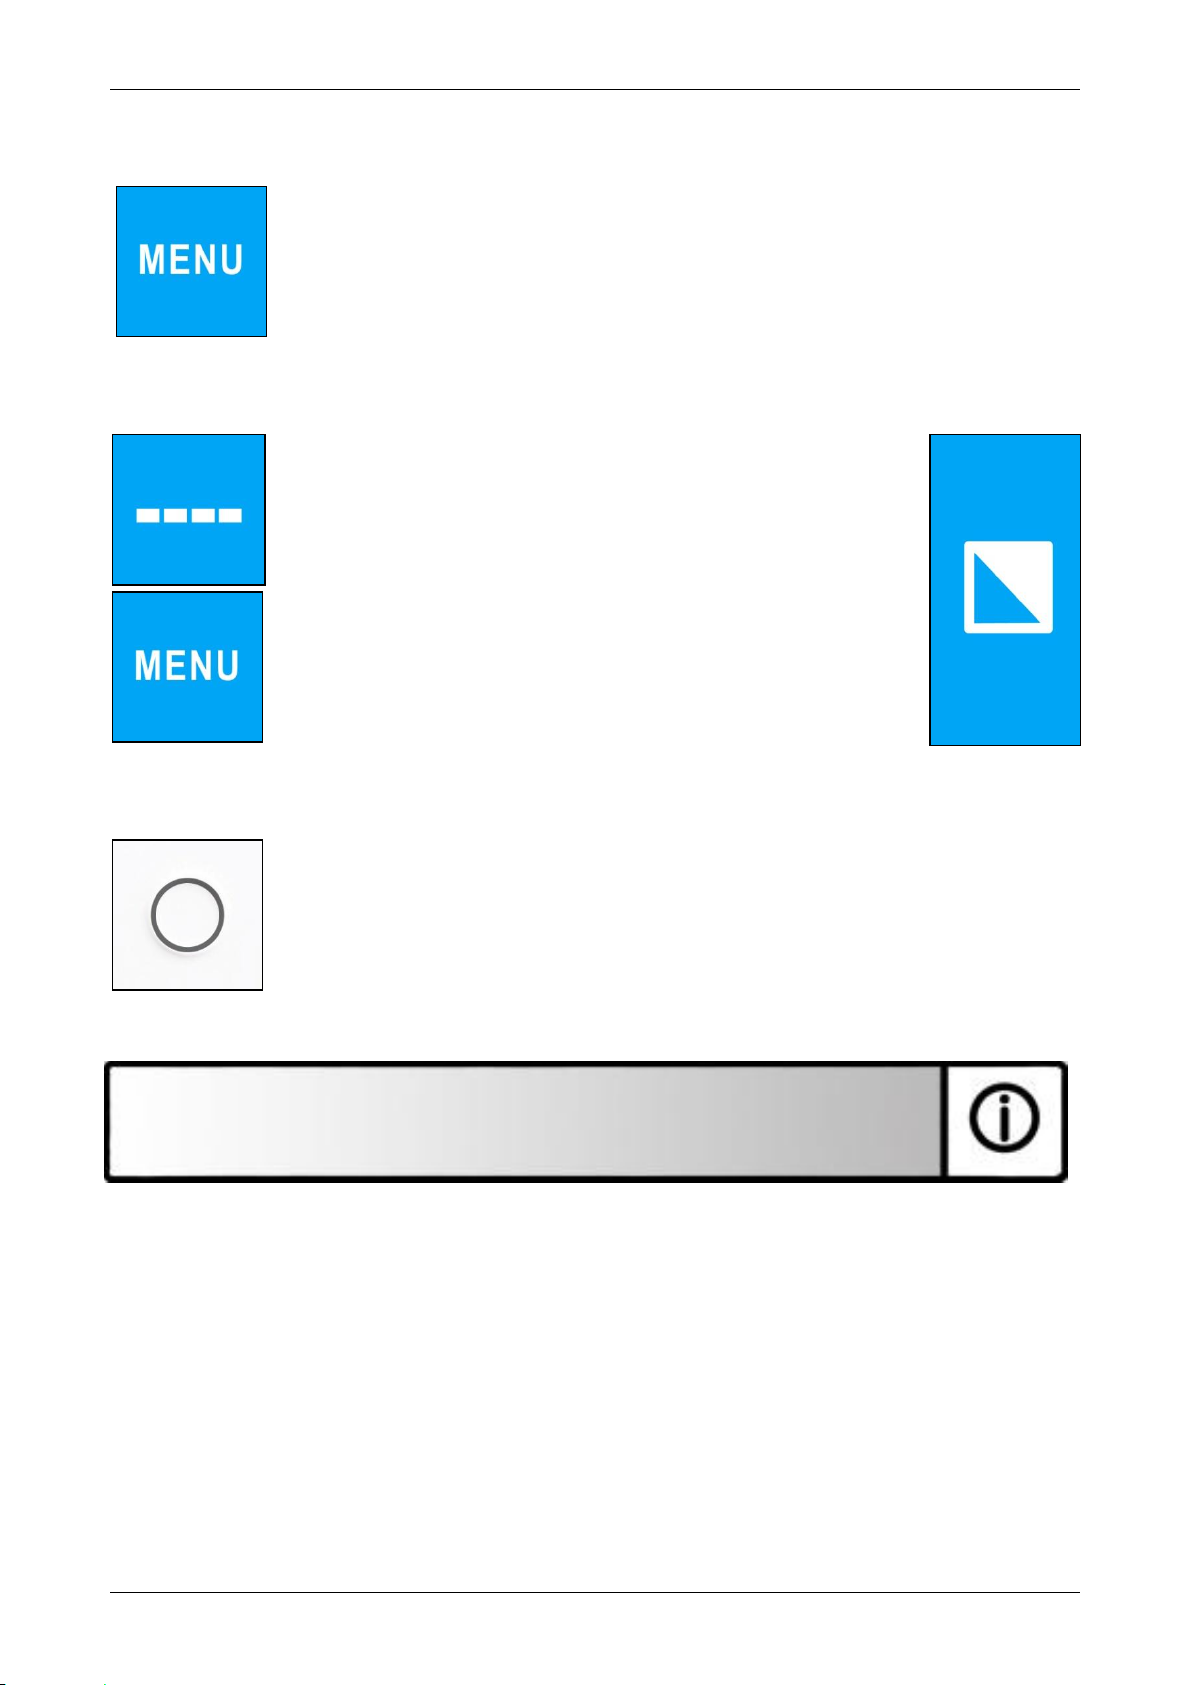
4.1. Activating the menu
To enter the menu, press the Menu button for 2 seconds.
4.2. Navigating the menu
Use the Reading Line or Menu buttons to navigate
between the menu items. The Mode button will
activate the chosen menu item or confirm the
selection. To change a selection, use the Reading
Line or Menu buttons. To move back in the menu,
press the Snapshot button.
4.3. Exiting the menu
To exit the menu, press the Snapshot button or the Menu
button for 2 seconds.
Menu: Information
This menu item shows the battery status and the current firmware version of
the unit. In this menu, it is not possible to make any changes.
- Activate the menu by pressing the Menu button for 2 seconds.
- Use the Menu button to move up and the Reading Line button to move
down within the menu.
- Press the Snapshot button to go exit the menu.
16 English

Optelec Traveller HD
Menu: Images
This menu contains 2 submenus:
- View: To view saved images
- Delete: To delete saved images
Submenu View:
To view the taken images:
- Activate the menu by pressing the Menu button for 2
seconds.
- Use the Menu button to move up and the Reading Line
button to move down within the menu. Select the menu
option Images and activate this menu by pressing the Mode
button.
- Select the View option by using the Menu and Reading Line buttons to
scroll through the options. Press the Mode button to confirm your
choice.
- Select the image you wish to view by using the Menu button to move
up the list with images, and the Line button to move down the list with
images. Press the Mode button to select the image.
- Use the Snapshot button to return to video mode.
Submenu Delete
To delete the taken images:
- Activate the menu by pressing the Menu button for 2
seconds.
- Use the Menu button to move up and the Reading Line
button to move down within the menu. Select the menu
option Images and activate this menu by pressing the Mode
button.
- Select the Delete option by using the Menu and Reading Line buttons
to scroll through the options. Press the Mode button to confirm your
choice.
- Select the image you wish to delete by using the Menu button to move
up the list with images, and the Reading Line button to move down the
list with images. Press the Mode button to select the image.
- Press the Mode button to confirm to delete the image, or the Snapshot
button to cancel.
- Press the Snapshot button to go back to the previous menu.
English 17
Optelec Traveller HD
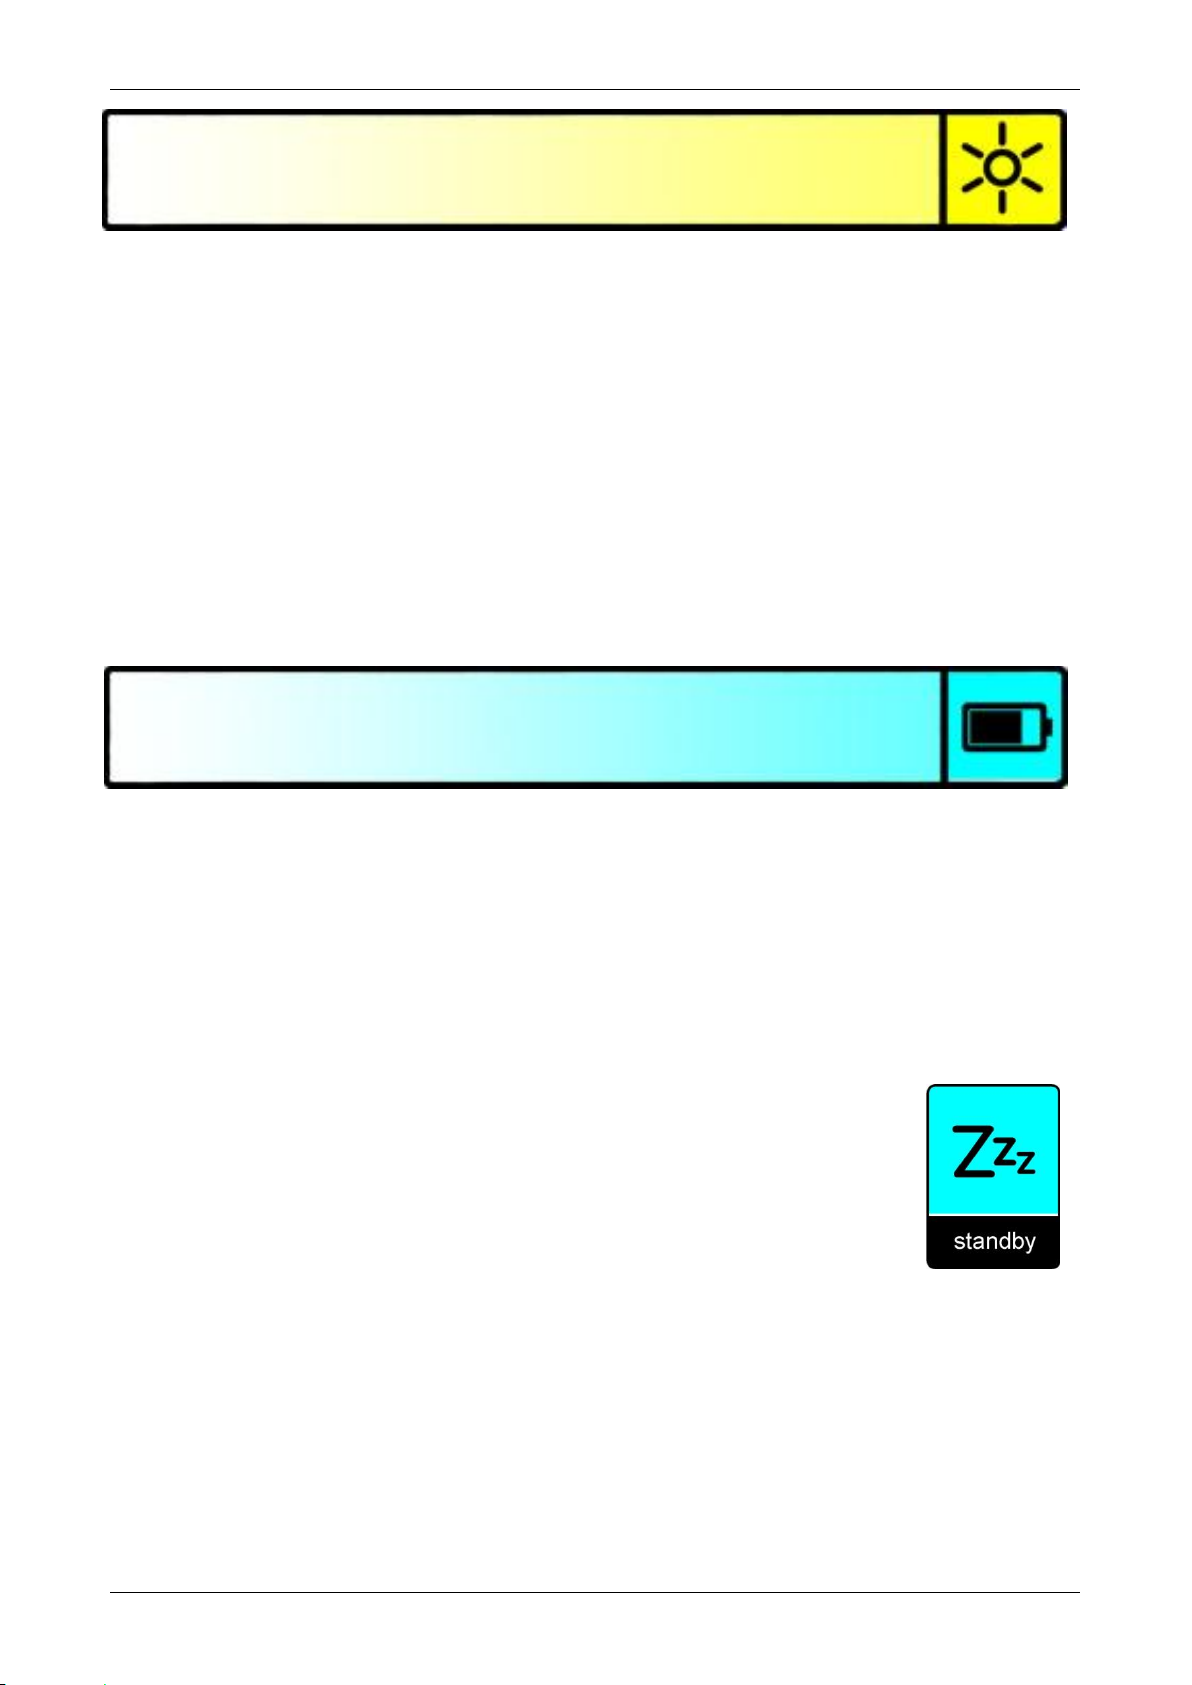
Menu: Brightness
This menu item allows you to adjust the brightness of the display.
- Activate the menu by pressing the Menu button for 2 seconds.
- Use the Menu button to move up and the Reading Line button to move
down within the menu. Select the menu option Brightness and activate
this menu by pressing the Mode button.
- Select the brightness level by using the Menu button to increase and
the Reading Line button to decrease the brightness level. There are 5
brightness levels to choose from. The default brightness level is 5.
- Press the Mode button to confirm your choice.
- Press the Snapshot button to go back to the previous menu.
Menu: Power
This menu item contains four submenus:
- Standby: To set the time before the Traveller HD goes into standby
mode
- Power off: To set the time before the Traveller HD switches off
- Open: To enable or disable the power-on function upon opening the
Traveller HD.
- Close: To enable or disable the power-off function upon closing the
Traveller HD
Submenu Standby
Sets the time before the Traveller HD goes into standby mode
to conserve power. Pressing any button will take the unit out of
standby mode. By default, the standby time is set to 15
minutes.
To adjust the standby time of the TravellerHD:
- Activate the menu by pressing the Menu button for 2 seconds.
- Use the Menu button to move up and the Reading Line button to move
down within the menu. Select the option Power and activate this menu
by pressing the Mode button.
- Select the Standby option by using the Menu and Reading Line buttons
to scroll through the options. Press the Mode button to confirm your
choice.
18 English
Optelec Traveller HD
- Select the time before the unit will enter Standby mode by using the
Menu button to increase and the Reading Line button to decrease the
time. Press the Mode button to confirm your choice. Selecting NEVER
will disable the Standby function.
- Press the Snapshot button to go back to the previous menu.
Submenu Power off
Sets the time before the Traveller HD is automatically switched
off. By default, the power off time is set to 5 minutes. These 5
minutes are activated after the default standby time of 15
minutes. By default, the unit is therefore automatically switched
off after 20 minutes.
To adjust the Traveller HD power off time:
- Activate the menu by pressing the Menu button for 2 seconds.
- Use the Menu button to move up and the Reading Line button to move
down within the menu. Select the menu option Power and activate this
menu by pressing the Mode button.
- Select the Power off option by using the Menu and Reading Line
buttons to scroll through the options. Press the Mode button to confirm
your choice.
- Select the time before the unit will power off by using the Menu button
to increase and the Reading Line button to decrease the time. Press
the Mode button to confirm your choice. Selecting NEVER will disable
the automatic power off function.
- Press the Snapshot button to go back to the previous menu.
Submenu Open
To enable or disable the power-on function upon opening the
Traveller HD:
- Activate the menu by pressing the Menu button for 2
seconds.
- Use the Menu button to move up and the Reading Line
button to move down within the menu. Select the menu option Power
and activate this menu by pressing the Mode button.
- Select the Open option by using the Menu and Reading Line buttons to
scroll through the options. Press the Mode button to confirm your
choice.
- To enable the power-on function upon opening the unit, select the
value POWER ON by using the Menu or Reading Line button. Press
the Mode button to confirm your choice. Selecting NOTHING will
disable the power-on function upon opening the unit.
- Press the Snapshot button to go back to the previous menu.
English 19
Optelec Traveller HD
Submenu Close
To enable or disable the power-off function upon closing the
Traveller HD:
- Activate the menu by pressing the Menu button for 2
seconds.
- Use the Menu button to move up and the Reading Line
button to move down within the menu. Select the menu option Power
and activate this menu by pressing the Mode button.
- Select the Close option by using the Menu and Reading Line buttons to
scroll through the options. Press the Mode button to confirm your
choice.
- To enable the power-off function upon closing the unit, select the value
POWER OFF by using the Menu or Reading Line button. Press the
Mode button to confirm your choice. Selecting NOTHING will disable
the power-off function upon closing the unit.
- Press the Snapshot button to go back to the previous menu.
Menu: Sound
This menu item allows you to enable or disable the sounds (feedback tones).
By default, the tones are enabled.
- Activate the menu by pressing the Menu button for 2 seconds.
- Use the Menu button to move up and the Reading Line button to move
down within the menu. Select the menu option Sound and activate this
menu by pressing the Mode button.
- To enable the sounds, select the value ON by using the Menu and
Reading Line buttons. Press the Mode button to confirm your choice.
Selecting the value OFF will disable the sounds.
- Press the Snapshot button to go back to the previous menu.
Menu: Light
This menu item allows you to enable or disable the object lighting. By
default, the object lighting is enabled.
- Activate the menu by pressing the Menu button for 2 seconds.
- Use the Menu button to move up and the Reading Line button to move
down within the menu. Select the menu option Light and activate this
20 English
Optelec Traveller HD
menu by pressing the Mode button. To enable the object lighting, select
the value ON by using the Menu and Reading Line buttons. Press the
Mode button to confirm your choice. Selecting the value OFF will
disable the object lighting.
- Press the Snapshot button to go back to the previous menu.
Menu: Color
The Traveller HD supports four high contrast modes. For each of these four
modes, the foreground and background colors can be selected. Three of the
high contrast modes can be disabled if just one high contrast mode is
required.
- Activate the menu by pressing the Menu button for 2 seconds.
- Use the Menu button to move up and the Reading Line button to move
down within the menu. Select the menu option Color and activate this
menu by pressing the Mode button.
- Select the high contrast mode by using the Menu button to move up
and Reading Line button to move down in the color submenu. Press
the Mode button to confirm your choice.
- To select a new high contrast color for the foreground and background,
use the Menu button to move up and the Reading Line button to move
down in the list of color combinations. Select a color combination by
pressing the Mode button. High contrast modes 2, 3 and 4 can be
disabled by selecting the DISABLED value.
- Press the Snapshot button to go back to the previous menu.
Menu: Reset
The Traveller HD can be reset to the factory default settings. Any settings
that have been adjusted, will be restored to the factory defaults.
- Activate the menu by pressing the Menu button for 2 seconds.
- Use the Menu button to move up and the Reading Line button to move
down within the menu. Select the menu option Reset and activate this
menu by pressing the Mode button.
- To restore the factory defaults, select YES by using the Menu and
Reading Line buttons. Press the Mode button to confirm to reset all
settings to the factory defaults. Choosing NO will leave all settings as
they were.
- Press the snapshot button to go back to the previous menu.
English 21

Optelec Traveller HD
5. Charging the battery
5.1. Charging the Traveller HD
To charge the Traveller HD, connect the power supply to the 12V DC IN jack
located on the left side of the unit. Plug the other end of the power supply into
a power outlet. The LED indicator next to the 12V DC IN jack will glow
orange continuously while the Traveller HD is charging. Once the unit is fully
charged, the LED indicator will turn green. If the LED indicator flashes, there
is a charging problem. In this case, disconnect the power supply and try
again.
Charging the Traveller HD takes approximately 4 hours. A fully charged
Traveller HD can operate for an average time of 3 hours, depending on the
power settings. Please note that, for safety reasons, only the power supply
that was delivered with the Traveller HD can be used to charge the unit’s
battery.
5.2. Standby and Auto Power Off
The Traveller HD will automatically go into standby mode after 15 minutes if
no button is pressed or no image change is detected. Pressing any button
will wake up the unit. Five minutes after the Traveller HD goes into standby
mode, the unit will automatically switch off. Pressing the orange On / Off
button will switch it back on. The standby time and power-off time can be
changed or disabled in the Traveller HD menu. Please refer to chapter 4 on
how to change these settings.
5.3. Battery warning
When the battery charge reaches below 5% of its total
capacity, the unit will issue a battery warning every minute by
displaying the battery-empty icon for 2 seconds. When this
occurs, make sure to charge your unit as soon as possible.
When the battery is empty, the unit automatically switches off.
If a unit does not switch on, please make sure it is charged.
22 English

Optelec Traveller HD
Appendix A: Safety and Regulatory Notices
Please read the instructions carefully before setting up your Traveller HD.
Keep this user manual for future reference.
Intended Use:
The Traveller HD is designed in such a way that it can be used in a hospital
environment for general purposes such as reviewing medical records. The
Traveller HD can not be used for surgical procedures in combination with life
supporting systems.
Warning: Critical diagnostic decisions should not be based on images
displayed by this device.
Do not expose the Traveller HD to excessive heat or direct sunlight to
avoid the risk of fire.
Do not remove any parts of the Traveller HD. Contact an Optelec
authorized service organization in your area.
To avoid risk of electrical damage, keep your Traveller HD away from
fluids and chemicals.
Handle the Traveller HD with care. Rough handling will damage the
internal components.
Do not use the Traveller HD near inadequately shielded medical
devices.
Do not try to open the battery compartment or try to remove the battery.
Contact your dealer to service this equipment if necessary. Do not
disassemble your unit as it will void the warranty.
Always unplug and switch off the unit before cleaning. Use a dry soft
cloth to clean the exterior. Do not use cleaning agents or abrasive
materials as they will damage your unit.
Use of the Traveller HD other than described in this manual will exclude it
from warranty conditions.
Contacting Product Support
If you have questions about operating, installing or configuring your Traveller
HD, please contact your Optelec distributor or the Optelec office nearest to
you. See the last pages of this manual for a complete list of Optelec
addresses.
Warranty Conditions
Optelec warrants the Traveller HD, effective from the date of delivery, to be
free of any defects in material and workmanship.
English 23

Optelec Traveller HD
This device bears the CE, FCC and UL approval
mark.
The warranty is not transferable and does not apply to groups or multi-users.
The Traveller HD was designed for the individual purchaser to be used at
home, school and work. Optelec reserves the right to repair or replace any
purchased Traveller HD with a similar or improved product.
In no event shall Optelec or its suppliers be held liable for any indirect or
consequential damages. The original user’s remedies are limited to
replacement of Traveller HD modules. This warranty is valid only when
serviced in the country of original purchase, and with intact seals. For
additional warranty claims or service during or after warranty period, please
contact your Optelec distributor.
Optelec is not responsible for any uses of this device other than those
described in this manual.
Compliance
This product is in conformity with the following directives:
Council directive 93/42/EEC of 14th June 1993 concerning medical devices
Class I / Annexe VII.
Electrical medical equipment requires special precaution with regard to EMC
(Electro Magnetic Compatibility) and must be installed and put into service
according to EMC guidelines.
WARNING: The use of accessories and cables other than those specified
and sold by the manufacturer of the Traveller HD, as replacement parts for
components, may result in increased emissions or decreased functioning of
the Traveller HD.
This device complies with part 15 of the FCC rules.
Operation is subject to the following two conditions:
(1) This device may not cause harmful interference, and
(2) This device must accept any interference received, including interference
that may cause undesired operation.
24 English
Optelec Traveller HD
Follow operating instruction when using device
Do not throw this electronic device into the trash
when discarding. To minimize pollution and ensure
utmost protection of the global environment, please
recycle.
Caution
Keep dry
Accessory: Power
AC/DC adapter: mfr. Mean Well Enterprises Co., Ltd., Ltd., type GSM40A12
Input: AC 100-240V, 50/60Hz, 1.0-0.5A; Output: 12Vdc. 3.34A
Guideline:
Input rating for Traveller HD: 12Vdc. 3A
Protection against electric shock: Class I
Protection against harmful ingress of water or particulate matter: IPX0
The Traveller HD is intended to be routinely cleaned and disinfected by
the user with water and alcohol after use.
Do not touch or close to the user when using the Traveller HD.
Markings Explanation (on label):
Caution for battery pack
CAUTION
RISK OF EXPLOSION IF BATTERY IS REPLACED BY AN INCORRECT
TYPE.
DISPOSE OF USED BATTERIES ACCORDING TO THE INSTRUCTIONS.
English 25

Optelec Traveller HD
Appendix B: Specifications
Magnification 2.4 – 30 times (+/-3%)
Viewing modes Full color photo mode
High contrast color combination 1, white on black
High contrast color combination 2, black on white
High contrast color combination 3 (unassigned)
High contrast color combination 4 (unassigned)
Screen 13,3” TFT
Battery average 3 hours continuous use
6 hours charging time
Integrated LED lighting
Weight 1995 g
Dimensions 365x240x49 mm
Operating conditions
Temperature +10°C to 35°C / 50°F to 95°F
Humidity < 70%, no condensation
Altitudes up to 3000 m (9842 feet)
Pressure 700 – 1060 hPa
Storage & transportation conditions
Temperature +10°C to 40°C / 50°F to 104°F
Humidity < 95%, no condensation
Altitudes up to 12192 m (40000 feet)
Pressure 186 – 1060 hPa
26 English

Optelec Traveller HD
Gebruikershandleiding
Versie 1.2
Copyright 2015 Optelec, Nederland
Alle rechten voorbehouden
Telefoon: +31 (0)88 6783 444. Fax +31 (0)88 6783 400
Optelec
Postbus 399
2993 LT Barendrecht
Nederland
E-mail: info@optelec.nl
Website: www.optelec.com
Nederlands 27

Optelec Traveller HD
1. Introductie
Gefeliciteerd met het kiezen van de Traveller HD, een lichtgewicht draagbare
beeldschermloep, ontwikkeld door Optelec. Met de Traveller HD kunt u lezen,
foto's bekijken, werken en nog veel meer. De Traveller DH vergroot en
verbetert tekst, objecten en afbeeldingen en stelt u in staat om ze te bekijken
in uw voorkeurs- hoog contrast kleurencombinatie, helderheid en contrast
instellignen. Het is eenvoudig te bedienen en kan worden gebruikt in huis, op
het werk en op school.
1.1. Over deze handleiding
Daarom is het mogelijk dat deze handleiding niet de laatste versie is.
Download de meest up-to-date handleiding op www.optelec.com bij de sectie
Support.
Deze handleiding helpt u om vertrouwd te raken met de functionaliteiten en
de werking van de Traveller HD. Lees deze handleiding grondig voordat u de
Traveller HD gaat gebruiken.
Als u vragen of suggesties heeft met betrekking tot het gebruik van dit
product, neem dan contact op met uw leverancier, Optelec distributeur of het
Optelec hoofdkantoor, door het raadplegen van de contactinformatie pagina
aan het einde van deze handleiding. We waarderen uw feedback. We hopen
dat u geniet van het werken met uw Traveller HD.
28 Nederlands
Optelec Traveller HD
1. Ontgrendelen
2. Menu
3. Mode
4. Leeslijn
5. Aan / uit
6. Zoom
7. Snapshot
8. Rollen
9. Schuiven
1 1 2 3 4 5 6 1 8 9 7
1.2. Wat zit er in de doos?
De Traveller HD verpakking bevat het volgende:
De Traveller HD
Een beschermende draagtas
Een oplader
Een scherm reinigingsdoekje
Deze handleiding
1.3. Uw Traveller HD leren kennen
De volgende cijfers tonen de belangrijkste onderdelen van de Traveller HD.
Nederlands 29
Optelec Traveller HD
Druk op de twee blauwe
ontgrendelknoppen om de
Traveller HD open te
klappen
Til het scherm op totdat deze in
de hoogste stand staat
2. Aan de slag
De Traveller HD is correct voor u geplaatst wanneer het scherm naar boven
is gericht, en het Zoom draaiwiel aan de rechterkant van het scherm zit.
2.1. De Traveller HD gebruiken
De Traveller HD kan alleen worden gebruikt in de open positie. Het scherm
zal worden vastgezet in een ergonomische hoek voor een optimale
leespositie, terwijl de camera naar beneden zal wijzen. In de open positie
kunt u lange teksten lezen en gemakkelijk schuiven over documenten.
Om het apparaat te openen, gaat u als volgt te werk:
1. Plaats de Traveller HD voor u zodat het scherm naar boven, en het Zoom
draaiwiel aan de rechterkant van het scherm zit.
2. Druk op de twee blauwe ontgrendelknoppen aan de buitenkant van de rol.
Het scherm van Traveller HD zal openen, omhoog gaan en aan gaan.
3. Til het scherm op totdat het scherm vergrendeld in de hoogste stand.
Om het apparaat te sluiten, gaat u als volgt te werk:
1. Plaats de Traveller HD voor u, zodat het scherm naar boven en in het
midden staat, en het Zoom draaiwiel aan de rechterkant van het scherm
zit.
2. Druk op de twee blauwe ontgrendelknoppen aan de buitenkant van de rol.
3. Duw het scherm zachtjes naar beneden totdat het scherm vergrendeld in
de gesloten stand.
Belangrijk: Gebruik alleen de blauwe ontgrendelknoppen om het scherm te
ontgrendelen of in te klappen. Forceer het scherm niet omhoog of omlaag
door kracht te gebruiken.
30 Nederlands
 Loading...